1
4. Unscrew and remove the template from the surface of the table and clean
the table surface.
Take care not to damage the table.
If needed, you can download a full-scale template from our Web site.
!
5.4
Kramer Electronics is not responsible for any damage caused to the
table.
Inserting the TBUS-3 through the Cut Out Opening
To install TBUS-3 in the opening:
1. Remove the protective rubber guard from around the outer rim of the
TBUS-3 housing. Beware of the sharp edge!
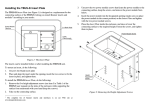
2. Carefully insert the unit into the prepared opening (see Figure 5).
3. Take the support brackets under the table and place them into the support
bracket grooves on both sides of the unit (see Figure 2, item 7).
4. Verify proper alignment of the unit before tightening the mounting screws.
5. Screw both mounting butterfly screws upward until they reach the table
surface (from underneath). Tighten firmly (see Figure 5).
6. Screw the locking butterfly screws downward until tight against the mounting
bracket.
Figure 5: Inserting TBUS-3 into the Prepared Opening
TBUS-3 - Installing the TBUS-3
11