1
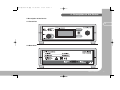
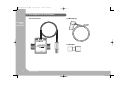
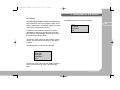
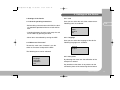
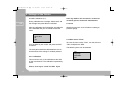
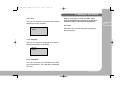
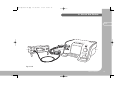
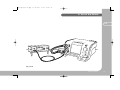
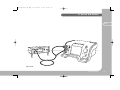
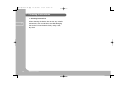
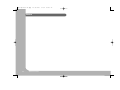
apm-eng-0506-01.qxp
23.05.2006
07:51
Seite 1
HOFFRICHTER
Airflow Pressure Meter
User’s manual
apm-eng-0506-01.qxp
23.05.2006
07:51
Seite 2
Serial number
Each HOFFRICHTER device is provided with a
serial number which guarantees the product can
be traced back. The serial number is on the type
identification plate to be found on the reverse of
the device.
In case of any query or complaint, please always
state the serial number
Conformity
The device complies with the requirements of the
directives 73/23/CEE.
2
Airflow Pressure Meter
apm-eng-0506-01.qxp
23.05.2006
07:51
Seite 3
1. Safety Instructions . . . . . . . . . . . . . . . . . . . . .4
2. Intended Use . . . . . . . . . . . . . . . . . . . . . . . . .5
Contents
3. Legend of Symbols . . . . . . . . . . . . . . . . . . . .6
4. Description of the Device . . . . . . . . . . . . . . . .7
5. Settings of the Device . . . . . . . . . . . . . . . . .11
6. Use of the Device . . . . . . . . . . . . . . . . . . . . .14
7. Cleaning Instructions . . . . . . . . . . . . . . . . . .20
8. Technical Data . . . . . . . . . . . . . . . . . . . . . . .21
Airflow Pressure Meter
3
apm-eng-0506-01.qxp
23.05.2006
07:51
Seite 4
1. Safety Instructions
1. Safety Instructions
Before first use of your Airflow Pressure Meter
(APM), please read this manual thoroughly.
1.
Keep the manual in a safe place, so that you will
be able to consult it whenever necessary.
Attention!
HOFFRICHTER GmbH shall not be held liable
for any damages or consequential damages,
consequences for safety, reliability and performance of the device in case of:
- Tampering, modifying, adding expansion
features, adjustment, repair and maintenance
executed by persons who have not been
authorized by us.
- Building in accessory and spare parts which
have been fabricated by other manufactures
and not been released by us for use in the
Airflow Pressure Meter.
- Using the Airflow Pressure Meter in a different
way than what has been described in
the manual.
4
Airflow Pressure Meter
Make sure the APM and the Flow-sensor has the
same serial number. Otherwise the measurements
will not be correct.
Do not connect other devices than the Flow-sensor into the plug socket on the front of the APM.
apm-eng-0506-01.qxp
23.05.2006
07:51
Seite 5
2. Intended Use
2. Intended Use
The Airflow Pressure Meter is intended for measurement of airflow or pressure and was especially
developed for calibrating the ventilators made by
HOFFRICHTER.
2.
Airflow Pressure Meter
5
apm-eng-0506-01.qxp
23.05.2006
07:52
Seite 6
3. Legend of Symbols
3. Legend of Symbols
3.
Please observe the operating instructions
Do not dispose of device in household
waste
CE-declaration of conformity
Input Pressure
Input Flowsensor
6
Airflow Pressure Meter
apm-eng-0506-01.qxp
23.05.2006
07:52
Seite 7
4. Description of the Device
4. Description of the Device
4.1 Front View
4.
4.2 Back View
Airflow Pressure Meter
7
apm-eng-0506-01.qxp
23.05.2006
07:52
Seite 8
4. Description of the Device
4.3 Flow Sensor
4.4 Blind plug
4.5.
4.5 Adaptor
8
Airflow Pressure Meter
apm-eng-0506-01.qxp
23.05.2006
07:52
Seite 9
4. Description of the Device
4.6. Display
The following items can now be selected:
The Airflow Pressure Meter (APM) is provided with a
four line display which is activated as soon as the
AMP is switched on. The display shows the actual
value of the measurement running.
If there are more than four lines in the menue,
(indicated by arrows on the right side of the display) you can scroll through the items by turning
the multi functional Key (MFK).
4.6.
unit
language
calibration
exit
To enter the main menue for the pressure measurement, turn the switch to “Pressure”, and press
the MFK.
The following items can now be selected:
unit
language
zero point
calibration
exit
To enter the main menue for the airflow measurement, turn the switch to “Flow”, and press the
MFK.
Airflow Pressure Meter
9
apm-eng-0506-01.qxp
23.05.2006
07:52
Seite 10
4. Description of the Device
4.7. Included in delivery
4.7.
10
APM and Flow sensor
Power supply
User´s manual
Measuring tube (Flow)
Measuring tube (Pressure)
Y-Connector
Blind plug
Adaptor
Carrier bag
Airflow Pressure Meter
apm-eng-0506-01.qxp
23.05.2006
07:52
Seite 11
5. Settings of the Device
5. Settings of the Device
5.2.1. unit
5.1. General operating instructions
Here you can select the unit of the measurement.
Following units are available:
- Before taking measurements with APM, the device should be operated online for at least half an
hour.
- Changing between the main menu resp. the sub
menu is done by pressing the MFK.
hPa
mbar
cmH2O
Pa
- Menu items are selected by turning the MFK.
5.2.2. language
5.2. Main menu “Pressure”
Here you can select the language of the device.
Following languages are available:
To enter the main menu “Pressure”, turn the
switch to “Pressure” and press the MFK.
5.2.
german
english
The following items can be selected:
unit
language
zero point
calibration
exit
5.2.3. zero point
By selecting this menu item the calibration of the
zero point is started.
Pay attention to that there is no pressure on the
connection piece of the measuring device before
Airflow Pressure Meter
11
apm-eng-0506-01.qxp
23.05.2006
07:52
Seite 12
5. Settings of the Device
and after calibration (3 s).
5.3.
During calibration the message “Please wait” and
the average zero point-offset is indicated.
After the calibration has finished the zero point-offset is indicated and you are asked to store the
value:
xxx hPa
store value
no
yes
Turn the MFK to your choice and press the MFK
to confirm.
have any doubt in the correctness of the measurement, please contact the manufacturer.
5.2.5 exit
Selecting menu item “exit” will effect re-setting to
pressure gauge.
5.3. Main menue “Flow”
To enter the main menue “Flow”, turn the switch to
“Flow” and press the MFK.
The following items can be selected:
The zero point should be calibrated from time to
time because of the change in ambient pressure.
5.2.4. calibration
This menu item only is for calibration of the APM
by the manufacturer. The calibration is protcted by
a PIN.
Please, never try to “crack” the PIN. If you
12
Airflow Pressure Meter
unit
language
calibration
exit
apm-eng-0506-01.qxp
23.05.2006
07:52
Seite 13
5. Setting of the Device
5.3.1. unit
Here you can select the unit of the measurement.
Following units are available:
Please, never try to “crack” the PIN. If you
have any doubt in the correctness of the measurement, please contact the manufacturer.
5.3.
5.3.4 exit
l/min
ml/sec
Selecting menu item exit will effect re-setting to
pressure gauge.
5.3.2. language
Here you can select the language of the device.
Following languages are available:
german
english
5.3.3. calibration
This menu item only is for calibration of the APM
by the manufacturer. The calibration is protected
by a PIN.
Airflow Pressure Meter
13
apm-eng-0506-01.qxp
23.05.2006
07:52
Seite 14
6. Use of the Device
6. Use of the Device
6.1.
The APM can be used either as pressure meter or
flow meter, whereas always only one measuring
function is possible.
6. Calibration items occurs for 0, 10, 20, 40, 60,
80, 100, 120 and 160 l/min.
7. The value measured is to be brought to the
calibration value by turning the MFK and
accepted by pressing the Mode key.
6.1. Calibration of airflow of CARAT I
Follow the instructions:
(see fig. 6.1.01 page 15)
1. Establish the electrical connection between the
Flow Sensor and the APM.
2. Connect the first end of the therapy tube to the
Tube Connector for Inspiration.
3. Connect the other end of the therapy tube to
the Flow Sensor. Observe the flow direction of
the Flow Sensor indicatad by an arrow.
4. Connect the pressure measuring tube to the
Connector Measuring Tube on the ventilator.
5. In the Service display, menu item Flow Sensor
Calibration can be selected; enter and confirm
PIN 0000.
14
Airflow Pressure Meter
8. The value must be set with a precision of + 0.5
l/min.
9. The calibration can be cancelled by pressing
the MFK for 3 seconds.
10. After the calibration has finished, return to the
standard screen by pressing the MFK.
apm-eng-0506-01.qxp
23.05.2006
07:52
Seite 15
6. Use of the Device
6.1.
fig. 6.1.01
Airflow Pressure Meter
15
apm-eng-0506-01.qxp
23.05.2006
07:52
Seite 16
6. Use of the Device
6.2. Calibration of airflow of CARAT II
6.2.
Follow the instructions:
(see fig. 6.2.01 page 17)
1. Establish the electrical connection between the
Flow Sensor and the APM.
2. Connect the adaptor to the Tube Connector for
Expiration on the ventilator.
3. Attach the Flow Sensor to the adaptor.
Observe the flow direction of the Flow Sensor
indicatad by an arrow.
4. Connect the first end of the therapy tube to
the Flow Sensor.
5. Connect the other end of the therapy tube to
the Tube Connector for Inspiration.
6. Connect the pressure measuring tube to the
Connector Measuring Tube on the ventilator.
7. On the Service Display, menu item Flow
Sensor Calibration can be selected; enter and
confirm PIN 0000.
16
Airflow Pressure Meter
8. Calibration items occurs for 0, 10, 20, 40, 60,
80, 100, 120 and 160 l/min.
9. The value measured is to be brought to the
calibration value by turning the MFK and
accepted by pressing the Mode key.
10. The value must be set with a precision of
+ 0.5 l/min.
11. The calibration can be cancelled by pressing
the MFK for 3 seconds.
12. After the calibration has finished, return to the
standard screen by pressing the MFK.
apm-eng-0506-01.qxp
23.05.2006
07:52
Seite 17
6. Use of the Device
6.2.
fig. 6.2.01
Airflow Pressure Meter
17
apm-eng-0506-01.qxp
23.05.2006
07:52
Seite 18
6. Use of the Device
6.3. Calibration of pressure of CARAT I / II
6.3.
Follow the instructions:
(see fig. 6.3.01 page 19)
1. Put the blind plug into the Tube Connector for
Inspiration on the ventilator.
2. Connect the second leg of the silicon tube with
the Connector Measuring Tube on the ventila
tor.
3. Connect the third end of the silicon tube with
the pressure inlet of the APM.
4. Open the Service display menu item Pressure
sensor calibration can be selected; enter and
confirm the PIN code 0000.
5. Calibration items occurs for 0, 5, 10, 20 and
40 hPa.
6. The value shown on the measuring device is to
be brought to the calibration value by turning
the MFK and accepted by pressing the Mode
Key.
7. The value must be set with a precision of
+ 0.05 hPa.
18
Airflow Pressure Meter
8. The calibration can be cancelled by pressing
the MFK for 3 seconds.
9. After the calibration is finished, return to the
standard screen by pressing the MFK.
apm-eng-0506-01.qxp
23.05.2006
07:52
Seite 19
6. Use of the Device
6.3.
fig. 6.3.01
Airflow Pressure Meter
19
apm-eng-0506-01.qxp
23.05.2006
07:52
Seite 20
7. Cleaning Instructions
7. Cleaning Instructions
7.
20
When cleaning the device, do not use any volatile
substances, such as solvents, to avoid damaging
the surface. Clean the device only using a soft,
dry cloth.
Airflow Pressure Meter
apm-eng-0506-01.qxp
23.05.2006
07:52
Seite 21
8. Technical Data
8. Technical Data
Power supply
Input:
Output:
Operating conditions
Operating temperature: 0 °C - 50 °C
Relative air humidity: 0 % - 95 %
230 V/AC
12 V DC/ 500 mA
SAFETY INSTRUCTION
Only use the supplied power supply unit for operating the APM
8.
Storage conditions
Storage temperature: -40 °C - 85 °C
(store in a dry, vibration free and vertical position;
store device and accessories in their original
packing)
Specifications and performance
Dimensions:
225 x 200 x 80 mm
Weight:
1.0 kg
Pressure measuring range:
0…100 hPa
Determined deviation:
+/- 0.5 % of the measuring value
(Calibration by DKD-approved pressure maintaining valve
with RS232)
Flow measuring range: 0...200 l/min
(Calibration by Vip EKU, approved flow measuring device)
Display accuracy
Pressure:
Flow:
0.1 hPa
0.1 l/min
Data subject to technical modification
Airflow Pressure Meter
21
apm-eng-0506-01.qxp
23.05.2006
Notes
22
Airflow Pressure Meter
07:52
Seite 22
apm-eng-0506-01.qxp
23.05.2006
07:52
Seite 23
Notes
Airflow Pressure Meter
23
apm-eng-0506-01.qxp
23.05.2006
07:52
Seite 24
Serial number:
Manufacturer: HOFFRICHTER GmbH
Mettenheimer Str. 12-14
D-19061 Schwerin
Telefon: + 49-385-39925-0
Fax: + 49-385-39925-25
www.hoffrichter.de
[email protected]
APM-eng-0506-01