1
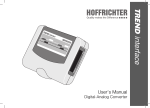
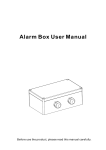
ALAR ALARMBOX HOFFRICHTER GmbH Mettenheimer Straße 12 / 14 19061 Schwerin Germany Tel: +49 385 39925 - 0 Fax: +49 385 39925 - 25 E-Mail: [email protected] www.hoffrichter.de M User‘s Manual Alarmbox-eng-1010-01 Art. no.: 5000 0367 Remote Alarm Box for the ventilators CARAT and TRENDvent SERIAL NUMBER DISPOSAL DISCLAIMER Every HOFFRICHTER GmbH device is supplied with a serial number for traceability purposes. DEVICE HOFFRICHTER GmbH is not liable for consequences in terms of safety, reliability and performance of the product where: Please enter your device‘s serial number here. You will find the serial number on the rating plate on the back of the device. Serial number: ..................................... Please always quote the serial number for all queries and complaints. CONFORMITY The device complies with the requirements of Directive 93/42/EEC. 2 Info The device must not be disposed of with the household waste. Please contact the relevant customer services department to find out how to dispose of the device, etc. properly. Proper disposal saves natural resources and prevents harmful substances being released into the environment. • interventions, modifications, extensions, calibration, repairs and maintenance are carried out by persons not authorized by us, • other manufacturers’ accessories and spare parts are used that have not been approved by us for use on the product, • the product is used other than as described in the user’s manual or • the hygiene and cleaning instructions described in the user’s manual have not been complied with. PACKAGING The packaging is taken back by the distributor but it can alternatively be disposed of separately in the normal household waste. BATTERIES Statutory guarantee rights remain unaffected by this. Exchanged batteries must be recycled via relevant collecting points in accordance with battery regulations. Disposal/ Disclaimer 15 CONTENTS TECHNICAL DATA Specifications and Performance Total alarm sound level acc. to DIN EN ISO 3745 67 dB(A) at a basic sound level of 19 dB(A) Jack plug connector for CARAT 3.5 mm Batteries 2x R6/AA Dimensions (W x D x H) 125 x 66 x 25 mm Weight Remote alarm box (incl. batteries): 130 g Cable: 130 g; Adapter for CARAT: 10 g Operating- and Transport Conditions Operating temperature - 15 °C to + 50 °C Relative air humidity 10 % to 95 % Atmospheric pressure 600 hPa to 1100 hPa Storage Conditions Storage temperature - 10 °C to + 50 °C Storage conditions store in a dry, vibration-free; store device and accessories in their original packing Scope of Delivery ......................................... 4 CARAT ..................................................... 4 TRENDvent............................................... 4 General ........................................................ 5 Information on User’s Manual .................... 5 Symbols on the Device ............................. 5 Symbols used in this User’s Manual .......... 6 Safety Information ........................................ 7 Intended Use ............................................... 8 Description of the Device ............................. 9 Commissioning .......................................... 10 Functional Check ....................................... 11 Alarm Output ............................................. 12 Battery Change .......................................... 13 Cleaning and Disinfection ........................... 13 Technical Data ........................................... 14 Disposal..................................................... 15 Device .................................................... 15 Packaging .............................................. 15 Batteries ................................................. 15 Disclaimer .................................................. 15 The manufacturer reserves the right to make technical changes without notice. 14 Technical Data Contents 3 BATTERY CHANGE SCOPE OF DELIVERY CARAT: CARAT Component Remote alarm box with RJ11 socket 0000 4035 0000 4833 Adpater connected to the system with RJ11 socket and 3.5 mm jack plug 0000 4835 User’s manual 5000 0366 Figure 5 Remote alarm LED Remove the batteries and insert two new batteries of size R6/AA into the battery compartment. 3. Close the battery compartment and tight the screw. 0000 4035 Connection cable TRENDvent (4 pins with RJ10- and RJ11 plug; length: 10 m) 0001 4115 User’s manual 5000 0366 CLEANING AND DISINFECTION Wipe the remote alarm box with a slightly dampened cloth. We recommend Mikrozid® Liquid for disinfecting the housing. Article number Remote alarm box with RJ11 socket Scope of Delivery 2. Remote alarm LED TRENDvent: TRENDvent 4 Loosen the screw of the battery compartment cover and remove the battery compartment cover. Article number Connection cable CARAT (4 pins with two RJ11 plugs; length: 10 m) Component 1. Figure 6 Do not use aggressive abrasive or other cleaners (e.g. acetone) for cleaning the device. Battery Change / Cleaning and Disinfection 13 ALARM OUTPUT Alarm Function Each alarm is signaled by a continuous tone and a red lit remote alarm LED. There is no distinction which alarm it is and what is the priority of the alarm. It will always produce the same alarm sound. Alarm in Case of Connection Errors A connection failure is signaled by an intermittent tone and a yellow lit remote alarm LED. Batteries Charging State After the remote alarm box has been turned on, the battery LED indicates the battery charging state. Green OK Yellow = Attention, batteries must be replaced soon Red = Warning, low batteries, replace batteries 12 Alarm Output GENERAL Low batteries will additionally signaled by an intermittent tone. When the battery LED is lit red and an intermittent tone sounds simultaneously, the batteries must be replaced immediately. Optical Alarm Display If an alarm or a connection failure occurs, the remote alarm LED is lit continuously red. If the batteries are low the remote alarm LED is lit red. CARAT ventilator’s remote alarm LED is located in the adapter (Figure 5 on page 13) and TRENDvent ventilator’s remote alarm LED is located on the back of device (Figure 4). INFORMATION ON USER’S MANUAL Read this user’s manual through carefully before using your therapy device for the first time. Follow the safety and cleaning instructions in particular. Keep the manual in a safe place close to the device so that you can refer to it immediately if necessary. SYMBOLS ON THE DEVICE Observe the warning and safety instructions in the user’s manual. Do not dispose of the device in the household waste. Please contact the relevant customer services department to find out how to dispose of the device properly. CE conformity declaration Test alarm button Connection error LED Battery LED General 5 FUNCTIONAL CHECK SYMBOLS USED IN THIS USER’S MANUAL Important information is denoted by symbols in this user’s manual. Be sure to follow these instructions in order to avoid accidents, personal injury and material damage. This symbol denotes general safety instructions. Follow these instructions to avoid accidents, personal injury or material damage. In addition, the local accident prevention regulations and general safety regulations in force in the area of use must be observed. Connection socket remote alarm box CARAT This symbol denotes hazardous situations that may lead to moderately severe injuries. Figure 3 Remote alarm LED This symbol denotes information, tips and instructions for the efficient, error-free use of the device. Connection socket remote alarm box TRENDvent This symbol denotes hazardous situations that may lead to serious injuries or death. Figure 4 6 General To check whether the remote alarm box works properly, a functional check must be performed before each commissioning. To do this, proceed as follows: 1. Turn on the remote alarm box via the ON/ OFF switch. 2. Press the test alarm button. Afterwards the remote alarm box generates an alarm sound. In addition the remote alarm LED is lit red. CARAT ventilator’s remote alarm LED is located in the adapter (Figure 5 on page 13) and TRENDvent ventilator’s remote alarm LED is located on the back of device (Figure 4). If you do not succeed in performing the functional check, the remote alarm box may not be used and must be checked by an authorized service department. Functional Check 11 COMMISSIONING 1. Loosen the screw of the battery compartment cover and remove the battery compartment cover. 2. Insert the two supplied batteries into the battery compartment. Alternatively, you can use other batteries of size R6/AA. 3. Close the battery compartment and tight the screw. 4. CARAT: First put the one end of the connection cable into the RJ11 socket of the adapter and put the other end into the RJ11 socket of the remote alarm box (Figure 3 on page 11). Afterwards put the jack plug into the connector remote alarm box of CARAT (Figure 2 on page 9). TRENDvent: Put the one end of the connection cable into the RJ11 socket of the remote alarm box and the other end into the connector remote alarm box on the back of the device (Figure 4 on page 11). 10 Commissioning SAFETY INFORMATION 5. Turn on the remote alarm box via the ON/ OFF switch. 6. Perform a functional check acc. to page 11 . • Laying the cable make sure that it is impossible to trip over it. Also make sure that the cable can not be squeezed. Operating the remote alarm box make sure that a high visibility is assured and that the unit is not covered. The jack plug must be connected properly to the system. Otherwise, a system alarm will be signaled. Whenever you start up the remote alarm box, ensure to test the alarm for proper functioning beforehand (see „Functional Check“ on page 11) • Open the battery compartment only after having disconnected the remote alarm box from the system. • Do not use the alarmbox next to mobile phones ore microwave ovens. Electromagnetical fields with more than 10 V/m could detract from safe use. • Only registered devices from the manufacturer are allowed to be connected to the remote alarm box. • With exception of the battery cover, do not open the housing of the remote alarm box. Notify the responsible service department in case of any malfunctions. • Do not put the system into operation if housing or cables are damaged. Sicherheitshinweise 7 INTENDED USE DESCRIPTION OF THE DEVICE The remote alarm box is a wired alarm system for use in home care. Thereby alarms of the ventilators CARAT and TRENDvent alarms will be passed to the remote alarm box. Following the remote alarm box generates an alarm sound. There is no distinction which alarm it is and what is the priority of the alarm. It will always output the same alarm sound. RJ11 socket ON/OFF switch Alarm LED Test alarm button The remote alarm box may only be used with the ventilators CARAT and TRENDvent of HOFFRICHTER GmbH. Connection error LED Sound hole for the audible alarm Screw for battery Battery LED compartment cover Never ignore any audible alarm signals. Such signals indicate conditions which require immediate action. Battery compartment cover Figure 1 8 Intended Use Rating plate Figure 2 Description of the Device 9