1
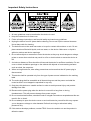
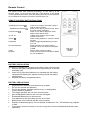
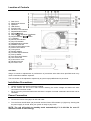
LPU191 Turntable System with USB/SD Slot USER MANUAL IMPORTANT! WARRANTY INFORMATION INSIDE. PLEASE READ Trademark of TEAC Corporation JAPAN www.teac.com.au Important Safety Instructions 1. All user guidelines must be read before the device is used. 2. Keep the instructions for future use. 3. Follow all usage instructions, and heed all safety and cautionary guidelines. 4. Unplug the device from AC power before cleaning. Do not use liquid or aerosol cleaners. Use a damp cloth for cleaning. 5. The device must not be used near water or be put in contact with moisture or rain. Do not place containers filled with liquids, such as vases, on the device. Make sure no liquid is spilled on device and device openings. 6. Do not allow objects or creatures to enter the device as they may touch dangerous voltage points or cause short-outs that may result in a fire or electric shock or cause the device to fail. 7. A minimum distance of 5cm should be left around the device for sufficient ventilation. Do not cover or block ventilation openings on the cabinet with objects or heat retaining surfaces such as a bed, the carpet etc. 8. When moving this device, take safety precautions and ensure that the AC power plug is disconnected. 9. This device shall be operated only from the type of power source indicated on the marking label. 10. The mains plug shall be accessible at all times during use and the power cord shall be routed so that it is not trapped or squashed in any way. 11. Only place this device on a stable surface in order to avoid personal injury and product damage from falls. 12. Disconnect the power plug when the device is unused for a long time or during thunderstorms. This will prevent damage from power surges. 13. Do not overload wall outlets, extension cords or integral convenience receptacles as this can result in fire or shock. 14. Do not attempt to open the device cover or service this device yourself as this may expose you to dangerous voltage or other hazards. Refer all servicing to authorized safety personnel only. 15. If this device develops problems, contact TEAC for service and do not use the product in defective states. USB Usage Precautions Never turn the unit off or disconnect a USB Storage Device (Flash Drive) when it is being accessed. Doing so can damage the TV and the connected USB storage device. Do not use a device that has a maximum current consumption of 100 mA or more. Do not use a device that has security functions or other special functions. Do not use a device that is divided into two or more partitions. A USB hub cannot be used to connect USB devices to this unit. USB STORAGE DEVICES THAT CAN BE USED WITH THIS UNIT Only USB Storage Device (Flash Memory) maximum 16GB can be used. Do NOT use a high-capacity USB hard disk with this unit. Some flash memory players that charge from USB terminals cannot be used for playback. Hard disk drives, CD/DVD Drives, and other devices connected via USB cannot be used. This unit cannot copy or move files. Playable formats: FAT12, FAT16, FAT32S Depending on the condition of the USB flash drive, this unit might not be able to play the files on it or skipping might occur. NTFS, HFS and HFS+ formats are not supported and cannot be used. Max. number of playable folders: 200 Max. number of playable files: 999 If the USB storage device contains more than 999 files or 200 folders, this unit cannot play it back correctly. This unit cannot play files that are larger than 2GB. Files with variable bit rates might not play correctly. FILE INFORMATION DISPLAY The display of this unit can only show single-byte letters and numbers. If the file information contains Japanese, Chinese or other double-byte characters, playback is possible but the name will not be shown correctly. Remote Control The remote control uses Infra-Red technology. To use, point it at the Infra-red sensor on the unit and press the control buttons. If the remote control signals become weak, check the battery power and ensure that there are no obstacles in between the remote control and the unit. REMOTE CONTROL BUTTON FUNCTIONS 1) Skip/Search forward Skip/Search backward 2) Play/Pause 3) +10/-10 4) Stop 5) Rep/Ran 6) Track separation 7) Rec 8) Delete Press once to skip to next track, press & hold for search forward Press once to skip to previous track, press & hold for search backward Press once to start to playback. Press again to enter pause mode In MP3 mode, press to skip 10 track forward or backward Press to stop playback or cancel the stored program Press to toggle Repeat/Random function on or off. Press to divide the recording track at turntable one by one while recording MP3 to USB. Press to start or stop recording Press and hold for a few seconds to delete the current MP3 file BATTERY INSTALLATION The battery compartment is located on the back of the remote control. 1. Remove the battery compartment door by pressing in on the tab and lifting it off. 2. Insert two (2) AAA size batteries (not included) into the battery compartment following the polarity markings inside the battery compartment. 3. Replace the battery compartment door. BATTERY PRECAUTIONS Replacement of batteries must be done by an adult. Do not mix old and new batteries. Do not mix alkaline, standard (carbon-zinc) or rechargeable (nickel-cadmium) batteries. The supply terminals are not to be short-circuited. Non-rechargeable batteries are not to be recharged. Exhausted batteries are to be removed. Only batteries of the equivalent type are to be used. Batteries are to be inserted with the correct polarity. Dispose of batteries properly. Do not dispose of batteries in fire. The batteries may explode or leak. If the remote control will not be in use for a long time, remove the batteries and store them separately. Location of Controls 1) Dust Cover 2) 3) 4) 5) 6) 7) 8) 9) 10) 11) 12) 13) 14) 15) 16) 17) 18) 19) 20) 21) 22) 23) 24) 25) 26) Radio Band Selector Speakers USB Socket Function knob FM Stereo LED Indicator Repeat/Random button Record Button Skip Up / Skip Down Button Play/Pause/Stop Button +10 Button Record LED indicator Play LED indicator Repeat/Random indicator SD/MMC Card Slot Power On/Off-Volume knob Power LED indicator Tuning Knob Spindle Adaptor Turntable Speed Selector Pick-Up Holder Auto Stop On/Off Switch Line Out Socket 3.5mm Aux-In Jack FM Wire Antenna AC Power Cord CAUTION: Usage of controls or adjustments or performance of procedures other than those specified herein may result in hazardous radiation exposure. This unit should not be adjusted or repaired by anyone except qualified service personnel. Installation Precautions Unpack all parts and remove protective material. Do not connect the unit to the mains before checking the mains voltage and before all other connections have been made. Do not cover any vents and make sure that there is a space of several centimeters around the unit for ventilation. Power Connection 1. Connect the Power Cord (26) to an AC wall outlet. 2. Turn the Power On/Off Knob (16) clockwise until the Power LED Indicator (17) lights up, showing that the power supply is normal. Now your system is ready to play music. NOTE: The unit will switch to standby mode automatically if it is left idle for over 15 minutes in order to save energy. Radio Operation MANUAL TUNING 1. 2. 3. 4. Turn on the Power (16) and turn Function knob (5) to “Tuner”. Select the desired band with the Radio Band Selector (2) Tune to the desired station by turning the Tuning Knob (18). Adjust the Volume Knob (16) to the desired volume level. FM / FM-STEREO RECEPTION Set the Radio Band Selector (2) at “FM” to receive FM radio in Mono mode. Mono mode is a good alternative to use when stereo FM reception is weak. Set the Radio Band Selector (2) at “FM-ST” to receive stereo FM radio. The FM-Stereo LED Indicator (6) will light up to show that stereo FM is being received. Hints for best reception: - AM: The receiver has a built-in bar antenna. If AM reception is weak, slight rotation or re-positioning of the unit will usually improve the AM reception. FM: The receiver has a built-in FM Wire Antenna (25) hanging at the rear cabinet. This wire should be totally unraveled and extended for best reception. Phono (Record Player) Operation To start, remove the stylus protector. Ensure that the tone arm is moved from the tone arm rest before operating and re-secured again after use. If the stylus needs to be replaced, you can buy a new stylus from your local music store. 1. 2. 3. 4. 5. 6. 7. 8. Select “Phono” with the Function Selector (5) Set the speed selector to the proper position depending on the record to be played. Place the vinyl record on the platter (use the Spindle Adaptor if required). Lift the tone arm from the rest and gently move it towards the record. The platter will start to rotate. Place the tone arm to the desired position on the record. Adjust the volume to the desired level. At the end of the record, the platter will automatically stop rotating. Lift the tone arm from the record and return it to the rest. To stop manually, lift the tone arm from the record and return it to the rest. NOTES: - With certain types of records, the auto-stop area is out of the unit setting, so playback will stop before the last track finishes. In this case, switch the Auto-Stop Switch (22) to “Off” so that it will run to the end of the record. With this setting, the platter rotation will not stop automatically; manually turn off the unit with the power button or switch the Auto-Stop Switch (22) to “On”. Then put the tone arm back to the rest. - As Aux and Phono were designed at the same position of this system, when the Aux In jack(24) is plugged in, the channel will change to Aux automatically and the turntable rotation will be disabled. Please ensure the Aux In jack (24) is not plugged in before using Phono mode. Aux In Operation Connect the unit to other device by connecting the Aux In jack (24) with a 3.5mm audio cable (not provided) , then connect the other end to your external device such as a smartphone/Discman/MP3 player to perform the music playback or encoding function etc. 1. Slide the Function Knob (5) to Phono/Aux. 2. Adjust the Power ON-OFF/ Volume Control Knob (16) to the desired volume level. 3. Start music playback on your external device. USB Operation (MP3 Playback) CONNECTING USB DEVICES The system is able to decode and playback MP3 files stored in connected USB flash drives and SD/MMC memory cards. 1. Turn the Function knob (5) to USB or SD. 2. Plug in the USB stick firmly, or if you are using an SD card, insert it in the direction of the arrow as shown, with the label facing upwards. Insert straight without bending. 3. CAUTION: Connecting the USB stick or SD/MMC Card upside down or backwards could damage the audio system or the storage media (USB thumb drive/SD/MMC Card). Check to be sure that the direction is correct before connecting. 4. The system will start reading and playback files in the storage media automatically after connecting and the Play LED indicator (13) will light up . NOTES: - The USB port does not support connections via USB extension cables and is not designed to communicate with computers directly. - Before disconnecting the storage media, turn the system off or change to another mode to ensure that data is not lost or corrupted during disconnection. - If the storage media is large, the unit may take some time to read the contents. - The system can detect and read the file under MP3 format only though the USB port or SD Card slot. - Due to variances in MP3 encoding format, some MP3s may not be able to play via the USB socket. This is not a malfunction of the system. - MP3 track format requirement: MP3 bit rate 32 KBPS~256 KBPS. REMOVING USB DEVICES To remove the USB drive/Memory Card, turn off the power or switch the function mode to either Phono or Tuner first. Then pull the USB drive/SD/MMC card out carefully in a straight motion. NEVER remove the storage media while it is in use, especially during encoding. This will cause damage to the storage media and result in data loss. MP3 PLAYBACK CONTROLS Play / Pause / Stop mode 1. To interrupt, press the “Play/Pause/Stop button (10) once, the Play LED indicator (13) will be flashing. Press again to resume normal playback. 2. If press and hold the “Play/Pause/Stop button (10) for two seconds during playback mode. The system will go to stop mode. 3. To start playback again, press the “Play/Pause/Stop” button (10) to start playback, the first track will start playback and the Play LED indicator (13) will light up. Skip / Search mode (skip/search up / skip/search down ) 1. During play or pause mode, if “Skip Up” Button (9) is pressed. It will go to next track and then remain the play or pause mode. 2. During play or pause mode, if “Skip Down” Button (9) is pressed. It will go back to the beginning of the track and remain the play or pause mode. 3. After step 2, press “Skip Down” Button (9) again will go to the previous track and remain the play or pause mode. 4. If press and hold the “Skip Up/Down” button (9) during playback, the playing track will go fast forward or backward until the button being released. +10 / -10 tracks (using the remote control) Press the “+10 /-10 button (11) on the remote control to skip tracks more conveniently. Repeat / Random mode Press the Repeat/Random Button (7) before or during playback to cycle through different Repeat/Random modes shown below: PLAY MODE LED INDICATOR STATUS REPEAT SINGLE TRACK FLASH IN RED COLOR REPEAT ALL TRACKS LIGHT UP IN RED COLOR RANDOM MODE LIGHT UP IN GREEN COLOR OFF MODE TURNED OFF Repeat play There are two types of Repeat – Repeat 1 Track and Repeat All Tracks. Random play You can listen to all the tracks in a random order with this function. Encoding (Recording) from PHONO/AUX to MP3 on USB The system is able to encode music on vinyl records (Phono) to MP3 format on a connected USB flash drive or SD/MMC card (supports maximum up to 2GB memory size). PHONO ENCODING 1) Set the Function knob (5) to “Phono/Aux” mode and then press the “ Rec” Button(8). 2) The Record LED indicator (12) will light up. Now the system is ready to encode. 3) Start music playback from the vinyl record at the desired track. 4) After the music ends, press the “ Rec” Button (8) again to stop encoding. NOTES: - The recording speed is 1:1 and follows the actual play time of the music. The system will create a “AUDIO” folder and then save the newly encoded MP3s in it. The recording format is preset – MP3 bit rate: 128 KBPS, sampling rate: 44.1kHz. To stop recording, press the “ Rec” Button (8) again during recording mode. To avoid system confusion and causing it to choose incorrect media, please insert either one USB or one SD/MMC Card only for recording. Otherwise, the system will select the recording media randomly. AUX ENCODING 1) Connect the unit to other audio devices by connecting the Aux in jack (24) 2) Set the Function knob (5) to “Phono/Aux” made and then press “ Rec” Button(8). 3) The Record LED indicator (12) will light up. Now the system is ready to encode. 4) Start playback your external device to recording to USB or SD. 5) After recording finishes, press the “ Rec“ Button (8)again to stop the encoding. TRACK SEPARATION (Start new MP3 File during encoding) During encoding of Phono to USB drive/SD/MMC card, you can start a new MP3 file (eg. in between songs) by pressing the “ “ (Track Separation) button once on the remote control. The Record LED indicator (12) will flash once, the system will generate a new track and continue encoding. DELETE TRACK (During MP3 playback) You can delete a MP3 file from your USB/SD media device. Press and hold the delete button on the remote control while the desired file is playing, and the Play LED indicator (13) will flash once to show that the deletion is complete. The system will proceed to play the next file. Line Out Connection You can connect the system to your home Hi-Fi system by connecting the Line out Socket (23) to the auxiliary input socket with a RCA cable (not included). Specifications Power Supply: AC~230-240V 50Hz Power Consumption: 9W Speakers: 2x 1.5W RMS, 4Ω Turntable Speed Selection: 2 speed (33/45 RPM) Type of Needle: Ruby Needle (Part Nr.: 214-008800-00R) Radio: FM and AM analogue tuners Audio Inputs: USB, SD/MMS, 3.5mm aux in Main Unit Size: 364(W) x 357(D) x 112(H) mm Gross Weight: 5.1 kg * Weight and dimensions are approximate * Specifications are subject to change Accessories 1. 2. 3. User manual Remote control Spindle adapter