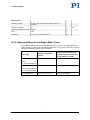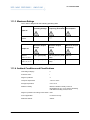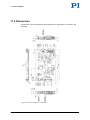
1
MS211E C-872 PILine® Electronics User Manual Version: 2.1.0 Date: 23.10.2013 This document describes the following product: C-872.160 Piezomotor Drive Electronics for PILine® Systems Physik Instrumente (PI) GmbH & Co. KG · Auf der Römerstr. 1 76228 Karlsruhe, Germany Telephon +49 721 4846-0 · Telefax +49 721 4846-1019 · E-Mail [email protected] Physik Instrumente (PI) GmbH & Co. KG is the owner of the following trademarks: PI®, PIC®, PICMA®, Picoactuator®, PIFOC®, PILine®, PInano®, PiezoWalk®, NEXACT®, NEXLINE®, NanoCube®, NanoAutomation® © 2013 Physik Instrumente (PI) GmbH & Co. KG, Karlsruhe, Germany. The text, photographs and drawings in this manual are protected by copyright. With regard thereto, Physik Instrumente (PI) GmbH & Co. KG retains all the rights. Use of said text, photographs and drawings is permitted only in part and only upon citation of the source. Original instructions First printing: 23.10.2013 Document number: MS211E, BRo, version 2.1.0 Subject to change without notice. This manual is superseded by any new release. The latest release is available for download (p. 3) on our website. Contents 1 About this Document 1.1 1.2 1.3 1.4 1.5 2 3 Goal and Target Audience of this User Manual ...................................................1 Symbols and Typographic Conventions ...............................................................1 Figures ..................................................................................................................2 Other Applicable Documents ................................................................................2 Downloading Manuals ..........................................................................................3 Safety 2.1 2.2 2.3 5 Intended Use ........................................................................................................5 General Safety Instructions ..................................................................................5 Organizational Measures ......................................................................................6 Product Description 3.1 3.2 3.3 3.4 1 7 Product View.........................................................................................................7 Scope of Delivery ...............................................................................................10 Accessories ........................................................................................................11 Functional Principles ..........................................................................................11 3.4.1 Control ..............................................................................................11 3.4.2 Supported Motor Types ....................................................................12 3.4.3 Frequency Control and Fixed Frequency Mode ...............................12 3.4.4 Looping Through of Encoder and Switch Signals ............................13 3.4.5 SPI Interface .....................................................................................14 4 Unpacking 17 5 Installation 19 5.1 5.2 5.3 5.4 5.5 5.6 6 Start-Up 6.1 Installing the C-872 in a Case ............................................................................19 Connecting the Power Supply to the C-872 .......................................................20 Connecting a PILine® Motor or RodDrive Linear Drive to the C-872.................21 Connecting an Analog Control Signal to the C-872............................................22 Connecting the SPI Master Unit to the C-872 ....................................................22 Connecting the Signal Processing Electronics to the C-872 ..............................23 25 Adapting the DIP Switch Settings .......................................................................25 6.1.1 General Procedure ...........................................................................25 6.1.2 Motor Type ........................................................................................26 6.2 6.3 6.4 7 6.1.3 Type of Control .................................................................................27 6.1.4 Activation State of Fixed Frequency Mode .......................................27 6.1.5 Activation State of Frequency Control ..............................................27 Switching on the C-872 ......................................................................................28 Executing Motions ..............................................................................................29 Executing the Run-In Procedure ........................................................................31 Adjustment of Internal Settings 7.1 7.2 33 General Notes on the Adjustment of Settings ....................................................33 Setting the Frequency for Fixed Frequency Mode .............................................34 8 Maintenance 37 9 Troubleshooting 39 10 Customer Service 41 11 Technical Data 43 11.1 11.2 11.3 Specifications......................................................................................................43 11.1.1 Data Table ........................................................................................43 11.1.2 Frequency Ranges According to Motor Types .................................44 11.1.3 Maximum Ratings .............................................................................45 11.1.4 Ambient Conditions and Classifications ...........................................45 Dimensions .........................................................................................................46 Pin Assignment ...................................................................................................47 11.3.1 Motor Connection: MDR14 ...............................................................47 11.3.2 Motor Connection: 15-pin sub-D (f) ..................................................48 11.3.3 Connection for Control Signal and Electronics for Signal Processing, 15-pin Sub-D (m) ..........................................................49 12 Old Equipment Disposal 51 13 EC Declaration of Conformity 53 1 About this Document 1 About this Document In this Chapter Goal and Target Audience of this User Manual ............................................................ 1 Symbols and Typographic Conventions ........................................................................ 1 Figures ........................................................................................................................... 2 Other Applicable Documents ......................................................................................... 2 Downloading Manuals ................................................................................................... 3 1.1 Goal and Target Audience of this User Manual This manual contains information on the intended use of the C-872. It assumes that the reader has a fundamental understanding of basic servo systems as well as motion control concepts and applicable safety procedures. The latest versions of the user manuals are available for download (p. 3) on our website. 1.2 Symbols and Typographic Conventions The following symbols and typographic conventions are used in this user manual: CAUTION Dangerous situation If not avoided, the dangerous situation will result in minor injury. Actions to take to avoid the situation. NOTICE Dangerous situation If not avoided, the dangerous situation will result in damage to the equipment. Actions to take to avoid the situation. C-872 PILine® Electronics MS211E Version: 2.1.0 1 1 About this Document INFORMATION Information for easier handling, tricks, tips, etc. Symbol/ Label Meaning 1. Action consisting of several steps whose sequential order must be observed 2. Action consisting of one or several steps whose sequential order is irrelevant List item p. 5 Cross-reference to page 5 RS-232 Labeling of an operating element on the product (example: socket of the RS-232 interface) Warning signs affixed to the product that refer to detailed information in this manual. 1.3 Figures For better understandability, the colors, proportions and degree of detail in illustrations can deviate from the actual circumstances. Photographic illustrations may also differ and must not be seen as guaranteed properties. 1.4 Other Applicable Documents The devices and software tools which are mentioned in this documentation are described in their own manuals. 2 Description Document P-661 and U-164 PILine® piezo linear motors MP96E User Manual U-264 PILine® RodDrive linear drive MP109E User Manual Version: 2.1.0 MS211E C-872 PILine® Electronics 1 About this Document 1.5 Downloading Manuals INFORMATION If a manual is missing on our website or if there are problems in downloading: Contact our customer service department (p. 41). The current versions of the manuals are found on our website. For some products (e. g. Hexapod systems and electronics that are delivered with a CD), access to the manuals is password-protected. The password is stored on the CD. Download freely accessible manuals 1. Open the website http://www.pi-portal.ws. 2. Click Downloads. 3. Click the corresponding category (e. g. C Motion Controllers) 4. Click the corresponding product code (e. g. C-872). 5. Click Documents. The available manuals are displayed. 6. Click the desired manual and save it on the hard disk of your PC or on a data storage medium. Download password-protected manuals 1. Carry out steps 1 to 5 of the download process for freely accessible manuals. 2. Insert the product CD in the PC drive. 3. Switch to the Manuals directory on the CD. 4. In the Manuals directory, open the Release News (file including releasenews in the file name). 5. Find the user name and password in the User login for software download section in the Release News. 6. In the User login area on the left margin in the website, enter the user name and the password in the corresponding fields. 7. Click Login. The available manuals are displayed. 8. Click the desired manual and save it on the hard disk of your PC or on a data storage medium. C-872 PILine® Electronics MS211E Version: 2.1.0 3 2 Safety 2 Safety In this Chapter Intended Use ................................................................................................................. 5 General Safety Instructions ........................................................................................... 5 Organizational Measures............................................................................................... 6 2.1 Intended Use The C-872 is a laboratory device as defined by DIN EN 61010-1. It is intended to be used in interior spaces and in an environment which is free of dirt, oil, and lubricants. The C-872 must be installed in a suitable case before start-up. The C-872 is a power amplifier for operating PILine® ultrasonic piezomotors (single or dual drive as for example with PILine® RodDrive). The C-872 is a single-channel device. The C-872 must not be used for purposes other than those named in this user manual. In particular, the C-872 must not be used to drive ohmic or inductive loads. The C-872 is intended for open-loop operation. The C-872 loops through signals from limit and reference point switches as well as incremental sensors, in order to provide them to external electronics for signal processing. 2.2 General Safety Instructions The C-872 is built according to state-of-the-art technology and recognized safety standards. Improper use can result in personal injury and/or damage to the C-872. Only use the C-872 for its intended purpose, and only use it if it is in a good working order. Read the user manual. Immediately eliminate any faults and malfunctions that are likely to affect safety. The operator is responsible for the correct installation and operation of the C-872. C-872 PILine® Electronics MS211E Version: 2.1.0 5 2 Safety Install the C-872 near the power source so that it can be quickly and easily disconnected from the power source. 2.3 Organizational Measures User manual Always keep this user manual available by the C-872. The latest versions of the user manuals are available for download (p. 3) on our website. Add all information given by the manufacturer to the user manual, for example supplements or Technical Notes. If you pass the C-872 on to other users, also turn over this user manual as well as other relevant information provided by the manufacturer. Only use the device on the basis of the complete user manual. Missing information due to an incomplete user manual can result in minor injury and property damage. Only install and operate the C-872 after having read and understood this user manual. Personnel qualification The C-872 may only be installed, started up, operated, maintained and cleaned by authorized and appropriately qualified personnel. 6 Version: 2.1.0 MS211E C-872 PILine® Electronics 3 Product Description 3 Product Description In this Chapter Product View ................................................................................................................. 7 Scope of Delivery ........................................................................................................ 10 Accessories ................................................................................................................. 11 Functional Principles ................................................................................................... 11 3.1 Product View Figure 1: C-872.160 piezomotor drive electronics for PILine® systems 1 LED for displaying the ready state 2 6-bit DIP switch: Selecting the motor type and control, switching the frequency control and fixed frequency mode on and off 3 15-pin Sub-D panel plug, male, user interface for control signal input (analog or via SPI interface) among other things 4 15-pin Sub-D socket, female, for PILine® piezo linear motor or RodDrive linear drive 5 MDR14 socket for PILine® piezo linear motor or RodDrive linear drive 6 Barrel connector socket for power supply connection 7 Potentiometer for frequency adjustment in fixed frequency mode C-872 PILine® Electronics MS211E Version: 2.1.0 7 3 Product Description Figure 2: C-872.160 detailed view: DIP switches and user interface Type Function LED, green/off Display of the ready state: 6-bit DIP switch (p. 25) Green: C-872 is ready for operation Off: C-872 is not ready for operation Switches for: Selection of the motor type (1 to 3) Selection of the control (4) Switching fixed frequency mode on and off (5) Switching the frequency control on and off (6) 15-pin Sub-D panel plug, Inputs for: male (p. 49) Analog control signal SPI interface (control value and frequency specification) Outputs for looped-through signals: 8 Version: 2.1.0 Signals of an incremental position sensor Signals of limit switches and reference point switch MS211E C-872 PILine® Electronics 3 Product Description Figure 3: C-872.160 detailed view: connections for motors and supply voltage Type Function 15-pin Sub-D socket, female (p. 48) Connection for a PILine® piezomotor or RodDrive linear drive: Output of the piezo voltage for the motor Inputs for signals to be looped through: MDR14 socket (p. 47) Signals of an incremental position sensor Signals of limit switches and reference point switch Connection for a PILine® piezomotor or RodDrive linear drive: Output of the piezo voltage for the motor Inputs for signals to be looped through: Barrel connector socket Signals of limit switches and reference point switch Power supply connection for the supply voltage: C-872 PILine® Electronics Signals of an incremental position sensor Middle pin: 24 V DC Terminal contact: GND (power) MS211E Version: 2.1.0 9 3 Product Description Figure 4: C-872.160: Potentiometer for frequency adjustment in fixed frequency mode; turning in the direction of the arrow reduces the frequency Type Function 10-turn potentiometer Fine adjustment of the frequency in fixed frequency mode 3.2 Scope of Delivery 10 Order Number Items C-872.160 Piezomotor drive electronics for PILine® systems MS211E User manual for the C-872.160 (this document) Version: 2.1.0 MS211E C-872 PILine® Electronics 3 Product Description 3.3 Accessories Order Number Description M-663.AB Adapter Box, MDR to 15-pin Sub-D, for PILine® Stages with Long Cables Technical Note M663T0015 for adapter box Extension cable for use with adapter box M-663.AB: M-663.A01 Extension Cable for PILine®, MDR to 15-pin Sub-D, 1 m M-663.A03 Extension Cable for PILine®, MDR to 15-pin Sub-D, 3 m M-663.A05 Extension Cable for PILine®, MDR to 15-pin Sub-D, 5 m M-663.A10 Extension Cable for PILine®, MDR to 15-pin Sub-D, 10 m To order, contact our customer service department (p. 41). 3.4 Functional Principles 3.4.1 Control The C-872 can be controlled via the analog control input or the SPI interface. The control is selected via DIP switch 4. Control via analog control input Control signal: -10 to 10 V The amount of the control signal determines the amplitude of the output piezo voltage and thus the motor velocity. The polarity of the control signal determines the direction of motion. The frequency of the piezo voltage can be specified within the permissible range (p. 44) by the frequency control or the potentiometer for fixed frequency mode. Details see "Frequency Control and Fixed Frequency Mode" (p. 12). Control via SPI interface A control value between -32767 and 32767 determines the amplitude of the piezo voltage and the direction of motion. When the frequency control as well as fixed frequency mode are switched off, the frequency of the piezo voltage is also determined via the SPI interface. Further details see "SPI Interface" (p. 14) and "Frequency Control and Fixed Frequency Mode". (p. 12). C-872 PILine® Electronics MS211E Version: 2.1.0 11 3 Product Description 3.4.2 Supported Motor Types The C-872 supports all types of PILine® piezomotors currently offered by PI or integrated in PILine® stages and drives. The C-872 is adapted to the connected motor type via the DIP switches 1 to 3 (p. 26). The setting determines the following: Maximum amplitude of the output piezo voltage Permissible frequency range (p. 44) 3.4.3 Frequency Control and Fixed Frequency Mode The piezo voltage that is output by the C-872 oscillates with a specific frequency in order to excite the piezo actuator in the PILine® piezomotor. At the optimum operating point, the frequency of the piezo voltage is as close as possible to the resonant frequency of the motor. The resonant frequency of the motor is influenced by various factors: Motor type Installation conditions of the motor Execution of the run-in procedure Temperature The C-872 is equipped with a frequency control that automatically optimizes the frequency of the piezo voltage, i.e. adapts it to the connected motor. The frequency control can be switched on and off via DIP switch 6 (p. 27). The frequency control operates with 1 kHz. For operation with a fixed frequency ("fixed frequency mode"), the C-872 is equipped with a potentiometer for fine adjustment of the frequency. Fixed frequency mode can be switched on and off via DIP switch 5 (p. 27). The parameters of the frequency control (frequency range, control gain) and fixed frequency mode (frequency range of the potentiometer) depend on the motor type and are unchangeably stored in the firmware of the C-872. Details see "Frequency Ranges According to Motor Types" (p. 44). The frequency can also be directly specified via the SPI interface. The following table shows the relationships between the frequency control, fixed frequency mode and frequency specification via SPI. 12 Version: 2.1.0 MS211E C-872 PILine® Electronics 3 Product Description Frequency control switched on Frequency control switched off The amplitude of the piezo voltage and the direction of motion can be specified via the analog control input or the SPI interface. Fixed frequency mode switched on The amplitude of the piezo voltage and the When switched on, the C-872 direction of motion can starts with the standard frequency* be specified via the for the respective motor type. analog control input or The C-872 ignores the following: the SPI interface. Settings for fixed frequency mode (DIP switch 5 and potentiometer) Frequency specifications via the SPI interface The frequency control becomes active as soon as the analog control signal or the control value transmitted via SPI exceeds a particular threshold. Fixed frequency mode switched off Analog operation The amplitude of the piezo voltage and the direction of motion are The frequency is specified via the specified by the setting of analog control the potentiometer. input. The C-872 ignores frequency specifications via the SPI interface. Control via SPI interface The amplitude of the piezo voltage and the direction of motion are specified via the SPI interface. The frequency is The standard specified via the frequency* for the SPI interface respective motor (p. 14). type is used. When the C-872 is switched off, the adapted frequency is lost, since it is only stored in the volatile memory. *The standard frequency for the motor type corresponds to the center frequency of the frequency range for frequency control (p. 44). 3.4.4 Looping Through of Encoder and Switch Signals The C-872 has inputs for signals from reference point and limit switches as well as from an incremental encoder. The C-872 does not evaluate these signals but loops them through and makes them available via an interface to electronics for signal processing. For industrial applications, a velocity control can be implemented in the C-872 upon request if an encoder is present and the installation conditions and load conditions of the motor are known. The velocity control can linearize the motion and simplify any externally executed position control. C-872 PILine® Electronics MS211E Version: 2.1.0 13 3 Product Description 3.4.5 SPI Interface The SPI interface is intended for controlling the C-872 via a master unit. The C-872 only works as a slave unit and does not send any response to the master unit. The lines for the SPI interface are available on the 15-pin Sub-D panel plug, male (p. 49). Signal characteristics: Absolute limit values Min Max Unit Input voltage -0.5 6.5 V Recommended operating values Min Max Unit 0.8 V LOW level of the input voltage HIGH level of the input voltage 2 Input voltage 0 V 5 V Signal definition: Name Description Direction for C-872 SDI Serial Data In (MOSI): data line Input SCK Serial Clock Input Max. 10 MHz CS Chip Select: Selection of the slave unit Input Active LOW ENABLE Pulses for separating the individual transmission frames Input Active HIGH SCK The data is captured by the C-872 with a rising SCK edge (transition LOW → HIGH). The data must remain stable 16 ns before the rising SCK edge. If no activity is present, SCK can have the state LOW or HIGH. 14 Version: 2.1.0 MS211E C-872 PILine® Electronics 3 Product Description CS CS must be LOW during the entire time that a 16-bit data packet is transmitted and then briefly switch to HIGH before the next 16-bit data packet. The change from HIGH to LOW must take place at least 16 ns before the first clock cycle of the data transmission. The change from LOW to HIGH must take place at least 16 ns after the sixteenth clock cycle of the data transmission. ENABLE ENABLE separates the individual transmission frames from each other. For this purpose, ENABLE must switch to HIGH for at least 1 µs after the transmission of the three data packets of a transmission frame while CS is also HIGH. Size of the data packets and the transmission frame (on SDI line) The packet size is 16 bits. The data is transmitted with the highest-value bit first (MSB first). MSB ... (D15) ... LSB (D1) (D0) For each transmission frame, the three following data packets must always be transmitted on the SDI line: Packet 1: Frequency of the piezo voltage, HIGH word Packet 2: Frequency of the piezo voltage, LOW word Packet 3: Control value in the range from -32767 to 32767, determines the amplitude of the piezo voltage and the direction of motion. The C-872 only accepts frequency specifications via SPI that are within the permissible frequency range for the set motor type (p. 44). If the frequency specification exceeds the range limit, the C-872 sets the frequency to the corresponding limit value. Frequency specifications must always be transferred to the C-872, even though they are only evaluated when the frequency control as well as the fixed frequency mode are switched off. Further details see "Frequency Control and Fixed Frequency Mode" (p. 12). Example: In order to set the frequency to 158517 Hz (= 0x26B35) and the control value to +17512 (= 0x4468), the master unit must send the following: Packet 1: 0x0002 Packet 2: 0x6B35 Packet 3: 0x4468 C-872 PILine® Electronics MS211E Version: 2.1.0 15 3 Product Description Figure 5: C-872.160: Signals of the SPI interface over time 16 Version: 2.1.0 MS211E C-872 PILine® Electronics 4 Unpacking 4 Unpacking NOTICE Electrostatic hazard The C-872 contains electrostatically sensitive equipment (ESD) and can be damaged if handled improperly. Avoid touching assemblies, pins and PCB traces. Before you touch the C-872, discharge yourself of any electric charges: − Wear an antistatic wrist strap or − Before touching an electronic component, briefly touch a conducting, grounded object. Only handle and store the C-872 in environments that dissipate existing static charges to earth in a controlled way and prevent electrostatic charges (ESD workplace or electrostatically protected area, in short EPA). 1. Unpack the C-872 with care. 2. Compare the contents against the items covered by the contract and against the packing list. 3. Inspect the contents for signs of damage. If parts are missing or you notice signs of damage, contact PI immediately. 4. Keep all packaging materials in case the product needs to be returned. C-872 PILine® Electronics MS211E Version: 2.1.0 17 5 Installation 5 Installation In this Chapter Installing the C-872 in a Case ..................................................................................... 19 Connecting the Power Supply to the C-872 ................................................................ 20 Connecting a PILine® Motor or RodDrive Linear Drive to the C-872 ......................... 21 Connecting an Analog Control Signal to the C-872 .................................................... 22 Connecting the SPI Master Unit to the C-872 ............................................................. 22 Connecting the Signal Processing Electronics to the C-872 ....................................... 23 5.1 Installing the C-872 in a Case NOTICE Electrostatic hazard The C-872 contains electrostatically sensitive equipment (ESD) and can be damaged if handled improperly. Avoid touching assemblies, pins and PCB traces. Before you touch the C-872, discharge yourself of any electric charges: − Wear an antistatic wrist strap or − Before touching an electronic component, briefly touch a conducting, grounded object. Only handle and store the C-872 in environments that dissipate existing static charges to earth in a controlled way and prevent electrostatic charges (ESD workplace or electrostatically protected area, in short EPA). INFORMATION The C-872 is intended for insertion in a case. For this purpose, the board has a 3 mm wide, unpopulated and uncontacted edge on the two longitudinal sides. Tools and accessories Suitable case: − The case is made of metal. − The case securely encloses all live parts. C-872 PILine® Electronics MS211E Version: 2.1.0 19 5 Installation − The case is connected to a suitable protective earth conductor (cross2 sectional area of the cable ≥ 0.75 mm ). The contact resistance must be < 0.1 ohm at 25 A at all connection points relevant to the protective earth conductor function. − The case is shielded and designed in such a way that the C-872 fulfills all requirements for electromagnetic compatibility after installation. − The case has suitable retainers for inserting the C-872. The dimensions of the C-872 are found in the dimensional drawing (p. 46). Installing the C-872 in the case 1. Insert the C-872 into the retainer of the case. 2. Connect all metallic connector shells of the C-872 to the case so that they are conductive. 3. Close the case. If the protective earth conductor has to be removed temporarily (e. g. in the case of modifications), reconnect the C-872 to the protective earth conductor before starting it up again. 5.2 Connecting the Power Supply to the C-872 Prerequisites The C-872 is properly installed in a case (p. 19). The power supply is not connected to the power socket via the power cord. Tools and accessories Power supply, 24 V DC, 50 W, with barrel connector Connect the power supply to the C-872 Connect the power supply to the barrel connector socket of the C-872. 20 Version: 2.1.0 MS211E C-872 PILine® Electronics 5 Installation 5.3 Connecting a PILine® Motor or RodDrive Linear Drive to the C-872 NOTICE Damage due to incorrect motor selection The selection of an incorrect motor type via the DIP switches of the C-872 can cause damage to the motor. Make sure that the motor type selected with the DIP switches matches the connected motor. INFORMATION The C-872 supports the following PILine® motors and drives: P-661, U-161, P-664, U-164, Dual P-664, Dual U-164, U-264 (RodDrive). PILine® stages that contain the above listed motors and drives can normally be connected to the C-872 as well. However, since the C-872 does not perform any position control, the C-867 PILine® controller is recommended for operating these stages instead. INFORMATION The C-872 is designed for the PILine® piezomotor or RodDrive linear drive to be connected either to the 15-pin sub-D socket, female, or to the MDR14 socket. If motors or drives of the appropriate type are nevertheless connected to both sockets, the piezo voltage that is output will not attain the optimum frequency. The motors or drives will not maintain the specified forces and velocities and may heat up. Only connect a motor or drive to one of the two sockets. Prerequisite The C-872 is switched off, i. e. the power supply is not connected to the power socket with the power cord. Tools and accessories A suitable PILine® piezomotor or RodDrive linear drive If the cable of the motor or drive is too short: the M-663.AB adapter box and M-663.Axx extension cable are available as optional accessories (p. 11) C-872 PILine® Electronics MS211E Version: 2.1.0 21 5 Installation Connecting the PILine® piezomotor or RodDrive linear drive Connect the PILine® piezomotor or RodDrive linear drive to the 15-pin sub-D socket, female, or to the MDR14 socket. 5.4 Connecting an Analog Control Signal to the C-872 Prerequisite The signal source is switched off or the output is 0 V. Tools and accessories Signal source that supplies a signal in the range of -10 V to +10 V 15-pin Sub-D connector, female Connecting the control signal Connect the signal source to pin 9 of the 15-pin Sub-D panel plug, male, via a 15-pin Sub-D connector, female. 5.5 Connecting the SPI Master Unit to the C-872 Tools and accessories SDI, SCK, CS and ENABLE signals from the master unit, details see "SPI Interface" (p. 14) 15-pin Sub-D connector, female Connecting the SPI master unit Connect the master unit to the following pins of the 15-pin Sub-D panel plug, male, via the 15-pin Sub-D connector, female: 22 − Pin 2: SDI − Pin 3: SCK − Pin 11: CS − Pin 4: ENABLE Version: 2.1.0 MS211E C-872 PILine® Electronics 5 Installation 5.6 Connecting the Signal Processing Electronics to the C-872 INFORMATION The C-872 has inputs for signals from reference point and limit switches as well as from an incremental encoder. The C-872 does not evaluate these signals but loops them through and makes them available via the 15-pin sub-D panel plug, male, to external electronics for signal processing (e.g. for position control): Pin 12: negative limit switch (TTL, active high: proper operation of the motor: low (0 V), end position reached: high (+5 V)) Pin 5: positive limit switch (TTL, active high: proper operation of the motor: low (0 V), end position reached: high (+5 V)) Pin 13: reference point switch (TTL) Pin 14: encoder ENCA+ (RS-422) Pin 7: encoder ENCA- (RS-422) Pin 15: encoder ENCB+ (RS-422) Pin 8: encoder ENCB- (RS-422) Tools and accessories Electronics for processing reference point and limit switch signals (TTL) Electronics for processing encoder signals (RS-422) Sub-D connector, 15-pin, female Connecting the Signal Source Connect the electronics for signal processing to the corresponding pins of the 15-pin sub-D panel plug, male, via a 15-pin sub-D connector, female. C-872 PILine® Electronics MS211E Version: 2.1.0 23 6 Start-Up 6 Start-Up In this Chapter Adapting the DIP Switch Settings ................................................................................ 25 Switching on the C-872 ............................................................................................... 28 Executing Motions ....................................................................................................... 29 Executing the Run-In Procedure ................................................................................. 31 6.1 Adapting the DIP Switch Settings 6.1.1 General Procedure Figure 6: DIP switches 1 to 6: switch up = ON; switch down = OFF Switches Function 1 to 3 Motor type (p. 26) 4 Type of control (p. 27) 5 Activation state of the fixed frequency mode (p. 27) 6 Activation state of the frequency control (p. 27) INFORMATION Changed DIP switch settings become effective after the C-872 is switched on. If you have changed the DIP switch settings while the C-872 was switched on, switch the C-872 off and back on again to activate the new settings. C-872 PILine® Electronics MS211E Version: 2.1.0 25 6 Start-Up Prerequisite The C-872 is switched off, i. e. the power supply is not connected to the power socket via the power cord. Adapting the DIP switch settings Put the individual DIP switches in the correct position for your application. Details are given in the following tables. 6.1.2 Motor Type NOTICE Damage due to incorrect motor selection The selection of an incorrect motor type via the DIP switches of the C-872 can cause damage to the motor. Make sure that the motor type selected with the DIP switches matches the connected motor. Motor type Switch 1 Switch 2 Switch 3 P-661 ON ON ON OFF ON ON ON OFF ON U-161 2 × U-161 (dual drive) P-664 2 × P-664 (dual drive) 2 × U-164 (dual drive) U-264 (RodDrive) INFORMATION If you want to connect an M-6xx stage with PILine® piezomotors or RodDrive linear drives to the C-872: 1. For the motor type of your stage, refer to the data sheet or user manual of the stage. 2. Set the corresponding motor type with DIP switches 1 to 3. 26 Version: 2.1.0 MS211E C-872 PILine® Electronics 6 Start-Up 6.1.3 Type of Control Control mode Switch 4 Control via SPI interface OFF Control via analog control ON input 6.1.4 Activation State of Fixed Frequency Mode Activation state Switch 5 Fixed frequency mode switched on OFF Fixed frequency mode switched off ON 6.1.5 Activation State of Frequency Control Activation state Switch 6 Frequency control switched on OFF Frequency control switched off ON C-872 PILine® Electronics MS211E Version: 2.1.0 27 6 Start-Up 6.2 Switching on the C-872 CAUTION Risk of electric shock during operation without case If the C-872 is operated without a case, live parts are accessible. Touching the live parts can result in minor injuries from electric shock. Only operate the C-872 when it is installed in a shielded case that securely encloses all live parts and fulfills all requirements for electromagnetic compatibility. CAUTION Risk of electric shock if the protective earth conductor is not connected! If a protective earth conductor is not or not properly connected, dangerous touch voltages can occur on the C-872 in the case of malfunction or failure of the system. If touch voltages exist, touching the C-872 can result in minor injuries from electric shock. Connect the C-872 to a protective earth conductor (p. 19) before start-up. Do not remove the protective earth conductor during operation. If the protective earth conductor has to be removed temporarily (e. g. in the case of modifications), reconnect the C-872 to the protective earth conductor before starting it up again. INFORMATION During operation of the C-872, the piezo voltage is present at the two sockets for connecting PILine® piezomotors or RodDrive linear drives (15-pin Sub-D socket, female, and MDR14 socket). Prerequisite 28 The C-872 has been properly installed in a suitable case (p. 19). You have set the DIP switches of the C-872 in accordance with your application (p. 25). Version: 2.1.0 MS211E C-872 PILine® Electronics 6 Start-Up Switching on the C-872 Connect the power cord of the power supply with the power socket. The LED next to the DIP switches shows the ready state of the C-872: − Green: C-872 is ready for operation − Off: C-872 is not ready for operation 6.3 Executing Motions INFORMATION The frequency control and any external position control that is present can influence each other. If the external position control does not work satisfactorily: 1. Switch off the frequency control of the C-872, see "Adapting the DIP Switch Settings" (p. 25). 2. Optimize the frequency of the output piezo voltage: − − If the fixed frequency mode is switched on: Adjust the frequency with the potentiometer, see "Adjustment of Internal Settings" (p. 33). If the fixed frequency mode is switched off and the control takes place via the SPI interface: Specify the correct frequency, see "SPI Interface" (p. 14). INFORMATION In the case of control via the SPI interface, frequency specifications must always be transmitted to the C-872, even though they are only evaluated when the frequency control as well as the fixed frequency mode are switched off. The C-872 only accepts frequency specifications via SPI that are within the permissible frequency range for the set motor type (p. 44). INFORMATION The C-872 is equipped with protection for no-load operation: In the case of control without load, the C-872 periodically switches off the output of the piezo voltage for 500 ms each time. C-872 PILine® Electronics MS211E Version: 2.1.0 29 6 Start-Up Prerequisite You have read and understood the user manual of the PILine® piezomotor or RodDrive linear drive. You have mounted the PILine® piezomotor or RodDrive linear drive according to the description in the corresponding user manual. The C-872 has been properly installed in a suitable case (p. 19). You have connected the PILine® piezomotor or RodDrive linear drive to the C-872 (p. 21). You have connected a suitable control signal to the C-872. − Analog control signal (p. 22) or − SPI master unit (p. 22) You have set the DIP switches of the C-872 in accordance with your application (p. 25). You have switched on the C-872 (p. 28). Executing motions If the control takes place via an analog control signal: Change the control signal within the range of -10 V to +10 V. If the control takes place via the SPI interface: − Change the control value within the range of -32767 to +32767. − Transmit a frequency specification to the C-872. The PILine® piezomotor or RodDrive linear drive produces corresponding motions. 30 Version: 2.1.0 MS211E C-872 PILine® Electronics 6 Start-Up 6.4 Executing the Run-In Procedure INFORMATION To generate the maximum force, a run-in procedure is necessary for the PILine® piezomotor or the RodDrive linear drive. For details on the run-in procedure, see the user manual of the PILine® piezomotor or RodDrive linear drive. Prerequisite You have the user manual of the PILine® piezomotor or RodDrive linear drive at hand. You have executed initial motions with the PILine® piezomotor or the RodDrive linear drive (p. 29). The system consisting of the C-872 and the PILine® piezomotor or RodDrive linear drive is still ready for operation. Executing the run-in procedure Set the analog control signal or the control value transmitted via SPI according to the information on the run-in procedure in the user manual of the PILine® piezomotor or RodDrive linear drive. INFORMATION The run-in procedure must be repeated every time the PILine® piezomotor or RodDrive linear drive is mounted. C-872 PILine® Electronics MS211E Version: 2.1.0 31 7 Adjustment of Internal Settings 7 Adjustment of Internal Settings In this Chapter General Notes on the Adjustment of Settings ............................................................. 33 Setting the Frequency for Fixed Frequency Mode ...................................................... 34 7.1 General Notes on the Adjustment of Settings CAUTION Risk of electric shock during operation without case If the C-872 is operated without a case, live parts are accessible. Touching the live parts can result in minor injuries from electric shock. Only open the C-872 case when you are authorized and have the corresponding qualifications. Before opening the case, remove the C-872 from the power source by pulling the power plug. When operating with an open case, do not touch any components in the case aside from the potentiometer for frequency adjustment. NOTICE Electrostatic hazard The C-872 contains electrostatically sensitive equipment (ESD) and can be damaged if handled improperly. Avoid touching assemblies, pins and PCB traces. Before you touch the C-872, discharge yourself of any electric charges: − Wear an antistatic wrist strap or − Before touching an electronic component, briefly touch a conducting, grounded object. Only handle and store the C-872 in environments that dissipate existing static charges to earth in a controlled way and prevent electrostatic charges (ESD workplace or electrostatically protected area, in short EPA). C-872 PILine® Electronics MS211E Version: 2.1.0 33 7 Adjustment of Internal Settings 7.2 Setting the Frequency for Fixed Frequency Mode Fixed frequency mode is intended for applications to which the following applies: The frequency control does not lead to satisfactory results. The frequency is not specified via SPI. In fixed frequency mode, the frequency can be adjusted within the permissible range (p. 44) using a potentiometer. Figure 7: C-872.160: Potentiometer for frequency adjustment in fixed frequency mode; turning in the direction of the arrow reduces the frequency INFORMATION In fixed frequency mode, the frequency must be adjusted with the potentiometer again every time the PILine® piezomotor or RodDrive linear drive is mounted. INFORMATION The frequency of the piezo voltage is optimally adjusted when the following criteria are met along with an equal amount of control: 34 The PILine® piezomotor or RodDrive linear drive moves in both directions with maximum velocity and force. The PILine® piezomotor or RodDrive linear drive consumes the highest energy, i.e. the current consumption of the C-872 achieves a maximum value for both directions of motion. Version: 2.1.0 MS211E C-872 PILine® Electronics 7 Adjustment of Internal Settings Prerequisite You have read and understood the General Notes on the Adjustment of Settings (p. 33). The system is still ready for operation according to the prerequisites listed in "Executing Motions" (p. 29). Tools and accessories Trimmer adjustment tool, or alternatively a thin-bladed screwdriver If present: force sensor, e.g. load cell If present: ammeter for the current consumption of the C-872 Setting the frequency for fixed frequency mode 1. Switch the C-872 off by pulling the power plug. 2. Switch on fixed frequency mode with DIP switch 5 (p. 27). 3. Make sure that the correct motor type and thus the right frequency range is selected with DIP switches 1 to 3 (p. 26). 4. Provide access to the potentiometer for frequency adjustment by opening the case of the C-872. The position of the potentiometer on the C-872 is shown in the figure in "Product View" (p. 7) (position number 7). 5. If you want to measure the current consumption of the C-872: Suitably install the ammeter in the circuit for supplying the C-872. 6. Switch on the C-872 by connecting the power cord of the power supply to the power socket. 7. Start a continuous motion that covers the entire travel range of the PILine® piezomotor or RodDrive linear drive with a periodic change in direction. The change in direction should occur once per second. If the control takes place via an analog control signal: − Set the control signal to -7.5 V or +7.5 V (i. e. ¾ of the maximum control), depending on the direction of motion. If the control takes place via the SPI interface: − Set the control value to --24575 or +24575 (i. e. ¾ of the maximum control), depending on the direction of motion. − Transmit any frequency specification to the C-872 (although it is not used, the frequency specification must always be transmitted as well). C-872 PILine® Electronics MS211E Version: 2.1.0 35 7 Adjustment of Internal Settings 8. Adjust the frequency of the piezo voltage: − Turn the potentiometer with the trimmer adjustment tool to change the frequency. − During the frequency change, observe the velocity of the PILine® piezomotor or RodDrive linear drive for both directions of motion. − During the frequency change, measure the force generation of the PILine® piezomotor or RodDrive linear drive for both directions of motion with the force sensor or with your hand. − If you have installed an ammeter: Measure the current consumption of the C-872 during the frequency change. Is the frequency optimally adjusted (= PILine® piezomotor or RodDrive linear drive moves in both directions with maximum velocity and force, current consumption of the C-872 takes on maximum value)? If yes: Switch the C-872 off by pulling the power plug and close the case of the C-872. If no: Adjust the frequency again until the optimum frequency has been set. 36 Version: 2.1.0 MS211E C-872 PILine® Electronics 8 Maintenance 8 Maintenance The C-872 is maintenance-free. For updating the firmware of the C-872, contact the customer service department (p. 41). C-872 PILine® Electronics MS211E Version: 2.1.0 37 9 Troubleshooting 9 Troubleshooting Problem Possible Causes Solution Motor/drive/stage does not move The cable is not connected correctly Check the cable connections. Motor/drive/stage or cable is faulty When present, replace the defective motor/drive/stage with a device of the same type and test the new combination. Incorrect motor type set Frequency of the piezo voltage incorrectly set Check the settings of DIP switches 1 to 3 for selecting the motor type (p. 26). If the motor/drive/stage still does not move even though the motor type has been correctly set, the motor may have been damaged by the incorrect selection. Contact our customer service department (p. 41). 1. Switch off the frequency control (p. 27). 2. If necessary, let the motor/drive/stage cool down. 3. Adjust the frequency in fixed frequency mode (p. 34), or specify the frequency via the SPI interface (p. 14): − At approx. ¾ of the maximum control, test all frequencies from the frequency range of the motor type (p. 44) one after the other. If the motor/drive/stage does not move at any of the tested frequencies, it is faulty. Unsatisfactory system performance Motors or drives are connected to both sockets. Contact our customer service department (p. 41). If motors or drives of the appropriate type are connected to both sockets, the piezo voltage that is output will not attain the optimum frequency. The motors or drives will not maintain the specified forces and velocities and may heat up. Only connect a motor or drive to either the 15-pin Sub-D socket, female, or the MDR14 socket. Incorrect motor type set Check the settings of DIP switches 1 to 3 for selecting the motor type (p. 26). External position control The frequency control and any external position control that is present can influence each other. does not work satisfactorily Switch off the frequency control of the C-872 (p. 27). If the problem that occurred with your system is not listed in the table above or cannot be solved as described, contact our customer service department (p. 41). C-872 PILine® Electronics MS211E Version: 2.1.0 39 10 Customer Service 10 Customer Service For inquiries and orders, contact your PI sales engineer or send us an e-mail (mailto:[email protected]). If you have questions concerning your system, have the following information ready: Product codes and serial numbers of all products in the system Firmware version of the controller (if present) Version of the driver or the software (if present) Operating system on the PC (if present) The latest versions of the user manuals are available for download (p. 3) on our website. C-872 PILine® Electronics MS211E Version: 2.1.0 41 11 Technical Data 11 Technical Data In this Chapter Specifications .............................................................................................................. 43 Dimensions .................................................................................................................. 46 Pin Assignment ............................................................................................................ 47 11.1 Specifications 11.1.1 Data Table C-872.160 Function Driver for PILine® ultrasonic piezomotors / single and dual drives with P-661, U-161, U-164 and U-264 Channels 1 Control signal input Analog or SPI Unit Tolerance Analog: Input on Sub-D 15 (m); ±10 V; controls velocity and direction of motion; 12-bit A/D converter SPI: See below Electrical properties Output power 50 W max. Output voltage 240 (AC voltage, maximum amplitude and permissible frequency range depending on the motor selection) Vpp max. Current limitation 2.5 (short-circuit-proof, protection for no-load operation) A max. Interface and operation DIP switch Selecting the motor, activating / deactivating frequency control, activating / deactivating fixed frequency mode, control analog or via SPI Motor connector MDR14 and Sub-D 15 (f) SPI Input on Sub-D 15 (m) Control value controls velocity and direction of motion, frequency specification possible I/O ports Sub-D 15 (m) Looped through: 3× signals for limit and reference point switches (TTL), 4× encoder signal (A/B, differential) C-872 PILine® Electronics MS211E Version: 2.1.0 43 11 Technical Data Miscellaneous Operating voltage 24 VDC, 50 W, from external power supply (not included) Current consumption 2.5 A Operating temperature range 5 to 40 °C Mass 0.125 kg Dimensions 172 × 100 × 20 (incl. connector) mm max. 11.1.2 Frequency Ranges According to Motor Types The following table shows the permissible frequency ranges for the supported motor types (selection of the motor type with DIP switches 1 to 3 (p. 26)). The C-872 ensures that the permissible range is never exceeded. Motor type Range for frequency control Range for the potentiometer in fixed frequency mode and for specification via SPI P-661 214 kHz to 225 kHz 205 kHz to 230 kHz 154 kHz to 163 kHz 154 kHz to 163 kHz U-264 (RodDrive) 157 kHz to 161 kHz 154 kHz to 163 kHz Version: 2.1.0 MS211E U-161 2 × U-161 (dual drive) P-664 2 × P-664 (dual drive) 2 × U-164 (dual drive) 44 C-872 PILine® Electronics 11 Technical Data 11.1.3 Maximum Ratings The C-872 is designed for the following operating data: Maximum Operating Voltage Maximum Operating Maximum Power Frequency (Unloaded) Consumption Input on: 50 W Barrel connector 24 V DC socket Maximum Output Voltage Maximum Output Current Maximum Output Frequency 240 V (peak-peak) 590 mA (at 240 V peak- 230 kHz peak) 15-pin Sub-D (f): 240 V (peak-peak) pins 2, 3, 9, 11 590 mA (at 240 V peak- 230 kHz peak) Output on: MDR14: pins 5, 7, 8, 9 11.1.4 Ambient Conditions and Classifications Overvoltage category: II Protection class: I Degree of pollution: 2 Transport temperature: –25°C to +85°C Storage temperature: 0°C to 70°C Relative humidity: Maximum relative humidity of 80% at temperatures of up to 31°C, linearly decreasing until relative humidity of 50% at 40°C Degree of protection according to IEC 60529: IP20 Area of application: For indoor use only Maximum altitude: 2000 m C-872 PILine® Electronics MS211E Version: 2.1.0 45 11 Technical Data 11.2 Dimensions Dimensions in mm. Note that the decimal places are separated by a comma in the drawings. Figure 8: C-872.160: Dimensions in millimeters 46 Version: 2.1.0 MS211E C-872 PILine® Electronics 11 Technical Data 11.3 Pin Assignment 11.3.1 Motor Connection: MDR14 Connector: MDR14 (3M) Pin Signal Function 1 GND 0V 2 PLIMIT Input: positive limit switch, TTL 3 NLIMIT Input: negative limit switch, TTL 4 REFSWITCH Input: reference point switch, TTL 5 MOTOR_COM Output: piezo 6 VDD Output: +5 V 7 MOTOR_COM Output: piezo 8 MOTOR_PHS1 Output: piezo 9 MOTOR_PHS2 Output: piezo 10 ENCA+ Input: encoder channel A, RS-422 11 ENCA- Input: encoder channel A (inverted), RS-422 12 ENCB+ Input: encoder channel B, RS-422 13 ENCB- Input: encoder channel B (inverted), RS-422 14 Reserved For future use C-872 PILine® Electronics MS211E Version: 2.1.0 47 11 Technical Data 11.3.2 Motor Connection: 15-pin sub-D (f) Connector: 15-pin sub-D (f) Pin No. Signal Function 1 NC not connected MOTOR_COM Output: piezo MOTOR_COM Output: piezo GND 0V MOTOR_PHS1 Output: piezo MOTOR_PHS2 Output: piezo VDD Output: +5 V NLIMIT Input: negative limit switch, TTL PLIMIT Input: positive limit switch, TTL REFSWITCH Input: reference point switch, TTL Reserved For future use ENCA+ Input: encoder channel A, RS-422 ENCA- Input: encoder channel A (inverted), RS-422 ENCB+ Input: encoder channel B, RS-422 ENCB- Input: encoder channel B (inverted), RS-422 9 2 10 3 11 4 12 5 13 6 14 7 15 8 48 Version: 2.1.0 MS211E C-872 PILine® Electronics 11 Technical Data 11.3.3 Connection for Control Signal and Electronics for Signal Processing, 15-pin Sub-D (m) Connector: 15-pin Sub-D (m) Pin No. Signal Function 1 NC Not connected ANALOG IN Input: control signal (±10 V), sampling with 20 kHz SDI Input: Serial Data In (MOSI) for SPI interface GND 0V SCK Input: Serial Clock for SPI interface CS Input: Chip Select for SPI interface ENABLE Input: Pulses for separating the transmission frames for SPI interface NLIMIT Output: negative limit switch, TTL, active high: proper operation of the motor: low (0 V), end position reached: high (+5 V) PLIMIT Output: positive limit switch, TTL, active high: proper operation of the motor: low (0 V), end position reached: high (+5 V) REFSWITCH Output: reference point switch, TTL NC Not connected ENCA+ Output: Encoder channel A, RS-422 ENCA- Output: Encoder channel A (inverted), RS-422 ENCB+ Output: Encoder channel B, RS-422 ENCB- Output: Encoder channel B (inverted), RS-422 9 2 10 3 11 4 12 5 13 6 14 7 15 8 C-872 PILine® Electronics MS211E Version: 2.1.0 49 12 Old Equipment Disposal 12 Old Equipment Disposal In accordance with the applicable EU law, electrical and electronic equipment may not be disposed of with unsorted municipal wastes in the member states of the EU. When disposing of your old equipment, observe the international, national and local rules and regulations. To meet the manufacturer’s product responsibility with regard to this product, Physik Instrumente (PI) GmbH & Co. KG ensures environmentally correct disposal of old PI equipment that was first put into circulation after 13 August 2005, free of charge. If you have old PI equipment, you can send it postage-free to the following address: Physik Instrumente (PI) GmbH & Co. KG Auf der Römerstr. 1 D-76228 Karlsruhe, Germany C-872 PILine® Electronics MS211E Version: 2.1.0 51 13 EC Declaration of Conformity 13 EC Declaration of Conformity For the C-872, an EC Declaration of Conformity has been issued in accordance with the following European directives: 2006/95/EC, Low Voltage Directive 2004/108/EC, EMC Directive 2011/65/EU, RoHS Directive The applied standards certifying the conformity are listed below. Safety (Low Voltage Directive): EN 61010-1:2010 EMC: EN 61326-1:2013 RoHS: EN 50581:2012 If an electrical operating device is designed to be integrated in another electrical operating device: The operator is responsible for a standards compliant integration of the electrical device into the overall system. C-872 PILine® Electronics MS211E Version: 2.1.0 53