1
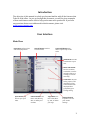
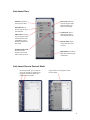
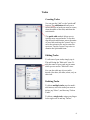
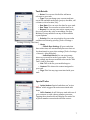
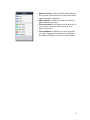
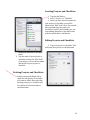
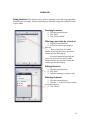
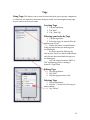
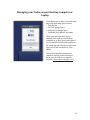
Todo for iPad User Manual Version 4.0 Build 7213 © 2010 Appigo, Inc. All rights reserved. Todo and the Todo logo are trademarks of Appigo, Inc. 1 Table of Contents Introduction………………………………………………………………………………………………….. User Interface……………………………………………………………………………………………….. Main View List Insert View List Insert View in Portrait Mode 3 3 Lists………………………………………………………………………………………………………………. Using Lists Creating Lists Editing Lists Deleting Lists 5 Tasks……………………………………………………………………………………………………………... Using Tasks Creating Tasks Editing Tasks Deleting Tasks Special Tasks 6 Projects and Checklists…………………………………………………………………………………. Using Projects and Checklists Creating Projects and Checklists Editing Projects and Checklists Deleting Project and Checklists 9 Contexts………………………………………………………………………………………………………… Using Contexts Creating Contexts Filtering your tasks by a Context Editing Contexts Deleting Contexts 11 Tags………………………………………………………………………………………………………………. Using Tags Creating Tags Filtering your tasks by Tags Editing Tags Deleting Tags 12 Managing your Tasks on your Desktop Computer or Laptop………………………. Settings…………………………………………………………………………………………………………. 13 14 2 Introduction The objective of this manual is to help you become familiar with all the features that Todo for iPad offers. As you go through this document, you will be given examples of how each feature can be used to help you become more productive. If you have any questions that are not addressed in this document, please visit www.support.appigo.com User Interface Main View Lists insert: All your lists Search button: Use this Quick-‐add button: Use will be displayed here. to search tasks this as a quick way to add tasks Add button: Use this to add tasks to your lists Multi-‐edit button: Use this to delete, reschedule, or move multiple tasks or to arrange your tasks manually Tasks area: All your tasks, projects, and checklists of your selected list will be displayed here grouped by your sorting setting. Sync button: Tap Context button: Use Tag button: Use Settings button: here to sync your this to add, filter by, this to add, filter Tap here to access edit, or delete your by, edit, or delete your Todo’s tasks contexts your t ags settings 3 Lists Insert View All List: Tap here to view all your tasks Starred List: Tap here to view all your starred tasks Inbox List: Tap here to view all your tasks don’t have a list that assignment or that have been imported into Todo Overdue task count: is the total This number of overdue tasks within your list Lists Insert View in Portrait Mode In portrait mode, you can tap the arrow on the left or anywhere on the insert to flip the insert and make your lists visible. Focus List: Tap here to view all your tasks that fall under your Focus List settings Task count: This is the total number of tasks within your list Custom Lists: These are the lists you have created Edit button: Use this to add, edit, or delete your custom lists Tap the insert arrow again to hide the list insert. 4 Lists Using Lists Lists can be used to group tasks by topics, areas, companies, courses, priorities, or anything you want. You can have lists like the ones shown below. Creating Lists 1. Tap the “Edit” button in the list insert 2. Tap “New List” 3. Enter the name of your list and choose a color for it Editing Lists 1. Tap the “Edit” button in the list insert 2. Tap the list you would like to edit Deleting Lists 1. Tap the “Edit” button in the list insert 2. Tap the “-‐“ of the list you want to delete and tap “Delete” 5 Tasks Creating Tasks You can use the “add” or the “quick-‐add” button. The add button allows you to select the type of task you want to create, then the name of the task, and then the task details. The quick-‐add method allows you to quickly enter several tasks. To use this, tap the quick-‐add button, enter the name of your task, and tap the “return” key to save the current to-‐do and to enter the next one. Tap the “return” key twice to dismiss the quick-‐add form. Editing Tasks To edit one of your tasks, simply tap it. This will bring the “Edit task” view. To edit the name of your task, tap its name while you are on the “Edit task” view. You can also edit any of your task’s details (due date, due time, alerts, etc) on this view. Deleting Tasks To delete multiple tasks, tap the multi-‐ edit button, select the tasks you want to delete, tap “Move”, and then tap “Delete Tasks”. To delete a single task, swipe your finger left to right over it and tap “Delete”. 6 Task Details • Notes: You can use this field to add notes relevant to your task. • Type: You can change your current task into any of the available task types (project, checklist, call a contact, visit a location, etc). • Due Date: You can set a due date for your task. • Due Time: You can also set a due time for it. • Repeat: You can set your task to repeat every day, every other day, only on weekdays, the first Monday of every month or on any of the available repeat options. • Priority: You can set priorities for your tasks and then sort them by priority (Todo > Settings > Sorting > Priority, Due Date) • Alerts - Global Alert Setting: All your tasks that have a due time, will automatically have an alert set for them based on your alert settings (Todo > Settings > General > Alert Defaults), - Individual Alerts: You can set as many alerts as you need for each of your tasks. To set an alert, simply tap the next available alert on the “Edit Task” view of your task. • List: This is the list your task belongs to. • Context: This shows the context assigned to your task. • Tags: This lists any tags associated with your task. Special Tasks • Action button: Special tasks have an “action button” which triggers the action associated with them. • Call a Contact: It will link your task with one of your contacts or with a phone number you enter. Tapping the action button will display the entire list of phone numbers associated with that contact. 7 • Email a Contact: It has the same functionality as the previous special task but it works with emails rather than phone numbers. • SMS a Contact: It links your task to a contact or phone number you enter. • Visit a Location: It will link your task with one of your contacts, your current location, or to an address you enter. • Visit a Website: It will link your task to an URL you enter. Tapping the action button will bring the address, which you can tap to launch Safari. 8 Projects and Checklists Using Projects and Checklists You can use projects and checklists to create a 2-‐level structure for your tasks. The difference between a project and a checklist is that checklist items don’t have any details they just have names. Whereas, project subtasks are regular tasks that can have details (due date, due time, notes, etc). You can use checklists things such as shopping lists or packing lists. Opening a project or checklist: To do this, simply tap your project or checklist. The page will flip and you will see all your subtasks or checklist items To exit out of your project or checklist, tap anywhere on the left page of the binder 9 Creating Projects and Checklists 1. Tap the add button 2. Select “Project” or “Checklist” 3. Once you have entered a name for your project or checklist, you will be taken to the “Edit Task” view. Tap outside this view and tap your project or checklist to open it. Once inside, you can start adding subtasks or checklist items with the quick-‐add or add button. Editing Projects and Checklists 1. Tap your project or checklist. This will open your project or checklist and display its subtasks or checklist items. 2. Tap the name of your project or checklist to bring the “Edit Task” view where you can edit the name and details of your project or checklist. Deleting Projects and Checklists • Simply, swipe your finger left to right over the project or checklist you want to delete. Be aware that deleting a project or checklist will also delete all of its subtasks or checklist items. 10 Contexts Using Contexts: This feature can be used to organize your tasks by geographical locations (not in a map). Keep in mind that you can only assign one context to each of your tasks. Creating Contexts 1. Tap the context button 2. Tap “Edit” 3. Tap “New Context” Filtering your tasks by a Context 1. Tap the context button 2. Select the context you want to filter by - Notice that there is a small banner at the top that shows you what context you are filtering by - For more granular filtering, tap each of your lists to see which tasks within each list are associated with the context you are filtering by Editing Contexts 1. Tap the context button 2. Tap “Edit” 3. Tap the context you want to edit Deleting Contexts 1. Tap the context button 2. Tap the “-‐“ to the left of the context you want to delete 3. Tap “Delete” 11 Tags Using Tags: This feature can be used to associate ideas, places, people, companies, or whatever you seem fit to associate with your tasks. You can assign as many tags as you want to each of your tasks. Creating Tags 1. Tap the tag button 2. Tap “Edit” 3. Tap “New Tag” Filtering your tasks by Tags 1. Tap the tag button 2. Select the tags you want to filter by and then tap “Done” - Notice that there is a small banner at the top that shows you what tags you are filtering by - For more granular filtering, tap each of your lists to see which tasks within each list are associated with the tags you are filtering by - You can choose between “AND” or “OR” tag filtering (Todo > Settings > General > Tags Filter) Editing Tags 1. Tap the tag button 2. Tap “Edit” 3. Tap the tag you want to edit Deleting Tags 1. Tap the tag button 2. Tap the “-‐“ to the left of the tag you want to delete 3. Tap “Delete” 12 Managing your Tasks on your Desktop Computer or Laptop Todo allows you to sync your tasks with any of the following sync services: • Todo Online • iCal (Via Appigo Sync) • Outlook (Via Appigo Sync) • Toodledo (free and pro accounts) These sync services allow you to manage your tasks in your desktop computer or to keep your tasks synced across multiple devices and computers. Be aware that the only sync service that syncs all of Todo’s features is Todo Online. You can find detailed information related to syncing Todo with any of these sync services in our support website (www.support.appigo.com) 13 Settings Completed Tasks: Choose to display or hide your completed tasks. - Sorting: Set your sorting preference - Personalize: Use this to register your copy of Todo. - Theme: Use this change the feel and look of Todo for iPad. We release new themes periodically so check often. - - General: - Application Icon | Show: Select what type of task count will be displayed on your Todo’s icon badge. - Completed Tasks | Show: Select how long your completed tasks will be shown for. - Priority Theme: Choose the style used to represent your task priorities. - Color Overdue Date: Choose to display the dates of your overdue tasks in red. - Show List Color: Choose to display a dot by your tasks. The color of the dot represents the list your task belongs to. - Show List Names: Choose to display or hide the names of your lists for each of your tasks. - Visible Lists: Select the lists that will be displayed in the Main View. - “All” List Filter: Select the lists that will be part of the “All” List. - Tags Filter: Choose between “And” or “Or” tag filtering. - Due Date, List, Context, Priority: Set default details or properties for your new tasks. 14 Alert Sound, Default Alert: Set the default values for your alerts. These settings will be applied to all your tasks that have a due time. - Passcode Lock: Set a 4-‐digit code to prevent access to your Todo. - Third Party Apps: Enable or disable the ability to interact with other apps that work with Todo. - Focus List: All the settings listed here allow you to control what tasks are displayed in your Focus List. Remember that only one of these settings must be met for a task to be part of your Focus List. - Synchronization: This option allows you to setup the sync between Todo and one of the available services. Once you have successfully setup the sync, then you will have the following settings: - Service: The sync service you are currently syncing with. - Switch Services: It allows you to switch to another sync service. - Sync at Startup: Choose to sync your tasks every time your Todo is launched. - Resolution: Select whether your Todo or your sync service will take precedence when the same task is edited in more than one place in between syncs. Be aware that this setting does not determine the direction of regular sync (tapping the sync button). - Completed Tasks: Select how long your completed tasks will be stored in Todo. - 15 Advanced: o Perform Full Synchronization: This is not a regular sync option. This sync will merge all your data from Todo with the data in your sync service. o Reset Synchronization Data: This is not a regular sync option. This will replace all your data from Todo with the data found in your sync service. - - Information: - Diagnostics: Use this to send your Diagnostic Report when you have a problem with your Todo. - Help & Documentation: This will take you to our support website www.support.appigo.com - Privacy Policy: This will take you to our privacy policy page. - Write a Review: This will launch the App Store where you can write about how much you love your Todo. - About: It lists information about your Todo such as the version you are running. - View Apps: It lists all the Todo-‐ friendly apps. These are apps that can import tasks into Todo. 09/27/10 © 2010 Appigo, Inc. All rights reserved. Todo and the Todo logo are trademarks of Appigo, Inc. 16