1
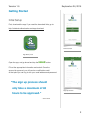
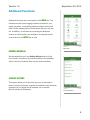
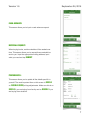
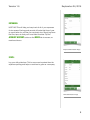
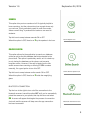
Version 1.5
September 24, 2015
APP USER GUIDE
Introduction
SellMeBooks is a premier textbook buy back company for students to sell their books back for the
highest prices. This app will allow you to scan books to find out the best price we can offer to buy
the books from students across the country. You can manually enter ISBN’s, scan multiple books
and email receipts for various orders. This is the best book buying app available.
Table of Contents
I.
Getting Started
…………………………………………………………………………… 2
II.
Scanning Titles and the Buy List
III.
Additional Functions …………………………………………………………………………… 6
IV.
Bluetooth Scanner
…………………………………………………………. 4
……………………….………………………………………………….. 10
1
Version 1.5
September 24, 2015
Getting Started
Initial Setup
First, download the app. If you need the download links, go to:
http://students.sellmebooks.com/app-download
Home Screen
App Store | Icon
Open the app, and go ahead and tap the SIGN
UP button.
Fill out the appropriate information and submit. Once the account is approved, you will receive a notification email. At that point you can log in with your email address and password.
“The sign up process should
only take a maximum of 48
Sign Up Screen
hours to be approved.”
- SMB TEAM
2
Version 1.5
September 24, 2015
Database Update
When you log in for the first time, you will be prompted to refresh the database. The database is the list of titles that SellMeBooks can
buy, so this step absolutely has to be done.
Tap OKAY, and you will be taken to the MORE screen
More Screen
In the upper left-hand corner, tap REFRESH
DATABASE, and
the following screen will pop up. *** Make sure you are connected to WiFi, and tap okay
*** IMPORTANT:
If the database sync gives you an error message after the initial
Database Refresh
download, simply quit the application entirely, open it again, go to
the MORE tab, and try refreshing one more time. Again, make sure
to be connected to WiFi.
3
Version 1.5
September 24, 2015
Scanning Titles
Tap SCAN on the bottom left. This uses the camera on your
phone to automatically scan ISBN barcodes that are on the back
of textbooks.
In addition, an ISBN can be manually typed in via the KEYPAD tab. If the ISBN number happens to not be in the
database, simply tap OK. Remember: after an unsuccessful
check, tap the CLEAR button to type in another ISBN.
Barcode Lookup
*** If the ISBN scanner is having difficulty, try holding the phone
further away from the barcode, and move in on it slowly. This may
help the autofocus process.
MULTI-SCAN MODE:
Tap the button below that has two dotted boxes to swap over
to multi-scan mode. This mode allows you to scan multiple
ISBN’s, and is helpful when scanning a large bookshelf to quickly
see which books can, and cannot, be sent to students.
Final details: the 1x or 2x that are seen next to the dollar values
represent whether or not scanning is in single or double-guide.
Multi-Scan Mode
Refer to PREFERENCES on page 7 for more information.
4
Version 1.5
September 24, 2015
The Buy List
When scanning, ISBN numbers we can send to a student will come up. When scanning through a shelf the first time, it might not be necessary to add every title to the buy list, but after a professor selects the books he/she will no longer need, the Buy List is an easy way to tally up how much to pay the professor.
If the ISBN number is in the database, the following will pop up.
Tap ADD
TO LIST in order to put the title in the Buy List. If the
book is an INSTRUCTOR copy, go to the buy list and tap in the
box next to that book to change the amount. Do the same for
ANNOTATED copies.
Successful Scan
Title prices can be adjusted according to agreed-upon prices, or
to adjust for Instructor/Annotated copies, and afterwards, a
receipt can be emailed to the professor by tapping COMPLETE ORDER
Deleting items: if you need to remove a book, simply swipe left,
Buy List
and tap the red DELETE button that appears.
5
Version 1.5
September 24, 2015
Additional Functions
Additional functions can be accessed via the MORE tab. This
includes everything from logging important receipts for your
weekly expenses, to submitting tracking numbers to the back
office, to then keeping track of those boxes after they are sent
out. In addition, we will discuss connecting the Bluetooth
scanner in a later section, but settings for turning this access
on and off are in the MORE tab as well.
More Tab
REFRESH DATABASE:
We discussed this one in the Getting Started section of this
user manual—this allows for periodic updates to the database,
which is the list of textbook titles we can send to students.
ACCOUNT HISTORY:
This screen allows you to see every item you’ve submitted in
terms of orders, shipments, requests for materials, cash advances,
expenses you’ve logged and all contacts you’ve entered
(this will usually be professors).
Account History
6
Version 1.5
September 24, 2015
CASH ADVANCE:
This screen allows you to input a cash advance request.
MATERIAL REQUEST:
When buying books, certain materials will be needed over
time. This screen allows you to request those materials be
sent to you. Input the appropriate mailing address, input what you need and tap SUBMIT.
PREFERENCES:
This screen allows you to update all the details specific to
yourself. The most important item on this screen is SINGLE
vs. DOUBLE
GUIDE pricing adjustments. Make sure this is on
SINGLE if you are buying from faculty and on DOUBLE if you
are buying from students.
7
Version 1.5
September 24, 2015
EXPENSES:
USE THIS! This will help you keep track of all of your expenses
for tax season! Having good records will make that time of year
so much better for you than for everybody else. Simply log items
like Gas, tape, etc and you’ll have them here later. Tap the ACCOUNT HISTORY button on the MORE tab to access, as
mentioned above.
Expense Submission Page
STATS:
Log your daily stats here. This is even more important than the
expense reporting and helps us continue to grow as a company.
Stats Submission Page
8
Version 1.5
September 24, 2015
SOUNDS: This option lets you turn sounds on/off. It’s typically helpful to
have sounds on, but the volume down low enough where only
you can hear. This is particularly useful in multi-scan mode,
where a small “ding” is produced for books we can send to
students.
Tap this icon to swap between sounds ON or OFF. When this option is OFF, there is an X by the speaker in the icon.
Sound Option Icon
ONLINE SEARCH:
This option allows for the application to search our database
online as well as the title database that’s downloaded to the
phone itself. This option is particularly useful, as it is a back-up
to only having the database on the phone, and prevents
long-term errors. However, if the app is lagging on the title
search screen when scanning or entering in ISBN numbers
manually, it’s a good option to turn this OFF.
Tap this icon to swap between online search ON or OFF.
Online Search Option Icon
When this option is OFF, there is an X inside the magnifying
glass.
BLUETOOTH CONNECTION:
Tap the icon to the right to turn on/off the connection to the
bluetooth scanner. Leave this option OFF until you’ve successfully
paired the scanner to your phone, then tap this icon and select
ON. A screen will appear that begins the process of connection.
Just wait, and the scanner will beep once the app connection
has been successful.
Bluetooth Connection Icon
9
Version 1.5
September 24, 2015
The Bluetooth Scanner
Initial Setup
1. Insert the batteries included in the package—the door to the
scanner can be unlocked using a thin coin to turn the lock
under the scanner to the horizontal position.
2. Charge the scanner—RED: charging, GREEN: fully charged
This process usually takes a few hours at the most. Begin
charge by plugging the black cable socket into the circular
side port of the scanner, and attaching the USB to the provided
USB/electrical outlet port.
3. Powering on/off the device is simple: press the small, black,
circular button on the top of the device until the scanner
beeps.
Battery Access Diagram
4. Recommended scanning techniques: aim the scan bar horizontally across the desired barcode, without any angles.
10
Version 1.5
September 24, 2015
Connecting the Scanner to Your Phone
iPHONE:
1. Begin with your iPhone’s bluetooth setting being turned off. You can do this under Settings > Bluetooth
2. Reset the scanner—this will erase all previously paired devices
by turning on the scanner, pressing and holding the trigger
button, pressing and holding the power button and waiting
until the device beeps 3 times.
Scanner Reset Diagram
3. Scan this barcode to the right to put the scanner into pairing
mode.
4. Go to your iPhone Settings page, and turn on bluetooth.
5. Tap on Socket CHS [XXXXX].
iPhone Connect Barcode
6. Once the scanner has been successfully paired, open up the SellMeBooks app, and tap the MORE tab, and then
scroll down to the Bluetooth
Scanner option. Leave this option OFF until the scanner has successfully
been paired to the iPhone. Once it has been, tap this icon,
select ON, and wait until the scanner beeps, indicating it’s
been successfully connected to the app.
Bluetooth Connection Icon
*** Important: if you quit the app during the day
(for example, if the app freezes), or if you’re just between offices,
wait for the scanner to beep, indicating it’s successfully
connected to the app again. Otherwise, any scans you make with
the scanner will not send data to the app.
11
Version 1.5
September 24, 2015
ANDROID:
1. Begin with your Android’s bluetooth setting being turned off. 2. Reset the scanner—this will erase all previously paired devices
by turning on the scanner, pressing and holding the trigger
button, pressing and holding the power button and waiting
until the device beeps 3 times.
Scanner Reset Diagram
3. Turn on Bluetooth
4. Go to the Google Play Store, and download:
SocketScan 10 *** Note, if prompted, allow the app to access your Bluetooth settings / USB storage / SD card / Coarse location
5. Open SocketScan 10 application once download and install
are complete
6. When prompted to set SocketScan 10 as Input Method, tap Back 7. Tap the Menu icon
, then select “Input Method”
8. On the next screen, select SocketScan 10 as input method
9. Power on the scanner
10. In SocketScan 10, tap the Menu icon
Socket EZ Pair
and then select
11. Scan the barcode on the screen to switch or set your scanner
SPP Mode. The scanner will beep 3 times.
12. Select [On screen] button
13. On the next screen, tap the 8Ci [1D Scanner] or 8Qi
[2D Scanner] button that is appropriate for your scanner button
14. Scan the barcode of the screen. The scanner will beep 3 times.
12
Version 1.5
September 24, 2015
15. When notified of a pairing request, swipe the notification down,
then tap Pairing request
16. On the next screen, tap Pair
17. The scanner will beep once to indicate connected state, and is
ready to move on to the SellMeBooks application.
18. Tap Back
to close Socket EZ Pair 19. If your scanner isn’t registered, it might pop up a registration
icon. Just ignore that.
20. Once the scanner has been successfully paired, open up the SellMeBooks app, and tap the MORE tab, and then
scroll down to the Bluetooth
Scanner option. Leave this option OFF until the scanner has successfully
been paired to the iPhone. Once it has been, tap this icon,
select ON, and wait until the scanner beeps, indicating it’s
been successfully connected to the app.
Bluetooth Connection Icon
*** Important: if you quit the app during the day
(for example, if the app freezes), or if you’re just between offices,
wait for the scanner to beep, indicating it’s successfully
connected to the app again. Otherwise, any scans you make with
the scanner will not send data to the app.
13
Version 1.5
September 24, 2015
Battery Indication
1. When not connected to AC Power (wall outlet, for example): Red Blinking: 20% or less battery power
2. When connected to AC Power:
Red Constant: battery is charging
Green Constant: battery is fully charged
Scanner Sounds
To change scanner sounds, scan the appropriate barcode below when the scanner is NOT
connected to a phone. You can ensure this by making sure your phone’s bluetooth is turned off, and
then turning on the scanner to scan the barcode.
14