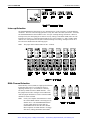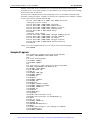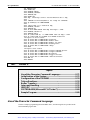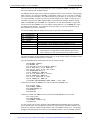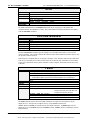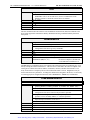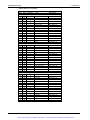
1
Artisan Technology Group is your source for quality new and certified-used/pre-owned equipment • FAST SHIPPING AND DELIVERY • TENS OF THOUSANDS OF IN-STOCK ITEMS • EQUIPMENT DEMOS • HUNDREDS OF MANUFACTURERS SUPPORTED • LEASING/MONTHLY RENTALS • ITAR CERTIFIED SECURE ASSET SOLUTIONS SERVICE CENTER REPAIRS Experienced engineers and technicians on staff at our full-service, in-house repair center WE BUY USED EQUIPMENT Sell your excess, underutilized, and idle used equipment We also offer credit for buy-backs and trade-ins www.artisantg.com/WeBuyEquipment InstraView REMOTE INSPECTION LOOKING FOR MORE INFORMATION? Visit us on the web at www.artisantg.com for more information on price quotations, drivers, technical specifications, manuals, and documentation SM Remotely inspect equipment before purchasing with our interactive website at www.instraview.com Contact us: (888) 88-SOURCE | [email protected] | www.artisantg.com Personal488 User's Manual PC/IEEE 488 Controller For DOS & Windows 3.Xi the smart approach to instrumentation ™ IOtech, Inc. 25971 Cannon Road Cleveland, OH 44146-1833 Phone: (440) 439-4091 Fax: (440) 439-4093 E-mail: [email protected] Internet: www.iotech.com Personal488 User's Manual PC/IEEE 488 Controller For DOS & Windows 3.X p/n © 1998 by IOtech, Inc. Personal488-902 Rev. 3.0 February 1998 Printed in the United States of America. Artisan Technology Group - Quality Instrumentation ... Guaranteed | (888) 88-SOURCE | www.artisantg.com Warranty Information Your IOtech warranty is as stated on the product warranty card. You may contact IOtech by phone, fax machine, or e-mail in regard to warranty-related issues. Phone: (440) 439-4091, fax: (440) 439-4093, e-mail: [email protected] Limitation of Liability IOtech, Inc. cannot be held liable for any damages resulting from the use or misuse of this product. Copyright, Trademark, and Licensing Notice All IOtech documentation, software, and hardware are copyright with all rights reserved. No part of this product may be copied, reproduced or transmitted by any mechanical, photographic, electronic, or other method without IOtech’s prior written consent. IOtech product names are trademarked; other product names, as applicable, are trademarks of their respective holders. All supplied IOtech software (including miscellaneous support files, drivers, and sample programs) may only be used on one installation. You may make archival backup copies. FCC Statement IOtech devices emit radio frequency energy in levels compliant with Federal Communications Commission rules (Part 15) for Class A devices. If necessary, refer to the FCC booklet How To Identify and Resolve Radio-TV Interference Problems (stock # 004-000-00345-4) which is available from the U.S. Government Printing Office, Washington, D.C. 20402. CE Notice Many IOtech products carry the CE marker indicating they comply with the safety and emissions standards of the European Community. As applicable, we ship these products with a Declaration of Conformity stating which specifications and operating conditions apply. Warnings, Cautions, Notes, and Tips Refer all service to qualified personnel. This caution symbol warns of possible personal injury or equipment damage under noted conditions. Follow all safety standards of professional practice and the recommendations in this manual. Using this equipment in ways other than described in this manual can present serious safety hazards or cause equipment damage. This warning symbol is used in this manual or on the equipment to warn of possible injury or death from electrical shock under noted conditions. This ESD caution symbol urges proper handling of equipment or components sensitive to damage from electrostatic discharge. Proper handling guidelines include the use of grounded anti-static mats and wrist straps, ESD-protective bags and cartons, and related procedures. This symbol indicates the message is important, but is not of a Warning or Caution category. These notes can be of great benefit to the user, and should be read. In this manual, the book symbol always precedes the words “Reference Note.” This type of note identifies the location of additional information that may prove helpful. References may be made to other chapters or other documentation. Tips provide advice that may save time during a procedure, or help to clarify an issue. Tips may include additional reference. Specifications and Calibration Specifications are subject to change without notice. Significant changes will be addressed in an addendum or revision to the manual. As applicable, IOtech calibrates its hardware to published specifications. Periodic hardware calibration is not covered under the warranty and must be performed by qualified personnel as specified in this manual. Improper calibration procedures may void the warranty. Quality Notice IOtech has maintained ISO 9001 certification since 1996. Prior to shipment, we thoroughly test our products and review our documentation to assure the highest quality in all aspects. In a spirit of continuous improvement, IOtech welcomes your suggestions. Artisan Technology Group - Quality Instrumentation ... Guaranteed | (888) 88-SOURCE | www.artisantg.com Personal488 PC/IEEE 488 Controller General Table of Contents General Table of Contents .....................................................................................iii Detailed Table of Contents ......................................................................................v Introduction to this Manual ................................................................................. xv SECTION I: HARDWARE GUIDES ...................................................................... I-1 1. Overview............................................................................................................. I-3 2. Personal488 (with GP488B): 8-bit DMA Interface Board ..................................... I-8 3. Personal488/AT: 16-bit DMA Interface Board ....................................................... I-13 4. Personal488/NB: 170 kByte Interface Module for Notebook, Laptop, & Desktop PCs ... I-17 5. Personal488/MM: 330 kByte Interface Board ........................................................ I-18 6. Personal488/CARD: Type II PCMCIA Interface Card for Notebook & Desktop PCs ... I-22 SECTION II: SOFTWARE GUIDES.................................................................. II-31 7. Overview......................................................................................................... II-33 8. Driver488/DRV: All Languages Compatible ........................................................ II-34 9. Driver488/SUB: C Language, Pascal & QuickBasic Compatible ............................ II-133 10. Driver488/W31: C Language & Visual Basic Compatible ..................................... II-191 11. Driver488/W95: (Software Revisions Pending) ................................................... II-257 12. Driver488/WNT: (Software Revisions Pending) .................................................. II-258 SECTION III: COMMAND REFERENCES ..................................................III-259 13. Overview......................................................................................................III-261 14. Command Summaries...............................................................................III-262 15. Command References ...............................................................................III-282 SECTION IV: TROUBLESHOOTING.............................................................. IV-353 16. Overview...................................................................................................... IV-355 17. Radio Interference Problems.................................................................. IV-356 18. Troubleshooting Checklists .................................................................... IV-357 19. Error Messages........................................................................................... IV-361 SECTION V: APPENDIX .....................................................................................V-367 SECTION VI: INDEX.......................................................................................... VI-375 Personal488 User’s Manual, Rev. 3.0 Artisan Technology Group - Quality Instrumentation ... Guaranteed | (888) 88-SOURCE | www.artisantg.com iii iv Personal488 User’s Manual, Rev. 3.0 Artisan Technology Group - Quality Instrumentation ... Guaranteed | (888) 88-SOURCE | www.artisantg.com Personal488 PC/IEEE 488 Controller Detailed Table of Contents FCC Radio Frequency Interference Statement................................................................Error! Warranty .....................................................................................................................................iii Limitation of Liability ..............................................................................................................iii Copyright Notice ........................................................................................................................iii Trademark Notice......................................................................................................................iii Quality Notice ............................................................................................................................iii General Table of Contents .......................................................................................v Detailed Table of Contents ................................................................................... vii Introduction to this Manual ...............................................................................xvii About this Manual .................................................................................................................. xvii How to Use this Manual......................................................................................................... xvii Header Files & Command References.................................................................................. xvii SECTION I: HARDWARE GUIDES ......................................................................... I-1 1. Overview ........................................................................................................... I-3 Introduction .............................................................................................................................. I-3 IEEE 488.2 Interface Boards ................................................................................................... I-4 Driver488 Software Interface.................................................................................................. I-4 Interface & Interface Board Specifications ......................................................................... I-6 IEEE 488.1-1987 Interface ........................................................................................................... I-6 IEEE 488.2-1987 Interface ........................................................................................................... I-6 GP488B Interface Board ............................................................................................................... I-6 AT488 Interface Board.................................................................................................................. I-6 MP488 Interface Board ................................................................................................................. I-6 MP488CT Interface Board ............................................................................................................ I-7 GP488/2 Interface Board............................................................................................................... I-7 GP488/MM Interface Board.......................................................................................................... I-7 NB488 Interface Module ............................................................................................................... I-7 PCMCIA Interface Card................................................................................................................ I-7 2. Personal488 (with GP488B) .......................................................................... I-8 The Package .............................................................................................................................. I-8 Hardware Installation (for PC/XT/AT) ................................................................................. I-8 Installation & Configuration of the Interface Card .................................................................... I-8 Default Settings............................................................................................................................. I-9 I/O Base Address Selection ........................................................................................................... I-9 Interrupt Selection ...................................................................................................................... I-10 DMA Channel Selection.............................................................................................................. I-10 Wait State Configuration............................................................................................................ I-11 Internal Clock Selection.............................................................................................................. I-11 Board Installation ....................................................................................................................... I-11 3. Personal488/AT .............................................................................................. I-13 The Package ............................................................................................................................ I-13 Hardware Installation (for PC/XT/AT) ............................................................................... I-13 Personal488 User’s Manual, Rev. 3.0 Artisan Technology Group - Quality Instrumentation ... Guaranteed | (888) 88-SOURCE | www.artisantg.com v Installation & Configuration of the Interface Card...................................................................I-13 Default Settings ...........................................................................................................................I-13 I/O Base Address Selection..........................................................................................................I-13 Interrupt Selection.......................................................................................................................I-14 DMA Channel Selection ..............................................................................................................I-15 Board Installation ........................................................................................................................I-15 4. Personal488/NB..............................................................................................I-17 The Package.............................................................................................................................I-17 Hardware Installation (for Notebook, Laptop, & Desktop PCs)......................................I-17 5. Personal488/MM.............................................................................................I-18 The Package.............................................................................................................................I-18 Hardware Installation (for PC/XT/AT)................................................................................I-18 Installation & Configuration of the Interface Card...................................................................I-18 Default Settings ...........................................................................................................................I-18 I/O Base Address Selection..........................................................................................................I-19 Interrupt Selection.......................................................................................................................I-20 DMA Channel Selection ..............................................................................................................I-20 Internal Clock Selection ..............................................................................................................I-21 Board Installation ........................................................................................................................I-21 6. Personal488/CARD ........................................................................................I-22 The Package.............................................................................................................................I-22 Introduction.............................................................................................................................I-22 Hardware Installation (for Notebook & Desktop PCs) .....................................................I-23 Interfaces & Connectors ..............................................................................................................I-23 Interface Cable Connection .........................................................................................................I-23 Installation into a PC...................................................................................................................I-24 Interface Cable & IEEE 488 Accessories....................................................................................I-24 Software Installation .............................................................................................................I-24 Initialization Software.................................................................................................................I-24 Configuration Software ...............................................................................................................I-27 Functionality ...........................................................................................................................I-29 SECTION II: SOFTWARE GUIDES .................................................................... II-31 7. Overview ....................................................................................................... II-33 8. Driver488/DRV ............................................................................................. II-34 8A. Introduction ........................................................................................... II-34 8B. Installation & Configuration .............................................................. II-35 Before You Get Started......................................................................................................... II-35 Making Backup Disk Copies ............................................................................................... II-36 Driver Installation................................................................................................................ II-36 Selective Installation of Support files....................................................................................... II-36 Driver Installation to Disk ........................................................................................................ II-37 Configuration Utility............................................................................................................ II-38 Interfaces.................................................................................................................................... II-38 External Devices ........................................................................................................................ II-38 Opening the Configuration Utility............................................................................................ II-38 Configuration of IEEE 488 Interfaces................................................................................ II-39 Configuration of Serial Interfaces ..................................................................................... II-41 Configuration of IEEE 488 External Devices.................................................................... II-42 Multiple Interface Management ......................................................................................... II-43 8C. External Device Interfacing................................................................ II-45 Introduction........................................................................................................................... II-45 Character Command Language (CCL).............................................................................. II-45 DOS Devices ........................................................................................................................... II-46 vi Personal488 User’s Manual, Rev. 3.0 Artisan Technology Group - Quality Instrumentation ... Guaranteed | (888) 88-SOURCE | www.artisantg.com Configuration of Named Devices.........................................................................................II-46 Use of External Devices.........................................................................................................II-47 Direct I/O with DOS Devices ................................................................................................II-47 Extensions For Multiple Interfaces.....................................................................................II-48 Duplicate Device Names ............................................................................................................II-48 Access of Multiple Interfaces .....................................................................................................II-48 Example ......................................................................................................................................II-49 8D. Getting Started...................................................................................... II-49 Introduction ...........................................................................................................................II-49 Keyboard Controller Program .............................................................................................II-50 Direct Control from DOS Using CCL ..................................................................................II-51 8E. Microsoft C.............................................................................................. II-53 Use of the Character Command Language........................................................................II-53 Initialization of the System..................................................................................................II-53 Configuration of the 195 DMM ............................................................................................II-56 Taking Readings....................................................................................................................II-56 Buffer Transfers.....................................................................................................................II-56 Interrupt Handling ...............................................................................................................II-57 IEEEIO.C.................................................................................................................................II-59 CRITERR.ASM (Microsoft C & Turbo C)............................................................................II-61 Sample Program ....................................................................................................................II-62 8F. Microsoft Fortran.................................................................................. II-63 Sample Program ....................................................................................................................II-63 8G. QuickBASIC ........................................................................................... II-64 Use of the Character Command Language........................................................................II-64 Initialization of the System..................................................................................................II-64 Configuration of the 195 DMM ............................................................................................II-66 Taking Readings....................................................................................................................II-66 Buffer Transfers.....................................................................................................................II-67 BASIC VARPTR & SADDR ...................................................................................................II-68 Interrupt Handling ...............................................................................................................II-68 Sample Program ....................................................................................................................II-70 8H. Turbo C ................................................................................................... II-71 Use of the Character Command Language........................................................................II-71 Initialization of the System..................................................................................................II-72 Configuration of the 195 DMM ............................................................................................II-74 Taking Readings....................................................................................................................II-74 Buffer Transfers.....................................................................................................................II-75 Interrupt Handling ...............................................................................................................II-76 IEEEIO.C.................................................................................................................................II-78 CRITERR.ASM (Microsoft C & Turbo C)............................................................................II-80 Sample Program ....................................................................................................................II-80 8I. Turbo Pascal............................................................................................ II-82 Use of Character Command Language ..............................................................................II-82 Initialization of the System..................................................................................................II-83 Configuration of the 195 DMM ............................................................................................II-84 Taking Readings....................................................................................................................II-85 Buffer Transfers.....................................................................................................................II-85 Interrupt Handling ...............................................................................................................II-86 Sample Program ....................................................................................................................II-88 8J. Spreadsheets........................................................................................... II-90 Use of Direct DOS I/O Devices..............................................................................................II-90 Initialization of the System..................................................................................................II-90 Configuration of the 195 DMM ............................................................................................II-91 Personal488 User’s Manual, Rev. 3.0 Artisan Technology Group - Quality Instrumentation ... Guaranteed | (888) 88-SOURCE | www.artisantg.com vii Taking Readings ................................................................................................................... II-92 Interrupt Handling............................................................................................................... II-92 8K. Other Languages ................................................................................... II-96 Introduction........................................................................................................................... II-96 Finding Addresses................................................................................................................. II-97 Garbage Collection..................................................................................................................... II-97 Memory Models .......................................................................................................................... II-97 Calling Protocols ........................................................................................................................ II-99 Opening & Closing the Driver........................................................................................... II-100 I/O Control (IOCTL) Communication .............................................................................. II-100 IOCTL Get & Set Device Data ................................................................................................ II-100 IOCTL Read & Write ............................................................................................................... II-101 Data & Command Communication.................................................................................. II-102 ARM Condition Detection .................................................................................................. II-102 Sample Program ................................................................................................................. II-102 8L. Language-Specific Information........................................................ II-104 Aztec C .................................................................................................................................. II-104 Use of Character Command Language................................................................................... II-104 CRITERR.C (for Aztec C) ........................................................................................................ II-105 GW-BASIC (for GW-BASIC or Interpreted BASIC)........................................................ II-105 Use of Direct DOS I/O Devices................................................................................................ II-105 BASIC VARPTR & SADDR..................................................................................................... II-105 GET & PUT (for GW-BASIC only).......................................................................................... II-106 JPI TopSpeed Modula-2 ..................................................................................................... II-106 Use of Direct DOS I/O Devices................................................................................................ II-106 Logitech Modula-2 .............................................................................................................. II-106 Use of Direct DOS I/O Devices................................................................................................ II-106 True Basic ............................................................................................................................ II-107 Use of Character Command Language................................................................................... II-107 IEEEIO.TRU ............................................................................................................................ II-107 TOOLKIT.LIB .......................................................................................................................... II-107 Turbo Basic.......................................................................................................................... II-108 Use of Character Command Language................................................................................... II-108 8M. Data Transfers..................................................................................... II-108 Terminators ......................................................................................................................... II-108 End-Of-Line (EOL) Terminators............................................................................................. II-108 TERM Terminators.................................................................................................................. II-112 Direct I/O & Buffered I/O ................................................................................................... II-113 Direct Bus OUTPUT................................................................................................................ II-113 Direct Bus ENTER................................................................................................................... II-113 Buffered I/O.............................................................................................................................. II-114 Asynchronous Transfers .................................................................................................... II-115 8N. Operating Modes ................................................................................. II-115 Introduction......................................................................................................................... II-116 Operating Mode Transitions ............................................................................................. II-116 System Controller Mode ..................................................................................................... II-117 System Controller, Not Active Controller Mode.............................................................. II-117 Not System Controller Mode .............................................................................................. II-119 Active Controller, Not System Controller Mode.............................................................. II-119 8O. Utility Programs.................................................................................. II-120 Printer & Serial Redirection............................................................................................. II-120 Removal & Reinstallation ................................................................................................. II-122 MARKDRVR & REMDRVR .................................................................................................... II-122 Moving Files from an IEEE 488 (HP-IB) Controller to a PC ........................................ II-123 PRNTEMUL Files.................................................................................................................... II-123 viii Personal488 User’s Manual, Rev. 3.0 Artisan Technology Group - Quality Instrumentation ... Guaranteed | (888) 88-SOURCE | www.artisantg.com Configuration of the IEEE Interface for PRNTEMUL ..........................................................II-123 Running PRNTEMUL..............................................................................................................II-124 Data Transfer ...........................................................................................................................II-124 8P. Command Descriptions...................................................................... II-124 Introduction .........................................................................................................................II-124 Format ...................................................................................................................................II-125 Syntax .......................................................................................................................................II-125 Response ...................................................................................................................................II-127 Mode ..........................................................................................................................................II-127 Bus States .................................................................................................................................II-127 Examples...................................................................................................................................II-131 Data Types ............................................................................................................................II-131 CCL Reserved Words............................................................................................................II-132 List of Reserved Words ...........................................................................................................II-132 8Q. Command Reference .......................................................................... II-132 9. Driver488/SUB ........................................................................................... II-133 9A. Introduction ......................................................................................... II-133 9B. Installation & Configuration ............................................................ II-134 Before You Get Started........................................................................................................II-134 Making Backup Disk Copies ..............................................................................................II-135 Driver Installation ..............................................................................................................II-135 Configuration Utility ..........................................................................................................II-135 Interfaces ..................................................................................................................................II-136 External Devices.......................................................................................................................II-136 Opening the Configuration Utility ..........................................................................................II-136 Configuration of IEEE 488 Interfaces ..............................................................................II-136 Configuration of Serial Interfaces....................................................................................II-139 Configuration of IEEE 488 External Devices ..................................................................II-140 9C. External Device Interfacing ............................................................. II-141 Introduction .........................................................................................................................II-141 Subroutine Calls .......................................................................................................................II-142 Configuration of Named Devices.......................................................................................II-142 Use of External Devices.......................................................................................................II-143 Extensions for Multiple Interfaces....................................................................................II-144 Duplicate Device Names ..........................................................................................................II-144 Access of Multiple Interfaces ...................................................................................................II-144 Example ....................................................................................................................................II-145 9D. Getting Started.................................................................................... II-145 Introduction .........................................................................................................................II-145 C Language...........................................................................................................................II-145 Required Headers.....................................................................................................................II-146 Required Libraries ...................................................................................................................II-146 QuickBASIC..........................................................................................................................II-148 Required Definition File ..........................................................................................................II-149 Required Libraries ...................................................................................................................II-149 Pascal ....................................................................................................................................II-149 Required Libraries ...................................................................................................................II-149 9E. C Languages ........................................................................................ II-150 Accessing from a C Program..............................................................................................II-150 Establishing Communications ..........................................................................................II-151 Confirming Communication ..............................................................................................II-152 Setting Up Event Handling ................................................................................................II-152 Reading Driver Status ........................................................................................................II-152 External Device Initialization...........................................................................................II-153 Personal488 User’s Manual, Rev. 3.0 Artisan Technology Group - Quality Instrumentation ... Guaranteed | (888) 88-SOURCE | www.artisantg.com ix Interrupt Handling............................................................................................................. II-153 Basic Data Acquisition ...................................................................................................... II-154 Block Data Acquisition ...................................................................................................... II-154 Sample Program ................................................................................................................. II-155 Command Summary ........................................................................................................... II-158 9F. QuickBASIC .......................................................................................... II-159 Accessing from a QuickBASIC Program ......................................................................... II-159 Establishing Communications.......................................................................................... II-159 Confirming Communications............................................................................................ II-160 Setting Up Event Handling ............................................................................................... II-160 Reading Driver Status ....................................................................................................... II-161 External Device Initialization .......................................................................................... II-161 Interrupt Handling............................................................................................................. II-162 Basic Data Acquisition ...................................................................................................... II-162 Block Data Acquisition ...................................................................................................... II-162 Sample Program ................................................................................................................. II-163 Command Summary ........................................................................................................... II-166 9G. Pascal ..................................................................................................... II-166 Accessing from a Pascal Program.................................................................................... II-166 Establishing Communications.......................................................................................... II-167 Confirming Communication ............................................................................................. II-168 Setting Up Event Handling ............................................................................................... II-168 Reading Driver Status ....................................................................................................... II-168 External Device Initialization .......................................................................................... II-169 Interrupt Handling............................................................................................................. II-169 Basic Data Acquisition ...................................................................................................... II-170 Block Data Acquisition ...................................................................................................... II-170 Sample Program ................................................................................................................. II-171 Command Summary ........................................................................................................... II-174 9H. Data Transfers ..................................................................................... II-175 Terminators ......................................................................................................................... II-175 TERM Terminators.................................................................................................................. II-175 Data Input and Output ...................................................................................................... II-176 Asynchronous Transfers .................................................................................................... II-177 9I. Operating Modes................................................................................... II-177 Introduction......................................................................................................................... II-177 Operating Mode Transitions ............................................................................................. II-178 System Controller Mode ..................................................................................................... II-179 System Controller, Not Active Controller Mode.............................................................. II-179 Not System Controller Mode .............................................................................................. II-181 Active Controller, Not System Controller Mode.............................................................. II-181 9J. Utility Programs................................................................................... II-182 Printer & Serial Redirection............................................................................................. II-182 Removal & Reinstallation ................................................................................................. II-184 MARKDRVR & REMDRVR .................................................................................................... II-184 Moving Files from an IEEE 488 (HP-IB) Controller to a PC ........................................ II-185 PRNTEMUL Files.................................................................................................................... II-185 Configuration of the IEEE Interface for PRNTEMUL .......................................................... II-185 Running PRNTEMUL ............................................................................................................. II-185 Data Transfer ........................................................................................................................... II-186 9K. Command Descriptions...................................................................... II-186 Introduction......................................................................................................................... II-186 Format .................................................................................................................................. II-187 Syntax ....................................................................................................................................... II-187 Returns ..................................................................................................................................... II-187 x Personal488 User’s Manual, Rev. 3.0 Artisan Technology Group - Quality Instrumentation ... Guaranteed | (888) 88-SOURCE | www.artisantg.com Mode ..........................................................................................................................................II-187 Bus States .................................................................................................................................II-187 Examples...................................................................................................................................II-189 Data Types ............................................................................................................................II-189 Arm Condition Bit Masks ........................................................................................................II-189 Control Line Bit Masks ............................................................................................................II-189 Terminator Structures .............................................................................................................II-189 Status Structure .......................................................................................................................II-190 Completion Code Bit Masks.....................................................................................................II-190 Miscellaneous Constants..........................................................................................................II-190 9L. Command Reference........................................................................... II-190 10. Driver488/W31.......................................................................................... II-191 10A. Introduction ....................................................................................... II-191 10B. Installation & Configuration.......................................................... II-192 Before You Get Started........................................................................................................II-192 Making Backup Disk Copies ..............................................................................................II-193 Driver Installation ..............................................................................................................II-193 Enhanced Mode DMA Transfers .............................................................................................II-194 Configuration Utility ..........................................................................................................II-195 Interfaces ..................................................................................................................................II-195 External Devices.......................................................................................................................II-195 Opening the Configuration Utility ..........................................................................................II-195 Configuration of IEEE 488 Interfaces ..............................................................................II-196 Configuration of IEEE 488 External Devices ..................................................................II-198 Modification of the Initialization File .............................................................................II-199 Driver Core Sections ................................................................................................................II-200 10C. External Device Interfacing ........................................................... II-202 Introduction .........................................................................................................................II-202 Subroutine Calls .......................................................................................................................II-202 Configuration of Named Devices.......................................................................................II-202 Use of External Devices.......................................................................................................II-204 Extensions For Multiple Interfaces...................................................................................II-204 Duplicate Device Names ..........................................................................................................II-205 Access of Multiple Interfaces ...................................................................................................II-205 Example ....................................................................................................................................II-205 10D. Getting Started.................................................................................. II-205 Introduction .........................................................................................................................II-206 C Languages .............................................................................................................................II-206 Visual Basic ..............................................................................................................................II-206 C Languages .........................................................................................................................II-206 Required Headers.....................................................................................................................II-206 Required Libraries ...................................................................................................................II-207 Visual Basic..........................................................................................................................II-207 Required Files...........................................................................................................................II-207 10E. C Languages ...................................................................................... II-208 Accessing from a Windows Program.................................................................................II-208 Opening & Closing the Driver .................................................................................................II-208 Establishing Communications ..........................................................................................II-209 Confirming Communications ............................................................................................II-211 IEEE 488 Event Message .....................................................................................................II-211 Reading Driver Status ........................................................................................................II-213 External Device Initialization...........................................................................................II-214 Basic Data Acquisition .......................................................................................................II-214 Block Data Acquisition.......................................................................................................II-215 Personal488 User’s Manual, Rev. 3.0 Artisan Technology Group - Quality Instrumentation ... Guaranteed | (888) 88-SOURCE | www.artisantg.com xi Sample Programs................................................................................................................ II-216 Data Acquisition Sample Programs........................................................................................ II-216 IEEE 488 Event Message Sample Programs ......................................................................... II-224 Command Summary ........................................................................................................... II-231 10F. Visual Basic......................................................................................... II-232 Accessing from a Windows Program................................................................................ II-232 Opening & Closing the Driver................................................................................................. II-233 Establishing Communications.......................................................................................... II-234 Confirming Communications............................................................................................ II-235 IEEE 488 Event Custom Control ....................................................................................... II-235 Reading Driver Status ....................................................................................................... II-238 External Device Initialization .......................................................................................... II-238 Basic Data Acquisition ...................................................................................................... II-239 Block Data Acquisition ...................................................................................................... II-239 Dynamic Data Exchange (DDE) ....................................................................................... II-241 Application ............................................................................................................................... II-241 Server Links ............................................................................................................................. II-241 Acquisition Engine................................................................................................................... II-243 Sample Programs................................................................................................................ II-246 Data Acquisition Sample Program ......................................................................................... II-246 IEEE 488 Event Custom Control Sample Program............................................................... II-249 Acquisition Engine Sample Program...................................................................................... II-250 Command Summary ........................................................................................................... II-251 10G. Utility Programs................................................................................ II-251 Introduction......................................................................................................................... II-251 WINTEST.............................................................................................................................. II-251 Opening a Device Handle for Communication....................................................................... II-252 Handle Lists ............................................................................................................................. II-252 WINTEST Session ................................................................................................................... II-253 QUIKTEST ........................................................................................................................... II-254 Application Files ...................................................................................................................... II-254 Installation ............................................................................................................................... II-254 Operation of the Application ................................................................................................... II-255 Cutting & Pasting to Other Applications ............................................................................... II-255 Dynamic Data Exchange (DDE) ............................................................................................. II-255 Loading the Project into Visual Basic..................................................................................... II-256 Licensing .............................................................................................................................. II-256 10H. Command Reference ........................................................................ II-256 11. Driver488/W95 .......................................................................................... II-257 12. Driver488/WNT......................................................................................... II-258 SECTION III: COMMAND REFERENCES.................................................... III-259 13. Overview ................................................................................................. III-261 14. Command Summaries .......................................................................... III-262 14A. Driver488/SUB, C Languages ....................................................... III-262 Function Descriptions.......................................................................................................III-262 The Commands ...................................................................................................................III-264 Syntax Parameters ............................................................................................................III-264 Defined Constants..............................................................................................................III-265 Structure Definitions ........................................................................................................III-265 14B. Driver488/SUB, QuickBASIC ........................................................ III-266 Function Descriptions.......................................................................................................III-266 The Commands ...................................................................................................................III-268 Syntax Parameters ............................................................................................................III-268 xii Personal488 User’s Manual, Rev. 3.0 Artisan Technology Group - Quality Instrumentation ... Guaranteed | (888) 88-SOURCE | www.artisantg.com Defined Constants.............................................................................................................. III-269 Structure Definitions ........................................................................................................ III-269 14C. Driver488/SUB, Pascal ....................................................................III-270 Function Descriptions....................................................................................................... III-270 The Commands................................................................................................................... III-272 Syntax Parameters ............................................................................................................ III-272 Defined Constants.............................................................................................................. III-272 Structure Definitions ........................................................................................................ III-273 14D. Driver488/W31, C Languages .........................................................III-274 Function Descriptions....................................................................................................... III-274 The Commands................................................................................................................... III-276 Syntax Parameters ............................................................................................................ III-276 Defined Constants.............................................................................................................. III-276 Structure Definitions ........................................................................................................ III-277 14E. Driver488/W31, Visual Basic ..........................................................III-278 Function Descriptions....................................................................................................... III-278 The Commands................................................................................................................... III-280 Syntax Parameters ............................................................................................................ III-280 Defined Constants.............................................................................................................. III-281 Structure Definitions ........................................................................................................ III-281 15. Command References ...........................................................................III-282 15A. Driver488/DRV Commands ............................................................III-282 15B. Driver488/SUB, W31, W95, & WNT Commands ..........................III-312 SECTION IV: TROUBLESHOOTING................................................................ IV-353 16. Overview .................................................................................................. IV-355 17. Radio Interference Problems.............................................................. IV-356 18. Troubleshooting Checklists................................................................. IV-357 18A. Introduction ...................................................................................... IV-357 18B. Driver488/DRV .................................................................................. IV-357 18C. Driver488/SUB................................................................................... IV-358 18D. Driver488/W31 ................................................................................... IV-359 18E. Driver488/W95 & Driver488/WNT.................................................. IV-360 19. Error Messages ....................................................................................... IV-361 SECTION V: APPENDIX .......................................................................................V-367 SECTION VI: INDEX............................................................................................ VI-375 Personal488 User’s Manual, Rev. 3.0 Artisan Technology Group - Quality Instrumentation ... Guaranteed | (888) 88-SOURCE | www.artisantg.com xiii xiv Personal488 User’s Manual, Rev. 3.0 Artisan Technology Group - Quality Instrumentation ... Guaranteed | (888) 88-SOURCE | www.artisantg.com Personal488 PC/IEEE 488 Controller Introduction to this Manual About this Manual This edition of the Personal488 User’s Manual supersedes all previous editions. The material in this manual reflects the particular combinations of IEEE 488 I/O adapter and driver software, and is comprised of four primary Sections: Hardware Guides, Software Guides, Command References, and Troubleshooting, followed by two more Sections: Appendix and Index. The last two pages contain a List of IEEE 488 Acronyms & Abbreviations and a List of ASCII Acronyms & Abbreviations as additional references for this manual and for other related literature. Before calling for technical assistance, check the Troubleshooting section for a possible solution to the problem. Since much of the hardware and software material in this manual is similar to material elsewhere in the manual, make sure you view the material which corresponds to your specific hardware and software. For example, do not read about Driver488/DRV when your application pertains to Driver488/W31 Information which may have changed since the time of printing will be found in a README.TXT file on disk, or in an addendum to the manual. How to Use this Manual Because this manual contains a large volume of information, a four-level table of contents system is used in addition to a complete Detailed Table of Contents. In this four-level system, the General Table of Contents at the front of this manual should be used primarily to locate the main Sections of the manual, i.e., specific hardware guides and software guides. The first page of each Section contains a second-level table, listing the Chapters with their page locations. Next, many of these Chapters contain a third-level table, listing the Sub-Chapters or specific Topics with their page locations. Finally, many of these Sub-Chapters contain a fourth-level table, listing the specific Topics with their page locations. While this multi-level method is easy to use, experienced users may prefer the traditional table of contents. As mentioned above, this manual also includes an Index, so you can quickly find the page(s) pertaining to a specific topic. Header Files & Command References Since changes are taking place in Driver488/W95 and Driver488/WNT software as this publication goes to press, please refer to your operating system header file for the latest available information specific to your application. Personal488 User’s Manual, Rev. 3.0 Artisan Technology Group - Quality Instrumentation ... Guaranteed | (888) 88-SOURCE | www.artisantg.com xv xvi Personal488 User’s Manual, Rev. 3.0 Artisan Technology Group - Quality Instrumentation ... Guaranteed | (888) 88-SOURCE | www.artisantg.com Section I: HARDWARE GUIDES Personal488 User’s Manual, Rev. 3.0 Artisan Technology Group - Quality Instrumentation ... Guaranteed | (888) 88-SOURCE | www.artisantg.com I-1 I-2 Personal488 User’s Manual, Rev. 3.0 Artisan Technology Group - Quality Instrumentation ... Guaranteed | (888) 88-SOURCE | www.artisantg.com I. HARDWARE GUIDES I. 1. Overview HARDWARE GUIDES Chapters 1. 2. 3. 4. 5. 6. 1. Overview............................................................................................ I-3 Personal488 (with GP488B)........................................................... I-8 Personal488/AT .............................................................................. I-13 Personal488/NB .............................................................................. I-17 Personal488/MM............................................................................. I-18 Personal488/CARD ........................................................................ I-22 Overview Topics • • • • Introduction ........................................................................................ I-4 IEEE 488.2 Interface Boards ............................................................ I-4 Driver488 Software Interface .......................................................... I-4 Interface & Interface Board Specifications ................................. I-6 IEEE 488.1-1987 Interface................................................................................ I-6 IEEE 488.2-1987 Interface................................................................................ I-6 GP488B Interface Board .................................................................................. I-6 AT488 Interface Board ..................................................................................... I-6 MP488 Interface Board .................................................................................... I-6 MP488CT Interface Board ............................................................................... I-7 GP488/2 Interface Board .................................................................................. I-7 GP488/MM Interface Board ............................................................................. I-7 NB488 Interface Module................................................................................... I-7 PCMCIA Interface Card ................................................................................... I-7 Introduction The Hardware Guides section contains chapters pertaining to different Personal488 Drivers, as indicated in the previous Section I Table of Contents. Each Driver488 section contains information regarding specific PC/IEEE 488 controllers. The hardware guide describes the I/O adapter and includes instructions for inspecting, configuring, and installing the adapter. In addition to this manual, Power488 and Power488CT users receive a manual supplement describing the Standard Commands for Programmable Instruments (SCPI) command set and the IOTTIMER.DLL, a Microsoft Windows Dynamic Link Library of functions. This overview introduces the hardware and software sections of this manual. The Personal488 converts your PC or PC/AT into an IEEE 488.2-compliant controller. Each controller package includes an interface board or module, driver software and complete documentation. The following information provides a brief overview of a specific PC/IEEE 488 interfaces and software drivers, and of the Driver488 components. Personal488 User’s Manual, Rev. 3.0 Artisan Technology Group - Quality Instrumentation ... Guaranteed | (888) 88-SOURCE | www.artisantg.com I-3 1. Overview I. HARDWARE GUIDES IEEE 488.2 Interface Boards The family of PC/IEEE 488 controllers includes the GP488B, the GP488/2, the AT488, the MP488, the MP488CT, the GP488/MM and the NB488. All are IEEE 488.2 compatible and supported by Driver488 software. The MP488 and MP488CT also provide digital I/O, and the MP488CT provides a set of programmable counter/timers, all of which are fully supported by Driver488. Some features of the interfaces are listed below: • GP488B interface board (for PC/XT/AT): Features five jumper-selectable interrupt lines. Three 8-bit jumper-selectable DMA channels are also available. The 8-bit DMA mode provides full compatibility with programs written for GP488 series boards. • AT488 interface board (for PC/XT/AT and PS/2 with the ISA bus): Features eleven jumperselectable interrupt lines. Three 16-bit and four 8-bit jumper-selectable DMA channels are also available. The 8-bit DMA mode provides full compatibility with programs written for the GP488 series boards. • MP488 interface board (for PC/XT/AT and PS/2 with the ISA bus): Features eleven jumperselectable interrupt lines. Three 16-bit and four 8-bit jumper-selectable DMA channels are also available. The 8-bit DMA mode provides full compatibility with programs written for the GP488 series boards. The digital I/O section of this board provides 40 digital I/O lines which can be programmed for a mix of input and output. • MP488CT interface board (for PC/XT/AT and PS/2 with the ISA bus): Features eleven jumperselectable interrupt lines. Three 16-bit and four 8-bit jumper-selectable DMA channels are also available. The 8-bit DMA mode provides full compatibility with programs written for the GP488 series boards. The digital I/O section of this board provides 40 input or output lines which can be programmed for a mix of input and output. The counter/timer section features a programmable clock generator plus 5 fully independent versatile counter/timer channels. • GP488/2 interface board (for Personal Systems/2 with MicroChannel architecture): Features seven software selectable interrupt lines and fourteen 8-bit software selectable DMA arbitration levels. • GP488B/MM interface board: Converts your Ampro PC/104 Single Board PC into an IEEE 488.2 compliant controller or peripheral. • NB488 external interface module (for notebook, laptop and desktop PCs): Connects to a PC’s parallel port eliminating the need for an internal expansion slot. Driver488 Software Interface Driver488 is the software interface between DOS or Windows and the IEEE 488 controller board. Driver488 software includes the driver itself, an installation program, other utility programs, and programming examples. Driver488 provides a full implementation of the IEEE 488.2 standard, plus advanced capabilities such as high-speed DMA data transfers, interrupt vectoring on specified events, automatic error detection, callable subroutines, and serial (COM) port support. Driver488 monitors all IEEE 488 bus monitoring and control lines and generates an interrupt based on SRQ status and various other bus conditions. Driver488 software supports automatic program vectoring to service routines for C, Pascal, and BASIC. On a specified event (Error, SRQ, Peripheral, Controller, Trigger, Clear, Talk, Listen, Idle, ByteIn, ByteOut, Change), Driver488 can either call a specified application routine or simulate a light pen interrupt to signal that the event has occurred. Versions with HP-style character commands can be accessed by virtually any language that can communicate with DOS files, and additionally provide standard DOS device driver interfaces which permit communications with the IEEE 488 bus and/or connected devices in the same manner as LPT1, COM1, etc. Versions with the Subroutine API offer higher performance and can be used with most popular C, Pascal, and Basic languages. The Driver488 commands and bus protocol are very similar to those used by the Hewlett-Packard HP-85 controller. I-4 Personal488 User’s Manual, Rev. 3.0 Artisan Technology Group - Quality Instrumentation ... Guaranteed | (888) 88-SOURCE | www.artisantg.com I. HARDWARE GUIDES 1. Overview Versions of Driver488 are described in the following text and table. • Driver488/DRV: The industry’s easiest-to-use IEEE 488.2 driver, offering HP-style commands, support for all programming languages and spread sheets, and features such as automatic program vectoring on SRQ. • Driver488/SUB : A subroutine-style IEEE 488.2 driver that provides all the function of Driver488/DRV, as well as high performance for fast, interrupt-driven programmed I/O operations. • Driver488/W31: A Dynamic Link Library (DLL) that brings IEEE 488.2 control to Microsoft Windows 16-bit applications. Includes support for Visual Basic, C, Quick C, Turbo C and Borland C++. • Driver488/W95: A Dynamic Link Library (DLL) that brings IEEE 488.2 control to Microsoft Windows 95 for 32-bit applications. Pending software revisions, it includes support for Microsoft C, Visual Basic, and Borland C++. • Driver488/WNT: A Dynamic Link Library (DLL) that brings IEEE 488.2 control to Windows NT version 3.1 or 3.5 applications. Pending software revisions, it includes support for Windows NT SDK, or C language compiler Visual Basic 4. • Driver488/LIB: An IEEE 488.2 library of C function calls that link directly to your application for maximum speed with minimal memory requirements, adding as few as as 25 Kbytes to a compiled program. Available with an optional license that allows unlimited copies of compiled applications. • Driver488/OEM: A compact IEEE 488.2 function-call library that enables quick and easy integration of IEEE 488.2 capability into PC-based instruments. • Driver488/IUX: A high performance IEEE 488.2 driver for running Interactive Systems UNIX System V and AT&T UNIX STREAMS. • Driver488/SCX: A high performance driver for SCO UNIX System V and AT&T UNIX STREAMS. Driver488 Family Overview Driver488 Driver Type Description W951 High performance driver for Windows 95 WNT1 High performance driver for Windows NT High performance driver for Windows Higher performance driver for subroutine-style programming. Device driver, compatible with all languages Fast, compact, no resident driver. Specially designed to operate as an IEEE 488.2 peripheral. For Interactive Systems & SCO UNIX. W31 SUB DRV LIB2 OEM2 IUX2 SCX2 Compatible Operating System Microsoft Windows 95 Microsoft Windows NT Microsoft Windows 3.x DOS DOS Compatible Languages Driver Architecture COM Support C, C++ for Windows & Visual Basic C Dynamic Link Library (DLL) No Power488 Digital I/O & CounterTimer Support No Dynamic Link Library (DLL) Dynamic Link Library (DLL) Memory resident No No No Yes Yes Yes Memory resident Yes Yes Linkable function calls Linkable function calls Memory resident. No No Optional No No No C & Visual Basic C, Pascal, & QuickBASIC DOS All, including spreadsheets C DOS3 C UNIX C 1 Note: Driver488/W95 and Driver488/WNT are minimally discussed in this manual, pending current software revisions. Refer to your operating system header file for the latest available information specific to your application. 2 Note: Driver488/LIB, OEM, IUX, and SCX are not discussed in this manual. These drivers are shipped with their respective manuals. 3 Note: Call the factory regarding Driver488/OEM compatibility with other operating systems. Personal488 User’s Manual, Rev. 3.0 Artisan Technology Group - Quality Instrumentation ... Guaranteed | (888) 88-SOURCE | www.artisantg.com I-5 1. Overview I. HARDWARE GUIDES Interface & Interface Board Specifications Note 1: The IOT7210 IEEE 488 Controller Chip is 100% compatible with the NEC µPD7210 chip and exhibits better performance, as well as lower power consumption. Note 2: Specifications subject to change without notice. IEEE 488.1-1987 Interface SH1, AH1, T6, TE0, L4, LE0, SR1, PP0, RL0, DC1, DT1, E1/2 Controller Subsets: C1, C2, C3, C4 and C9 Terminator: Software selectable characters and/or EOI Connector: Standard Amphenol 57-20240 with metric studs IEEE 488.2-1987 Interface IEEE 488 Bus Readback Registers: NDAC, NRFD, DAV, EOI, SRQ Bus Error Handling GP488B Interface Board IEEE 488 Controller Device: IOT7210 (See Note) Power Consumption: 750mA max @ 5V from PC supply Dimensions: Occupies one short PC slot size (5.25" long, plus IEEE 488 connector) Speed: 8-bit DMA: 330K byte/s (reads); 220K byte/s (writes) Environment: 0 to 50° C, 0 to 95% RH, non-condensing DMA Capability: 8-bit on channels 0 - 3 Interrupt Capability: IRQ 2 - 7 I/O Base Address: &H02E1, &H22E1, &H42E1, or &H62E1 AT488 Interface Board IEEE 488 Controller Device: IOT7210 (See Note) Power Consumption: 750mA max @ 5V from PC supply Dimensions: Occupies one short PC slot size (5.25" long, plus IEEE 488 connector) Speed: 16-bit DMA: 1M byte/s (reads); 800K byte/s (writes).8-bit DMA: 330K byte/s (reads); 220K byte/s (writes) Environment: 0 to 50° C, 0 to 95% RH, non-condensing DMA Capability: Channels 1 - 3 (8 - bit) are selectable in a PC/XT or PC/AT.Channels 0 - 3 (8 - bit) and 5 - 7 (16 - bit) are selectable in a PC/AT. Multiple AT488 boards may share the same DMA channel. Interrupt Capability: IRQ 2 - 7 for PC/XT, IRQ 2 - 7, 9, 10 - 12, 14, or 15 for PC/AT 16-bit slot I/O Base Address: &H02E1, &H22E1, &H42E1, or &H62E1 MP488 Interface Board IEEE 488 Controller Device: IOT7210 (See Note) Power Consumption: 2A max @ 5V from PC supply Dimensions: Occupies one 16-bit PC/AT full slot or 8-bit PC/XT full slot. Fits in PC/ATwith low PC/XT form-factor. 13.13" long x 3.9" high (333mm x 99mm). Speed: 16-bit DMA: 1M byte/s (reads); 800K byte/s (writes).8-bit DMA: 330K byte/s (reads); 220K byte/s (writes) Environment: 0 to 50° C, 0 to 95% RH, non-condensing DMA Capability: Channels 1-3 (8-bit) are selectable in a PC/XT or PC/AT.Channels 0-3 (8-bit) and 5-7 (16-bit) are selectable in a PC/AT. Multiple MP488 boards may share the same DMA channel. Interrupt Capability: IRQ 2-7 for PC/XT, IRQ 2 - 7, 9, 10 - 12, 14, or 15 for PC/AT 16-bit slot I/O Base Address: &H02E1, &H22E1, &H42E1, or &H62E1 Digital I/O: 40 digital I/O lines; 24 configurable as input or output, 8 fixed input,and 8 fixed output lines. I-6 Personal488 User’s Manual, Rev. 3.0 Artisan Technology Group - Quality Instrumentation ... Guaranteed | (888) 88-SOURCE | www.artisantg.com I. HARDWARE GUIDES 1. Overview MP488CT Interface Board IEEE 488 Controller Device: IOT7210 (See Note) Power Consumption: 2A max @ 5V from PC supply Dimensions: Occupies one 16-bit PC/AT full slot or 8-bit PC/XT full slot. Fits inPC/AT with low PC/XT form-factor. 13.13" long x 3.9" high (333mm x 99mm). Speed: 16-bit DMA: 1M byte/s (reads); 800K byte/s (writes).8-bit DMA: 330K byte/s (reads); 220K byte/s (writes) Environment: 0 to 50° C, 0 to 95% RH, non-condensing DMA Capability: Channels 1-3 (8-bit) are selectable in a PC/XT or PC/AT. Channels 0-3 (8-bit) and 5-7 (16-bit) are selectable in a PC/AT.Multiple MP488 boards may share the same DMA channel. Interrupt Capability: IRQ 2 - 7 for PC/XT, IRQ 2 - 7, 9, 10 - 12, 14, or 15 for PC/AT 16-bit slot I/O Base Address: &H02E1, &H22E1, &H42E1, or &H62E1 Digital I/O: 40 digital I/O lines; 24 configurable as input or output, 8 fixed input, 8 fixed output lines. Counter/Timer: AMD Am9513A, 1 frequency output, 5 counter/timers. Counter/Timer Frequency: DC - 7 MHz. Internal Timebase: Up to 1 MHz, accuracy of 0.01%. GP488/2 Interface Board IEEE 488 Controller Device: IOT7210 (See Note) Power Consumption: 1A max @ 5V from PC supply. Dimensions: Occupies one full length slot in a MicroChannel bus. Speed: 8-bit DMA: 330K byte/s (reads); 220K byte/s (writes). Environment: 0 to 50° C, 0 to 95% RH, non-condensing DMA Capability: 8-bit on channels 0 through 14 Interrupt Capability: IRQ 4, 5, 6, 7, 10, 11, or 15. GP488/MM Interface Board IEEE 488 Controller Device: IOT7210 (See Note) Maximum Transfer Rate: 330K byte/s (reads and writes) Connector: 26-pin header ribbon cable to standard IEEE 488 connectors Environment: 0 to 70° C; 0 to 95% RH (non-condensing) DMA Capability: Channels 0, 1, 2., or 3 (jumper selectable) Interrupts: IRQ 2, 3, 4, 5, 6, or 7 IEEE Base I/O Addresses: &H02E1, &H22E1, &H42E1, or &H62E1 NB488 Interface Module Speed: 170 Kbyte/s (reads and writes) Dimensions: 5.5" x 4" x 1.5" IEEE 488 Connector: Accepts standard IEEE 488 connector with metric studs Parallel Port Input Connector: Male DB25 Parallel Port Output Connector to Printer IEEE: Female DB25 Instrument Fan-out: Can control up to 14 IEEE instruments Power: 400-500 mA at 5 VDC from PC keyboard port or 7-15 VDC at 400-500 mA from external power source Environment: 0 to 70° C; 0 to 95% RH (non-condensing) PCMCIA Interface Card Speed: 1.0M byte/s Dimensions: Type II (5 mm) PCMCIA Card Power: 100 mA I/O: 16-byte, relocatable Personal488 User’s Manual, Rev. 3.0 Artisan Technology Group - Quality Instrumentation ... Guaranteed | (888) 88-SOURCE | www.artisantg.com I-7 2. Personal488 (with GP488B) 2. I. HARDWARE GUIDES Personal488 (with GP488B) Topics • • The Package.........................................................................................I-8 Hardware Installation (for PC/XT/AT)...........................................I-8 Installation & Configuration of the Interface Card....................................I-8 Default Settings.................................................................................................I-9 I/O Base Address Selection...............................................................................I-9 Interrupt Selection............................................................................................I-9 DMA Channel Selection..................................................................................I-10 Wait State Configuration...............................................................................I-11 Internal Clock Selection ................................................................................I-11 Board Installation ..........................................................................................I-11 The Package Personal488, including the IEEE 488 interface board and the Driver488 software, is carefully inspected, both mechanically and electrically, before shipment. When you receive the product, unpack all items carefully from the shipping carton and check for any obvious signs of physical damage that may have occurred during shipment. Report any such damage to the shipping agent immediately. Remember to retain all shipping materials in the event shipment back to the factory becomes necessary. For the following software versions, the Personal488 package varies: • Driver488/DRV, SUB, or W31: This package includes: The GP488B IEEE 488 Bus Interface Board, Driver488 Software Disks (Driver488/DRV, Driver488/SUB, Driver488/W31), and the Personal488 User’s Manual. • Driver488/W95: This package includes: The GP488B IEEE 488 Bus Interface Board, Driver488 Software Disks (Driver488/W95), and the Personal488 User’s Manual. • Driver488/WNT: This package includes: The GP488B IEEE 488 Bus Interface Board, Driver488 Software Disks (Driver488/WNT), and the Personal488 User’s Manual. Hardware Installation (for PC/XT/AT) Installation & Configuration of the Interface Card The following paragraphs explain configuration and physical installation of the interface card. Software installation and setup are covered in a separate section. After configuring your board, please make note of the following. This information is needed for Driver488 software installation. I-8 • I/O Base Address • Interrupt Channel • DMA channel, if applicable • Whether or not the board is the System Controller Personal488 User’s Manual, Rev. 3.0 Artisan Technology Group - Quality Instrumentation ... Guaranteed | (888) 88-SOURCE | www.artisantg.com I. HARDWARE GUIDES Note: 2. Personal488 (with GP488B) The GP488B, as illustrated, has one DIP switch, two 12-pin headers and one 3-pin header, labeled SW1, J3, J4, and J5, respectively. The DIP switch setting, along with the arrangement of the jumpers on the headers, set the hardware configuration. Default Settings The figure indicates the GP488B default configuration. Notice that SW1 controls the wait state generation, the I/O base address and interrupt response level, J4 sets the interrupt request level, J3 selects the DMA channel, and J5 selects the clock source. I/O Base Address Selection The I/O base address sets the addresses used by the computer to communicate with the IEEE 488 interface hardware on the board. The address is normally specified in hexadecimal and can be 02E1, 22E1, 42E1, or 62E1. The registers of the IOT7210 IEEE 488 controller chip and other auxiliary registers are then located at fixed offsets from the base address. Most versions of Driver488 are capable of managing as many as four IEEE 488 interface boards. To do so, the board configurations must be arranged to avoid conflict among themselves. No two boards may have the same I/O address, but they may, and usually should, have the same DMA channel and interrupt level. The factory default I/O base address is 02E1. To use another, set SW1 switches 4 and 5 according to the following table and figure. I/O Base Address 02E1 02E1 06E1 0AE1 0EE1 12E1 16E1 1AE1 1EE1 22E1 22E1 26E1 2AE1 2EE1 32E1 36E1 3AE1 3EE1 42E1 42E1 46E1 4AE1 4EE1 52E1 56E1 5AE1 5EE1 62E1 62E1 66E1 6AE1 6EE1 72E1 76E1 7AE1 7EE1 Register Read Register Write Register Data In Data Out Interrupt Status 1 Interrupt Mask 1 Interrupt Status 2 Interrupt Mask 2 Serial Poll Status Serial Poll Mode Address Status Address Mode CMD Pass Through Auxiliary Mode Address 0 Address 0/1 Address 1 End of String Personal488 User’s Manual, Rev. 3.0 Artisan Technology Group - Quality Instrumentation ... Guaranteed | (888) 88-SOURCE | www.artisantg.com I-9 2. Personal488 (with GP488B) I. HARDWARE GUIDES Interrupt Selection The GP488B interface board may be set to interrupt the PC on the occurrence of certain hardware conditions. The level of the interrupt generated is set by J4. The GP488B adheres to the “AT-style” interrupt sharing conventions. When an interrupt occurs, the interrupting device must be reset by writing to I/O address 02FX, where X is the interrupt level (from 0-7). This interrupt response level is set by switches 1, 2, and 3 of SW1 which must be set to correspond to the J4 interrupt level setting. Interrupt selection is illustrated in the following figure. DMA Channel Selection Direct Memory Access (DMA) is a high-speed method of transferring data from or to a peripheral, such as a digitizing oscilloscope, to or from the PC’s memory. The PC has four DMA channels, but channel 0 is used for memory refresh and is not available for peripheral data transfer. Channel 2 is usually used by the floppy disk controller, and is also unavailable. Channel 3 is often used by the hard disk controller in PCs, XTs, and the PS/2 with the ISA bus, but is usually not used in ATs. So, depending on your hardware, DMA channels 1 and possibly 3 are available. Under some rare conditions, it is possible for high-speed transfers on DMA channel 1 to demand so much of the available bus bandwidth that simultaneous access of a floppy controller will be starved for data due to the relative priorities of the two channels. Configure the board according to which DMA channel, if any, is available. I-10 Personal488 User’s Manual, Rev. 3.0 Artisan Technology Group - Quality Instrumentation ... Guaranteed | (888) 88-SOURCE | www.artisantg.com I. HARDWARE GUIDES 2. Personal488 (with GP488B) Wait State Configuration The GP488B is fast enough to be compatible with virtually every PC/XT/AT-compatible computer on the market. Even if the computer is very fast, the processor is normally slowed to 8MHz or below when accessing the I/O channel. If the I/O channel runs faster than 8 MHz, it may be faster than the GP488B card. If you suspect this is a problem, the computer can be made to wait for the GP488B by enabling wait states. Increasing the number of wait states slows down access to the GP488B card, but the overall performance degradation is usually only a few percent. Internal Clock Selection The IEEE 488 bus interface circuitry requires a master clock. This clock is normally connected to an on-board 8 MHz clock oscillator. However, some compatible IEEE 488 interface boards connect this clock to the PC’s own clock signal. Using the PC clock to drive the IEEE 488 bus clock is not recommended because the PC clock frequency depends on the model of computer. A standard PC has a 4.77 MHz clock, while an AT might have a 6 MHz or 8 MHz clock. Other manufacturers’ computers may have almost any frequency clock. If you are using a software package designed for an interface board (that derived its clock from the PC clock) and you need to do the same to use GP488B with that particular software, the clock source can be changed. However, the clock frequency must never be greater than 8 MHz, and clock frequency must be correctly entered in the Driver488 software. Board Installation The IEEE 488 interface board(s) are installed into expansion slots inside the PC’s system unit. PC/ATcompatible computers have two types of expansion slots: 8-bit (with one card-edge receptacle), and 16bit (with two card-edge receptacles). Eight-bit boards, such as the IEEE 488 interface boards, may be used in either type of slot, 8- or 16-bit. Some machines may have special 32-bit memory expansion slots which should not be used for IEEE 488 interface boards. Install each IEEE 488 interface board into the expansion slots as follows: Ensure the PC is turned off and unplug the power cord. Remove the cover mounting screws from the rear of the PC system unit. Remove the system unit cover by sliding it forward and tilting it upward. Personal488 User’s Manual, Rev. 3.0 Artisan Technology Group - Quality Instrumentation ... Guaranteed | (888) 88-SOURCE | www.artisantg.com I-11 2. Personal488 (with GP488B) I. HARDWARE GUIDES A rear panel opening is provided at the end of each expansion slot for mounting I/O connectors. If a slot is unused, this opening is covered by a metal plate held in place with a screw. Remove this screw and the cover plate from the desired expansion slot, saving the screw. Insert the IEEE 488 interface board carefully into the expansion slot, fitting the IEEE 488 connector through the rear panel opening, and inserting its card edge into the motherboard card edge receptacle. With the board firmly in place, fix its mounting bracket to the rear panel, using the screw removed from the cover plate. Slide the system unit cover back on, re-attaching it with the screws. Plug the power cord in and turn on the PC. If all is well, the system should boot normally. If not, carefully check that none of the I/O addresses conflict with any other devices or boards. If you are not sure, contact your PC’s dealer or manufacturer. I-12 Personal488 User’s Manual, Rev. 3.0 Artisan Technology Group - Quality Instrumentation ... Guaranteed | (888) 88-SOURCE | www.artisantg.com I. HARDWARE GUIDES 3. 3. Personal488/AT Personal488/AT Topics • • The Package ...................................................................................... I-13 Hardware Installation (for PC/XT/AT) ........................................ I-13 Installation & Configuration of the Interface Card.................................. I-13 Default Settings............................................................................................... I-13 I/O Base Address Selection ............................................................................ I-13 Interrupt Selection ......................................................................................... I-14 DMA Channel Selection ................................................................................. I-15 Board Installation .......................................................................................... I-15 The Package Personal488/AT, including the IEEE 488 interface board and the Driver488 software, is carefully inspected, both physically and electronically, before shipment. When you receive the product, unpack all items carefully from the shipping carton and check for any obvious signs of physical damage that may have occurred during shipment. Report any such damage to the shipping agent immediately. Remember to retain all shipping materials in the event shipment back to the factory becomes necessary. The Personal488/AT includes: • AT488 IEEE Bus Interface Board • Driver488 Software Disks (Driver488/DRV, Driver488/SUB, Driver488/W31, & Driver488W95) • Personal488 User’s Manual Hardware Installation (for PC/XT/AT) Installation & Configuration of the Interface Card The following paragraphs explain configuration and physical installation of the interface card. Software installation and setup are covered in a separate section. After configuring your board, please make note of the following: the I/O Base Address, the interrupt channel, the DMA channel, if any, and whether or not the board is the System Controller. This information is needed for Driver488 software installation. The Personal488/AT has two DIP switches (S1 and S2), and three 14-pin headers (IRQ, DACK and DRQ). The DIP switch settings, along with the arrangement of the jumpers on the headers, set the hardware configuration. Default Settings Notice that S1 and IRQ set the interrupt response level, S2 controls the I/O base address, and DACK and DRQ select the DMA channel. Personal488 User’s Manual, Rev. 3.0 Artisan Technology Group - Quality Instrumentation ... Guaranteed | (888) 88-SOURCE | www.artisantg.com I-13 3. Personal488/AT I. HARDWARE GUIDES I/O Base Address Selection The I/O base address sets the addresses used by the computer to communicate with the IEEE 488 interface hardware on the board. The address is normally specified in hexadecimal and can be 02E1, 22E1, 42E1, or 62E1. The registers of the IOT7210 IEEE 488 controller chip and other auxiliary registers are then located at fixed offsets from the base address. Most versions of Driver488 are capable of managing as many as four IEEE 488 interface boards. To do so, the board configurations must be arranged to avoid conflict among themselves. No two boards may have the same I/O address, but they may, and usually should, have the same DMA channel and interrupt level. The factory default I/O base address is 02E1. To use a different base address, set S2 according to the figure. I/O Base Address 02E1 02E1 06E1 0AE1 0EE1 12E1 16E1 1AE1 1EE1 22E1 22E1 26E1 2AE1 2EE1 32E1 36E1 3AE1 3EE1 42E1 42E1 46E1 4AE1 4EE1 52E1 56E1 5AE1 5EE1 62E1 62E1 66E1 6AE1 6EE1 72E1 76E1 7AE1 7EE1 Register Read Register Write Register Data In Data Out Interrupt Status 1 Interrupt Mask 1 Interrupt Status 2 Interrupt Mask 2 Serial Poll Status Serial Poll Mode Address Status Address Mode CMD Pass Through Auxiliary Mode Address 0 Address 0/1 Address 1 End of String Interrupt Selection The AT488 interface board may be set to interrupt the PC on the occurrence of certain hardware conditions. The main board interrupt may be set to IRQ level 3 through 7, 9 through 12, 14, or 15. I-14 Personal488 User’s Manual, Rev. 3.0 Artisan Technology Group - Quality Instrumentation ... Guaranteed | (888) 88-SOURCE | www.artisantg.com I. HARDWARE GUIDES 3. Personal488/AT Interrupts 10 through 15 are only available in a 16-bit slot on an AT-class machine. Interrupt 9 becomes synonymous with interrupt 2 when used in a PC/XT bus. The selected interrupt may be shared among several AT488s in the same PC/AT chassis. The AT488 adheres to the “AT-style” interrupt sharing conventions. When the AT488 requires service, the IRQ jumper determines which PC interrupt level is triggered. When an interrupt occurs, the interrupting device must be reset by writing to an I/O address which is different for each interrupt level. The switch settings determine the I/O address to which the board’s interrupt rearm circuitry responds. The IRQ jumper and switch settings must both indicate the same interrupt level for correct operation with interrupts. The previous figure shows the settings for selected interrupts. DMA Channel Selection Direct Memory Access (DMA) is a high-speed method of transferring data from or to a peripheral, such as a digitizing oscilloscope, to or from the PC’s memory. The AT class machine has seven DMA channels. Channels 0-3 (8-bit), 5, 6, and 7 (16-bit) are available only in a 16-bit slot on a PC/AT-class machine. Channel 2 is usually used by the floppy disk controller, and is unavailable. Channel 3 is often used by the hard disk controller in PCs, XTs, and the PS/2 with the ISA bus, but is usually not used in ATs. Channels 5 through 7 are 16-bit DMA channels. They offer the highest throughput (up to 1 Megabyte per second). Channels 0 through 3 are 8-bit DMA channels. Although slower, they offer compatibility with existing GP488B applications that only made use of 8-bit DMA channels. Under some rare conditions, it is possible for high-speed transfers on DMA channel 1 to demand so much of the available bus bandwidth that simultaneous access of a floppy controller will be starved for data due to the relative priorities of the two channels. Both the DRQ and DACK jumpers must be set to the desired DMA channel for proper operation. Configure the board according to which DMA channel is available. The following figure shows settings for selecting the DMA channels. Personal488/AT DMA Selection Board Installation The IEEE 488 interface board(s) are installed into expansion slots inside the PC’s system unit. PC/ATcompatible computers have two types of expansion slots: 8-bit (with one card-edge receptacle), and 16bit (with two card-edge receptacles). Eight-bit boards, such as the IEEE 488 interface boards, may be used in either type of slot, 8- or 16-bit. Some machines may have special 32-bit memory expansion slots which should not be used for IEEE 488 interface boards. Personal488 User’s Manual, Rev. 3.0 Artisan Technology Group - Quality Instrumentation ... Guaranteed | (888) 88-SOURCE | www.artisantg.com I-15 3. Personal488/AT I. HARDWARE GUIDES Install each IEEE 488 interface board into the expansion slots as follows: Ensure the PC is turned off and unplug the power cord. Remove the cover mounting screws from the rear of the PC system unit. Remove the system unit cover by sliding it forward and tilting it upward. A rear panel opening is provided at the end of each expansion slot for mounting I/O connectors. If a slot is unused, this opening is covered by a metal plate held in place with a screw. Remove this screw and the cover plate from the desired expansion slot, saving the screw. Insert the IEEE 488 interface board carefully into the expansion slot, fitting the IEEE 488 connector through the rear panel opening, and inserting its card edge into the motherboard card edge receptacle. With the board firmly in place, fix its mounting bracket to the rear panel, using the screw removed from the cover plate. Slide the system unit cover back on, re-attaching it with the screws. Plug the power cord in and turn on the PC. If all is well, the system should boot normally. If not, carefully check that none of the I/O addresses conflict with any other devices or boards. If you are not sure, contact your PC’s dealer or manufacturer. I-16 Personal488 User’s Manual, Rev. 3.0 Artisan Technology Group - Quality Instrumentation ... Guaranteed | (888) 88-SOURCE | www.artisantg.com I. HARDWARE GUIDES 4. 4. Personal488/NB Personal488/NB Topics • • The Package ...................................................................................... I-17 Hardware Installation (for Notebook, Laptop, & Desktop PCs)I-17 The Package Personal488/NB, including the IEEE 488 interface hardware and the Driver488 software, is carefully inspected, both mechanically and electrically, before shipment. When you receive the product, unpack all items carefully from the shipping carton and check for any obvious signs of physical damage that may have occurred during shipment. Report any such damage to the shipping agent immediately. Remember to retain all shipping materials in the event shipment back to the factory becomes necessary. Personal488/NB includes: • NB488 IEEE 488 Bus Interface Board • Driver488 Software Disks (Driver488/DRV, Driver488/SUB & Driver488/W31) • Printer Port to Interface Cable (CA-35-2) • Keyboard Port Power Adapter (CA-107) • AC Power Adapter (TR-2) • DIN-5 to DIN-6 Adapter (CN-15-6) for CA-107 (Optional; Contact factory if required) • Driver488 User’s Manual Hardware Installation (for Notebook, Laptop, & Desktop PCs) Personal488/NB does not need to be disassembled during installation, as there are no internal switches or controls to set. Simply connect the Personal488/NB to any PC parallel printer port (female DB25) by unplugging the printer cable and plugging the supplied cable’s (CA-35-2) male end into the computer and the female end into the mating connector on the Personal488/NB. Any printer port: LPT1, LPT2, or LPT3 may be used, but should be noted for future software installation. Next connect the IEEE 488 cable to the mating connector on the Personal488/NB. Personal488/NB allows for LPT pass-through for simultaneous IEEE 488 instrument control and printer operation. When using a printer in the system configuration, attach the original printer cable (male DB25) into the remaining mating connector on the Personal488/NB. The Personal488/NB may be powered with a supplied cable (CA-107) from the PC’s keyboard port or via a supplied external power unit (TR-2) that plugs into any standard AC wall outlet. If powering the unit through the PC keyboard port, attach the supplied power cord to the keyboard port and connect to the power jack on the Personal488/NB. If using an AC power adapter, plug it into a 120 VAC outlet and attach the low voltage end to the jack on the Personal488/NB. The POWER LED should now be on and hardware installation complete. At power-on, the printer should behave normally and can be checked by issuing a Print Screen command (or any other convenient method of checking the printer). However, installation of the software will be necessary before the Personal488/NB can communicate with IEEE 488 instruments. Once the NB488 is installed, a utility program has been included to help identify the LPT port type. Software installation requires the user to specify whether the LPT port is a standard IBM PC/XT/AT/PS/2 compatible port or a slower 4-bit option. Type NBTEST.EXE to run this program. Personal488 User’s Manual, Rev. 3.0 Artisan Technology Group - Quality Instrumentation ... Guaranteed | (888) 88-SOURCE | www.artisantg.com I-17 5. Personal488/MM 5. I. HARDWARE GUIDES Personal488/MM Topics • • The Package.......................................................................................I-18 Hardware Installation (for PC/XT/AT).........................................I-18 Installation & Configuration of the Interface Card..................................I-18 Default Settings...............................................................................................I-18 I/O Base Address Selection.............................................................................I-19 Interrupt Selection..........................................................................................I-20 DMA Channel Selection..................................................................................I-20 Internal Clock Selection ................................................................................I-21 Board Installation ..........................................................................................I-21 The Package Personal488/MM, including IEEE 488 interface board and Driver488 software, is carefully inspected, both physically and electronically, before shipment. When you receive the product, carefully remove all items carefully from the shipping carton and check for any obvious signs of physical damage that may have occurred during shipment. Report any such damage to the shipping agent immediately. Remember to retain all shipping materials in the event shipment back to the factory becomes necessary. The Personal488/MM includes: • GP488/MM IEEE 488 Bus Interface Board • Driver488 Software Disks (Driver488/DRV, Driver488/SUB, Driver488/W31 & Driver488/W95) • Personal488 User’s Manual Hardware Installation (for PC/XT/AT) Installation & Configuration of the Interface Card The following paragraphs explain configuration and physical installation of the interface card. Software installation and setup are covered in a separate section. After configuring your board, please make note of the following. This information is needed for Driver488 software installation. • I/O Base Address • Interrupt Channel • DMA channel, if applicable • Whether or not the board is the System Controller Note: I-18 The GP488/MM is only compatible with the Ampro PC/104. The board includes one DIP switch, two 12-pin headers and one 3-pin header, labeled SW1, JP2, JP3, and JP1, respectively. The DIP switch setting, along with the arrangement of the jumpers on the headers, set the hardware configuration. Personal488 User’s Manual, Rev. 3.0 Artisan Technology Group - Quality Instrumentation ... Guaranteed | (888) 88-SOURCE | www.artisantg.com I. HARDWARE GUIDES 5. Personal488/MM Default Settings There are presently two revision levels of GP488/MM board, Rev. A and Rev. B. The following figure indicates the GP488/MM default configuration on a Rev. B board. The configuration is the same for Rev. A, however, on Rev. A boards the JP2 and JP3 labels are reversed from that illustrated. Switch SW1 controls the wait state generation and the I/O base address and interrupt response level. On the Rev. B board, JP2 sets the interrupt request level and JP3 selects the DMA channel. On Rev. A boards, the JP2 and JP3 labels are reversed from those shown in the following diagram. For both board revision levels JP1 selects the clock source. I/O Base Address Selection The I/O base address sets the addresses used by the computer to communicate with the IEEE 488 interface hardware on the board. The address is normally specified in hexadecimal and can be 02E1, 22E1, 42E1, or 62E1. The registers of the IOT7210 IEEE 488 controller chip and other auxiliary registers are then located at fixed offsets from the base address. Most versions of Driver488 are capable of managing as many as four IEEE 488 interface boards. To do so, the board configurations must be arranged to avoid conflict among themselves. No two boards may have the same I/O address, but they may, and usually should, have the same DMA channel and interrupt level. The factory default I/O base address is 02E1. To use another, set SW1 switches 4 and 5 according to the following table and figure. I/O Base Address 02E1 02E1 06E1 0AE1 0EE1 12E1 16E1 1AE1 1EE1 22E1 22E1 26E1 2AE1 2EE1 32E1 36E1 3AE1 3EE1 42E1 42E1 46E1 4AE1 4EE1 52E1 56E1 5AE1 5EE1 62E1 62E1 66E1 6AE1 6EE1 72E1 76E1 7AE1 7EE1 Register Read Register Write Register Data In Data Out Interrupt Status 1 Interrupt Mask 1 Interrupt Status Interrupt Mask 2 Serial Poll Status Serial Poll Mode Address Status Address Mode CMD Pass Through Auxiliary Mode Address 0 Address 0/1 Address 1 End of String Personal488 User’s Manual, Rev. 3.0 Artisan Technology Group - Quality Instrumentation ... Guaranteed | (888) 88-SOURCE | www.artisantg.com I-19 5. Personal488/MM I. HARDWARE GUIDES Interrupt Selection The GP488/MM interface board may be set to interrupt the PC on the occurrence of certain hardware conditions. The level of the interrupt generated is set by JP3 on Rev. B boards (JP2 on Rev. A boards). The GP488/MM interface board adheres to the “AT-style” interrupt sharing conventions. When an interrupt occurs, the interrupting device must be reset by writing to I/O address 02FX, where X is the interrupt level (from 0-7). This interrupt response level is set by switches 1, 2, and 3 of SW1 which must be set to correspond to the JP3 (Rev. B board) interrupt level setting. Interrupt selection for a Rev. B board is illustrated in the following figure. Note: The jumper label would read JP2 for Rev. A boards. DMA Channel Selection Direct Memory Access (DMA) is a high-speed method of transferring data from or to a peripheral, such as a digitizing oscilloscope, to or from the PC’s memory. The factory default selection is DMA channel 1. Note that jumper JP2 is used to configure revision B boards while the jumper labeled JP3 is used to select the DMA channel on version A boards. Note: I-20 Check your computer documentation to ensure the selected DMA channel is not being used by another device. The GP488B/MM board has circuitry which allows for more than one GP488/MM board to share the same channel. Most computers use DMA channel 2 for floppy disk drives, making that channel unavailable. Personal488 User’s Manual, Rev. 3.0 Artisan Technology Group - Quality Instrumentation ... Guaranteed | (888) 88-SOURCE | www.artisantg.com I. HARDWARE GUIDES 5. Personal488/MM Internal Clock Selection The IEEE 488 bus interface circuitry requires a master clock. This clock is normally connected to an on-board 8 MHz clock oscillator. However, some compatible IEEE 488 interface boards connect this clock to the PC’s own clock signal. Using the PC clock to drive the IEEE 488 bus clock is not recommended because the PC clock frequency depends on the model of computer. A standard PC has a 4.77 MHz clock, while an AT might have a 6 MHz or 8 MHz clock. Other manufacturers’ computers may have almost any frequency clock. If you are using a software package designed for an interface board (that derived its clock from the PC clock) and you need to do the same to use GP488/MM with that particular software, the clock source can be changed. However, the clock frequency must never be greater than 8 MHz, and clock frequency must be correctly entered in the Driver488 software. Board Installation IEEE 488 interface board(s) are installed into expansion slots inside the PC’s system unit. PC/AT-compatible computers have two types of expansion slots: 8-bit (with one card-edge receptacle), and 16-bit (with two card-edge receptacles). Eightbit boards, such as the IEEE 488 interface boards, may be used in either type of slot, 8- or 16-bit. Some machines may have special 32-bit memory expansion slots which should not be used for IEEE 488 interface boards. Install each IEEE 488 interface board into the expansion slots as follows: Ensure the PC is turned off and unplug the power cord. Remove the cover mounting screws from the rear of the PC system unit. Remove the system unit cover by sliding it forward and tilting it upward. A rear panel opening is provided at the end of each expansion slot for mounting I/O connectors. If a slot is unused, this opening is covered by a metal plate held in place with a screw. Remove this screw and the cover plate from the desired expansion slot, saving the screw. Insert the IEEE 488 interface board carefully into the expansion slot, fitting the IEEE 488 connector through the rear panel opening, and inserting its card edge into the motherboard card edge receptacle. With the board firmly in place, fix its mounting bracket to the rear panel, using the screw removed from the cover plate. Slide the system unit cover back on, re-attaching it with the screws. Plug the power cord in and turn on the PC. If all is well, the system should boot normally. If not, carefully check that none of the I/O addresses conflict with any other devices or boards. If you are not sure, contact your PC’s dealer or manufacturer. Personal488 User’s Manual, Rev. 3.0 Artisan Technology Group - Quality Instrumentation ... Guaranteed | (888) 88-SOURCE | www.artisantg.com I-21 6. Personal488/CARD 6. I. HARDWARE GUIDES Personal488/CARD Topics • • • The Package.......................................................................................I-22 Introduction.......................................................................................I-22 Hardware Installation (for Notebook & Desktop PCs) ............I-23 Interfaces & Connectors .................................................................................I-23 Interface Cable Connection ...........................................................................I-23 Installation into a PC.....................................................................................I-24 Interface Cable & IEEE 488 Accessories ......................................................I-24 • Software Installation .......................................................................I-24 Initialization Software...................................................................................I-24 Configuration Software..................................................................................I-27 • Functionality .....................................................................................I-29 The Package The Personal488/CARD components were carefully inspected prior to shipment. After receiving your order, carefully unpack all items from the shipping carton and check for any signs of physical damage which may have occurred during shipment. Immediately report any damage to the shipping agent. Retain all shipping materials in case you must return the unit to the factory. If the unit is damaged, a RMA # (Return Material Authorization Number) must be obtained before returning it. An RMA # can be obtained by calling (216) 439-4091 or your sales representative. Every Personal488/CARD is shipped with the following items: • IEEE 488 PCMCIA interface Card • Interface Cable (CA-137) • Initialization Software: Client Driver, and Enabler • Driver Software (Programming Support including Configuration Utilities): Driver488/DRV, Driver488/W31, and Driver488/SUB • Personal488 User’s Manual Introduction The Personal488/CARD is a low-power Type II PCMCIA IEEE 488 interface that enables IEEE 488.2 control from notebook and desktop PCs. This card plugs into any Type II (5mm) PCMCIA socket and is PCMCIA PC Card Standard Specification 2.1 compliant. CardSoftTM Card and Socket services are available on the majority of notebook PCs currently sold. If your notebook has different software, you may purchase the CardSoftTM software from the Personal488/CARD manufacturer. The Personal488/CARD does not require an ISA-bus expansion slot or external power. The Personal488/CARD is highly flexible with respect to I/O addressing and interrupt level use. It can, by default, automatically configure itself upon insertion into your notebook or desktop PC or upon system startup. In addition, users may specify any interrupt level and any I/O space base address for the Personal488/CARD. The card permits “Hot-Swapping”, that is, insertion of the PCMCIA card while the system is powered. I-22 Personal488 User’s Manual, Rev. 3.0 Artisan Technology Group - Quality Instrumentation ... Guaranteed | (888) 88-SOURCE | www.artisantg.com I. HARDWARE GUIDES 6. Personal488/CARD Hardware Installation (for Notebook & Desktop PCs) Hardware installation topics are covered in the following paragraphs. It is strongly suggested that you read and perform the following instructions to assure the proper installation and usage of the Personal488/CARD. The hardware installation topics include: • Personal488/CARD-to-Interface Cable connection • Installation of Personal488/CARD into PC • Interface Cable connection with IEEE 488 compatible accessories The plug and play operation of the Personal488/CARD allows for the operating parameters to be configured via software, circumventing the need for switch or jumper settings. Interfaces & Connectors The Personal488/CARD is shipped with an interface cable (CA-137) that permits the card to directly interface with up to fourteen (14) IEEE 488 instruments. The PCMCIA card connects to the CA-137 cable via the female slot connector found along its “bottom” edge, as shown in the figure. The unit itself, being a PCMCIA socket card, constitutes a Type II (5mm) PCMCIA socket interface. The opposite end of the CA-137 Interface Cable is terminated in an IEEE 488 connector with metric studs. A pin-out of this connector is provided below. Interface Cable Connection Follow the instructions below to connect the Personal488/CARD to the Interface Cable (CA-137). Note: The PCMCIA Card and the Slot Connector End of the Interface Cable are keyed to ensure proper connection. The card and cable should connect easily and fit snug. DO NOT force the PCMCIA Card / Interface Cable mating. Refer to the figures on this page while performing these instructions. 1. In one hand, hold the PCMCIA Card so that the company logo is face up and the bottom edge of the card is facing you. 2. In the other hand, hold the Slot Connector End of the Interface Cable so that the groove (keyed portion of the connector) is face down and the company logo is face up. 3. Press the Slot Connector into the PCMCIA Card. The Personal488/CARD should now be firmly connected to the Interface Cable. Personal488 User’s Manual, Rev. 3.0 Artisan Technology Group - Quality Instrumentation ... Guaranteed | (888) 88-SOURCE | www.artisantg.com I-23 6. Personal488/CARD I. HARDWARE GUIDES Note: The slot connector is keyed to match the PCMCIA Card so that an improper connection can not be made. Therefore, DO NOT force this connection as damage may result! For proper contact, the connection of the card and cable must be snug. Installation into a PC With your PC powered-down (turned off), install your Personal488/CARD using the instructions provided below. Note: If the Client Driver Software is used, you are not required to power down your PC before installing the Personal488/CARD. The Client Driver Software enables insertion and removal of the card into any Type II socket at any time, and automatically configures the card upon its insertion (“Hot-Swapping”). Note: Enabler Software, on the other hand, does not allow “Hot-Swapping.” More detailed information is provided later in this chapter. Note: “Hot-Swapping” refers to the insertion and removal of the PCMCIA card while the system is powered. 1. With your PC powered down (turned off), insert the PCMCIA Card into the PCMCIA socket with the company logo face up (for most Notebook PCs). 2. Push the PCMCIA Card into the PCMCIA socket as if you were loading a diskette into a diskette drive. Stop once the card is engaged into the socket. This is marked by hearing a “click” and seeing that the socket eject button has been engaged (pushed out). Note: CardSoft™ Card and Socket Services are available on the majority of notebook PCs currently sold. If your notebook has incompatible software, you may purchase the CardSoft™ software from the Personal488/CARD manufacturer. Interface Cable & IEEE 488 Accessories Only IEEE 488 compatible accessories (instruments) can interface with the Personal488/CARD. The Personal488/CARD and cable permit a fan-out of fourteen (14) directly interfaced IEEE 488 instruments. 1. Plug the IEEE 488 connector end of the Interface Cable into any compatible IEEE 488 accessories. 2. With your fingers and/or applicable flat bladed screw driver, tighten the screw pins (metric studs) located on the IEEE 488 connector to secure the connection. Note: You will need additional IEEE 488 interface cables (terminated at both ends with IEEE 488 connectors) for subsequent IEEE 488 instruments. At this point, the default configuration of the Personal488/CARD will be used. The default configuration is the initialization of the “CARD” upon system boot-up having not used the Client Driver or Enabler to make changes to the “CARD’s” settings. Once all connections have been checked for correctness, the “system” can be powered up. If communication problems exist due to initialization conflicts, the Client Driver or Enabler will have to be installed in order to make initialization changes. This subject is covered in the following paragraphs. Note: The Client Driver or Enabler is needed even if there are no configuration conflicts but a desire to change the Personal488/CARD’s configuration to meet predetermined specifications and/or needs. Software Installation The Personal488/CARD is provided with both Initialization and Configuration Software (the Configuration Software is driver specific and therefore included with each driver). This text introduces support for the Initialization Software (Client Driver and Enabler). For more information, refer to the driver-specific “Installation & Configuration” Sub-Chapters found in Chapters 8 through 12. The I-24 Personal488 User’s Manual, Rev. 3.0 Artisan Technology Group - Quality Instrumentation ... Guaranteed | (888) 88-SOURCE | www.artisantg.com I. HARDWARE GUIDES 6. Personal488/CARD following drivers are available for the Personal488/CARD: Driver488/DRV, Driver488/SUB, and Driver488/W31. Initialization Software Initialization of the Personal488/CARD is software oriented. The Client Driver and Enabler files conform to the PCMCIA (PC Card) Card Services Specification 2.1. When used with CardSoft™ Card and Socket Services (or compatible) software, the Personal488/CARD automatically configures itself upon system start-up. The use of CardSoft™ is not required, however, the chosen utility software must be compatible with the PCMCIA (PC Card) Card Services Specification 2.1. If you need to control which resources the Personal488/CARD utilizes, you must load either the Client Driver or Enabler, but not both. The Personal488/CARD’s resources are IRQ level, base I/O port address for sixteen consecutive ports, and PCMCIA Type II socket number (with 0 being the first socket). Using the Client Driver The Client Driver sets the IRQ, Socket # (if more than one PCMCIA socket is available), and an I/O Address Range for communication purposes. The settings which result are referred to as default. There is no predetermined default setting since these settings depend on what the Client Driver finds vacant and, therefore, usable. This does not take into account transparent devices not seen by the Client Driver. Note: Depending on your system configuration, the default settings may conflict with the IRQ, Socket #, and I/O Address Range that your system has already allocated to another device. If this is the case, change the initialization settings as described below. Using the Enabler The Enabler performs the same function of setting up the needed system resources as the Client Driver, but in a more direct and somewhat limited way. The only real advantage of using the Enabler is the amount of PC memory rescued (about 7 kb). This memory would be used indefinitely by the Client Driver, since the Client Driver must store a program in memory to manage “Hot-Swapping.” If the Card and Socket Services are only needed for the Client Driver, you could save more memory by not loading them when using the Enabler. On the down side of using the Enabler, the Personal488/Card must be installed before you run the Enabler. Also, every time the Personal488/Card is removed, and reinstalled, the Enabler must be run. The Enabler requires explicit IRQ, Socket #, and I/O Address Range parameters. If Card and Socket Services are running, they will not know that the Enabler allocated some resources, and may therefore allocate them to another device. Changing Initialization Settings Use the following steps to change the initialization settings, or to initialize the Personal488/CARD system to your specifications and/or needs. Note: If your PC has a valid version of PCMCIA Card and Socket Services software, it is recommended that you use Client Driver, since Client Driver supports Note: “Hot-Swapping” refers to the insertion and removal of the PCMCIA card while the system is powered. 1. Choose between the Client Driver (IOT488CL.SYS) or Enabler (IOT488EN.EXE) files as to which one best suits your needs. The choice heavily depends upon the host computer environment and the desire for Plug and Play functionality. 2. If you choose the Client Driver file option, you will need to update your CONFIG.SYS file by adding the following command line: DEVICE=path\IOT488CL.SYS options Personal488 User’s Manual, Rev. 3.0 Artisan Technology Group - Quality Instrumentation ... Guaranteed | (888) 88-SOURCE | www.artisantg.com I-25 6. Personal488/CARD 3. I. HARDWARE GUIDES The Personal488/CARD must be installed before using the Enabler. The initialization is only valid as long as the Personal488/CARD is present. You will need to update your AUTOEXEC.BAT file with the following command line: path\IOT488EN.EXE options Client Driver The Client Driver has the following CONFIG.SYS file line syntax: DEVICE=path\IOT488CL.SYS [ (GROUP) [ (GROUP) [ ... ]]] where the following parts are described as follows: Part Client Driver Description GROUP ITEM Sxx Bxxx [ITEM[,ITEM[,ITEM]]] Sxx | Bxxx | Ixx The socket number, xx in [0...15], default to any available socket, if omitted. The I/O base address (hex), xxx in [100...3F0], default to any available I/O Ixx address, if omitted. The IRQ level, xx in [0...15], 0 means no interrupt, default to any available IRQ level, if omitted. IOT488CL.SYS The simplest command line, shown above, will configure the card in any PCMCIA socket with available consecutive 16 bytes in the system I/O space, and an available IRQ level. Note that you should not assume the resource selections will always be the same. IOT488CL.SYS (s0,b300,i5) The command line above will configure the card in socket 0 with I/O base address at 300H and IRQ level 5, if those resources are available. IOT488CL.SYS (b300,i5) (i10) ( ) This command line tells the client driver to configure the card in any socket with a base address of 300H and IRQ 5. If not available, the client driver will then try to configure it with a base address and socket number assigned by the Card and Socket Services and IRQ 10. If IRQ 10 is not available, the Client Driver will then try to configure the card with a base address, socket number, and an IRQ level assigned by the Card and Socket Services. Space characters are only allowed in between the groups, not inside a group. The items within a group are separated by a single comma. The order of items in a group does not make any difference. Nor are the characters in an item case sensitive. Enabler The command line syntax for the Enabler is similar to that used by the Client Driver. DEVICE=path\IOT488EN.EXE (Sxx,Bxxx,Ixx[,Wxx]) where the following parts are described as follows: Part Enabler Description GROUP ITEM Sxx Bxxx Ixx Wxx [ITEM[,ITEM[,ITEM]]] Sxx | Bxxx | Ixx The same as the Client Driver syntax, except it must be specified to enable the card. The same as the Client Driver syntax, except it must be specified to enable the card. The same as the Client Driver syntax, except it must be specified to enable the card. Specifies the PCIC memory window, xx (hex) in [80...EF], default to D0 if omitted. IOT488EN.EXE I-26 (Sxx,R[,Wxx]) Personal488 User’s Manual, Rev. 3.0 Artisan Technology Group - Quality Instrumentation ... Guaranteed | (888) 88-SOURCE | www.artisantg.com I. HARDWARE GUIDES 6. Personal488/CARD To reset the card, the command line syntax above can be used, in which R is the reset switch. Socket number must be specified, but Wxx can be omitted (default memory window at D0000H). After executing an IOT488EN.EXE command with the reset option, IOT488EN.EXE must be run again to set the card’s resources. IOT488EN.EXE (s0,r) This command line resets the card in socket 0 (default memory window at D0000H), IOT488EN.EXE (s1,r,wc8) This command line resets the card in socket 1 (with PCIC memory window at C8000H). Configuration Software For ease of use, this text repeats material found in the driver-specific “Installation & Configuration” Sub-Chapters found in Chapters 8 through 12 of this manual. In addition, this text includes Personal488/CARD information not contained elsewhere. Aside from this chapter on Personal488/CARD, you should also read through the “External Device Interfacing” Sub-Chapters found in Chapters 8, 9, and 10 of this manual. Configuration Utility The configuration utility permits you to specify the Driver488 system configuration, add interfaces, define external devices, etc. It does so by modifying the Driver488 startup configuration and is specified in a Windows-style initialization file named DRVR488.INI. The first screen of the CONFIG.EXE program is used to enter the configuration settings so the Driver488 software can be correctly modified to reflect the state of the hardware. The driver can be reconfigured at any time by running the CONFIG.EXE program. Changes to the configuration will not be recognized by the driver until the driver is unloaded and reloaded. Typically, this is accomplished by rebooting your computer or using the utilities MARKDRVR and REMDRVR. For details regarding utilities, refer to the “Utility Programs” Sub-Chapters found in Chapters 8, 9, and 10 of this manual To start the CONFIG program, type CONFIG within the directory in which the configuration utility resides, typically C:\IEEE488. The minimum requirement for configuring your system is to make certain that your Personal488/CARD is selected under “Device Type.” The default settings in all of the other fields match those of the interface as shipped from the factory. If you are unsure of a setting, it is recommended that you leave it as is. Interfaces and External Devices The CONFIG program can configure both interfaces and external devices. Interfaces are the Personal488/Card and serial ports. External devices are instruments or other devices attached to the IEEE 488 bus or the MP488(CT) Counter/Timers and Digital I/O devices. Configuration Program Screens In general, all Driver488 configuration utility screens have three main windows: the “name” of the interfaces or devices on the left, the “configuration” window on the right, and the “instruction” window at the bottom of the screen. Based on current cursor position, the valid keys for each window will display in the Instructions box. To begin the interface configuration, move the cursor in the name window to select an interface description for modification. (Interfaces can be added or deleted using <F3> and <F4>). Notice moving the cursor up and down the list of interfaces or devices in the left window changes the parameters in the configuration window. The configuration fields always correspond with the currently selected interface and device type. Once all modifications have been made to the configuration screen, <F10> must be pressed to accept the changes made or <F9> can be pressed to exit without saving any change. Additional function keys Personal488 User’s Manual, Rev. 3.0 Artisan Technology Group - Quality Instrumentation ... Guaranteed | (888) 88-SOURCE | www.artisantg.com I-27 6. Personal488/CARD I. HARDWARE GUIDES allow the user to continue onto the configuration of external devices via <F5> or to view a graphic representation of the interface card with the selected settings via <F7>. Configuring Driver488 Interfaces Driver488 supports two types of interfaces: IEEE and Serial. Once the CONFIG.EXE program is entered, highlight the Device Type selection from the Configuration Window and choose the CARD488 option from the resulting pop-up menu. The Driver488/DRV screen, shown next, or one similar, will be displayed. Once an interface is selected, the fields and default entries which appear in the configuration window depend on the device type specified. To add another IEEE interface, select <F3>. If you will be using more than one interface, refer to other sections of this manual for additional information, as needed. The configuration parameters of the IEEE interface are described following the figure of the Driver488/DRV screen. Configuration Parameters I-28 • Name: This field is a descriptive instrument name which is manually assigned by the user. This must be a unique name. Typically, IEEE or COM is used (up to 8 characters). • IEEE Bus Address: This is the setting for the IEEE bus address of the board. It will be checked against all the instruments on the bus for conflicts. It must be a valid IEEE bus address from 0 to 30. • Interrupt: A hardware interrupt level can be specified to improve the efficiency of the I/O adapter control and communication using Driver488. Personal488/CARDs may not share the same interrupt level. If no interrupt level is to be used, select NONE. Valid interrupt levels depend on the type of interface, since interrupt sharing is not permitted in the PCMCIA 2.1 specification. Settings are as follows: Levels 3-7, Levels 9-12, Levels 14-15, or NONE. • SysController: This field determines whether or not the Personal488/CARD is to be the System Controller. The system controller has ultimate control of the IEEE 488 bus, and the ability of asserting the interface clear (IFC) and remote enable (REN) signals. Each IEEE 488 bus can have only one system controller. If the PCMCIA IEEE Card is a peripheral, it may still take control of the IEEE 488 bus if the Active Controller passes control to it. The “CARD” may then control the bus and, when it is done, pass control back to the System Controller or another controller, which then becomes the active controller. If the “CARD” will be operating in Peripheral mode (not System Controller), leave this field blank. • LightPen: This field determines whether the LightPen command is to be used. If selected, it will disable the detection of interrupts via setting the light pen status. The default is light pen interrupt enabled. • Timeout (ms): The time out period is the amount of time that data transfers wait before assuming that the device does not transfer data. If the time out period elapses while waiting to transfer data, Personal488 User’s Manual, Rev. 3.0 Artisan Technology Group - Quality Instrumentation ... Guaranteed | (888) 88-SOURCE | www.artisantg.com I. HARDWARE GUIDES 6. Personal488/CARD an error signal occurs. This field is the default timeout for any bus request or action, measured in milliseconds. If no timeout is desired, the value may be set to zero. • Device Type: This field specifies the type of board or module, in this case a Personal488/CARD (CARD488), represented by the IEEE device name selected. I/O Address • IEEE 488: This field is the I/O base address which sets the addresses used by the computer to communicate with the IEEE interface hardware on the board. The address is specified in hexadecimal and can be 100 through 3F0 on even 16-byte boundaries (those ending in 0). The Personal488/CARD uses sixteen (16) consecutive I/O ports. Note: Since many I/O ports in the allowed range are [or may be] in use by other system hardware, we recommend using port 300 to 360 hex. Using a port already in use could cause loss of data, or physical damage. • Wait State: Wait States can be generated if IEEE 488 bus I/O synchronization between the Personal488/CARD and PC is an issue. It should be noted that the time out specification is independent of wait state(s). The Personal488/CARD is fast enough to be compatible with virtually every PC/XT/AT-compatible computer on the market. Even if the computer is very fast, the processor is normally slowed to 8 MHz or below when accessing the I/O channel. If the I/O channel runs faster than 8 MHz, it may be faster than the Personal488/CARD. If this is a suspected problem, the computer can be made to wait for the “CARD” by enabling wait states. Increasing the number of wait states slows down the access to the “CARD”. The overall resultant performance degradation is usually only a few percent. • Bus Terminators: The IEEE 488 bus terminators specify the characters and/or end-or-identify (EOI) signal that are to be appended to data that is sent to the external device, or mark the end of data that is received from the external device. In conclusion, to save your changes to disk press <F10>. All changes will be saved in the directory where you installed Driver488. If at any time you wish to alter your Driver488 configuration, simply rerun CONFIG. The changes made will not take effect until the system is rebooted (Warm or Cold). Driver488/W31 Configuration Utility The configuration utility provided with Driver488/W31 has been updated to provide a familiar Windows user interface. The interface contains the same characteristics as the DOS configuration program, however, the file storage differs as indicated by the table below. Driver Version Windows DOS Driver File Storage File Location DRVR488W.INI WIN.COM (in Windows Directory) DRVR488.INI CONFIG.EXE (in assigned directory) File Name Functionality The Personal488/CARD transfers data to the host computer via the PCMCIA interface. This interface provides access to the PC’s data bus, allowing real-time data collection and storage to disk at 1.0 M byte/sec. The Personal488/CARD built-in 7210 controller device controls the IEEE 488 bus using the IOT7210 Controller Chip, which is 100% compatible with the NEC µPD7210. However, the IOT7210 exhibits better performance and lower power consumption. The programmed I/O mode allows the host computer to acquire individual data samples or large blocks of data under application control. Personal488 User’s Manual, Rev. 3.0 Artisan Technology Group - Quality Instrumentation ... Guaranteed | (888) 88-SOURCE | www.artisantg.com I-29 6. Personal488/CARD I. HARDWARE GUIDES The interrupt transfer mode allows the host computer to perform other tasks until the Personal488/CARD has sent or received a programmed amount of data. This mode provides the most efficient use of computer resources and data transfer. Note: I-30 For more information on the functionality of the Personal488/CARD, refer to the “Data Transfers,” “Operating Modes,” and “Command Descriptions” Sub-Chapters found in Chapters 8 and 9 of this manual. Personal488 User’s Manual, Rev. 3.0 Artisan Technology Group - Quality Instrumentation ... Guaranteed | (888) 88-SOURCE | www.artisantg.com Section II: SOFTWARE GUIDES II-32 Personal488 User’s Manual, Rev. 3.0 Artisan Technology Group - Quality Instrumentation ... Guaranteed | (888) 88-SOURCE | www.artisantg.com Personal488 User’s Manual, Rev. 3.0 Artisan Technology Group - Quality Instrumentation ... Guaranteed | (888) 88-SOURCE | www.artisantg.com II-33 Driver488/DRV II. Software Guides SOFTWARE GUIDES Chapters 7. Overview ........................................................................................ II-33 8. Driver488/DRV.............................................................................. II-34 9. Driver488/SUB ............................................................................ II-133 10. Driver488/W31........................................................................... II-191 11. Driver488/W95........................................................................... II-257 12. Driver488/WNT ......................................................................... II-258 7. Overview The Software Guides section contains chapters pertaining to various Driver488 software. Information includes instruction for installation and configuration, device interfacing, and API (Application Program Interface) command references. Note that more detailed topic-specific tables of contents are included with each of the topics identified above. In addition to this manual, Power488 and PowerCT users receive a manual supplement describing the Standard Commands for Programmable Instruments (SCPI) command set and the IOTTIMER.DLL, a Microsoft Windows Dynamic Link Library of functions. II-34 Personal488 User’s Manual, Rev. 3.0 Artisan Technology Group - Quality Instrumentation ... Guaranteed | (888) 88-SOURCE | www.artisantg.com II. SOFTWARE GUIDES 8. 8. Driver488/DRV Driver488/DRV Sub-Chapters 8A. 8B. 8C. 8D. 8E. 8F. 8G. 8H. 8I. 8J. 8K. 8L. 8M. 8N. 8O. 8P. 8Q. 8A. Introduction............................................................................... II-34 Installation & Configuration.................................................. II-35 External Device Interfacing ................................................... II-45 Getting Started.......................................................................... II-49 Microsoft C ................................................................................. II-53 Microsoft Fortran ..................................................................... II-63 QuickBASIC ............................................................................... II-64 Turbo C........................................................................................ II-71 Turbo Pascal .............................................................................. II-82 Spreadsheets .............................................................................. II-90 Other Languages ....................................................................... II-95 Language-Specific Information ........................................... II-104 Data Transfers ......................................................................... II-108 Operating Modes ..................................................................... II-115 Utility Programs ..................................................................... II-120 Command Descriptions ......................................................... II-124 Command Reference .............................................................. II-132 Introduction Driver488 represents a family of software drivers for IEEE 488 interfaces and other peripherals, emphasizing a consistent, easy to use interface to simplify IEEE 488 instrument control and application program development. Different versions of the driver are available to suit almost any application. For maximum functionality and ease of use, a resident driver is accessible via both Character Command Language (CCL) and subroutine calls to control a multitude of IEEE 488 interfaces and other instruments. At the opposite extreme is a small, fast driver entirely linked to the application program, which can control just one IEEE 488 interface and instruments attached thereto. Portability of any given application among the Driver488 family members is ensured with a consistent interface, which allows an application using CCL to use any driver offering that interface with minimal change. Similarly, any application using the subroutine interface would require little if any change to be used with another version of Driver488. Driver488/DRV uses HP (Hewlett-Packard) style commands which simplify IEEE 488 instrument control and application development by transparently executing multiple low-level bus management tasks, shielding the user form the complexities of IEEE 488 protocol. These commands can be used in application programs written in any popular software language. Driver488/DRV features a menudriven installation/configuration program with options for programming language; type and number of hardware interfaces (IEEE 488 board type and options); and external devices, such as time out limits, terminators, symbolic device names, and device numeric addresses. To get optimal use of your PC’s conventional 640Kbyte memory, Driver488/DRV automatically detects and loads itself into high memory when used with a system employing DOS 5.0 or higher. Driver488/DRV provides PC serial (COM) port support, enabling direct serial communication from programming languages and spreadsheets. In addition, Driver488/DRV supports asynchronous Personal488 User’s Manual, Rev. 3.0 Artisan Technology Group - Quality Instrumentation ... Guaranteed | (888) 88-SOURCE | www.artisantg.com II-35 8A. Overview II. SOFTWARE GUIDES - 8. Driver488/DRV communication and automatic program vectoring to service routines for Basic, C and Pascal programs. For example, upon the occurrence of a specified event, such as SRQ, TRIGGER, TALK, or ERROR, Driver488/DRV will automatically vector to your interrupt service routine. Using Driver488/DRV, SCPI (Standard Command for Programmable Instruments) programmability can be brought to Power488 I/O functions. SCPI is a language that defines common commands and syntax for communication between controller and instruments. As such, it provides a consistent programming environment for all SCPI-compatible equipment, simplifying programming and letting you exchange instruments regardless of their make or type, without the need for extensive reprogramming. Driver488/DRV supports up to four IEEE 488 interfaces. There can be multiple external devices on each interface up to the limits imposed by either electrical loading (14 devices), or with a product such as Expander488, to the limits of the IEEE 488 addressing protocols. Driver488/DRV supports the GP488B, AT488, GP488/MM, MP488, MP488CT and NB488 series of IEEE 488.2 interface hardware. All interaction between the application and the driver takes place via subroutine calls. 8B. Installation & Configuration Topics • • • Before You Get Started ................................................................. II-35 Making Backup Disk Copies ........................................................ II-36 Driver Installation.......................................................................... II-36 Selective Installation of Support files........................................................ II-36 Driver Installation to Disk .......................................................................... II-37 • Configuration Utility ..................................................................... II-38 Interfaces ........................................................................................................ II-38 External Devices ............................................................................................ II-38 Opening the Configuration Utility ............................................................. II-38 • • • • Configuration of IEEE 488 Interfaces........................................ II-39 Configuration of Serial Interfaces.............................................. II-41 Configuration of IEEE 488 External Devices ........................... II-42 Multiple Interface Management.................................................. II-43 Before You Get Started Prior to Driver488/DRV software installation, configure your interface board by setting the appropriate jumpers and switches as detailed in “Section I: Hardware Guides.” Note the configuration settings used, as they must match those used within the Driver488/DRV software installation. Once the IEEE 488 interface hardware is installed, you are ready to proceed with the steps outlined within this Sub-Chapter to install and configure the Driver488/DRV software. The Driver488/DRV software disk(s) include the driver files themselves, installation tools, example programs, and various additional utility programs. A file called README.TXT, if present, is a text file containing new material that was not available when this manual went to press. II-36 Personal488 User’s Manual, Rev. 3.0 Artisan Technology Group - Quality Instrumentation ... Guaranteed | (888) 88-SOURCE | www.artisantg.com II. SOFTWARE GUIDES - 8. Driver488/DRV 8B. Installation & Configuration NOTICE 1. The Driver488/DRV software, including all files and data, and the diskette on which it is contained (the “Licensed Software”), is licensed to you, the end user, for your own internal use. You do not obtain title to the licensed software. You may not sublicense, rent, lease, convey, modify, translate, convert to another programming language, decompile, or disassemble the licensed software for any purpose. 2. You may: • only use the software on one single machine • copy the software into any machine-readable or printed form for backup in support of your use of the program on the single machine • transfer the programs and license to use to another party if the other party agrees to accept the terms and conditions of the licensing agreement. If you transfer the programs, you must at the same time either transfer all copies whether in printed or in machine-readable form to the same party and destroy any copies not transferred. The first thing to do, before installing the software, is to make a backup copy of the Driver488/DRV software disks onto blank disks. To make the backup copy, follow the instructions given below. Making Backup Disk Copies 1. Boot up the system according to the manufacturer’s instructions. 2. Type the command CD\ to go back to your system’s root directory. 3. Place the first Driver488/DRV software disk into drive A:. 4. Type DISKCOPY A:A: and follow the instructions given by the DISKCOPY program. (You may need to swap the original (source) and blank (target) disks in drive A: several times to complete the DISKCOPY. If your blank disk is unformatted, the DISKCOPY program allows you to format it before copying.) 5. When the copy is complete, remove the backup (target) disk from drive A: and label it to match the original (source) Driver488/DRV software disk just copied. 6. Store the original Driver488/DRV software disk in a safe place. 7. Place the next Driver488/DRV software disk into drive A: and repeat steps 4-6 for each original (source) disk included in the Driver488/DRV package. 8. Place the backup copy of the installation disk into drive A:, type A:INSTALL, then follow the instructions on the screen. Driver Installation There are two steps involved in installing Driver488/DRV onto your working disk: The required files must first be extracted from the distribution disk to the working disk, and the software must be configured. Since the Driver488/DRV files are compressed on the distribution disks, the INSTALL program must be used to properly extract them. Driver488/DRV should normally be installed on a hard disk. Installing Driver488/DRV on a floppy disk, while possible, is not recommended. Assuming that the Driver488/DRV disk is in drive A:, start the installation procedure by typing A:INSTALL at the prompt. Selective Installation of Support files The installation program allows you to choose which files are to be copied to your working disk. A menu will display a listing of the following files: Personal488 User’s Manual, Rev. 3.0 Artisan Technology Group - Quality Instrumentation ... Guaranteed | (888) 88-SOURCE | www.artisantg.com II-37 8B. Installation & Configuration Files Driver488/DRV Driver Modules Driver488/DRV Executable ReadMe File Default Config Files Character Command Language Files IEEE 488 Utility Files Transfer488 Utilities Example Files II. SOFTWARE GUIDES - 8. Driver488/DRV Description Contains the driver modules needed for the initial installation and proper execution. The primary file which loads the driver; required for proper execution. Contains any new information about the driver not already included in the user manual. These are .INI files which contain suggested configurations for the various interfaces. Programming language specific examples and utilities. Includes utilities for redirection of COM and LPT ports, the Keyboard Controller, and utilities for removing Driver488/DRV from memory after use. Utilities for transferring files to and from HP computers using HP BASIC (Rocky Mountain Basic). Sample programs. All the files will appear with a check mark beside them, indicating that they are selected for installation. If you wish to unselect an item, please move the cursor to the item bar and press the <Space Bar> to toggle the check mark off. Pressing the <Space Bar> again will toggle the check mark on. In this way you can select or omit those file categories you wish to install. For a normal first installation, allow INSTALL to install all parts of Driver488/DRV. For a first-time installation, the Device Driver files are mandatory. However, if hard disk space is extremely limited, certain parts, such as language support and examples for languages not immediately used, may be omitted. The distribution disks may be used to install or reinstall any or all parts of Driver488/DRV at a later time. You may rerun INSTALL at any time to install files that you previously omitted. When you have finished your selection, press <Enter>. The Directory Selection screen will appear with two horizontal windows. Driver Installation to Disk The Directory Selection screen allows you to specify where the Driver488/DRV files are to be installed. The upper window will be highlighted and contain the words “Install from:” on the first line, and the path from which you are installing Driver488/DRV (typically “A:”) on the second line. If this “Install from:” path is correct, press <Enter> to accept and move to the next window. If it is not correct, edit the path before pressing <Enter>. Pressing <Enter> will move you to the second window, with the words “Install to:” on the first line and the default directory “C:\IEEE488" on the second line. Simply press <Enter> to accept the default or edit the path as you prefer and then press <Enter>. Two smaller boxes will display below the two directory windows: “Start” and “Cancel.” “Start” should be highlighted. To proceed with installing Driver488/DRV, press <Enter>. Otherwise move the cursor to “Cancel” and press <Enter> to abort the installation. If you proceed with the installation, the files selected from the previous menu will be extracted from the distribution disk to your hard disk. INSTALL will prompt you for disk insertion if you have a multiple disk distribution set of Driver488/DRV. When INSTALL is finished transferring the files to your hard disk, the message “Driver488/DRV Software Installation is Complete” will appear. At this point, press <Enter> to continue with the installation. Next, the install program displays a prompt regarding the modification of your AUTOEXEC.BAT file. This file holds operating system commands that are executed after all other system setup and configuration is done, and just before commands are accepted from the keyboard. The AUTOEXEC.BAT file can be used for many purposes. For more details, see your operating system manual. The Driver488/DRV installation program provides the following options: II-38 Personal488 User’s Manual, Rev. 3.0 Artisan Technology Group - Quality Instrumentation ... Guaranteed | (888) 88-SOURCE | www.artisantg.com II. SOFTWARE GUIDES - 8. Driver488/DRV 8B. Installation & Configuration • If “Yes” is selected, the Driver488/DRV command line will be added to the beginning of your AUTOEXEC.BAT file. • If “No” is selected, no changes will be made to the AUTOEXEC.BAT file. • If “Manually” is selected, you can choose where the Driver488/DRV command line is to be added in your AUTOEXEC.BAT file. After modifying the AUTOEXEC.BAT file, the installation program automatically invokes the configuration program: CONFIG. You may also run CONFIG from the command line at a later time to modify your configuration as required. Note if any error messages display when you are trying to load DRVR488.EXE in memory, If so, refer to “Section IV: Troubleshooting” in this manual. Configuration Utility The configuration utility permits you to specify the Driver488/DRV system configuration, add interfaces, define external devices, etc. It does so by modifying the Driver488/DRV startup configuration specified in a Windows-style initialization file named DRVR488.INI. The first screen of the CONFIG program is used to enter the configuration settings so the Driver488/DRV software can be correctly modified to reflect the state of the hardware. The driver can be reconfigured at any time by running the CONFIG program. Changes to the configuration will not be recognized by the driver until the driver is unloaded and reloaded. Typically, this is accomplished by rebooting your computer or using the utilities MARKDRVR and REMDRVR. For details on these utilities, refer to the “Utility Programs” Sub-Chapters found in Chapters 8 and 9 in this manual. To start the CONFIG program, type CONFIG within the directory in which the configuration utility resides, typically C:\IEEE488. Interfaces The minimum requirement for configuring your system is to make certain that your IEEE 488.2 interface board or module is selected under “Device Type.” The default settings in all of the other fields match those of the interface as shipped from the factory. If you are unsure of a setting, it is recommended that you leave it as is. External Devices The CONFIG program can configure both interfaces and external devices. Interfaces are IEEE interface boards and serial ports. External devices are instruments or other devices attached to the IEEE 488 bus or the MP488(CT) Counter/Timers and Digital I/O devices. For more details, refer to the topic “Configuration of IEEE 488 External Devices” found later in this Sub-Chapter. Opening the Configuration Utility In general, all Driver488/DRV configuration utility screens have three main windows: the “name” of the interfaces or devices on the left, the “configuration” window on the right, and the “instruction” window at the bottom of the screen. Based on current cursor position, the valid keys for each window will display in the Instructions box. To begin the interface configuration, move the cursor in the name window to select an interface description for modification. (Interfaces can be added or deleted using <F3> and <F4>.) Notice moving the cursor up and down the list of interfaces or devices in the left window changes the parameters in the configuration window. The configuration fields always correspond with the currently selected interface and device type. Once all modifications have been made to the configuration screen, <F10> must be pressed to accept the changes made or <F9> can be pressed to exit without making any change. Additional function keys Personal488 User’s Manual, Rev. 3.0 Artisan Technology Group - Quality Instrumentation ... Guaranteed | (888) 88-SOURCE | www.artisantg.com II-39 8B. Installation & Configuration II. SOFTWARE GUIDES - 8. Driver488/DRV allow the user to continue onto the configuration of external devices via <F5> or to view a graphic representation of the interface card with the selected settings via <F7>. Configuration of IEEE 488 Interfaces The Driver488/DRV supports two types of interfaces: IEEE and Serial (COM). The following Driver488/DRV figure displays the configuration screen of an MP488CT IEEE 488.2 interface. To add another IEEE interface, select <F3>. If you will be using more than one interface, refer to the final topic “Multiple Interface Management” in this Sub-Chapter. Once an interface is selected, the fields and default entries which display in the configuration window depend on the device type specified. The configuration parameters of the interface, are as follows: Configuration Parameters • Name: This field is a descriptive instrument name which is manually assigned by the user. This must be a unique name. Typically, IEEE or COM is used. • IEEE Bus Address: This is the setting for the IEEE bus address of the board. It will be checked against all the instruments on the bus for conflicts. It must be a valid address from 0 to 30. • DMA: A direct memory access (DMA) channel can be specified for use by the I/O interface card. If DMA is to be used, select a channel as per the hardware setting. If no DMA is to be used, select NONE. The NB488 does not support DMA, so the DMA field will not display if this device type is used. Valid settings are shown in the table. • Interrupt: A hardware interrupt level can be specified to improve the efficiency of the I/O Board I/O adapter control and communication GP488B using Driver488/DRV. For DMA operation AT488 or any use of OnEvent and Arm functions, MP488 an interrupt level must be selected. Boards MP488CT may share the same interrupt level. If no NB488 interrupt level is to be used, select NONE. CARD488 Valid interrupt levels depend on the type of interface. Possible settings are shown in the table. • II-40 I/O Board GP488B AT488 MP488 MP488CT NB488 CARD488 Specified DMA Channel 1, 2, 3 or none 1, 2, 3, 5, 6, 7 or none 1, 2, 3, 5, 6, 7 or none 1, 2, 3, 5, 6, 7 or none Not applicable Not applicable Specified Interrupt Level levels 2-7 or none levels 3-7, 9-12, 14-15 or none levels 3-7, 9-12, 14-15 or none levels 3-7, 9-12, 14-15 or none level 7 for LPT1, level 5 for LPT2 levels 3-7, 9-12, 14-15 or none SysController: This field determines whether or not the IEEE 488 interface card is to be the System Controller. The System Controller has ultimate control of the IEEE 488 bus, and the ability of asserting the interface clear (IFC) and remote enable (REN) signals. Each IEEE 488 bus can have only one System Controller. If the board is a peripheral, it may still take control of the IEEE 488 bus if the Active Controller passes control to the board. The board may then control the Personal488 User’s Manual, Rev. 3.0 Artisan Technology Group - Quality Instrumentation ... Guaranteed | (888) 88-SOURCE | www.artisantg.com II. SOFTWARE GUIDES - 8. Driver488/DRV 8B. Installation & Configuration bus and, when it is done, pass control back to the System Controller or another computer, which then becomes the active controller. If the board will be operating in Peripheral mode (not System Controller), select NO in this field. • LightPen: This field determines whether the LIGHT PEN command is to be used. If selected, it will disable the detection of interrupts via setting the light pen status. The default is light pen interrupt enabled. • Timeout (ms): The time out period is the amount of time that data transfers wait before assuming that the device does not transfer data. If the time out period elapses while waiting to transfer data, an error signal occurs. This field is the default timeout for any bus request or action, measured in milliseconds. If no timeout is desired, the value may be set to zero. • Device Type: This field specifies the type of board or module (such as GP488, MP488CT or NB488) represented by the IEEE device name selected. I/O Address • IEEE 488: This field is the I/O base address which sets the addresses used by the computer to communicate with the IEEE interface hardware on the board. The address is specified in hexadecimal and can be 02E1, 22E1, 42E1 or 62E1. Note: This field does not apply to the NB488. Instead, the NB488 uses the I/O address of the data register (the first register) of the LPT port interface, typically 0x0378. • Digital I/O: This field is the base address of the Digital I/O registers. It is only applicable for MP488 and MP488CT boards. Note that the Digital I/O SCPI communication parameters are configured as an external device. Refer to the “Section I: Hardware Guides” for more information. • Counter/Timer: This field is the base address of the Counter/Timer registers. It is only applicable for MP488CT boards. Note the Counter/Timer SCPI communication parameters are configured as an external device. Refer to the “Section I: Hardware Guides” for more information. • Bus Terminators: The IEEE 488 bus terminators specify the characters and/or end-or-identify (EOI) signal that is to be appended to data that is sent to the external device, or mark the end of data that is received from the external device. This second Driver488/DRV configuration example displays an IEEE interface with the NB488 interface module specified. This screen resembles the previous IEEE interface example with the exception of 3 different configuration parameters which are described below. Configuration Parameters • LPT Port: The LPT port is the external parallel port to be connected to the NB488. Valid selections are: LPT1, LPT2 or LPT3. This field takes the place of the I/O Address field. • Enable Printer Port: Because most laptop and notebook PCs provide only one LPT port, the NB488 offers LPT passthrough for simultaneous IEEE 488 instrument control and printer operation. If this option is selected, a printer connected to the NB488 will operate as if it were connected directly to the LPT port. If not enabled, then the printer will not operate when the NB488 is active. The disadvantage Personal488 User’s Manual, Rev. 3.0 Artisan Technology Group - Quality Instrumentation ... Guaranteed | (888) 88-SOURCE | www.artisantg.com II-41 8B. Installation & Configuration II. SOFTWARE GUIDES - 8. Driver488/DRV of pass-through printer support is that it makes communications with the NB488 about 20% slower. • LPT Port Type: This field is used to specify whether the LPT port is a standard IBM PC/XT/AT/PS/2 compatible port. Valid options are: Standard or 4-bit. The slower 4-bit option is provided for those computers which do not fully implement the IBM standard printer port. These computers can only read 4 bits at a time from the NB488 making communication with the NB488 up to 30% slower. A test program has been provided with NB488 to help identify the user’s LPT port type. Once the NB488 is installed, type: NBTEST.EXE. This program will determine if your computer can communicate with the NB488 and what type of LPT port is installed (Standard or 4-bit). It is important to note there are four different versions of the NB488 driver. The CONFIG utility determines which is to be used based on the user-defined parameters. If both pass-through printer support and the 4-bit LPT port support are selected, then the communication with the IEEE 488 bit may be slowed as much as 40% compared with the fastest case in which neither option is selected. The actual performance will very depending on the exact type and speed of the computer used. To save your changes to disk, press <F10>, or to exit without making any changes, press <F9>. All changes will be saved in the directory where you installed Driver488/DRV. If at any time you wish to alter your Driver488/DRV configuration, simply rerun CONFIG. Configuration of Serial Interfaces The following Driver488/DRV screen displays the configuration of a Serial (COM) interface. To add another serial interface, select <F3>. The following serial interface parameters are available for modification. Configuration Parameters II-42 • Name: This field is a descriptive instrument name which is manually assigned. This must be a unique name. • Baud Rate: The allowable Data Rates range from 75 to 115.2K and all standard rates therein. This includes: 75, 110, 150, 300, 600, 1200, 1800, 2400, 4800, 9600, 19.2K, 38.4K, 57.6K, and 115.2K. Slower processors may have difficulty at the higher data rates because of the amount of processing required for terminator, end of buffer, and fill processing. • Flow: X-ON/X-OFF is supported. With this configured, Driver488/DRV scans incoming characters for an X-OFF character. Once it is received, no more characters are transmitted until an X-ON character is received. The driver also issues an X-OFF to ask the attached device to stop sending when its internal buffer becomes three-quarters full and issues an X-ON when its buffer has emptied to one-quarter full. Personal488 User’s Manual, Rev. 3.0 Artisan Technology Group - Quality Instrumentation ... Guaranteed | (888) 88-SOURCE | www.artisantg.com II. SOFTWARE GUIDES - 8. Driver488/DRV 8B. Installation & Configuration • Interrupt: A hardware interrupt level can be specified to improve the efficiency of the I/O adapter control and communication using Driver488/DRV. For any use of OnEvent and Arm functions, an interrupt level must be selected. If no interrupt level is to be used, select NONE. Valid interrupt levels depend on the device type. • Input Buffer: This field is used to enter the buffer sizes for I/O. • Output Buffer: This field is used to enter the buffer sizes for I/O. • Parity: Parity can be EVEN, ODD, NONE, MARK, or SPACE. • CTS Timeout: The driver supports 3 hardware handshake lines: Data Carrier Detect (DCD), Data Set Ready (DSR), and Clear To Send (CTS). Each line can be individually designated to be ignored, used with no specified timeout, or used with a selected timeout. The timeout is selected by specifying the number of milliseconds to wait for the indicated condition to become satisfied. • Data Bits: Data formats from 5 though 8 Data Bits are supported. • DSR Timeout: The driver supports 3 hardware handshake lines: Data Carrier Detect (DCD), Data Set Ready (DSR), and Clear To Send (CTS). Each line can be individually designated to be ignored, used with no specified timeout, or used with a selected timeout. The timeout is selected by specifying the number of milliseconds to wait for the indicated condition to become satisfied. • Stop Bits: With 6, 7, or 8 Data Bits specified, either 1 or 2 Stop Bits are allowed. With 5 Data Bits specified, 1 or 1.5 Stop Bits may be selected. • DCD Timeout: The driver supports 3 hardware handshake lines: Data Carrier Detect (DCD), Data Set Ready (DSR), and Clear To Send (CTS). Each line can be individually designated to be ignored, used with no specified timeout, or used with a selected timeout. The timeout is selected by specifying the number of milliseconds to wait for the indicated condition to become satisfied. • Timeout (ms): The time out period is the amount of time that data transfers wait before assuming that the device does not transfer data. If the time out period elapses while waiting to transfer data, an error signal occurs. This field is the default timeout for any bus request or action, measured in milliseconds. If no timeout is desired, the value may be set to zero. • Device Type: This field specifies the type of device represented by the serial external device name selected. • I/O Address: The I/O Address is the computer bus address for the board. It is set to default values, as listed in the table, during the initial installation. These values can be changed, however, using the default address values is recommended. Any conflict will be noted by a pop up help screen. • Bus Terminators: The bus terminators specify the characters to be appended to data that is sent to the external device, or mark the end of data that is received from the external device. I/O Comm. COM1 COM2 COM3 COM4 I/O Comm. COM1 COM2 COM3 COM4 Typical Interrupt Level typically level 4 typically level 3 typically level 4 or 5 typically level 2 or 3 Default Address Values typically address 3F8 typically address 2F8 typically address 3E8 typically address 2E8 Configuration of IEEE 488 External Devices Within your IEEE 488.2 application program, devices on the bus may be accessed by name. These names must be created and configured with the CONFIG program, after you have configured your interfaces. The following figure displays the configuration screen of an external device named DMM195. When configuring an IEEE interface, this screen can be accessed by selecting <F5> Configure External Devices. Personal488 User’s Manual, Rev. 3.0 Artisan Technology Group - Quality Instrumentation ... Guaranteed | (888) 88-SOURCE | www.artisantg.com II-43 8B. Installation & Configuration II. SOFTWARE GUIDES - 8. Driver488/DRV To add additional devices, use <F3>. Note this external device screen is also used to configure MP488CT Digital I/O (DIGIO) and Counter/Timers (TIMER). The following parameters are available for modification. Configuration Parameters • Name: External device names are user defined names which are used to convey the configuration information about each device, from the initialization file to the application program. Each external device must have a name to identify its configuration to Driver488/DRV. The name can then be used to obtain a handle to that device which will be used by all of the Driver488/DRV commands. External device names consist of 1 to 6 characters, and the first character must be a letter. The remaining characters may be letters, numbers, or underscores ( _ ). External device names are case insensitive; upper and lower case letters are equivalent. ADC is the same device as adc. • IEEE Bus Address: This is the setting for the IEEE 488 bus address of the device. It will be checked against all the devices on the bus for conflicts. The IEEE 488 bus address consists of a primary address from 00 to 31, and an optional secondary address from 00 to 31 or “NONE”. • Timeout (ms): The time out period is the amount of time that data transfers wait before assuming that the device does not transfer data. If the time out period elapses while waiting to transfer data, an error signal occurs. This field is the default timeout for any bus request or action, measured in milliseconds. If no timeout is desired, the value may be set to zero. • Device Type: This field specifies the type of device represented by the external device name selected. • Bus Terminators: The IEEE 488 bus terminators specify the character(s) and/or end-or-identify (EOI) signal that is to be appended to data that is sent to the external device, or mark the end of data that is received from the external device. Note: Because secondary addresses and bus terminators are specified for each external device name, it may be useful to have several different external devices defined for a single IEEE 488 bus device. For example, separate names would be used to communicate with different secondary addresses within a device. Also, different names might be used for communication of command and status strings (terminated by carriage return/line feed) and for communication of binary data (terminated by EOI). Note: If installation or configuration problems exist, refer to “Section IV: Troubleshooting.” To save your changes to disk, press <F10>. All changes will be saved in the directory where you installed Driver488/DRV. If at any time you wish to alter your Driver488/DRV configuration, simply rerun CONFIG. II-44 Personal488 User’s Manual, Rev. 3.0 Artisan Technology Group - Quality Instrumentation ... Guaranteed | (888) 88-SOURCE | www.artisantg.com II. SOFTWARE GUIDES - 8. Driver488/DRV 8B. Installation & Configuration Multiple Interface Management When designing a complex data acquisition system, it might be necessary to have more than one IEEE 488 bus interface controlled by the computer. Typical instances include: A system with more than 15 devices, the use of distributed control or the simultaneous operation of multiple transactions. System With More Than 15 Devices The IEEE 488 electrical specification limits the number of devices on a single bus (including the controller) to 15. While a bus expander, such as the Expander488, can increase that limit to 28, complex systems may require two or more IEEE 488 buses and have more controllers. In this case, two or more interfaces would be used, each configured as a System Controller. Because they are attached to completely separate buses, the two interfaces do not affect each other. They can have the same IEEE 488 bus address, and the addresses of the devices on one bus may be the same as the addresses of the devices on the other bus. Use of Distributed Control Two or more IEEE 488 buses can also be useful when they have different functions. For example, a computer might use one bus as a System Controller to control instruments, while using another bus as a Peripheral, to communicate with another computer. Simultaneous Operation of Multiple Transactions Another use of two IEEE 488 buses is to allow simultaneous operation of two separate transactions. Some instruments, such as spectrum analyzers, have the ability to send their results, through the IEEE 488 bus, directly to a printer or a plotter. Such an instrument, along with a printer or plotter, would be attached to one interface, while other devices would be attached to another IEEE 488 interface. The computer could configure the spectrum analyzer to plot its results and then pass control to it, allowing it to control the printer or plotter. Meanwhile, the computer would be using the other bus to control other equipment. To allow such complex systems, Driver488/DRV supports as many as four interfaces on a single computer. The CONFIG program helps you to configure multiple interfaces and notifies you of possible conflicts. The examples in this manual assume, for the most part, that only one board is installed in the system, and that it is accessed through the three device names given above for the first board. If multiple interfaces are installed, then they are accessed in just the same manner as the first board, except that different device names, as given above, are used. If, for example, two interfaces are installed, then a BASIC program to use them might be: 100 110 120 130 140 150 OPEN “\DEV\IEEEIN” FOR INPUT AS #1 OPEN “\DEV\IEEEOUT” FOR OUTPUT AS #2 OPEN “\DEV\IEEEIN2" FOR INPUT AS #3 OPEN “\DEV\IEEEOUT2" FOR OUTPUT AS #4 PRINT#2,"OUTPUT 10;R0X" PRINT#4,"OUTPUT 10;R1X" where line 140 sends R0X to device 10 on the IEEE 488 bus controlled by board 1, and line 150 send R1X to device 10 on the second IEEE 488 bus. Because they are on two physically different IEEE 488 buses, there is no confusion as to which device 10 is being accessed. Note: If installation or configuration problems exist, refer to “Section IV: Troubleshooting.” Personal488 User’s Manual, Rev. 3.0 Artisan Technology Group - Quality Instrumentation ... Guaranteed | (888) 88-SOURCE | www.artisantg.com II-45 8C. External Device Interfacing 8C. II. SOFTWARE GUIDES - 8. Driver488/DRV External Device Interfacing Topics • • • • • • • Introduction..................................................................................... II-45 Character Command Language (CCL) ...................................... II-45 DOS Devices..................................................................................... II-46 Configuration of Named Devices ................................................ II-46 Use of External Devices................................................................. II-47 Direct I/O with DOS Devices ........................................................ II-47 Extensions For Multiple Interfaces............................................ II-48 Duplicate Device Names............................................................................... II-48 Access of Multiple Interfaces ....................................................................... II-48 Example .......................................................................................................... II-49 Introduction This Sub-Chapter is a technical review of external device interfacing. It contains information on how to use external devices, DOS devices and multiple interfaces. Driver488/DRV controls I/O interfaces and their attached external devices. In turn, Driver488/DRV is controlled by one of two access methods: the Character Command Language (CCL), and direct DOS I/O devices. Driver488/DRV communicates directly with I/O interfaces, such as an IEEE 488 interface board and a serial (RS-232) port. More than one I/O interface may reside on a single plug-in board. For example, an RS-232 board often contains two or four functionally separate I/O interfaces, one for each port. The GP488B board contains the IEEE 488 I/O interface; and an MP488CT board contains an IEEE 488 interface, a digital I/O interface, and a counter/timer I/O interface. I/O interfaces connect to external devices such as: digitizers, multimeters, plotters, and oscilloscopes (IEEE 488 interface); and serial devices such as printers, plotters, and modems (serial RS-232 port). Driver488/DRV allows direct control of IEEE 488 external devices, but it does not support other external devices such as an RS-232 plotter. Such devices are supported by directly controlling the I/O interface (serial port). Driver488/DRV is controlled by sending data and commands, and receiving responses and status by one of two access methods: the Character Command Language, and Direct DOS I/O devices. These methods, also known as Application Program Interfaces or APIs, are available to connect the application (user’s) program to Driver488/DRV. Character Command Language (CCL) The Character Command Language (CCL) API is a type of DOS device driver that can control and communicate with Driver488/DRV. A DOS device driver is a special type of program that appears to the user’s program as a file that can be written to and read from like any disk file, but that does not actually read and write the disk. For example, the DOS command: COPY FILE.LST LPT1 copies the disk file FILE.LST to the device driver LPT1 which prints FILE.LST. There is no file named LPT1; the LPT1 device driver program has the responsibility for communicating with the printer. The COPY command can write to LPT1 just like an ordinary file, but DOS knows LPT1 is only a device driver and allows it to process the data. II-46 Personal488 User’s Manual, Rev. 3.0 Artisan Technology Group - Quality Instrumentation ... Guaranteed | (888) 88-SOURCE | www.artisantg.com II. SOFTWARE GUIDES - 8. Driver488/DRV 8C. External Device Interfacing The Character Command Language is a device driver that writes commands to, and reads responses from, Driver488/DRV. To use the Character Command Language, the application program opens a file with a special name, such as: “\DEV\IEEE”, and uses standard DOS file I/O commands to communicate with the Character Command Language device driver. Since the CCL is a device driver, standard DOS commands such as: TYPE and COPY may be used to communicate with Driver488/DRV via the CCL. DOS Devices Driver488/DRV may also be controlled by using DOS Devices. A DOS Device is a special type of DOS device driver that uses Driver488/DRV to communicate with a single External Device. Remember that, as a DOS device driver, a DOS Device may be written to and read from, like any disk file. When writing data to a DOS Device, the device driver commands Driver488/DRV to send the data to the corresponding External Device. Similarly, when reading from the DOS Device, the device driver commands Driver488/DRV to read data from the External Device. Driver488/DRV allows DOS Devices to be created that refer to specific External Devices, just as LPT1 refers to the printer. For example, if an IEEE 488 plotter were configured as a DOS Device named PLOTDD (DD for DOS Device), then we could use COPY to send a plot file to it: COPY PLOTFILE.PLT PLOTDD Configuration of Named Devices External Devices and DOS Devices are most easily configured by using CONFIG. The device names, terminators, time out period, and bus addresses may be entered into CONFIG which then writes a configuration file containing the device configuration information. This configuration file is automatically read when Driver488/DRV loads to install the configured devices. Every device to be accessed by Driver488/DRV must have a valid device name. Driver488/DRV comes with several device and interface names preconfigured for use. Among those already configured for the GP488B board, for example, are: IEEE and COM1. You can configure up to 50 external devices for the IEEE 488 bus. It is also possible to configure new named devices by using the Driver488/DRV command MAKE DEVICE. The MAKE DEVICE command creates a temporary device that is an identical copy of an already existing Driver488/DRV device. The new device has default configuration settings identical to those of the existing device. The new device can then be reconfigured by calling the proper functions, such as BUS ADDRESS, INT LEVEL, and TIME OUT. When Driver488/DRV is closed, the new device is forgotten unless the KEEP DEVICE command is used to make it permanent. The following code illustrates how the Character Command Language API version of the MAKE DEVICE command could be used to configure several new named devices: 100 110 120 200 210 220 300 310 320 PRINT#1,"MAKE DEVICE DMM =ADC" PRINT#1,"BUSADDRESS 16" PRINT#1,"TERM CR LF EOI" PRINT#1,"MAKE DEVICE SCOPECMD =ADC" PRINT#1,"BUSADDRESS 1200" PRINT#1,"TERM LF" PRINT#1,"MAKE DEVICE SCOPE =ADC" PRINT#1,"BUSADDRESS 1201" PRINT#1,"TERM EOI" Lines 100-120 of the above example define an external device named DMM (digital multi-meter) as device 16 with bus terminators of carriage-return line-feed (CR LF) and EOI. Lines 200-220 configure an oscilloscope command channel to use line-feed as its IEEE 488 bus terminator at a primary address of 12 and secondary address 00. Lines 300-320 configure the oscilloscope data channel to use EOI only as the bus terminator so that it can transfer binary data to its address of 1201: primary address 12, secondary address 01. External Devices and DOS Devices defined at installation time are permanent. Their definitions last until they are explicitly removed or until the computer is restarted. Devices defined after installation Personal488 User’s Manual, Rev. 3.0 Artisan Technology Group - Quality Instrumentation ... Guaranteed | (888) 88-SOURCE | www.artisantg.com II-47 8C. External Device Interfacing II. SOFTWARE GUIDES - 8. Driver488/DRV are normally temporary. They are forgotten as soon as the program finishes. The KEEP DEVICE and KEEP DOS NAME commands can be used to make these devices permanent. The REMOVE DEVICE and REMOVE DOS NAME commands remove the definitions of devices even if they are permanent. These commands are described in further detail in the “Section III: Command Reference” of this manual. Use of External Devices Once we have configured the external devices, we can refer to devices by name. For example, using the Character Command Language, the following program allows Driver488/DRV to communicate with a digital multimeter: 200 210 220 230 300 320 PRINT#1,"CLEAR DMM" PRINT#1,"OUTPUT DMM;VDC" PRINT#1,"ENTER DMM" INPUT#2,VOLTAGE PRINT#1,"TRIGGER SCOPECMD" PRINT#1,"ENTER SCOPE #1000 BUFFER 11";DS%;":";VARPTR(ARRAY) In these commands we CLEAR the DMM, configure it for DC volts, take a reading and store it in the variable VOLTAGE. Next, we TRIGGER the SCOPE at its command address and then read from its binary data channel into an array. While these commands are hypothetical, they show how device names can be used wherever a device address is allowed. As mentioned above, named devices have another advantage: they automatically use the correct bus terminators and time out. When a named device is defined, it is assigned bus terminators and a time out period. When communication with that named device occurs, Driver488/DRV uses these terminators and time out period automatically. Thus TERM statements are not needed to reconfigure the bus terminators for devices that cannot use the default terminators (which are usually carriage-return line-feed EOI). It is still possible to override the automatic bus terminators by explicitly specifying the terminators in an ENTER or OUTPUT command. For more information, see the ENTER, OUTPUT, and TERM commands described in “Section III: Command References.” Direct I/O with DOS Devices DOS Devices can be opened as files for direct communication. For example, we can configure two names to refer to a plotter with an IEEE 488 bus address of 05: 400 PRINT #1,"MAKE DEVICE PLOTTER BUSADDRESS 05" 410 PRINT #1,"MAKE DOS NAME PLOT=PLOTTER" 420 PRINT #1,"MAKE DOS NAME PLOTIN=PLOTTER" Then we can open them, one for input and one for output: 430 OPEN “PLOT” FOR OUTPUT AS #3 440 OPEN “PLOTIN” FOR INPUT AS #4 Two different names are used to communicate with the plotter because, in BASIC, the same file cannot be used for both input and output. In other languages, it might be possible to use the same file (with the same device name) for both input and output. Also note that BASIC normally has a limit of 3 open files. To open more than 3 files (as in this example; 2 for Driver488/DRV commands, and 2 for the plotter), BASIC must be started with the parameter /F:n (where n is the number of files). See your BASIC manual for more details. For clarity, the DOS Device names are not the same as External Device names. In normal use, one of the DOS Device names might be chosen to be the same as an External Device name to show that they communicate with the same External Device. Of course, the two DOS Device names must be different. Once the files are opened, we can communicate PRINT commands to the plotter and INPUT responses from the plotter without using the Driver488/DRV OUTPUT or ENTER commands. When a named device is used as a file, the OUTPUT and ENTER commands occur automatically. 500 PRINT#3,"IN; SP1; PA1000,1000;" ‘Send plot commands 510 PRINT#3,"OE;" ‘Request plotter status 520 INPUT#4,ST$ ‘Read plotter status II-48 Personal488 User’s Manual, Rev. 3.0 Artisan Technology Group - Quality Instrumentation ... Guaranteed | (888) 88-SOURCE | www.artisantg.com II. SOFTWARE GUIDES - 8. Driver488/DRV 8C. External Device Interfacing 530 PRINT ST$ ‘and display it Once a named device is configured, standard DOS commands may be used to transfer data to that device. For example: COPY PLOTFILE.DAT PLOT copies the plot data file PLOTFILE.DAT to the IEEE 488 bus plotter. CAUTION Because named devices can be used as files, some care must be taken so that they do not interfere with other file or device names in the system: 1. Device names should not be the same as the primary name (the part before the period) of any existing files or directories. For example, if you define a device with the name “BASIC”, then you cannot use the program “BASIC.EXE”, and if you name a device “IEEE 488", then you cannot access the Driver488/DRV subdirectory. 2. Device names should not be one of the standard DOS device names: COM, AUX, CON, LPT, or PRN. This could interfere with normal DOS operation. 3. Device names should normally not be duplicated. If duplicate device names are used, only the last one of them installed is accessible. To avoid confusion, duplicate device names are not recommended. With the considerations noted in the above warning, External Devices and DOS Devices make Driver488/DRV significantly easier to use. External Devices allow IEEE 488 bus devices to be referenced symbolically, by a name, rather than by their bus address. They also automatically use the appropriate IEEE 488 bus terminators and time out period. Finally, it is possible to communicate directly with DOS Devices just as you would communicate with any file. Extensions For Multiple Interfaces Driver488/DRV allows the simultaneous control of multiple interfaces each with several attached devices. To avoid confusion, external devices may be referred to by their “full name” which consists of two parts. The “first name” is the hardware interface name, followed by a colon separator ( : ). The “last name” is the external device name on that interface. For example, the “full name” of DMM might be IEEE:DMM. Duplicate Device Names Duplicate device names are most often used in systems that consist of several identical sets of equipment. For example, a test set might consist of a signal generator and an oscilloscope. If three test sets were controlled by a single computer using three separate IEEE 488 interfaces, then each signal generator and each oscilloscope might be given the same name and the program would specify which test set to use by opening the correct interface (OPEN“IEEE” for one, OPEN“IEEE2" for the other), or by using the interface names when communicating with the devices (”IEEE:GENERATOR" for one and “IEEE2:GENERATOR” for the other.) Unique names are appropriate when the devices work together, even if more than one interface is used. If two different oscilloscopes, on two different interfaces are used as part of the same system, then they would each be given a name appropriate to its function. This avoids confusion and eliminates the need to specify the interface when opening the devices. Access of Multiple Interfaces If the computer only has one IEEE 488 interface, then there is no confusion, for every external device is known to be on that interface. However, if the computer has more than one IEEE 488 interface, then rules apply when using the Character Command Language: Personal488 User’s Manual, Rev. 3.0 Artisan Technology Group - Quality Instrumentation ... Guaranteed | (888) 88-SOURCE | www.artisantg.com II-49 8D. Getting Started II. SOFTWARE GUIDES - 8. Driver488/DRV 1. If the external device name is defined on the current hardware interface, then that interface is used to communicate with that device. The current hardware interface is the one that was opened to communicate with Driver488/DRV. This would be IEEE for the first IEEE 488 interface, IEEE2 for the second, etc. 2. If the name is defined on another hardware interface, that other interface is used to communicate with that device. 3. If the name is defined on more than one other interface (and not on the current interface) then one of those interfaces is used. The choice of which particular interface is not defined. 4. In order to specify the interface to use, the interface name may be prefixed with a colon to the device name. For example, IEEE2:DMM refers to the digital multimeter attached to interface IEEE2. If the specified device does not exist on the specified interface, then an error occurs. Example Assume there are three IEEE 488 interfaces: IEEE, IEEE2, and IEEE3 controlling multiple devices: SCOPE (on IEEE), DA (on IEEE2) and DA (on IEEE3). Since there are two external devices, both named DA, their full name must be used to specify them. After opening the interfaces with the following command lines: OPEN “IEEE” AS #1 OPEN “IEEE2" AS #2 OPEN “IEEE3" AS #3 we can communicate with the external devices, according to the four rules above. PRINT PRINT PRINT PRINT PRINT 8D. #1,"OUTPUT #3,"OUTPUT #1,"OUTPUT #1,"OUTPUT #1,"OUTPUT SCOPE;..." SCOPE;..." DA;..." IEEE2:DA;..." IEEE2:SCOPE;..." SCOPE on IEEE. See Rule 1 SCOPE on IEEE (not IEEE2). See Rule 2 DA on IEEE2 or IEEE3 (not specified). See Rule 3 DA on IEEE2. See Rule 4 ERROR (not IEEE:SCOPE). See Rule 4 Getting Started Topics • • • Introduction..................................................................................... II-49 Keyboard Controller Program..................................................... II-50 Direct Control from DOS Using CCL ......................................... II-51 Introduction Once Driver488/DRV has been installed in your system, it is ready to begin controlling IEEE 488 bus devices. This Sub-Chapter describes methods of controlling the bus directly from the keyboard. Other Sub-Chapters in this Chapter develop short programs, in various languages, to control a Keithley Instruments Model 195 digital multimeter. The techniques used in these programs are quite general, and apply to the control of most instruments. It is not necessary to write programs to control IEEE 488 bus devices using Driver488/DRV. Instead, using the Character Command Language Application Program Interface (CCL API), commands to the bus may be sent directly from the keyboard, with responses displayed on the screen or sent to a file. The Keyboard Controller program provides this capability, as do the standard MS-DOS commands. II-50 Personal488 User’s Manual, Rev. 3.0 Artisan Technology Group - Quality Instrumentation ... Guaranteed | (888) 88-SOURCE | www.artisantg.com II. SOFTWARE GUIDES - 8. Driver488/DRV 8D. Getting Started Keyboard Controller Program The program KBC.EXE is a utility program that allows you to enter Driver488/DRV commands from the keyboard and see what effect they have. When KBC is run, it displays an IEEE> prompt and waits for a command to be entered from the keyboard. When the <Enter> key is pressed, KBC sends the command to Driver488/DRV and displays any response or error messages that occur. This allows you to test the various Driver488/DRV commands and their effects on your instruments without having to write a program. A dialog with KBC might be: First, we can use the HELLO command to display the Driver488/DRV revision identification: IEEE> HELLO <Enter> Driver488 Revision X.X ©199X IOtech, Inc. Then check the Driver488/DRV status: IEEE> STATUS <Enter> CS21 1 I000 000 T0 C0 P0 OK The following indicators describe each component of the Driver488/DRV status: Indicator C S 21 1 I 0 0 0 000 T0 C0 P0 OK Driver488/DRV Status It is in the Controller state. It is the System Controller. The value of its IEEE 488 bus address. An Address Change has occurred. It is idle (neither a talker nor a listener). There is no ByteIn available. It is not ready to send a ByteOut. Service Request (SRQ) is not asserted. There is no outstanding error. It has not received a bus device TRIGGER command (only applicable in the Peripheral mode). It has not received a CLEAR command (only applicable in the Peripheral mode). No CONTINUE transfer is in progress. The error message is “OK”. Next, take a reading from IEEE 488 bus device 16: IEEE> ENTER 16 <Enter> NDCV=035.679E-3 Now, list the commands that have been executed so far and re-execute the ENTER command: IEEE> .L <Enter> 3 HELLO 2 STATUS 1 ENTER 16 IEEE .1 <Enter> IEEE> ENTER 16 <Enter> NDCV+032.340E-3 Notice that the .L and .1 commands are not Driver488/DRV commands. Instead, they are supplied by the KBC program. The .L command is used to show a list of the previously entered commands. KBC keeps the last 20 commands in this list. Any of these commands can be reentered by typing a period followed by the number of that command. For example, the .1 command reenters the last command that was entered. The user may then edit this command, or may just press <Enter> re-executing the command. Personal488 User’s Manual, Rev. 3.0 Artisan Technology Group - Quality Instrumentation ... Guaranteed | (888) 88-SOURCE | www.artisantg.com II-51 8D. Getting Started II. SOFTWARE GUIDES - 8. Driver488/DRV Finally, EXIT causes KBC to terminate: IEEE> EXIT <Enter> As already mentioned, KBC obeys the standard DOS editing keys. In using these editing keys, the previous command is used as a template. Characters from the template are copied into the current command line under control of the editing keys. These editing keys, coupled with the ability to retrieve previous commands, greatly ease the task of trying various Driver488/DRV commands. The editing keys and their actions are: Editing Key <F1> or <Æ> <F2>char <F3> <F4>char <F5> <Del> <Ins> <Esc> Editing Function Copies one character from the template to the command line. Copies characters from the template to the command line up to the character specified. Copies all remaining characters from the template to the command line. Skips over (does not copy) characters from the template up to the character specified. Replaces the template with the current command line. Skips over (does not copy) one character in the template. Toggles insert mode. When insert mode is off (the default) characters from the template are skipped as characters are entered from the keyboard. When insert mode is on, no characters in the template are skipped. Clears the command line and leaves the template unchanged. Direct Control from DOS Using CCL Because Driver488/DRV is a standard MS-DOS device driver, any program that can read and write characters to files can control the IEEE 488 bus. In particular, MS-DOS (and PC-DOS) provide several commands that can communicate directly with Driver488/DRV. To begin communication, it is helpful to turn on the Driver488/DRV automatic error display: C:\> ECHO ERROR ON> IEEE <Enter> and tell Driver488/DRV to end its responses with an end-of-file character (control-Z, ASCII 26): C:\> ECHO FILL $26> IEEE <Enter> Note the format of these commands: the DOS command ECHO, followed by the Driver488/DRV command ERROR ON or FILL $26, which is redirected by the > to a file named IEEE. When ECHO tries to write the command to IEEE, DOS notices that IEEE is the name of a device driver, not a file, and so sends the command to the device driver which of course is Driver488/DRV. Once the input terminator is initialized to the end-of-file character, DOS can be used to get responses from Driver488/DRV and the attached IEEE 488 bus devices. First, we can use the HELLO command to display the Driver488/DRV revision identification: C:\> ECHO HELLO> IEEE <Enter> C:\> TYPE IEEE <Enter> Driver488 Revision X.X ©199X IOtech Inc. Then check the Driver488/DRV status: C:\> ECHO STATUS> IEEE <Enter> C:\> TYPE IEEE <Enter> CS21 1 I000 000 T0 C0 P0 OK The following indicators describe each component of the Driver488/DRV status: II-52 Personal488 User’s Manual, Rev. 3.0 Artisan Technology Group - Quality Instrumentation ... Guaranteed | (888) 88-SOURCE | www.artisantg.com II. SOFTWARE GUIDES - 8. Driver488/DRV Indicator C S 21 1 I 0 0 0 000 T0 C0 P0 OK 8D. Getting Started Driver488/DRV Status It is in the Controller state. It is the System Controller. The value of its IEEE 488 bus address. An Address Change has occurred. It is idle (neither a talker nor a listener). There is no ByteIn available. It is not ready to send a ByteOut. Service Request (SRQ) is not asserted. There is no outstanding error. It has not received a bus device TRIGGER command (only applicable in the Peripheral mode). It has not received a CLEAR command (only applicable in the Peripheral mode). No CONTINUE transfer is in progress. The error message is “OK”. Next, take a reading from IEEE 488 bus device 16: C:\> ECHO ENTER 16> IEEE <Enter> C:\> TYPE IEEE <Enter> NDCV=035.679E-3 Now, if an IEEE 488 bus device name has been defined using the INSTALL program, that name can be used to refer to the bus device. For example, assume that a Keithley Instruments Model 195 digital multimeter has been given the name K195. The meter could be reset to its power-on conditions with a CLEAR command: C:\> ECHO CLEAR K195> IEEE <Enter> To program the 195 for the 2 VDC range, send it the R3F0X command: C:\> ECHO OUTPUT K195;R3F0X> IEEE <Enter> This could also be achieved by sending the command directly to the device: C:\> ECHO R3F0X> K195 <Enter> To check the status of the 195, use the SERIAL POLL, or SPOLL command: C:\> ECHO SPOLL K195> IEEE <Enter> C:\> TYPE IEEE <Enter> To display a reading from the 195, use the ENTER command: C:\> ECHO ENTER K195> IEEE <Enter> C:\> TYPE IEEE <Enter> To view continuous readings from the 195, read directly from the K195 device: C:\> TYPE K195 <Enter> This causes readings to be taken from the 195 and displayed until <Ctrl-Break> is typed. Note that <Ctrl-Break> may halt Driver488/DRV in the middle of a transaction, causing the first attempt at another command to give a SEQUENCE ERROR. If this should occur, simply retry the last command. It is also possible to save the bus device data into a file: C:\> C:\> C:\> C:\> ECHO TYPE ECHO TYPE ENTER K195> IEEE <Enter> IEEE> DATA <Enter> ENTER FREQ> IEEE <Enter> IEEE>> DATA <Enter> The first two commands create a file named DATA that holds a reading from the 195. The next two commands append a reading from the device FREQ to the data file. Note the use of the >> to indicate append. Personal488 User’s Manual, Rev. 3.0 Artisan Technology Group - Quality Instrumentation ... Guaranteed | (888) 88-SOURCE | www.artisantg.com II-53 8E. Microsoft C 8E. II. SOFTWARE GUIDES - 8. Driver488/DRV Microsoft C Topics • • • • • • • • • Use of the Character Command Language ............................... II-53 Initialization of the System.......................................................... II-53 Configuration of the 195 DMM .................................................... II-56 Taking Readings ............................................................................. II-56 Buffer Transfers.............................................................................. II-56 Interrupt Handling ........................................................................ II-57 IEEEIO.C .......................................................................................... II-59 CRITERR.ASM (Microsoft C & Turbo C) ................................... II-61 Sample Program ............................................................................. II-62 Use of the Character Command Language In order to simplify programming Driver488/DRV with C, the following files are provided on the Driver488/DRV program disk: • IEEEIO.C: Communications routines for Driver488/DRV • IEEEIO.H: Header file, contains declarations from IEEEIO.C • IEEEDEMO.C: Example file showing use of fputs and fgets with Driver488/DRV (included with Microsoft C only) • CRITERR.ASM: Critical error handler assembly language source file (included with Microsoft C and Turbo C only) • CRITERR.OBJ: Object file produced from CRITERR.ASM (included with Microsoft C and Turbo C only) • CRITERR.H: Header file, contains declarations for using CRITERR.ASM The actual demonstration program is contained in 195DEMO.C. All files for Microsoft C are in the \MSC directory. To execute the demonstration program, the files must be compiled and then linked. The following DOS commands perform these steps: C> msc 195demo; C> msc ieeeio; C> link 195demo ieeeio; Finally, the demonstration program is run by typing 195DEMO <Enter>. Notice that the critical error handler CRITERR.ASM is not required for the demonstration program. Its use is described later in “CRITERR.ASM (Microsoft C & Turbo C),” one of the last topics in this Sub-Chapter. The above command assumes that you have Microsoft C and that the files have been copied into the appropriate directory for use with your C compiler. Notice that the program uses a small data model because it uses less than 64K of code and data. Initialization of the System Any program using Driver488/DRV must first establish communications with the Driver488/DRV software driver. In C, this is accomplished using the OPEN statement. Communication both to and from Driver488/DRV is required. Thus, the file must be opened for both reading and writing (RDWR). II-54 Personal488 User’s Manual, Rev. 3.0 Artisan Technology Group - Quality Instrumentation ... Guaranteed | (888) 88-SOURCE | www.artisantg.com II. SOFTWARE GUIDES - 8. Driver488/DRV 8E. Microsoft C Also, in Microsoft C and Turbo C, the file must be opened in BINARY mode so that end-of-line characters are not translated. In Microsoft C and Turbo C, the file is opened with the following statement: ieee=open(“ieee”,O_RDWR | O_BINARY); which is part of the IEEEINIT function contained in IEEEIO.C. IEEEIO.C supplies several other useful routines and definitions. These routines and definitions are described later in more detail in “Interrupt Handling,” an upcoming topic in this Sub-Chapter. In the above statement, the value returned by OPEN and placed into the integer variable IEEE, is either the handle of the opened file, or -1 if some error has occurred. The IEEEINIT routine checks for this error indication and returns a -1 if there has been such an error. Of course, the file descriptor variable name IEEE may be changed as desired, but throughout this manual and the program files, IEEE has been used. Once the file is opened, we can send commands and receive responses from Driver488/DRV. Normally, when DOS communicates with a file, it checks for special characters, such as control-Z which can indicate end-of-file. When communicating with IEEE 488 devices, DOS’s checking would interfere with the communication. The RAWMODE function prevents DOS from checkings for special characters: rawmode(ieee); As an additional benefit, communication with Driver488/DRV is much more efficient when DOS does not check for special characters. Driver488/DRV can accept commands only when it is in a quiescent, ready state. While Driver488/DRV should normally be ready, it is possible that it was left in some unknown state by a previous program failure or error. In order to force Driver488/DRV into its quiescent state, we use the IOCTL_WT function: ioctl_wt(ieee,"break",5); This IOCTL_WT function is equivalent to the BASIC statement IOCTL#1,“BREAK” which sends the BREAK command through a “back door” to Driver488/DRV. Driver488/DRV recognizes this “back door” command regardless of what else it might be doing and resets itself so that it is ready to accept a normal command. We can then completely reset the Driver488/DRV with the RESET command: ieeewt(“reset\r\n”); which resets the operating parameters of the Driver488/DRV back to their normal values (those that were set during system boot by the DRVR488 DOS command). Notice that the EOL OUT terminators that mark the end of a Driver488/DRV command are reset to carriage return and line feed by the IOCTL_WT command. Thus, the RESET command must be terminated by both a carriage return (\r) and a line feed (\n). As it is more convenient if Driver488/DRV accepts line feed only as the command terminator, we use the EOL OUT command to set the command terminator to just line feed (\n): ieeewt(“eol out lf\r\n”); Notice that this command must also be terminated by both a carriage return and a line feed because the command terminator is not changed until after the EOL OUT command is executed. Character strings in C are normally terminated by a null (an ASCII 0). Thus, it is appropriate for Driver488/DRV to terminate its responses to the program with a null so that the response can be treated as a normal character string. We can use the EOL IN command to configure Driver488/DRV so that it does provide an ASCII null terminator: ieeewt(“eol in $0\n”); Finally, we enable SEQUENCE - NO DATA AVAILABLE error detection by setting the FILL mode to ERROR: ieeewt(“fill error\n”); Personal488 User’s Manual, Rev. 3.0 Artisan Technology Group - Quality Instrumentation ... Guaranteed | (888) 88-SOURCE | www.artisantg.com II-55 8E. Microsoft C II. SOFTWARE GUIDES - 8. Driver488/DRV All the commands discussed so far: OPEN, RAWMODE, IOCTL_WT, RESET, EOL OUT, EOL IN and FILL ERROR are part of the IEEEINIT function included in IEEEIO.C. IEEEINIT returns a zero if these steps were executed successfully, and a -1 if some error was encountered. Thus, to accomplish all the above steps, we just use the following: #include “ieeeio.h” #include <stdio.h> if (ieeeinit() == -1) { printf(“Cannot initialize IEEE system.\n”); exit(1); } The two INCLUDE statements provide the program with definitions of the standard I/O and IEEE I/O functions so they can be referenced by the demo program. IEEEINIT is called to initialize the system, and if it indicates an error (returns a -1), we print an error message and exit. If there was no error, we just continue with the program. Once everything is reset, we can test the communications and read the Driver488/DRV revision number with the HELLO command: char response[256]; ieeewt(“hello\n”); ieeerd(response); printf(“%s\n”,response); We first IEEEWT the HELLO command, then IEEERD the response from Driver488/DRV into the character string response (IEEEWT and IEEERD are both supplied in IEEEIO.C). Finally, we display the response with a PRINTF. It is not necessary to perform the HELLO command, but it is included here as a simple example of normal communication with Driver488/DRV. Its response is the revision identification of the Driver488/DRV software: Driver488 Revision X.X ©199X IOtech, Inc. We can also interrogate Driver488/DRV for its status: ieeewt(“status\n”); ieeerd(response); printf(“%s\n”,response); Subsequently, the printed response is similar to the following: CS21 1 I000 000 T0 C0 P0 OK The following indicators describe each component of the Driver488/DRV status: Indicator C S 21 1 I 0 0 0 000 T0 C0 P0 OK II-56 Driver488/DRV Status It is in the Controller state. It is the System Controller. The value of its IEEE 488 bus address. An Address Change has occurred. It is idle (neither a talker nor a listener). There is no ByteIn available. It is not ready to send a ByteOut. Service Request (SRQ) is not asserted. There is no outstanding error. It has not received a bus device TRIGGER command (only applicable in the Peripheral mode). It has not received a CLEAR command (only applicable in the Peripheral mode). No CONTINUE transfer is in progress. The error message is “OK”. Personal488 User’s Manual, Rev. 3.0 Artisan Technology Group - Quality Instrumentation ... Guaranteed | (888) 88-SOURCE | www.artisantg.com II. SOFTWARE GUIDES - 8. Driver488/DRV 8E. Microsoft C Configuration of the 195 DMM Once the system is initialized we are ready to start issuing bus commands. The IEEE 488 bus has already been cleared by the Interface Clear (IFC) sent by the RESET command, so we know that all bus devices are waiting for the controller to take some action. To control an IEEE 488 bus device, we output an appropriate device-dependent command to that device. For example, the F0R0X command line below sets the 195 to read DC volts with automatic range selection: ieeewt(“output 16;F0R0X\n”); The OUTPUT command takes a bus device address (16 in this case) and data (F0R0X) and sends the data to the specified device. The address can be just a primary address, such as 12, or 05, or it can include a secondary address: 1201. Note that both the primary address and, if present, the secondary address are two-digit decimal numbers. A leading zero must be used, if necessary to make a two-digit address. Taking Readings Once we have set the 195’s operating mode, we can take a reading and display it: float voltage; ieeewt(“enter 16\n”); ieeescnf(“%*4s%e”,&voltage); printf(“The read value is %g\n”,voltage); The ENTER command takes a bus address (with an optional secondary address) and configures that bus device so that it is able to send data (addressed to talk). No data is actually transferred, however, until the IEEESCNF statement requests the result from Driver488/DRV at which time data is transferred to the program into the variable voltage. A typical reading from a 195 might be NDCV+1.23456E-2, consisting of a four character prefix followed by a floating point value. The format passed to IEEESCNF causes it to skip the four character prefix (%*4s) and then convert the remaining string into the float variable voltage. All the power of C may be used to manipulate, print, store, and analyze the data read from the IEEE 488 bus. For example, the following statements print the average of ten readings from the 195: int i; float sum; sum=0.0; for (i=0; i<10; i++) { ieeewt(“enter 16\n”); ieeescnf(“%*4s%e”,&voltage); sum=sum+voltage; } printf(“The average of 10 readings is %g\n”,sum/10.0); Buffer Transfers Instead of using an IEEERD(_) function to receive the data from a device, we can direct Driver488/DRV to place the response directly into a data buffer of our choosing. For example, each reading from the 195 consists of 17 bytes: a four-byte prefix and an eleven-byte reading followed by the two-byte command terminator. So, we can collect 100 readings in a 1700-byte array. To do this, we must first allocate the required space in an array: char hundred[1700]; Now that we have allocated a place for the readings, we can direct Driver488/DRV to put readings directly into hundred with the ENTER #count BUFFER command: ieeeprtf(“ENTER 16 #1700 BUFFER %d:%d\n”, segment(hundred),offset(hundred)); This command consists of the keyword ENTER, followed by the bus device address (16), a number sign (#), the number of bytes to transfer (1700), and the keyword BUFFER, followed by the memory address of the buffer. The buffer address is specified as segment:offset where segment and offset are Personal488 User’s Manual, Rev. 3.0 Artisan Technology Group - Quality Instrumentation ... Guaranteed | (888) 88-SOURCE | www.artisantg.com II-57 8E. Microsoft C II. SOFTWARE GUIDES - 8. Driver488/DRV each 16-bit numbers and the colon (:) is required to separate them. The segment and offset values we need are returned by the segment and offset functions, respectively. Once the data has been received, we can print it out: for (i=0; i<1700; i++) putchar(hundred[i]); The program could process the previous set of data while collecting a new set into a different buffer. To allow the program to continue, specify continue in the command: ieeeprtf(“ENTER 16 #1700 BUFFER continue\n”, segment(hundred),offset(hundred)); Once we have started the transfer, we can check the status: ieeewt(“status\n”); ieeerd(response); printf(“%s\n”,response); The status that is returned is typically: CS21 1 L100 000 T0 C0 P1 OK Notice P1 which states a transfer is in progress, and L which shows we are still a listener. If the bus device is so fast that the transfer completes before the program can check status, the response is P0 showing that the transfer is no longer in progress. We can also WAIT for the transfer to complete and check the status again: ieeewt(“wait\n”); ieeewt(“status\n”); ieeerd(response); printf(“%s\n”,response); This time the status must be P0 as the WAIT command waits until the transfer has completed. Now that we know the transfer is complete, we are ready to print out the received data as shown above. Interrupt Handling The IEEE 488 bus is designed to be able to attend to asynchronous (unpredictable) events or conditions. When such an event occurs, the bus device needing attention can assert the Service Request (SRQ) line to signal that condition to the controller. Once the controller notices the SRQ, it can interrogate the bus devices, using Parallel Poll (PPOLL) and/or Serial Poll (SPOLL) to determine the source and cause of the SRQ, and take the appropriate action. Parallel Poll is the fastest method of determining which device requires service. Parallel Poll is a very short, simple IEEE 488 bus transaction that quickly returns the status from many devices. Each of the eight IEEE 488 bus data bits can contain the Parallel Poll response from one or more devices. So, if there are eight or fewer devices on the bus, then just the single Parallel Poll can determine which requires service. Even if the bus is occupied by the full complement of 15 devices, then Parallel Poll can narrow the possibilities down to a choice of no more than two. Unfortunately, the utility of Parallel Poll is limited when working with actual devices. Some have no Parallel Poll response capability. Others must be configured in hardware, usually with switches or jumpers, to set their Parallel Poll response. If Parallel Poll is not available, or several devices share the same Parallel Poll response bit, then Serial Polling is still required to determine which device is requesting service. Serial Poll, though it is not as fast as Parallel Poll, does offer three major advantages: it gives an unambiguous response from a single bus device; it returns additional status information beyond the simple request/no-request for service; and, most importantly, it is implemented on virtually all bus devices. The SRQ line can be monitored in two ways: it can be periodically polled by using the STATUS command, or by checking the “light pen status.” BASIC provides a method for detecting and servicing external interrupts: the ON PEN statement. The ON PEN statement tells BASIC that, when an external interrupt is detected, a specific subroutine, II-58 Personal488 User’s Manual, Rev. 3.0 Artisan Technology Group - Quality Instrumentation ... Guaranteed | (888) 88-SOURCE | www.artisantg.com II. SOFTWARE GUIDES - 8. Driver488/DRV 8E. Microsoft C known as the interrupt service routine (ISR), is to be executed. Normally, the interrupt detected by ON PEN is the light pen interrupt. However, Driver488/DRV redefines this “light pen interrupt” to signal when an IEEE 488 bus related interrupt (such as SRQ) has occurred. Unlike BASIC, C does not provide an automatic method of checking for light pen interrupts. Therefore, a function is needed to check for the interrupt. The function could use the STATUS command, but it is much faster to check the interrupt status directly using a BIOS interrupt. The CKLPINT (check light pen interrupt) function provided in IEEEIO.C uses the BIOS to check for Driver488/DRV interrupts and returns true (1) if one is pending. Interrupts are checked automatically by the IEEEWT routine before sending any data to Driver488/DRV. However, IEEEWT does not call CKLPINT directly. Instead, it calls the routine that is pointed to by IEEE_CKI (IEEE check interrupt). If IEEE_CKI points to CKLPINT, then IEEEWT checks for Driver488/DRV interrupts, but if IEEE_CKI points to _false_, a function that always returns 0, then interrupt checking is disabled. Initially, IEEE_CKI does point to _false_, and so interrupt checking is disabled. To enable interrupt checking IEEE_CKI must be redirected to CKLPINT: int cklpint(); ieee_cki = cklpint; Once an interrupt has been detected, an interrupt service routine must be invoked to handle the interrupting condition. When IEEEWT detects an interrupt, it calls the interrupt service routine (ISR). Just as IEEEWT does not call the check-for-interrupt routine directly, it does not call the ISR directly, either. Instead, it calls the routine pointed to by IEEE_ISR (IEEE interrupt service routine). If IEEE_ISR is set to point to some specific ISR, then that ISR is executed when IEEEWT detects an interrupt. Initially, IEEE_ISR points to no_op, a function that does nothing. So, unless IEEE_ISR is redirected to another routine, nothing is done when an interrupt is detected. In the 195DEMO example program an interrupt service routine, called isr, has been provided. So, IEEE_ISR must be set to point this routine for interrupts to be handled properly: ieee_isr = isr; Once we have enabled interrupt checking by setting IEEE_CKI to point to CKLPINT, and specified the interrupt service routine by setting IEEE_ISR to point to isr, then we can specify which conditions are to cause an interrupt. The ARM command specifies those conditions. In this example we want the interrupt to occur on the detection of a Service Request (SRQ): ieeewt(“arm srq\n”); The 195 can be set to request service on any of several different internal conditions. In particular, the M2 command causes an SRQ on the detection of any invalid command or command option by the 195: ieeewt(“output 16;M2X”); This OUTPUT command is placed early in the program so that all subsequent commands to the 195 cause an SRQ, if they are invalid. Now that interrupt detection is enabled, and the interrupt service routine is specified, we must specify the actions to take to service the interrupt. We first display a message indicating that an interrupt was detected, and then turn off interrupt checking: void isr() { int _false_(); printf(“Interrupt detected...”); ieee_cki = _false_; We next check the Driver488/DRV Serial Poll Status to determine if an SRQ actually caused the interrupt: int sp; ieeewt(“spoll\n”); ieeescnf(“%d”,&sp); if (sp==0) { printf(“Non-SRQ Interrupt!\n”); exit(1); } Personal488 User’s Manual, Rev. 3.0 Artisan Technology Group - Quality Instrumentation ... Guaranteed | (888) 88-SOURCE | www.artisantg.com II-59 8E. Microsoft C II. SOFTWARE GUIDES - 8. Driver488/DRV We then Serial Poll the 195 to determine its status. If there were other devices on the bus that could be generating the SRQ, each of them would be have to be checked in turn. int st195; ieeewt(“spoll 16\n”); ieeescnf(“%d”,&st195); if ((st195 & 0x40) == 0 ) { printf(“Non-195 SRQ!\n”); exit(); } Bit DIO7, with a value of 0x40, is returned as true (1) in the Serial Poll response of those devices requesting service. In our simple example we expect that the 195 is the only possible cause of an SRQ, and if not, there must be some error. Now that we have identified the device that is requesting service, we can further examine the Serial Poll status to classify the request: if ((st195 & 0x20) == 0) { if (st195 & 0x01) printf(“Overflow\n”); if (st195 & 0x02) printf(“Buffer Full\n”); if (st195 & 0x04) printf(“Buffer 1/2 Full\n”); if (st195 & 0x08) printf(“Reading Done\n”); if (st195 & 0x10) printf(“Busy\n”); } else { if (st195 & 0x01) printf(“Illegal Command Option\n”); if (st195 & 0x02) printf(“Illegal Command\n”); if (st195 & 0x04) printf(“No Remote\n”); if (st195 & 0x08) printf(“Trigger Overrun\n”); if (st195 & 0x10) printf(“Failed Selftest\n”); } The action taken depends on the system design, but in this example, a message display is adequate. Now, after decoding the cause of the SRQ, we can re-enable interrupts and return to the main program: ieee_cki = cklpint; IEEEIO.C The IEEEIO.C file contains several useful declarations and functions, many of which have been used in the 195DEMO example program. They are: • IEEE is an integer that holds the file descriptor (MS-DOS handle) returned by OPEN. int ieee • segment and offset return the 16-bit segment and offset values that make up a pointer. int segment(ptr) void *ptr int offset(ptr) void *ptr The implementation of these functions depends on the memory model being used. In the small data model, pointers are 16 bits and are exactly the offset desired. Here, the segment is always the internal ds register value. In the large data model, pointers are 32 bits, one word of which is the segment and the other is the offset. For more information on memory models, see the “Other Languages” Sub-Chapter in this Chapter. II-60 Personal488 User’s Manual, Rev. 3.0 Artisan Technology Group - Quality Instrumentation ... Guaranteed | (888) 88-SOURCE | www.artisantg.com II. SOFTWARE GUIDES - 8. Driver488/DRV • 8E. Microsoft C ERRNO holds the error code for I/O and other errors. extern int errno; • IOCTL_RD and IOCTL_WT are special versions of IOCTL_IO which reads and writes to the I/O control channel of a device. int ioctl_io(handle,chars,size,iocall) int handle, size, iocall; char chars[]; #define ioctl_rd(handle,chars,size) \ ioctl_io(handle,chars,size,0x4402) #define ioctl_wt(handle,chars,size) \ ioctl_io(handle,chars,size,0x4403) The I/O control channel of a device is read from and written to exactly as the normal (data) channel is read and written, but the data transferred is not to be treated in the same way. Normally, the I/O control channel is used to communicate setup and status information regarding the device without actually transferring any data to or from it. When using Driver488/DRV, IOCTL_WT is used to force Driver488/DRV to be ready to accept a command, and IOCTL_RD is used to return status information from the driver. These functions correspond exactly to the IOCTL and IOCTL$ commands, as described in “Section III: Command References.” • CKLPINT, IEEE_CKI, and IEEE_ISR are functions and pointers which provide for automatic interrupt detection and servicing. int cklpint() int _false_() int (*ieee_cki)() = _false_ void no_op() void (*ieee_isr)() = no_op Driver488/DRV signals interrupts, which are enabled with the ARM command, by causing the light pen signal to appear “true.” The CKLPINT checks that Driver488/DRV is able to service an interrupt (the response from IOCTL_RD is 0) and then checks if an interrupt is pending by checking the light pen status. The IEEEWT routine (described below) calls the function pointed to by IEEE_CKI to determine if an IEEE interrupt needs to be serviced. The IEEE_CKI normally points to the function _false_ which always returns zero (0). To enable interrupt checking IEEE_CKI must be redirected to point to CKLPINT. Interrupt checking is disabled by pointing IEEE_CKI back to _false_. Once an interrupt has been detected, IEEEWT calls the interrupt service routine pointed to by IEEE_ISR to service the interrupt. The IEEE_ISR initially points to no_op, a function that does nothing, but it may be redirected as needed to specify the appropriate interrupt service routine for each part of a program. • _IEEEWT and _IEEERD are very similar to the unbuffered WRITE and READ routines provided in the C library. int _ieeewt(handle,chars) int handle char chars[] int _ieeerd(handle,chars,size) int handle, size char chars[] #define ieeewt(chars) _ieeewt(ieee,chars) #define ieeerd(chars) _ieeerd(ieee,chars,sizeof(chars)) The _IEEEWT differs from WRITE in that it checks for Driver488/DRV interrupts before writing, determines the number of characters to write by using STRLEN, and prints an error message if an error has occurred during writing. The _IEEERD differs from READ only in that it prints an error message if an error has occurred during reading. IEEEWT and IEEERD (without the leading underscore) write and read to the file IEEE. Notice that IEEERD uses SIZEOF to determine the number of characters to read. This only works if SIZEOF can determine the number of bytes in the Personal488 User’s Manual, Rev. 3.0 Artisan Technology Group - Quality Instrumentation ... Guaranteed | (888) 88-SOURCE | www.artisantg.com II-61 8E. Microsoft C II. SOFTWARE GUIDES - 8. Driver488/DRV receive buffer, chars. This means chars must be an array of known size, for example, char chars[256], not char*chars. • IEEEPRTF and IEEESCNF are IEEE 488 versions of PRINTF and SCANF, respectively. int ieeeprtf(format,...) char *format int ieeescnf(format,a,b,c,d,e) char *format,*a,*b,*c,*d,*e The IEEEPRTF accepts a format string and a list of arguments. It formats its arguments according to the specified format and sends the formatted string to Driver488/DRV. The IEEESCNF accepts a format string and up to 5 pointers (to the types specified in the format string). It reads a string of up to 256 bytes from Driver488/DRV, terminates it with a zero, converts it according to the format string, and places the converted values into the variables pointed to by the specified pointers. • RAWMODE sets the file specified by handle for “raw mode” I/O. int rawmode(handle) int handle In “raw mode” MS-DOS does not interpret the characters received from the file. In particular, control-Z is not taken as end-of-file. “Raw mode” is usually appropriate for IEEE 488 communications because it does not interfere with the transfer of binary data and because it is much more efficient than “non-raw mode” I/O. • IEEEINIT establishes communications with Driver488/DRV and configures it for use with C. int ieeeinit() It first opens the file IEEE for both reading and writing and puts the file descriptor into IEEE. It then puts the file into “raw mode”. Driver488/DRV is then initialized by sending the IOCTL “BREAK” and RESET commands. Normal output from C is terminated by a new-line (line feed) character, and returned strings should be terminated by a null, so EOL OUT LF and EOL IN $0 commands are then issued. Finally a FILL ERROR command is issued to enable SEQUENCE - NO DATA AVAILABLE error detection. If an error is detected during any of these commands, IEEEINIT returns a -1, otherwise it returns a zero (0). CRITERR.ASM (Microsoft C & Turbo C) Normally, when Driver488/DRV detects an error, perhaps due to a syntax error in a command, it responds with an I/O error to DOS. When this happens, DOS normally issues an ABORT, RETRY or IGNORE message and waits for a response from the keyboard. There is no way for the user’s program to detect such an error, determine the cause, and take appropriate action. However, DOS does provide a method of redefining the action to be taken on such a “critical error”. CRITERR.ASM contains a critical error handler that, when invoked, makes it appear to the calling program that some less-critical error has occurred. The critical error handler is installed by CRIT_ON() and removed by CRIT_OFF().The critical error handler is also automatically removed by DOS when the program exits. The following program fragment demonstrates the use of the critical error handler: #include “criterr.h” crit_on(ieee); if (ieeewt(“output 16;F0X”) == -1) { printf(“Error writing F0X to device 16, \n”); crit_off(); ioctl_wt(ieee,"break",5); ieeewt(“eol out lf\r\n”); ieeewt(“status\n”); ieeerd(response); printf(“status = %s\n”,response); crit_on(ieee); } We must first #include the header file with the definitions of the critical error routines. We then enable critical error trapping with CRIT_ON which takes as a parameter the handle of the file for which II-62 Personal488 User’s Manual, Rev. 3.0 Artisan Technology Group - Quality Instrumentation ... Guaranteed | (888) 88-SOURCE | www.artisantg.com II. SOFTWARE GUIDES - 8. Driver488/DRV 8E. Microsoft C critical error trapping is to be enabled. Only read and write commands to that handle are trapped. Errors caused by other actions, or associated with other files are not trapped. Error trapping may only be enabled for one file at a time. Now, if IEEEWT signals an error by returning a -1, we can check what happened. We first PRINTF an error message, then we turn critical error trapping off with CRIT_OFF so that, if another critical error occurs, we get the ABORT, RETRY or IGNORE message and know a catastrophic double error has occurred. We then IOCTL_WT(_BREAK_) to force Driver488/DRV to listen to our next command. The IOCTL_WT also resets the EOL OUT terminator so we can be sure that Driver488/DRV detects the end of our commands. We next reset the EOL OUT terminator to our preferred line feed only and ask Driver488/DRV for its status. On receiving the response, we could interpret the status and take whatever action is appropriate. However, in this example, we just display the status. Finally, we reenable the critical error handler and continue with the program. Sample Program #include “ieeeio.h” #include <stdio.h> void main (void){ int ieee char response[256]; float voltage; int i; float sum; char hundred[1700]; ieee=open(“ieee”,O_RDWR | O_BINARY); rawmode(ieee); ioctl_wt(ieee,"break",5); ieeewt(“reset\r\n”); ieeewt(“eol out lf\r\n”); ieeewt(“eol in $0\n”); ieeewt(“fill error\n”); if (ieeeinit() == -1) { printf(“Cannot initialize IEEE system.\n”); exit(1); } ieeewt(“hello\n”); ieeerd(response); printf(“%s\n”,response); ieeewt(“status\n”); ieeerd(response); printf(“%s\n”,response); ieeewt(“output 16;F0R0X\n”); ieeewt(“enter 16\n”); ieeescnf(“%*4s%e”,&voltage); printf(“The read value is %g\n”,voltage); sum=0.0; for (i=0; i<10; i++) { ieeewt(“enter 16\n”); ieeescnf(“%*4s%e”,&voltage); sum=sum+voltage; } printf(“The average of 10 readings is %g\n”,sum/10.0); ieeeprtf(“ENTER 16 #1700 BUFFER %d:%d\n”, segment(hundred),offset(hundred)); for (i=0; i<1700; i++) putchar(hundred[i]); ieeeprtf(“ENTER 16 #1700 BUFFER continue\n”, segment(hundred),offset(hundred)); ieeewt(“status\n”); ieeerd(response); printf(“%s\n”,response); int cklpint(); ieee_cki = cklpint; ieee_isr = isr; ieeewt(“arm srq\n”); Personal488 User’s Manual, Rev. 3.0 Artisan Technology Group - Quality Instrumentation ... Guaranteed | (888) 88-SOURCE | www.artisantg.com II-63 8E. Microsoft C II. SOFTWARE GUIDES - 8. Driver488/DRV ieeewt(“output 16;M2X”); } void isr() { int _false_(); int st195; printf(“Interrupt detected...”); ieee_cki = _false_; int sp; ieeewt(“spoll\n”); ieeescnf(“%d”,&sp); if (sp==0) { printf(“Non-SRQ Interrupt!\n”); exit(1); } ieeewt(“spoll 16\n”); ieeescnf(“%d”,&st195); if ((st195 & 0x40) == 0 ) { printf(“Non-195 SRQ!\n”); exit(); } if ((st195 & 0x20) == 0) { if (st195 & 0x01) printf(“Overflow\n”); if (st195 & 0x02) printf(“Buffer Full\n”); if (st195 & 0x04) printf(“Buffer 1/2 Full\n”); if (st195 & 0x08) printf(“Reading Done\n”); if (st195 & 0x10) printf(“Busy\n”); } else { if (st195 & 0x01) printf(“Illegal Command Option\n”); if (st195 & 0x02) printf(“Illegal Command\n”); if (st195 & 0x04) printf(“No Remote\n”); if (st195 & 0x08) printf(“Trigger Overrun\n”); if (st195 & 0x10) printf(“Failed Selftest\n”); } ieee_cki = cklpint; 8F. Microsoft Fortran Note: The following short program illustrates the use of Driver488/DRV with Microsoft Fortran. Most of the program length is composed of utilities that simplify character I/O in Fortran. Sample Program Character Result*127 Integer StrLen Call OpenIeee Write(1,*)’RESET’ Write(1,*)’REMOTE 16’ Write(1,*)’OUTPUT 16;Z1X’ Write(1,*)’ENTER 16’ Call FlushIeee Read(2) Result Write(*,*)Result(1:StrLen(Result,127)) END II-64 Personal488 User’s Manual, Rev. 3.0 Artisan Technology Group - Quality Instrumentation ... Guaranteed | (888) 88-SOURCE | www.artisantg.com II. SOFTWARE GUIDES - 8. Driver488/DRV 8G. QuickBASIC SUBROUTINE OpenIeee Open(1,File=’\dev\ieeeout’,Status=’OLD’, 1 Access=’SEQUENTIAL’) Open(2,File=’\dev\ieeein’,Status=’OLD’, 1 Access=’SEQUENTIAL’,Form=’BINARY’) END SUBROUTINE FlushIeee Rewind 1 Rewind 2 END FUNCTION StrLen(String,MaxLen) Character String*127 StrLen=MaxLen-1 DO 10 i=1,MaxLen-2 If (String(i:i) .eq. CHAR(13) .and. 1 String(i+1:i+1) .eq. CHAR(10)) then StrLen=i-1 Goto 20 EndIf 10 Continue 20 Continue END 8G. QuickBASIC Topics • • • • • • • • Use of the Character Command Language............................... II-64 Initialization of the System.......................................................... II-64 Configuration of the 195 DMM .................................................... II-66 Taking Readings............................................................................. II-66 Buffer Transfers ............................................................................. II-67 BASIC VARPTR & SADDR ........................................................... II-68 Interrupt Handling ........................................................................ II-68 Sample Program ............................................................................. II-70 Use of the Character Command Language Several versions of Microsoft QuickBASIC are currently popular: 2.0, 3.0, 4.0, and 4.5. While they vary considerably in their user interface and performance, they are virtually identical when it comes to controlling Driver488/DRV. Two demonstration programs are included for QuickBASIC: 195DEMO.BAS and 195DEMO4.BAS. 195DEMO.BAS is compatible with versions 2.0 and higher of QuickBASIC, while 195DEMO4.BAS requires version 4.0 or version 4.5. These examples can be found on the Driver488/DRV disk in the \QB directory. To execute the demo program, start QuickBASIC with the QB /L command. The /L parameter tells QuickBASIC to load the default library containing the ABSOLUTE subroutine. This /L parameter is not needed in version 4.0 using 195DEMO4.BAS. Also, in earlier versions of QuickBASIC, such as 2.0, the EVENT TRAPPING and CHECKING BETWEEN STATEMENTS compiler options must be turned on for the program to compile and execute correctly. Initialization of the System Any program using Driver488/DRV must first establish communications with the Driver488/DRV software driver. In BASIC and most other languages this is accomplished using an OPEN statement. Communication both to and from Driver488/DRV is required. In BASIC, this means that two files Personal488 User’s Manual, Rev. 3.0 Artisan Technology Group - Quality Instrumentation ... Guaranteed | (888) 88-SOURCE | www.artisantg.com II-65 8G. QuickBASIC II. SOFTWARE GUIDES - 8. Driver488/DRV must be opened, one for input, and one for output. Other languages may allow the same file to be opened for both input and output. Three file names are allowed: \DEV\IEEEOUT, \DEV\IEEEIN, and \DEV\IEEE. By convention, they are used for output, input, and both input and output, respectively. But in actuality, they are all the same and any one of them can be used for input, output, or both, depending on the programming language. In BASIC, the files are opened with the following commands: 110 OPEN “\DEV\IEEEOUT” FOR OUTPUT AS #1 200 OPEN “\DEV\IEEEIN” FOR INPUT AS #2 Of course, file numbers may change as desired, but throughout this manual, file #1 is assumed to output to Driver488/DRV, and file #2 is assumed to input from Driver488/DRV. Once these files are opened, we can send commands and receive responses from Driver488/DRV. While Driver488/DRV should normally be in a reset, inactive state, it is possible that it was left in some unknown state by a previous program failure or error. In order to force Driver488/DRV into its quiescent state we can use the IOCTL statement: 160 IOCTL#1,"BREAK" IOCTL is a BASIC statement that sends commands through a “back door” to Driver488/DRV. Driver488/DRV recognizes this “back door” command regardless of what else it might be doing and resets itself so that it is ready to accept a normal command. We can then completely reset the Driver488/DRV with the RESET command: 170 PRINT#1,"RESET" which resets the operating parameters of the Driver488/DRV back to their normal values (those that were set during system boot by the DRVR488 DOS command). The IOCTL BREAK and RESET commands guarantee that Driver488/DRV is ready for action. Note that the IOCTL BREAK and RESET commands are placed before the OPEN statement for file #2. This guarantees that BASIC is able to open Driver488/DRV for input. For more details, see the FILL command in “Section III: Command References.” With the initialization commands and some comments, the program now appears as: 100 110 120 150 160 170 180 190 200 ‘Establish communications with Driver488/DRV OPEN “\DEV\IEEEOUT” FOR OUTPUT AS #1 ‘ ‘Reset Driver488/DRV IOCTL#1,"BREAK" PRINT#1,"RESET" ‘ ‘Open file to read responses from Driver488/DRV OPEN “\DEV\IEEEIN” FOR INPUT AS #2 Once everything is reset, we can enable the SEQUENCE - NO DATA AVAILABLE error detection by setting the FILL mode to ERROR: 225 PRINT#1,"FILL ERROR" We can also test the communications and read the Driver488/DRV revision number with the HELLO command: 310 PRINT#1,"HELLO" 320 INPUT#2,A$ 330 PRINT A$ First we PRINT the HELLO command to file #1, then we INPUT the response from file #2 into the character string variable A$ (“A-string”). Finally we display the response with a PRINT to the screen. Because BASIC cannot both PRINT and INPUT from the same file, we use two OPEN statements, and two different file numbers to communicate with Driver488/DRV. PRINT must reference the file opened for output (in these examples, file #1) and INPUT must reference the file opened for input (file #2). Attempting to communicate with the wrong file (such as INPUT#1) results in an error. II-66 Personal488 User’s Manual, Rev. 3.0 Artisan Technology Group - Quality Instrumentation ... Guaranteed | (888) 88-SOURCE | www.artisantg.com II. SOFTWARE GUIDES - 8. Driver488/DRV 8G. QuickBASIC It is not necessary to perform the HELLO command, but it is included here as a simple example of normal communication with Driver488/DRV. Its response is the revision identification of the Driver488/DRV software: Driver488 Revision X.X ©199X IOtech, Inc. We can also interrogate Driver488/DRV for its status: 410 PRINT#1,"STATUS" 420 INPUT#2,ST$ 430 PRINT ST$ Subsequently, the printed response is similar to the following: CS21 1 I000 000 T0 C0 P0 OK The following indicators describe each component of the Driver488/DRV status: Indicator C S 21 1 I 0 0 0 000 T0 C0 P0 OK Driver488/DRV Status It is in the Controller state. It is the System Controller. The value of its IEEE 488 bus address. An Address Change has occurred. It is idle (neither a talker nor a listener). There is no ByteIn available. It is not ready to send a ByteOut. Service Request (SRQ) is not asserted. There is no outstanding error. It has not received a bus device TRIGGER command (only applicable in the Peripheral mode). It has not received a CLEAR command (only applicable in the Peripheral mode). No CONTINUE transfer is in progress. The error message is “OK”. Configuration of the 195 DMM Once the system is initialized we are ready to start issuing bus commands. The IEEE 488 bus has already been cleared by the Interface Clear (IFC) sent by the RESET command, so we know all bus devices are waiting for the controller to take some action. To control an IEEE 488 bus device, we OUTPUT an appropriate device-dependent command to that device. For example, the command F0R0X sets the 195 to read DC volts with automatic range selection: 610 PRINT#1,"OUTPUT 16;F0R0X" The OUTPUT command takes a bus device address (16 in this case) and data (F0R0X) and sends the data to the specified device. The address can be just a primary address, such as 12, or 05, or it can include a secondary address: 1201. Note that both the primary address and, if present, the secondary address are two-digit decimal numbers. A leading zero must be used, if necessary, to make a two-digit address. Taking Readings Once we have set the 195’s operating mode, we can take a reading and display it: 710 PRINT#1,"ENTER 16" 720 INPUT#2,R$ 730 PRINT R$ The ENTER command takes a bus address (with an optional secondary address) and configures that bus device so that it is able to send data (addressed to talk). No data is actually transferred, however, until the INPUT statement requests the result from Driver488/DRV at which time data is transferred to the program into the variable R$. Once the result has been received, any BASIC functions or statements can be used to modify or interpret it. In this example, the result is in the form NDCV+1.23456E-2 showing the range (NDCV) Personal488 User’s Manual, Rev. 3.0 Artisan Technology Group - Quality Instrumentation ... Guaranteed | (888) 88-SOURCE | www.artisantg.com II-67 8G. QuickBASIC II. SOFTWARE GUIDES - 8. Driver488/DRV and the numeric value of the reading (+1.23456E-2). The BASIC MID$ function can be used to strip off the range characters and keep only the numeric part (the fifth character and beyond), and the VAL function can be used to convert this string to a number: 740 N$=MID$(R$,5) 741 N=VAL(N$) 742 PRINT “The read value is”;N These may be combined for efficiency: 740 PRINT “The read value is”;VAL(MID$(R$,5)) All the power of BASIC may be used to manipulate, print, store, and analyze the data read from the IEEE 488 bus. For example, the following statements print the average of ten readings from the 195: 810 820 830 840 850 860 870 SUM=0 FOR I=1 TO 10 PRINT#1,"ENTER 16" INPUT#2,R$ SUM=SUM+VAL(MID$(R$,5)) NEXT I PRINT “The average of ten readings is”;SUM/10 Buffer Transfers Instead of using an INPUT#2 statement to receive the data from a device, we can direct Driver488/DRV to place the response directly into a data buffer of our choice. For example, each reading from the 195 consists of 17 bytes: a four-byte prefix and an eleven-byte reading followed by the two-byte command terminator. So, we can collect 100 readings in a 1700-byte string. To do this, we must first allocate the required space in a string variable: 910 R$=SPACE$(1700) And then we must tell Driver488/DRV where R$ is located in memory. In QuickBASIC 4.0, the VARSEG function allows us to determine the segment address of a variable. DS%=VARSEG(R$) Now that we know the segment address of R$, we can get its offset address by using SADDR: RDESC=0 RDESC=SADDR Notice that we first create RDESC by setting it to zero. This prevents R$ from being moved as a result of creating RDESC after calling SADDR. Now we have the segment and offset of R$, we can pass it directly to Driver488/DRV with the ENTER #count BUFFER command: PRINT#1,"ENTER16 #1700 BUFFER"; DS%; “:”;RDESC This command consists of the keyword ENTER, followed by the bus device address (16), a number sign (#), the number of bytes to transfer (1700), and the keyword BUFFER, followed by the memory address of the buffer. The buffer address is specified as segment:offset where segment and offset are each 16-bit numbers and the colon (:) is required to separate them. The segment value we need, is the BASIC data segment value that we have just acquired into DS% with GET.SEGMENT. The offset value is the offset of the string in that data segment, which is RDESC. Once the data has been received, we can print it out: 980 PRINT R$ The program can continue with other work while the transfer occurs. For example, the program could process the previous set of data while collecting a new set into a different buffer. To allow the program to continue, specify CONTINUE in the command: PRINT#1,"ENTER16 #1700 BUFFER"; DS%; “:”;RDESC; “CONTINUE” II-68 Personal488 User’s Manual, Rev. 3.0 Artisan Technology Group - Quality Instrumentation ... Guaranteed | (888) 88-SOURCE | www.artisantg.com II. SOFTWARE GUIDES - 8. Driver488/DRV 8G. QuickBASIC Once we have started the transfer, we can check the status: 980 PRINT#1,"STATUS" 990 INPUT#2,ST$ 1000 PRINT ST$ The status that is returned is typically: CS21 1 L100 000 T0 C0 P1 OK Notice P1 which states a transfer is in progress, and L which shows we are still a listener. If the bus device is so fast that the transfer completes before the program can check status, the response is P0 showing that the transfer is no longer in progress. We can also WAIT for the transfer to complete and check the status again: 1010 1020 1030 1040 PRINT#1,"WAIT" PRINT#1,"STATUS" INPUT#2,ST$ PRINT ST$ This time the status must be P0 as the WAIT command waits until the transfer has completed. Now that we know the transfer is complete, we are ready to print out the received data as shown above. BASIC VARPTR & SADDR The BASIC VARPTR and SADDR functions must be used with caution. The first time a variable such as I or ST$ is encountered, or an array such as R%() is dimensioned, space is made for it in BASIC’s data space. The other variable or arrays may be moved to make room for the new item. If the memory location of an item must be fixed, then BASIC cannot be allowed to encounter any new variables or arrays. For example, in the ENTER statement shown above, Driver488/DRV is told the memory address of R$ (for GW-BASIC, R%(0)). Then, while the transfer is going on, the Driver488/DRV status is read into the string variable ST$. If ST$ has not been used previously then BASIC would have to create a new ST$ and might move R$. Of course, Driver488/DRV would have no way of knowing that R$ has been moved, and the data would not be placed correctly into R$. Interrupt Handling The IEEE 488 bus is designed to be able to attend to asynchronous (unpredictable) events or conditions. When such an event occurs, the bus device needing attention can assert the Service Request (SRQ) line to signal that condition to the controller. Once the controller notices the SRQ, it can interrogate the bus devices, using Parallel Poll (PPOLL) and/or Serial Poll (SPOLL) to determine the source and cause of the SRQ, and take the appropriate action. Parallel Poll is the fastest method of determining which device requires service. Parallel Poll is a very short, simple IEEE 488 bus transaction that quickly returns the status from many devices. Each of the eight IEEE 488 bus data bits can contain the Parallel Poll response from one or more devices. So, if there are eight or fewer devices on the bus, then just the single Parallel Poll can determine which requires service. Even if the bus is occupied by the full complement of 15 devices, then Parallel Poll can narrow the possibilities down to a choice of no more than two. Unfortunately, the utility of Parallel Poll is limited when working with actual devices. Some have no Parallel Poll response capability. Others must be configured in hardware, usually with switches or jumpers, to set their Parallel Poll response. If Parallel Poll is not available, or several devices share the same Parallel Poll response bit, then Serial Polling is still required to determine which device is requesting service. Serial Poll, though it is not as fast as Parallel Poll, does offer two major advantages: it returns additional status information beyond the simple request/no-request for service, and it is implemented on virtually all bus devices. The SRQ line can be monitored in two ways: it can be periodically polled using the STATUS command, or it can be used to cause an external interrupt when asserted. Personal488 User’s Manual, Rev. 3.0 Artisan Technology Group - Quality Instrumentation ... Guaranteed | (888) 88-SOURCE | www.artisantg.com II-69 8G. QuickBASIC II. SOFTWARE GUIDES - 8. Driver488/DRV BASIC provides a method for detecting and servicing external interrupts: the ON PEN statement. The ON PEN statement tells BASIC that, when an external interrupt is detected, a specific subroutine, known as the interrupt service routine (ISR), is to be executed. Normally, the interrupt detected by ON PEN is the light pen interrupt. However, Driver488/DRV redefines this “light pen interrupt” to signal when an IEEE 488 bus related interrupt (such as SRQ) has occurred. When Driver488/DRV detects an interrupt, it informs the user’s program that an interrupt has occurred by making it appear that a light pen interrupt has occurred. To allow BASIC and Driver488/DRV to work together to detect and service the interrupt, the following steps are required: 1. BASIC must be told which subroutine to execute upon detection of the interrupt. 2. BASIC interrupt detection must be enabled. 3. Driver488/DRV must be configured to detect the interrupt. The ON PEN GOSUB, PEN ON, and ARM SRQ commands, respectively, perform these steps: 250 ON PEN GOSUB ISR 260 PEN ON 270 PRINT#1,"ARM SRQ" 1. The ON PEN GOSUB command tells BASIC that the subroutine called ISR is to be executed when the light pen interrupt is detected. Driver488/DRV causes the light pen interrupt to occur on detection of an IEEE 488 interrupt. 2. The PEN ON command enables the actual checking for light pen interrupt status. 3. The ARM SRQ command tells Driver488/DRV that an interrupt is to be signaled on detection of a service request from the IEEE 488 bus. These commands are placed near the beginning of the program to catch Service Requests (SRQ) whenever they occur. The 195 can be set to request service on any of several different internal conditions. In particular, the M2 command causes an SRQ on the detection of any invalid command or command option by the 195: 550 PRINT#1,"OUTPUT 16;M2X" This OUTPUT command is placed early in the program so that all subsequent commands to the 195 cause an SRQ, if they are invalid. At this point BASIC is checking for an interrupt, and knows to GOSUB SRQ when an interrupt is detected. Driver488/DRV is set to generate an interrupt on detection of an SRQ generated by the 195 on detection of an invalid command. We must still, however, specify what action should be taken once an interrupt is detected. Upon entering the interrupt service routine, we first check Driver488/DRV to see if it is ready for a command and if so, read the Serial Poll Status to determine if an SRQ actually caused the interrupt: 2000 2010 2020 2030 2040 2050 2060 2070 2080 SRQ: ‘Interrupt service routine—Entered due to SRQ ‘ ‘RETURN if Driver488/DRV is not ready for commands. IF IOCTL$(2)"0" THEN RETURN ‘ ‘Check that it is indeed an SRQ PRINT#1,"SPOLL" INPUT#2,SP IF SP=0 THEN PRINT “Non-SRQ Interrupt!”: STOP Next we Serial Poll the 195 to determine its status. If there were other devices on the bus that could be generating the SRQ, each of them would be have to be checked in turn. 2110 PRINT#1,"SPOLL 16" 2120 INPUT#2,ST195 2130 IF (ST195 AND 64) = 0 THEN PRINT “Non-195 SRQ!”: STOP II-70 Personal488 User’s Manual, Rev. 3.0 Artisan Technology Group - Quality Instrumentation ... Guaranteed | (888) 88-SOURCE | www.artisantg.com II. SOFTWARE GUIDES - 8. Driver488/DRV 8G. QuickBASIC Bit DIO7, with a value of 64, is returned as true (1) in the Serial Poll response of those devices requesting service. In our simple example, we expect that the 195 is the only possible cause of an SRQ, and if not, there must be some error. Now that we have identified the device that is requesting service, we can further examine the Serial Poll status to classify the request. If DIO6 is set, then the 195 is signaling an error condition. If that bit is clear, some non-error condition caused the SRQ: 2160 IF (ST195 AND 32)=0 THEN ‘Test ERROR Status Bit ‘Interpret no-error status 2210 IF ST195 AND 1 THEN PRINT “Overflow” 2220 IF ST195 AND 2 THEN PRINT “Buffer Full” 2230 IF ST195 AND 4 THEN PRINT “Buffer 1/2 Full” 2240 IF ST195 AND 8 THEN PRINT “Reading Done” 2250 IF ST195 AND 16 THEN PRINT “Busy” 2260 ELSE ‘Interpret error status 2310 IF ST195 AND 1 THEN PRINT “Illegal Command Option” 2320 IF ST195 AND 2 THEN PRINT “Illegal Command” 2330 IF ST195 AND 4 THEN PRINT “No Remote” 2340 IF ST195 AND 8 THEN PRINT “Trigger Overrun” 2350 IF ST195 AND 16 THEN PRINT “Failed Selftest” 2360 END IF Finally, once we have diagnosed the error, we are ready to return to the main program: 2400 RETURN Sample Program 100 110 120 150 160 170 180 190 200 225 250 260 270 310 320 330 410 420 430 550 610 710 720 730 740 741 742 740 810 820 830 840 850 860 870 910 980 ‘Establish communications with Driver488/DRV OPEN “\DEV\IEEEOUT” FOR OUTPUT AS #1 ‘ ‘Reset Driver488/DRV IOCTL#1,"BREAK" PRINT#1,"RESET" ‘ ‘Open file to read responses from Driver488/DRV OPEN “\DEV\IEEEIN” FOR INPUT AS #2 PRINT#1,"FILL ERROR" ON PEN GOSUB ISR PEN ON PRINT#1,"ARM SRQ" PRINT#1,"HELLO" INPUT#2,A$ PRINT A$ PRINT#1,"STATUS" INPUT#2,ST$ PRINT ST$ PRINT#1,"OUTPUT 16;M2X" PRINT#1,"OUTPUT 16;F0R0X" PRINT#1,"ENTER 16" INPUT#2,R$ PRINT R$ N$=MID$(R$,5) N=VAL(N$) PRINT “The read value is”;N PRINT “The read value is”;VAL(MID$(R$,5)) SUM=0 FOR I=1 TO 10 PRINT#1,"ENTER 16" INPUT#2,R$ SUM=SUM+VAL(MID$(R$,5)) NEXT I PRINT “The average of ten readings is”;SUM/10 R$=SPACE$(1700) PRINT#1,"STATUS" Personal488 User’s Manual, Rev. 3.0 Artisan Technology Group - Quality Instrumentation ... Guaranteed | (888) 88-SOURCE | www.artisantg.com II-71 8G. QuickBASIC II. SOFTWARE GUIDES - 8. Driver488/DRV 990 INPUT#2,ST$ 1000 PRINT ST$ 1010 PRINT#1,"WAIT" 1020 PRINT#1,"STATUS" 1030 INPUT#2,ST$ 1040 PRINT ST$ 2000 SRQ: ‘Interrupt service routine—Entered due to SRQ 2010 ‘ 2020 ‘RETURN if Driver488/DRV is not ready for commands. 2030 IF IOCTL$(2)"0" THEN RETURN 2040 ‘ 2050 ‘Check that it is indeed an SRQ 2060 PRINT#1,"SPOLL" 2070 INPUT#2,SP 2080 IF SP=0 THEN PRINT “Non-SRQ Interrupt!”: STOP 2110 PRINT#1,"SPOLL 16" 2120 INPUT#2,ST195 2130 IF (ST195 AND 64) = 0 THEN PRINT “Non-195 SRQ!”: STOP 2160 IF (ST195 AND 32)=0 THEN ‘Test ERROR Status Bit ‘Interpret no-error status 2210 IF ST195 AND 1 THEN PRINT “Overflow” 2220 IF ST195 AND 2 THEN PRINT “Buffer Full” 2230 IF ST195 AND 4 THEN PRINT “Buffer 1/2 Full” 2240 IF ST195 AND 8 THEN PRINT “Reading Done” 2250 IF ST195 AND 16 THEN PRINT “Busy” 2260 ELSE ‘Interpret error status 2310 IF ST195 AND 1 THEN PRINT “Illegal Command Option” 2320 IF ST195 AND 2 THEN PRINT “Illegal Command” 2330 IF ST195 AND 4 THEN PRINT “No Remote” 2340 IF ST195 AND 8 THEN PRINT “Trigger Overrun” 2350 IF ST195 AND 16 THEN PRINT “Failed Selftest” 2360 END IF 2400 RETURN 8H. Turbo C Topics • • • • • • • • • Use of the Character Command Language ............................... II-71 Initialization of the System.......................................................... II-72 Configuration of the 195 DMM .................................................... II-74 Taking Readings ............................................................................. II-74 Buffer Transfers.............................................................................. II-75 Interrupt Handling ........................................................................ II-76 IEEEIO.C .......................................................................................... II-78 CRITERR.ASM (Microsoft C & Turbo C) ................................... II-80 Sample Program ............................................................................. II-80 Use of the Character Command Language In order to simplify programming Driver488/DRV with C, the following files are provided on the Driver488/DRV program disk: II-72 Personal488 User’s Manual, Rev. 3.0 Artisan Technology Group - Quality Instrumentation ... Guaranteed | (888) 88-SOURCE | www.artisantg.com II. SOFTWARE GUIDES - 8. Driver488/DRV 8H. Turbo C • IEEEIO.C: Communications routines for Driver488/DRV • IEEEIO.H: Header file, contains declarations from IEEEIO.C • CRITERR.ASM: Critical error handler assembly language source file (included with Microsoft C and Turbo C, only) • CRITERR.OBJ: Object file produced from CRITERR.ASM (included with Microsoft C and Turbo C, only) • CRITERR.H: Header file, contains declarations for using CRITERR.ASM The actual demonstration program is contained in 195DEMO.C (described by the project file 195DEMO.PRJ in Turbo C, only). All files for Microsoft C are in the \MSC directory; all files for Turbo C are in the \TURBOC directory. To execute the demonstration program, enter Turbo C and perform the following steps: 1. Type <Alt-p> (for Project) p (for Project Name) 195demo. 2. Press <Enter> to set up the project to run. 3. Then type <Alt-r> to compile and run the demonstration program. The above process assumes that you have Turbo C, and that the files have been copied into the appropriate directory for use with your C compiler. Note that the program uses a small data model because it uses less than 64K of code and data. Initialization of the System Any program using Driver488/DRV must first establish communications with the Driver488/DRV software driver. In C, this is accomplished using the OPEN statement. Communication both to and from Driver488/DRV is required. Thus, the file must be opened for both reading and writing (RDWR). Also, in Microsoft C and Turbo C, the file must be opened in BINARY mode so that end-of-line characters are not translated. In Microsoft C and Turbo C, the file is opened with the following statement: ieee=open(“ieee”,O_RDWR | O_BINARY); In Aztec C, the file is opened with the following statement: ieee=open(“ieee”,O_rdwr); which is part of the IEEEINIT function contained in IEEEIO.C. IEEEIO.C supplies several other useful routines and definitions. These are described in more detail in “Interrupt Handling,” an upcoming topic in this Sub-Chapter. In the above statement, the value returned by OPEN and placed into the integer variable IEEE, is either the handle of the opened file or -1 if some error has occurred. The IEEEINIT routine checks for this error indication and returns a -1 if there has been such an error. Of course, the file descriptor variable name IEEE may be changed as desired, but throughout this manual and the program files, IEEE has been used. Once the file is opened, we can send commands and receive responses from Driver488/DRV. Normally, when DOS communicates with a file, it checks for special characters, such as control-Z which can indicate end-of-file. When communicating with IEEE 488 devices, DOS’s checking would interfere with the communication. The RAWMODE function prevents DOS from checkings for special characters: rawmode(ieee); As an additional benefit, communication with Driver488/DRV is much more efficient when DOS does not check for special characters. Personal488 User’s Manual, Rev. 3.0 Artisan Technology Group - Quality Instrumentation ... Guaranteed | (888) 88-SOURCE | www.artisantg.com II-73 8H. Turbo C II. SOFTWARE GUIDES - 8. Driver488/DRV Driver488/DRV can accept commands only when it is in a quiescent, ready state. While Driver488/DRV should normally be ready, it is possible that it was left in some unknown state by a previous program failure or error. In order to force Driver488/DRV into its quiescent state, we use the IOCTL_WT function: ioctl_wt(ieee,"break",5); This IOCTL_WT function is equivalent to the BASIC statement IOCTL#1,“BREAK” which sends the BREAK command through a “back door” to Driver488/DRV. Driver488/DRV recognizes this “back door” command regardless of what else it might be doing and resets itself so that it is ready to accept a normal command. We can then completely reset the Driver488/DRV with the RESET command: ieeewt(“reset\r\n”); which resets the operating parameters of the Driver488/DRV back to their normal values (those that were set during system boot by the DRVR488 DOS command). Notice that the EOL OUT terminators that mark the end of a Driver488/DRV command are reset to carriage return and line feed by the IOCTL_WT command. Thus, the RESET command must be terminated by both a carriage return (\r) and a line feed (\n). As it is more convenient if Driver488/DRV accepts line feed only as the command terminator, we use the EOL OUT command to set the command terminator to line feed (\n): ieeewt(“eol out lf\r\n”); Notice that this command must also be terminated by both a carriage return and a line feed because the command terminator is not changed until after the EOL OUT command is executed. Character strings in C are normally terminated by a null (an ASCII 0). Thus, it is appropriate for Driver488/DRV to terminate its responses to the program with a null so that the response can be treated as a normal character string. We can use the EOL IN command to configure Driver488/DRV so that it does provide an ASCII null terminator: ieeewt(“eol in $0\n”); Finally, we enable SEQUENCE - NO DATA AVAILABLE error detection by setting the FILL mode to ERROR: ieeewt(“fill error\n”); All the commands discussed so far: OPEN, RAWMODE, IOCTL_WT, RESET, EOL OUT, EOL IN and FILL ERROR are part of the IEEEINIT function included in IEEEIO.C. IEEEINIT returns a zero if these steps were executed successfully, and a -1 if some error was encountered. Thus, to accomplish all the above steps, we just use the following: #include “ieeeio.h” #include .h if (ieeeinit() == -1) { printf(“Cannot initialize IEEE system.\n”); exit(1); } The two INCLUDE statements provide the program with definitions of the standard I/O and IEEE I/O functions so they can be referenced by the demo program. IEEEINIT is called to initialize the system, and if it indicates an error (returns a -1), we print an error message and exit. If there was no error, we just continue with the program. Once everything is reset, we can test the communications and read the Driver488/DRV revision number with the HELLO command: char response[256]; ieeewt(“hello\n”); ieeerd(response); printf(“%s\n”,response); We first IEEEWT the HELLO command, then IEEERD the response from Driver488/DRV into the character string response (IEEEWT and IEEERD are both supplied in IEEEIO.C). Finally, we display the response with a PRINTF. II-74 Personal488 User’s Manual, Rev. 3.0 Artisan Technology Group - Quality Instrumentation ... Guaranteed | (888) 88-SOURCE | www.artisantg.com II. SOFTWARE GUIDES - 8. Driver488/DRV 8H. Turbo C It is not necessary to perform the HELLO command, but it is included here as a simple example of normal communication with Driver488/DRV. Its response is the revision identification of the Driver488/DRV software: Driver488 Revision X.X ©199X IOtech, Inc. We can also interrogate Driver488/DRV for its status: ieeewt(“status\n”); ieeerd(response); printf(“%s\n”,response); Subsequently, the printed response is similar to the following: CS21 1 I000 000 T0 C0 P0 OK The following indicators describe each component of the Driver488/DRV status: Indicator C S 21 1 I 0 0 0 000 T0 C0 P0 OK Driver488/DRV Status It is in the Controller state. It is the System Controller. The value of its IEEE 488 bus address. An Address Change has occurred. It is idle (neither a talker nor a listener). There is no ByteIn available. It is not ready to send a ByteOut. Service Request (SRQ) is not asserted. There is no outstanding error. It has not received a bus device TRIGGER command (only applicable in the Peripheral mode). It has not received a CLEAR command (only applicable in the Peripheral mode). No CONTINUE transfer is in progress. The error message is “OK”. Configuration of the 195 DMM Once the system is initialized we are ready to start issuing bus commands. The IEEE 488 bus has already been cleared by the Interface Clear (IFC) sent by the RESET command, so we know that all bus devices are waiting for the controller to take some action. To control an IEEE 488 bus device, we output an appropriate device-dependent command to that device. For example, the F0R0X command line below sets the 195 to read DC volts with automatic range selection: ieeewt(“output 16;F0R0X\n”); The OUTPUT command takes a bus device address (16 in this case) and data (F0R0X) and sends the data to the specified device. The address can be just a primary address, such as 12, or 05, or it can include a secondary address: 1201. Note that both the primary address and, if present, the secondary address are two-digit decimal numbers. A leading zero must be used, if necessary to make a two-digit address. Taking Readings Once we have set the 195’s operating mode, we can take a reading and display it: float voltage; ieeewt(“enter 16\n”); ieeescnf(“%*4s%e”,&voltage); printf(“The read value is %g\n”,voltage); The ENTER command takes a bus address (with an optional secondary address) and configures that bus device so that it is able to send data (addressed to talk). No data is actually transferred, however, until the IEEESCNF statement requests the result from Driver488/DRV at which time data is transferred to the program into the variable voltage. A typical reading from a 195 might be NDCV+1.23456E-2, consisting of a four character prefix followed by a floating point value. The format passed to IEEESCNF causes it to skip the four character prefix (%*4s) and then convert the remaining string into the float variable voltage. Personal488 User’s Manual, Rev. 3.0 Artisan Technology Group - Quality Instrumentation ... Guaranteed | (888) 88-SOURCE | www.artisantg.com II-75 8H. Turbo C II. SOFTWARE GUIDES - 8. Driver488/DRV All the power of C may be used to manipulate, print, store, and analyze the data read from the IEEE 488 bus. For example, the following statements print the average of ten readings from the 195: int i; float sum; sum=0.0; for (i=0; i; i++) { ieeewt(“enter 16\n”); ieeescnf(“%*4s%e”,&voltage); sum=sum+voltage; } printf(“The average of 10 readings is %g\n”,sum/10.0); Buffer Transfers Instead of using an IEEERD(_) function to receive the data from a device, we can direct Driver488/DRV to place the response directly into a data buffer of our choosing. For example, each reading from the 195 consists of 17 bytes: a four-byte prefix and an eleven-byte reading followed by the two-byte command terminator. So, we can collect 100 readings in a 1700-byte array. To do this, we must first allocate the required space in an array: char hundred[1700]; Now that we have allocated a place for the readings, we can direct Driver488/DRV to put readings directly into hundred with the ENTER #count BUFFER command: ieeeprtf(“ENTER 16 #1700 BUFFER %d:%d\n”, segment(hundred),offset(hundred)); This command consists of the keyword ENTER, followed by the bus device address (16), a number sign (#), the number of bytes to transfer (1700), and the keyword BUFFER, followed by the memory address of the buffer. The buffer address is specified as segment:offset where segment and offset are each 16-bit numbers and the colon (:) is required to separate them. The segment and offset values we need are returned by the segment and offset functions, respectively. Once the data has been received, we can print it out: for (i=0; i<1700; i++) putchar(hundred[i]); The program could process the previous set of data while collecting a new set into a different buffer. To allow the program to continue, specify continue in the command: ieeeprtf(“ENTER 16 #1700 BUFFER continue\n”, segment(hundred),offset(hundred)); Once we have started the transfer, we can check the status: ieeewt(“status\n”); ieeerd(response); printf(“%s\n”,response); The status that is returned is typically: CS21 1 L100 000 T0 C0 P1 OK Notice P1 which states a transfer is in progress, and L which shows we are still a listener. If the bus device is so fast that the transfer completes before the program can check status, the response is P0 showing that the transfer is no longer in progress. We can also WAIT for the transfer to complete and check the status again: ieeewt(“wait\n”); ieeewt(“status\n”); ieeerd(response); printf(“%s\n”,response); This time the status must be P0 as the WAIT command waits until the transfer has completed. Now that we know the transfer is complete, we are ready to print out the received data as shown above. II-76 Personal488 User’s Manual, Rev. 3.0 Artisan Technology Group - Quality Instrumentation ... Guaranteed | (888) 88-SOURCE | www.artisantg.com II. SOFTWARE GUIDES - 8. Driver488/DRV 8H. Turbo C Interrupt Handling The IEEE 488 bus is designed to be able to attend to asynchronous (unpredictable) events or conditions. When such an event occurs, the bus device needing attention can assert the Service Request (SRQ) line to signal that condition to the controller. Once the controller notices the SRQ, it can interrogate the bus devices, using Parallel Poll (PPOLL) and/or Serial Poll (SPOLL) to determine the source and cause of the SRQ, and take the appropriate action. Parallel Poll is the fastest method of determining which device requires service. Parallel Poll is a very short, simple IEEE 488 bus transaction that quickly returns the status from many devices. Each of the eight IEEE 488 bus data bits can contain the Parallel Poll response from one or more devices. So, if there are eight or fewer devices on the bus, then just the single Parallel Poll can determine which requires service. Even if the bus is occupied by the full complement of 15 devices, then Parallel Poll can narrow the possibilities down to a choice of no more than two. Unfortunately, the utility of Parallel Poll is limited when working with actual devices. Some have no Parallel Poll response capability. Others must be configured in hardware, usually with switches or jumpers, to set their Parallel Poll response. If Parallel Poll is not available, or several devices share the same Parallel Poll response bit, then Serial Polling is still required to determine which device is requesting service. Serial Poll, though it is not as fast as Parallel Poll, does offer three major advantages: it gives an unambiguous response from a single bus device; it returns additional status information beyond the simple request/no-request for service; and, most importantly, it is implemented on virtually all bus devices. The SRQ line can be monitored in two ways: it can be periodically polled by using the STATUS command, or by checking the “light pen status.” BASIC provides a method for detecting and servicing external interrupts: the ON PEN statement. The ON PEN statement tells BASIC that, when an external interrupt is detected, a specific subroutine, known as the interrupt service routine (ISR), is to be executed. Normally, the interrupt detected by ON PEN is the light pen interrupt. However, Driver488/DRV redefines this “light pen interrupt” to signal when an IEEE 488 bus related interrupt (such as SRQ) has occurred. Unlike BASIC, C does not provide an automatic method of checking for light pen interrupts. Therefore, a function is needed to check for the interrupt. The function could use the STATUS command, but it is much faster to check the interrupt status directly using a BIOS interrupt. The CKLPINT (check light pen interrupt) function provided in IEEEIO.C uses the BIOS to check for Driver488/DRV interrupts and returns true (1) if one is pending. Interrupts are checked automatically by the IEEEWT routine before sending any data to Driver488/DRV. However, IEEEWT does not call CKLPINT directly. Instead, it calls the routine that is pointed to by IEEE_CKI (IEEE check interrupt). If IEEE_CKI points to CKLPINT, then IEEEWT checks for Driver488/DRV interrupts, but if IEEE_CKI points to _false_, a function that always returns 0, then interrupt checking is disabled. Initially, IEEE_CKI does point to _false_, and so interrupt checking is disabled. To enable interrupt checking IEEE_CKI must be redirected to CKLPINT: int cklpint(); ieee_cki = cklpint; Once an interrupt has been detected, an interrupt service routine must be invoked to handle the interrupting condition. When IEEEWT detects an interrupt, it calls the interrupt service routine (ISR). Just as IEEEWT does not call the check-for-interrupt routine directly, it does not call the ISR directly, either. Instead, it calls the routine pointed to by IEEE_ISR (IEEE interrupt service routine). If IEEE_ISR is set to point to some specific ISR, then that ISR is executed when IEEEWT detects an interrupt. Initially, IEEE_ISR points to no_op, a function that does nothing. So, unless IEEE_ISR is redirected to another routine, nothing is done when an interrupt is detected. In the 195DEMO example program an interrupt service routine, called isr, has been provided. So, IEEE_ISR must be set to point this routine for interrupts to be handled properly: ieee_isr = isr; Personal488 User’s Manual, Rev. 3.0 Artisan Technology Group - Quality Instrumentation ... Guaranteed | (888) 88-SOURCE | www.artisantg.com II-77 8H. Turbo C II. SOFTWARE GUIDES - 8. Driver488/DRV Once we have enabled interrupt checking by setting IEEE_CKI to point to CKLPINT, and specified the interrupt service routine by setting IEEE_ISR to point to isr, then we can specify which conditions are to cause an interrupt. The ARM command specifies those conditions. In this example we want the interrupt to occur on the detection of a Service Request (SRQ): ieeewt(“arm srq\n”); The 195 can be set to request service on any of several different internal conditions. In particular, the M2 command causes an SRQ on the detection of any invalid command or command option by the 195: ieeewt(“output 16;M2X”); This OUTPUT command is placed early in the program so that all subsequent commands to the 195 cause an SRQ, if they are invalid. Now that interrupt detection is enabled, and the interrupt service routine is specified, we must specify the actions to take to service the interrupt. We first display a message indicating that an interrupt was detected, and then turn off interrupt checking: void isr() { int _false()_; printf(“Interrupt detected...”); ieee_cki = _false_; We next check the Driver488/DRV Serial Poll Status to determine if an SRQ actually caused the interrupt: int sp; ieeewt(“spoll\n”); ieeescnf(“%d”,&sp); if (sp==0) { printf(“Non-SRQ Interrupt!\n”); exit(1); } We then Serial Poll the 195 to determine its status. If there were other devices on the bus that could be generating the SRQ, each of them would be have to be checked in turn. int st195; ieeewt(“spoll 16\n”); ieeescnf(“%d”,&st195); if ((st195 & 0x40) == 0 ) { printf(“Non-195 SRQ!\n”); exit(); } Bit DIO7, with a value of 0x40, is returned as true (1) in the Serial Poll response of those devices requesting service. In our simple example we expect that the 195 is the only possible cause of an SRQ, and if not, there must be some error. Now that we have identified the device that is requesting service, we can further examine the Serial Poll status to classify the request: if ((st195 & 0x20) == 0) { if (st195 & 0x01) printf(“Overflow\n”); if (st195 & 0x02) printf(“Buffer Full\n”); if (st195 & 0x04) printf(“Buffer 1/2 Full\n”); if (st195 & 0x08) printf(“Reading Done\n”); if (st195 & 0x10) printf(“Busy\n”); } else { if (st195 & 0x01) printf(“Illegal Command Option\n”); if (st195 & 0x02) II-78 Personal488 User’s Manual, Rev. 3.0 Artisan Technology Group - Quality Instrumentation ... Guaranteed | (888) 88-SOURCE | www.artisantg.com II. SOFTWARE GUIDES - 8. Driver488/DRV 8H. Turbo C printf(“Illegal Command\n”); if (st195 & 0x04) printf(“No Remote\n”); if (st195 & 0x08) printf(“Trigger Overrun\n”); if (st195 & 0x10) printf(“Failed Selftest\n”); } The action taken depends, of course, on the design of the system, but in this example, simply displaying a message is adequate. Finally, after decoding the cause of the SRQ, we are ready to re-enable interrupts and return to the main program: ieee_cki = cklpint; IEEEIO.C The IEEEIO.C file contains several useful declarations and functions, many of which have been used in the 195DEMO example program. They are: • IEEE is an integer that holds the file descriptor (MS-DOS handle) returned by OPEN. int ieee • segment and offset return the 16-bit segment and offset values that make up a pointer. int segment(ptr) void *ptr int offset(ptr) void *ptr The implementation of these functions depends on the memory model being used. In the small data model, pointers are 16 bits and are exactly the offset desired. Here, the segment is always the internal ds register value. In the large data model, pointers are 32 bits, one word of which is the segment and the other is the offset. For more information on memory models, see the “Other Languages” Sub-Chapter in this Chapter. • ERRNO holds the error code for I/O and other errors. extern int errno; • IOCTL_RD and IOCTL_WT are special versions of IOCTL_IO which reads and writes to the I/O control channel of a device. int ioctl_io(int handle chars,chars[], int size, int iocall) #define ioctl_rd(handle,chars,size) \ ioctl_io(handle,chars,size,0x4402) #define ioctl_wt(handle,chars,size) \ ioctl_io(handle,chars,size,0x4403) The I/O control channel of a device is read from and written to exactly as the normal (data) channel is read and written, but the data transferred is not to be treated in the same way. Normally, the I/O control channel is used to communicate setup and status information regarding the device without actually transferring any data to or from it. When using Driver488/DRV, IOCTL_WT is used to force Driver488/DRV to be ready to accept a command, and IOCTL_RD is used to return status information from the driver. These functions correspond exactly to the IOCTL and IOCTL$ commands, as described in “Section III: Command References.” The Turbo C library function IOCTL could be used to perform these functions for small-data programs, but it is not compatible with the large-data models. • CKLPINT, IEEE_CKI, and IEEE_ISR are functions and pointers which provide for automatic interrupt detection and servicing. Personal488 User’s Manual, Rev. 3.0 Artisan Technology Group - Quality Instrumentation ... Guaranteed | (888) 88-SOURCE | www.artisantg.com II-79 8H. Turbo C II. SOFTWARE GUIDES - 8. Driver488/DRV int cklpint(void) int _false_(void) int (*ieee_cki)(void) = _false_ void no_op(void) void (*ieee_isr)(void) = no_op Driver488/DRV signals interrupts, which are enabled with the ARM command, by causing the light pen signal to appear “true.” The CKLPINT checks that Driver488/DRV is able to service an interrupt (the response from IOCTL_RD is 0) and then checks if an interrupt is pending by checking the light pen status. The IEEEWT routine (described below) calls the function pointed to by IEEE_CKI to determine if an IEEE interrupt needs to be serviced. The IEEE_CKI normally points to the function _false_ which always returns zero (0). To enable interrupt checking IEEE_CKI must be redirected to point to CKLPINT. Interrupt checking is disabled by pointing IEEE_CKI back to _false_. Once an interrupt has been detected, IEEEWT calls the interrupt service routine pointed to by IEEE_ISR to service the interrupt. The IEEE_ISR initially points to no_op, a function that does nothing, but it may be redirected as needed to specify the appropriate interrupt service routine for each part of a program. • _IEEEWT and _IEEERD are very similar to the unbuffered _WRITE and _READ routines provided in the C library. int _ieeewt(int handle,char chars[]) int _ieeerd(int handle,char chars[],int size) #define ieeewt(chars) _ieeewt(ieee,chars) #define ieeerd(chars) _ieeerd(ieee,chars,sizeof(chars)) The _IEEEWT differs from _WRITE in that it checks for Driver488/DRV interrupts before writing, determines the number of characters to write by using STRLEN, and prints an error message if an error has occurred during writing. The _IEEERD differs from _READ only in that it prints an error message if an error has occurred during reading. IEEEWT and IEEERD (without the leading underscore) write and read to the file IEEE. Notice that IEEERD uses SIZEOF to determine the number of characters to read. This only works if SIZEOF can determine the number of bytes in the receive buffer, chars. This means chars must be an array of known size, for example, char chars[256], not char*chars. • IEEEPRTF and IEEESCNF are IEEE 488 versions of PRINTF and SCANF, respectively. int ieeeprtf(char *format, ...) int ieeescnf(char *format, ...) The IEEEPRTF accepts a format string and a list of arguments. It formats its arguments according to the specified format and sends the formatted string to Driver488/DRV. The IEEESCNF accepts a format string and pointers (to the types specified in the format string). It reads a string of up to 256 bytes from Driver488/DRV, terminates it with a zero, converts it according to the format string, and places the converted values into the variables pointed to by the specified pointers. • RAWMODE sets the file specified by handle for “raw mode” I/O. int rawmode(int handle); In “raw mode” MS-DOS does not interpret the characters received from the file. In particular, control-Z is not taken as end-of-file. “Raw mode” is usually appropriate for IEEE 488 communications because it does not interfere with the transfer of binary data and because it is much more efficient than “non-raw mode” I/O. • IEEEINIT establishes communications with Driver488/DRV and configures it for use with C. int ieeeinit(void); It first opens the file IEEE for both reading and writing and puts the file descriptor into IEEE. It then puts the file into “raw mode”. Driver488/DRV is then initialized by sending the IOCTL “BREAK” and RESET commands. Normal output from C is terminated by a new-line (line feed) character, and returned strings should be terminated by a null, so EOL OUT LF and EOL IN $0 commands are then issued. Finally a FILL ERROR command is issued to enable SEQUENCE - NO DATA AVAILABLE error detection. If an error is detected during any of these commands, IEEEINIT returns a -1, otherwise it returns a zero (0). II-80 Personal488 User’s Manual, Rev. 3.0 Artisan Technology Group - Quality Instrumentation ... Guaranteed | (888) 88-SOURCE | www.artisantg.com II. SOFTWARE GUIDES - 8. Driver488/DRV 8H. Turbo C CRITERR.ASM (Microsoft C & Turbo C) Normally, when Driver488/DRV detects an error, perhaps due to a syntax error in a command, or due to an IEEE 488 bus error (such as time out on data transfer), it responds with an I/O error to DOS. When this happens, DOS normally issues an ABORT, RETRY or IGNORE message and waits for a response from the keyboard. There is no way for the user’s program to detect such an error, determine the cause, and take appropriate action. However, DOS does provide a method of redefining the action to be taken on such a “critical error”. CRITERR.ASM contains a critical error handler that, when invoked, makes it appear to the calling program that some less-critical error has occurred. The critical error handler is installed by CRIT_ON() and removed by CRIT_OFF().The critical error handler is also automatically removed by DOS when the program exits. The following program fragment demonstrates the use of the critical error handler: #include “criterr.h” crit_on(ieee); if (ieeewt(“output 16;F0X”) == -1) { printf(“Error writing F0X to device 16, \n”); crit_off(); ioctl_wt(ieee,"break",5); ieeewt(“eol out lf\r\n”); ieeewt(“status\n”); ieeerd(response); printf(“status = %s\n”,response); crit_on(ieee); } We must first #include the header file with the definitions of the critical error routines. We then enable critical error trapping with CRIT_ON which takes as a parameter the handle of the file for which critical error trapping is to be enabled. Only read and write commands to that handle are trapped. Errors caused by other actions, or associated with other files are not trapped. Error trapping may only be enabled for one file at a time. Now, if IEEEWT signals an error by returning a -1, we can check what happened. We first PRINTF an error message, then we turn critical error trapping off with CRIT_OFF so that, if another critical error occurs, we get the ABORT, RETRY or IGNORE message and know a catastrophic double error has occurred. We then IOCTL_WT(_BREAK_) to force Driver488/DRV to listen to our next command. The IOCTL_WT also resets the EOL OUT terminator so we can be sure that Driver488/DRV detects the end of our commands. We next reset the EOL OUT terminator to our preferred line feed only and ask Driver488/DRV for its status. On receiving the response, we could interpret the status and take whatever action is appropriate. However, in this example, we just display the status. Finally, we reenable the critical error handler and continue with the program. Sample Program #include “ieeeio.h” #include .h void main (void) { char response[256]; float voltage; int i; float sum; char hundred[1700]; ieee=open(“ieee”,O_RDWR | O_BINARY); ieee=open(“ieee”,O_rdwr); rawmode(ieee); ioctl_wt(ieee,"break",5); ieeewt(“reset\r\n”); ieeewt(“eol out lf\r\n”); ieeewt(“eol in $0\n”); ieeewt(“fill error\n”); if (ieeeinit() == -1) { printf(“Cannot initialize IEEE system.\n”); exit(1); Personal488 User’s Manual, Rev. 3.0 Artisan Technology Group - Quality Instrumentation ... Guaranteed | (888) 88-SOURCE | www.artisantg.com II-81 8H. Turbo C II. SOFTWARE GUIDES - 8. Driver488/DRV } ieeewt(“hello\n”); ieeerd(response); printf(“%s\n”,response); ieeewt(“status\n”); ieeerd(response); printf(“%s\n”,response); ieeewt(“output 16;F0R0X\n”); ieeewt(“enter 16\n”); ieeescnf(“%*4s%e”,&voltage); printf(“The read value is %g\n”,voltage); sum=0.0; for (i=0; i; i++) { ieeewt(“enter 16\n”); ieeescnf(“%*4s%e”,&voltage); sum=sum+voltage; } printf(“The average of 10 readings is %g\n”,sum/10.0); ieeeprtf(“ENTER 16 #1700 BUFFER %d:%d\n”, segment(hundred),offset(hundred)); for (i=0; i<1700; i++) putchar(hundred[i]); ieeeprtf(“ENTER 16 #1700 BUFFER continue\n”, segment(hundred),offset(hundred)); ieeewt(“status\n”); ieeerd(response); printf(“%s\n”,response); ieeewt(“wait\n”); ieeewt(“status\n”); ieeerd(response); printf(“%s\n”,response); ieee_cki = cklpint; ieee_isr = isr; ieeewt(“arm srq\n”); ieeewt(“output 16;M2X”); } void isr() { int _false()_; int sp; int st195; printf(“Interrupt detected...”); ieee_cki = _false_; ieeewt(“spoll\n”); ieeescnf(“%d”,&sp); if (sp==0) { printf(“Non-SRQ Interrupt!\n”); exit(1); } ieeewt(“spoll 16\n”); ieeescnf(“%d”,&st195); if ((st195 & 0x40) == 0 ) { printf(“Non-195 SRQ!\n”); exit(); } if ((st195 & 0x20) == 0) { if (st195 & 0x01) printf(“Overflow\n”); if (st195 & 0x02) printf(“Buffer Full\n”); if (st195 & 0x04) printf(“Buffer 1/2 Full\n”); if (st195 & 0x08) printf(“Reading Done\n”); if (st195 & 0x10) printf(“Busy\n”); } else { if (st195 & 0x01) printf(“Illegal Command Option\n”); II-82 Personal488 User’s Manual, Rev. 3.0 Artisan Technology Group - Quality Instrumentation ... Guaranteed | (888) 88-SOURCE | www.artisantg.com II. SOFTWARE GUIDES - 8. Driver488/DRV 8H. Turbo C if (st195 & 0x02) printf(“Illegal Command\n”); if (st195 & 0x04) printf(“No Remote\n”); if (st195 & 0x08) printf(“Trigger Overrun\n”); if (st195 & 0x10) printf(“Failed Selftest\n”); } 8I. Turbo Pascal Topics • • • • • • • Use of Character Command Language...................................... II-82 Initialization of the System.......................................................... II-83 Configuration of the 195 DMM .................................................... II-84 Taking Readings............................................................................. II-85 Buffer Transfers ............................................................................. II-85 Interrupt Handling ........................................................................ II-86 Sample Program ............................................................................. II-88 Use of Character Command Language In order to simplify programming Driver488/DRV with Turbo Pascal 4.0 and Turbo Pascal 6.0, the following files are provided on the Driver488/DRV program disk in the \TURBOP40 directory: • IEEEIO.PAS: Communications routines unit for Driver488/DRV. • IEEEIO.TPU: Compiled unit for using Driver488/DRV. The actual demonstration program is contained in 195DEMO.PAS. The IEEEIO.PAS unit contains initialization code that prepares for communication with Driver488/DRV. It opens the IeeeOut and IeeeIn files, sets them into “raw mode”, resets Driver488/DRV with IOCTL followed by Writeln(IeeeOut,’RESET’), and enables NO DATA AVAILABLE error detection by Writeln(IeeeOut,’FILLERROR’). These and several other declarations and subroutines contained in the IEEEIO unit, are further discussed below: VAR Regs: REGISTERS; IeeeOut, IeeeIn: TEXT; PROCEDURE IOCTL; PROCEDURE IOCTLRead(var Command:STRING); PROCEDURE RawMode(var AFile:TEXT); PROCEDURE IeeeComplete; • Regs, defined as a REGISTERS type in the DOS unit, is a record that is used to pass the microprocessor registers to and from the MS-DOS and IntrPascal procedures. Each of the accessible registers is referred to as a component of Regs. For example Regs.AX:=$1234 is the same as Regs.AH:=$12;Regs.AL:=$34. • IeeeOut and IeeeIn are two TEXT file variables that are used for writing to, and reading from, Driver488/DRV, respectively. They are opened by the IEEEIO unit initialization code, and closed by IeeeComplete. Personal488 User’s Manual, Rev. 3.0 Artisan Technology Group - Quality Instrumentation ... Guaranteed | (888) 88-SOURCE | www.artisantg.com II-83 8I. Turbo Pascal II. SOFTWARE GUIDES - 8. Driver488/DRV • IOCTL is equivalent to the IOCTL#1 BASIC statement that is described in “Section III: Command References.” Its effect is to cause Driver488/DRV to listen to the program regardless of what state it was previously in. This is used by IeeeInit to reset Driver488/DRV. • IOCTLRead is equivalent to the IOCTL$ BASIC function that is described in “Section III: Command References.” It returns a single character, either 0 or 1, stating whether (1) or not (0) Driver488/DRV has a response to be read by the program. While it is not used in this sample program, it is included for completeness. • All strings are of type STRING which is a 255 character string. Unless more memory is needed, there is no reason to define strings with fewer than their maximum of 255 characters. • RawMode is a procedure that tells DOS not to check for control characters when communicating with the specified TEXT file. This greatly improves the efficiency of communicating with Driver488/DRV. • IeeeComplete should be called at the end of programs that use Driver488/DRV to close the IeeeOut and IeeeIn files. Initialization of the System Any program using Driver488/DRV must first establish communications with the Driver488/DRV software driver. In Turbo Pascal (“Turbo”) this is accomplished using ASSIGN, REWRITE and RESET statements. Communication both to and from Driver488/DRV, is required. In Turbo, this means that two files must be opened, one for input, and one for output. Other languages may allow the same file to be opened for both input and output. Three file names are allowed: IEEEOUT, IEEEIN, and IEEE. By convention, they are used for output, input, and both input and output, respectively. But actuality, they are all the same and any one of them can be used for input, output, or both, depending on the programming language. Note that, unlike BASIC (refer to the “QuickBASIC” Sub-Chapter in Chapter 8), the \DEV\ prefix is not used in Turbo Pascal. In Turbo, the files are opened with the following statements: VAR IeeeOut, IeeeIn: TEXT; Assign(IeeeOut,’IeeeOut’); Rewrite(IeeeOut); Assign(IeeeIn,’IeeeIn’); Reset(IeeeIn); which are contained in the IEEEIO unit initialization procedure. Of course, the TEXT file variable names (IeeeOut and IeeeIn) may be changed as desired, but throughout this manual, IeeeOut and IeeeIn are used. Once the files are opened, we can tell DOS that they are used for binary communications and that DOS should not check for control characters. To do this, we use RawMode: RawMode(IeeeOut); RawMode(IeeeIn); Now that the files are ready, we can send commands and receive responses from Driver488/DRV. While Driver488/DRV should normally be in a reset, inactive state, it is possible that it was left in some unknown state by a previous program failure or error. In order to force Driver488/DRV into its quiescent state we can use the supplied IOCTL procedure: IOCTL; {Invoke IOCTL procedure} The IOCTL procedure is equivalent to the BASIC statement IOCTL#1,“BREAK” which sends the BREAK command through a “back door” to Driver488/DRV. Driver488/DRV recognizes this “back door” command regardless of what else it might be doing and resets itself so that it is ready to accept a normal command. We can then completely reset the Driver488/DRV with the RESET command: Writeln(IeeeOut,’RESET’); which resets the operating parameters of the Driver488/DRV back to their normal values (those that were set during system boot by the DRVR488 DOS command). II-84 Personal488 User’s Manual, Rev. 3.0 Artisan Technology Group - Quality Instrumentation ... Guaranteed | (888) 88-SOURCE | www.artisantg.com II. SOFTWARE GUIDES - 8. Driver488/DRV 8I. Turbo Pascal Next, we can enable SEQUENCE - NO DATA AVAILABLE error detection by setting the FILL mode to ERROR: Writeln(IeeeOut,’FILL ERROR’); The IOCTL, RESET, and FILL ERROR statements are also included in the IEEEIO unit initialization code. Once everything is reset, we can test the communications and read the Driver488/DRV revision number with the HELLO command: VAR Response: STRING; Writeln(IeeeOut,’HELLO’); Readln(IeeeIn,Response); Writeln(Response); First we Writeln the HELLO command to IeeeOut, then we Readln the response from IeeeIn into the character variable Response. Finally we display the response with a Writeln to the screen. Because Turbo Pascal cannot both Writeln and Readln from the same text file, we use two different files to communicate with Driver488/DRV. Writeln must reference the file opened for output (in these examples, IeeeOut) and Readln must reference the file opened for input (IeeeIn). Attempting to communicate with the wrong file (such as Writeln(IeeeIn_)) results in an error. It is not necessary to perform the HELLO command, but it is included here as a simple example of normal communication with Driver488/DRV. Its response is the revision identification of the Driver488/DRV software: Driver488 Revision X.X ©199X IOtech, Inc. We can also interrogate Driver488/DRV for its status: Writeln(IeeeOut,’STATUS’); Readln(IeeeIn,Response); Writeln(Response); Subsequently, the printed response is similar to the following: CS21 1 I000 000 T0 C0 P0 OK The following indicators describe each component of the Driver488/DRV status: Indicator C S 21 1 I 0 0 0 000 T0 C0 P0 OK Driver488/DRV Status It is in the Controller state. It is the System Controller. The value of its IEEE 488 bus address. An Address Change has occurred. It is idle (neither a talker nor a listener). There is no ByteIn available. It is not ready to send a ByteOut. Service Request (SRQ) is not asserted. There is no outstanding error. It has not received a bus device TRIGGER command (only applicable in the Peripheral mode). It has not received a CLEAR command (only applicable in the Peripheral mode). No CONTINUE transfer is in progress. The error message is “OK”. Configuration of the 195 DMM Once the system is initialized we are ready to start issuing bus commands. The IEEE 488 bus has already been cleared by the Interface Clear (IFC) sent by the RESET command, so we know all bus devices are waiting for the controller to take some action. To control an IEEE 488 bus device, we OUTPUT an appropriate device-dependent command to that device. For example, the command F0R0X sets the 195 to read DC volts with automatic range selection: Personal488 User’s Manual, Rev. 3.0 Artisan Technology Group - Quality Instrumentation ... Guaranteed | (888) 88-SOURCE | www.artisantg.com II-85 8I. Turbo Pascal II. SOFTWARE GUIDES - 8. Driver488/DRV Writeln(IeeeOut,’OUTPUT 16;F0R0X’); The OUTPUT command takes a bus device address (16 in this case) and data (F0R0X) and sends the data to the specified device. The address can be just a primary address, such as 12, or 05, or it can include a secondary address: 1201. Note that both the primary address and, if present, the secondary address are two-digit decimal numbers. A leading zero must be used, if necessary, to make a two-digit address. Taking Readings Once we have set the 195’s operating mode, we can take a reading and display it: VAR Reading: STRING; Writeln(IeeeOut,’ENTER 16’); Readln(IeeeIn,Reading); Writeln(Reading); The ENTER command takes a bus address (with an optional secondary address) and configures that bus device so that it is able to send data (addressed to Talk). No data is actually transferred, however, until the Readln statement requests the result from Driver488/DRV at which time data is transferred to the program into the variable Reading. Once the result has been received, any Turbo Pascal functions or statements can be used to modify or interpret it. In this example, the result is in the form NDCV+1.23456E-2 showing the range (NDCV) and the numeric value of the reading (+1.23456E-2). The Turbo Pascal Copy function can be used to strip off the range characters and keep only the numeric part (the fifth character and beyond), and the VAL procedure can be used to convert this string to a number: VAR voltage: REAL; code: INTEGER; Reading:=Copy(Reading,5,255); Val(Reading,voltage,code); Writeln(‘The read value is ‘,voltage); These may be combined for efficiency: Val(Copy(Reading,5,255),voltage,code); Writeln(‘The read value is ‘,voltage); All the power of Turbo Pascal may be used to manipulate, print, store, and analyze the data read from the IEEE 488 bus. For example, the following statements print the average of ten readings from the 195: VAR sum: REAL; i: INTEGER; sum:=0.; FOR i:=1 TO 10 DO BEGIN Writeln(IeeeOut,’ENTER 16’); Readln(IeeeIn,Reading); Val(Copy(Reading,5,255),voltage,code); sum:=sum+voltage; END; Writeln(‘The average of 10 readings is ‘,sum/10); Buffer Transfers Instead of using a Readln(IeeeIn_) statement to receive the data from a device, we can direct Driver488/DRV to place the response directly into a data buffer of our choice. For example, each reading from the 195 consists of 17 bytes: a four-byte prefix and an eleven-byte reading followed by the two-byte command terminator. So, we can collect 100 readings in a 1700 byte array. To do this we must first allocate the required space in an array: VAR r: ARRAY[0..1699] of CHAR; II-86 Personal488 User’s Manual, Rev. 3.0 Artisan Technology Group - Quality Instrumentation ... Guaranteed | (888) 88-SOURCE | www.artisantg.com II. SOFTWARE GUIDES - 8. Driver488/DRV 8I. Turbo Pascal Now that we have allocated a place for the readings, we can direct Driver488/DRV to put readings directly into the r array with the ENTER #count BUFFER command: Writeln(IeeeOut,’ENTER 16 #1700 BUFFER’, Seg(r[0]),’:’,Ofs(r[0])); This command consists of the keyword ENTER, followed by the bus device address (16), a number sign (#), the number of bytes to transfer (1700), and the keyword BUFFER, followed by the memory address of the buffer. The buffer address is specified as segment:offset where segment and offset are each 16-bit numbers and the colon (:) is required to separate them. The segment value we need, is the value returned by the Turbo Pascal Seg function. The offset is the offset of the array in that data segment, which is the value returned by Ofs(r[0]). Once the data has been received, we can print it out: FOR i:=0 TO 1699 DO Write(r[i]); The program could process the previous set of data while collecting a new set into a different buffer. To allow the program to continue, specify CONTINUE in the command: Writeln(IeeeOut,’ENTER 16 #1700 BUFFER ‘, Seg(r[0]),’:’,Ofs(r[0]),’ CONTINUE’); Once we have started the transfer, we can check the status: Writeln(IeeeOut,’STATUS’); Readln(IeeeIn,Response); Writeln(Response); The status that is returned is typically: CS21 1 L100 000 T0 C0 P1 OK Notice P1 which states a transfer is in progress, and L which shows we are still a listener. If the bus device is so fast that the transfer completes before the program can check status, the response is P0 showing that the transfer is no longer in progress. We can also WAIT for the transfer to complete and check the status again: Writeln(IeeeOut,’WAIT’); Writeln(IeeeOut,’STATUS’); Readln(IeeeIn,Response); Writeln(Response); This time the status must be P0 as the WAIT command waits until the transfer has completed. Now that we know the transfer is complete, we are ready to print out the received data as shown above. Interrupt Handling The IEEE 488 bus is designed to be able to attend to asynchronous (unpredictable) events or conditions. When such an event occurs, the bus device needing attention can assert the Service Request (SRQ) line to signal that condition to the controller. Once the controller notices the SRQ, it can interrogate the bus devices, using Parallel Poll (PPOLL) and/or Serial Poll (SPOLL) to determine the source and cause of the SRQ, and take the appropriate action. Parallel Poll is the fastest method of determining which device requires service. Parallel Poll is a very short, simple IEEE 488 bus transaction that quickly returns the status from many devices. Each of the eight IEEE 488 bus data bits can contain the Parallel Poll response from one or more devices. So, if there are eight or fewer devices on the bus, then just the single Parallel Poll can determine which requires service. Even if the bus is occupied by the full complement of 15 devices, then Parallel Poll can narrow the possibilities down to a choice of no more than two. Unfortunately, the utility of Parallel Poll is limited when working with actual devices. Some have no Parallel Poll response capability. Others must be configured in hardware, usually with switches or jumpers, to set their Parallel Poll response. If Parallel Poll is not available, or several devices share the same Parallel Poll response bit, then Serial Polling is still required to determine which device is requesting service. Personal488 User’s Manual, Rev. 3.0 Artisan Technology Group - Quality Instrumentation ... Guaranteed | (888) 88-SOURCE | www.artisantg.com II-87 8I. Turbo Pascal II. SOFTWARE GUIDES - 8. Driver488/DRV Serial Poll, though it is not as fast as Parallel Poll, does offer three major advantages: it gives an unambiguous response from a single bus device; it returns additional status information beyond the simple request/no-request for service; and, most importantly, it is implemented on virtually all bus devices. The SRQ line can be monitored in two ways: it can be periodically polled using the STATUS command, or it can be used to cause an external interrupt when asserted. BASIC provides a method for detecting and servicing external interrupts: the ON PEN statement. The ON PEN statement tells BASIC that, when an external interrupt is detected, a specific subroutine, known as the interrupt service routine (ISR), is to be executed. Normally, the interrupt detected by ON PEN is the light pen interrupt. However, Driver488/DRV redefines this “light pen interrupt” to signal when an IEEE 488 bus related interrupt (such as SRQ) has occurred. Unlike BASIC, Turbo Pascal does not provide an automatic method of checking for light pen status. Therefore, a procedure is needed to check for the interrupt. The procedure could use the STATUS command, but it is much faster to check the interrupt status directly, using a BIOS interrupt: PROCEDURE CheckInt(Signal:integer); BEGIN Regs.AX=$0400; {Function 4, check light pen status} Intr($10,Regs); {BIOS interrupt $10} WHILE Registers.AH 0 DO BEGIN {A Driver488/DRV interrupt has occurred} {Take the appropriate action} Regs.AX=$0400; {Check if another interrupt has occurred} Intr($10,Regs); END END; {of procedure CheckInt} Inside the WHILE loop, where Registers.AH is not zero, we know that a Driver488/DRV interrupt has occurred. The ARM command is used to specify which conditions should cause that interrupt. In this example we want the interrupt to occur on the detection of a Service Request: Writeln(IeeeOut,’ARM SRQ’); The 195 can be set to request service on any of several different internal conditions. In particular, the M2 command causes an SRQ upon the detection of any invalid command or command option by the 195: Writeln(IeeeOut,’OUTPUT 16;M2X’); This OUTPUT command is placed early in the program so that all subsequent commands to the 195 cause an SRQ, if they are invalid. Now we can check for interrupts by calling CheckInt at appropriate places in the program. The only place CheckInt should not be used, is between a command that requests a response, such as STATUS or ENTER, and the statement(s) that reads the response. The CheckInt parameter, Signal, can be used to identify where the interrupt was detected. A typical sequence might be the following: Writeln(IeeeOut,’STATUS’); Readln(IeeeIn,Response); CheckInt(10); Writeln(IeeeOut,’ENTER 16’); Readln(IeeeIn,Reading); CheckInt(20); Each time CheckInt is called, Driver488/DRV interrupts are checked. Now we must specify what action should be taken when an interrupt is detected. Upon detecting an interrupt, we first display a message indicating that an interrupt was found, and then check the Driver488/DRV Serial Poll Status to determine if an SRQ actually caused the interrupt: II-88 Personal488 User’s Manual, Rev. 3.0 Artisan Technology Group - Quality Instrumentation ... Guaranteed | (888) 88-SOURCE | www.artisantg.com II. SOFTWARE GUIDES - 8. Driver488/DRV 8I. Turbo Pascal VAR sp: INTEGER; Writeln(‘Interrupt detected at signal ‘,Signal); Writeln(IeeeOut,’SPOLL’); Readln(IeeeIn,sp); IF sp=0 THEN BEGIN Writeln(‘Non-SRQ Interrupt!’); Halt END; Next we Serial Poll the 195 to determine its status. If there were other devices on the bus that could be generating the SRQ, each of them would be have to be checked in turn. VAR st195: INTEGER; Writeln(IeeeOut,’SPOLL 16’); Readln(IeeeIn,st195); IF (st195 and 64)=0 THEN BEGIN Writeln(‘Non-195 SRQ!’); Halt END; Bit DIO7, with a value of 64, is returned as true (1) in the Serial Poll response of those devices requesting service. In our simple example, we expect that the 195 is the only possible cause of an SRQ, and if not, there must be some error. Now that we have identified the device that is requesting service, we can further examine the Serial Poll status to classify the request: IF (st195 and 32)=0 THEN BEGIN { ERROR is not set} IF (st195 and 1) 0 THEN Writeln(‘Overflow’); IF (st195 and 2) 0 THEN Writeln(‘Buffer Full’); IF (st195 and 4) 0 THEN Writeln(‘Buffer 1/2 Full’); IF (st195 and 8) 0 THEN Writeln(‘Reading Done’); IF (st195 and 16) 0 THEN Writeln(‘Busy’) END ELSE BEGIN {ERROR is set}IF (st195 and 1) 0 THEN Writeln(‘Illegal Command Option’); IF (st195 and 2) 0 THEN Writeln(‘Illegal Command’); IF (st195 and 4) 0 THEN Writeln(‘No Remote’); IF (st195 and 8) 0 THEN Writeln(‘Trigger Overrun’); IF (st195 and 16) 0 THEN Writeln(‘Failed Selftest’) END; The action taken depends, of course, on the design of the system, but in this example, simply displaying a message is adequate. Sample Program BEGIN VAR IeeeOut, IeeeIn: TEXT; VAR Response: STRING; VAR Reading: STRING; VAR voltage: REAL; code: INTEGER; VAR sum: REAL; i: INTEGER; VAR r: ARRAY[0..1699] of CHAR; Assign(IeeeOut,’IeeeOut’); Rewrite(IeeeOut); Assign(IeeeIn,’IeeeIn’); Reset(IeeeIn); RawMode(IeeeOut); RawMode(IeeeIn); IOCTL; {Invoke IOCTL procedure} Writeln(IeeeOut,’RESET’); Writeln(IeeeOut,’FILL ERROR’); Writeln(IeeeOut,’HELLO’); Readln(IeeeIn,Response); Writeln(Response); Writeln(IeeeOut,’STATUS’); Personal488 User’s Manual, Rev. 3.0 Artisan Technology Group - Quality Instrumentation ... Guaranteed | (888) 88-SOURCE | www.artisantg.com II-89 8I. Turbo Pascal II. SOFTWARE GUIDES - 8. Driver488/DRV Readln(IeeeIn,Response); Writeln(Response); Writeln(IeeeOut,’OUTPUT 16;F0R0X’); Writeln(IeeeOut,’ENTER 16’); Readln(IeeeIn,Reading); Writeln(Reading); Reading:=Copy(Reading,5,255); Val(Reading,voltage,code); Writeln(‘The read value is ‘,voltage); Val(Copy(Reading,5,255),voltage,code); Writeln(‘The read value is ‘,voltage); sum:=0.; FOR i:=1 TO 10 DO BEGIN Writeln(IeeeOut,’ENTER 16’); Readln(IeeeIn,Reading); Val(Copy(Reading,5,255),voltage,code); sum:=sum+voltage; END; Writeln(‘The average of 10 readings is ‘,sum/10); Writeln(IeeeOut,’ENTER 16 #1700 BUFFER ‘, Seg(r[0]),’:’,Ofs(r[0])); FOR i:=0 TO 1699 DO Write(r[i]); Writeln(IeeeOut,’ENTER 16 #1700 BUFFER ‘, Seg(r[0]),’:’,Ofs(r[0]),’ CONTINUE’); Writeln(IeeeOut,’STATUS’); Readln(IeeeIn,Response); Writeln(Response); Writeln(IeeeOut,’WAIT’); Writeln(IeeeOut,’STATUS’); Readln(IeeeIn,Response); Writeln(Response); PROCEDURE CheckInt(Signal:integer); BEGIN VAR sp: INTEGER; VAR st195: INTEGER; Regs.AX=$0400; {Function 4, check light pen status} Intr($10,Regs); {BIOS interrupt $10} WHILE Registers.AH 0 DO BEGIN {A Driver488/DRV interrupt has occurred} {Take the appropriate action} Regs.AX=$0400; {Check if another interrupt has occurred} Intr($10,Regs); END Writeln(IeeeOut,’ARM SRQ’); Writeln(IeeeOut,’OUTPUT 16;M2X’); Writeln(IeeeOut,’STATUS’); Readln(IeeeIn,Response); CheckInt(10); Writeln(IeeeOut,’ENTER 16’); Readln(IeeeIn,Reading); CheckInt(20); Writeln(‘Interrupt detected at signal ‘,Signal); Writeln(IeeeOut,’SPOLL’); Readln(IeeeIn,sp); IF sp=0 THEN BEGIN Writeln(‘Non-SRQ Interrupt!’); Halt END; Writeln(IeeeOut,’SPOLL 16’); Readln(IeeeIn,st195); IF (st195 and 64)=0 THEN BEGIN Writeln(‘Non-195 SRQ!’); Halt END; IF (st195 and 32)=0 THEN BEGIN { ERROR is not set} II-90 Personal488 User’s Manual, Rev. 3.0 Artisan Technology Group - Quality Instrumentation ... Guaranteed | (888) 88-SOURCE | www.artisantg.com II. SOFTWARE GUIDES - 8. Driver488/DRV 8I. Turbo Pascal IF (st195 and 1) 0 THEN Writeln(‘Overflow’); IF (st195 and 2) 0 THEN Writeln(‘Buffer Full’); IF (st195 and 4) 0 THEN Writeln(‘Buffer 1/2 Full’); IF (st195 and 8) 0 THEN Writeln(‘Reading Done’); IF (st195 and 16) 0 THEN Writeln(‘Busy’) END ELSE BEGIN {ERROR is set}IF (st195 and 1) 0 THEN Writeln(‘Illegal Command Option’); IF (st195 and 2) 0 THEN Writeln(‘Illegal Command’); IF (st195 and 4) 0 THEN Writeln(‘No Remote’); IF (st195 and 8) 0 THEN Writeln(‘Trigger Overrun’); IF (st195 and 16) 0 THEN Writeln(‘Failed Selftest’) END; END; {of procedure CheckInt} 8J. Spreadsheets Topics • • • • • Use of Direct DOS I/O Devices..................................................... II-90 Initialization of the System.......................................................... II-90 Configuration of the 195 DMM .................................................... II-91 Taking Readings............................................................................. II-92 Interrupt Handling ........................................................................ II-92 Use of Direct DOS I/O Devices Once Driver488/DRV has been installed in your system, it is ready to begin controlling IEEE 488 bus devices. To show how this is done, we develop a short program, in the Lotus 1-2-3 macro language, to control a Keithley Instruments Model 195 digital multimeter. This program should also be compatible with Symphony, and a very similar Quattro program is also included on the Driver488/DRV program disk. The techniques used in this program are quite general, and apply to the control of most instruments. Initialization of the System Any program using Driver488/DRV must first establish communications with the Driver488/DRV software driver. In Lotus 1-2-3 and most other languages this is accomplished using an OPEN command: {OPEN IEEE,W} Once the file is opened, we can send commands and receive responses from Driver488/DRV. First, completely reset the Driver488/DRV with the RESET command: {WRITELN RESET} which resets the operating parameters of the Driver488/DRV back to their normal values (those that were set during system boot by the DRVR488 DOS command). When Lotus 1-2-3 reads from Driver488/DRV it expects that the responses are terminated by a single carriage return character. As Driver488/DRV normally appends both carriage return and line feed to its responses, it must be configured to use the correct terminator: {WRITELN EOL IN CR} Next, we can enable SEQUENCE - NO DATA AVAILABLE error detection by setting the FILL mode to ERROR: {WRITELN FILL ERROR} Personal488 User’s Manual, Rev. 3.0 Artisan Technology Group - Quality Instrumentation ... Guaranteed | (888) 88-SOURCE | www.artisantg.com II-91 8J. Spreadsheets II. SOFTWARE GUIDES - 8. Driver488/DRV All of the commands discussed so far: OPEN, RESET, EOL IN CR, and FILL ERROR are placed in a separate subroutine called IeeeInit. Thus, to accomplish all of the above steps, use IeeeInit: {IeeeInit} Once everything is reset, we can test the communications and read the Driver488/DRV revision number with the HELLO command: {WRITELN “HELLO”} {READLN Hello} We first WRITELN the HELLO command, then READLN the response into the cell named Hello (lower case). Notice the quotation marks (“ ”) around the word HELLO (upper case) in the WRITELN command. These force Lotus to write the word HELLO (upper case) rather than the contents of the cell named Hello (lower case). Otherwise, since upper-case and lower-case letters are considered identical, both HELLO and Hello would refer to the same cell. It is not necessary to perform the HELLO command, but it is included here as a simple example of normal communication with Driver488/DRV. Its response is the revision identification of the Driver488/DRV software: Driver488 Revision X.X ©199X IOtech, Inc. We can also interrogate Driver488/DRV for its status: {WRITELN “STATUS”} {READLN Status} Subsequently, the printed response is similar to the following: CS21 1 I000 000 T0 C0 P0 OK The following indicators describe each component of the Driver488/DRV status: Indicator C S 21 1 I 0 0 0 000 T0 C0 P0 OK Driver488/DRV Status It is in the Controller state. It is the System Controller. The value of its IEEE 488 bus address. An Address Change has occurred. It is idle (neither a talker nor a listener). There is no ByteIn available. It is not ready to send a ByteOut. Service Request (SRQ) is not asserted. There is no outstanding error. It has not received a bus device TRIGGER command (only applies in Peripheral mode). It has not received a CLEAR command (only applicable in the Peripheral mode). No CONTINUE transfer is in progress. The error message is “OK”. Configuration of the 195 DMM Once the system is initialized we are ready to start issuing bus commands. The IEEE 488 bus has already been cleared by the Interface Clear (IFC) sent by the RESET command, so we know that all bus devices are waiting for the controller to take some action. To control an IEEE 488 bus device, we output an appropriate device-dependent command to that device. For example, the F0R0X command line below sets the 195 to read DC volts with automatic range selection: {WRITELN “OUTPUT 16;F0R0X”} The OUTPUT command takes a bus device address (16 in this case) and data (F0R0X) and sends the data to the specified device. The address can be just a primary address, such as 12, or 05, or it can include a secondary address: 1201. Note that both the primary address and, if present, the secondary address are two-digit decimal numbers. A leading zero must be used, if necessary to make a two-digit address. Notice that the entire OUTPUT command is enclosed in quotation marks (“ ”). This is necessary because the command includes a semicolon character (;) which would interfere with the WRITELN command if it were not enclosed in quotes. II-92 Personal488 User’s Manual, Rev. 3.0 Artisan Technology Group - Quality Instrumentation ... Guaranteed | (888) 88-SOURCE | www.artisantg.com II. SOFTWARE GUIDES - 8. Driver488/DRV 8J. Spreadsheets Taking Readings Once we have set the 195’s operating mode, we can take a reading: {WRITELN ENTER 16} {READLN Reading} The ENTER command takes a bus address (with an optional secondary address) and configures that bus device so that it is able to send data (addressed to talk). No data is actually transferred, however, until the READLN statement requests the result from Driver488/DRV at which time data is transferred to the program into the cell Reading. Once the result has been received, any Lotus 1-2-3 functions or statements can be used to modify or interpret it. In this example, the result is in the form NDCV+1.23456E-2 showing the range (NDCV) and the numeric value of the reading (+1.23456E-2). The Lotus 1-2-3 @MID function can be used to strip off the range characters and keep only the numeric part (the fifth character and beyond), and the @VALUE function can be used to convert this string to a number: {LET Voltage,@VALUE(@MID(Reading,4,11))} All the power of Lotus 1-2-3 may be used to manipulate, print, store, and analyze the data read from the IEEE 488 bus. For example, the following statements compute the average of ten readings from the 195: {FOR Index,0,9,1,Sum1} Sum1: {WRITELN ENTER 16} {READLN Reading} {PUT Voltages,0,Index,@VALUE(@MID(Reading,4,11))} {RETURN} The FOR statement sets Index to each of the successive values from 0 to 9, calling the Sum1 subroutine for each value of Index. Sum1 takes a reading from the 195, converts it to a numeric value, and places it into a row of the range Voltages. The ten readings in Voltages are finally averaged by a formula in the cell named Average which can be seen in the example spreadsheet. Interrupt Handling The IEEE 488 bus is designed to be able to attend to asynchronous (unpredictable) events or conditions. When such an event occurs, the bus device needing attention can assert the Service Request (SRQ) line to signal that condition to the controller. Once the controller notices the SRQ, it can interrogate the bus devices, using Parallel Poll (PPOLL) and/or Serial Poll (SPOLL) to determine the source and cause of the SRQ, and take the appropriate action. Parallel Poll is the fastest method of determining which device requires service. Parallel Poll is a very short, simple IEEE 488 bus transaction that quickly returns the status from many devices. Each of the eight IEEE 488 bus data bits can contain the Parallel Poll response from one or more devices. So, if there are eight or fewer devices on the bus, then just the single Parallel Poll can determine which requires service. Even if the bus is occupied by the full complement of 15 devices, then Parallel Poll can narrow the possibilities down to a choice of at most two. Unfortunately, the utility of Parallel Poll is limited when working with actual devices. Some have no Parallel Poll response capability. Others must be configured in hardware, usually with switches or jumpers, to set their Parallel Poll response. If Parallel Poll is not available, or several devices share the same Parallel Poll response bit, then Serial Polling is still required to determine which device is requesting service. Serial Poll, though it is not as fast as Parallel Poll, does offer two major advantages: it returns additional status information beyond the simple request/no-request for service, and it is implemented on virtually all bus devices. The SRQ line can be monitored in two ways: it can be periodically polled using the STATUS command, or it can be used to cause an external interrupt when asserted. Personal488 User’s Manual, Rev. 3.0 Artisan Technology Group - Quality Instrumentation ... Guaranteed | (888) 88-SOURCE | www.artisantg.com II-93 8J. Spreadsheets II. SOFTWARE GUIDES - 8. Driver488/DRV BASIC provides a method for detecting and servicing external interrupts: the ON PEN statement. The ON PEN statement tells BASIC that, when an external interrupt is detected, a specific subroutine, known as the interrupt service routine (ISR), is to be executed. Normally, the interrupt detected by ON PEN is the light pen interrupt. However, Driver488/DRV redefines this “light pen interrupt” to signal when an IEEE 488 bus related interrupt (such as SRQ) has occurred. Unlike BASIC, Lotus 1-2-3 does not provide an automatic method of checking for light pen status. Therefore, a subroutine is needed to check for the interrupt. This subroutine uses the SPOLL command to check for SRQ: CheckSRQ: {DEFINE Signal:VALUE} {WRITELN SPOLL} {READLN SP} {LET SP,@VALUE(@MID(SP,0,@LENGTH(SP)-1))} {IF SP=0}{BLANK ST195}{RETURN} The CheckSRQ takes a numeric parameter, Signal, which can be used to note where in the program the interrupt occurred. The subroutine begins by reading the response to the SPOLL command and converting that response to a numeric value, SP. If SP is zero (0), then no SRQ is pending and we clear the 195 status cell, ST195, and then return. If SP is non-zero, we know that an SRQ is pending. The 195 can be set to request service on any of several different internal conditions. In particular, the M2 command causes an SRQ upon the detection of any invalid command or command option by the 195: {WRITELN “OUTPUT 16;M2X”} This OUTPUT command is placed early in the program so that all subsequent commands to the 195 cause an SRQ, if they are invalid. Now check for service requests by calling CheckSRQ at appropriate places in the program. The only place CheckSRQ should not be used, is between a command that requests a response, such as STATUS or ENTER, and the statement(s) that read that response. The CheckSRQ parameter, Signal can be used to identify where the interrupt was detected. A typical sequence might be: {WRITELN “STATUS”} {READLN Status} {CheckSRQ 10} {WRITELN ENTER 16} {READLN Reading} {CHECKSRQ 20} Once CheckSRQ has determined, with a Serial Poll, that a service request is indeed pending, it then checks the 195 to determine if it is the source of the interrupt. If there were other devices on the bus that could be generating the SRQ, each of them would be have to be checked in turn. {WRITELN SPOLL 16} {READLN ST195} {LET ST195,@VALUE(@MID(ST195,0,@LENGTH(ST195)-1))}~ The tilde (~) at the end of the LET statement forces evaluation of the spreadsheet. In particular, it causes the values of the cells DIO8 through DIO1 to be set to the values of the bits of ST195. These cells can then be examined to inspect the 195’s status: {IF DIO7}{BRANCH 195SRQ} {BEEP}{GETLABEL “Non-195 SRQ detected! Press Return.”,TypeHere} {RESTART}{RETURN} Bit DIO7, is returned as true (1) in the Serial Poll response of those devices requesting service. In our simple example, we expect that the 195 is the only possible cause of an SRQ, and if it is not, there must be some error. If DIO7 is set, we BRANCH to 195SRQ and continue with the subroutine. Otherwise we BEEP, display an error message, and terminate macro execution. TypeHere is a blank cell that holds anything that is typed by the user before the return <Enter> is pressed. II-94 Personal488 User’s Manual, Rev. 3.0 Artisan Technology Group - Quality Instrumentation ... Guaranteed | (888) 88-SOURCE | www.artisantg.com II. SOFTWARE GUIDES - 8. Driver488/DRV 8J. Spreadsheets Now that we have identified the device that is requesting service, we can further examine the Serial Poll status to classify the request. If DIO6 is set, then the 195 is signaling an error condition. If that bit is clear, then some non-error condition caused the SRQ: 195SRQ: {IF DIO6}{BRANCH 195ERR} {IF DIO5}{BEEP} {GETLABEL “195 Status: BUSY. Press Return.”,TypeHere} {IF DIO4}{BEEP} {GETLABEL “195 Status: READING DONE. Press Return.”,TypeHere} {IF DIO3}{BEEP} {GETLABEL “195 Status: BUFFER 1/2 FULL. Press Return.” TypeHere} {IF DIO2}{BEEP} {GETLABEL “195 Status: BUFFER FULL. Press Return.”,TypeHere} {IF DIO1}{BEEP} {GETLABEL “195 Status: OVERFLOW. Press Return.”,TypeHere} {RETURN} 195ERR: {IF DIO5}{BEEP} {GETLABEL “195 Status: FAILED SELFTEST. Press Return.”,TypeHere} {IF DIO4}{BEEP} {GETLABEL “195 Status: TRIGGER OVERRUN. Press Return.”,TypeHere} {IF DIO3}{BEEP} {GETLABEL “195 Status: NO REMOTE. Press Return.”,TypeHere} {IF DIO2}{BEEP} {GETLABEL “195 Status: ILLEGAL COMMAND. Press Return.”,TypeHere} {IF DIO1}{BEEP} {GETLABEL “195 Status: ILLEGAL COMMAND OPTION. Press Return.”,TypeHere} Finally, once we have diagnosed the service request, we are ready to return to the main program: {RETURN} Sample Program {OPEN IEEE,W} {WRITELN RESET} {WRITELN EOL IN CR} {WRITELN FILL ERROR} {IeeeInit} {WRITELN “HELLO”} {READLN Hello} {WRITELN “STATUS”} {READLN Status} {WRITELN “OUTPUT 16;F0R0X”} {WRITELN ENTER 16} {READLN Reading} {LET Voltage,@VALUE(@MID(Reading,4,11))} {FOR Index,0,9,1,Sum1} Sum1: WRITELN ENTER 16} {READLN Reading} {PUT Voltages,0,Index,@VALUE(@MID(Reading,4,11))} {RETURN} CheckSRQ: {DEFINE Signal:VALUE} {WRITELN SPOLL} {READLN SP} {LET SP,@VALUE(@MID(SP,0,@LENGTH(SP)-1))} {IF SP=0}{BLANK ST195}{RETURN} {WRITELN “OUTPUT 16;M2X”} {WRITELN “STATUS”} {READLN Status} {CheckSRQ 10} {WRITELN ENTER 16} {READLN Reading} {CHECKSRQ 20} {WRITELN SPOLL 16} Personal488 User’s Manual, Rev. 3.0 Artisan Technology Group - Quality Instrumentation ... Guaranteed | (888) 88-SOURCE | www.artisantg.com II-95 8J. Spreadsheets II. SOFTWARE GUIDES - 8. Driver488/DRV {READLN ST195} {LET ST195,@VALUE(@MID(ST195,0,@LENGTH(ST195)-1))}~ {IF DIO7}{BRANCH 195SRQ} {BEEP}{GETLABEL “Non-195 SRQ detected! Press Return.”,TypeHere} {RESTART}{RETURN} 195SRQ: {IF DIO6}{BRANCH 195ERR} {IF DIO5}{BEEP} {GETLABEL “195 Status: BUSY. Press Return.”,TypeHere} {IF DIO4}{BEEP} {GETLABEL “195 Status: READING DONE. Press Return.”,TypeHere} {IF DIO3}{BEEP} {GETLABEL “195 Status: BUFFER 1/2 FULL. Press Return.” TypeHere} {IF DIO2}{BEEP} {GETLABEL “195 Status: BUFFER FULL. Press Return.”,TypeHere} {IF DIO1}{BEEP} {GETLABEL “195 Status: OVERFLOW. Press Return.”,TypeHere} {RETURN} 195ERR: {IF DIO5}{BEEP} {GETLABEL “195 Status: FAILED SELFTEST. Press Return.”,TypeHere} {IF DIO4}{BEEP} {GETLABEL “195 Status: TRIGGER OVERRUN. Press Return.”,TypeHere} {IF DIO3}{BEEP} {GETLABEL “195 Status: NO REMOTE. Press Return.”,TypeHere} {IF DIO2}{BEEP} {GETLABEL “195 Status: ILLEGAL COMMAND. Press Return.”,TypeHere} IF DIO1}{BEEP} {GETLABEL “195 Status: ILLEGAL COMMAND OPTION. Press Return.”,TypeHere} {RETURN} 8K. Other Languages Topics • • Introduction......................................................................................... 95 Finding Addresses .............................................................................. 96 Garbage Collection ............................................................................................97 Memory Models....................................................................................................97 Calling Protocols................................................................................................98 • • Opening & Closing the Driver ......................................................... 99 I/O Control (IOCTL) Communication........................................... 100 IOCTL Get & Set Device Data.........................................................................100 IOCTL Read & Write ........................................................................................100 • • • Data & Command Communication ............................................... 101 ARM Condition Detection............................................................... 102 Sample Program ............................................................................... 102 Introduction Driver488/DRV is compatible with virtually every MS-DOS programming language. If you wish to use Driver488/DRV with a language that is not covered in this chapter, try the following: II-96 Personal488 User’s Manual, Rev. 3.0 Artisan Technology Group - Quality Instrumentation ... Guaranteed | (888) 88-SOURCE | www.artisantg.com II. SOFTWARE GUIDES - 8. Driver488/DRV 8K. Other Languages • Check the Driver488/DRV disk. Support for languages not described in this manual may be included in the Driver488/DRV program disk. • Try the examples given for a language that is similar to the one you wish to use. Different varieties of BASIC, Pascal, or other languages may be similar enough in their implementation that they can be used identically to control Driver488/DRV. The DDAEMON.EXE (driver daemon) program that is provided on the Driver488/DRV disk can help in determining just how a language communicates with Driver488/DRV. • Call your service representative for technical support. New language support examples will be available to you as they are developed. If no support is available or appropriate for your language, it is still practical to control Driver488/DRV so long as your language supports system interrupt calls. A system interrupt is a special type of subroutine call that is used to gain access to the MS-DOS and BIOS internal procedures. They are used by the I/O library of every language to control the disk, keyboard, screen, printer, and other hardware in the system. The same system interrupts are used to control Driver488/DRV. Most programming languages have subroutines that allow interrupts to be invoked. The often have names such as Int86, SysInt, or DOSInt. If you are not sure that your language has such a subroutine, then check with the language manufacturer. To control Driver488/DRV you need to be able to do the following: • Find the segment and offset addresses of variables (or arrays) in your program • Open and close the IEEE file that is used to communicate with Driver488/DRV • Configure the IEEE file for binary communication • Send and receive commands and data to and from the IEEE file, and • Perform IOCTL“BREAK” and IOCTL$ functions as described in “Section III: Command References.” The examples throughout this Sub-Chapter are in assembly language to demonstrate the low-level commands that communicate with DOS and Driver488/DRV. However, it is likely that your programming language has the ability to perform all these functions without directly using assembly language. Finding Addresses The system interrupts that transfer command and data to and from Driver488/DRV need to be told where in memory the data is to be transferred. Addresses in an MS-DOS computer are composed of two 16-bit numbers: a segment and an offset. The actual memory address of an object is computed during memory access by multiplying the segment value by 16 and adding the offset to the result. This forms a 20-bit address that covers the address range available in MS-DOS. All MS-DOS addresses are specified in this segment:offset form. A segment of memory is a region of memory in which all data elements have the same segment value. Each segment is 64K bytes long, with locations within the segment determined by the offset address. Segments can and often do overlap. For example, all of the following segment:offset pairs refer to the same address (2CF89 hex): 2CF8:0009, 2CF0:0089, 2C00:0F89, 2000:CF90, 1E32:EC69 (1E320 + EC69 = 2CF89). There is no universal way of determining the segment and offset address of a data object in a programming language. Some languages, such as interpreted GW-BASIC or BASICA, keep all their variables in a single segment known as the data segment. However, they do not provide a convenient method of determining the segment address of that data segment. A special assembly-language subroutine, must be used to find the data segment address. Once the data segment address is found, it is fixed. All variables reside in this single, fixed data segment. These BASICs do provide a function, VARPTR, that returns a variable’s offset address within the data segment. Personal488 User’s Manual, Rev. 3.0 Artisan Technology Group - Quality Instrumentation ... Guaranteed | (888) 88-SOURCE | www.artisantg.com II-97 8K. Other Languages II. SOFTWARE GUIDES - 8. Driver488/DRV Other types of BASICs include a function called VARSEG that returns the segment address of a variable. This eliminates the need for a special assembly-language routine, but, in these languages, the segment address may be different for each variable or array. VARSEG may need to be called for each variable whose address is required. Note that the address (segment and offset) of a variable or array may not be the address of the portion of that variable that holds the data. The address may instead be the address of a variable descriptor, a data structure that describes the structure of the variable or array. The descriptor usually includes the current length of the variable as well as its actual address. The descriptor of an array may include the number of elements in the array, the number of subscripts used to refer to the array elements, and the ranges of the subscripts. You should check with the language manufacturer to determine just what VARPTR (or its equivalent) points to. When trying to determine addresses you may have to consider garbage collection, memory models, and calling protocols. Garbage Collection Garbage collection is a process whereby a language with variable-length data structures, such as strings in BASIC or lists in LISP, can reuse the memory that is no longer being used by any variables. When a program is running, it can move variables around to consolidate this unused space and reclaim it for new variables. Garbage collection can occur at almost any time and invalidate any stored values of variable addresses. Thus, in languages that use garbage collection, addresses should be “fresh” and recalculated whenever they might have changed. Memory Models Some languages, most notably C, allow a choice of memory models. These are known by various names such as: “tiny,” “small,” “medium,” “compact,” “large,” or even “huge.” The exact meaning of these names may vary between different languages, but they typically have the following interpretation: Memory Model Total Code/Data Largest Data Structure Tiny ≤ 64K bytes ≤ 64K bytes Small ≤ 64K bytes ≤ 64K bytes Medium > 64K bytes (for code only) ≤ 64K bytes (for data only) ≤ 64K bytes (for code only) > 64K bytes (for data only) ≤ 64K bytes Large > 64K bytes ≤ 64K bytes Huge > 64K bytes > 64K bytes Compact ≤ 64K bytes Typical Interpretation Code and data fit together within a single 64K segment. Might be in the format necessary to convert to a .COM file. Both code and data each reside within their own 64K segment. Near (16-bit, offset only) references to code and data elements are possible. More than 64K of code, in multiple segments, while data fits within a single 64K segment. No subprogram may exceed 64K. Code fits within a single 64K segment, while data may occupy more than one segment. Explicit segment addresses are required to address data elements. No single data structure, such as an array or record, may be more than 64K. More than 64K of both code and data. Still, no single subprogram or data structure may exceed 64K. More than 64K of both code and data. Data structures may be larger than 64K. When using the Tiny, Small, or Medium memory models, all data elements are in the same segment. Once the segment address of one is known, it can be used to refer to any address. In the Compact, Large, and Huge memory models, data elements have a 32-bit address composed of a segment and an offset. The segment values may be different for each data element. Many languages do not offer the same flexibility of memory models as does C, but addressing methods used by other languages may often be viewed as one of the standard C models. The following program fragment, taken from the Microsoft C support file IEEEIO.C shows how segment and offset addresses are computed in the various memory models: II-98 Personal488 User’s Manual, Rev. 3.0 Artisan Technology Group - Quality Instrumentation ... Guaranteed | (888) 88-SOURCE | www.artisantg.com II. SOFTWARE GUIDES - 8. Driver488/DRV 8K. Other Languages #if defined(M_I86SM) || defined(M_I86MM) int segment(ptr) void near *ptr; { static struct SREGS segs = { 0, 0, 0, 0, }; if (segs.ds==0) segread(&segs); return segs.ds; } #define offset(ptr) (int)ptr #else #define offset(ptr) ((unsigned)(fp)) #define segment(ptr) ((unsigned)((unsigned long)(fp) > 16)) #endif The #IF statement checks if we are using the Small (M_I86SM) or Medium (M_I86MM) models (Microsoft C does not support the Tiny model) and, if we are, defines a function segment that returns the (constant) segment value that can be used for all data elements. The segment function takes a pointer (ptr) as an argument, but does not use it. Instead, the first time it is called, it calls the segread library function to read the ds segment register and returns that value. Each subsequent time segment is called, it returns the saved ds register value. In these small-data models, the pointer to a data object is just the offset address of that object, and so we define offset(ptr) as (int)ptr, which is just an integer with the same value as the pointer. If we are using a large-data model, data pointers are 32 bits, and the segment and offset must be extracted from the 32-bit far pointer (fp). The offset, which is the least-significant word of the pointer, is extracted by converting the pointer to unsigned. This discards the upper 16-bit of the pointer, leaving the segment value. The segment is extracted by interpreting (casting) the pointer as an unsigned long (32-bit) integer, shifting the result right 16 places, and then taking the least significant word of the result. In this way, the offset and segment are extracted from the 32-bit far pointer. Calling Protocols If the programming language we are using does not provide functions that return the segment or offset of an object, we must write our own. The data object whose address we desire is passed as an argument to this function. The calling protocols for that language specify just how information about the arguments is passed to the function. There are two popular methods of passing arguments: call-by-value and call-by-reference. Other methods, such as call-by-name which is used in Algol 60, are possible, but are not used in common microcomputer languages. Call-By-Value In call-by-value, which is the only method used by C, the actual arguments are copied, and these copies are passed to the subprogram. If the address of a variable is needed by the subprogram then that address must be explicitly passed to the subprogram. For example: int i; Declare and integer variable i. i=5; Set i to 5 fun1(i); Call fun1 with an argument of 5. fun2(&i); Call fun2 with an argument equal to the address of i. Notice that if fun1 tries to change the value of i, it only changes its own copy of i, not the calling program’s variable. In contrast, fun2 has the address of i and can get access to the calling program’s variable and change its value. In call-by-value, the entire data element must be duplicated and passed to the subprogram. This is not a problem for simple variables, but can be quite awkward if a large array must be copied to be passed to the subprogram. Large data structures are rarely passed using call-by-value. Instead, the address of the data structure is passed in what is, in effect, call-by-reference. Call-By-Reference Call-by-reference is the most common form of argument passing in languages other than C. In call-byreference, the address of the argument is passed to the subprogram. The size of this address may be 16 or 32 bits depending on the language and its memory model. Personal488 User’s Manual, Rev. 3.0 Artisan Technology Group - Quality Instrumentation ... Guaranteed | (888) 88-SOURCE | www.artisantg.com II-99 8K. Other Languages II. SOFTWARE GUIDES - 8. Driver488/DRV If the argument is a data object, then the subprogram can modify that data object because it has that object’s memory address. If an expression is passed using call-by-reference, the expression is evaluated and stored in a temporary location. The address of this temporary is then passed to the subprogram. The subprogram usually can change this value but it has no effect on the variables of the calling program. Call-by-reference can be used to give the same effect as call-by-value. To do this, the arguments are first copied into temporary locations, then the addresses of these temporaries are passed using call-byreference. The calling protocol is call-by-reference because the addresses of the data objects are passed to the subprogram. However, because these addresses are the addresses of copies of the arguments and not the actual arguments, the subprogram cannot know the actual addresses of the arguments, nor can it change their values. This type of call-by-reference is always used for expressions. When expressions are passed using call-by-reference, they are first evaluated and their results stored in temporary locations. Then the addresses of these temporaries are passed to the subprogram. By forcing the data object to be treated as an expression, call-by-reference can be used with the same effect as call-by-value as described above. In BASIC, this is accomplished by surrounding the variable in parentheses: CALL SUB(A) calls SUB and passes the address of A, while: CALL SUB((A)) calls SUB and passes the address of a temporary variable that contains the same value as A. Differences It is important to note the difference between call-by-value and call-by-reference. In call-by-value, the subprogram does not know the actual addresses of the arguments and cannot change their values, while in call-by-reference, the subprogram knows the addresses of its arguments and can change them. This can have important ramifications. For example, in True Basic, functions are always call-by-value. The arguments are copied and the addresses of these copies are passed to functions. In contrast, subroutines are call-by-reference and are passed the addresses of the actual arguments. Thus, if one tries to write a function that returns the address of a string variable, it does not work! The address returned is the address of the copy of the string, not the desired address of the actual string variable. Instead, a subroutine with two parameters must be used, the first being the string whose address is desired, and the second being set to that address when the subroutine is called. Opening & Closing the Driver Any program using Driver488/DRV must first establish communications with the Driver488/DRV software driver. This is accomplished using the MS-DOS OPEN function. In assembly language, this might appear as follows: name ieee DB” DW0 mov mov mov int jc mov IEEE”,0 AH, 3Dh AL, 02 DX,offset name 21h error ieee, AX ;Driver488/DRV device name ;Place to hold Driver488/DRV file handle ;Open function ;Access code = read/write ;DS:DX - name ;Execute DOS function ;Error if carry set ;Save file handle Once the file is opened, we can communicate with it to perform almost all the functions of Driver488/DRV. When the program is done, it should close the Driver488/DRV file: mov mov int jc or II-100 AH,3Eh BX,ieee 21h error DL,20h ;Close function ;File handle ;Execute DOS function ;Check for error :Set “don’t check for control characters” bit Personal488 User’s Manual, Rev. 3.0 Artisan Technology Group - Quality Instrumentation ... Guaranteed | (888) 88-SOURCE | www.artisantg.com II. SOFTWARE GUIDES - 8. Driver488/DRV 8K. Other Languages I/O Control (IOCTL) Communication DOS provides several I/O Control (IOCTL) functions that are useful with Driver488/DRV. Two of these: IOCTL GetDeviceData and IOCTL SetDeviceData allow Driver488/DRV to be configured for faster “Raw Mode” communication, while the other two: IOCTL Read and IOCTL Write, perform the functions of the BASIC IOCTL$ function and IOCTL#1 command, respectively. IOCTL Get & Set Device Data When communicating with character devices, DOS normally checks the transferred data for control characters such as X-ON, X-OFF and control-Z. However when communicating with Driver488/DRV, this is not desirable. First of all, it might interfere with control characters that are supposed to be transferred to or from Driver488/DRV. Second, and more importantly, while DOS is checking for control characters, it only transfers one character at a time to or from Driver488/DRV. This is much less efficient than transferring large blocks of data. Thus, whenever possible, DOS should be configured to not check for control characters when communicating with Driver488/DRV. This is typically accomplished by a function called RawMode in the language-specific support files (such as IEEEIO.C) provided with Driver488/DRV. The DOS IOCTL Get and SetDeviceData functions are used together to configure Driver488/DRV for RawMode (binary) communication as: mov mov int mov or mov mov int AX,4400h BX,ieee 21h DH,0 DL,20h AX,4401h BX,ieee 21h ;DOS Get Device Data Function ;File handle for Driver488/DRV ;Execute DOS function ;Must clear DH :Set “don’t check for control characters” bit ;DOS Set Device Data Function ;File handle ;Execute DOS function The first part of this code fragment reads the current device control settings from DOS. These are returned in the DX register which is then modified to tell DOS not to check for control characters. Finally, DOS is again called to implement the new control settings. Once the ieee file has been opened and configured for RawMode, we are ready to communicate with Driver488/DRV. IOCTL Read & Write IOCTL Read and IOCTL Write provide a “back-door” communication channel to Driver488/DRV. This alternate method of communication is normally used to send special commands (Write) and request status (Read) from Driver488/DRV. Driver488/DRV recognizes only one IOCTL Write command: BREAK. When IOCTL Write is used to send BREAK to Driver488/DRV, it forces Driver488/DRV into a quiescent, ready state in which it is waiting for a new command. The BREAK command also forces the EOL OUT terminators to their default values. Thus Driver488/DRV is reset so that it is ready and able to receive new commands, regardless of what it was previously doing. It is recommended that the BREAK command be sent before any other Driver488/DRV commands. In assembly language, BREAK may be sent as indicated in the table. brk brklen DB EQU mov mov mov mov int jc “BREAK” $-brk AX, 4403h BX, ieee CX, brklen DX, offset brk 21h error ;BREAK command text ;Length of BREAK command ;IOCTL Write function ;File handle ;# chars to send ;DS:DX -> command ;Execute DOS function ;Check for error This is identical to the BASIC command IOCTL described in “Section III: Command References” of this manual. The IOCTL Read command is used to receive status from Driver488/DRV. It receives a single ASCII character, either 0, 1, 2, or 3. The meaning of each response is: Personal488 User’s Manual, Rev. 3.0 Artisan Technology Group - Quality Instrumentation ... Guaranteed | (888) 88-SOURCE | www.artisantg.com II-101 8K. Other Languages • II. SOFTWARE GUIDES - 8. Driver488/DRV 0: A response of 0 indicates that Driver488/DRV is ready to receive a command. It has no data to read, nor is it expecting data for output to the IEEE 488 bus. Driver488/DRV is forced into this state by the IOCTL BREAK command. • 1: A response of 1 indicates that Driver488/DRV has a response ready to be read by the user’s program. The program must read the response before sending a new command (except IOCTL BREAK) or a SEQUENCE - DATA HAS NOT BEEN READ error occurs. • 2: A response of 2 indicates that Driver488/DRV is waiting for data to OUTPUT to the IEEE 488 bus. The user’s program must send the appropriate data with terminators as needed to Driver488/DRV. Attempting to read from Driver488/DRV while it is waiting for data causes a SEQUENCE - NO DATA AVAILABLE error. • 3: A response of 3 indicates that Driver488/DRV is waiting for the completion of a command. This is similar to a response of 2 except that Driver488/DRV is waiting for a command, rather than for data to OUTPUT. The IOCTL Read response can be read from Driver488/DRV as: ioctlbufDB ioctllenEQU mov mov mov mov 0 $-ioctllen AX,4402h BX,ieee CX,ioctllen DX,offset ioctlbuf int 21h jc error ;IOCTL Read response buffer ;Length of buffer ;IOCTL Read ;File handle ;# chars to read ;DS:DX - buffer ;Execute DOS function ;Check for error Data & Command Communication Once Driver488/DRV has been opened, configured for RawMode communication, and reset with the IOCTL Write command BREAK, we are ready to communicate with Driver488/DRV and control the IEEE 488 bus. The BASIC commands: PRINT#1,"HELLO" LINE INPUT#1,A$ might be implemented in assembly language as: cr lf hello hellolen response responselen recvdlen mov mov mov mov int jc mov mov mov mov int jc mov EQU EQU DB EQU DB EQ DW 0Dh 0Ah “HELLO”,,cr,,lf $-hello 256 DUP (?) $-response ? AH, 40h BX, ieee CX, hellolen DX, offset hello 21h error AH, 3Fh BX, ieee CX, responselen DX, offset response 21h error recvdlen, AX ;Carriage-return ;Line-feed ;HELLO command with terminators ;HELLO command length ;Place to put Driver488/DRV response ;Length of response buffer ;Place to keep # chars in response ;DOS Write function ;File handle ;Command length ;DS:DX - command ;Execute DOS function ;Check for error ;DOS Read function ;File handle ;Buffer length ;DS:DX - buffer ;Execute DOS function ;Check for error ;Save # of characters received In this way, data and commands can be transferred to or from Driver488/DRV. II-102 Personal488 User’s Manual, Rev. 3.0 Artisan Technology Group - Quality Instrumentation ... Guaranteed | (888) 88-SOURCE | www.artisantg.com II. SOFTWARE GUIDES - 8. Driver488/DRV 8K. Other Languages ARM Condition Detection It is sometimes desirable to be able to easily check for asynchronous bus conditions, such as Service Request (SRQ), without having to use the Driver488/DRV STATUS command. This can be accomplished by using the light pen interrupt emulation feature of Driver488/DRV. When this feature is enabled, Driver488/DRV preempts the normal function of the light pen BIOS status request interrupt. Instead of returning the light pen switch status, this interrupt returns an indicator that is non-zero if any of the ARM conditions are true. See the ARM command in “Section III: Command References” for more details about the conditions that can be checked. Checking the Driver488/DRV light pen emulation status is straight forward, as illustrated by the following table. mov int or jnz mov int or jnz AX,0400h 10h AH,AH GotInt AX,0400h 10h AH,AH GotInt ;Test light pen function ;BIOS video interrupt ;Check AH ;Non-zero means interrupt ;Repeat the test There are two items to notice about this routine: it uses the BIOS video interrupt 10h rather than the DOS function call interrupt 21h, and it checks twice to see if a condition has been detected. The test must be repeated if IOCTL Read is used to check the Driver488/DRV status. IOCTL Read causes the light pen interrupt emulation to return no interrupt status on the next status read, regardless of the actual ARM condition status. This allows the BASIC function ON PEN to operate properly, but requires the status to be checked twice in other languages. Sample Program name ieee DB” DWO IEEE”, 0 ;Driver488/DRV device name ;Place to hold Driver488/DRV file handle ioctlbufDB ioctllenEQU 0 $-ioctllen ;IOCTL Read response buffer ;Length of buffer cr lf EQU EQU 0Dh 0Ah ;Carriage-return ;Line-feed hello hellolen DB EQU “HELLO”,,cr,,lf $-hello ;HELLO command with terminators ;HELLO command length response responselen DB EQ 256 DUP (?) $-response recvdlen DW ? ;Place to put Driver488 response ;Length of response buffer ; ;Place to keep # chars in response start mov mov mov int jc mov mov mov int jc mov mov int mov or Ah, 3Dh AL, 02 DX, offset name 21h error ieee,AX AH, 3Eh BX, ieee 21h error AX, 4400h BX, ieee 21h DH, 0 DL, 20h mov mov int AX, 4401h BX, ieee 21h ;Open function ;Access code = read/write ;DS:DX-name ;Execute DOS function ;Error if carry set ;Save file handle ;Close function ;File handle ;Execute DOS function ;Check for error ;DOS GetDeviceData Function ;File handle for Driver488/DRV ;Execute DOS function ;Must clear ;Set “don’t check for control characters” bit ;DOS SetDeviceData Function ;File handle ;Execute DOS function Personal488 User’s Manual, Rev. 3.0 Artisan Technology Group - Quality Instrumentation ... Guaranteed | (888) 88-SOURCE | www.artisantg.com II-103 8K. Other Languages brk brklen II-104 II. SOFTWARE GUIDES - 8. Driver488/DRV DB EQU “BREAK” $-brk ;BREAK command text ;Length of break command mov mov mov mov int jc AX, 4403h BX, ieee CX, brklen DX, offset brk 21h error ;IOCTL Write function ;File handle ;# chars to send ;DS:DX -> command ;Execute DOS function ;Check for error mov mov mov mov ;IOCTL Read function ;File handle ;# chars to read ;DS:DX - buffer int jc AX, 4402h BX, ieee CX, ioctllen DX, offset ioctlbuf 21h error mov mov mov mov int jc AH, 40h BX, ieee CX, hellolen DX, offset hello 21h error ;DOS Write function ;File handle ;Command length ;DS:DX - command ;Execute DOS function ;Check for error mov mov mov mov ;DOS Read function ;File handle ;Buffer length ;DS:DX - buffer int jc mov AH, 3Fh BX, ieee CX, responselen DX, offset response 21h error recvdlen, AX ;Execute DOS function ;Check for error ;Save # of characters received mov int or jnz AX, 0400h 10h AH, AH GotInt ;Test light pen function ;Video BIOS interrupt ;Check AH ;Non-zero means interrupt detected mov int or jnz AX, 0400h 10h AH, AH GotInt ;Repeat the test ;Execute DOS function ;Check for error Personal488 User’s Manual, Rev. 3.0 Artisan Technology Group - Quality Instrumentation ... Guaranteed | (888) 88-SOURCE | www.artisantg.com II. SOFTWARE GUIDES - 8. Driver488/DRV 8L. 8L. Language-Specific Information Language-Specific Information Topics • Aztec C ............................................................................................ II-104 Use of Character Command Language.....................................................II-104 CRITERR.C (for Aztec C) ............................................................................II-104 • GW-BASIC (for GW-BASIC or Interpreted BASIC) .............. II-105 Use of Direct DOS I/O Devices ....................................................................II-105 BASIC VARPTR & SADDR .........................................................................II-105 GET & PUT (for GW-BASIC only) ..............................................................II-105 • JPI TopSpeed Modula-2 .............................................................. II-106 • Logitech Modula-2........................................................................ II-106 • True Basic ...................................................................................... II-107 Use of Direct DOS I/O Devices ....................................................................II-106 Use of Direct DOS I/O Devices ....................................................................II-106 Use of Character Command Language.....................................................II-107 IEEEIO.TRU..................................................................................................II-107 TOOLKIT.LIB................................................................................................II-107 • Turbo Basic.................................................................................... II-107 Use of Character Command Language.....................................................II-107 Aztec C Use of Character Command Language In order to simplify programming Driver488/DRV with C, the following files are provided on the Driver488/DRV program disk: • IEEEIO.C: Communications routines for Driver488/DRV • IEEEIO.H: Header file, contains declarations from IEEEIO.C • CRITERR.C: Critical error handler routines (included with Aztec C, only) • CRITERR.H: Header file, contains declarations for using CRITERR The actual demonstration program is contained in 195DEMO.C. All files for Aztec C are in the \AZTECC directory. To execute the demonstration program, the files must be compiled and then linked. The following DOS commands perform these steps: C> cc 195demo C> cc ieeeio C> ln 195demo ieeeio -lm -lc Finally, the demonstration program is run by typing 195demo <Enter>. Note that the critical error handler (CRITERR.C) is not required for the demonstration program. CRITERR.C (for Aztec C) Normally, when Driver488/DRV detects an error, perhaps due to a syntax error in a command, or due to an IEEE 488 bus error (such as time out on data transfer), it responds with an I/O error to DOS. When this happens, DOS normally issues an ABORT, RETRY or IGNORE message and waits for a response from the keyboard. There is no way for the user’s program to detect such an error, determine Personal488 User’s Manual, Rev. 3.0 Artisan Technology Group - Quality Instrumentation ... Guaranteed | (888) 88-SOURCE | www.artisantg.com II-105 8L. Language-Specific Information II. SOFTWARE GUIDES - 8. Driver488/DRV the cause, and take appropriate action. However, DOS does provide a method of redefining the action to be taken on such a “critical error”. CRITERR.ASM contains a critical error handler that, when invoked, makes it appear to the calling program that some less-critical error has occurred. The critical error handler is installed by CRIT_ON() and removed by CRIT_OFF(). The critical error handler is also automatically removed by DOS when the program exits. The following program fragment demonstrates the use of the critical error handler: #include “criterr.h” crit_on(ieee); if (ieeewt(“output 16;F0X”) == -1) { printf(“Error writing F0X to device 16, \n”); crit_off(); ioctl_wt(ieee,"break",5); ieeewt(“eol out lf\r\n”); ieeewt(“status\n”); ieeerd(response); printf(“status = %s\n”,response); crit_on(ieee); } We must first #include the header file with the definitions of the critical error routines. We then enable critical error trapping with CRIT_ON which takes as a parameter the handle of the file for which critical error trapping is to be enabled. Only read and write commands to that handle are trapped. Errors caused by other actions, or associated with other files are not trapped. Error trapping may only be enabled for one file at a time. Now, if IEEEWT signals an error by returning a -1, we can check what happened. We first PRINTF an error message, then we turn critical error trapping off with CRIT_OFF so that, if another critical error occurs, we get the ABORT, RETRY or IGNORE message and know a catastrophic double error has occurred. We then IOCTL_WT(_BREAK_) to force Driver488/DRV to listen to our next command. The IOCTL_WT also resets the EOL OUT terminator so we can be sure that Driver488/DRV detects the end of our commands. We next reset the EOL OUT terminator to our preferred line feed only and ask Driver488/DRV for its status. On receiving the response, we could interpret the status and take whatever action is appropriate. However, in this example, we just display the status. Finally, we reenable the critical error handler and continue with the program. GW-BASIC (for GW-BASIC or Interpreted BASIC) Use of Direct DOS I/O Devices Once Driver488/DRV has been installed in your system, it is ready to begin controlling IEEE 488 bus devices. To show how this is done, we develop a short program in BASIC to control a Keithley Instruments Model 195 digital multimeter. The complete sample program is provided on the Driver488/DRV disk as 195DEMO.BAS in the \MSBASIC directory. BASIC VARPTR & SADDR The BASIC VARPTR and SADDR functions must be used with caution. The first time a variable such as I or ST$ is encountered, or an array such as R%() is dimensioned, space is made for it in BASIC’s data space. The other variable or arrays may be moved to make room for the new item. If the memory location of an item must be fixed, then BASIC cannot be allowed to encounter any new variables or arrays. For example, in the ENTER statement shown above, Driver488/DRV is told the memory address of R$ (for GW-BASIC, R%(0)). Then, while the transfer is going on, the Driver488/DRV status is read into the string variable ST$. If ST$ has not been used previously then BASIC would have to create a new ST$ and might move R$. Of course, Driver488/DRV would have no way of knowing that R$ has been moved, and the data would not be placed correctly into R$. II-106 Personal488 User’s Manual, Rev. 3.0 Artisan Technology Group - Quality Instrumentation ... Guaranteed | (888) 88-SOURCE | www.artisantg.com II. SOFTWARE GUIDES - 8. Driver488/DRV 8L. Language-Specific Information GET & PUT (for GW-BASIC only) Users of GW-BASIC and/or Interpreted BASIC can also manipulate two commands not available in QuickBASIC: GET and PUT, as detailed in the following paragraphs. The BASIC INPUT and PRINT statements communicate with Driver488/DRV one character at a time. That is, the PRINT statement breaks up each command into single characters and transfers those characters separately to Driver488/DRV, and the INPUT statement reads one character at a time from Driver488/DRV until it detects the carriage-return and line-feed that marks the end of the line. It is more efficient, especially for long transfers, to read and write blocks of characters. The GET and PUT statements can be used to gain this improved efficiency. GET and PUT are normally used to communicate with fixed-length random access files. Driver488/DRV can be accessed as a random access file: 100 OPEN “\DEV\IEEE” FOR RANDOM AS #3 This opens the third Driver488/DRV name, IEEE, for I/O as a random access file with 128-byte records. (The other two names: IEEEOUT and IEEEIN, are used for PRINT and INPUT). BASIC normally limits the number of opened files to 3. Opening additional files can cause a TOO MANY FILES error. If you should get such an error, you might need to save your program, leave BASIC (with the SYSTEM command), and reenter BASIC specifying a /F:n parameter. See your BASIC reference manual for more details. JPI TopSpeed Modula-2 Use of Direct DOS I/O Devices Once Driver488/DRV has been installed in your system, it is ready to begin controlling IEEE 488 bus devices. To show how this is done, we develop a short program, in JPI TopSpeed Modula-2 and Logitech Modula-2, to control a Keithley Instruments Model 195 digital multimeter. The techniques used in this program are quite general, and apply to the control of most instruments. In order to simplify programming Driver488/DRV with Modula-2, the following files are provided on the Driver488/DRV program disk: • IEEEIO.MOD: Communication routines for Driver488/DRV. • IEEEIO.DEF: Declaration file for IEEEIO.MOD. The actual demonstration program is contained in K195DEMO.MOD. A Modula-2 version of the keyboard controller program is also included. Logitech Modula-2 Use of Direct DOS I/O Devices Once Driver488/DRV has been installed in your system, it is ready to begin controlling IEEE 488 bus devices. To show how this is done, we develop a short program, in JPI TopSpeed Modula-2 and Logitech Modula-2, to control a Keithley Instruments Model 195 digital multimeter. The techniques used in this program are quite general, and apply to the control of most instruments. In order to simplify programming Driver488/DRV with Modula-2, the following files are provided on the Driver488/DRV Program disk: • CHARDEV.MOD: General purpose character device I/O routines. • CHARDEV.DEF: Declaration file for CHARDEV.MOD. • IEEEIO.MOD: Communication routines for Driver488/DRV. • IEEEIO.DEF: Declaration file for IEEEIO.MOD. The actual demonstration program is contained in K195DEMO.MOD. A Modula-2 version of the keyboard controller program is also included. Personal488 User’s Manual, Rev. 3.0 Artisan Technology Group - Quality Instrumentation ... Guaranteed | (888) 88-SOURCE | www.artisantg.com II-107 8L. Language-Specific Information II. SOFTWARE GUIDES - 8. Driver488/DRV True Basic Use of Character Command Language In order to simplify programming Driver488/DRV with True Basic, the following files are provided on the Driver488/DRV program disk in the TRUEBAS directory: • IEEEIO.TRU: Communications routines for Driver488/DRV. • IEEEIO.TRC: Compiled version of IEEEIO.TRU. • TOOLKIT.LIB: Utility routines from the True Basic Developer’s Toolkit. • KYBDCTRL.TRU: True Basic version of the Keyboard Controller Program. IEEEIO.TRU The IEEEIO.TRU file contains several useful declarations and functions, many of which have been used in the 195DEMO example program. It is divided into two modules: DosIO and IeeeIO. • DosIO includes interfaces to several MS-DOS (or PC-DOS) function requests. It requires the functions from the True Basic Developer’s Toolkit that are included in ToolKit.Lib. They are: Def Def Def Def Read(handle,bufseg,buflen) Write(handle,bufseg,buflen) IoctlRead(handle,bufseg,buflen) IoctlWrite(handle,bufseg,buflen) These routines read and write to a character device such as Driver488/DRV. They each take the following file handle returned by OPEN, as the arguments handle: bufseg, the segment address of the data buffer to read or write, and buflen, the length of the data buffer. • IeeeIO includes routines for the convenient control of Driver488/DRV. TOOLKIT.LIB TOOLKIT.LIB contains four routines from the True Basic Developer’s Toolkit: Convert, Interrupt, Signal_e_, and String_ptr . • Convert (from HEXLIB.TRC) is used to convert hexadecimal string constants such as H3D02 into numeric form. • Interrupt (from DOSLIB.TRC) is used to call low-level DOS and BIOS functions. • Signal_e_ (from DOSLIB.TRC) interprets any error codes returned by Interrupt. • String_ptr (from DOSLIB.TRC) returns the segment address of a string variable. The text of the string is located at an offset of 8 from the segment address. More information about these routines, as well as other useful routines are included in the True Basic Developer’s Toolkit, available from True Basic. If you already have the Developer’s Toolkit, you can substitute HEXLIB.TRC or DOSLIB.TRC library statements for the TOOLKIT.LIB library statements in these routines. Turbo Basic Use of Character Command Language In order to simplify programming Driver488/DRV with Turbo Basic, the following files are provided on the Driver488/DRV program disk in the \TURBOBAS directory: II-108 Personal488 User’s Manual, Rev. 3.0 Artisan Technology Group - Quality Instrumentation ... Guaranteed | (888) 88-SOURCE | www.artisantg.com II. SOFTWARE GUIDES - 8. Driver488/DRV 8M. Data Transfers • IEEEIO.BAS: Communications routines for Driver488/DRV. • IEEEIO.ASM: Assembly language file for direct DOS access without Turbo Basic interference. • IEEEIO.COM: Executable version of IEEEIO.ASM. • KYBDCTRL.BAS: Turbo Basic version of the Keyboard Controller Program. The actual demonstration program is contained in 195DEMO.BAS. These examples also require the file REGNAMES.INC which is included with Turbo Basic. 8M. Data Transfers Topics • Terminators ................................................................................... II-108 End-Of-Line (EOL) Terminators ................................................................II-108 TERM Terminators ......................................................................................II-112 • Direct I/O & Buffered I/O............................................................ II-113 Direct Bus OUTPUT.....................................................................................II-113 Direct Bus ENTER .......................................................................................II-113 Buffered I/O...................................................................................................II-114 • Asynchronous Transfers............................................................. II-115 Terminators Every transfer of data, between a program and Driver488/DRV, or between Driver488/DRV and a bus device, must have a definite end. This is a common requirement in most systems. For example, most printers do not print a line until they receive the carriage return that ends that line. Similarly, a BASIC INPUT statement waits for the <Enter> key to be pressed before returning the entered data to the program. The only time that some terminator is not required is when the number of characters that compose the data is known in advance or is transferred along with the data. This is the case, for example, when fixed-length records are read from a random access disk file. Driver488/DRV actually uses four terminators: • The end-of-line (EOL) terminator for output from the program to Driver488/DRV. • The end-of-line (EOL) terminator for input to the program from Driver488/DRV. • The data terminator (TERM) for output to bus devices from Driver488/DRV. • The data terminator (TERM) to input from bus device into Driver488/DRV. End-Of-Line (EOL) Terminators The EOL terminators mark the end of character strings transferred between the user’s program and Driver488/DRV. The EOL output terminator marks the end of strings transferred from the user’s program to Driver488/DRV, and the EOL input terminator marks the end of strings transferred into the user’s program from Driver488/DRV. The EOL terminators normally consist of one or two ASCII characters. The characters do not need to be printable. In fact they are usually special characters such as carriage return and line feed. Also, input and output terminators need not be the same. It is possible to specify that no characters are to be used as EOL terminators. If the EOL output terminator is set to NONE, then Driver488/DRV assumes that it receives an entire command in each Personal488 User’s Manual, Rev. 3.0 Artisan Technology Group - Quality Instrumentation ... Guaranteed | (888) 88-SOURCE | www.artisantg.com II-109 8M. Data Transfers II. SOFTWARE GUIDES - 8. Driver488/DRV transfer, and when the EOL input terminator is set to NONE, Driver488/DRV does not append any characters to the returned data. Driver488/DRV senses the EOL output terminator to detect the end of a command or, in the case of the OUTPUT data command, to detect the end of the data. Most commands have many different variations. It is the EOL output terminator that lets Driver488/DRV know when the command has been completely received and is ready for execution. Without the EOL output terminator, there would be no way of determining when one command ends and the next begins. Driver488/DRV provides the EOL input terminator to the user’s program so that the program is able to detect the end of a response. For example, BASIC needs to receive a carriage-return and line-feed combination when using the INPUT statement to receive a response from Driver488/DRV. Driver488/DRV automatically provides this EOL input terminator to the program. For most programming languages, in most situations, both input and output EOL terminators should be carriage-return line-feed (CR LF). These are the default values set up by INSTALL, but they can be changed by using the INSTALL program. The EOL output terminator should be set to whatever is conventionally sent at the end of a PRINT or equivalent statement to Driver488/DRV, and the EOL input terminator should be set to whatever is required at the end of a line of input from Driver488/DRV. As mentioned previously, the EOL output terminator is used to delimit the data portion of an OUTPUT command. If, in the OUTPUT command, no character count is specified, the EOL output terminator does delimit data. However, if a character count is specified, Driver488/DRV will accept exactly that number of characters from the program for output to the bus, even if the EOL output terminator is among those characters. Furthermore, if a character count is not specified, the TERM output terminator will be sent to the bus devices after the data. If a character count is specified, nothing will be sent to the bus except the exact characters that were sent from the program. For example: PRINT#1,"OUTPUT10;ABC" sends ABC <TERM output terminator> to device 10, while PRINT#1,"OUTPUT10#5;DEF" sends DEF <CR><LF> to device 10 because BASIC will send a carriage return and line feed (<CR><LF>) at the end of the command, and a character count of 5 was specified. The EOL input terminator delimits character strings returned to the program by Driver488/DRV. However, if the character count is specified in an ENTER command, then exactly that number of characters, without the EOL input terminator appended, will be returned to the program. In this case, the normal INPUT statement will not be able to read the data from Driver488/DRV. Instead, a function like INPUT$(count,file) that reads a specific number of characters, must be used. For example, the following statements : PRINT#1,"ENTER 16" INPUT#2,A$ read a line of data from device 16, while the following : PRINT#1,"ENTER 16#10" A$=INPUT$(10,2) statements read exactly 10 characters from device 16. Finally, the EOL terminators are not used in BUFFERED transfers, either ENTER or OUTPUT. EOL IN NONE As mentioned above, the input or output EOL terminators may be set to NONE. To understand how communication with Driver488/DRV is possible without terminators, it is necessary to understand in more detail how programs communicate with Driver488/DRV. When a program sends information to Driver488/DRV, it uses an MS-DOS Write Data command. It tells DOS where to send the data (to Driver488/DRV), the number of characters to send (from 1 to II-110 Personal488 User’s Manual, Rev. 3.0 Artisan Technology Group - Quality Instrumentation ... Guaranteed | (888) 88-SOURCE | www.artisantg.com II. SOFTWARE GUIDES - 8. Driver488/DRV 8M. Data Transfers 65,535 characters), and where the data is to be found in memory (the address of the data buffer). For example, in C: ieeewt(“HELLO\r\n”); calls Write Data, telling it to send 7 characters to Driver488/DRV. In contrast, the BASIC command PRINT#1,"HELLO" causes the DOS Write Data command to be called 7 times, once for each character of the command, and once for each carriage return and line feed that terminate the command. Each time Write Data is called it is told to write just one character to Driver488/DRV from a specified location in memory. Whether written all at once, or one character at a time, the command is transferred to DOS to be passed to Driver488/DRV. Once DOS has been told to write some data to Driver488/DRV, it calls Driver488/DRV with essentially the same information that the program had told DOS: a command code that specifies Write Data, a character count, and the location of the data. Driver488/DRV responds to DOS by processing the data and returning the number of characters that have been accepted along with any error indicators. When a program requests information from Driver488/DRV, it uses an MS-DOS Read Data command. It tells DOS where to get the data (from Driver488/DRV), the size of the data buffer (from 1 to 65,535 characters), and where the data is to be put in memory (the address of the data buffer). In BASIC, for example, the command: LINE INPUT#1,A$ causes the DOS Read Data command to be called repeatedly, reading one character at a time into A$ until the carriage-return and line-feed combination that marks the end of the line, is read. Conversely, in C: ieeerd(response); calls Read Data only once, requesting as many characters as there are in the array response. When DOS has been told to read some data from Driver488/DRV, it calls Driver488/DRV with essentially the same information that the program has told DOS: a command code that specifies Read Data, a character count, and the location of the data buffer. Driver488/DRV responds to DOS by filling some or all of the data buffer, and returning the number of characters that have been read along with any error indicators. DOS then returns the number of characters read to the calling program. If EOL IN NONE is specified, Driver488/DRV never appends terminators to data being read by the program. This means that the program cannot search for a specified character or combination of characters to know when to stop reading. Hence, EOL IN NONE cannot be used in languages such as BASIC or Turbo Pascal which require carriage return and line feed at the end of input lines. Languages such as C or True Basic, that use MS-DOS calls to communicate with Driver488/DRV, can use EOL IN NONE by using the following procedure: 1. Read data from Driver488/DRV into a buffer of reasonable size (typically 64 to 1024 bytes long). DOS returns to the program the number of bytes read. 2. If the number of bytes read is less than the length of the buffer, then the reading is done. Otherwise, go on with step 3. 3. Use the IOCTL function to check if Driver488/DRV has more information available. If it does (IOCTL returned a 1, ASCII 31h), then go to step 1 to read more data into a new buffer. Otherwise, the reading is done. Personal488 User’s Manual, Rev. 3.0 Artisan Technology Group - Quality Instrumentation ... Guaranteed | (888) 88-SOURCE | www.artisantg.com II-111 8M. Data Transfers II. SOFTWARE GUIDES - 8. Driver488/DRV The following C code fragment reads data using the above procedure: #define bufsize 256 char response[bufsize], /* holds read data */ ioctlbuf[1]; /* holds IOCTL status */ int len, /* number received this time */ total=0; /* total received */ do {len=ieeerd(response); /* read some data */ if (len==-1) {...error...} /* check for error */ total += len; /* add len to total */ /* process len characters at this point */ if (len<bufsize) break; /* done if partial */ ioctl_rd(ieee,ioctlbuf,1); /* repeat while more */ } while (ioctlbuf==’1’); Notice that the ability to use EOL IN NONE requires the ability to use the character count returned by the DOS Read Data command, and the ability to check Driver488/DRV status using IOCTL. The advantage of using EOL IN NONE is that only data is returned to the program. Driver488/DRV does not have to add terminators to the data, and the program does not need to search for terminators to know the amount of data it received. RawMode Communication When communicating with character devices, DOS normally checks the transferred data for control characters such as X-ON, X-OFF and control-Z. However, when communicating with Driver488/DRV, this is not desirable. First, it might interfere with control characters that are supposed to be transferred to or from Driver488/DRV. Second, and more importantly, when DOS is checking for control characters, it only transfers one character at a time to or from Driver488/DRV. This is much less efficient than transferring large blocks of data. Therefore, whenever possible DOS should be configured not to check for control characters when communicating with Driver488/DRV. This is typically accomplished by a function called RawMode in the language-specific support files (such as IEEEIO.C) provided with Driver488/DRV. The assembly-language fragment, provided in the following table, performs this function. mov mov int mov or mov mov int AX,4400h BX,ieee 21h DH,0 DL,20h AX,4401h BX,ieee 21h ;DOS Get Device Data Function ;File handle for Driver488/DRV ;Execute DOS function ;Must clear DH :Set “don’t check for control characters” bit ;DOS Set Device Data Function ;File handle ;Execute DOS function The first part of this code fragment reads the current device control settings from DOS. These are returned in the DX register which is then modified to tell DOS not to check for control characters. Finally, DOS is again called to implement the new control settings. RawMode can greatly improve the efficiency of communication with Driver488/DRV, and should be used whenever possible, but it is not required unless EOL OUT NONE is to be used. EOL OUT NONE Once DOS has been told not to check for control characters, and we have chosen a programming language (such as C or True Basic, but not BASIC) that can send an entire command in one DOS Write Data call, we can use EOL OUT NONE so that we do not have to append termination characters to Driver488/DRV commands. If EOL OUT NONE is specified, Driver488/DRV assumes that the data it receives from DOS is the complete command. Obviously, EOL OUT NONE cannot be used with the BASIC PRINT# statement because PRINT# transfers characters one at a time to DOS, which passes them along individually to Driver488/DRV. Commands are not given to Driver488/DRV in a single transfer. Even when the language does pass the command to DOS in a single transfer, DOS does not pass the command to Driver488/DRV in one transfer unless we have configured DOS to use RawMode as described above. II-112 Personal488 User’s Manual, Rev. 3.0 Artisan Technology Group - Quality Instrumentation ... Guaranteed | (888) 88-SOURCE | www.artisantg.com II. SOFTWARE GUIDES - 8. Driver488/DRV 8M. Data Transfers EOL OUT NONE does eliminate the inconvenience of appending terminators to Driver488/DRV commands, but it does require that the entire command be contained in one transfer. Without EOL OUT NONE it is possible to split a long Driver488/DRV command into several, smaller phrases: ieeewt(“ENTER 16 #1000 ”); ieeewt(“BUFFER &HB800:0 ”); ieeewt(“CONTINUE\n”); which would have to be combined into a single transfer with EOL OUT NONE : ieeewt(“ENTER 16 #1000 BUFFER &HB800:0 CONTINUE”); TERM Terminators Just as the EOL terminators delimit the end of strings transferred between the user’s program and Driver488/DRV, the TERM terminators delimit the end of strings transferred between Driver488/DRV and bus devices. The TERM output terminator marks the end of strings transferred from Driver488/DRV to bus devices, and the TERM input terminator marks the end of strings transferred into Driver488/DRV from bus devices. The TERM terminators differ from the EOL terminators in one important aspect. While the EOL terminators are composed of one or two characters, the TERM terminators can include the IEEE 488 bus end-or-identify (EOI) signal. The EOI signal, when asserted during a character transfer, marks that character as the last of the transfer. This allows the detection of the end of data regardless of which characters comprise the data. This feature is very useful in binary data transfers which might contain any ASCII values from 0 to 255. To support the EOI signal, the TERM input and output terminators can be composed of just EOI, one or two characters, or one or two characters with EOI. If EOI is specified, it has a slightly different meaning on input than on output. When EOI alone is specified as the TERM output terminator, the EOI bus signal is asserted during the last data character transmitted. If EOI is specified with one or two characters, then EOI is asserted on the last of the characters. In this way, EOI is asserted on the last character transmitted to the bus device. When EOI alone is specified as the TERM input terminator, then all the characters received from the bus device, including the one on which EOI was asserted are returned to the user’s program. When one or two characters are specified, without EOI, all the characters up to, but not including, the TERM input terminator characters, are returned to the program. However, if both EOI and characters are specified, the following considerations apply: • If EOI is received, and the complete terminator character sequence has not been received (even if the first of the two characters has been received), then all the received characters are returned to the program. • If the complete terminator character sequence has been received, with or without EOI asserted on the last character, then only the characters up to but not including the terminator characters are returned. • If only one character is specified for input termination, the complete terminator character sequence consists of just that one character, but if two characters are specified, then it consists of both characters, received consecutively. During normal OUTPUT, without a specified character count or buffer, the EOL output terminator received by Driver488/DRV is replaced by the TERM output terminator before sending the data to the bus devices. During normal ENTER, the TERM input terminator received by Driver488/DRV is replaced with the EOL input terminator before being returned to the program. In this way, the program communicates with Driver488/DRV using the EOL terminators, and Driver488/DRV communicates with bus devices using the TERM terminators. See the ENTER and OUTPUT command descriptions in the following text, and in “Section III: Command References” for more information. Personal488 User’s Manual, Rev. 3.0 Artisan Technology Group - Quality Instrumentation ... Guaranteed | (888) 88-SOURCE | www.artisantg.com II-113 8M. Data Transfers II. SOFTWARE GUIDES - 8. Driver488/DRV Direct I/O & Buffered I/O Direct I/O is communication through the use of the PRINT and INPUT statements, or their equivalent. Direct I/O is the simplest method of communicating with Driver488/DRV and, through it, with bus devices. However, direct I/O has a relatively large overhead and so, for large data transfers, buffered I/O is preferable. In buffered I/O, the program tells Driver488/DRV where in memory to find or put the data and Driver488/DRV takes care of the actual transfer. Direct Bus OUTPUT The OUTPUT command sends data to bus devices. For example, the statement PRINT#1,"OUTPUT 05;SP1;" sends the characters SP1; to device 5. This is an example of direct I/O as the data is communicated directly to Driver488/DRV through the PRINT statement. As discussed above, Driver488/DRV recognizes the EOL output terminator as the end of the data and sends the TERM output terminator in its place after sending the data. Binary direct output is also possible. For example, the following statements send all 256 ASCII characters: PRINT#1,"OUTPUT 05 #256;"; FOR I=0 TO 255 PRINT#1,CHR$(I); NEXT I The first statement tells Driver488/DRV to expect 256 characters to follow that are to be sent to device 5. Notice the semicolon (;)just after the #256. This marks the end of the actual OUTPUT command and the start of the data. The semicolon at the end of the line tells BASIC not to send anything else, such as the normal carriage-return and line-feed combination, after sending the quoted characters. The next three lines send the 256 ASCII characters from 0 to 255 in order, to Driver488/DRV for transfer to device 5. The semicolon at the end of the third line has the same function as the semicolon at the end of the first line: it prevents BASIC from sending any extra characters. In this example, we are performing a binary transfer. Driver488/DRV knows how many characters are to be transferred and neither requires EOL output terminators to end the command, nor sends TERM output terminators to the bus device. The data is transferred to the bus device exactly as sent from the program. Direct Bus ENTER The ENTER command is used to read data from bus devices. For example, the statements: PRINT#1,"ENTER 16" INPUT#2,A$ read data from device 16 and store the returned data in the A$ variable. This is an example of direct ENTER input since the data received from the bus is read into the program via the INPUT statement that reads the result directly from Driver488/DRV. As discussed above, Driver488/DRV accepts data from device 16 until it detects the TERM input terminator. It replaces the TERM input terminator with the EOL output terminator and returns the result to the program. BASIC accepts the data just as it accepts character data from any file. This allows us to use the varieties of BASIC input statements to control how the data is received. For example, if the data read form the device is in the form of a valid number then we can read it as a number: PRINT#1,"ENTER 16" INPUT#2,N Or, if the data consists of several values separated by commas, we can read it as several values: PRINT#1,"ENTER 16" INPUT#2,A$,N,B$,I Or, if we want to read the entire input, even if it includes commas or other special characters, we can use LINE INPUT: PRINT#1,"ENTER 16" LINE INPUT#2,L$ II-114 Personal488 User’s Manual, Rev. 3.0 Artisan Technology Group - Quality Instrumentation ... Guaranteed | (888) 88-SOURCE | www.artisantg.com II. SOFTWARE GUIDES - 8. Driver488/DRV 8M. Data Transfers Finally, just as we can perform direct binary OUTPUT, we can also perform direct binary ENTER: PRINT#1,"ENTER 16#128" A$=INPUT$(128,2) When performing a binary ENTER, Driver488/DRV does not check for TERM input terminators when reading from the bus, nor does it provide EOL input terminators to the program. The data is returned to the program just as it is received from the bus device. The INPUT$ function which is designed to read a specific number of characters from a file or device, is ideal for reading the result from Driver488/DRV. Note that a normal INPUT statement does not work, as Driver488/DRV does not provide the EOL input terminators on binary ENTERs. Buffered I/O In buffered I/O, the program does not transfer data to or from Driver488/DRV. All it does is send the address and quantity of data to be transferred, and Driver488/DRV takes care of the details of the transfer. The program must be able to tell Driver488/DRV when in memory to find the data. In other words, it must be able to provide Driver488/DRV with the actual memory address of the buffer. In BASIC, the capability is partially provided by the VARPTR function. VARPTR returns a number from 0 to 65,535 giving the address of its argument. For example: PRINT VARPTR(A%(0)) prints the address of the first byte of the A% array. This address, however, is relative to the start of BASIC’s data segment. The first three statements ask Driver488/DRV for the location of its callable subroutines, and configure BASIC (via the DEF SEG statement) to be able to call them. The offset of GET.SEGMENT, which is 0, from the start of the IEEESEG area must be specified, and then GET.SEGMENT can be called. The VARSEG function is used in a similar manner to determine the value of the BASIC data segment. This data segment value remains fixed during program execution, and so these statements need only be performed once to set the value of the data segment. With the data segment value determined, and the VARPTR function able to find the offsets into that segment, we are able to completely specify the memory address of any BASIC variable or array. However, character string variables, such as A$, are not stored in the same manner as numeric variables and are not recommended for BUFFERED I/O. The following is a typical BUFFERED ENTER command: DIM W%(10) PRINT#1,"ENTER 12 #20 BUFFER"; VARSEG(W%(1)); “:”; VARPTR(W%(1)) The PRINT statement in this example sends to Driver488/DRV the command (ENTER), the bus device address (12) and number of bytes to transfer (20), the BUFFER keyword, the segment (VARSEG(W%(1)), a colon character (:) that lets Driver488/DRV know that the memory address is given as a segment followed by an offset, and the offset (VARPTR(W%(1)). If BASIC’s segment and offset to W%(1) are 2540 and 1320, respectively, then the PRINT statement would send: “ENTER 12 #20 BUFFER 2450:1320” to Driver488/DRV. This gives Driver488/DRV all the information it needs to be able to transfer the received data directly into the W% array. BUFFERED OUTPUT is also possible. For example, say we wanted to send the data just received in the example above to a device 17. We would use the following command: PRINT#1,"OUTPUT17 #20 BUFFER"; VARSEG(W%(1)); “:”; VARPTR(W%(1)) Normally, BUFFERED I/O is performed without any terminator detection. However, it is possible to explicitly specify that the ENTER should stop on detection of EOI, or on detection of EOI or some single character. For example, if we want to terminate on EOI: PRINT#1,"ENTER 12#20 BUFFER"; VARSEG(W%(1));“:”; VARPTR(W%(1));“EOI” Personal488 User’s Manual, Rev. 3.0 Artisan Technology Group - Quality Instrumentation ... Guaranteed | (888) 88-SOURCE | www.artisantg.com II-115 8M. Data Transfers II. SOFTWARE GUIDES - 8. Driver488/DRV This reads data into W% until either 20 characters have been received, or EOI has been detected. However, if EOI causes the transfer to stop, we can discover how much data has been received by using the BUFFERED command: PRINT#1,"BUFFERED" INPUT#2,N The number of bytes transferred is read into N. Now we can use this value to send the read data out to device 17: PRINT#1,"OUTPUT17#";N;"BUFFER";VARSEG(W%(1));":";VARPTR(W%(1));"EOI" Note that the variable N has been used in place of the literal 20 to specify how many bytes to transmit. Clearly, BUFFERED I/O is more complex than simple direct I/O. However, it can be very useful. BUFFERED I/O is normally much faster than direct I/O because the characters go directly from memory to the bus under the control of Driver488/DRV without the intervention of BASIC or DOS. Also, BUFFERED I/O is not limited by the 255-character limit on INPUT$ that can hinder binary ENTERs. Asynchronous Transfers Driver488/DRV can return to the user’s program while a transfer is in progress. This is useful whenever the transfer takes a substantial amount of time, and other processing could proceed while waiting. For example, suppose a certain bus device can transfer only 1000 bytes per second. If there are 10,000 bytes to transfer, it takes 10 seconds to complete the transfer. The following statements might be used to receive this data: DIM R%(5000) PRINT#1,"ENTER 09 #10000 BUFFER"; DS%; “:”; VARPTR(R%(1)); “CONTINUE” Now do other work while the transfer is continuing PRINT#1,"WAIT" The CONTINUE keyword tells Driver488/DRV to return to the program after setting up the transfer. The program is then free to do other processing, as long as it does not need access to the IEEE 488 bus. Finally, when the program is ready to process the received data it performs a WAIT to check that the data has been completely received. In this way, CONTINUE transfers overlap IEEE 488 bus data transfers with program execution. The use of DMA and interrupts requires proper hardware and software configuration. For more information, refer to the Sub-Chapter “Installation & Configuration” early in this Chapter. 8N. Operating Modes Topics • • • • • • II-116 Introduction................................................................................... II-116 Operating Mode Transitions ...................................................... II-116 System Controller Mode.............................................................. II-117 System Controller, Not Active Controller Mode.................... II-117 Not System Controller Mode...................................................... II-119 Active Controller, Not System Controller Mode.................... II-119 Personal488 User’s Manual, Rev. 3.0 Artisan Technology Group - Quality Instrumentation ... Guaranteed | (888) 88-SOURCE | www.artisantg.com II. SOFTWARE GUIDES - 8. Driver488/DRV 8N. Operating Modes Introduction There are four types of IEEE 488 bus devices: Active Controllers, Peripherals, Talk-Only devices, and Listen-Always devices: • In simple systems, Talk-Only and Listen-Always devices are usually used together, such as a TalkOnly digitizer sending results to a Listen-Always plotter. In these systems, no Controller is needed because the Talker assumes it is the only Talker on the bus, and the Listener(s) assume they are all supposed to receive all data sent over the bus. This is a simple and effective method of transferring data from one device to another, but is not adequate for more complex systems where, for example, one computer is controlling many different bus devices. • In more complex systems, the Active Controller sends commands to the various bus Peripherals, telling them what to do. The controller sends bus commands such as: Unlisten, Listen Address Group, Untalk, and Talk Address Group to specify which device(s) send data, and which receive it. When an IEEE 488 bus system is first turned on, some device must be the Active Controller. This device is the System Controller and always keeps some control of the bus. In particular, the System Controller controls the Interface Clear (IFC) and Remote Enable (REN) bus management lines. By asserting Interface Clear, the System Controller forces all other bus devices to stop their bus operations, and regains control as the Active Controller. Operating Mode Transitions The System Controller is initially the Active Controller. It can, if desired, Pass Control to another device and thereby make that device the Active Controller. Notice that the System Controller remains the System Controller even when it is not the Active Controller. Of course, the device to which control is passed must be capable of taking the role of Active Controller. It would make no sense to try to pass control to a printer. Control should only be passed to other computers that are capable, and ready, to become the Active Controller. Note further that there must be exactly one System Controller on the IEEE 488 bus. All other potential controllers must be configured as Peripherals when they power up. The state diagram which follows, shows the relationships between the various operating modes. The top half of the state diagram shows the two operating states of a System Controller. At power on, it is the active controller. It directs the bus transfers by sending the bus commands mentioned previously. It also has control of the Interface Clear and Remote Enable bus lines. The System Controller can pulse Interface Clear to reset all of the other bus devices. Furthermore, the System Controller can pass control to some other bus device and thereby become a Peripheral to the new Active Controller. If the System Controller receives control from the new Active Controller, then it once again becomes the Active Controller. The System Controller can also force the Active Controller to relinquish control by asserting the Interface Clear signal. Personal488 User’s Manual, Rev. 3.0 Artisan Technology Group - Quality Instrumentation ... Guaranteed | (888) 88-SOURCE | www.artisantg.com II-117 8N. Operating Modes II. SOFTWARE GUIDES - 8. Driver488/DRV The bottom half of the state diagram shows the two operating states of a Not System Controller device. At power on, it is a Peripheral to the System Controller which is the Active Controller. If it receives control from the Active Controller, it becomes the new Active Controller. Even though it is the Active Controller, it is still not the System Controller. The System Controller can force the Active Controller to give up control by asserting Interface Clear. The Active Controller can also give up control by passing control to another device, which may or may not be the System Controller. In summary, a bus device is set in hardware as either the sole System Controller in the system, or as a non-System Controller. At power on, the System Controller is the Active Controller, and the other devices are Peripherals. The System Controller can give up control by Passing Control, and can regain control by asserting Interface Clear, or by receiving control. A Peripheral can become the Active Controller by receiving control, and can give up control by passing control, or on detecting Interface Clear. System Controller Mode The most common Driver488/DRV configuration is as the System Controller, controlling several IEEE 488 bus instruments. In this mode, Driver488/DRV can perform all the various IEEE 488 bus protocols necessary to control and communicate with any IEEE 488 bus devices. As the System Controller in the Active Controller mode, Driver488/DRV can use all the commands available for the Active Controller state, plus control the Interface Clear and Remote Enable lines. The available bus commands and their actions are: Command ABORT LOCAL REMOTE LOCAL LOCKOUT CLEAR TRIGGER ENTER OUTPUT PASS CONTROL SPOLL PPOLL PPOLL CONFIG PPOLL DISABLE PPOLL UNCONFIG SEND RESUME Action Pulse Interface Clear. Unassert Remote Enable, or send Go To Local to selected devices. Assert Remote Enable, optionally setting devices to Remote. Prevent local (front-panel) control of bus devices. Clear all or selected devices. Trigger selected devices. Receive data from a bus device. Send data to bus devices. Give up control to another device which becomes the Active Controller. Serial Poll a bus device, or check the Service Request state. Parallel Poll the bus. Configure Parallel Poll responses. Disable the Parallel Poll response of selected bus devices. Disable the Parallel Poll response of all bus devices Send low-level bus sequences. Unassert Attention. Use to allow Peripheral-to-Peripheral transfers. System Controller, Not Active Controller Mode After passing control to another device, the System Controller is no longer the Active Controller. It acts as a Peripheral to the new Active Controller, and the allowed bus commands and their actions are modified accordingly. However, it still maintains control of the Interface Clear and Remote Enable lines. The available bus commands and their actions are: Command Action Pulse Interface Clear. Unassert Remote Enable. Assert Remote Enable. Receive data from a bus device as directed by the Active Controller. Send data to bus devices as directed by the Active Controller. Set own Serial Poll request (including Service Request) status. Get own Serial Poll request status. As a bus Peripheral, Driver488/DRV must respond to the commands issued by the Active Controller. The controller, for example, can address Driver488/DRV to Listen in preparation for sending data. ABORT LOCAL REMOTE ENTER OUTPUT REQUEST SPOLL II-118 Personal488 User’s Manual, Rev. 3.0 Artisan Technology Group - Quality Instrumentation ... Guaranteed | (888) 88-SOURCE | www.artisantg.com II. SOFTWARE GUIDES - 8. Driver488/DRV 8N. Operating Modes There are two ways to detect our being addressed to Listen: through the STATUS command, or by detecting an interrupt with the ARM command. The STATUS command can be used to watch for commands from the Active Controller. The Operating Mode, which is a “P” while Driver488/DRV is a Peripheral, changes to a “C” if the Active Controller passes control to Driver488/DRV. The Addressed State goes from Idle “I” to Listen “L” or Talk “T” if Driver488/DRV is addressed to Listen or to Talk, and goes back to IDLE “I” when the Active Controller issues Unlisten (UNL), Untalk (UNT), or specifies another Talker Address Group (TAG). The TRIGGER “T1” and CLEAR “C1” indicators are set when Driver488/DRV is triggered or cleared, and reset when STATUS is read. The Address Change indicator is set to CHANGE “G1” when the Addressed State changes. These indicators allow the program to sense the commands issued to Driver488/DRV by the Active Controller. The various STATUS indicators and their descriptions are provided in the following table: STATUS Indicator “P” (Peripheral) “C” (Controller) “T1” (Trigger) “C1” (Clear) “T” (Talk) “L” (Listen) “I” (Idle) “G1” (Change) Description Driver488/DRV is in the Peripheral (*CA) operating mode. Driver488/DRV is the Active Controller (CA). Driver488/DRV, as a Peripheral, has received a TRIGGER bus command. Driver488/DRV, as a Peripheral, has received a CLEAR bus command. Driver488/DRV is in the Talk state and can OUTPUT to the bus. Driver488/DRV is in the Listen state and can ENTER from the bus. Driver488/DRV is in neither the Talk nor Listen state. An Address Change has occurred, that is, a change between Peripheral and Controller, or among Talk, Listen, and Idle has occurred. This is, perhaps, the most useful interrupt in the Peripheral mode. The following BASIC program fragment illustrates the use of the Address Change and Addressed State indicators to communicate with the Active Controller. First, check STATUS until it indicates there has been an Address Change: 200 210 220 230 240 250 260 270 280 290 300 310 PRINT#1,"STATUS" INPUT#2 ST$ ‘Has there been no Address Change? IF MID$(ST$,7,1)="0" THEN 200 ‘Are we still in the idle state? STATE$=MID$(ST$,9,1) IF STATE$="I" THEN 200 ‘Are we addressed to listen? IF STATE$="L" THEN 400 ‘Are we addressed to talk? IF STATE$="T" THEN 500 PRINT “BAD ADDRESSED STATE VALUE: ”;ST$: STOP If addressed to Listen, then ENTER a line from the controller and PRINT it out: 400 410 420 430 440 ‘Listen state PRINT#1,"ENTER" LINE INPUT#2,A$ PRINT A$ GOTO 200 If addressed to Talk, then INPUT a line from the keyboard and OUTPUT it to the controller: 500 510 520 530 ‘Talk state LINE INPUT A$ PRINT#1,"OUTPUT;";A$ GOTO 200 It is also possible to detect these conditions with the ARM command and handle them in an Interrupt Service Routine (ISR). The Peripheral, Controller, Talk, Listen, and Idle conditions cause interrupts only when the Address Change indicator “G1” in the STATUS response is set. The Change, Trigger, and Clear indicators are all reset by the STATUS command. Thus, the STATUS command Personal488 User’s Manual, Rev. 3.0 Artisan Technology Group - Quality Instrumentation ... Guaranteed | (888) 88-SOURCE | www.artisantg.com II-119 8N. Operating Modes II. SOFTWARE GUIDES - 8. Driver488/DRV should be used in the Interrupt Service Routine to prevent re-interruption by an indicator which has not been reset. The various ARM conditions and their descriptions are provided in the following table: ARM Condition SRQ Peripheral Controller Trigger Clear Talk Listen Idle Bytein Byteout Error Change Description The internal Service Request state is set. See the SPOLL command in “Section III: Command References” for more information. Driver488/DRV is in the Peripheral (*CA) operating mode. Driver488/DRV is the Active Controller (CA). Driver488/DRV, as a Peripheral, has received a TRIGGER bus command. Driver488/DRV, as a Peripheral, has received a CLEAR bus command. Driver488/DRV is in the Talk state and can OUTPUT to the bus. Driver488/DRV is in the Listen state and can ENTER from the bus. Driver488/DRV is in neither the Talk nor Listen state. Driver488/DRV has been received a byte from the IEEE 488 bus. Driver488/DRV can output a byte to the IEEE 488 bus. Driver488/DRV has detected an error condition. An Address Change has occurred, that is, a change between Peripheral and Controller, or among Talk, Listen, and Idle has occurred. This is, perhaps, the most useful interrupt in the Peripheral mode. Not System Controller Mode If Driver488/DRV is not configured as the System Controller, then at power on, it is a bus Peripheral. It might use a program like the one previously described to communicate with the Active Controller. When Driver488/DRV is not the System Controller and not the Active Controller (*SC*CA), the available bus commands and their actions are: Command ENTER OUTPUT REQUEST SPOLL Action Receive data from a bus device as directed by the Active Controller. Send data to bus devices as directed by the Active Controller. Set own Serial Poll request (including Service Request) status. Get own Serial Poll request status. Active Controller, Not System Controller Mode If the Active Controller passes control to the Driver488/DRV, then it becomes the new Active Controller. This can be detected by the STATUS command or as an ARMed interrupt. As an Active Controller, but not the System Controller, the available bus commands and their actions are: Command ABORT LOCAL LOCAL LOCKOUT CLEAR TRIGGER ENTER OUTPUT PASS CONTROL SPOLL PPOLL PPOLL CONFIG PPOLL DISABLE PPOLL UNCONFIG SEND RESUME II-120 Action Assert Attention and send My Talk Address to stop any bus transfers. Send Go To Local to selected devices. Prevent local (front-panel) control of bus devices. Clear all or selected devices. Trigger selected devices. Receive data from a bus device. Send data to bus devices. Give up control to another device which becomes the Active Controller. Serial Poll a bus device, or check the Service Request state. Parallel Poll the bus. Configure Parallel Poll responses. Disable the Parallel Poll response of selected bus devices. Disable the Parallel Poll response of all bus devices. Send low-level bus sequences. Unassert Attention. Used to allow Peripheral-to-Peripheral transfers. Personal488 User’s Manual, Rev. 3.0 Artisan Technology Group - Quality Instrumentation ... Guaranteed | (888) 88-SOURCE | www.artisantg.com II. SOFTWARE GUIDES - 8. Driver488/DRV 8O. 8O. Utility Programs Utility Programs Topics • • Printer & Serial Redirection ..................................................... II-120 Removal & Reinstallation........................................................... II-122 MARKDRVR & REMDRVR..........................................................................II-122 • Moving Files from an IEEE 488 (HP-IB) Controller to a PCII-123 PRNTEMUL Files .........................................................................................II-123 Configuration of the IEEE Interface for PRNTEMUL............................II-123 Running PRNTEMUL ..................................................................................II-124 Data Transfer ...............................................................................................II-124 Printer & Serial Redirection IEEELPT and IEEECOM are stand-alone utilities (Driver488/DRV need not be installed to use them) that allow programs which are unaware of the IEEE 488 bus to control IEEE 488 bus devices as if they were printer (IEEELPT) or serial (IEEECOM) devices. They automatically redirect communications destined for printer or serial ports to specified IEEE 488 bus devices. For example, the command: C> IEEELPT IEEE05 will configure IEEE 488 bus device 5 to appear as the first parallel printer port (LPT1:). Any text that is destined for LPT1: will, instead be send to bus device 5. For example, the COPY command: C> COPY TEXTFILE.DOC LPT1: will copy the contents of TEXTFILE.DOC to the IEEE 488 bus. Any software which prints to LPT1: will now send its data to IEEE 488 bus device 5. Similarly, the command: C> IEEECOM IEEE12 will redirect communications to and from the COM1: serial port to IEEE 488 bus device 12. Thus, a plotting program which expects a serial plotter can communicate with an IEEE 488 plotter using Power488. Serial port redirection is often less effective than printer port redirection because many programs control the serial port hardware directly and bypass the redirection program. It is still possible to redirect output from such a program to an IEEE device if that program can be configured to send its output to a disk file rather than directly to the printer or plotter. If a file such as \DEV\COM1 is specified, the program will act as though the data were being written to an actual disk file, while the output will be sent to the IEEE 488 bus device to which COM1 was redirected. The program may even issue a warning message that the specified file exists and will be overwritten. If it does, then the user may tell it that it may delete or overwrite the file. No harm can result from trying to delete a device. To understand how these programs are used, it is necessary to keep in mind the difference between logical and physical devices. When the computer first boots up, it takes an inventory of the installed hardware. It might, for example, find two parallel printer ports, and one serial communications port. These are the physical devices. The physical device, LPT1 (note the absence of the colon) is the printer port first identified by the computer. The logical device LPT1: (with the colon) refers to the device which is currently configured to receive data to be printed. The computer maintains two tables of four entries each to keep track of physical devices by logical device name. In the case of two printer and one serial port, these tables initially appear as: Personal488 User’s Manual, Rev. 3.0 Artisan Technology Group - Quality Instrumentation ... Guaranteed | (888) 88-SOURCE | www.artisantg.com II-121 8O. Utility Programs II. SOFTWARE GUIDES - 8. Driver488/DRV Printer Port Assignments LPT1: LPT1 LPT2: LPT2 LPT3: (none) Serial Port Assignments LPT4: (none) COM1: COM1 COM2: (none) COM3: (none) COM4: (none) The IEEELPT command takes up to four optional device arguments. Each argument is of the form IEEEpp, IEEEppss or LPTn, where pp is an IEEE 488 bus primary address from 00 to 30, ppss is a bus address composed of a primary address from 00 to 30 followed by a secondary address from 00 to 31, and n is a physical printer port device number, from 1 to 4. If IEEELPT is executed with no arguments, then it just displays the current logical printer port assignments. If one or more arguments are provided, then the first logical printer port (LPT1:) is redirected to the physical device specified by the first argument, the next logical port (LPT2:) is redirected to the next specified physical device, and so on. If fewer than four devices are specified, then the remaining logical printers are directed to any unused physical parallel printer ports. For example, on a machine with two physical parallel printer ports these commands have the effects indicated in the following table: Command (Boot-Up) Printer Port Assignments LPT1: LPT2: LPT3: LPT4: LPT1 LPT2 (none) (none) LPT1 LPT2 (none) (none) IEEELPT IEEE05 IEEE05 LPT1 LPT2 (none) IEEELPT IEEE05 IEEE1201 IEEE05 IEEE1201 LPT1 LPT2 IEEELPT IEEE05 IEEE1201 IEEE17 IEEE05 IEEE1201 IEEE17 LPT1 IEEELPT IEEE05 IEEE1201 IEEE17 IEEE29 IEEE05 IEEE1201 IEEE17 IEEE29 IEEELPT LPT1 IEEE05 LPT1 IEEE05 LPT2 (none) IEEELPT LPT2 LPT1 IEEE1201 LPT2 LPT1 IEEE1201 (none) IEEELPT (No change) Note that the port assignments are flexible, any order may be used. Also note how the physical printer ports are added to the assignments if there is room for them and if they have not already been specified. Serial port redirection is accomplished by IEEECOM. IEEECOM is used identically to IEEELPT except that the physical port names (without colons) are COM1 through COM4 rather than LPT1 through LPT4. For example, the IEEECOM command: IEEECOM IEEE12 COM2 COM1 will redirect communications from COM1: to IEEE 488 bus device 12, COM2: to COM2, and COM3: to COM1. In addition to the port specifications, both IEEELPT and IEEECOM allow two optional parameters. The /Aioaddr parameter is used to specify the I/O base address of the IEEE 488 interface board and the /Baddr parameter sets its IEEE 488 bus address. The I/O base address must be specified when the associated IEEE 488 interface board is not at the default I/O address of 02E1 (hex). The I/O base address is usually given as a hexadecimal number. For example, to use the default I/O address, the parameter would be /A&H02E1. If the hexadecimal I/O address ends in a 0 or an 8 then consecutive I/O addresses will be used. If the address ends in a 1 then I/O addresses will be separated by &H400. I/O addresses ending in other than 0, 1, or 8 are not allowed. For example, the command: IEEELPT IEEE05 /A&H22E1 would configure LPT1: for output to IEEE 488 bus address 05 on a second interface card located at 22E1 (hex). The I/O base address is usually set by switches or jumpers on the interface card. Refer to the manufacturer’s instructions for your IEEE 488 board to determine its I/O address. The default I/O port base address for IEEELPT and IEEECOM is /A&H02E1. II-122 Personal488 User’s Manual, Rev. 3.0 Artisan Technology Group - Quality Instrumentation ... Guaranteed | (888) 88-SOURCE | www.artisantg.com II. SOFTWARE GUIDES - 8. Driver488/DRV 8O. Utility Programs The /B sets the primary IEEE 488 bus address of IEEE 488 interface card. Every IEEE 488 bus device, including the controller must have a unique IEEE 488 address in the range of 00 to 30 (decimal). The default address for the interface card is 21, but must be changed if any IEEE Peripheral uses the same address. For example, the command: IEEECOM IEEE21 /B00 sets the interface card bus address to 00 so that COM1: may be redirected to an IEEE 488 bus device with an address of 21. Removal & Reinstallation Driver488/DRV is a special type of terminate-and-stay-resident (TSR) program that controls Power488, Personal488, and LAN488. When DRVR488.COM is executed, it installs itself permanently into memory and connects itself into DOS so that it appears to be a standard device driver that can be used to control IEEE 488 devices. Normally, Driver488/DRV is present in memory whenever the computer is operating, even if it is not being used. Most computers have enough memory so that the amount taken by Driver488/DRV is not critical, but some very large programs need so much memory that they cannot operate if Driver488/DRV is installed. It is possible to temporarily remove Driver488/DRV by editing the AUTOEXEC.BAT file. Once Driver488/DRV is installed, the AUTOEXEC.BAT file will contain one or more lines similar to the following: C:\IEEE488\DRVR488 These are the commands that install Driver488/DRV. They can be disabled by adding the word REM, followed by a space, to convert them to remarks: REM C:\IEEE488\DRVR488 When the computer is rebooted, these lines will be ignored, Driver488/DRV will not be loaded, and the memory that would have been used for Driver488/DRV will now be available for other programs. If Driver488/DRV is needed later, the AUTOEXEC.BAT file must be re-edited to remove the REMs and to re-enable Driver488/DRV, and then the computer must be rebooted. A more practical method involves the creation of a separate batch file that holds the DRVR488 commands. When Driver488/DRV is installed, the DRVR488 commands are placed in the AUTOEXEC.BAT file. By moving these commands to a separate batch file, it is possible to avoid installing Driver488/DRV before it is needed. To create a separate batch file, first copy AUTOEXEC.BAT to a new file, perhaps DRIVER.BAT. Then edit the AUTOEXEC.BAT file, deleting the DRVR488 commands, and edit DRIVER.BAT, leaving only the DRVR488 commands. When the system is rebooted, Driver488/DRV will no longer be installed because the AUTOEXEC.BAT file no longer contains the DRVR488 commands. However, whenever Driver488/DRV is needed, it can be installed by typing DRIVER which will execute the DRVR488 commands in the DRIVER.BAT file. Once Driver488/DRV has been installed, it will remain installed until the system is rebooted. MARKDRVR & REMDRVR Using the techniques described above, it is possible to install Driver488/DRV only when it is needed. However, it is still necessary to reboot the computer to remove Driver488/DRV. The MARKDRVR and REMDRVR utilities allow Driver488/DRV and other TSR programs, such as Sidekick and Superkey, to be installed and removed at will, without rebooting. Before installing the TSR program, the MARKDRVR command should be used to “snapshot” the system state: C:> MARKDRVR comment C:> C:\IEEE488\DRVR488 The MARKDRVR command is followed by an optional comment of up to 119 character that is normally used to note which TSR programs are about to be installed. When the above command is executed it Personal488 User’s Manual, Rev. 3.0 Artisan Technology Group - Quality Instrumentation ... Guaranteed | (888) 88-SOURCE | www.artisantg.com II-123 8O. Utility Programs II. SOFTWARE GUIDES - 8. Driver488/DRV saves internal system information including the interrupt vectors, the device driver chain, and the free memory pointer. This information, along with the specified comment, is saved for use by REMDRVR. The MARKDRVR command is then followed by the commands needed to install the TSR programs. When using Driver488/DRV, these would be the DRVR488 commands. When these commands have completed, Driver488/DRV is installed and ready for use. When Driver488/DRV is no longer needed, it can be removed by using the REMDRVR command: C: >REMDRVR REMDRVR prints out the comment that was saved by MARKDRVR and then uses the information that MARKDRVR saved to restore the system to the state it had before MARKDRVR had been executed. This removes Driver488/DRV and any other TSR programs that had been loaded in the interim and recovers their memory for reuse. If several different TSR programs are being used, then it might be appropriate to use MARKDRVR more than once. Then, when REMDRVR is used, it will only remove the TSR programs that were installed after the last MARKDRVR command. Each time REMDRVR is used, it will remove one more “layer” of TSR programs. The comment saved by MARKDRVR can help keep track of which TSR programs are removed at each step. Note that the most recently installed programs are always removed first. It is not possible to remove a program until all the more recently installed programs have been removed. When working with Power488, it is good practice to create a DRIVER.BAT file that includes the DRVR488 commands as described above. Then a MARKDRVR command, such as MARKDRVR Driver488 can be added to the beginning of the DRIVER.BAT file. Then, Driver488/DRV can be installed by typing DRIVER and removed by typing REMDRVR. Driver488/DRV can thus be installed and removed as desired, without rebooting the computer. Moving Files from an IEEE 488 (HP-IB) Controller to a PC Included on the Driver488/DRV release disk is a utility program that allows files to be transferred from any IEEE controller to the PC in which Driver488/DRV resides. This utility program configures the PC as a Peripheral on the IEEE network, much like a standard IEEE 488 printer. Any controller capable of sending information to an IEEE 488 printer, including controllers like the HP 9000 series computers, can send any type of data to the PC. Once launched to the PC, the file transfer utility allows the operator to redirect the incoming data either to the PC screen, a PC disk file, or a printer attached to the PC. PRNTEMUL Files In the \UTILS subdirectory of the Driver488/DRV diskette, there are 2 files: • PRNTEMUL.EXE: This file is the MS-DOS executable version of the program. This is all that you will need to emulate an IEEE 488 printer on a PC/AT or PS/2 computer. • PRNTEMUL.C: This is the C source code of the PRNTEMUL.EXE program. It uses a C subroutine interface of Driver488/DRV, which is located in the \SUBAPI directory of the main Driver488/DRV directory. Configuration of the IEEE Interface for PRNTEMUL The PRNTEMUL program requires the Driver488/DRV to be configured as a Peripheral (same as an IEEE printer). Make sure that the IEEE interface is configured at a unique IEEE address. Once Driver488/DRV is configured properly, reboot the computer and connect your PC/AT to your IEEE controller. II-124 Personal488 User’s Manual, Rev. 3.0 Artisan Technology Group - Quality Instrumentation ... Guaranteed | (888) 88-SOURCE | www.artisantg.com II. SOFTWARE GUIDES - 8. Driver488/DRV 8P. Command Descriptions Running PRNTEMUL After the IEEE interfaces of each computer has been configured and connected, run the PRNTEMUL program from the \UTILS directory by typing one of the following commands at the DOS prompt: Command Description Prints information received from the IEEE 488 bus to the screen. Redirects information to a file called MYPROG.BAS Redirects information to the printer port (LPT1). PRNTEMUL <ENTER> PRNTEMUL > MYPROG.BAS <ENTER> PRNTEMUL > LPT1 <ENTER> Once the PRNTEMUL program is started, it will continue to send any information received from the IEEE bus to the specified destination until any key is pressed. Once a key is pressed, the PRNTEMUL program will return to DOS at which time it can be run again, with a different destination specified, if so desired. Data Transfer Data is transferred to the computer running PRNTEMUL the same way information is sent to an IEEE printer. For a description of how to print information out, refer to the documentation of your IEEE controller. For example, the following commands might be used on an HP 9000 computer running HP BASIC: Command LOAD “MYPROG.BAS” PRINTER IS 710 LIST Description Load a program to print out. Set the current printer to address 10 of the IEEE bus. List the current program to the selected printer (computer running PRNTEMUL). The output of the PRNTEMUL program could be redirected to a datafile to transfer source files from the IEEE controller to a PC/AT or PS/2. 8P. Command Descriptions Topics • • Introduction .................................................................................. II-124 Format ............................................................................................ II-125 Syntax ............................................................................................................II-125 Response ........................................................................................................II-127 Mode ...............................................................................................................II-127 Bus States ......................................................................................................II-127 Examples .......................................................................................................II-131 • • Data Types ..................................................................................... II-131 CCL Reserved Words ................................................................... II-131 List of Reserved Words................................................................................II-132 Introduction There are two types of commands: Bus commands and system commands. Bus commands communicate with the IEEE 488 bus. System commands configure or request information from Driver488/DRV. This Sub-Chapter contains a detailed description of the bus and system command Personal488 User’s Manual, Rev. 3.0 Artisan Technology Group - Quality Instrumentation ... Guaranteed | (888) 88-SOURCE | www.artisantg.com II-125 8P. Command Descriptions II. SOFTWARE GUIDES - 8. Driver488/DRV formats available for Driver488/DRV. For more detail on the individual system commands, see “Section III: Command References.” Format The format for the Driver488/DRV command descriptions consists of several sections which together define the command. Using the QuickBASIC language, this format is implemented for the system commands found in Sub-Chapter 15A: “Driver488/DRV Commands” of the “Section III: Command References” in this manual. Syntax The Syntax section of the system command description describes the proper command syntax that must be sent to Driver488/DRV. The following conventions for syntax descriptions, use the QuickBASIC language: • No command may be more than 255 characters long. The data part of the OUTPUT command does not count in this length and so the OUTPUT data may be as long as necessary. • Items in upper case, such as ENTER or OUTPUT must be used exactly as stated except that command keywords are not case sensitive: Enter, enter, ENTER, and eNtEr are all equivalent. • Items in lower case, such as addr or count, represent parameters that must be substituted with an appropriate value. • Blank spaces in commands are generally ignored. Thus, LOCAL LOCKOUT is the same as LOCALLOCKOUT. Spaces are not ignored when: in the data part of an OUTPUT command, within quoted strings in a SEND command, after an apostrophe (‘) in a terminator specification (term), at the end of a device name, or within a number. • Items enclosed in square brackets ([item]) are optional. Multiple items enclosed in square brackets separated by vertical lines ([item1|item2|item3]) are optional, any one or none may be chosen. No more than one item may be selected. • Ellipses within square brackets ([...])mean that the items in the brackets may be repeated as many times as desired. For example [,addr...] means that any number of address separatoraddress combinations may be used. • Braces, or curly brackets, ({item1|item2}) mean that exactly one of the enclosed items is required. • Combinations of brackets are possible. For example, {term[term][EOI]|EOI} allows the choice of term, term term, term term EOI, term EOI, or just EOI, but does not allow the choice of “nothing.” • Numeric parameters (those that are given as numbers) are decimal unless preceded by &H or 0X, in which case they are hexadecimal. Thus, 100 is decimal 100, &H64 is hexadecimal 64 which equals decimal 100, 0XFF is decimal 255, and 0ff is invalid because F is not a valid decimal digit. The only exception to this rule is that bus addresses, both primary and secondary, must be specified as decimal numbers. Hexadecimal bus addresses are not allowed. Several of the commands are accompanied by required or optional syntax parameters. These are further described with each command, but the more common ones are discussed below, using QuickBASIC: Bus Addressing II-126 • pri-addr : A primary device address in the range 0 to 30. • sec-addr : An optional two-digit secondary device address in the range 00 to 31. • name : A one- to eight-character device name composed of letters, numbers, and underscores ( _ ) used to represent the address of a particular bus device. Personal488 User’s Manual, Rev. 3.0 Artisan Technology Group - Quality Instrumentation ... Guaranteed | (888) 88-SOURCE | www.artisantg.com II. SOFTWARE GUIDES - 8. Driver488/DRV • 8P. Command Descriptions addr : An IEEE 488 bus address. A numeric primary address optionally followed by a secondary address, or a device name. Thus, addr is of the form {name|pri-addr[sec-addr]} where name is a device name, pri-addr is a primary address, and sec-addr is a two-digit secondary address. • [,addr...] : An optional list of bus addresses, each one preceded by an address separator; either a comma (,) or a blank. No more than 50 bus addresses are allowed in any single command. Character Count • #count : The number of characters to be transferred, using a pound sign (#) followed by an integer in the range 1 to 4,294,967,295 (or 232 - 1). It may be specified in hexadecimal by preceding it with &H or 0X. The hexadecimal range is &H1 to &HFFFFFFFF. A character count of zero is invalid. ASCII Characters • $char : A single character whose ASCII value is the number char, a decimal number in the range 0 to 255 or a hexadecimal number in the range $H0 to $HFF, or &H0 to &HFF. For example, 65 is the letter A, as is $41 or &H41. • CR : The carriage return character ($13, $0D or &H0D). • LF : The line feed character ($10, $0A or &H0A). • ‘X : Any (usually) printable character. The apostrophe is immediately followed, without any intervening spaces, by a single character that is taken as the character specified. For a complete description of ASCII control codes and character sets, refer to the tables in “Section V: Appendix” of this manual. ASCII Character Strings • data : An arbitrary string of characters. None of the special forms given above ($char, CR, LF, or ‘X) are used. For example, CRLF as data is taken as the letters: C, R, L, and F, not as carriage return line feed CR LF. • ‘data’ : An arbitrary string of characters enclosed in apostrophes. Terminators • term : Any single character, specified as CR, LF, ‘X, or $char as described above ({CR|LF|’X|$char}). Part of terminator sequence used to mark the end of lines of data and commands. • [term] : An optional term character. For example, term[term] means that one or two terminators may be specified. • EOI : The IEEE 488 bus end-or-identify signal. When asserted during the transfer of a character, EOI signals that that character is the last in the transfer. On input, ΕΟΙ, if specified, causes the input to stop. On output, EOI causes the bus EOI signal to be asserted during transmission of the last character transferred. • NONE : The no end-of-line characters indicator. When EOL OUT NONE is specified, Driver488/DRV assumes that entire, complete, commands are transferred with a single DOS-level output command. When EOL IN NONE is specified, Driver488/DRV does not append any input terminators to received data. I/O Base Address • ioaddr : The I/O base address for the interface card, in the range &H0 to &HFFFF, usually specified in hexadecimal, though decimal is allowed. Personal488 User’s Manual, Rev. 3.0 Artisan Technology Group - Quality Instrumentation ... Guaranteed | (888) 88-SOURCE | www.artisantg.com II-127 8P. Command Descriptions II. SOFTWARE GUIDES - 8. Driver488/DRV Interrupts • interrupt : One of the following: SRQ, ERROR, PERIPHERAL, CONTROLLER, TRIGGER, CLEAR, TALK, LISTEN, IDLE, BYTEIN, BYTEOUT, CHANGE. • [,interrupt...] : An optional list of interrupts, each preceded by a comma. Memory Buffer Addresses • segment : A segment address in the range -32768 to 65535 (&H0 to &HFFFF). An address of the form segment:offset is converted into a real 20-bit address by multiplying the segment by 16 and adding the offset. As the segment is often stored in an integer variable, values greater than 32767 (32768 to 65535) are printed as negative numbers (-32768 to -1, respectively). Driver488/DRV automatically interprets negative segment values as their corresponding positive values. • offset : The offset part of a segment:offset address. An integer in the range -32768 to 65535. As with segment, negative offset values are interpreted as their corresponding positive values. • absolute : A real 20-bit address. An integer in the range 0 to 1,048,575 (&H0 to &HFFFFF). • buf-addr : The memory address of the current data buffer. The buf-addr may be given either as segment:offset (the colon is required), or as an absolute memory address. Response The Response section of the system command description describes the response that the user’s program should read after sending the command. If a response is provided, it must be read. Errors occur if another command is issued before reading the response. Mode This section of the command description format specifies the operating modes in which the command is valid. Driver488/DRV may be configured as the System Controller in which case it is initially the Active Controller, or as a Not System Controller in which case it is initially in the Peripheral state. The Driver488/DRV configuration as System Controller or Not System Controller can be changed by the INSTALL program. Note: Even if Driver488/DRV is not configured as the System Controller, it can still become the Active Controller if another controller on the IEEE 488 bus passes control to Driver488/DRV. The modes are referred to by their names and states, as shown below: Mode Name System Controller Active Controller Active System Controller Not System Controller, Active Controller State SC CA SC•CA *SC•CA Mode Name Not System Controller Peripheral (Not Active Controller) System Controller, Not Active Not System Controller, Not Active Controller State *SC *CA SC•*CA *SC•*CA Bus States This section of the command description format indicates the state of the bus device. The mnemonics abbreviations for these bus states, as well as the relevant bus lines and bus commands, are listed in the following two tables: II-128 Personal488 User’s Manual, Rev. 3.0 Artisan Technology Group - Quality Instrumentation ... Guaranteed | (888) 88-SOURCE | www.artisantg.com II. SOFTWARE GUIDES - 8. Driver488/DRV Bus State 8P. Command Descriptions Bus Lines Hex Value (QuickBASIC) Decimal Value Data Transfer (DIO) Lines 6 5 4 3 8 7 2 1 &H80 &H40 &H20 &H10 &H08 &H04 &H02 &H01 128 64 32 16 8 4 2 1 0 0 0 0 0 0 0 0 0 1 0 0 0 0 0 0 0 0 0 0 1 0 1 0 1 0 0 0 0 0 0 0 0 0 0 0 0 0 0 0 0 0 0 1 0 0 0 0 0 0 0 1 0 0 0 0 1 0 0 0 0 0 0 0 0 1 0 0 0 0 1 0 1 0 0 0 0 0 0 0 0 8 7 &H80 &H40 &H20 &H10 128 64 32 16 8 4 2 1 x x x x x x x x x x x x x x x x x x 0 0 0 0 0 0 1 1 0 0 1 0 0 0 1 0 0 1 0 0 0 1 0 1 0 1 0 0 1 0 0 0 0 0 1 0 1 0 0 a 1 a a 0 0 1 c 0 1 1 a 0 1 1 0 1 0 d 0 d d S 0 0 o 0 1 1 d 1 1 1 1 0 0 d 0 d d P2 1 1 m 1 0 0 d 0 1 1 0 0 0 r 0 r r P1 1 0 m 0 0 0 r 0 1 1 0 0 1 n 1 n n P0 1 1 d 0 1 0 n 1 1 1 Bus Management Lines IFC REN Interface Clear Remote Enable IEEE 488 Interface: Bus Management Lines ATN EOI SRQ Attention (&H04) End-Or-Identify (&H80) Service Request (&H40) 0 1 0 0 0 1 IEEE 488 Interface: Handshake Lines DAV NDAC NRFD Data Valid (&H08) Not Data Accepted (&H10) Not Ready For Data (&H20) 0 0 0 0 0 0 Serial Interface: Bus Management Lines DTR RI RTS Data Terminal Ready (&H02) Ring Indicator (&H10) Request To Send (&H01) 0 0 0 Serial Interface: Handshake Lines CTS DCD DSR Clear To Send (&H04) Data Carrier Detect (&H08) Data Set Ready (&H20) Bus State Bus Commands (IEEE 488) (ATN is asserted “1”) Hex Value (QuickBASIC) Decimal Value DCL GET GTL LAG LLO MLA MTA PPC PPD PPU SCG SDC SPD SPE TAG TCT UNL UNT Device Clear (&H14) Group Execute Trigger (&H08) Go To Local (&H01) Listen Address Group (&H20-3F) Local Lock Out (&H11) My Listen Address My Talk Address Parallel Poll Config Parallel Poll Disable (&H07) Parallel Poll Unconfig (&H15) Second. Cmd. Group (&H60-7F) Selected Device Clear (&H04) Serial Poll Disable (&H19) Serial Poll Enable (&H18) Talker Address Group (&H40-5F) Take Control (&H09) Unlisten (&H3F) Untalk (&H5F) (x = “don’t care”) Data Transfer (DIO) Lines 6 5 4 3 &H08 &H04 2 1 &H02 &H01 If a command is preceded by an asterisk (*), that command is unasserted. For example, *REN states that the remote enable line is unasserted. Conversely, REN without the asterisk states that the line becomes asserted. The bus states are further described, according to the following bus lines: Personal488 User’s Manual, Rev. 3.0 Artisan Technology Group - Quality Instrumentation ... Guaranteed | (888) 88-SOURCE | www.artisantg.com II-129 8P. Command Descriptions II. SOFTWARE GUIDES - 8. Driver488/DRV Bus Management Lines For the general control and coordination of bus activities, five bus management lines are used by either an IEEE 488 interface or a serial interface: • Interface Clear (IFC): Employed by either IEEE 488 or serial interfaces, this line is used only by the System Controller to place all bus devices in a known, quiescent state. Specifically, the IFC places the devices in the Talk and Listen Idle states (neither Active Talker nor Active Listener) and makes the System Controller the Active Controller. • Remote Enable (REN): Employed by either IEEE 488 or serial interfaces, this line is used only by the System Controller to allow bus devices to respond to remote (bus) commands. When REN is asserted, all listeners capable of remote operation enter remote operation when addressed to Listen. If REN is unasserted, then the bus devices may ignore the bus and remain in local operation. Generally, the REN command should be issued before any bus programming is attempted. • Attention (ATN): Employed by an IEEE 488 interface, this is one of the most important lines for bus management, and can only be driven by the Active Controller. When ATN is asserted, the information contained on the data lines is to be interpreted as a bus (multiline) command. When it is unasserted, that information is to be interpreted as data for the Active Listeners. • End-Or-Identify (EOI): Employed by an IEEE 488 interface, this line is used to signal the last byte of a multibyte data transfer. The device that is sending the data asserts EOI during the transfer of the last data type. The EOI signal is not always necessary, since the end of the data may be indicated by some special character such as the carriage return. The Active Controller also uses EOI to perform a Parallel Poll by simultaeously asserting EOI and ATN. • Service Request (SRQ): Employed by an IEEE 488 interface, this line is asserted by any device to attract the immediate attention of the Active Controller. Consequently, it can be used to interrupt the current sequence of events. The device may be reporting that it has data to send, an error condition to report or both. The Controller can determine which device requested service using Serial Poll or Parallel Poll. The Serial Poll will clear the SRQ line unless some other device is requesting service. • Data Terminal Ready (DTR): Employed by a serial interface, this line is specified to indicate the presence and readiness of data terminal and data communication equipment (DEC). The DTR is asserted by the terminal equipment when terminal power is on, indicating to the modem or other DCE that the terminal is ready. • Ring Indicator (RI): Employed by a serial interface, this line indicates that a ringing signal is being received on the communication equipment. • Request To Send (RTS): Employed by a serial interface, this line is specified to assist half-duplex communication equipment in transmitting and receiving data. Before a transmission, the sender’s RTS signal is asserted, requesting the receiver to switch its circuitry to the receive mode. Handshake Lines To “handshake” the transfer of information across the data lines, three lines are used by either an IEEE 488 interface or a serial interface: II-130 • Data Valid (DAV): Employed by an IEEE 488 interface, this line is controlled by the Active Talker. Before sending any data, the Talker verifies that NDAC (see below) is asserted, which indicates that all Listeners have accepted the previous data byte. The Talker then places a byte onto the data lines and waits until NRFD (see below) is unasserted, indicating that all Addressed Listeners are ready to accept the information. When NRFD and NDAC are in the proper state, the Talker asserts DAV to indicate that the data on the bus is valid. • Not Ready For Data (NRFD): Employed by an IEEE 488 interface, this line is used by the Listeners to inform the Talker that they are ready to accept new data. The Talker must wait for each Listener to unasserted this line, which they do at their own rates, when they are ready for more data. This assures that all devices accepting the information are ready to receive it. Personal488 User’s Manual, Rev. 3.0 Artisan Technology Group - Quality Instrumentation ... Guaranteed | (888) 88-SOURCE | www.artisantg.com II. SOFTWARE GUIDES - 8. Driver488/DRV 8P. Command Descriptions • Not Data Accepted (NDAC): Employed by an IEEE 488 interface, this line is also controlled by the Listeners, and indicates to the Talker that each device addressed to listen has accepted the information. Each device releases NDAC at its own rate, but NDAC does not do so until the slowest Listener has accepted the data byte. This type of handshaking permits multiple devices to receive data from a single data transmitter on the bus. All active receiving devices will participate in the data handshaking on a byte-by-byte basis and operate the NDAC and NRFD lines in a “wired-or” scheme so that the slowest active device will determine the rate at which the data transfers take place. In other words, data transfers are asynchronous and occur at the rate of the slowest participating device. • Clear To Send (CTS): Employed by a serial interface, this line is specified to assist half-duplex communication equipment in transmitting and receiving data. When ready to receive, the receiver asserts its CTS line, allowing transmission to begin. • Data Carrier Detect (DCD): Employed by a serial interface, this line is asserted by the modem or other data communication equipment (DCE) to indicate that it has established a communication link with the modem or DCE at the other end of the communication link (e.g., phone line). It must be asserted for the terminal to go on-line and receive data. • Data Set Ready (DSR): Employed by a serial interface, this line is specified to indicate the presence and readiness of data terminal and data communication equipment (DCE). The DSR is asserted by the modem or other DCE to allow the terminal to go on-line and receive data. Data Transfer Lines To transfer information between devices on the bus, eight lines (DIO1 through DIO8) are used by the IEEE 488 interface. As previously discussed, when ATN is unasserted, the information contained on the data lines is to be interpreted as data for the Active Listeners. However, when ATN is asserted, that information is to be interpreted as a bus (multiline) command. Bus Command Groups Bus commands are bytes sent by the Active Controller over the data bus with Attention (ATN) asserted. These commands are sent to all devices and are divided into the following 5 groups: • Addressed Command Group (ACG): These commands affect only those devices which have previously been addressed to be a Listener. There are 5 bus line addressed commands: GET, GTL, PPD, SDC and TCT. • Universal Command Group (UCG): These commands cause every instrument on the bus to carry out the bus function specified (if the instrument is capable of it). There are 5 bus line universal commands: DCL, LLO, PPU, SPD, and SPE. • Listen Address Group (LAG): These commands address to Listen specified bus devices. The addressed device then becomes a Listener. There are 31 (0 to 30) listen addresses associated with this group. The 3 most significant bits of the data bus are set to 001 while the 5 least significant bits are the address of the device being told to Listen. The last command in this group is UNL. • Talk Address Group (TAG): These commands address to Talk specified bus devices. The addressed device then becomes a Talker. There are 31 (0 to 30) talk addresses associated with this group. The 3 most significant bits of the data bus are set to 010 while the 5 least significant bits are the address of the device being told to Talk. The last command in this group is UNT. • Secondary Command Group (SCG): These commands are used to specify a subaddress or subfunction within a given bus device. There are 32 (0 to 31) possible secondary commands used to specify a subaddress of subfunction within a given bus device. They are also used in the Parallel Poll Configure (PPC)sequence. • Three bus commands not found in the above groups are: MLA, MTA, and PPC. All of the IEEE 488 bus commands are further described individually, as follows: Personal488 User’s Manual, Rev. 3.0 Artisan Technology Group - Quality Instrumentation ... Guaranteed | (888) 88-SOURCE | www.artisantg.com II-131 8P. Command Descriptions II. SOFTWARE GUIDES - 8. Driver488/DRV Bus Commands • Device Clear (DCL): This UCG command causes all bus devices to be initialized to a pre-defined or power-up state. • Group Execute Trigger (GET): This ACG command usually signals all bus devices to begin executing a triggered action. This allows actions of different devices to begin simultaneously. • Go To Local (GTL): This ACG command allows the selected devices to be manually controlled. • Local Lock Out (LLO): This UCG command prevents manual control of the instrument’s functions. • My Listen Address (MLA): This command addresses a device to Listen. The device accepts data from the Active Talker and outputs this data through the serial interface. It substitutes the selected serial terminators for the received IEEE 488 bus terminators. • My Talk Address (MTA): This command addresses a device to Talk. The device retrieves data from the serial input buffer and outputs it to the IEEE 488 bus. It substitutes the selected IEEE 488 bus terminators for the received serial terminators. The device will continue to output serial input buffer data as long as the IEEE 488 controller allows. • Parallel Poll Configure (PPC): This command configures devices capable of performing a Parallel Poll via the data bit they are to assert in response to a Parallel Poll. • Parallel Poll Disable (PPD): This ACG command disables the Parallel Poll response of selected devices. • Parallel Poll Unconfigure (PPU): This UCG command disables all devices from responding to a Parallel Poll. • Selected Device Clear (SDC): This ACG command causes a single device to be initialized to predefined or power-up state. • Serial Poll Disable (SPD): This UCG command disables a device from sending its Serial Poll status byte. • Serial Poll Enable (SPE): This UCG command, when ATN is unasserted, will cause a device that is addressed to talk, to output its Serial Poll status byte. • Take Control (TCT): This ACG command passes bus control responsibilities from the current Controller to another device which has the ability to control. • Unlisten (UNL): This LAG command places the device in the Listen Idle state. • Untalk (UNT): This TAG command places the device in the Talk Idle state. For more detailed information, many of these commands appear in Chapter 15 “Command References” of “Section III: Command References” in this manual. Also, for information on the relationship between bus messages and ASCII character codes, turn to “Section V: Appendix” in this manual. Examples The Examples section of the command description format lists one or more short examples of the command’s normal use. These and additional programs can be found in language or example subdirectories of the Driver488/DRV installation directory. Data Types For information on the Driver488/DRV data bit masks, data constants, and data structures, turn to the topic “Data Types” found in the Sub-Chapter 9K “Command Descriptions” of Chapter 9 “Driver488/SUB.” II-132 Personal488 User’s Manual, Rev. 3.0 Artisan Technology Group - Quality Instrumentation ... Guaranteed | (888) 88-SOURCE | www.artisantg.com II. SOFTWARE GUIDES - 8. Driver488/DRV 8P. Command Descriptions CCL Reserved Words The following alphabetized list contains words reserved for use by the Character Command Language (CCL) interface. These words may not appear as a device name nor as the first characters of a device name. Upper and lower cases are insignificant. Some examples of this are: • all : This is a reserved word, therefore alloy, Alloy, or ALLOY are all invalid External Device names. • cr : This is a reserved word, therefore crane, Crane, or CRANE cannot be used as the name of an External Device if the Character Command Language is to be used. • in : This is a reserved word, so input, Input, or INPUT are all invalid External Device names. List of Reserved Words • • • • • • 8Q. all buffer cmd continue cr data • • • • • • dma eoi error in lf listen • • • • • • mla monitor mta none off on • • • • • • out talk unl unt until_rsv while_srq Command Reference To obtain a detailed description of the command references for Driver488/DRV, turn to Section III in this manual entitled “Command References.” The commands are presented in alphabetical order for ease of use. Personal488 User’s Manual, Rev. 3.0 Artisan Technology Group - Quality Instrumentation ... Guaranteed | (888) 88-SOURCE | www.artisantg.com II-133 9A. Introduction 9. II. SOFTWARE GUIDES - 9. Driver488/SUB Driver488/SUB Sub-Chapters 9A. 9B. 9C. 9D. 9E. 9F. 9G. 9H. 9I. 9J. 9K. 9L. Introduction ............................................................................. II-133 Installation & Configuration ................................................ II-134 External Device Interfacing ................................................. II-141 Getting Started ........................................................................ II-145 C Languages ............................................................................ II-150 QuickBASIC.............................................................................. II-159 Pascal ......................................................................................... II-166 Data Transfers *....................................................................... II-175 Operating Modes * .................................................................. II-177 Utility Programs...................................................................... II-182 Command Descriptions *....................................................... II-186 Command Reference *............................................................ II-190 * For Driver488/SUB, W31, W95, & WNT 9A. Introduction Driver488/SUB is similar to Driver488/DRV in that it uses HP (Hewlett-Packard) style commands, has COM port support, offers asynchronous I/O capability, provides automatic event vectoring and error checking, and transfers data at the maximum DMA rate of the board being controlled. Like Driver488/DRV, Driver488/SUB supports the Power488 series boards’ additional input/output functions with SCPI (Standard Command for Programmable Instruments). Driver488/SUB differs from Driver488/DRV in programming style and performance. You can access the memory-resident Driver488/SUB via a library of function calls, allowing for faster input/output operations. You can use Driver488/SUB with any of the languages for which function call libraries are offered, including: C, Pascal, and QuickBASIC. The following example of programming a digital multimeter highlights the programming style differences between Driver488/DRV and Driver488/SUB: Driver488/DRV, using C Language Driver488/SUB, using C Language main ( ) { ieeeinit ( ); ieeewt (Output dmm; R0T1X”); Ieeewt (“Enter dmm”); ieeerd (val); } main ( ) { OpenName (dmm. “DMM”); Output (dmm, “R0T1X) Enter (dmm, val); } Driver488/SUB lets you obtain optimal use of your PC’s conventional 640K byte memory by automatically detaching and loading itself into high memory (when used with a test system employing DOS 5.0 or higher). If sufficient high memory is available, Driver488/SUB will not consume any conventional memory. This makes the driver particularly useful for applications executing long programs demanding large amounts of memory. II-134 Personal488 User’s Manual, Rev. 3.0 Artisan Technology Group - Quality Instrumentation ... Guaranteed | (888) 88-SOURCE | www.artisantg.com II. SOFTWARE GUIDES - 9. Driver488/SUB 9B. Installation & Configuration Driver488/SUB supports up to four IEEE 488 interfaces. Each interface can support multiple external devices up to the limits imposed by electrical loading (14 devices), or with a product such as Extender488, to the limits of the IEEE 488 addressing protocols. Driver488/SUB supports the GP488B (not PCIIA, NI), AT488, MP488, MP488CT, and NB488 series of IEEE 488.2 interface hardware. There is no Character Command Language (CCL) support contained in Driver488/SUB. All interaction between the application and the driver takes place via normal subroutine. 9B. Installation & Configuration Topics • • • • Before You Get Started ............................................................... II-134 Making Backup Disk Copies...................................................... II-135 Driver Installation ....................................................................... II-135 Configuration Utility................................................................... II-135 Interfaces.......................................................................................................II-136 External Devices...........................................................................................II-136 Opening the Configuration Utility ............................................................II-136 • • • Configuration of IEEE 488 Interfaces ..................................... II-136 Configuration of Serial Interfaces ........................................... II-139 Configuration of IEEE 488 External Devices......................... II-140 Before You Get Started Prior to Driver488/SUB software installation, configure your interface board by setting the appropriate jumpers and switches as detailed in the “Section I: Hardware Guides.” Note the configuration settings used, as they must match those used within the Driver488/SUB software installation. Once the IEEE 488 interface hardware is installed, you are ready to proceed with the steps outlined within this Sub-Chapter to install and configure the Driver488/SUB software. The Driver488/SUB software disk(s) include the driver files themselves, installation tools, example programs, and various additional utility programs. A file called README.TXT, if present, is a text file containing new material that was not available when this manual went to press. NOTICE 1. The Driver488/SUB software, including all files and data, and the diskette on which it is contained (the “Licensed Software”), is licensed to you, the end user, for your own internal use. You do not obtain title to the licensed software. You may not sublicense, rent, lease, convey, modify, translate, convert to another programming language, decompile, or disassemble the licensed software for any purpose. 2. You may: • only use the software on one single machine; • copy the software into any machine-readable or printed form for backup in support of your use of the program on the single machine; and, • transfer the programs and license to use to another party if the other party agrees to accept the terms and conditions of the licensing agreement. If you transfer the programs, you must at the same time either transfer all copies whether in printed or in machine-readable form to the same party and destroy any copies not transferred. Personal488 User’s Manual, Rev. 3.0 Artisan Technology Group - Quality Instrumentation ... Guaranteed | (888) 88-SOURCE | www.artisantg.com II-135 9B. Installation & Configuration II. SOFTWARE GUIDES - 9. Driver488/SUB The first thing to do, before installing the software, is to make a backup copy of the Driver488/SUB software disks onto blank disks. To make the backup copy, follow the instructions given below. Making Backup Disk Copies 1. Boot up the system according to the manufacturer’s instructions. 2. Type the command CD\ to go back to your system’s root directory. 3. Place the first Driver488/SUB software disk into drive A:. 4. Type DISKCOPY A:A: and follow the instructions given by the DISKCOPY program. (You may need to swap the original (source) and blank (target) disks in drive A: several times to complete the DISKCOPY. If your blank disk is unformatted, the DISKCOPY program allows you to format it before copying.) 5. When the copy is complete, remove the backup (target) disk from drive A: and label it to match the original (source) Driver488/SUB software disk just copied. 6. Store the original Driver488/SUB software disk in a safe place. 7. Place the next Driver488/SUB software disk into drive A: and repeat steps 4-6 for each original (source) disk included in the Driver488/SUB package. 8. Place the backup copy of the installation disk into drive A:, type A:INSTALL, then follow the instructions on the screen. Driver Installation There are two steps involved in installing Driver488/SUB onto your working disk. The required files must first be copied from the distribution disk to your working disk, and then the configuration must be established by modifying the supplied Windows-style initialization file. Driver488/SUB should normally be installed on a hard disk. Installing Driver488/SUB on a floppy disk, while possible, is not recommended. Assuming that the Driver488/SUB disk is in drive A:, start the installation procedure by typing A:INSTALL at the prompt. For a normal first installation, allow INSTALL to install all parts of Driver488/SUB. If hard disk space is extremely limited, certain parts, such as language support and examples for languages not immediately used, may be omitted. The distribution disks may be used to install or reinstall any or all parts of Driver488/SUB at a later time. Note if any error messages display when you are trying to load DRVR488.EXE in memory. If so, refer to “Section IV: Troubleshooting” in this manual. The CONFIG utility runs automatically upon calling installation and permits you to specify the system configuration, add interfaces, define external devices, etc. You may also run CONFIG from the command line at a later time to modify your configuration as required. The following text describes the configuration of interface boards, external devices and serial external devices. Configuration Utility The Driver488/SUB startup configuration is specified in a Windows-style initialization file named DRVR488.INI, which resides in the Driver488/SUB directory. The first screen of the CONFIG program is used to enter the configuration settings so the Driver488/SUB software can be correctly modified to reflect the state of the hardware. The driver can be reconfigured at any time by running the CONFIG program. To start the CONFIG program, type CONFIG while in the directory in which the configuration utility resides, typically C:\IEEE488\UTILS. II-136 Personal488 User’s Manual, Rev. 3.0 Artisan Technology Group - Quality Instrumentation ... Guaranteed | (888) 88-SOURCE | www.artisantg.com II. SOFTWARE GUIDES - 9. Driver488/SUB 9B. Installation & Configuration Interfaces The minimum requirement for configuring your system is to make certain that your IEEE 488.2 interface board or module is selected under “Device Type.” The default settings in all of the other fields match those of the interface as shipped from the factory. If you are unsure of a setting, it is recommended that you leave it as is. External Devices Within your IEEE 488.2 application program, devices on the bus are accessed by name. These names must be created and configured within the CONFIG program. After configuring your interface parameters, press <F5> to open the External Devices window. All configured devices will be accessible in your application program via the OpenName command. For more details, refer to the topic “Configuration of IEEE 488 External Devices” found later in this Sub-Chapter. Opening the Configuration Utility In general, all Driver488/SUB configuration utility screens have three main windows: the “name” of the interfaces or devices on the left, the “configuration” window on the right, and the “instruction” window at the bottom of the screen. Based on current cursor position, the valid keys for each window will display in the Instructions box. To begin the interface configuration, move the cursor in the name window to select an interface description for modification. (Interfaces can be added or deleted using <F3> and <F4>.) Notice moving the cursor up and down the list of interfaces or devices in the left window changes the parameters in the configuration window. The configuration fields always correspond with the currently selected interface and device type. Once all modifications have been made to the configuration screen, <F10> must be pressed to accept the changes made or <F9> can be pressed to exit without making any change. Additional function keys allow the user to continue onto the configuration of external devices via <F5> or to view a graphic representation of the interface card with the selected settings via <F7>. Configuration of IEEE 488 Interfaces The Driver488/SUB supports two types of interfaces: IEEE and Serial (COM). The following Driver488/SUB figure displays the configuration screen of an MP488CT IEEE 488.2 interface. To add another IEEE interface, select <F3>. For additional information on using more than one interface, refer to the final topic “Multiple Interface Management” in the SubChapter “Installation & Configuration” of Chapter 8. Once an interface is selected, the fields and default entries which display in the configuration window depend on the device type specified. The configuration parameters of the IEEE interface, shown in the figure, are as follows: Personal488 User’s Manual, Rev. 3.0 Artisan Technology Group - Quality Instrumentation ... Guaranteed | (888) 88-SOURCE | www.artisantg.com II-137 9B. Installation & Configuration II. SOFTWARE GUIDES - 9. Driver488/SUB Configuration Parameters • Name: This field is a descriptive instrument name which is manually assigned by the user. This must be a unique name. Typically, IEEE or COM is used. • IEEE Bus Address: This is the setting for the IEEE bus address of the board. It will be checked against all the instruments on the bus for conflicts. It must be a valid address from 0 to 30. • DMA: A direct memory access (DMA) channel can be specified for use by the I/O interface card. If DMA is to be used, select a channel as per the hardware setting. If no DMA is to be used, select NONE. The NB488 does not support DMA, therefore the DMA field will not display if this device type is used. Valid settings are displayed in the table. • Interrupt: A hardware interrupt level can I/O Board Specified Interrupt Level be specified to improve the efficiency of the GP488B levels 2-7 or none I/O adapter control and communication AT488 levels 3-7, 9-12, 14-15 or none using Driver488/SUB. For DMA operation MP488 levels 3-7, 9-12, 14-15 or none or any use of OnEvent and Arm functions, MP488CT levels 3-7, 9-12, 14-15 or none an interrupt level must be selected. Boards NB488 level 7 for LPT1, level 5 for LPT2 may share the same interrupt level. If no CARD488 levels 3-7, 9-12, 14-15 or none interrupt level is to be used, select NONE. Valid interrupt levels depend on the type of interface. Possible settings are shown in the table. • SysController: This field determines whether or not the IEEE 488 interface card is to be the System Controller. The System Controller has ultimate control of the IEEE 488 bus, and the ability of asserting the Interface Clear (IFC) and Remote Enable (REN) signals. Each IEEE 488 bus can have only one System Controller. If the board is a Peripheral, it may still take control of the IEEE 488 bus if the Active Controller passes control to the board. The board may then control the bus and, when it is done, pass control back to the System Controller or another computer, which then becomes the active controller. If the board will be operating in Peripheral mode (not System Controller), select NO in this field. • LightPen: This field determines whether the LightPen command is to be used. If selected, it will disable the detection of interrupts via setting the light pen status. The default is light pen interrupt enabled. • Timeout (ms): The time out period is the amount of time that data transfers wait before assuming that the device does not transfer data. If the time out period elapses while waiting to transfer data, an error signal occurs. This field is the default timeout for any bus request or action, measured in milliseconds. If no timeout is desired, the value may be set to zero. • Device Type: This field specifies the type of board or module (such as GP488, MP488CT or NB488) represented by the IEEE device name selected. I/O Board GP488B AT488 MP488 MP488CT NB488 CARD488 Specified DMA Channel 1, 2, 3 or none 1, 2, 3, 5, 6, 7 or none 1, 2, 3, 5, 6, 7 or none 1, 2, 3, 5, 6, 7 or none Not applicable Not applicable I/O Address • IEEE 488: This field is the I/O base address which sets the addresses used by the computer to communicate with the IEEE interface hardware on the board. The address is specified in hexadecimal and can be 02E1, 22E1, 42E1 or 62E1. Note: This field does not apply to the NB488. Instead, the NB488 uses the I/O address of the data register (the first register) of the LPT port interface, typically 0x0378. • II-138 Digital I/O: This field is the base address of the Digital I/O registers. It is only applicable for MP488 and MP488CT boards. Note the Digital I/O SCPI communication parameters are configured as an external device. Refer to the “Section I: Hardware Guides” for more information. Personal488 User’s Manual, Rev. 3.0 Artisan Technology Group - Quality Instrumentation ... Guaranteed | (888) 88-SOURCE | www.artisantg.com II. SOFTWARE GUIDES - 9. Driver488/SUB 9B. Installation & Configuration • Counter/Timer: This field is the base address of the Counter/Timer registers. It is only applicable for MP488CT boards. Note the Counter/Timer SCPI communication parameters are configured as an external device. Refer to the Hardware Guides and section for more information. • Bus Terminators: The IEEE 488 bus terminators specify the characters and/or end-or-identify (EOI) signal that is to be appended to data that is sent to the external device, or mark the end of data that is received from the external device. This second Driver488/SUB configuration example displays an IEEE interface with the NB488 interface module specified. This screen resembles the previous IEEE interface example with the exception of 3 different configuration parameters which are described below. Configuration Parameters • LPT Port: The LPT port is the external parallel port to be connected to the NB488. Valid selections are: LPT1, LPT2 or LPT3. This field takes the place of the I/O Address field. • Enable Printer Port: Because most laptop and notebook PCs provide only one LPT port, the NB488 offers LPT passthrough for simultaneous IEEE 488 instrument control and printer operation. If this option is selected, a printer connected to the NB488 will operate as if it were connected directly to the LPT port. If not enabled, then the printer will not operate when the NB488 is active. The disadvantage of pass-through printer support is that it makes communications with the NB488 about 20% slower. • LPT Port Type: This field is used to specify whether the LPT port is a standard IBM PC/XT/AT/PS/2 compatible port. Valid options are: Standard or 4-bit. The slower 4-bit option is provided for those computers which do not fully implement the IBM standard printer port. These computers can only read 4 bits at a time from the NB488 making communication with the NB488 up to 30% slower. A test program has been provided with NB488 to help identify the user’s LPT port type. Once the NB488 is installed, type: NBTEST.EXE. This program will determine if your computer can communicate with the NB488 and what type of LPT port is installed (Standard or 4-bit). It is important to note there are four different versions of the NB488 driver. The CONFIG utility determines which is to be used based on the user-defined parameters. If both pass-through printer support and the 4-bit LPT port support are selected, then the communication with the IEEE 488 bit may be slowed as much as 40% compared with the fastest case in which neither option is selected. The actual performance will vary depending on the exact type and speed of the computer used. To save your changes to disk, press <F10>, or to exit without making any changes, press <F9>. All changes will be saved in the directory where you installed Driver488/SUB. If at any time you wish to alter your Driver488/SUB configuration, simply rerun CONFIG. Personal488 User’s Manual, Rev. 3.0 Artisan Technology Group - Quality Instrumentation ... Guaranteed | (888) 88-SOURCE | www.artisantg.com II-139 9B. Installation & Configuration II. SOFTWARE GUIDES - 9. Driver488/SUB Configuration of Serial Interfaces The following Driver488/SUB screen displays the configuration of a serial (COM) interface. To add another serial interface, select <F3>. The following serial interface parameters are available for modification. Configuration Parameters II-140 • Name: This field is a descriptive instrument name which is manually assigned. This must be a unique name. • Baud Rate: The allowable Data Rates range from 75 to 115.2K and all standard rates therein. This includes: 75, 110, 150, 300, 600, 1200, 1800, 2400, 4800, 9600, 19.2K, 38.4K, 57.6K, and 115.2K. Slower processors may have difficulty at the higher data rates because of the amount of processing required for terminator, end of buffer, and fill processing. • Flow: X-ON/X-OFF is supported. With this configured, Driver488/SUB scans incoming characters for an X-OFF character. Once it is received, no more characters are transmitted until an X-ON character is received. The driver also issues an X-OFF to ask the attached device to stop sending when its internal buffer becomes three-quarters full and issues an X-ON when its buffer has emptied to one-quarter full. • Interrupt: A hardware interrupt level can be specified to improve the efficiency of the I/O adapter control and communication using Driver488/SUB. For any use of OnEvent and Arm functions, an interrupt level must be selected. If no interrupt level is to be used, select NONE. Valid interrupt levels depend on the device type: • Input Buffer: This field is used to enter the buffer sizes for I/O. • Output Buffer: This field is used to enter the buffer sizes for I/O. • Parity: Parity can be EVEN, ODD, NONE, MARK, or SPACE. • CTS Timeout: The driver supports 3 hardware handshake lines: Data Carrier Detect (DCD), Data Set Ready (DSR), and Clear To Send (CTS). Each line can be individually designated to be ignored, used with no specified timeout, or used with a selected timeout. The timeout is selected by specifying the number of milliseconds to wait for the indicated condition to become satisfied. • Data Bits: Data formats from 5 though 8 Data Bits are supported. • DSR Timeout: The driver supports 3 hardware handshake lines: Data Carrier Detect (DCD), Data Set Ready (DSR), and Clear To Send (CTS). Each line can be individually designated to be ignored, used with no specified timeout, or used with a selected timeout. The timeout is selected by specifying the number of milliseconds to wait for the indicated condition to become satisfied. • Stop Bits: With 6, 7, or 8 Data Bits specified, either 1 or 2 Stop Bits are allowed. With 5 Data Bits specified, 1 or 1.5 Stop Bits may be selected. I/O Comm. COM1 COM2 COM3 COM4 Typical Interrupt Level typically level 4 typically level 3 typically level 4 or 5 typically level 2 or 3 Personal488 User’s Manual, Rev. 3.0 Artisan Technology Group - Quality Instrumentation ... Guaranteed | (888) 88-SOURCE | www.artisantg.com II. SOFTWARE GUIDES - 9. Driver488/SUB 9B. Installation & Configuration • DCD Timeout: The driver supports 3 hardware handshake lines: Data Carrier Detect (DCD), Data Set Ready (DSR), and Clear To Send (CTS). Each line can be individually designated to be ignored, used with no specified timeout, or used with a selected timeout. The timeout is selected by specifying the number of milliseconds to wait for the indicated condition to become satisfied. • Timeout (ms): The time out period is the amount of time that data transfers wait before assuming that the device does not transfer data. If the time out period elapses while waiting to transfer data, an error signal occurs. This field is the default timeout for any bus request or action, measured in milliseconds. If no timeout is desired, the value may be set to zero. • Device Type: This field specifies the type of device represented by the serial external device name selected. • I/O Address: The I/O Address is the computer bus address for the board. It is set to default values during the initial installation. These values, as listed in the table, can be changed. However, using the pre-selected values is recommended. Any conflict will be noted by a pop-up help screen. • Bus Terminators: The bus terminators specify the characters to be appended to data that is sent to the external device, or mark the end of data that is received from the external device. I/O Comm. COM1 COM2 COM3 COM4 Default Address Values typically address 3F8 typically address 2F8 typically address 3E8 typically address 2E8 Configuration of IEEE 488 External Devices Configuration of IEEE 488 external devices under Driver488/SUB is done by editing an initialization file that stores the specific configuration information about all of the configured external devices. The configuration for each device is set when the Driver488/SUB loads itself into memory and is present at the start of the application program. Each external device requires a handle to communicate with Driver488/SUB. An external device handle is a means of maintaining a record about 3 configurable items: its IEEE 488 bus address, its IEEE 488 bus terminators, and its time out period. Any communication with the external device uses these three items. The different configurable items are listed in the following figure. These items define the external device. All external devices have either a default value or a user supplied value for the different fields. All fields can be changed by Driver488/SUB commands during program execution. The following figure displays the configuration screen of an external device named DMM195. When configuring an IEEE interface, this screen can be accessed by selecting <F5>: Configure External Devices. To add additional devices, use <F3>. Note this external device screen is also used to configure MP488CT Digital I/O (DIGIO) and Counter/Timers (TIMER). The following parameters are available for modification: Configuration Parameters • Name: External device names are user defined names which are used to convey the configuration information about each Personal488 User’s Manual, Rev. 3.0 Artisan Technology Group - Quality Instrumentation ... Guaranteed | (888) 88-SOURCE | www.artisantg.com II-141 9C. External Device Interfacing II. SOFTWARE GUIDES - 9. Driver488/SUB device, from the initialization file to the application program. Each external device must have a name to identify its configuration to Driver488/SUB. The name can then be used to obtain a handle to that device which will be used by all of the Driver488/SUB commands. External device names consist of 1 to 32 characters, and the first character must be a letter. The remaining characters may be letters, numbers, or underscores ( _ ). External device names are case insensitive; upper and lower case letters are equivalent. ADC is the same device as adc. • IEEE Bus Address: This is the setting for the IEEE 488 bus address of the board. It will be checked against all the devices on the bus for conflicts. The IEEE 488 bus address consists of a primary address from 00 to 30, and an optional secondary address from 00 to 30. Where required, Driver488/SUB accepts a secondary address of -1 to indicate “NONE.” • Timeout (ms): The time out period is the amount of time that data transfers wait before assuming that the device does not transfer data. If the time out period elapses while waiting to transfer data, an error signal occurs. This field is the default timeout for any bus request or action, measured in milliseconds. If no timeout is desired, the value may be set to zero. • Device Type: This field specifies the type of device represented by the external device name selected. • Bus Terminators: The IEEE 488 bus terminators specify the character(s) and/or end-or-identify (EOI) signal that is to be appended to data that is sent to the external device, or mark the end of data that is received from the external device. Note: Because secondary addresses and bus terminators are specified by each handle, it may be useful to have several different external devices defined for a single IEEE 488 bus device. For example, separate device handles would be used to communicate with different secondary addresses within a device. Also, different device handles might be used for communication of command and status strings (terminated by carriage return/line feed) and for communication of binary data (terminated by EOI). Note: If installation or configuration problems exist, refer to “Section IV: Troubleshooting.” To save your changes to disk, press <F10>. All changes will be saved in the directory where you installed Driver488/SUB. If at any time you wish to alter your Driver488/SUB configuration, simply rerun CONFIG.. 9C. External Device Interfacing Topics • Introduction................................................................................... II-141 Subroutine Calls.......................................................................................... II-142 • • • Configuration of Named Devices .............................................. II-142 Use of External Devices............................................................... II-143 Extensions for Multiple Interfaces ........................................... II-144 Duplicate Device Names............................................................................. II-144 Access of Multiple Interfaces ..................................................................... II-144 Example ........................................................................................................ II-145 Introduction This Sub-Chapter is a technical review of external device interfacing. It contains information on how to use external devices and multiple interfaces. Driver488/SUB controls I/O adapters and their attached external devices. In turn, Driver488/SUB is controlled via subroutine calls. II-142 Personal488 User’s Manual, Rev. 3.0 Artisan Technology Group - Quality Instrumentation ... Guaranteed | (888) 88-SOURCE | www.artisantg.com II. SOFTWARE GUIDES - 9. Driver488/SUB 9C. External Device Interfacing Driver488/SUB communicates directly with I/O adapters such as an IEEE 488 interface board or a serial (RS-232C) port. More than one I/O adapter may reside on a single plug-in board. For example, an RS-232C board often contains two or four functionally separate I/O adapters, one for each port. The IEEE 488 interface board contains the IEEE 488 I/O adapter. I/O adapters connect to external devices such as digitizers, multimeters, plotters, and oscilloscopes (IEEE 488 interface); and serial devices such as printers, plotters, and modems (serial RS-232C port). Driver488/SUB allows direct control of both IEEE 488 external devices and other external devices such as an RS-232C plotter. Driver488/SUB is controlled by sending data and commands and receiving responses and status by subroutine calls. This method is the only Application Program Interface, API, available to connect the application (user’s) program to Driver488/SUB. Subroutine Calls The subroutine API is a library of subroutines linked to the application program that are invoked like any other subroutines in that programming language. Once invoked, these routines can control Driver488/SUB. Configuration of Named Devices Named devices provide a method to maintain a permanent record of an external device’s configuration that does not change between application programs. Once the configuration of a particular external device is established, its Driver488/SUB configuration for that device will remain the same until the next time you reconfigure it or unload and reload the driver. The external devices supported by Driver488/SUB are: IEEE 488 external devices and serial external devices. External devices are most easily configured at installation. For Driver488/SUB, the device names, terminators, timeout period, and bus addresses may be entered into a configuration file which contains the device configuration information. This configuration file is automatically read during driver load to install the configured named devices. The application program can then refer to the external device by name and have all of the configuration information automatically set. Every device to be accessed by Driver488/SUB must have a valid device name. Driver488/SUB comes with several device and interface names preconfigured for use. Among those already configured for the GP488B board, for example, are: IEEE and DEV. You can configure up to 32 external devices for each IEEE 488 interface. DEV can be used to create other devices. It is also possible to configure new named devices by using the Driver488/SUB command MakeDevice. The MakeDevice command creates a temporary device that is an identical copy of an already existing Driver488/SUB device. The new device has default configuration settings identical to those of the existing device. The new device can then be reconfigured by calling the proper functions, such as BusAddress, IntLevel, and TimeOut. When Driver488/SUB is closed, the new device is forgotten unless the KeepDevice command is used to make it permanent. The following code illustrates how the subroutine API version of the MakeDevice command could be used to configure several new named devices. Using the C language subroutine interface, three named devices can be configured as follows: dev = OpenName (“dev”) dmm = MakeDevice (dev, “DMM”); if (dmm == -1) {process error . . .} err = BusAddress (dmm, 16, NOADDRESS); if (err == -1) {process error . . . } term.EOI = TRUE; term.nChars = 2; term.termChar [0] = ‘\r’; term.termChar [1] = ‘\n’; err=Term (dmm, &term, BOTH); if (err == -1 {process error . . . } Personal488 User’s Manual, Rev. 3.0 Artisan Technology Group - Quality Instrumentation ... Guaranteed | (888) 88-SOURCE | www.artisantg.com II-143 9C. External Device Interfacing II. SOFTWARE GUIDES - 9. Driver488/SUB adc = MakeDevice (dev, “ADC”); if (a == -1) {process error . . . } err = BusAddress (adc,14,00); if (err == -1) {process error . . .} term,EOI = FALSE; term.nChars = 1; term.termChar [0] = ‘\n’; err = Term (adc,&term,BOTH); if (err == -1) {process error . . .} scope = MakeDevice (dev,”SCOPE”); if (scope == -1) {process error . . .} err = BusAddress (scope,12,01); if (err == -1) {process error . . .} term.EOI = TRUE; term.nChars = 0; err = Term (scope,&term,BOTH); if (err == -1) {process error. . .} The above example defines the following: An external device named DMM (digital multimeter) as device 16 with bus terminators of carriage return (\r), line feed (\n), and EOI; a second external device named ADC (analog-to-digital converter) as device 14 with bus terminators of carriage return and line feed (together as \n); and a third external device named SCOPE (oscilloscope) as device 12 with bus terminators of EOI only. External devices defined in a configuration file are permanent. Their definitions last until they are explicitly removed or until the configuration file is changed and Driver488/SUB is restarted. Devices defined after installation are normally temporary. They are forgotten as soon as the program finishes. The KeepDevice command can be used to make these devices permanent. The RemoveDevice command removes the definitions of devices even if they are permanent. These commands are described in further detail in the “Section III: Command Reference” of this manual. Use of External Devices When using subroutine Application Program Interface (API) functions, it is first necessary to obtain a device handle for the device(s) with which you wish to interact. When using Driver488/SUB, the OpenName function must be the first function called in the program. It takes the name of the device to open and returns a handle for the specified interface board or device. Every other function can then use that handle to access the device. The following program illustrates how Driver488/SUB might communicate with an analog-to-digital converter (adc) and an oscilloscope (scope): DevHandleT DevHandleT DevHandleT DevHandleT int err; ieee; adc; scope; deviceList [5]; // // // // handle to access the interface board ieee handle to access a ADC488 handle to acess the scope array containing a list of device handles; Communication with a single device: adc = OpenName (“ADC”); If you use several devices, you must open each one: II-144 ieee = OpenName (“IEEE”) ; scope = OpenName (“SCOPE”) ; deviceList [0] = adc; deviceList [1] = scope deviceList [2] = -1 ; // Add adc to the list of devices // Add oscilloscope to the list of devices // End of list marker Abort(ieee) ; // Send Interface Clear (IFC) Output(scope, “SYST:ERR:?”); Enter(scope,data) ; printf(data) ; // Read SCOPE error status Personal488 User’s Manual, Rev. 3.0 Artisan Technology Group - Quality Instrumentation ... Guaranteed | (888) 88-SOURCE | www.artisantg.com II. SOFTWARE GUIDES - 9. Driver488/SUB 9C. External Device Interfacing Output(adc, “A0 C1 G0 R3 T0 X”) ; Enter(adc,data) ; printf (data) ; ClearList (deviceList) ; Close (adc) ; // Set up ADC488 // Send a Selected Device Clear (SDC) to a list // Close ADC488. Handle is now unavailable for // access. If we tried to call Output by sending the handle adc without first opening the name ADC, an error would result and Output would return a -1 as shown below: result = Output (adc, “A0 C1 G0 R3 T0 X”); printf (“Output returned: %d.\n”,result); should print: Output returned: -1. As mentioned above, named devices have another advantage: they automatically use the correct bus terminators and time out. When a named device is defined, it is assigned bus terminators and a time out period. When communication with that named device occurs, Driver488/SUB uses these terminators and time out period automatically. Thus Term commands are not needed to reconfigure the bus terminators for devices that cannot use the default terminators (which are usually carriage-return line-feed EOI). It is still possible to override the automatic bus terminators by explicitly specifying the terminators in an Enter or Output command, or to change them semi-permanently via the Term command. For more information, see the Enter, Output, and Term commands described in “Section III: Command References.” Extensions for Multiple Interfaces Driver488/SUB allows the simultaneous control of multiple interfaces each with several attached devices. To avoid confusion, external devices may be referred to by their “full name” which consists of two parts. The “first name” is the hardware interface name, followed by a colon separator ( : ). The “last name” is the external device name on that interface. For example, the “full name” of DMM might be IEEE:DMM. Duplicate Device Names Duplicate device names are most often used in systems that consist of several identical sets of equipment. For example, a test set might consist of a signal generator and an oscilloscope. If three test sets were controlled by a single computer using three separate IEEE 488 interfaces, then each signal generator and each oscilloscope might be given the same name and the program would specify which test set to use by opening the correct interface (OpenName(“IEEE”) for one, OpenName(“IEEE2”) for the other), or by using the interface names when opening the devices (OpenName(“IEEE:GENERATOR”) for one and OpenName(“IEEE2:GENERATOR”) for the other). Unique names are appropriate when the devices work together, even if more than one interface is used. If two different oscilloscopes, on two different interfaces are used as part of the same system, then they would each be given a name appropriate to its function. This avoids confusion and eliminates the need to specify the interface when opening the devices. Access of Multiple Interfaces If the computer only has one IEEE 488 interface, then there is no confusion, for every external device is known to be on that interface. As noted above, duplicate device names on one interface are not recommended; if they exist, the most recently defined device with the requested name will be used. When more than one interface is available and duplicate names appear on different interfaces, the following rules apply: 1. If the external device name is specified without its interface name, then any external device with that name may be used. If more than one external device has that name, then the choice of which particular external device is not defined. Personal488 User’s Manual, Rev. 3.0 Artisan Technology Group - Quality Instrumentation ... Guaranteed | (888) 88-SOURCE | www.artisantg.com II-145 9D. Getting Started 2. II. SOFTWARE GUIDES - 9. Driver488/SUB If the external device name is specified with its interface name prefixed, then that external device on that hardware interface is used. If that external device is not attached to the specified hardware interface, then an error occurs. Example Assume there are three IEEE 488 interfaces: IEEE, IEEE2, and IEEE3 controlling multiple devices: SCOPE (on IEEE), DA (on IEEE2) and DA (on IEEE3). Since there are two external devices, both named DA, their full name must be used to specify them. We can communicate with the external devices, according to the two rules above. scope = OpenName (“SCOPE”) ; da = OpenName (“DA”) da = OpenName (“IEEE2:DA”) ; scope = OpenName (“IEEE2:SCOPE”); 9D. // // // // SCOPE DA on DA on Error on IEEE (Rule 1) IEEE2 or IEEE3 (not specified) IEEE2 (Rule 2) (not IEEE:SCOPE) (Rule 2) Getting Started Topics • • Introduction................................................................................... II-145 C Language .................................................................................... II-145 Required Headers........................................................................................ II-146 Required Libraries ...................................................................................... II-146 • QuickBASIC ................................................................................... II-148 Required Definition File ............................................................................ II-149 Required Libraries ...................................................................................... II-149 • Pascal .............................................................................................. II-149 Required Libraries ...................................................................................... II-149 Introduction The following text outlines the steps necessary to produce an application program that communicates with Driver488/SUB. The application is the simplest one possible, it merely requests the revision number of the resident driver using the Hello command. Examples are provided in C, QuickBASIC and Pascal. Each of these supported languages are described in more detail in each of the next three Sub-Chapters “C Languages,” “QuickBASIC,” and “Pascal” of this Chapter. For further information on the Hello command, see the “Section III: Command References” of this manual. C Language To successfully operate Driver488/SUB, several declarations must be included in the user’s application program. These declarations are found in two headers which must be included in the main module of your C program. The two required headers can be found in the language-specific subdirectory at the end of the path \IEEE488\SUBAPI, if installed under the default conditions. In the same directory as the headers, are the libraries for the different memory models. One of these libraries must be linked with your C project to resolve Driver488/SUB external references. II-146 Personal488 User’s Manual, Rev. 3.0 Artisan Technology Group - Quality Instrumentation ... Guaranteed | (888) 88-SOURCE | www.artisantg.com II. SOFTWARE GUIDES - 9. Driver488/SUB 9D. Getting Started Required Headers For Microsoft C and Quick C Users • All programs must include the following header files to run with Driver488/SUB: iotmc60.h iot_main.h • These header files must be included in your test program. To do so, insert the following lines: #include “iotmc60.h” #include “iot_main.h” These lines must be included at the top of your program before any calls to the Driver488/SUB subroutine functions are made. Notice that the header file iot_main.h must be in the module containing your main ( ) function and may not appear in any other modules. For Turbo C Users • All programs must include the following header files to run with Driver488/SUB: iottc20.h iot_main.h • These header files must be included in your test program. To do so, insert the following lines: #include “iottc20.h” #include “iot_main.h” These lines must be included at the top of your program before any calls to the Driver488/SUB subroutine functions are made. Notice that the header file iot_main.h must be in the module containing your main ( ) function and may not appear in any other modules. For Turbo C++ and Borland C++ Users • All Turbo C++ programs must include the following header files to run with Driver488/SUB: iottx20.h iot_main.h • These header files must be included in your test program. To do so, insert the following lines: #include “iottx10.h” #include “iot_main.h” These lines must be included at the top of your program before any calls to the Driver488/SUB subroutine functions are made. Notice that the header file iot_main.h must be in the module containing your main ( ) function and may not appear in any other modules. Required Libraries For Microsoft C & Quick C Users • Driver488/SUB supports four memory models: “small,” “medium,” “compact” and “large.” Include the iotm60.h and iot_main.h header files in your program and link in the proper Driver488/SUB library files, as shown below: iotmc60s.lib iotmc60m.lib iotmc60c.lib iotmc60l.lib for small memory model programs. for medium memory model programs. for compact memory model programs. for large memory model programs. For more information on memory models, see the Sub-Chapter “Other Languages” in Chapter 8. • Use the following command-line commands to compile and link your program. For example, the following commands create a compact model executable file using Microsoft C: cl/AC hello.c iotmc60c.lib; Personal488 User’s Manual, Rev. 3.0 Artisan Technology Group - Quality Instrumentation ... Guaranteed | (888) 88-SOURCE | www.artisantg.com II-147 9D. Getting Started II. SOFTWARE GUIDES - 9. Driver488/SUB or cl/c/AC hello.c link hello.obj,,,iotmc60c.lib; Similarly, the following commands create a compact model executable file, using Quick C: qcl/c/AC hello.c qlink hello.obj,,,iotmc60c.lib; • Use the example test program to query Driver488/SUB for its Hello message: #include “iotmc60.h” #include “iot_main.h” main ( ) { DevHandleT ieee; char response [100] ; Hello (ieee,response) ; printf (“--%s\n,response) ; } Upon execution, the following response is printed on the screen: -- Driver488 ver 4.0........ To run this program, Driver488/SUB must be installed and resident. Successful operation of this program proves that the driver is installed and the Driver488/SUB subroutines were properly linked to the application program. Errors in setting up board parameters like DMA channel and interrupts will not be detected by this program. For Turbo C Users • Driver488/SUB supports four memory models: “small,” “medium,” “compact” and “large.” (See the Sub-Chapter “Other Languages” in Chapter 8, for more information on memory models.) Include the iottc20.h and iot_main.h header files in your program and link in the proper Driver488/SUB library files, as shown below: iottc20s.lib iottc20m.lib iottc20c.lib iottc20l.lib • for small memory model programs. for medium memory model programs. for compact memory model programs. for large memory model programs. Use the following command-line commands to compile and link your program. For example, the following commands create a compact model executable file: tcc -mc hello.c iottc20c.lib or tcc -c -mc hello.c tlink hello.obj + c0c.obj,,,cc.lib iottc20c.lib • Use the example test program to query Driver488/SUB for its Hello message: #include “iottc20.h” #include “iot_main.h” main ( ) { DevHandleT ieee; char response [100]; Hello (ieee, response); printf (“--%s\n”,response); } Upon execution, the following response is printed on the screen: -- Driver488 ver 4.0........ II-148 Personal488 User’s Manual, Rev. 3.0 Artisan Technology Group - Quality Instrumentation ... Guaranteed | (888) 88-SOURCE | www.artisantg.com II. SOFTWARE GUIDES - 9. Driver488/SUB 9D. Getting Started To run this program, Driver488/SUB must be installed and resident. Successful operation of this program proves that the driver is installed and the Driver488/SUB subroutines were properly linked to the application program. Errors in setting up board parameters like DMA channel and interrupts will not be detected by this program. For Turbo C++ and Borland C++ Users • Driver488/SUB supports four memory models: “small,” “medium,” “compact” and “large.” (See the Sub-Chapter “Other Languages” in Chapter 8, for more information on memory models.) Include the iottx10.h and iot_main.h header files in your program and link in proper Driver488/SUB library files, as shown below: iottx10s.lib for small memory model programs. iottx10m.lib for medium memory model programs. iottx10c.lib for compact memory model programs. iottx10l.lib for large memory model programs. • Use the following command-line command to compile and link your program. For example, the following commands create a compact model executable file using Turbo C++: tcc -mc hello.c iottx10c.lib or tcc -c -mc hello.c tlink hello.obj + c0c.obj,,,cc.lib iottx10c.lib Similarly, these commands create a compact model executable file, using Borland C++: bcc -mc hello.c iottx10c.lib or bcc -c -mc hello.c tlink hello.obj + c0c.obj,,,c.lib iottx10c.lib • Use the example test program to query Driver488/SUB for its Hello message: #include “iottx10.h” #include “iot_main.h” main ( ) { DevHandleT ieee; char response [100]; Hello (ieee, response); printf (“--%s\n”, response); } Upon execution, the following response is printed on the screen: -- Driver488 ver 4.0........ To run this program, Driver488/SUB must be installed and resident. Successful operation of this program proves that the driver is installed and the Driver488/SUB subroutines were properly linked to the application program. Errors in setting up board parameters like DMA channel and interrupts will not be detected by this program. QuickBASIC To successfully operate Driver488/SUB, a definition file must be included in the user’s application program. This definition file can be found in the \IEEE488\SUBAPI\QB45 subdirectory, if installed under the default conditions. In the same directory as the definition file, are the libraries needed to access Driver488/SUB from QuickBASIC. Personal488 User’s Manual, Rev. 3.0 Artisan Technology Group - Quality Instrumentation ... Guaranteed | (888) 88-SOURCE | www.artisantg.com II-149 9D. Getting Started II. SOFTWARE GUIDES - 9. Driver488/SUB Required Definition File All programs must include the iotmqb45.def definition file to run with Driver488/SUB. To include this program in your test program, insert the following line: ‘$INCLUDE: ‘iotmqb45.def’ This line should be included at the top of your program before any calls to the Driver488/SUB subroutine functions are made. Required Libraries Driver488/SUB can be accessed from QuickBASIC using the integrated environment and the DOS command line. If the QuickBASIC integrated environment is used, the iotmqb45.qlb quick library must be loaded into QuickBASIC. To do so, start QuickBASIC with the following DOS command: qb /liotmqb45.qlb If the command line compiler is used, the iotmqb45.lib library must be linked with your program with the following commands: bc hello.bas; link hello.obj,,,iotmqb45.libc:\qb45\brun45.lib; Use the example test program to query Driver488/SUB for its Hello message: ‘$INCLUDE: ‘iotmqb45.def’ response$ = SPACE$ (100) rv% = iohello%(ieee%,response$) PRINT response$ END Upon execution, the following response is printed on the screen: -- Driver488 ver 4.0........ To run this program, Driver488/SUB must be installed and resident. Successful operation of this program proves that the driver is installed and the Driver488/SUB subroutines were properly linked to the application program. Errors in setting up board parameters like DMA channel and interrupts will not be detected by this program. Pascal To successfully operate Driver488/SUB, a library file must be included in the user’s application program. The required library can be found in the language-specific subdirectory at the end of the path \IEEE488\SUBAPI\TPAS60, if installed under the default conditions. Required Libraries All programs need to include the following library file to run with Driver488/SUB: iottp60.tpu This library file must be included in your test program. To do so, insert the following line: uses iottp60; This line must be included at the top of your program before any calls to the Driver488/SUB subroutine functions are made. Use the following command-line commands to compile and link your program. For example, the following command creates a compact model executable file: tpc hello.c Use the example test program to query Driver488/SUB for its Hello message: II-150 Personal488 User’s Manual, Rev. 3.0 Artisan Technology Group - Quality Instrumentation ... Guaranteed | (888) 88-SOURCE | www.artisantg.com II. SOFTWARE GUIDES - 9. Driver488/SUB program hello; uses iottp60; var ieee : Integer; response : string; rv : Integer ; 9E. C Languages { Device handles } { Text buffer for Driver488/SUB responses } { General purpose return value } begin { Query Driver488/SUB for its hello message } rv:=ioHello (ieee, response) ; Writeln (response) ; end. Upon execution, the following response is printed on the screen: -- Driver488 ver 4.0........ To run this program, Driver488/SUB must be installed and resident. Successful operation of this program proves that the driver is installed and the Driver488/SUB subroutines were properly linked to the application program. Errors in setting up board parameters like DMA channel and interrupts will not be detected by this program. 9E. C Languages Topics • • • • • • • • • • • Accessing from a C Program...................................................... II-150 Establishing Communications .................................................. II-151 Confirming Communication ...................................................... II-152 Setting Up Event Handling ........................................................ II-152 Reading Driver Status................................................................. II-152 External Device Initialization................................................... II-153 Interrupt Handling ...................................................................... II-153 Basic Data Acquisition................................................................ II-154 Block Data Acquisition ............................................................... II-154 Sample Program ........................................................................... II-155 Command Summary .................................................................... II-158 Accessing from a C Program Note: Subroutines may be used with all C languages except Aztec C. Driver488/SUB provides support for Microsoft C, Turbo C and Borland C. To allow for ready access to all Driver488/SUB functions and type definitions, an include file provides all required declarations. In addition, one include file must be included in the main module to provide for automatic detection of certain compiler options and enable the required adjustments within the driver. Note that the header files (*.h) must be included in your program and linked to the proper Driver488/SUB library files, as described in the previous Sub-Chapter “Getting Started.” The following #include directives should appear near the beginning of the main module. • For Borland C compilers: #include “iot_main.h” #include “iotbc20.h” • For Microsoft compilers: #include “iot_main.h” Personal488 User’s Manual, Rev. 3.0 Artisan Technology Group - Quality Instrumentation ... Guaranteed | (888) 88-SOURCE | www.artisantg.com II-151 9E. C Languages II. SOFTWARE GUIDES - 9. Driver488/SUB #include “iotmc60.h” • For Turbo C++ and Borland C++ compilers: #include “iottx10.h” #include “iot_main.h” Notice that the header file iot_main.h must be in the module containing your main ( ) function and may not appear in any other modules. The following declarations are assumed through the remainder of this discussion: DevHandleT adc,adc2,ieee,dev; int hundred [100]; char response [256]; int i; float voltage; float sum; IeeeStatusT substat; int sp, stadc; int errnum; char errtext [64]; TermT noterm; /*Device handles*/ /*Driver488/SUB status structure*/ /*Text buffer for Driver488/SUB responses*/ /*General purpose loop counter*/ /*Single reading variable*/ /*Summation used to compute average*/ /*Driver488/SUB status structure*/ /*Driver488/SUB and ADC488 spoll response*/ /*ADC488 error number*/ /*ADC488 error response*/ /*Driver488 terminator structure*/ Establishing Communications For the sake of this discussion, assume that Driver488/SUB has been configured to start with a configuration including the devices IEEE (IEEE 488 interface) and ADC (ADC488/8S connected to the IEEE 488 interface). Additional interfaces and/or devices may also have been defined, as the driver can support up to 4 interfaces and 56 devices simultaneously. To open the two devices of interest, we use the following statements: ieee = OpenName (“IEEE”) ; adc = OpenName (“ADC”) ; If the ADC was not configured within Driver488/SUB, it can be optionally created “on the fly.” First, verify that opening the ADC failed, then use the GetError command to clear the error condition generated by this failure. Next, use the handle of the device DEVIEEE, which is always available within Driver488/SUB, to clone a new device called ADC using the MakeDevice command. Lastly, the IEEE bus address 14 is assigned to the ADC: if ((adc=OpenName (“ADC”))==-1) { GetError (ieee,response); dev=OpenName (“DEVIEEE”); adc=MakeDevice (dev,”ADC”); BusAddress (adc,14,-1); } If other devices were needed for the application at hand, they could either be defined in the startup configuration for Driver488/SUB or they could be created “on the fly” from the application: adc2=MakeDevice (adc,”ADC2”) ; BusAddress (adc2,10,-1) ; / *Clone a new device */ // Set the bus address The new device ADC2 is configured to reside at a different bus address so that the two devices may be distinguished. There is one other important difference between ADC and ADC2 at this point. ADC2 is a temporary device; that is, as soon as the creating application closes, ADC2 ceases to exist. If our intent was to create a device that could be accessed after this application ends, we must tell Driver488/SUB this: KeepDevice (adc2) ; After executing the previous statement, ADC2 is marked as being permanent; that is, the device will not be removed when the creating application exists. If we later wish to remove the device, however, we can do so explicitly: RemoveDevice (adc2) ; II-152 Personal488 User’s Manual, Rev. 3.0 Artisan Technology Group - Quality Instrumentation ... Guaranteed | (888) 88-SOURCE | www.artisantg.com II. SOFTWARE GUIDES - 9. Driver488/SUB 9E. C Languages Confirming Communication With or without an open device handle, the application can, if desired, confirm communication with Driver488/SUB via the Hello function: Hello (ieee,response) ; printf (“%s\n”,response) ; The function also fills in a string, from which information can be extracted if it is desirable to display facts about the driver in use. Setting Up Event Handling If the event notification mechanism of Driver488/SUB is to be used, it should normally be set up during application initialization and left in place until application shutdown. No special action is required if event notification is not needed for the particular application. First, the OnEvent function establishes the notification path by specifying the function to be called, as follows: OnEvent (ieee,isr, (OpaqueP)0) ; Either during initialization or at some appropriate later point in the application, specific event types may be Armed or Disarmed for use in the event system. Individual event types may be turned on and off at will freely through the life of the application. In this case, we Arm to request notification of IEEE 488 bus service requests: Arm (ieee,acSRQ) ; To cease recognizing bus service requests, we might Disarm just the one class of events: Disarm (ieee,acSRQ) ; Or, to completely disable event notifications: Disarm (ieee,0) ; Note that an external device handle is acceptable in this and other functions which actually refer to the interface; the external device handle will simply be translated to the handle of the interface to which the device is attached, prior to taking action. This translation is fully automatic within Driver488/SUB and requires little overhead, so you need not and should not go to great lengths to pass an interface handle, if your application structure makes the use of external device handles the more logical choice. Reading Driver Status Your application may interrogate Driver488/SUB at any time to determining its status and other information. Status information is returned in a structure provided by the application and can be displayed by the showstat function shown below: Status (ieee,&substat) ; showstat (&substat) ; Another function to display the information contained in the Status structure could be: void showstat printf printf printf printf printf printf printf printf printf printf printf printf printf } (IeeeStatusT (“SC (“CA (“Primaddr (“Secaddr (“SRQ (“addrChange (“talker (“listener (“triggered (“cleared (“transfer (“byteIn (“byteOut * : : : : : : : : : : : : : substattt) { %d\t”,substat->SC) ; %d\t”,substat->CA) ; %d\t”,substat->Primaddr) ; %d\n”,substat->Secaddr) ; %d\t”,substat->SRQ) ; %d\t”,substat->addrChange) ; %d\t”,substat->talker) ; %d\n”,substat->listener) ; %d\t”,substat->triggered) ; %d\t”,substat->cleared) ; %d\t”,substat->transfer) ; %d\n”,substat->byteIn) ; %d\n”,substat->byteOut) ; Personal488 User’s Manual, Rev. 3.0 Artisan Technology Group - Quality Instrumentation ... Guaranteed | (888) 88-SOURCE | www.artisantg.com II-153 9E. C Languages II. SOFTWARE GUIDES - 9. Driver488/SUB External Device Initialization Refer to the device manufacturer’s documentation on specific requirements for initializing your IEEE 488 instrument. In the case of the ADC488, appropriate initialization involves sending it a Clear command and placing it into Remote mode: Clear (adc) ; Remote (adc) ; For our hypothetical application, we also wish to have the ADC488 generate a service request should it detect a command error. This involves sending a command string consisting of textual data to the ADC488: Output (adc, “M8X”) ; We may also wish to perform other initialization and configuration. In this case, we set up the ADC488 (adc) in the following configuration: /* Setup the ADC488 Differential inputs (A0) Scan group channel 1 (C1) Compensated ASCII floating-point output format (G0) Channel 1 range to +/-10V (R3) One-shot trigger on talk (T6) */ The command to perform this configuration combines the above strings and adds the Execute (X) command for the ADC488: Output (adc,”A0C1G0R3T6X”) ; Interrupt Handling In case we send out an invalid command, either due to a programming error or an unanticipated condition in the equipment, Driver488/SUB will automatically notify the interrupt handling function as established above: Output (adc,”V13X”) ; The interrupt handler as established above might consist of a function similar to the following: void isr (OpaqueP param) { int sp, stadc, errnum; char errtext [64] ; /* Print parameter passed to isr to screen */ printf (“ In intrrupt handler, param=%d\n”,param) ; /* Check if the intrrupt was due to a Service Request */ sp=SPoll (ieee) ; if (sp==0) { printf (“ No SRQ detected\n”) ; exit (1) ; } /* Check that the Service Request was from the ADC488 */ stadc=SPo;l (adc) ; if ((stadc&0x40)==0) { printf (“ Not an ADC488 SRQ.\n”) ; exit (1) ; } /* Interpret the Serial Poll response */ if (stadc&0x01) printf (“ Triggered\n”) ; if (stadc&0x02) II-154 Personal488 User’s Manual, Rev. 3.0 Artisan Technology Group - Quality Instrumentation ... Guaranteed | (888) 88-SOURCE | www.artisantg.com II. SOFTWARE GUIDES - 9. Driver488/SUB 9E. C Languages printf (“ trigger overrun\n”) ; if (stadc&0x04) printf (“ Buffer overrun\n”) ; if (stadc&0x08) { /* Read and interpret the ADC488 error status */ printf (“ ADC488 error\n”) ; Output (adc,”E?”) ; Enter (adc,errtext) ; sscanf (errtext,”E%d”,&errnum) ; if (errnum&0x01) printf (“ Invalid DDC\n”) ; if (errnum&0x02) printf (“ Invalid DDC option\n”) ; if (errnum&0x04) printf (“ Conflict error\n”) ; if (errnum&0x08) printf (“ NVRAM setup error\n”) ; if (errnum&0x10) printf (“ Calibration error\n”) ; if (errnum&0x20) printf (“ NVRAM calibration error\n”) ; } if (stadc&0x20) printf (“ Ready\n”) ; if (stadc&0x40) printf (“ SRQ asserted\n”) ; if (stadc&0x80) printf (“ Data acquisition complete\n”) ; /* Set up interrupt pointers */ OnEvent (ieee, isr, (OpaqueP)0) ; } Basic Data Acquisition With both Driver488/SUB and the external device ready for action, we next might try taking a simple reading using the ADC488. Here, we use the serial poll (SPoll) capabilities of Driver488/SUB to determine when a response is ready and to format the reply: while((SPoll (adc) & 32) ==0) ; Enter(adc,response) ; sscanf(response,”%f”,&voltage) ; printf(“ADC488 channel #1 reading valve is %g\n”,voltage) ; Block Data Acquisition First, we set up the ADC488 (adc) in the following configuration: /* Setup the ADC488: Compensated binary output format (G10) 100 usec scan interval (I3) No pre-trigger scans, 100 post-trigger scans (N100) Continuous trigger on GET (T1) */ We then wait for the ADC488 to start the acquisition process. Once the acquisition is complete, which is determined by the MSB of the ADC488’s serial poll response, the buffer pointer of the ADC488 is reset (B0). Output(adc, “G10I3N100T1X”); /* wait for the ready bit of the ADC488 to be asserted */ while ((SPoll(adc) & 32) == 0); /* Trigger the ADC488 */ Trigger(adc); /* wait for the acquisition complete bit of ADC488 to be asserted */ while ((SPoll(adc) & 128) == 0); Personal488 User’s Manual, Rev. 3.0 Artisan Technology Group - Quality Instrumentation ... Guaranteed | (888) 88-SOURCE | www.artisantg.com II-155 9E. C Languages II. SOFTWARE GUIDES - 9. Driver488/SUB /* Reset the buffer pointer of the ADC488 */ Output(adc, “B0X”); Next, we fill the buffer with 100 readings from the ADC488. Since the data being returned from the ADC488 is in a binary format, the noterm terminator structure is used to disable scanning for terminators such as carriage-return and line-feed: noterm.EOI=0 ; noterm.nChar=0 ; EnterX (adc, (char*) hundred,200,1,¬erm,1,0L) ; The EnterX function will use a DMA transfer if available. Because DMA transfers are performed entirely by the hardware, the program can continue with other work while the DMA transfer function occurs. For example, the program will process the previous set of data while collecting a new set of data into a different buffer. However, before processing the data we must wait for the transfer to complete. For illustration purposes, we query the Driver488/SUB status both before and after waiting. /* Display DRIVER488/W31 status */ Status (ieee,&substat) ; showstat (&substat) ; /* Wait for completion of input operation*/ Wait (adc) ; /* Display DRIVER488/W31 status */ Status (ieee,&substat) ; showstat (&substat) ; Now we process the buffer: /* Print the received characters */ for (i=0;id;i++) { printf (“%6d”,hundred [i]) ; if ((i%10)==9) printf (“\n”) ; } The functions described so far in this Sub-Chapter provide enough functionality for a basic data acquisition program. The following program listing covers the examples used. Additional functions provided by Driver488/SUB are described in the “Section III: Command References” of this manual. Sample Program #include<stdio.h> #include<stdlib.h> #include<string.h> #include”iot_main.h” #include”iottx10.h” void showstat (IeeeStatusT*) ; void isr (OpaqueP) ; /*handle inerrupt*/ DevHandleT int adc,ieee,dev; hundred[100] ; void main ( ) { char response [256] ; int i; float voltage, sum; IeeeStatusT substat ; /*establish communications with Driver488/SUB*/ if ((ieee=OpenName (“IEEE”))==-1) { printf (“Cannot initialize IEEE system.\n”) ; exit (1) ; } II-156 Personal488 User’s Manual, Rev. 3.0 Artisan Technology Group - Quality Instrumentation ... Guaranteed | (888) 88-SOURCE | www.artisantg.com II. SOFTWARE GUIDES - 9. Driver488/SUB 9E. C Languages /*Disable the automatic onscreen error display*/ Error (ieee,OFF) ; /*Open the ADC488 devie handle or create if necessary*/ if ((adc=OpenName (“ADC”))==-1 { GetError (ieee,response) ; dev=OpenName (“DEVIEEE”) ; adc=MakeDevice (dev,”ADC”) ; BusAddress (adc,14,-1) ; } /* Read the Driver488/SUB revision number */ Hello (ieee,response) ; printf (“%s\n”,response) ; /*Set up interrupt pointers */ OnEvent (ieee,isr, (OpaqueP)0) ; /*Enable Driver488/SUB interrupt on Error or Service Request */ Arm (ieee,acSRQ) ; /*Display the Driver488/SUB system status */ Status (ieee,&substat) ; showstat (&substat) ; /*Put the ADC488 into remote mode */ Remote (adc) ; /*Clear the ADC488*/ Clear (adc) ; /*Enable ADC488 SRQ on command errors */ Output (adc,”M8X”) ; /*Send an invlaid command to the ADC488 */ printf (“Sending invalid ADC command\n”) ; Output (adc,”V13X”) ; /*Setup the ADC488: Differential inputs (a0) Scan grou channel 1 (C1) Compensated ASCII floating-point output format (G0) Channel 1 range to +/-10v (R3) One-shot trigger on talk (T6) */ Output (adc,”A0C1G0R3T6X”) ; /*Wait for the ready bit of the ADC488 to be asserted */ while ((SPoll (adc) & 32 ==0) ; /*Display a reading */ Enter (adc,reponse) ; sscanf (response,”%f”,&voltage) ; printf (“ADC488 channel #1 reading value is %g\n”,voltage) ; /*Display the average of 10 readings */ sum=0.0 ; for (i=0;i;i++) { Enter (adc,response) ; sscanf (response,”%f”,voltage) ; sum=sum+voltage; } printf (“The average of 10 readings is %g\n”,sum/10.0) ; /*Setup the ADC488: Compensated binary output format (G10) Personal488 User’s Manual, Rev. 3.0 Artisan Technology Group - Quality Instrumentation ... Guaranteed | (888) 88-SOURCE | www.artisantg.com II-157 9E. C Languages II. SOFTWARE GUIDES - 9. Driver488/SUB 100u sec scan interval (I3) No pre-trigger scans, 100 post-trigger scans (n100) Continuous trigger on GET (T1) */ Output (adc,”G10I3N100T1X”) ; /*Wait for the ready bit of the ADC488 to be asserted*/ while ((SPoll (adc) &32)==0) ; /*Trigger the ADC488 */ Trigger(adc); /*Wait for the acquisition complete bit to be asserted*/ while ((SPoll (adc) &128)==0) ; /*Reset the buffer pointer of the ADC488 */ Output (adc,”BOX”) ; /*Take 100 readings from the ADC488* / noterm.EOI=0; noterm.nChar=0; EnterX(adc, (char*)hundred,200,1,¬erm,1,0L); /*Check the Status before and after waiting */ Status (ieee,&substat) ; showstat (&substat) ; /* Wait for completion of input operation */ Wait (adc); /*Display the Driver488/SUB system status */ Status (ieee,&substat) ; showstate (&substat) ; /* Print the received characters */ for (i=0;id;i++) { printf(“%6d”,hundred[i]) ; if ((i%10)==9) printf (“\n”) ; } } /*Interrupt service routine for Driver488/SUB interrupts */ void isr (OpaqueP param) { int sp, stadc, errnum; char errtext [64] ; /*Print parameter passed to isr to screen */ printf (“ In interrupt handler, param=%d\n”,param) ; /* Check if the interrupt was due to a Service Request */ sp=SPoll (ieee) ; if (sp==0) { printf (“ No SRQ detected\n”) ; exit (1) ; } /* Check that the Service Request was from the ADC488 */ stadc=SPoll (adc) ; if ((stadc&0x40)==0) { printf(“ Not an ADC488 SRQ.\n”) ; exit (1) ; } /* Interpret the Serial Poll response */ II-158 Personal488 User’s Manual, Rev. 3.0 Artisan Technology Group - Quality Instrumentation ... Guaranteed | (888) 88-SOURCE | www.artisantg.com II. SOFTWARE GUIDES - 9. Driver488/SUB 9F. QuickBASIC if (stadc&0x01) printf (“ Triggered\n”) ; if (stadc&0x02) printf (“ Trigger overrun\n”) ; if (stadc&0x04) printf (“ Buffer overrun\n”) ; if (stadc&0x08) { /* Read and interpret the ADC488 error status * / printf (“ ADC488 error\n”) ; errnum=5; Output (adc,”E?”) ; Enter (adc,errtext) ; sscanf (errtext,”E%d”,&errnum) ; if (errnum&0x01) printf(“ Invalid DDC\n”) ; if (errnum&0x02) printf(“ Invalid DDC option\n”) ; if (errnum&0x04) printf(“ Conflict error\n”) ; if (errnum&0x08) printf(“ NVRAM setup error\n”) ; if (errnum&0x10) printf(“ Calibration error\n”) ; if (errnum&0x20) printf(“ NVRAM calibration error\n”) ; } if (stadc&0x20) printf (“ Ready\n”) ; if (stadc&0x40) printf(“ SRQ asserted\n”) ; if (stadc&0x80) printf(“ Data acquisition complete \n”) ; /* Set up interrpt pointers */ OnEvent (ieee,isr,(OpaqueP) 0) ; } /* Display Status from Driver488/SUB */ void showstate (IeeeStatusT *substat) { printf (“SC : %d\t”,substat->SC) ; printf (“CA : %d\t”,substat->CA) ; printf (“Primaddr : %d\t”,substat->Primaddr) ; printf (“Secaddr : %d\t”,substat->Secaddr) ; printf (“SRQ : %d\t”,substat->SRQ) ; printf (“addrChange : %d\t”,substat->addrChange) ; printf (“talker : %d\t”,substat->talker) ; printf (“listener : %d\t”,substat->listener) ; printf (“triggered : %d\t”,substat->triggered) ; printf (“cleared : %d\t”,substat->cleared) ; printf (“transfer : %d\t”,substat->transfer) ; printf (“byteIn : %d\t”,substat->byteIn) ; printf (“byteOut : %d\t”,substat->byteOut) ; } Command Summary To obtain a summary of the C language commands for Driver488/SUB, turn to the “Section III: Command References” of this manual. Personal488 User’s Manual, Rev. 3.0 Artisan Technology Group - Quality Instrumentation ... Guaranteed | (888) 88-SOURCE | www.artisantg.com II-159 9F. QuickBASIC 9F. II. SOFTWARE GUIDES - 9. Driver488/SUB QuickBASIC Topics • • • • • • • • • • • Accessing from a QuickBASIC Program ................................. II-159 Establishing Communications................................................... II-159 Confirming Communications..................................................... II-160 Setting Up Event Handling ........................................................ II-160 Reading Driver Status ................................................................. II-161 External Device Initialization ................................................... II-161 Interrupt Handling ...................................................................... II-162 Basic Data Acquisition ................................................................ II-162 Block Data Acquisition................................................................ II-162 Sample Program ........................................................................... II-163 Command Summary..................................................................... II-166 Accessing from a QuickBASIC Program Driver488/SUB provides support for Microsoft QuickBASIC. To allow for ready access to all Driver488/SUB functions and type definitions, a definition file provides all required declarations. Note the definition file (*.def) must be included in your program and linked to the proper Driver488/SUB library files, as described in the Sub-Chapter “Getting Started” earlier in this Chapter. The following $include directives should appear near the beginning of the program: ‘$include: ‘IOTMQB45.DEF’ The following declarations are assumed throughout the remainder of this discussion. DIM DIM DIM DIM DIM DIM DIM DIM DIM DIM DIM DIM adc%,adc2%,ieee%,dev,% hundred% (100) ; response$ (256) i% voltage ! sum ! substat as Ieee status sp%,stadc% errnum% errtext$ (64) rv% noterm as terms ’ ’ ’ ’ ’ ’ ’ ’ ’ ’ ’ ’ Device handles Driver488/SUB status structure Text buffer for Driver488/SUB responses General purpose loop counter Single reading variable Summation used to compute average Driver488/SUB status structure Driver488/SUB and ADC488 spoll response ADC488 error number ADC488 error response Driver488/SUB return value Driver488/SUB terminator structure Establishing Communications For the sake of this discussion, assume that Driver488/SUB has been configured to start with a configuration including the devices IEEE (IEEE 488 interface) and ADC (ADC488/8S connected to the IEEE 488 interface). Additional interfaces and/or devices may also have been defined, as the driver can support up to four interfaces and 56 devices simultaneously. To open the two devices of interest, we use the following statements: ieee% = ioOpenName% (“IEEE”) adc% = ioOpenName% (“ADC”) If the ADC was not configured within Driver488/SUB, it can be optionally created “on the fly.” First verify that opening the ADC failed, then use the GetError command to clear the error condition generated by this failure. Next, use the handle of the device DEVIEEE, which is always available within II-160 Personal488 User’s Manual, Rev. 3.0 Artisan Technology Group - Quality Instrumentation ... Guaranteed | (888) 88-SOURCE | www.artisantg.com II. SOFTWARE GUIDES - 9. Driver488/SUB 9F. QuickBASIC Driver488/SUB, to clone a new device called ADC using the MakeDevice command. Lastly, the IEEE bus address 14 is assigned to the ADC. adc% = ioOpenName% (“ADC”) IF (adc% = 1) THEN response$ = SPACES (256) rv% = ioGetError% (ieee%, response$) dev% =ioOpenName% (“DEVIEEE”) adc% = ioMakeDevice% (dev%,”ADC”) rv% = ioBusAddress% (adc%,14,-1) END IF If other devices were needed for the application at hand, they could either be defined in the startup configuration for Driver488/SUB or they could be created on the fly from the application: adc2% = ioMakeDevice% (adc%,”ADC2”) ; rv% = ioBusAddress% (adc2%,10,-1) ; /*Clone a new device */ // Set the bus address The new device ADC2 is configured to reside at a different bus address so that the two devices may be distinguished. There is one other important difference between ADC and ADC2 at this point. ADC2 is a temporary device; that is, as soon as the creating application closes, ADC2 ceases to exist. If our intent was to create a device that could be accessed after this application ends, we must tell Driver488/SUB this: rv%=ioKeepDevice% (adc2%) ; After executing the above statement, ADC2 is marked as being permanent; that is, the device will not be removed when the creating application exists. If we later wish to remove the device, however, we can do so explicitly: rv%=ioRemoveDevice% (adc2) ; Confirming Communications With or without an open device handle, the application can, if desired, confirm communication with Driver488/SUB via the Hello function: response$ = SPACES (256) rv% = ioHello% (ieee%,response$) PRINT response$ The function also fills in a string from which information can be extracted if it is desirable to display facts about the driver in use: Setting Up Event Handling If the event notification mechanism of Driver488/SUB is to be used, it should normally be set up during application initialization and left in place until application shutdown. No special action is required if event notification is not needed for the particular application. First, the ONPEN GOSUB and PEN ON functions establish the notification path by specifying the function to be called: ON PEN GOSUB isr PEN ON rv% = ioLightPen% (ieee%, 1) Either during initialization or at some appropriate later point in the application, specific event types may be Armed or Disarmed for use in the event system. Individual event types may be turned on and off at will freely through the life of the application. In this case, we Arm to request notification of IEEE 488 bus service requests: rv% = ioArm% (ieee%, acSRQ) To cease recognizing bus service requests, we might Disarm just the one class of events: rv% = ioDisarm% (ieee%, acSRQ) ; Or, to completely disable event notifications: Personal488 User’s Manual, Rev. 3.0 Artisan Technology Group - Quality Instrumentation ... Guaranteed | (888) 88-SOURCE | www.artisantg.com II-161 9F. QuickBASIC II. SOFTWARE GUIDES - 9. Driver488/SUB rv% = ioDisarm% (ieee%, 0) ; Note that an external device handle is acceptable in this and other functions which actually refer to the interface; the external device handle will simply be translated to the handle of the interface to which the device is attached, prior to taking action. This translation is fully automatic within Driver488/SUB and requires little overhead, so you need not and should not go to great lengths to pass an interface handle, if your application structure makes the use of external device handles the more logical choice. Reading Driver Status Your application may interrogate Driver488/SUB at any time to determine its status and other information. Status information is returned in a structure provided by the application and can be displayed by the showstat function shown below: rv%=ioStatus%(ieee%,substat) CALL showstat (substat) Another function to display the information contained in the Status structure could be: SUB showstat PRINT PRINT PRINT PRINT PRINT PRINT PRINT PRINT PRINT PRINT PRINT PRINT PRINT END SUB (substat AS IeeeStatus) “SC :”; substat.SC, “CA :”; substat.CA, “Primaddr :”; substat.Primaddr “Secaddr :”; substat.Secaddr, “SRQ :”; substat.SRQ, “addrChange :”; substat.addrChange “talker :”; substat.talker, “listener :”; substat.listene, “triggered :”; substat.triggered “cleared :”; substat.cleared, “transfer :”; substat.transfer, “byteIn :”; substat.byteIn “byteOut :”; substat.byteOut External Device Initialization Refer to the device manufacturer’s documentation on specific requirements for initializing your IEEE 488 instrument. In the case of the ADC488, appropriate initialization involves sending it a Clear command and placing it into Remote mode: rv% = ioRemote% (adc%) rv% = ioClear% (adc%) For our hypothetical application, we also wish to have the ADC488 generate a service request should it detect a command error. This involves sending a command string consisting of textual data to the ADC488: rv% = ioOutput & (adc%, “M8X”) We may also wish to perform other initialization and configuration. In this case, we set up the ADC488 (adc) in the following configuration: Differential inputs (A0) Scan group channel 1 (C1) Compensated ASCII floating-point output format (G0) Channel 1 range to +/-10V (R3) One-shot trigger on talk (T6) The command to perform this configuration combines the above strings and adds the Output command for the ADC488: rv% = ioOutput& (adc%, “A0C1G0R3T6X”) II-162 Personal488 User’s Manual, Rev. 3.0 Artisan Technology Group - Quality Instrumentation ... Guaranteed | (888) 88-SOURCE | www.artisantg.com II. SOFTWARE GUIDES - 9. Driver488/SUB 9F. QuickBASIC Interrupt Handling In case we send out an invalid command, either due to a programming error or an unanticipated condition in the equipment, Driver488/SUB will automatically notify the interrupt handling function as established above: rv% = ioOutput & (adc%, “V13X”) The interrupt handler as established above might consist of a function similar to the following: ‘ Interrupt service routine for Driver488/SUB interrupts isr : ‘ Print isr message to screen PRINT “ In interrupt handler” ‘ Check if the intrrupt was due to a Service Request sp% = ioSPoll % (ieee%) IF (sp% = 0) THEN PRINT “ No SRQ detected”: END ‘ Check that the Service Request ws from the ADC488 stadc% = ioSPoll%(adc%) IF ((stadc% AND 64) = 0) THEN PRINT “ Not an ADC488 SRQ.”: END ‘ Interpret the Serial Poll response IF ((stadc% AND 1) >0) THEN PRINT “Triggered” IF ((stadc% AND 2) >0) THEN PRINT “Trigger overrun” IF ((stadc% AND 4) >0) THEN PRINT “Buffer overrun” IF ((stadc% AND 8) >0) THEN ‘ Read and interpret the ADC488 error status PRINT “ ADC488 error” rv% = ioOutput & (adc%, “E?”) errtext$ = SPACE$ (64) rv% = ioEnter& (adc%, errtext$) errnum% = VAL (RIGHT$ (errtex$, LEN (errtext$) - 1)) IF ((errnum AND 1) >0) THEN PRINT “ Invalid DDC” IF ((errnum AND 2) >0) THEN PRINT “ Invalid DDC option” IF ((errnum AND 4) >0) THEN PRINT “ Conflict error” IF ((errnum AND 8) >0) THEN PRINT “ NVRAM setup error” IF ((errnum AND 16) >0) THEN PRINT “ Calibration error” IF ((errnum AND 32) >0) THEN PRINT “ NRRAM calibration error” END IF IF ((stadc% AND 32) >0) THEN PRINT “ ready “ IF ((stadc% AND 64) >0) THEN PRINT “ SRQ asserted” IF ((stadc% AND 128) >0) THEN PRINT “ Data acquisition complete” RETURN Basic Data Acquisition With both Driver488/SUB and the external device ready for action, we next might try taking a simple reading using the ADC488. Here, we use the serial poll (SPoll) capabilities of the system to determine when a response is ready and format the reply. WHILE ((ioSPoll%(adc%) AND 32) = 0) : WEND response$ = SPACE$ (256) rv% = ioEnter& (adc%, response$) voltage ! = VAL (reponse$) PRINT “ADC488 channel #1 rading value is “; voltage! Block Data Acquisition First, we set up the ADC488 (adc) in the following configuration: Compensated binary output format (G10) 100 usec scan interval (I3) No pre-trigger scans = 0, 100 post-trigger scans (N100) Continuous trigger on GET (T1) Personal488 User’s Manual, Rev. 3.0 Artisan Technology Group - Quality Instrumentation ... Guaranteed | (888) 88-SOURCE | www.artisantg.com II-163 9F. QuickBASIC II. SOFTWARE GUIDES - 9. Driver488/SUB We then wait for the ADC488 to start the acquisition process. Once the acquisition is complete, which is determined by the MSB of the ADC488’s serial poll response, the buffer pointer of the ADC488 is reset (B0). rv% = WHILE rv% = WHILE rv% = ioOutput& (adc%, “G10I3N100T1X”) ((ioSPoll% (adc%) AND 32) = 0) : WEND ioTrigger% (adc%) ((ioSPoll% (adc%) AND 128) = 0) : WEND ioOutput& (adc%, “BOX”) Next, we fill the buffer with 100 readings from the ADC488. The noterm terminator structure is used to disable scanning for terminators such as carriage-return and line-feed. noterm.eoi = 0 noterm.nChar = 0 hundred$ = SPACES (200) rv% = ioEnterX& (adc%, hundred$, 200, 1, noterm, 1, 0) The EnterX function will use a DMA transfer if available. Because DMA transfers are performed entirely by the hardware, the program can continue with other work while the DMA transfer function occurs. For example, the program will process the previous set of data while collecting a new set of data into a different buffer. However, before processing the data we must wait for the transfer to complete. For illustration purposes, we query the Driver488/SUB status both before and after waiting. rv% = ioStatus% (ieee%, substat) CALL showstat (substat) rv% = ioWait% (adc%) rv% = ioStatus% (ieee%, substat) CALL showstat (substat) Now we process the buffer: FOR i = 0 to 99 PRINT CVI (MID$ (hundred$, i * 2 +1, 2)) ; IF ((iMOD 10) = 9) THEN PRINT NEXT I The above functions provide enough functionality for a basic data acquisition program. Additional functions provided by Driver488/SUB are described in the “Section III: Command References” of this manual. Sample Program ‘$INCLUDE:’iotmqb45.def’ DECLARE SUB showstat (substat AS IeeeStatus) COMMON SHARED adc%, ieee%, dev% DIM hundred$ (200) , response$ (256), i%, voltage!, sum!, substat AS IeeeStatus DIM rv%, noterm AS terms ‘ establish communications with Driver488/SUB ieee% = ioOpenName% (“IEEE”) IF (ieee% = -1) THEN PRINT “Cannot initialize IEEE system.”: END ‘ Disable the automatic onscreen error display rv% = ioError% (ieee%, TURNOFF) ‘ Open the ADC488 device handle or create if necessary adc% = ioOpenName% (“ADC”) IF (adc% = -1) THEN response$ = SPACE$ (256) rv% = ioGet Error% (ieee%, response$) dev% = ioOpenName% (dev%, “ADC”) rv% = ioBusAddress% (adc%, 14, -1) END IF II-164 Personal488 User’s Manual, Rev. 3.0 Artisan Technology Group - Quality Instrumentation ... Guaranteed | (888) 88-SOURCE | www.artisantg.com II. SOFTWARE GUIDES - 9. Driver488/SUB 9F. QuickBASIC ‘ Read the Driver488/SUB revision number response$ = SPACE$ (256) rv% = ioHello% (ieee%, response$) PRINT response% ‘ Set up interrupt pointers ON PEN GOSUB isr PEN ON rv% = ioLightPen% (ieee%, 1) ‘ Enable Driver488/SUB interrupt on Error or Service Request rv% = ioArm% (ieee%, acSRQ) ‘ Display the Driver488/SUB system status rv% = ioStatus% (ieee%, substat) CALL showstat (substat) ‘ Put the ADC488 into remote mode rv% = ioRemote% (adc%) ‘ Clear the AC488 rv% = io Clear% (adc%) ‘ Enable ADC488 SRQ on command errors rv% = ioOutput& (adc%, “M8X”) ‘ Send an invalid command to the ADC488 PRINT “Sending invalid ADC command” rv% = ioOutput & (adc%, “V13X”) ‘ Setup the ADC488: ‘ Differential inputs (a0) ‘ Scan group channel 1 (C1) ‘ Compensated ASCII floating-point output format (G0) ‘ Channel 1 range to +/-10V (R3) ‘ One-shot trigger on talk (T6) rv% = ioOutput& (adc%, “A0C1G0R3T6X”) ‘ Wait for the ready bit of the ADC488 to be asserted WHILE ((ioSPoll%(adc%) AND 32) = 0) : WEND ‘ Display a reading response$ = SPACE$ (256) rv% = ioEnter& (adc%, response$) voltage ! = VAL (response$) PRINT “ADC488 channel #1 reading value is “; voltage! ‘ Display the average of 10 readings sum ! = 0! FOR i = 0 TO 9 response$ = SPACE$ (256) rv% = ioEnter& (adc%, response$) voltage ! = VAL (response$) sum ! = sum! + voltage ! NEXT i PRINT “The average of 10 readings is “; sum! / 10! ‘ ‘ ‘ ‘ Set up the ADC488 : Compensated binary output format (G10) 100uSec scan interval (I3) No pre-trigger scans, 100 post-trigger scans (n100) ‘ Continuous trigger on GET (T1) rv% = ioOutput& (adc%, “G10I3N100T1X”) Personal488 User’s Manual, Rev. 3.0 Artisan Technology Group - Quality Instrumentation ... Guaranteed | (888) 88-SOURCE | www.artisantg.com II-165 9F. QuickBASIC II. SOFTWARE GUIDES - 9. Driver488/SUB ‘ Wait for the ready bit of the ADC488 to be asserted WHILE ((isSPoll%(adc%)AND 32) = 0 ) : WEND ‘ Trigger the ADC488 rv% = ioTrigger% (adc%) ‘ Wait for the data acquisition bit of the ADC488 to be asserted WHILE ((ioSPoll%(adc%) AND 128) = 0) : WEND ‘ Reset the buffer pointer of the ADC488 rv% = ioOutput& (adc%, “BOX”) ‘ Take 100 readings from the ADC488 noterm.eoi = 0 noterm.nChar = 0 hundred$ = SPACE$ (200) rv% = ioEnterX& (adc%, hundred$, 200, 1, noterm, 1, 0) ‘ Check the Status before and after waiting rv% = ioStatus% (ieee%, substat) CALL showstat (substat) ‘ Wait for completion of input operation rv% = ioWait% (adc%) rv% = ioStatus% (ieee%, substat) CALL showstat (substat) ‘ Print the received characters FOR i = 0 to 99 PRINT CVI (MID$ (hundred$, i, * 2 + 1, 2)) ; IF ((i MOD 10) = 9) THEN PRINT NEXT i END ‘ Interrupt service routine for Driver488/SUB interrupts isr: ‘ Print isr message to screen PRINT “ In interrupt handler” ‘ Check if the interrupt was due to a Service Request sp% = ioSPoll% (ieee%) IF (sp% = 0) THEN PRINT “ No SRQ detected”: END ‘ Check that the Service Request was from the ADC488 stadc% = isSPoll% (adc%) IF ((stadc% AND 64) = 0) THEN PRINT “ Not an ADC488 SRQ.”: END ‘ Interpret the Serial Poll response IF ((stadc% AND 1) 0) THEN PRINT “ Triggered” IF ((stadc% AND 2) 0) THEN PRINT “ Trigger overrun” IF ((stadc% AND 4) 0) THEN PRINT “ Buffer overrun” IF ((stadc% AND 8) 0) THEN ‘ Read and interpret the ADC488 error status PRINT “ ADC488 error” rv% = ioOutput& (adc%, “E?”) errtext$ = SPACE$ (64) rv% = ioEnter& (adc%, errtext$) errnum% = VAL (RIGHT$ (errtext$, LEN (errtext$) -1)) IF ((errnum AND 1) > 0) THEN PRINT “ Invalid DDC” IF ((errnum AND 2) > 0) THEN PRINT “ Invalid DDC option” IF ((errnum AND 4) > 0) THEN PRINT “ Conflict error” IF ((errnum AND 8) > 0) THEN PRINT “ NVRAM setup error” IF ((errnum AND 16) > 0) THEN PRINT “ Calibration error” IF ((errnum AND 32) > 0) THEN PRINT “ NVRAM calibration error” END IF II-166 Personal488 User’s Manual, Rev. 3.0 Artisan Technology Group - Quality Instrumentation ... Guaranteed | (888) 88-SOURCE | www.artisantg.com II. SOFTWARE GUIDES - 9. Driver488/SUB 9F. QuickBASIC IF ((stadc% AND 32) > 0) THEN PRINT “ Ready” IF ((stadc% AND 64) > 0) THEN PRINT “ SRQ asserted” IF ((stadc% AND 128) > 0) THEN PRINT “ Data acquisition complete” RETURN SUB, showstat (substat AS IeeeStatus) ‘ Display Status from Driver488/SUB PRINT “SC :”; substate.SC>, PRINT “CA :”; substate.CA, PRINT “Primaddr :”; substate.Primaddr PRINT “Secaddr :”; substate.Secaddr, PRINT “SRQ :”; substate.SRQ, PRINT “addrChange :”; substate.addrChange PRINT “talker :”; substate.talker, PRINT “listener :”; substate.listener, PRINT “triggered :”; substate.triggered PRINT “cleared :”; substate.cleared, PRINT “transfer :”; substate.transfer, PRINT “byteIn :”; substate.byteIn PRINT “byteOut :”; substat.byteOut END SUB Command Summary To obtain a summary of the QuickBASIC language commands for Driver488/SUB, turn to the “Section III: Command References” of this manual. 9G. Pascal Topics • • • • • • • • • • • Accessing from a Pascal Program ............................................ II-166 Establishing Communications .................................................. II-167 Confirming Communication ...................................................... II-168 Setting Up Event Handling ........................................................ II-168 Reading Driver Status................................................................. II-168 External Device Initialization................................................... II-169 Interrupt Handling ...................................................................... II-169 Basic Data Acquisition................................................................ II-170 Block Data Acquisition ............................................................... II-170 Sample Program ........................................................................... II-171 Command Summary .................................................................... II-174 Accessing from a Pascal Program Driver488/SUB provides support for Borland Turbo Pascal. To allow for ready access to all Driver488/SUB functions and type definitions, an include file provides all required declarations. In addition, one include file must be included in the main module to provide for automatic detection of certain compiler options and enable the required adjustments within the driver. Note that the header files (*.h) must be included in your program and linked to the proper Driver488/SUB library files, as described in the Sub-Chapter “Getting Started” earlier in this Chapter. The following include (uses) directives should appear near the beginning of the program: uses iottp60; Personal488 User’s Manual, Rev. 3.0 Artisan Technology Group - Quality Instrumentation ... Guaranteed | (888) 88-SOURCE | www.artisantg.com II-167 9G. Pascal II. SOFTWARE GUIDES - 9. Driver488/SUB The following declarations are assumed throughout the remainder of this discussion. var adc,ieee,dev,adc2 : Integer; code : Integer; hundred : array [0..99] of Integer; response : string; i: Integer; voltage : Real; sum : Real; substat : IeeeStatusrec; nilptr : pointer; lrv : Longint; sp,stadc, errnum : Integer; errtext : string; { { { { { { { { { { { { { Device handles } Return Code } Driver488/SUB status structure } Text buffer for Driver488/SUB responses } General purpose loop counter } Single reading variable } Summation used to compute average } Driver488/SUB status structure } General purpose pointer } General purpose long return value } Driver488/SUB and ADC488 spoll response } ADC488 error number } ADC488 error response } Establishing Communications For the sake of this discussion, assume that Driver488/SUB has been configured to start with a configuration including the devices IEEE (IEEE 488 interface) and ADC (an ADC488/8S connected to the IEEE 488 interface). Additional interfaces and/or devices may also have been defined, as the driver can support up to four interfaces and 56 devices simultaneously. To open the two devices of interest, we use the following statements: ieee: = ioOpenName (‘IEEE’); adc: = ioOpenName (‘ADC’); If the ADC was not configured within Driver488/SUB, it can be optionally created “on the fly.” First, verify that opening the ADC failed, then use the GetError command to clear the error condition generated by this failure. Next, use the handle of the device DEVIEEE, which is always available within Driver488/SUB, to clone a new device called ADC using the MakeDevice command. Lastly, the IEEE bus address 14 is assigned to the ADC: if adc = -1 then begin rv: = ioGetError (ieee, response); dev: = ioOpenName (‘DEVIEEE’); adc: = ioMakeDevice (dev,’ADC’); rv: = ioBusAddress (adc,14,-1); end; If other devices were needed for the application at hand, they could either be defined in the startup configuration for Driver488/SUB or they could be created “on the fly” from the application: dev: = ioOpenName (‘DEVIEEE’); adc2: = ioMakeDevice (dev,’ADC2’) ; rv: = ioBusAddress (adc2,14,-1) ; The new device ADC2 is configured to reside at a different bus address so that the two devices may be distinguished. There is one other important difference between ADC and ADC2 at this point. ADC2 is a temporary device; that is, as soon as the creating application closes, ADC2 ceases to exist. If our intent was to create a device that could be accessed after this application ends, we must tell Driver488/SUB this: rv: = ioKeepDevice (adc2); After executing the above statement, ADC2 is marked as being permanent; that is, the device will not be removed when the creating application exists. If we later wish to remove the device, however, we can do so explicitly: rv: = ioRemoveDevice% (adc2); II-168 Personal488 User’s Manual, Rev. 3.0 Artisan Technology Group - Quality Instrumentation ... Guaranteed | (888) 88-SOURCE | www.artisantg.com II. SOFTWARE GUIDES - 9. Driver488/SUB 9G. Pascal Confirming Communication With or without an open device handle, the application can, if desired, confirm communication with Driver488/SUB via the Hello function. rv: = ioHello (ieee,response); Writeln (response); The function also fills in a string from which information can be extracted if it is desirable to display facts about the driver in use. Setting Up Event Handling If the event notification mechanism of Driver488/SUB is to be used, it should normally be set up during application initialization and left in place until application shutdown. No special action is required if event notification is not needed for the particular application. First, the OnEvent function establishes the notification path by specifying the function to be called, as follows: rv: = ioOnEvent (ieee,@isr,nilptr); Either during initialization or at some appropriate later point in the application, specific event types may be Armed or Disarmed for use in the event system. Individual event types may be turned on and off at will freely through the life of the application. In this case, we Arm to request notification of IEEE 488 bus service requests: rv: = ioArm (ieee, acSRQ); To cease recognizing bus service request, we might Disarm just the one class of events: rv: = ioDisarm (ieee, acSRQ); Or, to completely disable event notifications: rv: = ioDisarm (ieee, 0); Note that an external device handle is acceptable in this and other functions which actually refer to the interface; the external device handle will simply be translated to the handle of the interface to which the device is attached, prior to taking action. This translation is fully automatic within Driver488/SUB and requires little overhead, so you need not and should not go to great lengths to pass an interface handle if your application structure makes the use of external device handles the more logical choice. Reading Driver Status Your application may interrogate Driver488/SUB at any time to determine its status and other information. Status information is returned in a structure provided by the application and can be displayed by the showstat function shown below: rv: = ioStatus (ieee, substat); showstat (@substat); Another function to display the information contained in the Status structure could be: procedure showstat (substat : StatPtr); begin Write(‘SC : ‘, substat^.SC); Write(‘CA : ‘, substat^.CA); Write(‘Primaddr : ‘, substat^.Primaddr); Write(‘Secaddr : ‘, substat^.Secaddr); Writeln(‘SRQ : ‘, substat^.SRQ); Write(‘addrChange : ‘, substat^.addrChange); Write(‘talker : ‘, substat^.talker); Writeln(‘listener : ‘, substat^.listener); Write(‘triggered : ‘, substat^.triggered); Write(‘cleared : ‘, substat^.cleared); Write(‘transfer : ‘, substat^.transfer); Writeln(‘byteIn : ‘, substat^.byteIn); Writeln(‘byteOut : ‘, substat^.byteOut); end; Personal488 User’s Manual, Rev. 3.0 Artisan Technology Group - Quality Instrumentation ... Guaranteed | (888) 88-SOURCE | www.artisantg.com II-169 9G. Pascal II. SOFTWARE GUIDES - 9. Driver488/SUB External Device Initialization Refer to the device manufacturer’s documentation on specific requirements for initializing your IEEE 488 instrument. In the case of the ADC488, appropriate initialization involves sending it a Clear command and placing it into Remote mode: rv: = ioClear (adc); rv: = ioRemote (adc); For our hypothetical application, we also wish to have the ADC488 generate a service request should it detect a command error. This involves sending a command string consisting of textual data to the ADC488: lrv: = ioOutput (adc,‘M8X’); We may also wish to perform other initialization and configuration. In this case, we set up the ADC488 (adc) in the following configuration: Differential inputs (A0) Scan group channel 1 (C1) Compensated ASCII floating-point output format (G0) Channel 1 range to +/-10V (R3) One-shot trigger on talk (T6) The command to perform this configuration combines the above strings and adds the Output command for the ADC488: lrv: = ioOutput (adc,’A0C1G0R3T6X’) Interrupt Handling In case we send out an invalid command, either due to a programming error or an unanticipated condition in the equipment, Driver488/SUB will automatically notify the interrupt handling function as established above: lrv: = ioOutput (adc,’V13X’) The interrupt handler as established above might consist of a function similar to the following: procedure isr (var param);far; var sp, stadc, errnum : Integer; errtext : string; { Driver488/SUB and ADC488 spoll response } { ADC488 error number } { ADC error response } begin { Check if the interrupt was due to a Service Request } sp: = ioSPoll (ieee); if sp = 0 then begin Writeln (‘No SRQ detected’); halt; end; { Check that the Service Request was from the ADC488 } stadc: = ioSPoll (adc); if stadc = 64 then begin Writeln (‘Not an ADC488 SRQ. SPOLL = ‘,stadc); halt; end; { Interpret the Serial Poll response } if bitSet(stadc,1) then Writeln(‘Triggered’); if bitSet(stadc,2) then Writeln(‘Trigger overrun’); if bitSet(stadc,4) then II-170 Personal488 User’s Manual, Rev. 3.0 Artisan Technology Group - Quality Instrumentation ... Guaranteed | (888) 88-SOURCE | www.artisantg.com II. SOFTWARE GUIDES - 9. Driver488/SUB 9G. Pascal Writeln(‘Buffer overrun’); if bitSet(stadc,8) then { Read and interpret the ADC488 error status } Writeln(‘ADC488 error’); errnum: = 5; lrv: = ioOutput (adc,’E?’); lrv: = ioEnter (adc,errtext); Val (errtext,errnum,code); ifbitSet (errnum,1) then Writeln (‘Invalid DDC’); ifbitSet (errnum,2) then Writeln (‘Invalid DDC option’); ifbitSet (errnum,4) then Writeln (‘Conflict error’); ifbitSet (errnum,8) then Writeln (‘NVRAM setup error’); ifbitSet (errnum,16) then Writeln (‘Calibration error’); ifbitSet (errnum,32) then Writeln (‘NVRAM calibration error’); end; ifbitSet (stadc,32) then Writeln (‘Ready’); ifbitSet (stadc,64) then Writeln (‘SRQ asserted’); ifbitSet (stadc,128) then Writeln (‘Data acquisition complete’); { Set up interrupt pointers } nilptr: = nil; rv: = ioOnEvent (ieee,@isr,nilptr); end; Basic Data Acquisition With both Driver488/SUB and the external device ready for action, we next might try taking a simple reading using the ADC488. Here, we use the serial poll (SPoll) capabilities of the system to determine when a response is ready and format the reply. While not bitset (ioSPoll(adc),32) do begin end; lrv: = ioEnter (adc,response); Val (response,voltage,code); Writeln (‘ADC488 channel #1 reading value is’,voltage); Block Data Acquisition First, we set up the ADC488 (adc) for the following configuration: Compensated binary output format (G10) 100 usec scan interval (I3) No pre-trigger scans = 0, 100 post-trigger scans (N100) Continuous trigger on GET (T1) We then wait for the ADC488 to start the acquisition process. Once the acquisition is complete, which is determined by the MSB of the ADC488’s serial poll response, the buffer pointer of the ADC488 is reset (B0).: lrv: = ioOutput (adc,’G10I3N100T1X’); while not bitset (ioSPoll (adc),32) do begin end; rv: = ioTrigger (adc); while not bitset (ioSPoll (adc),128) do begin end; lrv: = ioOutput (adc,’BOX’); Next, we fill the buffer with 100 readings from the ADC488. The noterm terminator structure is used to disable scanning for terminators such as carriage-return and line-feed. Personal488 User’s Manual, Rev. 3.0 Artisan Technology Group - Quality Instrumentation ... Guaranteed | (888) 88-SOURCE | www.artisantg.com II-171 9G. Pascal II. SOFTWARE GUIDES - 9. Driver488/SUB noterm.eoi: = false; noterm.nChar: = 0; lrv: = ioEnterX (adc,hundred,200,true,noterm,true,nilptr); The EnterX function will use a DMA transfer if available. Because DMA transfers are performed entirely by the hardware, the program can continue with other work while the DMA transfer function occurs. For example, the program will process the previous set of data while collecting a new set of data into a different buffer. However, before processing the data we must wait for the transfer to complete. For illustration purposes, we query the Driver488/SUB status both before and after waiting. rv: = ioStatus (ieee,substat); showstat (@substat); rv: = ioWait (adc); rv: = ioStatus (ieee,substat); showstat (@substat); Now we process the buffer: { Print the received characters } for i: = 0 to 99 do begin Write (hundred[i]); if (imod10) = 9 then Writeln (‘’); end; The above functions provide enough functionality for a basic data acquisition program. Additional functions provided by Driver488/SUB are described in the “Section III: Command References” of this manual. Sample Program program manual; uses iottp60, dos; var adc,ieee,dev,adc2 : Integer; code : Integer; hundred : array [0..99] of Integer; response : string; i: Integer; rv: Integer; voltage : Real; sum : Real; substat : IeeeStatusrec; nilptr : pointer; lrv : Longint; noterm : termrec; { Device handles } { Return Code } { Driver488/SUB status structure } { Text buffer for Driver488 responses } { General purpose loop counter } { General purpose return value } { Single reading variable } { Summation used to compute average } { Driver488/SUB status structure } { General purpose pointer } { General purpose long return value } { Driver488 terminator structure } { Function to determine if bit is set according to mask value } function bitSet (source,mask : integer) : boolean; begin if (source div mask) mod 2 = 0 then bitSet: = false; else bitSet: = true; end; end; procedure isr (var param);far; var sp,stadc errnum : Integer; errtext : string; II-172 { Driver488 and ADC488 spoll response } { ADC488 error number } { ADC488 error response } Personal488 User’s Manual, Rev. 3.0 Artisan Technology Group - Quality Instrumentation ... Guaranteed | (888) 88-SOURCE | www.artisantg.com II. SOFTWARE GUIDES - 9. Driver488/SUB 9G. Pascal begin { Check if the interrupt was due to a Service Request } sp: = ioSPoll (ieee); if sp = 0 then begin Writeln (‘No SRQ detected’); halt; end; { Check that the Service Request was from the ADC488 } stadc: = ioSPoll (adc); if not bitSet (stadc,64) then begin Writeln (‘Not an ADC488 SRQ.SPOLL = ‘,stadc); halt; end; { Interpret the Serial Poll response } if bitSet(stadc,1) then Writeln (‘Triggered’); if bitSet(stadc,2) then Writeln(‘Trigger overrun’); if bitSet(stadc,4) then Writeln(‘Buffer overrun’); if bitSet(stadc,8) then { Read and interpret the ADC488 error status } Writeln(‘ADC488 error’); errnum: = 5; lrv: = ioOutput (adc,’E?’); lrv: = ioEnter (adc,errtext); Val (errtext,errnum,code); ifbitSet (errnum,1) then Writeln (‘Invalid DDC’); ifbitSet (errnum,2) then Writeln (‘Invalid DDC option’); ifbitSet (errnum,4) then Writeln (‘Conflict error’); ifbitSet (errnum,8) then Writeln (‘NVRAM setup error’); ifbitSet (errnum,16) then Writeln (‘Calibration error’); ifbitSet (errnum,32) then Writeln (‘NVRAM calibration error’); end; ifbitSet (stadc,32) then Writeln (‘Ready’); ifbitSet (stadc,64) then Writeln (‘SRQ asserted’); ifbitSet (stadc,128) then Writeln (‘Data acquisition complete’); { Set up interrupt pointers } nilptr: = nil; rv: = ioOnEvent (ieee,@isr,nilptr); end; { Display Status from Driver488/SUB } procedure showstat (substat : StatPtr); begin Write(‘SC Write(‘CA Write(‘Primaddr Write(‘Secaddr Writeln(‘SRQ Write(‘addrChange Write(‘talker : : : : : : : ‘, ‘, ‘, ‘, ‘, ‘, ‘, substat^.SC); substat^.CA); substat^.Primaddr); substat^.Secaddr); substat^.SRQ); substat^.addrChange); substat^.talker); Personal488 User’s Manual, Rev. 3.0 Artisan Technology Group - Quality Instrumentation ... Guaranteed | (888) 88-SOURCE | www.artisantg.com II-173 9G. Pascal II. SOFTWARE GUIDES - 9. Driver488/SUB Writeln(‘listener Write(‘triggered Write(‘cleared Write(‘transfer Writeln(‘byteIn Writeln(‘byteOut : : : : : : ‘, ‘, ‘, ‘, ‘, ‘, substat^.listener); substat^.triggered); substat^.cleared); substat^.transfer); substat^.byteIn); substat^.byteOut); end; begin { Establish communications with Driver488/SUB } ieee: = ioOpenName (‘IEEE’); if ieee = -1 then begin Writeln(‘Cannot initialize IEEE system’); halt; end; { Disable the automatic onscreen error display } if ioError (ieee,OFF) = -1 then begin end; { Open the ADC488 device handle or create if necessary } adc: = ioOpenName (‘ADC’); if adc = -1 then begin rv: = ioGetError (ieee,response); dev: = ioOpenName (‘DEVIEEE’); adc: = ioMakeDevice (dev,’ADC’); rv: = ioBusAddress (adc,14,-1); end; { Read the Driver488/SUB revision number } rv: = ioHello (ieee,response); Writeln (response); { Set up interrupt pointers } rv: = ioOnEvent (ieee,@isr,nilptr); { Enable Driver488/SUB interrupt on Error or Service Request } rv: = ioArm (ieee,acSRQ); { Display the Driver488/SUB system status } rv: = ioStatus (ieee,substat); showstat (@substat); { Put the ADC488 into remote mode } rv: = ioRemote (adc); { Clear the ADC488 } rv: = ioClear (adc); { Enable ADC488 SRQ on command errors } lrv: = ioOutput (adc,’M8X’); { Send an invalid command to the ADC488 } Writeln (‘Sending invalid ADC command’); lrv: = ioOutput (adc,’V13X’); { Set up the ADC488: Differential inputs (A0) Scan group channel 1 (C1) Compensated ASCII floating-point output format (G0) Channel 1 range to 3 (+/-10V) One-shot trigger on talk (T6) } lrv: = ioOutput (adc,’A0C1G0R3T6X’); { Wait for the ready bit of the ADC488 to be asserted } while not bitset (ioSPoll (adc),32) do begin end; II-174 Personal488 User’s Manual, Rev. 3.0 Artisan Technology Group - Quality Instrumentation ... Guaranteed | (888) 88-SOURCE | www.artisantg.com II. SOFTWARE GUIDES - 9. Driver488/SUB 9G. Pascal { Display a reading } lrv: = ioEnter (adc,response); Val (response,voltage,code); Writeln (‘ADC488 channel #1 reading value is ‘,voltage); { Display the average of 10 readings } sum: = 0.0; for i: 0 to 9 do begin lrv: = ioEnter (adc,response); Val (response,voltage,code); sum: = sum + voltage; end; Writeln (‘The average of 10 readings is ‘,sum/10.0); { Set up the ADC488: Compensated binary output format (G10) 100uSec scan interval (I3) No pre-trigger scans, 100 post-trigger scans (n100) Continuous trigger on GET (T1) } lrv: = ioOutput (adc,’G10I3N100T1X’); { Wait for the ready bit of the ADC488 to be asserted } while not bitset (ioSPoll (adc),32 do begin end; { Trigger the ADC488 } rv: = ioTrigger (adc); { Wait for the ready bit of the ADC488 to be asserted } while not bitset (ioSPoll (adc),128) do begin end; { Reset the buffer pointer of the ADC488 } lrv: = ioOutput (adc,’BOX’); { Take 100 readings from the ADC488 } noterm.EOI: = false; noterm.nChar: = 0; lrv: = ioEnterX (adc,hundred,200,true,noterm,true,nilptr); { Check the Status before and after waiting } rv: = ioStatus (ieee,substat); { Wait for completion of input operation } rv: = ioWait (adc); rv: = ioStatus (ieee,substat); showstat (@substat); { Print the received characters } for i: = 0 to 99 do begin Write (hundred[i]); if (i mod 10) = 9 then Writeln (‘’); end; end. Command Summary To obtain a summary of the Pascal language commands for Driver488/SUB, turn to the “Section III: Command References” of this manual. Personal488 User’s Manual, Rev. 3.0 Artisan Technology Group - Quality Instrumentation ... Guaranteed | (888) 88-SOURCE | www.artisantg.com II-175 9H. Data Transfers 9H. II. SOFTWARE GUIDES - 9. Driver488/SUB Data Transfers For Driver488/SUB, W31, W95, & WNT Topics • Terminators ................................................................................... II-175 TERM Terminators ..................................................................................... II-175 • • Data Input and Output................................................................ II-176 Asynchronous Transfers ............................................................. II-177 Terminators Every transfer of data, between a program and Driver488, or between Driver488 and a bus device, must have a definite end. This is a common requirement in most systems. For example, most printers do not print a line until they receive the carriage return that ends that line. Similarly, a BASIC Input statement waits for the <Enter> key to be pressed before returning the entered data to the program. The only time that some terminator is not required is when the number of characters that compose the data is known in advance or is transferred along with the data. This is the case, for example, when fixed-length records are read from a random access disk file. Driver488 actually uses two terminators: • The data terminator (Term) for output to bus devices from Driver488. • The data terminator (Term) to input from bus device into Driver488. TERM Terminators The Term terminators delimit the end of strings transferred between Driver488 and bus devices. The Term output terminator marks the end of strings transferred from Driver488 to bus devices, and the Term input terminator marks the end of strings transferred into Driver488 from bus devices. The Term terminators normally consist of one or two ASCII characters. The characters do not need to be printable and, in fact, are usually special characters such as carriage return and line feed. Input and output terminators need not be the same. You can specify that no characters are to be used as Term terminators. If the Term output terminator is set to NONE, then Driver488 does not append any characters to the data sent to the device. When the Term input terminator is set to NONE, Driver488 does not check for terminator characters in the returned data. The Term terminators can include the IEEE 488 bus end-or-identify (EOI) signal. The EOI signal, when asserted during a character transfer, marks that character as the last of the transfer. This allows the detection of the end of data regardless of which characters comprise the data. This feature is very useful in binary data transfers which might contain any ASCII values from 0 to 255. To support the EOI signal, the Term input and output terminators can be composed of just EOI, one or two characters, or one or two characters with EOI. If EOI is specified, it has a slightly different meaning on input than on output. When EOI alone is specified as the Term output terminator, the EOI bus signal is asserted during the last data character transmitted. If EOI is specified with one or two characters, then EOI is asserted on the last character. In this way, EOI is asserted on the last character transmitted to the bus device. When EOI alone is specified as the Term input terminator, then all the characters received from the bus device, including the one on which EOI was asserted are returned to the user’s program. When one or II-176 Personal488 User’s Manual, Rev. 3.0 Artisan Technology Group - Quality Instrumentation ... Guaranteed | (888) 88-SOURCE | www.artisantg.com II. SOFTWARE GUIDES - 9. Driver488/SUB 9H. Data Transfers two characters are specified, without EOI, all the characters up to, but not including, the Term input terminator characters, are returned to the program. However, if both EOI and characters are specified, the following considerations apply: • If EOI is received, and the complete terminator character sequence has not been received (even if the first of the two characters has been received), then all the received characters are returned to the program. • If the complete terminator character sequence has been received, with or without EOI asserted on the last character, then only the characters up to but not including the terminator characters are returned. • If only one character is specified for input termination, the complete terminator character sequence consists of just that one character, but if two characters are specified, then it consists of both characters, received consecutively. During normal Output, without a specified character count, the Term output terminator is appended to the data before sending the data to the bus devices. During normal Enter, the Term input terminator received by Driver488 is stripped off before being returned to the program. See the Enter and Output commands in the following text, and in “Section III: Command References.” Data Input and Output When a program performs data I/O through Driver488, it tells Driver488 where in memory to find or put the data and the amount of data to transfer. Driver488 handles the actual transfer. The program sends the address and quantity of data to be transferred, and Driver488 takes care of the details of the transfer. The program must be able to tell Driver488 where in memory to find the data, that is, it must be able to provide Driver488 with the actual address of the buffer. In C language, a character array is usually used at the memory location for the incoming or outgoing data: char buffer [20]; The following is a typical EnterX command: char buffer [20] EnterX (dev, buffer, sizeofbuffer, 1, 0L, 0, 0L); The Driver488 EnterX command addresses the ADC bus device (dev), requests Driver488 to read 20 bytes of data and put the received data in the buffer memory location. This gives Driver488 all the information it needs to be able to transfer the received data directly into the buffer character array. Data I/O using the Driver488 OutputX command is also possible. For instance, suppose the data from the above example was to be sent to a device called DAC. Here, we would use the following command: OutputX (DAC, buffer, sizeofbuffer, 1, 0L, 0, 0L); Data I/O is normally performed with terminator detection set to the default values of carriage-return line-feed (CR LF) with end-or-identify (EOI). However, it is possible to explicitly specify that the Enter should stop on detection of EOI only, or on detection of EOI or some single character. For example, to terminate on EOI: term.eoi=1; term.nChar=0; EnterX (dev, buffer, sizeofbuffer, 1, &term, 0 0L); This reads data into the buffer character array until either 20 characters have been received, or EOI has been detected. However, if EOI causes the transfer to stop, we may need to know how much data was received. This information can be obtained by using the Buffered command: N=Buffered(dev) The number of bytes transferred is read into N. This value can now be used to send the read data out to the device (dev), as follows: OutputN (dev, buffer, N, 1, &term, 0, 0L); Note that the variable N has been used in place of the literal 20 to specify how many bytes to transmit. Personal488 User’s Manual, Rev. 3.0 Artisan Technology Group - Quality Instrumentation ... Guaranteed | (888) 88-SOURCE | www.artisantg.com II-177 9H. Data Transfers II. SOFTWARE GUIDES - 9. Driver488/SUB Asynchronous Transfers Driver488 can return to the user’s program while a transfer is in progress. This is useful whenever the transfer takes a substantial amount of time, and other processing could proceed while waiting. For example, suppose a certain bus device can transfer only 1000 bytes per second. If there are 10,000 bytes to transfer it takes 10 seconds to complete the transfer. The following statements might be used to receive this data: char data [10000]; EnterX (ADC, data, 10000, 1, 0L, 1, 0L); /*Now do other work while the transfer is processing*/ Wait (ADC); The “true” async flag tells Driver488 to return to the program after setting up the transfer. The program is then free to do other processing, as long as it does not need access to the IEEE 488 bus. Finally, when the program is ready to process the received data, it performs a Wait to check that the data has been completely received. In this way, asynchronous transfers overlap IEEE 488 bus data transfers with program execution. The use of DMA and interrupts requires proper hardware and software configuration. For more information, refer to the Sub-Chapter “Installation & Configuration” early in this Chapter. 9I. Operating Modes For Driver488/SUB, W31, W95, & WNT Topics • • • • • • Introduction................................................................................... II-177 Operating Mode Transitions ...................................................... II-177 System Controller Mode.............................................................. II-178 System Controller, Not Active Controller Mode.................... II-179 Not System Controller Mode...................................................... II-181 Active Controller, Not System Controller Mode.................... II-181 Introduction There are four types of IEEE 488 bus devices: Active Controllers, Peripherals, Talk-Only devices, and Listen-Always devices: • In simple systems, Talk-Only and Listen-Always devices are usually used together, such as a TalkOnly digitizer sending results to a Listen-Always plotter. In these systems, no controller is needed because the talker assumes it is the only talker on the bus, and the listener(s) assume they are all supposed to receive all data sent over the bus. This is a simple and effective method of transferring data from one device to another, but is not adequate for more complex systems where, for example, one computer is controlling many different bus devices. • In more complex systems, the Active Controller sends commands to the various bus Peripherals, telling them what to do. The controller sends bus commands such as: Unlisten, Listen Address Group, Untalk, and Talk Address Group to specify which device(s) send data, and which receive it. When an IEEE 488 bus system is first turned on, some device must be the Active Controller. This device is the System Controller and always keeps some control of the bus. In particular, the System II-178 Personal488 User’s Manual, Rev. 3.0 Artisan Technology Group - Quality Instrumentation ... Guaranteed | (888) 88-SOURCE | www.artisantg.com II. SOFTWARE GUIDES - 9. Driver488/SUB 9I. Operating Modes Controller controls the Interface Clear (IFC) and Remote Enable (REN) bus management lines. By asserting Interface Clear, the System Controller forces all other bus devices to stop their bus operations, and regains control as the Active Controller. Operating Mode Transitions The System Controller is initially the Active Controller. It can, if desired, Pass Control to another device and thereby make that device the Active Controller. Notice that the System Controller remains the System Controller even when it is not the Active Controller. Of course, the device to which control is passed must be capable of taking the role of Active Controller. It would make no sense to try to pass control to a printer. Control should only be passed to other computers that are capable, and ready, to become the Active Controller. Note further that there must be exactly one System Controller on the IEEE 488 bus. All other potential controllers must be configured as Peripherals when they power up. The state diagram which follows, shows the relationships between the various operating modes. The top half of the state diagram shows the two operating states of a System Controller. At power on, it is the Active Controller. It directs the bus transfers by sending the bus commands mentioned previously. It also has control of the Interface Clear and Remote Enable bus lines. The System Controller can pulse Interface Clear to reset all of the other bus devices. Furthermore, the System Controller can pass control to some other bus device and thereby become a Peripheral to the new Active Controller. If the System Controller receives control from the new Active Controller, then it once again becomes the Active Controller. The System Controller can also force the Active Controller to relinquish control by asserting the Interface Clear signal. The bottom half of the state diagram shows the two operating states of a Not System Controller device. At power on, it is a Peripheral to the System Controller which is the Active Controller. If it receives control from the Active Controller, it becomes the new Active Controller. Even though it is the Active Controller, it is still not the System Controller. The System Controller can force the Active Controller to give up control by asserting Interface Clear. The Active Controller can also give up control by Passing Control to another device, which may or may not be the System Controller. In summary, a bus device is set in hardware as either the sole System Controller in the system, or as a non-System Controller. At power on, the System Controller is the Active Controller, and the other devices are Peripherals. The System Controller can give up control by passing control, and can regain control by asserting Interface Clear, or by receiving control. A Peripheral can become the Active Controller by receiving control, and can give up control by Passing Control, or on detecting Interface Clear. Personal488 User’s Manual, Rev. 3.0 Artisan Technology Group - Quality Instrumentation ... Guaranteed | (888) 88-SOURCE | www.artisantg.com II-179 9I. Operating Modes II. SOFTWARE GUIDES - 9. Driver488/SUB System Controller Mode The most common Driver488 configuration is as the System Controller, controlling several IEEE 488 bus instruments. In this mode, Driver488 can perform all the various IEEE 488 bus protocols necessary to control and communicate with any IEEE 488 bus devices. As the System Controller in the Active Controller mode, Driver488 can use all the commands available for the Active Controller state, plus control the Interface Clear and Remote Enable lines. The allowed bus commands and their actions are: Command Abort Local Remote Local Lockout Clear Trigger Enter Output Pass Control SPoll PPoll PPoll Config PPoll Disable PPoll Unconfig Send Resume Action Pulse Interface Clear. Unassert Remote Enable, or send Go To Local to selected devices. Assert Remote Enable, optionally setting devices to Remote. Prevent local (front-panel) control of bus devices. Clear all or selected devices. Trigger selected devices. Receive data from a bus device. Send data to bus devices. Give up control to another device which becomes the Active Controller. Serial Poll a bus device, or check the Service Request state. Parallel Poll the bus. Configure Parallel Poll responses. Disable the Parallel Poll response of selected bus devices. Disable the Parallel Poll response of all bus devices Send low-level bus sequences. Unassert Attention. Use to allow Peripheral-to-Peripheral transfers. System Controller, Not Active Controller Mode After Passing Control to another device, the System Controller is no longer the Active Controller. It acts as a Peripheral to the new Active Controller, and the allowed bus commands and their actions are modified accordingly. However, it still maintains control of the Interface Clear and Remote Enable lines. The available bus commands and their actions are: Command Abort Local Remote Enter Output Request SPoll Action Pulse Interface Clear. Unassert Remote Enable. Assert Remote Enable. Receive data from a bus device as directed by the Active Controller. Send data to bus devices as directed by the Active Controller. Set own Serial Poll request (including Service Request) status. Get own Serial Poll request status. As a bus Peripheral, Driver488 must respond to the commands issued by the Active Controller. The controller can, for example, address Driver488 to listen in preparation for sending data. There are two ways to detect our being addressed to listen: through the Status command, or by detecting an interrupt with the Arm command. The Status command can be used to watch for commands from the Active Controller. The Operating Mode, which is a “P” while Driver488 is a Peripheral, changes to a “C” if the Active Controller passes control to Driver488. The Addressed State goes from Idle “I” to Listen “L” or Talk “T” if Driver488 is addressed to listen or to talk, and goes back to Idle “I” when the Active Controller issues Unlisten (UNL), Untalk (UNT), or specifies another Talker Address Group (TAG). The Trigger “T1” and Clear “C1” indicators are set when Driver488 is triggered or cleared, and reset when Status is read. The Address Change indicator is set to Change “G1” when the Addressed State changes. These indicators allow the program to sense the commands issued to Driver488 by the Active Controller. The various Status indicators and their descriptions are provided in the following table: II-180 Personal488 User’s Manual, Rev. 3.0 Artisan Technology Group - Quality Instrumentation ... Guaranteed | (888) 88-SOURCE | www.artisantg.com II. SOFTWARE GUIDES - 9. Driver488/SUB Status Indicator “P” (Peripheral) “C” (Controller) “T1” (Trigger) “C1” (Clear) “T” (Talk) “L” (Listen) “I” (Idle) “G1” (Change) 9I. Operating Modes Description Driver488 is in the Peripheral (*CA) operating mode. Driver488 is the Active Controller (CA). Driver488, as a Peripheral, has received a Trigger bus command. Driver488, as a Peripheral, has received a Clear bus command. Driver488 is in the Talk state and can Output to the bus. Driver488 is in the Listen state and can Enter from the bus. Driver488 is in neither the Talk nor Listen state. An Address Change has occurred, that is, a change between Peripheral and Controller, or among Talk, Listen, and Idle has occurred. This is, perhaps, the most useful interrupt in the Peripheral mode. The following BASIC program fragment illustrates the use of the Address Change and Addressed State indicators to communicate with the Active Controller. First check Status until it indicates there has been an Address Change: while (1) { Status (ieee, &stat); if (!stat.addrChange) { continue;} if (stat.idle) {continue;) /* If we are addressed to listen, we ENTER a line from the */ /* controller and print it out. */ if (stat.listener) { Enter (ieee, data); printf (“%d”, data); printf (“\n”; continue; } /* If we are addressed to talk, we INPUT a line from the keyboard*/ /* and OUTPUT it to the controller.*/ if (stat.talker) { gets (message); Output (ieee, message); continue; } printf (Bad addressed state.\n”); break; } It is also possible to detect these conditions with the Arm command and handle them in an Interrupt Service Routine (ISR). The Peripheral, Controller, Talk, Listen, and Idle conditions cause interrupts only when the Address Change indicator “G1” in the Status response is set. The Change, Trigger, and Clear indicators are all reset by the Status command. Thus, the Status command should be used in the Interrupt Service Routine to prevent re-interruption by an indicator which has not been reset. The various Arm conditions and their descriptions are provided in the following table: Personal488 User’s Manual, Rev. 3.0 Artisan Technology Group - Quality Instrumentation ... Guaranteed | (888) 88-SOURCE | www.artisantg.com II-181 9I. Operating Modes Arm Condition SRQ Peripheral Controller Trigger Clear Talk Listen Idle Bytein Byteout Error Change II. SOFTWARE GUIDES - 9. Driver488/SUB Description The internal Service Request state is set. See the SPoll command in “Section III: Command References” for more information. Driver488 is in the Peripheral (*CA) operating mode. Driver488 is the Active Controller (CA). Driver488, as a Peripheral, has received a Trigger bus command. Driver488, as a Peripheral, has received a Clear bus command. Driver488 is in the Talk state and can Output to the bus. Driver488 is in the Listen state and can Enter from the bus. Driver488 is in neither the Talk nor Listen state. Driver488 has been received a byte from the IEEE 488 bus. Driver488 can output a byte to the IEEE 488 bus. Driver488 has detected an error condition. An Address Change has occurred, that is, a change between Peripheral and Controller, or among Talk, Listen, and Idle has occurred. This is, perhaps, the most useful interrupt in the Peripheral mode. Not System Controller Mode If Driver488 is not configured as the System Controller, then at power on, it is a bus Peripheral. It might use a program like the one previously described to communicate with the Active Controller. When Driver488 is not the System Controller and not the Active Controller (*SCy*CA), the available bus commands and their actions are: Command Enter Output Request SPoll Action Receive data from a bus device as directed by the Active Controller. Send data to bus devices as directed by the Active Controller. Set own Serial Poll request (including Service Request) status. Get own Serial Poll request status. Active Controller, Not System Controller Mode If the Active Controller passes control to the Driver488, then it becomes the new Active Controller. This can be detected by the Status command or as an Armed interrupt. As an Active Controller, but not the System Controller, the available bus commands and their actions are: Command Abort Local Local Lockout Clear Trigger Enter Output Pass Control SPoll PPoll PPoll Config PPoll Disable PPoll Unconfig Send Resume II-182 Action Assert Attention and send My Talk Address to stop any bus transfers. Send Go To Local to selected devices. Prevent local (front-panel) control of bus devices. Clear all or selected devices. Trigger selected devices. Receive data from a bus device. Send data to bus devices. Give up control to another device which becomes the Active Controller. Serial Poll a bus device, or check the Service Request state. Parallel Poll the bus. Configure Parallel Poll responses. Disable the Parallel Poll response of selected bus devices. Disable the Parallel Poll response of all bus devices. Send low-level bus sequences. Unassert Attention. Used to allow Peripheral-to-Peripheral transfers. Personal488 User’s Manual, Rev. 3.0 Artisan Technology Group - Quality Instrumentation ... Guaranteed | (888) 88-SOURCE | www.artisantg.com II. SOFTWARE GUIDES - 9. Driver488/SUB 9J. 9J. Utility Programs Utility Programs Topics • • Printer & Serial Redirection ..................................................... II-182 Removal & Reinstallation........................................................... II-184 MARKDRVR & REMDRVR..........................................................................II-184 • Moving Files from an IEEE 488 (HP-IB) Controller to a PCII-185 PRNTEMUL Files .........................................................................................II-185 Configuration of the IEEE Interface for PRNTEMUL............................II-185 Running PRNTEMUL ..................................................................................II-185 Data Transfer ...............................................................................................II-186 Printer & Serial Redirection IEEELPT and IEEECOM are stand-alone utilities (Driver488 need not be installed to use them) that allow programs which are unaware of the IEEE 488 bus to control IEEE 488 bus devices as if they were printer (IEEELPT) or serial (IEEECOM) devices. They automatically redirect communications destined for printer or serial ports to specified IEEE 488 bus devices. For example, the command: C> IEEELPT IEEE05 will configure IEEE 488 bus device 5 to appear as the first parallel printer port (LPT1:). Any text that is destined for LPT1: will, instead be send to bus device 5. For example, the COPY command: C> COPY TEXTFILE.DOC LPT1: will copy the contents of TEXTFILE.DOC to the IEEE 488 bus. Any software which prints to LPT1: will now send its data to IEEE 488 bus device 5. Similarly, the command: C> IEEECOM IEEE12 will redirect communications to and from the COM1: serial port to IEEE 488 bus device 12. Thus, a plotting program which expects a serial plotter can communicate with an IEEE 488 plotter using Power488. Serial port redirection is often less effective than printer port redirection because many programs control the serial port hardware directly and bypass the redirection program. It is still possible to redirect output from such a program to an IEEE device if that program can be configured to send its output to a disk file rather than directly to the printer or plotter. If a file such as \DEV\COM1 is specified, the program will act as though the data were being written to an actual disk file, while the output will be sent to the IEEE 488 bus device to which COM1 was redirected. The program may even issue a warning message that the specified file exists and will be overwritten. If it does, then the user may tell it that it may delete or overwrite the file. No harm can result from trying to delete a device. To understand how these programs are used, it is necessary to keep in mind the difference between logical and physical devices. When the computer first boots up, it takes an inventory of the installed hardware. It might, for example, find two parallel printer ports, and one serial communications port. These are the physical devices. The physical device, LPT1 (note the absence of the colon) is the printer port first identified by the computer. The logical device LPT1: (with the colon) refers to the device which is currently configured to receive data to be printed. The computer maintains two tables of four entries each to keep track of physical devices by logical device name. In the case of two printer and one serial port, these tables initially appear as: Personal488 User’s Manual, Rev. 3.0 Artisan Technology Group - Quality Instrumentation ... Guaranteed | (888) 88-SOURCE | www.artisantg.com II-183 9J. Utility Programs II. SOFTWARE GUIDES - 9. Driver488/SUB Printer Port Assignments LPT1: LPT1 LPT2: LPT2 LPT3: (none) Serial Port Assignments LPT4: (none) COM1: COM1 COM2: (none) COM3: (none) COM4: (none) The IEEELPT command takes up to four optional device arguments. Each argument is of the form IEEEpp, IEEEppss or LPTn, where pp is an IEEE 488 bus primary address from 00 to 30, ppss is a bus address composed of a primary address from 00 to 30 followed by a secondary address from 00 to 31, and n is a physical printer port device number, from 1 to 4. If IEEELPT is executed with no arguments, then it just displays the current logical printer port assignments. If one or more arguments are provided, then the first logical printer port (LPT1:) is redirected to the physical device specified by the first argument, the next logical port (LPT2:) is redirected to the next specified physical device, and so on. If fewer than four devices are specified, then the remaining logical printers are directed to any unused physical parallel printer ports. For example, on a machine with two physical parallel printer ports these commands have the effects indicated in the following table: Command (Boot-Up) Printer Port Assignments LPT1: LPT2: LPT3: LPT4: LPT1 LPT2 (none) (none) LPT1 LPT2 (none) (none) IEEELPT IEEE05 IEEE05 LPT1 LPT2 (none) IEEELPT IEEE05 IEEE1201 IEEE05 IEEE1201 LPT1 LPT2 IEEELPT IEEE05 IEEE1201 IEEE17 IEEE05 IEEE1201 IEEE17 LPT1 IEEELPT IEEE05 IEEE1201 IEEE17 IEEE29 IEEE05 IEEE1201 IEEE17 IEEE29 IEEELPT LPT1 IEEE05 LPT1 IEEE05 LPT2 (none) IEEELPT LPT2 LPT1 IEEE1201 LPT2 LPT1 IEEE1201 (none) IEEELPT (No change) Note that the port assignments are flexible, any order may be used. Also note how the physical printer ports are added to the assignments if there is room for them and if they have not already been specified. Serial port redirection is accomplished by IEEECOM. IEEECOM is used identically to IEEELPT except that the physical port names (without colons) are COM1 through COM4 rather than LPT1 through LPT4. For example, the IEEECOM command: IEEECOM IEEE12 COM2 COM1 will redirect communications from COM1: to IEEE 488 bus device 12, COM2: to COM2, and COM3: to COM1. In addition to the port specifications, both IEEELPT and IEEECOM allow two optional parameters. The /Aioaddr parameter is used to specify the I/O base address of the IEEE 488 interface board and the /Baddr parameter sets its IEEE 488 bus address. The I/O base address must be specified when the associated IEEE 488 interface board is not at the default I/O address of 02E1 (hex). The I/O base address is usually given as a hexadecimal number. For example, to use the default I/O address, the parameter would be /A&H02E1. If the hexadecimal I/O address ends in a 0 or an 8 then consecutive I/O addresses will be used. If the address ends in a 1 then I/O addresses will be separated by &H400. I/O addresses ending in other than 0, 1, or 8 are not allowed. For example, the command: IEEELPT IEEE05 /A&H22E1 would configure LPT1: for output to IEEE 488 bus address 05 on a second interface card located at 22E1 (hex). The I/O base address is usually set by switches or jumpers on the interface card. Refer to the manufacturer’s instructions for your IEEE 488 board to determine its I/O address. The default I/O port base address for IEEELPT and IEEECOM is /A&H02E1. II-184 Personal488 User’s Manual, Rev. 3.0 Artisan Technology Group - Quality Instrumentation ... Guaranteed | (888) 88-SOURCE | www.artisantg.com II. SOFTWARE GUIDES - 9. Driver488/SUB 9J. Utility Programs The /B sets the primary IEEE 488 bus address of IEEE 488 interface card. Every IEEE 488 bus device, including the controller must have a unique IEEE 488 address in the range of 00 to 30 (decimal). The default address for the interface card is 21, but must be changed if any IEEE Peripheral uses the same address. For example, the command: IEEECOM IEEE21 /B00 sets the interface card bus address to 00 so that COM1: may be redirected to an IEEE 488 bus device with an address of 21. Removal & Reinstallation Driver488 is a special type of terminate-and-stay-resident (TSR) program that controls Power488, Personal488, and LAN488. When DRVR488.COM is executed, it installs itself permanently into memory and connects itself into DOS so that it appears to be a standard device driver that can be used to control IEEE 488 devices. Normally, Driver488 is present in memory whenever the computer is operating, even if it is not being used. Most computers have enough memory so that the amount taken by Driver488 is not critical, but some very large programs need so much memory that they cannot operate if Driver488 is installed. It is possible to temporarily remove Driver488 by editing the AUTOEXEC.BAT file. Once Driver488 is installed, the AUTOEXEC.BAT file will contain one or more lines similar to the following: C:\IEEE488\DRVR488 These are the commands that install Driver488. They can be disabled by adding the word REM, followed by a space, to convert them to remarks: REM C:\IEEE488\DRVR488 When the computer is rebooted, these lines will be ignored, Driver488 will not be loaded, and the memory that would have been used for Driver488 will now be available for other programs. If Driver488 is needed later, the AUTOEXEC.BAT file must be re-edited to remove the REMs and to reenable Driver488, and then the computer must be rebooted. A more practical method involves the creation of a separate batch file that holds the DRVR488 commands. When Driver488 is installed, the DRVR488 commands are placed in the AUTOEXEC.BAT file. By moving these commands to a separate batch file, it is possible to avoid installing Driver488 before it is needed. To create a separate batch file, first copy AUTOEXEC.BAT to a new file, perhaps DRIVER.BAT. Then edit the AUTOEXEC.BAT file, deleting the DRVR488 commands, and edit DRIVER.BAT, leaving only the DRVR488 commands. When the system is rebooted, Driver488 will no longer be installed because the AUTOEXEC.BAT file no longer contains the DRVR488 commands. However, whenever Driver488 is needed, it can be installed by typing DRIVER which will execute the DRVR488 commands in the DRIVER.BAT file. Once Driver488 has been installed, it will remain installed until the system is rebooted. MARKDRVR & REMDRVR Using the techniques described above, it is possible to install Driver488 only when it is needed. However, it is still necessary to reboot the computer to remove Driver488. The MARKDRVR and REMDRVR utilities allow Driver488 and other TSR programs, such as Sidekick and Superkey, to be installed and removed at will, without rebooting. Before installing the TSR program, the MARKDRVR command should be used to “snapshot” the system state: C:> MARKDRVR comment C:> C:\IEEE488\DRVR488 The MARKDRVR command is followed by an optional comment of up to 119 character that is normally used to note which TSR programs are about to be installed. When the above command is executed it saves internal system information including the interrupt vectors, the device driver chain, and the free memory pointer. This information, along with the specified comment, is saved for use by REMDRVR. Personal488 User’s Manual, Rev. 3.0 Artisan Technology Group - Quality Instrumentation ... Guaranteed | (888) 88-SOURCE | www.artisantg.com II-185 9J. Utility Programs II. SOFTWARE GUIDES - 9. Driver488/SUB The MARKDRVR command is then followed by the commands needed to install the TSR programs. When using Driver488, these would be the DRVR488 commands. When these commands have completed, Driver488 is installed and ready for use. When Driver488 is no longer needed, it can be removed by using the REMDRVR command: C:> REMDRVR REMDRVR prints out the comment that was saved by MARKDRVR and then uses the information that MARKDRVR saved to restore the system to the state it had before MARKDRVR had been executed. This removes Driver488 and any other TSR programs that had been loaded in the interim and recovers their memory for reuse. If several different TSR programs are being used, then it might be appropriate to use MARKDRVR more than once. Then, when REMDRVR is used, it will only remove the TSR programs that were installed after the last MARKDRVR command. Each time REMDRVR is used, it will remove one more “layer” of TSR programs. The comment saved by MARKDRVR can help keep track of which TSR programs are removed at each step. Note that the most recently installed programs are always removed first. It is not possible to remove a program until all the more recently installed programs have been removed. When working with Power488, it is good practice to create a DRIVER.BAT file that includes the DRVR488 commands as described above. Then a MARKDRVR command, such as MARKDRVR Driver488 can be added to the beginning of the DRIVER.BAT file. Then, Driver488 can be installed by typing DRIVER and removed by typing REMDRVR. Driver488 can thus be installed and removed as desired, without rebooting the computer. Moving Files from an IEEE 488 (HP-IB) Controller to a PC Included on the Driver488 release disk is a utility program that allows files to be transferred from any IEEE controller to the PC in which Driver488 resides. This utility program configures the PC as a Peripheral on the IEEE network, much like a standard IEEE 488 printer. Any controller capable of sending information to an IEEE 488 printer, including controllers like the HP 9000 series computers, can send any type of data to the PC. Once launched to the PC, the file transfer utility allows the operator to redirect the incoming data either to the PC screen, a PC disk file, or a printer attached to the PC. PRNTEMUL Files In the \UTILS subdirectory of the Driver488 diskette, there are 2 files: • PRNTEMUL.EXE: This file is the MS-DOS executable version of the program. This is all that you will need to emulate an IEEE 488 printer on a PC/AT or PS/2 computer. • PRNTEMUL.C: This is the C source code of the PRNTEMUL.EXE program. It uses a C subroutine interface of Driver488, which is located in the \SUBAPI directory of the main Driver488 directory. Refer to the corresponding language support section on how to compile this code. Configuration of the IEEE Interface for PRNTEMUL The PRNTEMUL program requires the Driver488 to be configured as a Peripheral (same as an IEEE printer). Make sure that the IEEE interface is configured at a unique IEEE address. Once Driver488 is configured properly, reboot the computer and connect your PC/AT to your IEEE controller. Running PRNTEMUL After the IEEE interfaces of each computer has been configured and connected, run the PRNTEMUL program from the \UTILS directory by typing one of the following commands at the DOS prompt: II-186 Personal488 User’s Manual, Rev. 3.0 Artisan Technology Group - Quality Instrumentation ... Guaranteed | (888) 88-SOURCE | www.artisantg.com II. SOFTWARE GUIDES - 9. Driver488/SUB 9K. Command Descriptions Command Description Prints information received from the IEEE 488 bus to the screen. Redirects information to a file called MYPROG.BAS Redirects information to the printer port (LPT1). PRNTEMUL <ENTER> PRNTEMUL > MYPROG.BAS <ENTER> PRNTEMUL > LPT1 <ENTER> Once the PRNTEMUL program is started, it will continue to send any information received from the IEEE bus to the specified destination until any key is pressed. Once a key is pressed, the PRNTEMUL program will return to DOS at which time it can be run again, with a different destination specified, if so desired. Data Transfer Data is transferred to the computer running PRNTEMUL the same way information is sent to an IEEE printer. For a description of how to print information out, refer to the documentation of your IEEE controller. For example, the following commands might be used on an HP 9000 computer running HP BASIC: Command LOAD “MYPROG.BAS” PRINTER IS 710 LIST Description Load a program to print out. Set the current printer to address 10 of the IEEE bus. List the current program to the selected printer (computer running PRNTEMUL). The output of the PRNTEMUL program could be redirected to a datafile to transfer source files from the IEEE controller to a PC/AT or PS/2. 9K. Command Descriptions For Driver488/SUB, W31, W95, & WNT Topics • • Introduction .................................................................................. II-186 Format ............................................................................................ II-187 Syntax ............................................................................................................II-187 Returns ..........................................................................................................II-187 Mode ...............................................................................................................II-187 Bus States ......................................................................................................II-187 Examples .......................................................................................................II-188 • Data Types ..................................................................................... II-189 Arm Condition Bit Masks............................................................................II-189 Control Line Bit Masks................................................................................II-189 Terminator Structures ................................................................................II-189 Status Structure...........................................................................................II-190 Completion Code Bit Masks ........................................................................II-190 Miscellaneous Constants.............................................................................II-190 Introduction There are two types of commands: Bus commands and system commands. Bus commands communicate with the IEEE 488 bus. System commands configure or request information from Driver488. This Sub-Chapter contains a detailed description of the bus and system command formats Personal488 User’s Manual, Rev. 3.0 Artisan Technology Group - Quality Instrumentation ... Guaranteed | (888) 88-SOURCE | www.artisantg.com II-187 9K. Command Descriptions II. SOFTWARE GUIDES - 9. Driver488/SUB available for Driver488/SUB and Driver488/W31. The commands for Driver488/W95 and Driver488/WNT are provided as guides, pending current software revisions. Refer to your operating system header file for the latest available information specific to your application. A double-lined banner box similar to the following: Driver488/XXX Only indicates differences among these Driver488 versions. For more detail on the individual system commands, see “Section III: Command References.” Format The format for the Driver488/SUB, W31, W95, and WNT command descriptions consists of several sections which together define the command. Using the C language, this format is implemented for the system commands found in Sub-Chapter 15B: “Driver488/SUB, W31, W95 & WNT Commands” of the “Section III: Command References” in this manual. Syntax The Syntax section of the system command description describes the proper command syntax that must be sent to Driver488. To define the specific command function, syntax parameters accompany each of the system commands. For five detailed listings of syntax parameters for Driver488/SUB and Driver488/W31, turn to the topic “Syntax Parameters” found in each of the five Sub-Chapters of Chapter 14 “Command Summaries.” Returns The Returns section describes the return of the function completed. Note that most functions return a value of -1 to indicate an error. Where no other return value is needed, a 0 indicates normal completion. Some functions can also return specific values such as the number of bytes of data successfully transferred. Note: This format section differs from the Response section of the Driver488/DRV. Mode This section of the command description format specifies the operating modes in which the command is valid. Driver488 may be configured as the System Controller in which case it is initially the Active Controller, or as a Not System Controller in which case it is initially in the Peripheral state. The Driver488 configuration as System Controller or Not System Controller can be changed by the INSTALL program. Note: Even if Driver488 is not configured as the System Controller, it can still become the Active Controller if another controller on the IEEE 488 bus passes control to Driver488. The modes are referred to by their names and states as shown below: Mode Name System Controller Active Controller Active System Controller Not System Controller, Active Controller State SC CA SC•CA *SC•CA Mode Name Not System Controller Peripheral (Not Active Controller) System Controller, Not Active Not System Controller, Not Active Controller State *SC *CA SC•*CA *SC•*C A Bus States This section of the command description format indicates the state of the bus device. The mnemonics abbreviations for these bus states, as well as the relevant bus lines and bus commands, are listed in the following two tables: II-188 Personal488 User’s Manual, Rev. 3.0 Artisan Technology Group - Quality Instrumentation ... Guaranteed | (888) 88-SOURCE | www.artisantg.com II. SOFTWARE GUIDES - 9. Driver488/SUB Bus State 9K. Command Descriptions Bus Lines Hex Value (QuickBASIC) Decimal Value Data Transfer (DIO) Lines 6 5 4 3 8 7 2 1 &H80 &H40 &H20 &H10 &H08 &H04 &H02 &H01 128 64 32 16 8 4 2 1 0 0 0 0 0 0 0 0 0 1 0 0 0 0 0 0 0 0 0 0 1 0 1 0 1 0 0 0 0 0 0 0 0 0 0 0 0 0 0 0 0 0 0 1 0 0 0 0 0 0 0 1 0 0 0 0 1 0 0 0 0 0 0 0 0 1 0 0 0 0 1 0 1 0 0 0 0 0 0 0 0 8 7 &H80 &H40 &H20 &H10 128 64 32 16 8 4 2 1 x x x x x x x x x x x x x x x x x x 0 0 0 0 0 0 1 1 1 0 1 0 0 0 1 0 0 1 0 0 0 1 0 1 0 1 1 0 1 0 0 0 0 0 1 0 1 0 0 a 1 a a 0 1 1 c 0 1 1 a 0 1 1 0 1 0 d 0 d d S 0 0 o 0 1 1 d 1 1 1 1 0 0 d 0 d d P2 0 1 m 1 0 0 d 0 1 1 0 0 0 r 0 r r P1 0 0 m 0 0 0 r 0 1 1 0 0 1 n 1 n n P0 0 1 d 0 1 0 n 1 1 1 Bus Management Lines IFC REN Interface Clear Remote Enable IEEE 488 Interface: Bus Management Lines ATN EOI SRQ Attention (&H04) End-Or-Identify (&H80) Service Request (&H40) 0 1 0 0 0 1 IEEE 488 Interface: Handshake Lines DAV NDAC NRFD Data Valid (&H08) Not Data Accepted (&H10) Not Ready For Data (&H20) 0 0 0 0 0 0 Serial Interface: Bus Management Lines DTR RI RTS Data Terminal Ready (&H02) Ring Indicator (&H10) Request To Send (&H01) 0 0 0 Serial Interface: Handshake Lines CTS DCD DSR Clear To Send (&H04) Data Carrier Detect (&H08) Data Set Ready (&H20) Bus State Bus Commands (IEEE 488) (ATN is asserted “1”) Hex Value (QuickBASIC) Decimal Value DCL GET GTL LAG LLO MLA MTA PPC PPD PPU SCG SDC SPD SPE TAG TCT UNL UNT Device Clear (&H14) Group Execute Trigger (&H08) Go To Local (&H01) Listen Address Group (&H20-3F) Local Lock Out (&H11) My Listen Address My Talk Address Parallel Poll Config Parallel Poll Disable (&H70) Parallel Poll Unconfig (&H15) Second. Cmd. Group (&H60-7F) Selected Device Clear (&H04) Serial Poll Disable (&H19) Serial Poll Enable (&H18) Talker Address Group (&H40-5F) Take Control (&H09) Unlisten (&H3F) Untalk (&H5F) (x = “don’t care”) Data Transfer (DIO) Lines 6 5 4 3 &H08 &H04 2 1 &H02 &H01 If a command is preceded by an asterisk (*), that command is unasserted. For example, *REN states that the remote enable line is unasserted. Conversely, REN without the asterisk states that the line becomes asserted. For a further description of these bus states and their bus lines, turn to the topic “Bus States” found in the Sub-Chapter “Command Descriptions” of Chapter 8, and to “Section V: Appendix” in this manual. Personal488 User’s Manual, Rev. 3.0 Artisan Technology Group - Quality Instrumentation ... Guaranteed | (888) 88-SOURCE | www.artisantg.com II-189 9K. Command Descriptions II. SOFTWARE GUIDES - 9. Driver488/SUB Examples The Examples section of the command description format lists one or more short examples of the command’s normal use. These and additional programs can be found in language or example subdirectories of the Driver488 installation directory. Data Types Driver488 uses a number of data bit masks, data constants, and data structures. The following constructions have been defined for the C language. Other languages are shown in their respective language sections of this manual. Arm Condition Bit Masks Defined bit masks used in the Arm and Disarm functions: acError acByteIn acByteOut acChange acClear acController acIdle acListen acPeripheral acSRQ acTalk acTrigger Control Line Bit Masks The following Control Line functions for IEEE 488 devices: clEOI clSRQ clNRFD clNDAC clDAV clATN return the following defined bit masks, as shown in the table: Control Line Bit Masks Hex Value (QuickBASIC) Decimal Value Bit Mask 8 &H80 128 7 &H40 64 EOI SRQ Data Transfer (DIO) Lines 6 5 4 3 &H20 &H10 &H08 &H04 32 16 8 4 NRFD NDAC DAV ATN 2 &H02 2 1 &H01 1 0 0 The following Control Line functions for serial devices: clDSR clRI clDCD clCTS clDTR clRTS return the following defined bit masks, as shown in the table: Control Line Bit Masks Hex Value (QuickBASIC) Decimal Value Bit Mask 8 &H80 128 7 &H40 64 0 0 Data Transfer (DIO) Lines 6 5 4 3 &H20 &H10 &H08 &H04 32 16 8 4 DSR RI DCD CTS 2 &H02 2 1 &H01 1 DTR RTS For more information on the Control Line command, turn to “Section III: Command References” in this manual. Terminator Structures Structure used by Enter, Output, and Term: typedef struct { bool EOI; int nChar; bool EightBits; int termChar [2]; } TermT; II-190 /* Do we care about or send EOI?*/ /* 0,1, or 2 characters to match*/ /* 7 (False) or 8 (True) bit terminator match*/ /* The actual terminating character*/ Personal488 User’s Manual, Rev. 3.0 Artisan Technology Group - Quality Instrumentation ... Guaranteed | (888) 88-SOURCE | www.artisantg.com II. SOFTWARE GUIDES - 9. Driver488/SUB 9L. Command Reference Status Structure Structure used by Status: typedef struct { /* These flags are TRUE (non-zero) if: */ bool SC; /* we are System Controller */ bool CA; /* we are Active Controller */ char Primaddr; /* our primary bus address */ char Secaddr; /* our secondary bus address */ /* SRQ is active (CA) or rsv is active (-CA) */ bool SRQ; bool addrChange; /* we detected an address status change */ bool talker; /* we are an active talker */ bool listener; /* we are an active listener */ bool triggered; /* we have been triggered */ bool cleared; /* we have been cleared */ bool transfer; /* we have a transfer in progress */ bool byteIn; /* we have an input byte to read */ bool byteOut; /* we may be able to output a byte */ } IeeeStatusT; typedef IeeeStatusT*IeeeStatusPT; Completion Code Bit Masks Structure used by all the Enter and Output functions: typedef enum { ccCount = 0x0001 /* specified number of characters transferred */ ccBuffer = 0x0002 /* buffer count exhausted */ ccTerm = 0x0004 /* terminator character(s) detected */ ccEnd = 0x0008 /* End signal (EOI) detected */ ccChange = 0x0010 /* unexpected change of I/O signals */ ccStop = 0x0020 /* transfer terminated by program cmd */ ccDone = 0x4000 /* transfer has terminated */ ccError = 0x8000 /* details in error code field */ } CompCodeT; typedef CompCodeT far *CompCodePT; Miscellaneous Constants The following constants are defined and are required as parameters in several functions: IN 9L. OUT ON OFF FILL_OFF FILL_ERROR Command Reference For Driver488/SUB, W31, W95, & WNT To obtain a detailed description of the command references for Driver488/SUB and Driver488/W31, turn to Section III in this manual entitled “Command References.” The commands for Driver488/W95 and Driver488/WNT are provided as guides, pending current software revisions. Refer to your operating system header file for the latest available information specific to your application. The commands are presented in alphabetical order for ease of use. Personal488 User’s Manual, Rev. 3.0 Artisan Technology Group - Quality Instrumentation ... Guaranteed | (888) 88-SOURCE | www.artisantg.com II-191 10A. Introduction 10. II. SOFTWARE GUIDES - 10. Driver488/W31 Driver488/W31 Sub-Chapters 10A. 10B. 10C. 10D. 10E. 10F. 10G. 10H. 10A. Introduction ............................................................................. II-191 Installation & Configuration ................................................ II-192 External Device Interfacing ................................................. II-202 Getting Started ........................................................................ II-205 C Languages ............................................................................ II-208 Visual Basic .............................................................................. II-232 Utility Programs...................................................................... II-251 Command Reference............................................................... II-256 Introduction Note: Driver488/WIN from previous manuals, has been renamed Driver488/W31. Driver488/W31 includes a Windows Dynamic Link Library (DLL) for integrating IEEE 488.2 control into Microsoft Windows applications. Driver488/W31 transfers data at up to 1M byte/second. It uses HP-style IEEE 488 commands for high- and low-level IEEE 488.1 bus control, and offers additional commands that support the IEEE 488.2 standard. Furthermore, Driver488/W31 conforms to Windows’ standard application architecture, allowing Windows to link with the IEEE 488 driver during run time, and to manage its memory requirements, interrupts and messages. Because Microsoft Windows enables multitasking, multiple test applications may concurrently require access to the same network of IEEE 488 instruments. Driver488/W31 automatically arbitrates among test applications, letting multiple applications run concurrently without the risk of data loss. Microsoft Windows provides access to Dynamic Data Exchange (DDE), a mechanism by which unrelated applications can exchange data during run time. Driver488/W31 lets you use this interapplication communication technique to transfer data acquired from instruments to any other compatible application. For example, with Driver488/W31, an application program can collect data from an instrument and automatically transfer it to a concurrently running Excel spreadsheet. Driver488/W31 provides language interfaces for Microsoft C, Quick C on Windows, Visual Basic, Turbo C and Borland C++. Driver488/W31 makes IEEE events in your C or C++ applications conform to Windows’ standard event handling scheme, passing IEEE events such as bus errors and SRQs to Windows as standard messages. This assures consistent handling of IEEE and user events. Visual Basic lets you easily develop full-featured Windows applications. Unlike DOS-based testsystem development environments, which merely code for insertion into an application, Visual Basic greatly simplifies the task of adding a user interface to your application. In addition, Visual Basic contains a tool palette for designing your application’s user interface, letting you use point-and-click operations to design and test your interface. Driver488/W31 augments this tool palette with an IEEE Event Custom Control tool. When you include this Event Custom Control tool in your application, it creates service routines for IEEE events such as bus errors and instruments interrupts (SRQ), letting your application handle asynchronous bus events with ease. At run time, the IEEE Event Custom Control traps IEEE events which are then automatically dispatched to the appropriate service routines. II-192 Personal488 User’s Manual, Rev. 3.0 Artisan Technology Group - Quality Instrumentation ... Guaranteed | (888) 88-SOURCE | www.artisantg.com II. SOFTWARE GUIDES - 10. Driver488/W31 10B. Installation & Configuration Driver488/W31 supports up to four IEEE 488 interfaces. These can be multiple external devices on each interface up to the limits imposed by either electrical loading (14 devices), or with a product such as Expander488, to the limits of the IEEE 488 addressing protocols. Driver488/W31 supports the GP488B, AT488, MP488, MP488CT, GP488/MM, and NB488 series of IEEE 488.2 interface hardware (with the exception of the Digital I/O and Counter/Timer functions). All interaction between the application and the driver takes place via subroutine calls. Note that Counter/Timer support is available in the IOTTIMER.DLL package included on the Driver488/W31 diskette. Refer to your appropriate manuals for more information. 10B. Installation & Configuration Topics • • • Before You Get Started ............................................................... II-192 Making Backup Disk Copies...................................................... II-193 Driver Installation ....................................................................... II-193 Enhanced Mode DMA Transfers ................................................................II-194 • Configuration Utility................................................................... II-195 Interfaces.......................................................................................................II-195 External Devices...........................................................................................II-195 Opening the Configuration Utility ............................................................II-195 • • • Configuration of IEEE 488 Interfaces ..................................... II-195 Configuration of IEEE 488 External Devices......................... II-198 Modification of the Initialization File..................................... II-199 Driver Core Sections ....................................................................................II-200 Before You Get Started Prior to Driver488/W31 software installation, configure your interface board by setting the appropriate jumpers and switches as detailed in the “Section I: Hardware Guides.” Note the configuration settings used, as they must match those used within the Driver488/W31 software installation. Once the IEEE 488 interface hardware is installed, you are ready to proceed with the steps outlined within this Sub-Chapter to install and configure the Driver488/W31 software. The Driver488/W31 software disk(s) include the driver files themselves, installation tools, example programs, and various additional utility programs. A file called README.TXT, if present, is a text file containing new material that was not available when this manual went to press. Personal488 User’s Manual, Rev. 3.0 Artisan Technology Group - Quality Instrumentation ... Guaranteed | (888) 88-SOURCE | www.artisantg.com II-193 10B. Installation & Configuration II. SOFTWARE GUIDES - 10. Driver488/W31 NOTICE 1. The Driver488/W31 software, including all files and data, and the diskette on which it is contained (the “Licensed Software”), is licensed to you, the end user, for your own internal use. You do not obtain title to the licensed software. You may not sublicense, rent, lease, convey, modify, translate, convert to another programming language, decompile, or disassemble the licensed software for any purpose. 2. You may: • only use the software on one single machine; • copy the software into any machine-readable or printed form for backup in support of your use of the program on the single machine; and, • transfer the programs and license to use to another party if the other party agrees to accept the terms and conditions of the licensing agreement. If you transfer the programs, you must at the same time either transfer all copies whether in printed or in machine-readable form to the same party and destroy any copies not transferred. The first thing to do, before installing the software, is to make a backup copy of the Driver488/W31 software disks onto blank disks. To make the backup copy, follow the instructions given below. Making Backup Disk Copies 1. Boot up the system according to the manufacturer’s instructions. 2. Find the MS-DOS icon, and open the DOS window. 3. Type the command CD\ to go back to your system’s root directory. 4. Place the first Driver488/W31 software disk into drive A:. 5. Type DISKCOPY A: A: and follow the instructions given by the DISKCOPY program. (You may need to swap the original (source) and blank (target) disks in drive A: several times to complete the DISKCOPY. If your blank disk is unformatted, the DISKCOPY program allows you to format it before copying.) 6. When the copy is complete, remove the backup (target) disk from drive A: and label it to match the original (source) Driver488/W31 software disk just copied. 7. Store the original Driver488/W31 software disk in a safe place. 8. Place the next Driver488/W31 software disk into drive A: and repeat steps 4-6 for each original (source) disk included in the Driver488/W31 package. 9. Place the backup copy of the Installation disk into drive A:, type A:INSTALL, then follow the instructions on the screen. Driver Installation There are two steps involved in installing Driver488/W31 onto your working disk. The batch file must first be used to copy the required files from the distribution disk to your working disk, and then the configuration must be established by using the Driver488/W31 configuration utility or modifying the supplied Windows-style initialization file. Note: Driver488/W31 requires about 2.5MB of hard disk space. Driver488/W31 should normally be installed on a hard disk. Installing Driver488/W31 on a floppy disk, while possible, is not recommended. The installation batch file will install DRVR488W.INI into your Windows directory and all other files into a new subdirectory, named \IEEE488, within your Windows directory. Three subdirectories exist within the \IEEE488 subdirectory which include the language interfaces, example program(s), and utility programs: \LANGS, \EXAMPLES, and \UTILS, respectively. II-194 Personal488 User’s Manual, Rev. 3.0 Artisan Technology Group - Quality Instrumentation ... Guaranteed | (888) 88-SOURCE | www.artisantg.com II. SOFTWARE GUIDES - 10. Driver488/W31 10B. Installation & Configuration Assuming that the Driver488/W31 disk is in drive A:, specify the full path of your Windows directory. For example, if your Windows directory is C:\WINDOWS, you would copy all required files by entering the following command at the DOS prompt: INSTALL C:\WINDOWS The language support files can be copied to any location accessible to your compiler and other development tools. If you wish to have the Driver488/W31 support reside with your application, simply copy or move the files from the \LANGS\xxx directory appropriate to your development environment: • For Borland C compilers: \LANGS\BC • For Microsoft C compilers: \LANGS\MC • For Visual Basic: \LANGS\VB Alternatively, you can place the files where your compiler expects its own files, which may involve placing include files in one place and library files in another. Example programs are contained in individual subdirectories of \EXAMPLES with a precompiled executable made from the provided source files, allowing you to run the example and compare the source code without necessarily needing to compile the program. The utilities subdirectory \UTILS contains two utility programs: WINTEST and QUIKTEST. These programs were designed as an exercise in order to see the functionality contained within Driver488/W31, to test that your hardware is properly installed and working correctly, and to experiment with command sequences that might be used in your application. For more information on these programs, refer to the Sub-Chapter “Utility Programs” found later in this Chapter. Note: Before using Driver488/W31, the C:\WINDOWS\IEEE488 subdirectory must be added to your path. To do so, you may wish to add the following line to your AUTOEXEC.BAT file: set PATH=C:\WINDOWS\IEEE488;%PATH% or simply add the following segment to your path statement: ;C:\WINDOWS\IEEE488 Note if any error messages display when trying to load Driver488/W31 in memory. If so, refer to “Section IV: Troubleshooting” in this manual.. Enhanced Mode DMA Transfers Driver488/W31 contains an option to use Direct Memory Access (DMA) transfers which provides the highest data transfer rate of the interface hardware. Due to the fact the Microsoft-supplied enhancedmode DMA device-driver does not allow Driver488/W31 to properly interrogate the DMA controller, you must instruct Windows to use the DMA device driver. If you wish to use DMA transfers, perform the following additional installation steps: 1. In C:\WINDOWS\SYSTEM.INI, change the line: device=*vdmad to: device=vdmad.386 2. Next, copy VDMAD.386 from the C:\WINDOWS\IEEE488 directory into the C:\WINDOWS directory: COPY\WINDOWS\IEEE488\VDMAD.386 \WINDOWS Note: The device driver vdmad.386 can be used in Windows 3.1 only. DO NOT use any other operating system. Personal488 User’s Manual, Rev. 3.0 Artisan Technology Group - Quality Instrumentation ... Guaranteed | (888) 88-SOURCE | www.artisantg.com II-195 10B. Installation & Configuration II. SOFTWARE GUIDES - 10. Driver488/W31 Configuration Utility The Driver488/W31 startup configuration is specified in a Windows-style initialization file named DRVR488W.INI, which resides in the \WINDOWS directory. The first screen of the CONFIG program is used to enter the configuration settings so the Driver488/W31 software can be correctly modified to reflect the state of the hardware. An alternative to using the configuration utility, is to modify the initialization file directly (either using a text editor or from an application program). For more information on this process, refer to the last topic “Modification of the Initialization File” found in this Sub-Chapter. The driver can be reconfigured at any time by running the CONFIG program. If the driver is currently loaded (the Driver488/W31 icon is present), any changes made will not take affect until the driver is closed and reloaded. Interfaces The minimum requirement for configuring your system is to make certain that your IEEE 488.2 interface board or module is selected under “Device Type.” The default settings in all of the other fields match those of the interface as shipped from the factory. If you are unsure of a setting, it is recommended that you leave it as is. External Devices Within your IEEE 488.2 application program, devices on the bus are accessed by name. These names must be created and configured within the CONFIG program. After configuring your interface parameters, press <F5> to open the External Devices window. All configured devices will be accessible in your application program via the OpenName command. For more details, refer to the topic “Configuration of IEEE 488 External Devices” found later in this Sub-Chapter. Opening the Configuration Utility In general, all Driver488/W31 configuration utility screens have three main windows: the “name” of the interfaces or devices on the left, the “configuration” window on the right, and the “instruction” window at the bottom of the screen. Based on current cursor position, the valid keys for each window will display in the Instructions box. To begin the interface configuration, move the cursor in the name window to select an interface description for modification. (Interfaces can be added or deleted using <F3> and <F4>.) Notice moving the cursor up and down the list of interfaces or devices in the left window changes the parameters in the configuration window. The configuration fields always correspond with the currently selected interface and device type. Once all modifications have been made to the configuration screen, <F10> must be pressed to accept the changes made or <F9> can be pressed to exit without making any change. Additional function keys allow the user to continue onto the configuration of external devices via <F5> or to view a graphic representation of the interface card with the selected settings via <F7>. II-196 Personal488 User’s Manual, Rev. 3.0 Artisan Technology Group - Quality Instrumentation ... Guaranteed | (888) 88-SOURCE | www.artisantg.com II. SOFTWARE GUIDES - 10. Driver488/W31 10B. Installation & Configuration Configuration of IEEE 488 Interfaces Note: The Driver488/W31 supports only the IEEE interface. The following Driver488/W31 figure displays the configuration of: An MP488 IEEE 488.2 interface in the upper screen section, and a WAVE external device in the lower screen section. For additional information on using more than one interface, refer to the final topic “Multiple Interface Management” in the SubChapter “Installation & Configuration” of Chapter 8. Once an interface is selected, Configuration Utility Screen with MP488 Board the fields and default entries which display in the configuration window depend on the device type specified. The configuration parameters of the IEEE interface, shown in the figure, are as follows: Configuration Parameters • Name: This field is a descriptive instrument name which is manually assigned by the user. This must be a unique name. Typically, IEEE is used. • IEEE Bus Address: This is the setting for the IEEE bus address of the board. It will be checked against all the instruments on the bus for conflicts. It must be a valid address from 0 to 30. • DMA: A direct memory access (DMA) channel can be specified for use by the I/O interface card. If DMA is to be used, select a channel as per the hardware setting. If no DMA is to be used, select NONE. The NB488 does not support DMA, therefore the DMA field will not display if this device type is used. Valid settings are displayed in the table. • Interrupt: A hardware interrupt level I/O Board Specified Interrupt Level (IRQ) can be specified to improve the GP488B levels 2-7 or none efficiency of the I/O adapter control and AT488 levels 3-7, 9-12, 14-15 or none communication using Driver488/W31. For MP488 levels 3-7, 9-12, 14-15 or none DMA operation or any use of OnEvent and MP488CT levels 3-7, 9-12, 14-15 or none Arm functions, an interrupt level must be NB488 level 7 for LPT1, level 5 for LPT2 selected. Boards may share the same CARD488 levels 3-7, 9-12, 14-15 or none interrupt level. If no interrupt level is to be used, select NONE. Valid interrupt levels depend on the type of interface. Possible settings are shown in the table. • SysController: This field determines whether or not the IEEE 488 interface card is to be the System Controller. The System Controller has ultimate control of the IEEE 488 bus, and the ability of asserting the Interface Clear (IFC) and Remote Enable (REN) signals. Each IEEE 488 bus can have only one System Controller. If the board is a Peripheral, it may still take control of I/O Board GP488B AT488 MP488 MP488CT NB488 CARD488 Specified DMA Channel 1, 2, 3 or none 1, 2, 3, 5, 6, 7 or none 1, 2, 3, 5, 6, 7 or none 1, 2, 3, 5, 6, 7 or none Not applicable Not applicable Personal488 User’s Manual, Rev. 3.0 Artisan Technology Group - Quality Instrumentation ... Guaranteed | (888) 88-SOURCE | www.artisantg.com II-197 10B. Installation & Configuration II. SOFTWARE GUIDES - 10. Driver488/W31 the IEEE 488 bus if the Active Controller passes control to the board. The board may then control the bus and, when it is done, pass control back to the System Controller or another computer, which then becomes the Active Controller. If the board will be operating in Peripheral mode (not System Controller), select NO in this field. • Timeout (ms): The time out period is the amount of time that data transfers wait before assuming that the device does not transfer data. If the time out period elapses while waiting to transfer data, an error signal occurs. This field is the default timeout for any bus request or action, measured in milliseconds. If no timeout is desired, the value may be set to zero. • Device Type: This field specifies the type of device represented by the IEEE device name selected. I/O Address • IEEE 488: This field is the I/O base address which sets the addresses used by the computer to communicate with the IEEE interface hardware on the board. The address is specified in hexadecimal and can be 02E1, 22E1, 42E1 or 62E1. Note: This field does not apply to the NB488. Instead, the NB488 uses the I/O address of the data register (the first register) of the LPT port interface, typically 0x0378. • Bus Terminators: The IEEE 488 bus terminators specify the characters and/or end-or-identify (EOI) signal that is to be appended to data that is sent to the external device, or mark the end of data that is received from the external device. This second Driver488/W31 example displays the configuration of an NB488 IEEE interface module, specified in the upper screen section. This screen resembles the previous IEEE interface example with the exception of 3 different configuration parameters which are described below. Configuration Parameters • LPT Port: The LPT port is the external parallel port to be connected to the NB488. Valid selections are: LPT1, LPT2, or LPT3. This field takes the place of the I/O Address field. • Enable Printer Port: Configuration Utility Screen for NB488 Because most laptop and notebook PCs provide only one LPT port, the NB488 offers LPT pass-through for simultaneous IEEE 488 instrument control and printer operation. If this option is selected, a printer connected to the NB488 will operate as if it were connected directly to the LPT port. If not enabled, then the printer will not operate when the NB488 is active. The disadvantage of pass-through printer support is that it makes communications with the NB488 about 20% slower. Note: If this option is in use, it is important to note that printing will not occur while any IEEE devices are open. If you attempt to print while IEEE 488 devices are open, the program responds as if printing were accomplished. However, Windows actually spools the printer output but then waits until all IEEE 488 devices are closed before printing. II-198 Personal488 User’s Manual, Rev. 3.0 Artisan Technology Group - Quality Instrumentation ... Guaranteed | (888) 88-SOURCE | www.artisantg.com II. SOFTWARE GUIDES - 10. Driver488/W31 10B. Installation & Configuration To print through the NB488 printer port, you can either close all IEEE 488 devices, print as necessary and then reopen all instruments on the bus or allow Windows to spool the printer data until the driver devices are closed. • LPT Port Type: This field is used to specify whether the LPT port is a standard IBM PC/XT/AT/PS/2 compatible port. Valid options are Standard or 4-bit. The slower 4-bit option is provided for those computers which do not fully implement the IBM standard printer port. These computers can only read 4 bits at a time from the NB488 making communication with the NB488 up to 30% slower. A test program has been provided with NB488 to help identify the user’s LPT port type. Once the NB488 is installed, type: NBTEST.EXE. This program will determine if your computer can communicate with the NB488 and what type of LPT port is installed (Standard or 4-bit). It is important to note there are four different versions of the NB488 driver. The CONFIG utility determines which is to be used based on the user-defined parameters. If both pass-through printer support and the 4-bit LPT port support are selected, then the communication with the IEEE 488 bit may be slowed as much as 40% compared with the fastest case in which neither option is selected. The actual performance will very depending on the exact type and speed of the computer used. To save your changes to disk, pull down the File menu item and double-click on the Save option. Or to exit without making any changes, double-click on the Exit option. All changes will be saved in the directory where you installed Driver488/W31. If at any time you wish to alter your Driver488/W31 configuration, simply rerun CONFIG. Configuration of IEEE 488 External Devices Configuration of IEEE 488 external devices under Driver488/W31 is done by editing an initialization file that stores the specific configuration information about all of the configured external devices. The configuration for each device is set when the Driver488/W31 loads itself into memory and is present at the start of the application program. Each external device requires a handle to communicate with Driver488/W31. An external device handle is a means of maintaining a record about 3 configurable items: its IEEE 488 bus address, its IEEE 488 bus terminators and its time out period. Any communication with the external device uses these three items. The different configurable items, which define the external device, are listed in the following figure. All external devices have either a default value or a user supplied value for the different fields. All fields can be changed by Driver488/W31 commands during program execution. Like the first two configuration screen figures, this third figure displays the configuration of an external device named WAVE, specified in the lower screen section. The following parameters are available for modification: Configuration Parameters • Name: This field specifies the type of device represented by the IEEE device name selected. External device names are user defined names which are used to convey the configuration information about each device, from the initialization file to the application program. Each external device must have a name to identify its configuration to Configuration Utility Screen for External Devices Personal488 User’s Manual, Rev. 3.0 Artisan Technology Group - Quality Instrumentation ... Guaranteed | (888) 88-SOURCE | www.artisantg.com II-199 10B. Installation & Configuration II. SOFTWARE GUIDES - 10. Driver488/W31 Driver488/W31. The name can then be used to obtain a handle to that device which will be used by all the Driver488/W31 commands. External device names consist of 1 to 32 characters, and the first character must be a letter. The remaining characters may be letters, numbers, or underscores ( _ ). External device names are case insensitive; upper and lower case letters are equivalent. ADC is the same device as adc. • IEEE Bus Address: This is the setting for the IEEE 488 bus address of the board. It will be checked against all the devices on the bus for conflicts. The IEEE 488 bus address consists of a primary address from 00 to 30, and an optional secondary address from 00 to 31. Where required, Driver488/W31 accepts a secondary address of -1 to indicate “NONE.” • Timeout (ms): The time out period is the amount of time that data transfers wait before assuming that the device does not transfer data. If the time out period elapses while waiting to transfer data, an error signal occurs. This field is the default timeout for any bus request or action, measured in milliseconds. If no timeout is desired, the value may be set to zero. • Device Type: This field specifies the type of device represented by the external device name selected. • Bus Terminators: The IEEE 488 bus terminators specify the characters and/or end-or-identify (EOI) signal that is to be appended to data that is sent to the external device, or mark the end of data that is received from the external device. Note: Because secondary addresses and bus terminators are specified by each handle, it may be useful to have several different external devices defined for a single IEEE 488 bus device. For example, separate device handles would be used to communicate with different secondary addresses within a device. Also, different device handles might be used for communication of command and status strings (terminated by carriage return/line feed) and for communication of binary data (terminated by EOI). Note: If installation or configuration problems exist, refer to “Section IV: Troubleshooting.” To save your changes to disk, pull down the File menu item and double-click on the Save option. Or to exit without making any changes, double-click on the Exit option. All changes will be saved in the directory where you installed Driver488/W31. If at any time you wish to alter your Driver488/W31 configuration, simply rerun CONFIG. Modification of the Initialization File If instead of using the configuration utility you wish to modify the initialization file directly, (either using a text editor or from an application program), the following text describes the required contents. The example initialization file DRVR488W.INI provides a default setup with one 16-bit IEEE 488 interface at bus address 21, and one external device called WAVE at bus address 16. This file can be modified to define other configurations, as described in the following paragraphs. Fields not described, should be left as in the example. The order of the fields within the file is significant and should be preserved. If your application will modify the initialization file, note that per Microsoft recommendations for future compatibility, it should be accessed only through the GetPrivateProfileString and SetPrivateProfileString functions. Refer to the supplied DRVR488W.INI while reviewing the following material: II-200 • The field labeled “Driver” in each section, is the filename of the driver file for a particular layer of the driver. This can be just the filename if the driver file is present in the Windows directory or in the DOS search path, or this can include a full path to the file. • To support multiple IEEE 488 interfaces, duplicate the driver core sections labeled IEEE_3, IEEE_4, and IEEE for each additional interface, changing the names as required to avoid duplicate names. For instance, IEEE_3 might be changed to IEEE2_3. These names follow the rules given for device names under MakeDevice found in “Section III: Command References” of this manual. Also, for more information on multiple interfaces, see the last topic “Multiple Interface Management” in the Sub-Chapter “Installation & Configuration” of Chapter 8. Personal488 User’s Manual, Rev. 3.0 Artisan Technology Group - Quality Instrumentation ... Guaranteed | (888) 88-SOURCE | www.artisantg.com II. SOFTWARE GUIDES - 10. Driver488/W31 • 10B. Installation & Configuration Terminators refer to the particular characters or other signals which indicate the end of a data transfer. For instance, a carriage return (CR) and line feed (LF) pair typically indicates the end of a line of text to a printer. However, some printers may use just CR or just LF to indicate the end of a line. Other devices may use one of these combinations or some other character, with or without the IEEE 488 end-or-identify (EOI) signal, to indicate the end of a transfer. Driver488/W31 provides for automatic insertion and detection of these terminators, with the exact terminator to be used, configurable for each interface and external device. Terminators are indicated in the initialization file as a quoted string containing any combination of the following, which indicates no more than 2 characters plus an optional EOI: CR : Carriage return (decimal 13, hex 0D) LF : Line feed (decimal 10, hex 0A) $char : A specific character as indicated in decimal ‘X : A specific printable character such as X EOI : The IEEE 488 End Or Identify signal For example, to specify terminators of carriage return followed by line feed with EOI, the specification would be CR LF EOI. To specify a terminator of the character X (decimal 88, hex 58) without EOI, you could use either ’X or $88. Driver Core Sections Drivers Section This section contains the names of all active succeeding driver core sections. Any given section can be disabled by removing or commenting out the corresponding line in this section, as has been done with the support for a second IEEE 488 interface in the supplied initialization file. Router Section The Router section refers to the driver core section responsible for communications among the other parts of the driver. Message Handling Section The Message Handling section refers to the section responsible for error reporting. Interrupt Section The Interrupt section refers to the section responsible for coordination of interrupts and event handling. DMA Section The DMA section refers to the section responsible for data transfers via Direct Memory Access. IEEE_3 Section The IEEE_3 section concerns the lowest-level access to the interface board and is responsible for directly controlling the hardware. Its components include the following: • IOaddr: &H02E1, &H22E1, &H42E1, &H62E1, &H0378, &W0278 or &W03BC according to the hardware configuration. • DMA: The DMA channel number to be used (such as 1, 3, 5, etc.) as selected on the interface hardware. If DMA is not desired for any reason, the entry NONE in place of a channel number indicates this fact. For more information on enhanced mode DMA transfers, see the topic “Driver Installation” in the Sub-Chapter “Installation & Configuration” of this Chapter. • Interrupt: The interrupt channel to be used (such as 2, 7, 15, etc.) as selected on the interface hardware. If interrupt support is not desired, the word NONE replaces the channel number. Personal488 User’s Manual, Rev. 3.0 Artisan Technology Group - Quality Instrumentation ... Guaranteed | (888) 88-SOURCE | www.artisantg.com II-201 10B. Installation & Configuration • II. SOFTWARE GUIDES - 10. Driver488/W31 Subset: MP488CT, MP488, AT488, GP488BP, GP488B or NB488 depending on the type of interface which is present. Also, note that a section defining a GP488B interface must follow a section defining one of the other interfaces. IEEE_4 Section The IEEE_4 section concerns components which are common to all IEEE 488 interfaces but not necessarily all types of communications. These components include the following: • Slave: Name of the slave device. With multiple interfaces, this allows the specification of which interface is in this particular chain. The slave must be a device using the IOTMP488.EXE driver. • IEEE Bus Address: The IEEE 488 Bus Address to be assigned to the interface. This must be a one- or two-digit decimal address between 0 and 30. • System Controller: The digit 1 indicates System Controller, and 0 indicates not System Controller. IEEE Section The IEEE section, which is the device visible to applications as the interface device, concerns components which are common to all types of communication. These components include the following: • Slave: Name of the slave device. With multiple interfaces, this allows the specification of which interface is in this particular chain. The slave must be a device using the IOTIEEE4.EXE driver. • Timeout: Timeout interval in milliseconds. • Termin: Input terminator (Enter) following the format specified for terminators, as described above. • Termout: Output terminator (Output) following the format specified for terminators, as described above. IEEEDEV Section The IEEEDEV section is used for predefined external devices, such as a digital multimeter (DMM), oscilloscope (SCOPE), or analog-to-digital converter (ADC), and is visible to applications as an external device. The name can be changed to suit the application and will be the name referenced by the OpenName command. There must be at least one external device defined in the initialization file in order to use the MakeDevice command. There may be multiple external devices on each interface, up to the limits imposed by IEEE 488, but the total number of devices (interfaces plus external devices) may not exceed 56 at any one time. The components for this section, include the following: • Slave: Name of the slave device. With multiple interfaces, this allows the specification of which interface serves this external device. The slave must be a device using the IOTGNRCD.EXE driver. As noted above, several external devices can specify the same slave when multiple devices are physically connected to the same interface. • Termin: Input terminator (Enter) following the format specified for terminators, as described above. • Termout: Output terminator (Output) following the format specified for terminators, as described above. • IEEE Bus Address: IEEE 488 Bus Address (decimal) to be assigned to the device. If this address is one or two digits, it is interpreted as a primary address with no secondary address. With three digits, it is interpreted as a one-digit primary address followed by a two-digit secondary address. With four digits, it is interpreted as a two-digit primary address followed by a two-digit secondary address. • Timeout: Timeout interval in milliseconds. Additional external devices on the same IEEE 488 interface can be configured by duplicating the IEEEDEV section and modifying the bus address and other parameters as required. II-202 Personal488 User’s Manual, Rev. 3.0 Artisan Technology Group - Quality Instrumentation ... Guaranteed | (888) 88-SOURCE | www.artisantg.com II. SOFTWARE GUIDES - 10. Driver488/W31 10C. 10C. External Device Interfacing External Device Interfacing Topics • Introduction .................................................................................. II-202 Subroutine Calls.................................................................................................II-202 • • • Configuration of Named Devices.............................................. II-202 Use of External Devices .............................................................. II-204 Extensions For Multiple Interfaces ......................................... II-204 Duplicate Device Names .............................................................................II-205 Access of Multiple Interfaces......................................................................II-205 Example .........................................................................................................II-205 Introduction This Sub-Chapter is a technical review of external device interfacing. It contains information on how to use external devices and multiple interfaces. Driver488/W31 controls I/O adapters and their attached external devices. In turn, Driver488/W31 is controlled via subroutine calls. Driver488/W31 communicates directly with I/O adapters such as an IEEE 488 interface board. More than one I/O adapter may reside on a single plug-in board. For example, the IEEE 488 interface board contains the IEEE 488 I/O adapter. I/O adapters connect to external devices such as digitizers, multimeters, plotters, and oscilloscopes (IEEE 488 interface); and serial devices such as printers, plotters, and modems. However, Driver488/W31 allows direct control of IEEE 488 external devices only. Note: To reiterate, Driver488/W31 supports IEEE 488 external devices, and does not support serial external devices. Driver488/W31 is controlled by sending data and commands, and receiving responses and status by subroutine calls. This method is the only Application Program Interface, API, available to connect the application (user’s) program to Driver488/W31. Subroutine Calls The subroutine API is a library of subroutines linked to the application program that are invoked like any other subroutines in that programming language. Once invoked, these routines can control Driver488/W31. Configuration of Named Devices Named devices provide a method to maintain a permanent record of an external device’s configuration that does not change between application programs. Once the configuration of a particular external device is established, its Driver488/W31 configuration for that device will remain the same until the next time you reconfigure it or unload and reload the driver. The external devices supported by Driver488/W31 are IEEE 488 external devices only. External devices are most easily configured at installation. For Driver488/W31, the device names, terminators, timeout period, and bus addresses may be entered into a configuration file (either manually or using the CONFIG utility) which contains the device configuration information. This configuration file is automatically read during driver load to install the configured named devices. The application program can then refer to the external device by name and have all of the configuration information automatically set. Personal488 User’s Manual, Rev. 3.0 Artisan Technology Group - Quality Instrumentation ... Guaranteed | (888) 88-SOURCE | www.artisantg.com II-203 10C. External Device Interfacing II. SOFTWARE GUIDES - 10. Driver488/W31 Every device to be accessed by Driver488/W31 must have a valid device name. Driver488/W31 comes with several device and interface names preconfigured for use. Among those already configured for the GP488B board, for example, are: IEEE and WAVE. You can configure up to 32 external devices for each IEEE 488 interface. It is also possible to configure new named devices by using the Driver488/W31 command MakeDevice. The MakeDevice command creates a temporary device that is an identical copy of an already existing Driver488/W31 device. The new device has default configuration settings identical to those of the existing device. The new device can then be reconfigured by calling the proper functions, such as BusAddress, IntLevel, and TimeOut. When Driver488/W31 is closed, the new device is forgotten unless the KeepDevice command is used to make it permanent. The following code illustrates how the subroutine API version of the MakeDevice command could be used to configure several new named devices. Using the C language subroutine interface, three named devices can be configured as follows: wave = OpenName(“WAVE”) dmm = MakeDevice(WAVE,"DMM"); if (dmm == -1) { process error...} err = BusAddress(dmm,16,-1); if (err == -1) { processerror...} term.EOI = TRUE; term.nChars = 2; term.termChar[0] = ‘\r’; term.termChar[1] = ‘\n’; err = Term(dmm,&term,BOTH); if (err == -1) {process error...} adc = MakeDevice(WAVE,"ADC"); if (a == -1) { process error...} err = BusAddress(adc,14,00); if (err == -1) { process error...} term.EOI = FALSE; term.nChars = 1; term.termChar[0] = ‘\n’; err = Term(adc,&term,BOTH); if (err == -1) { process error...} scope = MakeDevice(WAVE,"SCOPE"); if (scope == -1) { process error...} err = BusAddress(scope,12,01); if (err == -1) { process error...} term.EOI = TRUE; term.nChars = 0; err = Term(scope,&term,BOTH); if (err == -1) { process error...} The above example defines the following: An external device named DMM (digital multimeter) as device 16 with bus terminators of carriage return (\r), line feed (\n), and EOI; a second external device named ADC (analog-to-digital converter) as device 14 with bus terminators of carriage return and line feed (together as \n); and a third external device named oscilloscope (SCOPE) as device 12 with bus terminators of EOI only. External devices defined in a configuration file are permanent. Their definitions last until they are explicitly removed or until the configuration file is changed and Driver488/W31 is restarted. Devices defined after installation are normally temporary. They are forgotten as soon as the program finishes. The KeepDevice command can be used to make these devices permanent. The RemoveDevice command removes the definitions of devices even if they are permanent. These commands are described in further detail in the “Section III: Command Reference” of this manual. II-204 Personal488 User’s Manual, Rev. 3.0 Artisan Technology Group - Quality Instrumentation ... Guaranteed | (888) 88-SOURCE | www.artisantg.com II. SOFTWARE GUIDES - 10. Driver488/W31 10C. External Device Interfacing Use of External Devices When using subroutine Application Program Interface (API) functions, it is first necessary to obtain a device handle for the device(s) with which you wish to interact. When using Driver488/W31, the OpenName function must be the first function called in the program. It takes the name of the device to open and returns a handle for the specified interface board or device. Every other function can then use that handle to access the device. The following program illustrates how Driver488/W31 might communicate with an analog-to-digital converter (adc) and an oscilloscope (scope): DevHandleT DevHandleT DevHandleT DevHandleT int err; ieee; adc; scope; deviceList[5]; // // // // handle to access handle to access handle to access array containing the interface board ieee a ADC488 the scope a list of device handles; Communication with a single device: adc = OpenName (“ADC”); If you use several devices, you must open each one. ieee = OpenName(“IEEE”); scope = OpenName(“SCOPE”); deviceList[0] = adc; deviceList[1] = scope deviceList[2] = -1; // Add adc to the list of devices // Add oscilloscope to the list of devices // End of list marker Abort(ieee); // Send Interface Clear (IFC) Output(scope,"SYST:ERR?"); Enter(scope,data); printf(data); // Read SCOPE error status Output(adc,"A0 C1 G0 R3 T0 X"); Enter(adc,data); printf(data); ClearList (deviceList) ; Close (adc) ; // Set up ADC488 // Send a Selected Device Clear (SDC) to a list // Close ADC488. Handle is now unavailable for // access. If we tried to call Output by sending the handle adc without first opening the name ADC, an error would result and Output would return a -1 as shown below: result = Output (adc, “A0 C1 G0 R3 T0 X”); printf (“Output returned: %d.\n”,result); should print: Output returned: -1. As mentioned above, named devices have another advantage: they automatically use the correct bus terminators and time out. When a named device is defined, it is assigned bus terminators and a time out period. When communicating with that named device occurs, Driver488/W31 uses these terminators and time out period automatically. Thus Term commands are not needed to reconfigure the bus terminators for devices that cannot use the default terminators (which are usually carriage-return line-feed EOI). It is still possible to override the automatic bus terminators by explicitly specifying the terminators in an Enter or Output command, or to change them semi-permanently via the Term command. For more information, see the Enter, Output, and Term commands described in “Section III: Command References.” Extensions For Multiple Interfaces Driver488/W31 allows the simultaneous control of multiple interfaces each with several attached devices. To avoid confusion, external devices may be referred to by their “full name” which consists of two parts. The “first name” is the hardware interface name, followed by a colon separator ( : ). The “last name” is the external device name on that interface. For example, the “full name” of DMM might be IEEE:DMM. Personal488 User’s Manual, Rev. 3.0 Artisan Technology Group - Quality Instrumentation ... Guaranteed | (888) 88-SOURCE | www.artisantg.com II-205 10D. Getting Started II. SOFTWARE GUIDES - 10. Driver488/W31 Duplicate Device Names Duplicate device names are most often used in systems that consist of several identical sets of equipment. For example, a test set might consist of a signal generator and an oscilloscope. If three test sets were controlled by a single computer using three separate IEEE 488 interfaces, then each signal generator and each oscilloscope might be given the same name and the program would specify which test set to use by opening the correct interface (OpenName(“IEEE”) for one, OpenName(“IEEE2”) for the other), or by using the interface names when opening the devices (OpenName(“IEEE:GENERATOR”) for one and OpenName(“IEEE2:GENERATOR”) for the other). Unique names are appropriate when the devices work together, even if more than one interface is used. If two different oscilloscopes, on two different interfaces are used as part of the same system, then they would each be given a name appropriate to its function. This avoids confusion and eliminates the need to specify the interface when opening the devices. Access of Multiple Interfaces If the computer only has one IEEE 488 interface, then there is no confusion; for every external device is known to be on that interface. As noted above, duplicate device names on one interface are not recommended; if they exist, the most recently defined device with the requested name will be used. When more than one interface is available and duplicate names appear on different interfaces, the following rules apply. 1. If the external device name is specified without its interface name, then any external device with that name may be used. If more than one external device has that name, then the choice of which particular external device is not defined. 2. If the external device name is specified with its interface name prefixed, then that external device on that hardware interface is used. If that external device is not attached to the specified hardware interface, then an error occurs. Example Assume there are three IEEE 488 interfaces: IEEE, IEEE2, and IEEE3 controlling multiple devices: SCOPE (on IEEE), DA (on IEEE2) and DA (on IEEE3). Since there are two external devices, both named DA, their full name must be used to specify them. We can communicate with the external devices, according to the two rules above. scope = OpenName (“SCOPE”) ; da = OpenName (“DA”) da = OpenName (“IEEE2:DA”) ; scope = OpenName (“IEEE2:SCOPE”); 10D. // // // // SCOPE DA on DA on Error on IEEE (Rule 1) IEEE2 or IEEE3 (not specified) IEEE2 (Rule 2) (not IEEE:SCOPE) (Rule 2) Getting Started Topics • Introduction................................................................................... II-206 C Languages................................................................................................. II-206 Visual Basic ................................................................................................. II-206 • C Languages................................................................................... II-206 Required Headers........................................................................................ II-206 Required Libraries ...................................................................................... II-207 • Visual Basic.................................................................................... II-207 Required Files .............................................................................................. II-207 II-206 Personal488 User’s Manual, Rev. 3.0 Artisan Technology Group - Quality Instrumentation ... Guaranteed | (888) 88-SOURCE | www.artisantg.com II. SOFTWARE GUIDES - 10. Driver488/W31 10D. Getting Started Introduction C Languages Driver488/W31 provides support for Microsoft C, Quick C and Borland C++. In addition, Driver488/W31 features an IEEE 488 Event Message. The IEEE Event Message can be used to trap IEEE 488 events such as bus errors and instrument interrupts (SRQ) letting your application handle asynchronous bus events. At run time, the IEEE 488 Message Handler traps IEEE 488 events, which are then automatically dispatched to the appropriate service routines. The following text outlines the steps necessary to produce an application program that communicates with Driver488/W31. For more details on using C languages to develop a basic data acquisition program and on how to use the IEEE 488 Event Message with Driver488/W31, turn to the next SubChapter “C Languages” in this Chapter. All of the examples described in that Sub-Chapter were developed using Quick C for Windows. For details on using the WINTEST and QUIKTEST utility programs, turn to the following Sub-Chapter “Utility Programs” in this Chapter. Additional functions provided by Driver488/W31 are described in “Section III: Command References” of this manual. Visual Basic Driver488/W31 provides support for Microsoft’s Visual Basic. Visual Basic includes a tool palette for designing your application’s user interface, letting you use point-and-click operations to design and test your entire user interface. For example, to place a button in one of your application’s windows, you simply select the button tool from the tool palette, then click and drag in the desired window to place and size the button. In addition, Driver488/W31 adds to the tool palette with an IEEE 488 Event Custom Control. Including the Event Custom Control in your application creates service routines for IEEE 488 events such as bus errors and instrument interrupts (SRQ), letting your application handle asynchronous bus events with unparalleled ease. At run time, the IEEE 488 Event Custom Control traps IEEE 488 events, which are then automatically dispatched to the appropriate service routines. The following text outlines the steps necessary to produce an application program that communicates with Driver488/W31. For more details on using Visual Basic to develop a basic data acquisition program, how to use the IEEE 488 Event Custom Control, and performing Dynamic Data Exchange with Driver488/W31, turn to the following Sub-Chapter “Visual Basic” in this Chapter. For details on using the WINTEST and QUIKTEST utility programs, turn to the following Sub-Chapter “Utility Programs” in this Chapter. Additional functions provided by Driver488/W31 are described in “Section III: Command References” of this manual. C Languages To successfully operate Driver488/W31, several declarations must be included in the user’s application program. These declarations are found in two headers which must be included in the main module of your C program. The two required headers can be found in the language-specific subdirectory at the end of the path \IEEE488\LANGUAGE, if installed under the default conditions. In the same directory as the headers is the library that must be linked with your C project to resolve Driver488/W31 external references. Note: For proper configuration, the C compiler must have byte alignment when using term structure. Required Headers For Microsoft C and Quick C Users: • All programs need to include the following header files to run with Driver488/W31: iot_main.h iotmc60w.h • These header files must be included in your test program. To do so, insert the following lines: Personal488 User’s Manual, Rev. 3.0 Artisan Technology Group - Quality Instrumentation ... Guaranteed | (888) 88-SOURCE | www.artisantg.com II-207 10D. Getting Started II. SOFTWARE GUIDES - 10. Driver488/W31 #include “iot_main.h” #include “iotmc60w.h” These lines must be included at the top of your program before any calls to the Driver488/W31 subroutine functions are made. Notice that the header file iot_main.h must be in the module containing your main() function and may not appear in any other modules. For Borland C Users: • All programs need to include the following header files to run with Driver488/W31: iot_main.h iotbc20w.h • These header files must be included in your test program. To do so, insert the following lines: #include “iot_main.h” #include “iotbc20w.h” These lines must be included at the top of your program before any calls to the Drvier488/W31 subroutine functions are made. Notice that the header file iot_main.h must be in the module containing your main() function and may not appear in any other modules. Required Libraries For Microsoft C & Quick C Users: • All programs need to include the following library in the link process to run with Driver488/W31: drvr488.lib This file must be included in your test program’s makefile or link process. Due to the complexity of makefiles, this discussion will not attempt to build a makefile but does include sample makefiles for each of the examples used within the next Sub-Chapter “C Languages” in this Chapter. For Borland C Users: • All programs need to include the following library in the link process to run with Driver488/W31: drvr488.lib This file must be included in your test program’s project file or link process. Due to the complexity of project files, this discussion will not attempt to build a project file but does include sample project files for each of the examples used within the next Sub-Chapter “C Languages” in this Chapter. Visual Basic To successfully operate Driver488/W31, a text file must be included in the user’s application program. The required library can be found in the language-specific subdirectory at the end of the path \IEEE488\WINAPI, if installed under the default conditions. Required Files In order to have access to all the Driver488/W31 functions, you must include the following file: IOTVB10.TXT You can accomplish this through the Add File item under the File menu. Type *.TXT into the selection field to find the file in your project. Certain functions provided by Driver488/W31 require that data structures be passed in a particular format which is not easily generated from a VB application. Conversion functions are provided in: IOTVB10.BAS This file should be included in the Project Window. Using the VB File menu, select the item Add File and select IOTVB10.BAS. At this point, all Driver488/W31 functions should be accessible. II-208 Personal488 User’s Manual, Rev. 3.0 Artisan Technology Group - Quality Instrumentation ... Guaranteed | (888) 88-SOURCE | www.artisantg.com II. SOFTWARE GUIDES - 10. Driver488/W31 10D. Getting Started If you require event handling support, use the custom control written for event handling. The IEEE 488 Event Custom Control support is included in the following file: IOTEVENT.VBX This file should be included in the Project Window. For more information on using the IEEE 488 Event Custom Control, turn to the topic “IEEE 488 Event Custom Control” found in the following SubChapter “Visual Basic” in this Chapter. 10E. C Languages Topics • Accessing from a Windows Program ....................................... II-208 • • • • • • • • Establishing Communications .................................................. II-209 Confirming Communications .................................................... II-211 IEEE 488 Event Message............................................................. II-211 Reading Driver Status................................................................. II-213 External Device Initialization................................................... II-214 Basic Data Acquisition................................................................ II-214 Block Data Acquisition ............................................................... II-215 Sample Programs ......................................................................... II-216 Opening & Closing the Driver....................................................................II-208 Data Acquisition Sample Programs .........................................................II-216 IEEE 488 Event Message Sample Programs.............................................II-224 • Command Summary .................................................................... II-231 Accessing from a Windows Program The structure of a Windows program generally dictates that actions take place in response to messages such as an operator key press, mouse action, menu selection, etc. This discussion covers the basic actions needed to control Driver488/W31. How these actions are combined and coordinated in response to Windows messages, is up to the application designer. Opening & Closing the Driver The first Driver488/W31 programming example is designed for simplicity. Its sole purpose is to verify proper communication with the driver, and upon closing, remove the driver from memory. In every C program using Driver488/W31, header files of declarations must be merged into the program. In the following example, those declarations have been omitted from the listing for the sake of brevity. With the associated source files, the following program can be built using the file EXAMPLE1.MAK (for Microsoft C or Quick C users) or EXAMPLE1.PRJ (for Borland C users) found on the Driver488/W31 disk. This example has several declarations that will be used later: HWND hDriver DevHandleT ieee; char hellomsg[256]; /* handle for Driver488/W31 */ /* handle for the IEEE board * / /* string to hold the hello response */ Personal488 User’s Manual, Rev. 3.0 Artisan Technology Group - Quality Instrumentation ... Guaranteed | (888) 88-SOURCE | www.artisantg.com II-209 10E. C Languages II. SOFTWARE GUIDES - 10. Driver488/W31 The program only has one menu with two selections: Go and Quit. When Go is selected, the service routine for Go opens Driver488/W31. Then the Hello function is called, using the handle returned from the OpenName function: case WM_INITDIALOG: cwCenter(hWndDlg, 0); /* initialize working variables */ ieee=OpenName(“IEEE”); Hello(ieee, hellomsg); SetDlgItemText(hWndDlg, 101, (LPSTR)hellomsg); Close(ieee); break; /* End of WM_INITDIALOG */ After the Hello Message window is displayed, as shown in the figure, the driver handle is closed. Since in this application the handle is created every time Go is selected, a potential conflict could arise if that handle is not closed as we exit this subroutine. Clicking the OK button will close this window. Hello Message Window When the application is closed by selecting Quit, the WM_DESTROY message is sent to Driver488/W31: case WM_CLOSE: /* close the window */ hDriver=FindWindow((LPSTR)"Driver488Loader", (LPSTR)"Driver488/W31"); SendMessage(hDriver, WM_DESTROY, 0, 0L); DestroyWindow(hWnd); if (hWnd == hWndMain) PostQuitMessage(0); /* Quit the application */ break; Establishing Communications The following program contains most of the function calls of Driver488/W31. The user interface of this program is intentionally simple to highlight the Driver488/W31 operations. To centralize all of the Driver488/W31-related code, the architecture of this example is not typical of a C program. This example operates the multi-channel 16-bit analog-to-digital converter; the ADC488. In every C program using Driver488/W31, header files of declarations must be merged into the program. In the next example, those declarations are omitted from the listing for the sake of brevity. With the associated source files, the following program can be built using the file EXAMPLE2.MAK (for Miscrosoft C or Quick C users) or EXAMPLE2.PRJ (for Borland C users) found on the Driver488/W31 disk. This example has several declarations that will be used later: HWND hDriver DevHandleT ieee, adc, devhandle; char textstr[2048], response[64]; double sum, voltage; /* /* /* /* handle for Driver488/W31 */ handles for the IEEE board * / string for Driver488responses */ variables for ADC488 responses */ For the sake of this discussion, assume that Driver488/W31 has been configured to start with a configuration including the devices IEEE (IEEE 488 interface) and ADC (ADC488/8S connected to the IEEE 488 interface). Additional interfaces and/or devices may also have been defined, as the driver can support up to 4 interfaces and 56 devices simultaneously. To open the two devices of interest, we use the following statements: II-210 Personal488 User’s Manual, Rev. 3.0 Artisan Technology Group - Quality Instrumentation ... Guaranteed | (888) 88-SOURCE | www.artisantg.com II. SOFTWARE GUIDES - 10. Driver488/W31 10E. C Languages /* Open Driver488/W31 */ if ((ieee=OpenName(“IEEE”))<0) { MessageBox(hWndDlg,(LPSTR)"Cannot initialize IEEE system", NULL,MB_OK); EndDialog(hWndDlg, TRUE); return TRUE; } /* Open or create the device named ADC */ Error(ieee, OFF); switch (adc=OpenName(“ADC”)) { case -2: MessageBox(hWndDlg,(LPSTR)"ADC device already open",NULL, MB_OK); EndDialog(hWndDlg, TRUE); return TRUE; case -1: /* Create the device ADC by copying the default device WAVE*/ switch (devhandle=OpenName(“WAVE”)) { case -2: MessageBox(hWndDlg,(LPSTR)"WAVE device already open",NULL,MB_OK); EndDialog(hWndDlg, TRUE); return TRUE; case -1: MessageBox(hWndDlg,(LPSTR)"Cannot open WAVE device",NULL,MB_OK); EndDialog(hWndDlg, TRUE); return TRUE; default: break; } if ((adc=MakeDevice(devhandle, “ADC”))) { MessageBox(hWndDlg, (LPSTR)"Cannot create ADC device", NULL, MB_OK); EndDialog(hWndDlg, TRUE); return TRUE; } Close(devhandle); break; default: break; } GetError(ieee, textstr); BusAddress(adc, 14, -1); If the ADC was not configured within Driver488/W31, it can be optionally created “on the fly”, as shown above. First Error was used to turn OFF automatic error reporting so that our application can trap the error instead. If opening the name ADC failed, the handle of the device IEEE, which is always available within Driver488/W31, is used to clone a new device called ADC using the MakeDevice command. GetError is then called to clear the internal error registered within Driver488/W31. Lastly, the IEEE bus address 14 is assigned to the ADC. If other devices were needed for the application at hand, they could either be defined in the startup configuration for Driver488/W31 or they could be created “on the fly” from the application: adc2 = MakeDevice(adc, “ADC2") BusAddress (adc2,10,-1) The new device ADC2 is configured to reside at a different bus address so that the two devices may be distinguished. There is one other important difference between ADC and ADC2 at this point. ADC2 is a temporary device; that is, as soon as the creating application closes, ADC2 ceases to exist. If our intent was to create a device that could be accessed after this application ends, we must tell Driver488/W31 this: KeepDevice (adc2) After executing the previous statement, ADC2 is marked as being permanent; that is, the device will not be removed when the creating application exits. If we later wish to remove the device, however, we can do so explicitly: RemoveDevice (adc2) Personal488 User’s Manual, Rev. 3.0 Artisan Technology Group - Quality Instrumentation ... Guaranteed | (888) 88-SOURCE | www.artisantg.com II-211 10E. C Languages II. SOFTWARE GUIDES - 10. Driver488/W31 Confirming Communications With or without an open device handle, the application can, if desired, confirm communication with Driver488/W31 via the Hello function: Hello(ieee, textstr); strcat(textstr, “\r\n”); The function also fills in a string, from which information can be extracted if it is desirable to display facts about the driver in use. IEEE 488 Event Message The IEEE 488 Event Message feature of Driver488/W31 allows a C program to respond to IEEE 488 bus events. Driver488/W31 will send the Windows Message WM_IEEE488EVENT to the application when an enable event occurs. A listing of available events is shown in the table: Event SRQ Peripheral Controller Trigger Clear Talk Listen Idle ByteIn ByteOut Error Change Note: Description The Service Request bus line is asserted. An addressed status change has occurred and the interface is a Peripheral. An addressed status change has occurred and the interface is an Active Controller. The interface has received a device Trigger command. The interface has received a device Clear command. An addressed status change has occurred and the interface is a Talker. An addressed status change has occurred and the interface is a Listener. An addressed status change has occurred and the interface is neither a Talker nor a Listener. The interface has received a data byte. The interface has been configured to output a data byte. A Driver488/W31 error has occurred. The interface has changed its addressed state. The Controller/Peripheral or Talker/Listener/Idle states of the interface have changed. This Event table mirrors the Arm Condition table found under the topic “System Controller, Not Active Controller Mode” in the Sub-Chapter “Operating Modes” of Chapter 9. To trap the IEEE 488 Event Message: Simply check for the WM_IEEE488EVENT message in the default switch of the application’s window handler. If the IEEE 488 Event Message is detected, execute code to handle the event. The following example uses the capability of the ADC488 to issue an IEEE 488 SRQ when it needs servicing. The IEEE 488 Event Message will be issued and trapped on the SRQ and the ADC488 will be serviced. In every C program using Driver488/W31, header files of declarations must be merged into the program. In the following example, those declarations have been omitted from the listing for the sake of brevity. With the associated source files, the following program can be built using the file EXAMPLE3.MAK (for Microsoft C or Quick C users) or EXAMPLE3.PRJ (for Borland C users) found on the Driver488/W31 disk. This example has several declarations that will be used later: HWND hDriver DevHandleT ieee; char textstr[2048], response[64]; char hellomsg[256]; int i, hundred[100]; TermT noterm; /* /* /* /* /* /* handle for Driver488/W31 */ handle for the IEEE board * / string for Driver488responses */ string to hold the hello response */ general counter and data buffer */ structure for disabling terminators */ Starting out like the previous example, this program then differs by adding an Error line to turn ON the automatic error reporting: II-212 Personal488 User’s Manual, Rev. 3.0 Artisan Technology Group - Quality Instrumentation ... Guaranteed | (888) 88-SOURCE | www.artisantg.com II. SOFTWARE GUIDES - 10. Driver488/W31 10E. C Languages /* open Driver488/W31 */ if ((ieee=OpenName(“IEEE”))) { MessageBox(hWndDlg, (LPSTR)"Cannot initialize IEEE system", NULL, MB_OK); EndDialog(hWndDlg, TRUE); return TRUE; } /* open device named ADC */ Error(ieee, OFF); switch (adc=OpenName(“ADC”)) { case -2: MessageBox(hWndDlg, (LPSTR)"ADC device already open", NULL, MB_OK); EndDialog(hWndDlg, TRUE); return TRUE; case -1: /* Create the device ADC by copying the default device WAVE*/ switch (devhandle=OpenName(“WAVE”)) { case -2: MessageBox(hWndDlg, (LPSTR)"WAVE device already open", NULL, MB_OK); EndDialog(hWndDlg, TRUE); return TRUE; case -1: MessageBox(hWndDlg, (LPSTR)"Cannot open WAVE device",NULL, MB_OK); EndDialog(hWndDlg, TRUE); return TRUE; default: break; } if ((adc=MakeDevice(devhandle, “ADC”))) { MessageBox(hWndDlg, (LPSTR)"Cannot create ADC device", NULL, MB_OK); EndDialog(hWndDlg, TRUE); return TRUE; } Close(devhandle); break; default: break; } GetError(ieee, response); Error(ieee, ON); BusAddress(adc, 14, -1); When the IEEE 488 Event Message has been passed to the application, the following service routine is executed. The particular subroutine is invoked when the ADC generates an SRQ on “acquisition complete.” default: if (Message==WM_IEEE488EVENT) { strcpy(textstr,"SRQ event detected\r\n"); SetDlgItemText(hWndDlg, 201, (LPSTR)textstr); } /* Clear the SRQ condition */ SPoll(adc); /* Reset the buffer pointer of the ADC488 */ Output(adc, “B0X”); /* Get 100 readings from the ADC488 */ for (i=0;id;i++) { Enter(adc,response); strcat(textstr, response); strcat(textstr, “\r\n”); } SetDlgItemText(hWndDlg, 201, (LPSTR)textstr); } return FALSE; Personal488 User’s Manual, Rev. 3.0 Artisan Technology Group - Quality Instrumentation ... Guaranteed | (888) 88-SOURCE | www.artisantg.com II-213 10E. C Languages II. SOFTWARE GUIDES - 10. Driver488/W31 To enable the WM_IEEE488EVENT message, Driver488/W31 must be told to which window to send the message using the OnEvent command. It must also enable the message on an SRQ with the Arm command. /* Setup event handling for trapping the SRQ */ OnEvent(ieee, hWndDlg, (OpaqueP)0L); Arm(ieee, acSRQ); Note that upon closing the handle, all event handling associated with this control is disabled. You must keep the device open during the time in which its events are of interest. That is, with an ADC488, you would open the device, assign the device handle, configure the adc with Output commands, and then wait for the SRQ event to be triggered. The SRQ event handler would read data from the ADC488 and then close the device, allowing other tasks access, and eliminating the event notification. The data read from the ADC488, is displayed in the ADC488 Response window, as shown in the figure. Data read from the ADC488 Finally, the ADC488 is setup to complete an acquisition and assert SRQ. /* Clear the ADC488 */ Clear(adc); /* Setup the ADC488 to SRQ on acquisition complete */ Output(adc, “M128X”); /* Setup the ADC488: 100 uSec scan interval (I3) No pre-trigger scans, 100 post-trigger scans (N100) Continuous trigger on GET (T1) */ Output(adc, “I3N100T1X”); /* Wait for the ready bit of the ADC488 to be asserted */ while ((SPoll(adc) & 32) == 0); /* Trigger the ADC488 */ Trigger(adc); Reading Driver Status Your application may interrogate Driver488/W31 at any time to determine its status and other information. Status information is returned in a structure provided by the application and can be displayed by the showstat function shown below. Status(ieee, &substat); showstat(&substat, textstr); Another function to display the information contained in the Status structure could be: void showstat(IeeeStatusT *substat, char *textstr) { char response[64]; sprintf(response, “SC strcat(textstr, response); sprintf(response, “CA strcat(textstr, response); II-214 :%d\r\n”, substat->SC); :%d\r\n”, substat->CA); Personal488 User’s Manual, Rev. 3.0 Artisan Technology Group - Quality Instrumentation ... Guaranteed | (888) 88-SOURCE | www.artisantg.com II. SOFTWARE GUIDES - 10. Driver488/W31 sprintf(response, “PrimAddr strcat(textstr, response); sprintf(response, “SecAddr strcat(textstr, response); sprintf(response, “SRQ strcat(textstr, response); sprintf(response, “addrChange strcat(textstr, response); sprintf(response, “talker strcat(textstr, response); sprintf(response, “listener strcat(textstr, response); sprintf(response, “triggered strcat(textstr, response); sprintf(response, “cleared strcat(textstr, response); sprintf(response, “transfer strcat(textstr, response); sprintf(response, “byteIn strcat(textstr, response); sprintf(response, “byteOut strcat(textstr, response); } 10E. C Languages :%d\r\n”, substat->Primaddr); :%d\r\n”, substat->Secaddr); :%d\r\n”, substat->SRQ); :%d\r\n”, substat->addrChange); :%d\r\n”, substat->talker); :%d\r\n”, substat->listener); :%d\r\n”, substat->triggered); :%d\r\n”, substat->cleared); :%d\r\n”, substat->transfer); :%d\r\n”, substat->byteIn); :%d\r\n”, substat->byteOut); External Device Initialization Refer to the device manufacturer’s documentation on specific requirements for initializing your IEEE 488 instrument. In the case of the ADC488, appropriate initialization involves sending it a Clear command and placing it into Remote mode: Clear (adc) ; Remote (adc) ; For our hypothetical application, we also wish to have the ADC488 generate a service request should it detect a command error. This involves sending a command string consisting of textual data to the ADC488: Output (adc, “M8X”) ; We may also wish to perform other initialization and configuration. In this case, we set up the ADC488 (adc) in the following configuration: /* Setup the ADC488 Differential inputs (A0) Scan group channel 1 (C1) Compensated ASCII floating-point output format (G0) Channel 1 range to +/- 10V (R3) One-shot trigger on talk (T6) */ The command to perform this configuration combines the above strings and adds the Execute (X) command for the ADC488: Output(adc, “A0C1G0R3T6X”); Basic Data Acquisition With both Driver488/W31 and the external device ready for action, we next might try taking a simple reading using the ADC488. Here, we use the serial poll (SPoll) capabilities of Driver488/W31 to determine when a response is ready and to format the reply. /* Wait for the ready bit of the ADC488 to be asserted */ while ((SPoll(adc) & 32) == 0); /* Display the reading */ Enter(adc, response); strcat(textstr, “ADC488 channel #1 reading value is ”); strcat(textstr, response); strcat(textstr, “\r\n”); Personal488 User’s Manual, Rev. 3.0 Artisan Technology Group - Quality Instrumentation ... Guaranteed | (888) 88-SOURCE | www.artisantg.com II-215 10E. C Languages II. SOFTWARE GUIDES - 10. Driver488/W31 /* Now acquire and display the average of 10 readings */ sum = 0.0; for (i=0;i<10;i++) { Enter(adc,response); sscanf(response,"%lf",&voltage); sum+=voltage; } sum/=10.0; sprintf(response, “The average of 10 readings is %lf\r\n”, sum); strcat(textstr, response); Block Data Acquisition First, we set up the ADC488 (adc) in the following configuration: /* Setup the ADC488: Compensated binary output format (G10) 100 uSec scan interval (I3) No pre-trigger scans, 100 post-trigger scans (N100) Continuous trigger on GET (T1) */ We then wait for the ADC488 to start the acquisition process. Once the acquisition is complete, which is determined by the MSB of the ADC488’s serial poll response, the buffer pointer of the ADC488 is reset (B0). Output(adc, “G10I3N100T1X”); /* wait for the ready bit of the ADC488 to be asserted */ while ((SPoll(adc) & 32) == 0); /* Trigger the ADC488 */ Trigger(adc); /* wait for the acquisition complete bit of ADC488 to be asserted */ while ((SPoll(adc) & 128) == 0); /* Reset the buffer pointer of the ADC488 */ Output(adc, “B0X”); Next, we fill the buffer with 100 readings from the ADC488. Since the data being returned from the ADC488 is in a binary format, the noterm terminator structure is used to disable scanning for terminators such as carriage return and line feed. noterm.EOI = 0; noterm.nChar = 0; EnterX(adc, (char *)hundred, 200, 1, ¬erm, 1, 0); The EnterX function will use a DMA transfer if available. Because DMA transfers are performed entirely by the hardware, the program can continue with other work while the DMA transfer function occurs. For example, the program will process the previous set of data while collecting a new set of data into a different buffer. However, before processing the data we must wait for the transfer to complete. For illustration purposes, we query the Driver488/W31 status both before and after waiting. /* Display DRIVER488/W31 status */ Status(ieee, &substat); showstat(&substat, textstr); /* Wait for completion of input operation*/ Wait(adc); /* Display DRIVER488/W31 status */ Status(ieee, &substat); showstat(&substat, textstr); II-216 Personal488 User’s Manual, Rev. 3.0 Artisan Technology Group - Quality Instrumentation ... Guaranteed | (888) 88-SOURCE | www.artisantg.com II. SOFTWARE GUIDES - 10. Driver488/W31 10E. C Languages Now we process the buffer: /* Print the received characters */ for (i=0;i<100;i++) { sprintf(response, “%6d ”, hundred[i]); strcat(textstr, response); if ((i%8)==7) { strcat(textstr,"\r\n"); } } strcat(textstr,"\r\n"); SetDlgItemText(hWndDlg, 201, (LPSTR)textstr); The readings are stored in the local variable textstr in the above example. They could, however be placed into a text-type control. Refer to the Driver488/W31 status display in the ADC488 Response window, shown in the following figure: Driver488/W31 Status Display The functions described so far in this Sub-Chapter provide enough functionality for a basic data acquisition program. The following program listing covers the examples used. Additional functions provided by Driver488/W31 are described in the “Section III: Command References” of this manual. Sample Programs Data Acquisition Sample Programs The following examples were developed using Quick C for Windows. Additional example programs are included on the Driver488/W31 disk. Source Code (Example 2.c) /* QuickCase:W KNB Version 1.00 */ #include “EXAMPLE2.h” #include “iot_main.h” #include “iotmc60w.h” #include “stdio.h” /* function prototypes */ void showstat(IeeeStatusT *substat, char *textstr); int PASCAL WinMain(HANDLE hInstance, HANDLE hPrevInstance, LPSTR lpszCmdLine, int nCmdShow) { /*******************************************************************/ /* HANDLE hInstance; handle for this instance */ /* HANDLE hPrevInstance; handle for possible previous instances */ /* LPSTR lpszCmdLine; long pointer to exec command line */ /* int nCmdShow; Show code for main window display */ /*******************************************************************/ Personal488 User’s Manual, Rev. 3.0 Artisan Technology Group - Quality Instrumentation ... Guaranteed | (888) 88-SOURCE | www.artisantg.com II-217 10E. C Languages II. SOFTWARE GUIDES - 10. Driver488/W31 MSG int msg; nRc; /* MSG structure to store your messages /* return value from Register Classes */ strcpy(szAppName, “EXAMPLE2"); hInst = hInstance; if (!hPrevInstance) { /* register window classes if first instance of application if ((nRc = nCwRegisterClasses()) == -1) { /* registering one of the windows failed LoadString(hInst,IDS_ERR_REGISTER_CLASS,szString, sizeof(szString)); MessageBox(NULL, szString, NULL, MB_ICONEXCLAMATION); return nRc; } } /* create application’s Main window hWndMain = CreateWindow( szAppName /* Window class name “Driver488/W31 Simple Example” , /* Window’s title WS_CAPTION | /* Title and Min/Max WS_SYSMENU /* Add system menu box WS_MINIMIZEBOX | /* Add minimize box WS_MAXIMIZEBOX | /* Add maximize box WS_THICKFRAME | /* thick sizeable frame WS_CLIPCHILDREN | /* don’t draw in child windows areas*/ WS_OVERLAPPED, CW_USEDEFAULT, 0, /* Use default X, Y CW_USEDEFAULT, 0, /* Use default X, Y NULL, /* Parent window’s handle NULL, /* Default to Class Menu hInst, /* Instance of window NULL); /* Create struct for WM_CREATE */ */ */ */ */ */ */ */ */ */ */ */ */ */ */ */ */ if (hWndMain == NULL) { LoadString(hInst, IDS_ERR_CREATE_WINDOW, szString, sizeof(szString)); MessageBox(NULL, szString, NULL, MB_ICONEXCLAMATION); return IDS_ERR_CREATE_WINDOW; } ShowWindow(hWndMain, nCmdShow) /* display main window */ while (GetMessage(&msg, NULL, 0, 0)) { /* Until WM_QUIT message TranslateMessage(&msg); DispatchMessage(&msg); } */ /* Do clean up before exiting from the application CwUnRegisterClasses(); return msg.wParam; } /* End of WinMain */ */ /*******************************************************************/ /* */ /* Main Window Procedure */ /* */ /* This procedure provides service routines for the Windows events */ /* (messages)that Windows sends to the window, as well as the user */ /* initiated events (messages) that are generated when the user */ /* selectsthe action bar and pulldown menu controls or the */ /* corresponding keyboard accelerators. */ /* */ /*******************************************************************/ LONG FAR PASCAL WndProc(HWND hWnd, WORD Message, WORD wParam, LONG lParam) II-218 Personal488 User’s Manual, Rev. 3.0 Artisan Technology Group - Quality Instrumentation ... Guaranteed | (888) 88-SOURCE | www.artisantg.com II. SOFTWARE GUIDES - 10. Driver488/W31 { HMENU hMenu=0; /* HBITMAP hBitmap=0 HDC hDC; /* PAINTSTRUCT ps; /* int nRc=0; /* HWND hDriver; 10E. C Languages handle for the menu /* handle for bitmaps handle for the display device holds PAINT information return code */ */ */ */ */ switch (Message) { case WM_COMMAND: /* The Windows messages for action bar and pulldown menu items /* are processed here. switch (wParam) { case IDM_F_GO: */ */ /* Place User Code to respond to the /* Menu Item Named “&Go” here. { FARPROC lpfnEX2DLGMsgProc; */ */ lpfnEX2DLGMsgProc = MakeProcInstance((FAPROC)EX2DLGMsgProc, hInst); nRc = DialogBox(hInst, MAKEINTRESOURCE(200), hWnd, lpfnEX2DLGMsgProc); FreeProcInstance(lpfnEX2DLGMsgProc); } break; case IDM_F_QUIT: /* Place User Code to respond to the /* Menu Item Named “&Quit” here. SendMessage(hWnd, WM_CLOSE, 0, 0L); break; default: return DefWindowProc(hWnd, Message, wParam, lParam); } break; /* End of WM_COMMAND case WM_CREATE: break; /* End of WM_CREATE case WM_MOVE: /* code for moving the window break; case WM_SIZE: /* code for sizing client area break; /* End of WM_SIZE case WM_PAINT: /* code for the window’s client area /* Obtain a handle to the device context /* BeginPaint will sends WM_ERASEBKGND if appropriate */ memset(&ps, 0x00, sizeof(PAINTSTRUCT)); hDC = BeginPaint(hWnd, &ps); /* Included in case the background is not a pure color SetBkMode(hDC, TRANSPARENT); */ */ */ */ */ */ */ */ */ */ /* Inform Windows painting is complete */ EndPaint(hWnd, &ps); break; /* End of WM_PAINT */ case WM_CLOSE: /* close the window */ /* Destroy child windows, modeless dialogs, then,this window */ hDriver=FindWindow((LPSTR)"Driver488/W31 Loader", (LPSTR)"Driver488/W31"); SendMessage(hDriver, WM_DESTROY, 0, 0L); DestroyWindow(hWnd); if (hWnd == hWndMain) PostQuitMessage(0); /* Quit the application */ break; default: /* For any message for which you don’t specifically provide */ /* a service routine, you should return the message to */ Personal488 User’s Manual, Rev. 3.0 Artisan Technology Group - Quality Instrumentation ... Guaranteed | (888) 88-SOURCE | www.artisantg.com II-219 10E. C Languages II. SOFTWARE GUIDES - 10. Driver488/W31 /* Windows for default message processing. return DefWindowProc(hWnd, Message, wParam, lParam); */ } return 0L; } /* End of WndProc */ /*******************************************************************/ /* */ /* Dialog Window Procedure */ /* */ /* This procedure is associated with the dialog box that is */ /* included in the function name of the procedure. It provides the */ /* service routines for the events (messages) that occur because */ /* the end user operates one of the dialog box’s buttons, entry */ /* fields, or controls. */ /*******************************************************************/ BOOL FAR PASCAL EX2DLGMsgProc(HWND hWndDlg, WORD Message, WORD wParam, LONG lParam) { DevHandleT ieee, adc, devhandle; /* handles for the IEEE devices */ IeeeStatusT substat; /* structure for the Driver488/W31 Status*/ chartextstr[2048],response[64]; /* strings for Driver488/W31 responses */ double sum, voltage; /* variables for ADC488 responses */ int i, hundred[100]; /* general counter and data buffer */ TermT noterm; /* structure for disabling terminators */ switch(Message) { case WM_INITDIALOG: cwCenter(hWndDlg, 0); /* initialize working variables */ /* open Driver488/W31 if ((ieee=OpenName(“IEEE”))<0) { MessageBox(hWndDlg, (LPSTR)"Cannot initialize IEEE system", NULL, MB_OK); EndDialog(hWndDlg, TRUE); return TRUE; } */ /* open or create the device named ADC */ Error(ieee, OFF); switch (adc=OpenName(“ADC”)) { case -2: MessageBox(hWndDlg, (LPSTR)"ADC device already open", NULL, MB_OK); EndDialog(hWndDlg, TRUE); return TRUE; case -1: /* Create the device ADC by copying the default device WAVE */ switch (devhandle=OpenName(“WAVE”)) { case -2: MessageBox(hWndDlg, (LPSTR)"WAVE device already open", NULL, MB_OK); EndDialog(hWndDlg, TRUE); return TRUE; case -1: MessageBox(hWndDlg, (LPSTR)"Cannot open WAVE device", NULL, MB_OK); EndDialog(hWndDlg, TRUE); return TRUE; default: break; } II-220 Personal488 User’s Manual, Rev. 3.0 Artisan Technology Group - Quality Instrumentation ... Guaranteed | (888) 88-SOURCE | www.artisantg.com II. SOFTWARE GUIDES - 10. Driver488/W31 10E. C Languages if ((adc=MakeDevice(devhandle, “ADC”))<0) { MessageBox(hWndDlg, (LPSTR)"Cannot create ADC device", NULL, MB_OK); EndDialog(hWndDlg, TRUE); return TRUE; } Close(devhandle); break; default: break; } GetError(ieee, textstr); BusAddress(adc, 14, -1); /* get Driver488/W31 hello response Hello(ieee, textstr); strcat(textstr, “\r\n”); */ /* get Driver488/W31 status response Status(ieee, &substat); showstat(&substat, textstr); */ /* Clear the ADC488 Clear(adc); */ /* Setup the ADC488 Differential inputs (A0) Scan group channel 1 (C1) Compensated ASCII floating-point output format (G0) Channel 1 range to +/- 10V (R3) One-shot trigger on talk (T6) */ Output(adc, “A0C1G0R3T6X”); /* wait for the ready bit of the ADC488 to be asserted while ((SPoll(adc) & 32) == 0); */ /* display the reading */ Enter(adc, response); strcat(textstr, “ADC488 channel #1 reading value is ”); strcat(textstr, response); strcat(textstr, “\r\n”); /* Now aquire and display the average of 10 readings sum = 0.0; for (i=0;i<0;i++) { Enter(adc,response); sscanf(response,"%lf",&voltage); sum+=voltage; } sum/=10.0; sprintf(response, “The average of 10 readings is %lf\r\n”, sum); strcat(textstr, response); */ /* Setup the ADC488: Compensated binary output format (G10) 100 uSec scan interval (I3) No pre-trigger scans, 100 post-trigger scans (N100) Continuous trigger on GET (T1) */ Output(adc, “G10I3N100T1X”); /* wait for the ready bit of the ADC488 to be asserted while ((SPoll(adc) & 32) == 0); /* Trigger the ADC488 */ Trigger(adc); Personal488 User’s Manual, Rev. 3.0 Artisan Technology Group - Quality Instrumentation ... Guaranteed | (888) 88-SOURCE | www.artisantg.com */ II-221 10E. C Languages II. SOFTWARE GUIDES - 10. Driver488/W31 /* wait for the acquisition complete bit of ADC488 to be asserted while ((SPoll(adc) & 128) == 0); */ /* Reset the buffer pointer of the ADC488 */ Output(adc, “B0X”); /* Take 100 readings from the ADC488 */ noterm.EOI = 0; noterm.nChar = 0; EnterX(adc, (char *)hundred, 200, 1, ¬erm, 1, 0); /* Display DRIVER488/W31 status Status(ieee, &substat); showstat(&substat, textstr); */ /* Wait for completion of input operation Wait(adc); */ /* Display DRIVER488/W31 status Status(ieee, &substat); showstat(&substat, textstr); */ /* Print the received charcters for (i=0;i<100;i++) { sprintf(response, “%6d ”, hundred[i]); strcat(textstr, response); if ((i%8)==7) { strcat(textstr,"\r\n"); } } strcat(textstr,"\r\n"); SetDlgItemText(hWndDlg, 201, (LPSTR)textstr); */ Close(ieee); Close(adc); break; /* End of WM_INITDIALOG */ case WM_CLOSE: /* Closing the Dialog behaves the same as Cancel PostMessage(hWndDlg, WM_COMMAND, IDCANCEL, 0L); break; /* End of WM_CLOSE case WM_COMMAND: switch(wParam) { case 201: /* Edit Control break; case IDOK: EndDialog(hWndDlg, TRUE); break; case IDCANCEL: /* Ignore data values entered into the controls /* and dismiss the dialog window returning FALSE EndDialog(hWndDlg, FALSE); break; } break; /* End of WM_COMMAND default: return FALSE; } return TRUE; } /* End of EX2DLGMsgProc II-222 */ */ */ */ */ */ */ Personal488 User’s Manual, Rev. 3.0 Artisan Technology Group - Quality Instrumentation ... Guaranteed | (888) 88-SOURCE | www.artisantg.com II. SOFTWARE GUIDES - 10. Driver488/W31 10E. C Languages /*******************************************************************/ /* */ /* nCwRegisterClasses Function */ /* */ /* The following function registers all the classes of all the */ /* windows associated with this application. The function returns */ /* an error code if unsuccessful, otherwise it returns 0. */ /* */ /*******************************************************************/ int nCwRegisterClasses(void) { WNDCLASS wndclass; /* struct to define a window class */ memset(&wndclass, 0x00, sizeof(WNDCLASS)); /* load WNDCLASS with window’s characteristics */ wndclass.style = CS_HREDRAW | CS_VREDRAW | CS_BYTEALIGNWINDOW; wndclass.lpfnWndProc = WndProc; /* Extra storage for Class and Window objects */ wndclass.cbClsExtra = 0; wndclass.cbWndExtra = 0; wndclass.hInstance = hInst; wndclass.hIcon = LoadIcon(hInst, “EXAMPLE2"); wndclass.hCursor = LoadCursor(NULL, IDC_ARROW); /* Create brush for erasing background */ wndclass.hbrBackground = (HBRUSH)(COLOR_WINDOW+1); wndclass.lpszMenuName = szAppName; /* Menu Name is App Name */ wndclass.lpszClassName = szAppName; /* Class Name is App Name*/ if (!RegisterClass(&wndclass)) return -1; return(0); } /* End of nCwRegisterClasses */ /*******************************************************************/ /* cwCenter Function */ /* */ /* centers a window based on the client area of its parent */ /* */ /*******************************************************************/ void cwCenter(hWnd, top) HWND hWnd; int top; { POINT pt; RECT swp; RECT rParent; int iwidth; int iheight; /* get the rectangles for the parent and the child GetWindowRect(hWnd, &swp); GetClientRect(hWndMain, &rParent); */ /* calculate the height and width for MoveWindow iwidth = swp.right - swp.left; iheight = swp.bottom - swp.top; */ /* find the center point and convert to screen coordinates pt.x = (rParent.right - rParent.left) / 2; pt.y = (rParent.bottom - rParent.top) / 2; ClientToScreen(hWndMain, &pt); */ /* calculate the new x, y starting point pt.x = pt.x - (iwidth / 2); pt.y = pt.y - (iheight / 2); /* top will adjust the window position, up or down */ */ if (top) Personal488 User’s Manual, Rev. 3.0 Artisan Technology Group - Quality Instrumentation ... Guaranteed | (888) 88-SOURCE | www.artisantg.com II-223 10E. C Languages II. SOFTWARE GUIDES - 10. Driver488/W31 pt.y = pt.y + top; /* move the window MoveWindow(hWnd, pt.x, pt.y, iwidth, iheight, FALSE); } */ /*******************************************************************/ /* CwUnRegisterClasses Function */ /* */ /* Deletes any refrences to windows resources created for this */ /* application, frees memory, deletes instance, handles and does */ /* clean up prior to exiting the window */ /* */ /*******************************************************************/ void CwUnRegisterClasses(void) { WNDCLASS wndclass; /* struct to define a window class */ memset(&wndclass, 0x00, sizeof(WNDCLASS)); UnregisterClass(szAppName, hInst); } /* End of CwUnRegisterClasses */ void showstat(IeeeStatusT *substat, char *textstr) { char response[64]; sprintf(response, “SC :%d\r\n”, substat->SC); strcat(textstr, response); sprintf(response, “CA :%d\r\n”, substat->CA); strcat(textstr, response); sprintf(response, “PrimAddr :%d\r\n”, substat->Primaddr); strcat(textstr, response); sprintf(response, “SecAddr :%d\r\n”, substat->Secaddr); strcat(textstr, response); sprintf(response, “SRQ :%d\r\n”, substat->SRQ); strcat(textstr, response); sprintf(response, “addrChange :%d\r\n”, substat->addrChange); strcat(textstr, response); sprintf(response, “talker :%d\r\n”, substat->talker); strcat(textstr, response); sprintf(response, “listener :%d\r\n”, substat->listener); strcat(textstr, response); sprintf(response, “triggered :%d\r\n”, substat->triggered); strcat(textstr, response); sprintf(response, “cleared :%d\r\n”, substat->cleared); strcat(textstr, response); sprintf(response, “transfer :%d\r\n”, substat->transfer); strcat(textstr, response); sprintf(response, “byteIn :%d\r\n”, substat->byteIn); strcat(textstr, response); sprintf(response, “byteOut :%d\r\n”, substat->byteOut); strcat(textstr, response); } Header File (Example2.h) /* QuickCase:W KNB Version 1.00 */ #include <windows.h> #include <string.h> #define IDM_FILE 1000 #define IDM_F_GO 1050 #define IDM_F_QUIT 1150 #define IDS_ERR_REGISTER_CLASS 1 #define IDS_ERR_CREATE_WINDOW 2 char szString[128]; /* variable to load resource strings II-224 */ Personal488 User’s Manual, Rev. 3.0 Artisan Technology Group - Quality Instrumentation ... Guaranteed | (888) 88-SOURCE | www.artisantg.com II. SOFTWARE GUIDES - 10. Driver488/W31 char HWND HWND void 10E. C Languages szAppName[20]; /* class name for the window hInst; hWndMain; cwCenter(HWND, int); */ LONG FAR PASCAL WndProc(HWND, WORD, WORD, LONG); BOOL FAR PASCAL EX2DLGMsgProc(HWND, WORD, WORD, LONG); int nCwRegisterClasses(void); void CwUnRegisterClasses(void); Resource Script (Example2.rc) #include “EXAMPLE2.h” EXAMPLE2 ICON 488.ICO EXAMPLE2 MENU BEGIN POPUP “&File” BEGIN MENUITEM “&Go”, IDM_F_GO MENUITEM SEPARATOR MENUITEM “&Quit”, IDM_F_QUIT END END #include “EXAMPLE2.DLG” STRINGTABLE BEGIN IDS_ERR_CREATE_WINDOW, “Window creation failed!” IDS_ERR_REGISTER_CLASS, “Error registering window class” END Dialog Script (Example2.dlg) DLGINCLUDE RCDATA DISCARDABLE BEGIN “EXAMPLE2.H\0" END 200 DIALOG 27, 40, 293, 138 STYLE DS_MODALFRAME | WS_POPUP | WS_VISIBLE | WS_CAPTION CAPTION “ADC488 Response” FONT 8, “Helv” BEGIN EDITTEXT 201, 3, 6, 287, 99, ES_MULTILINE | ES_AUTOVSCROLL | ES_AUTOHSCROLL PUSHBUTTON “OK”, IDS_ERR_REGISTER_CLASS, 127, 117, 40, 14 END Definition (Example2.def) NAME EXAMPLE2 EXETYPE WINDOWS STUB ‘WINSTUB.EXE’ CODE PRELOAD MOVEABLE DATA PRELOAD MOVEABLE MULTIPLE HEAPSIZE 4096 STACKSIZE 5110 EXPORTS WndProc @1 EX2DLGMsgProc @2 IEEE 488 Event Message Sample Programs Source Code (Example3.c) /* QuickCase:W KNB Version 1.00 */ #include “EXAMPLE3.h” #include “iot_main.h” Personal488 User’s Manual, Rev. 3.0 Artisan Technology Group - Quality Instrumentation ... Guaranteed | (888) 88-SOURCE | www.artisantg.com II-225 10E. C Languages II. SOFTWARE GUIDES - 10. Driver488/W31 #include “iotmc60w.h” #include “stdio.h” /* Global variables */ DevHandleT ieee, adc, devhandle; /* handles for IEEE devices */ char textstr[2048], response[64]; /* strings for Driver488/W31 responses*/ int PASCAL WinMain(HANDLE hInstance, HANDLE hPrevInstance, LPSTR lpszCmdLine, int nCmdShow) { /*******************************************************************/ /* HANDLE hInstance; handle for this instance */ /* HANDLE hPrevInstance; handle for possible previous instances */ /* LPSTR lpszCmdLine; long pointer to exec command line */ /* int nCmdShow; Show code for main window display */ /*******************************************************************/ MSG msg; int nRc; /* MSG structure to store your messages /* return value from Register Classes strcpy(szAppName, “EXAMPLE3"); hInst = hInstance; if (!hPrevInstance) { /* register window classes if first instance of application if ((nRc = nCwRegisterClasses()) == -1) { /* registering one of the windows failed LoadString(hInst, IDS_ERR_REGISTER_CLASS, szString, sizeof(szString)); MessageBox(NULL, szString, NULL, MB_ICONEXCLAMATION); return nRc; } } /* create application’s Main window hWndMain = CreateWindow( szAppName /* Window class name “Driver488/W31 Simple Example”, /* Window’s title WS_CAPTION | /* Title and Min/Max WS_SYSMENU | /* Add system menu box WS_MINIMIZEBOX | /* Add minimize box WS_MAXIMIZEBOX | /* Add maximize box WS_THICKFRAME | /* thick sizeable frame WS_CLIPCHILDREN | /* don’t draw in child windows areas WS_OVERLAPPED, CW_USEDEFAULT, 0, /* Use default X, Y CW_USEDEFAULT, 0, /* Use default X, Y NULL, /* Parent window’s handle NULL, /* Default to Class Menu hInst, /* Instance of window NULL); /* Create struct for WM_CREATE */ */ */ */ */ */ */ */ */ */ */ */ */ */ */ */ */ */ */ if (hWndMain == NULL) { LoadString(hInst, IDS_ERR_CREATE_WINDOW, szString, sizeof(szString)); MessageBox(NULL, szString, NULL, MB_ICONEXCLAMATION); return IDS_ERR_CREATE_WINDOW; } II-226 ShowWindow(hWndMain, nCmdShow); /* display main window */ while (GetMessage(&msg, NULL, 0, 0)) { TranslateMessage(&msg); DispatchMessage(&msg); } /* Until WM_QUIT message */ Personal488 User’s Manual, Rev. 3.0 Artisan Technology Group - Quality Instrumentation ... Guaranteed | (888) 88-SOURCE | www.artisantg.com II. SOFTWARE GUIDES - 10. Driver488/W31 10E. C Languages /* Do clean up before exiting from the application CwUnRegisterClasses(); return msg.wParam; } /* End of WinMain */ */ /*******************************************************************/ /* */ /* Main Window Procedure */ /* This procedure provides service routines for the Windows */ /* events(messages) that Windows sends to the window, as well as */ /* the user initiated events (messages) that are generated when */ /* the user selects the action bar and pulldown menu controls or */ /* the corresponding keyboard accelerators. */ /*******************************************************************/ LONG FAR PASCAL WndProc(HWND hWnd, WORD Message, WORD wParam, LONG lParam) { HMENU hMenu=0; /* handle for the menu */ HBITMAP hBitmap=0; /* handle for bitmaps */ HDC hDC; /* handle for the display device */ PAINTSTRUCT ps; /* holds PAINT information */ int nRc=0; /* return code */ HWND hDriver; switch (Message) { case WM_COMMAND: /* The Windows messages for action bar and pulldown menu items */ /* are processed here. */ switch (wParam) { case IDM_F_GO: /* Place User Code to respond to the */ /* Menu Item Named “&Go” here. */ { FARPROC lpfnEX3DLGMsgProc; lpfnEX3DLGMsgProc = MakeProcInstance((FARPROC)EX3DLGMsgProc, hInst); nRc = DialogBox(hInst, MAKEINTRESOURCE(200), hWnd, lpfnEX3DLGMsgProc); FreeProcInstance(lpfnEX3DLGMsgProc); } break; case IDM_F_QUIT: /* Place User Code to respond to the /* Menu Item Named “&Quit” here. SendMessage(hWnd, WM_CLOSE, 0, 0L); break; default: return DefWindowProc(hWnd, Message, wParam, lParam); } break; /* End of WM_COMMAND case WM_CREATE: break; /* End of WM_CREATE case WM_MOVE: /* code for moving the window break; case WM_SIZE: /* code for sizing client area break; /* End of WM_SIZE case WM_PAINT: /* code for the window’s client area /* Obtain a handle to the device context /* BeginPaint will sends WM_ERASEBKGND if appropriate memset(&ps, 0x00, sizeof(PAINTSTRUCT)); hDC = BeginPaint(hWnd, &ps); /* Included in case the background is not a pure color SetBkMode(hDC, TRANSPARENT); Personal488 User’s Manual, Rev. 3.0 Artisan Technology Group - Quality Instrumentation ... Guaranteed | (888) 88-SOURCE | www.artisantg.com */ */ */ */ */ */ */ */ */ */ */ II-227 10E. C Languages II. SOFTWARE GUIDES - 10. Driver488/W31 /* Inform Windows painting is complete EndPaint(hWnd, &ps); break; /* End of WM_PAINT case WM_CLOSE: /* close the window */ */ */ /* Destroy child windows, modeless dialogs, then, this window hDriver=FindWindow((LPSTR)"Driver488/W31 Loader", (LPSTR)"Driver488/W31"); SendMessage(hDriver, WM_DESTROY, 0, 0L); DestroyWindow(hWnd); if (hWnd == hWndMain) PostQuitMessage(0); /* Quit the application break; default: /* For any message for which you don’t specifically provide a /* service routine, you should return the message to Windows /* for default message processing. return DefWindowProc(hWnd, Message, wParam, lParam); } return 0L; } /* End of WndProc */ */ */ */ */ */ /*******************************************************************/ /* */ /* Dialog Window Procedure */ /* */ /* This procedure is associated with the dialog box that is */ /* included inthe function name of the procedure. It provides the */ /* service routines for the events (messages) that occur because */ /* the end user operates one of the dialog box’s buttons, entry */ /* fields, or controls. */ /*******************************************************************/ BOOL FAR PASCAL EX3DLGMsgProc(HWND hWndDlg, WORD Message, WORD wParam, LONG lParam) { double sum, voltage; int i, hundred[100]; TermT noterm; switch(Message) { case WM_INITDIALOG: cwCenter(hWndDlg, 0); /* initialize working variables */ /* open Driver488/W31 */ if ((ieee=OpenName(“IEEE”))<0) { MessageBox(hWndDlg, (LPSTR)"Cannot initialize IEEE system", NULL, MB_OK); EndDialog(hWndDlg, TRUE); return TRUE; } /* open device named ADC */ Error(ieee, OFF); switch (adc=OpenName(“ADC”)) { case -2: MessageBox(hWndDlg, (LPSTR)"ADC device already open", NULL, MB_OK); EndDialog(hWndDlg, TRUE); return TRUE; case -1: switch (devhandle=OpenName(“WAVE”)) { case -2: MessageBox(hWndDlg, (LPSTR)"WAVE device already open", NULL, MB_OK); EndDialog(hWndDlg, TRUE); II-228 Personal488 User’s Manual, Rev. 3.0 Artisan Technology Group - Quality Instrumentation ... Guaranteed | (888) 88-SOURCE | www.artisantg.com II. SOFTWARE GUIDES - 10. Driver488/W31 10E. C Languages return TRUE; case -1: MessageBox(hWndDlg, (LPSTR)"Cannot open WAVE device", NULL, MB_OK); EndDialog(hWndDlg, TRUE); return TRUE; default: break; } if ((adc=MakeDevice(devhandle, “ADC”))<0) { MessageBox(hWndDlg, (LPSTR)"Cannot create ADC device", NULL, MB_OK); EndDialog(hWndDlg, TRUE); return TRUE; } Close(devhandle); break; default: break; } GetError(ieee, response); Error(ieee, ON); BusAddress(adc, 14, -1); /* Setup event handling for trapping the SRQ OnEvent(ieee, hWndDlg, (OpaqueP)0L); Arm(ieee, acSRQ); */ /* Clear the ADC488 Clear(adc); */ /* Setup the ADC488 to SRQ on acquisition complete Output(adc, “M128X”); /* Setup the ADC488: */ 100 uSec scan interval (I3) No pre-trigger scans, 100 post-trigger scans (N100) Continuous trigger on GET (T1) */ Output(adc, “I3N100T1X”); /* Wait for the ready bit of the ADC488 to be asserted while ((SPoll(adc) & 32) == 0); */ /* Trigger the ADC488 Trigger(adc); strcpy(textstr,"Waiting for SRQ event\r\n"); SetDlgItemText(hWndDlg, 201, (LPSTR)textstr); break; /* End of WM_INITDIALOG case WM_CLOSE: /* Closing the Dialog behaves the same as Cancel PostMessage(hWndDlg, WM_COMMAND, IDCANCEL, 0L); break; /* End of WM_CLOSE case WM_COMMAND: switch(wParam) { case 201: /* Edit Control break; case IDOK: Close(ieee); Close(adc); EndDialog(hWndDlg, TRUE); break; case IDCANCEL: /* Ignore data values entered into the controls /* and dismiss the dialog window returning FALSE EndDialog(hWndDlg, FALSE); break; */ Personal488 User’s Manual, Rev. 3.0 Artisan Technology Group - Quality Instrumentation ... Guaranteed | (888) 88-SOURCE | www.artisantg.com */ */ */ */ */ */ II-229 10E. C Languages II. SOFTWARE GUIDES - 10. Driver488/W31 } break; /* End of WM_COMMAND default: if (Message==WM_IEEE488EVENT) { strcpy(textstr,"SRQ event detected\r\n"); SetDlgItemText(hWndDlg, 201, (LPSTR)textstr); /* Clear the SRQ condition SPoll(adc); */ */ /* Reset the buffer pointer of the ADC488 Output(adc, “B0X”); /* Get 100 readings from the ADC488 for (i=0;i<100;i++) { Enter(adc,response); strcat(textstr, response); strcat(textstr, “\r\n”); } SetDlgItemText(hWndDlg, 201, (LPSTR)textstr); } return FALSE; } return TRUE; } /* End of EX3DLGMsgProc */ */ */ /*******************************************************************/ /* */ /* nCwRegisterClasses Function */ /* */ /* The following function registers all the classes of all the */ /* windows associated with this application. The function returns */ /* an error code if unsuccessful, otherwise it returns 0. */ /* */ /*******************************************************************/ int nCwRegisterClasses(void) { WNDCLASS wndclass; /* struct to define a window class memset(&wndclass, 0x00, sizeof(WNDCLASS)); /* load WNDCLASS with window’s characteristics wndclass.style = CS_HREDRAW | CS_VREDRAW | CS_BYTEALIGNWINDOW; wndclass.lpfnWndProc = WndProc; /* Extra storage for Class and Window objects wndclass.cbClsExtra = 0; wndclass.cbWndExtra = 0; wndclass.hInstance = hInst; wndclass.hIcon = LoadIcon(hInst, “EXAMPLE3"); wndclass.hCursor = LoadCursor(NULL, IDC_ARROW); /* Create brush for erasing background wndclass.hbrBackground = (HBRUSH)(COLOR_WINDOW+1); wndclass.lpszMenuName = szAppName; /* Menu Name is App Name wndclass.lpszClassName = szAppName; /* Class Name is App Name if (!RegisterClass(&wndclass)) return -1; return(0); } /* End of nCwRegisterClasses */ */ */ */ */ */ */ /*******************************************************************/ /* cwCenter Function */ /* */ /* centers a window based on the client area of its parent */ /* */ /*******************************************************************/ void cwCenter(hWnd, top) HWND hWnd; II-230 Personal488 User’s Manual, Rev. 3.0 Artisan Technology Group - Quality Instrumentation ... Guaranteed | (888) 88-SOURCE | www.artisantg.com II. SOFTWARE GUIDES - 10. Driver488/W31 10E. C Languages int top; { POINT pt; RECT swp; RECT rParent; int iwidth; int iheight; /* get the rectangles for the parent and the child GetWindowRect(hWnd, &swp); GetClientRect(hWndMain, &rParent); */ /* calculate the height and width for MoveWindow iwidth = swp.right - swp.left; iheight = swp.bottom - swp.top; */ /* find the center point and convert to screen coordinates pt.x = (rParent.right - rParent.left) / 2; pt.y = (rParent.bottom - rParent.top) / 2; ClientToScreen(hWndMain, &pt); */ /* calculate the new x, y starting point pt.x = pt.x - (iwidth / 2); pt.y = pt.y - (iheight / 2); */ /* top will adjust the window position, up or down if (top) pt.y = pt.y + top; */ /* move the window MoveWindow(hWnd, pt.x, pt.y, iwidth, iheight, FALSE); } */ /*******************************************************************/ /* CwUnRegisterClasses Function */ /* */ /* Deletes any refrences to windows resources created for this */ /* application, frees memory, deletes instance, handles and does */ /* clean up prior to exiting the window */ /* */ /*******************************************************************/ void CwUnRegisterClasses(void) { WNDCLASS wndclass; /* struct to define a window class memset(&wndclass, 0x00, sizeof(WNDCLASS)); UnregisterClass(szAppName, hInst); } /* End of CwUnRegisterClasses */ */ Header File (Example3.h) /* QuickCase:W KNB Version 1.00 #include windows.h include g.h #define IDM_FILE 1000 #define IDM_F_GO 1050 #define IDM_F_QUIT 1150 #define IDS_ERR_REGISTER_CLASS 1 #define IDS_ERR_CREATE_WINDOW 2 */ char szString[128]; /* variable to load resource strings */ char szAppName[20]; /* class name for the window HWND hInst; HWND hWndMain; */ Personal488 User’s Manual, Rev. 3.0 Artisan Technology Group - Quality Instrumentation ... Guaranteed | (888) 88-SOURCE | www.artisantg.com II-231 10E. C Languages II. SOFTWARE GUIDES - 10. Driver488/W31 void cwCenter(HWND, int); LONG FAR PASCAL WndProc(HWND, WORD, WORD, LONG); BOOL FAR PASCAL EX3DLGMsgProc(HWND, WORD, WORD, LONG); int nCwRegisterClasses(void); void CwUnRegisterClasses(void); Resource Script (Example3.rc) #include “EXAMPLE3.h” EXAMPLE3 ICON 488.ICO EXAMPLE3 MENU BEGIN POPUP “&File” BEGIN MENUITEM “&Go”, IDM_F_GO MENUITEM SEPARATOR MENUITEM “&Quit”, IDM_F_QUIT END END #include “EXAMPLE3.DLG” STRINGTABLE BEGIN IDS_ERR_CREATE_WINDOW, “Window creation failed!” IDS_ERR_REGISTER_CLASS, “Error registering window class” END Dialog Script (Example3.dlg) DLGINCLUDE RCDATA DISCARDABLE BEGIN “EXAMPLE3.H\0" END 200 DIALOG 27, 40, 293, 138 STYLE DS_MODALFRAME | WS_POPUP | WS_VISIBLE | WS_CAPTION CAPTION “ADC488 Response” FONT 8, “Helv” BEGIN EDITTEXT 201, 3, 6, 287, 99, ES_MULTILINE | ES_AUTOVSCROLL | ES_AUTOHSCROLL PUSHBUTTON “OK”, IDS_ERR_REGISTER_CLASS, 127, 117, 40, 14 END Definition (Example3.def) NAME EXAMPLE3 EXETYPE WINDOWS STUB ‘WINSTUB.EXE’ CODE PRELOAD MOVEABLE DATA PRELOAD MOVEABLE MULTIPLE HEAPSIZE 4096 STACKSIZE 5110 EXPORTS WndProc @1 EX3DLGMsgProc @2 Command Summary To obtain a summary of the C language commands for Driver488/W31, turn to the “Section III: Command References” of this manual. II-232 Personal488 User’s Manual, Rev. 3.0 Artisan Technology Group - Quality Instrumentation ... Guaranteed | (888) 88-SOURCE | www.artisantg.com II. SOFTWARE GUIDES - 10. Driver488/W31 10F. 10F. Visual Basic Visual Basic Topics • Accessing from a Windows Program ....................................... II-232 Opening & Closing the Driver....................................................................II-233 • • • • • • • • Establishing Communications .................................................. II-234 Confirming Communications .................................................... II-235 IEEE 488 Event Custom Control............................................... II-235 Reading Driver Status................................................................. II-238 External Device Initialization................................................... II-238 Basic Data Acquisition................................................................ II-239 Block Data Acquisition ............................................................... II-239 Dynamic Data Exchange (DDE) ................................................ II-241 Application ...................................................................................................II-241 Server Links ..................................................................................................II-241 Acquisition Engine ......................................................................................II-243 • Sample Programs ......................................................................... II-246 Data Acquisition Sample Program ...........................................................II-246 IEEE 488 Event Custom Control Sample Program .................................II-249 Acquisition Engine Sample Program .......................................................II-250 • Command Summary .................................................................... II-251 Accessing from a Windows Program The structure of a Windows program generally dictates that actions take place in response to messages such as an operator key press, mouse action, menu selection, etc. This discussion covers the basic actions needed to control Driver488/W31. How these actions are combined and coordinated in response to Windows messages is up to the application designer. The interface between Visual Basic (VB) and Driver488/W31 consists of three pieces: • IOTVB10.TXT : A file containing the required external declarations • IOTVB10.BAS : A set of interface functions to handle structure conversions • IOTEVENT.VBX : An IEEE 488 Event Custom Control Your application can call all Driver488/W31 functions as documented in the “Section III: Command References.” The following functions found in that Section, as shown in the table, are renamed to avoid conflicts with VB reserved words: In order to have access to all the Driver488/W31 functions, you must include the file IOTVB10.TXT. You can accomplish this through the Add File item under the file menu. Type *.TXT into the selection field to find the file in your project. Driver488/W31 Command Visual Basic Name Clear Close Error Local Output Reset Resume Stop Wait ioClear ioClose ioError ioLocal ioOutput ioReset ioResume ioStop ioWait Certain functions provided by Driver488/W31 require that data structures be passed in a particular format which is not easily generated from a VB application. Conversion functions are provided in IOTVB10.BAS, which should be included in the Personal488 User’s Manual, Rev. 3.0 Artisan Technology Group - Quality Instrumentation ... Guaranteed | (888) 88-SOURCE | www.artisantg.com II-233 10F. Visual Basic II. SOFTWARE GUIDES - 10. Driver488/W31 Project window. Using the VB File menu, select the item Add File and select IOTVB10.BAS. At this point, all Driver488/W31 functions should be accessible. If you require event handling support, use the custom control written for event handling. The IEEE 488 Event Custom Control support is included in the file IOTEVENT.VBX, which should be included in the Project window. For more information on using the IEEE 488 Event Custom Control, turn to the following topic “IEEE 488 Event Custom Control” in this Sub-Chapter. Opening & Closing the Driver The first Driver488/W31 programming example is designed for simplicity. Its sole purpose is to verify proper communication with the driver, and upon closing, remove the driver from memory. In every Visual Basic program using Driver488/W31, a file of declarations must be merged into the program, typically to the GLOBAL.BAS file. In the following example, those declarations have been omitted from the listing for the sake of brevity. With the associated source files, the following program can be built using the file EXAMPLE1.MAK found on the Driver488/W31 disk. This example has two declarations that will be used later: Declare Function FindWindow Lib “User” (ByVal data1$, ByVal data2$)As Integer Declare Function SendMessage Lib “User” (ByVal winHandle%, ByVal message%, ByVal wp%, ByVal lp As Long) As Integer The form has only one text box with one button . When the button is pressed, the service routine for Command1_Click opens the driver. Then the Hello function is called, using the handle returned from the OpenName function. Sub Command1_Click () Dim ieee As Integer Dim hellomsg As String * 247 ieee = OpenName (“IEEE”) errcode = Hello (ieee, ByVal hellomsg) Response.Text = hellomsg errcode = ioClose(ieee) End Sub After the Hello Message window is displayed, as shown in the figure, the driver handle is closed. Since in this application, the handle is created every time the form button is pressed, a potential conflict could arise if that handle is not closed as we exit this subroutine. Clicking the HELLO button will close this window. Hello Message Window When the application is closed by the user, the Unload event is sent to the form. Our service routine for Unload uses the functions that were declared earlier in the GLOBAL.BAS file. Sub Form_Unload (Cancel As Integer) ‘Unload the IEEE driver loaderName$ = “Driver488Loader” winName$ = “Driver488/W31” Hdriver% = FindWindow (loaderName$, winName$) asdf = SendMessage (Hdriver%, &H2, 0, 0) End Sub II-234 Personal488 User’s Manual, Rev. 3.0 Artisan Technology Group - Quality Instrumentation ... Guaranteed | (888) 88-SOURCE | www.artisantg.com II. SOFTWARE GUIDES - 10. Driver488/W31 10F. Visual Basic Establishing Communications The following program contains most of the function calls of Driver488/W31. The user interface of this program is intentionally simple to highlight the Driver488/W31 operations. To centralize all of the Driver488/W31-related code, the architecture of this example is not typical of a Visual Basic program. This example operates the multichannel, 16-bit analog to digital converter; the ADC488. In every Visual Basic program using Driver488/W31, a file of declarations must be merged into the program, typically to the GLOBAL.BAS file. In the following example, those declarations have been omitted from the listing for the sake of brevity. With the associated source files, the following program can be built using the file EXAMPLE2.MAK found on the Driver488/W31 disk. This example has two declarations that will be used later: Declare Function FindWindow Lib “User” (ByVal data1$, ByVal data2$)As Integer Declare Function SendMessage Lib “User” (ByVal winHandle%, ByValmessage%, ByVal wp%, ByVal lp As Long) As Integer The following declarations are included in the General section of the form, and are assumed through the remainder of the discussion: Dim Dim Dim Dim Dim Dim Dim Dim Dim Dim nl As String * 2 mystring As String substat As IeeeStatus adc As Integer response As String * 256 intResp(500) As Integer voltage As Single sum As Single noterm As terms sample As String * 7 For the sake of this discussion, assume that Driver488/W31 has been configured to start with a configuration including the devices IEEE (IEEE 488 interface) and ADC (ADC488/8S connected to the IEEE 488 interface). Additional interfaces and/or devices may also have been defined, as the driver can support up to 4 interfaces and 56 devices simultaneously. To open the two devices of interest, we use the following statements: ‘Open Driver488/W31 ieee% = OpenName(“IEEE”) If (ieee% = -1) Then MsgBox “Cannot initialize IEEE system” End End If ‘Open device named ADC rv% = ioError (ieee%, TURNOFF) devhandle% = OpenName (“wave”) adc = OpenName(“ADC”) If (adc = -1) Then adc = MakeDevice(devhandle%, “ADC”) If (adc = -1) Then MsgBox “Can not initialize device ADC” End End If End If response = “” rv% = GetError (1eee%, response) rv% = BusAddress (adc, 14, -1) If the ADC was not configured within Driver488/W31, it can be optionally created “on the fly”, as shown above. First ioError was used to TURNOFF automatic error reporting so that our application can trap the error instead. If opening the name ADC failed, the handle of the device wave, which is Personal488 User’s Manual, Rev. 3.0 Artisan Technology Group - Quality Instrumentation ... Guaranteed | (888) 88-SOURCE | www.artisantg.com II-235 10F. Visual Basic II. SOFTWARE GUIDES - 10. Driver488/W31 always available within Driver488/W31, is used to clone a new device called ADC using the MakeDevice command. GetError is then called to clear the internal error registered within Driver488/W31. Lastly, the IEEE bus address 14 is assigned to the ADC. If other devices were needed for the application at hand, they could either be defined in the startup configuration for Driver488/W31 or they could be created “on the fly” from the application: adc2% = MakeDevice(adc, “ADC2") rv% = BusAddress(adc2, 10, -1) The new device ADC2 is configured to reside at a different bus address so that the two devices may be distinguished. There is one other important difference between ADC and ADC2 at this point. ADC2 is a temporary device; that is, as soon as the creating application closes, ADC2 ceases to exist. If our intent were to create a device that could be accessed after this application ends, we must tell Driver488/W31 this: rv%=KeepDevice (adc2) After executing the above statement, ADC2 is marked as being permanent; that is, the device will not be removed when the creating application exits. If we later wish to remove the device, however, we can do so explicitly: rv%=RemoveDevice (adc2) Confirming Communications With or without an open device handle, the application can, if desired, confirm communication with Driver488/W31 via the Hello function: rv% = Hello(ieee%, response) mystring = “” The function also fills in a string, from which information can be extracted if it is desirable to display facts about the driver in use. IEEE 488 Event Custom Control The IEEE 488 Event Custom Control feature of Driver488/W31 allows a Visual Basic program to respond to IEEE 488 bus events. This feature is represented by a tool icon in the toolbox containing “488” within a double arrow which appears when the IOTEVENT.VBX file is included in the Project window. To begin this program from the VB File menu, select the tool icon and then select IOTEVENT.VBX. The IEEE 488 Event Custom Control has properties that correspond to IEEE 488 bus events that can be enabled or disabled. If an IEEE 488 Event Custom Control property is enabled, the Visual Basic program will call a user written function associated with the specified event when the event occurs. The IEEE 488 Event Custom Control has two other properties: the Handle property and the CtrlName property. The Handle property specifies the device that the events describe. The CtrlName property stores space for the name of an application text box. For more information on CtrlName, refer to the topic “Dynamic Data Exchange (DDE)” found later in this Sub-Chapter. IEEE 488 Event Custom Control Icon The IEEE 488 bus events that Driver488/W31 supports are shown in the following table: II-236 Personal488 User’s Manual, Rev. 3.0 Artisan Technology Group - Quality Instrumentation ... Guaranteed | (888) 88-SOURCE | www.artisantg.com II. SOFTWARE GUIDES - 10. Driver488/W31 Event SRQ Peripheral Controller Trigger Clear Talk Listen Idle ByteIn ByteOut Error Change Note: 10F. Visual Basic Description The Service Request bus line is asserted. An addressed status change has occurred and the interface is a Peripheral. An addressed status change has occurred and the interface is an Active Controller. The interface has received a device Trigger command. The interface has received a device Clear command. An addressed status change has occurred and the interface is a Talker. An addressed status change has occurred and the interface is a Listener. An addressed status change has occurred and the interface is neither a Talker nor a Listener. The interface has received a data byte. The interface has been configured to output a data byte. A Driver488/W31 error has occurred. The interface has changed its addressed state. The Controller/Peripheral or Talker/Listener/Idle states of the interface have changed. This Event table mirrors the Arm Condition table found under the topic “System Controller, Not Active Controller Mode” in the Sub-Chapter “Operating Modes” of Chapter 9. To use an IEEE 488 Event Custom Control: 1. Click on the IEEE 488 tool in the toolbox and insert it on the form. 2. Enable the properties that specify the events you wish to trap. 3. Open the Code window for the IEEE 488 Event Custom Control. 4. For each property you enabled, open the Procedure window that corresponds to the property and write code enabling the program to perform the actions needed when the IEEE 488 event occurs. When the IEEE 488 event occurs during program execution, the function associated with that event will be called. The upcoming example uses the programs of the ADC488 to issue an IEEE 488 SRQ when it needs servicing. The IEEE 488 Event Custom Control will be programmed to trap the SRQ and the ADC488 will be serviced. In every Visual Basic program using Driver488/W31, a file of declarations must be merged into the program, typically to the GLOBAL.BAS file. In the following example, those declarations have been omitted from the listing for the sake of brevity. With the associated source files, the following program can be built using the file EXAMPLE3.MAK found on the Driver488/W31 disk. This example has several declarations that will be used later: Declare Function FindWindow Lib “User” (ByVal data1$, ByVal data2$) As Integer Declare Function SendMessage Lib “User” (ByVal winHandle%, ByVal message%, ByVal wp%, ByVal lp As Long) As Integer The following declarations are included in the General section of the form, and are assumed through the remainder of the discussion: Dim Dim Dim Dim Dim Dim Dim Dim Dim Dim nl As String * 2 mystring As String substat As IeeeStatus adc As Integer response As String * 256 intResp(500) As Integer voltage As Single sum As Single noterm As terms sample As String * 7 Personal488 User’s Manual, Rev. 3.0 Artisan Technology Group - Quality Instrumentation ... Guaranteed | (888) 88-SOURCE | www.artisantg.com II-237 10F. Visual Basic II. SOFTWARE GUIDES - 10. Driver488/W31 When the IEEE 488 Event Custom Control has been placed in your application, the following service routine is made available. The particular subroutine is invoked when the ADC generates an SRQ on “acquisition complete”. Sub Event4881_Srq () ‘Clear SRQ condition rv% = spoll (adc) ‘Reset the buffer pointer of the ADC488 rv% = ioOutput (adc, “B0X”) ‘Get 100 readings from the ADC488 TextWindow.Text = “” For i% = 1 to 100 rv% = Enter(adc, response) TextWindow.Text = TextWindow.Text + response Next i% End Sub The sole button on the form opens the pre-configured ADC then initializes it by clearing it. Next, the IEEE 488 event handling is setup by affiliating the Handle property of the Event4881 control to the newly opened ADC handle. For the bus event to be captured and sent to the custom control, the ADC handle must be left open. Sub Command1_Click () ‘Now opening a device named ADC adc = OpenName (“ADC”) If (adc = -1) Then MsgBox “Cannot initialize device ADC” End End If To activate this event (SRQ), the SRQ property of the IEEE controller must be set to True. At designtime, select the IEEE 488 tool icon on your form, then select SRQ in the properties area. Set the SRQ property to True. Note that upon closing the handle, all event handling associated with this control is disabled. You must keep the device open during the time in which its events are of interest. That is, with an ADC488, you would open the device, assign the handle to the Event Custom Control’s Handle property, configure the adc with ioOutput commands, and then wait for the SRQ event to be triggered. The SRQ event handler would read data from the ADC488 and then close the device, allowing other tasks access, and eliminating the event notification. The data read from the ADC488, is displayed in the Driver488/W31 Custom Control Example window, as shown in the figure. Data read from the ADC488 II-238 Personal488 User’s Manual, Rev. 3.0 Artisan Technology Group - Quality Instrumentation ... Guaranteed | (888) 88-SOURCE | www.artisantg.com II. SOFTWARE GUIDES - 10. Driver488/W31 10F. Visual Basic Finally, the ADC488 is setup to complete an acquisition and assert SRQ. ‘Clear ADC rv% = ioClear (adc) ‘Set up event handling for trapping the SRQ Event4881.Handle = adc Event4881.SRQ = -1 “Enable ADC to SRQ on acquisition complete rv% = ioOutput (adc, ”M128X") ‘Setup the ADC488: ‘100 uSec scan interval (I3) ‘No pre-trigger scans, 100 post-trigger scans (N100) ‘Continuous trigger on GET (T1) rv% = ioOutput (adc, “13N100T1X”) ‘Trigger the ADC488 rv% = Trigger (adc) Reading Driver Status Your application may interrogate Driver488/W31 at any time to determine its status and other information. Status information is returned in a structure provided by the application and can be displayed by the function shown below. rv% = Status(ieee%, substat) Call showstat (substat) Another function to display the information contained in the Status structure could be: Sub showstat (substat As IeeeStatus) nl = Chr$(13) + Chr$(10) mystring = “” mystring = mystring + “SC:” + Str$ (substat.SC) + nl mystring = mystring + “CA:” + Str$ (substat.CA) + nl mystring = mystring + “PrimAddr:” + Str$ (substat.PrimAddr) + nl mystring = mystring + “SecAddr:” + Str$ (substat.SecAddr) + nl mystring = mystring + “SRQ:” + Str$ (substat.SRQ) + nl mystring = mystring + “addrChange:” + Str$ (substat.addrChange) + nl mystring = mystring + “talker :” + Str$ (substat.talker) + nl mystring = mystring + “listener:” + Str$ (substat.listener) + nl mystring = mystring + “triggered:” + Str$ (substat.triggered) + nl mystring = mystring + “cleared:” + Str$ (substat.cleared) + nl mystring = mystring + “transfer:” + Str$ (substat.transfer) + nl mystring = mystring + “byteIn :” + Str$ (substat.byteIn) + nl mystring = mystring + “byteOut :” + Str$ (substat.byteOut) + nl TextWindow.Text = TextWindow.Text + RTrim$ (mystring) End Sub External Device Initialization Refer to the device manufacturer’s documentation for specific requirements for initializing your IEEE 488 instrument. In the case of the ADC488, appropriate initialization involves sending it a ioClear command and placing it into Remote mode: rv% = ioClear(adc) rv% = Remote(adc) For our hypothetical application, we also wish to have the ADC488 generate a service request should it detect a command error. This involves sending a command string consisting of textual data to the ADC488: rv% = ioOutput (adc, “M8X”) We may also wish to perform other initialization and configuration. In this case, we set up the ADC488 (adc) in the following configuration: Personal488 User’s Manual, Rev. 3.0 Artisan Technology Group - Quality Instrumentation ... Guaranteed | (888) 88-SOURCE | www.artisantg.com II-239 10F. Visual Basic II. SOFTWARE GUIDES - 10. Driver488/W31 ‘Setup the ADC488: ‘Differential inputs (A0) ‘Scan group channel 1 (C1) ‘Compensated ASCII floating point output format (G0) ‘Channel 1 range to +/ 10V (R3) ‘One shot trigger on talk (T6) The command to perform this configuration combines the above strings and adds the Execute (X) command for the ADC488: rv% = ioOutput(adc, “A0C1G0R3T6X”) Basic Data Acquisition With both Driver488/W31 and the external device ready for action, we next might try taking a simple reading using the ADC488. Here, we use the serial poll (SPoll) capabilities of Driver488/W31 to determine when a response is ready and to format the reply. The reply is appended to the existing contents of the control TextWindow so that it will not erase previous responses. ‘Wait for the ready bit of the ADC488 to be asserted While ((spoll(adc) And 32) = 0) Wend ‘Display the reading response = “” mystring = “” rv% = enter(adc, response) voltage = Val(response) mystring = mystring + “ADC488 channel #1 reading value is ” + Str$(voltage) + nl TextWindow.Text = TextWindow.Text + mystring ‘Now acquire and display an average of 10 readings sum = 0 For I% = 0 to 9 response = “” rv% = enter (adc, response) voltage = Val (response) sum = sum + voltage Next I% sum = sum / 10 mystring = “” mystring = mystring + “The average of 10 readings is” + Str$(sum) + nl TextWindow.Text = TextWindow.Text + mystring Block Data Acquisition First, we set up the ADC488 (adc) in the following configuration: ‘Setup the ADC488: ‘Compensated binary output format (G10) ‘100 uSec scan interval (I3) ‘No pre-trigger scans, 100 post-trigger scans (N100) ‘Continuous trigger on GET (T1) We then wait for the ADC488 to start the acquisition process. Once the acquisition is complete, which is determined by the MSB of the ADC488’s serial poll response, the buffer pointer of the ADC488 is reset (B0). rv% = iooutput(adc, “G10I3N100T1X”) ‘Wait for the ready bit of the ADC488 to be asserted While ((spoll(adc) And 32) = 0) Wend ‘Trigger the ADC488 rv% = Trigger(adc) ‘Wait for the acquisition complete bit of the ADC488 to be asserted II-240 Personal488 User’s Manual, Rev. 3.0 Artisan Technology Group - Quality Instrumentation ... Guaranteed | (888) 88-SOURCE | www.artisantg.com II. SOFTWARE GUIDES - 10. Driver488/W31 10F. Visual Basic While ((Spoll(adc) And 128) = 0) Wend ‘Reset the buffer pointer of the ADC488 rv% = ioOutput(adc, “B0X”) Next, we fill the buffer with 100 readings from the ADC488. Since the data being returned from the ADC 488 is in a binary format, the noterm terminator structure is used to disable scanning for terminators such as carriage return and line feed. noterm.eoi = 0 noterm.nChar = 0 rv% = EnterXI(adc, intResp(0), 200, 1, noterm, 0, 0) The EnterX function will use a DMA transfer if available. Because DMA transfers are performed entirely by the hardware, the program can continue with other work while the DMA transfer function occurs. For example, the program will process the previous set of data while collecting a new set of data into a different buffer. However, before processing the data we must wait for the transfer to complete. For illustration purposes, we query the Driver488/W31 status both before and after waiting. ‘Display DRIVER488/W31 status rv% = Status(ieee%, substat) Call showstat(substat) ‘Wait for completion of input operation rv% = ioWait(adc) ‘Display DRIVER488/W31 status rv% = Status(ieee%, substat) Call showstat(substat) Now we process the buffer: ‘Print the received characters mystring = “” For i% = 0 To 99 mystring = mystring + Str$(intResp(i%))+nl Next i% The readings are stored in the local variable mystring in the above example. They could, however be placed into a text-type control. Refer to the Driver488/W31 status display in the Driver488/W31 ADC Example Program window, shown in the following figure: Driver488/W31 Status Display The functions described so far in this Sub-Chapter provide enough functionality for a basic data acquisition program. The program listing which appears at the end of this Sub-Chapter, covers the examples used. Additional functions provided by Driver488/W31 are described in the “Section III: Command References” of this manual Personal488 User’s Manual, Rev. 3.0 Artisan Technology Group - Quality Instrumentation ... Guaranteed | (888) 88-SOURCE | www.artisantg.com II-241 10F. Visual Basic II. SOFTWARE GUIDES - 10. Driver488/W31 Dynamic Data Exchange (DDE) Dynamic Data Exchange (DDE) is a feature built into Microsoft Windows where by unrelated application programs can communicate. In test and measurement, there are several potential applications for DDE. For example, a very small program can be written to collect data for another specialized program to process, like a spreadsheet program. Programs such as Microsoft Excel have a wide variety of graphics, analysis, and report writing capabilities. Supplying data to Excel directly from an instrument can be a very powerful solution to a laboratory application. This example will explain the concept of DDE from a programmer’s perspective using Visual Basic as the development environment. Driver488/W31 will be used to collect instrument data that will be automatically transferred to an unrelated application program. Application Data that is transferred from one application to another, first goes through the clipboard. This is important to know when debugging a DDE application. To see what is being transferred from application to application at run time, just open the Clipboard in the Windows Program Manager. Every DDE data transfer requires a Client and a Server; the Client receives the data while the Server supplies it. Visual Basic has three controls that can act as a client: A picture box, a text box, and a label. Most controls on a form can act as a source for data, but only a form can act as a server. Windows provides two kinds of application links: Hot links and cold links. Hot links update the data in the client application as soon as the data is available on the server. Cold links require the operator to request that the client be updated. Cold links give more control to the operator as to when the data transfer takes place. Let us see how Microsoft Excel and Microsoft Word for Windows set up a DDE link: 1. If you have them, start them both. 2. In Word, type in a short string of text. 3. Select the text, then click the Copy item under the Edit menu. 4. Bring the Excel spreadsheet into the foreground by clicking on its window. 5. Select a cell, then click Paste Link under its Edit menu. The link is now complete, and any changes made in the string in the word processor will be reflected in the spreadsheet cell. Server Links Visual Basic provides two methods by which its applications can be linked to other applications: Design-time and run-time links. A design-time link is performed while in the Visual Basic development environment. Meanwhile, a run-time link is performed when your Visual Basic program is running. Run-time links are more flexible than design-time links in that the application which will be linked does not need to be chosen at design time. Design-Time Links To create a design-time link between your application and Microsoft Excel: II-242 1. Place a text box in your application’s form. 2. Select the text box by clicking on it with the mouse cursor. 3. Now go up into the Visual Basic Edit menu and select Copy. 4. If Excel is not running, start it now. 5. Select a cell in the Excel spreadsheet, then select Paste Link under the Edit menu. The hot link is now complete. Anything typed into your application’s text box will also show up in the spreadsheet cell. This link will be maintained when your application is running. Personal488 User’s Manual, Rev. 3.0 Artisan Technology Group - Quality Instrumentation ... Guaranteed | (888) 88-SOURCE | www.artisantg.com II. SOFTWARE GUIDES - 10. Driver488/W31 10F. Visual Basic During this process, some properties of the controls in your application were altered by Visual Basic. These include the LinkMode and the LinkTopic. For more information on the use and meaning of Link properties, consult your Visual Basic User Manual or Help system. Run-Time Links To create a run-time link: 1. Your program must set itself up as a server via the LinkMode property. Your application may have several forms, the form which contains the control that will supply the data must have its LinkMode property set to SERVER. This property can be set at design time by selecting the LinkMode property of your form and setting it to SERVER, or at run time by placing the following command in the Load event service routine of your form: LinkMode = SERVER Note: The string SERVER is defined in CONSTANT.TXT which should be added to your project if you wish to use it. 2. To take your application out of server mode at run time, issue the following command in the service routine of your choice: LinkMode = NONE 3. After your application has been setup as a server, the data in its controls is immediately accessible to other applications. 4. Start your application then launch Excel. 5. Select a cell in the spreadsheet. We can now type in an application link by specifying: the application to link, the form within the application, and the control within the form. For example, if your application is named PROJECT1, with one form named FORM1, containing one text box named TEXT1, type the following into a cell in your Excel spreadsheet: =PROJECT1|FORM1!TEXT1 You have now formed a hot link Anything typed in text box TEXT1 will appear in the spreadsheet cell. Posting Link Information One drawback to this run-time linking approach is that a user of your program would need to know the names of your application’s controls (like TEXT1) to complete the link. To eliminate this requirement, your application can be programmed to post the link information in the clipboard. When programs like Excel recognize the presence of this information in the clipboard, they enable a command called Paste Link under their Edit menu. Paste Link will automatically place the string that we typed above into the selected cell. To program your application to post the link information: 1. In your application, create a button or a menu item called Copy Link. Under your new control’s Click event, type in the following: ClipBoard.Clear ClipBoard.SetText “PROJECT1|Form1!text1", &HBF00 The first line clears the present contents of the clipboard. The second line places the control identifier which includes the application name, the form name and the control name, into the clipboard and tags it as a link specifier via the last parameter (&HBF00). 2. After starting your application, click the Copy Link control. 3. Select a cell in the Excel spreadsheet and click the Paste Link item under the Edit menu. The following string: =PROJECT1|Form1!text1 is automatically placed in the cell completing the link. Personal488 User’s Manual, Rev. 3.0 Artisan Technology Group - Quality Instrumentation ... Guaranteed | (888) 88-SOURCE | www.artisantg.com II-243 10F. Visual Basic II. SOFTWARE GUIDES - 10. Driver488/W31 Posting Link Information with Focus If your application has several text boxes from which DDE information can be sourced, you will want to allow your Copy Link control to post the name of the text box that presently has the Focus. To do this, here is one way: 1. Declare a global string called CtrlName as a storage space for the name of the text box that presently has the Focus. 2. Under the GotFocus event for each of the text boxes, type the following commands: Sub Text1_GotFocus() CtrlName = “text1" CopyLink.Enabled = TRUE End Sub Sub Text2_GotFocus() CtrlName = “text2" CopyLink.Enabled = TRUE End Sub Sub Text3_GotFocus() CtrlName = “text3" CopyLink.Enabled = TRUE End Sub These service routines will maintain the global variable CtrlName with the name of the presently selected text box. They also allow user access to your Copy Link button. 3. Under the LostFocus event for each of the text boxes, type the following commands: Sub Text1_LostFocus() CtrlName = “text1" CopyLink.Enabled = FALSE End Sub Sub Text2_LostFocus() CtrlName = “text2" CopyLink.Enabled = FALSE End Sub Sub Text3_LostFocus() CtrlName = “text3" CopyLink.Enabled = FALSE End Sub These service routines will disable user access to your Copy Link control when no text boxes have the Focus. 4. In your Copy Link service routine, type the following: Sub CopyLink_Click () ClipBoard.Clear ClipBoard.SetText “PROJECT1|Form1!” + CtrlName, &HBF00 End Sub This service routine will post the name of the text box that presently has the Focus. When you move to the Excel spreadsheet and perform a Paste Link, the proper text box specification will appear. Acquisition Engine One of the most common DDE applications in the data acquisition world, is sending collected data from an instrument directly to a spreadsheet or analysis package. Since spreadsheets and analysis programs typically do not have any means by which to setup instruments and collect data, an independent program must be written to perform those functions, namely, the Acquisition Engine. Using Driver488/W31, we will write a program that controls the 16channel digitizer, the ADC488/16A. II-244 Personal488 User’s Manual, Rev. 3.0 Artisan Technology Group - Quality Instrumentation ... Guaranteed | (888) 88-SOURCE | www.artisantg.com II. SOFTWARE GUIDES - 10. Driver488/W31 10F. Visual Basic The ADC488/16A Acquisition Engine will have one form that sets up some of the parameters of the instrument and provides a means of collecting and displaying the data. We will also include a means for posting a server link specification in the clipboard, so Excel can perform a Paste Link operation. Note: A similar example is also used within the QUIKTEST utility. For more information on this utility, turn to the next Sub-Chapter “Utility Programs” in this Chapter. All of the initialization happens in the following Form_Load service routine. Sub Form_Load () LinkMode = 1 Chan.AddItem “1" Chan.AddItem ”2" Chan.AddItem “3" Chan.AddItem ”4" Chan.AddItem “5" Chan.AddItem ”6" Chan.AddItem “7" Chan.AddItem ”8" Chan.AddItem “9" Chan.AddItem ”10" Chan.AddItem “11" Chan.AddItem ”12" Chan.AddItem “13" Chan.AddItem ”14" Chan.AddItem “15" Chan.AddItem ”16" Chan.ListIndex = 0 Range(0).value = -1 text1.text = “” StartFlag = 0 NL = Chr$(13) + Chr$(10) End Sub First the LinkMode is set to SERVER (1). Then the combo box is initialized with the channel numbers available from the ADC488/16A. After some form control initialization, the constant NL (new line) is defined as a string consisting of a carriage return and line feed. This will be used to put a new line between readings. Although the ADC488/16A has many programmable features, for the sake of brevity, this application will only exercise a few. This application provides controls to adjust the channel voltage range and the desired channel. The control where the collected data is returned is a text box with its Multiline and ScrollBar properties set to TRUE at design time. A very small bit of code resides behind the option buttons. The option buttons are configured as a control array. The Click event is serviced by the same code which sets the value of the global variable Rng to the index number of the option control. ADC488/16A Acquisition Engine Form Sub Range_Click (index As Integer) Rng = index End Sub When the Acquire button is pressed, executing the Acquire_Click routine, the pre-configured device ADC488 is opened and cleared. Then a string of ADC488 commands are sent to the device using the settings from the combo box and the variable Rng. Lastly, the global variable StartFlag is set to 1 (start). Personal488 User’s Manual, Rev. 3.0 Artisan Technology Group - Quality Instrumentation ... Guaranteed | (888) 88-SOURCE | www.artisantg.com II-245 10F. Visual Basic II. SOFTWARE GUIDES - 10. Driver488/W31 Sub Acquire_Click () Handle = OpenName(“ADC488") Err = ioClear(Handle) cmd$ = ”C" + Str$(Chan.ListIndex + 1) + “R” + Str$(Rng) + “T0X” Err = ioOutput(Handle, cmd$) StartFlag = 1 End Sub The acquisition actually takes place in the Timer service routine. If the acquisition took place in the Acquire_Click service routine, it might never relinquish control to the user again, collecting readings forever. At design time, the timer interval was set to 500 which translates to a 500 ms period. The service routine for the timer checks the StartFlag. If the value is 1, the routine collects data from the ADC488/16A via the Enter command. After getting a reading, the new reading is appended to the existing string using NL as a data separator: Sub Timer1_Timer () If StartFlag = 1 Then Err = Enter(Handle, resp) text1.text = text1.text + NL + resp End If End Sub The Stop button executes the Stopper_Click routine, setting the StartFlag back to 0, ending the acquisition, then closes the device ADC488 via its Handle: Sub Stopper_Click () StartFlag = 0 Err = ioClose(Handle) End Sub The Copy Link button executes the CopyLink_Click routine, posting the server link information in the clipboard. First the clipboard is cleared, then the link information is inserted. Sub CopyLink_Click () Clipboard.Clear Clipboard.SetText “ADC488|Form1|text1”’ &HBF00 End Sub While this application is running, pressing the Copy Link button seems to have no effect. After starting the Excel program, we select several cells in a column, then click Paste Link under the Edit menu. Returning to the application, we click the Acquire button. The data immediately begins flowing into the text box. Soon after, the Excel spreadsheet column begins to reflect the new data from the application, as indicated in the following two screens. Acquisition Engine Form with Data II-246 Personal488 User’s Manual, Rev. 3.0 Artisan Technology Group - Quality Instrumentation ... Guaranteed | (888) 88-SOURCE | www.artisantg.com II. SOFTWARE GUIDES - 10. Driver488/W31 10F. Visual Basic From Excel, this can be turned into a cold link, where the column of the spreadsheet is updated only when the user requests an update. In Excel, click Links... under the File menu. A list of the present links is displayed. Selecting the newly active link and clicking the option button, brings up a dialog box with a check box for enabling and disabling automatic link updates. If the ADC488 application is terminated, the data in the spreadsheet will become static. If we ask for the data to be updated, the Excel spreadsheet will make an attempt to start the application. The following program listing includes the ADC488 Acquisition Engine program. This program was designed to outline the basic concepts of DDE. For further information on DDE, consult your Visual Basic User Manual or Help system. Excel Spreadsheet with ADC488/16A Data Sample Programs Data Acquisition Sample Program GLOBAL.BAS Declarations Declare Function FindWindow Lib “User” (ByVal data1$, ByVal data2$) As Integer Declare Function SendMessage Lib “User” (ByVal winHandle%, ByVal message%, ByVal wp%, ByVal lp As Long) As Integer Declarations included in Form Dim Dim Dim Dim Dim Dim Dim Dim Dim nl As String * 2 mystring As String substat As IeeeStatus adc As Integer response as String * 256 intResp(500) As Integer voltage As Single noterm As terms sample As String * 7 Source Code Sub Command1_Click () nl = Chr$(13) + Chr$(10) TextWindow.Text = “” ‘open driver . . . ieee% = OpenName (“IEEE”) If (ieee% = -1) Then MsgBox “Cannot initialize IEEE system” End End If ‘Open device named ADC Personal488 User’s Manual, Rev. 3.0 Artisan Technology Group - Quality Instrumentation ... Guaranteed | (888) 88-SOURCE | www.artisantg.com II-247 10F. Visual Basic II. SOFTWARE GUIDES - 10. Driver488/W31 rv% = ioError (ieee%, TURNOFF) devhandle% = OpenName (“wave”) adc = OpenName (“ADC”) If (adc = -1) Then adc = MakeDevice (devhandle%, “ADC”) If (adc = -1) Then MsgBox “Can not initialize device ADC” End End If End If response = “” rv% = GetError (ieee%, response) rv% = BusAddress (adc, 14, -1) ‘Get DRIVER488/W31 status rv% = Hello (ieee%, response) mystring = “” For i% = 1 To Len (RTrim$ (response)) If Asc (Mid$(response, i%, 1)) = 10 Then mystring = mystring + nl Else mystring = mystring + Mid% (response, i%, 1) End If Next i% mystring = mystring + nl TextWindow.Text = TextWindow.Text + RTrim$ (mystring) TextWindow.Text = TextWindow.Text + nl ‘Display DRIVER488/W31 status rv% = Status (ieee%, substat) Call showstat (substat) ‘Clear ADC response = “” rv% = ioClear (adc) ‘Setup the ADC488: ‘Differential inputs (A0) ‘Scan group channel 1 (C1) ‘Compensated ASCII floating-point output format (G0) ‘Channel 1 range to +/- 10V (R3) ‘One-shot trigger on talk (T6) ‘rv% = iooutput (adc, “A0C1G0R3T6X”) ‘Wait for the ready bit of the ADC488 to be asserted While ((spoll (adc) And 32) = 0) Wend ‘Display the reading response = “” mystring = “” rv% = enter(adc, response) voltage = Val (response) mystring = mystring + “ADC488 channel #1 reading value is ” + Str$(voltage) + nl TextWindow.Text = TextWindow.Text + mystring ‘Now acquire and display an average of 10 readings sum = 0 For i% = 0 To 9 response = “” rv% = enter (adc, response) voltage = Val (response) sum = sum + voltage II-248 Personal488 User’s Manual, Rev. 3.0 Artisan Technology Group - Quality Instrumentation ... Guaranteed | (888) 88-SOURCE | www.artisantg.com II. SOFTWARE GUIDES - 10. Driver488/W31 10F. Visual Basic Next i% sum = sum / 10 mystring = “” mystring = mystring + “The average of 10 readings is ” + Str$(sum) + nl TextWindow.Text = TextWindow.Text + mystring ‘Setup the ADC488: ‘Compensated binary output format (G10) ‘100 uSec scan interval (I3) ‘No pre-trigger scans, 100 post-trigger scans (N100) ‘Continuous trigger on GET (T1) rv% = iooutput (adc, “G10I3N100T1X”) ‘Wait for ready bit of the ADC488 to be asserted While ((spoll (adc) And 32) = 0) Wend ‘Trigger the ADC488 rv% = Trigger (adc) ‘Wait for the ready bit of the ADC488 to be asserted While ((spoll (adc) And 32) = 0) Wend ‘Reset the buffer pointer of the ADC488 rv% = iooutput (adc, “B0X”) ‘Take 100 readings from the ADC488 noterm.eoi = 0 noterm.nChar = 0 rv% = EnterXI(adc, intResp(0), 200, 1, noterm, 0, 0) If rv% = -1 Then TextWindow.Text = TextWindow.Text + “Error in data transfer!” End End If ‘Display DRIVER488/W31 status rv% = Status (ieee%, substat) Call showstat (substat) ‘Wait for completion of input operation rv% = ioWait (adc) ‘Display DRIVER488/W31 status rv% = Status (ieee%, substat) Call showstat (substat) ‘Print the received characters mystring = “” For i% = 0 to 99 mystring = mystring + Str$(intResp(i%) + nl ‘Next i% mystring = mystring + nl TextWindow.Text = TextWindow.Text + mystring End Sub Sub Form_Unload (Cancel As Integer) ‘Unload the IEEE driver loaderName$ = “Driver488/W31 Loader” winName$ = “Driver488/W31” Hdriver% = FindWindow(loaderName$, winName$) asdf = SendMessage (Hdriver%, &H2, 0, 0) End Sub Sub showstat (substat As IeeeStatus) nl = Chr$(13) + Chr$(10) Personal488 User’s Manual, Rev. 3.0 Artisan Technology Group - Quality Instrumentation ... Guaranteed | (888) 88-SOURCE | www.artisantg.com II-249 10F. Visual Basic II. SOFTWARE GUIDES - 10. Driver488/W31 mystring = “” mystring = mystring + “SC :” + Str$ (substat.SC) + nl mystring = mystring + “CA :” + Str$ (substat.CA) + nl mystring = mystring + “PrimAddr :” + Str$ (substat.PrimAddr) + nl mystring = mystring + “SecAddr :” + Str$ (substat.SecAddr) + nl mystring = mystring + “SRQ :” + Str$ (substat.SRQ) + nl mystring = mystring + “addrChange:” + Str$(substat.addrChange)+ nl mystring = mystring + “talker :” + Str$ (substat.talker) + nl mystring = mystring + “listener :” + Str$ (substat.listener) + nl mystring = mystring + “triggered:” + Str$ (substat.triggered) + nl mystring = mystring + “cleared :” + Str$ (substat.cleared) + nl mystring = mystring + “transfer :” + Str$ (substat.transfer) + nl mystring = mystring + “byteIn :” + Str$ (substat.byteIn) + nl mystring = mystring + “byteOut :” + Str$ (substat.byteOut) + nl TextWindow.Text = TextWindow.Text + RTrim$ (mystring) End Sub Function cvi (stringarg$) As Single Static hb As Integer Static lb As Integer Static temp As Single hb = Asc(Right$(stringarg$, 1) lb = Asc(Left$(stringarg$, 1) temp = ((hb And &H7F) * 256) + lb If (hb And &H80) Then temp = -temp End If cvi = temp End Function IEEE 488 Event Custom Control Sample Program Declarations Included with Form Dim adc As Integer Dim response As String * 256 Source Code Sub Event4881_SRQ () ‘Clear SRQ condition rv% = spoll(adc) ‘Reset the buffer pointer of the ADC488 rv% = ioOutput(adc, “B0X”) ‘Get 100 readings from the ADC488 TextWindow.Text = “” For i% = 1 To 100 rv% = Enter(adc, response) TextWindow.Text = TextWindow.Text + Chr$(13) + Chr$(10) + response Next i% rv% = ioClose(adc) End Sub Sub Command1_Click () ‘Now opening a device named ADC adc = OpenName(“ADC”) If (adc = -1) Then MsgBox “Can not initialize device ADC” End End If ‘Clear ADC II-250 Personal488 User’s Manual, Rev. 3.0 Artisan Technology Group - Quality Instrumentation ... Guaranteed | (888) 88-SOURCE | www.artisantg.com II. SOFTWARE GUIDES - 10. Driver488/W31 10F. Visual Basic rv% = ioClear(adc) ‘Set up event handling for trapping the SRQ Event4881.Handle = adc Event4881.SRQ = -1 ‘Enable ADC to SRQ on acquisition complete rv% = ioOutput(adc, “M128X”) ‘Setup the ADC488: ‘100 uSec scan interval (I3) ‘No pre-trigger scans, 100 post-trigger scans (N100) ‘Continuous trigger on GET (T1) rv% = ioOutput(adc, “I3N100T1X”) ‘Trigger the ADC488 rv% = Trigger(adc) End Sub Acquisition Engine Sample Program GLOBAL.BAS Declarations Global Global Global Global Global NL As String resp As String * 255 StartFlag As Integer Handle As Integer Rng As Integer Source Code Sub Form_Load () LinkMode = 1 Chan.AddItem “1" Chan.AddItem ”2" Chan.AddItem “3" Chan.AddItem ”4" Chan.AddItem “5" Chan.AddItem ”6" Chan.AddItem “7" Chan.AddItem ”8" Chan.AddItem “9" Chan.AddItem ”10" Chan.AddItem “11" Chan.AddItem ”12" Chan.AddItem “13" Chan.AddItem ”14" Chan.AddItem “15" Chan.AddItem ”16" Chan.ListIndex = 0 Range(0).value = -1 text1.text = “” StartFlag = 0 NL = Chr$(13) + Chr$(10) End Sub Sub Acquire_Click () Handle = OpenName(“ADC”) Err = ioClear(Handle) cmd$ = “C” + Str$(Chan.ListIndex + 1) + “R” + Str$(Rng) + “T0X” Err = ioOutput(Handle, cmd$) StartFlag = 1 End Sub Sub CopyLink_Click () Personal488 User’s Manual, Rev. 3.0 Artisan Technology Group - Quality Instrumentation ... Guaranteed | (888) 88-SOURCE | www.artisantg.com II-251 10F. Visual Basic II. SOFTWARE GUIDES - 10. Driver488/W31 ClipBoard.Clear ClipBoard.SetText “ADC488|Form1!text1", &HBF00 End Sub Sub Range_Click (index As Integer) Rng = index End Sub Sub Stopper_Click () StartFlag = 0 Err = ioClose(Handle) End Sub Sub Timer1_Timer () If StartFlag = 1 Then Err = Enter(Handle, resp) text1.text = text1.text + NL + resp End If End Sub Command Summary To obtain a summary of the Visual Basic commands for Driver488/W31, turn to the “Section III: Command References” of this manual. 10G. Utility Programs Topics • • Introduction................................................................................... II-251 WINTEST ........................................................................................ II-251 Opening a Device Handle for Communication ....................................... II-252 Handle Lists ................................................................................................. II-252 WINTEST Session........................................................................................ II-253 • QUIKTEST...................................................................................... II-254 Application Files ......................................................................................... II-254 Installation .................................................................................................. II-254 Operation of the Application..................................................................... II-255 Cutting & Pasting to Other Applications................................................ II-255 Dynamic Data Exchange (DDE)................................................................ II-255 Loading the Project into Visual Basic ..................................................... II-256 • Licensing ........................................................................................ II-256 Introduction The Driver488/W31 software disk includes two utility programs: WINTEST and QUIKTEST. These programs were designed as an exercise for the user and to verify proper installation of the driver. WINTEST uses the Driver488/W31 C syntax while QUIKTEST uses Visual Basic. This Sub-Chapter describes each utility in detail. WINTEST WINTEST is a utility program included with Driver488/W31. Its primary application is to exercise the driver and instruments on the bus via Driver488/W31 commands, which are accessible from the menu bar. Since the lines of code that are generated and executed by WINTEST use the Driver488/W31 C language syntax, WINTEST is most useful for C programmers. II-252 Personal488 User’s Manual, Rev. 3.0 Artisan Technology Group - Quality Instrumentation ... Guaranteed | (888) 88-SOURCE | www.artisantg.com II. SOFTWARE GUIDES - 10. Driver488/W31 10G. Utility Programs Under the menu items of the WINTEST application are all of the commands in Driver488/W31. The commands are categorized in 8 groups: Menu Item Device DataTransfer Send Query Error Events Bus Config Group Description Commands dealing with accessing and configuring instruments Commands that send and receive data from instruments Low-level commands for sending commands and data to instruments Polling commands Driver query and error handling commands Commands dealing with enabling and disabling bus events Bus and instrument management commands Driver configuration commands As the application’s main window opens on the screen, a response window is also opened with the response from Driver488/W31’s Hello command placed in it. This window returns the response from any input command used during the session. Note: DO NOT close this response window for the duration of your WINTEST session. There is no mechanism in the application to re-open this window. Opening a Device Handle for Communication To perform any of the commands under the menu items, it is first necessary to open a device. Within the WINTEST main window is a menu item labeled Device, as shown in the figure. The field labeled devHandle holds a table of all of the devices that were configured during the driver configuration process. Next to each device name, is a number in brackets [ ]. This number corresponds to the present value of the handle associated with the device name. A value of -1 means that the device has not been opened. Any positive value means that the device is open and available. Selecting a Device Handle To open a device, select the desired device, then click the OpenName button. All of the commands under the menus will use the presently selected device handle shown in the devHandle field. If the selected device is not open, an error will be returned. To close the selected device, click the Close button. Handle Lists Several of the Driver488/W31 commands operate on lists of handles (i.e. ClearList). To create a list, select a device in the devHandle field that you wish to place in the list, then click the List button. Repeat this process for all of the devices that you want in the list. Non-list commands will still use the handle of the device that is presently showing in the devHandle field, but list-type commands will use the handles of all of the devices tagged as list handles. All of the devices tagged as list items must be open to successfully complete a list command. Personal488 User’s Manual, Rev. 3.0 Artisan Technology Group - Quality Instrumentation ... Guaranteed | (888) 88-SOURCE | www.artisantg.com II-253 10G. Utility Programs II. SOFTWARE GUIDES - 10. Driver488/W31 WINTEST Session Start WINTEST. In the devHandle field is the table of preconfigured devices. If no changes were made to the factory default, the table should include IEEE and Wave. The handle IEEE is always in the device table for interface-related commands. As shown in the following figure, select Wave in the devHandle field, then click the OpenName button. The number in brackets next to the name Wave changes from -1 to a positive number as the Opening a Device command is executed and the device is opened. The complete function call appears in the Function Call field and the call also appears in the executed command list. In the executed command list, the number to the left in parenthesis, is the value returned by the function call during execution. Generally, if the command completed successfully, the number is 0, and if the command caused an error, the number is -1. For more information on the command return values, refer to the “Section III: Command References” of this manual. To clear the device named Wave, select Clear under the Bus menu item. Then, create a new device using the MakeDevice command under the Device menu item. A dialog box will pop up that shows the C structure for the required user input. In this case, the name of the new device is required. Fill in the name and click OK. The command and the returned value will now be in the command list, as shown in the figure. Your new device now appears in the devHandle field. Select BusAddress under the Config menu item to set the address of your newly created device. Creating a New Device As you fill in the pop-up dialog boxes, WINTEST uses your input to adjust the parameters in the function call. These completed syntactically-correct lines of C code can be selected, cut and pasted into your C editor at any time. II-254 Personal488 User’s Manual, Rev. 3.0 Artisan Technology Group - Quality Instrumentation ... Guaranteed | (888) 88-SOURCE | www.artisantg.com II. SOFTWARE GUIDES - 10. Driver488/W31 10G. Utility Programs To get data from your new device, select Enter Commands under the DataTransfer menu item. A sub menu showing the controls for the Enter commands will display a dialog box, as indicated in the figure. Since the Enter command uses a subset of the parameters of the Displaying the Enter Commands EnterX command, the dialog box displays all of the controls for the EnterX command, while disabling those not appropriate for the Enter command. Click OK to get a reading. A dialog box pops up showing the results. The Enter command returns the number of bytes successfully transferred. Notice the byte count in parenthesis to the left of the command in the command list. For a complete explanation of the Driver488/W31 commands and their uses, refer to the “Section III: Command References” of this manual. QUIKTEST QUIKTEST is a simple application designed to exercise Driver488/W31, and the instruments connected to the interface card. QUIKTEST is a good tool for verifying that your driver and interface card are properly installed. QUIKTEST can also be used to experiment with your instruments to see how they respond to different sequences of commands. Included on the disk, is an executable version of QUIKTEST and the Visual Basic source code files, form files, and makefile. Application Files The executable version of QUIKTEST includes the following: The source code files, the form files, the make file, and the Visual Basic (VB) run-time Dynamic Link Library (DLL), as shown in the table: File Name QUIKTEST.EXE QUIKTEST.MAK QUIKTEST.FRM DEVICE.FRM GLOBAL.BAS IOTVB10.BAS MYCODE.BAS VBRUN100.DLL Description The executable version of the application The VB makefile, used to build the executable A VB form file, which generates the main window of the application A VB form file, which generates the pop-up window used to create and edit bus devices A VB source code file containing global declarations and variables A VB interface file included with Driver488/W31 A VB source code file containing application-specific routines The VB run-time DLL supplied by Microsoft Installation To run the application, only the QUIKTEST.EXE and VBRUN100.DLL files are required. Copy the VBRUN100.DLL file into your \WINDOWS directory. The QUIKTEST file can be copied anywhere or run from the floppy. However, the application will generally respond quicker if it is executed from the hard drive. Personal488 User’s Manual, Rev. 3.0 Artisan Technology Group - Quality Instrumentation ... Guaranteed | (888) 88-SOURCE | www.artisantg.com II-255 10G. Utility Programs II. SOFTWARE GUIDES - 10. Driver488/W31 Operation of the Application Designed for simplicity, the application has very few controls. To begin communicating with your instruments, you must first create a device. When creating a device, you can either use a device name that you have preconfigured or a new name. Press the Create button, as shown in the figure, then fill in the parameters in the pop-up Device Window. After a device has been created, most of the main window controls will be enabled. If your Creating a Device instrument has data available, pressing the Read button will collect the data and place it in the adjacent Results window. Commands can be sent to the selected device at any time. Simply type in the command string into the Output Data/Commands field, then click on the Send button, or hit <Enter>. When collecting data via the Read button, the data is placed at the destination selected in the Data Destination field. If the destination is a file, it is usually a good idea to specify the entire path. The example in the following figure, shows the Data Destination for Screen and file as Test.dat. A more complete destination for Screen and file would be C:\Test.dat. As additional devices are created, they will be added to the Instruments list. No two instruments can be created using the same name. Only one instrument in the Instruments list can be selected at any one time. All of the controls in the main window pertain directly to the selected instrument. For example, after creating create two devices, the last device created will be selected. Now click on the Serial Poll menu item. The Collecting Data response will immediately pop-up on the screen. Now select the other device and repeat the Serial Poll. The response of that device will now be on the screen. Cutting & Pasting to Other Applications The Results field of the QUIKTEST main window supports many of the features of a standard text editor. The cursor can be placed anywhere in the text, text can be added or deleted, and text can be selected, cut or copied. Under the Edit Readings menu item, is the Copy command for copying selected text to the clipboard. Text sent the clipboard can subsequently be pasted into almost any Windows application. Dynamic Data Exchange (DDE) The QUIKTEST application has the ability to send collected instrument results directly to other Windows applications via the Windows Dynamic Data Exchange (DDE) capabilities. For example, to send collected data to a Microsoft Excel spreadsheet: II-256 Personal488 User’s Manual, Rev. 3.0 Artisan Technology Group - Quality Instrumentation ... Guaranteed | (888) 88-SOURCE | www.artisantg.com II. SOFTWARE GUIDES - 10. Driver488/W31 10G. Utility Programs 1. Select Copy under the Edit Results menu item. 2. Start the Excel application, then select a range of cells within a column. 3. Within the Excel application, select Paste Link under the Edit menu item. The DDE “link” is now complete. 4. Next, click on the QUIKTEST application window to bring it to the foreground. 5. Finally, send the necessary commands to your instrument for it to supply readings continuously, by selecting Continuous in the Readings Control field, and clicking on the Read button. As the readings appear in the Results field of the QUIKTEST window, they should also appear in the selected cells of the Excel spreadsheet. For detailed information on performing Dynamic Data Exchange, refer to the topic “Dynamic Data Exchange (DDE)” found in the previous Sub-Chapter “Visual Basic” of this Chapter. Loading the Project into Visual Basic To inspect the source code of this application or change its functionality, the Visual Basic development package from Microsoft is required. Start the Visual Basic application. Select Open Project under the File menu item. Select the makefile QUIKTEST.MAK. All of the forms and source files will now be accessible for inspection and/or change. The majority of the source code pertains to the managing of the device table. Operating the action buttons is typically quite simple. However, it is important to understand how the application performs the collection of data: • The Read button merely sets a flag when it is clicked. • A Timer control actually collects the readings. • If the readings were actually collected by the clicking of the Read button, continuous data collection would never service the mouse, since the act of collecting data would not allow any user events to ever be serviced. For more information on data collection, see the topic “Dynamic Data Exchange (DDE)” found in the previous Sub-Chapter “Visual Basic” of this Chapter. Or more specifically, this information is found under the sub-topic “Acquisition Engine.” Licensing You may copy, change, and paste from these utility programs freely. Although owned by IOtech, purchasers of Driver488/W31 are granted unlimited privileges for copying and/or altering WINTEST and/or QUIKTEST. All other parts of Driver488/W31, however, are licensed software and cannot be copied or reproduced without the expressed written consent from IOtech, Inc. 10H. Command Reference For Driver488/SUB, W31, W95, & WNT To obtain a detailed description of the command references for Driver488/SUB and Driver488/W31, turn to Section III in this manual entitled “Command References.” The commands for Driver488/W95 and Driver488/WNT are provided as guides, pending current software revisions. Refer to your operating system header file for the latest available information specific to your application. The commands are presented in alphabetical order for ease of use. Personal488 User’s Manual, Rev. 3.0 Artisan Technology Group - Quality Instrumentation ... Guaranteed | (888) 88-SOURCE | www.artisantg.com II-257 11A. Introduction 11. II. SOFTWARE GUIDES - 11. Driver488/W95 Driver488/W95 Note: Driver488/WIN95 and Driver488/NT from previous manuals, have been renamed Driver488/W95 and Driver488/WNT, respectively. Note: The differences among Driver488 for Windows 3.x, Windows 95 and Windows NT are slight. However, because additional changes are being made to Driver488/W95 and Driver488/WNT at the time this manual is being revised, refer to your operating system header file (and README.TXT text file, if present) to obtain the current material on these driver versions. To obtain a detailed description of the command references for Driver488/SUB and Driver488/W31, turn to Section III in this manual entitled “Command References.” The commands for Driver488/W95 and Driver488/WNT are provided as guides, pending current software revisions. Refer to your operating system header file for the latest available information specific to your application. The commands are presented in alphabetical order for ease of use. II-258 Personal488 User’s Manual, Rev. 3.0 Artisan Technology Group - Quality Instrumentation ... Guaranteed | (888) 88-SOURCE | www.artisantg.com II. SOFTWARE GUIDES - 12. Driver488/WNT 12. 12A. Introduction Driver488/WNT Note: Driver488/WIN95 and Driver488/NT from previous manuals, have been renamed Driver488/W95 and Driver488/WNT, respectively. Note: The differences among Driver488 for Windows 3.x, Windows 95 and Windows NT are slight. However, because additional changes are being made to Driver488/W95 and Driver488/WNT at the time this manual is being revised, refer to your operating system header file (and README.TXT text file, if present) to obtain the current material on these driver versions. To obtain a detailed description of the command references for Driver488/SUB and Driver488/W31, turn to Section III in this manual entitled “Command References.” The commands for Driver488/W95 and Driver488/WNT are provided as guides, pending current software revisions. Refer to your operating system header file for the latest available information specific to your application. The commands are presented in alphabetical order for ease of use. Personal488 User’s Manual, Rev. 3.0 Artisan Technology Group - Quality Instrumentation ... Guaranteed | (888) 88-SOURCE | www.artisantg.com II-259 Section III: COMMAND REFERENCES III-260 Personal488 User’s Manual, Rev. 3.0 Artisan Technology Group - Quality Instrumentation ... Guaranteed | (888) 88-SOURCE | www.artisantg.com Personal488 User’s Manual, Rev. 3.0 Artisan Technology Group - Quality Instrumentation ... Guaranteed | (888) 88-SOURCE | www.artisantg.com III-261 Driver488/DRV Software Guides III. COMMAND REFERENCES Chapters 13. 14. 15. 13. Overview .................................................................................. III-261 Command Summaries........................................................... III-262 Command References ........................................................... III-282 Overview This Section on the Driver488 “Command References” contains the detailed descriptions of the Application Program Interface (API) command references pertaining to Driver488/DRV, Driver488/SUB, Driver488/W31, Driver488/W95, and Driver488/WNT. Although changes are currently being made to Driver488/W95 and to Driver488/WNT, the commands which apply to these drivers are close to those that apply to Driver488/W31. The Driver488/W31 command reference may be used as a detailed reference for these other two drivers. But for accuracy, refer to your operating system file header to obtain the actual syntax for your particular driver. III-262 Personal488 User’s Manual, Rev. 3.0 Artisan Technology Group - Quality Instrumentation ... Guaranteed | (888) 88-SOURCE | www.artisantg.com COMMAND REFERENCES 14. 15. Driver488/DRV Command Summaries Sub-Chapters 14A. 14B. 14C. 14D. 14E. 14A. Driver488/SUB, C Languages .............................................III-262 Driver488/SUB, QuickBASIC ...............................................III-266 Driver488/SUB, Pascal ..........................................................III-270 Driver488/W31, C Languages ...............................................III-274 Driver488/W31, Visual Basic ................................................III-278 Driver488/SUB, C Languages Topics • • • • • Function Descriptions ...............................................................III-262 The Commands ............................................................................III-264 Syntax Parameters......................................................................III-264 Defined Constants.......................................................................III-265 Structure Definitions .................................................................III-265 Function Descriptions Command Abort (IntfHandle) Arm (IntfHandle,Condition) AutoRemote (IntfHandle,Flag) Buffered (IntfHandle) BusAddress (Handle,Prim,Sec) CheckListener (IntfHandle Prim, Sec) Clear (Handle) ClearList (DevHandles) Clock Frequency (IntfHandle, Freq) Close (Handle) ControlLine (IntfHandle) Disarm (IntfHandle, Condition) DmaChannel (IntfHandle, DmaChan) Enter (IntfHandle,Data) EnterMore (IntfHandle,Data) EnterN (IntfHandle,Data,Count) EnterNMore (IntfHandle,Data,Count) EnterX (DevHandle, Data, Count, ForceAddr, Term, Async, Description Assert IFC Arm OnEvent for specified event(s) Assert REN on Output Return number of buffered bytes Set IEEE address of interface or device Check for device at specified bus address Issue Selected Device Clear (SDC) or Device Clear (DCL) Clear devices in list Specify clock interface frequency Close specified handle Get bus line status from IEEE 488 or serial bus Disarm event handling for specified condition Specify DMA channel Read data from specified device Read data from specified device without forcing address Read count bytes from specified device Read count bytes without forcing address Read data adjusting all parameters Personal488 User’s Manual, Rev. 3.0 Artisan Technology Group - Quality Instrumentation ... Guaranteed | (888) 88-SOURCE | www.artisantg.com III-263 14A. Driver488/SUB, C Languages III. COMMAND REFERENCES - 14. Command Summaries CompStat) Error (Handle, Display) FindListeners (IntfHandle, Prim, Listener, Limit) Finish (IntfHandle) GetError (Handle, ErrText) GetErrorList (DevHandles, ErrText, ErrHandle) Hello (IntfHandle, Message) IntLevel (IntfHandle,IntLev) IOAddress (IntfHandle, IOAddr) KeepDevice (DevHandle) LightPen (IntfHandle, LightPen) Listen (IntfHandle, Prim, Sec) Local (Handle) LocalList (DevHandles) Lol (IntfHandle) MakeDevice (DevHandle, Name) MyListenAddr (IntfHandle) MyTalkAddr (IntfHandle) OnEvent (IntfHandle,Handler,Argument) OepnName (Name) Output (DevHandle,Data) OutputN (DevHandle,Data,Count) OutputMore (DevHandle,Data) OutputNMore (DevHandle,Data,Count) OutputX (DevHandle,Data,Count, LastForceAddr,Term,Async,CompStat) PassControl (DevHandle) PPoll (IntfHandle) PPollConfig (DevHandle,PPresponse) PPollDisable (DevHandle) PPollDisableList (DevHandles) PPollUnconfig (IntfHandle) Remote (Handle) RemoteList (DevHandles) RemoveDevice (DevHandle) Request (IntfHandle, SPstatus) Reset (IntfHandle) Resume (IntfHandle,Monitor) SendCmd (IntfHandle,Bytes,Length) SendData (DevHandle,Bytes,Length) SendEoi (IntfHandle,Bytes,Length) SPoll (DevHandle) SPoll (IntfHandle) SPollList III-264 Control display of error messages Find devices configurable to listen at specific address Reassert ATN (see Resume) Get error code and error text Find device in error and identify Verify communication and get revision number Specify hardware interrupt level of I/O adapter Specify I/O port base address of I/O adapter Make specified external device permanent Enable or disable detection of interrupts via light pen status Send Listen Address Unassert REN (IntfHandle) or issue GTL (DevHandle) Issue GTL to devices in list Issue LLO bus command Create identical copy of existing device Send My Listen Address Send My Talk Address Specify function to be called upon Armed event Open specified device and return device handle Send data to specified device Send count bytes to specified device Send count bytes to specified device without forcing address Send count bytes without forcing address Send data to specified device adjusting all parameters Allow Interface to give control to another controller on bus Perform IEEE 488 parallel poll operation Configure Parallel Poll response of bus device Disable Parallel Poll response of a bus driver Disable Parallel Poll response of several bus devices Disable the Parallel Poll response of all bus devices Assert REN if IntfHandle, address to Listen if DevHandle Address specified external devices to Listen Remove Driver488 device Request service from Active Controller by asserting SRQ Provide warm start of interface, clear all error conditions Unassert ATN Send command strings with ATN asserted Send command strings with ATN unasserted Same as SendData with eoi on last byte Serial Poll device Get SRQ state Serial Poll devices until parameters are met Personal488 User’s Manual, Rev. 3.0 Artisan Technology Group - Quality Instrumentation ... Guaranteed | (888) 88-SOURCE | www.artisantg.com III. COMMAND REFERENCES - 14. Command Summaries (DevHandles,SPResult,UntilFlag) Status (IntfHandle,StatusVal) Stop (IntfHandle) SysController (IntfHandle,SysCont) Talk (IntfHandle,Prim,Sec) Term (Handle,TermP,TermType) TimeOut (Handle, Timeout) Trigger (Handle) TriggerList (DevHandles) UnListen (IntfHandle) UnTalk (IntfHandle) Wait (IntfHandle) 14A. Driver488/SUB, C Languages Return details of state of the driver Halt any asynchronous transfer that may be in progress Specify if interface is to be System Controller Send specified Talk Address Set terminators for interface or device Set time that must elapse before time out error declared Issue Group Execute Trigger Issue GET to devices in list Send the Unlisten (UNL) command Send the Untalk (UNT) command Wait until asynchronous transfer has completed The Commands To obtain a more detailed description of the command references for Driver488/SUB, turn to Chapter 15 “Command References” in this Section. The commands are presented in alphabetical order for ease of use. Syntax Parameters The symbol * (asterisk) refers to a Pointer. Name Type Argument Async Bytes CompStat Condition Count Data DevHandle DevHandles Display DmaChan ErrHandle ErrText Flag ForceAddr Freq Handle Handler IntLev IntfHandle Last Length LightPen Limit Listener Message Monitor Name Ppresponse void far * bool unsigned char * int * ArmCondT long char far * DevHandleT DevHandleT * bool int DevHandleT * char * bool bool int DevHandleT UserHandlerFP int DevHandleT bool int bool short unsigned short * char * bool char * int Description 32-bit argument Flag to indicate async transfer Pointer to characters to transfer Completion status from Driver Arm/Disarm bit mask Long count specifier Pointer to a character array External device handle Pointer to array of handles Error message display is ON or OFF Hardware DMA channel Pointer to handle that caused error Pointer to error text ON or OFF specifier Force address flag Clock frequency Either a DevHandle or an IntfHandle Pointer to OnEvent Handler Hardware Interrupt level Interface handle Terminator on last byte indicator Number of Bytes Light Pen emulation is ON or OFF Max number of listeners Pointer to listener list Pointer to character array Data monitor ON or OFF Pointer to name string Configuration byte Personal488 User’s Manual, Rev. 3.0 Artisan Technology Group - Quality Instrumentation ... Guaranteed | (888) 88-SOURCE | www.artisantg.com III-265 14A. Driver488/SUB, C Languages Prim SPResult Sec SPstatus StatusVal SysCont TermP TermType Timeout UntilFlag III. COMMAND REFERENCES - 14. Command Summaries char unsigned char * char int IeeeStatusT * bool TermT * int long char IEEE 488 primary address Array of SPOLL results IEEE 488 secondary address Service request status Pointer to status structure System Controller flag for IEEE 488 interface Pointer to terminator structure Terminator type: TERMIN or TERMOUT Timeout value in milliseconds SpollList operating mode Defined Constants Bus Command Constants bcUNT bcUNL bcMTA bcMLA bcTALK bcLISTEN Miscellaneous Constants 1 2 3 4 5 6 IN OUT ON OFF ALL SAME WHILE_SRQ UNTIL_RSV TRUE FALSE MAXHANDLES NOIEEEADRESS NODEVICE NONODE TERMIN TERMOUT 1 2 1 0 -1 -2 -2 -3 1 0 50 -1 -1 NULL 1 2 Structure Definitions typedef struct { bool SC; bool CA; uchar Primaddr; uchar Secaddr; bool SRQ; bool addrChange; bool talker; bool listener; bool triggered; bool cleared; bool transfer; bool byteIn; bool byteOut; } IeeeStatusT; III-266 typedef struct { bool EOI; int Char; bool EightBits; int termChar[2]; } TermT; Personal488 User’s Manual, Rev. 3.0 Artisan Technology Group - Quality Instrumentation ... Guaranteed | (888) 88-SOURCE | www.artisantg.com III. COMMAND REFERENCES - 14. Command Summaries 14B. 14B. Driver488/SUB, QuickBASIC Driver488/SUB, QuickBASIC Topics • • • • • Function Descriptions ...............................................................III-266 The Commands ............................................................................III-268 Syntax Parameters......................................................................III-268 Defined Constants.......................................................................III-269 Structure Definitions .................................................................III-269 Function Descriptions Command ioAbort% (IntfHandle%) ioAddress% (IntfHandle%,IOAddr%) ioArm% (IntfHandle%,Condition%) ioAutoRemote% (IntfHandle%,Flag%) ioBuffered& (IntfHandle%) ioBusAddress% (Handle%,Prim%,Sec%) ioCheckListener% (IntfHandle%,Prim%, Sec%) ioClear% (Handle%) ioClearList% (IntHandles%) ioClockFrequency% (IntfHandle%, Freq%) ioClose% (Handle%) ioControlLine% (IntfHandle%) ioDisarm% (IntfHandle%,Condition%) ioDmaChannel% (IntfHandle%,DmaChan%) ioEnter% (IntfHandle%,Data$) ioEnterMore& (IntfHandle%,Data$) ioEnterN& (IntfHandle%,Data$,Count&) ioEnterNMore& (IntfHandle%,Data$,Count&) Description Assert IFC Specify I/O port base address of I/O adapter Arm OnEvent for specified event(s) Assert REN on Output Return number of buffered bytes Set IEEE address of interface or device Check for device at specified bus address Issue Selected Device Clear (SDC) or Device Clear (DCL) Clear devices in list Specify clock interface frequency Close specified handle Get bus line status from IEEE 488 or serial bus Disarm event handling for specified condition Specify DMA channel Read data from specified device Read data from specified device without forcing address Read count bytes from specified device Read count bytes without forcing address ioEnterX& (DevHandle%,Data$,Count&, ForceAddr%,Term,Async%,CompStat%) Read data adjusting all parameters ioError% (Handle%,Display%) ioFindListeners% (IntfHandle%, Prim%, Listener%,Limit%) Control display of error messages Find devices configurable to listen at specific address Reassert ATN (see Resume) Get error code and error text Find device in error and identify ioFinish% (IntfHandle%) ioGetError (Handle%,ErrText$) ioGetErrorList% (DevHandles%(),ErrText$,ErrHandle%) ioHello% (IntfHandle%,Message$) ioIntLevel% (IntfHandle%,IntLev%) ioKeepDevice% (DevHandle%) ioLightPen% (IntfHandle%,LightPen%) ioListen% (IntfHandle%,Prim%,Sec%) Verify communication and get revision number Specify hardware interrupt level of I/O adapter Make specified external device permanent Enable or disable detection of interrupts via light pen status Send Listen Address Personal488 User’s Manual, Rev. 3.0 Artisan Technology Group - Quality Instrumentation ... Guaranteed | (888) 88-SOURCE | www.artisantg.com III-267 14B. Driver488/SUB, QuickBASIC III. COMMAND REFERENCES - 14. Command Summaries ioLocal% (DevHandle%) ioLocalList% (DevHandles%) ioLol% (IntfHandle%) ioMakeDevice% (DevHandle%,Name$) ioMyListenAddr% (IntfHandle%) ioMyTalkAddr% (IntfHandle%) ioOpenName% (Name$) ioOutput (DevHandle%,Data$) ioOutputN (DevHandle%,Data$,Count&) ioOutputMore (DevHandle%,Data$) ioOutputNMore (DevHandle%,Data$,Count&) ioOutputX (DevHandle%,Data$,Count&, Last%,ForceAddr%,Term,Async%, CompStat%) ioPassControl (DevHandle%) ioPPoll% (IntfHandle%) ioPPollConfig% (DevHandle%,Ppresponse%) ioPPollDisable% (DevHandle%) ioPPollDisableList% (DevHandles%) ioPPollUnconfig% (IntfHandle%) ioRemote% (DevHandle%) ioRemoteList% (DevHandle%) ioRemoveDevice% (DevHandle%) ioRequest% (IntfHandle%, Spstatus%) ioReset% (IntfHandle%) ioResume% (UntfHandle%,Monitor%) ioSendCmd% (IntfHandle%,Bytes$,Length%) ioSendData% (DevHandle%,Bytes$,Length%) ioSendEoi% (IntfHandle%,Bytes$,Length%) ioSPoll% (DevHandle%) ioSPoll% (IntfHandle%) ioSPollList% (DevHandles%(), SPResult%(),UntilFlag%) ioStatus% (IntfHandle%,StatusVal) ioStop% (IntfHandle%) ioSysController% (IntfHandle%,SysCont%) ioTalk% (IntfHandle,Prim%,Sec%) ioTerm% (Handle%,TermP,TermType%) ioTimeOut% (Handle%,Timeout&) ioTrigger% (Handle%) III-268 Unassert REN (IntfHandle) or issue GTL (DevHandle) Issue GTL to devices in list Issue LLO bus command Create identical copy of existing device Send My Listen Address Send My Talk Address Open specified device and return device handle Send data to specified device Send count bytes to specified device Send count bytes to specified device without forcing address Send count bytes without forcing address Send data to specified device adjusting all parameters Allow Interface to give control to another controller on bus Perform IEEE 488 parallel poll operation Configure Parallel Poll response of bus device Disable Parallel Poll response of a bus driver Disable Parallel Poll response of several bus devices Disable the Parallel Poll response of all bus devices Assert REN if IntfHandle, address to Listen if DevHandle Address specified external devices to Listen Remove Driver488 device Request service from Active Controller by asserting SRQ Provide warm start of interface, clear all error conditions Unassert ATN Send command strings with ATN asserted Send command strings with ATN unasserted Same as SendData with EOI on last byte Serial Poll device Get SRQ state Serial Poll devices until parameters are met Return details of state of the driver Halt any asynchronous transfer that may be in progress Specify if interface is to be System Controller Send specified Talk Address Set terminators for interface or device Set time that must elapse before time out error declared Issue Group Execute Trigger Personal488 User’s Manual, Rev. 3.0 Artisan Technology Group - Quality Instrumentation ... Guaranteed | (888) 88-SOURCE | www.artisantg.com III. COMMAND REFERENCES - 14. Command Summaries ioTriggerList% (DevHandles%()) ioUnListen% (IntfHandle%) ioUnTalk% (IntfHandle%) ioWait% (IntfHandle%) 14B. Driver488/SUB, QuickBASIC Issue GET to devices in list Send the Unlisten (UNL) command Send the Untalk (UNT) command Wait until asynchronous transfer has completed The Commands To obtain a more detailed description of the command references for Driver488/SUB, turn to Chapter 15 “Command References” in this Section. The commands are presented in alphabetical order for ease of use. Syntax Parameters Name Type Async% Bytes$ CompStat% Condition% Count& Data$ DevHandle% DevHandles%() Display% DmaChan% ErrHandle% ErrText$ Flag% ForceAddr% Freq% Handle% IntLev% IntfHandle% IOAddr% Last% Length% LightPen% Limit% Listener%() Message$ Monitor% Name$ Ppresponse% Prim% SPResult%() Sec% Spstatus% StatusVal SysCont% TermP TermType% Timeout& UntilFlag% integer string integer integer long string integer integer array integer integer integer string integer integer integer integer integer integer integer integer integer integer integer integer array string integer string integer integer integer array integer integer IeeeStatus integer terms integer integer integer Description Flag to indicate async transfer String containing characters to transfer Completion status from Driver Arm/Disarm bit mask Long count specifier Buffer used to send or receive data External device handle Array of handles Error message display is ON or OFF Hardware DMA channel Handle that caused error Buffer containing error text ON or OFF specifier Force address flag Clock frequency Either a DevHandle or an IntfHandle Hardware Interrupt level Interface handle I/O base address Terminator on last byte indicator Number of Bytes Light Pen emulation is ON or OFF Max number of listeners Array of FindListener results Buffer used to receive data Data monitor ON or OFF Name of external device or DOS device Configuration byte IEEE 488 primary address Array of SPOLL results IEEE 488 primary address Service request status Status structure System Controller flag for IEEE 488 interface Terms TYPE Terminator type: TERMIN or TERMOUT Timeout value in milliseconds SpollList operating mode Personal488 User’s Manual, Rev. 3.0 Artisan Technology Group - Quality Instrumentation ... Guaranteed | (888) 88-SOURCE | www.artisantg.com III-269 14B. Driver488/SUB, QuickBASIC III. COMMAND REFERENCES - 14. Command Summaries Defined Constants Arm/Disarm Bit Mask acError acSRQ acPeripheral acController acTrigger acClear acTalk acListen acIdle acByteIn acByteOut acChange &H800 &H400 &H200 &H100 &H080 &H040 &H020 &H010 &H008 &H004 &H002 &H001 ControlLine Bit Mask for Serial Bus clDSR &H20 clRI &H10 clDCD &H08 clCTS &H04 clDTR &H02 clRTS &H01 Bus Commands bcUNT bcUNL bcMTA bcMLA bcTALK bcLISTEN 1 2 3 4 5 6 Completion Status Bit Mask ccCount ccBuffer ccTerm ccEnd ccChange ccStop ccDone ccError &H001 &H002 &H004 &H008 &H0010 &H0020 &H4000 &H8000 ControlLine Bit Mask for IEEE 488 Bus clEOI &H80 clSRQ &H40 clNRFD &H20 clDAC &H10 clDAV &H08 clATN &H04 Miscellaneous IN OUT ON OFF ALL SAME WHILE_SRQ UNTIL_RSV TRUE FALSE MAXHANDLES NOIEEEADRESS NODEVICE NONODE TERMIN TERMOUT 1 2 1 0 -1 -2 -2 -3 1 0 50 -1 -1 NULL 1 2 Structure Definitions TYPE IeeeStatus SC CA Primaddr Secaddr SRQ addrChange talker listener triggered cleared transfer byteIn byteOut END TYPE III-270 AS AS AS AS AS AS AS AS AS AS AS AS AS integer integer integer integer integer integer integer integer integer integer integer integer integer TYPE terms EOI; Char; EightBits; term1 term2 END TYPE AS AS AS AS AS integer integer integer integer integer Personal488 User’s Manual, Rev. 3.0 Artisan Technology Group - Quality Instrumentation ... Guaranteed | (888) 88-SOURCE | www.artisantg.com III. COMMAND REFERENCES - 14. Command Summaries 14C. 14C. Driver488/SUB, Pascal Driver488/SUB, Pascal Topics • • • • • Function Descriptions ...............................................................III-270 The Commands ............................................................................III-272 Syntax Parameters......................................................................III-272 Defined Constants.......................................................................III-272 Structure Definitions .................................................................III-273 Function Descriptions Command ioAbort (IntfHandle) ioAddress (IntfHandle, IOAddr) ioArm (IntfHandle,Condition) ioAutoRemote (IntfHandle,Flag) ioBuffered (IntfHandle) ioBusAddress (Handle,Prim,Sec) ioCheckListener (IntfHandle Prim, Sec) ioClockFrequency (IntfHandle, Freq) ioClose (Handle) ioControlLine (IntfHandle) ioDisarm (IntfHandle, Condition) ioDmaChannel (IntfHandle, DmaChan) ioEnter (IntfHandle,Data) ioEnterMore (IntfHandle,Data) ioEnterN (IntfHandle,Data,Count) ioEnterNMore (IntfHandle,Data,Count) ioEnterX (DevHandle, Data, Count, ForceAddr, Term, Async, CompStat) ioError (Handle, Display) ioFindListeners (IntfHandle, Prim, Listener, Limit) ioFinish (IntfHandle) ioGetError (Handle, ErrText) ioGetErrorList (DevHandles, ErrText, ErrHandle) ioHello (IntfHandle, Message) ioIntLevel (IntfHandle,IOAddr) ioKeepDevice (DevHandle) ioLightPen (IntfHandle, LightPen) ioListen (IntfHandle, Prim, Sec) ioLocal (Handle) ioLocalList (DevHandles) ioLol (IntfHandle) Description Assert IFC Specify I/O port base address of I/O adapter Arm OnEvent for specified event(s) Assert REN on Output Return number of buffered bytes Set IEEE address of interface or device Check for device at specified bus address Specify clock interface frequency Close specified handle Get bus line status from IEEE 488 or serial bus Disarm event handling for specified condition Specify DMA channel Read data from specified device Read data from specified device without forcing address Read count bytes from specified device Read count bytes without forcing address Read data adjusting all parameters Control display of error messages Find devices configurable to listen at specific address Reassert ATN (see Resume) Get error code and error text Find device in error and identify Verify communication and get revision number Specify hardware interrupt level of I/O adapter Make specified external device permanent Enable or disable detection of interrupts via light pen status Send Listen Address Unassert REN (IntfHandle) or issue GTL (DevHandle) Issue GTL to devices in list Issue LLO bus command Personal488 User’s Manual, Rev. 3.0 Artisan Technology Group - Quality Instrumentation ... Guaranteed | (888) 88-SOURCE | www.artisantg.com III-271 14C. Driver488/SUB, Pascal III. COMMAND REFERENCES - 14. Command Summaries ioMakeDevice (DevHandle, Name) ioMyListenAddr (IntfHandle) ioMyTalkAddr (IntfHandle) ioOnEvent (IntfHandle,Handler,Argument) ioOpenName (Name) ioOutput (DevHandle,Data) ioOutputN (DevHandle,Data,Count) ioOutputMore (DevHandle,Data) ioOutputNMore (DevHandle,Data,Count) ioOutputX (DevHandle,Data,Count, Last ForceAddr, Term, Async, CompStat) ioPassControl (DevHandle) ioPPoll (IntfHandle) ioPPollConfig (DevHandle,PPresponse) ioPPollDisable (DevHandle) ioPPollDisableList (DevHandles) ioPPollUnconfig (IntfHandle) ioRemote (Handle) ioRemoteList (DevHandle) ioRemoveDevice (DevHandle) ioRequest (IntfHandle, SPstatus) ioReset (IntfHandle) ioResume (UntfHandle,Monitor) ioSendCmd (IntfHandle,Bytes,Length) ioSendData (DevHandle,Bytes,Length) ioSendEoi (IntfHandle,Bytes,Length) ioSPoll (DevHandle) ioSPoll (IntfHandle) ioSPollList (DevHandles,SPResult,UntilFlag) ioStatus (IntfHandle,StatusVal) ioStop (IntfHandle) ioSysController (IntfHandle,SysCont) ioTalk (IntfHandle,Pri,Sec) ioTerm (Handle,TermP,TermType) ioTimeOut (Handle,TermP,TermType) ioTrigger (Handle) ioTriggerList (DevHandles) ioUnListen (IntfHandle) ioUnTalk (IntfHandle) ioWait (IntfHandle) III-272 Create identical copy of existing device Send My Listen Address Send My Talk Address Specify function to be called upon Armed event Open specified device and return device handle Send data to specified device Send count bytes to specified device Send count bytes to specified device without forcing address Send count bytes without forcing address Send data to specified device adjusting all parameters Allow Interface to give control to another controller on bus Perform IEEE 488 parallel poll operation Configure Parallel Poll response of bus device Disable Parallel Poll response of a bus driver Disable Parallel Poll response of several bus devices Disable the Parallel Poll response of all bus devices Assert REN if IntfHandle, address to Listen if DevHandle Address specified external devices to Listen Remove Driver488 device Request service from Active Controller by asserting SRQ Provide warm start of interface, clear all error conditions Unassert ATN Send command strings with ATN asserted Send command strings with ATN unasserted Same as SendData with eoi on last byte Serial Poll device Get SRQ state Serial Poll devices until parameters are met Return details of state of the driver Halt any asynchronous transfer that may be in progress Specify if interface is to be System Controller Send specified Talk Address Set terminators for interface or device Set time that must elapse before time out error declared Issue Group Execute Trigger Issue GET to devices in list Send the Unlisten (UNL) command Send the Untalk (UNT) command Wait until asynchronous transfer has completed Personal488 User’s Manual, Rev. 3.0 Artisan Technology Group - Quality Instrumentation ... Guaranteed | (888) 88-SOURCE | www.artisantg.com III. COMMAND REFERENCES - 14. Command Summaries 14C. Driver488/SUB, Pascal The Commands To obtain a more detailed description of the command references for Driver488/SUB, turn to Chapter 15 “Command References” in this Section. The commands are presented in alphabetical order for ease of use. Syntax Parameters Name Type Argument Async BuffString Bytes CompStat Condition Count Data DataString DevHandle DevHandles Display DmaChan ErrHandle ErrText Flag ForceAddr Freq Handle Handler IntLev IntfHandle IOAddr Last Length LightPen Limit Listener Message Monitor Name Ppresponse Prim SPResult Sec SPstatus StatusVal SysCont Term TermType Timeout UntilFlag var (untyped) boolean string var (untyped) var (untyped) integer longint var (untyped) var string integer DevPtr boolean integer var integer var string boolean boolean integer integer HandlerProcPtr integer integer integer boolean integer boolean integer var (untyped) var string boolean string integer integer var (untyped) integer integer var (untyped) boolean var (untyped) integer longint integer Description 32 bit argument Flag to indicate async transfer Buffer containing characters to transfer Pointer to characters to transfer Completion status from Driver Arm/Disarm bit mask Long count specifier Pointer to a character array External device handle Pointer to array of handles Error message display is ON or OFF Hardware DMA channel Pointer to handle that caused error Pointer to error text ON or OFF specifier Force address flag Clock frequency Either a DevHandle or an IntfHandle Pointer to OnEvent Handler Hardware Interrupt level Interface handle Terminator on last byte indicator Number of Bytes Light Pen emulation is ON or OFF Max number of listeners Pointer to listener list Pointer to character array Data monitor ON or OFF Pointer to name string Configuration byte IEEE 488 primary address Array of SPOLL results IEEE 488 primary address Service request status Pointer to status structure System Controller flag for IEEE 488 interface Terminator structure Terminator type: TERMIN or TERMOUT Timeout value in milliseconds SpollList operating mode Personal488 User’s Manual, Rev. 3.0 Artisan Technology Group - Quality Instrumentation ... Guaranteed | (888) 88-SOURCE | www.artisantg.com III-273 14C. Driver488/SUB, Pascal III. COMMAND REFERENCES - 14. Command Summaries Defined Constants Arm/Disarm Bit Mask acError acSRQ acPeripheral acController acTrigger acClear acTalk acListen acIdle acByteIn acByteOut acChange $800 $400 $200 $100 $080 $040 $020 $010 $008 $004 $002 $001 ControlLine Bit Mask for Serial Bus clDSR $20 clRI $10 clDCD $08 clCTS $04 clDTR $02 clRTS $01 Bus Commands bcUNT bcUNL bcMTA bcMLA bcTALK bcLISTEN 1 2 3 4 5 6 Completion Status Bit Mask ccCount ccBuffer ccTerm ccEnd ccChange ccStop ccDone ccError $0001 $0002 $0004 $0008 $0010 $0020 $4000 $8000 ControlLine Bit Mask for IEEE 488 Bus clEOI $80 clSRQ $40 clNRFD $20 clDAC $10 clDAV $08 clATN $04 Miscellaneous Commands IN OUT ON OFF ALL SAME WHILE_SRQ UNTIL_RSV TRUE FALSE MAXHANDLES NOIEEEADRESS NODEVICE NONODE TERMIN TERMOUT 1 2 1 0 -1 -2 -2 -3 1 0 50 -1 -1 NULL 1 2 Structure Definitions type IeeeStatusRec = record SC :boolean; CA :boolean; Primaddr :integer; Secaddr :integer; SRQ :boolean; addrChange :boolean; talker :boolean; listener :boolean; triggered :boolean; cleared :boolean; transfer :boolean; byteIn :boolean; byteOut :boolean; end; III-274 type termrec = packed record EOI :boolean; nChar :integer; EightBits :boolean; termChar :termsvals; end; Personal488 User’s Manual, Rev. 3.0 Artisan Technology Group - Quality Instrumentation ... Guaranteed | (888) 88-SOURCE | www.artisantg.com III. COMMAND REFERENCES - 14. Command Summaries 14D. 14D. Driver488/W31, C Languages Driver488/W31, C Languages Topics • • • • • Function Descriptions ...............................................................III-274 The Commands ............................................................................III-276 Syntax Parameters......................................................................III-276 Defined Constants.......................................................................III-276 Structure Definitions .................................................................III-277 Function Descriptions Command Abort (IntfHandle) Arm (IntfHandle,Condition) AutoRemote (IntfHandle,Flag) Buffered (IntfHandle) BusAddress (Handle,Prim,Sec) CheckListener (IntfHandle Prim, Sec) Clear (Handle) ClearList (DevHandles) Clock Frequency (IntfHandle, Freq) Close (Handle) ControlLine (IntfHandle) Disarm (IntfHandle, Condition) DmaChannel (IntfHandle, DmaChan) Enter (IntfHandle,Data) EnterMore (IntfHandle,Data) EnterN (IntfHandle,Data,Count) EnterNMore (IntfHandle,Data,Count) EnterX (DevHandle, Data, Count, ForceAddr, Term, Async, CompStat) Error (Handle, Display) FindListeners (IntfHandle, Prim, Listener, Limit) Finish (IntfHandle) GetError (Handle, ErrText) GetErrorList (DevHandles, ErrText, ErrHandle) Hello (IntfHandle, Message) IntLevel (IntfHandle,IntLev) IOAddress (IntfHandle, IOAddr) KeepDevice (DevHandle) LightPen (IntfHandle, LightPen) Listen (IntfHandle, Prim, Sec) Local (Handle) Description Assert IFC Arm OnEvent for specified event(s) Assert REN on Output Return number of buffered bytes Set IEEE address of interface or device Check for device at specified bus address Issue Selected Device Clear (SDC) or Device Clear (DCL) Clear devices in list Specify clock interface frequency Close specified handle Get bus line status from IEEE 488 or serial bus Disarm event handling for specified condition Specify DMA channel Read data from specified device Read data from specified device without forcing address Read count bytes from specified device Read count bytes without forcing address Read data adjusting all parameters Control display of error messages Find devices configurable to listen at specific address Reassert ATN (see Resume) Get error code and error text Find device in error and identify Verify communication and get revision number Specify hardware interrupt level of I/O adapter Specify I/O port base address of I/O adapter Make specified external device permanent Enable or disable detection of interrupts via light pen status Send Listen Address Unassert REN (IntfHandle) or issue GTL (DevHandle) Personal488 User’s Manual, Rev. 3.0 Artisan Technology Group - Quality Instrumentation ... Guaranteed | (888) 88-SOURCE | www.artisantg.com III-275 14D. Driver488/W31, C Languages III. COMMAND REFERENCES - 14. Command Summaries LocalList (DevHandles) Lol (IntfHandle) MakeDevice (DevHandle, Name) MyListenAddr (IntfHandle) MyTalkAddr (IntfHandle) OnEvent (IntfHandle,Handler,Argument) OpenName (Name) Output (DevHandle,Data) OutputN (DevHandle,Data,Count) OutputMore (DevHandle,Data) OutputNMore (DevHandle,Data,Count) OutputX (DevHandle,Data,Count, LastForceAddr, Term, Async, CompStat) PassControl (DevHandle) PPoll (IntfHandle) PPollConfig (DevHandle,PPresponse) PPollDisable (DevHandle) PPollDisableList (DevHandles) PPollUnconfig (IntfHandle) Remote (Handle) RemoteList (DevHandles) RemoveDevice (DevHandle) Request (IntfHandle, SPstatus) Reset (IntfHandle) Resume (IntfHandle,Monitor) SendCmd (IntfHandle,Bytes,Length) SendData (DevHandle,Bytes,Length) SendEoi (IntfHandle,Bytes,Length) SPoll (DevHandle) SPoll (IntfHandle) SPollList (DevHandles,SPResult,UntilFlag) Status (IntfHandle,StatusVal) Stop (IntfHandle) SysController (IntfHandle,SysCont) Talk (IntfHandle,Prim,Sec) Term (Handle,TermP,TermType) TimeOut (Handle, Timeout) Trigger (Handle) TriggerList (DevHandles) UnListen (IntfHandle) UnTalk (IntfHandle) Wait (IntfHandle) III-276 Issue GTL to devices in list Issue LLO bus command Create identical copy of existing device Send My Listen Address Send My Talk Address Specify function to be called upon Armed event Open specified device and return device handle Send data to specified device Send count bytes to specified device Send count bytes to specified device without forcing address Send count bytes without forcing address Send data to specified device adjusting all parameters Allow Interface to give control to another controller on bus Perform IEEE 488 parallel poll operation Configure Parallel Poll response of bus device Disable Parallel Poll response of a bus driver Disable Parallel Poll response of several bus devices Disable the Parallel Poll response of all bus devices Assert REN if IntfHandle, address to Listen if DevHandle Address specified external devices to Listen Remove Driver488 device Request service from Active Controller by asserting SRQ Provide warm start of interface, clear all error conditions Unassert ATN Send command strings with ATN asserted Send command strings with ATN unasserted Same as SendData with EOI on last byte Serial Poll device Get SRQ state Serial Poll devices until parameters are met Return details of state of the driver Halt any asynchronous transfer that may be in progress Specify if interface is to be System Controller Send specified Talk Address Set terminators for interface or device Set time that must elapse before time out error declared Issue Group Execute Trigger Issue GET to devices in list Send the Unlisten (UNL) command Send the Untalk (UNT) command Wait until asynchronous transfer has completed Personal488 User’s Manual, Rev. 3.0 Artisan Technology Group - Quality Instrumentation ... Guaranteed | (888) 88-SOURCE | www.artisantg.com III. COMMAND REFERENCES - 14. Command Summaries 14D. Driver488/W31, C Languages The Commands To obtain a more detailed description of the command references for Driver488/W31, turn to Chapter 15 “Command References” in this Section. The commands are presented in alphabetical order for ease of use. Syntax Parameters The symbol * (asterisk) refers to a Pointer. Name Type Argument Async Bytes CompStat Condition Count Data DevHandle DevHandles Display DmaChan ErrHandle ErrText Flag ForceAddr Freq Handle Handler IntLev IntfHandle Last Length LightPen Limit Listener Message Monitor Name Ppresponse Prim SPResult Sec SPstatus StatusVal SysCont TermP TermType Timeout UntilFlag void far * bool unsigned char * int * ArmCondT long char far * DevHandleT DevHandleT * bool int DevHandleT * char * bool bool int DevHandleT UserHandlerFP int DevHandleT bool int bool short unsigned short * char * bool char * int char unsigned char * char int IeeeStatusT * bool TermT * int long char Description 32 bit argument Flag to indicate async transfer Pointer to characters to transfer Completion status from Driver Arm/Disarm bit mask Long count specifier Pointer to a character array External device handle Pointer to array of handles Error message display is ON or OFF Hardware DMA channel Pointer to handle that caused error Pointer to error text ON or OFF specifier Force address flag Clock frequency Either a DevHandle or an IntfHandle Pointer to OnEvent Handler Hardware Interrupt level Interface handle Terminator on last byte indicator Number of Bytes Light Pen emulation is ON or OFF Max number of listeners Pointer to listener list Pointer to character array Data monitor ON or OFF Pointer to name string Configuration byte IEEE 488 primary address Array of SPOLL results IEEE 488 secondary address Service request status Pointer to status structure System Controller flag for IEEE 488 interface Pointer to terminator structure Terminator type: TERMIN or TERMOUT Timeout value in milliseconds SpollList operating mode Personal488 User’s Manual, Rev. 3.0 Artisan Technology Group - Quality Instrumentation ... Guaranteed | (888) 88-SOURCE | www.artisantg.com III-277 14D. Driver488/W31, C Languages III. COMMAND REFERENCES - 14. Command Summaries Defined Constants Bus Command Constants bcUNT bcUNL bcMTA bcMLA bcTALK bcLISTEN Miscellaneous Constants: 1 2 3 4 5 6 IN OUT ON OFF ALL SAME WHILE_SRQ UNTIL_RSV TRUE FALSE MAXHANDLES NOIEEEADRESS NODEVICE NONODE TERMIN TERMOUT 1 2 1 0 -1 -2 -2 -3 1 0 50 -1 -1 NULL 1 2 Structure Definitions typedef struct { bool SC; bool CA; uchar Primaddr; uchar Secaddr; bool SRQ; bool addrChange; bool talker; bool listener; bool triggered; bool cleared; bool transfer; bool byteIn; bool byteOut; } IeeeStatusT; III-278 typedef struct { bool EOI; int Char; bool EightBits; int termChar[2]; } TermT; Personal488 User’s Manual, Rev. 3.0 Artisan Technology Group - Quality Instrumentation ... Guaranteed | (888) 88-SOURCE | www.artisantg.com III. COMMAND REFERENCES - 14. Command Summaries 14E. 14E. Driver488/W31, Visual Basic Driver488/W31, Visual Basic Topics • • • • • Function Descriptions ...............................................................III-278 The Commands ............................................................................III-280 Syntax Parameters......................................................................III-280 Defined Constants.......................................................................III-281 Structure Definitions .................................................................III-281 Function Descriptions Command Abort (IntfHandle) Arm (IntfHandle,Condition) AutoRemote (IntfHandle,Flag) Buffered (IntfHandle) BusAddress (Handle,Prim,Sec) CheckListener (IntfHandle Prim, Sec) Clear (Handle) ClearList (ListFirstElement (0)) Clock Frequency (IntfHandle, Freq) Close (Handle) ControlLine (IntfHandle) Disarm (IntfHandle, Condition) DmaChannel (IntfHandle, DmaChan) Enter (IntfHandle,Data) EnterI (IntfHandle,Data) EnterMore (IntfHandle,Data) EnterN (IntfHandle,Data,Count) EnterNI (IntfHandle,Data,Count) EnterNMore (IntfHandle,Data,Count) EnterNMoreI (IntfHandle,Data,Count) EnterXI(DevHandle, Data, Count, ForceAddr, Term, Async, CompStat) Error (Handle, Display) FindListeners (IntfHandle, Prim, ListFirstElement (0), Limit) Finish (IntfHandle) GetError (Handle, ByValErrText) GetErrorList (ListFirstElement(0), ByValErrText, ErrHandle) Hello (IntfHandle, ByValMessage) IntLevel (IntfHandle,IntLev) IOAddress (IntfHandle, IOAddr) ioClear (Handle) ioClose (Handle) Description Assert IFC Arm OnEvent for specified event(s) Assert REN on Output Return number of buffered bytes Set IEEE 488 address of interface or device Check for device at specified bus address See ioClear Clear devices in list Specify clock interface frequency See ioClose Get bus line status from IEEE 488 or serial bus Disarm event handling for specified condition Specify DMA channel See ioEnter Read binary data from specified device Read data from specified device without forcing address Read count bytes from specified device Read count bytes from specified device (binary) Read count bytes without forcing address Read count bytes without forcing address (binary) Read binary data adjusting all parameters See ioError Find devices configurable to listen at specific address Reassert ATN (see Resume) Get error code and error text Find device in error and identify Verify communication and get revision number Specify hardware interrupt level of I/O adapter Specify I/O port base address of I/O adapter Issue Selected Device Clear (SDC) or Device Clear (DCL) Close specified handle Personal488 User’s Manual, Rev. 3.0 Artisan Technology Group - Quality Instrumentation ... Guaranteed | (888) 88-SOURCE | www.artisantg.com III-279 14E. Driver488/W31, Visual Basic III. COMMAND REFERENCES - 14. Command Summaries ioEnter () ioError (Handle, Display) ioLocal (Handle) ioOutput (DevHandle, Data) ioReset (IntfHandle) ioResume (IntfHandle, Monitor) ioStop (IntfHandle) ioWait (IntfHandle) KeepDevice (DevHandle) Listen (IntfHandle, Prim, Sec) Local (Handle) LocalList (ListFirstElement) Lol (IntfHandle) MakeDevice (DevHandle, ByValName) MyListenAddr (IntfHandle) MyTalkAddr (IntfHandle) OpenName (ByValName) Output (DevHandle,Data) OutputI (DevHandle,Data) OutputN (DevHandle,Data,Count) OutputNI (DevHandle,Data,Count) OutputMore (DevHandle,Data) OutputNMore (DevHandle,Data,Count) OutputNMoreI (DevHandle,Data,Count) OutputX (DevHandle,Data,Count, LastForceAddr, Term, Async, CompStat) OutputXI (DevHandle,Data,Count, LastForceAddr, Term, Async, CompStat) PassControl (DevHandle) PPoll (IntfHandle) PPollConfig (DevHandle,PPresponse) PPollDisable (DevHandle) PPollDisableList (ListFirstElement (0)) PPollUnconfig (IntfHandle) Remote (Handle) RemoteList (ListFirstElement (0)) RemoveDevice (DevHandle) Request (IntfHandle, SPstatus) Reset (IntfHandle) Resume (IntfHandle,Monitor) SendCmd (IntfHandle,Bytes,Length) SendData (DevHandle,Bytes,Length) SendEoi (IntfHandle,Bytes,Length) SPoll (DevHandle) III-280 Read data from specified device Control display of error messages Unassert REN (IntfHandle) or issue GTL (DevHandle) Send data to specified device Provide warm start of interface, clear all error conditions Unassert ATN Halt any asynchronous transfer that may be in progress Wait until asynchronous transfer has completed Make specified external device permanent Send Listen Address See ioLocal Issue GTL to devices in list Issue LLO bus command Create identical copy of existing device Send My Listen Address Send My Talk Address Open specified device and return device handle See ioOutput Send binary data to the specified device Send count bytes to specified device Send count bytes to specified device (Binary) Send count bytes to specified device without forcing address Send count bytes without forcing address Send count bytes without forcing address (Binary) Send data to specified device adjusting all parameters Send binary data to specified device adjusting all parameters Allow Interface to give control to another controller on bus Perform IEEE 488 parallel poll operation Configure Parallel Poll response of bus device Disable Parallel Poll response of a bus driver Disable Parallel Poll response of several bus devices Disable the Parallel Poll response of all bus devices Assert REN if IntfHandle, address to Listen if DevHandle Address specified external devices to Listen Remove Driver488 device Request service from Active Controller by asserting SRQ See ioReset See ioResume Send command strings with ATN asserted Send command strings with ATN unasserted Same as SendData with EOI on last byte Serial Poll device Personal488 User’s Manual, Rev. 3.0 Artisan Technology Group - Quality Instrumentation ... Guaranteed | (888) 88-SOURCE | www.artisantg.com III. COMMAND REFERENCES - 14. Command Summaries SPoll (IntfHandle) SPollList (ListFirstElement(0), ResultFirstElement(0),UntilFlag ) Status (IntfHandle,StatusVal) Stop (IntfHandle) SysController (IntfHandle,SysCont) Talk (IntfHandle,Prim,Sec) Term (Handle,TermVal,TermType) TimeOut (Handle, Timeout) Trigger (Handle) TriggerList (ListFirstElement (0)) UnListen (IntfHandle) UnTalk (IntfHandle) Wait (IntfHandle) 14E. Driver488/W31, Visual Basic Get SRQ state Serial Poll devices until parameters are met Return details of state of the driver See ioStop Specify if interface is to be System Controller Send specified Talk Address Set terminators for interface or device Set time that must elapse before time out error declared Issue Group Execute Trigger Issue GET to devices in list Send the Unlisten (UNL) command Send the Untalk (UNT) command See ioWait The Commands To obtain a more detailed description of the command references for Driver488/W31, turn to Chapter 15 “Command References” in this Section. The commands are presented in alphabetical order for ease of use. Syntax Parameters Name Type Async Bytes ByVal ErrText ByVal Message ByVal Name CompStat Count Data DevHandle Display integer string string string string integer long string integer integer DmaChan ErrHandle Flag ForceAddr Freq Handle IntLev IntfHandle IOAddr Last Length Limit integer integer integer integer integer integer integer integer integer integer integer integer integer array integer integer integer integer integer ListFirstElement(0) Monitor PPresponse Prim ResultFirstElement(0) Sec Description Flag to indicate async transfer String containing characters to transfer Buffer containing error text Buffer used to receive Hello message Name of external device or DOS device Completion status from Driver Long count specifier Buffer used to send or receive data External device handle Error message display is TURN ON or TURN OFF Hardware DMA channel Handle that caused error ON or OFF specifier Force address flag Clock frequency Either a DevHandle or an IntfHandle Hardware Interrupt level Interface handle I/O base address Terminator on last byte indicator Number of Bytes Max number of listeners First element of the array of handles Data monitor ON or OFF Configuration byte IEEE 488 primary address First element of the array of results IEEE 488 secondary address Personal488 User’s Manual, Rev. 3.0 Artisan Technology Group - Quality Instrumentation ... Guaranteed | (888) 88-SOURCE | www.artisantg.com III-281 14E. Driver488/W31, Visual Basic III. COMMAND REFERENCES - 14. Command Summaries SPstatus StatusVal TermType TermVal Timeout UntilFlag integer IeeeStatus integer terms integer integer Service request status Status TYPE Terminator type: TERMIN or TERMOUT Terminator TYPE Timeout value in milliseconds SpollList operating mode Defined Constants Completion Status Bit Mask ccCount ccBuffer ccTerm ccEnd ccChange ccStop ccDone ccError &H0001 &H0002 &H0004 &H0008 &H0010 &H0020 &H4000 &H8000 Miscellaneous Commands TURNON TURNOFF ALL WHILESRQ UNTILRSV NOIEEEADRESS NODEVICE% TERMIN TERMOUT 1 2 -1 -2 -3 -1 -1 1 2 ControlLine Bit Mask for IEEE 488 Bus clEOI &H80 clSRQ &H40 clNRFD &H20 c1NDAC &H10 clDAV &H08 clATN &H04 ControlLine Bit Mask for Serial Bus clDSR &H20 clRI &H10 clDCD &H08 clCTS &H04 clDTR &H02 clRTS &H01 Bus Commands bcUNT bcUNL bcMTA bcMLA bcTALK bcLISTEN 1 2 3 4 5 6 Structure Definitions TYPE IeeeStatus SC CA Primaddr Secaddr SRQ addrChange talker listener triggered cleared transfer byteIn byteOut END TYPE III-282 AS AS AS AS AS AS AS AS AS AS AS AS AS Integer Integer Integer Integer Integer Integer Integer Integer Integer Integer Integer Integer Integer TYPE Terms EOI nChar EightBits term1 term2 END TYPE AS AS AS AS AS Integer Integer Integer Integer Integer Personal488 User’s Manual, Rev. 3.0 Artisan Technology Group - Quality Instrumentation ... Guaranteed | (888) 88-SOURCE | www.artisantg.com III. COMMAND REFERENCES - 14. Command Summaries 15. 14E. Driver488/W31, Visual Basic Command References Sub-Chapters 15A. 15B. 15A. Driver488/DRV Commands ................................................III-282 Driver488/SUB, W31, W95, & WNT Commands ..............III-312 Driver488/DRV Commands This Sub-Chapter contains the command references for Driver488/DRV, using the QuickBASIC language. The commands are presented in alphabetical order on the following pages for ease of use. For more information on the format of the command descriptions, turn to the Sub-Chapter “Command Descriptions” of Chapter 8. Bus Management Commands ABORT AUTO REMOTE CHECK LISTENER CONTROL LINE FIND LISTENERS PASS CONTROL PPOLL CONFIG or PPC PPOLL DISABLE or PPD PPOLL UNCONFIG or PPU REQUEST RESET Page III-283 III-284 III-285 III-286 III-292 III-301 III-301 III-302 III-302 III-303 III-304 Instrument Management Commands CLEAR LOCAL LOCAL LOCKOUT or LOL REMOTE TRIGGER Page III-285 III-296 III-296 III-302 III-310 Device Management Commands BUS ADDRESS KEEP DEVICE KEEP DOS NAME MAKE DEVICE MAKE DOS NAME REMOVE DEVICE REMOVE DOS NAME Page III-284 III-295 III-295 III-297 III-297 III-303 III-303 Device I/O Commands ENTER (Controller Mode) ENTER # count BUFFER (Controller) ENTER (Peripheral Mode) ENTER # count BUFFER (Peripheral) OUTPUT (Controller Mode) OUTPUT # count BUFFER (Control.) OUTPUT (Peripheral Mode) OUTPUT # count BUFFER (Periph.) PPOLL SPOLL SPOLLLIST Page III-287 III-288 III-288 III-289 III-297 III-298 III-298 III-300 III-301 III-306 III-307 Low-Level Bus Commands SEND Page III-305 Event Handling Commands ARM DISARM Page III-283 III-286 I/O Management Commands BUFFERED FINISH RESUME STOP Page III-284 III-293 III-304 III-309 WAIT III-311 Interface Management Commands CLOCK FREQUENCY DMA CHANNEL EOL INT LEVEL IO ADDRESS SYS CONTROLLER TERM TIME OUT Page III-285 III-287 III-290 III-293 III-293 III-309 III-309 III-310 Error Management Commands ERROR FILL Page III-291 III-291 Miscellaneous Commands HELLO IOCTL (BASIC Statement) IOCTL$ (BASIC Statement) LIGHT PEN STATUS Page III-293 III-294 III-294 III-296 III-307 Personal488 User’s Manual, Rev. 3.0 Artisan Technology Group - Quality Instrumentation ... Guaranteed | (888) 88-SOURCE | www.artisantg.com III-283 15A. Driver488/DRV Commands III. COMMAND REFERENCES - 15. Command References ABORT SYNTAX RESPONSE MODE BUS STATES SEE ALSO EXAMPLE ABORT[addr] None SC or *SC•CA IFC, *IFC (SC mode) ATN, MTA (*SC•CA mode) SYS CONTROLLER PRINT#1,"ABORT" As the System Controller (SC), whether Driver488 is the Active Controller or not, the ABORT command causes the Interface Clear (IFC) bus management line to be asserted for at least 500 microseconds. By asserting IFC, Driver488 regains control of the bus even if one of the devices has locked it up during a data transfer. Asserting IFC also makes Driver488 the Active Controller. If a Non System Controller was the Active Controller then it is forced to relinquish control to Driver488. ABORT forces all IEEE 488 device interfaces into a quiescent state. If Driver488 is a Non System Controller in the Active Controller state (*SC•CA), it asserts attention (ATN), which stops any bus transactions, and then sends its Talk address to “Untalk” any other Talkers on the bus. It does not (and cannot) assert IFC. ARM SYNTAX RESPONSE MODE BUS STATES SEE ALSO EXAMPLE ARM interrupt [[,]interrupt...] None Any None DISARM, LIGHT PEN; OnEvent (Sub-Chapter 15B) 100 ON PEN GOSUB 1000 Set up service routine. 110 PEN ON Enable interrupt polling. PRINT#1,"ARMSRQ" Detect Service Request 1000 PRINT#1,"SPOLL16" Get Serial Poll status from 1010 INPUT#2,STATUSBYTE device and act accordingly. 1999 RETURN Done with interrupt. The following ARM conditions are supported: Condition Description SRQ Peripheral Controller Trigger Clear Talk Listen Idle The Service Request bus line is asserted. An addressed status change has occurred and the interface is a Peripheral. An addressed status change has occurred and the interface is an Active Controller. The interface has received a device Trigger command. The interface has received a device Clear command. An addressed status change has occurred and the interface is a Talker. An addressed status change has occurred and the interface is a Listener. An addressed status change has occurred and the interface is neither a Talker nor a Listener. The interface has received a data byte. The interface has been configured to output a data byte. A Driver488 error has occurred. The interface has changed its addressed state. The Controller/Peripheral or Talker/Listener/Idle states of the interface have changed. ByteIn ByteOut Error Change The ARM command allows Driver488 to signal to the user specified function when one or more of the specified conditions occurs. ARM sets a flag corresponding to each implementation of the conditions indicated by the user. III-284 Personal488 User’s Manual, Rev. 3.0 Artisan Technology Group - Quality Instrumentation ... Guaranteed | (888) 88-SOURCE | www.artisantg.com III. COMMAND REFERENCES - 15. Command References 15A. Driver488/DRV Commands Once an interrupt is ARMed, it remains ARMed until it is DISARMed, or until Driver488 is reset. BASIC automatically suppresses light pen interrupt detection during the execution of an interrupt service routine, so the interrupt service routine is never re-entrantly invoked. In languages that explicitly poll the light pen status, polling should not be done during the interrupt service routine. AUTO REMOTE SYNTAX RESPONSE MODE BUS STATES SEE ALSO EXAMPLE AUTO REMOTE [{ON|OFF}] None SC None LOCAL, REMOTE, ENTER, OUTPUT PRINT#1,"AUTO REMOTE ON" The AUTO REMOTE command enables or disables the automatic assertion of the Remote Enable (REN) line by OUTPUT. When AUTO REMOTE is enabled, OUTPUT automatically asserts REN before transferring any data. When AUTO REMOTE is disabled, there is no change to the REN line. AUTO REMOTE is on by default. BUFFERED SYNTAX RESPONSE MODE BUS STATES SEE ALSO EXAMPLE BUFFERED Integer from 0 to 1,048,575 (or 220-1) Any None ENTER, OUTPUT PRINT#1,"ENTER16#1024 BUFFER &H1000:0 EOI" PRINT#1,"BUFFERED" INPUT#2,N PRINT N,"bytes were actually received." The BUFFERED command returns the number of characters transferred by the latest ENTER, OUTPUT, SEND DATA, or SEND EOI command. If a CONTINUE transfer is in progress, then the result is the number of characters that have been transferred at the moment the command is issued. This command is most often used after an ENTER #count BUFFER term to determine if the full number of characters was received, or if the transfer terminated upon detection of TERM. It is also used to find out how many characters have currently been sent during an asynchronous DMA transfer. BUS ADDRESS SYNTAX BUS ADDRESS [name] prim-addr[sec-addr] RESPONSE MODE BUS STATE SEE ALSO EXAMPLE name is the name of an external device. If name is not specified, then BUS ADDRESS sets the bus address of the interface. primary is the IEEE 488 bus primary address of the specified device. secondary is the IEEE 488 bus secondary address of the specified device. None Any None MakeDevice PRINT#1, “BUS ADDRESS DMM 1400" The BUS ADDRESS command sets the IEEE 488 bus address of the IEEE 488 hardware interface or an external device. Every IEEE 488 bus device has an address that must be unique within any single IEEE 488 bus system. The default IEEE 488 bus address for Driver488 is 21, but this may be changed if it conflicts with some other device. Personal488 User’s Manual, Rev. 3.0 Artisan Technology Group - Quality Instrumentation ... Guaranteed | (888) 88-SOURCE | www.artisantg.com III-285 15A. Driver488/DRV Commands III. COMMAND REFERENCES - 15. Command References CHECK LISTENER SYNTAX CHECK LISTENER pri-addr[sec-addr] RESPONSE pri-addr is a primary device address in the range 0 to 30. Sec-addr is an optional two-digit secondary device address in the range 00 to 31. 1 if listener found 0 if listener not found CA MODE BUS STATES SEE ALSO EXAMPLE ATN•MTA, UNL, LAG, (check for NDAC asserted) FIND LISTENER, BUS ADDRESS PRINT#1”CHECKLISTENER 1501” INPUT#2,N IF N=1 THEN PRINT “LISTENER FOUND” IF N=0 THEN PRINT “LISTENER NOT FOUND” The CHECK LISTENER command checks for the existence of a device on the IEEE 488 bus at the specified address. CLEAR SYNTAX CLEAR [addr[,addr…]] addr is a device address (primary with optional secondary) or an external device name. RESPONSE MODE BUS STATES SEE ALSO EXAMPLES None CA ATN•DCL (all devices) ATN•UNL, MTA, LAG, SDC RESET PRINT#1,CLEAR” PRINT#1,”CLEAR12,18” PRINT#1,”CLEAR DMM” (selected devices) Issue a Device Clear to all devices. Issue a Selected Device Clear to devices 12 and 18. Issue a Selected Device Clear to the device DMM. The CLEAR command causes the Device Clear (DCL) bus command to be issued by Driver488. If the optional addresses are included, the Selected Device Clear (SDC) command is issued to all specified devices. IEEE 488 bus devices that receive a Device Clear or Selected Device Clear command normally reset to their power-on state. CLOCK FREQUENCY SYNTAX [CLOCK]FREQUENCY frequency frequency is the actual clock rate in megahertz rounded up to the nearest whole number of megahertz. RESPONSE MODE BUS STATES SEE ALSO EXAMPLE None Any None RESET PRINT#1, “CLOCK FREQUENCY 8” The CLOCK FREQUENCY command specifies the IEEE 488 adapter internal clock frequency. The clock frequency depends upon the design and jumper settings of the interface board. The specified clock frequency must be the actual clock rate in megahertz rounded up to the nearest whole number of megahertz. For example, the MP488 and MP488CT boards use a fixed clock frequency of 8 MHz. III-286 Personal488 User’s Manual, Rev. 3.0 Artisan Technology Group - Quality Instrumentation ... Guaranteed | (888) 88-SOURCE | www.artisantg.com III. COMMAND REFERENCES - 15. Command References 15A. Driver488/DRV Commands CONTROL LINE SYNTAX RESPONSE MODE BUS STATES SEE ALSO EXAMPLE CONTROL LINE Bit-mapped number from 0 to 255 representing the state of the control lines. Any None TIME OUT PRINT#1,”CONTROL LINE” INPUT#2,”CL” The CONTROL LINE command may be used on either IEEE 488 devices or Serial devices. If the device specified is an IEEE 488 device, this command returns the status of the IEEE 488 bus control lines as an 8-bit unsigned value (bits 2 and 1 are reserved for future use), as shown below: 8 7 6 5 4 3 2 1 EOI SRQ NRFD NDAC DAV ATN 0 0 If the device refers to a Serial device, this command returns the status of the Serial port control lines as an 8-bit unsigned value (bits 8 and 7 are reserved for future use), as shown below: 8 7 6 5 4 3 2 1 0 0 DSR RI DCD CTS DTR RTS A fuller description of the above bus line abbreviations are provided below: Bus State Bus Lines Data Transfer (DIO) Lines 6 5 4 3 8 7 0 1 0 0 0 0 0 0 1 0 0 0 0 0 0 0 0 1 0 0 0 0 1 0 0 0 0 1 0 0 0 0 0 0 0 0 0 0 0 0 0 0 0 0 0 0 0 1 0 1 0 0 0 0 0 0 0 0 1 0 2 1 1 0 0 0 0 0 0 0 0 0 0 0 0 0 0 0 0 0 0 0 0 1 0 0 1 0 0 0 0 0 0 0 1 0 0 0 IEEE 488 Interface ATN EOI SRQ DAV NDAC NRFD Attention (&H04) End-Or-Identify (&H80) Service Request (&H40) Data Valid (&H08) Not Data Accepted (&H10) Not Ready For Data (&H20) Serial Interface DTR RI RTS CTS DCD DSR Data Terminal Ready (&H02) Ring Indicator (&H10) Request To Send (&H01) Clear To Send (&H04) Data Carrier Detect (&H08) Data Set Ready (&H20) DISARM SYNTAX RESPONSE MODE BUS STATES SEE ALSO EXAMPLES DISARM[interrupt[,interrupt…]] interrupt is one of the following events: SRQ, Peripheral, Controller, Trigger, Clear, Talk, Listen, Idle, Bytein, Byteout, or Change. None Any None ARM, LIGHT PEN; OnEvent (Sub-Chapter 15B) PRINT#1,”DISARM” Disable all interrupts PRINT#1,”DISARM SRQ” Do not respond to SRQ The DISARM command prevents Driver488 from setting the light pen status or invoking an event handle and interrupting the computer system, even when the specified conditions occur. The user’s program Personal488 User’s Manual, Rev. 3.0 Artisan Technology Group - Quality Instrumentation ... Guaranteed | (888) 88-SOURCE | www.artisantg.com III-287 15A. Driver488/DRV Commands III. COMMAND REFERENCES - 15. Command References can still check for the conditions by using the STATUS command. If the DISARM command is invoked without specifying any interrupts, then all interrupts are disabled. The ARM command may be used to re-enable interrupt detection. DMA CHANNEL SYNTAX DMA CHANNEL {channel|NONE} RESPONSE MODE BUS STATES SEE ALSO EXAMPLE channel is the DMA channel to be used by the I/O adapter. None Any None INT LEVEL, TIME OUT PRINT#1,”DMA CHANNEL 5” The DMA CHANNEL command specifies which DMA channel, if any, is to be used by the I/O interface card. The PC has four DMA channels, but channel 0 is used for memory refresh and is not available for peripheral data transfer. Channel 2 is usually used by the floppy-disk controller and is also unavailable. Channel 3 is used by the hard disk controller in PCs, but is usually not used in AT compatible machines. So, channel 1 (and possibly channel 3) is available for DMA transfers. The AT compatible computers have three 16-bit DMA channels: 5, 6, and 7. The MP488CT can use these channels for high speed transfer. The DMA CHANNEL value must match the hardware switch settings on the I/O adapter card. ENTER (Controller Mode) SYNTAX ENTER[addr][;][#count][;][term][term][EOI] addr is a device address (primary with optional secondary) or external device name. RESPONSE MODE BUS STATES SEE ALSO EXAMPLES count is the number of characters to read. Term and EOI override the normal bus input terminator. Device-dependent data. If count is specified, then the exact count of characters is returned without EOL being appended. If not, the response ends when the input terminator is detected and EOL is appended to the returned data. CA ATN•UNL, MLA,TAG, *ATN, data (With addr) *ATN, data (Without addr) OUTPUT, TERM, EOL, BUFFERED PRINT#1,”ENTER16” Read data from device 16 INPUT#2,A$ PRINT#1,”ENTER16”LINE INPUT#2,A$ PRINT#1,”ENTER16;CR” INPUT#2,A$ PRINT#1,”ENTER16$000” INPUT#2,A$ PRINT#1,”ENTER16LFEOI” INPUT#2,A$ PRINT#1,”ENTER0702 INPUT#2,A$ PRINT#1,”ENTER12#5” A$=INPUT$(5,#2) PRINT#1,”ENTER#20” A$=INPUT$(20,#2) PRINT#1,”ENTER DMM” INPUT#2,VOLTAGE PRINT#1,”ENTER COM1” INPUT#2,A$ III-288 Read an entire line of data from device 16 even if it contains commas or other punctuations Read data from device 16 until CR is detected Read data until a NULL is detected Read data until LF or EOI is detected. Read data from device 7 Read 5 bytes from device 12. INPUT$ returns 5 bytes from file #2 Read 20 more bytes. INPUT$ returns 20 bytes from file #2 Read data from device DMM Read data from device COM1 Personal488 User’s Manual, Rev. 3.0 Artisan Technology Group - Quality Instrumentation ... Guaranteed | (888) 88-SOURCE | www.artisantg.com III. COMMAND REFERENCES - 15. Command References 15A. Driver488/DRV Commands The ENTER command reads data from the I/O adapter. If a device address (with optional secondary address) or name is specified, then Driver488 is addressed to Listen, and that device is addressed to Talk. If no address is specified, then Driver488 must already be configured to receive data, either as a result of an immediately preceding ENTER command, or as a result of one of the SEND commands. If the character count count is specified, then that exact number of characters is read from the device. Otherwise, ENTER terminates reception on detection of the input terminator, that may be overridden by specifying the terminator in the ENTER command. The received terminator is then replaced with the EOL IN terminator before being returned to the user’s program. ENTER (Peripheral Mode) SYNTAX RESPONSE MODE BUS STATES SEE ALSO EXAMPLES ENTER[;][#count][;][term][term][EOI] count is the number of characters to read. Term and EOI override the normal bus input terminator. Device-dependent data. If count is specified, then exactly count characters are returned without EOL being appended. Otherwise the response ends when the input terminator is detected at which time EOL is appended to the returned data. *CA Determined by the Controller OUTPUT, TERM, EOL, BUFFERED PRINT#1,”ENTER” Read data into A$ until the default bus input terminator is INPUT#2,A$ detected PRINT#1,”ENTER CR” Read data until CR is detected INPUT#2,A$ PRINT#1,”ENTER$00” INPUT#2,A$ PRINT#1,”ENTER LFEOI” INPUT#2,A$ PRINT#1,”ENTER#10” A$=INPUT$(10,#2) Read data until a NULL is detected Read data until LF or EOI is detected Read 10 bytes. INPUT$ returns 10 bytes from file #2 In Peripheral mode, the ENTER command receives data from the I/O adapter under control of the Active Controller. The Active Controller must put Driver488 into the Listen state and configure some bus device to provide Driver488 with data. The Listen state can be checked with the STATUS command, or can cause an interrupt with the ARM command. A time-out error occurs (if enabled) if Driver488 does not receive a data byte within the time out period after issuing the ENTER command. ENTER #count BUFFER (Controller Mode) SYNTAX ENTER[addr][;]#count[;]BUFFER buf-addr [CONTINUE] [term] [term][EOI] addr is a device address (primary with optional secondary) or external device name. RESPONSE MODE BUS STATES SEE ALSO EXAMPLES count is the number of characters to read. CONTINUE specifies asynchronous transmission. Buf-addr is the memory buffer address. Term and EOI override the normal bus input terminators. None, returned data is placed directly into the specified memory buffer. CA ATN•UNL, MLA, TAG, *ATN, data *ATN, data (Without addr) OUTPUT, TERM, EOL, BUFFERED See next page. (With addr) Personal488 User’s Manual, Rev. 3.0 Artisan Technology Group - Quality Instrumentation ... Guaranteed | (888) 88-SOURCE | www.artisantg.com III-289 15A. Driver488/DRV Commands EXAMPLES III. COMMAND REFERENCES - 15. Command References PRINT#1,"ENTER16#100 BUFFER &H2000:0" PRINT#1, “ENTER16#100 BUFFER &H20100 EOI” PRINT#1,"BUFFERED" INPUT#2,N PRINT#1, “ENTER16#100 BUFFER 262144 CONTINUE” PRINT#1, “WAIT” PRINT#1, “ENTER16#100 BUFFER 262144 CONTINUE EOI” PRINT#1,"WAIT" PRINT#1,"BUFFERED” INPUT#2,NBUFFERED Read 100 characters into memory at &H20000. Read 100 characters, or until EOI is detected into memory at absolute location 20100. Read 100 characters as before, but allow the program to continue while the transfer is taking place. Wait until the transfer has completed. Read 100 characters as before, but stop if the EOI (end or identify) signal is encountered. Wait until the transfer has completed. Get the number of characters actually read. The ENTER #count BUFFER command reads data from the I/O adapter into a user-supplied memory region. If a device address (with optional secondary address) or name is specified, Driver488 is addressed to Listen, and that device is addressed to Talk. If no address is specified, Driver488 must already be configured to receive data, either as a result of an immediately preceding ENTER command, or as a result of one of the SEND commands. The character count count must be specified and is the maximum number of characters that is transferred. ENTER #count BUFFER does not detect the input terminator unless it is explicitly specified in the command. Otherwise the specified number of characters is received. The number of characters actually received can be checked with the BUFFERED command. The terminator characters, if received, are placed into the memory buffer. If CONTINUE is specified, Driver488 returns control to the user’s program as soon as possible, without waiting for the transfer to be completed. It does, however, wait for the first byte to check for time-out unless a time-out value of 0 had been specified by a TIMEOUT command. Because of hardware limitations, the CONTINUE may not return until a substantial portion of the transfer is complete, if configured for no interrupts. CONTINUE transfers are not finished until Driver488 has had an opportunity to “clean up” and complete the transfer. This “clean up” is usually automatic: Driver488 implicitly performs a WAIT command before performing any bus command. The program can itself use the WAIT command to guarantee that the transfer is complete. All characters read, including the bus terminator, if any, are placed in the memory buffer; no terminator translation is performed. The EOL IN terminator is not put into the memory buffer. ENTER #count BUFFER (Peripheral mode) SYNTAX ENTER[;] #count[;]BUFFERbuf-addr[CONTINUE][term][term][EOI] RESPONSE count is the number of characters to ENTER. buf-addr is the memory buffer address. CONTINUE specifies asynchronous transmission. term and EOI override the normal bus input terminators. None, returned data is placed directly into the specified memory buffer. *CA Determined by the Controller. OUTPUT, TERM, EOL, BUFFERED See next page. MODE BUS STATES SEE ALSO EXAMLES III-290 Personal488 User’s Manual, Rev. 3.0 Artisan Technology Group - Quality Instrumentation ... Guaranteed | (888) 88-SOURCE | www.artisantg.com III. COMMAND REFERENCES - 15. Command References EXAMPLES 15A. Driver488/DRV Commands PRINT#1,"ENTER#100 BUFFER &H2000:0" PRINT#1,"ENTER#100 BUFFER &H20100 EOI" PRINT#1,"BUFFERED" INPUT#2,NBUFFERED PRINT#1,"ENTER# 100 BUFFER 262144 CONTINUE" PRINT#1,"WAIT" PRINT#1,"ENTER#100 BUFFER 262144CONTINUE EOI" PRINT#1,"WAIT" PRINT#1,"BUFFERED" INPUT#2,NBUFFERED Read 100 characters into memory at &H20000. Read 100 characters, or until EOI is detected into memory at absolute location 20100. Read 100 characters as before, but allow the program to continue while the transfer is taking place. Wait until the transfer has completed. Read 100 characters as before, but stop if the EOI (end or identify) signal is encountered. Wait until the transfer has completed. Get the number of characters actually read. In Peripheral mode, the ENTER #count BUFFER command receives data from the bus under control of the Active Controller. The Active Controller must put Driver488 into the Listen state and configure some other device to provide it with data. The Listen state can be checked with the STATUS command, or can cause an interrupt via the ARM command. A time-out error occurs (if enabled) if Driver488 does not receive a data byte within the time out period after issuing the ENTER #count BUFFER command. The character count count must be specified, and is the maximum number of characters that is transferred. ENTER #count BUFFER does not detect the input terminator unless it is explicitly specified in the command. Otherwise the specified number of characters is received. The number of characters actually received can be checked with the BUFFERED command. If CONTINUE is specified, then Driver488 returns control to the user’s program as soon as possible, without waiting for the transfer to be completed. It does, however, wait for the first byte to check for time-out unless a time-out value of 0 had been specified by a TIMEOUT command. Because of hardware limitations, the CONTINUE may not return until a substantial portion of the transfer is complete if Driver488 is configured for no interrupts. CONTINUE transfers are not finished until Driver488 has had an opportunity to “clean up” and complete the transfer. This “clean up” is usually automatic: Driver488 implicitly performs a WAIT command before performing any bus command. The program can itself use the WAIT command to guarantee that the transfer is complete. All characters read, including the bus terminator, if any, are placed in the memory buffer. No terminator translation is performed. The EOL IN terminator is not put into the memory buffer. EOL SYNTAX EOL [name][IN|OUT] {term [term]|NONE} name is the name of an External Device. If name is not specified, then EOL acts on the I/O adapter. IN or OUT specifies whether the input or output terminators are being set. If neither IN nor OUT is specified, then both terminators are set identically. term is one of CR, LF, $char, or ‘X, specifying a terminator character. NONE may be specified instead of term to indicate that no EOL terminators are used. RESPONSE MODE BUS STATES SEE ALSO EXAMPLES None Any None TERM, ENTER, OUTPUT See next page. Personal488 User’s Manual, Rev. 3.0 Artisan Technology Group - Quality Instrumentation ... Guaranteed | (888) 88-SOURCE | www.artisantg.com III-291 15A. Driver488/DRV Commands EXAMPLES III. COMMAND REFERENCES - 15. Command References PRINT#1,"EOL DMM CR LF" PRINT#1,"EOLTIMER OUT CR LF" PRINT#1,"EOLTIMER IN CR" PRINT#1,"EOL DVM $0" PRINT#1,"EOL WAVE IN NONE" Set both input and output terminators to carriage-return line-feed. Set output terminator to CR LF. Set input terminator to CR only. Set both terminators to an ASCII NULL. Configure for no input terminator. The EOL command sets the end-of-line terminators for input to the user’s program, output to Driver488, or both. All output to Driver488, except OUTPUT #count, must be terminated by the EOL output terminator. All input to the user’s program, except ENTER #count, is terminated by the EOL input terminator. The default terminators for both input and output are set by INSTALL and are normally CR LF, which is appropriate for most languages. ERROR SYNTAX RESPONSE MODE BUS STATES SEE ALSO EXAMPLES ERROR {ON|OFF} None Any None STATUS; OnEvent, GetError, GetErrorList (Sub-Chapter 15B) PRINT#1,"ERROR OFF" Disable on-screen error message display. PRINT#1,"ERROR ON" Re-enable error message display. The ERROR command enables or disables automatic on-screen display of Driver488 error messages. ERROR ON enables error message display, and ERROR OFF disables it. ERROR ON is the default condition. FILL SYNTAX FILL [name] {OFF|ERROR|CR|LF|$char|’X} name is the name of an external device. If name is not specified, then EOL acts on the I/O adapter RESPONSE MODE BUS STATES SEE ALSO EXAMPLES OFF prevents response if none is available. ERROR enables SEQUENCE - NO DATA AVAILABLE errors. CR, LF, $char, or ‘X specify the character with which to “fill” the response. None Any None ENTER, OUTPUT, EOL PRINT#1,"FILL OFF" INT#1,"FILL ERROR" PRINT#1,"FILL $000" Do not detect NO DATA AVAILABLE errors. Do not return fill characters. Detect NO DATA AVAILABLE errors.Do not return fill characters. Do not detect NO DATA AVAILABLE errors. Fill requests with nulls. The FILL command controls the response of Driver488 to a request for data when none is available. This type of request can occur in three ways: (1) a program error, such as a missing ENTER command, results in a request for a response without first setting up Driver488 to provide that response; (2) the I/O procedures supplied with the user’s programming language request more data than is actually available; or (3) the OPEN command for input from Driver488 tries to read one character from Driver488 to confirm that data is available even before any commands have been issued. When such a request occurs, Driver488 can respond in three ways: (1) it can respond to the calling routine that no data is available, (2) it can immediately signal an error, or (3) it can satisfy the request by returning some specified character repeated as many times as necessary. The FILL command III-292 Personal488 User’s Manual, Rev. 3.0 Artisan Technology Group - Quality Instrumentation ... Guaranteed | (888) 88-SOURCE | www.artisantg.com III. COMMAND REFERENCES - 15. Command References 15A. Driver488/DRV Commands selects which response is to be used. In general, when Driver488 receives a request for data, it is provided with the address in memory of a buffer that is to hold the response, and with the buffer length. If FILL OFF is specified, then the buffer is filled with any available response, and the remainder of the buffer (if it is larger than the response) is not changed. If no response is available, then the entire buffer is left unchanged, but no error is indicated. If FILL ERROR is specified, then the buffer is filled with any available response, and the remainder of the buffer (if it is larger than the response) is not be changed. If no response is available, then the entire buffer is left unchanged and a SEQUENCE - NO DATA AVAILABLE error occurs. If FILL term is specified, where term is one of CR, LF, $char, or ‘X, the buffer is filled with any available response, and the remainder of the buffer (if it is larger than the response) is filled with the specified character. If no response is available, the entire buffer is filled with that character. If the error is due to an actual programming error, it is to the user’s advantage to have Driver488 automatically detect this error. In this case, error detection should be enabled with the FILL ERROR command. Normal I/O with Driver488 in both BASIC and Turbo Pascal 3.0 is performed on a character-by-character basis and so neither language reads more data than is available. Thus, FILL ERROR is appropriate for both languages. Note, however, that the OPEN for input command in some versions of BASIC does try to read one character upon opening the file. For this reason, the files should be opened in the following sequence: 100 110 120 130 140 OPEN “\DEV\IEEEOUT” FOR OUTPUT AS #1 IOCTL#1,"BREAK" PRINT#1,"RESET" OPEN “\DEV\IEEEIN” FOR INPUT AS #2 PRINT#1,"FILL OFF" The RESET command guarantees that FILL$000 (the default condition, FILL with the null character) is in effect when the OPEN statement tries to read the first character from Driver488. Driver488 responds with a null character that BASIC ignores so that the first real response from Driver488 will be corrupted. In some languages, such as C, the I/O routines may try to read a fixed length block from Driver488. Use of the BASIC GET file I/O also has this effect. The size of the block requested varies. It may be as much as several thousand bytes, or it may be the record size or buffer length defined for the file. In any case, if FILL is OFF, then no error is signaled, and the returned characters are placed into the first bytes of the buffer. The remainder of the block is not modified. It is, though, sometimes useful to fill the remainder of the block with some specific byte value. This is accomplished with the FILL term command. FILL term forces Driver488 to return as many characters as are requested by the I/O routines, even if they are dummy fill characters. FIND LISTENERS SYNTAX RESPONSE MODE BUS STATES SEE ALSO EXAMPLES FIND LISTENERS pri-addr The number of active listeners found, followed by those addresses, separated by commas. Any UNL, LAG CHECK LISTENER, BUS ADDRESS, STATUS PRINT#1,"FIND LISTENERS 12" LINE INPUT#1,A$ 0 No Listeners Found 1,12 Primary Address Listener Found 2,1200,1201 Secondary Address Listeners Found The FIND LISTENERS command finds all of the devices configured to listen at the specified primary address on the IEEE 488 bus. It takes the primary address to check, and returns the number of listeners found and their addresses. Personal488 User’s Manual, Rev. 3.0 Artisan Technology Group - Quality Instrumentation ... Guaranteed | (888) 88-SOURCE | www.artisantg.com III-293 15A. Driver488/DRV Commands III. COMMAND REFERENCES - 15. Command References FINISH SYNTAX RESPONSE MODE BUS STATES SEE ALSO EXAMPLE FINISH None CA ATN RESUME, PASS CONTROL PRINT#1, “FINISH” The FINISH command asserts ATN and releases any pending holdoffs after a RESUME function is called with the monitor flag set. FINISH everything necessary for Driver488 to be ready for the next operation. HELLO SYNTAX RESPONSE MODE BUS STATES SEE ALSO EXAMPLE HELLO Driver488 Revision X.X (C)199X IOtech, Inc. Any None Status; OpenName, GetError (Sub-Chapter 15B) PRINT#1,"HELLO" Get the HELLO response and display it. INPUT#2,A$ PRINT A$ The HELLO command is used to verify communication with Driver488, and to read the software revision number. When the command is sent, Driver488 returns a string similar to the following: Driver488 Revision X.X (C)199X IOtech, Inc. where X is the appropriate revision or year number. INT LEVEL SYNTAX INT LEVEL [channel|NONE] RESPONSE MODE BUS STATES SEE ALSO EXAMPLES channel is a valid interrupt channel. None Any None DMA CHANNEL, TIME OUT PRINT#1, “INT LEVEL 3" The INT LEVEL command specifies the hardware interrupt level that is used by the I/O adapter. Driver488 uses hardware interrupts, if available, to improve the efficiency of I/O adapter control and communication. The interrupt level is specified by an integer in the range 2 through 15, where channel availability within this range is determined by the system bus type and the adapter type. The interrupt level value must match the hardware settings on the I/O adapter card. IO ADDRESS III-294 SYNTAX IO ADDRESS[io-addr] RESPONSE MODE BUS STATES SEE ALSO EXAMPLES ioaddr is the I/O base address to set. None Any None INT LEVEL, DMA CHANNEL, TIME OUT PRINT#1,"IOADDRESS &H02E1" Personal488 User’s Manual, Rev. 3.0 Artisan Technology Group - Quality Instrumentation ... Guaranteed | (888) 88-SOURCE | www.artisantg.com III. COMMAND REFERENCES - 15. Command References 15A. Driver488/DRV Commands The IO ADDRESS command specifies the I/O port base address of the I/O adapter. The base address is set by a sixteen-bit integer, ioaddr, that is usually given as a hexadecimal number. For example, to use the default I/O address, the command would be IO ADDRESS &H02E1. The default I/O port base address for the IEEE 488 hardware interface is &H02E1 for the first interface, &H22E1 for the second, &H42E1 for the third, and &H62E1 for the fourth interface. The default I/O port base addresses for the serial hardware interface is &H03F8. Other standard I/O port base addresses are &H02F8, &H03E8, &H02E8. The IO ADDRESS value must match the hardware switch settings on the I/O adapter. IOCTL (BASIC Statement) SYNTAX RESPONSE MODE BUS STATES SEE ALSO EXAMPLE IOCTL#2,"BREAK" None Any None IOCTL$ IOCTL#2,"BREAK" Send the IOCTL message “BREAK” to the Driver488 The IOCTL command is a BASIC statement that can be used to reset Driver488 unconditionally. When the message “BREAK” is sent to Driver488 via the IOCTL Write DOS function (&H4403, accessible via the IOCTL BASIC statement), Driver488 stops any command currently executing, and prepares to accept a new command. This can be used even when Driver488 is not expecting a command, but is transferring data. Commands such as ABORT or RESET may then be used to reset the entire IEEE 488 bus. IOCTL resets the EOL OUT terminators to their default values to guarantee that Driver488 is able to recognize the next command correctly. No IOCTL commands other than BREAK are supported by Driver488. The IOCTL command can be accomplished in other languages by using MS-DOS function calls. IOCTL$ (BASIC Statement) SYNTAX RESPONSE MODE BUS STATES SEE ALSO EXAMPLE A$=IOCTL$(#2) A$ is a string variable that is set to one of the following: 0 if there is nothing to read, 1 if there is something to read, 2 if data should be written, 3 if the remainder of a command is expected. None Any None IOCTL 100 PRINT#1,"ENTER16" 110 A$=IOCTL$(#2) 120 IF A$="1" THEN PRINT INPUT$(1,#2): GOTO 110 130 PRINT “NO INPUT READY” The IOCTL$ command is a BASIC statement that can be used to determine the communication state of Driver488. When data is read from Driver488 using the IOCTL Read DOS command (&H4402, access via the IOCTL$ BASIC function), Driver488 returns a single ASCII character, either 0, 1, 2, or 3. The meaning of these responses is: • 0: A response of 0 indicates that Driver488 is ready to receive a command. It has no data to read, nor is it expecting data for output to the IEEE 488 bus. Personal488 User’s Manual, Rev. 3.0 Artisan Technology Group - Quality Instrumentation ... Guaranteed | (888) 88-SOURCE | www.artisantg.com III-295 15A. Driver488/DRV Commands III. COMMAND REFERENCES - 15. Command References • 1: A response of 1 indicates that Driver488 has a response ready to be read by the user’s program. The program must read the response before sending a new command (except IOCTL “BREAK”) or a SEQUENCE - DATA HAS NOT BEEN READ error occurs. • 2: A response of 2 indicates that Driver488 is waiting for data to OUTPUT to the I/O adapter. The user’s program must send the appropriate data with terminators as needed to Driver488 with PRINT statements (or their equivalent in other languages). Attempting to read from Driver488 while it is waiting for data, causes a SEQUENCE - NO DATA AVAILABLE error. • 3: A response of 3 indicates that Driver488 is waiting for the completion of a command. This is similar to a response of 2 except that Driver488 is waiting for a command rather than for data to OUTPUT. The IOCTL$ command has two primary uses: In the Keyboard Controller Program it allows the program to know when Driver488 has data available to read, and in BASIC Interrupt Service Routines it prevents interrupts from being serviced while Driver488 is busy finishing a command. Notice that IOCTL$ suppresses light pen interrupt emulation, so that the next time light pen status is requested, it responds with a “no interrupt” status. Normal light pen interrupt emulation is then restored. This is required to allow the BASIC ON PEN function to operate normally. The IOCTL$ command can be accomplished in other languages by using MS-DOS function calls. KEEP DEVICE SYNTAX KEEP DEVICE name RESPONSE MODE BUS STATES SEE ALSO EXAMPLES name is the name of an external device. None Any None MAKE DEVICE, REMOVE DEVICE PRINT#1, “KEEP DEVICE SCOPE” The KEEP DEVICE command makes the specified Driver488 device permanent. Permanent Driver488 devices are not removed when Driver488 is closed. Driver488 devices are created by MAKE DEVICE and are initially temporary. Unless KEEP DEVICE is used, all temporary Driver488 devices are forgotten when Driver488 is closed. The only way to remove the device once it has been made permanent by the KEEP DEVICE command, is to use the REMOVE DEVICE command. KEEP DOS NAME SYNTAX KEEP DOS NAME dosname RESPONSE MODE BUS STATES SEE ALSO EXAMPLES dosname is the name of the Driver488 DOS device. None Any None MAKE DOS NAME, REMOVE DOS NAME, KEEP DEVICE PRINT#1, “KEEP DOS NAME PLOTTER” The KEEP DOS NAME command makes the specified Driver488 DOS device permanent. Permanent Driver488 DOS devices are not removed when Driver488 is closed. Driver488 DOS devices are created by MAKE DOS NAME and are initially temporary. Unless KEEP DOS NAME is used, all temporary Driver488 DOS devices are forgotten when Driver488 is closed. The only way to remove the DOS device once it has been made permanent by the KEEP DOS NAME command, is to use the REMOVE DOS NAME command. The Driver488 DOS device is attached to a Driver488 device that was specified when the Driver488 DOS device was created by MAKE DOS NAME. If that Driver488 device is not permanent, then KEEP DOS NAME makes it permanent, and then makes the Driver488 DOS device permanent. III-296 Personal488 User’s Manual, Rev. 3.0 Artisan Technology Group - Quality Instrumentation ... Guaranteed | (888) 88-SOURCE | www.artisantg.com III. COMMAND REFERENCES - 15. Command References 15A. Driver488/DRV Commands LIGHT PEN SYNTAX RESPONSE MODE BUS STATES SEE ALSO EXAMPLES LIGHT PEN [ON|OFF] None Any None ARM, DISARM; OnEvent (Sub-Chapter 15B) PRINT#1, “LIGHT PEN ON” The LIGHT PEN command enables or disables the detection of interrupts via setting the light pen status. The default is light pen interrupt enabled. LOCAL System Controller Mode SYNTAX RESPONSE MODE BUS STATES SEE ALSO EXAMPLE LOCAL None SC *REN REMOTE, AUTO REMOTE PRINT#1,"LOCAL" SYNTAX LOCAL addr[,addr...] RESPONSE MODE BUS STATES SEE ALSO EXAMPLE addr is a bus device address (primary with optional secondary) or a device name. None CA ATNUNL, MTA, LAG,GTL REMOTE, AUTO REMOTE PRINT#1,"LOCAL 12,16" Send Go To Local to devices 12 and 16. Unassert the Remote Enable Line Active Controller Mode In the System Controller mode, the LOCAL command without optional addresses causes Driver488 to unassert the Remote Enable (REN) line. This causes devices on the bus to return to manual operation. As the Active Controller, with bus addresses specified, bus devices are placed in the local mode by the Go To Local (GTL) bus command. If addresses are specified, then the Remote Enable line is not unasserted. LOCAL LOCKOUT or LOL SYNTAX RESPONSE MODE BUS STATES SEE ALSO EXAMPLES LOCAL LOCKOUT or LOL None CA ATN•LLO LOCAL, LOCAL LIST, REMOTE PRINT#1,"LOCAL LOCKOUT" PRINT#1,"LOL" Send Local Lockout bus command. Same as above. The LOCAL LOCKOUT command causes Driver488 to issue a Local Lockout (LOL) IEEE 488 bus command. Bus devices that support this command are thereby inhibited from being controlled manually from their front panels. Personal488 User’s Manual, Rev. 3.0 Artisan Technology Group - Quality Instrumentation ... Guaranteed | (888) 88-SOURCE | www.artisantg.com III-297 15A. Driver488/DRV Commands III. COMMAND REFERENCES - 15. Command References MAKE DEVICE SYNTAX MAKE DEVICE name = oldname name is the name of the device that is created with the same configuration as the existing device oldname. RESPONSE MODE BUS STATES SEE ALSO EXAMPLE None Any None KEEP DEVICE, REMOVE DEVICE PRINT#1,”MAKE DEVICE DMM=SCOPE” PRINT#1,”BUS ADDRESS DMM 16 Create a device named DMM, attached to the same I/O adapter as SCOPE and set its IEEE 488 bus address to 16. The MAKE DEVICE command creates a new, temporary Driver488 device that is an identical copy of an already existing Driver488 device. The new device is attached to the same I/O adapter of the existing device and has the same terminators, timeouts, and other characteristics. If there are no appropriate Driver488 devices, then the INSTALL program must be used to create one. The newly created device is temporary, and is forgotten when Driver488 is closed. KEEP DEVICE may be used to make the device permanent. MAKE DOS NAME SYNTAX RESPONSE MODE BUS STATES SEE ALSO EXAMPLES MAKE DOS NAME dosname = devicename dosname is the name of the newly created Driver488 DOS device that is configured to communicate with the Driver488 device devicename None Any None KEEP DOS NAME, REMOVE DOS NAME, MAKE DEVICE PRINT#1, “MAKE DOS NAME METER = DMM” OPEN “METER” FOR OUTPUT AS #3 The MAKE DOS NAME command creates a new, temporary Driver488 DOS device that is configured to communicate with an already existing Driver488 device. The newly created DOS device is temporary, and is forgotten when Driver488 is closed. KEEP DOS NAME may be used to make the device permanent. OUTPUT (Controller Mode) SYNTAX OUTPUT [addr][#count][term][term][EOI];data addr is a device address (primary with optional secondary) or external device name. count is the number of characters to output. Term and EOI override the normal IEEE 488 bus output terminator data is a string of characters to output, terminated by the EOL output terminator (unless count is specified in which case no terminator is needed). RESPONSE MODE BUS STATES SEE ALSO EXAMPLES III-298 None CA REN (if SC and AUTO REMOTE), *ATN, data (without addr) REN (if SC and AUTO REMOTE), ATNyMTA, UNL, LAG, *ATN, data (with addr) ENTER, TERM, TIME OUT, EOL, BUFFERED See next page. Personal488 User’s Manual, Rev. 3.0 Artisan Technology Group - Quality Instrumentation ... Guaranteed | (888) 88-SOURCE | www.artisantg.com III. COMMAND REFERENCES - 15. Command References EXAMPLES PRINT#1,"OUTPUT22;R0C0T1X" PRINT#1,"OUTPUT;XYZ" PRINT#1,"OUTPUT0602;DEF" PRINT#1,"OUTPUT06#26; abcdefghijklmnopqrstuvwxyz" PRINT#1,"OUTPUT DMM;DC VOLTS" 15A. Driver488/DRV Commands Send “R0C0T1X” to device 22. And send it “XYZ”. Send “DEF” to device 6, secondary address 2. Send the 26 letters of the alphabet without terminators to device 6. Send “DCVOLTS” to device DMM. The OUTPUT command sends data to the I/O adapter. The Remote Enable (REN) line is first asserted if Driver488 is the System Controller and AUTO REMOTE is enabled. Then, if a device address (with optional secondary address) is specified, Driver488 is addressed to Talk and that device is addressed to Listen. If no address is specified, Driver488 must already be configured to send data, either as a result of an immediately preceding OUTPUT command or as the result of a SEND command. If the character count count is specified, that exact number of characters is sent to the bus devices. Otherwise, OUTPUT terminates data transfer upon detection of the EOL output terminator from the user’s program. The EOL output terminator is replaced with the bus output terminator before being sent to the bus devices. OUTPUT (Peripheral Mode) SYNTAX OUTPUT [#count][term][term][EOI];data RESPONSE MODE BUS STATES count is the number of characters to OUTPUT. term and EOI override the normal IEEE 488 bus output terminators. data is a string of characters to OUTPUT terminated by the EOL output terminator unless count is specified. None *CA Determined by the Controller. REN asserted if SYS CONTROLLER and AUTO REMOTE are enabled. ENTER, TERM, TIME OUT, BUFFERED PRINT#1,"OUTPUT;DCVOLTS" Send “DC VOLTS” PRINT#1,"OUTPUT#5;ABCDE" Send “ABCDE” without bus terminators. SEE ALSO EXAMPLES In Peripheral mode, the OUTPUT command sends data to the I/O adapter under control of the Active Controller. The Active Controller must put Driver488 into the Talk state and configure some bus device to accept the transferred data. The Talk state can be checked with the STATUS command, or can cause an interrupt via the ARM command. A time-out error occurs, if enabled, if no bus device accepts the data within the time out period after issuing the OUTPUT command. If the character count count is specified, that exact number of characters is sent to the bus device. Otherwise, OUTPUT terminates data transfer upon detection of the EOL output terminator from the user’s program. The EOL output terminator is replaced with the bus output terminator before being sent to the bus devices. Even as a Peripheral, Driver488 might be the System Controller. If it is and AUTO REMOTE is enabled, it asserts Remote Enable (REN) before sending any data. Personal488 User’s Manual, Rev. 3.0 Artisan Technology Group - Quality Instrumentation ... Guaranteed | (888) 88-SOURCE | www.artisantg.com III-299 15A. Driver488/DRV Commands III. COMMAND REFERENCES - 15. Command References OUTPUT #count BUFFER (Controller Mode) SYNTAX OUTPUT [addr]#count BUFFER buf-addr [CONTINUE] [term] [term] [EOI] addr is a device address (primary with optional secondary) or an external device name. RESPONSE MODE BUS STATES count is the number of bytes to OUTPUT. buf-addr is the memory buffer address. CONTINUE specifies asynchronous transmission. term and EOI override the normal IEEE 488 bus output terminator None CA REN (if SC), *ATN, data (without addr) SEE ALSO EXAMPLES REN (if SC), ATN•MTA, UNL, LAG, *ATN, data (with addr) ENTER, TERM, TIME OUT, EOL, BUFFERED PRINT#1,"OUTPUT16#100 BUFFER Send 100 characters from memory at &H20000. &H2000:0” PRINT#1,"OUTPUT16#100 BUFFER &H20100 EOI” PRINT#1,"OUTPUT0701 #100 BUFFER &H1000:0 EOI” PRINT#1,"OUTPUT16#100 BUFFER &H2000:0 CONTINUE EOI” PRINT#1,"WAIT" PRINT#1,"OUTPUT16#100 BUFFER &H2000:100” Send 100 characters from memory at &H20100 asserting EOI with the last character. Send 100 characters to bus device 07. Send 100 characters and allow the program to continue while the transfer is taking place. Wait for the transfer to complete. And send the next 100 bytes. The OUTPUT #count BUFFER command sends data to I/O adapter devices from a user- supplied memory region. The Remote Enable (REN) line is first asserted if Driver488 is the System Controller. Then, if a device address (with optional secondary address) is specified, Driver488 is addressed to Talk and that device is addressed to Listen. If no address is specified, Driver488 must already be configured to send data, either as a result of an immediately preceding OUTPUT command, or as the result of a SEND command. The character count count must be specified and is the number of characters that is transferred. OUTPUT #count BUFFER does not send any bus output terminators unless they are specified. The number of characters actually sent can be checked with the BUFFERED command. If CONTINUE is specified, then Driver488 returns control to the user’s program as soon as possible without waiting for the transfer to be completed. It does, however, wait for the first byte to check for time-out unless a time-out value of 0 had been specified by a TIME OUT command. Because of hardware limitations, the CONTINUE may not return until a substantial portion of the transfer is complete. CONTINUE transfers are not finished until Driver488 has had an opportunity to “clean up” and complete the transfer. This “clean up” is usually automatic: Driver488 implicitly performs a WAIT command before performing any bus command. The program can itself use the WAIT command to guarantee that the transfer is complete. All characters in the memory buffer are sent exactly as stored. No detection of the EOL output terminator is performed, and no terminator translation takes place. III-300 Personal488 User’s Manual, Rev. 3.0 Artisan Technology Group - Quality Instrumentation ... Guaranteed | (888) 88-SOURCE | www.artisantg.com III. COMMAND REFERENCES - 15. Command References 15A. Driver488/DRV Commands OUTPUT #count BUFFER (Peripheral Mode) SYNTAX RESPONSE MODE BUS STATES SEE ALSO EXAMPLES OUTPUT #count BUFFER buf-addr [CONTINUE] [term] [term] [EOI] count is the number of characters to OUTPUT. buf-addr is the memory buffer address. CONTINUE specifies an asynchronous data transfer. term and EOI override the normal IEEE 488 bus output terminators. None *CA Determined by the Controller. REN asserted if SYS CONTROLLER and AUTO REMOTE are enabled. ENTER, TERM, TIME OUT, BUFFERED PRINT#1,"OUTPUT#100 BUFFER Send 100 characters from memory at &H20000. &H2000:0" PRINT#1,"OUTPUT#100 BUFFER &H20100 EOI" PRINT#1,"OUTPUT#100 BUFFER &H1000:0 EOI" PRINT#1,"OUTPUT#100 BUFFER &H2000:0 CONTINUE EOI" PRINT#1,"WAIT" Send 100 characters from memory at &H20100 asserting EOI with the last character. Send 100 characters, asserting EOI on the last character. Send 100 characters and allow the program to continue while the transfer is taking place. Send 100 characters and allow the program to continue while the transfer is taking place. In Peripheral mode, the OUTPUT #count BUFFER command sends data to the I/O adapter under control of the Active Controller. The Active Controller must put Driver488 into the Talk state and configure some bus device to accept the data that is transferred. The Talk state can be checked with the STATUS command or it can cause an interrupt via the ARM command. A time-out error occurs, if enabled, if the Controller does not accept the data within the time out period after issuing the OUTPUT #count BUFFER command. The character count count must be specified and is the number of characters that is transferred. OUTPUT #count BUFFER does not send any bus output terminators unless they are specified. The number of characters actually sent can be checked with the BUFFERED command. If CONTINUE is specified, then Driver488 returns control to the user’s program as soon as possible without waiting for the transfer to be completed. It does, however, wait for the first byte to check for time-out unless a time-out value of 0 had been specified by a TIME OUT command. Because of hardware limitations, the CONTINUE may not return until a substantial portion of the transfer is complete, if Driver488 is configured for no interrupts. CONTINUE transfers are not finished until Driver488 has had an opportunity to “clean up” and complete the transfer. This “clean up” is usually automatic: Driver488 implicitly performs a WAIT command before performing any bus command. The program can itself use the WAIT command to guarantee that the transfer is complete. If EOI is specified, the last byte is not transferred until Driver488 has the opportunity to perform this clean up. All characters in the memory buffer are sent exactly as stored. No detection of the EOL output terminator is performed, and no terminator translation takes place. Even as a Peripheral, Driver488 might be the System Controller. If it is and if AUTO REMOTE is enabled, then it asserts RemoteEnable (REN) before sending any data. Personal488 User’s Manual, Rev. 3.0 Artisan Technology Group - Quality Instrumentation ... Guaranteed | (888) 88-SOURCE | www.artisantg.com III-301 15A. Driver488/DRV Commands III. COMMAND REFERENCES - 15. Command References PASS CONTROL SYNTAX PASS CONTROL addr addr is a device address (primary with optional secondary) or the external device name of the device to which control is passed. RESPONSE MODE BUS STATES SEE ALSO EXAMPLE None CA ATN•UNL, MLA, TAG, UNL, TCT, *ATN ABORT, RESET, SEND 100 PRINT#1, "PASS CONTROL 22" Control is passed to device 22. 110 PRINT#1,"STATUS" Use STATUS to check control. 120 INPUT#1,A$ Wait until we are controller again 130 IF LEFT$(A$,1)"C" THEN 110 The PASS CONTROL command allows Driver488 to give control to another controller on the bus. After passing control, Driver488 enters the Peripheral mode. If Driver488 was the System Controller, then it remains the System Controller, but it is no longer the Active Controller. The Controller now has command of the bus until it passes control to another device or back to Driver488. The System Controller can regain control of the bus at any time by issuing an ABORT command. PPOLL SYNTAX RESPONSE MODE BUS STATES SEE ALSO EXAMPLE PPOLL Number in the range 0 to 255. CA ATN•EOI <parallel poll response>, *EOI PPOLL CONFIG, PPOLL UNCONFIG, PPOLL DISABLE, SPOLL PRINT#1,"PPOLL" Conduct a Parallel Poll INPUT#2,PPSTAT Receive the PPOLL status The PPOLL (Parallel Poll) command is used to request status information from many bus devices simultaneously. If a device requires service, it responds to a Parallel Poll by asserting one of the eight IEEE 488 bus data lines (DIO1 through DIO8, with DIO1 being the least significant). In this manner, up to eight devices may simultaneously be polled by the controller. More than one device can share any particular DIO line. In this case, it is necessary to perform further Serial Polling to determine which device actually requires service. Parallel Polling is often used upon detection of a Service Request (SRQ), though it may also be performed periodically by the controller. In either case, PPOLL responds with a number from 0 to 255 corresponding to the eight binary DIO lines. Refer to the manufacturer’s documentation for each device to determine whether or not Parallel Poll capabilities are supported. PPOLL CONFIG or PPC SYNTAX PPOLL CONFIG addr;response or PPC addr;response addr is a device address (primary with optional secondary) or an external device name. response is the decimal equivalent of the four binary bits S, P2, P1, and P0 where S is then Sense bit, while P2, P1, and P0 assign the DIO bus data line used for the response. RESPONSE MODE BUS STATES SEE ALSO EXAMPLE III-302 None CA ATN•UNL, MTA, LAG, PPC PPOLL, PPOLL UNCONFIG, PPOLL DISABLE See next page. Personal488 User’s Manual, Rev. 3.0 Artisan Technology Group - Quality Instrumentation ... Guaranteed | (888) 88-SOURCE | www.artisantg.com III. COMMAND REFERENCES - 15. Command References EXAMPLE PRINT#1, "PPC23;&H0D" 15A. Driver488/DRV Commands Configure device 23 to assert DIO6 when it desires service (ist = 1) and it is Parallel Polled (&H0D = 1101 binary; S=ist=1, P2=1, P1=0, P0=1; 101 binary = 5 decimal = DIO6). The PPOLL CONFIG command configures the Parallel Poll response of a specified bus device. Not all devices support Parallel Polling and, among those that do, not all support the software control of their Parallel Poll response. Some devices are configured by internal switches. The Parallel Poll response is set by a four-bit binary number response: S, P2, P1, and P0. The most significant bit of response is the Sense (S) bit. The Sense bit is used to determine when the device will assert its Parallel Poll response. Each bus device has an internal individual status (ist). The Parallel Poll response is asserted when this ist equals the Sense bit value S. The ist is normally a logic 1 when the device requires attention, so the S bit should normally also be a logic 1. If the S bit is 0, then the device asserts its Parallel Poll response when its ist is a logic 0. That is, it does not require attention. However, the meaning of ist can vary between devices, so refer to your IEEE 488 bus device documentation. The remaining 3 bits of response: P2, P1, and P0, specify which DIO bus data line is asserted by the device in response to a Parallel Poll. These bits form a binary number with a decimal value from 0 through 7, specifying data lines DIO1 through DIO8, respectively. PPOLL DISABLE or PPD SYNTAX PPOLL DISABLE addr[,addr...] or PPD addr[,addr...] addr is a device address (primary with optional secondary) or an external device RESPONSE MODE BUS STATES SEE ALSO EXAMPLE None CA name. ATN•UNL, MTA, LAG, PPC, PPD PPOLL, PPOLL CONFIG, PPOLL UNCONFIG PRINT#1,”PPOLL DISABLE Disable Parallel Poll of devices 18, 6, and 13. 18,06,13” The PPOLL DISABLE command disables the Parallel Poll response of selected bus devices. PPOLL UNCONFIG or PPU SYNTAX RESPONSE MODE BUS STATES SEE ALSO EXAMPLE PPOLL UNCONFIG or PPU None CA ATN•PPU PPOLL, PPOLL CONFIG, PPOLL DISABLE PRINT#1,"PPOLL UNCONFIG" The PPOLL UNCONFIG command disables the Parallel Poll response of all bus devices. REMOTE Bus Addresses Not Specified SYNTAX RESPONSE MODE BUS STATES SEE ALSO EXAMPLES REMOTE None SC REN Remote (Sub-Chapter 15B) PRINT#1,"REMOTE" Assert Remote Enable Personal488 User’s Manual, Rev. 3.0 Artisan Technology Group - Quality Instrumentation ... Guaranteed | (888) 88-SOURCE | www.artisantg.com III-303 15A. Driver488/DRV Commands III. COMMAND REFERENCES - 15. Command References Bus Addresses Specified SYNTAX REMOTE addr[,addr...] addr is a device address (primary with optional secondary) or an external device name. RESPONSE MODE BUS STATES SEE ALSO EXAMPLES None SC•CA REN, ATN•UNL, MTA, LAG LOCAL, LOCAL LOCKOUT, Remote (Sub-Chapter 15B) PRINT#1,"REMOTE16,28" Assert REN and address devices 16 and 28 to listen. The REMOTE command asserts the Remote Enable (REN) bus management line. If the optional bus addresses are specified, REMOTE also address those devices to listen, placing them in the Remote state. REMOVE DEVICE SYNTAX REMOVE DEVICE [[,]name...] RESPONSE MODE BUS STATES SEE ALSO EXAMPLES name is the external device to remove. None Any None MAKE DEVICE, KEEP DEVICE, REMOVE DOS NAME PRINT#1, “REMOVE DEVICE DMM” The REMOVE DEVICE command removes the specific temporary or permanent Driver488 device that was created with either the MAKE DEVICE command or the INSTALL program. This command also removes a device that was made permanent through a KEEP DEVICE command. Notice that REMOVE DEVICE cannot be used to remove devices having DOS names. The REMOVE DOS NAME command must first be used to remove any associated DOS names from such devices before the devices are removed via the REMOVE DEVICE command. REMOVE DOS NAME SYNTAX REMOVE DOS NAME dosname RESPONSE MODE BUS STATES SEE ALSO EXAMPLES dosname is the name of the Driver488 DOS device to remove. None Any None MAKE DOS NAME, KEEP DOS NAME, REMOVE DEVICE PRINT#1, “REMOVE DOS NAME METER” The REMOVE DOS NAME command removes the temporary or permanent Driver488 DOS device that was created by either the MAKE DOS NAME command or the INSTALL program. REQUEST SYNTAX REQUEST[;] status status is the service REQUEST status in the range 0 to 255. RESPONSE MODE BUS STATES SEE ALSO III-304 None *CA SRQ if rsv is set *SRQ if rsv is not set STATUS, CONTROL LINE, PPOLL CONFIG Personal488 User’s Manual, Rev. 3.0 Artisan Technology Group - Quality Instrumentation ... Guaranteed | (888) 88-SOURCE | www.artisantg.com III. COMMAND REFERENCES - 15. Command References EXAMPLES EXAMPLES 15A. Driver488/DRV Commands See next page. PRINT#1,"REQUEST“;64+2+4 PRINT#1,"REQUEST 0" Generate an SRQ (decimal 64) with DIO2 (decimal 2) and DIO3 (decimal 4) set in the Serial Poll Response. Clear SRQ and Serial Poll Response. In Peripheral mode, Driver488 is able to request service from the Active Controller by asserting the Service Request (SRQ) bus signal. The REQUEST command sets or clears the Serial Poll status (including Service Request) of Driver488. REQUEST takes a numeric argument in the decimal range 0 to 255 (hex range &H0 to &HFF) that is used to set the Serial Poll status. When Driver488 is Serial Polled by the Controller, it returns this byte on the DIO data lines. The data lines are numbered DIO8 through DIO1. DIO8 is the most significant line and corresponds to a decimal value of 128 (hex &H80). DIO7 is the next most significant line and corresponds to a decimal value of 64 (hex &H40). DIO7 has a special meaning: It is the Request for Service (rsv) bit. If rsv is set, then Driver488 asserts the Service Request (SRQ) bus signal. If DIO7 is clear (a logic 0), then Driver488 does not assert SRQ. When Driver488 is Serial Polled, all eight bits of the Serial Poll status are returned to the Controller. The rsv bit is cleared when Driver488 is Serial Polled by the Controller. This causes Driver488 to stop asserting SRQ. RESET SYNTAX RESPONSE MODE BUS STATES SEE ALSO EXAMPLE RESET None Any None ABORT, TERM, TIME OUT PRINT#1,”RESET” The RESET command provides a warm start of the interface. It is equivalent to issuing the following command process, including clearing all error conditions: 1. 2. 3. 4. 5. 6. 7. 8. 9. 10. STOP DISARM Reset hardware. (Resets to Peripheral if not System Controller) ABORT (if System Controller) ERROR ON FILL$0 LOCAL REQUEST 0 (if Peripheral) Clear Change, Trigger, and Clear event conditions. Reset I/O adapter settings to installed values. (TIME OUT, INT LEVEL, and DMA CHANNEL) RESUME SYNTAX RESUME [MONITOR] [name] RESPONSE MODE BUS STATES SEE ALSO EXAMPLE name is either an I/O adapter or an external device. If name is an external device, then the device’s output terminators are used. If name is a hardware interface, then the default input terminators are used. If name is not specified, then RESUME acts as if the hardware interface was specified. MONITOR is a flag that when specified, Driver488 monitors the data. None CA *ATN FINISH PRINT#1,"RESUME" Unassert Attention Line. Personal488 User’s Manual, Rev. 3.0 Artisan Technology Group - Quality Instrumentation ... Guaranteed | (888) 88-SOURCE | www.artisantg.com III-305 15A. Driver488/DRV Commands III. COMMAND REFERENCES - 15. Command References The RESUME command unasserts the Attention (ATN) bus signal. Attention is normally kept asserted by Driver488, but it must be unasserted to allow transfers to take place between two peripheral devices. In this case, Driver488 sends the appropriate Talk and Listen addresses, and then must unassert Attention with the RESUME command. If MONITOR is specified, then Driver488 monitors the handshaking process but does not participate in it. Driver488 takes control synchronously when the last terminator or EOI is encountered. At that point, the transfer of data stops. The FINISH command must be called to assert Attention and release any pending holdoffs to be ready for the next action. SEND SYNTAX RESPONSE MODE BUS STATES SEE ALSO EXAMPLES SEND[;] subcommand[subcommand...] None CA (any subcommands) Any (DATA and EOI subcommands only) User-defined OUTPUT PRINT#1,”SEND MTA UNL LISTEN16 DATA ‘T1S0R2X’” is the same as PRINT#1,”OUTPUT16;T1S0R2X” PRINT#1,”SEND CMD 128,0,10 DATA 156,35 EOI ‘ABC’” sends the following byte sequence: Data ATN EOI 10000000 00000000 00001010 10011100 00100011 01000001 01000010 01000011 ATN ATN *ATN *ATN *ATN *ATN *ATN *ATN *EOI *EOI *EOI *EOI *EOI *EOI *EOI EOI The SEND command provides byte-by-byte control of data and command transfers on the bus and gives greater flexibility than the other commands. This command can specify exactly which operations Driver488 executes. The following subcommands are available within the SEND command: SEND Subcommand Operation (Bus Command or Data Transfer) UNT UNL MTA MLA TALK addr LISTEN addr[,addr...] DATA {‘data’|number} [,{‘data’|number}...] Send the Untalk bus command. ATN is asserted. Send the Unlisten bus command. ATN is asserted. Send the My Talk Address bus command. ATN is asserted. Send the My Listen Address bus command. ATN is asserted. Send the Talk Address Group (TAG) bus command. ATN is asserted. Send the Listen Address Group (LAG) bus command. ATN is asserted. Send character strings data or characters with numeric ASCII values char. ATN unasserted. Send character strings data or characters with numeric ASCII values char. ATN unasserted. EOI is asserted on the last character. Send character strings data or characters with numeric ASCII values char. ATN asserted. EOI {‘data’|number} [,{‘data’|number}...] CMD {‘data’|number} [,{‘data’|number}...] The DATA, EOI and CMD subcommands send data bytes or characters over the bus. The characters to be sent are specified either as a quoted string (‘data’) or as individual ASCII values (number[,number...]). For example, DATA‘R0X’ sends the characters R, 0, and X to the active listeners, while DATA13,&H0A sends the carriage return and line feed. Multiple quoted strings or ASCII valued bytes may be specified by separating them with commas. The EOI subcommand is identical to the DATA subcommand except that the End-Or-Identify (EOI) signal is asserted on the transfer of the last character. III-306 Personal488 User’s Manual, Rev. 3.0 Artisan Technology Group - Quality Instrumentation ... Guaranteed | (888) 88-SOURCE | www.artisantg.com III. COMMAND REFERENCES - 15. Command References 15A. Driver488/DRV Commands The CMD subcommand sends the data bytes with Attention (ATN) asserted. This ATN tells the bus devices that the characters are to be interpreted as IEEE 488 bus commands, rather than as data. EOI is not asserted during CMD transfers. For example, CMD &H3F is the same as UnListen (UNL). Note that it is not possible to assert EOI during the transfer of a command byte, because EOI and ATN together specify Parallel Poll (PPOLL). The maximum length of the SEND command, including any subcommands, is 255 characters. If large amounts of data must be transferred using the SEND command, then multiple SEND commands must be used so that they are each less than 255 characters long. For example: PRINT#1,”SEND UNT UNL MTA LISTEN 16 DATA 1,2,3,4,5,6” is equivalent to: PRINT#1,”SEND UNT UNL MTA LISTEN 16” PRINT#1,”SEND DATA 1,2,3” PRINT#1,”SEND DATA 4,5,6” In this way, a long SEND command can be broken up into shorter commands. SPOLL SYNTAX SPOLL [addr] addr is a device address (primary with optional secondary) or an external device name. RESPONSE MODE BUS STATES SEE ALSO EXAMPLES 0 or 64 (without addr) Number in the range 0 to 255 (with addr) CA ATN•UNL, MLA, TAG, SPE, *ATN, ATN•SPD, UNT SPOLL LIST, PPOLL PRINT#1,”SPOLL 16” Serial Poll device 16 INPUT#2,SPSTAT Receive the SPOLL status IF SPSTAT AND 64 THEN Test rsv... PRINT#1,”SPOLL” Check the SRQ status INPUT#2,SRQ Receive the SRQ status IF SRQ<>0 THEN If SRQ is asserted then ... In Active Controller mode, the SPOLL (Serial Poll) command performs a Serial Poll of the bus device specified and responds with a number from 0 to 255 representing the decimal equivalent of the eightbit device response. If rsv (DIO7, decimal value 64) is set, then that device is signaling that it requires service. The meanings of the other bits are device-specific. Serial Polls are normally performed in response to assertion of the Service Request (SRQ) bus signal by some bus device. In Active Controller mode, with no bus address specified, the SPOLL command returns the internal SRQ status. If the internal SRQ status is set, it usually indicates that the SRQ line is asserted. Driver488 then returns a 64. If it is not set, indicating that SRQ is not asserted, then Driver488 returns a 0. In Peripheral mode, the SPOLL command is issued without an address, and returns the Serial Poll status. If rsv (DIO7, decimal value 64) is set, then Driver488 has not been Serial Polled since the issuing last REQUEST command. The rsv is reset whenever Driver488 is Serial Polled by the Controller. Personal488 User’s Manual, Rev. 3.0 Artisan Technology Group - Quality Instrumentation ... Guaranteed | (888) 88-SOURCE | www.artisantg.com III-307 15A. Driver488/DRV Commands III. COMMAND REFERENCES - 15. Command References SPOLL LIST SYNTAX SPOLL LIST [UNTIL_RSV|WHILE_SRQ|ALL] addr[, addr...] addr is a device name (primary with optional secondary) or an external device name to be Serial Polled. RESPONSE MODE BUS STATES SEE ALSO EXAMPLES Number of devices serial polled followed by their responses which are numbers in the range 0 to 255, separated by commas. CA ATN•UNL, MLA, TAG, SPE, *ATN, data, ATN•SPD, UNT SPOLL, PPOLL PRINT#1,"SPOLL LIST ALL 16,17" Serial Poll devices 16 and 17. INPUT#2,SPSTAT Receive the SPOLL status. 2,64,12 Device 16 responded with 64, and 17 responded with 12. PRINT#1 “SPOLL LIST UNTIL_RSV 16,17" Serial Poll first device 16. INPUT#2, SPSTAT Receive the SPOLL status. 1,64 Device 16 responded with 64. SPOLL LIST performs a Serial Poll of one or more bus devices, and responds with the number of devices actually polled and their individual responses. An optional flag specifies the criteria Driver488 should use to terminate scanning the list of devices. If UNTIL_RSV is chosen, Driver488 Serial Polls the devices until the first device whose rsv bit is set, is found. If WHILE_SRQ is chosen, Driver488 Serial Polls the devices until the SRQ bus signal becomes unasserted. If ALL is chosen, all the devices are Serial Polled. The default is ALL. STATUS SYNTAX RESPONSE MODE BUS STATES SEE ALSO EXAMPLE STATUS[name] Character string as described below. Any None ARM, SPOLL, GetError (Sub-Chapter 15B) PRINT#1,"STATUS" Read Driver488 status. INPUT#2,A$ Receive status. PRINT A$ Display status. The STATUS command returns various items detailing the current state of Driver488/DRV. They are returned as one long character string, based on the following table: STATUS Item Values and Description (Starting Col., No. of Cols.) Operating model (1,1) System Controller (2,1) Primary Bus Address (3,2) Secondary Bus Address (5,2) Address Change (7,1) Addressed State (9,1) ByteIn (10,1) ByteOut (11,1) Service Request (12,1) Error Code (14,3) Triggered (18,2) Cleared (21,2) Transfer in Progress (24,2) Error Message (27,x) III-308 C: Controller; P: Peripheral S: System Controller; N: Not System Controller 00 to 30: Two-digit decimal number 00 to 31: Two-digit decimal number, or blank if no secondary address 0: Address change has not occurred; 1: Address change has occured T: Talker; L: Listener; I:Idle 0: No byte in; 1: Byte in 0: No byte out; 1: Byte out 0: SRQ is not asserted.; 1: SRQ is asserted. nnn: Three-digit error code T0: Trigger command not received; T1: Trigger command received C0: Clear command not received; C1: Clear command received. P0: No transfer in progress; P1: Transfer in progress Text of error message (x = variable text) Personal488 User’s Manual, Rev. 3.0 Artisan Technology Group - Quality Instrumentation ... Guaranteed | (888) 88-SOURCE | www.artisantg.com III. COMMAND REFERENCES - 15. Command References 15A. Driver488/DRV Commands These STATUS items are more-fully described in the following paragraphs: • The Operating Mode (C or P) indicates whether or not Driver488 is the Active Controller. If Driver488 passes control to another device, the Operating Mode indicator changes from C to P. When Driver488 regains control, the indicator is C again. If Driver488 is not the System Controller, it is initially a Peripheral and thus the indicator is P. It does, of course, become C when Driver488 receives control from the Active Controller. • The System Controller Mode (S or N) indicates whether or not Driver488 is the System Controller. If Driver488 is System Controller, the System Controller Mode indicator is S. If Driver488 is not System Controller, then the System Controller Mode indicator is N. The System Controller Mode may be configured from the INSTALL program or with the SYS CONTROLLER command. • The Primary Bus Address (00 to 30) is the IEEE 488 bus device primary address assigned to Driver488 or the specified device. The Secondary Bus Address (00 to 31) is the IEEE 488 bus device secondary address assigned to the specified device. If there is no secondary address, this field is blank. • The Address Change (0 or 1) indicator is set whenever Driver488 become a Talker, Listener, or the Active Controller, or when it becomes no longer a Talker, Listener, or the Active Controller. It is reset when STATUS is read. The Addressed State (T, L, or I) is the current Talker/Listener state of Driver488. As a Peripheral, Driver488 can check this status to see if it has been addressed to Talk or addressed to Listen by the Active Controller. In this way, the desired direction of data transfer can be determined. • The ByteIn (0 or 1) indicator is set when the I/O adapter has received a byte that can be read by an ENTER command. The ByteOut (0 or 1) indicator is set when the I/O adapter is ready to output data. The Service Request (0 or 1) field, as an Active Controller, reflects the IEEE 488 bus SRQ line signal. As a peripheral, this status reflects the rsv bit that can be set by the REQUEST command and is cleared when the Driver488 is Serial Polled (SPOLL). • The Error Code (000) indicator appears when no error has occurred. If it is non-zero, then the Error Message (see below) is appended to the STATUS response. The Error Code is reset to 000 when STATUS is read. • The Triggered (T0 or T1) and Cleared (C0 or C1) indicators are set when, as a Peripheral, Driver488 is triggered or cleared. These two indicators are cleared when STATUS is read. The Transfer in Progress (P1) indicator is set when a CONTINUE transfer is in progress. The Triggered and Cleared indicators are not updated while CONTINUE transfers (P1) are in progress. • The Error Message is a variable text description of the error status. For more details about the individual errors, refer to Chapter 19 “Error Messages.” The standard default setting yields the following power-up status response: CS21 1 I000 000 T0 C0 P0 OK where the following indicators describe each component of the Driver488/DRV status: Indicator C S 21 1 I 0 0 0 000 T0 C0 P0 OK Driver488/DRV Status It is in the Controller state. It is the System Controller. The value of its IEEE 488 bus address. An Address Change has occurred. It is Idle (neither a Talker nor a Listener). There is no ByteIn available. It is not ready to send a ByteOut. Service Request (SRQ) is not asserted. There is no outstanding error. It has not received a bus device TRIGGER command (only applicable in the Peripheral mode). It has not received a CLEAR command (only applicable in the Peripheral mode). No CONTINUE transfer is in progress. The error message is “OK”. Personal488 User’s Manual, Rev. 3.0 Artisan Technology Group - Quality Instrumentation ... Guaranteed | (888) 88-SOURCE | www.artisantg.com III-309 15A. Driver488/DRV Commands III. COMMAND REFERENCES - 15. Command References STOP SYNTAX RESPONSE MODE BUS STATES SEE ALSO EXAMPLE STOP[name] None Any ATN (Controller) None (Peripheral) ENTER, OUTPUT, BUFFERED, STATUS PRINT#1,"STOP" The STOP command halts any CONTINUE transfer that may be in progress. If the transfer has completed already, then STOP has no effect. The actual number of characters transferred is available from the BUFFERED command. SYS CONTROLLER SYNTAX RESPONSE MODE BUS STATES SEE ALSO EXAMPLES SYS CONTROLLER [OFF|ON] None Any IFC if System Controller ABORT, RESET PRINT#1”SYS CONTROLLER OFF” The SYS CONTROLLER command specifies whether or not the IEEE 488 interface card is to be the System Controller. The System Controller has ultimate control of the IEEE 488, and there may be only one System Controller on a bus. If Driver488 is a Peripheral (that is, not System Controller), it may still take control of bus transactions if the Active Controller passes control to Driver488. Driver488 may then control the bus and, when it is done, pass control back to the System Controller or other computer, which then becomes the Active Controller. TERM SYNTAX TERM[;] [devicename] [IN|OUT]term[term][EOI] RESPONSE MODE BUS STATES SEE ALSO EXAMPLES devicename refers to an external device name. IN or OUT specifies whether the input or output terminators are being set. If neither IN nor OUT is specified, then both terminators are set identically. term is one of CR, LF, $char, or ‘X, specifying a terminator character. None Any None EOL, ENTER, OUTPUT, STATUS PRINT#1,"TERM CR LF EOI" Set both input and output bus terminators to PRINT#1,"TERM OUT LF EOI" PRINT#1,"TERM IN ‘Z" PRINT#1,"TERM OUT $0 EOI" carriage return line feed, with EOI sent on output and detected on input. Set output term to LF with EOI. Set bus input term to the letter “Z”. Set output term to NULL with EOI. The TERM command sets the end-of-line (EOL) terminators for input from, and output to, the I/O adapter devices. All output to I/O adapter devices, except OUTPUT #count and OUTPUT #count BUFFER, is terminated by the bus output terminator. All ENTER input from I/O adapter devices, except ENTER #count and ENTER #count BUFFER, must be terminated by the bus input terminator. III-310 Personal488 User’s Manual, Rev. 3.0 Artisan Technology Group - Quality Instrumentation ... Guaranteed | (888) 88-SOURCE | www.artisantg.com III. COMMAND REFERENCES - 15. Command References 15A. Driver488/DRV Commands During OUTPUT, Driver488 takes the EOL terminator it receives from the user’s program, and replaces it with the bus output terminator before sending it to the I/O adapter device. Conversely, when Driver488 receives the bus input terminator, it replaces it with the EOL input terminator before returning it to the user’s program. The default terminators for both input and output are normally CR LF EOI, which is appropriate for most bus devices. EOI has a different meaning when specified for input than when it is specified for output. During input, EOI specifies that input is terminated on detection of the EOI bus signal, regardless of which characters have been received. During output, EOI specifies that the EOI bus signal is to be asserted during the last byte transferred. TIME OUT SYNTAX RESPONSE MODE BUS STATES SEE ALSO EXAMPLES TIME OUT [devicename] n[.[n][n][n]] devicename is the name of the external device. n[.[n][n][n]], the time out value, is the number of seconds to allow in the range of 0.000 to 65535.999. If zero is specified, ignore time outs. A leading 0 must be used for time out intervals below 1.000 second. None Any None RESET, MAKE DEVICE PRINT#1,"TIME OUT10" Reset to default (10 seconds). PRINT#1,"TIME OUT0.5" Set time out interval to one-half second. PRINT#1,"TIME OUT3600" Wait an hour before a time out error. PRINT#1,"TIME OUT0" Ignore time outs. The TIME OUT command sets the number of seconds that Driver488 waits for a transfer before declaring a time out error. Driver488 checks for time out errors on every byte it transfers, except in the case of CONTINUE transfers. While the first byte of a CONTINUE transfer is checked for time out errors, subsequent bytes are not. The user’s program must check for timely completion of a CONTINUE transfer. Time out checking may be suppressed by specifying time out after zero seconds. The default time out is 10 seconds. The time out interval may be specified to the nearest 0.001 seconds. However, due to the limitations of the computer, the actual interval is always a multiple of 0.055 seconds (55 milliseconds) and there is an uncertainty of 0.055 seconds in the actual time out interval. Time out intervals from 0.010 to 0.110 seconds are rounded to 0.110 seconds. Larger intervals are rounded to the nearest multiple of 0.055 seconds (e.g., 0.165, 0.220, 0.275 seconds, etc.). TRIGGER SYNTAX TRIGGER [addr[,addr...]] addr is a device address (primary with optional secondary) or an external device name to be triggered. RESPONSE MODE BUS STATES SEE ALSO EXAMPLES None CA ATN•GET (without addr) ATN•UNL, MTA, LAG, GET (with addr) STATUS, SEND, TriggerList (Sub-Chapter 15B) PRINT#1,"TRIGGER" Trigger all current listeners. PRINT#1,"TRIGGER02,04,16" Issue Group Execute Trigger (GET) to devices 2, 4, and 16. Personal488 User’s Manual, Rev. 3.0 Artisan Technology Group - Quality Instrumentation ... Guaranteed | (888) 88-SOURCE | www.artisantg.com III-311 15A. Driver488/DRV Commands III. COMMAND REFERENCES - 15. Command References The TRIGGER command issues a Group Execute Trigger (GET) bus command to the specified devices. If no addresses are specified, then the GET only affects those devices that are already in the Listen state as a result of a previous OUTPUT or SEND command. WAIT SYNTAX RESPONSE MODE BUS STATES SEE ALSO EXAMPLE WAIT None Any Determined by previous ENTER or OUTPUT command ENTER, OUTPUT, BUFFERED, STATUS PRINT#1,"WAIT" Wait for CONTINUE transfer to be done. The WAIT command causes Driver488 to wait until any CONTINUE transfer has completed, before returning to the user’s program. It can be used to guarantee that the data has actually been received before beginning to process it, or that it has been sent before overwriting the buffer. It is especially useful with ENTER when a terminator has been specified. In that case, the amount that is actually received is unknown, and so the user’s program must check with Driver488 to determine when the transfer is done. Time out checking, if enabled, is performed while WAITing. III-312 Personal488 User’s Manual, Rev. 3.0 Artisan Technology Group - Quality Instrumentation ... Guaranteed | (888) 88-SOURCE | www.artisantg.com III. COMMAND REFERENCES - 15. Command References 15B. 15B. Driver488/SUB, W31, W95, & WNT Driver488/SUB, W31, W95, & WNT Commands This Sub-Chapter contains command reference for Driver488/SUB, Driver488/W31, Driver488/W95, and Driver488/WNT, using the C language. The commands are presented in alphabetical order on the following pages for ease of use. For more information on the format of the command descriptions, turn to the Sub-Chapter “Command Descriptions” of Chapter 9. Note: The differences among Driver488 for Windows 3.x, Windows 95 and Windows NT are slight. However, because additional changes are being made to Driver488/W95 and Driver488/WNT at the time this manual is being revised, refer to your operating system header file (and README.TXT text file, if present) to obtain the current material on these driver versions. Bus Management Commands Abort AutoRemote CheckListener ControlLine (Driver488/SUB only) ControlLine (Driver488/W31, W95) FindListeners Lol PassControl PPollConfig PPollDisable PPollDisableList PPollUnconfig Request Reset Page III-313 III-314 III-315 III-317 III-318 III-325 III-330 III-340 III-340 III-341 III-341 III-341 III-343 III-343 Instrument Management Commands Clear ClearList Local LocalList Remote RemoteList Trigger TriggerList Page III-316 III-316 III-329 III-329 III-342 III-342 III-350 III-351 Device Management Commands BusAddress Close KeepDevice MakeDevice MakeNewDevice OpenName RemoveDevice Page III-315 III-317 III-328 III-330 III-330 III-334 III-342 Device I/O Commands Enter (Controller Mode) Enter (Peripheral Mode) EnterI (Controller Mode) EnterI (Peripheral Mode) Output (Controller Mode) Output (Peripheral Mode) OutputI (Controller Mode) OutputI (Peripheral Mode) PPoll SPoll SPollList Page III-319 III-321 III-322 III-324 III-334 III-336 III-337 III-339 III-340 III-345 III-346 Low-Level Bus Commands Listen MyListenAddr MyTalkAddr SendCmd SendData SendEoi Talk UnListen UnTalk Page III-329 III-331 III-331 III-344 III-344 III-345 III-348 III-351 III-351 Event Handling Commands Arm Disarm OnEvent (Driver488/SUB only) OnEvent (Driver488/W31, W95) OnEventVDM (Driver488/W95) Page III-313 III-318 III-331 III-332 III-333 I/O Management Commands Buffered Finish Resume Stop Wait Page III-314 III-325 III-344 III-348 III-352 Interface Management Commands ClockFrequency DmaChannel IntLevel IOAddress LightPen SysController Term TermQuery TimeOut TimeOutQuery Page III-316 III-319 III-327 III-328 III-328 III-348 III-349 III-349 III-350 III-350 Error Management Commands Error GetError GetErrorList Page III-324 III-326 III-326 Miscellaneous Commands Hello Status Page III-327 III-346 Personal488 User’s Manual, Rev. 3.0 Artisan Technology Group - Quality Instrumentation ... Guaranteed | (888) 88-SOURCE | www.artisantg.com III-313 15B. Driver488/SUB, W31, W95, & WNT III. COMMAND REFERENCES - 15. Command References Abort SYNTAX int pascal Abort(DevHandleT devHandle); devHandle refers to either an IEEE 488 hardware interface or an external device. If devHandle refers to an external device, the Abort command will act on the hardware interface to which the external device is attached. RETURNS MODE BUS STATES SEE ALSO EXAMPLE -1 if error SC or *SC•CA IFC, *IFC (SC) ATN•MTA (*SCCA) SysController errorflag = Abort(ieee); As the System Controller (SC), whether Driver488 is the Active Controller or not, the Abort command causes the Interface Clear (IFC) bus management line to be asserted for at least 500 microseconds. By asserting IFC, Driver488 regains control of the bus even if one of the devices has locked it up during a data transfer. Asserting IFC also makes Driver488 the Active Controller. If a Non System Controller was the Active Controller, it is forced to relinquish control to Driver488. Abort forces all IEEE 488 device interfaces into a quiescent state. If Driver488 is a Non System Controller in the Active Controller state (*SC•CA), it asserts Attention (ATN), which stops any bus transactions, and then sends its My Talk Address (MTA) to “Untalk” any other Talkers on the bus. It does not (and cannot) assert IFC. Arm SYNTAX int pascal Arm(DevHandleT devHandle, ArmCondT condition); devHandle refers to either an IEEE 488 hardware interface or an external device. If devHandle refers to an external device, the Arm command acts on the hardware interface to which the external device is attached. RETURNS MODE BUS STATES SEE ALSO EXAMPLE condition is one of the following: acError, acSRQ, acPeripheral, acController, acTrigger, acClear, acTalk, acListen, acIdle, acByteIn, acByteOut, or acChange. -1 if error Any None Disarm, OnEvent, LightPen errorflag = Arm(ieee, acSRQ|acTrigger|acChange); The following Arm conditions are supported: III-314 Condition Description acSRQ acPeripheral acController acTrigger acClear acTalk acListen acIdle acByteIn acByteOut acError acChange The Service Request bus line is asserted. An addressed status change has occurred and the interface is a Peripheral. An addressed status change has occurred and the interface is an Active Controller. The interface has received a device Trigger command. The interface has received a device Clear command. An addressed status change has occurred and the interface is a Talker. An addressed status change has occurred and the interface is a Listener. An addressed status change has occurred and the interface is neither Talker nor Listener. The interface has received a data byte. The interface has been configured to output a data byte. A Driver488 error has occurred. The interface has changed its addressed status. Its Controller/Peripheral or Talker/Listener/Idle states of the interface have changed. Personal488 User’s Manual, Rev. 3.0 Artisan Technology Group - Quality Instrumentation ... Guaranteed | (888) 88-SOURCE | www.artisantg.com III. COMMAND REFERENCES - 15. Command References 15B. Driver488/SUB, W31, W95, & WNT The Arm command allows Driver488 to signal to the user specified function when one or more of the specified conditions occurs. Arm sets a flag corresponding to each implementation of the conditions indicated by the user. Arm conditions may be combined using the bitwise OR operator. Once an interrupt is Armed, it remains Armed until it is Disarmed, or until Driver488 is reset. BASIC automatically suppresses light pen interrupt detection during the execution of an interrupt service routine, so the interrupt service routine is never re-entrantly invoked. In languages that explicitly poll the light pen status, polling should not be done during the interrupt service routine. If Pascal or C is being used, the OnEvent function must be called. This function acts similar to the ON PEN command in BASIC. When the Armed condition occurs, the OnEvent function calls a function specified by the user. AutoRemote SYNTAX int pascal AutoRemote(DevHandleT devHandle, bool flag); devHandle refers to either an IEEE 488 hardware interface or an external device. If devHandle refers to an external device, the AutoRemote command acts on the hardware interface to which the external device is attached. RETURNS MODE BUS STATES SEE ALSO EXAMPLE flag may be either OFF or ON -1 if error. When the flag is non-zero, AutoRemote is enabled; a zero flag disables the function. SC None Local, Remote, Enter (see EnterX), Output (see OutputX) errorcode = AutoRemote(ieee,ON); The AutoRemote command enables or disables the automatic assertion of the Remote Enable (REN) line by Output. When AutoRemote is enabled, Output automatically asserts REN before transferring any data. When AutoRemote is disabled, there is no change to the REN line. AutoRemote is on by default. Buffered SYNTAX long pascal Buffered(DevHandleT devHandle); devHandle refers to either an IEEE 488 hardware interface or an external device. If devHandle refers to an external device, the Buffered command acts on the hardware interface to which the external device is attached. RETURNS MODE BUS STATES SEE ALSO EXAMPLE -1 if error, otherwise long integer from 0 to 1,048,575(220-1) Any None Enter (see EnterX), Output (see OutputX) result = Buffered(ieee); printf(“%ld bytes were received.”,result); The Buffered command returns the number of characters transferred by the latest Enter, Output, SendData, or SendEoi command. If an asynchronous transfer is in progress, the result is the number of characters that have been transferred at the moment the command is issued. This command is most often used after a counted Enter, EnterN, EnterNMore, etc., to determine if the full number of characters was received, or if the transfer terminated upon detection of term. It is also used to find out how many characters have currently been sent during an asynchronous DMA transfer. Personal488 User’s Manual, Rev. 3.0 Artisan Technology Group - Quality Instrumentation ... Guaranteed | (888) 88-SOURCE | www.artisantg.com III-315 15B. Driver488/SUB, W31, W95, & WNT III. COMMAND REFERENCES - 15. Command References BusAddress SYNTAX int pascal BusAddress (DevHandleT devHandle, char primary, char secondary); devHandle refers to either an IEEE 488 hardware interface or an external device. primary is the IEEE 488 bus primary address of the specified device. secondary is the IEEE 488 bus secondary address of the specified device. If the specified device is an IEEE 488 hardware interface, this value must be -1 since there are no secondary addresses for the IEEE 488 hardware interface. For no secondary address, a -1 must be specified. RETURNS MODE BUS STATES SEE ALSO EXAMPLE -1 if error Any None MakeDevice errorcode = BusAddress(dmm,14,0); The BusAddress command sets the IEEE 488 bus address of the IEEE 488 hardware interface or an external device. Every IEEE 488 bus device has an address that must be unique within any single IEEE 488 bus system. The default IEEE 488 bus address for Driver488 is 21, but this may be changed if it conflicts with some other device. CheckListener SYNTAX int pascal CheckListener(DevHandleT devHandle, char primary, char secondary); devHandle refers to either an IEEE 488 hardware interface or an external device. If devHandle refers to an external device, the CheckListener command acts on the hardware interface to which the external device is attached. RETURNS MODE BUS STATES SEE ALSO EXAMPLE primary is the primary bus address to check for a Listener (00 to 30) secondary is the secondary bus address to check for a Listener (00 to 31). For no secondary address, a -1 must be specified -1 if error, otherwise it returns a 1 if a listener was found at the specified address and a 0 if a listener was not found at the specified address. CA ATN•MTA, UNL, LAG, (check for NDAC asserted) FindListener, BusAddress result = CheckListener(ieee,15,4); if (result == 1) { printf(“Device found at specified address.\n”); } if (result == 0) { printf(“Device not found at specified address.\n”); } The CheckListener command checks for the existence of a device on the IEEE 488 bus at the specified address. III-316 Personal488 User’s Manual, Rev. 3.0 Artisan Technology Group - Quality Instrumentation ... Guaranteed | (888) 88-SOURCE | www.artisantg.com III. COMMAND REFERENCES - 15. Command References 15B. Driver488/SUB, W31, W95, & WNT Clear SYNTAX RETURNS MODE BUS STATES SEE ALSO EXAMPLES int pascal Clear(DevHandleT devHandle); devHandle refers to either an IEEE 488 hardware interface or an external device. If devHandle refers to a hardware interface, then a Device Clear (DCL) is sent. If devHandle refers to an external device, a Selected Device Clear (SDC) is sent. -1 if error CA ATN•DCL (all devices) ATN•UNL, MTA, LAG, SDC (selected device) Reset, ClearList errorcode = Clear(ieee); Sends the Device Clear (DCL) command to the interface board errorcode = Clear(wave) Sends the Selected Device Clear (SDC) command to the WAVE errorcode = Clear(dmm) Sends the Selected Device Clear (SDC) command to the DMM The Clear command causes the Device Clear (DCL) bus command to be issued to an interface or a Selected Device Clear (SDC) command to be issued to an external device. IEEE 488 bus devices that receive a Device Clear or Selected Device Clear command normally reset to their power-on state. ClearList SYNTAX RETURNS MODE BUS STATES SEE ALSO EXAMPLES int pascal ClearList(DevHandlePT devHandles); devHandles is a pointer to a list of device handles that refer to external devices. If a hardware interface is in the list, DCL is sent instead of SDC. -1 if error CA ATN•DCL (all devices) ATN•UNL, MTA, LAG, SDC (selected device) Clear, Reset deviceList[0] = wave; Sends the Selected Device Clear deviceList[1] = scope; (SDC) command to a list of deviceList[2] = dmm; devices. deviceList[3] = NODEVICE; errorcode = ClearList(deviceList); The ClearList command causes the Selected Device Clear (SDC) command to be issued to a list of external devices. IEEE 488 bus devices that receive a Selected Device Clear command normally reset to their power-on state. ClockFrequency Driver488/SUB and Driver488/W31 only SYNTAX int pascal ClockFrequency(DevHandleT devHandle,int freq); devHandle refers to either an IEEE 488 Interface or an external device. If devHandle refers to an external device, the ClockFrequency command acts on the hardware interface to which the external device is attached. RETURNS MODE BUS STATES SEE ALSO freq is the actual clock rate rounded up to the nearest whole number of MHz. -1 if error Any None Reset Personal488 User’s Manual, Rev. 3.0 Artisan Technology Group - Quality Instrumentation ... Guaranteed | (888) 88-SOURCE | www.artisantg.com III-317 15B. Driver488/SUB, W31, W95, & WNT III. COMMAND REFERENCES - 15. Command References errorcode = ClockFrequency(ieee, 8); EXAMPLE The ClockFrequency command specifies the IEEE 488 adapter internal clock frequency. The clock frequency depends upon the design and jumper settings of the interface board. The specified clock frequency must be the actual clock rate in megahertz (MHz) rounded up to the nearest whole number of megahertz. The MP488 and MP488CT boards use a fixed clock frequency of 8 MHz. Note: This command is not applicable to the NB488. Close SYNTAX int pascal Close(DevHandleT devHandle); RETURNS MODE BUS STATES SEE ALSO EXAMPLE devHandle refers to either an IEEE 488 interface or an external device. -1 if error Any Completion of any pending I/O activities OpenName, MakeDevice, Wait errorcode = Close(wave); The Close command waits for I/O to complete, flushes any buffers associated with the device that is being closed, and then invalidates the handle associated with the device. ControlLine Driver488/SUB only SYNTAX int pascal ControlLine(DevHandleT devHandle); ControlLine returns a bit mapped number. devHandle refers to the I/O adapter. If devHandle refers to an external device, the ControlLine command acts on the hardware interface to which the external device is attached. RESPONSE MODE BUS STATES SEE ALSO EXAMPLES -1 if error, otherwise, a bit mapped integer indicating the value of the control lines. Any None TimeOut result = ControlLine(ieee); printf(“The response is %X\n”,result); The ControlLine command may be used on either IEEE 488 devices or Serial devices. If the device specified is an IEEE 488 device, this command returns the status of the IEEE 488 bus control lines as an 8-bit unsigned value (bits 2 and 1 are reserved for future use), as shown below: 8 7 6 5 4 3 2 1 EOI SRQ NRFD NDAC DAV ATN 0 0 If the device refers to a Serial device, this command returns the status of the Serial port control lines as an 8-bit unsigned value (bits 8 and 7 are reserved for future use), as shown below: 8 7 6 5 4 3 2 1 0 0 DSR RI DCD CTS DTR RTS A fuller description of the above bus line abbreviations are provided below: III-318 Personal488 User’s Manual, Rev. 3.0 Artisan Technology Group - Quality Instrumentation ... Guaranteed | (888) 88-SOURCE | www.artisantg.com III. COMMAND REFERENCES - 15. Command References Bus State 15B. Driver488/SUB, W31, W95, & WNT Bus Lines Data Transfer (DIO) Lines 6 5 4 3 8 7 0 1 0 0 0 0 0 0 1 0 0 0 0 0 0 0 0 1 0 0 0 0 1 0 0 0 0 1 0 0 0 0 0 0 0 0 0 0 0 0 0 0 0 0 0 0 0 1 0 1 0 0 0 0 0 0 0 0 1 0 2 1 1 0 0 0 0 0 0 0 0 0 0 0 0 0 0 0 0 0 0 0 0 1 0 0 1 0 0 0 0 0 0 0 1 0 0 0 IEEE 488 Interface ATN EOI SRQ DAV NDAC NRFD Attention (&H04) End-Or-Identify (&H80) Service Request (&H40) Data Valid (&H08) Not Data Accepted (&H10) Not Ready For Data (&H20) Serial Interface DTR RI RTS CTS DCD DSR Data Terminal Ready (&H02) Ring Indicator (&H10) Request To Send (&H01) Clear To Send (&H04) Data Carrier Detect (&H08) Data Set Ready (&H20) ControlLine Driver488/W31 and Driver488/W95 only SYNTAX int pascal ControlLine(DevHandleT devHandle); ControlLine returns a bit mapped number. devHandle refers to the I/O adapter. If devHandle refers to an external device, the ControlLine command acts on the hardware interface to which the external device is attached. RESPONSE MODE BUS STATES SEE ALSO EXAMPLES -1 if error, otherwise, a bit mapped integer indicating the value of the control lines. Any None TimeOut, ControlLine (Driver488/SUB only) result = ControlLine(ieee); printf(“The response is %X\n”,result); The ControlLine command applies to IEEE 488 devices only. It returns the status of the IEEE 488 bus control lines as an 8-bit unsigned value (bits 2 and 1 are reserved for future use), as shown below: 8 7 6 5 4 3 2 1 EOI SRQ NRFD NDAC DAV ATN 0 0 Disarm SYNTAX int pascal Disarm(DevHandleT devHandle, ArmCondT condition); devHandle refers to either an IEEE 488 interface or an external device. If devHandle refers to an external device, then the Disarm command acts on the hardware interface to which the external device is attached. RETURNS MODE BUS STATES SEE ALSO EXAMPLES condition specifies which of the conditions are no longer to be monitored. If condition is 0, then all conditions are Disarmed. -1 if error Any None Arm, OnEvent, LightPen errorcode=Disarm(ieee,acTalk|acListen|acChange); Personal488 User’s Manual, Rev. 3.0 Artisan Technology Group - Quality Instrumentation ... Guaranteed | (888) 88-SOURCE | www.artisantg.com III-319 15B. Driver488/SUB, W31, W95, & WNT III. COMMAND REFERENCES - 15. Command References errorcode=Disarm(ieee,0); The Disarm command prevents Driver488 from setting the light pen status or invoking an event handler and interrupting the PC, even when the specified condition occurs. The user’s program can still check for the condition by using the Status command. If the Disarm command is invoked without specifying any conditions, then all conditions are disabled. The Arm command may be used to re-enable interrupt detection. DmaChannel Driver488/SUB and Driver488/W31 only SYNTAX int pascal DmaChannel(DevHandleT devHandle, int channel); devHandle refers to either an IEEE 488 interface or an external device. If devHandle refers to an external device, the DmaChannel command acts on the hardware interface to which the external device is attached. RESPONSE MODE BUS STATES SEE ALSO EXAMPLE channel is the DMA channel to be used by the I/O adapter, or -1 for NONE. -1 if error Any None IntLevel, TimeOut errorcode = DmaChannel(ieee, 5); The DmaChannel command specifies which DMA channel, if any, is to be used by the I/O interface card. The PC has four DMA channels, but channel 0 is used for memory refresh and is not available for peripheral data transfer. Channel 2 is usually used by the floppy-disk controller and is also unavailable. Channel 3 is used by the hard disk controller in PCs, but is usually not used in AT compatible machines. So, channel 1 (and possibly channel 3) is available for DMA transfers. The AT compatible computers have three 16-bit DMA channels: 5, 6, and 7. The MP488CT, MP488, and AT488 interfaces can use these channels for high speed transfer. The DmaChannel value must match the hardware jumper settings on the I/O adapter card. Note: This command is not applicable to the NB488. Enter (Controller Mode) EnterX SYNTAX RETURNS MODE BUS STATES SEE ALSO EXAMPLE III-320 long pascal EnterX(DevHandleT devHandle, char *data,long count,bool forceAddr,TermT*term,bool async,int *compStat); devHandle refers to either an IEEE 488 interface or an external device. data is a pointer to the buffer into which the data is read. count is the number of characters to read. forceAddr is used to specify whether the addressing control bytes are to be issued for each EnterX command. term is a pointer to a terminator structure that is used to set up the input terminators. If term is set to 0, the default terminator is used. async is a flag that allows asynchronous data transfer. compStat is a pointer to an integer containing completion status information. -1 if error, otherwise, the number of bytes transferred. The memory buffer pointed to by the data parameter is filled in with the information read from the device. CA ATN•UNL, MLA, TAG, *ATN, data (With external device handle) *ATN, data (With interface handle) OutputX, Term, EOL, Buffered See next page. Personal488 User’s Manual, Rev. 3.0 Artisan Technology Group - Quality Instrumentation ... Guaranteed | (888) 88-SOURCE | www.artisantg.com III. COMMAND REFERENCES - 15. Command References EXAMPLE 15B. Driver488/SUB, W31, W95, & WNT term.EOI = TRUE; term.nChar = 1; term.EightBits = TRUE; term.termChar[0] = ‘\r’; bytecount=EnterX(timer,data,1024,0,&term,1,&stat); The EnterX command reads data from the I/O adapter. If an external device is specified, then Driver488 is addressed to Listen, and that device is addressed to Talk. If an interface is specified, then Driver488 must already be configured to receive data and the external device must be configured to Talk, either as a result of an immediately preceding EnterX command or as a result of one of the Send commands. EnterX terminates reception on either the specified count of bytes transferred, or the specified or default terminator being detected. Terminator characters, if any, are stripped from the received data before the EnterX command returns to the calling application. The forceAddr flag is used to specify whether the addressing control bytes are to be issued for each EnterX command. If the device handle refers to an I/O adapter, then forceAddr has no effect and command bytes are not sent. For an external device, if forceAddr is TRUE then Driver488 always sends the UNL, MLA, and TAG command bytes. If forceAddr is FALSE, then Driver488 compares the current device with the previous device that used that interface adapter board for an EnterX command. If they are the same, then no command bytes are sent. If they are different, then EnterX acts as if the forceAddr flag were TRUE and sends the command bytes. The forceAddr flag is usually set TRUE for the first transfer of data from a device, and then set FALSE for additional transfers from the same block of data from that device. Additional Enter Functions Driver488 provides additional Enter routines that are short form versions of the EnterX function. The additional Enter functions are: Enter, EnterN, EnterMore, and EnterNMore. These functions are discussed in detail below: Enter SYNTAX REMARKS long pascal Enter(DevHandleT devHandle, char *data) Enter is equivalent to the following call to EnterX: EnterX(devHandle,data,sizeof(data),1,0L,0,0L); The Enter function passes the device handle and a pointer to the data buffer to the EnterX function. It determines the size of the data buffer provided by the user and passes that value as the count parameter. It specifies forceAddr is TRUE, causing Driver488 to re-address the device. The default terminators are chosen by specifying a 0 as the term parameter. Asynchronous transfer is turned off by sending 0 for the async parameter, and the completion status value is ignored by sending 0 for the compStat parameter. EnterN SYNTAX REMARKS long pascal EnterN(DevHandleT devHandle,char *data,int count) EnterN is equivalent to the following call to EnterX: EnterX(devHandle,data,count,1,0L,0,0L); The EnterN function passes the device handle, the pointer to the data buffer, and the size of the data buffer to the EnterX function. It specifies forceAddr is TRUE, causing Driver488 to re-address the device. The default terminators are chosen by specifying a 0 pointer as the term parameter. Asynchronous transfer is turned off by sending 0 for the async parameter, and the completion status value is ignored by sending 0 for the compStat parameter. EnterMore SYNTAX REMARKS long pascal EnterMore(DevHandleT devHandle,char *data) EnterMore is equivalent to the following call to EnterX: EnterX(devHandle,data,sizeof(data),0,0L,0,0L); Personal488 User’s Manual, Rev. 3.0 Artisan Technology Group - Quality Instrumentation ... Guaranteed | (888) 88-SOURCE | www.artisantg.com III-321 15B. Driver488/SUB, W31, W95, & WNT III. COMMAND REFERENCES - 15. Command References The EnterMore function passes the device handle and the pointer to the data buffer to the EnterX function. It determines the size of the data buffer provided by the user and passes that value as the count parameter. It specifies forceAddr is FALSE, therefore Driver488 does not address the device if it is the same device as previously used. The default terminators are chosen by specifying a 0 as the term parameter. Asynchronous transfer is turned off by sending 0 for the async parameter, and the completion status value is ignored by sending 0 for the compStat parameter. EnterNMore SYNTAX REMARKS long pascal EnterNMore(DevHandleT devHandle,char *data,int count); EnterNMore is equivalent to the following call to EnterX: EnterX(devHandle,data,count,0,0L,0,0L); The EnterNMore function passes the device handle, the pointer to the data buffer, and the size of the data buffer to the EnterX function. It specifies forceAddr is FALSE; therefore, Driver488 does not address the device if it is the same device as previously used. The default terminators are chosen by specifying a 0 as the term parameter. Asynchronous transfer is turned off by sending 0 for the async parameter, and the completion status value is ignored by sending 0 for the compStat parameter. Enter (Peripheral Mode) EnterX SYNTAX RETURNS MODE BUS STATES SEE ALSO EXAMPLE long pascal EnterX(DevHandleT devHandle, char *data, long count,bool forceAddr,TermT*term,bool async,int *compStat); devHandle refers to either an IEEE 488 interface or an external device. data is a pointer to the buffer into which the data is read. count is the number of characters to read. forceAddr is ignored. term is a pointer to a terminator structure that is used to set up the input terminators. If term is set to 0, the default terminators are used. async is a flag that allows asynchronous data transfer. compStat is a pointer to an integer containing completion status information. -1 if error, otherwise, the number of bytes transferred. The memory buffer pointed to by the data parameter is filled in with the information read from the device. *CA Determined by the Controller Output, Term, Buffered, EOL (Sub-Chapter 15A) term.EOI = TRUE; term.nChar = 1; term.EightBits = TRUE; term.termChar[0] = ‘\r’; bytecount=EnterX(timer,data,1024,0,&term,1,&stat); In Peripheral mode, the EnterX command receives data from the I/O adapter under control of the Active Controller. The Active Controller must put Driver488 into the Listen state and configure some bus device to provide Driver488 with data. The Listen state can be checked with the Status command, or can cause an interrupt with the Arm command. A time-out error occurs (if enabled) if Driver488 does not receive a data byte within the time out period after issuing the EnterX command. Additional Enter Functions Driver488 provides additional Enter routines that are short form versions of the EnterX function. The additional Enter functions are: Enter and EnterN. In Peripheral mode, the device handle must III-322 Personal488 User’s Manual, Rev. 3.0 Artisan Technology Group - Quality Instrumentation ... Guaranteed | (888) 88-SOURCE | www.artisantg.com III. COMMAND REFERENCES - 15. Command References 15B. Driver488/SUB, W31, W95, & WNT always refer to an I/O adapter, and the forceAddr flag is ignored. Thus, EnterMore is equivalent to Enter, and EnterNMore is equivalent to EnterN. EnterI (Controller Mode) Driver488/W31 (Visual Basic only) EnterXI SYNTAX RETURNS MODE BUS STATES SEE ALSO EXAMPLE EnterXI (ByVal devHandle% ,data%, ByVal count&, ByVal forceAddr%, Term As terms, ByVal async%, compStat%)As Long devHandle% refers to either an IEEE 488 interface or an external device. data% is the first element in an integer array into which the data is read. count& is the number of characters to read. forceAddr% is used to specify whether the addressing control bytes are to be issued for each EnterXI command. term is a pointer to a terminator structure that is used to set up the input terminators. If term is set to 0, the default terminator is used. async% is a flag that allows asynchronous data transfer. compStat% is a pointer to an integer containing completion status information. -1 if error, otherwise the number of bytes transferred. The memory buffer pointed to by the data parameter is filled in with the information read from the device. CA ATN•UNL, MLA, TAG, *ATN, data (With external device handle) *ATN, data (With interface handle) Output, Term, Buffered, EOL (Sub-Chapter 15A) term.EOI = TRUE term.nChar = 1 term.EightBits = TRUE term.term1 = &HA bytecount=EnterXI(timer,data%(0),1024,0,term,1,stat) These EnterI commands for Visual Basic are identical to the standard Enter commands with the exception of the return values being placed in integer variables rather than string variables. The EnterXI command reads data from the I/O adapter. If an external device is specified, then Driver488 is addressed to Listen, and that device is addressed to Talk. If an interface is specified, then Driver488 must already be configured to receive data and the external device must be configured to Talk, either as a result of an immediately preceding EnterXI command or as a result of one of the Send commands. EnterXI terminates reception on either the specified count of bytes transferred, or the specified or default terminator being detected. Terminator characters, if any, are stripped from the received data before the EnterXI command returns to the calling application. The forceAddr% flag is used to specify whether the addressing control bytes are to be issued for each EnterXI command. If the device handle refers to an I/O adapter, then forceAddr% has no effect and command bytes are not sent. For an external device, if forceAddr% is TRUE then Driver488 always sends the UNL, MLA, and TAG command bytes. If forceAddr% is FALSE, then Driver488 compares the current device with the previous device that used that interface adapter board for an EnterXI command. If they are the same, then no command bytes are sent. If they are different, then EnterXI acts as if the forceAddr% flag were TRUE and sends the command bytes. The forceAddr% flag is usually set TRUE for the first transfer of data from a device, and then set FALSE for additional transfers from the same block of data from that device. Additional EnterI Functions Personal488 User’s Manual, Rev. 3.0 Artisan Technology Group - Quality Instrumentation ... Guaranteed | (888) 88-SOURCE | www.artisantg.com III-323 15B. Driver488/SUB, W31, W95, & WNT III. COMMAND REFERENCES - 15. Command References Driver488 provides additional EnterI routines that are short form versions of the EnterXI function. The additional EnterI functions are: EnterI, EnterNI, EnterMoreI, and EnterNMoreI. These functions are discussed in detail below: EnterNI SYNTAX REMARKS EnterNI(ByVal devHandle%,data%,By Val count& ) As Long EnterNI is equivalent to the following call to EnterXI: EnterXI(devHandle%,data%,count&, 1, 0, 0, 0) The EnterNI function passes the device handle, the pointer to the data buffer, and the size of the data buffer to the EnterXI function. It specifies forceAddr% is TRUE, causing Driver488 to re-address the device. The default terminators are chosen by specifying a 0 pointer as the term parameter. Asynchronous transfer is turned off by sending 0 for the async% parameter, and the completion status value is ignored by sending 0 for the compStat% parameter. EnterNMoreI SYNTAX REMARKS EnterNMoreI(ByVal devHandle%,data%,ByVal count&)As Long EnterNMoreI is equivalent to the following call to EnterXI: EnterXI(devHandle%,data%,count&,0,0,0,0); The EnterNMoreI function passes the device handle, the pointer to the data buffer, and the size of the data buffer to the EnterXI function. It specifies forceAddr% is FALSE; therefore, Driver488 does not address the device if it is the same device as previously used. The default terminators are chosen by specifying a 0 as the term parameter. Asynchronous transfer is turned off by sending 0 for the async% parameter, and the completion status value is ignored by sending 0 for the compStat% parameter. Note: All forms of the EnterI commands (except EnterXI) use EOI as the only terminator. Also, EnterI and EnterMoreI must be passed to the entire array (i.e. intarray(), not the starting location: intarray (0) ). The following table describes the differences between the various forms of EnterI. It outlines the variables passed to each function and how many bytes the functions read. EnterI Function EnterXI (ADC,IResp (0),1000,1,Term,1,1) EnterI (ADC, IResp()) EnterMoreI (ADC, IResp ()) EnterNI (ADC< IResp (0), 1000) EnterNMoreI (ADC, IResp (0), 1000) Reads Until n bytes or terminators Array full or EOI Variable Pass starting location n bytes or EOI Pass starting location Pass entire array where: SResp is String * 1000, and IResp(1000) is integer. III-324 Personal488 User’s Manual, Rev. 3.0 Artisan Technology Group - Quality Instrumentation ... Guaranteed | (888) 88-SOURCE | www.artisantg.com III. COMMAND REFERENCES - 15. Command References 15B. Driver488/SUB, W31, W95, & WNT EnterI (Peripheral Mode) Driver488/W31 (Visual Basic only) EnterXI SYNTAX RETURNS MODE BUS STATES SEE ALSO EXAMPLE EnterXI (ByVal devHandle% ,data%, ByVal count&, ByVal forceAddr%, Term As terms, ByVal async%, compStat%)As Long devHandle% refers to either an IEEE 488 interface or an external device. data% is the first element in an integer array into which the data is read. count& is the number of characters to read. forceAddr% is ignored. term is a pointer to a terminator structure that is used to set up the input terminators. If term is set to 0, the default terminators are used. async% is a flag that allows asynchronous data transfer. compStat% is a pointer to an integer containing completion status information. -1 if error, otherwise, the number of bytes transferred. The memory buffer pointed to by the data parameter is filled in with the information read from the device. *CA Determined by the Controller OutputX, Term, Buffered, EOL (Sub-Chapter 15A) term.EOI = TRUE term.nChar = 1 term.EightBits = TRUE term.term1 = &HA bytecount=EnterXI(timer,data%(0),1024,0,term,1,&stat) These EnterI commands for Visual Basic are identical to the standard Enter commands with the exception of the return values are placed in integer variables rather than string variables. In Peripheral mode, the EnterXI command receives data from the I/O adapter under control of the Active Controller. The Active Controller must put Driver488 into the Listen state and configure some bus device to provide Driver488 with data. The Listen state can be checked with the Status command, or can cause an interrupt with the Arm command. A time-out error occurs (if enabled) if Driver488 does not receive a data byte within the time out period after issuing the EnterXI command. Additional EnterI Functions Driver488 provides additional EnterI routines that are short form versions of the EnterXI function. The additional EnterI functions are: EnterI and EnterNI. In Peripheral mode, the device handle must always refer to an I/O adapter, and the forceAddr% flag is ignored. Thus, EnterMoreI is equivalent to EnterI, and EnterNMoreI is equivalent to EnterNI. Error SYNTAX int pascal Error(DevHandleT devHandle, bool display); RETURNS MODE BUS STATES devHandle refers to either an IEEE 488 interface or an external device. display indicates whether the error message display should be ON or OFF. -1 if error Any None Personal488 User’s Manual, Rev. 3.0 Artisan Technology Group - Quality Instrumentation ... Guaranteed | (888) 88-SOURCE | www.artisantg.com III-325 15B. Driver488/SUB, W31, W95, & WNT SEE ALSO EXAMPLE III. COMMAND REFERENCES - 15. Command References OnEvent, GetError, GetErrorList, Status errorcode = Error(ieee, OFF); The Error command enables or disables automatic on-screen display of Driver488 error messages. Specifying ON enables the error message display, while specifying OFF disables the error message display. Error ON is the default condition. FindListeners SYNTAX int pascal FindListeners(DevHandleT devHandle, char primary, unsigned short *listener, short limit); devHandle refers to either an IEEE 488 interface or an external device. If devHandle refers to an external device, then the FindListeners command acts on the hardware interface to which the external device is attached. primary is the primary IEEE 488 bus address to check. listener is a pointer to a list that contains all Listeners found on the specified interface board. The user must allocate enough memory to accommodate all of the possible Listeners up to the limit that he specified. limit is the maximum number of Listeners to be entered into the Listener list. RETURNS MODE BUS STATES SEE ALSO EXAMPLE -1 if error Any ATN•MTA, UNL, LAG CheckListener, BusAddress, Status DevHandleT listeners[5]; errorcode = FindListeners(ieee,10,listeners,5) The FindListeners command finds all of the devices configured to Listen at the specified primary address on the IEEE 488 bus. The command first identifies the primary address to check and returns the number of Listeners found and their addresses. Then, it fills the user supplied array with the addresses of the Listeners found. The number of Listeners found is the value returned by the function. The returned values include the secondary address in the upper byte, and the primary address in the lower byte. If there is no secondary address, then the upper byte is set to 255; hence, a device with only a primary address of 16 and no secondary address, is represented as 0xFF10, or -240 decimal. Finish SYNTAX int pascal Finish(DevHandleT devHandle); devHandle refers to either an IEEE 488 interface or an external device. If devHandle refers to an external device, the Finish command acts on the hardware interface to which the external device is attached. RETURNS MODE BUS STATES SEE ALSO EXAMPLE -1 if error CA ATN Resume, PassControl errorcode = Finish(ieee); The Finish command asserts Attention (ATN) and releases any pending holdoffs after a Resume function is called with the monitor flag set. III-326 Personal488 User’s Manual, Rev. 3.0 Artisan Technology Group - Quality Instrumentation ... Guaranteed | (888) 88-SOURCE | www.artisantg.com III. COMMAND REFERENCES - 15. Command References 15B. Driver488/SUB, W31, W95, & WNT GetError SYNTAX ErrorCodeT pascal GetError(DevHandleT devHandle, char *errText); devHandle refers to either the IEEE 488 interface or the external device that has the associated error. errText is the string that will contain the error message. If errText is non-null, the string must contain at least 247 bytes. RETURNS MODE BUS STATES SEE ALSO EXAMPLE -1 if error, otherwise, it returns the error code number associated with the error for the specified device. Any None Error, GetErrorList, Status errnum = GetError(ieee,errText); printf(“Error number:%d;%s \n”errnum,errText); The GetError command is called by the user after another function returns an error indication. The device handle sent to the function that returned the error indication, is sent to GetError as its devHandle parameter. GetError finds the error associated with that device, and returns the error code associated with that error. If a non-null error text pointer is passed, GetError also fills in up to 247 bytes in the string. The application must ensure that sufficient space is available. GetErrorList SYNTAX ErrorCodeT pascal GetErrorList(DevHandlePT devHandles, char *errText, DevHandlePT errHandle); devHandles is a pointer to a list of external devices that was returned from a function, due to an error associated with one of the external devices in the list. errText is the text string that contains the error message. The user must ensure that the string length is at least 247 bytes. RETURNS MODE BUS STATES SEE ALSO EXAMPLE errHandle is a pointer to the device handle that caused the error. -1 if error otherwise, it returns the error number associated with the given list of devices. Any None Error, GetError, Status char errText[329]; int errHandle; int errnum; result = ClearList(list); if (result == -1) { errnum=GetErrorList(list,errText,&errHandle); printf(“Error %d;%s,at handle %d\n”, errnum, errText, errHandle); } The GetErrorList command is called by the user, after another function identifying a list of device handles, returns an error indication. The device handle list sent to the function that returned the error indication, is sent to GetErrorList. GetErrorList finds the device which returned the error indication, returning the handle through errHandle, and returns the error code associated with that error. If a non-null error text pointer is passed, GetError also fills in up to 247 bytes in the string. The application must ensure that sufficient space is available. Personal488 User’s Manual, Rev. 3.0 Artisan Technology Group - Quality Instrumentation ... Guaranteed | (888) 88-SOURCE | www.artisantg.com III-327 15B. Driver488/SUB, W31, W95, & WNT III. COMMAND REFERENCES - 15. Command References Hello SYNTAX int pascal Hello(DevHandleT devHandle, char *message); devHandle refers to either an IEEE 488 interface or an external device. If devHandle refers to an external device, the Hello command acts on the hardware interface to which the external device is attached. RETURNS MODE BUS STATES SEE ALSO EXAMPLE message is a character pointer that contains the returned message. -1 if error. Any None Status, OpenName, GetError char message[247]; result = Hello(ieee,message); printf(“%s\n”,message); The Hello command is used to verify communication with Driver488, and to read the software revision number. If a non-null string pointer is passed, Hello fills in up to 247 bytes in the string. The application must ensure that sufficient space is available. When the command is sent, Driver488 returns a string similar to the following: Driver488 Revision X.X (C)199X IOtech, Inc. where X is the appropriate revision or year number. IntLevel Driver488/SUB and Driver488/W31 only SYNTAX int pascal IntLevel(DevHandleT devHandle, int channel); devHandle refers to either an IEEE 488 interface or an external device. If devHandle refers to an external device, then the IntLevel command acts on the hardware interface to which the external device is attached. RETURNS MODE BUS STATES SEE ALSO EXAMPLE channel is a valid interrupt channel, or -1 to specify NONE. -1 if error Any None DmaChannel, TimeOut errorcode = IntLevel(ieee, 7); The IntLevel command specifies the hardware interrupt level that is used by the I/O adapter. Driver488 uses hardware interrupts, if available, to improve the efficiency of I/O adapter control and communication. The interrupt level is specified by an integer in the range 2 through 15 as appropriate to the host computer bus and interface card type. The interrupt level value must match the hardware settings on the interface card. III-328 Personal488 User’s Manual, Rev. 3.0 Artisan Technology Group - Quality Instrumentation ... Guaranteed | (888) 88-SOURCE | www.artisantg.com III. COMMAND REFERENCES - 15. Command References 15B. Driver488/SUB, W31, W95, & WNT IOAddress Driver488/SUB and Driver488/W31 only SYNTAX int pascal IOAddress(DevHandleT devHandle, uint ioaddr); devHandle refers to either an interface or an external device. If devHandle refers to an external device, then the IOAddress command acts on the hardware interface to which the external device is attached. RETURNS MODE BUS STATES SEE ALSO EXAMPLE ioaddr is the I/O base address to set. -1 if error Any None IntLevel, DmaChannel, TimeOut errorcode = IOAddress(ieee,0x02E1); The IOAddress command specifies the I/O port base address of the I/O adapter. The base address is set by a 16-bit integer, ioaddr, that is usually given as a hexadecimal number. The default I/O port base address for the IEEE 488 hardware interface is 0X02E1 for the first interface, 0X22E1 for the second, and 0X42E1 and 0X62E1 for the third and fourth interfaces. The default I/O port base addresses for the serial hardware interface is 0X03F8. Other standard I/O port base addresses are 0X02F8, 0X03E8, 0X02E8. The IOAddress value must match the hardware switch settings on the I/O adapter. KeepDevice SYNTAX int pascal KeepDevice(DevHandleT devHandle); RETURNS MODE BUS STATES SEE ALSO EXAMPLE devHandle refers to an external device. -1 if error Any None MakeDevice, RemoveDevice, OpenName errorcode = KeepDevice(scope); The KeepDevice command changes the indicated temporary Driver488 device to a permanent device, visible to all applications. Permanent Driver488 devices are not removed when Driver488 is closed. Driver488 devices are created by MakeDevice and are initially temporary. Unless KeepDevice is used, all temporary Driver488 devices are forgotten when Driver488 is closed. The only way to remove the permanent device once it has been made permanent by the KeepDevice command, is to use the RemoveDevice command. LightPen Driver488/SUB only SYNTAX int pascal LightPen(DevHandleT devHandle, bool flag); devHandle refers to either an IEEE 488 interface or an external device. If devHandle refers to an external device, then the LightPen command acts on the hardware interface to which the external device is attached. RETURNS MODE BUS STATES SEE ALSO EXAMPLE flag may be either ON (LightPen enabled), or OFF (LightPen disabled). -1 if error Any None OnEvent, Arm, Disarm errorcode = LightPen(ieee,ON); Personal488 User’s Manual, Rev. 3.0 Artisan Technology Group - Quality Instrumentation ... Guaranteed | (888) 88-SOURCE | www.artisantg.com III-329 15B. Driver488/SUB, W31, W95, & WNT III. COMMAND REFERENCES - 15. Command References The LightPen command disables the detection of interrupts via setting the light pen status. The default is light pen interrupt enabled. Listen SYNTAX int pascal Listen(DevHandleT devHandle, char pri, char sec); devHandle refers to either an IEEE 488 interface or an external device. If devHandle refers to an external device, the command acts on the associated interface. pri and sec specify the primary and secondary addresses of the device which is to be addressed to listen. RETURNS MODE BUS STATES SEE ALSO EXAMPLES -1 if error CA ATN, LAG Talk, SendCmd, SendData, SendEoi, FindListeners errorcode = Listen (ieee, 12, -1); The Listen command addresses an external device to Listen. Local SYNTAX int pascal Local(DevHandleT devHandle); RETURNS MODE BUS STATES SEE ALSO EXAMPLES devHandle refers to either an IEEE 488 interface or an external device. -1 if error SC *REN Remote, AutoRemote errorcode = Local(ieee); To unassert the Remote Enable (REN) line, errorcode = Local(wave); the IEEE 488 interface is specified. To send the Go To Local (GTL) command, an external device is specified. In the System Controller mode, the Local command issued to an interface device, causes Driver488 to unassert the Remote Enable (REN) line. This causes devices on the bus to return to manual operation. A Local command addressed to an external device, places the device in the local mode via the Go To Local (GTL) bus command. LocalList SYNTAX RETURNS MODE BUS STATES SEE ALSO EXAMPLES int pascal LocalList(DevHandlePT devHandles); devHandles refers to a pointer to a list of external devices. -1 if error CA ATN•UNL, MTA, LAG,GTL Local, Remote, RemoteList, AutoRemote deviceList[0] = wave; To send the Go To Local deviceList[1] = timer; (GTO) bus command to a deviceList[2] = dmm; list of external devices. deviceList[3] = NODEVICE; errorcode = LocalList(deviceList); In the System Controller mode, the LocalList command issued to an interface device, causes Driver488 to unassert the Remote Enable (REN) line. This causes devices on the bus to return to manual operation. A LocalList command addressed to an external device, places the device in the local mode via the Go To Local (GTL) bus command. III-330 Personal488 User’s Manual, Rev. 3.0 Artisan Technology Group - Quality Instrumentation ... Guaranteed | (888) 88-SOURCE | www.artisantg.com III. COMMAND REFERENCES - 15. Command References 15B. Driver488/SUB, W31, W95, & WNT Lol SYNTAX int pascal Lol(DevHandleT devHandle); devHandle refers to either an IEEE 488 interface or an external device. If devHandle refers to an external device, the Lol command acts on the hardware interface to which the external device is attached. RETURNS MODE BUS STATES SEE ALSO EXAMPLES -1 if error CA ATN•LLO Local, LocalList, Remote, RemoteList errorcode = Lol(ieee); The Lol command causes Driver488 to issue an IEEE 488 LocalLockout (LLO) bus command. Bus devices that support this command are thereby inhibited from being controlled manually from their front panels. MakeDevice SYNTAX int pascal MakeDevice(DevHandleT devHandle, char *name); devHandle refers to an existing external device. name is the device name of the device that is to be made and takes the configuration of the device given by devHandle. RETURNS MODE BUS STATE SEE ALSO EXAMPLE Device handle, or -1 if error Any None KeepDevice, RemoveDevice, OpenName, Close dmm=MakeDevice(scope,"DMM"); Create a device named DMM, attached to BusAddress(dmm,16,-1); the same I/O adapter as SCOPE and set its IEEE 488 bus address to 16. The MakeDevice command creates a new temporary Driver488 device that is an identical copy of an already existing Driver488 external device. The new device is attached to the same I/O adapter of the existing device and has the same bus address, terminators, timeouts, and other characteristics. The newly created device is temporary and is removed when Driver488 is closed. KeepDevice may be used to make the device permanent. To change the default values assigned to the device, it is necessary to call the appropriate configuration functions such as BusAddress, IOAddress, and TimeOut. MakeNewDevice Driver488/W95 only SYNTAX DevHandleT pascal MakeNewDevice(LPSTR iName, LPSTR aName,BYTE primary,BYTE secondary,TermPT In,TermPT Out,DWORD tOut); devHandle refers to the new external device. Name is the device name of the device that is to be made and takes the configuration of the device based on the parameters specified. primary and secondary are the secondary and primary bus addresses to be specified. For no secondary address, a -1 must be specified. In and Out are pointers to terminator structures specified to set up the respective input and output terminators of the device. RETURNS MODE BUS STATE SEE ALSO tOut is the timeout parameter to be specified. Device handle, or -1 if error Any None MakeDevice, KeepDevice, RemoveDevice, OpenName, Close Personal488 User’s Manual, Rev. 3.0 Artisan Technology Group - Quality Instrumentation ... Guaranteed | (888) 88-SOURCE | www.artisantg.com III-331 15B. Driver488/SUB, W31, W95, & WNT III. COMMAND REFERENCES - 15. Command References This is a new function in Driver488/W95. This function is similar to the MakeDevice function except that MakeNewDevice will create a new device based on the parameters specified, instead of simply cloning an existing device. To change the default values assigned to the device, it is necessary to call the appropriate configuration functions such as BusAddress, IOAddress, and TimeOut. MyListenAddr SYNTAX int pascal MyListenAddr (DevHandleT devHandle); devHandle refers to either an interface or an external device. If devHandle refers to an external device, the command acts on the associated interface. RETURNS MODE BUS STATES SEE ALSO EXAMPLES -1 if error CA ATN, MLA MyTalkAddr, Talk, Listen, SendCmd errorcode = MyListenAddr (ieee); The MyListenAddr command addresses the interface to Listen. MyTalkAddr SYNTAX int pascal MyTalkAddr (DevHandleT devHandle); devHandle refers to either an interface or an external device. If devHandle refers to an external device, the command acts on the associated interface. RETURNS MODE BUS STATES SEE ALSO EXAMPLES -1 if error CA ATN, MTA MyListenAddr, Listen, SendCmd errorcode = MyTalkAddr (ieee); The MyTalkAddr command addresses the interface to Talk. OnEvent Driver488/SUB only SYNTAX RETURNS MODE BUS STATES SEE ALSO EXAMPLE int pascal OnEvent(DevHandleT devHandle,UserHandleFP handler,OpaqueP argument); devHandle refers to either an interface or an external device. handler is a user-specified interrupt-handler function that is to perform some function, defined by the user, when one of the Armed conditions occur. argument is the 32-bit argument passed to the handler function. It may be used to point to information used by the handler function. -1 if error Any None Arm, Disarm, LightPen void Handler(OpaqueP arg) { printf(“Interrupt handler got arg = %ld\n”,arg); } errorcode = OnEvent(ieee,Handler,(OpaqueP)(15)); The OnEvent command specifies the function to be called when an Armed event occurs. The function handler is passed the specified 32-bit argument entry. The handler can use the argument to identify the portion of the program that set up the OnEvent, and then use Status and other commands to III-332 Personal488 User’s Manual, Rev. 3.0 Artisan Technology Group - Quality Instrumentation ... Guaranteed | (888) 88-SOURCE | www.artisantg.com III. COMMAND REFERENCES - 15. Command References 15B. Driver488/SUB, W31, W95, & WNT determine the state of Driver488 and take appropriate action. OnEvent is most often used to respond to Service Requests (SRQ). OnEvent Driver488/W31 (C only) and Driver488/W95 only SYNTAX RETURNS MODE SEE ALSO BUS STATES EXAMPLE int pascal OnEvent(DevHandleT devHandle, HWND hWnd, OpaqueP lParam); devHandle refers to either an interface or an external device. hWnd is the window handle to receive the event notification. lParam value will be passed in the notification message. -1 if error Any Arm, Disarm None ieee = OpenName (“ieee”); OnEvent (ieee, hWnd, (OpaqueP) 12345678L); Arm (ieee, acSRQ | acError); break; The OnEvent command causes the event handling mechanism to issue a message upon occurrence of an Armed event. The message will have a type of WM_IEEE488EVENT, whose value is retrieved via: RegisterWindowMessage ((LPSTR) “WM_IEEE488EVENT”); The associated wParam is an event mask indicating which Armed event(s) caused the notification, and the lParam is the value passed to OnEvent. Note that although there is a macro for WM_IEEE488EVENT in the header file for each language, this macro resolves to a function call and therefore cannot be used as a case label. The preferred implementation is to include a default case in the message handling case statement and directly compare the message ID with WM_IEEE488EVENT. The following is a full example of a program using the OnEvent function: LONG FAR PASCAL export WndProc(HWND hWnd, unsigned iMessage, WORD wParam, LONG lParam); { HANDLE ieee; switch (iMessage) { case WM_CREATE: ieee = OpenName (“ieee”); OnEvent (ieee, hWnd, (OpaqueP) 12345678L); Arm (ieee, acSRQ | acError); break; default: if (iMessage == WM_IEEE488EVENT) { char buff [80]; wsprintf (buff, “Condition = %04X, Param = %081X”, wParam, lParam); MessageBox (hWnd, (LPSTR) buff,(LPSTR) “Event Noted”, MB OK); return TRUE; } } } Personal488 User’s Manual, Rev. 3.0 Artisan Technology Group - Quality Instrumentation ... Guaranteed | (888) 88-SOURCE | www.artisantg.com III-333 15B. Driver488/SUB, W31, W95, & WNT III. COMMAND REFERENCES - 15. Command References OnEventVDM Driver488/W95 (Console Mode Applications only) SYNTAX RETURNS MODE SEE ALSO BUS STATES EXAMPLE INT pascal OnEventVDM(DevHandleT devHandle, EventFuncT func); devHandle refers to either an interface or an external device. func is a user-specified interrupt-handler function that is to perform some function, defined by the user, when one of the Armed conditions occur. -1 if error Any OnEvent, Arm, Disarm None qsk(x,Arm(ieee0, acSRQ)); Arm SRQ detection and set qsk(x,OnEventVDM(ieee0, srqHandler)); up SRQ function handler This function is new in Driver488/W95. The OnEventVDM (VDM refers to Virtual DOS Machine) allows a call back to a user-specified function in a console mode application. The following is a full example of a console mode program using the OnEventVDM function: #include <windows.h> #include <stdio.h> #include “iotieee.h” // For debugging #define qsk(v,x) (v=x, printf(#x “ returned %d/n, v)) void srqHandler(DevHandlerT devHandle, UINT mask) { LONG xfered; printf(“\007\n\nEVENT-FUNCTION on %d mask 0x%04x\n”,devHandle, mask); qsk(xfered, Spoll(devHandle)); printf(“\n\n”); } void main(void) { LONG result, xfered; int ioStatus, x; DevHandleT ieee0, wave14, wave16; TermT myTerm; UCHAR buffer[500]; printf(“\n\nSRQTEST program PID %d\n”,GetCurrentProcessId ()); qsk(ieee0, OpenName(“ieee0”)); qsk(wave14, OpenName(“Wave14”)); qsk(wave16, OpenName(“Wave16”)); qsk(result, Abort(wave14)); qsk(result, Abort(wave16)); qsk(x, Hello(ieee0, buffer)); printf(“\n%s\n\n”, buffer); myTerm.EOI = 1; myTerm.nChar = 0; myTerm.termChar[0] = ‘\r’; myTerm.termChar[1] = ‘\n’; // Arm SRQ detection and set up SRQ function handler qsk(x, Arm(ieee0, acSRQ)); qsk(x, OnEventVDM(ieee0, srqHandler)); // Tell the Wave to assert SRQ in 3 seconds qsk(xfered,Output(wave16,“t3000x”,6L,1,0,&myTerm,0,&ioStatus)); printf(“Completion code: 0x%04x\n”, ioStatus); III-334 Personal488 User’s Manual, Rev. 3.0 Artisan Technology Group - Quality Instrumentation ... Guaranteed | (888) 88-SOURCE | www.artisantg.com III. COMMAND REFERENCES - 15. Command References 15B. Driver488/SUB, W31, W95, & WNT // Normally, your program would be off doing other work, for // this example we will just hold here for a short time. For(result = 0; result 30000; result++) { printf(“Result is %06d\r”, result); } printf(“\n\n”); qsk(xfered, Spoll(wave16)); qsk(x, Close(wave14)); qsk(x, Close(wave16)); qsk(x, Close(ieee0)); } OpenName SYNTAX DevHandleT pascal OpenName(char *name); RETURNS MODE BUS STATE SEE ALSO EXAMPLES name is the name of an interface or external device. Device handle associated with the given name, or -1 if error. Any None MakeDevice, Close dmm = OpenName(“DMM”); Open the external device DMM dmm = OpenName(“IEEE:DMM”); Specify the interface to which the external device is connected The OpenName command opens the specified interface or external device and returns a device handle for use in accessing that device. Output (Controller Mode) OutputX SYNTAX long pascal OutputX(DevHandleT devHandle, char *data, long count, bool last, bool forceAddr, TermT *terminator, bool async, int *compStat); devHandle refers to either an interface or an external device. If devHandle refers to an external device, the OutputX command acts on the hardware interface to which the external device is attached. data is a string of bytes to send. count is the number of bytes to send. last is a flag that forces the device output terminator to be sent with the data. forceAddr is used to specify whether the addressing control bytes are to be issued for each Output command. terminator is a pointer to a terminator structure that is used to set up the input terminators. If terminator is set to 0, the default terminator is used. async is a flag that allows asynchronous data transfer. compStat is a pointer to an integer containing completion status information. RETURNS MODE BUS STATES SEE ALSO EXAMPLES -1 if error, otherwise, the number of characters transferred CA With interface handle: REN (if SC and AutoRemote), *ATN, ATN With external device handle: REN (if SC and AutoRemote), ATN•MTA, UNL, LAG, *ATN, ATN Enter, Term, TimeOut, Buffered, EOL (Sub-Chapter 15A) term.EOI = TRUE; term.nChar = 1; term.EightBits = TRUE; term.termChar[0] = ‘\r’; data = “U0X”; count = strlen(data); bytecnt=Output(timer,data,count,1,0,&term,0,&stat); Personal488 User’s Manual, Rev. 3.0 Artisan Technology Group - Quality Instrumentation ... Guaranteed | (888) 88-SOURCE | www.artisantg.com III-335 15B. Driver488/SUB, W31, W95, & WNT III. COMMAND REFERENCES - 15. Command References The OutputX command sends data to an interface or external device. The Remote Enable (REN) line is first asserted if Driver488 is the System Controller and AutoRemote is enabled. Then, if a device address (with optional secondary address) is specified, Driver488 is addressed to Talk and the specified device is addressed to Listen. If no address is specified, then Driver488 must already be configured to send data, either as a result of a preceding OutputX command, or as the result of a Send command. Terminators are automatically appended to the output data as specified. The forceAddr flag is used to specify whether the addressing control bytes are to be issued for each OutputX command. If the device handle refers to an interface, forceAddr has no effect and command bytes are not sent. If the device handle refers to an external device and forceAddr is TRUE, Driver488 addresses the interface to Talk and the external device to Listen. If forceAddr is FALSE, Driver488 compares the current device with the most recently addressed device on that interface. If the addressing information is the same, no command bytes are sent. If they are different, OutputX acts as if the forceAddr flag were TRUE and sends the addressing information. The terminator is a pointer to a terminator structure that is used to set up the input terminators. This pointer may be a null pointer, requesting use of the default terminators for the device, or it may point to a terminator structure requesting no terminators. The async is a flag that allows asynchronous data transfer. If this flag is TRUE, the OutputX command returns to the caller as soon as the data transfer is underway and can be completed under DMA and/or interrupts. FALSE indicates that the OutputX command should not return until the transfer is complete. The compStat is a pointer to an integer containing completion status information. A null pointer indicates that completion status is not requested. In the case of an asynchronous transfer, this pointer must remain valid until the transfer is complete. Additional Output Functions Driver488 provides additional Output functions that are short form versions of the OutputX function. The additional Output functions are: Output, OutputN, OutputMore, and OutputNMore. These functions are discussed in detail below: Output SYNTAX REMARKS long pascal Output(DevHandleT devHandle,char *data); Output is equivalent to the following call to OutputX: OutputX(devHandle,data,strlen(data),1,1,0L,0,0L); The Output function passes the device handle and a pointer to the data buffer to the OutputX function. It determines the size of the data buffer provided by the user and passes that value as the count parameter. It specifies that the forceAddr flag is set TRUE, which causes Driver488 to address the device if an external device is specified. The default terminators are chosen by specifying a 0 pointer as the terminator parameter. Synchronous transmission is specified by sending 0 for the async parameter, and the completion status value is ignored by sending a 0 for the compStat pointer. OutputN SYNTAX REMARKS long pascal OutputN(DevHandleT devHandle,char *data,long count); OutputN is equivalent to the following call to OutputX: OutputX(devHandle,data,count,0,1,0L,0,0L); The OutputN function passes the device handle and a pointer to the data buffer to the OutputX function. It specifies that the forceAddr flag is set TRUE, which causes Driver488 to address the device if an external device is specified. The default terminators are chosen by specifying a 0 pointer as the terminator parameter. Synchronous transmission is specified by sending 0 for the async parameter, and the completion status value is ignored by sending a 0 for the compStat pointer. OutputMore SYNTAX REMARKS III-336 long pascal OutputMore(DevHandleT devHandle, char *data); OutputMore is equivalent to the following call to OutputX: Personal488 User’s Manual, Rev. 3.0 Artisan Technology Group - Quality Instrumentation ... Guaranteed | (888) 88-SOURCE | www.artisantg.com III. COMMAND REFERENCES - 15. Command References 15B. Driver488/SUB, W31, W95, & WNT OutputX(devHandle,data,strlen(data),1,0,0L,0,0L); The OutputMore function passes the device handle and a pointer to the data buffer to the OutputX function. It determines the size of the data buffer provided by the user and passes that value as the count parameter. It specifies that the forceAddr flag is set FALSE, so Driver488 does not re-address the device if it is the same device as that previously used. The default terminators are chosen by specifying a 0 pointer as the terminator parameter. Synchronous transmission is specified by sending 0 for the async parameter, and the completion status value is ignored by sending a 0 pointer for the compStat pointer. OutputNMore SYNTAX REMARKS long pascal OutputNMore (DevHandleT devHandle, char *data, long count); OutputNMore is equivalent to the following call to OutputX: OutputX(devHandle,data,0,0,0L,0,0L); The OutputNMore function passes the device handle and a pointer to the data buffer to the OutputX function. It specifies that the forceAddr flag is set FALSE, so Driver488 does not re-address the device if it is the same device as that previously used. The default terminators are chosen by specifying a 0 pointer as the terminator parameter. Synchronous transmission is specified by sending 0 for the async parameter, and the completion status value is ignored by sending a 0 pointer for the compStat pointer. Output (Peripheral Mode) OutputX SYNTAX RETURNS MODE BUS STATES SEE ALSO long pascal OutputX(DevHandleT devHandle, char *data, long count, bool last, bool forceAddr, TermT *terminator, bool async, int *compStat); devHandle refers to either an interface or an external device. data points to the bytes to send. count is the number of characters to send. last is a flag that forces the device output terminator to be sent with the data. forceAddr is ignored. terminator is a pointer to a terminator structure that is used to set up the output terminators. If terminator is set to 0, the default terminator is used. async is a flag that allows asynchronous data transfer. compStat is a pointer to an integer containing completion status information. -1 if error; otherwise, the number of characters transferred *CA Determined by the Controller. Enter, Term, TimeOut, Buffered In Peripheral mode, the OutputX command sends data to the interface under control of the Active Controller. The Active Controller must put the interface into the Talk state and configure some bus device to accept the transferred data. The Talk state can be checked with the Status command, or can cause an interrupt via the Arm command. A time-out error occurs, if enabled, if no bus device accepts the data within the time out period after issuing the OutputX command. Even as a Peripheral, Driver488 might be the System Controller. If Driver488 is the System Controller and AutoRemote is enabled, then Driver488 asserts Remote Enable (REN) before sending any data. The OutputX command in Peripheral mode is otherwise identical to the OutputX command in Controller mode. Additional Output Functions Driver488 provides additional Output routines that are short form versions of the OutputX function. The additional Output functions are: Output and OutputN. In Peripheral mode, the device handle Personal488 User’s Manual, Rev. 3.0 Artisan Technology Group - Quality Instrumentation ... Guaranteed | (888) 88-SOURCE | www.artisantg.com III-337 15B. Driver488/SUB, W31, W95, & WNT III. COMMAND REFERENCES - 15. Command References must always refer to an I/O adapter, and the forceAddr flag is ignored. Thus, OutputMore is equivalent to Output, and OutputNMore is equivalent to OutputN. OutputI (Controller Mode) Driver488/W31 (Visual Basic only) OutputXI SYNTAX OutputXI (ByVal devHandle%, data%, ByVal count&, ByVal last%, ByVal forceAddr%, Term As terms, ByVal async%, compstat%) As Long devHandle% refers to either an interface or an external device. If devHandle% refers to an external device, the OutputXI command acts on the hardware interface to which the external device is attached. RETURNS MODE BUS STATES SEE ALSO EXAMPLES data% is the first element in an integer array which holds the data being sent. count& is the number of bytes to send. last% is a flag that forces the device output terminator to be sent with the data. forceAddr% is used to specify whether the addressing control bytes are to be issued for each OutputXI command. terms is a pointer to a terminator structure that is used to set up the input terminators. If terms is set to 0, the default terminator is used. async% is a flag that allows asynchronous data transfer. compStat% is a pointer to an integer containing completion status information. -1 if error; otherwise, the number of characters transferred CA With interface handle: REN (if SC and AutoRemote), *ATN, ATN With external device handle: REN (if SC and AutoRemote), ATN•MTA, UNL, LAG, *ATN, ATN EnterI, Term, TimeOut, Buffered, EOL (Sub-Chapter 15A) term.EOI = TRUE term.nChar = 1 term.EightBits = TRUE term.term1 = &HA data%(0) = 1 data%(1) = 2 data%(2) = 3 bytecount = OutputI(dev, data%(0), 3, 0, term, 1, stat) The OutputI commands for Visual Basic are identical to the standard Output commands except for the variable holding the data to be sent is an integer rather than a string type. The OutputXI command sends data to an interface or external device. The Remote Enable (REN) line is first asserted if Driver488 is the System Controller and AutoRemote is enabled. Then, if a device address (with optional secondary address) is specified, Driver488 is addressed to Talk and the specified device is addressed to Listen. If no address is specified, then Driver488 must already be configured to send data, either as a result of a preceding OutputXI command, or as the result of a Send command. Terminators are automatically appended to the output data as specified. The forceAddr% flag is used to specify whether the addressing control bytes are to be issued for each OutputXI command. If the device handle refers to an interface, forceAddr% has no effect and command bytes are not sent. If the device handle refers to an external device and forceAddr% is TRUE, Driver488 addresses the interface to Talk and the external device to Listen. If forceAddr% is FALSE, Driver488 compares the current device with the most recently addressed device on that interface. If the addressing information is the same, no command bytes are sent. If they are different, OutputXI acts as if the forceAddr% flag were TRUE and sends the addressing information. The terms is a pointer to a terminator structure that is used to set up the input terminators. This pointer may be a null pointer, requesting use of the default terminators for the device, or it may point to III-338 Personal488 User’s Manual, Rev. 3.0 Artisan Technology Group - Quality Instrumentation ... Guaranteed | (888) 88-SOURCE | www.artisantg.com III. COMMAND REFERENCES - 15. Command References 15B. Driver488/SUB, W31, W95, & WNT a terminator structure requesting no terminators. The async% is a flag that allows asynchronous data transfer. If this flag is TRUE, the OutputXI command returns to the caller as soon as the data transfer is underway and can be completed under DMA and/or interrupts. FALSE indicates that the OutputXI command should not return until the transfer is complete. The compStat% is a pointer to an integer containing completion status information. A null pointer indicates that completion status is not requested. In the case of an asynchronous transfer, this pointer must remain valid until the transfer is complete. Additional OutputI Functions Driver488 provides additional OutputI functions that are short form versions of the OutputXI function. The additional OutputI functions are: OutputNI, OutputMoreI, and OutputNMoreI. These functions are discussed in detail below: OutputNI SYNTAX REMARKS OutputNI(ByVal devHandle%, data%, ByVal count&) As Long OutputNI is equivalent to the following call to OutputXI: OutputXI(devHandle%,data%,count&,0,1,0,0,0) The OutputNI function passes the device handle and a pointer to the data buffer, to the OutputXI function. It specifies that the forceAddr% flag is set TRUE, which causes Driver488 to address the device if an external device is specified. The default terminators are chosen by specifying a 0 pointer as the terms parameter. Synchronous transmission is specified by sending 0 for the async parameter, and the completion status value is ignored by sending a 0 for the compStat pointer. OutputMoreI SYNTAX REMARKS OutputMoreI(ByVal devHandle%,data%,By Val count&)As Long OutputMoreI is equivalent to the following call to OutputXI: OutputXI(devHandle%,data%,count&,1,0,0,0,0) The OutputMoreI function passes the device handle and a pointer to the data buffer, to the OutputXI function. It determines the size of the data buffer provided by the user and passes that value as the count& parameter. It specifies that the forceAddr% flag is set FALSE, so Driver488 does not readdress the device if it is the same device as that previously used. The default terminators are chosen by specifying a 0 pointer as the terms parameter. Synchronous transmission is specified by sending 0 for the async parameter, and the completion status value is ignored by sending a 0 pointer for the compStat pointer. OutputNMoreI SYNTAX REMARKS OutputNMoreI(ByVal devHandle, data%, ByVal count&) As Long OutputNMoreI is equivalent to the following call to OutputXI: OutputXI(devHandle%,data%,count&,0,0,0,0,0); The OutputNMoreI function passes the device handle and a pointer to the data buffer, to the OutputXI function. It specifies that the forceAddr% flag is set FALSE, so Driver488 does not readdress the device if it is the same device as that previously used. The default terminators are chosen by specifying a 0 pointer as the terms parameter. Synchronous transmission is specified by sending 0 for the async parameter, and the completion status value is ignored by sending a 0 pointer for the compStat pointer. Note: The OutputNI and OutputNMoreI commands do not send terminators. Also, OutputI and OutputMoreI must be passed to the entire array (i.e. intarray(), not the starting location: intarray (0) ). The following table describes the differences between the various forms of OutputI. It outlines the variables passed to each function and how many bytes the functions output. Personal488 User’s Manual, Rev. 3.0 Artisan Technology Group - Quality Instrumentation ... Guaranteed | (888) 88-SOURCE | www.artisantg.com III-339 15B. Driver488/SUB, W31, W95, & WNT III. COMMAND REFERENCES - 15. Command References OutputI Function OutputXI(ADC,IResp (0),1000,1,Term,1,1) OutputI (ADC, IRESP()) OutputMoreI (ADC, IResp ()) OutputNI (ADC< IResp (0), 1000) OutputNMoreI (ADC, IResp (0), 1000) Terminators Choice Variable Pass starting location Yes Pass entire array No Pass starting location where: SResp is String * 1000, and IResp(1000) is integer. OutputI (Peripheral Mode) Driver488/W31 only (Visual Basic only) OutputXI SYNTAX RETURNS MODE BUS STATES SEE ALSO OutputXI (ByVal devHandle%, data%, ByVal count&, ByVal last%, ByVal forceAddr%, Term As terms, ByVal async%, compstat%) As Long devHandle% refers to either an interface or an external device. data% points to the bytes to send. count& is the number of characters to send. last% is a flag that forces the device output terminator to be sent with the data. forceAddr% is ignored. terms is a pointer to a terminator structure that is used to set up the output terminators. If terms is set to 0, the default terminator is used. async% is a flag that allows asynchronous data transfer. compStat% is a pointer to an integer containing completion status information. -1 if error; otherwise, the number of characters transferred *CA Determined by the Controller. EnterI, Term, TimeOut, Buffered The OutputI commands for Visual Basic are identical to the standard Output commands except that they use an integer array for the output data rather than a string. In Peripheral mode, the OutputXI command sends data to the interface under control of the Active Controller. The Active Controller must put the interface into the Talk state and configure some bus device to accept the transferred data. The Talk state can be checked with the Status command, or can cause an interrupt via the Arm command. A time-out error occurs, if enabled, if no bus device accepts the data within the time out period after issuing the OutputXI command. Even as a Peripheral, Driver488 might be the System Controller. If Driver488 is the System Controller and AutoRemote is enabled, then Driver488 asserts Remote Enable (REN) before sending any data. The OutputXI command in Peripheral mode is otherwise identical to the OutputXI command in Controller mode. Additional OutputI Functions Driver488 provides additional OutputI functions that are short form versions of the OutputXI function. The additional OutputI functions are: OutputI and OutputNI. In Peripheral mode, the device handle must always refer to an I/O adapter, and the forceAddr% flag is ignored. Thus, OutputMoreI is equivalent to OutputI, and OutputNMoreI is equivalent to OutputNI. III-340 Personal488 User’s Manual, Rev. 3.0 Artisan Technology Group - Quality Instrumentation ... Guaranteed | (888) 88-SOURCE | www.artisantg.com III. COMMAND REFERENCES - 15. Command References 15B. Driver488/SUB, W31, W95, & WNT PassControl SYNTAX RETURNS MODE BUS STATES SEE ALSO EXAMPLE int pascal PassControl(DevHandleT devHandle); devHandle refers to an external device to which control is passed. -1 if error CA ATN•UNL, MLA, TAG, UNL, TCT, *ATN Abort, Reset, SendCmd errorcode = PassControl(scope); The PassControl command allows Driver488 to give control to another controller on the bus. After passing control, Driver488 enters the Peripheral mode. If Driver488 was the System Controller, then it remains the System Controller, but it is no longer the Active Controller. The Controller now has command of the bus until it passes control to another device or back to Driver488. The System Controller can regain control of the bus at any time by issuing an Abort command. PPoll SYNTAX int pascal PPoll(DevHandleT devHandle); devHandle refers to either an interface or an external device. If devHandle refers to an external device, then the PPoll command acts on the hardware interface to which the external device is attached. RETURNS MODE BUS STATES SEE ALSO EXAMPLE -1 if error; otherwise, a number in the range 0 to 255 CA ATN•EOI, *EOI PPollConfig, PPollUnconfig, PPollDisable, SPoll errorcode = PPoll(ieee); The PPoll (Parallel Poll) command is used to request status information from many bus devices simultaneously. If a device requires service then it responds to a Parallel Poll by asserting one of the eight IEEE 488 bus data lines (DIO1 through DIO8, with DIO1 being the least significant). In this manner, up to eight devices may simultaneously be polled by the controller. More than one device can share any particular DIO line. In this case, it is necessary to perform further Serial Polling (SPoll) to determine which device actually requires service. Parallel Polling is often used upon detection of a Service Request (SRQ), though it may also be performed periodically by the controller. In either case, PPoll responds with a number from 0 to 255 corresponding to the eight binary DIO lines. Not every device supports Parallel Polling. Refer to the manufacturer’s documentation for each bus device to determine if Parallel Poll capabilities are supported. PPollConfig SYNTAX int pascal PPollConfig(DevHandleT devHandle, int ppresponse); devHandle refers to either an interface or an external device to configure for the Parallel Poll. ppresponse is the decimal equivalent of the four binary bits S, P2, P1, and P0 where S is the Sense bit, and P2, P1, and P0 assign the DIO bus data line used for the response. RETURNS MODE BUS STATES -1 if error CA ATN•UNL, MTA, LAG, PPC Personal488 User’s Manual, Rev. 3.0 Artisan Technology Group - Quality Instrumentation ... Guaranteed | (888) 88-SOURCE | www.artisantg.com III-341 15B. Driver488/SUB, W31, W95, & WNT III. COMMAND REFERENCES - 15. Command References PPoll, PPollUnconfig, PPollDisable errorcode = Configure device DMM to assert DIO6 when it desires service (ist PPollConfig = 1) and it is Parallel Polled (0x0D = &H0D = 1101 binary; (dmm,0x0D); S=1, P2=1, P1=0, P0=1; 101 binary = 5 decimal = DIO6). The PPollConfig command configures the Parallel Poll response of a specified bus device. Not all SEE ALSO EXAMPLE devices support Parallel Polling and, among those that do, not all support the software control of their Parallel Poll response. Some devices are configured by internal switches. The Parallel Poll response is set by a four-bit binary number response: S, P2, P1, and P0. The most significant bit of response is the Sense (S) bit. The Sense bit is used to determine when the device will assert its Parallel Poll response. Each bus device has an internal individual status (ist). The Parallel Poll response is asserted when this ist equals the Sense bit value S. The ist is normally a logic 1 when the device requires attention, so the S bit should normally also be a logic 1. If the S bit is 0, then the device asserts its Parallel Poll response when its ist is a logic 0. That is, it does not require attention. However, the meaning of ist can vary between devices, so refer to your IEEE 488 bus device documentation. The remaining 3 bits of response: P2, P1, and P0, specify which DIO bus data line is asserted by the device in response to a Parallel Poll. These bits form a binary number with a decimal value from 0 through 7, specifying data lines DIO1 through DIO8, respectively. PPollDisable SYNTAX int pascal PPollDisable(DevHandleT devHandle); devHandle is either an interface or an external device that is to have its Parallel Poll response disabled. RETURNS MODE BUS STATES SEE ALSO EXAMPLE -1 if error CA ATN•UNL, MTA, LAG, PPC, PPD PPoll, PPollConfig, PPollUnconfig errorcode = PPollDisable(dmm); Disable Parallel Poll of device DMM. The PPollDisable command disables the Parallel Poll response of a selected bus device. PPollDisableList SYNTAX int pascal PPollDisableList(DevHandlePT devHandles); devHandles is a pointer to a list of external devices that are to have their Parallel Poll response disabled. RETURNS MODE BUS STATES SEE ALSO EXAMPLE -1 if error CA ATN•UNL, MTA, LAG, PPC, PPD PPoll, PPollConfig, PPollUnconfig deviceList[0] = wave; deviceList[1] = timer; deviceList[2] = dmm; deviceList[3] = NODEVICE; errorcode = PPollDisableList(deviceList); The PPollDisableList command disables the Parallel Poll response of selected bus devices. PPollUnconfig SYNTAX int pascal PPollUnconfig(DevHandleT devHandle); devHandle refers to a hardware interface. If devHandle refers to an external device, then the PPollUnconfig command acts on the hardware interface to which the external device is attached. RETURNS III-342 -1 if error Personal488 User’s Manual, Rev. 3.0 Artisan Technology Group - Quality Instrumentation ... Guaranteed | (888) 88-SOURCE | www.artisantg.com III. COMMAND REFERENCES - 15. Command References 15B. Driver488/SUB, W31, W95, & WNT CA MODE BUS STATES ATN•PPU PPoll, PPollConfig, PPollDisable SEE ALSO errorcode = PPollUnconfig(ieee); EXAMPLE The PPollUnconfig command disables the Parallel Poll response of all bus devices. Remote SYNTAX int pascal Remote(DevHandleT devHandle); RETURNS MODE BUS STATES devHandle refers to either an interface or an external device. If devHandle refers to an interface, then the Remote Enable (REN) line is asserted. If devHandle refers to an external device, then that device is addressed to Listen and placed into the Remote state. -1 if error SC REN (hardware interface) SEE ALSO EXAMPLES REN, ATN•UNL, MTA, LAG (external device) Local, LocalList, RemoteList errorcode = Remote(ieee); Assert the REN bus line. errorcode = Remote(scope); Assert the REN bus line and address the SCOPE device specified to Listen, to place it in the Remote state: The Remote command asserts the Remote Enable (REN) bus management line. If an external device is specified, then Remote will also address that device to Listen, placing it in the Remote state. RemoteList SYNTAX RETURNS MODE BUS STATES SEE ALSO EXAMPLE int pascal RemoteList(DevHandlePT devHandles); devHandles is a pointer to a list of devices. -1 if error SC•CA REN, ATN•UNL, MTA, LAG Remote, Local, LocalList deviceList[0] = wave; deviceList[1] = timer; deviceList[2] = dmm; deviceList[3] = NODEVICE; errorcode = RemoteList(deviceList); Assert the REN bus line and address a list of specified devices to Listen, to place these specified devices in the Remote state. The RemoteList command asserts the Remote Enable (REN) bus management line. If external devices are specified, then RemoteList will also address those devices to Listen, placing them in the Remote state. RemoveDevice SYNTAX int pascal RemoveDevice(DevHandleT devHandle); RETURNS MODE BUS STATES SEE ALSO EXAMPLE devHandle specifies an interface or an external device to remove. -1 if error Any None MakeDevice, KeepDevice, REMOVE DOS NAME (Sub-Chapter 15A) errorcode = RemoveDevice(dmm); Personal488 User’s Manual, Rev. 3.0 Artisan Technology Group - Quality Instrumentation ... Guaranteed | (888) 88-SOURCE | www.artisantg.com III-343 15B. Driver488/SUB, W31, W95, & WNT III. COMMAND REFERENCES - 15. Command References The RemoveDevice command removes the specific temporary or permanent Driver488 device that was created with either the MakeDevice command or the startup configuration. This command also removes a device that was made permanent through a KeepDevice command. Request SYNTAX int pascal Request(DevHandleT devHandle, int spstatus); devHandle refers to either an interface or an external device. If devHandle refers to an external device, the Request command acts on the hardware interface to which the external device is attached. spstatus is the Service Request status in the range 0 to 255. RETURNS MODE BUS STATES SEE ALSO EXAMPLES -1 if error *CA SRQ if rsv is set, *SRQ if not. Status, ControlLine errorcode = Request(ieee,0) Clear SRQ and Serial Poll Response. errorcode = Generate an SRQ (decimal 64) with DIO2 Request(ieee,64+2+4) (decimal 2) and DIO3 (decimal 4) set in the serial poll response. In Peripheral mode, Driver488 is able to request service from the Active Controller by asserting the Service Request (SRQ) bus signal. The Request command sets or clears the Serial Poll status (including Service Request) of Driver488. Request takes a numeric argument in the decimal range 0 to 255 (hex range &H0 to &HFF) that is used to set the Serial Poll status. When Driver488 is Serial Polled by the Controller, it returns this byte on the DIO data lines. The data lines are numbered DIO8 through DIO1. DIO8 is the most significant line and corresponds to a decimal value of 128 (hex &H80). DIO7 is the next most significant line and corresponds to a decimal value of 64 (hex &H40). DIO7 has a special meaning: It is the Request for Service (rsv) bit. If rsv is set, then Driver488 asserts the Service Request (SRQ) bus signal. If DIO7 is clear (a logic 0), then Driver488 does not assert SRQ. When Driver488 is Serial Polled, all eight bits of the Serial Poll status are returned to the Controller. The rsv bit is cleared when Driver488 is Serial Polled by the Controller. This causes Driver488 to stop asserting SRQ. Reset SYNTAX int pascal Reset(DevHandleT devHandle); devHandle refers to either an interface or an external device. If devHandle refers to an external device, the Reset command acts on the hardware interface to which the external device is attached. RETURNS MODE BUS STATES SEE ALSO EXAMPLE -1 if error Any None Abort, Term, TimeOut errorcode=Reset(ieee); The Reset command provides a warm start of the interface. It is equivalent to issuing the following command process, including clearing all error conditions: 1. 2. 3. 4. 5. 6. 7. III-344 Stop Disarm Reset hardware. (Resets to Peripheral if not System Controller) Abort (if System Controller) Error ON Local Request 0 (if Peripheral) Personal488 User’s Manual, Rev. 3.0 Artisan Technology Group - Quality Instrumentation ... Guaranteed | (888) 88-SOURCE | www.artisantg.com III. COMMAND REFERENCES - 15. Command References 8. 9. 15B. Driver488/SUB, W31, W95, & WNT Clear Change, Trigger, and Clear status. Reset I/O adapter settings to installed values. (BusAddress, TimeOut, IntLevel and DmaChannel) Resume SYNTAX int pascal Resume(DevHandleT devHandle, bool monitor); devHandle refers to either an interface or an external device. If devHandle refers to an external device, then the Resume command acts on the hardware interface to which the external device is attached. monitor is a flag that when it is ON, Driver488 monitors the data. RETURNS MODE BUS STATES SEE ALSO EXAMPLES -1 if error CA *ATN Finish errorcode = Resume(ieee,OFF); errorcode = Resume(ieee,ON); errorcode = Finish(ieee); Do not go into monitoring mode. Go into monitoring mode. The Resume command unasserts the Attention (ATN) bus signal. Attention is normally kept asserted by Driver488, but it must be unasserted to allow transfers to take place between two peripheral devices. In this case, Driver488 sends the appropriate Talk and Listen addresses, and then must unassert Attention with the Resume command. If monitor is specified, Driver488 monitors the handshaking process but does not participate in it. Driver488 takes control synchronously when the last terminator or EOI is encountered. At that point, the transfer of data stops. The Finish command must be called to assert Attention and release any pending holdoffs to be ready for the next action. SendCmd SYNTAX RESPONSE MODE BUS STATES SEE ALSO EXAMPLE int pascal SendCmd(DevHandleT devHandle, unsigned char *commands, int len); devHandle refers to an interface handle. commands points to a string of command bytes to be sent. len is the length of the command string. None CA User-defined SendData, SendEoi char command[] = “U?0"; errorcode = SendCmd(ieee, &command, sizeof command); The SendCmd command sends a specified string of bytes with Attention (ATN) asserted, causing the data to be interpreted as IEEE 488 command bytes. SendData SYNTAX RESPONSE MODE BUS STATES int pascal SendData(DevHandleT devHandle, unsigned char *data, int len); devHandle refers to an interface handle. data points to a string of data bytes to be sent. len is the length of the data string. None Any User-defined Personal488 User’s Manual, Rev. 3.0 Artisan Technology Group - Quality Instrumentation ... Guaranteed | (888) 88-SOURCE | www.artisantg.com III-345 15B. Driver488/SUB, W31, W95, & WNT SEE ALSO EXAMPLES III. COMMAND REFERENCES - 15. Command References SendCmd, SendEoi char data[] = “W0X”; errorcode = SendData(ieee, data, strlen (data)); The SendData command provides byte-by-byte control of data transfers and gives greater flexibility than the other commands. This command can specify exactly which operations Driver488 executes. SendEoi SYNTAX RESPONSE MODE BUS STATES SEE ALSO EXAMPLES int pascal SendEoi(DevHandleT devHandle, unsigned char *data, int len); devHandle refers to an interface handle. data points to a string of data bytes to be sent. len is the length of the data string. None Any User-defined SendCmd, SendData char data[] = “W0X”; errorcode = SendEoi(ieee, data, strlen (data)); The SendEoi command provides byte-by-byte control of data transfers and gives greater flexibility than the other commands. This command can specify exactly which operations Driver488 executes. Driver488 asserts EOI during the transfer of the final byte. SPoll SYNTAX RETURNS MODE BUS STATES SEE ALSO EXAMPLES int pascal SPoll(DevHandleT devHandle); devHandle refers to either an interface or a specific external device. -1 if error; otherwise, 0 or 64 (hardware interface) in the range 0 to 255 (external device) Any ATN•UNL, MLA, TAG, SPE, *ATN, ATN•SPD, UNT SPollList, PPoll errorcode = SPoll(ieee); Return the internal SRQ status errorcode = SPoll(dmm); Return the Serial Poll response of the specified device In Active Controller mode, the SPoll (Serial Poll) command performs a Serial Poll of the bus device specified and responds with a number from 0 to 255 representing the decimal equivalent of the eightbit device response. If rsv (DIO7, decimal value 64) is set, then that device is signaling that it requires service. The meanings of the other bits are device-specific. Serial Polls are normally performed in response to assertion of the Service Request (SRQ) bus signal by some bus device. In Active Controller mode, with the interface device specified, the SPoll command returns the internal SRQ status. If the internal SRQ status is set, it usually indicates that the SRQ line is asserted. Driver488 then returns a 64. If it is not set, indicating that SRQ is not asserted, then Driver488 returns a 0. With an external device specified, SPoll returns the Serial Poll status of the specified external device. In Peripheral mode, the SPoll command is issued only to the interface, and returns the Serial Poll status. If rsv (DIO7, decimal value 64) is set, then Driver488 has not been Serial Polled since the issuing last Request command. The rsv is reset whenever Driver488 is Serial Polled by the Controller. III-346 Personal488 User’s Manual, Rev. 3.0 Artisan Technology Group - Quality Instrumentation ... Guaranteed | (888) 88-SOURCE | www.artisantg.com III. COMMAND REFERENCES - 15. Command References 15B. Driver488/SUB, W31, W95, & WNT SPollList SYNTAX int pascal SPollList(DevHandlePT devHandles, unsigned char *result, char untilflag); devHandles is a pointer to a list of external devices. result is an array that is filled in with the Serial Poll results of the corresponding external devices. RETURNS MODE BUS STATES SEE ALSO EXAMPLE untilflag refers to either ALL, WHILE_SRQ, or UNTIL_RSV. -1 if error *CA ATN•UNL, MLA, TAG, SPE, *ATN, ATN•SPD, UNT SPoll, PPoll deviceList[0] = wave; Return the Serial Poll response for a deviceList[1] = timer; list of device handles. deviceList[2] = dmm; deviceList[3] = NODEVICE; result = SPollList(deviceList, resultList, ALL); In Active Controller mode, the SPollList (Serial Poll) command performs a Serial Poll of the bus devices specified and responds with a number from 0 to 255 (representing the decimal equivalent of the eight-bit device response) for each device on the list. If rsv (DIO7, decimal value 64) is set, then that device is signaling that it requires service. The meanings of the other bits are device-specific. Serial Polls are normally performed in response to assertion of the Service Request (SRQ) bus signal by some bus device. In Active Controller mode with the interface device specified, the SPollList command returns the internal SRQ status for each device. If the internal SRQ status is set, it usually indicates that the SRQ line is asserted. Driver488 then returns a 64. If it is not set, indicating that SRQ is not asserted, then Driver488 returns a 0. With an external device specified, SPollList returns the Serial Poll status of the specified external device. In Peripheral mode, the SPollList command is issued only to the interface and returns the Serial Poll status. If rsv (DIO7, decimal value 64) is set, then Driver488 has not been Serial Polled since the last Request command was issued. The rsv is reset whenever Driver488 is Serial Polled by the Controller. The untilflag refers to either ALL, WHILE_SRQ, or UNTIL_RSV. If ALL is chosen, all the devices are Serial Polled and their results placed into the result array. If untilflag is WHILE_SRQ, Driver488 Serial Polls the devices until the SRQ bus signal becomes unasserted, and the results are put into the result array. If untilflag is UNTIL_RSV, Driver488 Serial Polls the devices until the first device whose rsv bit is set, is found and the results are put into the result array. Status SYNTAX int pascal Status(DevHandleT devHandle, IeeeStatusT *result); devHandle refers to either an IEEE 488 interface or an external device. If devHandle refers to an external device, Status acts on the hardware interface to which the external device is attached. RETURNS MODE BUS STATES SEE ALSO result is a pointer to a Status structure. -1 if error Any None GetError, SPoll Personal488 User’s Manual, Rev. 3.0 Artisan Technology Group - Quality Instrumentation ... Guaranteed | (888) 88-SOURCE | www.artisantg.com III-347 15B. Driver488/SUB, W31, W95, & WNT EXAMPLE III. COMMAND REFERENCES - 15. Command References result = Status(ieee,&StatusResult); if (statusResult.transfer == TRUE) { printf(“We have a transfer in progress\n”); } else { printf(“There is no transfer in progress\n”); } The Status command returns various items detailing the current state of Driver488. They are returned in a data structure, based on the following table: Status Item Flag Values and Description Controller Active System Controller Primary Bus Address Secondary Bus Address Address Change Talker Listener ByteIn ByteOut Service Request Triggered Cleared Transfer in Progress .CA .SC .Primaddr .Secaddr .addrChange .talker .listener .bytein .byteout .SRQ .triggered .cleared .transfer TRUE: Active Controller, FALSE: Not CA. TRUE: System Controller, FALSE: Not SC. 0 to 30: Two-digit decimal number. 0 to 31: Two-digit decimal number, or -1 if no address. TRUE: Address change has occured, FALSE: Not so. TRUE: Talker, FALSE: Not Talker TRUE: Listener, FALSE: Not Listener TRUE: Byte in, ready to read, FALSE: Not so. TRUE: Byte out, ready to output, FALSE: Not so. TRUE: SRQ is asserted, FALSE: SRQ is not asserted TRUE: Trigger command received, FALSE: Not so. TRUE: Clear command received, FALSE: Not so. TRUE: Transfer in progress, FALSE: Not so. These Status items are more-fully described in the following paragraphs: III-348 • The Controller Active flag (.CA) is true if Driver488 is the Active Controller. If Driver488 is not the System Controller, then it is initially a Peripheral and it becomes a controller when Driver488 receives control from the Active Controller. • The System Controller flag (.SC) is true if Driver488 is the System Controller. The System Controller mode may be configured during installation or by using the SysController command. • The Primary Bus Address (.Primaddr) is the IEEE 488 bus device primary address assigned to Driver488 or the specified device. This will be an integer from 0 to 30. The Secondary Bus Address (.Secaddr) is the IEEE 488 bus device secondary address assigned to the specified device. This will be either -1 to indicate no secondary address, or an integer from 0 to 31. Note that the interface device can never have a secondary address. • The Address Change indicator (.addrChange) is set whenever Driver488 become a Talker, Listener, or the Active Controller, or when it becomes no longer a Talker, Listener, or the Active Controller. It is reset when Status is read. The Talker (.talker) and Listener (.listener) flags reflect the current Talker/Listener state of Driver488. As a Peripheral, Driver488 can check this status to see if it has been addressed to Talk or addressed to Listen by the Active Controller. In this way, the desired direction of data transfer can be determined. • The ByteIn (.byteIn) indicator is set when the I/O adapter has received a byte that can be read by an Enter command. The ByteOut (.byteOut) indicator is set when the I/O adapter is ready to output data. The Service Request field (.SRQ), as an active controller, reflects the IEEE 488 bus SRQ line signal. As a peripheral, this status reflects the rsv bit that can be set by the Request command and is cleared when the Driver488 is Serial Polled. For more details, refer to the SPoll command in this Sub-Chapter. • The Triggered (.triggered) and Cleared (.cleared) indicators are set when, as a Peripheral, Driver488 is triggered or cleared. These two indicators are cleared when Status is read. The Triggered and Cleared indicators are not updated while asynchronous transfers are in progress. The Transfer in Progress indicator (.transfer) indicates that an asynchronous transfer is in progress. Personal488 User’s Manual, Rev. 3.0 Artisan Technology Group - Quality Instrumentation ... Guaranteed | (888) 88-SOURCE | www.artisantg.com III. COMMAND REFERENCES - 15. Command References 15B. Driver488/SUB, W31, W95, & WNT Stop SYNTAX int pascal Stop(DevHandleT devHandle); devHandle refers to either an interface or an external device. If devHandle refers to an external device, the Stop command acts on the hardware interface to which the external device is attached. RETURNS MODE BUS STATES SEE ALSO EXAMPLE -1 if error Any ATN (Controller) None (Peripheral) Enter, Output, Buffered errorcode = Stop(ieee); The Stop command halts any asynchronous transfer that may be in progress. If the transfer has completed already, then Stop has no effect. The actual number of characters transferred is available from the Buffered command. SysController Driver488/SUB and Driver488/W31 only SYNTAX int pascal SysController(DevHandleT devHandle, bool flag); devHandle refers to either an interface or an external device. If devHandle refers to an external device, the SysController command acts on the hardware interface to which the external device is attached. flag specifies whether or not Driver488 is to be System Controller. If flag is ON, then Driver488 becomes System Controller. If flag is OFF, then Driver488 ceases to be System Controller. RETURNS MODE BUS STATE SEE ALSO EXAMPLES -1 if error Any IFC, *IFC (flag TRUE) None (flag FALSE) Abort, Reset errorcode = SysController(ieee,ON); The SysController command specifies whether or not the IEEE 488 interface card is to be the System Controller. The System Controller has ultimate control of the IEEE 488 bus, and there may be only one System Controller on a bus. If Driver488 is a Peripheral (that is, not System Controller), it may still take control of bus transactions if the Active Controller passes control to Driver488. Driver488 may then control the bus and, when it is done, pass control back to the System Controller or other computer, which then becomes the Active Controller. Talk SYNTAX int pascal Talk(DevHandleT devHandle, char pri, char sec); devHandle refers to either an interface or an external device. If devHandle refers to an external device, the Talk command acts on the associated interface. pri and sec specify the primary and secondary addresses of the device which is to be addressed to Talk. Personal488 User’s Manual, Rev. 3.0 Artisan Technology Group - Quality Instrumentation ... Guaranteed | (888) 88-SOURCE | www.artisantg.com III-349 15B. Driver488/SUB, W31, W95, & WNT III. COMMAND REFERENCES - 15. Command References -1 if error RETURNS CA MODE BUS STATES ATN, TAG Listen, SendCmd SEE ALSO errorcode = Talk (ieee, 12, -1); EXAMPLES The Talk command addresses an external device to Talk. Term SYNTAX int pascal Term(DevHandleT devHandle, TermT *terminator, int TermType); devHandle refers to either an interface or an external device. terminator is a pointer to the terminator structure. TermType can be either IN, OUT, or IN+OUT, specifying whether input, output, or RETURNS MODE BUS STATES SEE ALSO EXAMPLE -1 if error Any None Enter, Output, Status, EOL (Sub-Chapter 15A) term.EOI = TRUE; term.nChar = 1; term.EightBits = TRUE; term.termChar[0] = 13; errorcode = Term(ieee,&term,IN); both are being set. The Term command sets the end-of-line (EOL) terminators for input from, and output to, I/O adapter devices. These terminators are sent at the end of output data and expected at the end of input data, in the manner of CR LF as used with printer data. During output, Term appends the bus output terminator to the data before sending it to the I/O adapter device. Conversely, when Driver488 receives the bus input terminator, it recognizes the end of a transfer and returns the data to the calling application. The terminators never appear in the data transferred to or from the calling application. The default terminators for both input and output are set by the startup configuration and are normally CR LF EOI, which is appropriate for most bus devices. End-Or-Identify (EOI) has a different meaning when it is specified for input than when it is specified for output. During input, EOI specifies that input is terminated on detection of the EOI bus signal, regardless of which characters have been received. During output, EOI specifies that the EOI bus signal is to be asserted during the last byte transferred. TermQuery Driver488/W95 only SYNTAX INT TermQuery(DevHandleT devHandle, TermT *terminator, INT TermType); devHandle refers to either an interface or an external device. terminator is a pointer to the terminator structure. TermType can be either IN, OUT, or IN+OUT, specifying whether input, output, or RETURNS MODE BUS STATES SEE ALSO EXAMPLE -1 if error Any None Term, Enter, Output, Status, EOL (Sub-Chapter 15A) None provided. both are being set. III-350 Personal488 User’s Manual, Rev. 3.0 Artisan Technology Group - Quality Instrumentation ... Guaranteed | (888) 88-SOURCE | www.artisantg.com III. COMMAND REFERENCES - 15. Command References 15B. Driver488/SUB, W31, W95, & WNT This is a new function in Driver488/W95. The TermQuery function queries the terminators setting. Terminators are defined by the TermT structure. TimeOut SYNTAX int pascal TimeOut(DevHandleT devHandle, long millisec); RETURNS MODE BUS STATES SEE ALSO EXAMPLE devHandle refers to either an IEEE 488 interface or an external device. millisec is a numeric value given in milliseconds. -1 if error Any None Reset errorcode = TimeOut(ieee,100); Set the timeout value to 100 msec. The TimeOut command sets the number of milliseconds that Driver488 waits for a transfer before declaring a time out error. Driver488 checks for timeout errors on every byte it transfers, except in the case of asynchronous transfers. While the first byte of an asynchronous transfer is checked for time out, subsequent bytes are not. The user’s program must check for timely completion of an asynchronous transfer. Time out checking may be suppressed by specifying a time out value of zero seconds, which specifies an infinite timeout. The default time out is specified in the startup configuration, normally 10 seconds. The time out interval may be specified to the nearest 0.001 seconds (1 millisecond). However, due to the limitations of the computer, the actual interval is always a multiple of 55 milliseconds and there is an uncertainty of 55 msec in the actual interval. Time out intervals from 1 to 110 milliseconds are rounded to 110 milliseconds. Larger intervals are rounded to the nearest multiple of 55 msec (e.g. 165, 220, 275 msec, etc.). TimeOutQuery Driver488/W95 only SYNTAX RETURNS MODE BUS STATES SEE ALSO EXAMPLE INT pascal TimeOutQuery(DevHandleT devHandle, DWORD millisec); devHandle refers to either an IEEE 488 interface or an external device. millisec is a numeric value given in milliseconds. -1 if error Any None TimeOut, Reset None provided. This is a new function in Driver488/W95. The TimeOutQuery function queries the time out setting, given in milliseconds. Trigger SYNTAX int pascal Trigger(DevHandleT devHandle); RETURNS MODE devHandle refers to either an IEEE 488 interface or an external device. -1 if error CA Personal488 User’s Manual, Rev. 3.0 Artisan Technology Group - Quality Instrumentation ... Guaranteed | (888) 88-SOURCE | www.artisantg.com III-351 15B. Driver488/SUB, W31, W95, & WNT III. COMMAND REFERENCES - 15. Command References BUS STATES ATN•GET (interface handle) ATN•UNL, MTA, LAG, GET (external device handle) TriggerList, Status, SendCmd SEE ALSO errorcode = Issue a Group Execute Trigger (GET) bus command to those EXAMPLES Trigger(ieee); devices that are already in the Listen state as the result of a previous Output or Send command: errorcode = Issue a Group Execute Trigger (GET) bus command to the Trigger(dmm); device specified: The Trigger command issues a Group Execute Trigger (GET) bus command to the specified device. If no interface devices are specified, then the GET only affects those devices that are already in the Listen state as a result of a previous Output or Send command. TriggerList SYNTAX RETURNS MODE BUS STATES SEE ALSO EXAMPLE int pascal TriggerList(DevHandlePT devHandles); devHandles is a pointer to a list of external devices. -1 if error CA ATN•UNL, MTA, LAG, GET Trigger, SendCmd, Status deviceList[0] = wave; deviceList[1] = timer; deviceList[2] = dmm; deviceList[3] = NODEVICE; errorcode = TriggerList(deviceList); Issue a Group Execute Trigger (GET) bus command to a list of specified devices. The TriggerList command issues a Group Execute Trigger (GET) bus command to the specified devices. If no interface devices are specified, then the GET affects those devices that are already in the Listen state as a result of a previous Output or Send command. UnListen SYNTAX int pascal UnListen (DevHandleT devHandle); devHandle refers to either an interface or an external device. If devHandle refers to an external device, the UnListen command acts on the associated interface. RETURNS MODE BUS STATES SEE ALSO EXAMPLE -1 if error CA ATN, UNL Listen, UnTalk, SendCmd, Status errorcode = UnListen (ieee); The UnListen command unaddresses an external device that was addressed to Listen. UnTalk SYNTAX int pascal UnTalk (DevHandleT devHandle); devHandle refers to either an interface or an external device. If devHandle refers to an external device, the UnTalk command acts on the associated interface. RETURNS MODE BUS STATES SEE ALSO EXAMPLE III-352 -1 if error CA ATN, UNT Talk, UnListen, SendCmd, Status errorcode = UnTalk (ieee); Personal488 User’s Manual, Rev. 3.0 Artisan Technology Group - Quality Instrumentation ... Guaranteed | (888) 88-SOURCE | www.artisantg.com III. COMMAND REFERENCES - 15. Command References 15B. Driver488/SUB, W31, W95, & WNT The UnTalk command unaddresses an external device that was addressed to Talk. Wait SYNTAX int pascal Wait(DevHandleT devHandle); devHandle refers to either an interface or an external device. If devHandle is an external device, the Wait command acts on the hardware interface to which the external device is attached. RETURNS MODE BUS STATES SEE ALSO EXAMPLE -1 if error Any Determined by previous Enter or Output command. Enter, Output, Buffered, Status errorcode = Wait(ieee); The Wait command causes Driver488 to wait until any asynchronous transfer has completed before returning to the user’s program. It can be used to guarantee that the data has actually been received before beginning to process it, or that it has been sent before overwriting the buffer. It is especially useful with the Enter command, when a terminator has been specified. In that case, the amount that is actually received is unknown, and so the user’s program must check with Driver488 to determine when the transfer is done. Time out checking, if enabled, is performed while Waiting. Personal488 User’s Manual, Rev. 3.0 Artisan Technology Group - Quality Instrumentation ... Guaranteed | (888) 88-SOURCE | www.artisantg.com III-353 Section IV: TROUBLESHOOTING IV-354 Personal488 User’s Manual, Rev. 3.0 Artisan Technology Group - Quality Instrumentation ... Guaranteed | (888) 88-SOURCE | www.artisantg.com Personal488 User’s Manual, Rev. 3.0 Artisan Technology Group - Quality Instrumentation ... Guaranteed | (888) 88-SOURCE | www.artisantg.com IV-355 18. Troubleshooting Checklists IV. TROUBLESHOOTING & ERROR MESSAGES TROUBLESHOOTING Chapters 16. 17. 18. 19. 16. Overview ...................................................................................IV-355 Radio Interference Problems...............................................IV-356 Troubleshooting Checklists .................................................IV-357 Error Messages........................................................................IV-361 Overview This Section consists of basic troubleshooting checklists, steps to correct radio frequency interference problems, as well as a list of error messages for Driver488. The troubleshooting checklists, which pertain to problems resul