1
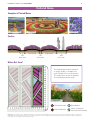
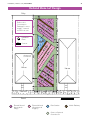
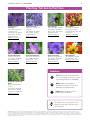
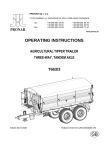
Volunteer
Professional
Volunteer + Professional
Holland Maze
Image Source: Illia Frenkel, “Purple Tulips.” 26 September 2014 via Flickr, CC BY-NC-SA 2.0.
DRAFT COPY
Field Guide | DFC-lots.com | Holland Maze
2
HELLO
What is the lot design likely to cost?
The estimated cost of the Holland Maze is over $5,500
and based on utilizing volunteer and professional labor.
The Field Guide recommends hiring a professional for
earthwork and lot preparation. The cost assumes that
residents or volunteers have access to basic safety gear
and garden tools.
MY NAME IS
How much upkeep will this lot design
require?
Holland Maze
A high level of maintenance is required for the Holland
Maze design to look its best. Maintenance will include
weeding and watering plants, particularly during times of
drought or excessive heat.
The Holland Maze lot design is a
playful adaptation of the tulip
fields found in the Netherlands.
The lot design consists of a series
of mounds planted with tulips,
lavender and geraniums. The
planted mounds create a bold
pattern that makes a statement
from afar.
Will the installation of this lot design
require a professional?
The Holland Maze features bright
summer colors and includes a
small rain garden that captures
water from the lot or from
portions of an adjacent property.
This lot design can be installed on
a single lot or, for greater impact,
on multiple lots.
For more information refer to DFC-lots.com
Cost
$50 - 1,000
The installation of this lot design will require professional
assistance for the first few steps. The Field Guide
identifies volunteer opportunities if you, with the help
and support of friends, family or neighbors, would like
to complete the planting portion of this lot design.
Please refer to the Step-By-Step section for guidance on
professional and volunteer recommended steps. If you
do not feel able to tackle the volunteer aspect of this lot
design, a professional can construct the entire project.
How long will it take to install this
lot design?
This lot design requires a professional for several steps
of the installation. The projected installation time
listed below is estimated for the volunteer opportunities
detailed in the Step-By-Step section only. While people
tackle projects differently, the Field Guide estimates
the installation time of this lot design to be one to two
full weekends with a volunteer group organized by a
knowledgeable lot leader. The Field Guide recommends
the help of at least 10 healthy adults or youth to
complete this lot design. The Field Guide assumes that
the lot is ‘construction ready,’ and all equipment and
materials required for the lot design have been acquired
and are ready to use.
$1,000 - 2,500
$5,500 +
$2,500 - 5,500
People
Volunteer
Professional
Volunteer + Professional
Experience
Beginner
Intermediate
Advanced
Low
Medium
High
Good
Better
Best
Upkeep
Stormwater
Location
Single, Double, or Multiple Lots in Full Sun or Part Sun
Field Guide | DFC-lots.com | Holland Maze
3
Holland Maze
Examples of Planted Mazes
1 - Lavender Hedge
2 - Tulip Maze
3 - Lavender
Section
2’-0”
Mulch Path
6’-0” Mound
1’-0”
Mulch Path
6’-0” Mound
4’-0”
Grass Path
Where Do I Grow?
Section
The Holland Maze can be installed
on single, double, or multiple lots
and is suitable for corner properties.
The image below shows an example
of mounds planted with tulips.
4 - Tulip Rows
Planted Mounds
Rain Garden
Mulch Pathways
Grass or Optional
Groundcover Pathways
Image Source: 1) Lori Quillen (SVLover), “Mt Shasta Lavender Farm.” 21 June 2014 via WeatherUnderground, license unknown; 2) Peter Toshiro, “At the Park: Tulip Garden.” 10 April 2011 via
Flickr, All Rights Reserved; 3) Peter Reed, “Lavender.” 02 July 2006 via Flickr, Creative Commons Attribution-NonCommerical 2.0 Generic; 4) Peter M Graham, “Tulip_070.” 21 April 2007 via
Flickr, Creative Commons Attribution-NonCommerical 2.0 Generic.
Field Guide | DFC-lots.com | Holland Maze
4
Before You Start
‘Construction Ready’
This lot design assumes that
you have prepared the lot to a
‘construction ready’ state.
‘Construction Ready’ refers to a
lot that is clean and clear of trash,
hazardous objects, unwanted trees,
brush and vegetation, fences, and
other unwanted structures.
It may be necessary to remove grass
in preparation for your lot design.
Refer to the Remove Your Grass box
located on the right hand side of
this page for more information.
Is there an available water source
near your lot? Consider how and
where you will access water during
and after construction to ensure
that your plants can establish.
If your lot is not ready for
construction, refer to the Clean +
Green lot design.
You can find the lot design at
DFC-lots.com.
Call Before You Dig
Locate underground utilities before beginning your
lot design. MISS DIG provides a free service to
Michigan residents by locating and marking utilities
on requested properties. Call (800) 482-7171 or 811
at least three days before you plan to start digging
on your lot.
Test Your Soil
Harmful pollutants have made their way into
many urban soils. To proceed with awareness,
consider having your soil tested before
construction. Two great options are available:
Soil testing is free to members of Keep Growing
Detroit’s Garden Resource Program. Call
(313) 757 – 2635 for more information or visit
detroitagriculture.net.
If you are not yet a member, you can work directly
with Michigan State University’s (MSU) Extension
Program. They have a Home Lawn and Garden
Soil Test Mailer for $25. For more information call
(888) 678 – 3464 or visit msusoiltest.com.
If you are concerned about the presence of lead or
other contaminants in your soil, call the Michigan
Department of Health and Human Services at
(866) 691 – 5323 or (800) 424 – LEAD.
Remove Your Grass
Need to remove grass in areas where you are
constructing your lot design?
There are many ways to remove unwanted grass.
The first is to remove the grass and its root system
by digging up the grass. Another option is to cover
your lot with cardboard or a plastic tarp to smother
your grass in darkness. It will take several weeks,
but after being covered, the dead grass will be
easier to remove.
Till Safely
Before you till, inspect your lot for signs of buried
concrete or rubble that was not removed during
the cleanup stage. Large debris can ruin tiller
blades.
When tilling, wear appropriate safety gear, such as
covered boots with socks, long pants, safety glasses,
dust mask, and ear protection. Make sure you
understand the safe operating procedures of your
tiller. Refer to the user’s manual.
Field Guide | DFC-lots.com | Holland Maze
5
What You Need: Shopping List
Shopping List
Materials
MaterialsList
List
The shopping list provides a breakdown
of potential materials, tools, and
resources required to construct this lot
design.
Materials
This shopping list is designed for
a single lot (30 by 100 feet).
Tools + Resources
Suggested Tools
·· Marking Paint, Spirit Level, and Tape
Measure
·· Safety Gear: Gloves, heavy work boots, tall
socks, pants, long sleeve shirts, dust masks,
protective eye wear, ear plugs, and hard hats
(if using heavy machinery)
·· Garden Tools: Spades, shovels, rakes, trash
bags, and wheelbarrows
·· Hacksaw and Screwdriver
·· Rain Garden Planting Soil, 1.5 cubic yards
(50% sand, 25% topsoil, and 25% compost or leaf litter)
·· Mulch or Wood Chips, 4 cubic yards (rain
garden and mulch pathways)
·· Bonemeal or Pine Bark, 1 bag
·· Downspout Disconnect: Standpipe cap,
downspout elbow, downspout connection
pipe, rubber cap, and hose clamp
Planting
·· Violet Intrigue Lavender, 69 pots
·· English Lavender, 69 pots
·· Giant Hyssop, 70 pots
·· Mixed Tulips, 520 bulbs
·· Rozanne Cranesbill, 30 pots
·· Cranesbill Geranium, 30 pots
·· Purple Cranesbill, 31 pots
·· Mixed Poppies, 1 pound of seed
·· Blue Chip Jr. Butterfly Bush, 16 pots
·· Tiller, 6 inch depth
Potential Water Sources
·· Garden Hose with possible extension hose
·· Sprinkler
·· Rain Barrel in addition to other water
source
·· Downspout Disconnect (shown in lot
design)
Field Guide Resources
Resources are available on the Field Guide’s web
site.
·· Clean + Green
·· Perennials + Grasses Planting Detail
·· Bulb Planting Detail
Pathway Groundcover:
·· Low-Maintenance Fescue Mix, 6.5 pounds
of seed
·· Germination Blanket, 3 rolls (4 by 112.5 feet)
Field Guide | DFC-lots.com | Holland Maze
6
Holland Maze Step-By-Step
Let’s Start
Want to create the Holland Maze?
The Field Guide recommends hiring a
professional for some tasks. Here are
a few guiding principles to help you
understand the tasks involved in the
lot design and the steps appropriate
for volunteers.
Check off tasks as you go along.
Lot Design Steps
Professional Recommended:
Prepare Your Lot
Create Mounds + Mulch
Pathways
Dig Rain Garden
Volunteer Opportunities:
Disconnect Your Downspout
Plant Perennials + Bulbs
Sow Poppies
Grass Pathways
Maintain Your Lot
Prepare Your Lot
The Holland Maze is one of the more complex
lot designs in the Field Guide.
It is recommended that you hire a
professional for these steps: Prepare Your Lot,
Create Mounds + Mulch Pathways, and Dig
Rain Garden.
If you decide to construct this lot design
without the recommended assistance of a
professional, the Field Guide has provided
guiding principles below to help assist you
with the installation of the lot design.
This lot design utilizes a full 30 by 100 foot
single lot. For greater impact, the Field Guide
recommends implementing the design on
multiple lots.
Till the existing soil six inches deep to loosen
the ground. Once the area is ready for
construction, use marking paint and a tape
measure to map out the size, shape, and
dimensions of the Holland Maze design.
Create Mounds + Mulch Pathways
To create mulch pathways, excavate four
inches of soil. Pathways are a combination
of one foot and two foot widths of varying
lengths. Add three inches (2.5 cubic yards) of
wood chips or mulch to the excavated mulch
pathways. The mulch pathways are designed
for easy access to the plant beds for weeding
and stormwater collection.
Use excavated soil to build mounds up to a
maximum height of six inches. The six inches of
mounded earth will form six foot wide planting
beds.
Field Guide | DFC-lots.com | Holland Maze
7
Holland Maze Step-By-Step
Dig Rain Garden
Once the area is ready for construction, dig
out one foot within the rain garden area and
place removed soil on adjacent mounds. The
rain garden is approximately 150 square feet.
A rain garden only works if water is directed into
it. The Field Guide recommends constructing
your rain garden near downspouts from
roofs of houses or garages or near other hard
surfaces such as driveways or patios. Ensure
water flows from these surfaces into your rain
garden.
Your rain garden should be one square foot
for every ten square feet of stormwater area
directed into your rain garden. If you are
unable to direct water into the rain garden
area, don’t worry! The garden will still provide
habitat to butterflies and aesthetic value as a
small garden.
After removing the soil, check that the
bottom of the rain garden is level. An easy
way to check this is with a string level or a spirit
level attached to a two-by-four board. A level
bottom is important to maximize infiltration
and minimize the chance of standing water in
the rain garden.
After leveling the bottom, the soil should be
prepared by scarifying, raking, or tilling the soil
four to six inches to loosen up any compaction.
Add three inches (1.5 cubic yards) of rain
garden planting soil to your rain garden and
top with three inches (1.5 cubic yards) of
wood chips or mulch after planting. Adding
wood chips or mulch will help suppress weeds.
Rain garden planting soil should consist of
approximately 50% sand, 25% topsoil, and 25%
compost or leaf litter. Mix together and place in
rain garden.
Disconnect Your Downspout
One of the easiest ways to collect stormwater
is by disconnecting your downspout and
directing it into your rain garden.
Before you start, remember that disconnected
downspouts should extend at least six feet
from any house foundation and five feet from
adjacent property or public sidewalk. Avoid
disconnecting downspouts where they might
discharge water across walkways, patios, or
driveways or where they might be a tripping
hazard. Do not disconnect directly over a septic
system.
Follow these steps to help you redirect your
roof water into your rain garden.
·· Measure the existing downspout, and mark
it approximately nine inches above sewer
connection or standpipe.
·· Cut with a hacksaw and remove cut piece.
·· Plug or cap the sewer standpipe with a rubber
cap secured by a hose clamp. Use screwdriver
to tighten and secure cap.
·· Attach elbow joint over the downspout.
·· Add downspout extension to elbow joint.
Extension should be length needed to carry
water away from house and towards rain
garden.
·· Secure pieces with sheet metal screws at each
joint.
·· Use plastic or concrete splashblocks, rocks,
flagstone, or boulders at the end of the
downspout to control erosion of soil and
plants in the rain garden from stormwater.
For more information, refer to the DWSD’s
How to Disconnect a Downspout document.
Don’t worry if you are unable to direct water into the rain garden area. The
garden will still provide habitat to butterflies and aesthetic value as a small
garden.
Field Guide | DFC-lots.com | Holland Maze
8
Holland Maze Step-By-Step
Plant Perennials + Bulbs
Sunny to partly sunny plantings are
recommended for the Holland Maze. If your lot
is in shade, seek alternative planting options.
Add a small handful of pine bark, bone meal or
organic food to the soil while planting lavender
cultivars and tulips. This will give perennials and
bulbs a nutrient boost.
Place plants and bulbs in the desired location,
then remove plastic pots, loosen roots, and
plant. Bulbs should be planted between
perennials.
For more guidance on planting perennials,
refer to the Perennials + Grasses Planting
Detail and Bulb Planting Detail.
Sow Poppies
Soil should already be loosened and prepared for
seeding after tilling and sculpting the mounds.
If the soil is compacted, rake the mounds this will allow for easier seed germination and
better water infiltration.
Seeding should take place in either spring (midMay to mid-June) or fall (mid-October to end
of November). There are multiple suppliers
of poppy seed mixes suitable for the Holland
Maze design. American Meadow’s California
Poppy Seeds Splendid Mix is one recommended
example.
American Meadow suggests 0.5 pounds of
California Poppy Seeds Splendid Mix per 1,000
square feet. The Field Guide recommends one
pound of California Poppy Seeds Splendid Mix
for all perennial beds in the lot design.
Spread seeds across all perennial beds. You
can do this by hand or with a hand-cranked
whirlwind seeder. It is likely that you will need
to do this several times over the bed. Gently
water seedlings daily until they are four to six
inches in height. Poppies should grow between
perennials and add color and texture to your
garden. Poppies are best seeded after the
perennials have been planted when the beds
require no additional construction.
Grass Pathways
Turf pathways are best seeded after all work
and clean up has taken place on the lot. The
Field Guide recommends a fescue seed mix for a
low-maintenance lawn alternative. This family of
floppy grasses is drought-resistant and requires
one cutting (in August or September) per year.
Fescue can be established in full sun to shade
and should be seeded in spring (mid-March to
mid-May) or fall (August to September). Seed
mix should be applied to damp lot.
Sow seeds by using a seed spreader or by hand
across the grass pathways. You may need to
do this several times to get even coverage. The
Field Guide recommends a seed rate of five
pounds per 1,000 square feet. If you follow
the Holland Maze lot design, you will need
approximately 6.5 pounds of fescue seed mix
for the grass pathways (1,278 square feet).
Do not sprinkle seeds on planting mounds or on
mulch beds. Placing a thin layer of straw or a
germination blanket over seeded areas will help
ensure that your seed establishes by keeping
seeds from blowing away and protecting them
from birds. Germination blankets or straw can
be purchased at most nurseries and garden
stores, including Detroit Farm and Garden. A 30
by 100 foot lot will require three 4 by 112.5 feet
single net germination blankets.
Gently water seedlings daily until they are four
to six inches in height. Once established, grass
will not require supplemental watering except
during unusually dry periods. Eco-Turf Low
Maintenance Fescue Mix is one recommended
seed mix and can be purchased through the
Michigan Wildflower Farm.
Other Field Guide lot designs can be used as
groundcovers. Check out the web site for
additional options and ideas.
Field Guide | DFC-lots.com | Holland Maze
9
Holland Maze Step-By-Step
Maintain Your Lot Design
Plants require care and maintenance to thrive.
Water and weed plants regularly, especially
during the first few years.
As mulch pathways biodegrade into soil, place
the newly created soil onto the mounds. This
new soil will be rich in nutrients and a welcome
food source for established plants. Add new
mulch to pathways and continue the process
throughout garden’s life span.
Low-maintenance fescue mix should be
watered daily until seedlings are four to six
inches in height. Once established, grass will
not require supplemental watering except
during unusually dry periods.
Rain gardens are a work in progress. Bulbs
and perennials may need to be replaced to
keep the garden dynamic and playful. Be
creative and make it your own!
Visit the Resources page on
the Field Guide’s web site
(DFC-lots.com) to discover
other vendors and places to
purchase plants.
Average
Height
of Plants
Average
Height
of Plants
20’
15’
10’
5’
2.5’
Perennials and Bulbs
Field Guide | DFC-lots.com | Holland Maze
10
Holland Maze Lot Design
Alley
5
+0
.5
Refer to the
Construction
Package for more
details - located
at DFC-lots.com
+0
.5
+0
’
1
.5
’
Individual
Plant
+0.5’
’
Contour
4
3
-0.5’
+0
.5
’
+0
.5
’
2
downspout
connection
+0
.5
+0
’
.5
’
House
House
+0
.5
+0
’
.5
’
1
+0
.5
+0
’
.5
’
Sidewalk
Road
1
1
Planted Mound
(Lavender &
Tulips)
0’
2
Planted Mound
(Geraniums &
Poppies)
3
Rain Garden
4
Grass or Optional
Groundcover
4’
8’
5
16’
Mulch Pathway
Field Guide | DFC-lots.com | Holland Maze
11
Planting: Full Sun to Part Sun
Violet Intrigue
Lavender 1
Lavendula angustifolia
‘Violet Intrigue’
24” Height x 18” Width
Blooms July - August
Fragrant Flowers
Quantity: 69 pots
English Lavender2
Lavendula angustifolia
‘Hidcote’
24” Height x 18” Width
Blooms July - August
Fragrant Flowers
Quantity: 69 pots
Giant Hyssop3
Agastache ‘Blue Fortune’
24” Height x 18” Width
Blooms July - September
Fragrant Flowers
Quantity: 70 pots
Mixed Tulips4
14” Height x 8” Width
Blooms April - May
Avoid Planting in Wet Soil
Conditions
Quantity: 520 bulbs
Rozanne Geranium5
Geranium ‘Rozanne’
18” Height x 18” Width
Blooms May - July
Quantity: 30 pots
Cranesbill Geranium6
Geranium sanguineum
18” Height x 18” Width
Blooms May - July
Quantity: 30 pots
Purple Cranesbill7
Geranium magnificum+
18” Height x 18” Width,
Blooms May - July
Quantity: 30 pots
Mixed Poppies8
18” Height x 12” Width
Blooms May - June
Quantity: 1 lb. of seed
Plant Sizes
Blue Chip Jr. Butterfly
Bush9
Buddleia davidii ‘Blue
Chip Jr.’
18” Height x 18” Width
Blooms June - August
Attractive to Butterflies
Quantity: 16 pots
Pots: Plants can be purchased in
one to five gallon pots. Size of pots
can change based on availability.
Bulbs: Bulbs are cheaper if
purchased in bulk. You can find
bulk bags at garden stores.
Seeds: Mixed poppies can be
purchased in seed form.
The larger the pot, the greater the
impact your design will have when
first installed.
Image Source: 1) Lavender Blue, “Limbo Poet Having a Break for a While.” 07 July 2007 via Flickr, CC BY-NC 2.0; 2) Peter Reed, “Lavender.” 02 July 2006 via Flickr, CC BY-NC 2.0; 3)
“—char—“, “Bumblebee back.” 18 July 2008 via Flickr, CC BY-NC 2.0; 4) MookieLuv, “Mixed rows of tulips.” 18 April 2010 via Flickr, CC BY-NC 2.0; 5) “Mwms1916”, “’Rozanne’ geranium
blooms.” 21 June 2012 via Flickr, CC BY-NC 2.0; 6) Tapio Kaisla, “Wood Cranesbill (Geranium Sylvaticum).” 18 June 2009 via Flickr, CC BY-NC-ND 2.0 UK; 7) “Color Line”, “Rosestorkneeb –
Geranium magnificum No 2.” 21 June 2005 via Flickr, CC BY-NC 2.0; 8) Becca Taylor, “Mixed Popies.” 07 June 2005 via Flickr, CC BY-NC 2.0; 9) Ptelea “Buddleja davidii ‘Dart’s Purple Rain’”
28 July 2012 via Wikimedia, CC BY-SA 3.0
Field Guide | DFC-lots.com | Holland Maze
Alley
12
Planting: Full Sun to Part Sun
5
Key
1
2
3
Lavender (Violet Intrigue &
English), Giant Hyssop, &
Mixed Tulips (Space lavender
approximately two feet apart
and mix evenly. Space tulips
evenly between Lavender.)
1
Geranium (Rozanne & Cranesbill)
& Poppies (Space geraniums
approximately two feet apart and
mix evenly. Sprinkle poppies over
perennial bed after geraniums
have been planted.)
Blue Chip Jr. Butterfly Bush
(Space approximately three
feet apart and mix evenly.)
3
2
4
House
1
Field Guide | DFC-lots.com | Holland Maze
13
Did You Know?
Professionals Can Help!
The Field Guide to Working With
Lots provides a Construction
Package for each lot design. The
Construction Package includes
information and details required
for a professional to construct
this design. On the Field Guide
web site, use the Construction
Package link located near the
top of this lot design page
to download and print. Your
selected professional will then be
able to provide a cost estimate
and schedule based on the
condition of your lot and the
design you select.
Want to Hire Locally?
DFC-lots.com has a growing list
of Detroit-based professionals
and suppliers of landscape
materials and services.
Helpful Facts
·· Tulips still grow after they are cut and
continue to bloom for 3 to 7 days in a
vase.
·· There are currently about 150 species
of tulip bulbs with a total of 3,000
different varieties; however, not all
tulips will grow in Michigan. Make
sure you speak to a professional before
purchasing tulips for your lot design.
·· The recommended plants for this lot
design have been selected for beauty,
habitat creation, and local availability.
·· Lavender can be harvested for oil.
·· Rain gardens capture, hold, and
release stormwater gradually back into
the soil.
·· Looking for more information on rain
gardens? The Sierra Club of Detroit has
been running a rain garden program
since 2012 and is happy to help.
Planting Tips
·· Call ahead to be sure the nursery or
garden store has the plants you need
for your lot design.
·· The best time to plant is in spring or
fall.
·· Do not plant in extreme heat.
Still unsure of where to start?
Call (313) 294-LOTS or email
fieldguide@detroitfuturecity.
com for assistance.
·· Water after planting and as needed.
Do not let plants dry out.
·· Weed weekly or as needed.
·· Sprinkle a handful of pine bark, bone
meal, or organic bulb food in hole with
tulips for added nutrients.
Field Guide | DFC-lots.com | Holland Maze
14
Draw Your Lot
Field Guide | DFC-lots.com | Holland Maze
Holland Maze Field Notes
15
Field Guide | DFC-lots.com | Holland Maze
16
Visit DFC-lots.com
#DFClots
Image Source: Peter Toshiro, “At the Park: Tulip Garden.” 10 April 2011 via Flickr, All Rights Reserved.