1
ADPRO VideoCentral
by Xtralis
Installation and
Upgrade Instructions
March 2010
Part 201572.13
ADPRO VideoCentral by Xtralis
Installation and Upgrade Instructions
Disclaimer
The contents of this document are provided on an "as is" basis. No representation or warranty (either
express or implied) is made as to the completeness, accuracy or reliability of the contents of this document.
The manufacturer reserves the right to change designs or specifications without obligation and without
further notice. Except as otherwise provided, all warranties, express or implied, including without limitation
any implied warranties of merchantability and fitness for a particular purpose are expressly excluded.
Intellectual Property and Copyright
This document includes registered and unregistered trademarks. All trademarks displayed are the
trademarks of their respective owners. Your use of this document does not constitute or create a licence or
any other right to use the name and/or trademark and/or label.
This document is subject to copyright owned by Xtralis AG ("Xtralis"). You agree not to copy, communicate
to the public, adapt, distribute, transfer, sell, modify or publish any contents of this document without the
express prior written consent of Xtralis.
General Warning
This product must only be installed, configured and used strictly in accordance with the General Terms and
Conditions, User Manual and product documents available from Xtralis. All proper health and safety
precautions must be taken during the installation, commissioning and maintenance of the product. The
system should not be connected to a power source until all the components have been installed. Proper
safety precautions must be taken during tests and maintenance of the products when these are still
connected to the power source. Failure to do so or tampering with the electronics inside the products can
result in an electric shock causing injury or death and may cause equipment damage. Xtralis is not
responsible and cannot be held accountable for any liability that may arise due to improper use of the
equipment and/or failure to take proper precautions. Only persons trained through an Xtralis accredited
training course can install, test and maintain the system.
Liability
You agree to install, configure and use the products strictly in accordance with the User Manual and product
documents available from Xtralis.
Xtralis is not liable to you or any other person for incidental, indirect, or consequential loss, expense or
damages of any kind including without limitation, loss of business, loss of profits or loss of data arising out
of your use of the products. Without limiting this general disclaimer the following specific warnings and
disclaimers also apply:
Fitness for Purpose
You agree that you have been provided with a reasonable opportunity to appraise the products and have
made your own independent assessment of the fitness or suitability of the products for your purpose. You
acknowledge that you have not relied on any oral or written information, representation or advice given by
or on behalf of Xtralis or its representatives.
Total Liability
To the fullest extent permitted by law that any limitation or exclusion cannot apply, the total liability of Xtralis
in relation to the products is limited to:
(i) in the case of services, the cost of having the services supplied again; or
(ii) in the case of goods, the lowest cost of replacing the goods, acquiring equivalent goods or having the
goods repaired.
Indemnification
You agree to fully indemnify and hold Xtralis harmless for any claim, cost, demand or damage (including
legal costs on a full indemnity basis) incurred or which may be incurred arising from your use of the
products.
Miscellaneous
If any provision outlined above is found to be invalid or unenforceable by a court of law, such invalidity or
unenforceability will not affect the remainder which will continue in full force and effect. All rights not
expressly granted are reserved.
Doc 10944_13
i
Installation and Upgrade Instructions
ADPRO VideoCentral by Xtralis
Document Conventions
The following typographic conventions are used in this document.
Convention
Description
Bold
Used to denote: emphasis
Used for names of menus, menu options, toolbar buttons
Italics
Used to denote: references to other parts of this document or other documents.
Used for the result of an action
The following icons are used in this document
Convention
Description
Caution: This icon is used to indicate that there is a danger to equipment. The
danger could be loss of data, physical damage, or permanent corruption of
configuration details.
Warning: This icon is used to indicate that there is a danger of electric shock.
This may lead to death or permanent injury.
Warning: This icon is used to indicate that there is a danger of inhaling
dangerous substances. This may lead to death or permanent injury.
Tradename statement
ADPRO is a registered trademark of Xtralis AG Pty Ltd.
Contact Us
The Americas +1 781 740 2223 Asia +852 2916 8894 Australia and New Zealand +61 3 9936 7000
Continental Europe +32 56 24 19 51 UK and the Middle East +44 1442 242 330
www.xtralis.com
ii
Doc 10944_13
ADPRO VideoCentral by Xtralis
Installation and Upgrade Instructions
Contents
1.0
Overview.........................................................................................1
2.0
Scope Of This Guide......................................................................1
3.0
What is Video Central? ..................................................................1
4.0
Hardware and Operating System Requirements ..........................2
4.1 General..................................................................................2
4.2 PC Configuration Requirements .............................................2
Operating System Requirements............................................2
Installation Prerequisites ........................................................2
Hardware Requirements ........................................................3
4.3 Installing Communication Devices ..........................................5
Modems and Terminal Adaptors.............................................5
Communication Devices.........................................................5
Network Cards .......................................................................5
Installation/Upgrade Guidelines....................................................6
5.1 Security and Permissions .......................................................6
5.2 Install/Upgrade Timing ...........................................................7
5.3 Database Backup Time ..........................................................7
5.4 Video Central/Remote Transmitter Passwords........................7
5.5 Disable the File Indexing Service............................................7
5.6 Virus Scan Software...............................................................7
5.7 Disable Screensavers ............................................................7
5.8 Defragment Hard Drives.........................................................8
5.9 Archive Database...................................................................8
5.10 Close Other Applications........................................................8
5.11 Disable Themes (Windows XP SP2).......................................8
5.12 Enable Messenger Service (Windows XP SP2) ......................9
5.0
6.0
Single-PC Installation/Upgrade Instructions ................................9
6.1 Backup Video Central Database...........................................10
Accessing the Database Administration screen ....................10
Database Tasks ...................................................................11
6.2 Closing Video Central...........................................................13
6.3 Install Video Central .............................................................14
6.4 Import Site Details and Database .........................................20
6.5 Check System Functionality .................................................22
6.6 Store Video Central DVD......................................................22
Doc 10944_13
ADPRO F
Installation and Upgrade Instructions
7.0
ADPRO VideoCentral by Xtralis
Multi-PC Installation/Upgrade Instructions.................................23
7.1 Backup Database.................................................................24
Accessing the Database Administration screen ....................24
Database Tasks ...................................................................25
7.2 Closing Video Central Gold ..................................................27
7.3 Install Video Central on Database Server .............................27
7.4 Import Site Details and Database .........................................34
7.5 Check Database Functionality ..............................................36
7.6 Install Video Central Gold on Other PCs...............................36
7.7 Check System Functionality .................................................42
7.8 Store Video Central DVD......................................................42
Doc 10944_13
ADPRO VideoCentral by Xtralis
1.0
Installation and Upgrade Instructions
Overview
This instruction booklet provides information on the installation and
upgrade process for Video Central Lite and Gold.
2.0
Scope Of This Guide
These instructions include the following information:
What is Video Central?
System Configuration and PC recommendations
Installing/Upgrading Video Central Lite/Gold on a single PC
Installing/Upgrading Video Central Gold on a multiple PC network
This document describes the Video Central installation and upgrade
process in considerable detail for both a single PC environment and a
multiple PC environment. It is strongly recommended that this document be
followed extremely carefully to ensure that any installation or upgrade is
trouble-free. Any departure from the suggested sequence may cause loss
of data and/or functionality.
If you have any questions regarding your particular Video Central
configuration or the process, or at any point the functionality is not as
expected, please contact your supplier.
In addition to the sequence below, there may be special instructions for a
particular software release contained in the release notes. Please read any
release notes.
3.0
What is Video Central?
Video Central is a PC-based software package specifically designed to
monitor video from remote sites fitted with:
ADPRO FastScan – VST 10, VST 10plus, VST 10CA,
VST 10CAplus, FastScan 2 and FastScan Series III,
ADPRO FastVu by Xtralis,
ADPRO FastTrace by Xtralis,
ADPRO FastTx by Xtralis,
ADPRO VM41 FastScan by Xtralis, and
ADPRO InSight Video Alarm Systems.
Video Central is available in two editions:
GOLD is the full-featured edition for single and multi-user
environments supporting multiple operators, communication devices
and PCs.
Doc 10944_13
1
ADPRO V
Issue 6 2
Installation and Upgrade Instructions
ADPRO VideoCentral by Xtralis
LITE is a basic version of the software for users who do not require
the following features: multiple operators, active sites list, basic
integration, interactive maps and multiple communications interfaces.
NOTE:
If Video Central Gold is running in a networked scenario, all PCs
must be running the same version of Video Central Gold.
4.0
Hardware and Operating System Requirements
4.1
General
To satisfactorily operate Video Central, the software must be loaded on a
recommended minimum PC hardware configuration. The PC must run
under an approved operating system, and have the ability to connect to
remote sites using an internal or external PSTN modem, ISDN terminal
adaptor (TA) or via the PC’s Ethernet network card.
4.2
PC Configuration Requirements
Video Central Gold can run on a single PC or Laptop computer or, in
network configuration with multiple PCs and communications interfaces.
Xtralis recommend that Video Central is the only application installed on a
PC, and that the PC is used exclusively for Video Central. Xtralis does not
warrant any behaviour caused by incompatibility with another application
running on the same PC.
Operating System Requirements
Video Central has been tested and validated on the following platforms:
Windows 2000 Professional (Service Pack 4)
Windows XP Professional (Service Pack 2)
Windows 2003 Server
NOTE:
Using Server versions of operating system software for the PC
running the Database is recommended, as this can provide
significant performance and operational benefits.
Installation Prerequisites
®
Video Central contains Microsoft .NET components and requires .NET 1.1
®
and 2.0 be installed prior to Video Central being installed. Microsoft .NET
1.1 and 2.0 can be found on the Video Central DVD.
2
Doc 10944_13
ADPRO VideoCentral by Xtralis
Installation and Upgrade Instructions
Hardware Requirements
The following tables define the hardware requirements for Video Central.
Note that due to the many possible installation and configuration scenarios
of Video Central, these recommendations are only guidelines and higher
specified equipment may be required. Purchasing or upgrading to higher
specified equipment also offers a degree of ‘future-proofing’ as any new
features added to Video Central in the future may increase the minimum
equipment specification.
Once Video Central is installed and operating near its planned maximum,
i.e. during peak load in the Monitoring Station, an evaluation of each PC
should be performed. Parameters to check include memory and disk space
used. If any of the parameters are close to maximum, i.e. hard disk is
nearly full or available physical memory is low or the performance of the
Video Central GUI appears sluggish, hardware upgrades to the PC should
be considered to ensure maximum reliability and performance.
The specifications shown are for minimum and typical specifications for a
PC. In a typical scenario, where for instance four communications devices
could be installed on the one PC, a higher specification PC would be
required, such as a Pentium 4 Processor 2.4 GHz with 512 MB of memory.
System Element
Requirements
Processor
Intel Pentium III 800 MHz or AMD
Chassis
Sufficient PCI slots to fit all the required peripheral
cards / modems
Main memory
512 MB
Hard disk capacity
At least 10 GB free
CD-ROM
10 X or greater
Sound card
TrueSpeech compatible codec required for each PC
using audio
Video card / VGA driver
AGP/PCI, 1024 x 768 resolution, 24 bit colour
32 MB
Printer support
Appropriate ports to support logging and graphics
printer if used
1 x Serial port
For external modem, if required
1 x Serial port
For transparent date, if required
1 x Dongle (USB)
Required for each PC running the Session Handler
module. (The SH module is required for remote site
connection to modems, terminal adaptors and LAN)
Table 1 – Minimum PC Requirements For VC Lite/Gold
Doc 10944_13
3
ADPRO V
Issue 6 4
Installation and Upgrade Instructions
ADPRO VideoCentral by Xtralis
System Element
Requirements
Processor
Intel Pentium IV 2.4 GHz or AMD
Chassis
Sufficient PCI slots to fit all the required peripheral
cards / modems
Main memory
At least 512 MB
Hard disk capacity
At least 10 GB free
CD-ROM
10 X or greater
Sound card
TrueSpeech compatible codec required for each PC
using audio
Video card / VGA driver
AGP/PCI, 1024 x 768 resolution, 24 bit colour
32 MB; dual display for interactive maps
Printer support
Appropriate ports to support logging and graphics
printer if used
Serial ports
Multiple serial ports to support communication devices
and transparent data, if used
1 x Dongle (USB)
Required for each PC running the Session Handler
module. (The SH module is required for remote site
connection to modems, terminal adaptors and LAN)
Table 2 – Recommended PC Requirements For VC Gold
Communications Device
Requirements
Internal modem
Line speed = 14 k4 to 33 k6 bps or DTE
rate = 38 k4 to 115 k2 bps, V.34 with
standard Windows TAPI drivers.
External modem (1x serial com port /
modem)
Line speed = 14 k4 to 33 k6 bps or DTE
rate = 38 k4 to 115 k2 bps, V.34 with
standard Windows TAPI drivers.
ISDN Terminal Adaptor (TA)
Line speed = 64 kbps/128 kbps or DTE
rate = 115 k bps, V.120, Hayes AT
command set compatibility.
LAN card
Ethernet 10BaseT or 100BaseTX
compatible
Table 3 - Communication Device Requirements
4
Doc 10944_13
ADPRO V
Issue 6 4
ADPRO VideoCentral by Xtralis
4.3
Installation and Upgrade Instructions
Installing Communication Devices
Prior to installing Video Central, any communication devices should be
installed on the PC(s). This is done under the Phone/Modem options or
Network options on the Control Panel on Windows. Please refer to your IT
support personnel or Windows Help for details on how to install
communication devices.
The serial communications rely heavily on the performance of the serial
ports of the PC. Some PCs have serial ports that will not reliably support
the data rates required to communicate with ADPRO transmitters. If
problems are experienced on serial communications connections, please
check that the Video Central Session Handlers are not recording errors due
to overruns on the PC serial ports.
Modems and Terminal Adaptors
Video Central has been designed to work with industry-standard modems
and terminal adaptors (TA). Contact your supplier for a recommendation as
to which modem/TA to use. If using internal modems in your PC, no more
than one should be installed in any PC as performance and operation with
more than one internal modem may produce erroneous results.
Communication Devices
Video Central Lite only supports a single communications device.
Video Central Gold supports a maximum of eight communication devices
(also known as Session Handlers) on any one PC, which is fitted with a
dongle. Up to four of the communication devices can be any mix of
modems or TAs, the rest are allocated as TCP/IP interfaces (managed
through the one TCP/IP interface). For instance, if one modem and two
TAs are connected to a Video Central PC, then five TCP/IP Session
Handlers are available for connection via Ethernet. If a multi-port serial
expander card is required to support serial devices on a PC, please contact
your supplier for the recommended expander card.
Network Cards
Video Central can be used to connect to FastTrace, FastTx, FastVu and
Fast Scan Transmitters over an Ethernet network. Note that Fast Scan
Transmitters must be fitted with a third party Network Adaptor (VM53 or
MSS100). Network cards fitted to Video Central PCs must be compatible
with either 10BaseT or 100BaseTx cabling.
Doc 10944_13
5
ADPRO V
Issue 6 6
Installation and Upgrade Instructions
ADPRO VideoCentral by Xtralis
In some circumstances, two network cards may be required in one PC
running Video Central, one used to access an internal Ethernet network
and one used for external Ethernet communications to ADPRO
transmitters. Video Central uses the IP address and subnet mask of the
ADPRO transmitters to determine which interface will be used for
communication with the transmitters. Therefore it is extremely important to
ensure that all IP addresses used for transmitters are managed centrally, to
ensure correct operation of Video Central.
5.0
Installation/Upgrade Guidelines
This section contains generic guidelines about upgrading/installing Video
Central and should be read prior to commencing the install/upgrade
process.
NOTES: It is recommended the database be backed up prior to
installing/upgrading Video Central.
If upgrading from Video Central Lite the database must first be
backed up and then the Video Central Lite software must be
uninstalled prior to installing Video Central Gold.
Refer to Backup Video Central Database on page 10 for
instructions on backing up the Video Central database.
Uninstallation of Video Central Lite is performed from the Control
Panel under Windows. Please refer to Windows Help for details
on this process. It is recommended that the PC be restarted after
the uninstall process
After upgrading, the database can be re-imported into Video
Central Gold if necessary. This process is described in Import
Site Details and Database on page 21
5.1
Security and Permissions
To install or upgrade Video Central, Administrator level access is generally
required. Power User level access may be used, but depending on the
limitations placed on Windows from a security perspective, this may not be
successful.
Video Central requires access to the registry in operational mode. This
impacts on the access levels of operators who use Video Central. The
correct access can be achieved as follows:
6
Windows 2000 / XP - Power Users and Administrators have access
to the required registry sections by default. Users must be provided
the appropriate access.
Doc 10944_13
ADPRO VideoCentral by Xtralis
5.2
Installation and Upgrade Instructions
Install/Upgrade Timing
It is important to choose a period of little to no activity in a Monitoring
Station to perform an install or an upgrade. Determine the timing which
best suits your Monitoring Station’s activity level. The actual install/upgrade
should be able to be completed within an hour in even complex scenarios,
excluding the time elapsed to backup the database (refer to Database
Backup Time on page 7 for further details).
5.3
Database Backup Time
The Video Central database can take a considerable time to backup. The
length of time to backup depends on the amount of data stored in the
database, which is directly influenced by how often backups are performed
and the activity that the Monitoring Station experiences. Experience of
performing a backup on your Video Central configuration will deliver the
best guideline as to the amount of time to allocate to this process, but it
could take several hours to backup a month’s data from a busy Monitoring
Station.
5.4
Video Central/Remote Transmitter Passwords
When upgrading/installing Video Central it is vitally important to ensure the
correct passwords are entered into site details for each ADPRO remote
video transmitter to access the transmitter. Video Central must use the
CMS Password to access transmitters.
5.5
Disable the File Indexing Service
To conserve memory resources, the Index Service should be disabled on
all drives used by Video Central. To perform this:
1. Open Windows Explorer, right click on a drive and select Properties.
2. Deselect the check box labelled Allow Indexing Service to index this
disk for fast file searching.
5.6
Virus Scan Software
Virus Scan software can interfere with the efficient running of Video
Central, particularly in busy Central Monitoring Stations. The software
should be configured for manual scan, and the scan performed during an
off-peak time in the Monitoring Station.
5.7
Disable Screensavers
Screensavers should be disabled as follows:
1. Go to Start / Control Panel / Display and select the Screensaver tab.
2. Set the Screensaver dropdown list to None.
Doc 10944_13
7
ADPRO V
Issue 6 8
Installation and Upgrade Instructions
5.8
ADPRO VideoCentral by Xtralis
Defragment Hard Drives
The hard drives on the database machine should be defragmented
regularly to maintain hard disk performance. This must be performed
without any applications running. To do this:
1. Go to Start / All Programs / Accessories / System Tools / Disk
Defragmenter.
2. Select Defragment.
5.9
Archive Database
The Video Central database stores all the video and audio information
received by Video Central and can grow to a large size. The database
should be regularly archived to ensure data is backed up, as well as
maintain Video Central performance. Please refer to the Video Central
online help or Backup Video Central Database on page 10 for details of
archiving data.
5.10
Close Other Applications
The number of applications running on the Video Central PCs must be kept
to a minimum to ensure resources are available for Video Central to
operate efficiently. Any unnecessary applications should not be used whilst
Video Central is in operation.
5.11
Disable Themes (Windows XP SP2)
With Windows XP SP2 installed, after multiple connection/disconnections
(usually several hundred) the number of GDI Objects created will reach the
Windows Operating System limit of 9,999. Once this limit is reached, a
message is displayed stating there is insufficient memory and the user
interface may not perform correctly. To work around this problem, perform
the following:
1. Go to Start / Control Panel.
2. Click Display.
3. On the Themes tab of the Display Properties dialog box, click
Windows Classic in the Theme list.
4. Click Apply, and then click OK.
To correct this problem, contact Microsoft Product Support Services to
obtain the hotfix.
Visit http://support.microsoft.com, select Search (Knowledge Base) and
search for ID: 319740.
8
Doc 10944_13
ADPRO VideoCentral by Xtralis
5.12
Installation and Upgrade Instructions
Enable Messenger Service (Windows XP SP2)
If you are using Windows XP and have installed Service Pack 2, the
following message will appear when the Video Central User Interface is
run:
“The Video Central Database could not start the Messenger Service. The
service cannot be started, either because it is disabled or because it has no
enabled devices associated with it. Low disk space warnings and task
completion messages will not be sent unless this service is running.”
This warning is caused by Service Pack 2, which disables the Messenger
service when it is installed. To fix this problem in Windows XP:
1. Go to Start / Control Panel / Administrative Tools / Services.
2. Right click on Messenger, select Properties and set the Startup type
to Automatic.
When Video Central is restarted it will spend some time starting the
service, and then you will receive a message saying:
“The Video Central Database has started the Messenger Service so that
messages such as low disk space warnings and task completion messages
can be sent. It was not running.”
This confirms that it is now working.
6.0
Single-PC Installation/Upgrade Instructions
The following upgrade process describes the recommended sequence in
detail for upgrade and installation in a single PC environment for Video
Central Lite or Gold. If a new Video Central installation is being performed,
then the ‘Backup’ section is not required, as there is no existing Video
Central data to backup. The previous version of Video Central Gold does
not need to be removed if upgrading to a new version of Video Central
Gold. If upgrading from Video Central Lite, this must first be un-installed.
Refer to Installation/Upgrade Guidelines on page 6 for further details.
NOTE:
6.1
6.2
6.3
6.4
6.5
6.6
Some steps are only required for Video Central Gold or Lite. The
setup screens do not appear for the other versions. These steps
are marked as such.
Backup Video Central Database (not required for new install)
Closing Video Central (not required for new install)
Install Video Central
Import data (if required)
Check System Functionality
Store Video Central DVD
Doc 10944_13
9
Installation and Upgrade Instructions
6.1
NOTE:
ADPRO VideoCentral by Xtralis
Backup Video Central Database
This step is not required for a new installation of Video Central.
Please continue to the next step.
The first step is to backup all the site information in the Video Central
database. This should always be done on a regular basis to ensure that the
monitoring station can be restarted quickly in the event of a PC crash.
Although every effort is made to ensure database compatibility, Xtralis
cannot guarantee backwards compatibility between software versions of
Video Central. Therefore it is important that prior to upgrade, a database
backup is performed so that if for any reason, you must revert to a previous
version of Video Central, you will have a compatible database.
NOTE:
Alarms received whilst a backup is in progress may not get
included in the current backup, but will be included in the next
backup sequence.
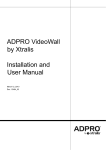
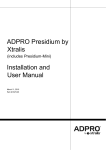
Accessing the Database Administration screen
Select the Database / Administration menu selection on Video Central
Gold to gain access to the Administration menu as shown below.
Figure 1 - Database Administration Access
NOTE:
10
You may require ADMINISTRATOR privileges on the PC to
perform the backup, or an ADMINISTRATOR logon under Video
Central if using User Logons.
Doc 10944_13
ADPRO VideoCentral by Xtralis
Installation and Upgrade Instructions
Select Database Management and a screen with five tabs will appear to
select between the five different types of database functions that can be
performed:
Database Archive Locations
Database Tasks
Database Task Queue
General Functions
User Functions
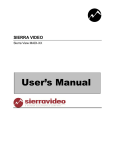
Database Tasks
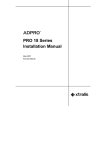
Click on the Tasks tab to carry out data administration tasks. The following
screen will appear:
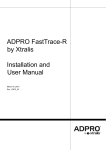
Figure 2 - Database Tasks Screen
To Export site details:
Under the Tasks tab, select the Export button. A similar screen will
appear:
Doc 10944_13
11
Installation and Upgrade Instructions
ADPRO VideoCentral by Xtralis
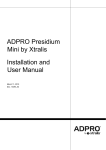
Figure 3 - Export Site Details
Select all site details to be exported, the file to which to export, and then
click OK. This process will store all site details (with no image or event
records) in a single file. To select multiple sites, hold down the CTRL key
and select another site, or use the Select All button to select all sites.
To Backup site details:
Under the Tasks tab, select the Backup button. A similar screen will
appear:
Figure 4 - Backup Site Data Screen
12
Doc 10944_13
ADPRO VideoCentral by Xtralis
Installation and Upgrade Instructions
Pick all sites to backup by using the Select All button.
Select a date range between which the information is to be backedup (the back-up will go from 00:00:00 hours of the first date through
st
to 23:59:59 hours of the last date). The default From date will be 1
January 1990 whilst the default To date will be the current date. Set
the “From Date” to the date when the last backup was performed.
Select a folder location to export to. If an export has been carried out
previously and you wish to write to the same file(s), use the dropdown menu to the right of the text box. Alternatively use the browse
button
to select the required location / file.
Press the OK button to start the backup / archive. A confirmation box
will be presented to verify the intended actions. If all information is
correct click the Yes tab.
The backup function will take varying times, depending upon the amount of
data to be backed up. The current status of the backup can be seen by
looking at the Tasks list (click on the Task Queue tab). Notification of
successful backup will be displayed on the relevant PC(s).
6.2
NOTE:
Closing Video Central
This step is not required for a new installation of Video Central
Gold. Please continue to the next step.
Video Central should now be shut down. To shut down the software either
select File / Exit or left-click on the Message Director Icon in the bottom
right-hand corner of the screen, and select File / Exit Video Central on the
Message Director menu.
Figure 5 - Shutting down Video Central Gold
Doc 10944_13
13
Installation and Upgrade Instructions
NOTE:
6.3
ADPRO VideoCentral by Xtralis
If upgrading from Video Central Lite to Video Central Gold, you
must first uninstall Video Central Lite before installing Video
Central Gold.
Install Video Central
The next step is to install the new Video Central software. Insert the DVD
into the appropriate drive. If the DVD does not autorun, select the
AutorunEx application from the drive from Windows Explorer. The
following screen will appear.
Figure 6 – Installation Screen
STEP 1:
Select Video Central Gold or Video Central Lite, the following
window is displayed.
Figure 7 - Video Central Setup Wizard Introduction Screen
14
Doc 10944_13
ADPRO V
Issue 6 1
ADPRO VideoCentral by Xtralis
Installation and Upgrade Instructions
STEP 2:
After checking that the version number that you are upgrading to
is correct, click NEXT. At any point during the installation, you
can go back any number of steps by clicking BACK.
STEP 3:
Check that the location shown is where you wish to install Video
Central. If it is correct, click NEXT, otherwise BROWSE and
select the location.
Figure 8 - Installation Location
STEP 4:
VC Lite Only
To be able to access setups on the FastTrace/FastTx or accept
incoming calls, you must select the YES option as shown in
Figure 9. To receive alarms, a dongle must also be fitted to your
PC. If using Video Central Lite without a dongle, Video Central
Lite will not answer incoming calls therefore is not suitable for
alarm monitoring.
Figure 9 - Transmitter Alarm Management Screen
Doc 10944_13
15
ADPRO V
14
Installation and Upgrade Instructions
ADPRO VideoCentral by Xtralis
If you select YES as shown in Figure 9, the CMS password
must be used to access ADPRO transmitters, and if you select
NO, the Observer password must be used to access ADPRO
transmitters.
STEP 4:
VC Gold Only
Select the Single-User option and click NEXT.
Figure 10 - Single/Multi User Selection
STEP 5:
Check that the location of the Database is correct. If so, click
NEXT, otherwise BROWSE and select the folder. This folder
should be where the Database of the previous version of Video
Central was stored if the system is being upgraded.
Figure 11 - Database Software Location
16
Doc 10944_13
ADPRO V
Issue 6 1
ADPRO VideoCentral by Xtralis
STEP 6:
Installation and Upgrade Instructions
VC Gold Only
If the Basic Integration capability is being used (i.e. Video
Central is passing alarm data to third party Central Station
software), select YES and click NEXT. If it is not being used,
select NO and click NEXT.
Figure 12 - Basic Integration Selection
STEP 7:
VC Gold Only
If Basic Integration is being used, check that the
communications settings are correct, make any required
changes and click NEXT.
Figure 13 - Basic Integration Options
NOTE:
Ensure that the COM port specified is not used for connection to
a modem or terminal adaptor.
Doc 10944_13
17
ADPRO V
Issue 6 1
Installation and Upgrade Instructions
STEP 8:
NOTE:
ADPRO VideoCentral by Xtralis
Enable the appropriate communication devices to be used for
Video Central by checking the appropriate boxes next to the
communications devices. Communication devices can also be
added after Video Central has been installed.
Video Central Lite only allows a single communication device to
be used. Video Central Gold allows multiple communication
devices.
Figure 14 - Communication Devices
NOTE:
STEP 9:
The Network adaptor only needs to be enabled if Ethernet
communications are to be used for communicating to the
Transmitters. Even though a Video Central PC may use the
network to communicate with other company IT infrastructure, this
setting only applies to communications with ADPRO Transmitters.
Configure the Modems and TAs for PSTN or ISDN operation as
appropriate.
Figure 15 - Connection Types for Modems and TAs
18
Doc 10944_13
ADPRO VideoCentral by Xtralis
Installation and Upgrade Instructions
STEP 10: Configure the PSTN devices for the number of rings required to
answer and for phone line checking (if required).
Figure 16 - Modem Setup
STEP 11: Configure the TA / Modem checking for ISDN devices.
Figure 17 – AT Checking
Doc 10944_13
19
ADPRO V
Issue 6 1
Installation and Upgrade Instructions
ADPRO VideoCentral by Xtralis
STEP 12: Check that the summary screen displays your required
installation options, then click FINISH to complete the install, or
click BACK to change an option.
Figure 18 - Installation Confirmation
STEP 13: Once the install has completed, reboot the PC.
6.4
NOTE:
Import Site Details and Database
This step is only required if the Site Details and Database are
being transferred to a new system.
The site details backed up under Database Tasks, can now be re-imported
into Video Central. With Video Central running, click on Database /
Administration / Database Management menu selection.
Figure 19 - Database Administration Access
20
Doc 10944_13
ADPRO VideoCentral by Xtralis
Installation and Upgrade Instructions
Click on the Tasks tab to carry out data administration tasks. The following
screen will appear:
Figure 20 - Database Tasks Screen
STEP 1:
Under the Tasks tab, select the Import button. A similar screen
will appear:
Figure 21 - Import Site Details
Select the file to which the site details were previously exported,
and click OK. The site details will now be imported into the Video
Central Database.
STEP 2:
Doc 10944_13
To link the archived database to the new Video Central
Database, select the Database tab and a similar screen will
appear.
21
Installation and Upgrade Instructions
ADPRO VideoCentral by Xtralis
Figure 22 - Database Screen
STEP 3:
6.5
Click Add, and select the location of the archived database, then
click OK. This data will now be available to be searched from
Video Central.
Check System Functionality
The final stage is to check the system functionality of Video Central. The
following capability should be confirmed:
6.6
Ability to connect to all Transmitter types monitored and with video
and audio transmission (where used)
Ability to receive alarms from all Transmitter types monitored
Connection to multiple sites simultaneously where more than one
communication device is used (Video Central Gold only)
Access to setup menus on each different type of transmitter
Access to remotely change control outputs
Database search and retrieval of data from the Video Central
Database
Store Video Central DVD
At this stage it is important to store the Video Central Upgrade DVD for
future use, or to enable a smooth recovery process in the instance of a
hard disk failure.
If your company has a data or configuration management plan, then the
software should be stored according to that plan. If not, make a backup of
the DVD and give one copy to the person responsible for the IT within the
Central Station or the Video Central administrator, and the other copy to
the Central Station manager.
22
Doc 10944_13
ADPRO VideoCentral by Xtralis
7.0
Installation and Upgrade Instructions
Multi-PC Installation/Upgrade Instructions
This section is only applicable to Video Central Gold.
The following upgrade process describes the recommended sequence in
detail for upgrade and installation in a Multi-PC environment. If a new Video
Central Gold installation is being performed, then the ‘Backup’ section is
not required, as there is no existing Video Central data to backup. The
previous version of Video Central Gold does not need to be removed prior
to installing the new version. If upgrading from Video Central Lite, this must
first be un-installed. Refer to Installation/Upgrade Guidelines on page 6 for
further details.
7.1
7.2
7.3
7.4
7.5
7.6
7.7
7.8
Backup Database (not required for new install)
Closing Video Central (not required for new install)
Install Video Central on Database Server
Import site details and database
Check Database Functionality
Install Video Central on Other PCs
Check System Functionality
Store Video Central DVD
There may be PCs on the network that perform more than one function
above, for instance the Database Server might also have Session Handlers
(i.e. communication devices such as modems and terminal adaptors)
connected, or PCs with Session Handlers might also be used as User
Interfaces. As the software is installed or upgraded on each PC, it is
important to check that the functionality of each PC is as expected.
WARNING: When Video Central is installed in a Multi-PC
environment, the IP address of the PC with the
Database is recorded in the other PCs with Video
Central installed. If for whatever reason, the IP
address of the Database PC is changed, the Video
Central system will stop functioning until a Video
Central Database with the correct IP address is
reinstated. This situation will also occur if the MultiPC installation is selected on a single PC at
installation time. If the IP address of the single PC is
altered, then Video Central will cease to function.
Doc 10944_13
23
ADPRO V
Issue 6 2
Installation and Upgrade Instructions
7.1
ADPRO VideoCentral by Xtralis
Backup Database
NOTE:
This step not required for a new installation of Video Central Gold.
Please continue to the next step.
The first step is to backup all the site information in the Video Central
database. This should always be done on a regular basis to ensure that the
monitoring station can be restarted quickly in the event of a PC crash.
Although every effort is made to ensure database compatibility, Xtralis
cannot guarantee backwards compatibility between software versions of
Video Central. Therefore it is important that prior to upgrade, a database
backup is performed so that if for any reason, you must revert to a previous
version of Video Central, you will have a compatible database.
NOTE: Alarms received whilst a backup is in progress may not get
included in the current backup, but will be included in the next
backup sequence.
From the Database Server, perform the following sequence:
Accessing the Database Administration screen
All Database functions must be carried out at the PC where the main Video
Central Database resides. On a Multi User system the Database module
sits in the Taskbar at the bottom of the main Windows screen.
Figure 23 - Database Administration Access
NOTE:
You may require ADMINISTRATOR privileges on the PC to
perform the upgrade, or an ADMINISTRATOR logon under Video
Central if using User Logons.
Select Database Management; a screen with five tabs will appear to select
between the five different types of database functions that can be
performed:
24
Database Archive Locations
Database Tasks
Database Task Queue
General Functions
User Functions
Doc 10944_13
ADPRO V
Issue 6 2
ADPRO VideoCentral by Xtralis
Installation and Upgrade Instructions
Database Tasks
Click on the Tasks tab to carry out data administration tasks. The following
screen will appear:
Figure 24 - Database Tasks Screen
STEP 1:
Under the Tasks tab, select the Export button. A similar screen
will appear:
Figure 25 - Export Site Details
Select all site details to be exported, the file to which to export,
and then click OK. This process will store all site details (with no
image or event records) in a single file. To select multiple sites,
hold down the CTRL key and select another site, or use the
Select All button to select all sites.
Doc 10944_13
25
Installation and Upgrade Instructions
STEP 2:
ADPRO VideoCentral by Xtralis
Under the Tasks tab, select the Backup button. A similar screen
will appear:
Figure 26 - Backup Site Data Screen
Pick all sites to backup by using the Select All button.
Select a date range between which the information is to be backedup (the back-up will go from 00:00:00 hours of the first date through
st
to 23:59:59 hours of the last date). The default From date will be 1
January 1990 whilst the default To date will be the current date. Set
the From Date to the date when the last backup was performed.
Select a folder location to export to. If an export has been carried out
previously and you wish to write to the same file(s), use the dropdown menu to the right of the text box. Alternatively use the browse
button
to select the required location / file.
Press the OK button to start the backup / archive. A confirmation box
will be presented to verify the intended actions. If all information is
correct click the Yes tab.
The backup function will take varying times, depending upon the amount of
data to be backed up. The current status of the backup can be seen by
looking at the Tasks list (click on the Task Queue tab). Notification of
successful backup will be displayed on the relevant PC(s).
26
Doc 10944_13
ADPRO VideoCentral by Xtralis
7.2
NOTE:
Installation and Upgrade Instructions
Closing Video Central Gold
This step not required for a new installation of Video Central Gold.
Please continue to the next step.
All Video Central applications should now be shut down on all PCs on the
Video Central network. To shut down Video Central, left-click on the
Message Director Icon in the bottom right-hand corner of the screen, and
select File / Exit Video Central on the Message Director menu.
NOTE:
It is important to shut down Video Central on the PCs with
Session Handlers after ensuring that all alarms have been
acknowledged, followed by PCs with User Interfaces, and finally
the Database.
Figure 27 - Shutting down Video Central Gold
7.3
Install Video Central on Database Server
The next step is to install the new Video Central software on the Database
PC. Insert the DVD into the appropriate drive. If the DVD does not autorun,
select the AutorunEx application from the drive from Windows Explorer.
The following screen will appear.
Figure 28 – Installation Screen
Doc 10944_13
27
Installation and Upgrade Instructions
STEP 1:
ADPRO VideoCentral by Xtralis
Select Video Central Gold, the following window is displayed.
Figure 29 - Video Central Setup Wizard Introduction Screen
STEP 2:
After checking that the version number that you are upgrading to
is correct, press NEXT. At any point during the installation, you
can go back any number of steps by clicking BACK.
STEP 3:
Check that the location shown is where you wish to install Video
Central. If it is correct, click NEXT, otherwise BROWSE and
select the location.
Figure 30 - Installation Location
28
Doc 10944_13
ADPRO VideoCentral by Xtralis
STEP 4:
Installation and Upgrade Instructions
Select the user option as required, i.e. if the Video Central
system is going to be run on more than one PC using a central
database, select the Multi-User option and click NEXT.
Figure 31 - Single/Multi User Selection
STEP 5:
The Video Central Database will be stored on this PC, so select
YES and click NEXT. Take note of the IP address and name of
the computer for use when installing the software on the other
PCs.
Figure 32 - Database Selection
Doc 10944_13
29
ADPRO V
Issue 6 3
Installation and Upgrade Instructions
STEP 6:
ADPRO VideoCentral by Xtralis
Check that the location of the Database is correct. If so, click
NEXT, otherwise BROWSE and select the folder. This folder
should be where the Database of the previous version of Video
Central was stored.
Figure 33 - Database Software Location
STEP 7:
If the Basic Integration capability is being used (i.e. Video
Central is passing alarm data to third party Central Station
software), select YES and click NEXT. If it is not being used,
select NO and click NEXT. The Basic Integration functionality is
only available on the Database Server PC.
Figure 34 - Basic Integration Selection
30
Doc 10944_13
ADPRO VideoCentral by Xtralis
STEP 8:
Installation and Upgrade Instructions
If Basic Integration is being used, check that the
communications settings are correct, make any required
changes and click NEXT.
Figure 35 - Basic Integration Options
NOTE:
Ensure that the COM port specified is not used for connection to
a modem or terminal adaptor.
STEP 9:
Enable the appropriate communication devices to be used for
Video Central on this PC by checking the appropriate boxes next
to the communications devices. Communication devices can be
added after Video Central has been installed.
Figure 36 - Communication Devices
NOTE:
The Network adaptor only needs to be enabled if Ethernet
communications are to be used for communicating to the
Transmitters. Even though the Video Central PCs use the
network to communicate between themselves, this setting only
applies to communications with Transmitters.
Doc 10944_13
31
ADPRO V
Issue 6 3
Installation and Upgrade Instructions
ADPRO VideoCentral by Xtralis
STEP 10: If the Database Server machine also supports communications
devices, configure the Modems and TAs for PSTN or ISDN
operation as appropriate.
Figure 37 - Connection Types for Modems and TAs
STEP 11: If the Database Server machine also supports communications
devices, configure the PSTN devices for the number of rings
required to answer and for phone line checking (if required).
Figure 38 - Modem Setup
32
Doc 10944_13
ADPRO VideoCentral by Xtralis
Installation and Upgrade Instructions
STEP 12: Configure the TA / Modem checking for ISDN devices.
Figure 39 – AT Checking
STEP 13: Check that the summary screen displays your required
installation options, then click FINISH to complete the install, or
click BACK to change an option.
Figure 40 - Installation Confirmation
STEP 14: Once the install has completed, reboot this PC and start Video
Central Gold if it does not automatically start.
Doc 10944_13
33
ADPRO V
Issue 6 3
Installation and Upgrade Instructions
7.4
ADPRO VideoCentral by Xtralis
Import Site Details and Database
NOTE:
This step is only required if the Site Details and Database are
being transferred to a new system.
The site details backed up under Database Tasks, can now be re-imported
into Video Central Gold on the PC running the Database. With Video
Central running, select Database on the taskbar menu.
Figure 41 - Database Administration Access
Select Database Management and click on the Tasks tab to carry out data
administration tasks. The following screen will appear:
Figure 42 - Database Tasks Screen
34
Doc 10944_13
ADPRO VideoCentral by Xtralis
STEP 1:
Installation and Upgrade Instructions
Under the Tasks tab, select the Import button. A similar screen
will appear:
Figure 43 - Import Site Details
Select the file to which the site details were previously exported,
and click OK. The site details will now be imported into the
Video Central Gold Database.
STEP 2:
To link the archived database to the new Video Central Gold
Database, select the Database Tab and a similar screen will
appear.
Select Add and select the location of the archived database,
then click OK. This data will now be available to be searched
from Video Central Gold.
Figure 44 - Database Menu
Doc 10944_13
35
ADPRO V
Issue 6 3
Installation and Upgrade Instructions
7.5
ADPRO VideoCentral by Xtralis
Check Database Functionality
The Database Functionality should now be checked. The following
capability should be checked:
7.6
Check that all sites are present in the Database as expected.
Perform a Database search within the Video Central database to
check that all expected events are still present in the Database.
If the Database Server also supports communication devices, check
that connections can be established to each transmitter type being
monitored.
Install Video Central Gold on Other PCs
The next step is to install the new Video Central software on the other PCs,
which support communication devices (Session Handlers) and user
interfaces. Each PC should be upgraded in turn and functionality confirmed
before commencing on the next PC. Insert the DVD into the appropriate
drive. If the DVD does not autorun, select the AutorunEx application from
the drive from Windows Explorer. The following screen will appear.
Figure 45 – Installation Screen
STEP 1:
36
Select Video Central Gold, the following window is displayed.
Doc 10944_13
ADPRO V
Issue 6 3
ADPRO VideoCentral by Xtralis
Installation and Upgrade Instructions
Figure 46 - Video Central Setup Wizard Introduction Screen
STEP 2:
After checking that the version number that you are upgrading to
is correct, press NEXT. At any point during the installation, you
can go back any number of steps by clicking BACK.
STEP 3:
Check that the location shown is where you wish to install Video
Central. If it is correct, click NEXT, otherwise BROWSE and
select the location.
Figure 47 - Installation Location
Doc 10944_13
37
Installation and Upgrade Instructions
STEP 4:
ADPRO VideoCentral by Xtralis
Select the Multi-User option and click NEXT.
Figure 48 - Single/Multi User Selection
STEP 5:
The Video Central Database will not be stored on this PC, so
select NO and click NEXT.
Figure 49 - Database Selection
38
Doc 10944_13
ADPRO VideoCentral by Xtralis
STEP 6:
Installation and Upgrade Instructions
Specify the location of the Database Server either by name or by
IP address. Click the TEST button to confirm that the Database
Server can be seen by this PC. It is important that if you select
NO, ensure that the IP address of the Database PC is correctly
entered otherwise the system will not function.
Figure 50 Database
Location
STEP 7:
Enable the appropriate communication devices to be used for
Video Central by checking the appropriate boxes next to the
communications devices. Communication devices can be added
after Video Central has been installed.
Figure 51 - Communication Devices
NOTE:
The Network adaptor only needs to be enabled if Ethernet
communications are to be used for communicating to the
Transmitters. Even though the Video Central PCs use the
network to communicate between themselves, this setting only
applies to communications with Transmitters.
STEP 8: Configure the Modems and TAs for PSTN or ISDN operation as
appropriate.
Doc 10944_13
39
ADPRO V
Issue 6 4
Installation and Upgrade Instructions
ADPRO VideoCentral by Xtralis
Figure 52 - Connection Types for Modems and TAs
STEP 9:
Configure the PSTN devices for the number of rings required to
answer and for phone line checking (if required).
Figure 53 - Modem Setup
STEP 10: Configure the TA / Modem checking for ISDN devices.
40
Doc 10944_13
ADPRO VideoCentral by Xtralis
Installation and Upgrade Instructions
Figure 54 – AT Checking
STEP 11: Check that the summary screen displays your required
installation options, then click FINISH to complete the install, or
click BACK to change an option.
Figure 55 - Installation Confirmation
Doc 10944_13
41
STEP 12: Once the install has completed, reboot this PC and start Video
Central Gold if it does not automatically start.
As each PC has the software installed or upgraded the following
functionality should be confirmed, with Video Central Gold running on the
Database Server:
7.7
Access to the Database, i.e. all sites are visible for possible
connection
Ability to communicate with each transmitter type on all
communication devices
Check System Functionality
Once the software has been upgraded/installed on all PCs, the system
functionality should be confirmed as follows:
7.8
Ability to receive alarms on all User Interfaces
Receiving alarms from multiple sites simultaneously on multiple User
Interfaces
Connection to multiple sites simultaneously with video and audio
transmission from multiple User Interfaces
Access to setup menus on each different type of transmitter
Access to remotely change control outputs
Video Central Database search and retrieval of data from all User
Interfaces
Store Video Central DVD
At this stage it is important to store the Video Central Upgrade DVD for
future use, or to enable a smooth recovery process in the instance of a
hard disk failure on one of the PCs.
If your company has a data or configuration management plan, then the
software should be stored according to that plan. If not, make a backup of
the DVD and give one copy to the person responsible for the IT within the
Central Station or the Video Central administrator, and the other copy to
the Central Station manager.
www.xtralis.com
The Americas +1 781 740 2223 Asia +852 2916 8894 Australia and New Zealand +61 3 9936 7000
Continental Europe +32 56 24 19 51 UK and the Middle East +44 1442 242 330
The contents of this document are provided on an “as is” basis. No representation or warranty (either express or implied) is made as to
the completeness, accuracy or reliability of the contents of this document. The manufacturer reserves the right to change designs or
specifications without obligation and without further notice. Except as otherwise provided, all warranties, express or implied, including
without limitation any implied warranties of merchantability and fitness for a particular purpose are expressly excluded.
This document includes registered and unregistered trademarks. All trademarks displayed are the trademarks of their respective
owners. Your use of this document does not constitute or create a licence or any other right to use the name and/or trademark and/or
label.This document is subject to copyright owned by Xtralis AG (“Xtralis”). You agree not to copy, communicate to the public, adapt,
distribute, transfer, sell, modify or publish any contents of this document without the express prior written consent of Xtralis.
Doc. 10944_13