1
®
ADPRO
FastTrace 2
FastTrace 2
by Xtralis
Quick Setup Guide
September, 2012
Doc. 21778_01
ADPRO FastTrace 2 FastTrace 2 by Xtralis
Quick Setup Guide
Disclaimer
The contents of this document are provided on an "as is" basis. No representation or warranty (either express or implied) is made as to
the completeness, accuracy or reliability of the contents of this document. The manufacturer reserves the right to change designs or
specifications without obligation and without further notice. Except as otherwise provided, all warranties, express or implied, including
without limitation any implied warranties of merchantability and fitness for a particular purpose are expressly excluded.
Intellectual Property and Copyright
This document includes registered and unregistered trademarks. All trademarks displayed are the trademarks of their respective owners.
Your use of this document does not constitute or create a license or any other right to use the name and/or trademark and/or label. This
document is subject to copyright owned by Xtralis AG ("Xtralis"). You agree not to copy, communicate to the public, adapt, distribute,
transfer, sell, modify or publish any contents of this document without the express prior written consent of Xtralis.
General Warning
This product must only be installed, configured and used strictly in accordance with the General Terms and Conditions, Technical and
User Manual and product documents available from Xtralis. All proper health and safety precautions must be taken during the installation,
commissioning and maintenance of the product. The system should not be connected to a power source until all the components have
been installed. Proper safety precautions must be taken during tests and maintenance of the products when these are still connected to
the power source. Failure to do so or tampering with the electronics inside the products can result in an electric shock causing injury or
death and may cause equipment damage. Xtralis is not responsible and cannot be held accountable for any liability that may arise due to
improper use of the equipment and/or failure to take proper precautions. Only persons trained through an Xtralis accredited training
course can install, test and maintain the system.
Liability
You agree to install, configure and use the products strictly in accordance with the User Manual and product documents available from
Xtralis.
Xtralis is not liable to you or any other person for incidental, indirect, or consequential loss, expense or damages of any kind including
without limitation, loss of business, loss of profits or loss of data arising out of your use of the products. Without limiting this general
disclaimer the following specific warnings and disclaimers also apply:
Fitness for Purpose
You agree that you have been provided with a reasonable opportunity to appraise the products and have made your own independent
assessment of the fitness or suitability of the products for your purpose. You acknowledge that you have not relied on any oral or written
information, representation or advice given by or on behalf of Xtralis or its representatives.
Total Liability
To the fullest extent permitted by law that any limitation or exclusion cannot apply the total liability of Xtralis in relation to the products is
limited to:
(i) in the case of services, the cost of having the services supplied again; or
(ii) in the case of goods, the lowest cost of replacing the goods, acquiring equivalent goods or having the goods repaired.
Indemnification
You agree to fully indemnify and hold Xtralis harmless for any claim, cost, demand or damage (including legal costs on a full indemnity
basis) incurred or which may be incurred arising from your use of the products.
Miscellaneous
If any provision outlined above is found to be invalid or unenforceable by a court of law, such invalidity or unenforceability will not affect
the remainder which will continue in full force and effect. All rights not expressly granted are reserved.
Document Conventions
The following icons conventions are used in this document.
Convention
Description
Caution: This icon is used to indicate that there is a danger to equipment. The danger could be loss of data,
physical damage, or permanent corruption of configuration details.
Warning: This icon is used to indicate that there is a danger of electric shock. This may lead to death or
permanent injury.
Warning: This icon is used to indicate that there is a danger of inhaling dangerous substances. This may
lead to death or permanent injury.
Tradename statement
ADPRO is a registered trademark of Xtralis AG Pty Ltd.
Contact Us
The Am ericas +1 781 740 2223 Asia +852 2916 8876 Australia and New Zealand +61 3 9936 7000
UK and Europe +44 1442 242 330 Middle East +962 6 588 5622
www.xtralis.com
Doc. 21778_01
i
Quick Setup Guide
ii
ADPRO FastTrace 2 FastTrace 2 by Xtralis
Doc. 21778_01
ADPRO FastTrace 2 FastTrace 2 by Xtralis
Quick Setup Guide
Contents
1 Packing List .............................................................................................................................1 2 Power Requirements...............................................................................................................1 3 Safety Instructions ..................................................................................................................1 4 Technical Documents .............................................................................................................1 5 Installing the FastTrace 2 Client Software on your Computer ..............................................1 5.1 5.2 5.3 5.4 6 FastTrace 2 Client – Minimum System Requirements .................................................1 5.1.1 Hardware ............................................................................................................1 5.1.2 Software..............................................................................................................2 Preparing the network settings on your PC .................................................................2 5.2.1 Changing the PC’s IP address .............................................................................2 Installing the FastTrace 2 Client Software ...................................................................3 Launching the FastTrace 2 Client .................................................................................3 5.4.1 Settings ...............................................................................................................4 5.4.2 Adding a FastTrace 2 server to the FastTrace 2 client .........................................4 5.4.3 Connecting to a FastTrace 2 Server ....................................................................5 Using ADPRO VideoCentral Platinum ....................................................................................5 6.1 6.2 6.3 6.4 6.5 Doc. 21778_01
Set up FastTrace 2 for Connection with ADPRO VideoCentral Platinum ...................5 Set up FastTrace 2 for Alarm Transmission to the ADPRO VideoCentral Platinum...6 Setting time zone, date and time in the FastTrace 2 ....................................................6 Save and Restart ...........................................................................................................6 Set up ADPRO VideoCentral Platinum for Alarm Reception from the FastTrace 2
Server.............................................................................................................................6 ADPRO FastTrace 2 FastTrace 2 by Xtralis
1
Quick Setup Guide
Packing List
After unpacking, check for any signs of damage. Damage should be reported to your
supplier immediately. Also check whether all items are present:
®
ADPRO FastTrace™ 2 server unit
Power cord
CD with client software and manuals
Quick Setup Guide
19’’ mounting brackets black
Set of resistors (if fitted with MIO / EIO input/output card)
Set of 4 rubber feet to use the FastTrace 2 Server as desktop unit
The products will be provided with a plug according to the National Heavy Current
Regulations of the country of shipment. Installation should be done according to National
Regulations.
2
Power Requirements
The ADPRO FastTrace 2 is designed for 100 – 240 VAC 50 – 60 Hz operation. It should not
share electrical outlets or circuits with devices that may cause significant electrical
interference, such as air conditioners or a photocopier.
Some installations may have particularly bad mains power disturbances, such as large
voltage spikes, surges and power sags which may cause system failure. In this case, power
line filters/conditioners and/or uninterruptible power supplies should be fitted between the
ADPRO FastTrace 2 and the mains.
3
Safety Instructions
The plug is the disconnect device for the FastTrace 2 video systems; the socket-outlet needs
to be installed near the video system and needs to be easily accessible.
4
Technical Documents
Please download the technical manual and users’ manual from our website
www.xtralissecurity.com. You can also download some technical data sheets on specific
items connecting to the FastTrace 2.
5
Installing the FastTrace 2 Client Software on
your Computer
5.1
FastTrace 2 Client – Minimum System Requirements
5.1.1 Hardware
Pentium 4, 1.6 GHz
512 MB RAM
Graphics card that is compatible with DirectX 7
It is recommended to use a graphics card that allows YUV surfaces and hardware stretching.
If not compatible the FastTrace 2 client software will force the graphics card to GDI mode,
which will increase CPU load.
Doc. 21778_01
1
Quick Setup Guide
ADPRO FastTrace 2 FastTrace 2 by Xtralis
5.1.2 Software
Windows XP (SP 2) or higher
Internet Explorer 7 or higher
DirectX 7
The FastTrace 2 Client version 2.01.xxxx is backwards compatible with all V3100 Hybrid
versions (from version 2.00.xxxx) and all V3100 FT versions (from version 1.00.0001).
However, some menus will look different, depending on the connected video system.
NOTE!
It is recommended to install the latest drivers of your graphics card!
For NVIDIA cards please check the website http://www.nvidia.com.
For ATI cards please check the website http://ati.amd.com.
5.2
The client can always be forced into GDI mode. Add the line
‘gdi=1’ in the [General] section of the ‘hydra.ini’ file. This file can be
found in your local work folder. Forcing the client to GDI mode is
not recommended!
Preparing the network settings on your PC
The FastTrace 2 video system is by default on IP address 10.0.0.10 with subnet mask
255.255.255.0. When installing the client software, you need to put your PC in the same IP
range (e.g. IP address 10.0.0.2 with subnet mask 255.255.255.0).
5.2.1 Changing the PC’s IP address
5.2.1.1 For Windows XP
From Start > All Programs > Accessories > Communications > Network Connections
right click on Local Area Connection and select Properties.
From here, select Internet Protocol (TCP/IP) and click Properties.
For ease of initial setup, you should change the PC IP settings to the following:
IP address
Subnet mask
Default gateway
10.0.0.2
255.255.255.0
10.0.0.1
Click OK and the Local Area Connection Properties box is displayed again. Click OK and
close the Network and Dial-up Connections panel.
5.2.1.2 For Windows Vista/ Windows 7
From Start click Control Panel (View by Category). Click Network and Internet. Click
Change adapter settings. Right click on Local Area Connection and select Properties.
Select Internet Protocol Version 4 (TCP/IPv4) and click Properties.
For ease of initial setup, you should change the PC IP settings to the following:
IP address
Subnet mask
Default gateway
2
10.0.0.2
255.255.255.0
10.0.0.1
Doc. 21778_01
ADPRO FastTrace 2 FastTrace 2 by Xtralis
Quick Setup Guide
NOTE!
If the PC being used for configuration is also the Video Central Session
Handler PC, the IP address should be set to 192.168.1.10 instead.
Click OK to return to the Local Area Connection panel. Again click OK to close this panel.
5.3
Installing the FastTrace 2 Client Software
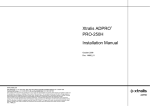
Connect your PC to the FastTrace 2 video system with an RJ45 network cross cable.
RJ45 network cross cable
Default address 10.0.0.10
Subnet mask 255.255.255.0
PC
FastTrace 2
Open Internet Explorer and type the address of the FastTrace 2 video system in the
address bar. If necessary add the setup page to the address: http://10.0.0.10/setup.php.
Click setup.exe. Click Run to start the installation. You can also click ‘Save’ to store the files
on your PC so that you can run the installation later. Click Run to begin the installation of the
Client software. When showing the License Agreement window, you need to agree with the
terms. Click I Agree. Accept or modify the installation folder. Click Next. Accept or modify
the work folder. Also select your preferred language. Click Install.
The installation is now completed. Click Close to exit this installation wizard.
5.4
Launching the FastTrace 2 Client
On the desktop, double click the FastTrace 2 shortcut.
If no shortcut icon can be found, click the Windows Start button, choose All Programs and
click FastTrace 2 > FastTrace 2. You will get a login window:
Doc. 21778_01
3
Quick Setup Guide
ADPRO FastTrace 2 FastTrace 2 by Xtralis
5.4.1 Settings
Via Settings you can change the language, the skin (= appearance of the program), the
work folder (in which stills and footage are stored) and the Auto restart settings:
5.4.2 Adding a FastTrace 2 server to the FastTrace 2 client
Launch the FastTrace 2 Client. Click Add.
You will get the window as underneath.
4
Doc. 21778_01
ADPRO FastTrace 2 FastTrace 2 by Xtralis
Quick Setup Guide
Please fill in all necessary information.
Name
IP Address
RTSP Port
Control Port
Connection Type
Username
Password
Enter a description as “Name”.
It is recommended to provide a meaningful description to your
FastTrace 2 video system!
Enter the IP address of the FastTrace 2 (by default 10.0.0.10).
Set RTSP and Control ports. Use the same ports as specified under
System > Ethernet/PPP.
Select the TCP or UDP protocol. UDP is recommended, but TCP may
be required if the connection goes through a router that blocks the
UDP packets.
Enter the username and password of an existing user. By default you
can log on with user “0” and password “666777”.
Click OK to save the added device.
At this time you can select the newly added video system from the list and connect to it.
5.4.3 Connecting to a FastTrace 2 Server
Launch the FastTrace 2 Client. Select the desired video system from the list and click
Connect.
6
Using ADPRO VideoCentral Platinum
The information underneath is specified for ADPRO VCP, but also applies for use of the
FastTrace 2 with VSKWin or M3000 software.
6.1
Set up FastTrace 2 for Connection with ADPRO
VideoCentral Platinum
Following information has to be entered before connecting to the ADPRO VideoCentral
Platinum:
Unit ID
Username and password
IP address and connection ports
Doc. 21778_01
5
Quick Setup Guide
ADPRO FastTrace 2 FastTrace 2 by Xtralis
Open System > Behaviour > Alarm transmission. Enter the correct value for “FastTrace
Unit ID” (value must be a number between 1 and 9999). Click Save.
Open System > General > Users. Click Add. Select a free user ID (= value from 0 through
31; with 0, 1 and 15 by default reserved). Enter the user name. Type the password (= 6
digits) and retype it to exclude typing errors. Select the Administrator level. Click Save.
Open System > Connections > Ethernet/PPP. For Ethernet parameters, enter the final IP
address, subnet mask and gateway, according to the specifications of the network to which
the system will be connected. For ports, modify Control port (= port 1) and RTSP port (= port
2) according to the ports configured in the Central Video Platinum software. Click Save.
6.2
Set up FastTrace 2 for Alarm Transmission to the
ADPRO VideoCentral Platinum
To set up the FastTrace 2 Server to send alarms to the ADPRO VideoCentral Platinum,
open System > Behaviour > Alarm transmission. Under Activate Alarm Transmission,
select the option “Primary Ethernet”. Under Primary Alarm Transmission, enter the IP
address of the VCP computer in the Destination 1 IP address field. Click Save.
6.3
Setting time zone, date and time in the FastTrace 2
Open System > General > Date/Time. Select the time zone, tick Yes for Daylight savings
and – if available – enter the NTP server address. Select “Date” and enter time (hours,
minutes, seconds). Click Save.
6.4
Save and Restart
To store all modifications to non-volatile memory, open System > Maintenance >
Configuration Management, select configuration 1 and click Save.
To apply the new network settings, restart the unit. Open System > Maintenance >
Configuration Management and click System Restart.
Now you can connect the FastTrace 2 to the final network and use the VCP software.
6.5
Set up ADPRO VideoCentral Platinum for Alarm
Reception from the FastTrace 2 Server
In the VideoCentral Platinum Client, open Tools > Administration > Sites and click Add.
Fill in all parameters as explained in 6.1 Set up FastTrace 2 for connection with ADPRO
VideoCentral Platinum.
6
Doc. 21778_01
ADPRO FastTrace 2 FastTrace 2 by Xtralis
Quick Setup Guide
Click OK.
Doc. 21778_01
7
ADPRO FastTrace 2 FastTrace 2 by Xtralis
www.xtralis.com
The Americas +1 781 740 2223 Asia +8621 5240 0077 Australia and New Zealand +61 3 9936 7000
UK and Europe +44 1442 242 330 Middle East +962 6 588 5622
The contents of this document are provided on an “as is” basis. No representation or warranty (either express or implied) is
made as to the completeness, accuracy or reliability of the contents of this document. The manufacturer reserves the right to
change designs or specifications without obligation and without further notice. Except as otherwise provided, all warranties,
express or implied, including without limitation any implied warranties of merchantability and fitness for a particular purpose are
expressly excluded.
This document includes registered and unregistered trademarks. All trademarks displayed are the trademarks of their
respective owners. Your use of this document does not constitute or create a license or any other right to use the name and/or
trademark and/or label.
This document is subject to copyright owned by Xtralis AG (“Xtralis”). You agree not to copy, communicate to the public, adapt,
distribute, transfer, sell, modify or publish any contents of this document without the express prior written consent of Xtralis.
Doc. 21778_01
Quick Setup Guide