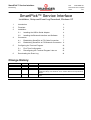
1
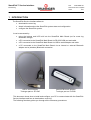
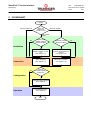
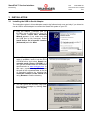
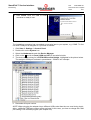
SmartPick™ Service Interface Dok. Entwicklung Datum/Vis:18.07.14/jw/bw Seite: AA0038EN.doc 1/15 SmartPick™ Service Interface Installation, Setup and Event Log Download, Windows XP 1 Introduction 2 2 Flowchart 3 3 Installation 4 3.1 Installing the USB to Serial Adapter 4 3.2 Installing the Bluetooth Interface and Software 6 4 5 6 Connection 7 4.1 Establishing SmartPick to PC Cable Connection 7 4.2 Establishing SmartPick to PC Bluetooth Connection 8 Configuring the Terminal Program 10 5.1 First Time Configuration 10 5.2 Reconfiguring the Terminal Program Later on 12 Downloading the Event Log 14 Change History Author Jürg Werthmüller Beat Walter Beat Walter Beat Walter Version 01.00 01.01 01.02 01.03 Date long ago 31.03.2010 29.04.2010 27.09.2010 Beat Walter 01.04 22.09.2011 Beat Walter 01.05 13.11.2013 Comments Created Re-formatted HyperTerm setup: line delay shall be set to 150 ms. HyperTerm setup: character delay shall be set to 1 ms. HyperTerm setup: Font shall be set to Courier New and script shall be Western. Page 15, nr. 11: 'lc' must be entered only if the SW revision is older than RL707. Renamed from AA0043. Headline refornatted. SmartPick™ Service Interface Dok. Entwicklung Datum/Vis:18.07.14/jw/bw AA0038EN.doc Seite: 2/15 1 INTRODUCTION The SmartPick Service Interface allows to: download the event log obtain information about the SmartPick system state and configuration configure the SmartPick system It can be accessed by using the buttons and LCD built into the SmartPick Main Board (not for event log download, though) a PC connected to the SmartPick Main Board via RS-232 COM port and cable a PC connected to the SmartPick Main Board via USB to serial adapter and cable a PC connected to the SmartPick Main Board via an internal or external Bluetooth adapter and a (wireless) Bluetooth connection USB to serial adapter external Bluetooth adapter Truninger part no. E11545 Truninger part no. E12230 This document shows how to install and configure your PC to communicate with the SmartPick Service Interface and how to download an event log. The following flowchart guides you through all the necessary procedures. SmartPick™ Service Interface Dok. Entwicklung Datum/Vis:18.07.14/jw/bw Seite: 2 FLOWCHART START RS-232 (COM) port Which PC interface do you like to use? Bluetooth adapter USB to serial adapter Yes Installation No Connection Yes Configuration USB to serial adapter software already installed? No Install the USB to serial adapter software on your PC (see chapter 3.1) Install the Bluetooth interface and software on your PC (see chapter 3.2) Establish SmartPick to PC cable connection (see chapter 4.1) Establish SmartPick to PC Bluetooth connection (see chapter 4.2) Terminal program already configured? No Configure terminal program (see chapter 5) Operation Bluetooth software already installed? Download event log (see chapter 6) END Yes AA0038EN.doc 3/15 SmartPick™ Service Interface Dok. Entwicklung Datum/Vis:18.07.14/jw/bw Seite: AA0038EN.doc 4/15 3 INSTALLATION 3.1 Installing the USB to Serial Adapter The instructions given in this subchapter need to be followed only once and only if you intend to use an USB to serial adapter to connect the SmartPick system to your PC. 1. Plug the adapter (Truninger part no. E11545) into a USB port of your PC. The window Found New Hardware Wizard appears. If not, make sure that the USB port is fully functional. Select Install from a list or specific location (Advanced) and click Next. 2. If the CD shipped along with the adapter cable is available, insert it into the PC’s CD-ROM drive and select Search removable media (floppy, CD-ROM…). If not, get the software from the SmartPick download site on www.truninger.com. In this case, unpack the zip file first; add the path of the unpacked folder to the list of searched locations by selecting Include this location in the search and using Browse to find the directory. 3. You can ignore the Windows Logo testing warning message by clicking Continue anyway. SmartPick™ Service Interface Dok. Entwicklung Datum/Vis:18.07.14/jw/bw Seite: AA0038EN.doc 5/15 4. Click Finish. Now, the USB to serial converter is ready to use. The installation procedure has now added a new serial port to your system, e.g. COM3. To find out which COM port is assigned to it, proceed as follows: 1. Click Start Settings Control Panel 2. Double-click on the System icon 3. Select the Hardware tab and click Device Manager 4. Click on the + box left to Ports (COM and LPT) to see what’s inside 5. The device we’re looking for is ATEN USB to serial bridge, highlighted in the picture below. The assigned COM port is shown in parentheses - COM3 in our example: 6. Remember this port number. NOTE: When plugging the adapter into a different USB socket than the one used during installation, a different COM port number will be assigned. In this case, you have to change the COM port setting in the terminal program (see chapter 5.2)! SmartPick™ Service Interface Dok. Entwicklung Datum/Vis:18.07.14/jw/bw Seite: 3.2 AA0038EN.doc 6/15 Installing the Bluetooth Interface and Software The instructions given in this subchapter need to be followed only once and only if you intend to use Bluetooth to connect the SmartPick system to your PC. Hardware To connect to the SmartPick Service Interface, theoretically every Bluetooth adapter can be used. For installation and usage, please consult the manufacturer’s user manual. The connection used for the SmartPick Service Interface is unsecured; you will need no pairing key. The Bluetooth program configuration depends heavily on the actually used software. Therefore, TRUNINGER can offer only limited support. We recommend using the software BlueSoleil, which works with most Bluetooth adapters. Software 1. Download the BlueSoleil Software from www.bluesoleil.com or from the SmartPick download site on www.truninger.com. On the Truninger net site, click Lifting Magnets SmartPick Download. You will find BlueSoleil in chapter Software Tools. 2. Unpack the zip file to your PC, e.g. into C:\Temp, and execute setup.exe 3. Choose your language and confirm the license agreement: 4. Reboot your PC and plug in the adapter (if it is an external device). Truninger part no. E12230 could be used here. After Windows Hardware Recognition, the device is ready to use. NOTE: Many adapters are not licensed to this evaluation copy, so the data transfer volume is limited to 5 MB. However, for use with SmartPick, this is sufficient. SmartPick™ Service Interface Dok. Entwicklung Datum/Vis:18.07.14/jw/bw Seite: AA0038EN.doc 7/15 4 CONNECTION NOTE: Connecting a PC to the SmartPick system may impair system safety. Therefore, assure that the system is never used to lift any loads as long as a PC is connected to it. 4.1 Establishing SmartPick to PC Cable Connection If you intend to use a cable to connect to SmartPick, i.e. using a COM port or an USB to serial adapter, please follow these steps: 1. Make sure the magnets are not used to lift any loads as long as your PC is connected to the SmartPick system. 2. To avoid sudden unexpected crane movements while you are working it is advisable to immobilise the crane (if possible switch off the crane’s main power supply). 3. When climbing the crane, make sure you take with you: a. your laptop, configured as described above and with fully recharged batteries. Please note that there might be no mains socket on the crane gantry b. the USB to serial adapter if you intend to use one c. a standard 9-pin D-sub cable, male connector on one end, female connector on the other end, pins connected 1:1. 4. Open the main board cabinet door of the SmartPick system. This is usually the leftmost cabinet or the second from the left. 5. The Main Board is installed in the top region of the cabinet. Plug the 9-pin D-Sub cable into the rightmost 9-pin socket of the main board, labelled RS232. Plug the other end of the cable either into the COM-socket of your PC or into the USB to serial adapter connected to an USB socket. SmartPick™ Service Interface Dok. Entwicklung Datum/Vis:18.07.14/jw/bw Seite: 4.2 AA0038EN.doc 8/15 Establishing SmartPick to PC Bluetooth Connection If you intend to use Bluetooth to connect to SmartPick, please follow these steps: 1. Make sure the magnets are not used to lift any loads as long as your PC is connected to the SmartPick system. 2. Assure that the SmartPick system is powered, up and ready and your PC is within “Bluetooth hearing distance” of the system. 3. Start BlueSoleil by double-clicking on the BlueSoleil icon on the desktop. 4. When starting the program for the first time, a screen might appear where you can set the properties of your computer. Usually, the default values can be accepted. Note that Use security level Medium must be unchecked! 5. Press F5 to start searching for available Bluetooth devices. In the BlueSoleil window, one or more named icons appear on the ellipse round the sun symbol. Wait until the bottom line of the BlueSoleil window says Device search completed. If this step fails, the Bluetooth adapter may not be compatible with BlueSoleil. SmartPick™ Service Interface Dok. Entwicklung Datum/Vis:18.07.14/jw/bw Seite: 5. The icon representing the SmartPick system has the shape of a mobile phone or a headset, depending on the hardware revision of the SmartPick main board. The icon is identified by the six-digit number corresponding to the project number of your SmartPick system (125678 in the example). Double click on this icon. The colour of the icon turns yellow. The Bluetooth serial port service icon (indicated by the white arrow in the figure) lights up yellow as well: 6. Single-click on the serial port service icon (indicated by the white arrow in the figure above). A window named Quick Connect might now pop up. If this is the case, uncheck Always show this dialog and click on the No button: 7. Between the SmartPick icon and the sun symbol, a green dashed line with an animated red bullet appears. The connection to SmartPick is now established. 8. In the bottom right corner of the PC screen, the following window pops up telling the COM port assigned to the SmartPick connection. Remember the COM port stated (COM7 in the example). AA0038EN.doc 9/15 10. If you missed to see this window, proceed as follows: Assure that the Bluetooth connection is established (green dashed line and animated red bullet visible). Right-click on the SmartPick icon and select Status…. A window pops up, indicating – amongst other things – the COM port. Then, click OK to close the window. SmartPick™ Service Interface Dok. Entwicklung Datum/Vis:18.07.14/jw/bw Seite: AA0038EN.doc 10/15 5 CONFIGURING THE TERMINAL PROGRAM The instructions given in this chapter need to be followed only once, i.e. when configuring your terminal program for use with the SmartPick Service Interface. The terminal program setup will be stored. The setup can then be retrieved any time later by a double click on the appropriate icon on your desktop. We recommend using the terminal program integrated in windows, called Hyper Terminal. In theory, every terminal program can be used. If there is no program available or the one you have doesn’t work, you can download HyperTerm63 from the SmartPick download site on www.truninger.com The following instructions are to be used with Hyper Terminal, but the settings are also valid for other terminal programs. 5.1 First Time Configuration 1. Start Hyper Terminal by clicking Start Programs Hyper Terminal Private Edition Hyper Terminal Private Edition. A Window License Agreement Reminder pops up. Click OK to get rid of it. 2. After a few seconds, a Window named Connection Description appears. Enter a suitable name in the Name: box. By convention, the following names are used: SmartPick Serial if you intend to use the RS-232 COM port or the USB to serial adapter, SmartPick BT if you intend to use the Bluetooth adapter. Click OK. SmartPick™ Service Interface Dok. Entwicklung Datum/Vis:18.07.14/jw/bw Seite: 3. A new window Connect To pops up. Click on the downward arrow of the Connect using: box and select the COM port assigned to the PC interface you intend to use. For built-in COM port: COM1 or COM2, for USB to serial adapter: as indicated by the Device Manager, see 3.1, for Bluetooth connection: as indicated when activating the serial port service, see 4.2. Then, click OK. 4. A window COMx Properties pops up. Configure the port settings as depicted in the figure to the right. Then, click OK. NOTE: With SmartPick software release BL695 and older, set Flow control to None. 5. In the Hyper Terminal menu bar, click File Properties. A window SmartPick … Properties opens. Select tab Settings. Assure that the Windows keys option is selected. Then, click onto button ASCII Setup… AA0038EN.doc 11/15 SmartPick™ Service Interface Dok. Entwicklung Datum/Vis:18.07.14/jw/bw Seite: AA0038EN.doc 12/15 6. Enable local echo by clicking on the Echo typed characters locally check box. The checkmark √ must be visible in the box. Set the line delay to 150 milliseconds and the character delay to 1 millisecond. Then, click OK. Close the SmartPick … Properties window by clicking OK. 7. Since some non-ASCII characters are used when viewing the event log, proceed as follows: Click View Font... Then, choose Font = Courier New , Font Style = Regular and – most importantly – Script = Western. Adapt the font size to suit your preferences. A size of 9 pt usually gives good results. 8. Save the settings on your desktop for easy access: Click File Save as. Then, select the Desktop folder and click Save. 9. Exit Hyper Terminal. A dialogue box appears: You are currently connected. Are you sure you want to disconnect now? Click Yes. 5.2 Reconfiguring the Terminal Program Later on Sometimes it is necessary to change the configuration of the terminal program. Typically, the assigned COM port needs to be changed when the USB to serial adapter or the Bluetooth connection decide to use a different port. Here is how it goes: 1. Open Hyper Terminal by double clicking the appropriate Hyper Terminal icon (SmartPick Serial or SmartPick BT) on your desktop. 2. Click on the OK button to get rid of the license agreement window. 3. In the Hyper Terminal window, disconnect the link by single clicking on the off-hook phone icon, indicated by the arrow in the figure to the right. The off-hook icon dims and the on-hook icon (adjacent to the off-hook icon) lights up. 4. Click File Properties. Then, enter the required changes. Click OK. SmartPick™ Service Interface Dok. Entwicklung Datum/Vis:18.07.14/jw/bw Seite: 5. You can save the changes by clicking File Save. 6. Reconnect the link by single clicking on the on-hook phone icon. AA0038EN.doc 13/15 SmartPick™ Service Interface Dok. Entwicklung Datum/Vis:18.07.14/jw/bw AA0038EN.doc Seite: 14/15 6 DOWNLOADING THE EVENT LOG The SmartPick event log is very much like the “black box” of an aircraft. It continuously logs information about system activity, detected problems etc. It is consulted by Truninger technicians to diagnose the cause of the problem in case of a system malfunction. This chapter guides you through the process of obtaining the event log and sending it to Truninger for investigation. 1. Assure that the connection to SmartPick has been established (chapters 4.1 or 4.2) and the Hyper Terminal program has been configured (chapter 5.1). 2. If you use a cable connection, double-click on the SmartPick Serial.ht icon on your PC desktop. 3. However, if you use a Bluetooth connection, double-click on the SmartPick BT.ht icon on your PC desktop. 4. A Window License Agreement Reminder pops up. Click OK to get rid of it. 5. After a few seconds, the Hyper Terminal window appears. 6. Make sure that Scroll Lock is not active, i.e. the LED in the top right corner of your keyboard, marked " " or " ", must not be lit. Otherwise, hit the Scroll Lock key once to switch off the LED. 7. Continue hitting Enter until the SmartPick log-in banner appears in the Hyper Terminal window: +--------------------------------------------------------------+ | S m a r t P i c k | |: |: | System ID: 123456 | |: |: | Press 'c' Return for Login | |: |: |--------------------------------------------------------------|: | TRUNINGER AG, CH-4513 Langendorf, Phone +41 32 617 37 00 |: +--------------------------------------------------------------+: :::::::::::::::::::::::::::::::::::::::::::::::::::::::::::::::: Note that when the system was just started up, it may take up to a minute until the system reacts to your input. 8. Log in by typing c (lowercase “c”) and hitting Enter. SmartPick replies with Password ? 9. Enter the password trag and hit Enter. SmartPick replies SmartPick RL0707 Sys Id: 123456 Uptime: 00:00:02 08:39:34 160709 SmartPick™ Service Interface Dok. Entwicklung Datum/Vis:18.07.14/jw/bw Seite: AA0038EN.doc 15/15 10. Start text capture by clicking Transfer Capture Text…. A window Capture Text pops up. Click Browse. A window Select capture file opens. Select folder Desktop and provide a suitable file name, e.g. evlog125678 Then, click Save to close the file selection window and Start to start text capture. 11. If the software version installed in SmartPick is older than RL707, in the Hyper Terminal window, type lc and Enter. lc stands for “list configuration”. The current system configuration will be output. 12. Type le –a and Enter. This is the command “list events – all”. The complete event log is output to the Hyper Terminal window, taking a minute or two. 13. When the output ceases, click Transfer Capture Text ► Stop. 14. Log out by typing di and Enter. di stands for “disconnect”. 15. Exit Hyper Terminal. You will be asked: You are currently connected. Are you sure you want to disconnect now? Click Yes. 16. If you were using a cable connection, disconnect the cable from SmartPick and from your PC. 17. If you were using a Bluetooth connection, close the Bluetooth connection by right-clicking on the serial port service icon in the BlueSoleil window and selecting Disconnect. Then, exit BlueSoleil. 18. On your PC desktop, you will find the file containing the captured event log (in our example evlog125678.txt). E-mail this file as an attachment to Truninger after sales [email protected] or directly to your Truninger contact person.