1
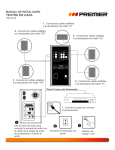
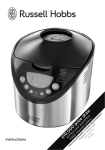
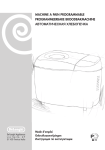
Operating Instructions
Bread Maker
Model: FBM300
General care and safety guide
Thank you for choosing this GOLDAIR Bread Maker. This GOLDAIR
appliance has been designed and manufactured to high standards
of engineering and with proper use and care, as described in this
leaflet, will give you years of useful service. Please read these
instructions carefully and keep them for future reference.
ALWAYS
✔ Always ensure hands are dry before handling
the plug or the Bread Maker.
✔ Always operate the Bread Maker on a
secure, dry, level surface.
✔ Always use oven mitts when removing bread
✔ Always allow adequate air space above and
on all sides for air circulation. Do not allow the
Bread Maker to touch curtains, wall coverings,
clothing, dishtowels or other flammable
materials during use. Do not use under
cupboards or curtains.
✔ Always be sure to unplug from the socket
when not in use and before cleaning.
✔ Always allow the Bread Maker to cool before
cleaning and storing.
✔ Carry out regular checks of the supply cord
to ensure no damage is evident.
✔ Return the Bread Maker after a malfunction,
or if it has been damaged in any manner, to an
authorised electrical service technician for
examination, repair or adjustment as special
purpose tools are required.
✔ Children should be supervised to ensure that
they do not play with the appliance.
The temperature of accessible surfaces may be
high when the appliance is operating; exercise
caution.
TECHNICAL SPECIFICATION
Model No: FBM300
Power Supply: 230V, 50Hz
Power: 650W
NEVER
✘ Never use this appliance outdoors.
✘ Never use this appliance for any purpose
other than its intended use. This appliance is
intended for household use only or in similar
applications such as:
•
Staff kitchen areas in shops, offices and
other working environments;
•
Farm houses
•
By clients in hotels, motels and other
residential type environments;
•
Bed and breakfast type environments.
✘ This appliance is not intended for use by
persons (including children) with reduced
physical, sensory or mental capabilities or lack
of experience and knowledge, unless they are
supervised or have been given instruction
concerning the use of the Bread Maker by a
person responsible for their safety.
✘ Close supervision is necessary when the
appliance is near children.
✘ Never leave the appliance unattended when
in use.
✘ Never allow the power cord to overhang the
edge of a table or bench top or to touch any hot
surface.
✘ Never place this appliance on or near a hot
gas or electric burner or where it could touch a
heated oven or microwave oven.
✘ Never immerse the Bread Maker cord set
and plug in water or any other liquid to protect
against electrical hazards.
✘ Never place the Bread Maker in a
dishwasher.
✘ Never use harsh, abrasive or caustic
cleaners to clean this appliance.
✘ Never operate the appliance with a damaged
cord or plug, after it malfunctions, or if it has
been damaged in any manner.
✘ The Bread Maker is not intended to be
operated by means of an external timer or
separate remote-control system. The use of an
extension cord is not recommended.
Components
Control Buttons
Viewing Window
Digital Display
Cover Handle
Delay Timer Buttons
Outer Casing
Measuring Cup
Bread Pan
Bread Pan Handle
Measuring Spoon
Kneading
Blade
Operating your Bread Maker
Place the Bread Maker on a flat, dry and level
surface.
THE CONTROL PANEL
Menu Select Button
This button is used to select the different
programs. Each time it is pressed, a short beep
will sound and the selected program will change.
If you press and hold the button, the
menus will cycle through quickly.
1. Basic
This program is primarily used for breads that
use white flour, although some recipes may
include small quantities of whole wheat flour.
Bread will be slightly more dense than French or
Sweet breads, as there are fewer rising cycles
and the overall cycle time is shorter.
2. French
Traditionally, French bread has a crispier crust
and lighter texture than basic breads. These
recipes do not usually include additional fats or
milk.
3. Whole wheat
This program is used for recipes which contain
significant amounts of whole wheat or rye flour,
oats or bran. It begins with a rest period during
which the flours and grains absorb the liquid this softens the ingredients and helps them to
combine properly. The program also incorporates
an additional rise cycle which helps the heavier
wheat and grains to expand.
4.Sweet
Suitable for sweet breads with a high sugar
content.
5. Express Bake (0.75Kg)
This program cooks a 0.75Kg loaf in about an
hour. The recipes call for very warm water and
larger amounts of yeast.
6. Express Bake (1.0Kg)
As above but for a 1.0Kg loaf.
7. Quick
This program is used when you have a dough
that requires very little kneading and mixing
before baking.
8. European
This program can be used for recipes that contain
baking powder or baking soda in place of yeast.
The bread baked on this setting is usually smaller
with a moist dense texture.
9. Dough
This program only makes the dough and will not
bake the final bread. This dough setting is
suitable for pizza bases, doughnuts, etc. Remove
the dough to shape and bake in a conventional
oven (or, in the case of doughnuts, deep fry).
10. Bagel Dough
As above with a longer rise time (30mins).
11. Jam
Use this setting to make sweet and savoury jams.
The process is a simple case of mixing and
heating.
12. Bake
This setting will use your BreadMaker to bake for
one hour. Baking can be controlled manually by
pressing the start/stop button to stop the function
at any time.
13. Gluten Free
For use with those breads that are gluten free.
Crust Colour Button
•
Use this button to select how you would like
your bread crust to be coloured. Push the
“Crust Colour” button to move the bar along
the bottom of the digital display to select
from Light, Medium, Dark or Rapid (used on
7.Quick function).
•
The bar will appear above the selected crust
colour, along the bottom of the display.
•
Please Note – you may select different crust
colours for only the first 3 bread options (i.e.
Basic, French and Whole Wheat). All other
bread options are set.
SUPPORT AND TECHNICAL ADVICE
North Shore City, Auckland, New Zealand
Monday – Friday 8am-5pm
Phone: 0800 232 633
Website: www.goldair.co.nz
Operating your Bread Maker, continued
Loaf Size Button
•
Use this button to select the bread weight
you are baking. Push the “Loaf Size”
button to move the bar along the top of
the digital display and select from 0.5Kg,
0.75Kg or 1.0Kg.
•
The bar will appear below the selected
size, along the top of the display.
•
Please Note – you may only select
different weights for the first 4 bread
options (i.e. Basic, French, Whole Wheat
and Sweet). All other bread options are
set.
Care and cleaning
Delay Timer Buttons
•
Use the Delay Timer buttons when you
would like to delay the start of your
selected bread option.
•
Use the up button to increase the time
and the down button to decrease the time.
•
The time that is displayed on the screen is
the total time the bread will take to make
(i.e. if you increase the time to 9 hours the
bread will be ready in 9 hours time). The
bread maker will countdown down the
interval time and then automatically switch
on.
•
Please Note – the delay timer does not
work on all bread options.
INSTRUCTIONS FOR MAKING AND BAKING
BREAD (Menu Programs 1-8)
When making bread. please follow these steps:
1.
2.
3.
Take the bread pan out of the bread
maker by grasping the pan handle and
pulling out gently.
Align the kneading blade with the
semicircle position on the rotation axis and
insert into bread pan.
According to recipe you are following, add
your liquid ingredients such as water and
eggs first, then your dry ingredients, flour,
salt and sugar. Lastly, add the yeast.
•
Please note: It is important that this
order is followed otherwise the bread
may not mix correctly or rise during
baking. If you are using the delay timer
function, ensure the yeast is on top of
the flour to avoid being mixed with any
water, salt and sugar, before mixing
phase occurs.
4. Insert the bread pan and push down on rim
until it clicks securely into place, fold the
bread pan handle down and close the lid.
5. Plug in the bread maker, the digital display
will show “MENU 1 TIMER 3∶25”, press
the Menu Select button and cycle through
the bread options until you reach your
desired setting.
6. Press the Crust Colour button to cycle
through until you reach your desired setting
(Light, Medium, Dark or Rapid). Please
Note: Only the first 3 bread options allow
a change of crust colour, all other
options are set and cannot be modified.
7. Press the Loaf Size button to cycle through
until you reach your desired weight setting.
Please Note: Only the first 4 bread
options allow a change of weight, all
other options are set and cannot be
modified.
8. Press the Timer Delay buttons if you would
like to delay the making/baking of your
bread. The time which is displayed on the
screen is the total time the bread will take to
make (i.e. if you increase the time to 9
hours the bread will be ready in 9 hours
time).
9. Press Start/Stop button, the Blue LED light
will illuminate and the maker will start.
10. If you want to stop the bread maker during
operation, press the Start/Stop button and
hold for one second. This is the only time
you should touch the control panel during
operation, otherwise leave to run.
Continued overleaf
SUPPORT AND TECHNICAL ADVICE
North Shore City, Auckland, New Zealand
Monday – Friday 8am-5pm
Phone: 0800 232 633
Website: www.goldair.co.nz
Operating your Bread Maker, continued
11. When the bread maker has completed its
selected option the buzzer will sound 15
times and unit will switch to keep the bread
warm. (The keep warm function will not
occur on the Jam and Dough options). The
blue LED on the Start/Stop button will flash
continuously.
12. After 1 hour the buzzer will sound again
and the LED will stop flashing. Press
Start/Stop button and hold for one second
to stop the warming function.
13. When the bread is complete, remove the
bread pan from the bread maker. This must
always be done while wearing oven gloves
on and by grasping the bread pan handle
and pulling the pan out.
Please Note: The temperature of
accessible surfaces may be high when
the appliance is operating, exercise
caution.
INSTRUCTIONS FOR MAKING DOUGH (Menu
Programs 9-10)
1. Ensure you follow instructions above (1-2)
on how to insert and secure the bread pan
into the bread maker.
2. Plug in the bread maker, the digital display
will show “MENU 1 TIMER 3∶25”, press
the Menu Select button and cycle through
the bread options until you reach Dough
setting.
3. When using the two dough options on your
bread maker, simply add all of the
ingredients based on the recipe you are
using (ensure you use the same rule for
adding ingredients as above – wet
ingredients, then dry).
4. The bread maker will mix these until well
combined; the buzzer sounds 15 times
when complete.
Please note the Keep Warm function
does not work with the Dough function.
INSTRUCTIONS FOR MAKING JAM (Menu
Program 11)
1. Ensure you follow instructions above (1-2)
on how to insert and secure the bread pan
into the bread maker.
2. Plug in the bread maker, the digital display
will show “MENU 1 TIMER 3∶25”, press
the Menu Select button and cycle through
the bread options until you reach Jam
setting.
3. When using the jam option on your bread
maker, simply add all of the ingredients
based on the recipe you are using.
4. The bread maker will mix and heat these
until well combined; the buzzer sounds 15
times when complete.
Please note the Keep Warm function
does not work with the Jam function.
INSTRUCTIONS FOR BAKING BREAD (Menu
Programs 12-13)
1.
2.
3.
•
4.
Ensure you follow instructions above on how
to insert and secure the bread pan into the
bread maker.
Plug in the bread maker, the digital display
will show “MENU 1 TIMER 3∶25”, press
the Menu Select button and cycle through
the bread options until you reach your
desired setting – Bake or Gluten Free.
Place the prepared, mixed dough into the
bread pan.
Please note: Ensure you do not use this
function unless you have already mixed
the dough. Options 12 and 13 only bake
bread.
When the bread maker has completed its
selected option the buzzer will sound 15
times and unit will switch to keep the bread
warm. The blue LED on the Start/Stop
button will flash continuously.
Continued overleaf
SUPPORT AND TECHNICAL ADVICE
North Shore City, Auckland, New Zealand
Monday – Friday 8am-5pm
Phone: 0800 232 633
Website: www.goldair.co.nz
Operating your Bread Maker, continued
5.
After 1 hour the buzzer will sound again
and the LED will stop flashing. Press
Start/Stop button and hold for one second
to stop the warming function.
6.
When the bread is complete, remove the
bread pan from the bread maker. This must
always be done while wearing oven gloves
and by grasping the handle and pulling the
pan out.
Additional information
USING THE TIMER DELAY FUNCTION
•
Please note: If you are using the bread
maker in hot or humid weather with a delay
time greater than 2 hours, there is a danger
the bread will rise too quickly.
•
To prevent this, reduce the liquid by one or
two tablespoons, increase the salt by 1/8 or
1/4 of a teaspoon and reduce the sugar by
up to 1/2 of the amount indicated in the
recipe.
•
Do not use the delay timer for long delay
periods if you are using ingredients that do
not keep well at room temperatures e.g.
milk, eggs, cheese, etc.
USING THE KEEP WARM FUNCTION
•
The automatic Keep Warm function
prevents the baked bread from getting
soggy by keeping it warm for up to one
hour after the program has ended.
The function stops when the Start/Stop
button is pressed or the bread maker is
unplugged from the supply socket.
Please note the Keep Warm function
does not work with the Dough or Jam
functions.
ADD INGREDIENT ALERT
•
If you are baking bread that requires the
addition of other ingredients, such as
dried fruit or nuts, a beep will sound at the
appropriate point in the cycle. This will
occur during programs 1, 3, 4 and 10 only.
Care and cleaning
Always ensure the Bread Maker is switched
off, cooled down and is unplugged from mains
supply before cleaning. Do not immerse the
Bread Maker , power cord or plug in water or
any other liquid. Do not use abrasive cleaning
materials (e.g. steel wool) or cleaning agents,
to clean any part of this bread maker.
Exterior - Wipe the body with a damp cloth and
dry thoroughly.
Interior - After use, ensure the interior has cooled
down then use a damp cloth to wipe out any
crumbs or flour.
Bread pan - Wipe the bread pan with a damp
cloth, then dry thoroughly.
If necessary, fill the bread pan with warm, soapy
water and leave it to soak for 1-3 hours. Rinse
and dry thoroughly.
Alternatively, wash the bread pan and kneading
paddle in the dishwasher on gentle cycle.
Measuring cup and spoon - To make cleaning
easier, rinse the measuring spoon and cup in
warm, soapy water immediately after use.
SUPPORT AND TECHNICAL ADVICE
North Shore City, Auckland, New Zealand
Monday – Friday 8am-5pm
Phone: 0800 232 633
Website: www.goldair.co.nz
Hints and tips
GENERAL
•
Always add the ingredients in the order
shown in the recipe.
•
It is important to keep the yeast away from
the liquids.
•
Use the ingredients at room temperature
(20º to 25ºC). Temperature can affect yeast
activity and will affect the quality of the
bread.
•
Take the bread pan out of the bread maker
by grasping the pan handle and pulling out
gently.
MEASURING TIPS
•
Each ingredient in the loaf of bread plays a
specific role; it is extremely important to
measure the ingredients correctly to get the
best results.
•
Always use correct baking measures. Never
use household cutlery because they can
vary greatly in size and will lead to the
inaccurate measuring of ingredients.
•
Wherever possible we recommend
weighing bulk ingredients such as flour on a
kitchen scale. Other dry ingredients can be
measured using the spoon and cup
provided, and some butter wrappers
provide weight guidelines.
LIQUIDS
•
Fill the spoon or cup provided to the level
indicated. Check your cup measurements
by placing the measuring cup on a flat
surface and reading the measurement at
eye level.
SOLID FATS
•
When using butter and margarine, it is
important to chop the ingredients into cubes
before adding to the bread pan. Butter and
margarine should be added at room
temperature. Use unsalted butter or
margarine.
ADDING FRUIT AND NUTS
•
Fruit and nuts are added towards the end
of the kneading cycle. The machine will
beep to let you know it is time to add fruit
or nuts. If they are added before the fruit
and nut beep, the fruit will be pureed due
to excessive kneading.
DRY INGREDIENTS
•
Use the spoon or cup provided (don’t use
household tableware spoons or cups). Put
the dry ingredients loosely into the spoon
or cup and level off with a flat knife. This is
particularly important with flour.
•
Do not pack dry ingredients down into the
cup, unless otherwise stated in the recipe.
FRESHNESS
•
Ensure all ingredients are fresh and used
before the specified use-by-date.
•
Avoid using perishable ingredients such
as milk, yoghurt, eggs or cheese with the
time delay function.
•
Store dry ingredients in airtight containers
to prevent drying out.
SLICING BREAD
•
For best results, wait at least 10 minutes
before slicing, as the bread needs time to
cool.
•
Place loaf on its side and cut in a sawing
motion with a serrated bread knife.
•
For easy and even slicing we recommend
using a bread knife or electric knife.
FREEZING BREAD
•
Make sure the bread has completely
cooled. Slice and wrap the bread in plastic
before freezing.
SUPPORT AND TECHNICAL ADVICE
North Shore City, Auckland, New Zealand
Monday – Friday 8am-5pm
Phone: 0800 232 633
Website: www.goldair.co.nz
Hints and tips, continued
•
TOPPINGS
•
Ingredients such as herbs, sesame seeds
and chopped bacon can be added to the
top of the bread during the baking stage
(depending on the topping, you need to add
•
toppings 5-10 minutes from baking
completion).
Open the lid of the Bread maker, gently brush
the top of the loaf with a little milk or egg yolk
and sprinkle with topping (do not allow
ingredients to fall outside the pan). Close the
lid and allow baking to continue.
Please note: This step needs to be done
quickly to prevent the bread from sinking. The
Bread maker gets very hot during baking,
always use caution to prevent injury.
Ingredients
YEAST
•
Yeast is a vital ingredient when bread
making; without it the bread will not rise.
•
Your bread maker maintains the optimum
temperature for the yeast to take effect
during the bread making process.
•
Use only instant or fast acting yeast.
•
If the weather is hot and humid, try reducing
the amount of yeast by ¼ teaspoon to
prevent the dough from over rising.
FLOUR
•
In order for the bread to rise, the flour used
has to have a sufficiently high protein
content. We recommend the use of a good
quality strong plain or bread flour.
SALT
•
In small amounts, salt adds flavour and
controls yeast action. Too much salt will
inhibit the yeast and the bread will not rise
properly.
•
When adding ingredients to the bread
pan, yeast and salt should be kept
separate.
PLEASE NOTE:
Never use more than the following ingredients
for any recipe in this bread maker:
•
675 grams flour
•
3 ½ teaspoons of yeast
LIQUIDS
•
When liquids are mixed with flour, gluten is
formed. Gluten is necessary for the bread
to rise. Most recipes use dry milk and water,
but other liquids such as fresh milk and fruit
juice can be used.
SUPPORT AND TECHNICAL ADVICE
North Shore City, Auckland, New Zealand
Monday – Friday 8am-5pm
Phone: 0800 232 633
Website: www.goldair.co.nz
Recipes
PLEASE NOTE:
Never use more than the following ingredients for
any recipe in this bread maker:
•
675 grams flour
•
3 ½ teaspoons of yeast
Basic White Bread - Menu Program 1
Ingredients
Water
Sunflower oil
Milk powder
Caster sugar
Salt
White flour
Fast action yeast
0.5Kg
175ml
1 tbsp
1 tbsp
1 tbsp
1 tsp
260g
1½ tsp
0.75Kg
255ml
1½ tbsp
1½ tbsp
1½ tbsp
1½ tsp
375g
2 tsp
1.0Kg
315ml
2 tbsp
2 tbsp
2 tbsp
2 tsp
460g
2¼ tsp
French Bread - Menu Program 2
Ingredients
Water
Salt
Sugar
Milk powder
White flour
Fast action yeast
0.5Kg
175ml
¾ tsp
¼ tsp
¼ tbsp
250g
¾ tsp
0.75Kg
255ml
1 tsp
⅓ tsp
⅓ tbsp
360g
1 tsp
1.0Kg
315ml
1½ tsp
½ tsp
½ tbsp
450g
1½ tsp
Sweet Bread - Menu Program 4
Mixed fruit loaf
Ingredients
Water
Milk powder
Butter
Caster sugar
Salt
Mixed spice
Nutmeg (optional)
White flour
Fast action yeast
Dried mixed fruit
0.5Kg
180ml
1½ tbsp
15g
1 tbsp
¾ tsp
¾ tsp
1 pinch
310g
1½ tsp
95g
0.75Kg
250ml
2 tbsp
20g
1½ tbsp
1 tsp
1 tsp
1 pinch
450g
2 tsp
135g
1.0Kg
365ml
2½ tbsp
25g
1¾ tbsp
1½ tsp
1½ tsp
1 pinch
560g
2¼ tsp
170g
Express Bake (0.75Kg) - Menu Program 5
Ingredients
Water
Sunflower oil
Milk powder
Caster sugar
Salt
White flour
Fast action yeast
Quantity
255ml
2 tbsp
2 tbsp
1¼ tbsp
1 tsp
375g
3 tsp
Express Bake (1.0Kg) - Menu Program 6
Wholemeal Bread - Menu Program 3
Ingredients
Water
Butter
Milk powder
Caster sugar
Salt
White flour
Wholemeal flour
Fast action yeast
0.5Kg
285ml
15g
¾ tbsp
¾ tsp
1 tsp
125g
245g
1¼ tsp
0.75Kg
410ml
20g
1 tbsp
1 tsp
1½ tsp
180g
360g
1½ tsp
1.0Kg
500ml
25g
1¼ tbsp
1 tsp
2 tsp
225g
450g
2 tsp
Ingredients
Water
Sunflower oil
Milk powder
Caster sugar
Salt
White flour
Fast action yeast
Quantity
315ml
3 tbsp
3 tbsp
1¾ tbsp
1½ tsp
460g
3½ tsp
Quick – Menu Program 7
Please refer to other bread recipes not within this
user manual for suitable ingredients and quantities.
SUPPORT AND TECHNICAL ADVICE
North Shore City, Auckland, New Zealand
Monday – Friday 8am-5pm
Phone: 0800 232 633
Website: www.goldair.co.nz
Recipes
Jam - Menu Program 11
Orange
European - Menu Program 8
Soda Bread
Ingredients
Buttermilk
Oil
Salt
Caster sugar
Bicarbonate soda
Plain flour
Quantity
350ml
2 tbsp
1 tsp
1 tsp
1 tsp
400g
Ingredients
Oranges
Lemons
Sugar
Pectin (thickening agent)
Quantity
3
1
160g
2 tbsp
Jam - Menu Program 11
Strawberry
Dough 1 - Menu Program 9
Pizza Dough
Ingredients
Quantity
Water (warm 45-50ºC)
Olive oil
Salt
Caster sugar
White flour
Fast action yeast
280ml
2 tbsp
1 tsp
2 tsp
450g
1½ tsp
Quantity
190g
2 tsp
130g
1 tbsp
Bake – Menu Program 12 (Bake Function
Only)
Gluten Free – Menu Program 13
Dough 2 - Menu Program 10
Bagel Dough
Ingredients
Water (warm 45-50ºC)
Olive oil
Salt
Strong white flour
Fast action yeast
Optional topping
Olive oil
Sesame seeds
Ingredients
Strawberries
Lemon juice
Sugar
Pectin (thickening agent)
Quantity
150ml
2 tbsp
1½ tsp
225g
1½ tsp
Please refer to other bread recipes not within this
user manual for suitable ingredients and
quantities.
2 tbsp
100g
SUPPORT AND TECHNICAL ADVICE
North Shore City, Auckland, New Zealand
Monday – Friday 8am-5pm
Phone: 0800 232 633
Website: www.goldair.co.nz
Troubleshooting
DOUGH DOES NOT RISE ENOUGH
STICKY BREAD THAT SLICES UNEVENLY
•
•
•
•
•
•
•
Liquids are too hot (above 40°C).
Inactive yeast or not enough yeast.
Ingredients are too cold.
Too much salt. Salt can be used to control
the effect of the yeast within the dough. Too
much salt may make the yeast inactive.
Check brand and type of flour.
Always use a serrated bread knife.
Allow bread to cool longer before slicing.
BREAD SHAPE AND HEIGHT VARIES WITH
EACH USE
•
Ensure accurate measurement of
ingredients.
Room temperature and length of the timer
cycle not constant.
BREAD FLOPS OVER SIDE OF BREAD PAN
•
•
•
BREAD HAS FLOURED CORNER
•
Too much dough.
Bread has over-risen (reduce amount of
yeast slightly).
Not enough sugar.
•
CRUST PALE IN COLOUR
•
•
Not enough sugar.
Adjust crust setting.
LOAVES SPREAD OUT OR LOSE SHAPE
INSTEAD OF RISING
•
Sometimes flour in the corner of the bread
pan may not have been completely
kneaded into the dough. Scrape it off with
a wooden or plastic utensil.
BREAD RISES TOO MUCH AND COMES
INTO CONTACT WITH BREAD MAKER LID
•
•
Dough too soft.
Too much yeast/water or flour.
Too little salt. Salt can be used to control
the effect of the yeast. However too much
salt may make the yeast inactive.
BREAD FALLS DURING BAKE CYCLE
•
BREAD IS HEAVY AND DENSE IN TEXTURE
Bread over-risen (reduce amount of yeast
slightly).
BREAD IS CRUMBLY OR HAS COARSE
TEXTURE
•
Bread over-risen (reduce amount of yeast
slightly).
BREAD HAS UNSUAL AROMA
•
•
•
•
•
Too much flour.
Not enough water or liquid.
Check type and brand of flour.
BREAD IS NOT BAKED THROUGH IN
CENTRE
•
•
Too much liquid.
Not enough flour.
Stale ingredients used.
Too much yeast.
SUPPORT AND TECHNICAL ADVICE
North Shore City, Auckland, New Zealand
Monday – Friday 8am-5pm
Phone: 0800 232 633
Website: www.goldair.co.nz
Two year warranty
Your Goldair product has been inspected and
tested and is guaranteed subject to the
following for a period to two years from the
date of purchase against defects in
workmanship and materials. During this
period, such defects will be rectified by repair
or replacement of the product purchased.
Your product contains no user serviceable
components and this warranty becomes
invalid if in our opinion the product has been
misused, abused, incorrectly installed,
tampered with, connected to an electrical
supply not corresponding with the name plate
specification, or subjected to power surges.
The warranty does not include any labour or
other associated expense that may be
involved in removal or installation of the
product. Normal wear and tear is expressly
excluded.
If the product is to be replaced (cannot be
repaired) then that replacement will be of the
same or similar product or accessory
excluding packaging, instruction card etc.
Where a replacement product is supplied, this
shall be guaranteed for the balance of the
original warranty period.
If your Goldair product fails to operate
satisfactorily, please return it to the retailer
from whom it was purchased. To obtain a
repair or replacement product under this
warranty, you will need to produce satisfactory
evidence of date of purchase. The completed
warranty and purchase receipt must be
presented with the product. The warranty
should be filled out at the time of purchase. It
is in your interest to make sure this is done.
Consumers Guarantee Act (1993).
Any model that is no longer available will be
replaced by a model of a value and with such
features as we consider appropriate in the
circumstances. Goldair Ltd is not responsible
for freight forwarding charges, losses or
damage in transit.
If service is required after the warranty period
has expired, the product should be returned to
a qualified electrical technician. Service
outside of the warranty period will be at your
cost.
In accordance with the above act consumers
are advised that: The manufacturer does not
undertake that repair facilities and parts are
necessarily available for this product.
If any of the provisions of the foregoing are
contrary to any relevant legislation, then that
provision shall be deemed to be excluded from
the warranty and the rest of the provisions will
continue to apply.
IMPORTANT: Please retain this warranty card
Name ……………………………………………… Purchased from …………………………………
Address …………………………………………… Date of purchase …………………………………
………………………………………………………. Name of product …………………………………
Suburb …………………………………………… Model no ……………………………………………