1
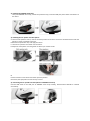
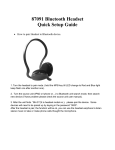
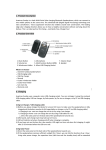
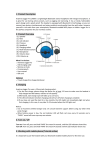
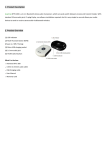
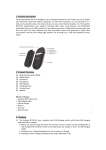
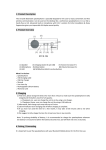
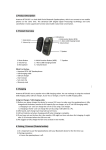
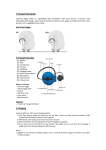
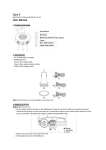
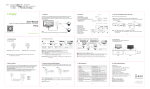
1. Product Description Avantree HM100P is a Bluetooth helmet headset for any Bluetooth Device. Together with the freedom to travel by motorcycle, HM100P gives you the comfort of a Bluetooth wireless communication. Its water resistant body guarantees total peace of mind, even in the rain, and an updated A2DP profile supports music and GPS when riding. Innovative noise reduction minimizes traffic and wind noise through the microphone, and direct helmet to helmet connection makes rider to passenger or rider to rider easier to keep in touch while on the go (within 33 feet wireless connection). 2. Product Overview 1. Volume down (Next) 2. LED indicator 3. MFB 4. USB port 5. Volume up (Previous) 6. Speakers 7. Microphone What’s in the box: a. Bluetooth headset main body b. Two speakers and boom microphone c. Helmet shaping mat d. Velcro pad for shaping mat e. Ear Speaker Velcro f. Mini USB charging cable g. User manual h. Warranty card 3. Installing 1). Installing the Velcro to the interphone headset helmet A. Find the best location for the headset on the helmet, and make sure it is clean and dry. B. Attach the shaping mat to the location. C. Remove the protective strip from the double-sided adhesive and carefully fix the Velcro to the surface of the plastic pad. NOTE: You need check the position of the Velcro carefully. Once fixed, it will not be possible to move it without damaging the Velcro. 2). Installing the HM100P main body Take your HM100P main body, remove the protective strip, make the USB port points down and attach it to the Velcro. 3). Installing the ear speaker and microphone A. Take the two speakers Velcro, test for the best position to fix them. The Velcro should be fixed inside the helmet, as close as possible to the ears. B. Remove the protective strip and apply the Velcro. C. Take the ear speakers and attach it to the Velcro. D. Adjust the microphone arm along down to where your mouth will be. NOTE: Put the helmet on a few times to find the optimum position. Once fixed, the equipment will not be easy to move. 4). Connecting the ear speaker and microphone to HM100P main body Connect USB cable to the USB port of HM100P main body carefully, Now Avantree HM-100 is installed successfully. 4. Charging 1). For first time use, please charge your HM100P until the battery reaches its full capacity. This usually takes about 2 hours 2). Afterwards, each charge cycle may take up to 2 hours. 3). LED will indicate red when charging and off when charging is complete. 4). If you have not used the item for a few months, LED might not turn red when first charging. It might take 15-35 minutes before the LED turns red. 5). We suggest fully charging the HM100P at least every two months NOTE: When the battery becomes low, the red LED will flash and the HM100P emits 3 “DU” tones every 30 seconds. Please recharge the battery fully as described above. When you can’t turn off the Bluetooth interphone, you can turn it off as soon as you charge it 5. Turning ON/OFF Turn On: From OFF, press and hold the “MFB” button for around 3 seconds, until the indicator LED shows blue for 1 second and flashes twice. You will also hear a long tone. Turn Off: From ON, press and hold the “MFB” button for around 7 to 8 seconds, until the indicator LED shows red for 1 second and flashes twice. You will also hear a long tone 6. Pairing/connect (Tutorial online) 1). Pairing with a Bluetooth cell phone A. Keep HM100P and Bluetooth cell phone within 1 meter when pairing. B. Press and hold the MFB button for 3 to 5 seconds until the LED flashes blue and red. You will also hear two tones. C. Search the headset from your phone. D. Once “Avantree HM100’’ found in search list, follow the steps and enter pin code 0000 to pair (some phones do not request the pin code). E. Connect the headset to your phone. The LED indicator will flash twice every 4 seconds if connected successfully. F. HM100P is ready for use now. 2). Pairing with an another HM100P for interphone A. Keep two interphones within 1 meter when pairing B. Make one of the interphones enter pairing mode C. Press and hold the MFB button of the other interphone until Blue LED is steady. D. The interphone whose blue LED is steady will automatically search and connect the interphone which is in pairing mode. After successfully connecting, the blue LEDs of both interphones will flash twice every 4 secs. 3). Pairing with two Bluetooth devices. A. Follow the above steps to pair it with one Bluetooth device. Once successfully paired, the LED will flash blue twice every 4 seconds. B. Press and hold the MFB button for 3 to 5 seconds until the LED flashes blue and red – HM100P has entered pairing mode again. C. Search the Bluetooth device and get them paired and connected. D. The HM100P is now paired and connected with two Bluetooth devices. NOTE: HM100P will switch to standby mode automatically if it can’t pair with any device within 2 minutes. HM100P will power itself off if it is not connected with any device within 10 mins HM100P can connect with two devices simultaneously, either two cell phones or a cell phone and an interphone. You can connect HM100P with the other Bluetooth device when it is in standby or intercom status. Once paired and connected with two Bluetooth devices, it will automatically connect to the two devices whenever you turn the HM100P on, provided that the HM100P is within range. We found most problems are caused by improper pairing between the headset and the Bluetooth device. Please follow the online instructions step-by-step. 7. Intercom Features When two HM100P headsets are connected, you will be able to use the intercom features. 1). Send out intercom: Press and hold V+ and V- together for about 2 seconds, then release it until you hear a short tone. NOTE: When HM100P is connected with another intercom and a cell phone at the same time, you will not be able to send out intercom during a phone call. 2). Cancel intercom: Briefly press MFB button when sending out intercom. You will hear a short tone. 3). Answer intercom: Briefly press MFB button, you will hear a short tone. 4). End intercom: Briefly press MFB button. You will hear a short tone 5). Reject intercom: Press and hold the MFB button for about 2 seconds when receiving intercom 6). Volume up: Short or long press VOL+ button. You will hear two “DU” tones when max or min volume is reached 7). Volume down: Short or long press VOL- button, you will hear two ”DU” tones when max or min volume is reached 8. Call Features When HM100P is connected with a Bluetooth cell phone, you will be able to make calls with HM100P. 1). Answer a call: Briefly press MFB button 2). End a call: Briefly press MFB button 3). Reject a call: Press and hold the MFB button for 2 seconds 4). Cancel a call: Briefly press MFB button when the call is not connected 5). Redialling last number: Press MFB button twice quickly. 6). Volume up: Short or long press VOL+ button. You will hear two ”DU” tones when max volume is reached. 7). Volume down: Short or long press V- button. You will hear two ”Du” tones when min volume is reached 8). Set factory defaulted settings: Ensure the headset is standby mode, then press and hold “V-” button until RED LED light up. NOTE: When HM100P is connect with another intercom and a cell phone at the same time, you can answer calls and make calls via your mobile phone resume. In intercom status, when call is completed, HM100P will revert to intercom status. 9. Music Streaming Please enter into your phone’s music player before listening music on the headset, music will be automatically heard on your headset for some phones, some need to transfer music from phone to the headset. 1). Volume Up: Briefly press “V+” to increase volume 2). Volume Down: Briefly press “V-“ to decrease volume 3). Play music: Press “MFB” Button 4). Pause: Press “MFB” Button 5). Previous track: Press and hold “V+” Button 6). Next track: Press and hold “V-” Button NOTE: Some functions are dependent on the mobile phone being used with the headset and may not work with some phones where those features are not supported. 10. Product Specification • Bluetooth V2.1 • Support profiles: Headset profile and hands free profile • Operation range: Class 2, 10 meters • Talk time: up to 7 hrs • Standby time: up to 80 hrs • Charging time: About 2 hours • Charging voltage: DC 5V 500mA • Main body dimensions: 100*20*35mm • Microphone arm: 230mm • Weight: 52g The talk and standby times may vary when used with different mobile phones or other compatible Bluetooth devices, usage settings, usage styles and environments. 11. Declaration of Conformity 11.1. EU This product is CE certified according to the provision of the R&TTE Directive (99/5/EC). We declare that this product is in compliance with the essential requirements and other relevant provisions of Directive 1999/5/EC. 11.2. FCC Statement 1). This device complies with Part 15 of the FCC Rules. Operation is subject to the following two conditions: • This device may not cause harmful interference. • This device must accept any interference received, including interference that may cause undesired operation. 2). Changes or modifications not expressly approved by the party responsible for compliance could void the user's authority to operate the equipment. 11.3. RF Warning Statement The device has been evaluated to meet general RF exposure requirement. The device can be used in portable exposure conditions without restriction. Changes or modifications not expressly approved by the party responsible for compliance could void the user's authority to operate the equipment. NOTE: This equipment has been tested and found to comply with the limits for a Class B digital device, pursuant to Part 15 of the FCC Rules. These limits are designed to provide reasonable protection against harmful interference in a residential installation. This equipment generates, uses and can radiate radiofrequency energy and, if not installed and used in accordance with the instructions, may cause harmful interference to radio communications. However, there is no guarantee that interference will not occur in a particular installation. If this equipment does cause harmful interference to radio or television reception, which can be determined by turning the equipment off and on, the user is encouraged to try to correct the interference by one or more of the following measures: • Reorient or relocate the receiving antenna. • Increase the separation between the equipment and receiver. • Connect the equipment into an outlet on a circuit different from that to which the receiver is connected. • Consult the dealer or an experienced radio/TV technician for help. 11.4. Trademark Statement The Bluetooth word mark and logos are owned by the Bluetooth SIG, Inc. Avantree is a trademark owned by Avantronics Limited. 13. Warranty Please refer to the warranty card included in the pack. Technical Support For more information about this product and other Avantree Bluetooth products, including video user guides and online technical support, please visit the www.avantree.com Due to the nature of our products, there may be software updates made without notice. Please always refer to the Avantree website for the latest information. FCC ID: WJ5-HM100 QD ID: B014717 Z-PKMN-HM100P-000