1
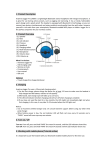
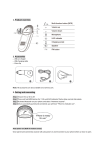
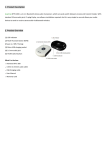
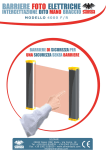
1. Product Description Avantree Jogger (AS6) is a lightweight sport headphone with in-ear drivers, it features with fashionable sport design, water resistant and decent stereo sound. Jogger is the ideal choice for active pursuits such as jogging and exercising. How to wear Jogger 2. Product Overview (1). Speaker (2). Next (3). Led Indicator (4). Previous (5). Headband (6). Charging Socket (7). Multi-Function Button(MFB) (8). Microphone (9). Volume Down (10). Volume Up What’s in the box: Avantree Jogger USB charging cable Manual Warranty card Carry pouch Silicon ear bud Optional: Travel /car charger/Armband 3. Charging Avantree AS6 uses 2.0mm jack charging socket. 1) First time, please charge the device for no less than 2 hours to make sure the headset is fully charged and the battery reaches its full capacity. 2) Afterwards, each charge cycle may take 2 hours around. 3) LED will indicate red in charging and off when charging is complete. 4) If you have not use the item for a few months, LED might not turn red when first charging. It might take 15-35 minutes before the LED turn red. Notice: Suggest to use Avantree certified charger only. Or consult Avantree support if intend to use other rd 3 party charger. When battery power is low, the red indicator light will flash red every 15 seconds. 4. Turn On / Off Turn On: From OFF, press and hold the “MFB” around 4 seconds until the indicator LED show Blue. Turn Off: From On, press and hold the “MFB” around 4 seconds until the indicator LED show red. 5. Working with mobile phone (Tutorial online) It is important to pair the headset with your Bluetooth Mobile phone for the first time use. 5.1 Pairing procedure: A. Ensure the headset is off. B. Press and hold the MFB button (about 7-10 seconds) until LED blinks blue and red alternately. C. Search the headset from your phone. D. Once “Avantree Jogger’’ found in search list, follow the steps and enter pin code 0000 to pair (some phones do not request the pin code); E. Connect the headset to your phone. F. Headset is ready for use now. Once paired and connected, the headset will be automatically connected to your phone whenever you turn the headset on again, provided your phone is in the range. We found most of the online technical support questions are caused by improper pairing between the headset and the Bluetooth device. Please follow the instruction step-by-step. 5.2 Basic Operations: ● Answering a call: Answering the first call: Press the “MFB” button once to answer the first call. Answering the second call: Press the “MFB” button once to answer the second call and end the first call simultaneously. ● Ending a call: Press the “MFB” button once to end a call. ● Reject a call: Reject the first call: Press and hold the “MFB” button for 3 seconds to reject the first call. Reject the second call: Press “Previous” button once to reject the second call. ● Voice Dial: If your mobile phone has voice dialing enabled, when in standby mode short press both ”V+” and “V-” then say the voice tag you wish to call. (Note: Some phones need to record the voice tag in advance, and some no need.) ● Last number redialing: In standby mode, double click the “MFB” button ● Switching a call between headset and mobile phone: Headset to Mobile Phone: During a call, press and hold “MFB” for 2 seconds to transfer the call to your mobile phone. Mobile Phone to Headset: During a call, press and hold “MFB” for 2 seconds to transfer the call to your headset. ● Mute&Unmute: During a conversation Mute the microphone: press and hold “Next” button till you hear a short beep. In mute status, you will hear two beeps every 3 seconds. Unmute the speakerphone: press and hold “Next” button again till you hear a short beep ● Restore the Default Setting: Under standby mode, press and hold ”Next” button for 8 seconds until the indicator flash blue and red, then press and hold “MFB” button for 4 seconds, then you will hear a beep, the headphone is now back to original setting, and after power on again, it will enter pairing mode automatically. 5.3 Music Streaming Please enter into your phone’s music player before listening music on the headset, music will be automatically heard on your headset for some phones, some need to transfer music from phone to the headset. Volume Up: Press and hold “Volume +” or short press “Volume+” to get volume increased Volume Down: Press and hold “Volume –“ or short press “Volume-“ to get volume decreased Play Music : Press “MFB” Button Pause : Press “MFB” Button Previous Track: Press “Previous” Button Next Track: Press “Next” Button Note: 1) Some functions are dependent on the mobile phone being used with the headset and may not work with some phones where those features are not supported. 2) For some phones, when the power saving mode is on with animated moving images, the music could be interrupted. Suggest to change the power saving mode to non-moving image. 6. Working with PC/ Laptop (Tutorial online) With PC running Microsoft Vista with Built-in Bluetooth 6.1 Pairing procedure: A. Ensure your PC with built-in Bluetooth. Turn On the Bluetooth of PC B. Double click Bluetooth icon, click “ Add a new device” C. Once “Avantree Jogger’’ found in search list, follow the steps and enter pin code “0000” to pair (some does not need this); D. Connect the headset to your PC. E. Headset is ready for use now. 6.2 Streaming the Music Before streaming the music, you need to change the sound setting first. Go to “Control Panel” – “Sound” – Playback, change the audio setting to “Bluetooth Stereo Audio”. Play music from your player ● Pause: During music streaming, press “MFB” Button, press “MFB” Button to resume it. ● Volume Up: Press and hold “Volume +” or short press “Volume+” to get volume increased ● Volume Down: Press and hold “Volume –” or short press “Volume-” to get volume decreased ● Previous / Back track: These two functions dependent on your PC system, some system, you can control it on Headset Previous / Back buttons, some system does not support. 6.3 For Skype Call Some PC system can change the sound setting automatically, then you can make Skype call right now. Some PC system needs change the sound setting first, go to Skype Tools – Options- Sound Devices, select “Audio in” / “Audio Out”/Ringing all three modes to “Bluetooth AV Audio”, save it. Then you can make Skype call 7. Product Specification Bluetooth V2.1+EDR Chipset: CSR BC05-Multimedia Single Chip Support profiles: Headset, Handsfree, A2DP,AVRCP Operation Range: Class 2, 10 meters Battery: 170mA rechargeable lithium battery Talk time: up to 9 hrs Music time: up to 8 hrs Standby time: up to 16 days Weight: 23g(light) Headset size: 85mm(L)x72mm(W)X25.5mm(H) The talk and standby times may vary when used with different mobile phones or other compatible Bluetooth devices, usage settings, usage styles and environments. 8. Safety Information To avoid any damage or malfunction of the device do not drop device from high places. Keep device away form humidity, water and any other liquid. If the device is exposed to water, moisture and other liquid, do not operate it to avoid any electrical shock, explosion and damage to the device or yourself. Do not place or keep this device near any heat source, such as, direct sun light, radiators, stoves or other apparatus which produces heat. It may cause explosion, degrade the performance and/or reduce battery life. Do not modify, repair or disassemble device at discretion (Especially battery: It may cause an explosion). Doing this will avoid the warranty. Do not place heavy objects on the device. Use only supplied and approved charger. Replacement or service must be done by qualified service center or manufacturer. Unplug this device when unused for long periods of time or during lightning storms. CAUTIONS: ELECTRIC SHOCK HAZARD The battery used in this device may present a risk of fire or chemical burn if mistreated. 9. Declaration of Conformity 9.1. FCC Statement This device complies with part 15 of the FCC Rules. Operation is subject to the following two conditions: (1) This device may not cause harmful interference, and (2) This device must accept any interference received, including interference that may cause undesired operation. 9.2. RF Warning Statement The device has been evaluated to meet general RF exposure requirement. The device can be used in portable exposure condition without restriction. Changes or modifications not expressly approved by the party responsible for compliance. Could void the user's authority to operate the equipment. NOTE: This equipment has been tested and found to comply with the limits for a Class B digital device, pursuant to Part 15 of the FCC Rules. These limits are designed to provide reasonable protection against harmful interference in a residential installation. This equipment generates, uses and can radiate radiofrequency energy and, if not installed and used in accordance with the instructions, may cause harmful interference to radio communications. However, there is no guarantee that interference will not occur in a particular installation. If this equipment does cause harmful interference to radio or television reception, which can be determined by turning the equipment off and on, the user is encouraged to try to correct the interference by one or more of the following measures: -- Reorient or relocate the receiving antenna. -- Increase the separation between the equipment and receiver. -- Connect the equipment into an outlet on a circuit different from that to which the receiver is connected. -- Consult the dealer or an experienced radio/TV technician for help 9.3. IC Statement This device complies with Industry Canada license-exempt. RSS standard(s). Operation is subject to the following two conditions: (1) this device may not cause interference, and (2) this device must accept any interference, including interference that may cause undesired operation of the device. Le présent appareil est conforme aux CNR d'Industrie Canada applicables aux appareils radio exempts de licence. L'exploitation est autorisée aux deux conditions suivantes : (1) l'appareil ne doit pas produire de brouillage, et (2) l'utilisateur de l'appareil doit accepter tout brouillage radioélectrique subi, même si le brouillage est susceptible d'en compromettre le fonctionnement." 9.4. EU This product is CE certified according to the provision of the R&TTE Directive (99/5/EC). Declare that this product is in compliance with the essential requirements and other relevant provisions of Directive 1999/5/EC. 9.5. Trademark Statement The Bluetooth word mark and logos are owned by the Bluetooth SIG, Inc. Avantree is a trademark owned by Avantronics limited. 10. Warranty Please refer the warranty card included in the pack. QDID: B015071 FCC ID: WJ5-ASX IC ID: 8475A-AS6 Online Tutorial & Technical Support For more information about this product and other Avantree Bluetooth products, including video user guides, product tutorials and online technical support, please visit the www.avantree.com ‘Product Tutorial’ and ‘Download’ pages. Due to the nature of our products, there may be software updates made without notice. Please always refer to the Avantree website for the latest information. Z-PKMN-AS6-0000V1.3