Transcript
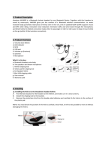
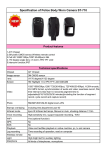
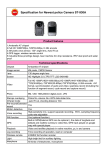
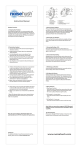
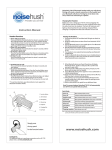
Pairing N800 with a Bluetooth device
1. Pairing with a Bluetooth cell phone
You have to pair N800 Bluetooth interphone with a Bluetooth cell phone before
first use. Please make sure your cell phone is Bluetooth-enabled. Specific pairing
steps may vary with different models of cell phones. Please refer to your cell
phone’s user’s manual for further information. The general pairing steps are as
follows:
- Keep N800 and Bluetooth cell phone within 1 meter when pairing;
- Ensure N800 is turned off, otherwise turn off N800 first
- Press and hold MFB button for about 3∼5 seconds; the red and blue LEDs will
flash alternately. N800 now entered pairing mode;
- Turn on your cell phone’s Bluetooth function to search for Bluetooth devices.
After the search is completed, select “N800” from the Bluetooth device list;
- According to the indication, enter password or PIN No:”1234”, and press ”Yes” or
“confirm”;
- After successful pairing, select “N800”from the Bluetooth device list and press
“connect”. The indicator light of N800 will flash twice every 4 seconds if connected
successfully.
N800
The Bluetooth interphone is a Bluetooth headset designed for the motorcycle rider
and passenger who wish to have clear and reliable wireless communications while
riding. It can also connect with a Bluetooth cell phone for hands-free
communication. It has the following features:
Two interphone headsets connect to use intercom feature:
- Send out intercom
- Answer intercom and reject intercom
- End intercom
- Adjust the volume
N800 pairs with a Bluetooth cell phone:
- Answer a call, end a call and reject a call
- Redial last number
- Adjust the volume
The interphone can connect to another interphone and a Bluetooth cell phone at
the same time:
- Dial a number during intercom
- Answer a call during intercom
2. Pairing two interphones together
If you want to use the Bluetooth intercom feature, you have to pair two
interphone together first. The general pairing steps are as follows:
- Keep two interphones within 1 meter when pairing;
- Make one of interphones enter pairing mode;
- Press and hold MFB button of another interphone until blue LED is on;
- The interphone whose blue LED is on will automatically search and connect the
interphone which entered pairing mode. After successfully connecting, the blue
LEDs of both interphones will flash twice every 4 seconds.
Notes:
- Pairing mode will last 2 minutes. N800 will switch to standby mode automatically
if it can’t pair with any device after 2 minutes. If you want to continue to pair the
N800 with a Bluetooth device, please switch off N800 first and re-pair according
to steps 1∼6 mentioned above.
- N800 will turn off automatically when it can’t connect to any device after 5
minutes.
- N800 can remember 8 paired devices, when the number of paired devices
exceeds 8; the first one will be replaced.
-
4
5
3
2
1
6
1 Volume down (-) and interphone button
2 Function button - Turn on/off, redial last number, answer/reject call
or interphone
3 USB Charging port, also used as a connection port to microphone
and speaker module
4 Loudspeaker
5 Microphone
6 Volume Up (+) and interphone button
Intercom feature
If two interphones connect each other, you are able to use intercom feature. Specific
operations are as follows:
Installation
1. Install the microphone and speaker to the N800 module
1
When N800 is on but don’t connect with any devices, press MFB button of N800
once, it will connect to the last connected device automatically.
- Every time N800 is switched on, it will connect to the last connected device
automatically. If you want to pair it with other devices, please switch off the
current device’s Bluetooth function first and try to pair N800 with the new device
according to steps 1∼6 mentioned above.
- N800 can connect with two devices simultaneously, either two Bluetooth cell
phones or a cell phone and an interphone. You can connect N800 to a Bluetooth
cell phone when it is in standby or intercom status.
- When N800 gets out of working range of the connected devices it will
automatically reconnect to the devices as soon as it is in working range again,
either it was connected to a interphone or a Bluetooth cell phone or both of
them.
2
2. Install N800 onto the helmet
1
2
3
4
5
6
Function
Operations or Status
Indication tone
Receiving intercom
Ringing
Ring
Send out intercom
Press and hold VOL+ or VOL- for about
2 seconds, and release it after hearing
“DU” tone
1 short tone
Cancel intercom
Short press MFB button when sending
out intercom
1 short tone
Answer intercom
Short press MFB button
1 short tone
Reject intercom
Press and hold MFB button for about
2 seconds when receiving intercom
1 short tone
End intercom
Short press MFB button
1 short tone
Making calls with N800
If N800 is connected to a Bluetooth cell phone, now you can make calls with N800. The
specific operations are as follows:
Indication tone
Function
Basic Operation
Incoming call
Auto-ringing
Ringing
Redial last number Short press MFB button twice quickly
1 short tone
Short press MFB button when the call is not connected 1 short tone
Cancel calling
Answer a call
Short press MFB button
1 short tone
Reject a call
Long press MFB button for 2 seconds
1 short tone
End a call
Short press MFB button
1 short tone
Volume up
Short or long press VOL+ button
None
Volume down
Short or long press VOL- button
None
Notes:
- When the volume is adjusted to max. or min. you will hear two “DU” tones.
- When two interphones are connected each other and a Bluetooth cell phone is also
connected, you can answer incoming calls with the interphone or dial a number with the
Bluetooth cell phone during intercom and the intercom will be kept. After ending the call,
the interphone will recover to intercom status. But you can’t send out intercom during a
phone call.
Installing the interphone
Installing the Velcro attached to interphone headset
- Before removing the protective strip from the double-sided adhesive, find the
best location to place the Velcro.
- Clean the part of the helmet that the interphone headset with adhesive will be
attached to. Remove any dirt or grease. Do not use cleaners that may damage the
helmet or that will leave an oily residue.
- Check again the position of the Velcro. Once it is fixed it will not be possible to
move.
- Make sure the surface is dry before continuing. Remove the protective strip from
the double-sided adhesive and carefully fix the Velcro to the outside shell of the
helmet.
Note: There are two types of Velcro, thin and thick. It is recommendable to use the
thick Velcro when the curvature in the surface of the helmet is large.
Installing the interphone headset
- Take your interphone headset, make the USB port points down and attaches the
interphone headset to the Velcro.
Installing the ear speaker and microphone
- Now you need to attach the ear speaker and microphone arm to the inside of the
helmet. Take the Velcro which the ear speaker will attach to, and test for the best
position to fix it.
- The Velcro should be fixed at the height of your ear. You will need to put the
helmet on a few times to find the optimum position. When the correct
positioning is found, remove the protective strip and apply the Velcro.
- Next, take the ear speaker and attach it to the Velcro. Run the microphone arm
down along down to where your mouth will be. As the microphone arm is
flexible, you can adjust it so it sits in the optimum position in front of your mouth.
Note: There are two types of Velcro, thin and thick. Please use based on the actual
situation.
Connecting the ear speaker and microphone to interphone headset Take care to
connect USB cable to the USB port of interphone headset, now you have successfully
installed the interphone
LED Indicator
1. When it is charging
LED indicator
Status of N800
Red LED is on
Charging in progress
Red LED is off
Charging finished
2. When it is not charging
LED indicator
Status of N800
Red and blue LEDs flash alternately
Pairing mode
Blue LED flashes once every 3 seconds
Standby mode (not connected)
Blue LED flashes twice quickly every 4 seconds
Standby mode (connected)
Blue LED flashes twice quickly every 4 seconds
Incoming call/calling
Blue LED flashes slowly
During a call
Red LED flashes
Low power
Care and maintenance
Read the following recommendations before using N800. Following these you will be
able to enjoy our product for many years.
- Keep it dry and don’t take it to damp places to avoid the product’s internal circuit
being affected.
- Keep the product away from direct sunlight or hot places. High temperatures will
shorten the life of electronic devices, destroy the battery or distort certain plastic
parts.
- Don’t expose the product to cold areas. It may damage the internal circuit board.
- Don’t try to disassemble the product as it may get damaged if you are not
professional.
- Don’t let it fall down onto the floor or other hard surfaces. The internal circuit
might get damaged.
- Don’t use intensive chemical products or detergent to clean the product.
- Don’t scratch the surface with sharp things.
- Don’t remove the microphone’s protector, so the microphone won’t be damaged.
- Please take down N800 from the helmet when you don’t use it for a long time.
In case N800 Bluetooth interphone doesn’t function properly, send it to the store you
bought it. The staff will help you to solve the problem.
Getting started
1. Charging the interphone headset
The Bluetooth interphones have built-in rechargeable batteries, prior to using
them; it is recommendable to charge their batteries fully for the first time.
Connect one end of USB cable to a standard power outlet and the USB plug to the
USB port of the interphone headset. The red LED will be on while charging. It
takes about 2 hours to charge the battery fully. When charging has completed, the
red LED will be off.
When the Bluetooth interphone is on and the battery becomes low, the red LED
flashes and the Bluetooth interphone emits 3 “DU” tones every 30 seconds. Please
recharge the battery fully as described above.
Notes:
a. When you can’t turn off the Bluetooth interphone, you can turn it off as soon as
you charge it.
b. There are travel charger and USB cable, please choose based on actual condition.
Warning:
- The battery is recycled.
- Batteries (battery pack or batteries installed) shall not be exposed to excessive
heat place such as sunshine, fire or the like.
2. Turning on/off N800
Function
Operation
LED indicator
Indication tone
Power on
Press and hold
MFB button for
3 seconds
Blue LED is on for
1 second and then
flashes twice
1 long tone
Power off
Press and hold
MFB button for
7-8 seconds
Red LED is on for
1 second and then
flashes twice
1 long tone
Entering
pairing
mode
Press and hold
MFB button for
3-5 seconds
Red and blue
LEDs flash alternately
2 short tones
Note: If you want N800 to enter pairing mode, you have to press and hold MFB
button for 3-5 seconds when the interphone is turned off or in standby mode.
FAQs
1. I can’t connect N800 to my Bluetooth cell phone. What to do now?
a) Please make sure N800 has been paired with a Bluetooth cell phone;
b) Enable your cell phone’s Bluetooth function, please refer to your cell phone’s
user’s manual for further information;
c) Please make sure N800 and your cell phone is in the effective working range and
that there are no barriers between them, such as walls and other electronic
devices etc.
2. What to do when two interphones can’t connect each other?
a) Please make sure one interphone is in pairing mode while the other one should
be in searching mode;
b) Ensure two interphones are in their working range and there are no barriers
between them.
3. What to do when N800 can’t connect to Bluetooth device after being out of its
working range for a short time?
a) Please bring the device back into the working range within 1 minute;
b) Press MFB button once to connect N800 to Bluetooth device again
Specifications
Bluetooth specification
Bluetooth profiles
Operating distance
Working time
Standby time
Charging time
Charging voltage
Dimensions
Weight
Bluetooth V2.1
Headset Profile and Hands-free Profile
10 meters
Up to 7 hours
Up to 80 hours
About 2 hours
DC 5V
Main body: 81×42×18m
The length of microphone arm: 230mm
49.5g
Notes:
1. This device complies with Part 15 of the FCC Rules. Operation is subject to the
following two conditions: (1) this device may not cause harmful interference, and
(2) this device must accept any interference received, including interference that
may cause undesired operation.
2. Changes or modifications not expressly approved by the party responsible for
compliance could void the user’s authority to operate the equipment.
Note
During an outgoing or an incoming call, your connected intercom device will go
on hold and reconnect after the call ended. This is if only you are connected to
another interphone device.
Contact Us
For additional help or to purchase accessories such as AC / DC,
please visit us at www.noisehush.com