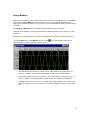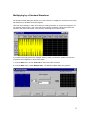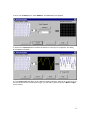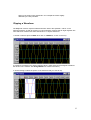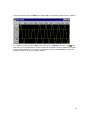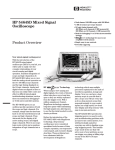
1
Agilent 81150A IntuiLink Waveform Editor Table of Contents Table of Contents........................................................................................................................1 Introduction to the Waveform Editor.............................................................................................5 Introduction to the User Interface.............................................................................................6 Supported Instrument..............................................................................................................7 Finding Information .................................................................................................................8 Contacting Technical Support..................................................................................................8 Legal Notice Page...................................................................................................................9 Using the Waveform Editor........................................................................................................11 Using Help ............................................................................................................................12 The Help Window:.............................................................................................................12 Dialog Box Help: ...............................................................................................................13 Printing Help .........................................................................................................................13 Creating Your Own Tools ......................................................................................................14 Additional Plug-ins ................................................................................................................15 Creating Waveforms .............................................................................................................16 Inserting Segments Using the Icons ..................................................................................16 Inserting Segments Using the Menu..................................................................................17 Drawing an Arbitrary Waveform ........................................................................................19 Selecting Waveform Data..................................................................................................21 Using Markers...................................................................................................................23 Performing Mathematics on Waveforms ................................................................................26 Adding, Subtracting, Multiplying Waveforms......................................................................26 Multiplying by a Standard Waveform .................................................................................27 Adding a Waveform from the Clipboard .............................................................................30 Taking the Absolute Value of a Waveform.........................................................................33 Removing High Frequency Components from a Waveform................................................34 Clipping a Waveform.........................................................................................................35 Selecting a Filter Function .................................................................................................37 Applying a Filter Function..................................................................................................38 Selecting a Windowing Function........................................................................................39 Applying a Windowing Function ........................................................................................40 Outputting Waveforms...........................................................................................................41 Establishing a Connection to an Arb..................................................................................41 Sending Waveforms to an Arb...........................................................................................43 Exporting Waveform Data to Excel ....................................................................................44 Waveform Editor Reference ......................................................................................................46 Standard Toolbar ..................................................................................................................47 Waveform Toolbar.................................................................................................................48 Supported Data File Formats.................................................................................................49 Menus...................................................................................................................................51 File Menu ..............................................................................................................................51 New (File Menu) ..........................................................................................................51 Open (File Menu) ........................................................................................................51 Close (File Menu)..............................................................................................................51 Save (File Menu) .........................................................................................................51 Save As (File Menu) .........................................................................................................52 Save All (File Menu)..........................................................................................................52 Save Instrument Setup (File Menu) ...................................................................................52 Load Instrument Setup (File Menu) ...................................................................................52 1 Properties (File Menu).......................................................................................................53 Print Preview (File Menu) ..................................................................................................53 Print (File Menu) ..........................................................................................................53 Exit (File Menu).................................................................................................................53 Edit Menu .............................................................................................................................54 Undo (Edit Menu) ........................................................................................................54 Redo (Edit Menu) ........................................................................................................54 Cut (Edit Menu) ...........................................................................................................54 Copy (Edit Menu) ........................................................................................................54 Paste (Edit Menu) ........................................................................................................54 Insert Segment (Edit Menu) ..............................................................................................55 Sine (Edit Menu) .........................................................................................................55 Triangle (Edit Menu) ....................................................................................................56 Square (Edit Menu) .....................................................................................................56 Saw Tooth (Edit Menu) Sinc (Edit Menu) ................................................................................................56 ..........................................................................................................57 Exponential Rise (Edit Menu) ......................................................................................57 Exponential Fall (Edit Menu) ........................................................................................57 Noise (Edit Menu) ........................................................................................................58 DC (Edit Menu) ...........................................................................................................58 Select All (Edit Menu)........................................................................................................58 Select (Edit Menu) .......................................................................................................59 Freehand (Edit Menu) ..................................................................................................59 Line Draw (Edit Menu) .................................................................................................59 Marker (Edit Menu) X Markers (Edit Menu) ......................................................................................................60 .................................................................................................60 Y Markers (Edit Menu) .................................................................................................60 Pin Markers (Edit Menu)....................................................................................................61 View Menu ............................................................................................................................62 Standard Toolbar (View Menu)..........................................................................................62 Waveform Toolbar (View Menu) ........................................................................................62 Status Bar (View Menu) ....................................................................................................62 Thumbnail View (View Menu)............................................................................................63 Grid (View Menu) ..............................................................................................................63 Zoom (View Menu) Zoom In (View Menu) ......................................................................................................63 ..................................................................................................64 Zoom Out (View Menu) ...............................................................................................64 Connect Dots (View Menu) ...............................................................................................64 Segment Marks (View Menu) ............................................................................................64 Math Menu............................................................................................................................65 Addition (Math Menu)........................................................................................................65 Subtraction (Math Menu)...................................................................................................65 Multiplication (Math Menu) ................................................................................................66 Clip (Math Menu) ..............................................................................................................66 Absolute (Math Menu).......................................................................................................66 Filter (Math Menu).............................................................................................................66 Low Pass (Math Menu) .....................................................................................................66 Smoothing (Math Menu)....................................................................................................67 Windowing (Math Menu) ...................................................................................................67 2 Extended Cosine (Math Menu) ..........................................................................................67 Raised Cosine (Math Menu)..............................................................................................68 Hamming (Math Menu) .....................................................................................................68 Invert (Math Menu)............................................................................................................68 Mirror (Math Menu) ...........................................................................................................69 Resize (Math Menu)..........................................................................................................69 Expand To Fit (Math Menu)...............................................................................................69 Communications Menu..........................................................................................................70 Connection (Communications Menu).................................................................................70 Send Waveform (Communications Menu) ....................................................................70 Tools Menu ...........................................................................................................................71 Import Waveform (Agilent Infiniium Scope) (Tools Menu) ..................................................71 Import Waveform (Agilent 546xx Scope) (Tools Menu) ......................................................71 Window Menu .......................................................................................................................72 Cascade (Window Menu) ..................................................................................................72 Tile Horizontal (Window Menu) .........................................................................................72 Tile Vertical (Window Menu)..............................................................................................72 Windows (Window Menu)..................................................................................................72 Dialog Boxes.........................................................................................................................73 Connection Dialog Box......................................................................................................73 Low Pass Filter Dialog Box ...............................................................................................74 Print Dialog Box ................................................................................................................75 Properties Dialog Box .......................................................................................................76 Resize Dialog Box.............................................................................................................77 Scope Waveform Setup Dialog Box...................................................................................78 Segment Parameters Dialog Box ......................................................................................79 Send Arbitrary Waveform Dialog Box ................................................................................81 Waveform Math Dialog Box...............................................................................................82 Index.........................................................................................................................................84 3 4 Introduction to the Waveform Editor 5 Introduction to the User Interface The Agilent IntuiLink Arbitrary Waveform Editor application is an ActiveX document server. This application provides a graphical user interface (GUI) that allows you to create, import, modify, and export arbitrary waveforms, and to send these waveforms to your function generator (see Supported Instruments). The user interface is shown below with its main areas identified by numbers: Let's look at each of these numbered areas in turn. 1. Menu Bar - provides standard Microsoft Windows_ style menus. 2. Standard Toolbar - provides toolbar buttons for such standard menu functions as Save, Cut, Paste, and Print. 3. Waveform Toolbar - provides toolbar buttons for the arbitrary waveform creation and edit functions. In particular, these buttons allow you to add waveform segments to the active waveform edit window. 4. Waveform Edit Windows - each of these windows allows you to create, edit, and display an arbitrary waveform. The contents of the active waveform edit window can be sent to your function generator. 6 5. Status Bar - displays messages about the following: • General status messages. • The current mode. • In Select mode, the start and end positions and number of points selected. • In Marker mode: - When an X marker is being moved, the positions of both X markers and the difference between them. - When a Y marker is being moved, the positions of both Y markers and the difference between them. • In Freehand or Line Draw mode, the cursor position and the length of the waveform. • The address of an arbitrary waveform generator (for example: GPIB1::11::INSTR) if one is connected, or else Disconnected. Supported Instrument The Agilent IntuiLink Arbitrary Waveform Editor supports the following Agilent Technologies instrument. (The remote interfaces provided with each instrument are also listed.) • Agilent 81150A Function/Arbitrary Waveform Generator (GPIB). The waveform editor supports connections to these instruments using a remote interface. Refer to your instrument user's manual for further information about establishing communication between your PC and instrument using one of these interfaces. Note: In addition, the waveform editor can import waveforms from the Agilent Infiniium Series and Agilent 54600 Series Oscilloscopes. 7 Finding Information The Agilent IntuiLink Arbitrary Waveform Editor Help provides the following help books in the table of contents: • Introduction to the Waveform Editor provides a short introduction to the waveform editor application. • Using the Waveform Editor provides task-oriented how-to topics on how to use the waveform editor. • Waveform Editor Reference provides a reference topic for each waveform editor command or dialog box. See Using Help for information on using this help system. See Contacting Technical Support if you need technical support. Contacting Technical Support You can contact Agilent Technologies Technical Support at one of the following telephone numbers: • In the United States: (800) 452-4844 • In Europe: 31 20 547 2183 For information on obtaining support world wide, use our web site: http://www.agilent.com/find/assist Or contact your Agilent Technologies Representative. 8 Legal Notice Page Copyright Notice Agilent IntuiLink Arbitrary Waveform Editor Software and Help: Copyright 2006 Agilent Technologies, Inc. All rights reserved. Trademarks Microsoft , Windows , MS Windows , and Windows NT are U.S. registered trademarks of Microsoft Corporation. U.S. Government Restricted Rights The Software and Documentation have been developed entirely at private expense. They are delivered and licensed as “commercial computer software” as defined in DFARS 252.227-7013 (Oct 1988), DFARS 252.211-7015 (May 1991) or DFARS 252.227-7014 (Jun 1995), as a “commercial item” as defined in FAR 2.101(a), or as “Restricted computer software” as defined in FAR 52.227-19 (Jun 1987)(or any equivalent agency regulation or contract clause), whichever is applicable. You have only those rights provided for such Software and Documentation by the applicable FAR or DFARS clause or the Agilent Technologies standard software agreement for the product involved. 9 10 Using the Waveform Editor 11 Using Help To start Help, from the Help menu select Contents and Index. (You can also start Help by clicking on the icon in the toolbar.) The Windows help Contents browser appears: Double-click on a book to open (expand) it and see the books and topics under it. Double-click on a topic to display it. Or use the buttons at the bottom of the help browser to open or close books, and to display topics. If you want to perform an indexed or full-text search, click on the Index or Find tab, and follow the instructions given. If you want to print one or more help topics, see Printing Help. The Help Window: Help topics are displayed in the help window: The buttons at the top of the help window help you to navigate to a topic. Click on Help Topics to return to the help Contents browser. Click on Back to return to the previously displayed topic. 12 Click on Options (or right-click anywhere within the topic) to display the options menu. You can also use the browse buttons ( ) to browse forward and back one topic at a time. Dialog Box Help: Many dialog boxes include a Help button. Click on this button to obtain the help topic for the dialog box. Note: button in the upper right-hand Certain standard dialog boxes such as Save have a corner. Click on this button, and then click on the area of interest in the dialog box to obtain help for these dialog boxes. Printing Help To print a help topic, display the topic in the help window (see Using Help), click on Options, and then click on Print Topic. The Print dialog box appears. Click on OK to print the help topic. To print all of the topics in a book in the help Contents, follow these steps: 1. Open the Windows help browser. (From the Help menu, select Contents and Index.) 2. Select the Contents tab if it is not already selected. 3. Select the desired book in the Contents hierarchy by clicking on it. (The book need not be open, just selected.) 4. Click on the Print button at the bottom of the help browser. 5. The Print dialog box appears. Click on OK. All of the topics found in the selected book are printed sequentially. Note that if you select a book at the top level of the Contents hierarchy (for example Waveform Editor Reference), a large number of topics may be printed. If you are using a network printer that prints job headers, you may want to turn off the job header or use a different printer to avoid printing a header sheet for each topic. 13 Creating Your Own Tools The Tools menu provides two selections that allow you to import waveforms from your Agilent Infiniium Oscilloscope, or from your Agilent 54600 Series Oscilloscope. (See Import Waveform (Agilent Infiniium Scope) (Tools Menu) or Import Waveform (Agilent 546xx Scope) (Tools Menu) for further information.) In addition, you can create your own tool and add it to the Tools menu. To do this, create the tool as an ActiveX DLL using Microsoft Visual BASIC, and then copy the ActiveX DLL to the following folder:C:\Program Files\Agilent\IntuiLink\Waveform Generator Tool\Tools\. You do not need to register the DLL. You can create tools to import waveforms from other oscilloscopes, or to perform mathematical operations or other functions on waveforms. An example Visual BASIC project is included in the following folder: C:\Program Files\Agilent\IntuiLink\Waveform Generator Tool\Examples\Tools_TDS\. If you compile this example, it will create a DLL file that supports importing waveforms from the Tektronix TDS 3014 DPO Oscilloscope. To activate this feature, copy this file (tds.dll) from the Tools_TDS folder to the Tools folder. Or, you can modify the Visual BASIC project to create your own ActiveX DLL to import waveforms. Once you have created your DLL, copy it to the Tools folder to activate it. For further information on how to modify this example and create a custom tool, see the TDS.txt file, which is located in the Tools_TDS folder. Note: The folders listed assume that you have installed the waveform editor in the default installation folder: C:\Program Files\Agilent\IntuiLink\Waveform Generator Tool\. If you have installed the software elsewhere, there should be a Tools folder and Examples\Tools_TDS folder under the installation folder. 14 Additional Plug-ins There are several additional plug-ins accessories for the Agilent IntuiLink Waveform Editor, which you can install to your machine. To install the plug-in for 81150A Waveform Editor, you have to set the installation directory to "Program Files/Agilent/IntuiLink/Waveform Generator Tool/Tools" If the Waveform Editor is installed in another directory, change the default of the install, or copy the dll files to the ..\Waveform Generator Tool\Tools directory. Note: 81150A Waveform Editor can detect the existing plug-ins installed in your machine If you have the existing plug-ins installed for using with Agilent IntuiLink Waveform Editor for the 33120A/33250A at the default directory "C:\Program Files/Agilent/IntuiLink/Waveform Generator/Tools" and directory for your 81150A Waveform Editor is also the default directory "C:\Program Files/Agilent/IntuiLink/Waveform Generator Tool" In this case, you do not need to re-install the plug-ins or copy the dll files. 15 Creating Waveforms Inserting Segments Using the Icons You can insert standard waveform segments using the waveform toolbar icons. When you click the desired icon the segment is inserted (with its default parameters) in the active waveform edit window. For example let’s insert a standard sine wave segment: 1. Click the icon in the standard toolbar to create a new waveform edit window. 2. Click the icon in the waveform toolbar to insert a sine wave segment. 3. The default, 2000-point, sine wave segment appears in the window, as shown below: To insert an additional sine wave segment, click the icon again. Or click on a different icon to insert a different segment. You can continue to insert segments to an existing waveform, provided there is room in the edit window for the segment to be inserted. Segments are always inserted on the right side of the waveform. Note: To change the segment parameters of an existing segment, double-click on the segment. The Segment Parameters dialog box appears, allowing you to change the parameters. See Segment Parameters Dialog Box for further information. You can also insert waveform segments using the menu and the Segment Parameters dialog box. See Inserting Segments Using the Menu for further information. 16 Inserting Segments Using the Menu You can insert standard waveform segments using the menu and the Segment Parameters dialog box. The dialog box allows you to insert the segment with its default parameters, or to change the parameters before inserting the segment. For example, let’s insert a 100-cycle sine wave segment consisting of 8000 points: 1. From the File menu, select New to create a waveform edit window. 2. From the Edit menu, select Insert Segment, and then select Sine. The Segment Parameters dialog box appears. a. Set the number of points to 8000. (You can type the number or use the arrow buttons.) b. Set the number of cycles to 100. c. Use the default values for all other parameters. The dialog box should appear as follows: 3. When you click OK, the 100-cycle sine waveform segment appears in the active edit window. 17 You can continue to insert segments to an existing waveform, provided there is room in the edit window for the segment to be inserted. Segments are always inserted on the right side of the waveform. Note: To change the segment parameters of an existing segment, double-click on the segment. The Segment Parameters dialog box reappears, allowing you to change the parameters. You can also insert waveform segments using the waveform toolbar icons. See Inserting Segments Using the Icons for further information. 18 Drawing an Arbitrary Waveform You can draw an arbitrary waveform using two different modes: Freehand mode and Line Draw mode. Freehand mode allows you to draw any shape that you want, while Line Draw mode allows you to draw a series of straight lines. Let's try drawing with these modes: 1. Create a new waveform edit window (from the File menu, select New). 2. Select Freehand mode (from the Edit menu, select Freehand, or click on the icon). 3. Click and hold the mouse button, and draw any shape that you want, perhaps using about half of the width of the window. An example of freehand drawing is shown below: Note: If the window already contains a waveform segment, the drawing will start at the right edge of that segment. Otherwise, the drawing will start at the left edge of the window. If you don't start at the left edge, a straight line will start at zero and extend to where you start drawing. You can go back and draw over what you have just drawn. 4. Now click on Freehand or the icon again. Freehand mode is canceled. 5. Select Line Draw mode (from the Edit menu, select Line Draw, or click on the icon). 19 6. Click the mouse button to start drawing somewhere to the right of the existing drawing, the first straight-line segment appears. Click somewhere further to the right to draw another straight line, and so forth. Here is an example of line drawing: 7. When you are finished, right-click to stop drawing, and then exit Line Draw mode by clicking on Line Draw or the icon again. Note: Both Freehand and Line Draw mode may be used anywhere within the window, except where a standard segment has been inserted. If the window already contains a waveform segment, the drawing will start at the right edge of that segment. Either mode may be used to draw over what you have drawn previously. 20 Selecting Waveform Data You can select all or a portion of a waveform as described below. Note: Once you have selected the waveform data, you can operate on the data with one of the Math menu functions, or with Cut, Copy, or Paste in the Edit menu. To select a standard waveform segment within the waveform: 1. Click on the desired waveform-edit window to select it as the active window. 2. Select the desired waveform segment using either of the following techniques: • Click on the small blue triangle above the waveform segment. The segment is highlighted as shown below: • Or, double-click anywhere within the waveform segment. The segment is highlighted and the Segment Parameters dialog box appears. Select the desired parameters in the dialog box and then click on OK. 21 To select the entire waveform: 1. Click on the desired waveform-edit window to select it as the active window. 2. In the Edit menu, click on Select All. The entire waveform is highlighted, as shown below: To select a portion of the waveform: 1. Click on the desired waveform-edit window to select it as the active window. 2. If you are not already in Select mode, from the Edit menu click on Select (or click on the icon in the toolbar). 3. Click the left mouse button at the start of the desired portion of the waveform, drag, and release the mouse button when the desired area is highlighted. (You can drag either left-to-right or right-to-left.) You can select any portion of a waveform, as shown below: 22 Using Markers Markers can be used as guides for freehand or line drawing, or to specify an area of a waveform to be clipped. Use Pin Markers to define an area where you can perform freehand or line drawing over standard segments. You can draw only in the area defined within the pinned X and Y markers. See Clipping a Waveform for an example of using markers to clip a waveform. Let's look at an example of using pinned markers for freehand drawing over a portion of a sine waveform. Assume that an eight-segment sine wave has already been created in the active edit window. 1. From the Edit menu, select Marker (or click on the markers appear over the waveform as shown below: icon in the toolbar). The X and Y • The vertical blue lines are the X markers, which mark positions along the X-axis. To move an X marker, click and drag the triangular handle at the top of the marker. • The horizontal blue lines are the Y markers, which mark positions along the Y-axis. To move a Y marker, click and drag the triangular handle at the left end of the marker. • In Marker mode, when you move an X marker, the X marker positions are shown in the status bar. When you move a Y marker, the Y marker positions are shown in the status bar. 23 2. Move the markers to define the desired area. For example, define an area starting at a minimum, and ending at another minimum in the waveform. In the following figure, the left X marker is shown being moved by dragging its handle: 3. From the Edit menu, select Pin Markers (or click on the icon in the toolbar). The pinned markers change color and the handles disappear. You cannot move markers that are pinned. 4. Now, from the Edit menu, select Freehand (or click on the icon in the toolbar). Draw freehand in the area defined by the pinned markers. (Any drawing outside that area is ignored.) 5. Exit Freehand (click on Freehand in the menu, or the icon, again). 6. Exit Pin Markers (click on Pin Markers in the menu, or the icon, again). 24 7. Turn off the X markers (click on ) and Y markers (click on ) to reveal the final waveform: Note that any potential discontinuities at the ends of the freehand area are automatically corrected with straight lines connecting to the original waveform. 25 Performing Mathematics on Waveforms Adding, Subtracting, Multiplying Waveforms You can use the Waveform Math dialog box to perform addition, subtraction, and multiplication operations on waveforms. In each case, a point-by-point addition, subtraction, or multiplication of one waveform by another is performed. For example, you could add a noise waveform to a square wave to get a resulting waveform similar to the following one. On the other hand, you could multiply 100 cycles of one sine wave by a single sine wave cycle to get a modulated waveform like the following one. The Waveform Math Dialog Box allows you to perform a math operation on two waveforms. The first waveform is the waveform or portion of a waveform that you have selected in the active waveform edit window. The second waveform is either a standard waveform or a waveform that has been copied to the clipboard. The procedure is slightly different for each of these cases. • See Multiplying by a Standard Waveform for an example using a standard waveform. • See Adding a Waveform from the Clipboard for an example using the clipboard. 26 Multiplying by a Standard Waveform The Waveform Math dialog box allows you to add, subtract, or multiply the waveform in the active edit window by a standard waveform segment. Let's look at an example in which we multiply an existing waveform by a sine wave segment. For our example, assume that a 100-cycle sine wave segment consisting of 8000 points has been created in the active edit window. The waveform would appear as shown below: If you want to actually perform the example, start by creating a waveform similar to that shown. To perform the multiplication, follow these steps: 1. From the Edit menu, click on Select All to select the entire waveform. 2. From the Math menu, select Multiplication. The Waveform Math dialog box appears: 27 3. Under Select Segment, click on the arrow to see the drop-down list of segments. Then click on Sine. The Segment Parameters dialog box appears: Note that the Points parameter is fixed at 8000 to match the number of points in the original waveform. The number of points must match so that the two waveforms can be multiplied point by point. 4. Click OK to accept the parameters as shown and return to the Waveform Math dialog box. 28 5. Leave Scale to Fit selected and click on OK. The resulting waveform appears as follows: 29 Adding a Waveform from the Clipboard The Waveform Math dialog box allows you to add, subtract, or multiply the waveform in the active edit window by another waveform that has been copied to the clipboard. Let's look at an example in which we add one waveform to another using the clipboard. For our example, assume that two waveforms have been created in separate edit windows. The first is a freehand drawn waveform, and the second is a sine waveform, both of 16,000 points. If you want to actually perform the example, create waveforms similar to those shown. To perform the addition: 1. Select the first waveform edit window (the freehand waveform). Then select the entire waveform (from the Edit menu, click on Select All): 2. Now copy the waveform to the clipboard (from the Edit menu select Copy). 3. Select the second waveform edit window (the sine waveform). Then select the entire waveform (from the Edit menu, click on Select All): 30 4. Now, from the Math menu, select Addition. The Math dialog box appears: 5. Click on the Clipboard button to select the waveform currently in the clipboard. The dialog should appear as follows: 6. Leave Scale to Fit selected to ensure that the resulting waveform will fit in the Y-axis range. (If the two waveforms are not matched in length, you will also be given the option to Match Length for the X-axis.) 31 7. Click on OK to perform the addition. The original sine waveform is replaced by the point-by point sum of the two waveforms: You can also copy a segment or a portion of a waveform to the clipboard, and then add, subtract, or multiply it by a waveform or portion of a waveform. 32 Taking the Absolute Value of a Waveform The Absolute math function allows you to take the absolute value, point-by-point, of any waveform, producing a waveform with only positive-value points. For example, let's take the absolute value of the sine waveform shown below. (You can create a similar waveform if you want to actually perform the example.) To take the absolute value of this waveform: 1. From the Edit menu, click on Select All to select the entire waveform. 2. From the Math menu, select Absolute. The resulting waveform appears as follows: In effect, the waveform has been mathematically rectified. Note: You can use the Invert math function after the Absolute math function to obtain an exclusively negative-valued waveform. 33 Removing High Frequency Components from a Waveform The Low Pass Filter function is effective in attenuating high-frequency components in a waveform, and in smoothing hand-drawn waveforms. See Selecting a Filter Function for further information about selecting a mathematical filter function. Let's look at an example. Assume that you want to attenuate the high-frequency noise component in the following waveform. (You can create a similar waveform if you want to actually perform the example.) To attenuate the noise component: 1. From the Math menu, select Filter, and then select Low Pass. (Note that you need not select the waveform. The low-pass filter function always operates on the entire waveform.) 2. The Low Pass Filter dialog box appears. Enter a Cut-Off value of 200 and click on OK. 3. The noise component is attenuated, as shown below: Note: The Cut-Off value is actually a multiplier, and does not correspond to an absolute frequency until the waveform is sent to an arbitrary function generator with a specified frequency. Then, the cut-off frequency is the CutOff value multiplied by the repetition rate. Note that the rising and falling 34 edges of the square wave segments in our example have been slightly distorted by the low-pass filter. Clipping a Waveform The Clip math function clips the selected waveform data to the specified Y values. In the following example, we will clip a portion of a sine waveform. Assume that an eight-segment sine wave has been created in the active edit window. To clip this waveform: 1. Enable Y markers (from the Edit menu click on Y Markers, or click on the icon). 2. Position the markers to the desired clipping values. (Click and drag the triangular handles at the left end of the markers. See Using Markers for further information.) 3. Click and drag to select the portion of the waveform that you want to clip. 35 4. Clip the waveform (from the Math menu select Clip) to the values specified by the Y markers. 5. To disable Y markers, from the Edit menu click again on Y Markers (or click on the icon). Note that only the selected area is clipped, and that in the selected area the waveform is clipped to the Y marker positions. If you want to clip the entire waveform, use Select All to select the waveform, and then clip to the Y marker positions. 36 Selecting a Filter Function Two filter functions are provided under Filter in the Math menu: Low Pass and Smoothing. The following paragraphs describe these functions, and when to use them. • Low Pass Filter: (See Low Pass (Math Menu).) This function provides a low pass FIR digital filter with a pass-band and stop-band ripple of less than 1 percent. The low pass filter attenuates frequencies with rapid roll-off above the cut-off point. The transition bandwidth from zero attenuation to maximum attenuation is variable, being narrower for smaller cut-off points. This bandwidth is generally about one-third the cut-off, and is not less than .003 times the cut-off. This function attenuates the amplitude at the frequency of the cut-off point by one-half (-3 dB). The Low Pass Filter dialog box allows you to set the cut-off value to an integer in the range from 1 to approximately one-half the number of points in the waveform. The cut-off frequency is equal to the specified cut-off value multiplied by the function generator window frequency. For example, if the function generator is set to 1 kHz and the cut-off value is set to 50, the low-pass filter will attenuate frequencies above 50 kHz. Use the low pass filter to remove high frequency noise, to limit the power spectrum to a desired low frequency band, to remove any impulses and spikes, or to smooth out a waveform. This function can only be applied to an entire waveform, not to a segment. • Smoothing Filter: (See Smoothing (Math Menu).) This function takes a moving average of the points in a waveform, thus smoothing it. Use this function to smooth out transitions in the waveform to minimize jitter. Large transitions in the waveform may cause unwanted frequency jitter due to quantization error in the time axis. This function can be applied to an entire waveform, or a selected segment of one. By default, the smoothing filter performs a 7-point moving average. However, you can change the number of points from the Properties dialog box (from the File menu, select Properties). The number of points can have any odd value from 3 to 99. See Applying a Filter Function for further information about using these functions. 37 Applying a Filter Function The Low Pass and Smoothing functions provide filtering that can be applied to a waveform. See Selecting a Filter Function for further information about choosing a filter function. To apply the Low Pass filter function to a waveform: 1. Select the desired waveform edit window to be the active window (click on the desired window). You need not select the waveform. The Low Pass filter function always applies to the entire waveform, whether or not the waveform or a portion of it has been selected. 2. From the Math menu, click on Filter, and then click on Low Pass. 3. The Low Pass Filter dialog box prompts you to enter a Cut-Off value. The value that you enter is multiplied by the window frequency of the function generator to get the cut-off frequency. 4. Click on OK to apply the filter to the waveform. To apply the Smoothing function to a waveform or a selected segment of a waveform: 1. Select the desired waveform edit window to be the active window (click on the desired window). 2. The Smoothing function can be applied to an entire waveform, or to a selected segment of a waveform. If you want to apply this function to a segment, select the segment using Select mode. If you want to apply the function to the entire waveform, you may leave the waveform unselected, or else select the entire waveform. If no waveform or segment is selected, the function is applied to the entire waveform in the active edit window. 3. From the Math menu, click on Filter, and then click on Smoothing. The function is applied to the waveform or selected segment. Note: By default, the smoothing filter performs a 7-point moving average. However, you can change the number of points from the Properties dialog box (from the File menu, select Properties). The number of points can have any odd value from 3 to 99. 38 Selecting a Windowing Function Employing a finite time interval (or window) of a continuous signal, such as a segment created in a waveform editor, may distort the spectral information of the underlying continuous waveform. To manage this distortion, the data can be multiplied by a windowing function. When you apply a windowing function, each point in the waveform is multiplied, point-by-point, by a corresponding point in the window provided by the function. Three such functions are provided under Windowing in the Math menu: Extended Cosine, Raised Cosine, and Hamming. The following paragraphs describe these functions. Note: The waveform edit window does not display time on the horizontal axis, but rather the number of points in the waveform. However, when you send a waveform to your arbitrary function generator, this number-of-points axis becomes a time axis according to the frequency that you specify during the send operation. Thus, for the purposes of this discussion, the window in time corresponds to the waveform edit window in which you create your waveform. Spectral leakage occurs when there are discontinuities at the end point of the window, or when the frequency components of the waveform are not harmonically related to the window length. The leakage affects both the magnitude and phase. A waveform may have some frequencies harmonically related to the window, and others that are not. Thus some frequency components may exhibit leakage, while others do not. The form of leakage depends on the shape of the window. The shape of the window used in the waveform editor, or when sampling a signal is rectangular (all values are multiplied by the constant 1). By changing the shape of the window, you can change the leakage. You can apply any of three different windowing functions from the menu to change the window shape. The windowing functions and their formulae are as follows: • Extended Cosine Bell (see Extended Cosine (Math Menu)): w(n) = 0.5(1-cos2π5n/N) for n = 0 to N/10 and n = 9N/10 to N w(n) = 1 for n = N/10 to 9N/10 • Raised Cosine (see Raised Cosine (Math Menu)): w(n) = 0.5(1-cos2πn/N) for n = 0 to N • Hamming (see Hamming (Math Menu)): w(n) = 0.08 + 0.46(1-cos2πn/N) for n = 0 to N Where in each case: N is one less than the number of samples in the window, and n is a discrete sample with a value in the range 0 to N. 39 Note: The Extended Cosine windowing function is recommended when there are obvious discontinuities at the end points and minimum modification of the waveform is desired. This function has little affect, except close to the end points. See Applying a Windowing Function for further information about using these functions. Applying a Windowing Function The Extended Cosine, Raised Cosine, and Hamming windowing functions can be used to correct for distorted spectral information where there are discontinuities at the end point of the window, or when the frequency components of the waveform are not harmonically related to the window length. See Selecting a Windowing Function for further information about choosing a windowing function. To apply a windowing function to a waveform: 1. Select the desired waveform edit window to be the active window (click on the desired window). You need not select the waveform. The windowing functions always apply to the entire waveform, whether or not the waveform or a portion of it has been selected. 2. From the Math menu, click on Windowing, and then click on the windowing function that you want: Extended Cosine, Raised Cosine, or Hamming. 3. The windowing function is applied to the waveform. The waveform shape changes primarily towards the end points of the waveform. 40 Outputting Waveforms Establishing a Connection to an Arb To establish a connection to your function generator, follow these steps. 1. Make sure that your function generator is physically connected to your PC by means of a remote interface, and that it is turned on. 2. From the Communications menu, select Connection. The Connection dialog box appears. 3. Click on an address (for example, GPIB1::11::INSTR) under Select Address(es) on the left. Then click on the Identify Instrument(s) button. The instrument is identified on the right under Identified Instruments on My Computer as shown below. Note: You can select and identify more than one instrument, but each must be identified individually. Select each address and click on Identify Instrument(s), in turn. Or you can double-click on each address. Instruments may be selected by their GPIB address. See Supported Instrument for further information. 4. Select the desired arbitrary function generator from the list of identified instruments on the right. (If there is only one instrument, it is already selected.) Now, click on the Connect button to connect the instrument. 41 Note: Only a supported instrument that is identified as an Arb (see Supported Instrument) can be connected. Also, only one instrument can be connected at a time. 5. Once an arbitrary function generator has been connected, the "Connected" message appears. Click on Close to close the dialog box. You can now send waveforms to the connected instrument (see Sending Waveforms to an Arb). 42 Sending Waveforms to an Arb To send a waveform to your function generator, follow these steps: 1. Prepare the waveform that you want to send. 2. Establish a connection to your function generator (see Establishing a Connection to an Arb) if you have not already done so. 3. From the Connections menu, select Send Waveform (or click on the toolbar). The Send Arbitrary Waveform dialog box appears: icon in the waveform a. Select the appropriate parameters to send the waveform. (See Send Arbitrary Waveform Dialog Box for further information.) b. Click on the Send button to send the waveform. c. The estimated time to send the waveform is displayed. Click on OK to continue. d. Once the waveform is completely sent, you are returned to the Send Arbitrary Waveform dialog box. Click on Close to exit the dialog box. Note: The waveform editor automatically puts the function generator into remote mode when you press Send. When the send operation is completed, the instrument goes into arb mode and output is enabled. 43 Exporting Waveform Data to Excel If you want to export waveform data from the waveform editor to Microsoft Excel, you can save the data as a .CSV file. Follow these steps: 1. Create and edit the waveform to be saved. 2. From the File menu, select Save As. The Save Waveform As dialog box appears: a. Enter a name in the File Name field. b. For Save as Type, select CSV (comma delimited) (*.CSV). c. Click on Save to save the file. The .CSV extension is appended to your file name automatically. 3. The file is now saved as a .CSV file, and can be read into Microsoft Excel. The following Excel spreadsheet is an example of a .CSV file exported by the waveform editor: Note: The .CSV file format uses the comma as the delimiter. Therefore, the European localized number format cannot be used, with commas as the decimal point. However, the waveform editor also can export files in the .TXT file format, which does support localized number formats. See Supported File Formats for further information. 44 45 Waveform Editor Reference 46 Standard Toolbar Provides quick access to the following menu selections: Button: Shortcut to: File menu, New File menu, Open File menu, Save File menu, Print Edit menu, Cut Edit menu, Copy Edit menu, Paste Edit menu, Undo Edit menu, Redo Help menu, Contents and Index 47 Waveform Toolbar Provides quick access to the following menu selections: Button: Shortcut to: Edit menu, Select Edit menu, Marker Edit menu, X Markers Edit menu, Y Markers Edit menu, Pin Markers Edit menu, Freehand Edit menu, Line Draw Edit menu, Sine Edit menu, Triangle Edit menu, Square Edit menu, Saw Tooth Edit menu, Sinc Edit menu, Exponential Rise Edit menu, Exponential Fall Edit menu, Noise Edit menu, DC View menu, Zoom View menu, Zoom In View menu, Zoom Out Communications menu, Send Waveform 48 Supported Data File Formats The Agilent IntuiLink Arbitrary Waveform Editor supports several data file formats, which are listed below. Data files can be saved with the Save and Save As commands, and opened with the Open command from the File menu. • Waveform (.WVF) File Format. This is the default format used for arbitrary waveform files saved using the waveform editor. • Comma-Separated Values (.CSV) File Format. This format uses the comma as the delimiter between columns, and a carriage-return/line-feed to terminate each row. - The waveform editor reads .CSV files from Microsoft Excel and other applications. The waveform editor reads the last column containing data as the waveform data column to be compatible with Agilent BenchLink Arb and most other applications including Excel. - The waveform editor saves .CSV files in a special format, shown below in an Excel Spreadsheet: Row 1 is used to store the column headers. The waveform data points are saved in the column A, which may be several thousand points in length. Succeeding columns are used to store the waveform parameters. In our example, columns B through F store the name, frequency, amplitude, offset, and number of points in the waveform. Note: The .CSV file format supports only the US English number format, with periods used as decimal points. This is because the comma is used as the delimiter. • Text (.TXT) File Format. This format puts all of the data points in a single column, with a carriage-return/line-feed after each value. If you read the file into Excel, the data points will be in column A, and that column may be several thousand points in length. This format can be used with localized number formats (for example, using the comma as the decimal point). 49 • Text (.PRN) File Format. This format puts all of the data points in a single row, using the space as the delimiter between data points. If you read the file into Excel, the data points will be in row number 1, and that row may be several thousand points in width. This format can be used with localized number formats (for example, using the comma as the decimal point). • Picture (.BMP) File Format (Save Only). You can save a raster representation of your waveform in a Windows Bitmap (.BMP) file. This makes it convenient to include a picture of your waveform in Microsoft Word or other applications. However, this picture no longer consists of waveform data. You cannot open a .BMP file in the waveform editor, and you will need to save your waveform data in one of the other supported formats. • ADS-File (.txt) File Format (Open Only). You can import the waveform from Agilent Digital Solutions ADS waveforms which is in text format. ADS files has more than one format, one of them the file will include the description of many signals, in this case the Agilent IntuiLink Arbitrary waveform editor will import the first signal only. Also the time separation between signal samples may be with equal and non-equal spacing and in the case of non-equal spacing interpolation is used to get equally spaces samples. Normalization is used when the signal values described in the file exceeds the limits of the DAC of the 81150A. The size of a waveform data array must be maximum 524288 (512k) points if it is more, one of two decisions will be done: 1. The signal will be clipped (Stop after the maximum size achieved) 2. Interpolation is done to resample the signal with larger time space to have less number of samples for the same signal time period. Both options are available in the Agilent IntuiLink Arbitrary Waveform Editor application. • MAT-File (.MAT) File Format (Open Only). You can import the waveform from binary waveform file, which is created by MATLAB and saved as level 5 MAT-File formats. The Agilent IntuiLink Arbitrary Waveform Editor application supports only the MAT-File, which contains waveform information in the format as describe below. Data type must be "double" format. Data must be stored in an 1-dimensional array. The size of a waveform data array must be minimum 10 points and maximum 524288 (512k) points. The value of each waveform data in an array must be in the range of -1 to +1. Note: There is also a waveform setup file format (.WFG), which is used to save the current instrument setup when you select the Save Instrument Setup (File Menu) command. However, no waveform data is saved in the .WFG file. The data must be saved separately from the instrument setup data, using one of the supported data file formats. 50 Menus File Menu New (File Menu) Creates a new waveform edit window in which to create an arbitrary waveform. Several waveform windows can be displayed at one time; maximized, iconified, cascaded, or tiled. If the waveform editor is iconified, all waveform edit windows are also iconified. You can set the default parameters used for a new waveform from the Properties dialog box. See Properties Dialog Box for further information. Open (File Menu) Displays the Open dialog box, which allows you to select and open any supported data file type. You can open .WVF files or other files previously saved with the waveform editor. You can also open file formats such as .CSV or .TXT, which may be imported from applications such as Microsoft Excel. See Supported Data File Formats for further information. Close (File Menu) Closes the currently active waveform edit window. Prompt you to first save the contents of the window if the waveform is new or has been updated. Save (File Menu) 51 Saves the waveform data displayed in the currently active waveform edit window in its previously created file. If the information has not been previously saved, the Save As dialog box appears prompting you to select a file name and format. See Save As (File Menu) for further information. Save As (File Menu) Displays the Save As dialog box, which prompts you for a file name in which to save the waveform data displayed in the currently active waveform edit window. By default, the file is saved with the .WVF extension. However, you can also save other supported file formats. See Supported Data File Formats for further information. Save All (File Menu) Saves the waveform data from all open waveform edit windows in the previously created files. If any windows have not been previously saved, you will be prompted for a name and location for each unsaved file. Save Instrument Setup (File Menu) Saves the instrument settings for the currently connected function generator in a waveform setup file (.WFG extension). You are prompted for a file name and location. Use this command to save your current instrument settings, which can then be loaded with the Load Instrument Setup (File Menu) command. Note: Both the Save Instrument Setup and the Load Instrument Setup commands are grayed and inactive when no function generator is connected. No waveform data is saved with the instrument settings. You need to save your waveform data separately in a data file. See Supported Data File Formats for further information. Load Instrument Setup (File Menu) 52 Loads the previously saved settings for the function generator from a waveform setup file (.WFG extension). The settings are then automatically downloaded into the connected instrument. See Save Agilent Instrument (File Menu) for further information. Note: Both the Save Instrument Setup and the Load Instrument Setup commands are grayed and inactive when no function generator is connected. Properties (File Menu) Displays the Properties dialog box, which allows you to set the default properties for a new waveform. You can also set the number of points for the Smoothing filter. See Properties Dialog Box for further information. Print Preview (File Menu) Displays the Print dialog box with the Preview tab showing. The Preview tab allows you to preview your configured printout on the screen. See Print Dialog Box for further information. Print (File Menu) Displays the Print dialog box with the Page Layout tab showing. You can configure a printout, preview it on the screen, and then output it to a printer. See Print Dialog Box for further information. Click on the icon to output a printout using the current configuration. Exit (File Menu) Closes all open windows, and then exits the waveform editor. Prompt you to first save any new or modified waveforms before exiting. 53 Edit Menu Undo (Edit Menu) Reverses your last action or command and reverts the application to the previous condition. Redo (Edit Menu) Reverses the action of the Undo command and reverts the application to the previous condition (before the Undo). Cut (Edit Menu) Removes the selected waveform data from a waveform edit window, but puts the data into the Windows Clipboard. See Selecting Waveform Data for further information. If no waveform data is selected, the command is not available. Copy (Edit Menu) Copies the selected waveform data to the Windows Clipboard. See Selecting Waveform Data for further information. If no waveform data is selected, the command is not available. Paste (Edit Menu) 54 Pastes the waveform data currently in the Windows Clipboard to the active waveform edit window. If no waveform data is currently in the Windows Clipboard, the command is not available. Insert Segment (Edit Menu) Allows you to select and insert a waveform segment of one of the following standard types. Select the appropriate waveform type and the Segment Parameters dialog appears. Sine Insert a sine wave segment. Triangle Insert a triangle wave segment. Square Insert a square wave segment. Saw Tooth Insert a ramp wave segment. Sinc Insert a sinc pulse segment. Exponential Rise Insert an exponential rise pulse segment. Exponential Fall Insert an exponential fall pulse segment. Noise Insert a noise segment. DC Insert a constant DC value segment. Sine (Edit Menu) Inserts a sine wave segment: • If, from the Edit menu you select Insert Segment, followed by Sine, the Segment Parameters dialog box appears. Select the desired parameters and click on OK to insert the segment. • If you click on the parameters. • To edit an existing segment, double-click on it. The Segment Parameters dialog box appears, allowing you to change the parameters for the segment. icon in the toolbar, the segment is inserted using the default 55 See Segment Parameters Dialog Box for further information. Triangle (Edit Menu) Inserts a triangle wave segment: • If, from the Edit menu you select Insert Segment, followed by Triangle, the Segment Parameters dialog box appears. Select the desired parameters and click on OK to insert the segment. • If you click on the parameters. • To edit an existing segment, double-click on it. The Segment Parameters dialog box appears, allowing you to change the parameters for the segment. icon in the toolbar, the segment is inserted using the default See Segment Parameters Dialog Box for further information. Square (Edit Menu) Inserts a square wave segment: • If, from the Edit menu you select Insert Segment, followed by Square, the Segment Parameters dialog box appears. Select the desired parameters and click on OK to insert the segment. • If you click on the parameters. • To edit an existing segment, double-click on it. The Segment Parameters dialog box appears, allowing you to change the parameters for the segment. icon in the toolbar, the segment is inserted using the default See Segment Parameters Dialog Box for further information. Saw Tooth (Edit Menu) 56 Inserts a saw tooth or ramp wave segment: • If, from the Edit menu you select Insert Segment, followed by Saw Tooth, the Segment Parameters dialog box appears. Select the desired parameters and click on OK to insert the segment. • If you click on the parameters. • To edit an existing segment, double-click on it. The Segment Parameters dialog box appears, allowing you to change the parameters for the segment icon in the toolbar, the segment is inserted using the default See Segment Parameters Dialog Box for further information Sinc (Edit Menu) Inserts a sinc pulse segment: • If, from the Edit menu you select Insert Segment, followed by Sinc, the Segment Parameters dialog box appears. Select the desired parameters and click on OK to insert the segment. • If you click on the parameters. • To edit an existing segment, double-click on it. The Segment Parameters dialog box appears, allowing you to change the parameters for the segment. icon in the toolbar, the segment is inserted using the default See Segment Parameters Dialog Box for further information. Exponential Rise (Edit Menu) Inserts a rising exponentially shaped pulse segment: • If, from the Edit menu you select Insert Segment, followed by Exponential Rise, the Segment Parameters dialog box appears. Select the desired parameters and click on OK to insert the segment. • If you click on the parameters. • To edit an existing segment, double-click on it. The Segment Parameters dialog box appears, allowing you to change the parameters for the segment. icon in the toolbar, the segment is inserted using the default See Segment Parameters Dialog Box for further information. Exponential Fall (Edit Menu) 57 Inserts a falling exponentially shaped pulse segment: • If, from the Edit menu you select Insert Segment, followed by Exponential Fall, the Segment Parameters dialog box appears. Select the desired parameters and click on OK to insert the segment. • If you click on the parameters. • To edit an existing segment, double-click on it. The Segment Parameters dialog box appears, allowing you to change the parameters for the segment. icon in the toolbar, the segment is inserted using the default See Segment Parameters Dialog Box for further information. Noise (Edit Menu) Inserts a noise segment consisting of pseudo-random values: • If, from the Edit menu you select Insert Segment, followed by Noise, the Segment Parameters dialog box appears. Select the desired parameters and click on OK to insert the segment. • If you click on the parameters. • To edit an existing segment, double-click on it. The Segment Parameters dialog box appears, allowing you to change the parameters for the segment. icon in the toolbar, the segment is inserted using the default See Segment Parameters Dialog Box for further information. DC (Edit Menu) Inserts a constant DC value segment: • If, from the Edit menu you select Insert Segment, followed by DC, the Segment Parameters dialog box appears. Select the desired parameters and click on OK to insert the segment. • If you click on the parameters. • To edit an existing segment, double-click on it. The Segment Parameters dialog box appears, allowing you to change the parameters for the segment. icon in the toolbar, the segment is inserted using the default See Segment Parameters Dialog Box for further information. Select All (Edit Menu) 58 Selects (highlights) the entire waveform in the currently active waveform edit window. Select (Edit Menu) Allows you to select (highlight) a portion of a waveform in the waveform edit window by clicking and dragging, or by selecting an entire segment. This is the default mode when the program is started or a new waveform edit window is created. See Selecting Waveform Data for further information. Freehand (Edit Menu) Enables freehand drawing using the mouse. When you select Freehand the cursor changes to a pencil cursor when inside the waveform edit window. Click and drag with the mouse to draw the desired waveform shape. Release the mouse button to complete your freehand waveform segment. Freehand segments are automatically connected to any pre-existing segments. To exit Freehand mode, click on Freehand (or the icon) again. Note: Standard waveform segments are protected against being overdrawn unless you set an area with Pin Markers. In that case, you can draw over the standard segment, but only within the defined, pinned area. A freehand or line draw segment, or a segment on which math functions have been performed (so that it is no longer a standard segment), is not protected and may be overdrawn. Line Draw (Edit Menu) Enablesline drawing using the mouse. Click once in the active waveform edit window to start the line, and then move the cursor and click again. You can draw a number of connected straight lines by moving the cursor and clicking again. Right-click to stop drawing, and then exit Line Draw mode by clicking on Line Draw (or the icon) again. Note: Standard waveform segments are protected against being overdrawn unless you set an area with Pin Markers. In that case, you can draw over the standard segment, but only within the defined, pinned area. A freehand or line draw segment, or a segment on which math functions have been performed (so that it is no longer a standard segment), is not protected and may be overdrawn. 59 Marker (Edit Menu) Turns Marker mode on and off. When you turn Marker mode on, both the X-axis and Y-axis markers are also turned on. However, each set of markers has to be turned off separately with X Markers (or the icon) and Y Markers (or the icon). Clicking and dragging the handle at the end of the marker in the ruler area can move each X or Y marker. Markers are useful to identify an area of the waveform to edit, or to specify an area to be clipped. You can use markers as guides for freehand and line drawing. Use Pin Markers to define an area in which you can alter a standard waveform segment using the Freehand or Line Draw mode. Drawing must be started within the area defined by the markers, and is allowed only in this area. Clicking and dragging is ignored, except within the defined area. When an X marker is being moved, the status bar displays the positions of both X markers and the difference between them. When a Y marker is being moved, the corresponding Y marker positions, and the difference, are displayed. For further information, see: • Using Markers • Clipping a Waveform X Markers (Edit Menu) Turns the X-axis markers on or off. Clicking and dragging the handle at the top of the marker in the ruler area can move each X marker. See Marker (Edit Menu) for further information. Y Markers (Edit Menu) 60 Turns the Y-axis markers on or off. Clicking and dragging the handle at the left end of the marker in the ruler area can move each Y marker. See Marker (Edit Menu) for further information. Pin Markers (Edit Menu) Select Pin Markers to fix the positions of the X and Y markers. The marker handles disappear so that you cannot move the pinned markers. The markers also change color when pinned. Pinned markers can be used to define a space where you can draw or edit part of a waveform. Standard waveform segments are protected against being overdrawn in Freehand or Line Draw mode. However, in the area defined within the pinned markers you can draw over any segment. Drawing must be started within the area defined by the markers, and is allowed only in this area. Clicking and dragging is ignored, except within the defined area. See Using Markers and Marker (Edit Menu) for further information. 61 View Menu Standard Toolbar (View Menu) If the Standard Toolbar menu selection is checked, the standard toolbar is currently active and is displayed. See Standard Toolbar for further information. Waveform Toolbar (View Menu) If the Waveform Toolbar menu selection is checked, the waveform toolbar is currently active and is displayed. See Waveform Toolbar for further information. Status Bar (View Menu) If the Status Bar menu selection is checked, the status bar is currently active and is displayed at the bottom of the Agilent IntuiLink Arbitrary Waveform Editor window. The status bar displays messages including the following: • General status messages. • The current mode. • In Select mode, the start and end positions and number of points selected. • In Marker mode: - When an X marker is being moved, the positions of both X markers and the difference between them. - When a Y marker is being moved, the positions of both Y markers and the difference between them. 62 • In Freehand or Line Draw mode, the cursor position and the length of the waveform. • The address of an arbitrary waveform generator (for example: GPIB1::11::INSTR) if one is connected, or else Disconnected. Thumbnail View (View Menu) If the Thumbnail View menu selection is checked, the thumbnail view is displayed. The thumbnail view provides a smaller view of the waveform shown in the active waveform edit window. Changes in the edit window are immediately reflected in the thumbnail view. The thumbnail view is a sampled representation of the complete waveform. It does not show all of the details of the actual waveform. Thumbnail View is primarily useful when you are using Zoom. The area that has been zoomed is shown by a small rectangle in the thumbnail view. You can click on and drag this rectangle in the thumbnail view to select a different portion of the waveform to view in the waveform edit window. See Zoom (View Menu) for further information. Grid (View Menu) Turns the grid lines in the waveform edit windows on or off. If the Grid menu selection is checked, the grid is currently turned on and appears in each waveform edit window. The grid lines match the major divisions in the vertical and horizontal scale rulers. Zoom (View Menu) Allows you to zoom into a specified area of the waveform edit window. Select Zoom to turn zoom mode on. The cursor changes to a magnifying glass. Click and drag to define the area to zoom— when you release the mouse button the selected area is magnified to fill the entire active edit window. You can repeat the process as desired until the maximum magnification (x32) is reached. To exit this mode, click on Zoom or the icon again. Note: When you zoom into a specified area, the apparent aspect ratio is not preserved. For example, if you select a tall, narrow area, it is magnified to fill the entire active edit window and the apparent shape may change. 63 The area that has been zoomed is shown by a small rectangle in the thumbnail view (if it is turned on). You can click on and drag this rectangle in the thumbnail view to select a different portion of the waveform to view in the active waveform edit window. See Thumbnail View (View Menu) for further information. Zoom In (View Menu) Zooms in (magnifies) the waveform in the active edit window by one step, doubling the magnification each time you select Zoom In until the maximum magnification (x32) is reached. Note: The area that has been zoomed is shown by a small rectangle in the thumbnail view (if it is turned on). You can click on and drag this rectangle in the thumbnail view to select a different portion of the waveform to view in the active waveform edit window. See Thumbnail View (View Menu) for further information. Zoom Out (View Menu) Zooms out (reduce) the waveform in the active edit window to the standard magnification (x1). Connect Dots (View Menu) A checkmark in front of Connect Dots indicates that all open waveform edit windows will display their data in a connected-dot format, showing continuous lines rather than points. With Connect Dots turned off you can see individual points. Segment Marks (View Menu) A checkmark in front of Segment Marks indicates that all open waveform edit windows will display segment marks (inverted blue arrows) at the top of the window. These marks show the beginning and end of each standard waveform segment. 64 To select an entire standard waveform segment, click on the segment mark above the segment at its right edge. Or, if you double-click within the segment, the segment is selected and the Segment Parameters dialog box appears. See Selecting Waveform Data for further information. Math Menu Addition (Math Menu) Performs a point-by-point addition of two waveforms selected as operands using the Waveform Math dialog box. When you select Addition from the Math menu, the Waveform Math dialog box appears with the + (addition) operator selected. The Waveform Math dialog box allows you to perform either of the following operations: • Add a standard waveform shape to the selected portion of the waveform in the active edit window. • Add one waveform, copied to the clipboard, to the selected portion of the waveform in the active edit window. See Waveform Math Dialog Box for further information about waveform addition. Subtraction (Math Menu) Performs a point-by-point subtraction of two waveforms selected as operands using the Waveform Math dialog box. When you select Subtraction from the Math menu, the Waveform Math dialog box appears with the - (subtraction) operator selected. The Waveform Math dialog box allows you to perform either of the following operations: • Subtract a standard waveform shape from the selected portion of the waveform in the active edit window. • Subtract one waveform, copied to the clipboard, from the selected portion of the waveform in the active edit window. See Waveform Math Dialog Box for further information about waveform subtraction. 65 Multiplication (Math Menu) Performs a point-by-point multiplication of two waveforms selected as operands using the Waveform Math dialog box. When you select Multiplication from the Math menu, the Waveform Math dialog box appears with the x (multiplication) operator selected. The Waveform Math dialog box allows you to perform either of the following operations: • Multiply a standard waveform shape by the selected portion of the waveform in the active edit window. • Multiply one waveform, copied to the clipboard, by the selected portion of the waveform in the active edit window. See Waveform Math Dialog Box for further information about waveform multiplication. Clip (Math Menu) Clips the selected waveform data in the active waveform edit window to the Y values specified by the Y markers. Clip operates only on the area of a waveform that has been selected, and only when Y markers are active and have been pinned (see Pin Markers (Edit Menu) for further information). Waveforms are clipped to both the upper and lower Y marker values. See Clipping a Waveform for further information. Absolute (Math Menu) Changes the sign for all negative Y-values point-by-point so that the selected waveform or segment contains only positive Y-value points. In effect, the resulting waveform or segment appears to be rectified. Select the waveform or segment to modify, and then select Absolute from the Math menu. Filter (Math Menu) The waveform editor provides the following filter functions: • Low Pass (Math Menu) • Smoothing (Math Menu) Low Pass (Math Menu) Applies the low pass filter function to the waveform in the active edit window. (The waveform does not need to be selected. The function is applied to the entire waveform.) From the Math menu, select Filter, and then select Low Pass. The Low Pass Filter dialog box appears, allowing 66 you to specify a Cut-Off value. The value that you enter is multiplied by the window frequency to obtain the cut-off frequency. For further information, see: • Selecting a Filter Function • Applying a Filter Function Smoothing (Math Menu) Applies the smoothing filter function to the selected waveform or segment. Select the waveform or segment to modify. (If the waveform in the active edit window is not selected, the filter function is applied to the entire waveform.) From the Math menu, select Filter, and then select Smoothing. The smoothing filter function applies a 7-point moving average by default. However, you can specify any odd number of points in the range 3-99 from the Properties Dialog Box. For further information, see: • Selecting a Filter Function • Applying a Filter Function Windowing (Math Menu) The waveform editor provides the following windowing functions: • Extended Cosine (Math Menu) • Raised Cosine (Math Menu) • Hamming (Math Menu) Extended Cosine (Math Menu) Applies the extended cosine bell windowing function to the waveform in the active edit window. (The waveform does not need to be selected. The function is applied to the entire waveform.) From the Math menu, select Windowing, and then select Extended Cosine. 67 For further information, see: • Selecting a Windowing Function • Applying a Windowing Function Raised Cosine (Math Menu) Applies the raised cosine windowing function to the waveform in the active edit window. (The waveform does not need to be selected. The function is applied to the entire waveform.) From the Math menu, select Windowing, and then select Raised Cosine. For further information, see: • Selecting a Windowing Function • Applying a Windowing Function Hamming (Math Menu) Applies the Hamming windowing function to the waveform in the active edit window. (The waveform does not need to be selected. The function is applied to the entire waveform.) From the Math menu, select Windowing, and then select Hamming. For further information, see: • Selecting a Windowing Function • Applying a Windowing Function Invert (Math Menu) Vertically flips the selected waveform or segment. The Y value of each point in the selected waveform or segment is multiplied by -1 to get an inverted value. Select the waveform or segment to modify, and then select Invert from the Math menu. 68 Mirror (Math Menu) Rotates the selected waveform or segment horizontally about the center of the selected segment. For example, if the selected waveform contains 8000 points, the rotation would be around point 4000. Select the waveform or segment to modify, and then select Mirror from the Math menu. Resize (Math Menu) Compresses or expands the selected waveform or segment horizontally or vertically. Select the waveform or segment to modify, and then select Resize from the Math menu. The Resize Dialog Box appears, displaying the current X Points and Y Amplitude values for the selected waveform or segment. The size of the waveform or segment can be changed horizontally by changing the Number of Points value for X Points. (You can enter a value in the range 8 to 15,999 points.) Or it can be changed vertically by changing the Percent of Original Data for the Y Amplitude. Click on OK to complete the resizing. Expand To Fit (Math Menu) This feature can be toggled on or off, as indicated by a checkmark. When Expand To Fit is checked, the entire waveform expands to fit the waveform edit window on the horizontal axis. As you insert waveform segments the window width is set to match the waveform so that the waveform always exactly fills the window. If you turn Expand To Fit off, the waveform window reverts to its default width. Note: Expand To Fit has no effect on the amplitude (vertical axis) of a waveform. The waveform does not need to be selected to perform the expansion. The entire waveform expands (not a selected segment). 69 Communications Menu Connection (Communications Menu) Establishes a connection to an arbitrary waveform generator instrument (see Supported Instrument). When you select Connection, the Connection dialog box appears, allowing you to search for and connect your instruments. See Connection Dialog Box for further information. Send Waveform (Communications Menu) Initiates a send or download of the contents of the active waveform edit window to previously connected arbitrary waveform generator instruments. The Send Arbitrary Waveform dialog box appears, allowing you to select parameters for the downloaded waveform. See Send Arbitrary Waveform Dialog Box for further information. Note: If you click on Send Waveform or the icon when no instrument is connected, the Connection dialog box appears. See Connection Dialog Box for further information. Once a connection has been established, the Send Arbitrary Waveform dialog box appears. 70 Tools Menu Import Waveform (Agilent Infiniium Scope) (Tools Menu) Displays the Agilent Infiniium Scope Waveform Setup dialog box, which allows you to set up to import a waveform from your Agilent Infiniium Oscilloscope. See Scope Waveform Setup Dialog Box for further information. Import Waveform (Agilent 546xx Scope) (Tools Menu) Displays the Agilent 546xx Scope Waveform Setup dialog box, which allows you to set up to import a waveform from your Agilent 546xx Oscilloscope. See Scope Waveform Setup Dialog Box for further information. 71 Window Menu Cascade (Window Menu) Arranges multiple waveform edit windows (Waveform, Waveform(2), and so forth) in overlapping cascade fashion. To select the active waveform edit window, either click on the desired window or select its name under Windows in the Window menu. Tile Horizontal (Window Menu) Arranges multiple waveform edit windows (Waveform, Waveform(2), and so forth) as horizontal windows stacked one above another. To select the active waveform edit window, either click on the desired window or select its name under Windows in the Window menu. Tile Vertical (Window Menu) Arranges multiple waveform edit windows (Waveform 1, Waveform(2), and so forth) as vertical windows arranged side-by-side. To select the active waveform edit window, either click on the desired window or select its name under Windows in the Window menu. Windows (Window Menu) 72 Selects the active waveform edit window. Select Windows from the Window menu, and then select a window name from the list and it will become the active waveform edit window. You can also select an edit window by simply clicking on it. Dialog Boxes Connection Dialog Box From the Communications menu select Connection to display the Connection dialog box. Note: If you click on Send Waveform in the menu, or the icon, when no instrument is connected, the Connection dialog box appears. Once a connection has been established, the Send Arbitrary Waveform dialog box appears. The Connection dialog box allows you to establish a connection to your function generator. See Establishing a Connection to an Arb for further information. The dialog box identifies and connects an arbitrary function generator instrument as follows: 1. The Select Instrument Address field displays the available instrument addresses. Select an address, and then click on Identify Instruments to identify the instrument at that address. 2. The Identified Instruments on My Computer field lists the instruments that have been identified. Each arbitrary function generator is identified as an Arb. Select an Arb by clicking on it: • Click on the Connect button to connect the selected instrument. • Click on the Disconnect button to disconnect the selected instrument. 3. Click on Close to close the dialog box when you are done. 73 Note: The Connection dialog box is also used to connect an Agilent Infiniium or Agilent 546xx Oscilloscope in order to import a waveform from the oscilloscope into the waveform editor. The procedure is the same except that only an Oscilloscope is identified as such and can be connected. See Scope Waveform Setup Dialog Box for further information. Low Pass Filter Dialog Box From the Math menu select Filter, and then select Low Pass to display the Low Pass Filter dialog box. (See Low Pass (Math Menu) for further information.) This dialog allows you to specify just one parameter, the Cut-Off value, which must be an integer in the range 1 to approximately one-half the number of points in the selected waveform or segment. Click on OK to accept the specified Cut-Off value. This Cut-Off value is a multiplier. It is multiplied by the repetition frequency specified for the function generator to get the cut-off frequency. For example, if the Cut-Off value is set to 100 and the function generator frequency is set to 1 kHz, the cut-off frequency for the filter is 100 kHz. See Selecting a Filter Function for further information. 74 Print Dialog Box From the File menu select either Print or Print Preview to display the Print dialog box. This dialog box provides two tabs: • The Preview tab displays a representation of the currently configured printout, which is printed when you click on the Print button. This tab is shown by default when you select Print Preview from the File menu. • The Page Layout tab allows you to configure the page to be printed. You can add the waveform windows to be included in the printout, and you can configure how these windows will be printed on the page. This tab is shown by default when you select Print from the File menu. Preview Tab: The Preview tab shows what your printout will look like with the current layout. Go to the Page Layout tab page to change the layout. Page Layout Tab: You can set the following parameters on the Page Layout tab: • Available - The available waveforms are listed. Select a waveform by clicking on its name, and then click on the Add> button to add it to the Print List. • Print List - The waveforms to be printed are listed. Select a waveform by clicking on its name, and then click on the <Remove button to remove it from the list. • Layout - Select the desired layout parameters: 75 - 1, 2, or 4 per Page. Select one of the six radio-buttons for the page layout. You can select 1, 2, or 4 waveforms-per-page, with either a landscape or portrait orientation. - Include Borders. Check this box to include borders in the printout. - Fit to Page. Check this box to re-scale the waveform windows to fit the printed page. Note that this feature affects the aspect ratio of the waveform. - White Background. This box is checked by default to print on a white background, rather than black. This setting is recommended if you are using an ink-jet printer. Go to the Preview tab page to see the effect of your settings. To Print: To print the waveforms, click on the Print button. To change the printer or its settings, click on the Printer Setup button. Properties Dialog Box From the File menu select Properties to display the Properties dialog box. You can set the following parameters for all waveform edit windows: • Points: Sets the waveform edit window width as a number of points. The number of points is a memory length, which depends on how large of memory of the instrument. The maximum waveform memory of 81150A is 512k (524288) points. • Segment Markers: When checked, each waveform edit window displays segment markers (small blue triangles) in the top ruler above the waveform. • Connect Dots: When checked, each waveform edit window displays a "connected dots" waveform. That is, the dots are connected to form a continuous waveform. • Grid On: When checked, each waveform edit window displays a grid. • Expand to Fit: When checked, the waveform expands to fit the window horizontally. As you insert waveform segments the window width is set to match the waveform so that the waveform always exactly fills the window on the horizontal axis. • Quantization: Each point is quantized as an integer of the specified number of bits (for example, as a 12-bit long integer), and then normalized to a real number. - Bits: Sets the number of bits for the quantization of each waveform point. - Restrict to Levels: When checked, the normalized points are rounded to specific levels supported by the bits of quantization. When not checked, normalized 76 points may fall outside these levels. Check this option for accuracy. Uncheck this option for slightly higher calculation speed. There is just one Math parameter: Smoothing. The Smoothing (Math Menu) filter function applies a 7- point moving average by default. However, you can set the Smoothing parameter to any odd number of points in the range 3 - 99. Resize Dialog Box From the Math menu select Resize to display the Resize dialog box. (See Resize (Math Menu) for further information.) The Resize command compresses or expands the selected waveform or segment horizontally or vertically, according to the two parameters that you specify in the Resize dialog box: • To expand or compress a segment horizontally, specify a value for Number of Points under X Points. You can enter a value in the range 8 to 524,288 points. • To expand or compress a segment vertically, specify a value for Percent of Original Data under Y Amplitude. You can specify any percentage value. Click on OK to resize the selected waveform or segment. 77 Scope Waveform Setup Dialog Box Use this dialog to import a waveform from your Agilent oscilloscope. From the Tools menu, select either Import Waveform (Agilent Infiniium Scope) or Import Waveform (Agilent 546xx Scope), depending on your model of oscilloscope, to display this dialog box. The dialog box provides two tab pages. From the Waveform tab page you can specify parameters for importing a waveform. From the Connect to Oscilloscope tab page you can establish a connection to your oscilloscope. Waveform Tab: You can specify the following in the Waveform Tab: • Currently Connected Oscilloscope: Shows the address of the currently connected oscilloscope. If no scope is connected, go to the Connect to Oscilloscope tab. • Channel: Specify the oscilloscope channel to import. • Number of Points (Agilent 546xx only): Specify the number of points to import for your Agilent 546xx Oscilloscope. Note: If you have an Agilent Infiniium Oscilloscope, the number of points is automatically selected. You can change the number of points using the oscilloscope's menu. Click on OK to import the specified waveform. 78 Connect to Oscilloscope Tab: The Oscilloscope Address is shown. To connect an oscilloscope, click on the Connect to Oscilloscope button. The Connection dialog box appears. See Connection Dialog Box for further information. Segment Parameters Dialog Box The Segment Parameters dialog box is used in two operations: • Inserting a segment in the active waveform edit window. • Selecting a segment for a math operation from the Waveform Math dialog box. Inserting a Segment: To insert a segment in the active waveform edit window, from the Edit menu, select Insert Segment, and then select one of the following segment types: Sine Triangle Square Saw Tooth Sinc Exponential Rise Exponential Fall Noise DC 79 When you select a segment the Segment Parameters dialog box appears. Note: You can also raise the Segment Parameters dialog box by double clicking on a waveform segment that already exists. In either case, you can use the dialog box to modify waveform parameters. The Segment Parameters dialog box allows you to select the following: • Waveform _ Select one of the nine standard waveform segments from the drop-down list. • Parameters - The following table lists the segment parameters. For each applicable parameter, enter a value by typing, or use the up and down arrows to select a value. (The parameters that are not applicable are grayed out.) Parameter: Default Value: Valid Range: Points 2000 8 – (window size) Amplitude 1.000 0.000 – 1.000 Offset 0.000 +/-1.000 Cycles 1 1 – 100 Phase (degrees) 0 0 – 359 Duty Cycle (percent) 50 20 – 80 Dampening Factor -5.000 +/-15.000 Zero Crossings 10 1 – 100 • Preview - The preview window shows what the segment looks like before you insert it. When you are satisfied, click on OK to insert the segment and close the dialog box. Or click on Defaults to revert to the default parameters for the segment. Selecting a Segment for Waveform Math: The Segment Parameters dialog box appears when you select a segment in the Waveform Math dialog box (for the second segment in a math operation). In this case, the Points parameter is 80 grayed to indicate that you cannot change the number of points. The number of points is fixed to match the selected waveform segment in the active waveform window. (The number of points must match in order to do a point-by-point addition, subtraction, or multiplication.) In all other respects, the dialog box is as described above for inserting a segment. Send Arbitrary Waveform Dialog Box Click on the icon in the waveform toolbar, or select the Send Waveform command from the Communications menu, to display the Send Arbitrary Waveform dialog box. (See Send Waveform (Communications Menu) for further information.) The dialog box provides two tab pages. From the Send Waveform tab page you can specify parameters and then send the waveform and parameters to your function generator. From the Manage Waveforms tab you can activate and delete the waveforms currently in the instrument's memory. Send Waveform Tab: You can set the following parameters on the Send Waveform tab: • Waveform Parameters: - Frequency (kHz): The function generator repeat frequency. - Amplitude (V p-p): The peak-to-peak amplitude of the repeating waveform. - Offset (Vdc): The dc offset to the waveform. • Reset Parameters: Click on Reset to restore the selected parameters: - Defaults for Waveform: The default parameters saved with the waveform in the file. - Current from Instrument: The current parameters retrieved from the function generator. 81 • Waveform Location on Instrument: - Volatile Memory: Save the waveform in the function generator's volatile memory. - Memory Name: Save the waveform in the named location on the instrument. • Send to Instrument: - Waveform and Parameters: Send the waveform and its parameters. - Waveform Parameters Only: Send only the parameters to save time when the waveform has already been sent. • Select Channel: - Channel 1: Send the waveform to channel 1 of the instrument. - Channel 2: Send the waveform to channel 2 of the instrument. Once you have specified all the parameters, click on Send to send the waveform to the function generator. A message is then displayed with an estimated time to complete the send operation. Manage Waveforms Tab: Waveforms on the Instrument: Lists the available waveforms stored on the function generator. To activate one of the waveforms, select its name and click on the Activate button. • To delete one of the non-permanent waveforms from the instrument, select its name and click on the Delete button. Permanent, built-in waveforms are indicated with an asterisk (*) preceding the name. These waveforms cannot be deleted from the instrument. Also, you cannot delete the currently active waveform. (To get around this, activate a different waveform and then select the one that you want to delete.) Waveform Math Dialog Box This dialog box appears when you select a waveform or portion of a waveform in the active edit window, and then select Addition, Subtraction, or Multiplication from the Math menu. The dialog box displays the correct operator (+, -, or x), depending on the selected math operation. As the dialog box initially appears, the following are displayed: • Selected Points: The waveform is shown as it was selected in the active edit window. This waveform is the first operand for the math operation. • Operator: The +, -, or x operator is displayed. You can select a different operator from the drop-down list. • Select Segment: You can select the segment or waveform to add, subtract, or multiply by the first operand. You have two choices: 82 - Clipboard: If you have previously copied a waveform or segment to the clipboard, this button is active. Click on the button to select the clipboard contents as the second operand. - Segment Drop-Down List: This displays None by default, but you can select any of the available standard waveform segments from the drop-down list as the second operand. When you select a segment (for example, Sine) the Segment Parameters Dialog Box appears. • Resulting Waveform: No waveform is displayed until you select a segment for the second operand. Once you select a standard segment or the clipboard for the second operand, the math operation is performed point-by-point on the two waveforms. The resulting waveform is displayed on the right, after the = sign. Two additional selections appear: • Match Length: Matches the length of the two waveforms to be added, subtracted, or multiplied. (This selection only appears if you selected Clipboard.) It is checked by default and normally should be left on. • Scale to Fit: Re-scales the resulting waveform to fit within the Y-axis scale. This selection is checked by default and normally should be left on. Click on Redo if you want to change your selections, or click on OK to replace the waveform in the active edit window with the waveform that results from the math operation. 83 Index A Absolute (Math Menu) · 65 absolute value · 32, 65 Adding a Waveform from the Clipboard · 29 adding waveforms · 25, 64, 81 Addition (Math Menu) · 64 Applying a Filter Function · 37 Applying a Windowing Function · 39 Cut (Edit Menu) · 53 cut and paste · 53 D DC (Edit Menu) · 57 dc segment · 57 Drawing an Arbitrary Waveform · 18 drawing waveforms · 58 freehand · 58 line draw · 58 C Cascade (Window Menu) · 71 cascading windows · 71 Clip (Math Menu) · 65 Clipping a Waveform · 34 Close (File Menu) · 50 closing files · 50 Connect Dots (View Menu) · 63 Connection (Communications Menu) · 69 Connection Dialog Box · 72 Contacting Technical Support · 8 copy · 53 Copy (Edit Menu) · 53 copyright · 9 creating · 14, 18, 50 files · 50 tools · 14 waveforms · 18 Creating Your Own Tools · 14 E Establishing a Connection to an Arb · 40 Exit (File Menu) · 52 Expand To Fit (Math Menu) · 68 Exponential Fall (Edit Menu) · 56 Exponential Rise (Edit Menu) · 56 Exporting Waveform Data to Excel · 43 Extended Cosine (Math Menu) · 66 F files · 50, 51 closing · 50 creating · 50 84 new · 50 opening · 50 saving · 50, 51 Filter (Math Menu) · 65 filtering a waveform · 37, 65, 66, 73 Finding Information · 8 Freehand (Edit Menu) · 58 freehand drawing · 58 G N New (File Menu) · 50 Noise (Edit Menu) · 57 noise segment · 57 O Open (File Menu) · 50 Grid (View Menu) · 62 H Hamming (Math Menu) · 67 help · 12, 13 I Import Waveform (Tools Menu) · 70 importing waveforms · 70 Insert Segment (Edit Menu) · 54 Inserting Segments Using the Icons · 15 Inserting Segments Using the Menu · 16 inserting waveform segments · 15, 16, 54 Introduction to the User Interface · 6 Invert (Math Menu) · 67 inverting waveforms · 67 P Paste (Edit Menu) · 53 Pin Markers (Edit Menu) · 60 Print (File Menu) · 52 Print Dialog Box · 74 Print Preview (File Menu) · 52 printing · 13, 52 Printing Help · 13 Properties (File Menu) · 52 Properties Dialog Box · 75 R Raised Cosine (Math Menu) · 67 raised cosine function · 67 Redo (Edit Menu) · 53 Resize (Math Menu) · 68 Resize Dialog Box · 76 L Legal Notice Page · 9 Line Draw (Edit Menu) · 58 Load Agilent 33250 Setup (File Menu) · 51 loading a setup · 51 Low Pass (Math Menu) · 65 Low Pass Filter Dialog Box · 73 M Marker (Edit Menu) · 59 markers · 22, 23, 24, 59, 60 math · 64, 65, 66, 67, 68, 81, 82 dialog · 81 waveform · 25, 26, 27, 28, 29, 30, 31, 64, 81, 82 Mirror (Math Menu) · 67 Multiplication (Math Menu) · 64 Multiplying by a Standard Waveform · 26 S save · 50, 51 files · 50, 51 setup · 51 Save (File Menu) · 50 Save Agilent 33250 Setup (File Menu) · 51 Save All (File Menu) · 51 Save As (File Menu) · 51 Saw Tooth (Edit Menu) · 55 saw tooth segment · 55 Scope Waveform Setup Dialog Box · 77 segment · 56, 57, 63 DC · 57 exponential · 56 marks · 63 noise · 57 parameters · 78, 79 saw tooth · 55 sinc pulse · 56 sine wave · 54 square wave · 55 triangle wave · 55 85 Segment Marks (View Menu) · 63 Segment Parameters Dialog Box · 78, 79 select · 20, 21, 57 all · 57 data · 20, 57 mode · 57 Select (Edit Menu) · 57 Select All (Edit Menu) · 57 Selecting a Filter Function · 36 Selecting a Windowing Function · 38 Selecting Waveform Data · 20 Send Arbitrary Waveform Dialog Box · 80 Send Waveform (Communications Menu) · 69 Sending Waveforms to an Arb · 42 Sinc (Edit Menu) · 56 sinc pulse segment · 56 Sine (Edit Menu) · 54 sine wave segment · 54 Smoothing (Math Menu) · 66 smoothing filter · 66 Square (Edit Menu) · 55 square wave segment · 55 Standard Toolbar · 46 Standard Toolbar (View Menu) · 61 Status Bar (View Menu) · 61 subtracting waveforms · 25, 64, 81 Subtraction (Math Menu) · 64 Supported Data File Formats · 49 Supported Instruments · 7 W waveform · 34, 35, 42, 69, 70 clipping · 34 importing · 70 math · 25, 26, 27, 29, 30, 64, 65, 66, 67, 68 segments · 54, 55, 56, 57 sending · 42, 69 toolbar · 47, 61 Waveform Math Dialog Box · 81 Waveform Toolbar · 47 Waveform Toolbar (View Menu) · 61 window · 71 cascading · 71 waveform · 6, 7, 71 windowing · 38, 39, 66, 67 extended cosine · 66 functions · 38, 39, 66, 67 hamming · 67 raised cosine · 67 Windowing (Math Menu) · 66 Windows (Window Menu) · 71 T Taking the Absolute Value of a Waveform · 32 Thumbnail View (View Menu) · 62 Tile Horizontal (Window Menu) · 71 Tile Vertical (Window Menu) · 71 tiled windows · 71 toolbar · 46, 47, 61 standard · 46, 61 waveform · 47, 61 tools · 14, 70 creating · 14 custom · 14 trademarks · 9 Triangle (Edit Menu) · 55 triangle wave segment · 55 U X Undo (Edit Menu) · 53 user interface · 6 Using Help · 12 Using Markers · 22 X Markers (Edit Menu) · 59 Y Y Markers (Edit Menu) · 59 86 Z Zoom (View Menu) · 62 Zoom In (View Menu) · 63 Zoom Out (View Menu) · 63 87