1
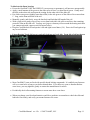
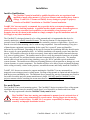
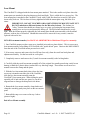
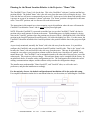
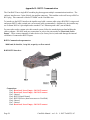
TM Patent Pending Owners Manual and Setup Guide (v 1.5a) www.cineslide.com ____________________________ Serial Number ____________________________ Date of Purchase ____________________________ Dealer This page intentionally blank Table of Contents DANGER - WARNINGS - SAFETY ........................................................................................................................2 This page intentionally blank Introduction ..............................................................................................................4 Introduction.................................................................................................................................................................5 FCC Compliance.........................................................................................................................................................5 Features........................................................................................................................................................................6 CineSlide™ Control and Operation..........................................................................................................................7 Device Power...........................................................................................................................................................8 PowerON ............................................................................................................................................................8 PowerOFF ..........................................................................................................................................................8 Auto-PowerOFF .................................................................................................................................................8 Lens Move ...............................................................................................................................................................9 LensON Commands. ..........................................................................................................................................9 LensOFF Commands..........................................................................................................................................9 Rehome...............................................................................................................................................................9 Care and Maintenance .............................................................................................................................................10 Installation .................................................................................................................................................................12 Installer Qualifications...........................................................................................................................................12 Pre-made Mounts...................................................................................................................................................12 Installer Provided, 3rd Party, Custom Mounts........................................................................................................13 Lens Mount............................................................................................................................................................14 Planning for the Mount Location Relative to the Projector - "Home" Side...........................................................15 Mount Installation..................................................................................................................................................16 Electrical Connections ...........................................................................................................................................16 Connection #1: Power Trigger cable ................................................................................................................16 Connection #2: Lens-Move Trigger cable........................................................................................................16 Connection #3: COMM....................................................................................................................................17 Connection #4: DC Power................................................................................................................................17 Route and Secure All Wiring.................................................................................................................................18 Final Assembly ..........................................................................................................................................................19 CineSlide™ Position Fine Adjustment..................................................................................................................19 Attach the Anamorphic Lens .................................................................................................................................20 Isco ONLY: ......................................................................................................................................................20 Schneider ONLY:.............................................................................................................................................20 Adjust the Lens ......................................................................................................................................................21 Setup, Safety Checklist .............................................................................................................................................22 Appendix A - IR (Infrared Remote) control information .....................................................................................23 Appendix B - RS232 Communication .....................................................................................................................24 Appendix C – Trigger Cable technical data ...........................................................................................................26 Specifications .............................................................................................................................................................27 Dimensions.................................................................................................................................................................28 CineSlide™ Warranty ..............................................................................................................................................29 DANGER - WARNINGS - SAFETY DO NOT SKIP THIS SECTION The CineSlide™ is a device with moving parts, generally moving a large anamorphic lens. This movement is quick and may be unexpected. This movement may generate significant forces that must be properly addressed for safe operation. Failure to follow the instructions may result in an unsafe installation. TechHT, LLC assumes no responsibility whatsoever for damages or injury to property or persons resulting from an improper installation. Throughout this document the warning symbol, as shown left, represents an item or issue that requires careful attention and strict compliance. Failure to follow and heed all warnings could result in personal injury or property damage or both. • This device should be installed by a competent, skilled installer. The installer must read and understand all instructions prior to and during installation. • THE CINESLIDE™ MUST BE MOUNTED TO A PROPER STRUCTURAL ELEMENT. An example if a proper structural element is a ceiling joist that is properly sized and rated for all dead and live loads it is to carry including a CineSlide™ and any other loads. TechHT does not size structural elements. A licensed structural engineer, architect or other qualified professional should be consulted to verify the structural elements are of sufficient size and strength to support any load attached to them. DO NOT INSTALL A CineSlide™ into sheetrock or wallboard (alone) as these are not structural elements. The forces created by a moving lens would likely cause a fastener to work loose from or come out of sheetrock or wallboard causing an unsafe condition. All fasteners used to mount a CineSlide™ must be of proper length and size to support a minimum of 200 lb pullout strength per fastener. For screw-in-wood fasteners, all fasteners must enter the wooden structural element a sufficient distance from any edge or side of the element, extend threads the proper distance into the wooden structural element, and be installed into side grain not end grain. For bolt and nut fasteners, nyloninsert style or other suitable lock nuts must be used to prevent any loosening of mounting fasteners. • Exercise extreme caution when working on a ladder or above floor level. Keep the area below the installation free from all objects that may be damaged, including people, at all times. Dropping tools parts, or lenses onto the floor or onto people below the work area could cause injury and/or severe damage to the device or lens. • Never work on the CineSlide, its mounts, or other related parts when the CineSlide™ is plugged into AC power. The CineSlide™ has moving parts that may be activated by unseen elements causing unexpected motion. Such unexpected motion could cause injury, knock a workman off balance, etc. ALWAYS UNPLUG the CineSlide™ when installing, checking, or adjusting the CineSlide. ALWAYS REMAIN CLEAR OF THE LENS MOVEMENT PATH. NEVER PLACE A LADDER, SCAFFOLD, etc. in a position where the CineSlide™ could contact the ladder, scaffold, or any person working on or from on such items. Page 2 CineSlide Manual ver 1.5a © 2007 TechHT, LLC • Mount the Cineslide™ in a location away from children, pets, accidental, casual, or unintentional human contact. The CineSlide™ has moving parts and while they are covered, it may be possible for a child or pet who tries hard enough to put their fingers into the device and risk injury. The CineSlide™ must be mounted near the ceiling, away from any risk of human contact with the device. • Do not mount the CineSlide™ where it may be an overhead hazard. Follow all applicable building codes and do not mount the device where it could strike a person's head, while moving or still. • The CineSlide™ is designed for indoor use in typical HVAC controlled environments only. Do not install operate, or store the CineSlide™ in moist or wet environments, or in locations where it will be subjected to temperature extremes. Store in a cool, dry place when not installed. • The rear of the CineSlide™ electronics box is an open design to allow for heat dissipation and ventilation. Do not block the rear of the case, DO NOT PUT ANY OBJECT INTO THE DEVICE. • DO NOT DISASSEMBLE the device in any way without specific instructions to do so from the manufacturer. There are no user serviceable parts inside. The CineSlide™ has parts that are designed such that a disassembly would render them inoperative and unrepairable. There are other parts that are factory adjusted and only a qualified repair technician could readjust. Many internal fasteners are secured with specific thread locking compounds, applied to factory machined surfaces at the time of manufacture. Removing these fasteners may damage them without special handling and proper reattachment. Opening or disassembly of a CineSlide™ without written direction from the manufacturer will void the warranty and may expose the user to risk of injury, and may permanently damage the device. • Do not use any power supply other than the one provided. Use only approved input voltages as listed on the back of the power supply and in the device specifications of this manual. • Route all power and control cabling in a safe manner secured with appropriate cable management hardware. Ensure cabling of any kind (AC power, DC power, 12V trigger, or RS232) is installed without any pull on it's receptacles or plugs, has no sever kinks, and is securely, and permanently affixed in such a manner that it cannot com into contact with any moving parts. • It is the responsibility of the professional installer and dealer to provide this operating manual to the end user and cover all safety and maintenance aspects of this manual with the end user. • The user of a CineSlide™ must understand the safety requirements of operating a CineSlide™ and verify it is properly installed. • FOLLOW ALL CARE AND MAINTENANCE instructions to ensure proper, safe operation of the CineSlide • The Safety checklist must be carefully completed and verified after installation, and periodically after installation as part of the devices routine maintenance CineSlide Manual ver 1.5a © 2007 TechHT, LLC Page 3 This page intentionally blank Page 4 CineSlide Manual ver 1.5a © 2007 TechHT, LLC Introduction Congratulations on your purchase of the CineSlide™ (patent pending). The CineSlide™ is the premier anamorphic lens transport system. The CineSlide™ was professionally engineered by to be a reliable, attractive, fully automated anamorphic "slide". The CineSlide™ is designed to be a stylish anamorphic lens transport with no bulky attached boxes, no cumbersome control cabling and control boxes to mount or hide. It is sleek, relatively lightweight and designed to complement the lens attached to it and the high end theater in which it will operate. This CineSlide™ is designed to do one thing and do it very well. It will automate the movement of an anamorphic lens into and out of the light path of a projector. It excels at this task and does it quickly with repeatable precision. Moving the anamorphic lens is no longer a huge inconvenience and distraction to the home theater experience. The CineSlide™ was designed with compactness, and aesthetics in mind. With its curved styling, flat main body dimensions of around 20" x 1" x 4", it has met that goal. FCC Compliance Requied statements: CAUTION: This device is classified by the FCC as a "Class B unintentional radiator". Any user that changes or makes any modification to this device not expressly approved by the manufacturer could void the user's authority to operate the equipment. NOTE: This equipment has been tested and found to comply with the limits for a Class B digital device, pursuant to Part 15 of the FCC Rules. These limits are designed to provide reasonable protection against harmful interference in a residential installation. This equipment generates, uses and can radiate radio frequency energy and, if not installed and used in accordance with the instructions, may cause harmful interference to radio communications. However, there is no guarantee that interference will not occur in a particular installation. If this equipment does cause harmful interference to radio or television reception, which can be determined by turning the equipment off and on, the user is encouraged to try to correct the interference by one or more of the following measures: -- Reorient or relocate the receiving antenna. -- Increase the separation between the equipment and receiver. -- Connect the equipment into an outlet on a circuit different from that to which the receiver is connected. -- Consult the dealer or an experienced radio/TV technician for help. Canada Users: This class B digital apparatus complies with Canadian ICES-003 CineSlide Manual ver 1.5a © 2007 TechHT, LLC Page 5 Features The CineSlide™ includes these features: • • • • • • • • • • • • • • Compatibility with all anamorphic lenses available today. The CineSlide™ is optimized for use with higher end ground glass lenses by Isco and Schneider but it is also compatible with prism based lenses. The CineSlide™ flexible lens mount design will allow users to upgrade or change lenses in the future without having to purchase a different transport system. With its heavy-lens capable design, the CineSlide™ is able to universally adapt to any anamorphic lenses. Each unit is hand-built with care in the USA, and carefully tested for proper performance. Custom mounts for IscoIII, and IscoII lenses are "slide off - slide on" replacements to the stock tabletop mount. Isco owners slide their lens off the original posts and slide it onto the CineSlide™ posts. For Schneider lenses, the CineSlide™ custom Schneider mounting system is a secure, fully adjustable, balanced, 2-post mount that is superior to the available stock mount (and costs less). Repeatable, accurate positioning. The CineSlide™ moves the lens to the exact same position every time. It's accuracy is much more than necessary, (+/- 0.001" typical) Quick change. Smooth, accurate motion repositions the anamorphic lens from "on" to "off" in just over 1 second. This quick-change capability is important to minimize the disruption to the viewing experience. It is now convenient to change aspect and lens modes even between movie trailers or DVD menus without having to wait on a lens movement. Automatic realignment and self tuning on power on. This eliminates the need for the end user to have to do any adjusting or tweaking of the lens once it is properly installed. Compact, lightweight, highly optimized and engineered design with aluminum construction. Industrial design, all parts are precision, industrial quality machine components like those used in industrial robotic systems. This CineSlide™ includes a 100% custom built Stepper motor along with German engineered and assembled motor control circuitry. Quiet, smooth, precision ball-bearing based linear slide bearings. No plastic slide components exist in the CineSlide™. The CineSlide™ bearings are designed for long life with continuous use by industrial robotics. They should last several lifetimes in a home theater environment. These bearings have negligible friction which facilitates a compact motor size and sleek design. Infrared (IR) remote control. Configuration files are available for both the Phillips Pronto remotes and the Home Theater Master line of remotes. An optional 8 device programmable remote control is available to control the CineSlide™ or use to "teach" other high end remotes such as the Harmony. RS232 control. The CineSlide™ has a compact, modular type jack for interfacing to a RS232 control system. Dual 12v trigger interfaces. A 12v trigger is provided for automated device power on/off, and a second 12v trigger is provided to interface with "2:35 trigger" capable devices. This trigger will automate the movement of the lens position. One CineSlide™ Trigger interface cable is included. Ultra low current design. Consumes 10mA when "asleep", 75mA standby/hold mode, only 400mA when traveling. Worldwide capable, low voltage, low current, and lightweight DC power supplies. Page 6 CineSlide Manual ver 1.5a © 2007 TechHT, LLC CineSlide™ Control and Operation DO NOT PLUG IN, CONTROL, OR USE THE CineSlide™ in any way until it has been completely, and properly installed. Failure to do so could result in injury and/or damage to the device. Once installed, The CineSlide™ is simple and logical to operate. It is designed to accurately move an anamorphic lens left and right, into and out of the light path of a projector. It does not move to the middle. It is designed such that no "tweaking" or fine tuning should ever be necessary. Once the CineSlide™ is physically mounted in the correct position, it will always move to the correct positions of "Lens ON" (lens in light path) or "Lens OFF" (lens out of light path) as instructed. In normal operation, the user would power the device on, and leave it on while in use. On demand, the user can quickly and/or automatically move the lens to its desired position(s). When the user is done using the system (i.e. turning off the projector), turn the CineSlide™ off as well. The CineSlide™ has 2 indicator LEDS on the face of its electronics case. Due to the nature of the Home Theater, and to minimize effects on projection "black levels", these LED's are not on during normal operation. There is no "power indicator" LED for this reason. When the CineSlide™ is connected to its DC power source (i.e. plugged in), the 2 red indicator leds will flash in the sequence of #1-#2-#1. This indicates the CineSlide™ has properly booted up, has entered "PowerOFF" mode and is listening for commands. Danger: The CineSlide™ MAY MOVE UNEXPECTEDLY EVEN THOUGH NO INDICATOR LIGHTS ARE ON! Always assume the CineSlide™ is on if it is plugged in. For normal operation, the IR activity LED (center) will blink when a valid IR command is received. The other LED (side) will light when the device is "busy" (i.e. rehome diagnostic command in progress). For typical IR remote users, the operation is simple. There are 4 fundamental, discrete commands: • PowerOn • PowerOff • LensOn • LensOff The CineSlide™ accepts these commands from up to 4 different command sources: • IR Remote (See Appendix A for IR buttons and IR information) • RS232 commands (See Appendix B for RS232 wiring, command list, and syntax) • (2) 12v trigger inputs Every command source has equal priority. The CineSlide™ will obey the commands as they are sent. It will not process commands while it is in motion. It will finish any motion already in progress, and then it will process any command that arrived while it was in motion. In the event multiple commands were received while it was in motion, the last instruction received "wins" and will be acted on at the end of that motion. CineSlide Manual ver 1.5a © 2007 TechHT, LLC Page 7 The following lists all the CineSlide™ modes, commands, and related behavior details. Device Power The CineSlide™ has 2 power modes, "PowerON" and "PowerOFF"". PowerON: In PowerON mode, the device is powered up, the motor control circuitry, and the motor are ON. When powered ON and not moving, the motor is in a "hold" state where it will use a small amount of current to hold the lens in place and resist any movement (i.e. from vibration induced by a subwoofer, etc). NEVER FORCE A MOVEMENT BY HAND WHEN THE DEVICE IS ON. When the CineSlide™ receives a "PowerON" command that wakes it from sleep, it will automatically "rehome" the lens. This is a short process where the lens is moved a small amount to activate its position sensor and set its "home" position to a known place. The default position for "home" is on the right side (away from the motor). See planning section this manual for "home" position details. There are (6) different commands that will cause the CineSlide™ to change to "PowerON" mode: • IR remote PowerON command (see Appendix 1 for IR remote information) • IR remote LensON command • RS232 PowerON command (see Appendix 2 for RS232 command list) • RS232 LensON command • Power Trigger ON command (a voltage change on the trigger input from 0V (off) to 12V (on)) • Lens Trigger ON command (a voltage change on the trigger input from 0V (off) to 12V (on)) PowerOFF: In PowerOFF mode, the motor control circuitry is powered down, no motor current, only a tiny amount of current is used to "listen" for incoming commands. The device is considered to be "asleep". This is the preferred state when the CineSlide™ is not in use and will further extend the life of the electronics, as well as conserve power. Note: In PowerOFF mode, it is possible to gently move the lens by hand, if necessary for some reason (not recommended for general operation). There are (4) different commands that will cause the CineSlide™ to change to "PowerOFF" mode: • IR remote PowerOFF command (see appendix 1 for IR remote information) • RS232 PowerOFF command (see appendix 2 for RS232 command list) • Power Trigger OFF command (a voltage change on the trigger input from 12V (on) to 0V (off)) • A timeout of the inactivity Auto-PowerOFF timer Auto-PowerOFF: The CineSlide™ has an automatic power-off feature built-in. If the device is left in the PowerON mode for more than 6 hours, with no commands received during that time, it will prepare to PowerOFF. At the end of this timeout period, if the lens is in the LensOFF position, the CineSlide™ will PowerOFF with no further delay. If the lens is in the LensON position, the lens will AUTOMATICALLY move to the Home/LensOFF position, and start a final 15 minute timer. If no command is received during the final timer, the CineSlide™ will go into PowerOFF mode. Anytime any command is sent to the CineSlide™, the Auto-PowerOFF timer is reset. CAUTION: The CineSlide™ will move to the LensOFF position automatically if it is left powered ON. This movement may be unexpected. Never install or use a CineSlide™ where this unexpected movement could pose any hazard to people or property. Page 8 CineSlide Manual ver 1.5a © 2007 TechHT, LLC Lens Move The commands to move the lens are referred to as "LensON" and "LensOFF". LensON means the lens is placed into the projector's light path. LensOFF moves the lens to its home position, out of the projector's light path. LensON Commands. The following commands will cause the lens to move to the LensON position: • IR remote command LensON • RS232 command LensON • Lens Trigger ON command (a voltage change on the trigger input from 0V (off) to 12V (on)) LensOFF Commands. The following signals will cause the lens to move to the LensOFF position: • IR remote command LensOFF • RS232 command LensOFF • Power Trigger OFF command (a voltage change on the trigger input from 12V (on) to 0V (off)) • A timeout of the 6 hour inactivity Auto-PowerOFF timer Caution: ALL "PowerOFF" commands will cause and automatic LensOFF move (if the lens is in the LensON position at the time of the PowerOFF command). Rehome. The advanced control set for the CineSlide™ includes a "rehome" command. This command will force a rehome sequence without a PowerON. This command is for diagnostic purposes and is not needed or used in normal operation. The CineSlide™ automatically executes the rehome procedure when it receives a Power-ON event. Also, in normal operation the lens will move to the home position (if necessary) upon a PowerOFF command/trigger event. This is so the lens is normally near the "home" position on power up, making the rehome routine a quick, non-districting event. In the event of a commercial power failure and restoral, the CineSlide™ will enter sleep mode on power restoral, and automatically rehome the next time it receives a PowerON command/event. CineSlide Manual ver 1.5a © 2007 TechHT, LLC Page 9 Care and Maintenance The CineSlide™ is designed to be a high reliability device with no significant maintenance. Some manufacturers clam their products are no maintenance, but to us that means "just run it until it breaks". We don’t believe in that method, we believe anything that moves needs at least minimal attention. We do recommend periodic checks of your CineSlide™. • During the first weeks of operation we strongly recommend that you go over the ceiling mount fasteners to ensure they are snug and tight. A visual and hand-check should be sufficient if the installation was done properly. Be sure noting has come loose, or looks stressed. The stock mount configurations include safety design features that when properly installed would prevent the CineSlide™ from falling. But since this is a device with heavy, expensive, moving parts, possibly above a hard floor or people, it is prudent to check the mount hardware. Perform a repeat safety checklist verification. Check each item on the list; minimally check all fasteners are secure and properly tightened. • The sliding component of the CineSlide™ is a ball bearing based industrial "linear bearing". It works somewhat like a regular round ball bearings but is more complex inside. This is a very high end bearing, typically used in things like precision robotics. The CineSlide™ II uses the superior performance of the ball-bearing based linear bearing slide component vs. inexpensive plastic bearings. Periodically check the linear bearing (lens slide) to ensure it has no "play", and does not feel loose in any way. This precision bearing should not have any "slack" or "play". If it develops any slack or play, or feels "rough" to move, it should be returned for service or replacement. For the curious disassembler, NEVER disassemble this bearing, or allow its truck to leave the rail. It is a custom built, factory assembled, pre-loaded, precision part. Besides voiding the warranty, disassembly will result in a permanent failure, a lot of little bearings in the floor, and an expensive component replacement. If the bearing truck is ever accidentally removed from the rail, DO NOT REASSEMBLE, it must be returned to the factory for replacement. A disassembled bearing may not hold the lens on the rail and could be unsafe to operate. The linear bearing on the CineSlide was shipped lubricated and with normal use should provide long, trouble free operation. It is recommended however that once every 6 months to a year (depending on frequency of use and conditions) that you lightly lubricate the slide component. This does not require any disassembly or tools, might take 5 minutes, and it is a simple operation. For lubrication, we recommend the use of Synco Brand “Super Lube” Synthetic Grease (part #21010). This is a PTFE multipurpose lubricant suitable for the linear bearings. It is colorless and odor free and even safe for food machinery use. It is available from TechHT as an accessory item or on line through Amazon.com (search Super Lube 21010). Page 10 CineSlide Manual ver 1.5a © 2007 TechHT, LLC To lubricate the linear bearing: • Power the CineSlide™ OFF and UNPLUG it as necessary to guarantee it will not move unexpectedly. • Apply a small amount of the grease to the slide rail so it has a very thin film of grease. Gently move the slide to the other side and repeat the coating for the other side of the slide rail. • Put a little extra grease (slightly more than a film) in the side grooves of the slide rail in an area about 1" long, on the front and back of the rail. • Manually, gently, and slowly, move the lens back and forth the full length of the rail. • With a paper towel gently wipe off any excess from both side's side grooves and leave the remaining protective film on the slide rail. You may use Q-tips to clean any excess around the bearing truck that you cannot reach with a paper towel (left arrow below). • Plug the CineSlide back in and operate it left and right several times (3-4). Power it off and again wipe any excess lubricant. • Linear Bearing Truck (left arrow) and rail (right arrow) back side. Front side of rail not shown • Most CineSlide™ parts are fixed with specific thread locking compounds. It is unlikely any fasteners will ever come loose as long as you do not disturb them. If you discover a part or fastener that has come loose, you may tighten it gently or contact the manufacturer for advice. • Periodically check all mounting fasteners to ensure none have come loose. • When you change your fire alarm batteries would be a good time to remember to check the slide and lubricate if necessary, and verify you mount fasteners are secure. CineSlide Manual ver 1.5a © 2007 TechHT, LLC Page 11 Installation Installer Qualifications The CineSlide™ must be installed by qualified installers who are experienced and qualified to install ceiling mounts (e.g. Projector Mounts), and attaching heavy items to ceilings. TechHT, LLC assumes no liability for any damages to people or property related to a CineSlide™ installation or CineSlide™ mount installation. TechHT, LLC does not specify, recommend, size or provide advise on structural components, specific fasteners, or fastening methods. A qualified installer should consult a licensed engineer or architect to verify any structural load capabilities, or the suitability of any fasteners used. Examples that may be shown in this manual are simply examples of specific installations and will NOT apply to any other installation. The CineSlide™ is designed primarily to be ceiling mounted and it is important that the device be securely attached to a suitable structural element. The moving element of a lens transport device generates lateral load forces that are not present with a stationary projector or light fixture. Special care must be exercised when mounting a device with moving components. Structural mounting of any piece of home theater equipment is not something for the casual "do it yourself" owner and should be performed by a professional. Depending on the specific location, the installation difficulty should require above average or expert installation skills. A CineSlide installation will normally require more than one person. The installers will need to be able to accurately locate and/or install suitable structural elements (e.g. joists or backing plates). The installers must be able to verify the structural elements are of suitable size to carry all loads, live and dead, that the structural component will be subjected to. The installers must be able to locate and avoid wiring, plumbing, sewer, gas, HVAC and other typical mechanical system elements. The installer must ensure any mounting fasteners will not penetrate or damage any such system elements, or system components. The installer will have to be able to locate and install the mount on the ceiling accurately, relative to the projector, assemble the mount, and finally install the CineSlide™. TechHT, LLC does not recommend or support attaching the CineSlide™ (or any automated lens transport) to an existing projector's ceiling mount. Existing ceiling mounts are optimized and designed to hold the projector and nothing else. The additional forces generated by moving components may result in forces that exceed the projector mount manufacturer's design. DO NOT attach a CineSlide™ to any projector mounts without consulting the mount manufacturer or a qualified engineer. Pre-made Mounts The CineSlide™ has several mounting options. The CineSlide™ design is optimized for a ceiling mount installation; however it may be mounted "upside down" on a flat surface or cantilevered from a shelf edge. The only requirement is that the CineSlide™ body must be level. The CineSlide™ does have moving parts and must be mounted out of reach and clear of children, pets, or any unintentional or casual contact. Placing fingers into the moving area may result in injury. TechHT, LLC accepts no responsibility for damage or injury caused by an improper installation location. Page 12 CineSlide Manual ver 1.5a © 2007 TechHT, LLC The available CineSlide™ mount options are designed to address the most common installations. There are adjustable and non adjustable mounts, mounts to attach to joists running parallel to the screen and joists running perpendicular to the screen. Some are simple to assemble, others are more complicated. There are also mounts to cantilever the CineSlide™ in front of a mounted projector shelf. Most pre-made CineSlide™ mount kits are designed with structural aluminum profile components made by Bosch-Rexroth. For the qualified installer, the Bosch system allows great flexibility for custom or non-standard installations. The installer may consult the Bosch Rexroth website for other options and to view the full line of Structural profiles and related hardware. (http://www.boschrexroth-us.com) For details on the installations of pre-made mount kits, see the instructions for the specific mount kit being used. Installer Provided, 3rd Party, Custom Mounts If custom or 3rd party mounts are used, the installer should use the slotted mount holes located at each end of the CineSlide to interface to the mount. Modifications to the CineSlide™ body may cause damage to the device, interfere with the mechanical movement, and will void the warranty. There are 2 slotted mounting holes on each side of the CineSlide™ sized for M8 and M6 screws respectively. Nuts, washers, screw heads in these holes should not interfere with the CineSlide™ moving mechanism. TechHT, LLC does not approve, recommend, specify or review any installer provided, 3rd party, or custom mounts. Any custom mount must be designed by qualified individuals or companies following proper engineering design principles. CineSlide Manual ver 1.5a © 2007 TechHT, LLC Page 13 Lens Mount The CineSlide™ is shipped with the lens mount posts attached. This is the smaller oval plate where the mount posts are attached is the plate that moves back and forth. This is called the lens mount plate. The lens mount plate is attached to the CineSlide™ body with (2) M6 Hex head screws and (1) M6 nylon insert safety lock nut. This lock nut is factory tightened to hold the mount plate snug, but allow it to rotate: IMPORTANT: DO NOT UNSCREW OR LOOSEN THE LENS MOUNT PLATE NUT. DO NOT substitute a different fastener for the M6 safety locknut. This locknut is a "safety" fastener that should not vibrate loose over time, preventing the lens mount from coming loose on its own and potentially falling off. The M6 locknut should not be overly tight. With the locknut properly tightened, the lens mount plate should rotate smoothly with firm hand pressure, with no play or looseness. Should this nut need to be removed for any reason, it must be replaced with a new one. ISCO III lens mount transfer (See MANUAL ADDENDUM for Multistand II type Isco mounts): 1. One CineSlide mount post has a stop screw installed in its end (see photo below). This is to prevent a lens mount assembly from sliding off a CineSlide with "upside down" posts. Unscrew this M6x16 BHCS from the end of the CineSlide mount post and set it aside. 2. If necessary, unscrew and remove the Isco III lens (lens only) from the stock lens back-plate and adjustment assembly. Set the lens aside in a safe place. 3. Completely unscrew and remove the (2) stock Isco mount assembly's side locking knobs. 4. Carefully slide the stock lens mount assembly off of the original Isco stand's posts being careful to not damage or bind the 2 plastic shims (washer-like very thin large rings). These shims are on most Isco mounts between the clamp and the posts. 5. With the Isco lens mount back plate (where the lens screws on) oriented toward the rear of the CineSlide, slide the Isco lens mount assembly onto the CineSlide™ lens mount posts. When sliding the stock assembly off of and onto the new posts, be careful to align and not to damage the thin plastic side shims. 6. Reattach the Isco mount assembly clamp knobs and clamp the assembly gently into place on the new mount posts. 7. Reinstall the stop screw removed in step 1 above (pictured right): End of Isco Mount assembly Lens "stop" screw Page 14 CineSlide Manual ver 1.5a © 2007 TechHT, LLC Planning for the Mount Location Relative to the Projector - "Home" Side The CineSlide™ has a "home" side for the lens. This is the CineSlide's "reference" position and the lens position default. The default "home" side is the side away from the motor (left as facing the device). This is the side the lens will move to automatically on power off. It also moves to the home side initially when it powers on as part of its automatic "rehome" operation. The "home" position is designed to be the same as the "Lens-OFF" position, and is refereneced as such in this manual. The instructions in this manual are written assuming a typical installation where the user will mount the CineSlide™ such that the "home" side is out of the projectors light path. NOTE: When the CineSlide™ is powered on and the lens is at rest the CineSlide™ "holds" the lens in position with a small amount of current to the motor. This holding power is slightly stronger by design when in the "LensON" position where the position may be more critical. Although the lens is also held in position in the LensOFF position (PowerON mode), it is held with slightly less force. For this reason, the CineSlide™ should be installed so the LensON position is the position with the lens in the projectors light path. As previously mentioned, normally the "home" side is the side away from the motor. It is possible to configure the CineSlide's and swap the Home/LensOFF and the LensON sides. That is, the "motor" side becomes the "home" side and LensON is the side away from the motor. This may be preferable for example in cases where a projectors heat exhaust would be directly into a lens that was "parked" on the normal home side. The CineSlide™ can be mounted oriented to the other side of the projector, out of the exhaust path. This requires a software change. This software change can be completed at the factory, by an authorized dealer, or installer with a configuration tool kit. The configuration kit includes the correct cabling, communications adapter, and the software utility to make the configuration change. The installer must understand the "Home/LensOFF", and "LensON" sides, as well as the user's preferences, and plan the installation accordingly. For the majority of users, the default configuration and installation will be the preferable setup. For complete information on the device movement behavior, see the section on Controlling the CineSlide. CineSlide Manual ver 1.5a © 2007 TechHT, LLC Page 15 Mount Installation Complete the installation of the CineSlide™ mount following the mount installation instructions specific to your installation and kit. DO NOT INSTALL THE LENS ONTO THE BACKING PLATE YET. Electrical Connections Make these connections AFTER the CineSlide™ has been securely mounted. The CineSlide™ electrical and control interfaces are all located on the back of the main electronics box. They are shown in the photo below: From Left to Right: 24VDC Power jack, RS232 COMM port, On/Off Trigger input, Lens Trigger input Make these connections in this order (as appropriate for your installation): NOTE: The CineSlide™ includes (2) 12v trigger inputs. This is a 2.5mm mini audio mono jack. (See appendix B for trigger cable information). Connection #1: Power Trigger cable. The CineSlide™ includes a 12V PowerON-OFF trigger input. Connecting this trigger to device with a 12V power trigger output (e.g. a projector's 12V screen trigger) will automate the power on and power off functions of the CineSlide™. Use of this connection is optional, but we recommend making this connection when possible, to automate the Power-ON PowerOFF function of the device. With this trigger connected, the lens will automatically move to the home position and the CineSlide will power off when the projector is turned off. The PowerON-OFF 12v trigger receptacle is shown in the photo above. Plug the Power Trigger cable into the appropriate CineSlide™ jack. Plug the other properly terminated end into the source triggering device (e.g. Projector, scaler, etc.) This input is non-polarized, the 12V +/- can be connected either way. Connection #2: Lens-Move Trigger cable. The CineSlide™ includes a 12V Lens-Move trigger input. This trigger is for use with devices that support or include "auto-2.35:1" sensing and provide a lens movement trigger output. When the triggering device activates this output, the lens will move to the "lens-ON" position automatically. When the source device deactivates this output, the lens will move to the "off position". Use of this connection is optional and may not be available from your source. Page 16 CineSlide Manual ver 1.5a © 2007 TechHT, LLC The Lens-Move 12v trigger receptacle is shown in the photo above. Plug the Lens-Move trigger cable into the appropriate CineSlide™ jack. Plug the other end into the triggering device (e.g. Projector, scaler, etc.). This input is non-polarized, the 12V +/- can be connected either way. Connection #3: COMM. The CineSlide™ may be controlled by RS232 via its COMM port. RS232 is used with many theater control systems. The RS232 interface to the CineSlide™ is a simple Transmit and Signal Ground interface and is not bidirectional. The user or installer must ensure standard RS232 cable lengths are not exceeded or unreliable RS232 communication may result. Use of this connection is optional and may not be available from your source. The CineSlide™ includes a modular RJ45 type jack interface, as shown above, to interface with RS232 control systems. RJ45 to 9 pin D-sub adapters are available for use with a standard Ethernet "patch cable" (not included) to interface with RS232 theater control systems. The RJ45 COMM connector is NOT a standard RS232 RJ45 pinout. The RJ45 modular jack was used for its compact size to help keep the CineSlide™ small, but this 8 conductor jack includes wiring for other factory service communication besides the end-user accessible RS232 input. If the RJ45 input cable is custom wired, do not wire to restricted pins. Terminating restricted pins may cause damage to the device. See Appendix B for RS232 communication parameters, control commands, and RJ45 pinout diagrams. Connection #4: DC Power. The CineSlide™ requires a 24 VDC, regulated, 30W power source. A compact, quality wall mount power supply is provided with the CineSlide. While other power supplies may provide proper voltage and current, they may not meet FCC EMI specifications. Therefore, power supplies other than the one provided with the CineSlide are not supported due to FCC compliance issues. DANGER: DO NOT POWER THE DEVICE ON OR PLUG IT IN, UNTIL THE AREA AROUND THE SLIDE IS COMPLETELY CLEAR. The CineSlide™ obviously has moving parts. This movement is strong and could easily run into a projector, push a worker off balance while on a nearby ladder, etc. DO NOT plug the power supply into AC power until the CineSlide move safely and completely unobstructed. CineSlide Manual ver 1.5a © 2007 TechHT, LLC Page 17 Route and Secure All Wiring With all connections connected and in place, route all wires along the CineSlide™ "top" (motor side) area. DO NOT route any wires on the moving lens slide side of the device. Securely attach all wires using provided cable ties or appropriate cable management hardware. If you have the laptop style power supply, securely mount it using double stick foam tape, cable ties, or other appropriate mounting hardware. We recommend mounting a laptop-type power supply on top of, or near the rear of the projector where the AC input to the CineSlide™ power supply will be near the projector's AC input. Route the power wired to the electrical outlet and secure as appropriate. Do not exceed wire lengths, to not apply or allow any "pull" at any wire input socket/receptacle, do not kink or crimp wiring. DANGER: IMPORTANT: ALL WIRES MUST BE SECURELY ATTACHED SO THEY CANNOT COME INTO CONTACT WITH ANY MOVING PARTS OF THE CINESLIDE. THE CINESLIDE'S MOVING PARTS COULD BECOME TANGLED, OR WEAR THROUGH A WIRES PROTECTIVE OUTER INSULATION CAUSING AN ELECTRICAL FAULT OR FAILURE. DO NOT OPERATE THE CINESLIDE™ UNTIL ALL WIRING IS PERMANENTLY, SECURELY, ATTACHED CLEAR OF ANY MOVING PARTS. Page 18 CineSlide Manual ver 1.5a © 2007 TechHT, LLC Final Assembly CineSlide™ Position Fine Adjustment A proper installation should have placed the CineSlide™ very close or exactly at its target position relative to the projector. Some mounting options are very flexible and provide a wide range for adjusting the CineSlide™ both left/right, and forward/rearward (relative to the lens). Some mounts require a more accurate installation and do not provide much flexibility. The CineSlide™ mechanism has no position adjustment other than the mechanical adjustment of mounting the slide body relative to the projector. This is by design. This removes any complex adjusting or possibilities of software errors causing misalignments. No "programming" is required. The CineSlide™ is designed to be permanently mounted. If the projector does not move, and the CineSlide™ mount does not move, then no adjustment other than the initial installation will be necessary. Most mounting arrangements take advantage of the slotted mounting holes on the sides of the CineSlide™. These holes allow a 0.75” adjustment range. Once the CineSlide™ is mounted and all wiring has been secured, gently move the lens mount by hand to a position slightly away from either end (anywhere in the middle of the travel). Plug it into AC power and send it a PowerON command. The CineSlide™ will automatically rehome (to its "Home/LensOFF" position). Send a command to move the lens away from the home position to the "LensON" position. If necessary for fine adjustment, loosen the left and right CineSlide™ mounting bolts and carefully center the lens mount with the centerline of the projector lens. For most lenses, a visual alignment of this leftright location is sufficient. Visually or by measurement, ensure the lens mount plate is centered relative to the projector's lens and light beam. If it is not, do not move the lens mount/slide by hand on the CineSlide™ itself. Left-right adjustments must be made by moving the CineSlide™ body mounting position. This is usually accomplished via the slotted mount holes located on each side of the CineSlide. For installations not using these mount points, the mount location must be adjusted as required. Once the CineSlide™ body has been adjusted so the lens mount and lens backing plate are centered with the projector's lens (light beam), tighten the mount bolts and check that all mount fasteners are secure and properly tightened. Caution: Some projectors allow a left-right lens shift. For such projectors, ensure the CineSlide™ lens mount is being centered with the light beam, which may not necessarily be the lens center. Check that the lens mount plate adjusters (the 2 Hex screws on the mount plate that allow left-right rotation of the lens) are snug/tight. To ensure the lens carrier was not bumped during assembly or adjustment, issue a PowerOFF, then a PowerON command. Next issue a Lens-ON command. The CineSlide™ will rehome, and then move to the ON position. Verify the lens mount is centered and readjust the CineSlide™ as required. Once set, the CineSlide™ will always return to the same position within thousandth's of an inch. CineSlide Manual ver 1.5a © 2007 TechHT, LLC Page 19 With the CineSlide™ body properly adjusted and positioned, tighten all mount hardware ensuring all lock washers and nylon lock nuts are in place. If a Bosch post type mount is being used, check all t-slot gussets and gusset fasteners. Double check all fasteners. Double check all wiring and ensure it is securely tied off where it cannot come into contact with any moving parts, or any other places where it may get pinched or stressed. Attach the Anamorphic Lens With the CineSlide™ installed and adjusted, install the anamorphic lens to the lens back-plate. Isco ONLY: For the Isco III, screw the lens onto its back-plate. Be sure it is screwed in completely, and not cross threaded. The lens should turn freely without binding as it is screwed into its back-plate. Depending on your projector and installation situation, you MAY be able to: • Move the CineSlide™ to the "LensOFF" position; • Loosen the Isco lens back plate adjusted knobs. • Adjust the back plate so it is as low as it will go on the posts; • Rotate it so it is horizontal to the floor. • Lock the adjusting knobs. • Locked in this position, we find it easiest to screw a heavy Isco into its back plate when possible. Schneider ONLY: The Schneider lens has 4 screw holes and one exposed stainless "bump" on its back. Align the lens so the "bump" is on the lower quadrant. You will see one on the slotted holes on the lens back plate is extended to accommodate this "bump". In the correct position, all 4 screw holes as well as the "bump" will line up with the corresponding curved slotted mount holes. In the correct position, you should be able to rotate the lens several degrees and all 4 holes and the "bump" will still be visible through the slotted holes during the rotation. Attach the Schneider lens to its backing plate using the (4) M3 x 10mm screws provided. Snug them firmly. Once the Schneider lens has been adjusted, we recommend removing each of the 4 screws, one at a time and applying a small drop of blue Loc-tite to the end of the screw. Remove any excess Loc-tite, only the tip (approximately 4-5 threads) should be coated. It should not look like it is going to "drip". Install the coated screw into the lens and tighten. Repeat for the other screws. ALL LENSES: TIP: Have something soft under the lens to catch it safely if you were to drop it accidentally. Page 20 CineSlide Manual ver 1.5a © 2007 TechHT, LLC Adjust the Lens Display an accurate fullscreen test pattern. A good source of a 2.35 and fullscreen test patterns is the "GetGray" calibration DVD from www.calibrate.tv. If you have a scaler or signal generator, display a grid. Adjust your lens: • Yaw - this is the "point left-to-right" rotation angle. The lens should be "pointed" at the center line of the screen. Loosen the 2 hex cap screws on the mount plate to make this adjustment. The lens mount plate allows for a 10 degree yaw adjustment. DO NOT LOOSEN THE CENTER NYLON INSERT LOCK-NUT • Altitude - The lens position relative to the floor. Move the lens up or down the adjustable posts to change. Tip: For Schneider CineMounts loosen 3 of the 4 clamp levers (leave only one inner "pitch clamp" snug) to make the up/down movement smooth. • Pitch - The "point up or down" angle. Adjust by loosening the side clamp for Isco. For Schneider, loosen the inner pitch adjustment clamps. • Roll - the lens needs to be "vertical" Ground glass lenses do have a top/bottom and sides. The sides should be parallel with the sides of your screen. Each of the adjustment above adjustments affects the others. Trial an error will show you the effects of each adjustment. Details on where to move the lens to adjust your image are beyond the scope of this document. We provide the instructions on how to move the lens; it is up to the experienced installer to know where to move it. Generally speaking, you want the light beam to travel straight through the center axis of the lens, into the rear center, out the front center. Once the lens is aligned, tighten its adjustment levers/knobs and be sure the lens mount plate adjustment bolts are tight. Note: Schneider CineMount levers are adjustable. Once they are tightened, pull up on the lever and rotate the lever to the desired position. This allows the levers to be aesthetically aligned or moved out of harms way. Be sure no levers are pointing outward where they may bump into anything. Carefully complete the following safety and installation checklist. AFTER the safety checklist is complete, and all T-nut fasteners have been checked, install the round gusset covers to the CineSlide mount gussets. CineSlide Manual ver 1.5a © 2007 TechHT, LLC Page 21 Setup, Safety Checklist This checklist may not be all-inclusive. The installer should verify all aspects of the installation have been completed and the device is mounted in a secure, safe manner. This checklist is just a reminder of some of the most important items: Mount to ceiling, or mount to structural element screws are secured, and tight. They are of the proper size and properly fastened into a structural element capable of holding 6x the weight of the lens and slide. For CineSlide mount kits, the CineSlide mount posts were installed with a top "safety screw" (this is the M8 screw that goes into the top center of each mount post). EVERY ceiling kit includes a safety screw for the posts. Ceiling plate kits have a M8 countersunk screw, Head rail type kits have a M8 t-slot screw that slides into the header rail. This screw will hold the assembly from falling in the event the gussets ever came loose. Upper stabilization gussets are installed. These are the gussets that reinforce or hold the top of the mount posts. There are 3 for each post on ceiling plates, 2 each post for header bar type kits. (Low profile ceiling/table plates do not have gussets). o Both fasteners of each gusset are tight, o All t-nuts are properly oriented 90 degrees from T-slot, and locked tight. Lower mount post M8 mount screws are installed. For ceiling or shelf mounts these screws should have a flat and a split-ring lock washer, and be tight. For low-profile/table mounts, these are flat head cap screws. o Washers and lock washers are in place as appropriate o screws are tight and secure Lower stabilization gussets are installed. These gussets reinforce the mount posts of ceiling mount and shelf kits. There is 1 gusset for each post. (Low profile ceiling/table plates do not have gussets). o Both fasteners of each gusset are tight, o All t-nuts are properly oriented 90 degrees from T-slot, and locked tight. All frame gussets are installed. Frame gussets reinforce and align joints in adjustable ceiling H frames. o Both fasteners of each gusset are tight, o All t-nuts are properly oriented 90 degrees from T-slot, and locked tight. All wires are routed away from any moving parts. All wires including power, trigger, and RS232 are secured with permanent, cable management hardware in such a way to guarantee they cannot com into contact with moving parts. No wires are stretched, kinked, or "pulling" on any sockets. Lens mount plate safety nylon lock nut in the center of lens mount plate is installed with a flat washer, lightly tightened and secure. Lens mount plate left and right hex mount screws include a flat washer, a split ring lock washer. Both these screws are tight. Lens mount post safety screws are installed and tight. These are screws installed in the ends of the lens' mount posts that would prevent a lens assembly from sliding off the mount posts in the event they loosened. Lens adjustment knobs and screws are secure and snug. The CineSlide™ should now be ready for operation. Page 22 CineSlide Manual ver 1.5a © 2007 TechHT, LLC Appendix A - IR (Infrared Remote) control information The CineSlide™ is designed for high end home theaters. As such is it our presumption that most theaters will already have an existing control system, or a high-end universal remote. The CineSlide™ has basic programming files available for the most popular PC-programmable universal IR remotes. The website provides download links for both the Phillips Pronto line of remotes (cineslidex.ccf) and a device file for the Home Theater Master remotes (cineslide-x.mxd). The files provided were created using programming methods at the digital level, they were not "learned". These files will produce "clean" IR signals to the CineSlide. These files include the CineSlide™ command set, programmed in a fundamental, basic fashion for the target remote. It is left up to the installer/user to program/reprogram custom button setups on their device or in the case of graphic remotes, to design their own less basic graphic interface. The files provided are designed to provide the core "hex" codes pre-assembled for basic use when programming these PC-programmable remotes. Many users have high end universal remotes that are not PC-programmable. These remotes rely on built in databases supplied by the remote manufacturer. For devices not in the remote manufacturer's database, these remotes must "learn" the codes from a source remote. TechHT, LLC offers an optional, preprogrammed universal remote for the CineSlide. The CineSlide™ optional remote is manufactured by "One for All" (OFA), a popular, high quality universal remote manufacturer. The CineSlide™ universal remote may vary slightly depending on current OFA production models, but in general the remote will be a basic, 6 to 8 device, programmable, universal remote. Although these OFA remotes are high quality programmable remotes and are perfectly suitable for controlling the CineSlide™, it is our expectation that most users will only use them to "teach" a high end remote control system. The CineSlide™ universal remote will be programmed as follows: Select "Aux" on the remote to select the CineSlide™ mode, then: • • The "Play" button will send the "PowerON" command The "Stop" button will send the "PowerOFF" command • • The UP arrow button send the "LensON" command The DOWN arrow button will send the "LensOFF" command The Phillips Pronto CCF file includes 4 buttons for use with your own custom Pronto system: PwrON, PwrOFF, LensON, LensOFF The Home Theater Master MXD file is programmed with the same keys as the Optional CineSlide™ IR remote, Play, Stop, Up-Arrow, Down-Arrow, and as applicable, corresponding LED entries. CineSlide Manual ver 1.5a © 2007 TechHT, LLC Page 23 Appendix B - RS232 Communication The CineSlide™ has a single RJ45 modular plug that supports multiple communication interfaces. The end-user interface uses 2 pins of this 8 pin modular connector. This modular socket will accept a RJ45 or RJ11 plug. This connector is labeled "COMM" on the CineSlide case. To interface to the RS232 interface the installer may build a custom cable using a RJ45/RJ11 crimper tool and proper RS232 cable (twisted pair cat5 network cable recommended). Alternatively, the installer may use a custom RJ45 to 9-pin adapter and a standard "Cat 5 Ethernet patch cable" (not included). For users who need to custom-wire their control system, follow the attached pinout when building the cable or adapter. DO NOT make any connections or wire to the pins marked as "Restricted, Leave Empty". Those connect internally to other devices (for factory service) and could damage the internal electronics if connected to RS232 inputs. RS232 Communication parameters 9600 baud, 8 data bits, 1 stop bit, no parity, no flow control. RJ45 RS232 Interface: Connections: Pin 1: Restricted, Leave Empty - DO NOT connect Pin 2: Restricted, Leave Empty - DO NOT connect Pin 3: Unused Pin 4: RS232 Signal Ground Pin 5: RS232 Receive (data from source to CineSlide) Pin 6: Unused Pin 7: Unused Pin 8: Restricted, Leave Empty - DO NOT connect Page 24 CineSlide Manual ver 1.5a © 2007 TechHT, LLC RS232 Command Set: Note <CR> symbol below represents a carriage return, (Decimal 013, Hex 0x0D) Command sequence RS232 command PowerON A001<CR> PowerOFF A002<CR> LensON A003<CR> LensOFF A004<CR> ForceRehome A005<CR> CineSlide Manual ver 1.5a © 2007 TechHT, LLC Page 25 Appendix C – Trigger Cable technical data The CineSlide is equipped with (2) 12V “trigger” inputs. These trigger inputs connect internally to OptoIsolated solid state sensors to detect when a 12V signal is input to the device. The triggers control both the power state and the lens position as described in detail in the user’s manual. TechHT offers CineSlide trigger cables as an accessory item, for our installer’s convenience. We offer regular and ultra-low current cables. CineSlide’s manufactured prior to January 1, 2008 were designed to accept a 12v, 20mA source trigger signal as listed in the CineSlide specifications. We have found some devices do not have 12V trigger output with enough power to trigger the Cineslide sensor. For these devices, the installer must either use a “ultra low current” premade trigger cable from TechHT, or construct their own “ultra low current” trigger cable. CineSlide’s manufactured after January 1, 2008 have the ultra low current capability built in and do not need a special trigger cable for low current source devices. If necessary, to construct a ultra-low voltage trigger cable you will need the following: (1) 2.5mm round mono audio male plug or plug/cable assembly (1) plug to fit the trigger source device. These vary by device. An example is a 3.5mm round mono plug. (1) 4.1k ohm 1/8 watt ( or larger wattage) resistor. When building the ultra-low current type trigger cable, solder the 4.1k resistor in line with one of the signal wires in the trigger cable. We recommend shrink wrapping the soldered resistor to prevent any contact with other wires. The resistor may be added anywhere along the wire. It is shown in the diagram below near the center for illustration only. In practice it may be more convenient to add the resistor near one plug or the other when building the cable. CineSlide special trigger cable with ultra-low current construction (when required, see above): Page 26 CineSlide Manual ver 1.5a © 2007 TechHT, LLC Specifications Model: CSII automated anamorphic lens transport Physical: (without mount hardware, or lens): Weight: approximately 5lbs Length 21" Width 4.5" Body Height to lens mount plate surface 1.3" Total height 2.9" Electrical Power Supply: Input: 100-240V 0.8A 47-63Hz Output: 24V DC 1.25A min. Ratings: FCC, CE, UL certifications, RoHS compliant Connector: 5.5 x 2.1 x 12mm barrel jack center hole positive Current consumption: Sleep: 10 mA PowerON, hold mode: 75mA Moving: 450mA for 1.5 sec Interfaces: 12 V Trigger: (2) 12V DC input, 20mA input. 2.5mm miniature mono audio cable jacks COMM: RJ45 non-standard RS232 control port Operating conditions: The CineSlide™ is a precision device. It is designed for use in a typical home theater residential environment with normal HVAC. DO NOT operate, or store in moist or wet conditions. Extended Storage: Cool, HVAC conditioned, dry location. IR Receiver: Front mounted Infrared receiver. Typical Range 40+ft, dependent on sending IR unit (Optional) Remote Control: 3rd Party pre-programmed JP1 type PC-programmable IR remote. CineSlide Manual ver 1.5a © 2007 TechHT, LLC Page 27 Dimensions (detailed drawing available from www.techht.com) Page 28 CineSlide Manual ver 1.5a © 2007 TechHT, LLC CineSlide™ Warranty TechHT, LLC makes the following LIMITED WARRANTY to the original consumer purchaser of the CineSlide lens transport device: TechHT, LLC warrants to the original purchaser that the CineSlide delivered hereunder will be free of defects in material and workmanship for the period listed below from the date of original manufacture as shown on the original, intact, unaltered and unmodified serial number label: ELECTRONIC PARTS including MOTOR: 1 Year MECHANICAL PARTS: 2 Years LABOR: Any Part: 2 years TechHT, LLC within said period shall at its option, either repair or replace free of charge, any product or part thereof found, upon TechHT, LLC's inspection, to be so defective, and will return the repaired or replaced product to the purchaser at TechHT, LLC's expense. THIS LIMITED WARRANTY IS IN LIEU OF ANY OTHER WARRANTIES, EXPRESS OR IMPLIED, INCLUDING ANY IMPLIED WARRANTY OF MERCHANTABILITY OR FITNESS FOR A PARTICULAR PURPOSE OR OTHERWISE, AND OF ANY OBILIGATIONS OR LIABILITY ON THE SELLERS PART. THIS LIMITED WARRANTY DOES NOT COVER NON-DEFECT DAMAGE, DAMAGE CASUED BY IMPROPER INSTALLATION, OPERATION OR CARE (INCLUDING BUT NOT LIMITED TO ABUSE, MISUSE, FAILURE TO PROVIDE REASONABLE AND NECESSARY MAINTENANCE, UNAUTHORIZED REPAIRS, MODIFICATIONS, OR ANY ALTERATIONS TO THIS PRODUCT), LABOR CHARGES FOR REINSTALLING OR REMOVING A REPLACED OR REPAIRED DEVICE, OR UNITS INSTALLED FOR COMMERCIAL USE. ADDITIONAL ITEMS NOT COVERED: This limited warranty is voided if the CineSlide is not purchased and installed in the U.S.A. This limited warranty is void for products with original serial number labeling that has been removed or altered and cannot be readily determined. User must keep the original receipt for proof of original purchase however the date of manufacture as shown with serial number establishes the warranty period should service be required. This warranty excludes and does not cover defects, malfunctions or failures of any CineSlide which were caused by repairs by persons not authorized by us, use of parts or accessories not authorized by us, unauthorized disassembly of any part or component of a CineSlide, mishandling, improper installation or installations by anyone other than a qualified professional installer in accordance with instructions provided and in accordance with all local plumbing, electrical and/or gas codes. This warranty excludes and does not cover defects, malfunctions or failures of any CineSlide which were caused by: modifications or damage to the CineSlide while in your possession, or unreasonable use, including failure to provide reasonable and necessary maintenance, failure to provide a proper, protected and adequate power source. This warranty excludes and does not cover defects, malfunctions or failures of any CineSlide which are cosmetic are caused by acts of god, are due to improper installation environments including wet or non-HVAC controlled environments, water damage, lightning strikes, or other significant electrical disturbances beyond our control. UNDER NO CIRCUMSTANCES SHALL TECHHT, LLC BE LAIBLE FOR CONSEQUENTIAL, INCIDENTAL, OR SPECIAL DAMAGES ARISING IN CONNECTION WITH THE USE, OR INABILITY TO USE, THIS PRODUCT. IN NO EVENT SHALL TEHCHHT LLC'S LIABILITY FOR BREACH OF WARRANTY, BREACH OF CONTRACT, NEGLIGENCE OR STRICT LIABILITY EXCEED THE PRICE PAID TO TECHHT BY THE CONSUMER, DEALER, OR DISTRIBUTOR FOR THE PRODUCT COVERED HEREBY. NO PERSON IS AUTHORIZED TO ASSUME FOR US ANY OTHER LIABILITY IN CONNECTION WITH THE SALE OF THIS PRODUCT. For warranty service, contact the selling dealer. For direct purchases contact TechHT, LLC via E-mail at [email protected] or as shown on the company website www.techht.com. Contact TechHT, LLC prior to shipping any CineSlide for service. If we authorize you to ship it to us, you will be responsible for all insurance and freight or other transportation charges to our service facility. For qualified warranty repairs we will return your CineSlide freight prepaid for addresses in the continental USA. Locations outside the Continental USA will incur additional shipping and handling charges and these must be paid in advance, prior to return shipping. Any returned CineSlide must be packed in its original factory packaging and double boxed to avoid damage in transit since we will not be responsible for any such damage. Any CineSlide returned in non-original packaging may incur a repacking charge for repacking in proper original packaging. Proof of purchase is required when requesting warranty service. The purchaser must present the sales receipt or other document that establishes proof of purchase. Necessary repairs that are not covered under this warranty may result in a service charge. All such service charges are the responsibility of the user submitting the warranty claim. Any service charges will be disclosed prior to the work being performed. All such service charges must be paid in full prior to return shipping. Return shipping for any CineSlide submitted for non-warranty service will be the responsibility of the user and prepaid prior to return. TechHT’s maximum liability is limited to the purchase price paid directly to TechHT by the consumer, dealer, or distributor. In no event shall the Company be liable for any consequential, indirect, incidental or special damages of any nature arising from the sales or use of the product, whether based in contract, tort, strict liability or otherwise. Note: Some states do not allow limitations on incidental or consequential damages or special damages, so the above limitation or exclusion may not fully apply. This warranty gives specific legal rights and you may also have other rights which may vary from state to state. CineSlide Manual ver 1.5a © 2007 TechHT, LLC Page 29 Setup, Safety Checklist (copy) This checklist may not be all-inclusive. The installer should verify all aspects of the installation have been completed and the device is mounted in a secure, safe manner. This checklist is just a reminder of some of the most important items: Mount to ceiling, or mount to structural element screws are secured, and tight. They are of the proper size and properly fastened into a structural element capable of holding 6x the weight of the lens and slide. For CineSlide mount kits, the CineSlide mount posts were installed with a top "safety screw" (this is the M8 screw that goes into the top center of each mount post). EVERY ceiling kit includes a safety screw for the posts. Ceiling plate kits have a M8 countersunk screw, Head rail type kits have a M8 t-slot screw that slides into the header rail. This screw will hold the assembly from falling in the event the gussets ever came loose. Upper stabilization gussets are installed. These are the gussets that reinforce or hold the top of the mount posts. There are 3 for each post on ceiling plates, 2 each post for header bar type kits. (Low profile ceiling/table plates do not have gussets). o Both fasteners of each gusset are tight, o All t-nuts are properly oriented 90 degrees from T-slot, and locked tight. Lower mount post M8 mount screws are installed. For ceiling or shelf mounts these screws should have a flat and a split-ring lock washer, and be tight. For low-profile/table mounts, these are flat head cap screws. o Washers and lock washers are in place as appropriate o screws are tight and secure Lower stabilization gussets are installed. These gussets reinforce the mount posts of ceiling mount and shelf kits. There is 1 gusset for each post. (Low profile ceiling/table plates do not have gussets). o Both fasteners of each gusset are tight, o All t-nuts are properly oriented 90 degrees from T-slot, and locked tight. All frame gussets are installed. Frame gussets reinforce and align joints in adjustable ceiling H frames. o Both fasteners of each gusset are tight, o All t-nuts are properly oriented 90 degrees from T-slot, and locked tight. All wires are routed away from any moving parts. All wires including power, trigger, and RS232 are secured with permanent, cable management hardware in such a way to guarantee they cannot com into contact with moving parts. No wires are stretched, kinked, or "pulling" on any sockets. Lens mount plate safety nylon lock nut in the center of lens mount plate is installed with a flat washer, lightly tightened and secure. Lens mount plate left and right hex mount screws include a flat washer, a split ring lock washer. Both these screws are tight. Lens mount post safety screws are installed and tight. These are screws installed in the ends of the lens' mount posts that would prevent a lens assembly from sliding off the mount posts in the event they loosened. Lens adjustment knobs and screws are secure and snug. The CineSlide™ should now be ready for operation. Page 30 CineSlide Manual ver 1.5a © 2007 TechHT, LLC