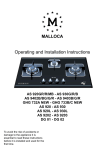
1
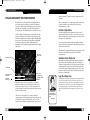
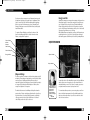
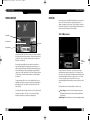
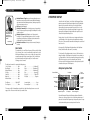
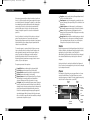
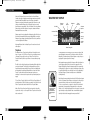
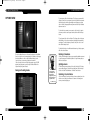
STG ENG MAN 21.2.97_P.Script
8/5/99 12:58
Page i
®
STAR TREK® GENERATIONS™
MicroProse
The Ridge, Chipping Sodbury, South Glos BS17 6BN
™, ® & © 1997 Paramount Pictures. All Rights Reserved. STAR TREK and related marks are
trademarks of Paramount Pictures. MicroProse, Inc. is an authorized user. Manual and
Underlying Computer Code © 1997 MicroProse. All Rights Reserved. MICROPROSE is a
registered trademark of MicroProse Software, Inc. Main title music by A. Courage an
J. Goldsmith. © Bruin Music Company and Ensign Music Corp. All Rights Reserved.
All other trademarks are the property of their respective holders.
Made in the UK
docs.com
http://www.replacement
MP191 261 MANR
STG ENG MAN 21.2.97_P.Script
8/5/99 12:58
Page ii
TABLE OF CONTENTS
CHAPTER 1: THE VOYAGES OF THE STARSHIP
U.S.S. ENTERPRISE NCC-1701-D™ . . . . . . . . . . . . . . . . . . . . . . . . . . . 1
Important Note . . . . . . . . . . . . . . . . . . . . . . . . . . . . . . . . . . . . . . . 2
Before Starting the Game . . . . . . . . . . . . . . . . . . . . . . . . . . . . . . . 3
Installing the Game . . . . . . . . . . . . . . . . . . . . . . . . . . . . . . . . . . . 3
CHAPTER 2: CAPTAIN’S LOG . . . . . . . . . . . . . . . . . . . . . . . . . . . . . . . . 5
Game Overview . . . . . . . . . . . . . . . . . . . . . . . . . . . . . . . . . . . . . . . 6
The Controls . . . . . . . . . . . . . . . . . . . . . . . . . . . . . . . . . . . . . . 6
Stellar Cartography Conversations . . . . . . . . . . . . . . . . . . . . 6
Stardate Units . . . . . . . . . . . . . . . . . . . . . . . . . . . . . . . . . . . . 7
Scanning . . . . . . . . . . . . . . . . . . . . . . . . . . . . . . . . . . . . . . . . . 7
Navigation . . . . . . . . . . . . . . . . . . . . . . . . . . . . . . . . . . . . . . . 8
Space Combat . . . . . . . . . . . . . . . . . . . . . . . . . . . . . . . . . . . . 8
Away Mission Transportation . . . . . . . . . . . . . . . . . . . . . . . . 9
CHAPTER 3: STELLAR CARTOGRAPHY . . . . . . . . . . . . . . . . . . . . . . . . 11
Stellar Cartography Functions Overview . . . . . . . . . . . . . . . . . . 12
Full Sector/System View . . . . . . . . . . . . . . . . . . . . . . . . . . . 13
Simulation/Cancel Destruction . . . . . . . . . . . . . . . . . . . . . . 13
Long/Short Range Scan . . . . . . . . . . . . . . . . . . . . . . . . . . . . 13
Scan Window . . . . . . . . . . . . . . . . . . . . . . . . . . . . . . . . . . . . 14
Set Course . . . . . . . . . . . . . . . . . . . . . . . . . . . . . . . . . . . . . . 14
Stardate Counter . . . . . . . . . . . . . . . . . . . . . . . . . . . . . . . . . 15
Computer Log . . . . . . . . . . . . . . . . . . . . . . . . . . . . . . . . . . . . 15
Transport . . . . . . . . . . . . . . . . . . . . . . . . . . . . . . . . . . . . . . . 15
Tactical . . . . . . . . . . . . . . . . . . . . . . . . . . . . . . . . . . . . . . . . . 15
Options . . . . . . . . . . . . . . . . . . . . . . . . . . . . . . . . . . . . . . . . 16
CHAPTER 4: AWAY MISSIONS . . . . . . . . . . . . . . . . . . . . . . . . . . . . . . 17
Transition Screen . . . . . . . . . . . . . . . . . . . . . . . . . . . . . . . . . . . . . 18
Viewing the Main Screen . . . . . . . . . . . . . . . . . . . . . . . . . . . . . . 19
Controls . . . . . . . . . . . . . . . . . . . . . . . . . . . . . . . . . . . . . . . . . . . . 19
Health Window . . . . . . . . . . . . . . . . . . . . . . . . . . . . . . . . . . . . . . 20
Tricorder Window . . . . . . . . . . . . . . . . . . . . . . . . . . . . . . . . . . . . . 21
Level View . . . . . . . . . . . . . . . . . . . . . . . . . . . . . . . . . . . . . . . 21
Zoom In/Out View . . . . . . . . . . . . . . . . . . . . . . . . . . . . . . . . 22
Lifeforms Scan . . . . . . . . . . . . . . . . . . . . . . . . . . . . . . . . . . . 22
Energy Scan . . . . . . . . . . . . . . . . . . . . . . . . . . . . . . . . . . . . . 22
Trilithium Scan . . . . . . . . . . . . . . . . . . . . . . . . . . . . . . . . . . . 22
Mission Objectives Window . . . . . . . . . . . . . . . . . . . . . . . . . . . . 23
Weapons Window . . . . . . . . . . . . . . . . . . . . . . . . . . . . . . . . . . . . 23
Weapon Settings . . . . . . . . . . . . . . . . . . . . . . . . . . . . . . . . . 24
Energy Level Bar . . . . . . . . . . . . . . . . . . . . . . . . . . . . . . . . . 25
Objects Window . . . . . . . . . . . . . . . . . . . . . . . . . . . . . . . . . . . . . . 25
Equipment Inventory . . . . . . . . . . . . . . . . . . . . . . . . . . . . . . . . . . 26
TABLE OF CONTENTS
CHAPTER 5: TACTICAL COMBAT . . . . . . . . . . . . . . . . . . . . . . . . . . . . . 27
Transition Screen . . . . . . . . . . . . . . . . . . . . . . . . . . . . . . . . . . . . 28
Tactical Viewscreen . . . . . . . . . . . . . . . . . . . . . . . . . . . . . . . . . . . 29
Sensor Display . . . . . . . . . . . . . . . . . . . . . . . . . . . . . . . . . . . . . . . 30
Piloting . . . . . . . . . . . . . . . . . . . . . . . . . . . . . . . . . . . . . . . . . . . . . 31
Tactical Manoeuvres . . . . . . . . . . . . . . . . . . . . . . . . . . . . . . . 31
User Control . . . . . . . . . . . . . . . . . . . . . . . . . . . . . . . . . . . . . 32
Enterprise Display . . . . . . . . . . . . . . . . . . . . . . . . . . . . . . . . . . . . 33
Enterprise Systems Panel . . . . . . . . . . . . . . . . . . . . . . . . . . 33
Shields . . . . . . . . . . . . . . . . . . . . . . . . . . . . . . . . . . . . . . . . . 35
Phasers® . . . . . . . . . . . . . . . . . . . . . . . . . . . . . . . . . . . . . . . 35
Torpedoes . . . . . . . . . . . . . . . . . . . . . . . . . . . . . . . . . . . . . . 36
Targeted Ship Display . . . . . . . . . . . . . . . . . . . . . . . . . . . . . . . . . 37
CHAPTER 6: GAME SETTINGS AND OPTIONS . . . . . . . . . . . . . . . . . 39
Options Menu . . . . . . . . . . . . . . . . . . . . . . . . . . . . . . . . . . . . . . . 40
Saving and Loading Games . . . . . . . . . . . . . . . . . . . . . . . . . 40
Entering a New Game . . . . . . . . . . . . . . . . . . . . . . . . . . . . . . 41
Quitting a Game . . . . . . . . . . . . . . . . . . . . . . . . . . . . . . . . . . 41
Settings Menu . . . . . . . . . . . . . . . . . . . . . . . . . . . . . . . . . . . . . . . 42
Sound Effects Volume . . . . . . . . . . . . . . . . . . . . . . . . . . . . . 42
Music Volume . . . . . . . . . . . . . . . . . . . . . . . . . . . . . . . . . . . . 42
Difficulty Levels . . . . . . . . . . . . . . . . . . . . . . . . . . . . . . . . . . 42
Window Size . . . . . . . . . . . . . . . . . . . . . . . . . . . . . . . . . . . . . 43
Subtitles . . . . . . . . . . . . . . . . . . . . . . . . . . . . . . . . . . . . . . . . 43
Controls Screen . . . . . . . . . . . . . . . . . . . . . . . . . . . . . . . . . . . . . . 43
APPENDIX A: EQUIPMENT . . . . . . . . . . . . . . . . . . . . . . . . . . . . . . . . . 45
Phaser® . . . . . . . . . . . . . . . . . . . . . . . . . . . . . . . . . . . . . . . . . . . . 46
Tricorder . . . . . . . . . . . . . . . . . . . . . . . . . . . . . . . . . . . . . . . . . . . . 46
Communicator . . . . . . . . . . . . . . . . . . . . . . . . . . . . . . . . . . . . . . . 46
Hypospray . . . . . . . . . . . . . . . . . . . . . . . . . . . . . . . . . . . . . . . . . . 47
APPENDIX B: STARFLEET PERSONNEL . . . . . . . . . . . . . . . . . . . . . . . 49
Captain Jean-Luc Picard™ . . . . . . . . . . . . . . . . . . . . . . . . . . . . . 50
Commander William Thomas Riker™ . . . . . . . . . . . . . . . . . . . . 50
Commander Deanna Troi™ . . . . . . . . . . . . . . . . . . . . . . . . . . . . . 50
Doctor Beverly Crusher M.D.™ . . . . . . . . . . . . . . . . . . . . . . . . . . 51
Lieutenant Commander Data™ . . . . . . . . . . . . . . . . . . . . . . . . . . 51
Lieutenant Commander Geordi La Forge™ . . . . . . . . . . . . . . . . 51
Lieutenant Commander Worf™ . . . . . . . . . . . . . . . . . . . . . . . . . . 51
Captain James T. Kirk™ . . . . . . . . . . . . . . . . . . . . . . . . . . . . . . . . 52
APPENDIX C: U.S.S ENTERPRISE NCC-1701-D . . . . . . . . . . . . . . . . . 53
CREDITS . . . . . . . . . . . . . . . . . . . . . . . . . . . . . . . . . . . . . . . . . . . . . . . 55
TECHNICAL ASSISTANCE . . . . . . . . . . . . . . . . . . . . . . . . . . . . . . . . . . 60
MICROPROSE CUSTOMER SERVICES . . . . . . . . . . . . . . . . . . . . . . . . 61
ON-LINE SERVICES . . . . . . . . . . . . . . . . . . . . . . . . . . . . . . . . . . . . . . 62
STG ENG MAN 21.2.97_P.Script
8/5/99 12:58
Page iv
CHAPTER
1
1. THE VOYAGES OF U.S.S. ENTERPRISE NCC-1701-D™
Space, the final frontier. These are the
voyages of the Starship Enterprise, its
continuing mission: to explore strange
new worlds, to seek out new life and
new civilizations, to boldly go where no
one has gone before...™
iv
STG ENG MAN 21.2.97_P.Script
8/5/99 12:58
Page 2
1. THE VOYAGES OF U.S.S. ENTERPRISE NCC-1701-D™
1. THE VOYAGES OF U.S.S. ENTERPRISE NCC-1701-D™
BEFORE STARTING THE GAME
IMPORTANT NOTE
You are strongly advised to consult the READ ME file when you
are given that Option after Installation. This contains important
information not covered by this manual.
Dream of the future. Imagine sailing from star to star in spaceships
moving faster than light across the vast ocean of space...
Welcome on board the Federation U.S.S. Enterprise NCC-1701-D™,
where these dreams actually happen! The year is 2371. Join the
command crew of the Enterprise—Captain Picard, Commander Riker,
Data, Worf, Geordi La Forge, Dr. Crusher and Commander Troi—and
travel across the galaxy at warp speed to resolve an exciting adventure
played out over several solar systems.
Playing Star Trek® Generations™ grants you the unique opportunity to
guide the actions of each U.S.S. Enterprise crew member, as well as
those of the legendary James T. Kirk, captain of both the original U.S.S.
Enterprise™ and the U.S.S. Enterprise NCC-1701-A™. All the characters
have their own distinctive personalities, allowing you to fully interact
with them while controlling their individual actions on missions or
gaining advice from them as you plan your course of action.
Like the movie Star Trek Generations, this game centres on the
investigation of a 78-year-old mystery surrounding the strange, elusive
Nexus, a ribbon of energy passing through the galaxy destroying
starships in its wake. Also at the heart of this mystery is the misguided
Dr. Tolian Soran, who has plans of his own involving the Nexus. In
solving this mystery, you will meet alien races, fight enemy starships
and explore countless planets in the search for clues. In playing this
game, you will become involved with an adventure beyond your
expectations.
All that awaits is for you to guide the course of that adventure. Make it
so!
2
For successful installation of the game, your computer must be a
minimum of an IBM PC 90 MHz Pentium or compatible system and have
the following system requirements:
Windows™ 95
16 Mb RAM
Quad-speed CD-ROM drive
Hard drive with 75 Mb free
High Colour graphics for 640 x 480 x 16-bit colour (2 Mb video
memory minimum)
Mouse
Windows™ 95-compatible sound card
A joystick is used only in Tactical Combat. For optimum performance, an
IBM PC 166 MHz Pentium or a compatible system with 32 Mb RAM is
recommended.
The Star Trek Generations package contains two CD-ROMs and this
Reference Manual.
INSTALLING THE GAME
To install Star Trek Generations, follow these instructions:
Place the Star Trek Generations Disc 1 in the CD-ROM drive, then close
the drive. Since Star Trek Generations is a Windows™ 95 auto-run
CD-ROM program, the installation program will begin at this point.
Click on the Install button at the Main Menu to continue the
installation process.
You need to decide which directory you want to place the game in. The
default directory is C:\PROGRAM FILES\STAR TREK GENERATIONS. If
you wish to install to a different directory, type in your own directory
path or click the Browse button to find an available directory. Click the
OK button to continue.
Now, the installation program will copy files from the CD-ROM to your
hard drive.
When you are given the Option, you MUST consult the READ ME file
3
STG ENG MAN 21.2.97_P.Script
8/5/99 12:58
Page 4
1. THE VOYAGES OF U.S.S. ENTERPRISE NCC-1701-D™
CHAPTER
To play the game, just place Star Trek Generations Disc 1 in the CD-ROM
drive, click the Start Menu and then click on Star Trek Generations.
The game will prompt you when you need to insert Star Trek
Generations Disc 2.
2
2. CAPTAIN’S LOG
Captain’s Log, Stardate: 48623.4. Captain
Jean-Luc Picard reporting. The Enterprise is
responding to a distress call from the
Amargosa Solar Observatory, a Federation
laboratory orbiting the Amargosa sun. Curiously
enough, a member of the observatory, a
Dr. Tolian Soran, was rescued once before by
another Starship: the U.S.S. Enterprise NCC1701-B™, 78 years ago when it came to the aid
of a damaged vessel, the Lakul. Although 47
survivors were saved—among them my good
friend Guinan—the Lakul was destroyed by the
Nexus, an energy ribbon which passes through
our galaxy once every 39 years. That rescue
mission ended with the reported death of the
famed Captain James T. Kirk. This history of
Dr. Soran fills me with a great foreboding for
the future.
4
STG ENG MAN 21.2.97_P.Script
8/5/99 12:58
Page 6
2. CAPTAIN’S LOG
2. CAPTAIN’S LOG
GAME OVERVIEW
Whether this is your first experience playing an action game or not, you
will find this section provides quick descriptions as to what you can
expect from Star Trek Generations. If you want short character sketches
of the Enterprise crew or an overview of the Enterprise, go to Appendix
B: Starfleet Personnel or Appendix C: U.S.S.Enterprise NCC-1701-D
respectively.
The Controls
“As you read through
this manual, you may
want to make use of
expert advice from my
crew.”
–Captain Picard
The Mouse
In general, left-clicking, or “clicking,” your mouse on an on-screen
button selects that button, while right-clicking your mouse plays a brief
verbal description of that button’s functions. Click and hold on to your
mouse button, or “dragging,” to change weapon settings and ships
systems power levels.
A text description accompanies all voice-overs if you turn on the
‘Subtitles’. To learn more about the Subtitles function, see Chapter 6:
Game Settings and Options.
The game starts with Captain Picard ordering the Enterprise to respond
to a distress signal from an observatory in the Amargosa star system.
This command is given while Captain Picard is with Lt. Cmdr. Data, the
ship’s science officer, in the Enterprise’s Stellar Cartography lab. From
here, you will be able to plan your strategies, access several key ship’s
systems, transport crew members to various locations and chart the
course of the mysterious Nexus.
Stellar Cartography Conversations
In Stellar Cartography, you will overhear conversations between Captain
Picard and Data, between Picard and other crew members elsewhere on
the ship, between Picard and Starfleet Command or between Picard and
members of alien races. Your actions in Stellar Cartography, as well as
those on Away Missions or at the Tactical Station, will determine what
conversations you hear as the characters respond to your specific
commands. Often the conversations will provide clues and advice.
While in Stellar Cartography, anytime you wish to replay the last clue or
advice given, click your mouse on the Computer Log button in the lowerright corner of the screen.
6
Stardate Units
It is important to note that every action you initiate in Stellar
Cartography takes a certain amount of time, which is measured in
Stardate units. During the game, your opponents—controlled by the
computer—will also undertake activities, such as moving fleets of
starships or beaming to a planet. The chance that you can stop their
actions or arrive at a location before them is dependent upon how much
time passes. The time spent on an Away Mission or engaged in Tactical
Combat is also measured in Stardate units.
Scanning
From Stellar Cartography, click on either the Long or Short Range Scan
buttons to scan solar systems, suns, planets or any other starship that
you select. How much information you receive about a scanned object
depends on whether the Enterprise is in the same solar system as the
targeted object; for the greater the distance, the less effective the scan.
7
STG ENG MAN 21.2.97_P.Script
8/5/99 12:58
Page 8
2. CAPTAIN’S LOG
2. CAPTAIN’S LOG
Navigation
Away Mission Transportation
During your adventures, you will need to travel from solar system to
solar system within a sector of space to investigate planets and
starships orbiting various suns. To navigate to any location, click your
cursor on the desired place on the space map in Stellar Cartography and
then click the Set Course button.
Space Combat
Transport
“I suggest performing a
scan of the intended
destination before
arriving there to avoid
any surprises.”
Upon reaching a desired planet, space station or starship to investigate,
you will need to send a crew member on an Away Mission. While in
Stellar Cartography, perform a Short Range Scan of the destination to
bring up the Transport button. When Captain Picard selects a crew
member to go on the mission, click on the Transport button to beam
that crew member to the targeted location. This brings up the Away
Missions screen.
–Capt. Picard
If the Enterprise encounters other starships, you might need to engage
in ship-to-ship combat either for protection or to complete your mission.
Such combat is initiated either by completing a Short Range Scan of
another starship or if another starship moves to intercept you. The
Tactical button will then light up in Stellar Cartography. Click the Tactical
button to bring up the Tactical Combat screen, where you will control the
ship’s weapons and movements during battle. For a complete
description of the Tactical Station and its functions, see Chapter 5:
Tactical Combat.
8
9
STG ENG MAN 21.2.97_P.Script
8/5/99 12:58
Page 10
2. CAPTAIN’S LOG
CHAPTER
3
3. STELLAR CARTOGRAPHY
Science Officer’s Log, Stardate:
48623.5. Lt. Cmdr. Data reporting.
Located on Deck 12, Room 1072,
Stellar Cartography is used primarily
to map all charted stars and solar
systems; however, its usefulness as a
scientific tool is not limited to that
one sole function. For instance, I have
noted how this lab has become a
functional, yet temporary, base of
operations during our current
mission.
10
STG ENG MAN 21.2.97_P.Script
8/5/99 12:58
Page 12
3. STELLAR CARTOGRAPHY
3. STELLAR CARTOGRAPHY
object you can select. To deselect an object, just target another object
on-screen.
STELLAR CARTOGRAPHY FUNCTIONS OVERVIEW
Throughout the course of the game, Stellar Cartography will serve as
your command centre for all operations conducted on the Enterprise.
On-screen, you will see Picard and Data viewing a map of a space sector.
All planets, suns and starships you encounter will be displayed here.
The current location of the Enterprise will also be indicated on the map.
When on an Away Mission or in a space battle, you exit from this screen
to begin those activities, and you will return to this screen upon
finishing the mission or battle.
Full Sector/System View
The Stellar Cartography map can display either a full sector view of
space, containing several solar systems, or it can show only one single
system. The same button is used to select between those choices. Using
this button costs 0.1 Stardate units.
In addition, Stellar Cartography’s space sector map allows you to chart
the course of the Nexus, a strange distortion wave of temporal energy
which flows through the universe, passing through the Milky Way galaxy
every 39.1 years. Little is known about it, except that any starship that
encounters it is destroyed. In a chance encounter with the U.S.S.
Enterprise NCC-1701-B, the Nexus supposedly claimed the life of Captain
James T. Kirk.
The Nexus ribbon
To view a specific system while the Stellar Cartography map displays
several solar systems, select the system on the map by targeting its sun
and then click on System View.
When the Stellar Cartography map displays a single system, click on Full
Sector View to display all existing solar systems on the Stellar
Cartography map.
Full Sector/
System View
Simulation/Cancel Destruction
Stardate
Counter
While inactive in the beginning, the Simulation Destruction button will
become active as events unfold in the game. Click it to simulate the
destruction of any pre-selected sun on the full sector view of the Stellar
Cartography map. This shows you how a sun’s destruction would alter
the course of the mysterious Nexus through the sector. Click on Cancel
Destruction to end the simulation and its effects. Either function of this
button uses 0.3 Stardate units.
Scan Window
Simulation/Cancel
Destruction
Long/Short
Range Scan
Set Course
Computer Log/
Transport/Tactical
Options
Right-click your cursor over any on-screen button to command the
Enterprise’s computer voice to describe that button’s function. Some
buttons have more than one function or are only active during certain
points in the game. Those buttons will only display the function you may
be able to use at that moment.
Click your cursor over any planet, sun or starship on the Stellar
Cartography map to select that object. At that point, you may scan or fly
to that object. You cannot select the Enterprise or any moons in this
manner. The cursor will acquire a targeting site when it passes over any
12
Long/Short Range Scan
“It is best to scan only
objects relevant to the
mission in order to save
time.”
If the Enterprise is in the same solar system as the selected object of the
scan, a Short Range Scan is possible, but if the selected object is in
another system in the sector, then only a Long Range Scan is possible.
Either way, click on this button to select a scan of the targeted object on
the map. Scanning takes 0.1 Stardate units. The results of the scan
appear in the Scan Window and the targeted object is labeled on the
map.
–Lt. Cmdr. Data
13
STG ENG MAN 21.2.97_P.Script
8/5/99 12:58
Page 14
3. STELLAR CARTOGRAPHY
3. STELLAR CARTOGRAPHY
Scan Window
Stardate Counter
This readout indicates the current Stardate in the game. Other actions
conducted in Stellar Cartography update the counter in increments of
0.1, showing the passage of time in the game. When games are saved,
they list the last recorded Stardate for that game session. The game
starts with Stardate: 48623.4.
Descriptive Text
Computer Log
Trilithium
Click on this button to replay the last clue or advice offered to you. This
information is relayed by either Captain Picard or the Enterprise
computer. When this button is inactive, there is no relevant information
to give.
Scanned Object
Energy Readings
Transport
Lifeforms
This button occupies the same space as the Computer Log button and is
active only after a Short Range Scan of a planet, space station or
starship has been conducted. Click on the Transport button to bring up
the Away Mission screen and beam a crew member to the selected
target. For further information about the Away Mission screen, see
Chapter 4: Away Missions.
Scroll Buttons
This display window, located in the left corner of the screen next to the
Long/Short Range Scan button, presents the results of the last scan
conducted. A picture of the scanned object is presented, accompanied
by a text description of the object. Next to the text are scroll arrows,
allowing you to scroll through the text.
Tactical
This button also shares the same place as the Computer Log and
Transport buttons. It becomes active only when an enemy vessel is in
range and, either you have completed a Short Range Scan of it, or it has
moved in to attack you.
Below the object’s picture, indicator symbols appear if life signs, energy
or Trilithium (an experimental, unstable material which stops fusion
inside a star) are present, with a circle symbol for life signs, a square for
energy readings and a triangle for Trilithium.
When an enemy vessel initiates an attack, you will automatically go to
the Tactical Combat screen. When you conduct a Short Range Scan of a
starship that has not yet attacked you, the targeted starship may then
decide to attack.
When the Enterprise-receives incoming messages from Starfleet
Command, they are also displayed on this window.
Click on the Tactical button to call up the Tactical Combat screen. For
further information about the Tactical Combat screen, see Chapter 5:
Tactical Combat.
Set Course
Select a sun, sector, planet or starship on the Stellar Cartography map
and then click on the Set Course button to have the Enterprise arrive at
that location. This also labels that selected location on the map.
Movement anywhere on the map takes 1.0 Stardate units.
14
“You would not want to
initiate an attack
against another vessel
without an indication
that it is a hostile
starship or that it is
aiding a known enemy.”
–Lt. Cmdr. Data
15
STG ENG MAN 21.2.97_P.Script
8/5/99 12:58
Page 16
3. STELLAR CARTOGRAPHY
CHAPTER
Options
Click on the Options button to bring up the Options Menu, which pauses
the game, allowing you to Load and Save games, to change the Game
Settings and modify keyboard commands. Pressing ESCAPE also brings
up the Options Menu. For further information about the Options Menu,
see Chapter 6: Game Settings and Options.
4
4. AWAY MISSIONS
First Officer’s Log, Stardate:
48623.5. Cmdr. William Riker
reporting. The most important thing
to remember about an Away Mission
is that each Starfleet officer must be
willing to follow the proper mission
protocols to ensure success. This is
highly-valued in a crew member since
a clear sense of the goals at hand
helps in determining how best to
focus your actions in a limited amount
of time; be it solving an unusual puzzle
or deciding how to deal with any aliens
you might encounter. Anything else
can lead to disaster.
16
STG ENG MAN 21.2.97_P.Script
8/5/99 12:58
Page 18
4. AWAY MISSIONS
4. AWAY MISSIONS
Away Missions are necessary when you must investigate a planet, space
station or starship in order to complete your mission. Each Away
Mission is conducted by only one member of the Enterprise crew,
selected by Captain Picard as the best choice for the mission based on
the information you have gathered. During the mission, you control the
actions of that chosen crew member as you solve intriguing mysteries
and explore unknown lands.
VIEWING THE MAIN SCREEN
Energy
Level Bar
Weapon
Settings
Weapons
Window
TRANSITION SCREEN
Health Window
Health Bar
Armour/
Oxygen Bar
Object
Indicator
Object
Window
Equipment Inventory
The upper portion of the screen for Away Missions is viewed from the
perspective of the crew member you control. As you move the crew
member around to explore his or her surroundings, you will see what he
or she would see.
To change your field of view without moving about, right-click and drag
your cursor across the upper portion of the screen in the direction you
want to view. Pressing PgUp allows you to look up, PgDn to look down
and Home to centre your view.
After you select the Transport button in Stellar Cartography and exit that
screen, a transition screen will appear showing the planet, space station
or starship the Away Mission takes place on. In addition, this transition
screen will include a text description detailing that specific mission’s
background.
When the Proceed button appears, click on it to continue.
18
The lower portion of the Away Missions screen contains the Away
Missions Control Panel, which allows you to view your health, examine
specific objects, review your mission objectives and use your
equipment. Right-click on any item or button on the Control Panel to get
a text description of it.
CONTROLS
Keyboard
Move Forward . . . .Up Arrow W
Move Back . . . .Down Arrow Z
Run . . . . . . . .SHIFT+ Arrow Key
Turn Left . . . . . . . .Left Arrow A
Turn Right . . . . .Right Arrow S
Slide Left . . . . . . . . . .Keypad /
Slide Right . . . . . . . .Keypad *
Dim Screen . . . . . . . . . . . . .2
Jump . . . . . . . . . . . . . . . .Enter Key
Crouch . . . . . . . . . . . . .Right CTRL
Fire/Attack . . . . . . . . . . .Keypad 0
. . . . . . . . . .or Left Mouse Button
Look Up . . . . . . . . . . .PageUp Key
Look Down . . . . . . . . .PageDn Key
Centre View . . . . . . . . . .Home Key
Brighten Screen . . . . . . . . . . .3
19
STG ENG MAN 21.2.97_P.Script
8/5/99 12:58
Page 20
4. AWAY MISSIONS
4. AWAY MISSIONS
Mouse Control
Look Around/Steer Left and Right - Hold down Right Mouse Button and
move in Action Window.
HEALTH WINDOW
During an Away Mission, it is possible to be hurt or injured. To view the
relative health of your crew member, click on the green button at the
upper left of the Away Mission Control Panel and the Health Window will
appear.
Inside the Health Window is a picture of the crew member sent on this
mission and, to the right of that, a green Health Status Bar. When the
crew member is hurt, the picture changes from an upright posture to a
bent-over stance and the Health Status Bar decreases.
If the Health Status Bar drops down low enough, the crew member can
be rendered unconscious. Before that happens, a warning signal will
sound (as long as the Health Window is on-screen). Should the crew
member be in danger of dying, he or she will automatically be beamed
up. At that point, that Away Mission will end and will be considered a
failed mission.
Health can be regained over time or, if crew members receive a
Hypospray treatment or, take in nourishment; such as drinking non-toxic
liquids. Health is also fully recovered when an Away Mission ends.
To the right of the Health Status Bar is the Armour/Oxygen Bar, which is
used to indicate either how much body armour (such as a spacesuit) or
breathable air is left, depending upon the situation. Armour cannot be
repaired, but air can be replenished by entering an environment that has
plenty of oxygen. Normally, you do not start an Away Mission with armour.
TRICORDER WINDOW
Tricorder Window
Tricorder and
Equipment
Inventory
Tricorder Window
Button
Level
View
Lifeforms
Scan
Zoom In/
Out View
Trilithium Scan
Energy
Scan
On any Away Mission, the Tricorder is an important piece of equipment
used to scan your surroundings. Click on the blue button on the left of
the Away Mission Control Panel to bring up the Tricorder Window.
Click on the Tricorder icon in the Equipment Inventory to deactivate the
Tricorder. When the Tricorder is deactivated, the Tricorder Window turns
a light blue with no buttons or scan results displayed. Click on that icon
again to reactivate the Tricorder. A further description of the Tricorder
can be found in Appendix A: Equipment.
Within the Tricorder Window are several functions that are useful on any
mission.
Level View
Each planet, space station or starship has one to three levels to explore.
Click on any of this icon’s three lines to select the corresponding level
you will see on the Tricorder Window, with the highest line representing
the top level.
The Tricorder can only map the specific areas on each level that you
have already explored. However, if you are onboard a Federation
starship or space station, the Tricorder can call up full maps of all levels
from its library computer.
20
21
STG ENG MAN 21.2.97_P.Script
8/5/99 12:58
Page 22
4. AWAY MISSIONS
4. AWAY MISSIONS
Zoom In/Out View
Click on this icon either to zoom in on the Tricorder Window’s view of a
level or to zoom out. Each circle on the icon represents the degree that
you either zoom in or out, with the largest circle allowing for the widest
view of a level.
MISSION OBJECTIVES WINDOW
Lifeforms Scan
When this icon is lit, the lifeforms scan function is on and all lifeforms
present will appear as coloured dots on the Tricorder Window. Click this
icon to turn it off or on.
For each Away Mission, each alien race will have a specific lifeform
colour reading, with light blue always indicating survivors in need of
rescue. Dead aliens do not register at all on the Tricorder. YOU appear
as a directional arrow, always in the center of the window, with the
arrow pointing in the direction you are facing.
Energy Scan
Mission Objectives
Window
Mission Objectives
Button
When this icon is lit, the Energy Scan function is On with all energy
sources present appearing as glowing squares on the Tricorder Window.
Click this icon to turn it off or on.
Anytime you wish to view the specific objectives for each mission, click
on the Mission Objectives button (the orange button at the bottom left
of the screen) and the Mission Objectives Window will appear, listing
your goals for that specific Away Mission.
Trilithium Scan
“At times, you may want
to narrow a search with
your Tricorder to only
one specific scan for
best results.”
–Cmdr. Riker
When this icon is lit, the Trilithium Scan function is On with all Trilithium
present appearing as flashing triangles on the Tricorder Window. Click
this icon to turn it off or on. At the start of the game this button will not
be available. Later actions might make it available to you.
Trilithium itself is an experimental, unstable compound primarily
developed by the Romulans. It can inhibit nuclear reactions and can be
found, in a highly explosive resin form, as a toxic waste residue from the
warp drive engines of a starship.
WEAPONS WINDOW
On Away Missions, you will find it necessary to protect yourself from
hostile aliens and other hazards. In such cases, a weapon such as the
Federation Mark II Phaser is a handy piece of equipment to carry along.
Click on the Phaser icon in the Equipment Inventory to carry it, ready to
fire it when needed. On the upper portion of the Away Mission screen,
you will be able to see the Phaser held.
Click on the Target to fire your Phaser or press 0 on the Numeric Keypad.
“A Phaser comes in
handy to cut through
already damaged walls
which may block your
path.”
To holster it, click on the Phaser icon. When the Phaser is not used, the
entire Phaser Window darkens. Often, you will start an Away Mission
with the Phaser already drawn.
–Cmdr. Riker
22
23
STG ENG MAN 21.2.97_P.Script
8/5/99 12:58
Page 24
4. AWAY MISSIONS
4. AWAY MISSIONS
Energy Level Bar
If you have more than one weapon in your Equipment Inventory, cycle
through them by clicking on the orange button—the Weapons Select
button—located to the left of the Phaser Settings Bar. During Away
Missions, you may find other weapons, such as a Romulan Type III
Disrupter. Other weapons are controlled like a Phaser, but they might
have different effects.
Operating any weapon uses energy and every weapon in the game has a
limited power supply. For instance, the energy level of any Phaser you
use is indicated by a bar along the bottom of the window. When the
Phaser is fully powered, the whole bar is lit. Depending on how often
you shoot the Phaser and at what settings, the lit portion of the bar will
decrease until your Phaser runs out of energy.
While Starfleet Phasers recharge after you return to the Enterprise upon
completing the mission, it is possible to reload all types of weapons
with matching power cells which may be found during an Away Mission.
To operate a Phaser effectively, you will need to make use of the
functions in the Weapons Window. For further information about
Phasers, see Appendix A: Equipment.
Phaser Settings
Indicator
Weapons
Select Button
OBJECTS WINDOW
Phaser Settings Bar
Objects Window
Energy Level Bar
Objects Indicator
Weapon Settings
The Phaser, as well as most weapons, has three basic settings: stun, kill
and destroy. These settings are represented on a multi-coloured bar that
runs along the top of the Weapons Window. The stun setting is
represented by green, the kill setting is yellow, and the destroy setting is
an orange-red. Each setting has different degrees of effect, such as
moving from a light stun to a heavy stun.
The white indicator arrow above the Weapon Settings Bar shows the
current setting. To select a setting drag, either the multi-coloured bar or,
the indicator arrow, to the desired setting. Remember, as a Starfleet
officer, you are trained only to fight in self-defense or in defense of
others. Killing an alien must only be a last resort.
24
“While it might be easy
to order Earl Grey tea or
synthehol from a
replicator, some
computer terminals
require a bit more effort
to operate.”
–Cmdr. Riker
Located at the bottom of the Away Mission screen, the Objects Window
depicts objects seen on the upper portion of the screen that can be
manipulated when you are in front of them. For example, you can use
computer terminals encountered or pick up items found.
To communicate with any survivors you encounter, place yourself over
them so that their image appears in the Objects Window and click on
that image. In the same manner, it is possible to search the bodies of
dead or unconscious aliens.
25
STG ENG MAN 21.2.97_P.Script
8/5/99 12:58
Page 26
4. AWAY MISSIONS
CHAPTER
To pick up objects, drag the selected object to the Equipment Inventory.
If you right-click on the object, the crew member will tell you what it is.
Object Indicator
This button, located at the lower left of the Object Window, flashes
when there are several objects present. Click on it to switch between
each object’s icon. When all the objects that were present are removed,
this indicator will darken.
5
5. TACTICAL COMBAT
EQUIPMENT INVENTORY
Located on the right of the Away Mission Control Panel, the Equipment
Inventory shows icons of all the items you have collected. You will start
each mission with a Communicator, Tricorder, Phaser and Hypospray.
When you are on an Away Mission with Lt. Cmdr. Data, a Hypospray will
not be present since it does not work on androids.
To store items in your inventory, you must place their icon in an empty
square. If there are no empty squares, then no more objects can be
stored until you decide to remove an object from the inventory. To
remove objects, drag the equipment icon from the inventory into the
Objects Window. The only equipment that cannot be removed is the
Starfleet Communicator; its special status is indicated by its darkened
background.
To select equipment for use, click on its icon. The icon box of the
equipment you are currently using will be highlighted with an orange
outline. If you select an object that cannot be used at that time, the
crew member will notify you. Right-click on an equipment icon, and the
crew member will inform you as to that object’s usefulness.
26
Security Officer’s Log, Stardate:
48623.7. Lt. Cmdr. Worf reporting.
A true warrior will be ready to face
the enemy with honour and cunning,
be it on the battlefield or in space.
And a true warrior will know how to
use a ship’s Tactical Display in a space
battle, for while it may not be a
bat’telh, the Tactical Display requires
no less skill in striking down an
enemy. For, as we Klingons say,
“leghlaHchu’be’chugh mIn lo’laHbe’ taj
jej”—a sharp knife is nothing without
a sharp eye!
STG ENG MAN 21.2.97_P.Script
8/5/99 12:58
Page 28
5. TACTICAL COMBAT
5. TACTICAL COMBAT
Tactical Combat becomes necessary when you encounter hostile enemy
starships while navigating through space. Often, an enemy vessel will
attack you first. Occasionally you will have the opportunity to begin
battle. In such cases, you will want to take not only the number and type
of starships you face into account, but also remember that Starfleet
officers prefer to fight only when all other options to accomplish their
mission have been exhausted. Nevertheless, you must be prepared to
initiate combat against starships allied with the crazed Dr. Tolian
Soran—such as those vessels crewed by Lursa and B’Etor and their
renegade Klingons—in order to stop his fanatical plans.
TRANSITION SCREEN
After selecting the Tactical button in Stellar Cartography, a transition
screen will appear showing the Enterprise facing off against whatever
specific number and type of starships it has encountered.
When the Proceed button appears, click on that button to continue.
TACTICAL VIEWSCREEN
Sensor Display
Tactical
Viewscreen
Viewscreen
Zoom Bar
Enemy Systems
Target View Button
Enterprise
Systems
Enemy Ship Display
Enterprise
Display
Phaser Controls
Torpedo
Controls
Conn Control
The upper portion of the Tactical Combat screen—the Tactical
Viewscreen—is the viewing screen of the battle from the Enterprise’s
position. From this vantage point, you are able to see the enemy vessel
you have targeted.
Below the Tactical Viewscreen are the Sensor Display and Tactical
Control Panel, which allow you to protect yourself against hostile
starships.
Right-click any on-screen button to command the Ship’s Computer to
supply a verbal description of that button.
To change the Tactical Viewscreen’s perspective to view directly ahead of
the Enterprise, click the button to the upper left of the Sensor Display
window.
To restore the Tactical Viewscreen’s point of view on the targeted enemy,
click that button again.
To the right of the Tactical Viewscreen is the Viewscreen Zoom Bar. Click
and hold down your mouse button on this bar to zoom in on your
target’s image (by raising the bar) or to zoom out from it (by lowering
the bar).
28
29
STG ENG MAN 21.2.97_P.Script
8/5/99 12:58
Page 30
5. TACTICAL COMBAT
5. TACTICAL COMBAT
SENSOR DISPLAY
PILOTING
As combat progresses, you will find it advantageous to manoeuvre the
ship in order to avoid enemy fire, to face the enemy directly, or to
engage in a strategy of your choosing. To pilot the ship, you can either
give specific commands to the Conn (the Enterprise’s flight controller) or
you may control the movement of the ship directly.
Tactical Manoeuvres
Enemy Ships
The Enterprise
1734
Sensor Zoom
Bar
Target Indicator
Located in the middle of the Tactical Combat screen, the Sensor Display
shows a three-dimensional representation of the current battle. During
combat, the location of any nearby enemy starships in relation to the
Enterprise is indicated here.
Each starship is placed within an oval centered around a white icon
representing the Enterprise. All starships are represented by an icon
placed on an altitude bar, which indicates their relative height in space
to that of the Enterprise. The currently targeted enemy vessel will be
outlined in red. In the lower left corner of the Sensor Display, a Distance
to Target Indicator shows the distance between you and the targeted
enemy vessel.
To target a starship, click on its icon in the display window. If you are
pitted against more than one enemy and you want to cycle through all
available targets, click on the button located to the lower left of the
Sensor Display.
To the right of the Sensor Display is the Sensor Zoom Bar. Click and hold
down your mouse button on the bar to zoom in the Sensor Display
window by raising the bar or pan away by lowering the bar.
30
Tactical
Manoeuvres
Menu
At the bottom centre of the Tactical Control Panel, a text indicator
identifies what pre-selected command the Conn is following. Click on
this indicator slot to bring up the Tactical Manoeuvres Menu, which lists
several standard flight commands you can give to the Conn. To select
one of the commands, click on the desired one. The Conn is
automatically flying the Enterprise when you enter the Tactical Combat
screen
The Tactical Manoeuvre commands available to select from are:
Close on Target sets a direct course for the targeted enemy vessel.
The Enterprise will stop when it reaches an optimal attack distance
from the target.
Evade Target orders the Enterprise to evade only the targeted starship.
31
STG ENG MAN 21.2.97_P.Script
8/5/99 12:58
Page 32
5. TACTICAL COMBAT
“If you lack the proper
Conn experience, there
is no dishonor in
delegating the Conn to
another.”
–Lt. Cmdr. Worff
5. TACTICAL COMBAT
Maintain Distance to Target keeps you the same distance from your
target the moment you selected the command. While the Enterprise
may match velocities with the targeted vessel, the target may still be
able to manoeuvre around you.
Full Stop halts the Enterprise.
Stand by for Command tells the Conn that you are no longer giving it
orders so that you may either personally pilot the Enterprise or select
another command.
Warp Out of System exits the Enterprise out of the system it is
currently in—as long as the Warp engines are on line—for another
system that is randomly chosen. At that point, that combat will be
ended and will be considered a failed battle.
Maintain Current Status confirms your last command, allowing it to
continue.
ENTERPRISE DISPLAY
On the left side of the Tactical Control Panel is the Enterprise Display
window accompanied by the Enterprise Systems Panel. The Enterprise
Systems Panel contains the indicator bars for the ship’s different
systems with each system represented by a specific colour in a box
above the bar. These bars show the current status of any given ship
system, while the Enterprise Display identifies their specific location
onboard the ship with matching colours.
During combat, it is possible for the enemy to target certain functions
on the Enterprise or that only certain systems might receive damage.
This portion of the screen will show where the damage has occurred and
how serious it is.
In the upper left of the Enterprise Display window is the Ship Name
Indicator, which identifies the name of your starship.
User Control
To de-activate the Conn and fly the ship yourself, either select the ‘Stand
by for Command’ order or use your mouse with your keyboard to control
the Enterprise. Whenever you use a mouse or keyboard command, that
command supersedes the last command given to the Conn. When you
are finished manually controlling the ship, the Conn will return to
following your last command.
The Keyboard commands for operating the Enterprise are:
Close on Target . . . . . . . . . . . . . . . .Key 1
Left . . . . . . . . . . . . . . . . . .Left Arrow A
Evade Target . . . . . . . . . . . . . . . . . .Key 2
Right . . . . . . . . . . . . . . .Right Arrow S
Maintain Distance . . . . . . . . . . . . . .Key 3
Climb . . . . . . . . . . . . . . .Down Arrow Z
Full Stop . . . . . . . . . . . . . . . . . . . . .Key 4
Dive . . . . . . . . . . . . . . . . . .Up arrow W
Stand By . . . . . . . . . . . . . . . . . . . . .Key 5
Roll Left . . . . . . . . . . . . . . . .Right CTRL
Warp Out . . . . . . . . . . . . . . . . . . . . .Key 6
Roll Right . . . . . . . . . . . . . . . .Keypad 0
Maintain Status . . . . . . . . . . . . . . . .Key 7
Fire Phasers . . . . . . . . . . . . .Right SHIFT
Fire Torpedoes . . . . . . . . . . . . . . . . .Enter
Increase Speed . . . . . . . . . . . . . . .Key +
Decrease Speed . . . . . . . . . . . . . .Key -
To change your field of view without moving the ship, right-click and drag the cursor across the
upper portion of the screen in the direction you want to view.
To the lower left of the display window is a button. Click that button to
change the display of the Enterprise in the window from a schematic to
a 3-D representation of the ship as viewed by the targeted enemy ship.
Click the button again to restore the schematic view of the ship.
In the lower right of the display window is the Velocity Indicator, which
shows the current speed of the Enterprise.
Enterprise Systems Panel
Propulsion
Forward Shield
Power
Generator
Port Shield
Computer
Systems
Starboard
Shield
Sensors
Aft Shield
Damage
Control
Weapons Systems
Life Support
Excess Energy Bar
Above the Enterprise Display is the Enterprise Systems Panel which
allows you to select any system in order to determine what amount of
power can be directed from Engineering to that specific system. You may
also determine which systems receive repair work from here.
32
33
STG ENG MAN 21.2.97_P.Script
8/5/99 12:58
Page 34
5. TACTICAL COMBAT
5. TACTICAL COMBAT
Propulsion controls your ship’s velocity. If damaged, Warp drive will
go off-line. Its indicator box is blue.
Power Generator controls the energy used to power the ship’s other
systems. If damaged, other systems will go off-line. Its indicator box is
bright yellow.
Computer Systems controls the accuracy of your ship’s weapons.
When damaged, weapons accuracy drops. Its indicator box is white.
Sensors controls the viewscreen and display windows. As it is
damaged, each of the screens will fail to display any sensor readings.
Its indicator box is bluish-grey.
Damage Control determines the rate at which repairs are conducted.
When it is destroyed, no other systems on the ship will be repaired.
Click on any damaged system’s indicator box to cut off its repairs.
Click again to restore repairs. Its indicator box is purple.
Each system is represented by an indicator bar with a coloured box at
the top of it. That bar shows the level of power supplied to the system
versus the full potential of that system. The yellow bar on the indicator
shows what the current level is, with the white outline indicating the
current setting. The blue bar on the indicator shows what the full
potential of that system is. A red bar on the indicator represents
damage to that specific system. The coloured box indicates which
system it is.
A red colour indicator box at the top of the bar denotes a destroyed
system. Destroyed systems are no longer usable until repaired.
Repairing destroyed systems requires more time than to repair systems
that have suffered only some damage. Repaired systems have their
indicator boxes outlined in white.
Shields
To increase the power to a system, click and hold down your mouse
button on the white outline to raise the yellow bar. Dragging on the
white outline while lowering it down the bar decreases power to a
system. The yellow bars slowly change to match the new level
established by the white outline. The horizontal readout bar for
Engineering indicates how much excess energy you have to increase
power to all of your ship’s systems.
Besides being represented on the Enterprise Systems Panel, the ship’s
shields are indicated on the Enterprise Display by pale yellow outlines,
matching the colour of their indicator boxes. Each shield is
differentiated by a different shade of pale yellow. If they are damaged,
their outline will fade. When they are destroyed, their outline will
disappear.
As the main defense for a starship, the shields will stop Phasers and
Photon Torpedoes from damaging the ship, but in turn, will be damaged
by those weapons themselves.
The systems represented on the panel are:
Forward Shield measures the strength of your forward shield.
Port Shield measures the strength of your left-side shield.
Starboard Shield measures the strength of your right-side shield.
Aft Shield measures the strength of your rear shield.
Weapons Systems controls your Phasers and your Photon Torpedoes.
When damaged, some weapons will become inactive. When
destroyed, all weapons are off-line. Its system box is orange.
Life Support controls the starship’s life support systems. Life support
creates a comfortable environment for the crew to work in. When it is
damaged, the rates of repair procedures and torpedo loading are both
slowed down as the crew must deal with a harsher environment.
Should it be completely damaged, the emergency life support will
automatically engage. When it is destroyed, the ship’s environment
will soon be unable to support life and your crew will die, rendering all
systems inactive. Its system box is green.
Phasers
The Enterprise’ s Phaser banks are a more powerful version of a crew
member’s hand-held Phasers. These Type X Phasers are used as a
starship’s primary means of attack. To use them, target the enemy ship
and click on the Fire Phasers button or press SHIFT.
Phasers
Safety
Fire Phasers
Button
273
Phaser
Banks
Forward
Torpedoes
34
Photon
Safety
Fire
Photon
Torpedoes
Button
Aft
Torpedoes
Photon
Torpedo
Counter
35
STG ENG MAN 21.2.97_P.Script
8/5/99 12:58
Page 36
5. TACTICAL COMBAT
5. TACTICAL COMBAT
Under the Fire Phaser’s button is an indicator bar for each Phaser
located on the ship, showing how much energy remains versus the full
potential of that Phaser. White bars on the indicator show which
Phasers are ready and are facing the targeted ship. Yellow bars on the
indicator show which Phasers are not facing the target; as a result,
these Phasers are unavailable. Click on the indicator bar to de-activate a
Phaser bank, and click the indicator bar again to activate the Phaser.
Deactivated Phasers are outlined.
Phasers require time to recharge after discharging a blast. A blue bar on
the indicator shows which Phasers are recharging. While you may fire
Phasers as they recharge, the resulting blast will not be as powerful as
one from a fully functional Phaser.
TARGETED SHIP DISPLAY
Weapons
Systems
Life
Support
Propulsion
Aft Shield
Power
Generator
Computer
Systems
Starboard Shield
Sensors
Port Shield
Damage
Control
Forward Shield
Cloaking
Device
A damaged Phaser bank is indicated by a red bar and cannot be used
until repaired.
Excess Energy Bar
Torpedoes
The Enterprise has 20 Torpedo tubes, which can be launched one at a
time or in groups of 10. The Photon Torpedo does a significant amount
of damage, but your ship has only 275 of them. The more Photon
Torpedoes launched, the less your chances of success with any single
torpedo.
On the right-hand side of the Tactical Control Panel is a display of the
currently targeted enemy vessel. This display is similar to that of the
Enterprise’s, but where you would allocate power or repairs, here you
target specific systems you wish to damage.
Most targeted enemy vessels will also have an additional indicator bar
on their systems display. This bar, located to the upper left of the
Targeted Ship Display, shows the system strength of the enemy ship’s
cloaking device. Its system box is grey. A cloaking device allows a ship
to render itself invisible to an enemy ship’s sensors. (As stipulated by
the Treaty of Algeron, Federation starships are not outfitted with
cloaking devices.)
The left box is the ship’s forward torpedo launcher, while the right is the
rear torpedo launcher. The blue lit box indicates which torpedo tube
faces the targeted enemy starship. The grey lit box shows which tubes
are facing away from the target. Between the two boxes is the Photon
Torpedo Counter, which counts down how many torpedoes are
remaining. You cannot restock torpedoes after you have depleted your
supply.
To fire a Photon Torpedo, left-click on the Fire Photon Torpedo Button. To
select the number of Photon Torpedoes you wish to fire, left-click on the
Photon Torpedo tubes located under the Photon Torpedo Button.
After a Photon Torpedo has been fired, time is required to reload the
torpedo tubes one by one. You may fire Photon Torpedoes before all the
tubes are reloaded.
“In attacking, it is best
to target specific
systems rather than
have fate guide your
aim.”
By cloaking, the enemy starship abandons the field of battle and grants
you victory. However, cloaked ships are not destroyed, so they may be
encountered later in another sector, this time fully operational.
To lock on a specific section or system of a ship, click on the desired
target either on the target ship’s display window or on the system
indicator box. To de-select that target, click on the section or system box
again. As with your ship, all attacks must contend with the targeted
starship’s shields before damaging the enemy vessel itself.
–Lt. Cmdr. Worf
36
37
STG ENG MAN 21.2.97_P.Script
8/5/99 12:58
Page 38
5. TACTICAL COMBAT
Using this display, it is possible to compare display readouts for the
Enterprise and an enemy starship to gain a sense of what each
starship’s strengths and weaknesses are. Note that not all starships
have the same number of shields.
On the lower left of the Targeted Ship Display is a button that changes
the targeted ship’s image in the display window from a schematic to a 3D representation. The 3-D representation is shown as it faces the
Enterprise. Clicking on the button changes the displayed image.
CHAPTER
6
6. GAME SETTINGS AND OPTIONS
Chief Engineer’s Log, Stardate:
48623.8. Lt. Cmdr. Geordi La Forge
reporting. No matter what the
operating system is, I’ve found it’s
always a good idea to get a handle on
how that system works before using
it. That way, if you need to make
changes to it, you know exactly what
you’re doing.
38
STG ENG MAN 21.2.97_P.Script
8/5/99 12:58
Page 40
6. GAME SETTINGS AND OPTIONS
6. GAME SETTINGS AND OPTIONS
OPTIONS MENU
To save a game, click on the Save button. This brings up a menu which
allows you nine slots to save games. A tenth slot signifies the automatic
Save Game function, which automatically saves the game at your last
action in Stellar Cartography. All saved games are listed by the Stardate
they were saved on.
To select the slot you want to save a game in, click on the slot, type in
the name you want to save the game under, and then click the Accept
button.
To load a game, click on the Load button. This brings up the Load menu,
which allows you to load any saved game, including the automatically
saved game. To select the game you want to load, click on its slot and
then click the Accept button.
To exit either the Save or Load Menus without saving or loading a game,
click on the Cancel button.
Entering a New Game
The Options Menu allows you to Save and Load games, to start a New
Game or to Quit the one you were playing. It also allows you to bring up
the Settings Menu, in order to adjust the default settings, or the
Controls Screen, to customize your keyboard commands.
Click on the Options button in Stellar Cartography or press ESCAPE
anytime during the game to enter the Options Menu. While in the
Options Menu, the game is Paused.
Saving and Loading Games
Clicking on the New button brings up a prompt asking whether you want
to start a new game. Click the Accept button to begin the new game, or
click the Cancel button.
Quitting a Game
“On the Holodeck, I
periodically save the
program I’m in at
keypoints, and you may
want to do the same for
your game as well.”
–Lt. Cmdr. La Forge
40
To exit the game you were playing, click on the Quit button. This brings
up a prompt asking you if you want to quit the game. Click the Accept
button to exit Star Trek Generations or click the Cancel button.
Returning to Current Game
Click on the Return to Game button after you have completed your other
selections to exit the Options Menu and to return to the exact game
screen you were last playing on.
41
STG ENG MAN 21.2.97_P.Script
8/5/99 12:58
Page 42
6. GAME SETTINGS AND OPTIONS
SETTINGS MENU
The Settings Menu allows you to change the sound volume, the
difficulty level of play, the window size of the game, or to deactivate the
subtitles. To enter the Settings Menu, click on the Settings button on the
Options Menu.
6. GAME SETTINGS AND OPTIONS
Window Size
There are two window sizes to play the game in: Small or Large (the
default setting). To adjust the size of the game window, click on the
Window Size button until the size you want is displayed on the button
itself.
Subtitles
In the game, when you right-click on a button or an item, subtitles
appear at the bottom of the screen describing what that button does or
what that item is. Whenever you hear a conversation, subtitles appear
as well. The Subtitles button allows you to turn the subtitles Off or On.
On is the default setting. To chose between the two functions, click the
Subtitles button until your choice is displayed on the button itself.
CONTROLS SCREEN
The Controls Screen allows you to configure the Away Team member’s
movements to your keyboard commands. To enter the Controls Screen,
left-click on the Controls button on the Options Menu.
Sound Effects Volume
To change the volume of the sound effects, click on the Sound Effects
Volume Bar. The volume ranges from Off at the left end to Loud at the
right end of the bar.
Music Volume
Click on the Music Volume bar to change the volume of the music for the
game. The volume ranges from off at the left end to loud at the right end
of the bar.
Difficulty Levels
There are three levels of difficulty—Ensign, Lieutenant, and Captain—
with Ensign being the beginner’s level and Captain the master’s level.
The default is Lieutenant. To reset the difficulty level, click on the
Difficulty Level button until the level you want is displayed on the button
itself. The harder the level of difficulty, the more difficult the clues,
puzzles and opponents are.
42
The default keyboard commands are listed under Movement in Chapter
4: Away Missions and under “Phaser” in Appendix A: Equipment.
43
STG ENG MAN 21.2.97_P.Script
8/5/99 12:58
Page 44
6. GAME SETTINGS AND OPTIONS
APPENDIX
To change a keyboard command, click on the first column and then
press the key that will represent the command. Click on the second
column to enter a second key so that two keys must be pressed at the
same time to execute that command. To restore the default commands,
you must re-enter them over your previous choices.
A
APPENDIX A: EQUIPMENT
The only keyboard commands you will not be able to change are 2,
which dims the screen, and 3, which brightens the screen.
Chief Medical Officer’s Log, Stardate:
48623.9. Dr. Beverly Crusher, M.D.
reporting. The correct use of any
Starfleet equipment, whether it is a
Hypospray or a Tricorder, is
important when on a mission. I
wouldn’t prepare for an operation
without familiarizing myself with my
tools, and I think the same applies
outside of surgery.
44
STG ENG MAN 21.2.97_P.Script
8/5/99 12:58
Page 46
APPENDIX A: EQUIPMENT
APPENDIX A: EQUIPMENT
HYPOSPRAY
PHASER®
A standard instrument carried in Starfleet Medical Kits and used by
trained medical personnel, the Hypospray is a device that administers
medication to a wounded patient without penetrating the skin. The
proper medication is loaded into the Hypospray through a vial and used
as needed. All Starfleet personnel are familiar with the proper use of a
Hypospray due to basic Starfleet training.
On Away Missions, Starfleet personnel are armed with the type II
Phaser. Although it is a weapon and can be used to hurt people or
damage structures and objects, the Phaser is intended to be used
mainly in self-defense by all Starfleet officers. The type II has 16 power
level settings, from a light stun to an explosive/disruption effect.
To fire a Phaser on an Away Mission, move the cursor over the intended
target and left-click or press 0 on the Keypad. Selecting a Phaser,
determining a setting and measuring its energy level are described
under “Weapons Window” in Chapter 4: Away Missions.
To use a Hypospray when wounded on Away Missions, click on the
Hypospray icon in the Equipment Inventory. Most Hypospray are good
for two or three uses, restoring half the lost health at first and one-fifth
the lost health on the next use.
Phasers cannot be operated underwater, although exposure to water
does not damage them for future use above water.
TRICORDER
Used to record various types of data, the standard Tricorder is equipped
with sensors designed to detect lifeforms, energy readings and material
structures. During Away Missions, Starfleet officers use Tricorders to
locate people and objects and to store maps of their surroundings. All
information in a Tricorder is downloaded to the ship’s computer records
upon returning from an Away Mission.
To learn how to operate a Tricorder in the game, see “Tricorder Window”
in Chapter 4: Away Missions.
“Sometimes,
hyposprays intended for
an alien physiology may
affect our human
biology differently.”
–Dr. Crusher
COMMUNICATOR
Onboard ship or on Away Missions, all Starfleet personnel carry a
personal Communicator. Designed to provide a reliable and efficient line
of communication between crew members and their ship or between
separated Starfleet officers, the Communicator is a vital part of any
Starfleet operation.
To activate a Communicator, click on its icon in the Equipment Inventory.
This will open a frequency with the Enterprise in order to talk with other
crewmates for advice or information. Occasionally, the game might
prompt you to contact the Enterprise by lighting up the Communicator
icon in the Equipment Inventory.
46
47
STG ENG MAN 21.2.97_P.Script
8/5/99 12:58
Page 48
APPENDIX
B
APPENDIX B: STARFLEET PERSONNEL
Counselor’s Log, Stardate: 48624.0.
Deanna Troi reporting. If the wellbeing of a crew is important for the
proper operation of a starship, then it
is important for a ship’s commander
to know the crew, not just as
officers, but as individuals as well.
48
STG ENG MAN 21.2.97_P.Script
8/5/99 12:58
Page 50
APPENDIX B: STARFLEET PERSONNEL
Although Starfleet is composed of numerous members from several
worlds, in this game, you are fortunate enough to have eight of the best
personnel from two generations of officers aiding you in your missions.
Each Starfleet officer will serve on at least one Away Mission.
CAPTAIN JEAN-LUC PICARD
As the commanding officer of the Enterprise and a noted diplomat,
Captain Picard prefers to resolve most problems peacefully and will use
force only as a last resort or in defense against an immediate threat.
Although he has recently become aware of his own mortality, Picard
takes comfort in his affection for his brother’s family and in realizing
that how one lives is more important that what he leaves behind.
COMMANDER WILLIAM THOMAS RIKER
Being the executive officer of the Enterprise, Commander Riker
considers his primary duty is to the safety of the ship and its crew.
Although jovial, Riker takes his responsibilities seriously, rarely willing
to sacrifice a crew member’s life in order to complete a mission. A risktaker, Riker often comes up with highly unusual strategies to get out of
difficult situations. Privately, he hopes one day to captain the Enterprise.
COMMANDER DEANNA TROI
Half-human and half-Betazoid, Deanna Troi uses her empathic abilities
in her role as the Enterprise’s counselor to attend to the crew’s
psychological needs. Often, she is the only crew member whom Picard
confides in when he is personally troubled, which makes her advice
invaluable to him. She is highly trained as both a psychologist and
Starfleet officer and uses her skills to best aid her crewmates.
50
APPENDIX B: STARFLEET PERSONNEL
DOCTOR BEVERLY CRUSHER, M.D.
Dr. Crusher serves as the chief medical officer on board the Enterprise.
As both a Starfleet officer and a physician, Dr. Crusher conducts herself
as a professional while on duty yet still allows herself a relaxed lifestyle
off duty as a skilled dancer, playwright and theater director. Among her
professional achievements is her understanding of Data’s android
mechanics and her tour of duty as the Chief of Starfleet Medical.
LIEUTENANT COMMANDER DATA
Having recently installed an emotion chip designed by his creator
Dr. Noonien Soong, Lt. Commander Data—a sophisticated android—
continues his quest to understand what it means to be human. As the
ship’s operations manager and science officer, Data uses his
phenomenal intellect to resolve many difficult problems encountered by
the Enterprise. Among all the relationships he has developed, his
friendship with Geordi La Forge is the most important to him.
LIEUTENANT COMMANDER GEORDI LA FORGE
Originally the Enterprise’s flight controller, Lt. Commander La Forge
currently serves as its chief engineer. Blind since birth, La Forge wears a
VISOR, a prosthesis that allows him to see in visible light as well as in
other frequencies in the electromagnetic spectrum, such as infrared. He
considers his blindness and the use of his VISOR as neither disabling
nor advantageous.
LIEUTENANT COMMANDER WORF
Recently promoted to Lieutenant Commander, Worf is the Enterprise’s
Security Chief and Tactical Officer. As the first Klingon in Starfleet, he
has often played an important role in the constantly evolving
relationship between the Klingons and the Federation. Strongly
emotional, Worf strives to excel at any tasks assigned to him, proving
that underestimating him is often a mistake.
51
STG ENG MAN 21.2.97_P.Script
8/5/99 12:58
Page 52
APPENDIX B: STARFLEET PERSONNEL
APPENDIX
CAPTAIN JAMES TIBERIUS KIRK
The most famous officer in Starfleet history, Captain James T. Kirk
commanded both the original Constitution-class starship Enterprise,
registry number NCC-1701, and its replacement, the Enterprise-A. With a
reputation for being cunning and brave, Kirk preferred to take any risks
encountered during a mission himself, instead of placing a crew member
under his command in jeopardy. After a long career, Kirk was believed
killed in 2293 on the maiden launch of the Excelsior-class Enterprise-B,
when its hull was ruptured by the Nexus, while rescuing survivors from
the starship Lakul. He died as he had lived: choosing to make a
difference for the betterment of others.
C
APPENDIX C: U.S.S. ENTERPRISE-NCC-1701-D™
“As long as you serve on the
Enterprise, you make a difference.”
– Captain James T. Kirk
52
STG ENG MAN 21.2.97_P.Script
8/5/99 12:58
Page 54
APPENDIX C: U.S.S. ENTERPRISE-NCC-1701-D™
Launched in 2363 on Stardate 40759.5, the U.S.S. Enterprise-NCC1701-D™ is the Starfleet’s flagship, and the United Federation of Planet’s
most celebrated starship. A Galaxy-class vessel, registry number NCC1701-D, the Enterprise is the fifth starship to sail under that name—with
the first having been captained by James T. Kirk.
With a crew complement of 1,014 and outfitted with sophisticated
computers and sensory equipment, the Enterprise is quite capable of
completing any scientific and exploratory missions required of it. Its
armament consists of 275 photon torpedoes and Type X Phaser banks,
while its main defense is a series of deflector shields modulated at
7257.4 MHz. Powered by a matter/anti-matter reaction chamber, the
Enterprise’s engines are capable of reaching speeds of warp factor 9.6,
although the ship can also fly at slower sub-light speeds under impulse
power. The primary mode of travel from ship to planet is the ship’s
transporter, which beams people from one location to another
instantaneously. And while the ship’s replicator supplies foodstuffs and
drinks, it can also fashion devices to be used in the normal operations
of the ship. Should any systems malfunction, trained crew members
make use of the Jefferies maintenance tubes which are located
throughout the ship to conduct repairs.
During emergencies, the Enterprise can detach its saucer section, which
houses the bridge, from the stardrive section, which contains main
engineering—where the Warp engines are located—and the battle
bridge. In such occasions, most crew members are moved to the saucer
for safety.
Command of this ship is currently entrusted to Captain Jean-Luc Picard.
It is considered the highest honor in Starfleet to have served on the
Enterprise with her able crew.
54
CREDITS
CREDITS
Producer
Simon Ffinch
Assistant Producer
Stan Yee
Lead Game Designer
Erol Otus
Game Designers
Simon Ffinch
Paul Kim
Jason Rossilli
Sami Tabikh
Lead Programmer
Greg Blaha
Programmers
David Stidolph
Sami Tabikh
Supporting Programmers
Erick Jap
Kuswara Pranawahadi
Kevin Ray
Additional Programmers
Chuck Hughes
Mike Winter
3-D Engineer
Marc Reynolds
Supervising Artist
Erol Otus
Artists
Sebastian G. Hyde
Sunil Mukherjee
Suzanne Onodera
Gavin Wood
Additional Artists
Chuck Butler
Greg Dyer
Brandon Perlow
Greg Smith
Osman Soykut
Paul Wood
55
STG ENG MAN 21.2.97_P.Script
8/5/99 12:58
Page 56
CREDITS
CREDITS
Movie Production Supervisors
Aron Bonar
John Edwards
Movie Visual Effects Artists
Aron Bonar
Matt Carlström
John Edwards
Suzi Hammon
Brian LeFrance
Video Digitizing by
Additional Visual Effects by
Deanan DaSilva of Delusion
(Digital Illusion)
Lead Scripter
Steve Tsai
Scripters
Matthew Archambault
Bing Crowell
Simon Ffinch
Erin Fritz
Sam Kolb
Paul Mogg
Scott Petersen
Additional Scripter
Julien Beasley
Lead World Builder
Jason Rossilli
World Builders
Grace Chen
Bing Crowell
Steve Tsai
Gavin Wood
Additional World Builder
Casto Vocal
Scriptwriters
Kyle Brink
Naren Shankar
Daniel Young
Audio Director
56
Deanan DaSilva of Delusion
(Digital Illusion)
Music Composed and Produced by Steve Scherer
Lead Sound Designer
J. White
Sound Designer
Scott Petersen
Quality Assurance Manager
Evan Birkby
Quality Assurance Lead
Vansouk Lianemany
Quality Assurance Testers
Olivia Allende
Sean Blair
Willis Emery
Michael P. Gonos
Brian M. King
Chris McCoin
Bill Schmidt
Ken Schmidt
Victor Spiegel
Andreia Wilson
Compatibility Manager
Hoi Nguyen
Compatibility Technicians
William Hom
Khoi Nguyen
Manual Writer
Aaron Malchow
Manual Editor
Marisa Ong
Manual Editor (Europe)
Alkis Alkiviades
Product Marketing Manager
Stephen Haney
Product Marketing Manager
(Europe)
Matt Carroll
Promotions Coordinator
Carter Lipscomb
Marketing Services Manager
Kathryn Lynch
Creative Director
Rick Rasay
Paul Mogg
57
STG ENG MAN 21.2.97_P.Script
8/5/99 12:58
Page 58
CREDITS
CREDITS
Project Coordinator
Jerome Paterno
Senior Graphics Artist
Reiko Yamamoto
Starring
Vice President, Corporate
Communications
Holly Hartz
Public Relations Manager
Kathy Sanguinetti
Public Relations
Bender, Goldman & Helper
Director, Corporate Services
and Purchasing
Guymond Louie
Corporate Services Buyer
Rosa Galloso
Viacom Consumer Products
Suzie Domnick
Randy Casey
Juliet Dutton
Robert Read
Patrick Stewart as Captain Jean-Luc Picard
Jonathan Frakes as Cmdr. William Riker
LeVar Burton as Lt. Cmdr. Geordi La Forge
Michael Dorn as Lt. Cmdr. Worf
Gates McFadden as Dr. Beverly Crusher, M.D.
Marina Sirtis as Cmdr. Deanna Troi
Brent Spiner as Lt. Cmdr. Data
Majel Barrett as the Ship’s Computer
William Shatner as Captain James T. Kirk
Malcolm McDowell as Dr. Tholian Soran
Very Special Thanks
John Vifian
Special Thanks
58
Star Trek: The Next Generation
Consultants
Michael Okuda
Denise Okuda
Naren Shankar
Recording Studios
Enterprise InterActive, Burbank, CA
Buzzy’s Recording Studios,
Hollywood, CA
3-D Authoring Tool by
Michael Case of Digital Dialect
Video Segments Produced by
Direct Images of Oakland, CA
Producer of Blue Screen Shoot
Bill Nolan
Stand-in for Malcolm McDowell
Randi Hall
Carrie Galbraith
Mathias Genser
Mesceille Ogata
Denise Okuda
Michael Okuda
Chuck’s dog, Lucy
State of Nevada, Department of Conservation and
Natural Resources, Division of State Parks
59
STG ENG MAN 21.2.97_P.Script
8/5/99 12:58
Page 60
TECHNICAL ASSISTANCE
MICROPROSE CUSTOMER SERVICES
TECHNICAL ASSISTANCE
If you experience difficulties with the game, you may need some help
from us. As we receive many calls every day, we can deal with your
enquiry more efficiently if you have the following information available:
1. The correct name of the game
2. The type of computer and specifications you are running it on
3. Your Windows version
4. How much memory you have
5. The exact error message reported (if any)
6. The version # of the game
7. The size of your Windows swap file
8. The name of any alternative Windows front ends
MSD Report
Occasionally, MicroProse Customer Services may request an MSD report
from you. MSD is a diagnostic program that can help establish the cause
of most compatibility problems on your PC while attempting to run our
games. This program is supplied with all versions of DOS and
Windows™, however Windows™ 95 users will first need to copy the
program from the Windows™ CD to the hard drive with the following
command: copy d:\other\msd\msd.exe c:\windows\command
MICROPROSE CUSTOMER SERVICES
United Kingdom
Telephone: +44 (0) 1454 893900 (0900-1730 GMT/BST)
FAX:
+44 (0) 1454 894296
MicroProse, The Ridge, Chipping Sodbury, South Glos BS17 6BN
Germany
Telephone: +49 (0) 5241 946480 (Monday & Wednesday 1400-1700)
FAX:
+49 (0) 5241 946494
MicroProse, Bartholomaüsweg 31, 33334 Gütersloh
France
Telephone: +33 (04) 72 53 25 00
Electronic Arts, Centre d’Affaires Télébase, 3 rue Claude Chappe, 69771
St. Didier au Mont d’Or Cedex
USA
Telephone: +1 510 522 1164
(0900-1700 Pacific Time)
FAX:
+1 510 522 9357
MicroProse, 2490 Mariner Square Loop, Alameda, California, 94501
To generate your MSD report, first exit Windows 3.x or ‘95 and place a
spare formatted floppy disk in drive A: and type: msd /f a:report.txt
You can then print this report or send the disc to MicroProse (should
this be required).
Contacting Us
Ring us on 01454 893900, Monday to Friday between 09.00 and 17.30
hours. Have a pen and paper handy when you call.
Fax us on 01454 894296.
Alternately, you can write to Customer Services at the address shown in
this document.
Due to the many different hardware/software configurations available
for modern PCs, you may still have to talk to your computer dealer, or
hardware supplier, in order to get our game to run with their product.
Software Fault
In the unlikely event of a software fault please return the complete
package, with your receipt, to the place of purchase.
60
61
STG ENG MAN 21.2.97_P.Script
8/5/99 12:58
Page 62
ON-LINE SERVICES
ON-LINE SERVICES
Bulletin Boards
United Kingdom
Germany
USA
+44 (0)1454 327083
+44 (0)1454 327084
+49 (0)5241 946484
+1 510 522 8909
(14,400 baud)
(14,400 baud)
(28,800 baud)
(14,400 baud)
CompuServe
MicroProse-Europe
71333,314
MicroProse-Germany 74777,3326
MicroProse-USA
76004,2144
MicroProse Forum and Library areas can also be found at ‘Game
Publishers Forum B’ (GO GAMEBPUB)
AOL
Send e-mail to our postbox at: mps1
MicroProse Forum and Library areas can also be reached by pressing ‘ck’
for ‘go to keyword’ and choosing ‘microprose’.
Internet
E-Mail
Messages can be sent to the following address for support, questions
and queries:
[email protected]
[email protected] (Germany)
FTP
The MicroProse FTP site features a complete library of the latest
updates, demos and product information. The address is:
ftp.microprose.com
World-Wide-Web
Our WWW pages contain information on a large number of current and
upcoming MicroProse products. Use your Web Browser software to point to:
http://www.microprose.com
62
63
STG ENG MAN 21.2.97_P.Script
8/5/99 12:58
Page 64
MICROPROSE SOFTWARE LICENSE AGREEMENT
MICROPROSE SOFTWARE LICENSE AGREEMENT
The enclosed software program is licensed by MicroProse to customers
for their use only on the terms set forth below. Opening this package or
using the enclosed discs indicates your acceptance of these terms.
MicroProse hereby grants you a non-exclusive license to use the
enclosed software and manual subject to the terms and restrictions set
forth in this Software License Agreement.
This manual and the software accompanying it are copyrighted, with all
rights reserved. You may not copy or otherwise reproduce any part of
this software or the manual, except that you may load the software into
a computer as an essential step in executing the software on the
computer. The original and any back-up copies of the software and the
manual are to be used only in connection with a single computer. You
may physically transfer the software from one computer to another,
provided that the software is used in connection with only one computer
at a time. You may not transfer the software electronically from one
computer to another over a network. You may not distribute copies of
the software or the manual to others.
YOU MAY NOT USE, COPY, MODIFY, TRANSFER, SUBLICENSE, RENT,
LEASE, CONVEY, TRANSLATE, CONVERT TO ANY PROGRAMMING
LANGUAGE OR FORMAT OR DECOMPILE OR DISASSEMBLE THE
SOFTWARE OR ANY COPY, MODIFICATION OR MERGED PORTION, IN
WHOLE OR IN PART, EXCEPT AS EXPRESSLY PROVIDED FOR IN THIS
LICENSE.
64


![ManualCover-3Panel10_03 [Converted]](http://vs1.manualzilla.com/store/data/005711777_1-408df82eece155ec198a9b3b174c8b0a-150x150.png)