1
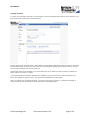
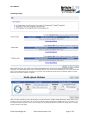
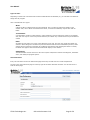
User Manual
Welcome
Welcome to Article Promoter 2.16 User Guide!
Article Promoter makes it easy for non-technical users to easily update and manage articles, news stories,
headlines, and editorials. Packed with plenty of features, but yet so simple and easy to use, Article Promoter is the
perfect solution for publishing articles on the web.
After Article Promoter is installed on your server, you can begin adding articles or setting up user accounts.
Keeping track of which articles need approval and keeping your website up-to-date has never been easier!
A final note - we will continue to update the documentation and we would greatly appreciate any feedback you
could give us. If you find any sections confusing or lacking in information, please e-mail us at
[email protected] to let us know. We thank you for your input.
Logging In
To login to Article Promoter, enter the web address to Article Promoter admin into your browser. For example:
http://www.yoursitename.com/cgi-bin/artman2/admin.cgi
After you arrive at the Article Promoter login page, enter your username and password to login.
If you have forgotten either your Username or Password, use the 'Forgot your password?' link on the login page to
be emailed the details.
© GSL Technologies Inc.
GSL Article Promoter 2.16
Page: 1 of 9
User Manual
Program Basics
Article Promoter's user interface has been designed to be simple and easy to navigate. At the top of each page, a
blue navigation bar allows you to access the different features of Article Promoter. At any point you may navigate
to other sections of the program, but be cautious to save your work before you do so. When creating a new record
or modifying an already existing one, no changes are recorded until the "Save" button is clicked.
If you accidentally go to another page or click "Cancel", you can usually click the "Back" button on your web
browser, and it will remember what was last entered in the form. This functionality may or may not be available, as
it is dependant on your web browser, not Article Promoter.
© GSL Technologies Inc.
GSL Article Promoter 2.16
Page: 2 of 9
User Manual
Creating an Article
To create your first article, first click on "Create Article" in the blue navigation bar at the top of the interface. You'll
be presented with a blank form in the Article Editor.
Start by filling out the Title field. Enter a short abstract in the Summary field and type the main body of your article
into the Content field. An article cannot be saved or previewed without belonging to a Category (Menu), so make
sure to select a Category from the drop-down list.
Another field which may be available to you is the Status field. If you want to be able to preview or publish your
article, make sure to set it to "visible".
If your administrator has made the 'filename' field available, you'll be able to enter a unique filename for your
article. For example, by typing "events", your article will be published as "events.shtml".
After you've filled in all the appropriate fields, you can save your article, preview it, or upload some images to
include. Please see the next section for more information on uploading images.
© GSL Technologies Inc.
GSL Article Promoter 2.16
Page: 3 of 9
User Manual
WYSIWYG Editor
The cross browser WYSIWYG rich text editor supports multiple web browser for both Windows and Mac OS X. With
the WYSIWYG editor enabled for either the summary, content, or additional article fields, you can format text
similar to using a word processor and without knowing any HTML.
Your editing options include bold, italic, underline, align left/center/right, numbered lists, bulleted lists, indent
right/left, text color, text highlight color, insert horizontal rule, add link, add email link, add image link, and view
html source.
Supported Browsers:
for Windows users:
•
•
•
•
for Mac OS X users:
Internet Explorer
5.5+
Firefox 1.0+
Mozilla 1.7+
Netscape 7.1+
•
•
•
Firefox 1.0+
Mozilla 1.7+
Netscape 7.1+
Note: Browsers not supported will display a regular text area that can not be edited.
Editor Buttons
Change text to bold
Choose font color
Change text to italic
Choose background color
Underline text
Insert horizontal rule
Align left
Insert link
Align center
Insert image
Align right
Insert table
Create a numbered list
Edit selected table or cell
Create a bullet list
View and edit html source
Indent right
Full screen edit mode
Indent left
Paste from Word
© GSL Technologies Inc.
GSL Article Promoter 2.16
Page: 4 of 9
User Manual
Entering content
The WYSWYG editor allows you to create content with word processor-like formatting. Type your content directly
in, then highlight the text you wish to style (make bold, italic or change the text color for example). Copying and
pasting content into the editor from other sources works as well but note that the content may require some
additional styling and formatting after being added. Also, pasting in content that was copied from Word or email
software can sometimes add extra line spaces.
There is some browser specific differences with the editor to note. Using Internet Explorer 5.5+ (Windows), as you
enter text, pressing <enter> starts a new paragraph, which leaves a blank line. For single line breaks, press
<shift> + <enter>. With all other supported browsers (Mozilla, Firefox and Netscape), pressing <enter> adds a
single line break. To start a new paragraph, press <enter> twice.
Inserting web page links and email links
You can add either web page links or email links within your content using the Hyperlink button. Here are the
options available:
•
•
•
Source dropdown: choose the type of link, for example, http:// for a web link or mailto: for an email
link. In the following field, enter the rest of the link URL or email address.
Target dropdown: by default links will open in the same browser window. To have links open in a new
browser window, select "Blank" from the Target dropdown list.
Text field: enter text your want to have appear when a user mouses over the link (ex. Click here for
more information)
Note: Advanced users can add anchor links within the content that will automatically appear in the Bookmark
dropdown. To do this, select the "View Source" button and add an anchor tag within the content. Ex.<a
name="anchor link name">
Inserting images
To insert online images into your content, use the Image button. Here are the options available:
•
•
•
•
Source field: enter the URL of the image (ex. http://www.yoursite.com/image.jpg)
Title field: enter "alt" text (optional)
Alignment dropdown: use to choose the alignment of your image. The example at the bottom of the
Image popup shows you how your choice will look.
Additional image options that can be set include: border, image height and width as well as spacing.
Note: To learn about uploading images to include in your content see the “Uploading Images” and “Image
Placeholders” sections of the documentation.
Inserting tables
There are two ways to create tables after selecting the Table button:
1.
Mouse over the table grid to choose the number of columns and rows.
© GSL Technologies Inc.
GSL Article Promoter 2.16
Page: 5 of 9
User Manual
2.
Or choose the "Advanced Table Insert" link at the bottom of the table grid to open the Insert Table popup
window.
Creating a table using the table grid creates a table with no borders. Borders can then be added to the table by
selecting the table, then clicking the Edit Table/Cell button, and choosing the Edit Table option.
Using the "Advanced Table Insert" option to create a table includes the option to select borders and column and
row spans when creating the table.
Editing tables and cells
After selecting the table to edit, the three main table and cells editing option categories are Table Size, Edit Table
and Edit Cell.
•
•
•
Table Size: This option allows you to insert rows and columns, increase/decrease row spans and col
spans as well as delete rows and columns.
Edit Table:
o AutoFit: choose width and height of table by auto fitting to content, window or by selecting size
by pixels or percent.
o Properties: choose table alignment, margins, borders, cell spacing and padding.
o Style: preview the CSS style that has been created or edit CSS directly.
Edit Cell:
o AutoFit: choose width and height of a cell by auto fitting to content or by selecting size by pixels
or percent.
o Properties: choose text alignment, borders, cell spacing and padding.
o Style: preview the CSS style that has been created or edit CSS directly.
Viewing and editing html source
To enter HTML directly into the WYSIWYG editor , select the Edit/View Source button "<>", then paste the HTML
code. Next click the "apply" button to see the results in the editor. To preview the results on your webpage before
publishing, click the "Preview without publishing" button. This will open a new window with the full article publish
preview results.
Full screen edit mode
Full screen edit mode allows you to expand the WYSIWYG editor to the full size of your browser window. To return
the WYSIWYG editor to the original size, click the Full Screen button again.
Paste from Word
Use the Paste from Word button to paste in article content that was written in Word. This will prevent the extra
code, characters and formatting that Word adds.
© GSL Technologies Inc.
GSL Article Promoter 2.16
Page: 6 of 9
User Manual
Uploading Images
Each article can have up to twenty-five images associated with it, which can be inserted into the Content,
Summary, and spare fields of the article. To upload images, click the "Add or Upload File(s)" link on the article edit
page. In the Upload Files pop-up window you will see a list Upload File fields. Click the "Browse" button to select
files from your local computer to upload.
After you click "Upload" from the upload page, you'll be sent to the "Modify Upload Attributes" page, where you'll
be able to see your images and enter in title and captions. Additional options available allow you to choose to use
an image thumbnail (smaller version of the image), set the image alignment and make the image link to a larger
image or another web page.
© GSL Technologies Inc.
GSL Article Promoter 2.16
Page: 7 of 9
User Manual
After you've saved your changes, you'll be returned to editing the article. Note that any images you've uploaded
will now be listed on this page under "Uploaded Images".
To erase images, click the "remove" link beside the image To modify the image (title, caption, alignment, etc.) click
the "modify" link.
Please note that images do not automatically get published in your articles. To publish your images, please read
the next section on “Image Placeholders”.
Image Placeholders
You can place uploaded images in your articles by inserting special placeholders into the Content, Summary, or
spare fields. Listed on the edit article page are all of the images which have been uploaded for an article, as well as
a sample placeholder for each.
Example: ***image1***
To place an image in your article, cut-and-paste the placeholder (***image1***) for your image into the Content,
Summary, or a spare field. Article Promoter will insert your images and respective captions wherever your
placeholders appear.
On Windows use Ctrl + c to copy and Ctrl + v to paste.
On Mac use 'Apple' + c to copy and 'Apple' + c to paste.
Use the "Preview" button to get a look at what the page will look like when published.
Browsing Articles
If you've been given access to list articles, you'll see a button in the blue navigation bar labelled "Articles". From
the Article Editor, you can modify and erase articles.
When browsing through articles, you can use the Keyword Search function to narrow down the number of entries
to search through. You may also elect to only display articles from a specific Category, or with a specific Status
(click the "advanced search" link to display these additional options.
Article Promoter remembers your last search settings for a while if you leave the page and return, and it may be
confusing at first to only see one or two records. To show all of your records again, use the "Reset" button, which
resets the Keyword Search.
© GSL Technologies Inc.
GSL Article Promoter 2.16
Page: 8 of 9
User Manual
Types of Users
Depending on what level of access Article Promoter's administrator has afforded you, you'll be able to do different
things with the program.
Here is the different User Types:
Writer
A Writer is able to submit articles to some categories, but is not able to make them appear on the
website. Also, once a Writer has submitted an article, it cannot be modified by anyone other than an
Editor.
Trusted Writer
A Trusted Writer is able to create articles in some categories, and can make them visible on the website.
Also, this user may see a list of any articles that they've created. Any of these articles may be modified or
erased.
Editor
An Editor has full control over some of the categories on the site. This user may modify and delete any
articles in these categories. An Editor may also view articles that have been submitted by Writers, these
articles will have a status of "pending". By modifying these articles and changing the status to "visible",
the Editor can approve these articles and make them display on the website.
Administrator
The administrator has full control over the entire system: add/remove articles and categories, administer
users, and modify the program options.
User Preferences
Every user has access to the User Preferences page where they can edit their user email and password.
The link to the User Preferences page is at the top right of the Article Promoter interface. You can also link to it
from the Home page.
© GSL Technologies Inc.
GSL Article Promoter 2.16
Page: 9 of 9