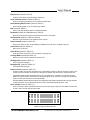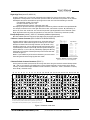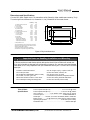
1
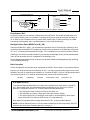
User’s Manual
BPP-420 • v4.0 • 2/03 • pg 1
4x20 Serial LCD Module (BPP-420) v4.0
The BPP-420 is an LCD module with attached serial interface. This combination works like a simple
serial-receive terminal at 2400 or 9600 baud (switch selectable). Common control codes like carriage
returns, linefeeds, tabs, backspace, etc. are supported. The display also implements instructions for
cursor positioning, backlight control, large-character display, and right-aligned printing.
New Features in Rev 4.0. This latest version of BPP-420 has the following new features:
• Ability to redefine custom, block-graphics characters.
• Jumper pads to increase backlight brightness or set backlight always on.
• 64-byte buffer, large alpha (A-Z) characters, right-alignment (introduced in rev 3.0)
The revision is identified by “BPP4/PT” printed in the lower right portion of the serial daughterboard.
Table of Contents
Pinout of the BPP-420...............................................................................................................2
Configuration.............................................................................................................................2
Hookup for Use .........................................................................................................................2
Pizeo Buzzer Bell ......................................................................................................................3
Backlight Option Pads...............................................................................................................3
Basic Operation.........................................................................................................................3
Control Codes and Special Features ........................................................................................3
Old-Mode Operation..................................................................................................................3
Program Examples....................................................................................................................7
Dimensions and Specifications .................................................................................................8
Important Notes on Handling, Installation, and Mounting ............................................... 10
Disclaimer of Liability
Scott Edwards Electronics, Inc. is not responsible for any special, incidental, or consequential damages resulting
from any breach of warranty, or under any legal theory, including lost profits, downtime, goodwill, damage to or
replacement of equipment or property, and any costs or recovering, reprogramming, or reproducing of data
associated with the use of the hardware or software described herein.
Warranty
Scott Edwards Electronics, Inc. warrants this product against defects in materials and workmanship for a period
of 90 days. If you discover a defect, we will, at our option, repair, replace, or refund the purchase price. Return
the product with a description of the problem. We will return your product or its replacement via standard shipping.
Expedited shipping is available at the customer’s expense.
• Note: Abusing the module, or attempting to repair or modify it, voids this warranty.
Trademarks and Copyrights
Windows® and MS-DOS® are registered trademarks of Microsoft Corporation; BASIC Stamp® is a registered
trademark of Parallax Inc. All trademarked names referenced herein are the property of their respective holders.
This manual in its entirety is copyright Scott Edwards Electronics, Inc., 1995—1999.
Scott Edwards Electronics, Inc.
1939 S. Frontage Road, Suite F, Sierra Vista, AZ 85635 USA
ph: 520-459-4802 • fax: 520-459-0623 • www.seetron.com
User’s Manual
BPP-420 • v4.0 • 2/03 • pg 2
Pinout of the BPP-420
Connections to the BPP-420 are made through a 5-pin header on the serial interface daughterboard,
as shown in figure 1 below. Note that the photo is upside down with respect to the LCD. This was done
in order to show the labels on the circuit board rightside-up. (The same board is used with 4x40 LCDs,
where the labels match the LCD orientation.)
back
Closeup of J4
contrast
control
piezo-buzzer output:
5Vdc at 25mA or less
darker
Closeup of J1
+5V
pins are 0.025" posts
on 0.100" centers
TOP
GND
Serial data
Closeup of S1
Duplicate +5V and GND
connections (see text)
OFF
ON
2 = BAUD
2400
9600
1 = MODE
NORMAL
OLD
Figure 1. Connections and controls.
Do not reverse +5V and GND, even momentarily. Reversed power will destroy the electronics.
Do not exceed 5.5V into +5. Overvoltage will damage the module.
Connect power only through J1. Connecting power to other points on the module will damage it.
Read and follow installation guidelines on page 10. Improper handling voids the warranty.
Configuration
Mode. Set the mode switch (1) OFF/down to use the features and instructions described in this manual.
Set mode ON/up to emulate operation of the LCD Serial Backpack®. Unless you are using this display
to replace an older (circa 1996) 4x20 serial display, leave this switch OFF. See note on page 3.
Baud. Set baud switch (2) OFF/down for 2400 baud, ON/up for 9600 baud. Other parameters are
always no parity, 8 data bits, 1 stop bit (N81).
NOTE: The BPP-420 reads the switches only at startup. Change settings only with the power off.
Hookup for Use
Figures 1 and 2 show how to connect serial I/O and power to the BPP-420. Make sure that the power
polarity is correct. Reversing +5 and GND will damage the BPP-420 and possibly your power supply.
The power source should be regulated to 5 volts ±0.25 volts and be capable of supplying 100mA
(maximum current draw with the LED backlight on).
J1, the 5-pin connector, has two extra pins for +5 and GND. These pins are arranged in a pallindrome
layout. If you make a matching 5-pin connector, the connections will always line up properly regardless
of connector orientation. Suitable female crimp sockets for making connectors are available from
Jameco (www.jameco.com, PN: 100765). Digi-Key carries ready-made 5-pin socket and flex-cable
assemblies in varying lengths (www.digikey.com; example part no.: A9BAG-0506F-ND).
Scott Edwards Electronics, Inc.
1939 S. Frontage Road, Suite F, Sierra Vista, AZ 85635 USA
ph: 520-459-4802 • fax: 520-459-0623 • www.seetron.com
User’s Manual
BPP-420 • v4.0 • 2/03 • pg 3
PC Serial (comm) Port
BASIC Stamps
Stamp
J1
DB-9 female
(solder side)
1
2
3
4
7
SER
GND (Vss)
GND
+5V (Vdd)
GND
5
+5
6
J1
8
I/O pin 0
+5
9
+5
SER
power
supply
Figure 2. Connecting to PC serial port, BASIC Stamps.
Piezo Buzzer “Bell”
As figure 1 shows, you can connect a piezo buzzer to the BPP-420. The buzzer will beep when the
ASCII bell character (cntl-G) is received. The buzzer must have an internal oscillator and work on
5V at 25mA or less. Suitable units are Jameco 76021, Radio Shack 273-065, and Digi-Key P9948.
Connecting anything other than a suitable buzzer to J4 will void the warranty.
Backlight Option Pads (BRIGHT and BL_ON)
Pads marked BRIGHT and BL_ON customize the operation of the LED backlight. Soldering a wire
across the pads marked BRIGHT changes the current-limiting resistance in the backlight circuit from
16Ω to 8Ω, increasing the brightness of the light. This increases max current draw to about 150mA.
Soldering a wire across the pads marked BL_ON connects the backlight directly to the module’s power
input so that whenever the unit is powered up the backlight is on.
Do not attempt these modifications unless you are skilled at soldering. Damage due to poor soldering
is not covered by warranty.
Basic Operation
Set the configuration and connect serial input/power to the BPP-420 as shown in the previous sections.
Now you can send text serially to the display. On a PC, you may use a terminal program (such as the
Windows Terminal or Hyperterminal accessory, or Procomm for DOS). Set it for the appropriate baud
rate (matching switch 2). In addition to the baud rate, the terminal should be set for:
no parity
8 data bits
1 stop bit
flow control = none
local echo = on
OLD-MODE Operation
The codes and features described in this manual are available only when switch 1 (mode) is
OFF. When mode is ON, the interface emulates the operation of our original LCD Serial
Backpack® installed to a 4x20 LCD. There are some inevitable differences:
• BPP-420 draws about 5mA versus 2mA for the older unit.
• BPP-420 does not require a delay after clearing the screen (buffer).
• BPP-420 controls the LED backlight, even when in old-compatibility mode. Send
bytes <254><255> for ON and <254><0> for OFF (old mode only).
New users of this product should always leave switch 1 OFF to use the newer features.
NOTE: Users of older 4x20 serial LCDs connected the backlight to power separately. DO NOT
do that with this version! Connect power only through J1.
Scott Edwards Electronics, Inc.
1939 S. Frontage Road, Suite F, Sierra Vista, AZ 85635 USA
ph: 520-459-4802 • fax: 520-459-0623 • www.seetron.com
User’s Manual
BPP-420 • v4.0 • 2/03 • pg 4
Control Codes and Special Feaures
Table 1 lists the BPP-420 control codes. To send control codes from a terminal program, hold down
Control and press another key. For example, to send cntl-E (underline cursor) hold down Control and
press E. To send control codes from a program, send the ASCII value as a single byte (not as a text
representation of the number). Using cntl-E as an example, send a single byte containing the value 5
(00000101 binary). Control codes not listed in the table are ignored by the BPP-420 and have no effect.
Table 1. Display Control Codes
Function
Null (ignored prior to buffer)
Cursor home
Start big characters
End big characters
Hide cursor
Show underline cursor
Show blinking-block cursor
Bell (pulse piezo-buzzer output)
Backspace
Horizontal tab (cursor to next multiple-of-4 column)
Smart linefeed (cursor down one line)
Vertical tab (cursor up one line)
Formfeed (clear screen)
Carriage return
Backlight on
Backlight off
Accept cursor-position entry
Format right-aligned text
Begin special instruction*
Code
ASCII
cntl-@
cntl-A
cntl-B
cntl-C
cntl-D
cntl-E
cntl-F
cntl-G
cntl-H
cntl-I
cntl-J
cntl-K
cntl-L
cntl-M
cntl-N
cntl-O
cntl-P
cntl-R
ESC (cntl-[)
0
1
2
3
4
5
6
7
8
9
10
11
12
13
14
15
16
18
27
*NOTE: New (rev 4.0) custom-character instructions (ESC-D and ESC-E) begin with the Escape
character; see listings under Escape at the end of this section.
Null (control-@, ASCII 0)
Nulls are ignored; sending a null to the display has no effect. However, unlike other unused codes, nulls
are not even stored in the display buffer. They may be used as a brief time delay whose length depends
on the baud rate: 2400 bps = 4.16 ms delay; 9600 bps = 1.04 ms.
Cursor Home (control-A, ASCII 1)
Move the cursor to the first character position of the first line.
Begin Big-character Display (control-B, ASCII 2)
Put the display into big-character display mode. In this mode, characters are displayed as four-line-tall
graphics. The display can show up to four big characters at a time. The big character set includes numbers
0—9, letters A—Z (uppercase only), and symbols period (.), hyphen (-), colon (:) and space. The display
remains in big-character mode until it receives a character other than the ones listed, or a control-C. Note
that null (ASCII 0) will not end big-character mode because it is discarded before being buffered.
The numbers and letters are four columns wide followed by one blank column; punctuation and spaces
are two columns followed by one blank column.
Tips for using big characters: Give the display approximately 10 ms to ‘draw’ the characters. If you have
used ESC-D to redefine any of the custom characters, send ESC-E 1 to reset them to defaults before
displaying large characters.
End Big-character Display (control-C, ASCII 3)
End big-character mode without otherwise affecting the display.
Scott Edwards Electronics, Inc.
1939 S. Frontage Road, Suite F, Sierra Vista, AZ 85635 USA
ph: 520-459-4802 • fax: 520-459-0623 • www.seetron.com
User’s Manual
BPP-420 • v4.0 • 2/03 • pg 5
Hide Cursor (control-D, ASCII 4)
Hide the cursor (either type, blinking or underline).
Show Underline Cursor (control-E, ASCII 5)
Show a non-blinking underline cursor at the printing location.
Show Blinking-Block Cursor (control-F, ASCII 6)
Show a blinking block cursor at the printing location.
Bell (control-G, ASCII 7)
Pulse J4 for approximately 100 ms to beep piezo buzzer.
Backspace (control-H or backspace key, ASCII 8)
Move the cursor back one space and erase the character in that space.
Horizontal Tab (control-I or Tab key, ASCII 9)
Move the cursor forward to next multiple-of-four column.
Smart Linefeed (control-J, ASCII 10)
Move cursor down one line. If immediately preceded by carriage return, linefeed is ignored.
Vertical Tab (control-K, ASCII 11)
Move cursor up one line.
Clear Screen (control-L, ASCII 12)
Clear the screen, leaving the cursor in position 0 (see figure 3).
Carriage Return (control-M, ASCII 13)
Move the cursor to the first position of the next line.
Backlight ON (control-N, ASCII 14)
Turn on the LED backlight.
Backlight OFF (control-O, ASCII 15)
Turn off the LED backlight.
Position Cursor (control-P, ASCII 16)
Accept a number (0 to 79) and move the cursor to that position (where 0 is the 1st character of the 1st line
and 79 is the last character of the 4th line; see figure 3). Number may be in text or single-byte format:
Text method: Send the desired display position as a printable text. For example, to move the cursor to
position 21 (2nd character, 2nd line) from a terminal program, press control-P, and type “21” followed by
a space or other character (which will be discarded).
One-byte method: Send the display position as a single-byte value equal to the position plus 64. For example,
to move to position 21 you would send control-P (ASCII 16) followed by ASCII 85 (21 + 64).
Clear Column (control-Q, ASCII 17)
Clear the current column and advance the cursor to the next column, same line. This feature can be used
to clear a four-line-high section of the screen.
0 1 2 3 4 ...
19
20
39
40
59
60
79
Figure 3. Layout of the 4x20 LCD
Scott Edwards Electronics, Inc.
1939 S. Frontage Road, Suite F, Sierra Vista, AZ 85635 USA
ph: 520-459-4802 • fax: 520-459-0623 • www.seetron.com
User’s Manual
BPP-420 • v4.0 • 2/03 • pg 6
Right-align Text (control-R, ASCII 18)
Accept a number from 2 to 9 (as text) representing the width of an area on the screen in which rightaligned text is to be printed. Cursor will back up that number of characters from present cursor position.
Subsequent text will be stored without printing to the screen until one of the following is received:
• The specified number of characters.
• A control character (ASCII 1–31).
• A decimal point [the period (.) character, ASCII 46].
The display will print the text with right alignment and erase any leftover text within the specified width.
For example, move the cursor to the right end of the screen, send control-R (ASCII 18), followed by “5”
(ASCII 53), then “123” and Enter. The “123” will be printed right-aligned within the 5-character space.
Right alignment works only with the standard LCD character set, not with “big” characters (cntl-B).
Escape Sequences (control-[, ASCII 27, followed by additional parameters)
BPP-420 understands two instructions that begin with the escape code (ASCII 27).
NOTE: If you redefine any of the custom characters, you must restore
them using ESC E before using big-character mode.
bit 0 (1)
bit 1 (2)
bit 2 (4)
bit 3 (8)
The BPP-420 has eight custom-character slots. These characters are
mapped to ASCII codes 128 through 135. At startup, the unit loads
bitmaps into these slots for the big-character (cntl-B) mode. Using
the Define instruction, you can change a bitmap. Send Escape (ASCII
27) followed by the letter D (ASCII 68), then the symbol number you
wish to define (0—7, ASCII 48—55), followed by eight bytes defining
the bitmap. The contents of those bytes map to the custom character
as shown in figure 4.
bit 4 (16)
• Define a Custom Character (ESC D n B0 B1 B2 B3 B4 B5 B6 B7)
Byte Values
byte 0
binary
1xx00000
decimal
128
byte 1
1xx00100
132
byte 2
1xx00010
130
byte 3
1xx11111
159
byte 4
1xx00010
130
byte 5
1xx00100
132
byte 6
1xx00000
128
byte 7
1xx00000
128
x is don’t-care bit
Figure 4. Defining a custom symbol.
(see www.seetron.com for bitmap-design tools)
• Restore Default Custom Characters (ESC E 1)
The big-character mode (cntl-B) builds 4-line-high characters using the custom-character bitmaps (ASCII
128 —135). If you use ESC D to redefine one or more of these characters, big characters won’t display
correctly. To restore the bitmaps needed for custom characters, use ESC E 1. That is, send ASCII 27 (ESC),
ASCII 69 (E), and ASCII 49 (1).
32
40
48
56
64
72
80
88
96
104 112 120 128 160 168 176 184 192 200 208 216 224 232 240 248
0
1
2
3
4
5
6
7
To find the ASCII code for a given character, add the row and column numbers.
For example, capital D is in the column marked 64 in row 4, so its ASCII code is
68. Use the reverse procedure to determine the symbol for a given code. For
example, ASCII code 244 produces the symbol Ω, found at colum 240, row 4.
NOTE: ASCII 135–160 are blanks
Figure 5. Character code chart
Scott Edwards Electronics, Inc.
1939 S. Frontage Road, Suite F, Sierra Vista, AZ 85635 USA
ph: 520-459-4802 • fax: 520-459-0623 • www.seetron.com
User’s Manual
BPP-420 • v4.0 • 2/03 • pg 7
Program Examples
Any computer/programming language that can produce serial output (2400 or 9600 bps, N81) can talk
to the BPP-420. The examples here are in BASIC, chosen because of its popularity and readability.
You may download these and other program listings from www.seetron.com.
'
'
'
'
'
'
Program: 420DEMO.BAS (Demonstrate 4x20 Serial LCD with BASIC Stamp I)
This program demonstrates many of the features of the 4x20 Serial
LCD Module from Scott Edwards Electronics, Inc. Set the module to
2400 bps (S1: both switches down). Connect the serial input
of the module to Stamp pin 0, GND to GND and +5V to +5V.
Run this program.
' ===========Define names for LCD instructions==========
SYMBOL noCurs = 4
' Make cursor invisible.
SYMBOL ulCurs = 5
' Show underline cursor.
SYMBOL clrLCD = 12
' Clear entire LCD screen.
SYMBOL posCmd = 16
' Position cursor.
SYMBOL clrCol = 17
' Clear column.
SYMBOL bell = 7
' Ring bell.
SYMBOL wedge = 128
' Wedge-shaped symbol.
SYMBOL bksp = 8
' Backspace.
SYMBOL bigNums = 2
' Begin big numbers.
' =================Begin demonstration=================
pause 1000 ' Wait a sec.
serout 0,n2400,(clrLCD)
' Clear the screen.
for b2 = 0 to 79
serout 0,n2400,(wedge)
' Fill screen with wedges.
next
pause 1000 ' Wait 1 second.
serout 0,n2400,(posCmd,68)
' Move to position 4 (64+4= 68).
for b2 = 1 to 12
' Clear a 12-character swath with
pause 350
' ...the clear-column feature.
serout 0,n2400,(clrCol,bell)
' Ring bell (if available) each loop.
next
' Turn on the underline cursor, move to pos. 26, and show message.
serout 0,n2400,(ulCurs,posCmd,90,"4x20 LCD")
pause 1000
' Wait 1 second.
for b2 = 1 to 8
pause 100
serout 0,n2400,(bksp,bell)
next
pause 1000 ' Wait 1 second.
serout 0,n2400,(noCurs)
' Backspace to erase message.
' Ring bell (if available) each loop.
' Turn cursor off.
' Print the numbers 0 to 99 in big numbers in the middle of
' the screen. Pause a half second between numbers.
for b2 = 0 to 99
serout 0,n2400,(posCmd,70,bigNums,#b2)
pause 500
next b2
END
' Finished.
Scott Edwards Electronics, Inc.
1939 S. Frontage Road, Suite F, Sierra Vista, AZ 85635 USA
ph: 520-459-4802 • fax: 520-459-0623 • www.seetron.com
User’s Manual
BPP-420 • v4.0 • 2/03 • pg 8
Program Examples (cont.)
'
'
'
'
'
'
Program: 420DEMO.BS2 (Demonstrate 4x20 Serial LCD with Stamp II)
This program demonstrates many of the features of the 4x20 Serial
LCD Module from Scott Edwards Electronics. Set the module to
9600 bps (S1: switch 1 down; 2 up). Connect the serial input
of the module to BS2 pin P0, GND to GND and +5V to +5V.
Run this program.
' =========Define names for LCD instructions, bps=======
noCurs
con
4
' Make cursor invisible.
ulCurs
con
5
' Show underline cursor.
clrLCD
con
12
' Clear entire LCD screen.
posCmd
con
16
' Position cursor.
clrCol
con
17
' Clear column.
wedge
con
128
' Wedge-shaped symbol.
bigNums
con
2
' Begin big numbers.
N9600
con
$4054
' Baudmode for inverted, 9600-bps output.
' The constants "bell" and "bksp" are predefined in PBASIC2.
' =================Begin demonstration=================
pause 1000
serout 0,N9600,[clrLCD]
' Clear the screen.
for b2 = 0 to 79
serout 0,N9600,[wedge]
' Fill screen with wedges.
next
pause 1000
' Wait 1 second.
serout 0,N9600,[posCmd,68]
' Move to position 4 (64+4= 68).
for b2 = 1 to 12
' Clear a 12-character swath with
pause 350
' ...the clear-column feature.
serout 0,N9600,[clrCol,bell]
' Ring bell (if available) each loop.
next
' Turn on the underline cursor, move to pos. 26, and show message.
serout 0,N9600,[ulCurs,posCmd,90,"4x20 LCD"]
pause 1000
' Wait 1 second.
for b2 = 1 to 8
pause 100
' Backspace to erase message.
serout 0,N9600,[bksp,bell]
' Ring bell (if available) each loop.
next
pause 1000
' Wait 1 second.
serout 0,N9600,[noCurs]
' Turn cursor off.
' Print the numbers 0 to 99 in big numbers in the middle of
' the screen. Pause a half second between numbers.
for b2 = 0 to 99
serout 0,N9600,[posCmd,70,bigNums,dec b2]
pause 500
next
END
' Finished.
Scott Edwards Electronics, Inc.
1939 S. Frontage Road, Suite F, Sierra Vista, AZ 85635 USA
ph: 520-459-4802 • fax: 520-459-0623 • www.seetron.com
User’s Manual
BPP-420 • v4.0 • 2/03 • pg 9
Program Examples (cont.)
' Program: Q420DEMO.BAS (QBASIC Demo of 4x20 Serial LCD)
' This program demonstrates the 4x20 Serial LCD Module from Scott
' Edwards Electronics, Inc. with QBASIC. This program requires
' slight modifications to run under PowerBASIC or First BASIC,
' available from www.powerbasic.com. A modified version is
' available for download from www.seetron.com/bpk_ex1.zip.
' To run this program, connect the serial input of the LCD
' module to the com port transmit-data pin (pin 3 of DB9;
' pin 2 of DB25). Connect GND of module to com port signal GND
' (pin 5 of DB9; pin 7 of DB25). Configure LCD module for 9600 bps
' (S1: switch 1 down; 2 up). Connect +5V power to LCD module : +5V
' to +5V and GND to GND. Run demo.
DECLARE SUB pause (time AS INTEGER)
CONST clrLCD = 12
' Clear the LCD screen.
CONST noCurs = 4
' Make cursor invisible.
CONST ulCurs = 5
' Turn on underline cursor.
CONST bell = 7
' Beep piezo buzzer (if attached).
CONST bksp = 8
' Backspace.
CONST bigNums = 2
' Begin big-number mode.
CONST clrCol = 17
' Clear column.
CONST wedge = 128
' Wedge-shaped symbol.
CONST posCmd = 16
' Position the cursor.
OPEN "com1:9600,N,8,1,CD0,CS0,DS0,OP0" FOR OUTPUT AS #1
PRINT #1, CHR$(clrLCD);
' Clear LCD.
FOR i = 0 TO 79
PRINT #1, CHR$(wedge);
' Fill the screen with wedges.
NEXT
PRINT #1, CHR$(posCmd); CHR$(68);
' Move cursor to pos. 4 (64+4).
FOR i = 1 TO 12
' Clear a 12-column section of
PRINT #1, CHR$(clrCol); CHR$(bell);
' ..screen. Ring bell w/each loop.
pause (350)
NEXT
PRINT #1, CHR$(posCmd); CHR$(90); CHR$(ulCurs);
PRINT #1, "4x20 LCD";
' Print message on LCD.
SLEEP 1
' Wait a second.
FOR i = 1 TO 8
PRINT #1, CHR$(bksp); CHR$(bell);
' Backspace to erase message.
pause (150)
' Ring bell w/each loop.
NEXT
SLEEP 1
' Wait a second.
PRINT #1, CHR$(noCurs);
' Make cursor invisible.
FOR i = 0 TO 99
' Show #s 0-99 as big numbers.
theNum$ = LTRIM$(RTRIM$(STR$(i)))
' Trim spaces from number string.
PRINT #1, CHR$(posCmd); CHR$(70); CHR$(bigNums); theNum$;
pause (500)
' Wait 1/2 second.
NEXT
END
SUB pause (time AS INTEGER)
FOR i = 1 TO time
PRINT #1, CHR$(0);
NEXT
END SUB
Scott Edwards Electronics, Inc.
1939 S. Frontage Road, Suite F, Sierra Vista, AZ 85635 USA
ph: 520-459-4802 • fax: 520-459-0623 • www.seetron.com
User’s Manual
BPP-420 • v4.0 • 2/03 • pg 10
Dimensions and Specifications
Current BPP-420L models use LCDs manufactured by Powertip; older models were made by Truly.
The sole significant difference is in dimension L, the y dimension of the screen frame.
A
B
C
D
E
F
G
H
I
J
K
L
-
y offset pcb edge to hole ctr
y pcb height
y hole spacing
y screen opening
y character size
x character size
x offset pcb edge to hole ctr
x screen frame
x screen opening
x hole spacing
x pcb width
y frame height
mounting hole diameter
frame depth, non-backlit
frame depth, LED-backlit
Powertip
2.50
60.00
55.00
25.20
4.75
2.95
2.50
98.00
76.00
93.00
98.00
42.00
2.50
5.00
8.50
Truly
2.50
60.00
55.00
25.20
4.75
2.95
2.50
98.00
76.00
93.00
98.00
38.40
2.50
5.00
8.50
A
E
B
C
D
L
F
G
• All dimensions in mm.
• Worst-case tolerance for any dimension is ±0.50mm.
• Maximum depth (from front of screen frame to tips of
interface header posts) is 26mm.
• Dimensions based on information provided by
manufacturers—subject to change without notice.
I
J
H, K
Figure 6. Physical dimensions
Important Notes on Handling, Installation, and Mounting
LCDs are precision-made electro-optical devices that should last a lifetime of normal use.
They are vulnerable to damage from mishandling, however. Our warranty excludes damage
from abuse, so it is very important that you handle and mount your LCD with care. Here are
some tips:
• Handle in a static-safe manner
• Do not drop or strike
• Do not attempt to disassemble, repair, or modify
• Do not drill, cut, notch, grind, etc.
• Mount with machine screws in corner holes
• Do not attempt to enlarge mounting holes
Table 2. Basic
Specifications
• Do not use glue, epoxy, or paint on this unit
• Protect from water, solvents, oils
• Do not bend, warp, or stress
• Install behind a protective transparent window
• Protect from strong electrical fields, ESD
• Protect from reverse-power hookup
Power requirements (BL off).................................4.8 to 5.5 Vdc @ 10mA
Power requirements (BL on)...............................4.8 to 5.5 Vdc @ 100mA
User connector .....................5-pin header; 0.025" posts on 0.10" centers
Connector pinout....................................................+5 GND SER GND +5
Serial input...............RS-232, or inverted TTL/CMOS, 9600 or 2400, N81
Buzzer output .............5V @ 25mA max; pulses approx. 100ms for BELL
Operating temperature.......................................0° to 50°C (32° to 122°F)
Serial data rates ............................................................2400 or 9600 bps
Scott Edwards Electronics, Inc.
1939 S. Frontage Road, Suite F, Sierra Vista, AZ 85635 USA
ph: 520-459-4802 • fax: 520-459-0623 • www.seetron.com