Transcript
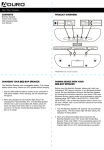
Get Familiar With Your Dash Cam DVR
Dash Cam DVR
USER MANUAL
Please read this manual before operating the Dash Cam DVR and keep it handy.
The Dash Cam DVR is a commercial grade mini car DVR capable of VGA quality color
video and audio.
Car cameras support a variety of law enforcement, industrial, commercial,
and consumer video surveillance applications including:
•
•
•
•
•
Recording the actual events of a car accident for insurance purposes
Monitoring driving instructors or young drivers newly on their own
Surveying commercial drivers such as taxi, truck, and delivery drivers
Keeping valet drivers accountable
Capturing evidence of car vandalism
Viewing Screen
Your purchase should include:
1 x VGA Car Cam
1 x USB Cable
1 x Car Charger
1 x Car Mount
1 x Instruction Booklet
SPECIFICATIONS
SD Card Slot
Video Resolution
640x480
Video Format
AVI
Frames per Second
30
Motion Detected
No
Photo Format
JPEG
Photo Resolution
1280x1024
Water Resistant
No
Battery Life
2 Hours
Type of Memory
SD Card
Memory Capacity
32GB
Recording Capacity
2GB ≈ 1 hour
4GB ≈ 2 hours
8GB ≈ 4 hours
16GB ≈ 8 hours
32GB ≈ 16 hours
USB Interface
2.0 USB
Player Software
VLC Recommended
Operating Systems
Windows 2000
Windows Me
Windows XP
Windows Vista
Windows 7
Windows 8
Mac OSX
Linux
IMPORTANT NOTICE: Allow the device to charge 4 – 6 hours before using.
1. Plug the device into your PC using the USB cable or remove the SD Card and
insert it into the SD Card slot on your computer
2. Locate “Removable Disk” inside the (My) Computer folder
• AutoPlay Removable Disk > Open folder to view files
HOW TO CHARGE THE DEVICE USING YOUR COMPUTER
1. Remove the backing and insert the battery into the back of the device
2. Plug the USB cable into the USB port on the device
3. Plug the USB cable into the USB port on your computer
• The blue and red indicator light will turn on while charging
• The red indicator light will turn off when charging is complete
HOW TO CHARGE THE DEVICE USING YOUR CAR
1. Insert the car charger into the car charging port of the device
2. Insert the car charger into the charging port of your vehicle
HOW TO TURN ON THE DEVICE
1. When connected to your vehicle the device will automatically turn on when
the vehicle is turned on
2. If not connected to your vehicle press and hold the power button until the
device turns on
• The blue indicator light will flash while the device is on
Removable Back for Battery
Power Button
Transfer the Files to Your PC
IMPORTANT NOTICE: Car cameras are designed to run off of constant power. The
internal battery should not be relied upon for extended recording. The purpose of
the battery is to make sure the most recent files are saved in case of an accident
where the unit would normally lose power.
Camera Lens
Crisp clear video
Easily mounts inside almost any vehicle
Capture video for legal, safety, or insurance purposes
Powered by battery or a car’s cigarette lighter
Removable SD card for easy transfer and viewing on any computer
Flip down 2.5” viewing screen
Operating the Dash Cam DVR
Record Button
HOW TO TURN OFF THE DEVICE
1. When connected to your vehicle the device will automatically turn off when
the vehicle is turned off
2. If not connected to your vehicle press the power button again
• The blue indicator light will turn off
HOW TO RECORD VIDEO
1. The device automatically starts recording video once it is turned on
2. To stop recording, press the record button
HOW TO TAKE PHOTOS
1. Press the mode button once to enter photo mode
2. Press the record button
• The screen will turn off and then back on
• Your photo has been saved
HOW TO PREVIEW AND DELETE YOUR VIDEO/PHOTO
1. Press the mode button twice to enter preview mode
2. Use the down/up keys to view your files
• Press the record button to watch videos
• Press the record button to zoom in on photos
3. Press the menu button to delete your video/photo
4. Press the record button to confirm
• You can then choose to delete one or all of your files
Or…
• Go to Start > Computer > Removable Disk
3. Open the Removable Disk drive
4. Open the ADR folder
5. Double click the file you want to view
• VLC Player is recommended for watching videos
Troubleshooting
THE DEVICE WON’T TURN ON
• Charge the device for at least 4 hours before the first use
• Make sures the charging cable is securely inserted into the device and into the power source
THE DEVICE ISN’T CHARGING
• Replace the battery or charging cable
THE DEVICE HAS CRASHED
• You need to reset the device
MY COMPUTER DOESN’T RECOGNIZE THE DEVICE
• Unplug the device from your PC and reboot the device
• Unplug the device from your PC and reboot your PC
• Try using a different USB slot on your PC
• Replace the USB cable
THE SOUND OR VIDEO IS UNCLEAR
USB Port
• The device needs charging
OTHER PROBLEMS
• Email us at [email protected]