1
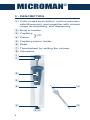
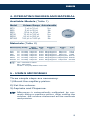
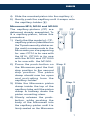
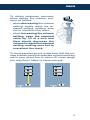
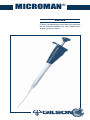
MICROMAN® ENGLISH Other languages can be consulted and downloaded on our website, www.gilson.com. MICROMAN® CONTENTS page 1 - INTRODUCTION 2 2 - PARTS CHECK LIST 3 3 - DESCRIPTION 4 4 - OPERATING RANGES AND MATERIALS 5 5 - USING MICROMAN 5 6 - FITTING THE CAPILLARY AND PISTON 6 7 - SETTING THE VOLUME 8 8 - PIPETTING 10 9 - GLP FEATURES 11 10 - TROUBLESHOOTING 11 11 - CLEANING AND DECONTAMINATION 12 12 - SPECIFICATIONS 14 1 - INTRODUCTION Congratulations on acquiring your new Microman® pipette. Microman is suitable for many different types of application, including pipetting volatile, viscous, dense, or high surface tension liquids. It is a quality product from Gilson, which is fully ISO8655 compliant, CE labeled (conforms to the EC directive on in vitro diagnostic medical devices). The six models permit precise and accurate pipetting of viscous, dense and vaporous liquids. They also allow contamination free pipetting, avoiding vapor contamination and crosscontamination. M25, M50 and M250, with thin and long CPs are especially suited for use with long or narrow vessels. M10 and M100 autoclavable models are especially suited for 100 % contamination free pipetting. Enjoy the following features: 2 ENGLISH - Microman pipettes are equipped with a positive displacement mechanism that isolates the aspirated liquid from the body of the pipette. The positive displacement mechanism prevents the sample-to-sample contamination that can result from the aerosol effect. - Microman uses disposable capillaries and pistons. Changing these parts, which must be the only ones to make contact with the aspirated liquids, can provide absolute protection against the contamination caused by carry-over from one sample or reagent to another. You simply have to change the capillary and piston between each assay; they are automatically and simultaneously ejected, thus avoiding any risk to the operator. - Microman is equipped with a direct reading volumeter that allows precise and continuous adjustment of the required volume. Microman is permanently calibrated at the manufacturing stage, the capillary and piston are positioned automatically, therefore it requires no further calibration. - Microman requires no lubrication or maintenance, because of the nature and quality of the materials used in its construction. 2 - PARTS CHECK LIST Just take a moment to verify that the following items are present: - Microman, User's Guide, Safety bag, Adhesive id-tags (strip of 6), Capillary-pistons (10), Certificate of conformity (including bar-code sticker). 3 MICROMAN® 3 - DESCRIPTION Color coded push-button (red for autoclavable Microman), and magnifier with volume range for aspirating, and dispensing. Body or handle. Capillary. CP Piston. Capillary-piston holder. Shaft. Thumbwheel for setting the volume. Volumeter. } 4 ENGLISH 4 - OPERATING RANGES AND MATERIAL Available Models (Table 1) Model Volume Range Autoclavable M10 M25 M50 M100 M250 M1000 1 µL to 10 µL 3 µL to 25 µL 20 µL to 50 µL 10 µL to 100 µL 50 µL to 250 µL 100 µL to 1000 µL Yes No No Yes No No Materials (Table 2) Model Spring Clamp Shaft Body CP Holder (B) M10 M25 M50 M100 M250 M1000 Polyester Polyester Polyester Polyester Polyester Polyester ☞ SS SS SS SS SS SS Be Alloy Be Alloy Be Alloy Be Alloy Be Alloy Be Alloy PVDF PVDF PVDF PVDF PVDF PVDF Capillary (C) Polypropylene Polypropylene Polypropylene Polypropylene Polypropylene Polypropylene Piston (P) C-P Polyester CP10 Polyester CP25 Polyester CP50 Polyethylene CP100 Polyethylene CP250 Polyacetal CP1000 SS = Stainless Steel Be = Beryllium PVDF = Polyvinylidene Fluoride 5 - USING MICROMAN Three simple steps are necessary: 1) Mount the capillary-piston. 2) Set the volume. 3) Aspirate and Dispense. Microman is automatically calibrated, by correctly fitting a capillary-piston. After setting the volume, the volume measured will be accurate and precise. 5 MICROMAN® 6 - FITTING THE CAPILLARY AND PISTON Never lubricate the capillary-holder, capillary, or any other part of the pipette. If the capillary tends to slip off the capillary-holder, clean the capillaryholder with ethanol, using a medical wipe or similar soft tissue. Microman M25, M50 and M250 Take care not to damage the sealing tip when you handle the piston . 1) Verify that the model of capillary-piston (identified on the Tipack security sticker on the rack) corresponds to the Microman you are preparing for use: CP25 is for use with the M25, CP50 is for use with the M50 and CP250 is for use with the M250. 2) Press the push-button to the second stop to open the clamp . 3) Select a piston and slide the stem fully into the clamp. 6 ENGLISH 4) Slide the mounted piston into the capillary . 5) Gently push the capillary until it snaps onto the capillary-holder . Microman M10, M100 and M1000 The capillary-pistons (CP) are delivered already assembled. To fit a capillary-piston, follow this procedure: 1) Verify that the model of - CP capillary-piston (identified on the Tipack security sticker on the rack) corresponds to the Microman you are preparing for use: CP10 is for use with the M10, CP100 is for use with the M100 and CP1000 is for use with the M1000. CP 2) Press the push-button on Step 2 the Microman past the first stop position to the second stop position. The piston clamp should now be open and protruding from the capillary-holder. 3) Slide the Microman piston clamp inside the top of the capillary tube until the piston clamp is halfway down the piston mounting stem. 4) Slowly release the pushbutton, while pushing the body of the Microman into the capillary-piston until it is firmly seated on the Microman. Step 3 7 MICROMAN® 5) Continue releasing the push-button to ensure that the piston is secured by the piston clamp. 6) To ensure that the piston is correctly seated, and therefore calibrated, slowly press the push-button until you feel and hear a slight click. 7- SETTING THE VOLUME The volume of liquid to be aspirated is set using the volumeter. The volumeter consists of three number-dials, which are read from top (most significant digit) to bottom (least significant digit). A marker is used to set exact or intermediate volumes using the scale on the bottom dial. The dials are colored either black or red to indicate the position of the decimal point, according to the model (see examples). ��� � � � ���� � � � ��� � � � ������ ����� ������ Model M10, M25, M50 M100, M250 M1000 ��� � � � ���� � � � ����� ������� ������ ������� � � � Color of volumeter numbers Black Red µL 0.1 µL µL none 0.1 and 0.01 mL mL The volume is set by turning the thumbwheel slowly to reach the required setting. 8 ENGLISH To obtain maximum accuracy when setting the volume, proceed as follows: - when decreasing the volume setting, slowly reach the required setting, making sure not to overshoot the mark. - when increasing the volume setting, pass the required value by 1/3 of a turn and then slowly decrease the volume to reach the required setting, making sure not to overshoot the mark. To avoid parallax errors, make sure that the volume indicator and the selected volume marking are in your direct line of vision. At close range you may find it helps to close one eye. 9 MICROMAN® 8 - PIPETTING Aspirating - press the push-button to the first stop (1), - immerse the capillary 2 mm into the liquid, - slowly, release the push-button to draw up the liquid (top position), - wipe any liquid from the outside of the capillary, taking care not to touch the orifice. Top 1 2 Dispensing - place the end of the capillary against the inside wall of the recipient vessel, - press the push-button slowly to the first stop, - keeping the push-button depressed, move the capillary away from the side wall, - withdraw Microman from the vessel and release the push-button. Ejecting the Piston-capillary: Press the push-button to the first stop (1), then press harder to the second stop (2); at this point the piston and capillary are ejected simultaneously. 9 - GLP FEATURES These are as follows: - No-need-to-touch disposables (capillary-piston). - Serial Number: engraved on body of the pipette. 10 ENGLISH - Bar Code: on the box and with the certificate (can be transferred). ID Tag - ID Tag (Application or User). - Colour-coded magnifier with volume range. - Gilson certificate of conformity according to ISO8655. Serial Number - Colour coded push-button blue for standard Microman, red for autoclavable Microman. - Microman and CP are CE IVD labeled. 10 - TROUBLESHOOTING You may be able to identify and to correct the problem by reference to the following table. If you can’t solve the problem, contact your Gilson representative. Before returning any pipette, ensure that it is completely free of chemical, biological, or radioactive contamination. Use the safety bag provided by Gilson. Leaks: change the capillary and piston. No stroke: the piston is not properly fitted into the clamp; check that the piston is seated correctly (refer to pages 6-7). Difficult to fit a capillary: clean the capillaryholder with ethanol. Inaccuracy: you should check the capillary is correctly mounted on the capillary-holder (refer to pages 6-7). Imprecision: change the capillary and piston. 11 MICROMAN® Difficult to set the volume: this suggests that the pipette is damaged internally; in which case you should contact your Gilson representative. If the problem persists ... Contact your Gilson representative. 11 - CLEANING AND DECONTAMINATION Microman is designed so that the parts normally in contact with liquid contaminants, can easily be cleaned and decontaminated. Cleaning The pipette must be cleaned with soap solution before it is decontaminated. External 1) Wipe the entire pipette with a soft-cloth or lint-free tissue impregnated with soap solution, to remove all dirty marks. If the pipette is very dirty, a brush with soft plastic bristles may be used. 2) Wipe the entire pipette with a soft-cloth or lint-free tissue impregnated with distilled water. 3) Leave the parts to dry by evaporation or wipe them with a clean soft-cloth or lint-free tissue. Internal The following components only can be immersed in a decontaminant solution: clamp assembly, return spring and capillary-holder (shaft). 1) Unscrew the capillary-holder (shaft). 2) Remove the clamp assembly and return spring from the shaft. 12 ENGLISH 3) Set aside the body (handle) in a dry and secure location. 4) Clean the individual components using an ultrasonic bath (for 20 minutes at 50 °C) or with a soft-cloth and brushes. Small round brushes with soft plastic bristles may be used to clean the interior of the shaft. 5) Rinse the individual components with distilled water. 6) Leave the parts to dry by evaporation or wipe them with a clean soft-cloth or lint-free tissue. 7) Reassemble the pipette. Decontamination You may refer to the Decontamination Procedure LT802288 available at www.gilson.com. Chemical Decontamination The pipette should be cleaned before it is decontaminated. Full details of recommended decontamination procedures for Gilson pipettes are available from your supplier. Whatever other decontaminant you use, check with the supplier of the decontaminant that it is compatible with the materials used in the construction of the pipette, and does not attack either of the following plastics: Polyester or PVDF (Polyvinylidene Fluoride). Non-immersible Parts 1) Wipe the body (handle) of the pipette with a soft-cloth or lint-free tissue impregnated with the chosen decontaminant. 2) Wipe the body (handle) of the pipette with a soft-cloth or lint-free tissue impregnated with distilled water or sterilized water. 13 MICROMAN® Immersible Parts The following components only can be immersed in a decontaminant solution: clamp assembly, return spring and capillary-holder (shaft). 1) Unscrew the capillary-holder (shaft). 2) Remove the clamp assembly and return spring from the shaft. 3) Set aside the body (handle) in a dry and secure location. 4) Immerse the components in the decontaminant solution or wipe them according the instructions given by the manufacturer or supplier of the decontaminant. 5) Rinse the individual components with distilled or sterilized water. 6) Leave the parts to dry by evaporation or wipe them with a clean lint-free tissue or a soft-cloth. 7) Reassemble the pipette. Autoclaving Only Microman M10 and M100 are autoclavable. The four other models (Microman M25, M50, M250, and M1000) are not autoclavable. 1) Unscrew the capillary-holder (shaft). 2) Remove the clamp assembly and return spring from the shaft. 3) Clean the parts to be autoclaved, especially the shaft. 4) Put the parts in an autoclaving sack. 5) Autoclave for 20 minutes at 121 °C, 0.1 MPa. 6) Check that the parts are dry before reassembling the pipette. 7) Set the pipette aside to stabilize at room temperature. 14 ENGLISH 12 - SPECIFICATIONS Microman is a high quality pipette that offers excellent accuracy and precision. The figures given in the “Gilson Maximum Permissible Errors” table were obtained using Gilson CPs. These figures are only guaranteed by using genuine Gilson CPs. Each pipette is inspected and validated by qualified technicians according to the Gilson Quality System. Gilson declares that its manufactured pipettes comply with the requirements of the ISO 8655 Standard, by type testing. The adjustment is carried out under strictly defined and monitored conditions (ISO 8655-6): • Basis of adjustment, Ex. • Reference temperature, 20 °C • Relative humidity, 50% • Barometric pressure, 101 kPa • Use of distilled water grade 3 (ISO 3696) • Ten measurements for each test volume, which are Nominal Volume, 50% of Nominal Volume, and the minimum or 10% of Nominal Volume. The data given in the table conform to the ISO 8655-2 Standard. 15 MICROMAN® Specifications Table Maximum Permissible Errors Gilson ISO 8655 Model Volume (Reference) (µL) Systematic Random Systematic Random error (µL) error (µL) error (µL) error (µL) 1 5 10 ± 0.09 ± 0.10 ± 0.15 0.03 0.03 0.06 ± 0.20 ± 0.20 ± 0.20 0.10 0.10 0.10 Min. 3 M25 10 (F148502) Max. 25 ± 0.25 ± 0.27 ± 0.30 0.08 0.08 0.10 ± 0.70 ± 0.70 ± 0.70 0.30 0.30 0.30 M50 Min. 20 (F148503) Max. 50 ± 0.34 ± 0.70 0.20 0.30 ± 0.70 ± 0.70 0.30 0.30 Min. 10 M100 50 (F148504) Max. 100 ± 0.50 ± 0.75 ± 1.00 0.20 0.30 0.40 ± 1.50 ± 1.50 ± 1.50 0.60 0.60 0.60 Min. 50 M250 100 (F148505) Max. 250 ± 1.50 ± 1.70 ± 2.50 0.30 0.30 0.50 ± 6.00 ± 6.00 ± 6.00 2.00 2.00 2.00 Min. 100 M1000 500 (F148506) Max.1000 ± 3.00 ± 5.00 ± 8.00 1.60 2.50 4.00 ± 12.00 ± 12.00 ± 12.00 4.00 4.00 4.00 Min. M10 (F148501) Max Performance Tests Each pipette is inspected and validated according to the Gilson Quality Assurance System. Based on extensive historical data, manufacturing conditions and expertise, and in compliance with ISO standards relative to statistical process control, the assurance level of this instrument performing to specifications is 99.8%. Specifications rely on the quality and consistency for the whole pipetting system; they are guaranteed only when the pipette is used with Gilson capillary-pistons. 16 ENGLISH EC DECLARATION OF CONFORMITY The company, GILSON S.A.S. 19, avenue des Entrepreneurs BP. 145 - 95400 Villiers-le-Bel (France) Tel.: +33(0)1 34 29 50 00, Fax: +33(0) 1 34 29 50 20, www.gilson.com Hereby certifies on its sole responsibility that the products listed below: - Microman® M10, M25, M50, M100, M250, M1000 - Positive displacement Capillaries/Pistons comply with the requirements of the following European Directive: 98/79/EC* on In Vitro Medical Diagnostic * Annex III, self-declared Villiers-le-Bel, September, 14th, 2005 Atika El Sayed General Manager Hervé Ledorze Quality Manager 17 MICROMAN® NOTES 18 ENGLISH 19 LT801502/B - ©2006 Gilson SAS All right reserved English September 2006 Printed in France World Headquarters Gilson, Inc. 3000 Parmenter Street, P. O. Box 620027, Middleton, WI 53562-0027, USA Telephone: (1) 800-445-7661 or (1) 608-836-1551 Fax: (1) 608-831-4451 Gilson SAS 19 avenue des Entrepreneurs, B. P. 145, 95400 Villiers-le-Bel, France Telephone: (33) 1-34-29-50-00 Fax: (33) 1-34-29-50-20