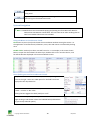
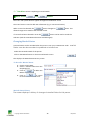
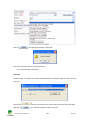
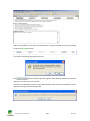
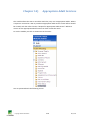
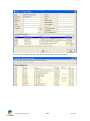
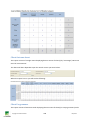
1
CareDirector Youth 8.0.1 User Guide Contents Chapter 1) Introduction ................................................................................... 8 CareDirector Youth Security .......................................................................... 9 Localisation .................................................................................................. 10 Workflow ..................................................................................................... 10 Logging onto the CareDirector Youth Application ....................................... 14 A Look at Screen Layout............................................................................... 14 Idle Time Out ............................................................................................... 20 Logging Out .................................................................................................. 20 My RAISE ...................................................................................................... 21 Work Management Module ........................................................................ 21 Updating User Preferences .......................................................................... 24 Alert Me Module .......................................................................................... 26 Chapter 2) Setting up Personal Details .......................................................... 28 Objectives .................................................................................................... 28 Contents ....................................................................................................... 28 Personal Details ........................................................................................... 28 Searching for a Person ................................................................................. 29 Hints and Tips on Searching ......................................................................... 31 Entering a New Client .................................................................................. 31 Updating Personal Details............................................................................ 34 Lead Professional ......................................................................................... 39 Relationships ................................................................................................ 42 Involvement ................................................................................................. 47 Searching for a Person in the Involvement Screen...................................... 47 Summary ...................................................................................................... 51 Chapter 3) Updating Personal Details............................................................ 52 Description ................................................................................................... 52 Copyright © 2015 CareWorks 2 May 2014 Objectives .................................................................................................... 52 Updating Client Details ................................................................................ 52 Recording Health Details ............................................................................. 53 Recording Education Details ........................................................................ 58 Other Tabs in the Personal Details Module ................................................. 61 Legal Status & LAC ....................................................................................... 63 Letters .......................................................................................................... 65 Merge Info ................................................................................................... 67 Other Buttons in Personal Details ............................................................... 68 Client Role .................................................................................................... 69 Client Other Info .......................................................................................... 72 Attached Files............................................................................................... 75 Transferring Client Records between Organisations ................................... 76 Importing a Client Record ............................................................................ 78 Summary ...................................................................................................... 80 Chapter 4) Dashboards .................................................................................. 81 Overview ...................................................................................................... 81 Viewing a Dashboard ................................................................................... 81 Case Summary Dashboard ........................................................................... 81 Prevention Dashboard ................................................................................. 84 Chapter 5) Referrals ....................................................................................... 86 Creating Referrals ........................................................................................ 86 Allocating a Referral..................................................................................... 96 Setting a Referral Priority ............................................................................ 98 Filtering Referrals ......................................................................................... 99 Sorting Referrals List .................................................................................. 100 Searching for a Client Referral ................................................................... 100 Re-Allocating a Referral ............................................................................. 101 Copyright © 2015 CareWorks 3 May 2014 Referral Action History............................................................................... 102 Other Functions ......................................................................................... 104 Referral Closure ......................................................................................... 106 Re-Open a Referral .................................................................................... 111 Chapter 6) Offences ..................................................................................... 112 Introduction ............................................................................................... 112 Outstanding Offences ................................................................................ 117 Linked Clients ............................................................................................. 118 Chapter 7) Hearing details ........................................................................... 120 Introduction ............................................................................................... 120 Entering the First Hearing’s Offence Details.............................................. 126 Hearing 2 – The Adjournment/Sentence Hearing ..................................... 128 Hearing 3 – The Trial Hearing .................................................................... 131 Hearing 4 – The Final Sentence Hearing .................................................... 132 Chapter 8) Outcomes ................................................................................... 136 Function ..................................................................................................... 136 Inserting a Pre Court Outcome .................................................................. 138 Inserting a Court Outcome ........................................................................ 139 Entering Requirements/Conditions ........................................................... 142 Proposals .................................................................................................... 146 Chapter 9) Programmes ............................................................................... 147 Viewing the Programmes Listing with no Client selected ......................... 147 Viewing Programmes with a Client or Referral Selected........................... 148 Programmes Listing ................................................................................... 148 Columns displayed in the Programmes Grid ............................................. 149 Viewing a Programme................................................................................ 149 Interventions Tab ....................................................................................... 156 Requirements Tab ...................................................................................... 157 Copyright © 2015 CareWorks 4 May 2014 Breaches Tab .............................................................................................. 157 Referral Order Details Tab ......................................................................... 159 Compliance Tab ......................................................................................... 160 Chapter 10) Assessments and Documentation ............................................ 162 Function ..................................................................................................... 162 Identifying an Existing Document .............................................................. 163 Create a New Document ............................................................................ 166 Ascribing Case Stages to a Core Asset ....................................................... 170 Using the Case Stage Functions to Change the Content of an Assessment Document .................................................................................................. 174 Completing a Pre-Sentence Report ........................................................... 176 Recording a Bail Proposal .......................................................................... 181 Exporting and Importing Documents ........................................................ 185 Sending Assets and Other Documents via Secure Email ........................... 189 Web-mail Server ........................................................................................ 193 Chapter 11) Victims ...................................................................................... 194 Updating a Victim Record .......................................................................... 196 Searching for a Victim Record.................................................................... 196 Attached Files............................................................................................. 197 Victim Contacts .......................................................................................... 198 Adding RJ work to a Victim Record ............................................................ 198 Chapter 12) Appeals ..................................................................................... 200 Chapter 13) CAMHS...................................................................................... 206 Chapter 14) Appropriate Adult Services ...................................................... 210 Chapter 15) Groups & Events/Incidents ...................................................... 213 Groups Module .......................................................................................... 214 Events/Incidents Module ........................................................................... 239 Chapter 16) Intervention Setup ................................................................... 254 Copyright © 2015 CareWorks 5 May 2014 Chapter 17) Looked After Children .............................................................. 257 Chapter 18) Substance Misuse..................................................................... 260 Chapter 19) Panel Setup .............................................................................. 263 Chapter 20) Reporting .................................................................................. 269 Within the Application ............................................................................... 269 Using the Search Facility ............................................................................ 270 Referrals ..................................................................................................... 270 Offences ..................................................................................................... 271 Hearing Details ........................................................................................... 272 Outcomes ................................................................................................... 273 Programmes ............................................................................................... 274 Enforcement .............................................................................................. 274 Victims........................................................................................................ 275 Results of Searches .................................................................................... 276 Schools ....................................................................................................... 281 Client and Ad Hoc Reports & Statutory Returns........................................ 284 Standard Functions within Reports ........................................................... 286 Client Reports ............................................................................................ 289 Asset Report 1a, 1b and 2 .......................................................................... 300 Statutory Returns ....................................................................................... 303 OLAP Cubes ................................................................................................ 303 Chapter 21) Youth Justice: Scaled Approach ............................................... 321 YRO Outcomes ........................................................................................... 324 YRO Programmes ....................................................................................... 328 YRO Contacts.............................................................................................. 332 Recording YRO Contacts ............................................................................ 334 Assessing Intervention Levels .................................................................... 337 Calculations for Intervention Levels .......................................................... 345 Copyright © 2015 CareWorks 6 May 2014 Static Factors Scores .................................................................................. 345 Summary .................................................................................................... 348 Copyright © 2015 CareWorks 7 May 2014 Chapter 1) Introduction This session describes the functionality of CareDirector Youth, the process of logging onto the CareDirector Youth application and introduces some basic navigation within CareDirector Youth. It also describes the Work Management screen of CareDirector Youth, which a worker can use to track the status of their on-going tasks. This session also contains an introduction to the Security and Workflow features introduced to CareDirector Youth at Version 2.2. At the end of this session delegates will be familiar with: Starting the CareDirector Youth application from the desktop and Logging In An overview of CareDirector Youth Security, Localisation and Workflow Screen Layout, Controls and Navigation within CareDirector Youth Using the Work Management screen Configuring User Preferences Using Alert Me to set up various CareDirector Youth alerts Background CareDirector Youth Security Localisation Workflow Logging onto CareDirector Youth A look at Screen layout The CareDirector Youth Banner Screen Controls System Navigation Idle Timeout Logging Out Work Management Module Copyright © 2015 CareWorks 8 May 2014 User Preferences Alert Me Module Summary CareDirector Youth is an application, developed by CareWorks, which uses a case management approach to record the services that are provided to Social Services clients. The system includes a client module containing personal details and family household information. Referrals may be logged against these clients and electronically allocated for Assessment and Care Management. Standard forms are electronically stored and are presented as HTML documents. Information from the database is automatically inserted into these documents. Data entered into the documents may be processed to update the database. This means that users can interact with the system through their standard forms on screen. To avoid transcription, previously recorded forms may be cloned and become the basis for current assessments or forms. The system includes automated electronic mail notifications to inform users of key events during the management of a case. Authorities can configure these email notifications based on workflows configured. Each time a piece of information is accessed on the system, the system stores a record. Audit Trails show the date and time that an item has been read or updated. CareDirector Youth Security Users of CareDirector Youth will not automatically be given access to all available CareDirector Youth modules. When a user logon is created in the system, the logon name will be associated with a security profile for each module to which they require access. This profile will grant the user access to the module and will further control the level of detail visible to the user within that module, as well as the actions that the user may carry out in that module. For example, a user in the Child Protection Team may be allowed to read and update all information stored in the Child Protection module, whereas a user in another Children’s team may only be allowed to view a limited summary of the Child Protection information, and have no update access. A detailed planning exercise may be carried out on each customer site in consultation with CareWorks and a number of Module profiles will be created appropriate to the requirements of the authority. During setup, users will be assigned to the profiles that match their business needs. Copyright © 2015 CareWorks 9 May 2014 Since each site may have vastly differing profiles, it is not possible to provide a single training manual which exactly matches individual profiles. Therefore this manual is based on the default module profiles that are available with CareDirector Youth “out of the box”, before customers apply their own customisations. Accordingly, the screen shots used in this document may not always be an exact match for the corresponding screen available on a customer site – indeed screens may differ between users on the same site, depending on the number of profiles created for each module. In general, all available fields are shown in the default module profiles, so screens on your customer site will be a sub set of those shown here. Localisation Localisation is a feature of CareDirector Youth that allows all the field labels and text in the system to be changed to reflect local terminology and practise. One example of this usage is the translation of screens into Welsh. Furthermore the population of data in the drop down fields can be fully amended by each Local Authority or HSE. This training manual uses the standard English terminology and screens of CareDirector Youth. Readers should bear in mind that screen pictures shown in this manual may differ from the screens available on their particular site, if localisation has been implemented. Workflow Workflow is designed to allow Raise users to tailor the application to match their business processes. In particular, it allows authorities to define their own requirements for mandatory data fields, and also to specify mandatory processes to be followed. This manual is based on the use of the default workflows that are available with CareDirector Youth ‘Out of the Box’. It should be borne in mind that the workflows implemented on your site may be different and may require different steps to be carried out. The Personal Details, Referrals, Child Protection, Looked After Children and Leaving Care modules contain actions controlled by Workflow. Following the default workflow When following steps for setting up a client, you will receive prompts on actions to take. These actions lead you through setting up a client in YOT by default. Copyright © 2015 CareWorks 10 May 2014 Example workflow process ETE (Education, Training & Employment) When there is a completed Core Asset present against the young person’s record, and there is no Education record with current dates and engagement completed, and there is no Employment record with current dates and engagement completed Then Upon entry to the Personal Details screen for that young person’s record, the user will be presented with the following message: The message WILL display if Both the Education AND Employment screens are missing records with current information as outlined in the below the record(s) have end date(s) completed, but no record with start date only (indicating it is current) the record(s) have current dates (i.e.: start date but no end date), but the engagement has been left blank The message will NOT display if there is a record containing current information (start date and engagement completed, and end date blank) in the Education screen, but NOT the Employment screen there is a record containing current information (start date and engagement completed, and end date blank) in the Employment screen, but NOT the Education screen Copyright © 2015 CareWorks 11 May 2014 ‘Review’ Case Stage When: there is a Programme/Outcome, and there is a Start of Order case stage associated with it, and 3 months has lapsed since the last case stage recorded for that Programme/Outcome (regardless of what type that case stage is), and There are more than 6 weeks remaining until the Programme end date Then: Upon entry to the Personal Details screen for that young person’s record, the user will be presented with the following message: ‘Release from Custody’ Case Stage When: there is a custodial Programme/Outcome, and there is a Start of Order case stage associated with it, and the Release Date recorded in the custodial Programme has lapsed, and there is no Release from Custody case stage associated with the Programme/Outcome Then Upon entry to the Personal Details screen for that young person’s record, you will be presented with the following message: Copyright © 2015 CareWorks 12 May 2014 ‘End of Order’ Case Stage When there is a Programme/Outcome, and there is a Start of Order case stage associated with it, and the Programme End Date has lapsed, and there is no End of Order case stage associated with the Programme/Outcome Then Upon entry to the Personal Details screen for that young person’s record, you will be presented with the following message: Following Workflows The workflows are the default navigation as you complete client profiles in Raise. They are to indicate a required course of action to follow an existing business process. Copyright © 2015 CareWorks 13 May 2014 Logging onto the CareDirector Youth Application To start the CareDirector Youth application 1. Browse to your organization’s CareDirector Youth installation using Internet Explorer. The CareDirector Youth login screen is displayed. 2. Enter your username. 3. Enter your password. 4. Choose Training from the drop down list of databases (see note below). 5. Click on logon. Note: When you return to your office you can use the Live system in your normal working environment or you can choose the Training database to refresh your skills. Activity: Log into the CareDirector Youth application using the username and password supplied by your trainer. A Look at Screen Layout The first time a user logs on to CareDirector Youth, they are presented with the Work Management screen - the layout of which, is typical of all screens in CareDirector Youth. Copyright © 2015 CareWorks 14 May 2014 Each screen of the CareDirector Youth application is divided into two: Modules are listed on the left-hand side with a working window on the right-hand side. The modules are grouped under menus, according to the type of service they are relevant to. Each menu is opened by single-clicking on the menu title. The above example shows modules listed under the My RAISE menu. Note: Modules visible to a user will depend on their user access as configured using Profile Based Security. To go to a module simply click on the module name. For example, to go to the Assessments module, click on Assessments in the left-hand window. Some modules such as Personal Details, Service Placements, Child Protection etc. are made up of sub-modules (denoted by a + beside the module name). The sub-modules can be viewed by clicking on the +. The list of sub-modules can be closed by clicking on the –. (The + changes to a – when the list is expanded). After logging in, the initial working window shows the logged on worker’s Work Management screen. Users can change this initial screen to match their Personal Preferences e.g. if a user prefers to be presented with a list of current Referrals, they can set that screen as their start-up form. This course looks at other screens that appear in the working window of the Personal Details, Referrals and Assessments modules, as well as the Work Management module. Details about setting User Preferences may be found in Session 6 of this course. The CareDirector Youth Banners Fixed Banner In each of the modules, the top of the working window gives useful information about the current screen. The banner includes the name of the current module. This information is useful in navigating through the system. If a client has been selected, the banner includes the Name and Age of the client, as well as a Referral Number if appropriate. Some examples of banners are shown below: Copyright © 2015 CareWorks 15 May 2014 Reminder: Use the banner to find out which module of CareDirector Youth you are currently in and the name of the client you are currently working with. As you move from module to module, the selected client name remains in the banner, as you continue to work with that client in every module until you select another client. Scrolling Banner In addition to the fixed banner shown on all screens, it is possible for each user to add an additional ‘Scrolling Banner’ which displays further information about the selected case, as shown in the example below. Details about setting User Preferences may be found in Session 6 of this course. Workflow Banner In Workflow Enabled modules, the banner includes up to six coloured squares that are used to access Workflow Related information or to proceed to the next step in a Workflow. These squares have tool-tips which indicate their purpose. Workflow control is reviewed further in subsequent sessions of this course. Screen Controls Saving Changes Changes entered on any screen in CareDirector Youth are only saved when the or buttons have been clicked. Note: It is not simply a matter of entering the data and moving to another screen. This will not save the data. General Control Buttons The Update or Insert button always appears at the bottom of the working window, when a form is being entered or changed, along with other control buttons. The buttons that appear will change, depending on the module being used and the profile of the logged in user within that module. For example, in Personal Details the following buttons may be displayed when an existing record is being viewed. If there is no client selected, then the Update button is replaced by the to add a record once the form is completed. button, A different set of buttons is displayed when looking at the Referral list window. Copyright © 2015 CareWorks 16 May 2014 Because this is a list of records, there is no Update button. Details of the buttons on each module will be covered in the corresponding chapter of this manual. Displaying Records Records are displayed in a grid. There are indicators at the bottom of the screen of the records dispalyed: Ref Count: The number of records displayed on the screen. Client Count: The number of clients for which records are displayed. Hid Count: The number of records filtered which the user cannot view as they do not have access. Remember: Profile Based Security means that the buttons displayed on any screen can be altered to suit the module profile associated with the logged on user. Button Used to …. save changes that have been made to an existing record that is currently on the screen. save changes when a new record is being created e.g. new person, new referral etc. Clear current record details off screen – e.g. when wrong client has been selected in Personal Details. Delete the record currently displayed on screen – Not always available to everyone. Search for a record in the current module – i.e. search for a referral if accessed from the Referrals module, but finds a person if used in the Personal Details module. Refresh a list to show default – e.g. when looking at referrals for a particular client, refresh is used to go back to the default list for the logged in user. Show the list, currently displayed on screen, in Print Preview mode, to allow printing. Copyright © 2015 CareWorks 17 May 2014 Export the list on screen to an Excel spread sheet, for further analysis using Excel. Appears on Referral listing and Work Management screens and may be used to log out of CareDirector Youth. System Navigation Note: CareWorks does not recommend copying and pasting text from Microsoft Word or Outlook into CareDirector Youth fields. This can cause error when sending data to YJB if non-standard characters are included. Using the Mouse in CareDirector Youth Click means to press (once) and release the mouse button without moving the mouse. As the application is browser based, all buttons, icons, tabs and menus are selected by clicking once. Double click is used only to select a record from a list. For example, in the screen shown below, to open the client details of Helen Flynn, double click on her record in the list, and her details become displayed in the Personal Details screen. Some fields types used in CareDirector Youth: Drop Down Lists: This is a selection field, activated by clicking the arrow to the right. Select one valid option for the field from those displayed in the drop-down list. Check box: A = a ‘True’ or ‘Yes’ value, A blank = a ‘False’ or ‘No’ value. Clicking the box toggles the check (mark) on or off. Radio buttons: Only one option may be selected at a time. Single clicking a radio button selects the labelled field (and deselects any previously selected option). Copyright © 2015 CareWorks 18 May 2014 Date Fields Dates are required throughout the CareDirector Youth application. There are two ways of entering dates in CareDirector Youth. Date fields have a data entry facility and a select facility using a calendar. Option 1: Data Entry The data entry portion allows a date to be typed in e.g. 7/12/07 Once the cursor leaves the field (by pressing TAB or clicking elsewhere) the system fills in the field in the standard format of the CareDirector Youth application. Note: Date can be entered using many formats including: 31/1/1970 or 31/01/70 or 31.01.70 or 310170, but must always be in ddmmyy format. Option 2: Select Alternatively, the select facility can be used to enter dates. Click on the calendar to display the select facility. calendar Choose a month from the drop-down list and choose a year from the second drop-down list. Finally click on a number to select the date during that month and year. Note: Click on the calendar button a second time to close drop-down lists without selecting a date. Advanced Navigation Features When entering data to screens within CareDirector Youth it is possible to use the mouse to click on each field, type in the details and click on the next field etc. Alternatively, pressing the Tab key on the keyboard can be used to move to the next field. Copyright © 2015 CareWorks 19 May 2014 Holding Shift while pressing the Tab Key can be used to move back to the previous field. Holding ALT while pressing the Down Arrow key is used to open a drop down list. The Arrow Keys can be used to move up and down through the list. Press return to select the item from the drop-down list. Idle Time Out For security reasons, the CareDirector Youth application “times out” if left inactive. In other words after a period of inactivity or idle time it is necessary to log into the system again. A message is displayed as shown. The time delay before the application times out is configurable by a local IT Systems Administrator. Any unsaved work will be lost when the system times out. When completing the documents generated by CareDirector Youth, the user is not active in CareDirector Youth, only in the document itself. Pressing the Save button within a document saves the changes and is seen as CareDirector Youth activity. Remember: Changes to any screen are only saved when the or button has been clicked. Changes to a document are only saved when the Save button is clicked. Logging Out To log out of the CareDirector Youth application and end your session: Click on the Logout option on the CareDirector Youth Menu, at the top of the module menu window, under the Welcome message. Remember: You should always log out or lock the screen when leaving the PC unattended. Activity: Log out of the CareDirector Youth application. Copyright © 2015 CareWorks 20 May 2014 Log into the CareDirector Youth application using keyboard navigation instead of using the mouse. My RAISE The My RAISE menu contains modules specific to the user who is currently logged into CareDirector Youth, designed to assist that user in their day to day work and in setting up their personal preferences. (enabling the user to configure personal alert notifications). There is also an additional Client Search module, whichManagement is also located under the Details module. The modules include Work (enabling thePersonal user to track their tasks), User Preferences (enabling the user to configure various Users are given access to the My CareDirector Youth menu when they are set up by a CareDirector Youth settings), and Alert Me, Systems Administrator to be a member of the Module Profile entitled ‘User Module’ (see Profile Based Security Manual for further details). Work Management Module The Work Management module is used to track a worker’s tasks. Workflow configuration allows an entry to be placed on the Work Management screen when an activity is created – e.g. when an assessment document is created. The workflow can also set the expected time for completion of the task, causing the user to see at a glance the tasks which are due for completion by a certain date. It is also possible to view the work management tasks of team members using the Agency/ team/ role pick lists. It should be noted that these drop down lists are security controlled and depending on the agreed security within your authority may be limited to only allowing access to the individual workers tasks. The tasks tracked depend on the workflow configurations implemented on your site. Work Management is accessed by selecting Work Management from the list of modules in the lefthand window, under the My RAISE menu. When accessed, the screen displays a list of tasks for the logged on user. Each task has a status. Copyright © 2015 CareWorks 21 May 2014 There are 4 possible status values as follows: Pending The task is started. Warning The task has a due date 2 days from today. Overdue The task has passed its due date. Completed The task has been completed – i.e. a document has a completion date or a planned meeting has an Actual Date. Example of Tracking a Document Status Assessment documents that are set up using workflow can be given timescales for completion. For example, a document may be set up with a duration of 7 days – i.e. it must be completed 7 days after it is started. Once the document is created, it becomes an active task in the Work Management screen for the worker, with a status of Pending. The Start Date is set to the Start Date of the document and a Due Date is calculated based on 7 days from the start date. This due date is also displayed in the Work Management Task List. In the example shown above, the Initial Assessment has a duration of 7 days, so the due date is for a document started on the 4th Feb is 11th Feb. Copyright © 2015 CareWorks 22 May 2014 The Work Management module then tracks the progress of the document, changing the status as required (see below). Note: Timescales for tasks can be locally configured using workflow. Some tasks have When a Private Fostering Assessment (PFAAR) is completed within CareDirector Youth (when timescales already set up in CareDirector Youth by default, such as: the end date is entered and saved), this triggers a Work Management task to appear in the When a Child Protection Strategy discussion document is completed within CareDirector Youth Work Management screen, to alert that a Visit Under Regulation 8 needs to take place , by a (when the end date is entered and saved), this triggers a Work Management task to appear in projected due date, 6 weeks later. the Work Management screen, to alert that a Child Protection Conference needs to take place, by a projected due date, 15 days later. Two days before the task is due to be completed, the status changes to Warning . If the task is not closed by the projected due date, the status will change to Overdue. Work Management Views When the Work Management screen is first accessed, the screen displays a detailed list of all pending tasks for the logged on user within a range of Due Dates (1 week before and after the current date). The Current View area can be used to change the view, by selecting the appropriate options. For example, active tasks are tasks which still require completion and selecting the Read Status: Unread radio button will display only tasks that are unread. Copyright © 2015 CareWorks 23 May 2014 The Status, Task Type and Task drop-downs can be changed to display all tasks with a chosen status. The date ranges can be used to filter the task list on a range of Start Dates or Due Dates. Updating User Preferences The User Preferences module is also located under the My CareDirector Youth menu, and has multiple functions: a. To allow the user to add a scrolling Alert Banner that displays additional information in the Personal Details and Referrals module Banners. b. To allow the user to choose either the Work Management screen or their Referral List screen to be the Starting Form view on login. c. When a user is a member of more than one team, it allows them to change the Default Team. d. To allow the user to select a Default Language for CareDirector Youth. Alert Banner Configure Raise Banner When the Banner Enabled box is ticked, the user can set their choices for the appearance of the alert banner. Implementing the changes shown above causes a scrolling banner to be slowly displayed that shows the selected Client or Referral Data, depending on the module. An example of this banner is pictured below: Copyright © 2015 CareWorks 24 May 2014 Start-up Form This drop-down field allows the user to change the page that is automatically presented on logon. The default page that is presented is the Work Management page. If a user prefers to be presented with a list of their allocated referrals, the Referrals List form is chosen as the Start-Up Form. Note: Remember to press to save the changes. Change Default Team When a user is a member of multiple teams, the button in the Change Teams section of User Preferences screen can be used to display a list of all teams to which the user belongs. The current default team is ticked. To change the default team the user double clicks on the new record and presses . The Default tick will now be changed. Changing the default team will ensure that Closure Requests go to the appropriate Team Manager. It also ensures that the appropriate Team/Team Manager name is populated into documents created by the user. When the user presses the system will automatically log them out of CareDirector Youth. When they log in again, the new team will be the default. Default Language The user is able to select a default language from the drop-down list of available options. Copyright © 2015 CareWorks 25 May 2014 Alert Me Module The Alert Me module is located under the ‘My RAISE’ menu in the left-hand side of the screen. It allows each individual user to configure when and how an alert will be sent by CareDirector Youth, to the user. The ‘Send Alerts To’ section of the screen allows the user to choose where the alerts will be sent to. Ticking the Management screen. check box will cause alerts to appear in the user’s Work If the user has an email address saved within their User Set Up (under System Administration), then ticking the in the user’s Email inbox. check box will cause alerts to appear The ‘Change Type’ section of the screen allows the user to choose when alerts will be triggered, by selecting the relevant radio button. The ‘Alert For’ section of the screen allows the user to choose what the alerts will be about. The user can view the entire list by scrolling with the scroll bar and arrows. The user selects the modules that will trigger alerts, by ticking the relevant check boxes. (The list will display modules the user has access to according to Profile Based Security). Copyright © 2015 CareWorks 26 May 2014 Modules in the list can be expanded by clicking on the to reveal an alphabetical list of areas within that module, that can be selected and/or de-selected to trigger alerts. Ticking and un-ticking the module check box will select and deselect all areas in the list under that module. All areas in the list can be selected or de-selected individually both before and after the module check box has been ticked. Once the user has ticked the relevant check boxes in each section of the Alert Me screen, clicking the button saves the choices. removes any unsaved changes, and the screen reverts back to the options that were selected the last time the screen was saved. You should now be familiar with Starting the CareDirector Youth application from the desktop and Logging In An overview of CareDirector Youth Security, Localisation and Workflow Screen Layout, various controls and navigation within CareDirector Youth Logging out of CareDirector Youth Using the Work Management module to Manage Tasks Configuring User Preferences Using the Alert Me Module to set up Alerts Copyright © 2015 CareWorks 27 May 2014 Chapter 2) Setting up Personal Details This Session describes how to enter some initial personal details onto the CareDirector Youth system. Objectives At the end of this session delegates will be familiar with Searching for a person on the system, using advanced tips to do so Setting up a new client and entering some personal details about the client Updating marital status and address details for a person Adding details of relationships inside and outside the household Viewing all people involved with the client Contents Personal Details Searching for a Person Hints and Tips on Searching Entering a New Client Updating Personal Details Lead Professional Relationships Involvement Summary Personal Details The Personal Details module in CareDirector Youth contains client details, details of relationships between the client and other people and details of professionals who have an on-going involvement with them. Links to address matching and verification software are provided. The Personal Details module also holds Education and Health details, which may be required when completing assessments during the course of a case. A facility to record and search against names that the client is “also known as” is provided. A history of name and address changes is maintained by the system. Details of any Legal Status record for a client, other than the Legal Status of a Looked After Child may be entered in Personal Details, as well as any other significant event for the client. Copyright © 2015 CareWorks 28 May 2014 Searching for a Person In order to update Personal Details a search can be used to find the person on the system. When the user selects the Personal Details module for the first time, on login to CareDirector Youth, the screen presented is the Client Search screen, enabling the user to search before entering a new client, to ensure they are not already entered onto the system. For example, when setting up a new client or entering their family members and other relationships. Once a client has been selected, and their record opened on screen, clicking into the Personal Details module will present the Personal Details screen for that client. To search for a client within CareDirector Youth from this point onwards after login, the user will select the Client Search module. To Search for a Person Click on the Client Search module in the left-hand window of the screen, underneath the Personal Details module. The Client Search screen appears as shown below: Enter some client details to search on, and click Copyright © 2015 CareWorks . 29 May 2014 CareDirector Youth will search through its database looking for people who match the criteria and displays the results in the bottom section of the screen. The user can scroll through the results using the scroll bar and arrows to the right-hand side of the results. 1. Double-click on a line to select the person. Their information will then be displayed in the Personal Details screen. If a number of people satisfy the search criteria, it may be useful to scroll horizontally to view the Date of Birth and Address details to confirm that the correct person is selected, or 2. Click on to close the screen without selecting an individual, or 3. Select someone and if when their details are displayed in the Personal Details screen, they are not the client you intended on opening, click on search screen, to re-open the same results list (as explained below). Note: within the If the CareDirector Youth Client number is known, it can be entered in the Client No field on the Search dialog. In this case the button in the Top frame is used to search for the person and only one record will be displayed in the Search Result list. Repeating a Search If the personal details screen shows that the wrong person has been selected from the Search Results list, the user can click to the Client Search module on the CareDirector Youth tree, and click the button. This button causes CareDirector Youth to search using the same criteria as entered in the last search, without re-entering the details on the Search Dialog form. The Search Results list is re-displayed and the correct person can be selected. Copyright © 2015 CareWorks 30 May 2014 Hints and Tips on Searching Searching on Surname To search for people with a surname of Brown, type the word Brown into the surname field and click on search. CareDirector Youth will search through its database looking for people whose surname (or a previous surname or alias) matches the criteria and displays the results: Using Soundex in the Search Click the Soundex check box before clicking on search to include “sound likes”. It can be used with any of the name fields. For example, doing a soundex search for people whose surname is Smith will match Smith, Smyth, Smithy, etc. Using Wildcards in the Search It is also possible to use the wildcard character (*) to search. Wildcards can be used in any of the fields and multiple times. For example: Searching with a First Name of Dan* would find Dan, Daniel, Danny, etc. Searching for a Surname of M*c* finds names like McDonald, MacAfee, March, etc. Searching is Not Case Sensitive You may enter the text in uppercase or lowercase. Activity: Logon onto CareDirector Youth and go to the Personal Details module. Click on and find: all people on CareDirector Youth with a Surname Smith (Hint: Smith can be spelt in a variety of ways) all people on CareDirector Youth with a First Name Mary all people on CareDirector Youth with a First Name beginning with Ma. (Hint: Use Ma*) Entering a New Client A new client is added to the CareDirector Youth database by inserting their personal details. Remember: CareDirector Youth functionality will ensure that users have searched before attempting to add a client, to check that the client is not already on the system. Copyright © 2015 CareWorks 31 May 2014 To Set Up a New Client On clicking into the Personal Details module without a client record already selected, the user is presented with the Client Search screen. If a client is already selected within the Personal Details screen, click on the button within Personal Details. A message will ask “Do you want to clear the current record?” On clicking OK to continue, the user is presented with the Client Search screen. Alternatively, users can click straight to the Client Search module on the CareDirector Youth tree at any time, to search for a client record. If the client does not appear within the results following a thorough search, clicking on the button opens a new Personal Details screen, to enable the user to create a new client record. The search criteria entered for the client search, are automatically populated into the Personal Details screen, while all other fields are blank for the user to enter manually, as displayed below: Note: Mandatory fields are marked with a red asterisk and depend on the configured Workflow (*). Fill in a Surname and First Name by typing the details into the fields. Fill in the Ethnicity by selecting one from the drop-down list. Click one of the tick boxes for Gender to select Male, Female or Not Known. Fill in a Date of Birth or an Estimated Age. Target Group can be used to record whether or not the client is a traveller. Select a Property Type. You can select a property type from the drop-down list. Fill in a Primary Address. The Outside Jurisdiction checkbox should be ticked if the client is ordinarily a resident outside of England (this information is required in relation to Contact Point). Complete any other Personal Details that are known at this stage. Copyright © 2015 CareWorks 32 May 2014 Click on to add the client to the database. In most default Workflows, this completes the process of adding a person to CareDirector Youth. In custom workflows which require further screens to be completed, the user will be presented with the screen for the next step in the Workflow – e.g. the Client Role screen. Note: When adding a person, if multiple workflows are available to the user, a pop up dialog will display asking them to choose the appropriate workflow, after they clear any selected client details from the screen. Alert Information In the centre of the Person Details screen are a number of tick boxes and one text box that provide alerts for users as to whether a person’s record has the following information held elsewhere in CareDirector Youth. The information stored in these fields is entered in other screens and tabs within CareDirector Youth and when entered the tick or text will display here. Entering the different elements of information will be covered elsewhere in CareDirector Youth documentation but to summarise: Known to CP This tick box will be auto completed when a Child Protection record is current within the Child Protection for a child e.g. a Child Protection Enquiry Known to AP This tick box will be auto completed when an Adult Protection record is current within the Child Protection for an adult e.g. an Adult Protection Enquiry Alleged Perpetrator This tick box is auto completed when an Adult Protection Enquiry is recorded and in the “abuse” tab of the Adult Protection module Subject to CP Plan Tick box is auto completed when a current Child Protection Plan document is present on a Childs record. Special Health Measures Tick box is auto completed when there is text in the “Special Measures” field within the “Health” tab of Person Details. Looked After This field populates with the current status of any LAC legal status record. This will be either “Current”, “Historic” or “None”. Activity: Copyright © 2015 CareWorks 33 May 2014 Enter the following new clients. Check with your trainer who will give you a surname to use (or use your own surname). First Name: Mary Surname: “See above” Ethnicity: White British Gender: Female Estimated Age: 45 Street: Main Street Town: New Town Phone 1: 07867 111111 First Name: David Surname: “See above” Ethnicity: White British Gender: Male Street: Main Street Town: New Town Date of Birth: 1/1/2001 Updating Personal Details The main categories of information recorded on CareDirector Youth are: Client Details (Names, Addresses, Aliases, Personal Characteristics etc.). Relationships (Inside and outside the household). Health Details (GP, Disability/Impairment, Hospital, Immunisation, etc.). Education (Schools attended, Examinations, Special Education Needs etc.). Significant Events (Family events, Court Proceedings etc.). Other Involvements (i.e. other services being provided to the client). Personal details can be updated or added for any person on the system. In this session we look at two examples, how to update marital status and how to update address. Copyright © 2015 CareWorks 34 May 2014 See Also: Session 5 Updating Personal Details. Note: on the and buttons: The Insert and Update buttons appear throughout CareDirector Youth. The Insert button is used to add new information (e.g. a new marital status). When a record is selected, the button changes to a allows changes to be made to the selected record. button. This If a record has been selected in error the button can be used to cancel the selection (and the Insert Button becomes available again). Changing Marital Status A marital status can be recorded when the person is set up on CareDirector Youth. Marital Status can also be recorded or updated at a later time. Select the Personal Details of the person. Click on the Marital button on the Personal Details screen. This displays the Marital Status History screen. To Record a Marital Status Choose a Start Date. Select a marital status from the drop-down list. Click on Marital Status. to add a new Click on to return to the Personal Details screen. Marital Status History The screen displays a history of changes in Marital Status for this person. Copyright © 2015 CareWorks 35 May 2014 To Delete a Marital Status Record (usually one entered in error): Click on the record to be deleted. Click on the Click on button. Click on OK to confirm. to return to the Personal Details screen. Activity: Select the client details of Mary ________ added earlier in this session. Add a Marital Status of Married Couple with a Start Date of 14th February 2004. We will add details of her husband later in this session. Change of Primary Address The Primary Address of a client is updated from the Personal Details screen: Copyright © 2015 CareWorks 36 May 2014 Type in the new details by typing over the previous details in Property No, Property Name, Street etc. The Search button can be used to consult the gazetteer and check or complete an address. Click on any changes. to save Note: Not all system users will have access to a gazetteer. You can select Unknown from the Property Type drop down list if the client address is not known, or if the client is missing, for example. If unknown is selected, the address fields are still editable so the user can complete a partial address if the information is known. The checkbox under the Borough and Ward fields should be ticked if the client is usually resident outside of England. This information is required in relation to Contact Point. The Address History Screen Previous Addresses are all retained by the system and can be viewed by clicking on the Address History button on the Personal Details screen. A range of Other Addresses can also be maintained for each client. These addresses are also available from the Address History screen. Click on the Address button on the Personal Details screen to open the Address History screen. Copyright © 2015 CareWorks 37 May 2014 By default Current Address Records are displayed. Click beside Historical Address Records to see previous addresses. Click beside Current & Historical Records to see all the address information (current and historical). Recording Other Addresses Click to enter additional addresses such as a Care Address, Home Address or Temporary Address. The drop-down list for Property Type field allows the user to select the type of address e.g. LA Care, Other Family etc. Recording Historical Addresses Click to enter the additional address. After inserting the address click on the record and to display the details. Add the From and To Dates and press the Update button to record the historical dates. Activity: David has regular periods of weekend respite care at Home from Home Centre, 2 Main Street, Sometown. Copyright © 2015 CareWorks 38 May 2014 Add a care address for David (the child set up earlier), by selecting the Personal Details of the client and clicking on the Address History button to go to the Address History screen. Lead Professional On clicking the button at the right hand side of the Personal Details screen, the user will be presented with the Lead Professional screen, enabling them to specify or view the lead professional for the currently selected client. The button is also located in the Referral Allocation screen and the Secondary Allocation screen, as outlined in Fundamentals Session 5 for the Referrals module. These routes enable the user allocating the referral to record the lead professional for the case at the point of allocation. Having an access route to the Lead Professional screen from the Personal Details screen enables the Lead Professional information to be maintained for clients in situations where there are no current referrals for the client, and/or where a user does not have access to any of the client’s referrals. This route can also be used as a shortcut to obtain Lead Professional information quickly after searching for a client, without having to first locate a referral. On clicking a button, the user is presented with the same screen, to record new and/or view all entries that have been recorded previously, regardless of which button has been used. The Lead Professional screen displays as shown below: Copyright © 2015 CareWorks 39 May 2014 The Agency, Role and Name fields are mandatory, and these fields display values according to the Systems Administration Team, Role and Staff Set Up, as in all other locations throughout CareDirector Youth where these fields are displayed. The Start Date is also a mandatory field in order to indicate a particular point in time for the current (and in time, historical) Lead Professionals. The End Date is an optional field, enabling users to complete it as and when the end date for the current Lead Professional becomes known and/or relevant. On clicking the user is presented with an information message to confirm that the record has been inserted successfully, and the Lead Professional details display in the grid listing as shown below: Note: On accessing any of the buttons, all Lead Professional entries (both historical and current) will be displayed, regardless of which screen the button was accessed in, to record the original entry. If a record is selected when the user clicks the button, then the record becomes deselected, and all fields in the screen will become blank once again. Copyright © 2015 CareWorks 40 May 2014 If the user has entered some information into the fields in the screen when the button is clicked, then all fields will become blank and the information entered will not have been saved. If a record is entered in error, the user can single click on the record in the list to highlight it and the button becomes enabled. On clicking , the user is presented with a message to ask whether they are sure they wish to delete the record. On clicking to the message, the Lead Professional record is deleted from the list, and the user is presented with a message to confirm the successful deletion. Clicking the button within the Lead Professional screen returns the user back to the Personal Details screen. Updating the Lead Professional If and when the Lead Professional changes, users will need to record further entries to the Lead Professional screen (rather than updating the existing record), in order to retain historical Lead Professionals information in addition to recording the current one. On clicking the or button on the Lead Professional screen, an automatic validation will run to check that there are no overlapping Lead Professional records, and ensuring that only one entry can be recorded as the current Lead Professional at any given time. The current Lead Professional will be recorded with a mandatory Start Date, but no end date as shown in the example below (or with an optional End Date in the future if known). Before adding an entry for the new Lead Professional details, the user should update the existing entry for the current Lead Professional by recording an End Date. If the current Lead Professional has no end date when the user attempts to insert a new Lead Professional record, they will be presented with an error message, as shown below: Copyright © 2015 CareWorks 41 On clicking to the message, the user is returned to the Lead Professional screen to make the necessary amendments. May 2014 The Lead Professional grid list displays in chronological order by default, with the most recent/current Lead Professional at the top of the list. Note: The End Date of one Lead Professional cannot be the same Start Date for another Lead Professional. Different dates must be used, as shown in the example below. Copyright © 2015 CareWorks 42 May 2014 Relationships Within the CareDirector Youth application there are two types of Client Relationship which are used to record family members, significant others and parties involved: Relationships within the household; and Relationships outside the household. When adding a relationship there are two further possible circumstances: The person already exists on CareDirector Youth. The person does not yet exist on CareDirector Youth. Clicking on the Relationships tab displays existing relationships (if any have been recorded on CareDirector Youth). To add a Relationship Inside the Household, click the top Insert button. To add a Relationship Outside the Household, click the bottom Insert button. Copyright © 2015 CareWorks 43 May 2014 In each case the following screen is displayed: Step 1 : Searching CareDirector Youth to see if the Person Already Exists on CareDirector Youth Enter the search criteria and click . This retrieves any clients who match the criteria. Double-click on a line to select the person or Click on Note: to close the screen without selecting an individual. When adding a relationship inside the household, the system automatically populates the address fields. You may wish to clear the address and repeat the search to check if the client has been entered with a variation on the address. If the Person Does not yet exist on CareDirector Youth Fill in the client details click on to enter the person on CareDirector Youth. If the Person Already Exists on CareDirector Youth The system retrieves the client details and displays their details on the upper part of the Relationships screen at the end of the search. Step 2: Filling in the Actual Relationship Once a client has been selected or inserted in step 1, their names are populated on the middle panel of the screen: Copyright © 2015 CareWorks 44 May 2014 Enter the actual relationships using the drop-down lists. Enter Start and End Dates if this is an historical relationship. If the relationship being entered is a family member, tick . If the relationship being entered is alleged to have abused the client, tick . Click on to save the details. Step 3: Legal Relationships Recording a Legal Relationship is optional on CareDirector Youth. The bottom portion of the screen may be used to store information about legal relationships. The values here depend on the category of the user and may include those shown below: Select the names from the drop-down lists. Use the tick boxes to record legal relationship(s). Click on to save any details. If the Related person is known to the Child Protection team, the “Known to CP” column displays a red tick. Copyright © 2015 CareWorks 45 May 2014 At the top of this screen there is a field called ‘Family Type’. The family type relevant to the client is selected from the drop down list. Whenever a family type is selected in this field, the the bottom left-hand corner of the screen saves the change when clicked. button at Other Buttons on Relationships Screen There are a number of other buttons on the Relationships screen which function as described below. When a relation inside the household is selected, this button moves the selected relation to the list of “Relationships outside the Household”. Note that this does not change the address of the related person. To update the related person’s address, their record must be selected in Personal Details and updated as previously described. When a relation outside the household is selected, this button moves the selected relation to the list of “Relationships inside the Household”. Note that this does not change the address of the related person. To update the related person’s address, their record must be selected in Personal Details and updated as previously described. When a relation inside or outside the household is selected, this button removes the relationship – however, the related client record is not deleted. The Excel button allows any list to be exported to an Excel spread sheet, for printing or analysis. Copyright © 2015 CareWorks 46 May 2014 Involvement The Involvement screen allows a user to view those people / agencies / suppliers involved with a client. This screen is a view only screen and allows a user to see a snap shot of who is currently involved with the client. The information is populated into this screen when specific areas within the system are entered into the following areas: in the CareDirector Youth relationships as allocated workers in the Health Professionals Suppliers Education Employment Access to the Involvements module is set up using Profile Based Security (PBS). Note: It is also possible to hide specific relationship types through PBS. A list of client Involvement can be seen by either having a selected person as seen below or by searching for the client from within the Involvement module. Searching for a Person in the Involvement Screen Click on the Copyright © 2015 CareWorks module and the screen below is presented: 47 May 2014 To search for your client click on the button from within the Involvement screen. Record the client’s details in the Involvement Search screen and then click to search for the client. The search result screen returns all relevant results found. Double-click on the relevant person line. Note: A client can also be found by using the referral number if known. Copyright © 2015 CareWorks 48 May 2014 The Client No then appears in the Involvement search screen, clicking on the button will return all the current Involvement to the client. The result brings back all open involvements. Should you wish to see a history select the checkbox. This will return all both open and closed involvements. Copyright © 2015 CareWorks 49 May 2014 The screen can also be filtered by changing the Involvements drop-down list. Depending on the permission a user has to view a client’s Involvements these are counted and the number will be displayed in the hide count on the bottom of the screen. The screen below shows there are 2 results displayed, and 1 hidden involvement. The involvement screen has the ability to export the information onto an Excel spread sheet by clicking on the button. This presents the user with the ability to choose the structure of the report by either selecting the available columns individually or by clicking on the and then clicking the button. The user is then presented with an Excel spread sheet: Copyright © 2015 CareWorks 50 May 2014 Summary You should now be familiar with Searching for a Client Updating Client Details Entering a New Client Recording Personal Details Lead Professional Adding Relationships Viewing people Involved with a Client Copyright © 2015 CareWorks 51 May 2014 Chapter 3) Updating Personal Details Description This session describes how to update Personal Details using the various tabs and buttons throughout the Personal Details module. Objectives At the end of this session delegates will be familiar with: Updating Religion, Phone Number and other Personal Details of a client. Recording Health Details including details of a client’s GP, Disability Details and Hospital Admissions. Recording Education Details of a client including Schools, Examination Results and Special Needs Education. Using the tabs in the Personal Details module to record, update or view details about a client such as Employment, Legal Status, Significant Events, Letters, Audit Trail and Merge Information. Using the buttons on the Personal Details screen to record, update and view details about a client such as Category, Role, Name History and Alias, Language and Other Information and Consent. Transferring client records from one organisation to another. Updating Client Details As shown in Session 2, a client can be selected by searching for them (by clicking the Search button) on the Personal Details screen. Searches will return only Clients you are authorised to view. Alternatively, the button can be used to return from other modules, such as Referrals, Assessments etc., to the Personal Details screen for a client. Similarly, when a client is selected in any CareDirector Youth module, selecting the Personal Details module from the left-hand window, will display the personal details of that client. Copyright © 2015 CareWorks 52 May 2014 Once the Personal Details screen for a client has been selected and are displayed on the screen these details can be updated or additional details can be added. Reminder: A banner on each screen displays the name of the current client. Reminder: If a Workflow has been configured for any screen in the Personal Details module, the mandatory fields may differ from those shown here. To Add or Update the Religion field Select the personal details of the client. Choose a Religion from the list. Click on to save any changes. To Add or Update the Phone Number Select the personal details of the client. Type the information in the Phone field. Click on to save any changes. See Also: Session 2 for updating Address, Marital Status and Relationships. Recording Health Details The Health tab in the Personal Details module is made up of five screens on which details of health can be recorded. Copyright © 2015 CareWorks 53 May 2014 The Health Details screen is used to record the name of the GP, Community Health Worker or other Health professionals associated with the client. It also allows the user to record a list of known health problems and a number of free text comments about the client’s health. Details of any Impairment or Disability along with the severity are recorded in the second screen. The Hospital Details screen is used to record any admissions to hospital. The types of Immunisation given and the age of the child when immunised are recorded on the fourth screen. The final screen is used to record Other Details including childhood illnesses, allergies and other health related information. In this session we look at three examples: Recording a Hospital Admission. Entering the name of a client’s GP. Entering details of a Disability. To Record a Hospital Admission Select the Personal Details of the client. Click on the Health tab in Personal Details and click on the Hospital Details tab. Copyright © 2015 CareWorks 54 May 2014 Enter an Admission Date, either Planned or Actual. Select the name of the Hospital from the drop-down list. Optionally select the name of the Ward from the drop-down list or type in the name of the Ward in the Other Ward field. Optionally supply a Discharge Date as well as details about the Reason for Stay, Consultant and other Comments. Record the Dates of Receipt and Response to Section 2 and Section 5, and Outcome, as appropriate. These dates will allow the Hospital Discharge Details to be linked to a Referral using the button on the Referral Detail screen (see Session 3 – Referrals for further details). Note: Hospital Discharge details will normally be recorded for Adults only. To Record the Name of the Client’s Health Professionals Select the Personal Details of the client. Click on the Health tab in Personal Details and click on the Health Details tab. Select the Health Professional type from the drop-down list. Copyright © 2015 CareWorks 55 May 2014 Select the Professional’s name from the drop-down list. OR Type in the Professional’s Name (and phone no. if available) into the Free Text fields. Press to create the record. GPs can be grouped into Medical Practices. If this option is being used at your site, the Practice can be selected from the Org/Practice drop down list. The Health Professional List will show General Practitioner only. The Professional Name drop-down list will only show the GPs associated with that specific practice. To Record that a child has a health condition that requires special measures This text box allows the addition of information relating to a health condition for a child and acts then as an alert on the main Person Details screen. When information is entered the associated tick box on the same screen is auto completed. On the main person details screen the “Special Health Measures” tick box is also completed when text is saved within this field and acts as an alert to the system user. Note: To remove the information from the tick box it is possible to firstly remove the tick in the tick box within the Health screen. A message will be displayed asking for confirmation before the information is removed. Copyright © 2015 CareWorks 56 May 2014 Note: Further information about each of the Health Professionals in the drop down list is available by selecting the name and clicking on the Zoom button. This displays any address and contact information recorded on CareDirector Youth about the Professional. This also displays details of other clients registered with that person.. To Record a Disability The Disability/Impairment screen may be used to record details of any disability and the severity of that disability. Where applicable, the following should be recorded on this screen: Registered Blind, Registered Deaf, Registered Hard of Hearing or Registered Partially Sighted. Select the Personal Details of the client. Click on the Health tab in Personal Details and click on the Disability/Impairments tab. Select a Disability Category from the drop-down list. Select a Severity from the drop-down list. Enter a Start Date. Enter the date the BD8 was Received. Click on to add the information. Note: Follow the same process to fill in details of any impairment on this screen. Copyright © 2015 CareWorks 57 May 2014 Note: Dates Recorded for Disabilities and Impairments There are five dates that can be recorded for each record. These should be used as follows: Start Date Date information was added to CareDirector Youth. Start Date is a mandatory field. Onset Date Actual or estimated date when condition first began or was believed to have an impact on the client. Diagnosed Date Date that a diagnosis was made by an appropriate specialist. Notified Date Date that Social Services were informed. End Date Date when the condition ceased. Recording Education Details The Education tab has two screens: The School screen is used to record details of the schools attended. The Education screen is used to record absences, exclusions, examinations, special needs education, standard assessment tests and other education details. Copyright © 2015 CareWorks 58 May 2014 School Details Select the School from the drop-down list. Enter the Start Date for the client at the selected school. This is the minimum amount of information required by the system. Additional details such as year, teacher(s) name etc. can be entered now by filling in the remaining fields. Note: Year Group refers to the year group the child is in according to their age. NC Year Group Click on to add the client’s school details. refers to the year in which they are actually taught. Example: When the child leaves this school, the school record is selected and the Date Left and A child held back 1 year, and 11 years old at 1st Sep, would be in Year Group (according to age) – Year Reason Left are entered before pressing to save the change. 7, and NC Year Group (actually taught in) – Year 6. Copyright © 2015 CareWorks 59 May 2014 The new school details are then entered as a new record, on the same screen. Education The Education Record tab is divided into five separate screens. Each of the screens may be completed in exactly the same way as the other screens in the Personal Details module. The first screen, Absence/Exclusion is used to record periods of non-attendance at school. The Indicator and Reason are selected from the drop-down lists. The dates of the absence are selected from the calendar. The second screen is used to record Examination details. Again, the fields are selected from drop-down lists and by filling in the date(s). The Special Needs screen includes a drop-down list of stages in Special Needs Education. (See example below). The Standard Assessment Test screen includes drop-down lists for Exam Type, Level, Subject, Date and Did Not Sit Code. The Other Details screen includes drop-down options to record the presence of Individual Education Plan, Subject of Statement of Special Needs and Transition Plan Made. The screen also includes free text fields for Other Courses / Training Undertaken, Achievements in Sports and Drama and who holds Record of Achievement. Reminder: Click on Insert or Update to save the changes to the client’s details. Copyright © 2015 CareWorks 60 May 2014 For example, to add details of Special Needs Education: Select the Personal Details of the client. Click on the Education tab in Personal Details. Click on the Special Needs Education tab. The following screen appears: Fill in the Date On. Select the SEN Stage from the drop-down list. Click on to update the client’s details The ID is automatically allocated by the system. Reminder: Dates can be entered by typing in the date or by selecting the month and year from the drop-down lists in the calendar and the clicking on the date. Other Tabs in the Personal Details Module There are other tabs available from the Personal Details screen: Employment Legal Status Sig. Events Letters Audit Trail Copyright © 2015 CareWorks 61 May 2014 Merge Info Reminder: The actual tabs shown, as well as the fields on those pages, depend on the module profile associated with the user’s logon. Employment The Employment screen is used to record details of jobs held by the client including apprenticeships, voluntary work and part-time work. Enter the Employer’s Name. Type in the Occupation. Select the Type of Employment or Training Scheme from the drop-down list. Enter a Date Started. Enter the Engagement hours (and minutes) per week. Add any other details. Click on to update the client’s details. The details of the employment can be updated at a later stage by selecting the record, adding new or changed details and clicking on Update. For example, Date Left and Reason Left can be recorded at a later stage. Copyright © 2015 CareWorks 62 May 2014 Legal Status & LAC To Record a Legal or LAC Status for a Client Select the Personal Details of the client. Click on the Legal Status & LAC tab. Complete the form using the fields described in the table below: Name Description Known to Social Services Date Select a check box to record if the client is Known to Social Services or not. Legal Status Select the client’s current Legal Status from a statutory list . The most recent date that Known to Social Services status was recorded Start Date The start date of the client’s current legal status (Legal Status) Review Date The ‘due by’ date of the client’s legal status review. Review Held The date the cleint’s review date was actually held. End Reason The recorded reason for the client’s legal status ending or changing. End Date The date the cleint’s current legal status ends or changes. (Legal Status) LAC Status The Looked After Child status. Copyright © 2015 CareWorks 63 May 2014 Placement The client’s placement type. Relevant Child Select if the child is relevant (or whether this is unknown) Eligible Child Select if the child is eligible (or whether this is unknown) Start Date (LAC) The start date of the client’s LAC status. End Date (LAC) The end or change date of the client’s LAC status. Comments Any notes or comments about the LAC episode or placement. Click on to add the Legal Status. Recording Significant Events Where a client has a long association with Social Services, recording a separate list of Significant Events may be useful. The Significant Events Screen can be used to highlight to a practitioner the milestones of the contacts. Significant events are recorded for a client in the Personal Details module. Significant events include: Court Proceeding (e.g. Emergency Protection Order, Section 7 Report etc.) Family (e.g. Parents separate, Step-parent, Death in family, Drug abuse etc.) Personal (e.g. Notified as missing, Domestic Abuse, Drug Abuse etc.) To Add a Significant Event: Select the Personal Details of the client. Click on the Sig. Events tab. Copyright © 2015 CareWorks 64 May 2014 Enter a Start Date for the event. Select an Event Group and an event from the drop-down lists. Additional information such as a Reason or a Comment can also be recorded on this screen. Letters The CareDirector Youth system can create and print standard letters. A local system administrator is responsible for adding in the letter templates to be used at your location. To Create a Letter 4. Select the client and choose the Letters tab from the Personal Details module. Fill in the Date Created. Choose a Letter Template from the drop-down list. Copyright © 2015 CareWorks 65 May 2014 Fill in any Comments about the letter and Click . A letter appears on the screen based on the template selected. The client’s details such as name and address are automatically filled in by the system. The letter can be printed out for sending by clicking on the Print button in the letter. Click on Save to save a copy of the letter. Click on Close to return to CareDirector Youth. To Reprint a Letter Select the client and choose the Letters tab from the Personal Details module. Select the letter and double-click to open the letter. As outlined above click on Print to print another copy of the letter. As mentioned in Session 1, the system keeps track of each time information about a client is viewed or updated. These details can be viewed by selecting the Audit tab. Copyright © 2015 CareWorks 66 May 2014 The button allows the list to be exported to an Excel spread sheet, for printing or analysis. Merge Info If there are two records within CareDirector Youth for the same client, and information has been added to both records (so one of them cannot be deleted), it is possible to ‘merge’ one record into the other, resulting in just one record for the client. This may occur for example, where a client has been entered onto the system twice in error, or where two clients have been added to the system and it becomes known at a later date that one of the names was an alias for the same person and not in fact two separate people as first appeared. The Merge facility itself is within the System Administration module, but the Merge Info screen within Personal Details indicates whether there has been a ‘merge’ performed on the client’s record, and provides information about the merge(s). Copyright © 2015 CareWorks 67 May 2014 In this example, there used to be two records within CareDirector Youth for Daisy Coleman; a record with Client Number 514069 (Merged From) and a second record with Client Number 513693 (Merged To): The record that had the ‘Merged From’ Client Number no longer exists, as the information from that record has been merged into the ‘Merged To’ record. The current record, which has kept the ‘Merged To’ Client Number, is now the sole existing record within CareDirector Youth for Daisy Coleman. The Merge Info screen also displays the date that the records were merged, and the user who performed the merge, as below. Other Buttons in Personal Details The Client Category In order to generate statistical reports, a client category may be recorded for a client. To Insert a Client Category: Fill in the Primary Category and enter a Start Date. Copyright © 2015 CareWorks 68 May 2014 If Secondary categories exist for a Category, select the appropriate Secondary Category. Click to save the details. Client Role As mentioned in Session 1, the CareDirector Youth application holds information about many types of people e.g. Service Providers, Staff Members, Referrers, as well as Service Users. Clicking on the Client Role button on the Personal Details screen allows a client role to be entered. Select the Personal Details of the client and click on Client Role. Select a Client Role from the drop-down list and enter a Start Date. Click on to save the details. Note: If a client is recorded as a victim, they cannot be recorded as any other client role. Name History If the Surname, First Name or Middle Name of a client is updated, in Personal Details, CareDirector Youth keeps a record of any previous names. This Name History can be viewed by clicking on the Name button on the Personal Details screen. This is a read-only screen. Click on to return to the Personal Details screen. Note: When a client search is performed, CareDirector Youth searches previous names in the name history screen, as well as the current name in the Personal Details screen, and the alias screen. Copyright © 2015 CareWorks 69 May 2014 Alias An alias can be added for a client by clicking on the Alias button on the Personal Details screen. If any aliases have already been recorded for the client they are displayed here. To add an alias Enter a Surname in the Surname field. A First Name and Middle Name can also be added to the Alias if required. Click on to add the Alias. Note: The button can be used to clear any text in the Surname, First Name or Middle Name fields of the Alias screen. To Delete an alias Click on the Alias to be deleted. (Usually one entered in error). Click on the Click on button. Click on to confirm. to return to the Personal Details screen. Note: When searching for a client by name the system searches all previous names in name history and aliases as well as the current personal details name information. Language Details of languages can be recorded or updated for each client by clicking on the Language button on the Personal Details screen. Copyright © 2015 CareWorks 70 May 2014 Select a Language from the drop-down list. The Fluency and Preference fields are optional in the default Workflow. Select a value from the drop-down list to fill them in, if required. Click on to add the Language. To update, select the Language record in the list. Select the new options from the drop down lists and click . Note: The Preference field is used for bilingual clients to record their preferred language. Copyright © 2015 CareWorks 71 May 2014 Client Other Info The Other screen is used to capture other information about the client including Birth Cert Number, National Insurance Number, NHS Number and PNC Number. This screen can also be used where a client has come from another local authority to record details of the other authority and the client’s previous Social Worker and Legal Status. This screen is completed in the same way as the other screens within the Personal Details module. When details are completed, they are saved by pressing the Copyright © 2015 CareWorks 72 button. May 2014 Consent The Consent screen is used to capture information about consent that the client may have given or refused, and to whom they communicated that consent/refusal. The relevant information is entered in the fields on screen, and clicking the saves the Consent Information. Multiple records can be entered into this screen. button The Adult Transition Date field has been introduced in relation to Contact Point. Once Contact Point and all related functionality are active, there will be an option of Contact Point Adult Transition in the Consented To field. The Adult Transition Date field is disabled, and will only become enabled once Contact Point Adult Transition is selected in the Consented To field. The Adult Transition Date will be a mandatory field when it is enabled, and its purpose is for users to specify the date when the young person’s record should be archived on Contact Point. Paper Files The paper files button is located at the bottom of the Personal Details screen. Copyright © 2015 CareWorks 73 May 2014 Clicking on this button allows the user to record the location of any paper files associated with the client. Date of entry, description of paper file in File Details and its Location are filled in the appropriate fields. The button is clicked to insert this record. A date is required in this screen, and the user is prompted to supply the date if it is not entered. It is possible to update and delete Paper File records by selecting the relevant record in the list (by single clicking to highlight it) then clicking the relevant button, or buttons. It is also possible to clone a Paper File entry from one client record, to another client record, or even from one referral on a client, to another referral on the same client, by highlighting the record in the list and clicking the button. If cloning to a different client, then the client you are cloning to must have a relationship with your current client, and also a referral for the cloned entry to be stored on. Note: If this is not the case, when the clone button is clicked, the client you wish to clone to will not be displayed in the cloning screen. Once the button is clicked, a window opens to display the clients who have a relationship with the current client, what the relationship is and by default, the corresponding open referrals for the current client and their relationship clients (with referral number and date of referral). The relationships and referrals listed by default are those that the user has access to according to Profile Based Security. Referrals not listed by default are those that are Closure Requested, Closed Fully, or those to which the user does not have access to according to Profile Based Security. However, on ticking within the cloning screen, all of these referrals will become displayed for the user to clone to. Copyright © 2015 CareWorks 74 May 2014 The allocated team and action taken are also displayed under each referral to assist with selection, prompting the user to select which referral the record is going to be cloned ‘to’ under the relevant client, by ticking its ‘check box’. The current client is also listed, enabling users to clone information from one referral to another/others for the same client. Un-ticking will return the clone screen to the default display, excluding removing all referrals from the list that are Closure Requested, Closed Fully or where the user does not have access to the referrals according to Profile Based Security. Once the relevant referral or referrals have been ticked, the button is then used to copy the record from the current client referral onto the selected client’s record and referral(s). A message is displayed informing the user that the related file has been successfully cloned. Attached Files The attached files button is also located at the bottom of the Personal Details screen and it allows the user to attach electronic files associated to the client. A Caption describing the attachment, the Document location within the electronic filing system and the Date it was attached, are recorded on the form in the appropriate fields: Copyright © 2015 CareWorks 75 May 2014 The button is pressed to insert this record. The button is used to navigate the computer filing system to select the required file, and the file path is then automatically recorded. A date is required on this form. The user is prompted to supply the date if it is not entered. The Document Type and Document Sub Type are used to categorise documents for viewing in the Document View module. Document Type refers to the module the document is being attached to, while Document Sub Type describes the document being attached. The button is used to return to the Referral screen. It is possible to , and same way as described above for related Paper Files. Attached File records in exactly the An attached document is viewed by double clicking on its name in the list of documents. The maximum size of attached files is 8MB. Transferring Client Records between Organisations If a client relocates to a new geographic area but still requires support, you can transfer a client record to a new social care organisation. You can also import a record for a new client from their previous social care provider. Attachments and documents are not transferred as part of the client record. Copyright © 2015 CareWorks 76 May 2014 Exporting a Client Record You can transfer a client record in an XML format. To export a client record: 1. Select a client in Personal Details. 2. Click the Transfer Case button. 3. The Transfer Case window opens. 4. Complete the mandatory fields, including the recipient’s e-mail address and click Transfer . The recipient receives an XML file which contains the client details. They can then import this universal standard into their system. Note: You can review the data being exported in an XML format be selecting XML Preview . Copyright © 2015 CareWorks 77 May 2014 Importing a Client Record You can import a client record in an XML format from another organisation. To import a client record: 1. Select the Client Search module. 2. Click Import Case . 3. Select an XML file, by clicking Select File . You will receive a message if the file is successfully loaded. 4. Click Import to start the import process. 5. The client record is displayed, select the client recordand click Import Case . The new client is number is displayed. 6. Click Close. The case is now successfully imported. Merging Duplicate Clients When importing a client from another YOT, you may already have a partial record of the same client. You can merge these two records when importing the new client record. 1. Select the Client Search module. 2. Click Import Case . 3. If there is a duplicate record, the Duplicate Client Analysis window launches. 4. Select the existing client record, and click Merge... Copyright © 2015 CareWorks 78 May 2014 5. A message is returned that the case was successfully imported. 6. Click Close. Now, both the imported and the existing record are successfully merged. Searching Imported and Exported Clients You can trace any imported or exported clients in the YOT Case Transfer Audit module. All clients imported or exported can be traced here. The module has a number of filters which can be set to allow you to search for clients. You can search by client number, action taken (imported or exported) and a range of dates between which the client may have been imported or exported. All imported files have a log file which can be viewed. Copyright © 2015 CareWorks 79 May 2014 Summary You should now be familiar with Updating Religion, Phone Number and Other Personal Details of a client Recording Health Details including details of a client’s GP, Disability Details and Hospital Admissions Recording Education Details of a client including Schools, Special Needs Education and Examinations Using other tabs and buttons on the Personal Details screen to record or update details about a client, such as Employment, Legal Status, Significant Events, Alias, Consent, etc Viewing any Client Merge and Audit Information Recording, Cloning & Viewing Paper File locations, and Recording, Cloning & Viewing Attached Files Transferring Client records from one organisation to another. Copyright © 2015 CareWorks 80 May 2014 Chapter 4) Dashboards Overview Dashboards have a number of views that enable logged in users to display a graphic view of their cases. The records of a young person can be opened from a dashboard. Viewing a Dashboard To view a dashboard, do the following: 1. Click Dashboards under My Raise. 2. Select the type of dashboard you want to display from the Dashboard drop-down list. The following options are available: Case Summary Dashboard — for more information, see Case Summary Dashboard. 3. 4. 5. 6. Prevention Dashboard — for more information, see Prevention Dashboard. Select the agency of the cases you want to view from the Agency drop-down list. Select the team of the cases you want to view from the Team drop-down list. Select the worker whose cases you want to view from the Worker drop-down list. Click Apply Filters. The dashboard is displayed in a grid form, with column title along the top, and the cases listed under the person who has responsibility for the young person’s cases. Case Summary Dashboard The Case Summary dashboard enables case managers to display a summarised view of their cases. It displays all open programs for which you are the responsible worker or the responsible worker of the intervention and all open referrals with no open program for which you are the primary or secondary allocated worker. This dashboard displays the following summary fields: Columns Description Current Cases Displays the number of cases displayed on the dashboard as calculated from Asset Plus assessments. Very High/High Risk Displays the number of cases where the risk is high (ROSH) as calculated from Asset Plus assessments. Copyright © 2015 CareWorks 81 May 2014 Columns Description Medium Risk Displays the number of cases where the risk is medium (ROSH) as calculated from Asset Plus assessments. Low Risk Displays the number of cases where the risk is low (ROSH) as calculated from Asset Plus assessments. New Primary Allocations Displays a value for referrals only and not programs or interventions, where Action Taken is Allocated or Assigned to Team or Assigned to Worker. National Standards Intensive Displays the number of cases where the young person intervention level is Intensive as calculated from Asset Plus assessments. Enhanced Displays the number of cases where the young person intervention level is Enhanced as calculated from Asset Plus assessments. Standard Displays the number of cases where the young person intervention level is Standard as calculated from Asset Plus assessments. Incomplete Documents Displays the number of documents that have a start date but are not recorded as completed or concluded. These can be associated with a programme, referral, or hearing. This dashboard displays the following fields for each client: Columns Description Young Person Displays the first and last name of the client. Order Displays the type of order that the young person is subject to. Client No Displays the person’s ID number. Ref No Displays the person’s reference number. Copyright © 2015 CareWorks 82 May 2014 Columns Description Length of Order in Months Displays the length of the order in months. Start date of Order Displays the start date of the order. Asset Date Displays the date of the asset as retrieved from the Asset Plus assessment. ROSH Date Displays the date of the last calculated ROSH as retrieved from the Asset Plus assessment. ROSH Displays the client's last calculated Risk of Serious Harm level as calculated from the Asset Plus assessment. VMP Date Displays the date of the Vulnerability Management Plan as retrieved from the Asset Plus assessment. VMP Review Date Displays the date of the VMP Review as retrieved from the Asset Plus assessment. RMP Date Displays the date of the Risk Management Plan as retrieved from the Asset Plus assessment. RMP Review Date Displays the date of the RMP Review as retrieved from the Asset Plus assessment. Legal Status Displays the LAC or accommodation status. Current School Hours Displays the current school hours. Borough Displays the client's borough. Ward Displays the client's ward. The grid is colour coded, as follows, to show when review dates are due: Green — review is due within one month. Yellow — review is due within two weeks. Orange — review is due within one week. Red — review is overdue. Copyright © 2015 CareWorks 83 May 2014 Prevention Dashboard The Prevention dashboard displays a summary of all young people who are on a prevention program. It enables the prevention team to get a high level overview of their prevention cases and navigate to individual young people for more detail. By default, this dashboard displays data for all open programs of type YJB Returns or Prevention Programs for which you are the responsible worker. You can also choose to filter by other teams or workers. This dashboard also shows data for all open referrals with no open program for which you are the primary or secondary allocated worker and the referral reason is Request for YOT Prevention Services or Request for Other Prevention Services. This dashboard displays the following fields: Columns Description Name Displays the first name and last name of the client. Client No Displays the person’s ID number. Ref No Displays the person’s reference number. Prog Type Displays the type of the programme. Prog Date Displays the date of the programme. Onset Score Displays the current onset score. Onset Change Indicates if the client's current onset score is equal to the last onset score or has increased or decreased. ROSH Level Displays the client's Risk of Serious Harm level as calculated from the Asset Plus assessment. VMP Level Displays the client's current VMP level as calculated from the Asset Plus assessment. Previous Outcomes Lists all of the client's outcomes prior to the start of the prevention program. Secondary Allocations Displays the client's secondary allocations with a start date but no end date. Copyright © 2015 CareWorks 84 May 2014 Columns Description Legal Status Displays the client's current legal status with a start date but no end date. Client Ward Displays the client's ward. Client Borough Displays the client's borough. Current School Hours Displays the client's school hours. Copyright © 2015 CareWorks 85 May 2014 Chapter 5) Referrals Referrals are a result of when a contact is received by a Youth Offending Service, which in turn needs to be recorded because of the possibility of on-going work. A referral represents an episode in a young person’s life and in the Youth Offending context that is when they are at risk of or actually offending. A young person can have one or many referrals and a Referral will always be linked to a client. Each Referral may have associated offences, hearings, assessments, interventions and programmes. Creating Referrals To access the Referrals module, you click on the appropriate icon on the left hand side of the screen: The start point for a new Referral is the creation a new person or finding an existing person. A search for the person is initiated using the facility. When the relevant Personal Details are displayed on the screen, you select the Referrals module. A screen will be displayed showing any existing Referrals for that client: Copyright © 2015 CareWorks 86 May 2014 Note: There are a number of buttons on this screen. Their functions are as outlined below. The button allows you to print off referrals: Copyright © 2015 CareWorks 87 May 2014 The button allows you choose details of referrals and export to Excel: To create a new Referral, click the button, which displays the Referral Details form. The name of the selected client is shown in the banner at the top of the screen. Note: Your system may be configured so that you can only create a single referral for a client. If you need to have multiple open referrals for the same client, contact your Raise System Administrator. If you are creating a referral for an existing client you will have to choose the right workflow step: Copyright © 2015 CareWorks 88 May 2014 Once the screen is active within the ‘Referred By’ section you click on Agency and select the agency that has initiated the referral: You then choose the Role/Team that referred from that agency: There are three options available for recording the name of the Referrer. If there is a predefined list of names of people who fill specific roles within a particular agency, then that name may be selected from the Name drop down list. For example, if a school initiate a Referral and their names are already set up, then it would be possible to select a teacher’s name. If the name is not available in the list, you may record the name and phone number in the free text fields. The Zoom button beside the Referrer field can be used to search the YOT database for details about the Referrer and contact details may be added directly to the database. This allows inclusion of additional contact details, such as address, for the Referrer. Note: Despite not having a red asterisk a name must be recorded. Select Mode to record how the Referral was received: Copyright © 2015 CareWorks 89 May 2014 It is also necessary to include a Reason from a pre-defined list in the Reason field: You can then record more details about the reason for the referral, in the free text box with that label. When the zoom button opened to facilitate data entry: Copyright © 2015 CareWorks beside the field is pressed a larger window is 90 May 2014 When all text is completed you can use clicking on the to check your spelling and you close by button. If the young person is a Child in Need and you know their number you record that fact: The Yes box is clicked to insert a tick, indicating that the Person/Parent/Carer is aware of the Referral. If they are not aware then the No box is ticked. Optionally it is possible to note that an Interpreter or Signer is required. If so, then a further field is displayed to note whether one has been arranged. You must state whether the young person is local or is from outside the borough or county: The Referral Taken By section is already completed, with the details of the logged on user, although these details may be changed, if required. Copyright © 2015 CareWorks 91 May 2014 The Action Taken section records key dates at different stages of the Referral. During the creation stage, the initial Action Taken with its date is recorded, as well as the Reason for that action. The Action Date should always reflect the date that a task is undertaken, which is not necessarily the date that it is put on CareDirector Youth. The date and time that you enter the data is automatically stored, but the Actual Date entered is very important. Date of Referral is considered to be the Action Date of the first Action taken which is that of Pending Allocation: At this stage, all the necessary details for a new Referral have been recorded. To save these details, the button is pressed. The details on the form are validated. If any mandatory fields are missing, you are prompted to complete them, before the Referral can be created. After validation, a new Referral is created and a unique Referral number is allocated. You will receive a confirmation message: At this point the screen banner is updated to show the Referral Number: Workflow will automatically be triggered and you will be presented with the first options of workflow: Copyright © 2015 CareWorks 92 May 2014 In this example you are allocating to a worker. You choose the step and click on the Go button: It will return you to the screen with the Action Taken box now displaying ‘Allocated (Ongoing Support)’ although the banner is still showing ‘Pending Allocation’. However it requires you to insert an and click the with the screen below to make your choices: Copyright © 2015 CareWorks button. You are then presented 93 May 2014 Clicking on OK will allocate the referral to a person and this will show in the Referral Banner: You will also see an e-mail box that enables you to e-mail the allocated worker and inform them of any immediate issues: Copyright © 2015 CareWorks 94 May 2014 Clicking on will send the mail and you will receive a confirmation message: Clicking on OK will bring back the workflow and you choose whether you want another step or to close the workflow: Copyright © 2015 CareWorks 95 May 2014 Allocating a Referral When the referral is created and allocated there can only be one primary allocated worker but that person or their manager can secondary allocate the referral to one or more other practitioners. Click on the Copyright © 2015 CareWorks button: 96 May 2014 Enter the date started and using the Agency, Role and Name fields choose the practitioner that you want to involve. Note: Those involved does not have to be restricted to just YOS staff. Enter details for Action Taken, Reason and any Comments you wish to add: Copyright © 2015 CareWorks 97 May 2014 Clicking on insert will create the secondary allocation and allow the secondary worker to see it on their referral list. You will receive a confirmation message and will be able to e-mail that worker. If the worker has no e-mail address you will receive the following message: When a secondary worker has finished their involvement the status can be updated and the ‘Date Left’ box filled in: Note: A referral cannot be closed by the primary worker if any secondary workers are still allocated to the referral. Setting a Referral Priority This section of the form is used to categorise Referrals to indicate urgency. Copyright © 2015 CareWorks 98 May 2014 To assign a priority, you press the button, which displays a new window. A priority level is selected from the drop down list, a date is chosen and you press the button to insert this Priority Level: This will now show on the Referral itself: Filtering Referrals When CareDirector Youth opens and you go to the Referral screen, the first screen displays a default list of all referrals appropriate to you: Copyright © 2015 CareWorks 99 May 2014 To filter by Team, select the Agency and Role. To filter by Person, select the Agency, Role and Name. You can filter additionally on Action Taken and Priority Level. It is possible to scroll through the displayed list using the scroll buttons at the right hand side. Sorting Referrals List The Referral Listing may be sorted into a specific order, by clicking on the headings in the list. For example to list referrals in client surname order, point to the Surname heading and click once. Searching for a Client Referral You can either search for a particular referral using the referral number, or you can search for any referrals which are for a particular client. Note: All rreferrals on the system will be searched for those matching the criteria, but only those to which you have access will be displayed. Referrals you do not have access to will be displayed numerically in the Hid Count. Searching for a Referral using Referral Number You can search for a referral using the Referral Ref No field. This uses the referral number for each referral as the search criteria. In the Enter Referral ID field, type the referral number for the required referral and click Enter. The referral is displayed in the main panel. Searching for a Referral using the Client Personal Details If searching for a referral for a specific client, the search is carried out in two steps: Copyright © 2015 CareWorks 100 May 2014 Enter client details and click Personal Details to locate and select the relevant client record. Any referrals for the client are displayed in the bottom pane of the personal details screen. See Also Session 2 Searching for a client. Re-Allocating a Referral Any appropriate member of staff may re-allocate referrals, although only an allocated worker’s manager may close referrals. If you need to do this you first need to pick up the workflow which is located in the top right hand corner of the screen: The light green signifies the current step: The dark blue signifies where you are in the overall workflow: The light blue allows you to launch the workflow: Copyright © 2015 CareWorks 101 May 2014 You would then go back through the stages described earlier to re-allocate the referral. Referral Action History You can see what workflow steps and management decisions have been taken in relation to a referral by clicking open the Action History. Copyright © 2015 CareWorks 102 May 2014 If you press the button the following screen is displayed: If you click on Show all Workers it will include those who are or have been secondary allocated to the referral. This list may be printed by pressing the button when the list is displayed. The button returns you to the Referral screen. Updating Residence When the value in the Residence drop-down list is changed, CareDirector Youth records the date. You can view the residence history by clicking the Residence History button. Copyright © 2015 CareWorks 103 May 2014 This screen lists the changes to the Residence field. You can modify the date of a change by selecting the change, setting the date in the Update Date field, and clicking the Update button. Other Functions You can carry out other functions within the referral. The icon allows you to go to Personal Details of the particular person. The icon allows you to record the location of any paper file: Copyright © 2015 CareWorks 104 May 2014 The icon allows you to attach any electronic documents related to the person: The icon allows you record any required consents: Copyright © 2015 CareWorks 105 May 2014 Referral Closure Referral Closure is a three step process. Step One: The worker allocated to a Referral may request its closure. To do this the worker clicks open the light blue workflow button and choose the ‘Closure Requested’ step: You then click Go and it brings you back to the screen. In the Current Action box fill in an Action Date and then choose a Closure Reason: Copyright © 2015 CareWorks 106 May 2014 Click on , the following message is displayed: The Closure Request will not proceed if there is • An active Secondary Allocation Step Two Once this step is complete you will be presented with the workflow again and this time only one step: Clicking On and click on Copyright © 2015 CareWorks will bring you back to the screen where you fill in the Action date . You will be prompted to confirm closure: 107 May 2014 Clicking on will bring you confirmation of the closure and the referral will be greyed out: Step Three – Approval or Rejection of a Closure Request. As a team manager you will have access to the Caseload module: Clicking on caseload will open up the screen: Copyright © 2015 CareWorks 108 May 2014 As a manager when you select caseload you will presented with a list of Referrals that are either ‘Closure Requested’ or ‘Fully Closed’. This list can be filtered using the drop down list: To Accept or Reject a Closure, the referral is selected and the appropriate button is chosen. Accepting a closure will bring up the following screen: Filling the Closure Date and clicking on OK will bring a confirmation message: Clicking on OK will reveal the Retention screen: Copyright © 2015 CareWorks 109 May 2014 Once you have chosen your method and retention period you click on the button which fills in the Archive Date: You will receive a confirmation message: The referral is now closed. Copyright © 2015 CareWorks 110 May 2014 Re-Open a Referral A referral that is already closed may be re-opened by selecting the Referral in the list of ‘Fully Closed’ referrals and choosing the button. Highlight the Closed Referral and click on Re-open. The following prompt will be displayed: Clicking on OK will bring up the following: Copyright © 2015 CareWorks 111 May 2014 Chapter 6) Offences Introduction Once a referral has been created for an offender often the next logical step is to record details of the offence(s) which the young person has been charged with by the police. The offences that are available for selection are those that are required for the Youth Justice Board’s Quarterly and Annual Returns. Entering an Offence(s) To open the Offences screen, click Dashboards under My Raise on the navigation pane. Copyright © 2015 CareWorks 112 May 2014 If offences have already been entered for this referral they will be displayed in the grid. If not you will be presented with an empty screen: Note: There are a number of buttons on this screen. Their functions are as outlined below. The Search button opens up a screen that allows basic searches to be conducted: The Print button allows you to print off offences: Copyright © 2015 CareWorks 113 May 2014 The Excel button allows you choose details of offences and export to Excel: If you select the Show All check box, you will see all the young person’s offences and not just the ones related to the particular referral. To add an offence you click initially on the Insert button. The following screen is displayed: At the top of the screen, there are three distinct tabs named Offences, Outstanding Offences and Linked Clients: Copyright © 2015 CareWorks 114 May 2014 The Offences tab allows for the insertion of new offences and the details associated with these offences. It also allows any existing offences to be selected, viewed and amended if necessary. To add an offence do the following: 1. Choose one of the following offence categories: Arson Breach of Bail Breach of Conditional Discharge Breach of Statutory Order Criminal Damage Death or Injury by Dangerous Driving Domestic Burglary Drugs Fraud and Forgery Motoring Offences Non Domestic Burglary Other Public Order Racially Aggravated Robbery Sexual Offences Theft and Handling Stolen Goods Vehicle Theft/ Unauthorised Taking Violence Against the Person — threatening with an article, with a blade or point or offensive weapon in public (Gravity Score =3) Threatening with an article, with a blade or point or offensive weapon on school premises (Gravity Score = 3) Map to YJB Offence Type ‘Violence Against the Person’ Violence Against the Person — Manslaughter Violence Against the Person — Other 2. You then choose the Offence Type within that category. 3. If required you can indicate that this is a gang offence by ticking the Gang Related Offence box: Note: If within the type of offence you choose ‘Other/Unspecified’ then you will see the screen change and an additional box appear: This enables you to classify the offence as serious according to Appendix G: Offences, covered by the ‘Serious Crime Shortcut’ onto ISSP in the YJB counting Rules 2007-08. Copyright © 2015 CareWorks 115 May 2014 4. Enter the date and time of the offence in the Offence On and Time of Offence fields. Note: The Offence Before box is used when the police are unsure of the exact date of the offence but know it was before a specific date: 5. Enter the Arrest Date. Note: This date is used to calculate the age of the young person for the YJB Returns. In the absence of this date, CareDirector Youth takes the offence date. 6. Enter the Charge Date. Note: The Decision Date is one that is used in two situations: 1. For Police Reprimands or Final Warnings as in these circumstances a young person is not charged. 2. For breach offences where the date represents when the decision to breach was taken. 7. You may record that the client has admitted the offence using the Client has Admitted to the offence check box. Note: For Police Reprimands and Final Warnings the Client admitted tick box should be ticked as these pre-court outcomes can only be given if the person admits the offence(s). Note: The Attempted check box is selected based on the selected Offence Type. 8. The Age at Offence will be calculated from the Arrest Date and the young person’s date of birth. 9. If any compensation may be required then you can enter the Monetary Value if necessary. 10. The Administrative Support Unit (ASU) Number is the local number given by the Police and can be entered if required. 11. Enter any additional information about the offence(s) can in the Offence Details field. Copyright © 2015 CareWorks 116 May 2014 12. When all necessary details are entered, click on the Insert button you will receive the following confirmation message: You will then see the offence in the bottom box: At any time by clicking the offence back into the top box you can make any necessary amendments including deletion and then click the Update button. Note: If you delete an offence you will be asked to enter details in the following screen: Outstanding Offences This tab is a presentation of all outstanding offences for the young person, regardless of the referral against which they have been logged: Copyright © 2015 CareWorks 117 May 2014 Linked Clients This tab is allows an association to be made between this client and this offence and another client and their offence: To create the association you first identify the primary client’s offence even if you have already identified it on the offences tab: You then identify the linked client by clicking on the button. In the search screen that appears you type in your search details. You click on the Search button on the bottom right hand side: Double clicking on this name will put the name into the linked client’s field: You then pick up the relevant referral: Once this is entered you can choose the Associated Offence: Copyright © 2015 CareWorks 118 May 2014 Any comments made can be added at this stage before clicking on . This will enter the Linked Client into the bottom field. This procedure can be repeated if there are further linked clients. Note: Offences can be linked even if they are not the same offence type. For example you may want to link someone who has committed a theft with someone who has received stolen goods. Copyright © 2015 CareWorks 119 May 2014 Chapter 7) Hearing details Introduction This module allows you to record and track the progress of a young person through the courts with their related offence(s). In addition you can record who was present in court and the decisions, such as Remand and Bail, made at each individual court appearance. The routes taken by a young person can be very varied and consequently you need to accurately record the movements and outcomes of each hearing. Function Creating a Court Hearing In our example there are four hearings which deal with two offences. The first is a remand and bail hearing where the young person appears and the case with the two offences is simply adjourned for a week. At the second adjournment hearing they take the pleas and the young person pleads guilty to one offence and not guilty to the other. The court imposes a sentence of a fine on the one offence but adjourns the other for two weeks to a trial. At the third hearing, which is a trial, the young person is found guilty and the case is adjourned for two week with a request for a Pre-Sentence Report. At the final hearing which is the second sentence hearing the young person is sentenced to a Referral Order. Hearing 1 – A Remand and Bail Hearing You select the Hearing Details module by clicking on hearing details in the left-hand menu: You will be presented with the Hearing Details screen: Copyright © 2015 CareWorks 120 May 2014 Note: There are a number of buttons on this screen. Their functions are as outlined below. The The The button opens up a screen that allows basic searches to be conducted: button allows you to print off hearings: button allows you choose details of hearings and export to Excel: Copyright © 2015 CareWorks 121 May 2014 If you tick the box then you will see all the young person’s hearings and not just the ones related to the particular referral. You click on the Insert button Copyright © 2015 CareWorks to create the new hearing: 122 May 2014 Fill in the Hearing Date by typing in the date in the agreed formats (07 Jan 2007, 22/01/07 or 22.01.07) or by clicking on the calendar: Next to that you will see a number in a box: This signifies that this is the first hearing in the sequence of hearings that may arise. You are also able to record whether it is a morning or afternoon hearing: In the next field CareDirector Youth will always default the Proceeding Type to Criminal: Note: It will be necessary to change this to Civil if you are recording an Anti-Social Behaviour Order that was given in a Civil Hearing. You then choose your Court Type: You enter the name of the Court: If necessary you can enter the number of the Court: The next box will default to the Court Name and you will only change it if the hearing is at a different location: Copyright © 2015 CareWorks 123 May 2014 Note: In a number of counties the Youth Bench may sit at different locations. Record the Type of Hearing: Bail or Remand proposed: Here you can record the type of bail or remand proposed for the the young person. The next four tick boxes each have a specific purpose and you will need to tick them if they are relevant to the hearing you are currently entering. The first of these relates to the possibility that the young person may receive a Secure Remand at the hearing that is being entered. This is required for CareDirector Youth to calculate the ISSP Route C which partly involves the young person being at risk of receiving such a remand. Copyright © 2015 CareWorks 124 May 2014 The second of these again relates to ISSP but this time it is in connection with Route D. This is where a young person has been released from custody within the last six months and at this particular hearing or a future hearing could be sentenced again to custody: The third will always default to being ticked as CareDirector Youth assumes the young person will attend court. If they do not then you un-tick the box: The final one relates to what are termed ‘Technical Remands in Custody’. This is where a young person is already remanded or has been sentenced to custody and appears in the same or another court on further offences. At that hearing the Youth Bench may give a Conditional Bail or a similar status as they know the young person is already in custody. If this is the case you would tick this box: Within Hearing Details you enter any details that are necessary: Note: If you make a mistake then the cancel button will clear the screen for re-entry. If you wish to delete the hearing the delete button will delete the hearing. However before the actual hearing can be deleted any offences or outcomes attached to that hearing or subsequent hearings will need to be removed. Once completed you click on the Insert button and a confirmation message will appear: Copyright © 2015 CareWorks 125 May 2014 Entering the First Hearing’s Offence Details Once acknowledged CareDirector Youth will automatically open the Hearing Offence Details screen, as it requires you to input the offences that the young person is appearing for and other outcomes that arise from the hearing: Your first action in the Available Offences box is to tick the two offences that the young person is appearing for at that hearing. Note: This box is made up of all the offences connected to that young person and which have not yet had a substantive outcome recorded against them. It is not referral specific but will take offences from all of the young person’s referrals which have no substantive outcome. If the reason for hearing offences is not correct for the particular offence you are dealing with then you re-select the type of hearing. In our example both offences have been adjourned to another date: Any further hearing details related to the offences can be added here: The Next Hearing Date can then be entered: Bail or Remand Imposed: Copyright © 2015 CareWorks 126 May 2014 Records if Bail or remand has been imposed. If Remanded to Youth Detention Accommodation is recorded, the new remand outcome is mapped to YJB Remand Decision Type ‘Youth Detention Accommodation’. CareDirector Youth will default Plea Entered to Not taken unless you alter the entry. In this example the plea was not taken at the remand and bail hearing: Note: It is important that you enter the plea at the hearing when it is taken. The bail or remand imposed is then entered along with any comments relating to those conditions: At this hearing the court has adjourned to another date but have not requested a PreSentence Report: Once this completed you click on Insert button and the entry is made into the bottom field following a confirmation message: Copyright © 2015 CareWorks 127 May 2014 You then hit the Back button . The hearing becomes a line on the hearing details grid: Hearing 2 – The Adjournment/Sentence Hearing To insert the next hearing you click on and CareDirector Youth will automatically default to the next hearing date that you had entered previously in Appearance Offence Details. You will then need to enter, the Type of Hearing and any Hearing Details before pressing the button. Copyright © 2015 CareWorks 128 May 2014 You will be taken to the Appearances Offences Details where you will see the offences in the bottom box; The next stage depends entirely on what happens in court. If for example all offences are to be dealt with together at a future hearing you will tick the box . This then brings all the offences forward and you will recognise this by the following message in the Offence Detail: However in our example the young person was pleading guilty to one offence and not guilty to the other, therefore each offence would be dealt with separately. You will tick the tick box to the left of the first offence: And you will see the chosen offence appear in Offence Details: The first offence where the young person has pleaded guilty and the court have imposed a sentence of a fine you will fill in as follows and then click on the Update button: You will tick the tick box to the left of the second offence: You will see the chosen offence appear in Offence Details: For the second offence the young person has pleaded not guilty and the court has adjourned for two weeks for a trial. This will appear as follows: Copyright © 2015 CareWorks 129 May 2014 Note: If for any reason an offence has to be deleted from the hearing it is not sufficient to simply highlight it but you must also put a tick in the selected box. You then click on Back INSERT and you will be returned to the grid where you see three grid lines: The Adjournment Status of the second two lines will need to be changed to Sentence as this status is required to put the outcome of the fine against the first offence. You re-open one of the two and change the Hearing Type from Adjournment to Sentence and click on Update. Following the confirmation message and clicking on Back will now show you the following screen: Note: At this stage you would actually record the outcome of the fine. The details will be dealt with in the Outcomes module. This would have the effect of removing the first offence as one that can be used in future hearings. Copyright © 2015 CareWorks 130 May 2014 Hearing 3 – The Trial Hearing To insert the next hearing you click on and CareDirector Youth will automatically default to the next Hearing Date that had been entered previously in Appearance Offence Details: You will then need to enter, the Type of Hearing and any Hearing Details before pressing the button: You will be taken to the Appearances Offences Details where you will see the offence in the bottom box and you select that offence. Complete as follows: When setting a Sentence Date and asking for reports you are required to fill in the following fields: You will tick the PSR (Pre-Sentence Report) Requested box, choose a value in PSR Directions and fill in a PSR Due Date: Copyright © 2015 CareWorks 131 May 2014 Note: The values in PSR Directions are as follows: Serious First Tier penalties such as Conditional Discharge or Fine Serious Enough Community Penalties such as Action Plan or Reparation Order So Serious Community Penalties/Custody – such as DTO or Supervision Order Note: The PSR Due Date is normally the same date as the Sentence Date but occasionally there may be an additional Remand Hearing before the actual sentence date. After you have clicked the update button and clicked the back button you will be returned to the Hearings List where you now will see four hearings: Hearing 4 – The Final Sentence Hearing To insert the next hearing you click on and CareDirector Youth will automatically default to the next Hearing Date that had been entered previously in Appearance Offence Details: You will then need to enter, the Type of Hearing and any Hearing Details before pressing the button: Copyright © 2015 CareWorks 132 May 2014 You will be taken to the Appearances Offences Details where you will see the offence in the bottom box and you select that offence. Complete as follows: Note: At this stage you would actually record the outcome of the Referral Order. The details will be dealt with in the Outcomes module. This would have the effect of removing the offence as one that can be used in future hearings. After you have clicked the update button and clicked the back button you will be returned to the Hearings List where you now will see five hearings: Copyright © 2015 CareWorks 133 May 2014 Use of the Attendees Tab Introduction This allows you to record the significant people that were present at each and every hearing. Examples would be parents, solicitor, police officer and YOT Duty Officer. Any notes about attendees can be added. Function You click on the Attendees tab: You fill in a Name: You then chose a Type: You enter any notes they wish to add: And finally you click on the Copyright © 2015 CareWorks button and the entry is placed in the Attendees field: 134 May 2014 The procedure can be repeated for any other attendees: Copyright © 2015 CareWorks 135 May 2014 Chapter 8) Outcomes The Outcomes module is where all outcomes either Pre-court or Court outcomes are recorded. Pre-Court outcomes are: Police Reprimands Final Warnings Fixed Penalties The Court Outcomes covers all possible outcomes that a Court may decide at a Sentence Hearing. Function To open Outcomes you identify the icon on the left hand side of the screen and open with a single click: This opens up a blank Outcomes screen, unless there have been Outcomes previously recorded against that particular referral: Copyright © 2015 CareWorks 136 May 2014 Note: To insert details of an outcome you must have already selected the appropriate referral and when inputting Court Outcomes there must be a hearing of type ‘Sentence’. If you attempt to enter an outcome without a referral being open you will see the following reminder: Clicking on will open up the following screen: The Outcomes module is presented as three tabs at the top of this screen: Copyright © 2015 CareWorks 137 May 2014 Outcome allows for the input of outcome details. Requirements and Conditions is to record details about any conditions or requirements attached to a substantive order. Proposals show the professional recommendation that the YOS have made to the court as part of the PreSentence Report or Stand Down Report. Inserting a Pre Court Outcome Select the Outcome Type from the drop down list: This results in a change to the screen: Enter the Outcome Date: Note: The Outcome Date will be the date on which the young person receives their PreCourt Outcome. Then select the Pre-Court Outcome: Copyright © 2015 CareWorks 138 May 2014 Note: Outcome Community Resolution maps to YJB legal outcome type: Community Resolution. Outcome Youth Conditional Caution maps to YJB legal outcome type: Youth Conditional Caution. You tick the relevant Offence(s) for which they young person received their Pre-Court Outcome: If Any Comments in connection with the Outcome could be recorded: Finally press to add your record and you will receive a confirmation message: Inserting a Court Outcome If you selected Court as the Outcome Type then you will see the following: Copyright © 2015 CareWorks 139 May 2014 When you select Hearing you will see any related sentence hearings and you choose the appropriate one: This will then display the relevant offence(s) for that particular hearing. You first record the Main Outcome: Copyright © 2015 CareWorks 140 May 2014 Note: Outcome Section 226b maps to YJB legal outcome type: Section 226b. Outcome Youth Caution maps to YJB legal outcome type: Youth Caution. By ticking the box below Outcome you signify that this is the Main Outcome for this hearing: Enter the Duration of the order: If the outcome was a Fine then obviously you would enter an Amount: You would then identify each offence that is related to this Main Outcome by ticking the Offences box: Note: The ‘None’ facility is there for when Outcome is given that is not related to an offence. Examples would be where an order is revoked for good behaviour or an ASBO is given. The comments box can be utilised if any relevant comments need attaching to the outcome. An example would be where there was an outcome of Victim Surcharge and the comments box was used to link to the related victim: You then click on to insert the outcome. Note: In the case of a Supervision Order or Community Rehabilitation Order you will receive the following message: Copyright © 2015 CareWorks 141 May 2014 Clicking OK will take you, after a confirmation message, to the Conditions and Requirements tab whilst clicking on Cancel will enter it as an Order with No Conditions or Requirements. You will receive the following confirmation message; If there are further outcomes the process is repeated and these inserted. Entering Requirements/Conditions This tab allows the entry and recording of any specific requirements or conditions that the court may impose in relation to specific outcomes: You select the Condition/Requirement from the drop down list: Copyright © 2015 CareWorks 142 May 2014 The ‘Other’ function allows you to record any Additional Conditions if imposed by the Court: You complete other required detail using the calendar or free text function: Clicking on will insert the Condition(s) or Requirement(s): Note: Any Requirements/Conditions attached to an outcome are automatically populated to the Requirements tab in Programmes. Entering a Referral Order Extension When entering an outcome of Referral Order extension you are required to associate it with the originating Referral Order: Copyright © 2015 CareWorks 143 May 2014 You tick the order that is to be revoked and click on . You will be returned to the outcomes screen where you complete the entry of the extension: You click on and you will receive the following confirmation message: Note: You will need to go to the Referral Order Programme and extend the end date of that programme. Entering a revocation of an existing order If you have an order revoked then in the first instance you should enter the new outcome that has replaced the order revoked, unless it is an early discharge based on a young person positively responding to the original order. In addition the new order will be the main outcome unless again it is an early discharge. When you enter an outcome of ‘Order Revoked’ you will be presented with the following screen: Copyright © 2015 CareWorks 144 May 2014 Having ticked the relevant order you click on outcomes screen where you complete the entry: . You will be returned to the Note: In the Offences box you would tick none if the revocation was based on an early discharge. If the revocation was based on non-compliance you would tick the new breach offence. If the revocation was based on further offending you would tick the relevant offences. You click on and you will receive the following confirmation message: You will then be returned to the programme that supports the revoked order so that you enter a new end date: Copyright © 2015 CareWorks 145 May 2014 Proposals Entries appear in the Proposals tab where specific proposals have been made to Court as part of a PSR. PSR proposals are added in the Proposals tab of Assessments and Documentation following the completion of a Pre-Sentence Report: Note: The entry in this field is to allow you to compare your professional recommendation with the legal outcome. Copyright © 2015 CareWorks 146 May 2014 Chapter 9) Programmes The Programmes module is where details of all Programmes and Orders can be viewed and recorded. Some programmes are created automatically following the input of certain court outcomes. Other programmes can be created manually particularly those in the prevention arena. This gives the practitioner the start point for the management of all programmes for which they may be responsible. To access the Programmes module, click The Programmes folder icon: You can view Programmes in several ways. With no client selected With a client selected With a client and a referral selected Viewing the Programmes Listing with no Client selected Selecting the programmes folder displays all programmes for all clients of which you are the responsible worker, (if the programmes are not complete or concluded). Copyright © 2015 CareWorks 147 May 2014 Viewing Programmes with a Client or Referral Selected If you have a Client selected, when you click the Programmes folder the Programmes screen is displayed with a grid list of, all programmes (both ongoing and complete) For the selected client And for all referrals recorded against the selected Client Programmes Listing The Programmes listing screen has six filters at the top of the screen. When a Client or Referral is selected, Agency defaults to YOT, Role and Name each default to ‘All’ (with ability to manually select other Roles and Names under YOT Agency). Programme Type defaults to ‘All’ (with ability to manually select specific Programme Types) Intervention Level defaults to ‘All’ (with ability to manually select specific Intervention Levels) Programme Status defaults to ‘All’ (with ability to manually select specific status – on-going or completed). Copyright © 2015 CareWorks 148 May 2014 Show All Pages is disabled. If show all is selected, the current referral is deslected, and all programmes are displayed for the current client. Columns displayed in the Programmes Grid The default columns listed in the Programmes grid are: Created Date, Start Date, End Date, Intervention Level, Release Date, Case No, Ref No, Prog No, Client No, Surname, Middle Name, First Name, Action Taken, Programme Type, Allocated To, Agency and Role. The columns displayed in the Programmes grid are explained in detail in the Programme Details section. Displaying Programmes in a Timeline Programmmes can be displayed in either the default grid format or as a time line, showing the duration of the programme as a timeline. To display the programmes list in a graphical time line view, select Timeline from the View drop down list. The Timeline view can still be filtered. Viewing a Programme Select a Programme to view it. Once a Programme is displayed, it has programme function buttons, and a grid. Copyright © 2015 CareWorks 149 May 2014 Programmes Function Buttons There are a number of function buttons on the Programmes screen. Their functions are as outlined below. The The The button opens up a screen that allows basic searches to be conducted: button allows you to print off programmes: button allows you to choose details of programmes and export to Excel: Copyright © 2015 CareWorks 150 May 2014 If a referral is selected, clicking the Show All check box displays all the young person’s programmes in the grid and not just those related to the particular referral. Double clicking on any record in the grid opens the record to allow you to add specific details of the programme: Copyright © 2015 CareWorks 151 May 2014 Where a programme has been created automatically from a Court Outcome then you are expected to complete and update the programme by filling in the following fields: Programme location Duration Agreed date Where a programme is being created manually then you will be expected to fill all the mandatory fields before clicking on Update. Six information tabs are displayed: Details Interventions Requirements (Only displayed if a YRO program type is selected) Breaches Referral Order Detail Compliance Programme Details On all programmes there are common details of the programme which are recorded: Field Description Copyright © 2015 CareWorks 152 May 2014 Programme This is the type of programme such as YIP Programme or Action Plan Youth Detention Accommodation - YOI All Youth Detention Accomodation programmes are mapped to YJB Programme Type ‘Other’ Youth Detention Accommodation - STC Youth Detention Accommodation - SCH Youth Conditional Caution Mapped to YJB Programme Type ‘Youth Conditional Caution Programme’ Youth Caution Mapped to YJB Programme Type ‘Youth Caution Programme’ Section 226b Mapped to YJB Programme Type ‘Section 226b Programme’ Programme. Programme This depends upon whether your service operates from more than base. Location Linked Outcome Programme Duration Primary Programme Working Days This will be automatically filled if it is a specific Court Outcome or can be manually entered. In the case of prevention programmes there is no need to create this link. Where known this can be entered and CareDirector Youth will then calculate the End Date automatically. In the case of certain programmes such as prevention programmes it is unnecessary unless they are a fixed duration. Can be recorded as number of nights. This refers to what is the main programme in relation to the originating referral. Where the programme is created automatically from an Outcome, this box will then be automatically filled. Where a programmes commences before the outcome is known (such as a Final Warning Programme) or where there is no outcome such as a Prevention Programme this will need to be ticked when the programme is automatically created. This is calculated by taking the Agreed Date from the Start Date, minus weekends and bank holidays. This is used for various National Standards and will vary dependent upon the type of programme. Dates Start Date This is the date on which the programme starts and/or the date on which the young person is sentenced. Agreed Date This will vary dependent upon the type of programme. For example for a Referral Order Programme it will be the date on which the Initial Panel meets. In this example the date is needed to create the End Date as a Referral Order duration runs from the date of the Initial Panel meeting. Copyright © 2015 CareWorks 153 May 2014 End Date Release Supervision Orders, Community Rehabilitation Orders and Custodial programmes require this date for National Standard purposes. This is the date on which the programme finishes or the court order runs out. If duration is entered then this will be calculated automatically. This is the date on which is estimated the young person will be released. Date Licence Recall New Release Sec, Est Repts Licence Recall New Release This is the date on which you dispatched electronically or via the escort services the required papers for someone going into custody. This is the date upon which the young person was recalled to custody following non-compliance with conditions. This is the new release date following recall. Responsible Officer Agency Role/Team Name Intervention Level Accommoda tion Opinion This will identify who has primary allocation for the programme. This will identify who has primary allocation for the programme. This will identify who has primary allocation for the programme. Displays the different Intervention Levels represented in the current listed records, enabling users to filter the list by Intervention Level. Displays ‘All’ by default. 5. The intervention level is displayed in red if it is for a date older than three months. 6. The intervention level is displayed in black if it is for a date within the last three months. The intervention level does not change once the programme is flagged as Completed successfully or Concluded. Closed Programmes are displayed as Not Applicable. This is where you record the Accommodation Opinion at the end of a programme based on the Leaving Care Act. Note: It is quite possible that a young person could have both the Breached and Completed Successfully boxes ticked. In this example they could have had their breach hearing upheld and asked to continue on the order which then complied with and completed. In Parenting Programmes (Voluntary and Statutory) there are specific details: Copyright © 2015 CareWorks 154 May 2014 Proposed to ISSP Released to ISSP This is ticked when either the governor of the YOI or the ISSP team make a proposal for the young person to be released to ISSP. This is ticked following acceptance by the governor of the YOI to release the young person to ISSP. On all programmes there is a compliance display box: This will indicate to you the number of actual attendances at a particular programme against the number of planned attendances. Further details can be found in the Compliance tab or within Contacts and Enforcements. Transferred In Transferred Out Breached This indicates where a young person has been transferred in from another YOT. This indicates where you have transferred the young person to another YOT or Probation. This is where the young person has been breached for non-compliance or further offending. Concluded Completed Successfully This indicates where a young person has had their original programme replaced with another for a variety of reasons including breach, failure to finish the programme or have transferred to another YOT. This is where the young person has successfully completed the required programme. On certain programmes there are additional details: Engagement Satisfaction Transferred In Transferred Out Breached Accommodation Opinion This is the degree to which the identified parent/s engaged with the programme. This is the parents’ rating of the programme offered by the YOT. Opinion Copyright © 2015 CareWorks 155 May 2014 Commented This indicates whether they have replied to your questionnaire. Note: These will only show if they are a contact type recorded against the particular programme. Interventions Tab Once Programme Details have been inserted successfully, the Interventions tab allows you to enter details of any planned intervention for that programme: Details are entered and saved using the button and can be amended using the button. Note: When adding a Parenting Intervention where no parent has been entered you will get the following prompt: Clicking on OK will take you the Relationships tab of Personal Details where the parent(s)/carer can be entered before returning to the Interventions tab. Copyright © 2015 CareWorks 156 May 2014 Requirements Tab Note: The Requirements tab is only enabled if a YRO programme type is selected. Once YRO Programme Details have been inserted successfully, the Requirements tab allows you to enter details of requirements for that programme: This tab contains the same information as the Requirements tab in the Outcomes module. Details are entered and saved using the button and can be amended using the button. Note: A Programme is automatically added if a requirement has been added to an Outcome. The Requirements tab of the programme will be auto-populated with the same requirement from the Outcome. Requirements added to a programme are listed in the Contacts module and can be linked to as long as the requirement is still active. When the requirement end date has passed, the requirement can no longer be linked to in contacts. Breaches Tab The Breaches tab allows you to record a formal breach decision including the Date of Breach Proceedings, Date of Court Application and Continuance Date if appropriate: Copyright © 2015 CareWorks 157 May 2014 Breach Date This is the date on which the decision to breach was taken. Date of Court Application This is the date when you applied to the court. Continuance Date This is the date on which the court decided that the current order would continue, even though the breach had been founded. Once a breach is inserted the breach the tick box on the details screen will become checked. Copyright © 2015 CareWorks 158 May 2014 Referral Order Details Tab Note: Un-ticking the ‘Only Show Panels After Today’ will show all historical panels: This tab provides an area to record the Referral Order Panel, the Type of Panel Meeting and the dates of those meetings together with any free text commentary required. Clicking on the available panel’s dropdown gives you a view of all panels that have already been set up: Details are entered and saved using the button and can be amended using the button: Copyright © 2015 CareWorks 159 May 2014 Note: The Panel Date has to be entered here if on Assessments and Documentation you want to associate the report with the particular panel: Compliance Tab Compliance is a measurement of client attendance at planned statutory contacts and is informed by both the Contacts and Enforcement modules. When a programme is set up for a client any number of planned statutory contacts can be linked to that programme. If these are recurring contacts they can be set up in Contacts module using the recurring option and entering the required number of reoccurrences. Note: The Contact Type needs to be Counts Towards Programme to enable it to be attached to a programme. Copyright © 2015 CareWorks 160 May 2014 As these Planned Contacts become Actual Contacts or not then this is reflected in the Compliance panel: Note: The Compliance tab needs to be viewed in order to see the consequences of any non-compliance: The Non Attendance Consequences, such as Warning Letter, are displayed as a result of what is entered in the Enforcement module. Note: When you view the Non-Compliant Meeting window bear in mind that these can be a mixture of non-attendances and future meetings that have not yet taken place. Copyright © 2015 CareWorks 161 May 2014 Chapter 10) Assessments and Documentation This module allows YOT users to record any assessments or documentation in relation to a young person in one single place. It brings together all written material about the young person. It also introduces the concept of a single dynamic and continuous assessment on a young person. Any local documents required within this module will need to be created by your local administrator using the Document Creator software. Function To open Assessments and Documentation identify the icon on the left hand side of the screen: A single click will open Assessments and Documents. Copyright © 2015 CareWorks 162 May 2014 You then have two choices, to identify an existing document you wish to update or create a new document. Note: It is important that if you choose to update an existing document by the Re-assess button then, with the exception of a Core Asset that has been case staged, the original document will be overwritten. If you need to keep the original then you should use the Clone facility on all documents except Core and Final Warning Assets. Identifying an Existing Document You can use the scroll facility on the right hand side to move up and down the document lists. If there a large number of documents then you can sort by clicking on the relevant column head. Once identified a double click on the line will open up the relevant document. Note: A document that has a green tick in the completed column is read only. If you wish to make amendments to that document you will need to highlight the document line and click the Reassess button . You will then see the following message: Copyright © 2015 CareWorks 163 May 2014 This is reminding you that you are opening up an existing document and possibly choosing to make changes. Note: Once opened, the date entry that had the function of locking the document will become blank. All pre-populated fields will be updated for example if the client’s address has changed the new address will be displayed. Clicking on OK at this stage will unlock the document and a double click will allow you to view their chosen document. For the purposes of this section of the manual our chosen document is a Core Asset. Note: Once a document is opened it is functioning as an HTML document outside of CareDirector Youth. Therefore it is possible for the application to be timed out without you being aware of the timeout. Consequently you may lose the data you have input to that point. CareWorks advises all users to constantly save as you work in a document. Copyright © 2015 CareWorks 164 May 2014 Note: It is possible for you to reopen CareWorks YOT/CareDirector Youth at any time by clicking on the icon on the base of the screen. This allows you to go back into CareWorks if you were looking for a particular piece of information. If you at any stage enter a date, which has the complete function, and then move to another part of the document you will get the following message; Essentially the prompt is telling you that if you save and exit with this date box completed you have locked the document. Once any work has been saved on the document you have the following functions: Save Locally This facility will become active when the document has been exported from CareDirector Youth and you are saving outside of the application. Saving it locally then allows the document to be imported into CareDirector Youth. Save This allows you to save the document. HMTL Preview This allows you to view the document in HTML without the control buttons showing. Check Spelling You can check your spelling. This will check the entire document by default. Words unknown to the dictionary can be added. View in Word This allows you to view the document in Word and save outside of CareWorks if necessary. This is also used to print the document. Close Copyright © 2015 CareWorks This allows you to close the document. 165 May 2014 Please note that if a user first saves and then immediately clicks on close you will see the following prompt. If you attempt to Close a document by clicking on Close before you have saved you will get the following message: Clicking on Cancel will delete your work. Create a New Document Choose a value in the category, this section of the manual we will choose a Core Asset. This will reveal the Type of document that makes up the category. In our example you have chosen a Core Asset. You then have to Associate the document with one of the following: Referral Hearing Outcome Programme Copyright © 2015 CareWorks 166 May 2014 Panel Meeting The choice of which value to associate it with depends upon what type of document is being done. For example: An ONSET document or any prevention document is likely to be associated with the referral or programme. A Final Warning or Core Asset is likely to be associated with the hearing (in the case of a PSR) or the outcome. A Referral Order Panel report is likely to be associated with a Panel Meeting. A Pre-Sentence Report is likely to be associated with the Sentence Hearing. Once the association is made the Document Information tab will reveal the associations. In our case it will show the outcomes available. You complete the association by ticking the right disposal. You then click Insert and the document will appear. Please note that in the categories Other Report and Panel Report you will be required to fill in a Start Date. Copyright © 2015 CareWorks 167 May 2014 At this stage you will now be viewing your chosen document. Note: Once a document is opened it is functioning as an HTML document outside of the CareWorks application. Therefore it is possible for the application to be timed out without you being aware of the timeout. Consequently you may lose the data you have input to that point. CareWorks advises you to constantly save as you work in a document. Note: It is possible for you to reopen CareWorks YOT/CareDirector Youth at any time by clicking on the icon on the base of the screen. This allows you to go back into CareWorks if you were looking for a particular piece of information. Copyright © 2015 CareWorks 168 May 2014 If you at any stage enter a date, which has the completed function, and then move to another part of the document you will get the following message: Essentially the prompt is telling you that if you save and exit with this date box completed you have locked the document. Once the work is completed on the document you have the following functions: Save Locally This facility will become active when the document has been exported from CareDirector Youth and you are saving outside of the application. Saving it locally then allows the document to be imported into CareDirector Youth. Save This allows you to save the document. HMTL Preview This allows you to view the document in HTML without the control buttons showing. Check Spelling You can check your spelling. This will check the entire document by default. Words unknown to the dictionary can be added. View in Word This allows you to view the document in Word and save outside of CareWorks if necessary. It is also where you print the document. Close This allows you to close the document. When you save initially you will be presented with the following message: Copyright © 2015 CareWorks 169 May 2014 This message is related to electronically dispatching the document to the YJB Placements Unit and is to be utilised when you have a young person who is likely to be remanded or sentenced to custody. If you click OK it will validate before dispatching that you have correct entries in: Date of Birth Sources of Information Vulnerability Section Risk of Harm Section Completed by Completed date If there is no risk of custody or the document is not yet complete click on and the document will be saved in the normal HTML format. Please note that if a user first saves and then immediately clicks on close you will see the following prompt: Ascribing Case Stages to a Core Asset Purpose The Case Stages tab allows you to attach the right case stage to a Core Asset as these are required for quarterly and annual reporting purposes. This function allows an assessment to be recorded and retained exactly how it was at a particular moment in time. You are then able to view historical documents as they were originally created. In addition you need only create one asset which becomes a continuous assessment that has a ‘snapshot’ taken of it periodically. In the case of Core Assets you will have the ability to Re-assess a closed document and will no longer need to Clone documents. Copyright © 2015 CareWorks 170 May 2014 Function A user selects the Core Asset by highlighting with a single click. If no case stages have been ascribed to the Asset you will see the following prompt: Note: Only documents that have a green tick in the completed column can be given a case stage. You then click on the Case Stage tab, choose the appropriate Case Stage: Note: The Start of Order and ISSP Start should be one and the same document unless the YOT and ISSP teams operate separately. In the former the same Asset can be given two case stages whilst in the latter it will be two separate documents. The End of Order and ISSP end are likely to be separate documents unless the Order is a 6 month one. You proceed to choose what this case stage Applies To; Finally you choose from the drop down list. Copyright © 2015 CareWorks 171 May 2014 To save the Case Stage you click on Insert and are presented with the following prompt: Following clicking of the case stage is inserted as a gridline: Within the Case Stage field three functions are available to you: Delete When you want to delete a case stage it is either because you have entered the wrong case stage or you need to add information at a later stage that was missing at the time of insertion. CareDirector Youth assumes that it is the latter and when you has highlighted the correct case stage and clicked on Delete the following prompt appears; Cancel will stop deletion and OK will present you with the following prompt; Copyright © 2015 CareWorks 172 May 2014 Clicking on OK will launch the original document to allow you to make the amendments required. If none are required fill in the Completed Date to match the original date, click on Save followed by Close. It will show a cloned entry of the original document in the grid. Having acknowledged this message you can then ascribe the correct stage by undertaking the steps outlined earlier. E-mail At certain points it may be necessary to e-mail documents to other agencies such as the Youth Justice Board’s Placement Team. The approach you take will depend upon the following: Your version of CareDirector Youth is connected to an SMTP server Your version of CareDirector Youth is connected to an Web mail server You are part of the YJB Connectivity Pilot Please see section on e-mailing documents. Ascribing the Next Case Stage Following the ascribing of the first case stage you may leave the completed Asset until such time as you do a further assessment or immediately re-assess the document so that further assessment can take place. To re-assess highlight the particular document and click on the button. The following prompt is displayed: Copyright © 2015 CareWorks 173 May 2014 Clicking OK re-opens the Asset in our example, and you can commence the re-assessment. Note: Once a document has lost its Completed Status then you can ‘Lock’ that document by using the button. When using this button you will receive the following prompt: Once the work is completed on the document the functions outlined earlier in ‘Identifying an Existing Document’ are again available. Once the assessment is completed then the steps outlined in ‘Ascribing a Case Stage’ can be followed. Using the Case Stage Functions to Change the Content of an Assessment Document Description The route that a young person takes is often complicated and does not follow a set pattern. The two functions of reassess and association allow you to change the contents of their assessment at the moment the young person changes direction. In our example a young person is on a Referral Order and the practitioner has completed their Start of Order Asset. The young person then appears in court for new offences which is adjourned for reports. The practitioner then has to do a new PSR Asset prior to doing their Pre-Sentence Report. The two functions allow the original Start of Order Asset to be utilised for the PSR Asset. Copyright © 2015 CareWorks 174 May 2014 Function In our example you can see a completed Asset in the bottom box and a Start of Order Asset showing in the Case Stage box. The young person then commits more offences, appears in court and it is adjourned for reports. You are now required to do a PSR Asset and wish to use the Asset highlighted above in dark blue. You highlight the Core Asset and click on the button. This will open up the following prompt: You click on which will open the Asset. You will notice at this stage that the offences within the Asset still relate to the original Referral Order: Please ignore this as these will change to the correct offence/s when you ascribe the new PSR Case Stage. Make the necessary changes and then date, save and close the document. Once the document is completed and you have the green tick you can ascribe the new case stage, as outlined earlier: Copyright © 2015 CareWorks 175 May 2014 Ascribing that case stage will change the offence/s to the correct ones: The ascribing of a case stage will always put in the correct offences. So in this example, if you returned to Core Asset to re-assess for the End Order case stage for the original Referral Order and then ascribed the right case stage it will remove the offence/s related to the PSR Asset and put in the offence/s related to the original Referral Order. Completing a Pre-Sentence Report Purpose This functionality allows you to construct a pre-sentence report, record the proposal and if the young person is ISSP eligible, but a proposal is being made that does not include ISSP, to record why ISSP is not being proposed. Function You click on the Assessment and Documentation icon on the left hand side to open up the screen: Copyright © 2015 CareWorks 176 May 2014 You choose the Category under which the pre-sentence report has been inserted: You would then choose under Type the name of your local Pre-Sentence Report: Once these are chosen you will see a change to the screen as outlined below: You then choose from Association the value of Hearing and proceed then to tick the appropriate hearing where your report will be considered: Copyright © 2015 CareWorks 177 May 2014 The fields within the Document Information should be filled in as follows: Date Requested This is the date that the court requested the report be written by the YOT. In most cases it will be the adjournment hearing that precedes the sentence hearing. End date This is the date on which you completed the report and it was ready to go to court. Date Sent This is the date it was dispatched to court. Due date This is the date when the report will be used. Working Days This records the number of working days taken to complete the report. It is calculated by looking at the number of working days from the requested date to the end date. Comments This allows you to record any relevant comments such as the fact that the report has been checked. The completed fields should be as follows Copyright © 2015 CareWorks 178 May 2014 Once these fields are completed you click on and this will open the report: You then complete the report and have the facility for the following functions: Save Locally This facility will become active when the document has been exported from CareDirector Youth and you are saving outside of the application. Saving it locally then allows the document to be imported into CareDirector Youth. Save This allows you to save the document. HMTL Preview This allows you to view the document in HTML without the control buttons showing. Copyright © 2015 CareWorks 179 May 2014 Check Spelling You can check your spelling. This will check the entire document by default. Words unknown to the dictionary can be added. View in Word This allows you to view the document in Word and save outside of CareWorks YOT if necessary. When viewing the document as Word you are then able to print for court purposes. Close This allows you to close the document. When you save and close the report it will appear as a line in the grid: You then need to highlight the line by a single click and click on the Proposal tab. The following will appear: You will record in the Proposal tab the proposal that you have outlined as part of your report. You will then record a nominal duration based on your proposal: Please note that next to the Cancel button you will see a message in either blue or red that indicates that the young person is or is not ISSP eligible: In those instances where the young person is ISSP eligible and you are not proposing ISSP as part of their proposal you can record the reason you are not proposing ISSP: Copyright © 2015 CareWorks 180 May 2014 Once this is done you click on the button and the proposal will appear as a line in the Proposal box: Note: When viewing in Word please remember that any changes you make will not be saved within the original HTML version inside the application. CareWorks advises that the only changes made to any report should be those relating to layout. Recording a Bail Proposal This allows you to record bail proposals, normally for ISSP, that are made at various hearings. In this case the young person has been remanded in custody and at their hearing and subsequent hearings the Bail or ISSP team present the court with a bail option as opposed to further remands in custody. Function You click on the Assessment and Documentation icon on the left hand side to open up the screen: You choose the Category of Other Report: Copyright © 2015 CareWorks 181 May 2014 You would then choose under Type the name of your local Bail Report: You then choose from Association the value of Hearing and proceed then to tick the appropriate hearing where their bail report will be considered: You then click on Insert which will open up the report; Copyright © 2015 CareWorks 182 May 2014 You complete the report and have the facility for the following functions: Save Locally This facility will become active when the document has been exported from CareDirector Youth and you are saving outside of the application. Saving it locally then allows the document to be imported into CareDirector Youth. Save This allows you to save the document. HMTL Preview This allows you to view the document in HTML without the control buttons showing. Check Spelling You can check your spelling. This will check the entire document by default. Words unknown to the dictionary can be added. View in Word This allows you to view the document in Word and save outside of CareWorks YOT if necessary. When viewing the document as Word you are then able to print for court purposes. Close This allows you to close the document. Note: You should record each a Bail Proposal each time you make an application to court. For example if a young person is Remanded in Custody and at each remand hearing the YOT make an application for ISSP Bail then each application should be recorded. Additional Functions Within the assessments and documentation screen there are a number of buttons that assist you. Insert This allows you to insert the selected document. Update Once inserted this allows you to update any changes to the document content or its association. For example a Final Warning Asset that was associated initially with a referral has the association changed to the disposal or programme. Reassess This allows you to re-open completed documents for amendments or new assessments. This button is only available when a closed document has been selected. Copyright © 2015 CareWorks 183 May 2014 Close This allows you to close any selected document that does not have a completed date. You will be presented with the following prompt. Cancel This clears down the current selection. It does not delete the selection. Delete This button allows you to delete a selected document. You will be presented with the following prompt. Any deleted document cannot be recovered. Clone This allows you to create another document as a copy and make the necessary alterations. An example is an appointment letter where another appointment has been offered but the content remains the same. It has been disabled as a function for Onsets, Final Warnings and Core Assets as users will use the Reassess function. Export This allows you to export the document and make it available outside of CareWorks YOT. Import This allows you to import a previously exported document into CareWorks YOT. Copyright © 2015 CareWorks 184 May 2014 E-mail At certain points it may be necessary to e-mail documents to other agencies such as the Youth Justice Board’s Placement Team. The approach you take will depend upon the following: Your version of CareDirector Youth is connected to an SMTP server Your version of CareDirector Youth is connected to an Web mail server You are part of the YJB Connectivity Pilot Please see Section on e-mailing documents. XML To be added once Connectivity is established nationally. Exporting and Importing Documents Description The Export process allows you to save the Assessment document, outside of CareDirector Youth, so that the document can be updated off-line. Once the Assessment is exported, it is marked as Checked Out to the exporting user, and no more changes can be made to that document within the CareDirector Youth system. The exporting user will update the Assessment offline and then Import it back into CareDirector Youth. At that point it will become freely available to all system users for updating. Function You search for the Assessment, as previously described. When the Assessment is displayed on the screen, the button is pressed, causing a Save dialog box to be displayed, as shown below: Copyright © 2015 CareWorks 185 May 2014 A location and file name are chosen for the Assessment and the Save button is pressed. You will then be informed: You may the open the exported document details: Copyright © 2015 CareWorks offline and complete all relevant 186 May 2014 When working offline in this way, the Save button is no longer available, and you save changes using the Save Locally button. If you get the following message click on Yes: The button should be pressed regularly while working offline to ensure that changes are saved as you are entered. If another user attempts to open an exported document from within the CareDirector Youth application you get the following prompt. Copyright © 2015 CareWorks 187 May 2014 Import Function Once changes are made to the exported document, the document must be imported to bring it back into CareDirector Youth to make it available to all users. When you are logged into CareDirector Youth, you should go to the Assessments and Documentation and select the relevant document as described previously. There is an button available on the Document Details screen, which will prompt you to locate the offline document and Import it back into CareDirector Youth. Highlight the document you want to import back into CareDirector Youth: Click on the button and the following screen will appear: Click on Browse to find you document: Copyright © 2015 CareWorks 188 May 2014 Highlight the file you want to import and click on Open. It will appear as a truncated line next to Browse: Click on Import and it will open up the document. You then need to save it and close it within CareDirector Youth: The document will now be viewable with the changes that you made when the document was outside of the application. Sending Assets and Other Documents via Secure Email Introduction The approach you take will depend upon the following: Your version of CareDirector Youth is connected to an SMTP server Your version of CareDirector Youth is connected to an Web mail server You are part of the YJB Connectivity Pilot SMTP Server You select the asset/document you wish to send in the Assets/Documents grid: Copyright © 2015 CareWorks 189 May 2014 Click the button. This launches the following message: If you need to select additional documents, click the and select another asset/document in the list and then click the Email button again. When you have selected the final document you want to send instead of the following will appear: Copyright © 2015 CareWorks 190 button click on . The May 2014 Select the format you want to send for each document by selecting the relevant check box beside each document in the documents to email grid: Fill in the ‘To’, Subject and Body fields. This will then enable the e-mail button: Click the email button. This will display a message stating that the system is generating the documents you wish to send: Copyright © 2015 CareWorks 191 May 2014 The message will change as the documents are e-mailed: If you have not filled in all the required fields you will get a validation error message stating the fields you need to complete in order to send the asset/document via secure email: In this situation, you will need to reassess that asset/document, fill in the fields indicated on the error message and close the document before sending the document again. If the documents have been successfully e-mailed you will receive the following message: Copyright © 2015 CareWorks 192 May 2014 Web-mail Server If your YOS uses a web mail server site then you follow the above instructions but you e-mail the documents to yourself instead of the YJB Placements Unit and then you attach the relevant documents to an e-mail to be sent to the YJB Placements Unit. If you send them as Word documents you will probably have to compress the files. Copyright © 2015 CareWorks 193 May 2014 Chapter 11) Victims The Vvictims module allows victim details to be recorded in relation to any referral and offence. Victim details are added to the person database and their client role should be set to “Victims” All victim records for a selected client or referral are displayed in the grid. To access the Victims module, click on the Victims link on the left hand side of the screen. The screen shown below will appear. Field Contact Number E-mail Preferred Contact. Description Auto populated from Victim record. Auto populated from Victim record. Select from drop-down list: Home Tel Mobile Work Tel Email Letter Visit Victim Client Details Field Contacted Copyright © 2015 CareWorks Description Select from drop-down list: By Telephone By Email With Visit 194 May 2014 RJ Offered Victim response If Declined, why? Satisfaction Closed date By Letter By Other method No Unable Yes Select from drop-down list: Yes No Select from drop-down list: Yes Declined Unable No Select from drop-down list: (Person): Fear of meeting YP Fear of being ID-Ed by YP or friends Fear of repercussion Still too difficult Don’t want to revisit experience Unlikely to benefit victim Unlikely to benefit YP Too busy/insufficient time Too far away to attend Not very affected by offence Didn’t feel the need to attend Didn’t want to attend Has moved on (Organisation): Insufficient time No staff available Insurance concerns Already dealt with Other Commitments Don’t want to be recognised in community Happens too frequently to attend Told to do so by management Select from drop-down list: Very Satisfied Satisfied Indifferent Dissatisfied Very Dissatisfied Unable to Determine Did not Comment Commented Select a date from a calendar. Victim Consultation Details Field Specific/Targeted Copyright © 2015 CareWorks Description Select check box. 195 May 2014 Vulnerable Repeat Not known to YP Racially Motivated Offence Offences Outcomes Select check box. Select check box. Select check box. Select check box. Pre populated with Offences on referral and tickboxes. Auto-populated with outcome linked to displayed offence. Victim Type Details Field Relationship to YP Linked Intervention RJ types Responsible Officer Key notes Description Mother Father Brother Sister Fellow pupil Fellow home care res. Not Known Known in passing Through peer groups Pre-populated drop downs from interventions Auto-populated from the two highest scoring RJs in RJ button screen. List of resposnsible officers (see system administrator) Free text Victim Offences Details Updating a Victim Record Once a Victim record is selected in the grid, it can be opened by double-clicking. To update the Victim record, 1. Double click to open the Victim record. It launches in the Personal Details window. 2. Click Update Victim Details. The Victim Personal Details window opens and the record is enabled for editing. 3. Edit the fields in the Victim record. 4. Click Update. The updated details are saved to the Victims’s Client record. Searching for a Victim Record It is possible to search for any victim from the Victims screen. 7. To search for a victim, click Search. 8. The Victim Search dialog launches. Copyright © 2015 CareWorks 196 May 2014 9. Enter any combination of data in the dialog, and click Search. 10. The records are returned. “There are xxxx records that match your query. Do you wish to view these records?’ 11. To view the records, click ‘OK’. Once you select a record which has been returned, the current client of referral is deselected and the victim records are displayed in the grid. Attached Files The Attached files button is located at the bottom of the Victims screen and it allows you to attach electronic files associated to the client. An attached document is viewed by double clicking on its name in the list of documents. An attached files record includes: A Caption describing the attachment, the Document location within the electronic filing system, and the Date it was attached, which are recorded on the form in the appropriate fields. To add an electronic file – click Insert. To update an electronic file, click Update To delete an electronic file, click Delete To clone an electronic file, click Clone. The button is used to navigate the computer filing system to select the required file, and the file path is then automatically recorded. A date is required on this form. The user is prompted to supply the date if it is not entered. The button is used to return to the Referral screen. Copyright © 2015 CareWorks 197 May 2014 The Document Type and Document Sub Type are used to categorise documents for viewing in the Document View module. Document Type refers to the module the document is being attached to, while Document Sub Type describes the document being attached. Victim Contacts All contacts with the victim can be recorded using the Contacts button at the bottom of the Victim record. Clicking Contacts launches the Contacts window. Here, you can record a new contact, or view any previously recorded contacts. Adding RJ work to a Victim Record Any Restorative Justice (RJ) work you do with a victim can be recorded in the Victim record. To record RJ work, 1. Double-click to open the Victim record. 2. Click the RJ Work button. The RJ work window opens. 3. Select or amend any check boxes for RJ work for the listed offences and outcomes as appropriate. 3.1. Victim Offered: the type of RJ work offered to the victim. 3.2. Agreed: The type of RJ work agreed with the victim. 3.3. Achieved: How you can record the date the RJ work was acheieved. 3.4. No RJ Reason: reasons the victim refused RJ work. Copyright © 2015 CareWorks 198 May 2014 3.5. Other: An alternative reason to the listed reasons. 4. Click Update. The changes are saved. 5. Click Back to return to the victims screen. The RJ Type 1 and RJ Type 2 fields in the victim record are populated with the top two scoring RJ Types. The types of RJ work will be returned in searches of the victim record. Copyright © 2015 CareWorks 199 May 2014 Chapter 12) Appeals The Appeals module allows you to record Appeals against conviction or duration and their progress. In order for the appeal process to work the first action is to enter an Appeal Hearing within Hearing Details. Once this is entered the Appeal function has a link to the correct Hearings. An Appeal Hearing is entered into Hearings. It will normally be the last in a sequence of hearings. In this example there had been two previous court hearings and the appeal was the third in the sequence: When you are taken into Hearing Offence Details you can simply click on the back button as no offences need entering. The only time that you would use this screen is if the appeal is adjourned and if that is the case you would change the type of hearing from appeal to adjournment and obviously the next one would be the Appeal Hearing. This will result in Hearing Type of Appeal being on grid: At this point you click on the menu item Appeals: Copyright © 2015 CareWorks 200 May 2014 The entry you have made in hearings will be displayed as a gridline: You then double click on the line in the grid which will show: Fill in details. The appeal hearing entered will appear on the drop down for Appeal Hearing. The related outcomes will show within Outcomes and you choose the appropriate one. The appeal type will either be against conviction or against sentence so please ensure you choose the right one: Copyright © 2015 CareWorks 201 May 2014 Or Once these are completed click on . It will enter a grid entry on Appeal Hearings and take you to the Appeal Details: Click on the Appeal Details tab and complete. The Outcome being appealed will automatically populate. A decision needs to be made based on the outcome of the appeal: If it is Appeal Withdrawn or Sentence Affirmed the process ends. If it is Sentenced Varied then the sentence can be either increased or decreased in length or replaced with a completely new outcome. In our first example an order has been increased Copyright © 2015 CareWorks 202 May 2014 from 6 to 12 months and consequently CareDirector Youth takes you to the programme screen to alter the end date of the programme. In our second example the sentence given was a new order and in this case the 6 month Supervision Order was replaced with a 6 month Detention and Training Order. It will confirm that you have varied the sentence: You will be taken to the Programmes where you will see the original programme and the new one: You will need to conclude the original programme: Copyright © 2015 CareWorks 203 May 2014 And update the new programme: When you now view the Outcomes the original outcome has become a historical outcome and turned red whilst the new one remains active and in black: If it is an appeal against Conviction and it is successful then the original outcome no longer stands in law: Copyright © 2015 CareWorks 204 May 2014 However the outcome will still be displayed for historical purposes and will be in red. Note: In the case of Sentence Varied or Conviction Overturned CareDirector Youth will hold a historical record of the original outcome but it will not count in any returns. The other two Appeal Withdrawn or Sentence Affirmed are self explanatory. Copyright © 2015 CareWorks 205 May 2014 Chapter 13) CAMHS The Child and Adolescent Mental Health Services (CAMHS) module allows for the creation of a new CAMHS record or the amendment to an existing record for a young person. This function is carried out by the practitioner and by CAMHS staff. This module is used for the Youth Justice Board performance measures. To access CAMHS you click on the appropriate icon on the left hand side of the screen: Copyright © 2015 CareWorks 206 May 2014 The following screen will appear: You will fill in the Start Date as the date on which your concerns about the mental health of a young person commenced: You would then fill in the date you referred to CAMHS: Note: This may be to your specialist worker if they are seconded from CAMHS or via your health worker to CAMHS. Copyright © 2015 CareWorks 207 May 2014 When the information is received from CAMHS either you or the specialist worker will fill in the date that the young person was assessed by CAMHS: Note: The Working Days for Measures purposes is calculated automatically from the difference between the Referred to CAMHS Date/Time and the CAMHS Assessment Date/Time. Following the assessment by CAMHS you should be able to enter whether the episode was seen as Acute or Non Acute: Within Action Taken you can record the current status of the young person with CAMHS: This can be updated as appropriate. Within Comments you may record relevant information. At any point during this process you can click on which will insert the record. However if no referral has been chosen you will get the following prompt: Copyright © 2015 CareWorks 208 May 2014 If the referral has been chosen then the record will be inserted into the bottom box after this confirmation message: At any stage if you click on the button this will return the record to the top box for amendments. When you no longer believe that there is a mental health issue you can put in an End Date and alter the reason if necessary: Copyright © 2015 CareWorks 209 May 2014 Chapter 14) Appropriate Adult Services This module allows the YOT to record the work they carry out as Appropriate Adults. Where a request is received at a YOT to provide an Appropriate Adult Service a new referral should be created, with the referral reason “Request for Appropriate Adult Service”. Whoever carries out the Appropriate Adult function can then record their work. To use the module you click on AA Services in the menu: You are presented with the following screen: Copyright © 2015 CareWorks 210 May 2014 Complete the various fields: The most important field is Outcome: And whether a Request for a Bed was Made and/or Met and whether the young person was Held in Custody Overnight: Copyright © 2015 CareWorks 211 May 2014 Each individual time a YOT member of staff attends for an Appropriate Adult session the details should be filled in. Note: The Waiting Time relates to how long you are waiting at the Police Station before the interview commences. Press to save this information to CareDirector Youth. Note: The facility allows you to see all Appropriate Adult work and not just the sessions related to this referral. Copyright © 2015 CareWorks 212 May 2014 Chapter 15) Groups & Events/Incidents This session describes the purpose of the Groups & Gangs modules and how to view and record Groups & Gangs and associated people and events, within CareDirector Youth. At the end of this session delegates will be familiar with The Purpose of the Groups & Gangs modules Recording, Updating and Deleting a Group or Gang, Characteristics, Members, associated Persons and Opponents of a Group or Gang and related Events and Incidents Managing the List screens for Groups & Gangs, Characteristics, Members, associated Persons and Opponents of a Group or Gang and related Events and Incidents Searching, Saving and Printing Groups & Gangs Characteristics, Members, associated Persons and Opponents of a Group or Gang and related Events and Incidents The Groups and Events/Incidents modules have been developed based upon requirements of the YJB (Youth Justice Board) and feedback from Careworks Youth Offending Team customers. The Groups and Events/Incidents modules are ‘stand alone’ modules within the system, which enable users to add a new Group (or Gang) and associate clients within CareDirector Youth with the Group (or Gang). Users are also able to add characteristics in relation to the Group (or Gang) and record Events and Incidents involving the Group (or Gang). The user can trigger an automatic alert within Personal Details to inform others of a particular persons association with a Group (or Gang), and also an automatic email notification to a Team Manager to flag the same. The stand-alone nature of the Groups and Events/Incidents modules enables easy configuration in terms of Profile Based Security, allowing the modules to be restricted at the levels required for prescribed staff. The stand-alone nature also means that users are able to enter all the necessary information in the one place, although linkage ‘behind the scenes’ between the Groups and other modules (such as Personal Details and Offences) will enable users to view relevant information from other areas and vice versa. The Groups and Events/Incidents modules are located towards the bottom of the CareDirector Youth tree under the Youth Offending Team menu, to the left-hand side of the screen. Both are stand alone modules. The opening screens displayed on selecting either of these modules, both work in the same way and are not client specific. Even if the user has a particular client record open on screen when the Groups or Events/Incidents module is selected, the initial screen will display a list of all Groups or all Events/Incidents which exist, regardless of client. Copyright © 2015 CareWorks 213 May 2014 Groups Module When the Groups module is selected on the CareDirector Youth tree, the Groups module will be displayed, with the Group Details tab open, and all Groups/Gangs in existence displayed in a list on screen. The tabs for Members/Related Persons, Characteristics and Known Opponents will be disabled (and greyed out) until a Group has been created and/or selected from the list. Group Details The Group Details tab allows a user to view all existing Groups/Gangs in a list on screen, edit the details of an existing Group/Gang, and also create new Gangs/Groups. To Create a New Group/Gang To create a new Group, a name for the group must be entered into the free text mandatory field Name, and a group type must be selected from the mandatory drop down list Type as below: Copyright © 2015 CareWorks 214 May 2014 Ward refers to an area the Group is associated with, if relevant. This field displays the same list as in the Ward field in Personal Details. The Cross Border Location field is also a drop down list field. The YJB intend this field to be used to record where the group originates from outside of the local authority borders. The options that display in this list are locally controlled, so this field can also be used to record varied detail about the Group location: Where the Group location originates from outside of the local authority borders Where the Group location is within local authority borders, but not Ward specific, for example, where the group area covers more than one ward Where the Group location is within local authority borders, but in a smaller area within a ward, for example, the name of a particular neighbourhood or estate The Known Website field enables a user to free text type the address of a group website if there is a known one. If there is a particular Ethnicity and/or Nationality associated with the Group, these can be chosen from the drop down lists, which show the same options as is Personal Details. Information Status allows the user to record how the information about the group has come about. The Start Date is the date the Group is The Endand/or Date known is entered created about.at a later date, if/when it becomes known that the Group has ceased to exist. Any relevant notes can be entered into the Comments field, and clicking the button saves the information. A pop-up message confirms ‘the record has been successfully inserted’ and the new Group will appear in the list. Copyright © 2015 CareWorks 215 May 2014 To Edit an Existing Group/Gang To edit an existing Gang/Group, single click on the Group in the list to highlight it. The related details will be displayed in the top section of the screen, and the the bottom left hand corner of the screen will change to an button at button. The user can make changes to the information fields as required before clicking the button to save the changes. Again, a pop up message stating ‘the record has been successfully updated’ will confirm this. Group/Gang List Screen Buttons When there is no Group/Gang selected in the list, the button will be disabled (greyed out). This button will become enabled once a Group/Gang is selected in the list. Clicking the button will erase the Group/Gang that is currently selected and highlighted within the list. Note: If a Group/Gang if it is associated with a) an offence, and/or b) an Event/Incident when the delete button is clicked, then a pop up message will alert the user of the association and notify that the group cannot be deleted. If required, the user would need to delete the relevant association first, in order to allow deletion of the Group/Gang. Clicking the button will clear the screen by deselecting the current Group/Gang and removing the related information displayed in the fields, about the currently selected Group/Gang. Searching Groups/Gangs Clicking the button will open up a Groups Search window, as below: Copyright © 2015 CareWorks 216 May 2014 Users can enter as much or as little search criteria as required into the relevant fields in this screen. Clicking search. will return the user to the Group Details screen without conducting a Clicking will clear any search criteria that has been entered, blanking out all the fields in the search screen. Once the necessary search criteria has been entered, clicking the button in this screen will cause CareDirector Youth to search for any Groups/Gangs which match the given criteria, and a list of results will be displayed in the Group Details list screen. Note: The wildcard (*) key can be used in any of the search criteria fields, and multiple times within the same search if required, as in other search screens throughout CareDirector Youth. Once the list of results has been returned into the list screen, clicking on in this screen will refresh the list, so that all Groups/Gangs are displayed once again, rather than just the search results. Saving & Printing Groups/Gangs The button at the bottom of the list screen enables the user to export the currently displayed list into Excel, so that the list can be saved and/or printed. Clicking on the button will open up a selection window as below. In this window, users can select which columns from the list need to be exported. Copyright © 2015 CareWorks 217 May 2014 Users can click on an individual item in the ‘Available Columns’ list, to highlight, and click the button to include it in the ‘Selected Columns’ list, repeating the process for each column required. Similarly, clicking the button will move an item from the ‘Selected Columns’ list, back into the ‘Available Columns’ list. Alternatively, clicking on or entire list from ‘Available Columns’ to ‘Selected Columns’ and vice versa. will shift the If an item in the ‘Selected Columns’ list is selected (highlighted by single clicking), clicking on the and buttons will move the item up or down the list, altering the order of the columns as they will appear once they are exported into Excel. Clicking on in this screen will return the user to the Groups/Gangs list screen without having exported anything. Once the required items from the list have been moved into ‘Selected Columns’, and depending upon the local settings of Microsoft Excel, clicking the button will either open an excel spreadsheet containing the exported information, or open a window as below: Copyright © 2015 CareWorks 218 May 2014 At this point, clicking opens a window as below, enabling users to name the file, navigate to a suitable location and click Clicking or at this stage will return the user to the Groups/Gangs list screen without having exported anything. Alternatively, clicking will display the exported information in an additional window on screen. The Groups/Gangs list will be displayed within the excel spreadsheet as below. (From this screen, a user with Excel knowledge can manipulate the columns and exported information further). Copyright © 2015 CareWorks 219 May 2014 The information can be printed by clicking on the icon at the top of the screen, and the spreadsheet can also be saved from this screen, by clicking on File and Save As, before navigating to a suitable location and naming the file, as described above. This screen is closed by clicking the in the top right hand corner. Members/Related Persons Once a Group/Gang has been selected from the list on the Group Details list screen, the Members/Related Persons tab becomes enabled. If there is no Group/Gang selected, the Members/Related Persons tab will be disabled (greyed out). The Members/Related Persons tab allows a user to view all existing people who are known as associated with a particular group or gang in some way, edit details of an existing Member/Related Person, and also create new Members/Related Persons. Copyright © 2015 CareWorks 220 May 2014 To Create a New Member/Related Person When the Members/Related Persons tab is opened, the selected Group/Gang will display in the banner, and it will also automatically appear in the fields, Group Name and Group Type, from information entered on the Group Details tab. There are two types of people that can be associated with a Group/Gang - either a member, or a related person (associated with the Group in some way without being a member). If ‘Member’ is selected from the Type drop down list, the Related Person Type drop down list will become disabled (greyed out) as below: Similarly, if ‘Related Person’ is selected from the Type drop down list, the Member Group Role drop down list will become disabled: The user then selects from the Member Group Role or Related Person Type drop down list, as relevant. The available options in each list are outlined below: Copyright © 2015 CareWorks 221 May 2014 The next step in the process is to search for the relevant person to associate with the Group/Gang, within CareDirector Youth. Note: In order to associate a person with a Group/Gang, they must first have a client record within CareDirector Youth. To search for the person, enter some name information for search criteria (the wildcard (*) key can be used multiple times within the same search). Once the search criteria are entered, click CareDirector Youth will search to find any client records which match the search criteria, and will display a list of results as below. Clicking or from this screen will return the user to the Members/Related Person screen without selecting a person from the list of results. Alternatively, double click on the relevant person in the results list. Copyright © 2015 CareWorks 222 May 2014 Information from their Personal Details will automatically display (their full name, client ID number and Date of Birth). The Commencement Age is automatically calculated from the persons Date of Birth, to the Start Date that they are known to have begun association with the Group/Gang. This calculation takes place when the record is inserted. The tick box automatically defaults to ticked, although a user can manually over-ride this and un-tick it by single clicking if required. (See later section on ‘Alerts’ for more detail). Start Date refers to date when it is known that the person became associated with the Group/Gang. End Date refers to the date if/when it becomes known that the person has ceased to be associated with the Group/Gang. This can be added at a later date if required. Users can enter a Review Date at regular intervals as and when the persons association is confirmed as ongoing, to display how recent the information is. Any relevant notes can be entered into the Comments field, and clicking the button saves the information. A pop-up message confirms ‘the record has been successfully inserted’ and the new Member/Related Person will appear in the list as below. When a person is inserted within the members screen, they will automatically become the currently selected client record for the logged in user. To Edit an Existing Member/Related Person To edit an existing Member/Related Person, single click on the person in the list to highlight them. Their related details will be displayed in the top section of the screen, and the button at the bottom left hand corner of the screen will change to an button. Copyright © 2015 CareWorks 223 May 2014 The user can make changes to the information fields as required before clicking the button to save the changes. Again, a pop up message stating ‘the record has been successfully updated’ will confirm this. Group/Gang Association Alerts The tick box on the Member/Related Person tab defaults to ‘ticked’. This can be manually over-ridden and un-ticked by single clicking if required. When a Member/Related Person is inserted and the tick box is ticked, an automatic alert is created within the Personal Details module and more specifically, the ‘Client Risks’ sub-module, within that persons client record. As such, when the Member/Related Person’s client record is opened by a user, the following message shown to the left will pop up on screen. Once the user has clicked OK to this message, on selecting the Client Risks sub module under Personal Details, the user will be able to view the alert that was automatically created when the person’s association with the Group/Gang was inserted in the Groups module. Double clicking on the Groups Alert in the list will open up the Alerts tab within Client Risks for the user to view. From this screen, single clicking on the Groups Alert to highlight it in the list, will display the relevant detail in the top section of the screen as below: Copyright © 2015 CareWorks 224 May 2014 The system will also automatically generate a ‘silent’ email to the Team Leader of the Primary allocated worker of the Member/Related Person, to notify them that a Groups Alert has been added to the Client Risks. Member/Related Persons List Screen Buttons When there is no Member/Related Person selected in the list, the button will be disabled (greyed out). This button will become enabled once a Member/Related Person is selected in the list. Clicking the button will erase the Member/Related Person that is currently selected and highlighted within the list. Note: Clicking will only erase the Person’s association with the Group/Gang – it will not erase their client record from Personal Details. Clicking the button will clear the screen by deselecting the current Member/Related Person and removing the related information displayed in the fields, about the currently selected Member/Related Person. Saving & Printing Members/Related Persons The button at the bottom of the list screen enables the user to export the list currently displayed, into Excel, so that the list can be saved and/or printed. Copyright © 2015 CareWorks 225 May 2014 Clicking on the button will open up a selection window as below. In this window, users can select which columns from the list need to be exported. Users can click on an individual item in the ‘Available Columns’ list, to highlight, and click the button to include it in the ‘Selected Columns’ list, repeating the process for each column required. Similarly, clicking the button will move an item from the ‘Selected Columns’ list, back into the ‘Available Columns’ list. Alternatively, clicking on or entire list from ‘Available Columns’ to ‘Selected Columns’ and vice versa. will shift the If an item in the ‘Selected Columns’ list is selected (highlighted by single clicking), clicking on the and buttons will move the item up or down the list, altering the order of the columns as they will appear once they are exported into Excel. Clicking on in this screen will return the user to the Members/Related Persons list screen without having exported anything. Once the required items from the list have been moved into ‘Selected Columns’, and depending upon the local settings of Microsoft Excel, clicking the button will either open an excel spreadsheet containing the exported information, or open a window as below: Copyright © 2015 CareWorks 226 May 2014 At this point, clicking opens a window as below, enabling users to name the file, navigate to a suitable location and click Clicking or at this stage will return the user to the Members/Related Persons list screen without having exported anything. Alternatively, clicking will display the exported information in an additional window on screen. The Members/Related Persons list will be displayed within the Excel spreadsheet as below. Copyright © 2015 CareWorks 227 May 2014 From this screen, a user with Excel knowledge can manipulate the columns and exported information further. The information can be printed by clicking on the icon at the top of the screen, and the spreadsheet can also be saved from this screen, by clicking on File and Save As, before navigating to a suitable location and naming the file, as described above. This screen is closed by clicking the in the top right hand corner. Characteristics Once a Group/Gang has been selected from the list on the Group Details list screen, the Characteristics tab becomes enabled. If there is no Group/Gang selected, the Characteristics tab will be disabled (greyed out). Copyright © 2015 CareWorks 228 May 2014 The Characteristics tab allows a user to view all existing characteristics or traits associated with a particular group or gang in some way, edit details of an existing Characteristic, and also create new ones. To Create a New Characteristic When the Characteristic tab is opened, the selected Group/Gang will display in the banner. The Category and Type of Characteristic associated with a Group/Gang are mandatory fields. There are four different Categories, namely ‘Activity’, ‘Colour Affiliation’, ‘Links’ and ‘Weapons’. The options displayed in the Type drop down list will depend upon what the user has selected for the Characteristic Category. All the available combinations are shown below: Copyright © 2015 CareWorks 229 May 2014 Once the Characteristic Category and Type have been chosen, choose an Information Status from the drop down list. This refers to the way in which the information has come to light. Start Date refers to date when it is known that the Characteristic became associated End refers to the date if/when it becomes known that the Characteristic has ceased to withDate the Group/Gang. be associated with the Group/Gang. This can be added at a later date if required. Users can enter a Review Date at regular intervals as and when the Characteristics association is confirmed as ongoing, to display how recent the information is. Any relevant notes can be entered into the Comments field, and clicking the button saves the information. A pop-up message confirms ‘the record has been successfully inserted’ and the new Characteristic will appear in the list as below. To Edit an Existing Characteristic To edit an existing Characteristic, single click on the entry in the list to highlight it. The related details will be displayed in the top section of the screen, and the the bottom left hand corner of the screen will change to an button at button. The user can make changes to the information fields as required before clicking the button to save the changes. Again, a pop up message stating ‘the record has been successfully updated’ will confirm this. Characteristics List Screen Buttons When there is no Characteristic selected in the list, the button will be disabled (greyed out). This button will become enabled once a Characteristic is selected in the list. Clicking the button will erase the Characteristic that is currently selected and highlighted within the list. Copyright © 2015 CareWorks 230 May 2014 Clicking the button will clear the screen by deselecting the current Characteristic and removing the related information displayed in the fields, about the currently selected Characteristic. Saving & Printing Characteristics The button at the bottom of the list screen enables the user to export the currently displayed list into Excel, so that the list can be saved and/or printed. Clicking on the button will open up a selection window as below. In this window, users can select which columns from the list need to be exported. Users can click on an individual item in the ‘Available Columns’ list, to highlight, and click the button to include it in the ‘Selected Columns’ list, repeating the process for each column required. Similarly, clicking the button will move an item from the ‘Selected Columns’ list, back into the ‘Available Columns’ list. Alternatively, clicking on or entire list from ‘Available Columns’ to ‘Selected Columns’ and vice versa. will shift the If an item in the ‘Selected Columns’ list is selected (highlighted by single clicking), clicking on the and buttons will move the item up or down the list, altering the order of the columns as they will appear once they are exported into Excel. Clicking on in this screen will return the user to the Characteristics list screen without having exported anything. Once the required items from the list have been moved into ‘Selected Columns’, and depending upon the local settings of Microsoft Excel, clicking the button will either open an excel spreadsheet containing the exported information, or open a window as below: Copyright © 2015 CareWorks 231 May 2014 At this point, clicking opens a window as below, enabling users to name the file, navigate to a suitable location and click Clicking or at this stage will return the user to the Characteristics list screen without having exported anything. Alternatively, clicking will display the exported information in an additional window on screen. The Characteristics list will be displayed within the Excel spreadsheet as below. Copyright © 2015 CareWorks 232 May 2014 From this screen, a user with Excel knowledge can manipulate the columns and exported information further. The information can be printed by clicking on the icon at the top of the screen, and the spreadsheet can also be saved from this screen, by clicking on File and Save As, before navigating to a suitable location and naming the file, as described above. This screen is closed by clicking the in the top right hand corner. Known Opponents Once a Group/Gang has been selected from the list on the Group Details list screen, the Known Opponents tab becomes enabled. If there is no Group/Gang selected, the Known Opponents tab will be disabled (greyed out). Copyright © 2015 CareWorks 233 May 2014 The Known Opponents tab allows a user to view all existing Opponents of a particular group or gang, edit details of an existing Opponent, and also create new ones. To Create a New Known Opponent When the Known Opponent tab is opened, the selected Group/Gang will display in the banner. The Opponent Type and Status of a Known Opponent associated with a Group/Gang are mandatory fields. There are two different Opponent Types, namely ‘Group’ and ‘Person’. If the Opponent Type ‘Group’ is selected, then the Group drop down list is activated and the Person Search section of the screen becomes disabled, as left. In this case, the Group drop down list will show all other Groups/Gangs which exist, for the user to choose from. As such, if two Groups/Gangs exist as rivals to one another, both would need to be created in the Group Details tab, before adding them as Known Opponents on each Group’s record. Copyright © 2015 CareWorks 234 May 2014 If the Opponent Type ‘Person’ is selected, the Group drop down list is disabled and the Person Search section of the screen becomes activated, as left. The user enters some name information as search criteria for the name of the person who is known to be an opponent of the Group/Gang, and clicks the matching the criteria will display as below: button. A list of results Double clicking on the name of the person in the results list will then automatically enter their Full Name and Client ID number into the Known Opponents screen. Once the Opponent Type has been selected, the user can enter a mandatory Status for the Known Opponent, as ‘Active’, ‘Inactive’ or ‘Unknown’. The Information Status can also be entered to indicate how the information came to light. Start Date refers to date when that person became a Known Opponent of the Group/Gang. Copyright © 2015 CareWorks 235 May 2014 End Date refers to the date if/when it becomes known that the person has ceased to be an Opponent of the Group/Gang. This can be added at a later date if required. Users can enter a Review Date at regular intervals as and when the persons association as a Known Opponent is confirmed as ongoing, to display how recent the information is. Any relevant notes can be entered into the Comments field, and clicking the button saves the information. A pop-up message confirms ‘the record has been successfully inserted’ and the new Known Opponent will appear in the list as below. To Edit an Existing Known Opponent To edit an existing Known Opponent, single click on the entry in the list to highlight it. The related details will be displayed in the top section of the screen, and the the bottom left hand corner of the screen will change to an button at button. The user can make changes to the information fields as required before clicking the button to save the changes. Again, a pop up message stating ‘the record has been successfully updated’ will confirm this. Known Opponents List screen buttons When there is no Characteristic selected in the list, the button will be disabled (greyed out). This button will become enabled once a Known Opponent is selected in the list. Clicking the button will erase the Known Opponent that is currently selected and highlighted within the list. Note: Clicking will only erase the Person’s association with the Group/Gang – it will not erase their client record from Personal Details. Copyright © 2015 CareWorks 236 May 2014 Clicking the button will clear the screen by deselecting the current Characteristic and removing the related information displayed in the fields, about the currently selected Characteristic. Saving & Printing Known Opponents The button at the bottom of the list screen enables the user to export the currently displayed list into Excel, so that the list can be saved and/or printed. Clicking on the button will open up a selection window as below. In this window, users can select which columns from the list need to be exported. Users can click on an individual item in the ‘Available Columns’ list, to highlight, and click the button to include it in the ‘Selected Columns’ list, repeating the process for each column required. Similarly, clicking the button will move an item from the ‘Selected Columns’ list, back into the ‘Available Columns’ list. Alternatively, clicking on or entire list from ‘Available Columns’ to ‘Selected Columns’ and vice versa. will shift the If an item in the ‘Selected Columns’ list is selected (highlighted by single clicking), clicking on the and buttons will move the item up or down the list, altering the order of the columns as they will appear once they are exported into Excel. Clicking on in this screen will return the user to the Known Opponents list screen without having exported anything. Once the required items from the list have been moved into ‘Selected Columns’, and depending upon the local settings of Microsoft Excel, clicking the button will either open an excel spreadsheet containing the exported information, or open a window as below: Copyright © 2015 CareWorks 237 May 2014 At this point, clicking opens a window as below, enabling users to name the file, navigate to a suitable location and click Clicking or at this stage will return the user to the Known Opponents list screen without having exported anything. Alternatively, clicking will display the exported information in an additional window on screen. The Known Opponents list will be displayed within the Excel spreadsheet as below. Copyright © 2015 CareWorks 238 May 2014 From this screen, a user with Excel knowledge can manipulate the columns and exported information further. The information can be printed by clicking on the icon at the top of the screen, and the spreadsheet can also be saved from this screen, by clicking on File and Save As, before navigating to a suitable location and naming the file, as described above. This screen is closed by clicking the in the top right hand corner. Events/Incidents Module The Events/Incidents module enables user to view existing and enter new known events or incidents which have taken or are planned to take place. These events/incidents may involve a whole Group/Gang or one or more Members/Related Persons or Known Opponents, who can also be added by the user, in association with the relevant event/incident. Users are also able to enter details of any follow up actions taken as a result, if relevant. When the Events/Incidents module is selected on the CareDirector Youth tree, the Events/Incidents list screen will be displayed, showing all events and incidents in existence, as below. Copyright © 2015 CareWorks 239 May 2014 To Create a New Event/Incident To create a new Event/Incident, first click on the button at the bottom left hand corner of the screen. This will open up a blank Event/Incidents form: If the Event/Incident is known to be occurring in the future, the Planned Start, End Dates and Times can be entered. If the Event/Incident has already occurred, Actual Start, End Dates are entered. Copyright © 2015 CareWorks 240 The Mode in which the information came to light can be entered. May 2014 (Options match those listed in the referral screen field ‘mode’). Information Status is also in relation to how the information came to light, and the options listed are the same wherever this field exists in other screens. The Type of Event/Incident is mandatory, and is selected from the options in the drop down list. Ward refers to an area where the Event/Incident is taking or has taken place, if relevant. This field displays the same list as in the Ward field in Personal Details. The Cross Border Location field is also a drop down list field. The YJB intend this field to be used to record where the group originates from outside of the local authority borders. The options that display in this list are locally controlled, so this field can also be used to record varied detail about the Group location: Where the Group location originates from outside of the local authority borders Where the Group location is within local authority borders, but not Ward specific, for example, where the group area covers more than one ward Where the Group location is within local authority borders, but in a smaller area within a ward, for example, the name of a particular neighbourhood or estate The lists in the Agency, Role/Team and Name fields here match those of the same name found in other screens throughout the system, such as in Contacts and Referrals. There is also a free text field for name in addition to the drop down list, in relation to each of these. Free text detail about the Event/Incident can be entered into the Incident Summary field, which can be expanded on screen using the (zoom) button. Once the zoom screen has been opened, the user is able to spell check the information using the Note: Clicking button. in the zoom screen is not the same as saving the changes. This will return the user to the Event/Incidents screen and clicking or as applicable will save the changes made in both the main screen and the zoom screen. Copyright © 2015 CareWorks 241 May 2014 Once all the relevant information has been entered, clicking on will save the Event/Incident details, and a message will confirm that ‘the record has been successfully inserted’. Clicking the button in this screen returns the user to the Events/Incidents list screen, displayed on first entering the module. Searching Events/Incidents At the top of the Events/Incidents list screen, there is a search area, containing a number of search criteria fields and a search button. Here, users can enter as little or as much information as desired, and clicking the button will filter the list below to return any matching results. In the above example, one result has been returned in the list for an ‘Actual’ Event/Incident with Faketown Warriors involvement, since 1st Jan 2008. By double clicking the Event/Incident in the list, the details screen will be opened to enable the user to access further information recorded about the Event/Incident. When the filtered/post-search list is displayed in the Events/Incidents list screen, and the button is clicked, any search criteria selected in the top section of the screen is cleared and the list in the bottom section is refreshed, returning to the full list of all existing Events/Incidents. Saving & Printing a List of Events/Incidents The button at the bottom of the list screen enables the user to export the currently displayed list into Excel, so that the list can be saved and/or printed. This can be done when the full list of all existing Events/Incidents is displayed, or after a search. Clicking on the button will open up a selection window as below. In this window, users can select which columns from the list need to be exported. Copyright © 2015 CareWorks 242 May 2014 Users can click on an individual item in the ‘Available Columns’ list, to highlight, and click the button to include it in the ‘Selected Columns’ list, repeating the process for each column required. Similarly, clicking the button will move an item from the ‘Selected Columns’ list, back into the ‘Available Columns’ list. Alternatively, clicking on or entire list from ‘Available Columns’ to ‘Selected Columns’ and vice versa. will shift the If an item in the ‘Selected Columns’ list is selected (highlighted by single clicking), clicking on the and buttons will move the item up or down the list, altering the order of the columns as they will appear once they are exported into Excel. Clicking on in this screen will return the user to the Known Opponents list screen without having exported anything. Once the required items from the list have been moved into ‘Selected Columns’, and depending upon the local settings of Microsoft Excel, clicking the button will either open an excel spreadsheet containing the exported information, or open a window as below: Copyright © 2015 CareWorks 243 May 2014 At this point, clicking opens a window as below, enabling users to name the file, navigate to a suitable location and click Clicking or at this stage will return the user to the Known Opponents list screen without having exported anything. Alternatively, clicking will display the exported information in an additional window on screen. The Events / Incidents list will be displayed within the Excel spreadsheet as below. Copyright © 2015 CareWorks 244 May 2014 From this screen, a user with Excel knowledge can manipulate the columns and exported information further. The information can be printed by clicking on the icon at the top of the screen, and the spreadsheet can also be saved from this screen, by clicking on File and Save As, before navigating to a suitable location and naming the file, as described above. This screen is closed by clicking the in the top right hand corner. Editing an Existing Event/Incident On entering the Events/Incidents module, the user must first locate the record for the existing Event/Incident in the list, either by scrolling down the list or using the search facility described above. Double clicking on the entry in the list will open the Event/Incident details screen. From this screen, any changes can be made before clicking to save them. Note: If a planned Event/Incident is already entered, and later, it becomes known that the Event/Incident did in fact take place, then the user can re-open the existing record for the planned Event/Incident and add the Actual Dates, before clicking new information. to save the Persons/Groups Involved in an Event/Incident Copyright © 2015 CareWorks 245 May 2014 To add information about people involved in the Event/Incident, locate the Event/Incident in the list screen and double click it to open the details screen. From here, click on the button at the bottom of the Event/Incident Details screen. This will open a pop-up window as below: The Group field lists all the existing Groups/Gangs. The Group Member field lists each individual recorded as being Members/Related Persons, who can be added individually, or ‘All’ can be selected instead as shown. Clicking saves the entry. A pop-up message will confirm that ‘the record has been successfully inserted’ and it will appear in the list at the bottom of this window, viewable by using the scroll bars. Multiple entries can be made to this Persons Involved screen as required. Clicking in this window returns the user to the Event/Incident details screen, and any Person/Groups added are displayed within the bottom half of the screen as below: Copyright © 2015 CareWorks 246 May 2014 To edit an entry for a Person/Group involved, double click on the entry in the bottom half of the Events/Incidents details screen (above), to reopen the Persons/Groups Involved window shown below. Highlight the Group/Person in the list by single clicking and their detail will be displayed in the fields at the top of the window. Make any changes as required and click the button to save them. Similarly, if an entry needed to be deleted, the user would highlight the Group/Person in the list as above, and click . On returning to the Events/Incidents list screen, the Groups/Persons Involved will have updated in the bottom half of the screen. Clicking in this window will simply clear the Group and Group Member fields in the top of the window. Follow-Up Details of an Event/Incident Dependent upon the type of event/incident that is known, it may be appropriate for a worker to take one or more ‘follow-up’ courses of action as a result of the event/incident. In this instance, a user can record such actions against the Event/Incident as follows. First, the user must locate the Event/Incident in the list screen and double click it to open the details screen. From here, click on the button at the bottom of the Event/Incident Details screen. This will open a pop-up window as below: Copyright © 2015 CareWorks 247 May 2014 Follow-up Date is the date that the follow- up action took place. Follow-Up Type has default values such as Referral to Education, Police, YOT, YIP and Children’s Service. These can be added to locally, with others. Follow-Up Details refer to the worker who carried out the follow-up action, and again, the Agency, Role/Team and Name drop down lists will display the same options as Agency, Role/Team and Name fields throughout the system. Management Sign-off Details can be completed if the follow-up action was discussed or authorised by a Team Manager, to record the same. Comments to explain the follow-up action can be free text typed into Follow-Up Summary. Once the relevant information is entered, clicking saves the entry. A pop-up message will confirm that ‘the record has been successfully inserted’ and it will appear in the list at the bottom of the follow-up window, viewable by using the scroll bars. Multiple entries can be made to this Follow Up screen as required. Clicking below: in this window returns the user to the Event/Incident details screen as Copyright © 2015 CareWorks 248 May 2014 To edit an entry for Follow-Up action, click again at the bottom of the Events/Incidents details screen (above), to reopen the Follow-Up action window shown below. Highlight the Follow-up entry in the list by single clicking and the detail will be displayed in the fields at the top of the window. Make any changes as required and click the button to save. Similarly, if a follow-up entry needed to be deleted, the user would highlight the Follow-Up action in the list as above, and click . Clicking in this window will simply clear all the fields in the window, with just the list remaining displayed. The button at the bottom of this window enables the user to export the list of follow-up actions into Excel, so that the list can be saved and/or printed. Copyright © 2015 CareWorks 249 May 2014 Clicking on the button will open up a selection window as below. In this window, users can select which columns from the list need to be exported. Users can click on an individual item in the ‘Available Columns’ list, to highlight, and click the button to include it in the ‘Selected Columns’ list, repeating the process for each column required. Similarly, clicking the button will move an item from the ‘Selected Columns’ list, back into the ‘Available Columns’ list. Alternatively, clicking on or entire list from ‘Available Columns’ to ‘Selected Columns’ and vice versa. will shift the If an item in the ‘Selected Columns’ list is selected (highlighted by single clicking), clicking on the and buttons will move the item up or down the list, altering the order of the columns as they will appear once they are exported into Excel. Clicking on in this screen will return the user to the Known Opponents list screen without having exported anything. Once the required items from the list have been moved into ‘Selected Columns’, and depending upon the local settings of Microsoft Excel, clicking the button will either open an excel spreadsheet containing the exported information, or open a window as below: Copyright © 2015 CareWorks 250 May 2014 At this point, clicking opens a window as below, enabling users to name the file, navigate to a suitable location and click Clicking or at this stage will return the user to the Known Opponents list screen without having exported anything. Alternatively, clicking will display the exported information in an additional window on screen. The Follow-Up actions list will be displayed within the Excel spreadsheet as below. Copyright © 2015 CareWorks 251 May 2014 From this screen, a user with Excel knowledge can manipulate the columns and exported information further. The information can be printed by clicking on the icon at the top of the screen, and the spreadsheet can also be saved from this screen, by clicking on File and Save As, before navigating to a suitable location and naming the file, as described above. This screen is closed by clicking the in the top right hand corner. Group/Gang Related Offences When adding an offence for a client that is known to be Group/Gang related, this can be recorded with the offence information, as long as the Group/Gang has already been created within the Groups module (as outlined above). The offence screen is accessed as usual, by searching for the client, creating or selecting an existing referral as appropriate, and opening the Offences module on the CareDirector Youth tree, to display the Offences screen as below: Copyright © 2015 CareWorks 252 May 2014 The Related Gang field is a drop down list which is disabled by default on entry to the screen. Once the Gang Related Offence tick box has been manually ticked, by single clicking, the Related Gang drop down list becomes enabled, as below: The Related Gang list will display all existing Groups/Gangs within the Group module. If the relevant Group/Gang is not listed here when the user attempts to enter a Group/Gang related offence, the user will need to create the Group/Gang within the Group module as described above. Other details on the Offence screen are entered as usual, and inserted or updated. (See Fundamentals for further detail on adding offences). Copyright © 2015 CareWorks 253 May 2014 Chapter 16) Intervention Setup The Intervention Setup module allows practitioners and administrator to create individual or custom interventions within the existing interventions framework. It can be used for both ISSP schedules and normal contacts. You click on the Intervention Setup in the menu: To add an Intervention complete the necessary fields: Copyright © 2015 CareWorks 254 May 2014 If you want the Intervention to count towards the ISSP schedule of 25 hours you need to tick the box marked ISSP: Once you have completed you click on . The Intervention will be entered in the grid below: Once an Intervention has been set up in this module it can be applied within the Intervention section of the Contacts module: Copyright © 2015 CareWorks 255 May 2014 Copyright © 2015 CareWorks 256 May 2014 Chapter 17) Looked After Children This module allows you to record the status of any Looked After Children and to record whether they are ‘eligible’ or ‘relevant’ as under the Children (Leaving Care) Act 2000. This function is carried out by the practitioner and other assigned staff. This module is used for the Youth Justice Board Performance Measures. To access Looked After Children you single click on the appropriate icon on the left hand side of the screen: This will open up the following screen: Copyright © 2015 CareWorks 257 May 2014 You enter the relevant LAC Status: You would next identify the Placement: The Start Date and possibly at a later date the End Date will be required: You will need to state whether the child is eligible or relevant in light of the Children (Leaving Care) Act 2000: Copyright © 2015 CareWorks 258 May 2014 Note: The definitions of eligible or relevant are as follows: An ‘eligible child’ according to the definition in the Children (Leaving Care) Act, i.e. still in care, and looked after for at least 13 weeks since the age of 14. A ‘relevant child’ according to the definition in the Children (Leaving Care)Act, i.e. have left care but were looked after for at least 13 weeks from the age of 14 and for some time while 16/17. Any comments can be entered in the Comments box. Once completed clicking on will insert the record whilst will allow you to update the record once it is clicked back into the top box. Note: If you attempt to record a Looked After status when the accompanying referral is either at ‘Closure Summary Completed’, ‘Closure Requested’ or Closed you will get the following prompt: Copyright © 2015 CareWorks 259 May 2014 Chapter 18) Substance Misuse This module allows the input of information relating to Substance Misuse. It is used in the compilation of information for the Youth Justice Board and Department of Health Returns. The Asset Screening Date field and the Requires Assessment fields will normally be filled in by the practitioner, while the remaining information will generally be provided by the specialist drugs worker or service within the team. To access Substance Misuse you click on the appropriate icon on the left hand side of the screen: Substance Misuse Information may be inserted and updated as required. A single click will open this screen: Copyright © 2015 CareWorks 260 May 2014 Following an assessment you may have concerns about the young person and believe they require a further assessment. You would then fill in the Assessment Date and tick the box: You then click which creates an entry in the box below: You make a referral to the substance misuse worker (secondary allocation of the referral is one method). Your colleague upon examination of the assessment either agrees or disagrees that the young person requires an assessment. If they agree they double click the initial record back into the top box and fill in the required date: When they have carried out their assessment they would enter the date of that assessment in the Received box and indicate what service they require: They can update the record at that point if so required: To amend any details on an existing record or to add further information to an existing record, highlight the relevant record with a single mouse click, add the requisite information and, to save click on the button. In this case when your colleague receives information about the service starting and the Service the young person is getting they would update this record: Copyright © 2015 CareWorks 261 May 2014 Any comments can be added: The reason box is for Children’s Services Returns but could be utilised by the YOT for recording a young person refusing a service: Copyright © 2015 CareWorks 262 May 2014 Chapter 19) Panel Setup The Panel Setup module allows practitioners and administrators to create and maintain lists of Panel Venues, Panel Members, Members’ Availability Information and create actual Panel Meetings themselves. Venues and Members will be set up initially and then maintained by the Referral Order Co-ordinators. Member availability and setting up the actual panels will be the daily business. You access the Panel Set up via the menu on the left hand-side: You are then presented with a screen with four separate tabs: Copyright © 2015 CareWorks 263 May 2014 The first tab, Venues, allows you to set up, amend and delete venue details for the panels and presents a list of current venues: Copyright © 2015 CareWorks 264 May 2014 Copyright © 2015 CareWorks 265 May 2014 The third tab, Member Unavailability, allows you to register member’s unavailability details and presents a list of current available members with their unavailability logged: The fourth tab, Panels, is where you create the individual panel meetings by selecting venues and members and associating them with a Panel Date. Initially a venue is picked from the dropdown list, a panel date and time selected and a maximum number of attendees established. Note: The number of attendees relates to how many young people the panel will deal with during the duration of the meeting. It could, for example, be used for an Initial Panel Meeting with one young person but it might also deal with a Review and Final Panel for two other young people. In this example the number of attendees would be three and any attempt to add further attendees will be stopped by CareDirector Youth. The panel is then in the bottom box and a single click will bring it back to the top box and the members can then be selected: Copyright © 2015 CareWorks 266 May 2014 If you click on the button this will then complete the setting up of the panel. Note: For the Panel to be completed it needs to be associated with the young person via the Referral Order Details tab within the Programme: Once this done then the practitioner can associate their Panel Report to the correct Panel: Copyright © 2015 CareWorks 267 May 2014 Copyright © 2015 CareWorks 268 May 2014 Chapter 20) Reporting Essentially there are three direct methods of obtaining information from the application. The first is within the application itself and this has the advantage of the information being contemporary as it utilises the application’s operational database. The next two are reliant on the data warehouse which effectively downloads and sorts information from the application database on a daily basis as illustrated below: YOT Nightly data extract Data Warehouse Data Reload OLAP Cubes Reporting Returns Services Careworks YOT (Web version) Analysis Data analysis OLAP Services Data Excel The first of these is a combination of client and ad hoc reports and the YJB statutory Quarterly and Annual Returns. The second approach is via the OLAP (On line Analytical Processing) cubes which allow the user to construct reports by interrogating data via an Excel spreadsheet. There is a fourth approach and this is where users construct their own reports via Microsoft Reporting Services. CareWorks, whilst not providing training on Microsoft Reporting Services, does offer training related to familiarising the user with the structure of the CareDirector Youth database. Within the Application This session describes how to obtain basic Management Information directly from the operational database. Copyright © 2015 CareWorks 269 May 2014 Using the Search Facility Within the following modules the user is presented with the ability via the search button to conduct basic searches: Personal Details Referrals Offences Hearing Details Outcomes Programmes Enforcement Victims In addition both the Referrals and Contacts module has a specific search facility which allows the user to interrogate by constructing different search parameters: Note: Within Contacts this will be limited to the person displayed in the banner. Activity: Search for all Priority 1 referrals related to a particular team. Activity: Search for all contacts between certain dates that have meeting type of Supervision Session (Stat Order) relaying to a particular young person. Referrals Within Referrals the user is presented with the following Search screen: Copyright © 2015 CareWorks 270 May 2014 Examples of the searches that can be conducted are as follows: Search for referrals related to a particular person. Search for Referral Reasons such as Request for Appropriate Adult Service. Search action taken to determine the number of referrals Pending Allocation. Search for referrals between set dates. Search for referrals originating from a particular agency, team or person. Search for all referrals allocated to a particular worker either as a primary or secondary worker. Search for referrals with a particular Closure Reason. Obviously these searches can be for a single or multiple values within the search screen. How the application can be utilised is illustrated by the use of Local Referral Number by a particular YOT. This field allows both alpha and numeric values to be entered. They wanted to distinguish which referrals were allocated to which geographical offices and asked the administrative staff to enter into the Local Referral Number field the name of the office dealing with the referral. As result they are now able to ascertain how many referrals are coming into which offices. Offences Within Offences the user is presented with the following search screen: Copyright © 2015 CareWorks 271 May 2014 Examples of the searches that can be conducted are as follows: Search for offences related to a particular person. Search for particular offences. Search for all offences between certain dates. Search for all arrests or charges between certain dates. Each YOT can determine the Location of offences according to local needs. For example if the YOT had decided to enter a value of Public Place as one of a number of locations, such as Commercial Premises and Private Dwelling, then all offences committed in a public place could be returned. Hearing Details Within Offences the user is presented with the following Search screen: Copyright © 2015 CareWorks 272 May 2014 Examples of the searches that can be conducted are as follows: Search for Court Hearings related to a particular person. Search for all proceedings of a Civil as opposed to Criminal nature. Search for all hearings of a certain type such as Sentence. Search for all hearings between certain dates. Search for all hearings where there was a risk of a Secure Remand. Using the referral number allows you to return all the hearings related to a particular referral. Outcomes Within Outcomes the user is presented with the following screen: Examples of the searches that can be conducted are as follows: Copyright © 2015 CareWorks 273 May 2014 Search for outcomes related to a particular person. Search for all Pre Court Outcomes. Search for all outcomes between certain dates. Search for all main outcomes in relation to a particular young person. Programmes Within Programmes the user is presented with the following screen: Examples of the searches that can be conducted are as follows: Search for Programmes related to a particular person. Search for particular programme dates between particular dates. Search for programmes starting and ending within set dates. Look for all programmes that have been breached within certain dates. It is possible to identify any young person who is due to be released from custody between certain dates. However it will not display the Release Date but that can be obtained by viewing individual programmes and added as a column to a spreadsheet. Enforcement Within Enforcement the user is presented with the following screen: Copyright © 2015 CareWorks 274 May 2014 Examples of the searches that can be conducted are as follows: Search for Enforcements related to a particular person. Search for Enforcements related to Attendance or Other. Search for particular reasons for absences. Search for all contacts where the reason for absence was recorded as Unacceptable. By entering a Date of Contact for a particular day and then clicking on search it is possible to ‘eyeball’ all contacts of non attendance and see the date of follow up in accordance with National Standards. Victims Within Victims the user is presented with the following screen: Copyright © 2015 CareWorks 275 May 2014 Examples of the searches that can be conducted are as follows: Search for a particular victim. Note: You are in effect in the Client Search facility so that the ability to search for particular victim aspects is limited. Results of Searches In most of the searches you will be informed of the result: Clicking on will reveal the result of this search. In our example we have asked to see all Court Outcomes relating to Referral Orders between certain dates: Copyright © 2015 CareWorks 276 May 2014 Note: Whilst the banner will display a specific client the results will relate to your query. In our example here we know there are 27 records but at this stage we are not aware of the names of the young people that make up this sample. In order to identify these young people you need to export the data to Excel. This is achieved by initially highlighting the results of your search by holding down the Ctrl , Caps Lock and A keys: Copyright © 2015 CareWorks 277 May 2014 You then click on Ctrl and C keys which copies that sample and opens up a blank Excel spreadsheet: Once you have chosen your cell paste your selection into the spreadsheet: This will then display the person’s name and the data can be manipulated within Excel. Additional Information There are two additional facilities which can assist you in looking for information. Copyright © 2015 CareWorks 278 May 2014 If you open up Personal Details without a client identified and consequently it is blank and then click on the Risks sub menu as shown it will display all recorded risks: These can be exported to Excel and you are given the ability to choose the columns you want displayed: Copyright © 2015 CareWorks 279 May 2014 You then highlight the Available Columns you want displayed and move it across into the Selected Columns. The selected columns can be moved up and down dependent upon the order you want each field in Excel. In this example we have asked to see Risk Type followed by Client Name and Start and End Dates: This query can then be exported Copyright © 2015 CareWorks to Excel: 280 May 2014 Further manipulation, such as sorting, can then be achieved within Excel. Schools Within Administration there exists a facility to maintain details of your local schools: Copyright © 2015 CareWorks 281 May 2014 However it also contains the ability to see all the young people attending that school who are currently on CareDirector Youth. You need to click the appropriate school into the top panel: Next to the name of the school you click on the magnifying glass icon and this will display a list of those young people who are or have attended the school: Copyright © 2015 CareWorks 282 May 2014 These can be sorted by clicking on the column heads and the results printed off: Copyright © 2015 CareWorks 283 May 2014 Client and Ad Hoc Reports & Statutory Returns This session describes the structure of the CareDirector Youth Data Warehouse and introduces the various tools that are used to produce analyses and reports. It should be noted that this course will concentrate on the CareDirector Youth Warehouse structure and the interaction of the reporting tools with the Warehouse and is not designed to address detailed formatting or advanced features of Microsoft Reporting Services. The Data Warehouse is a reporting database that sits separately from the CareDirector Youth operational database. The Warehouse is updated once per day from the operational system. This ensures that there is no direct performance impact on the live system from the generation of any reports. Also, the fact that the warehouse is not being dynamically updated ensures consistency in reports that are run repeatedly throughout the day. The operational system database is designed to handle multiple live interactive sessions simultaneously, while still ensuring speed of data input and update. The requirements for a reporting database are different. The speed of data input is less important than the speed of extraction. Also the ease of use of a reporting database is more important, since users interact directly with the database, whereas users of the operational system interact directly with the application. The above diagram illustrates the main components of the CareDirector Youth architecture, and a description of each component follows: CareDirector Youth Database This is the CareDirector Youth operational database which is accessed and updated by the CareDirector Youth application. Data Warehouse This is the reporting database which is updated once a day by an extract from the operational CareDirector Youth database. The extract program restructures the data that is transferred from CareDirector Youth. The warehouse contains two types of data – Atomic data brought directly from CareDirector Youth and Calculated data generated from the atomic data. For example the Client Age at Date of Referral is calculated data, calculated using the Client Date of Birth, which is atomic data brought into the warehouse during the extract. The Data Warehouse is accessed, for data extraction only, when CareDirector Youth users access the Reports module from within the application. These will include Client and Ad Hoc Reports and the YJB Returns which are provided by CareWorks, as well as Customised Reports that are generated by your own local authority itself. Accessing the Reports Note: You will have to be a user that firstly has the reports showing on your menu and you will need to be added to the domain that has access to the data warehouse server. Once this is achieved you will need to open up the menu item Reports open you will see a reporting structure similar to the one displayed below: Copyright © 2015 CareWorks 285 . If you click this May 2015 Standard Functions within Reports When using reports within CareDirector Youth there are standard features that apply to the running of any report. To create the report you will need to do a single click on the actual report. It is often easy to assume that you are clicking on the right report: However this is not the final item on the menu tree as shown by the Clicking on this will reveal the report you will need to click on: next to ‘Case File History’. Once the report is running there are other standard processes to be understood as illustrated by the report shown below: In certain reports you will need to know the young person’s Client Number prior to running the report. In many of the reports you will need to choose values from a drop down to make up your reports: In addition you may wish to set date parameters: Copyright © 2015 CareWorks 286 May 2015 Any field that has a box can be utilised by un-ticking the tick and typing in the required information: Note: Entries that require a date format must adhere to the format outlined above. Once you have selected your information you can view the report by clicking on whilst the report is running you will see the following: In order to hide the search criteria you can click on and this will hide the Report screen. Equally if you want to alter the search criteria of your report then clicking on to make your alterations. will reveal the panel for you A common mistake on viewing the report is to see the display page as the only one of the report: Clicking on will move you to the next page or clicking will take you to the last page. The size of the page being viewed can be altered using If you looking for a particular word then you can use This will take you to the first instance of that word within your report: If you that is not the one you are looking for then you click on At any stage you can re-run a report by using the refresh button tip in case you are not sure of the function. If you want to print any report then utilising the Clicking on . As with all buttons there is a tool button will start the printing process. will take you to any Help pages that have been set up. Copyright © 2015 CareWorks 287 May 2015 If you want to you will need first to select your export format: Once chosen then you need to click on again. In this example the export format is PDF and you will be presented with this screen: You then make your choices in connection with this message box. When viewing a report you can always drill down on any count held in a cell of the report: Holding the cursor over a count such as will turn the cursor into a pointing hand and clicking on the number will reveal the information behind the number: Copyright © 2015 CareWorks 288 May 2015 In addition you can see below the indenting of each row of information: This takes you down through the levels of information and shows the connection between different sets of data. Client Reports Case File History This report enables you to see the entire Pre-Court and Court Outcomes and the related Court Hearings and Offences. You can choose whether you want to see Pre-Court Outcomes and whether you want to see all Court Hearings or just those where the young person was sentenced. The purpose of the report is to support your work with the courts. To open this report click on Case File History icon: This will reveal the initial screen where you make your choices: The Client Number will need to be added and a decision as to what to include: You then click on the button shows below: Copyright © 2015 CareWorks and then you will the report as the part illustration 289 May 2015 The offences and offence date will only show when the outcome is delivered: It is recommended that if this is to be shown in Court that it is exported to a PDF file as this effectively locks the file. Ad Hoc Reports Each of these reports has a number of matrixes which allow you to view the same information from a number of perspectives. For example in Client Caseload you can see the same referrals from either a primary worker or a secondary worker perspective. Once you have decided on your filters and parameters then the report can seen from these distinctive differences. Client CaseLoad This report consists of 6 matrices each displaying distinct counts of Referral(s) at varying summary levels: 1. Count of distinct Referral(s) by 'Allocated Agency / Role / Worker' & 'Referral Reason' 2. Count of distinct Referral(s) by 'Allocated Agency / Role / Worker' & 'Referral Status' 3. Count of distinct Referral(s) by 'Referred by Agency / Role / Worker' & 'Referral Reason' 4. Count of distinct Referral(s) by 'Referred by Agency / Role / Worker' & 'Referral Status' 5. Count of distinct Referral(s) by 'Secondary Allocation Agency / Role / Worker' & 'Referral Reason' 6. Count of distinct Referral(s) by 'Secondary Allocation Agency / Role / Worker' & 'Referral Status' Each of the above will alter dependent upon the search criteria you enter in the search criteria: Copyright © 2015 CareWorks 290 May 2015 When the report has run each of the matrices above can be accessed by going to the corresponding page: In this example we have created a report for the final quarter of 2005 which shows the different teams within the YOT by worker and by referral reason: Client ETE Summary This report creates a snapshot of the current Education, Training and Employment of a specific young person. You will need to know the young person’s client number for this report. In the example shown below we are looking at a young person’s summary as of the end of December 2005: Running the report creates the following report: Copyright © 2015 CareWorks 291 May 2015 You will notice at the bottom a link to the Young Person’s Summary report. Clicking on this will take you the chronology of the young person. Client History This report outlines a brief history of the young person and their referrals to the YOT at a given date. In this example we have asked to look at a young person’s history up until the end of 2007: Where we have asked to render it as a YOT report, this includes data about whether they are Persistent Young Offenders, Prolific or other Priority Offenders or ISSP eligible. Clicking on the button would remove the following information: Part of the report is laid out as shown below: Copyright © 2015 CareWorks 292 May 2015 Note: Entries that are blank, such as Alias(es) and Relationships in the example above, are so because no data has been entered into CareDirector Youth. Client Offence This report consists of 4 matrices each displaying distinct counts of Client(s) or Offence(s) at varying summary levels: 1. Count of distinct by Offence Category & Ethnicity Category 2. Count of distinct by Offence Category & Ethnicity Category / Gender 3. Count of distinct by Offence Category / Offence Type & Ethnicity Category / Ethnicity Type 4. Count of distinct by Offence Category / Offence Type & Ethnicity Category / Ethnicity Type / Gender Each of the above will alter dependent upon the search criteria you enter below: When the report has run each of the matrices above can be accessed by going to the corresponding page: Copyright © 2015 CareWorks 293 May 2015 In the instance below you are looking at the first of the matrices: Client Outcomes This report consists of 4 matrices each displaying distinct counts of Client(s) or Outcome(s) at varying summary levels: 1. Count of distinct by Outcome Tier and Ethnicity Category 2. Count of distinct by Outcome Tier and Ethnicity Category / Gender 3. Count of distinct by Outcome Tier / Outcome and Ethnicity Category / Ethnicity Type 4. Count of distinct by Outcome Tier / Outcome and Ethnicity Category / Ethnicity Type / Gender Each of the above will alter dependent upon the search criteria you enter below: When the report has run each of the matrices above can be accessed by going to the corresponding page: In the instance below you are looking at the first of the matrices: Copyright © 2015 CareWorks 294 May 2015 Client Outcome Asset This report consists of a single matrix displaying distinct counts of Client(s) by 'Case Stage / YOT Asset Score' & 'Asset Section'. The above will alter dependent upon the search criteria you enter below: When the report has run you will see the following: Client Programmes This report consists of 4 matrices each displaying distinct counts of Client(s) at varying summary levels: Copyright © 2015 CareWorks 295 May 2015 1. Count of distinct Client(s) by Programme Type and Total Weekly ETE Hours 2. Count of distinct Client(s) by Programme Type / Total Weekly ETE Hours and Ethnicity Category 3. Count of distinct Client(s) by Programme Type / Total Weekly ETE Hours and Ethnicity Category / Ethnicity Type 4. Count of distinct Client(s) by Programme Type / Total Weekly ETE Hours and Ethnicity Category / Ethnicity Type / Gender Each of the above will alter dependent upon the search criteria you enter below: When the report has run each of the matrices above can be accessed by going to the corresponding page: In the instance below you are looking at the section of the second matrix: Client Programme Asset This report consists of a single matrix displaying distinct counts of Client(s) by Case Stage / YOT Asset Score and Asset Section. Copyright © 2015 CareWorks 296 May 2015 The above will alter dependent upon the search criteria you enter below: When the report has run you will see a report similar to the one below: Client Programme Total Weekly ETE Hours This report consists of 4 matrices each displaying distinct counts of Client(s) at varying summary levels in relation to programmes and education,training and employment: 1. Count of distinct Client(s) by Programme Type and Total Weekly ETE Hours 2. Count of distinct Client(s) by Programme Type / Total Weekly ETE Hours and Ethnicity Category 3. Count of distinct Client(s) by Programme Type / Total Weekly ETE Hours and Ethnicity Category / Ethnicity Type 4. Count of distinct Client(s) by Programme Type / Total Weekly ETE Hours and Ethnicity Category / Ethnicity Type / Gender Each of the above will alter dependent upon the search criteria you enter below: In the instance below you are looking at the section of the fourth matrix: Copyright © 2015 CareWorks 297 May 2015 Client PSR This report enables you to see Pre-Sentence R within the context of their client, the referral, the proposal to court, the relevant sentence hearing and the outcome. The report will alter dependent upon the search criteria you enter below: In the example below you will a sample of PSRs that are related to young people within a reporting quarter: Client Search This report enables you to search for a particular Client by name. The above will alter dependent upon the search criteria you enter below: The displayed result will look like this: Copyright © 2015 CareWorks 298 May 2015 If you click on the arrowed client number it will open up the Client Summary Report: Young Persons Summary Report This report shows the complete history of a young person and as illustrated above this report can also be accessed via the Client Search report. However for this particular version you need to know the client’s ID number. The reports will show: Referrals Aliases Addresses Relationships Copyright © 2015 CareWorks 299 May 2015 Education Employment General Practitioner Risk(s) Services Offences Hearings Outcomes Programmes Pre-Court Outcomes Obviously if information has not been entered then there will be no entry as in the illustration below: This has tended to be used for checking that essential information has been recorded against a young person. Asset Report 1a, 1b and 2 These reports have been developed to allow you to interrogate Assets at a high level by scores, risks or vulnerability and to see which are missing. They are accessed from the Reports function on the left hand side. Copyright © 2015 CareWorks 300 May 2015 Report 1a This report allows the user to search for particular Assets or other documents, related to particular programmes, particular teams and/or case stages and if they are Assets or Onsets to be able to search for ranges of scores on particular sections or for a range within the overall score. Note: If a user wants a particular section to be ignored then they should enter the value of N/A: This illustration shows a search within quarter 4 of a particular year for all Core Assets with a Substance Misuse score between 2 and 4: One of aspects that you have to remember is that if you add additional scores that you wish to search on then CareDirector Youth will only return those that have all the requisite scores and not each individual score. Report Asset 1b This report allows you to search for particular Core Assets, Final Warning Assets and Onsets related to particular programmes, particular teams and/or case stages and if there are indications of risk or vulnerability these can be viewed. If the latter are present you can then query whether the associated Risk Asset or Vulnerability Management Plan is present as a document. Copyright © 2015 CareWorks 301 May 2015 In the illustration you have asked to see all documents between set dates that had a Yes in the Risk Section of an Asset: Scrolling to the right will reveal further information: Asset Report 2 This report identifies any missing Assets between given dates and against all or a specific team: When run is complete the report will appear as below: Scrolling to the right will reveal additional information: If the box is empty in the Required On field then the Asset has been completed Copyright © 2015 CareWorks A date in any Completed On box confirms that the Asset has been completed A date in any of the Required On fields indicates that the Asset has not been done 302 May 2015 Statutory Returns These are the reports that are required by the Youth Justice Board on a quarterly and annual basis. Note: You will have to be a user that firstly has the reports showing on your menu and you will need to be added to the domain that has access to the data warehouse server. Once this is achieved you will need to open up the menu item Reports open you will see a reporting structure similar to the one displayed below: . If you click this You will then proceed in exactly the same way as previously outlined in the Ad Hoc section. OLAP Cubes These cubes allow you to construct ad hoc reports within the reporting constraints of the cubes and to save these reports for further use. Note: It is important to point out that a good working knowledge of Microsoft Excel will greatly assist you in using this facility. It is recommended that you should be proficient in Excel and understand in particular Charts and Pivot tables. The reports are accessed from wherever the two appropriate spreadsheets are held. These can be on your PC or on the server hosting the warehouse. The first of these is the raise_warehouse_yot which shows all the available fifty-six cubes and the Configuration tab and can be used for ad hoc reports and to familiarise yourself with the content of the cubes. The second of these is called raise_warehouse_template and this is blank worksheet that can be used to construct reports that you wish to use on a regular basis. Copyright © 2015 CareWorks 303 May 2015 How to Build a Report from an OLAP Cube To build a report in Excel from an OLAP cube, there are two steps. 1. You select the data source. 2. You drag/drop the required fields/dimensions to build the desired Pivot table. Optionally, you can then create a chart. Select the Data Source Make sure you do not have an existing Pivot table selected (i.e. click on an empty cell on the sheet) otherwise you will edit the existing pivot table, rather than create a new one: From the Main Menu in Excel you select Data -> Pivot Table and PivotChart Report: Copyright © 2015 CareWorks 304 May 2015 This will reveal the following: Click on the ‘External data source’ option, and then click Next: Click on Get Data: Copyright © 2015 CareWorks 305 May 2015 Note: An alternative route to this is to select Data -> Import External Data -> New Database Query …. Either route will work fine. You click on the OLAP cubes tab: Note: As you build your queries it will be the case that your desired data source might appear in the list, select it and proceed as shown later. To create a new data source, select New Data Source and click on OK and you will be presented with the dialog box as shown: Enter the name of the cube you want to connect to (you can give it any descriptive name you like here): Copyright © 2015 CareWorks 306 May 2015 Make sure you select version 8.0 of the OLAP provider. Click on Connect: On this screen you enter the name of your server: Copyright © 2015 CareWorks 307 May 2015 There is no need to enter userID/password. Authentication is done automatically based on your Windows logon. Click on Next. Copyright © 2015 CareWorks 308 May 2015 From the list of warehouses available (there may be only 1) select the YotWarehouse, and click on ‘Finish’. This will return you to the previous screen. Now you can select from the drop-down which cube you want to connect to, for example the client cube is cClient: . Click OK and now this connection will be available in your list of OLAP Cube Connections. As pointed out in the note earlier next time you want to connect to this cube, you will go straight from here: Copyright © 2015 CareWorks 309 May 2015 You click on OK will bring back to this screen: You will see a message telling you the data has been stored and clicking on ‘Next’ brings you to the next screen: Decide where you want to position the table and then click on ‘Finish’. This will bring you back to the worksheet: Copyright © 2015 CareWorks 310 May 2015 Building a Pivot Table Now you are ready to start to build a Pivot table. You will be presented with a layout in Excel similar to that shown above. You simply drag the items from the Pivot Table Field List onto the appropriate area of the Pivot table. The items are either dimensions or facts. Dimension tables contain reasonably static lists of data, which usually correspond to reference data used in the application. Reference data appears as a drop-down list in the CareDirector Youth application, such as “Ethnicity’ and “Reason for Referral’. Fact tables record specific dynamic data about individual cases or clients. They typically consist of fields containing actual data and fields which reference back to dimension tables. For example the main client table consists of the Client Number, Name Fields, Address Fields etc., and also fields that link back to all the dimension tables that describe various attributes of the client such as Age, Ethnicity, Nationality, Gender etc. Typically a fact item will be a count. There are 4 areas in the Pivot table of note. 1. Row Fields This is the area where you drop fields from the list if you want to have one row per value of the dimension. For example if you want to have a table with number of clients, broken down by ethnicity, with one row per ethnicity value, drop the ethnicity dimension here: Copyright © 2015 CareWorks 311 May 2015 2. Column Fields This is the area where you drop fields from the list if you want to have one column per value of the dimension. For example if you want to have a table with number of clients, broken down by Gender, with one column for Male, one column for Female drop the Gender dimension here: 3. Page Fields This is the area where you drop any dimensions that you want to filter your data on. For example if you only want to include in your report clients who are current clients, drop the Current Client dimension here, then select the value ‘1’ from the dimension: Copyright © 2015 CareWorks 312 May 2015 Note: You will often see the values of True and False which in a layperson’s terms mean Yes and No. In addition you may see the numbers 0, 1 and -1 which can be translated as No, Yes and Not Applicable respectively. In the example above it means you are looking for current clients. 4. Data Items This is where you place the actual fact(s) you want to view in your report. In many cases the cube will only contain one fact, which is a count, and this is the one you will have to use. In some cases the cube contains multiple facts, and you can choose one or more of these facts. The facts are identified in the field list by a symbol with 01/10: In this example after you have dragged and dropped the dimension and data items onto the sheet to produce a basic Client Table it will look like this: Copyright © 2015 CareWorks 313 May 2015 Verifying Data by Drilldown You may look at the results of your query and want to check particular items. To do this you highlight the particular cell on the spreadsheet: Then hold down the Control, Shift and D Keys. This will take you to the detail of the entries within a particular cell: The drilldown contains a large amount of data so you may need to scroll to the left and ultimately select the columns you need. For example the names of the young persons who make up the count in the cell: Creating a Chart from the Data To produce a chart from this data, you click on the small chart icon, or if not visible, right-click anywhere within the Pivot table, and select Pivot Chart: This will produce a new sheet with the chart located in it: Copyright © 2015 CareWorks 314 May 2015 To move the chart back to the same sheet as the Pivot table, you need to right-click on the chart and select location: Select “As object in” and select the required sheet from the drop-down List: Copyright © 2015 CareWorks 315 May 2015 By default, the chart will contain dropdowns to alter selection, similar to those on the Pivot table itself. You can manipulate the chart either by using these, or by using the ones on the Pivot table. To remove them from the chart, right-click on one of the drop-downs and select “Hide PivotChart Field Buttons’: The chart is a standard Excel chart, and so the normal operations exist to change the chart type, layout etc. Note: When a Pivot chart is refreshed, some formatting options on a chart may be lost, since Excel recreates the chart on refresh. To overcome this, you can record a macro that adjusts the formatting etc, and re-run this macro after refresh. Adding Drill-through Functionality to Reports In order for the drill-through functionality to function it requires a VBA macro to be part of the Excel workbook. There are 2 methods to achieve this: 1. To create your spreadsheet in a workbook that already has the macro. 2. To copy the macro from an existing workbook and paste into the new one. To use an existing workbook, use the yot_warehouse_template.xls document, which is in the careworks\yotwarehouse\reports directory on your server or on your PC. This is an empty Copyright © 2015 CareWorks 316 May 2015 workbook which already contains the drill-through macro. The workbook contains a sheet called config: On this sheet there is a cell for entering the server name, and a Refresh button. This is used for modifying existing Pivot tables/charts to point them to a new server. This is not required when you create your own reports, but it is necessary to customise reports which were created against a different server originally, for example a spreadsheet from CareWorks, or from a different YOT. If you have already created a workbook, and need to copy the macro, do the following: 1. Open the yotwarehouse.xls spreadsheet. From the main menu, you select tools->macro>visual basic editor. 2. In the VB screen, on the left hand side, open the ‘Modules’ folder, and double-click Module 1. Copyright © 2015 CareWorks 317 May 2015 3. In the Main Menu, you will now see the code for the macros. Find the section beginning with Sub Drillthrough() And ending with End Sub Copy this entire section. To paste this into an existing spreadsheet, you need to do the following: Copyright © 2015 CareWorks 318 May 2015 i Locate the target spreadsheet project on the left tree in VBA – it will be at the top level of the tree, as VBAProject( MySheet.xls). ii Open this project and right-click on the Microsoft Excel Objects folder. Select Insert>Module: iii This will create a new module called Module1. Simply paste the code into the main Window. Close the Window, and return to Excel. iv To assign a hot key to a macro (e.g. CTL-ALT-D) select Tools->Macro->Macros from the Main Menu in Excel. In the Window that pops up, find the macro you are interested in: Copyright © 2015 CareWorks 319 May 2015 Note: Be careful, if you have multiple workbooks open, you will see the macros from all workbooks listed here, make sure that you select the correct one. Macros from other workbooks will have the workbook name in front of them. v Click on Options to enter the Shortcut key: vi You simply enter the letter you want, Excel will automatically decide whether you need to add CTL and/or SHIFT, depending on whether other combinations are already used or not. Click OK. Copyright © 2015 CareWorks 320 May 2015 Chapter 21) Youth Justice: Scaled Approach This session describes how the CareWorks application incorporates the Scaled Approach and the introduction of the Youth Rehabilitation Order (YRO). At the end of this session delegates will be familiar with: Recording a Pre-Sentence Report (PSR) proposal of a YRO with related requirements Recording an Outcome of a YRO with related requirements Maintaining a YRO Programme with related requirements and interventions Recording Contacts that are associated with a YRO and certain requirements Using the Scaled Approach module to automatically assess and manually over-ride Intervention levels Having an overview of the calculations performed ‘behind the scenes’ to generate Levels of Intervention The Core Asset completed for the PSR should be completed as usual, and a case stage of PSR recorded in the Case Stage tab, as shown below: Note:Where there are multiple offences with the same gravity score, the offence with a scaled approach intervention level is the primary index offence in the Asset document. Copyright © 2015 CareWorks 321 May 2015 The PSR Report document is also completed as normal, within the Assessments and Documentation module of the relevant client record. The PSR should still be associated to the relevant sentence hearing upon creation, and the dates pertaining to the PSR (Requested, End, Sent and Due) should also be entered as usual, and as shown below: Upon completion of the PSR Report, the Proposal tab is used to record the suitable YRO proposal, which composes of the proposed YRO type, and also the proposed related requirements. Copyright © 2015 CareWorks 322 May 2015 The Proposal drop down list contains the different YRO types of YRO, YRO - Intensive Fostering and YRO - ISS: The Duration is entered as usual. The Requirements section of the screen remains disabled until one of the YRO types have been selected within the Proposal field. The Requirements tick boxes then becomes enabled for use. All 16 potential requirements are listed in the requirements section of the proposal screen, viewable by using the scroll arrows to the right hand side: Multiple requirements can be selected by ticking the corresponding check boxes. Potential requirements are: Activity Attendance Centre Curfew Drug Testing Drug Treatment Education Electronic Monitoring Exclusion Intoxicating Substance Treatment Local Authority Residence Copyright © 2015 CareWorks Note: Reparation does not feature as a potential Requirement in its own right. YJB have confirmed that where Reparation is proposed for or imposed upon the young person, it should be included as part of an Activity requirement. 323 May 2015 Mental Health Treatment Programme Prohibited Activity Residence Supervision Unpaid Work Clicking the button then stores the proposal in the list and disables the Requirements check boxes. As usual, the first proposal entered is classed (and recorded) as the main outcome. Subsequent proposals can be recorded if required/relevant. The type of proposal is displayed in the grid listing, and the related requirements can be viewed by single clicking to highlight the proposal in the grid listing. The requirements selected for the proposal are then displayed as ticked in the top portion of the proposal screen. YRO Outcomes Recording the Outcome and Requirements Once an YRO sentence has been passed at court, the sentence hearing is recorded as usual. The Court Outcome Type is selected as usual, along with the relevant hearing from the drop down list. The TICs (Taken into Consideration), Duration and Comments are entered as usual, and the Main Outcome and related Offences check boxes ticked: Copyright © 2015 CareWorks 324 May 2015 The three YRO types are listed in the Outcome drop down list: Once all the information is entered and the button is clicked, a confirmation message displays as shown here. On clicking the button, the user is redirected automatically to the Outcomes Requirements/Conditions tab as shown below: Copyright © 2015 CareWorks 325 May 2015 The From Date automatically defaults to the Start Date of the YRO, according to the date of the Outcome entered. The To Date defaults to the End Date of the YRO, according to an automatic calculation performed using the Outcome Date and Duration entered. These dates can be manually over-written to the dates that are relevant to the particular requirement being recorded. The Duration is manually entered also, and Comments relating to that requirement can also be added via free text. As a type of YRO has been entered as the Outcome, the Condition/Requirement drop down list displays all those Requirements that are relevant to YROs (the same list displayed in the PSR Proposal screen): Copyright © 2015 CareWorks 326 May 2015 Once the Requirement information has been entered, clicking saves the Requirement into the grid listing beneath, and returns the screen to the default setting (blanked fields, with the exception of the From and To Dates which return to the YRO Start and End Dates), ready for the next requirement to be recorded as relevant and added to the grid listing: All information recorded against the requirement (including the comments) can be viewed in further grid columns by scrolling to the right hand side of the grid listing, or by single clicking the requirement in the grid listing to view the details in the top portion of the screen, where information can be edited if required and saved using the button. Upon selecting the YRO outcome in the Outcome tab, the system runs a validation to check whether the minimum requirements have been recorded for the corresponding type of YRO. Upon clicking the user is automatically redirected to the Requirements/Conditions tab/screen. Proposals tab within the Outcomes module The YRO proposal automatically displays within the Proposals tab in the YRO Outcome, as is the case with other Outcomes and their corresponding proposals. Copyright © 2015 CareWorks 327 May 2015 In addition to the description of the Outcome proposed and the recommended duration, the Requirements proposed in relation to the YRO are also displayed within this screen, to compare against the actual Outcome and Requirements imposed by the courts. YRO Programmes Recording the Programme Once an YRO Outcome has been recorded against the client record, a Programme of the same type is automatically created against the client record also: Upon viewing the automatically generated Programme, some details are already entered by default, as they are ‘pulled through’ from entries made within the Outcomes module: Copyright © 2015 CareWorks 328 May 2015 The user must complete the Programme details by ensuring the Location, Duration and Agreed Date are entered (automatically completing the End Date field) and click the button to save the details. Copyright © 2015 CareWorks 329 May 2015 The Responsible Officer fields default to the logged in user who recorded the outcome, and require manual amendment to reflect the true worker responsible for the young person’s order/programme. Once the Programme has been updated, a confirmation message displays as shown here. Recording the Requirements Upon entering the Intervention/Requirements tab within the Programme, some details are ‘pulled through’ automatically: On clicking the button, the user is presented once again with the updated Programme Details screen. Copyright © 2015 CareWorks 330 May 2015 As the Programme is of an YRO type, the screen alters accordingly, to display a Requirements field (rather than an Intervention drop down list as with other Programme Types), which lists all the potential Requirements relevant to YROs: The Start Date and End Date for the requirement are entered manually. Free text Comments relating to the requirement can also be recorded. The worker responsible for this particular requirement is recorded in the Associated Worker drop down list fields. Copyright © 2015 CareWorks 331 May 2015 Clicking the button then saves the Requirement to the grid listing beneath, and blanks the Intervention Detail and Associated Worker fields, ready for the next Requirement to be recorded as required. As the Programme is of an YRO type, alterations to the screen also incorporates a Requirement End section and a Not Completed section in relation that relate to each individual requirement recorded. YRO Contacts Recording Completion of Requirements and the YRO As Requirements come to an end, for whatever reason, this must be recorded. Copyright © 2015 CareWorks 332 May 2015 As each Requirement ends, a responsible worker must re-visit the Programme Interventions/Requirements tab within the YRO programme, and select the relevant Requirement from the grid listing by single clicking, as shown above. The Start Date and the End Date of the Requirement should be updated if necessary to reflect the actual dates that the requirement started and finished. If the requirement was Completed the worker must indicate whether the young person completed successfully or was non-compliant. If the requirement was Not Completed, ticking the corresponding check box then enables the Not Completed section of the screen. The worker must select the most relevant reason for the requirement not being completed: Clicking the requirement ends. button then saves the changes made. This process is to be carried out as each Copyright © 2015 CareWorks 333 May 2015 Breaches to the YRO are recorded as per breaches for other orders and use of the Programmes module Breaches tab is the same. When the YRO programme itself comes to an end, a responsible worker must re-visit the Programme Details screen once all the requirements end details are recorded, to record the Programme closure details. The Programme Dates should be amended if required to reflect the true dates. Accommodation Opinions must be recorded and the Concluded or Completed Successfully check box ticked, as is the case with other programme types. Recording YRO Contacts On entering a Contact Details screen for the young person, any YRO programme against the young person’s record is displayed in the list of Linked Programmes. Copyright © 2015 CareWorks 334 May 2015 The Requirements recorded against the YRO are also displayed beneath. The list is disabled by default, and becomes enabled once the YRO Linked Programme has been ticked. Multiple requirements can be viewed by using the scroll arrows to the right hand side. The Contact Type determines if the contact counts towards the linked programme as either Counts Towards Programme, or Does Not Count Towards Programme. Adding Notes to a Contact Record Notes added to a record are shown in the Notes free text field. The Notes button displays the number of notes added to a record. Click it to display the full notes added to a contact record. Notes button Searching for Contact Types In the Contacts Grid Listing screen, filters have been added at the top of the screen, so that once a Programme type of YRO has been selected, any particular Requirement recorded against the YRO can be selected to filter all contacts linked to that particular Requirement: Copyright © 2015 CareWorks 335 May 2015 All other Contacts and Enforcement functionality operates in the same way for YROs as for other orders and programme types. If a client attended the scheduled contact, it is marked with a green check it is marked with a red cross , if they did not attend, . Enforcement Records for Client’s Missing Contacts If a client misses a contact meeting and a contact record has been created with: An Actual date Contact Type of Counts Towards Programme A linked Programme And the Client Attended check box is NOT ticked The system will generate a warning that a contact meeting has been missed and automatically navigates to an enforcement record. Recording a Breach offence against a client The enforcement record can be competed with the Enforcement Action of Breach. Raise records an offence of Breach against the most recent referral which contains the Programme linked to the contact. The offence is the breach of a statutory order, of breach of order of licence conditions. The Offence On Date is the date of the missed contact linked to the Enforcement record. Printing All Contacts You can selct all contact notes to be printed as a readable report. Copyright © 2015 CareWorks 336 May 2015 To print all contacts as a single report: 1. Click the Select All check box at the bottom of the Contacts screen. 2. Click Print. 3. A dialog window offers formatting options for the report. 4. Click OK. 5. A report is displayed with selected contacts in chronological order. A user can select or deselect contacts to create a chronological report. Assessing Intervention Levels The Core Asset is completed for the young person and Case Staged appropriately as normal. If ‘Yes’ has been answered to any of the questions in the risk section, then a Risk of Serious Harm Asset (ROSH) is also completed for the young person. To assess the Scaled Approach level of intervention required for the young person, the worker must access the Scaled Approach module towards the bottom of the Youth Offending menu. Upon entry to the screen, a list of the young person’s Core Assets and ROSHs (if there are any) is displayed, as below: Copyright © 2015 CareWorks 337 May 2015 The Document Type and Case Stages for Core Assets are displayed in the grid listing. The Score column displays the corresponding scores for the Core Asset Static Factors, Dynamic Factors, and the Total of the two scores. (See section 1.6 for further detail on calculations relating to Static and Dynamic Factors). The LoR column displays the Likelihood of Reoffending according to the Core Asset Total score (Static plus Dynamic scores) and for ROSHs, displays the Likelihood of Reoffending according to the level of risk indicated within the ROSH itself. Any of the documents listed in the top half of the screen can be viewed in full from this screen by double clicking on the record in the listing. The buttons along the bottom of the screen remain disabled until at least one document has been selected. The worker must first tick the relevant Core Asset Case Stage, and then the relevant ROSH if there is one, as below. If a ROSH is selected first, a message displays as shown opposite: Copyright © 2015 CareWorks 338 May 2015 On clicking the button, an Intervention Level is calculated and recorded in the grid listing, and a confirmation message displays as shown: The ROSH and/or Core Asset details that produced the Intervention Level are summarised in the lower grid listing, displaying the ROSH risk level, Core Asset Static, Dynamic and Total scores and related LoR. The Date Completed indicates when the Intervention Level was calculated and recorded, and the Completed By column indicates the user who recorded it within the Scaled Approach screen. The Current Intervention Level column displays the level calculated. (See section 1.6 for further details on intervention level calculations). In the above example, the Intervention Level calculated is Intensive. Copyright © 2015 CareWorks 339 May 2015 Over-riding Intervention Levels It is possible to manually over-ride the intervention level that has been automatically calculated according to YJB specifications. Note: By default, the button at the bottom of the Scaled Approach screen is disabled in the Scaled Approach Default Module Profile. An additional Module Profile named Scaled Approach Override is also shipped. Any users with membership to this Module Profile have access to an enabled button. A local decision would need to be taken as to which users should be allowed access to this function. (Please see Profile Based Security User Manual for details on how to end a user’s membership to one Module Profile and add their membership to another). If the automatically calculated Intervention Level is not suitable, the relevant record is highlighted in the grid listing by single clicking (as below): Copyright © 2015 CareWorks 340 May 2015 The button can then be clicked, and an over-ride screen is presented: Copyright © 2015 CareWorks 341 May 2015 The user must record the Date the over-ride is taking place, the new Intervention Level, name of the user overriding (the user name is recorded in the audit trail) and free text reason for it. Note: The original YJB specification enabled a manual over-ride by one level only (i.e. from Intensive to Enhanced only, but not Standard). This decision was later revisited and altered, so that any level of intervention can be chosen when manually over-riding (as in the example below): Clicking the shown below: Copyright © 2015 CareWorks button saves the over-ride action and updates the grid listing as 342 May 2015 The Current Intervention Level updates to the new level selected during the manual over-ride. Upon scrolling to the right hand side of the grid listing, audit information is displayed relating to the over-ride: The originally calculated level is recorded, the name and date entered at over-ride, and also the actual date the over-ride was performed in the system, and the username of the person logged on to perform it. Multiple manual over-rides can be performed. The audit information displayed in the grid listing will always summarise the originally calculated level and the most recent manual over-ride. Copyright © 2015 CareWorks 343 May 2015 By single clicking to highlight the Intervention Level record in the grid listing and clicking the button at the bottom of the screen, a full audit is presented which displays the details of all manual over-rides performed to that Intervention Level record: Again, upon scrolling to the right hand side of the listing, further details can be viewed relating to the dates and names entered at over-ride, and the actual dates the over-rides were performed within the system along with the usernames of the workers logged in to perform the over-rides: Copyright © 2015 CareWorks 344 May 2015 Clicking the module screen behind. button closes the audit screen, and returns to the Scaled Approach Calculations for Intervention Levels As specified by the YJB, the CareWorks system automatically generates Intervention Levels by calculating Static Factor Scores, Dynamic Factor Scores, and adding them together for a Total score, in relation to Core Assets. These are displayed within the Scaled Approach module grid listing: The total score for the selected Core Asset determines the Likelihood of Reoffending (LoR) automatically generated in the next column. For ROSHs, the CareWorks system recognises the level of Risk recorded within the document itself, and this is automatically displayed in the LoR column, as shown above. If a Core Asset and a ROSH are selected to calculate an Intervention Level, the highest LoR of the two will determine the level of intervention. If a Core Asset alone is selected to calculate a Level of Intervention, the LoR of that Asset alone will determine the Level of Intervention. This is explained in more detail in the sections below. Static Factors Scores Note: The automatically generated Intervention Levels can be manually over- ridden as and when required, by workers with authorised access to the over-ride function. Static Factors Copyright © 2015 CareWorks Initial Score Scoring 345 May 2015 Offence Type - Motoring Offences / Vehicle Theft / Unauthorised Taking = 4 - Burglary (domestic & non-domestic) = 3 - Other Offence = 0 Age at First Reprimand / Caution / Warning - 10 to 12 = 4 - 13 to 17 = 2 - No previous Reprimand / Caution / Warning = 0 Age at First Conviction - 10 to 13 = 4 - 14 to 17 = 3 - No previous convictions = 0 Number of previous convictions - 4 or more = 4 - 1 to 3 = 3 - No previous convictions = 0 Total Static Factors Score (0-16) 0 Dynamic Factors Scores Dynamic Factors / Asset Section Scoring Living Arrangements 0, 1, 2, 3, 4 Family & Personal Relationships 0, 1, 2, 3, 4 Education, Training & Employment 0, 1, 2, 3, 4 Neighbourhood 0, 1, 2, 3, 4 Lifestyle 0, 1, 2, 3, 4 Substance Use 0, 1, 2, 3, 4 Physical Health 0, 1, 2, 3, 4 Copyright © 2015 CareWorks 346 Initial Score May 2015 Emotional & Mental Health 0, 1, 2, 3, 4 Perception of Self & Others 0, 1, 2, 3, 4 Thinking & Behaviour 0, 1, 2, 3, 4 Attitudes to Offending 0, 1, 2, 3, 4 Motivation to Change 0, 1, 2, 3, 4 Total Dynamic Factors Score (0-48) 0 Total Factors Scores for LoR (Likelihood of Reoffending) Static Score (0-16) + Dynamic Score (0-48) = Total (0-64), indicating LoR Rating (LoR) Low (score 0-14 inclusive) Medium (score 15-32 inclusive) High (score 33-64 inclusive) Resulting Intervention Level Child / Young Person Profile Intervention Level Low likelihood of reoffending (as indicated by Asset score [static and dynamic factors] between 0 and 14 inclusive) AND STANDARD Low risk of serious harm (as indicated by no risk of serious harm assessment being required, or low risk of serious harm assessment) Medium likelihood of reoffending (as indicated by Asset score [static and dynamic factors] between 15 and 32 inclusive) ENHANCED OR Copyright © 2015 CareWorks 347 May 2015 Medium risk of serious harm (as indicated by risk of serious harm assessment) High likelihood of reoffending (as indicated by Asset score [static and dynamic factors] between 33 and 64 inclusive) OR INTENSIVE High or Very High risk of serious harm (as indicated by risk of serious harm assessment) Summary You should now be familiar with Recording a PSR Proposal of a YRO with related requirements Recording a court Outcome of a YRO with related requirements Maintaining a YRO Programme with related Interventions Recording Contacts for a YRO, related to specific requirements Using the Scaled Approach module to assess interventions levels automatically Using the Scaled Approach module to manually over-ride automatically generated intervention levels The calculations performed to automatically identify Intervention Levels Copyright © 2015 CareWorks 348 May 2015