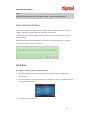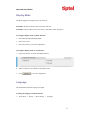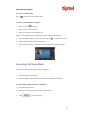
1
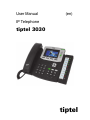
User Manual
(en)
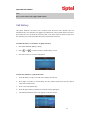
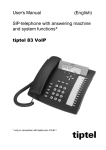
IP Telephone
tiptel 3030
tiptel
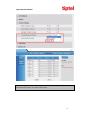
tiptel 3030 User Manual
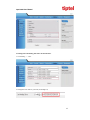
Table of Content
Table of Content ............................................................................................................................. 3
Safety notes .................................................................................................................................... 7
Getting Started ................................................................................................................................ 8
Packing List .............................................................................................................................. 8
Phone Installation.................................................................................................................... 11
1. Attach the Foot stand................................................................................................... 11
2. Connect the Handset and optional Headset ................................................................. 11
3. Connect the Network and Power................................................................................. 12
Initialization ............................................................................................................................ 12
Status ....................................................................................................................................... 13
Registration ............................................................................................................................. 14
Idle Screen .............................................................................................................................. 16
Getting Familiar with Your Phone .............................................................................................. 17
Hardware Components Preview.............................................................................................. 17
Icon Preview ........................................................................................................................... 20
LED Instruction....................................................................................................................... 24
Power Indicator LED ...................................................................................................... 24
Line LED: (Line or Memory Key set as Line) ................................................................ 24
BLF or BLF List Key LED :( Line/Memory Key set as BLF)........................................ 24
Shared Line Key LED :( Line/Memory Key set as Shared Line) ................................... 25
Other Key Led ................................................................................................................. 25
Info Key Instruction ................................................................................................................ 26
User Interface .......................................................................................................................... 27
Memory Key Function Overview ........................................................................................... 28
Basic Setting Configuration ........................................................................................................ 31
Web Login ............................................................................................................................... 31
Administrator Password .......................................................................................................... 32
Basic Network Setting ............................................................................................................ 33
3
tiptel 3030 User Manual
WAN Port ........................................................................................................................ 33
PC Port ............................................................................................................................ 35
Display Mode .......................................................................................................................... 37
Language ................................................................................................................................. 37
Time and Date ......................................................................................................................... 39
Ring Tone ................................................................................................................................ 42
Volume .................................................................................................................................... 44
Wallpaper ................................................................................................................................ 46
Screen Saver............................................................................................................................ 47
LED Status Setting .................................................................................................................. 50
Backlight ................................................................................................................................. 50
Contact Management .............................................................................................................. 51
Local Directory ....................................................................................................................... 51
Remote Phonebook ................................................................................................................. 56
Call History ............................................................................................................................. 57
LDAP Phonebook ................................................................................................................... 60
Broadsoft Phonebook .............................................................................................................. 62
Call log .................................................................................................................................... 63
Other features settings ................................................................................................................ 64
Dial Plan.................................................................................................................................. 64
Emergency Call ....................................................................................................................... 65
LED Status Setting .................................................................................................................. 66
Action URL ............................................................................................................................. 67
Softkey Layout ........................................................................................................................ 68
Programmable Key ................................................................................................................. 69
Ext Key ................................................................................................................................... 70
Basic Call Features ...................................................................................................................... 70
Place a Call ............................................................................................................................. 70
End a Call ................................................................................................................................ 72
Redial a Call ............................................................................................................................ 72
Receive a Call ......................................................................................................................... 72
4
tiptel 3030 User Manual
Incoming Call Show Mode ..................................................................................................... 73
Auto Answer ........................................................................................................................... 74
Call Hold ................................................................................................................................. 75
Call Transfer............................................................................................................................ 75
Call Conference....................................................................................................................... 79
Call Forward ........................................................................................................................... 80
Call Return .............................................................................................................................. 84
Call Waiting Tone.................................................................................................................... 84
Hide Caller ID ......................................................................................................................... 86
Reject Anonymous .................................................................................................................. 86
Call Mute ................................................................................................................................ 87
DND ........................................................................................................................................ 88
Key as Send............................................................................................................................. 88
No Key Entry Timeout ............................................................................................................ 89
Keypad Lock ........................................................................................................................... 90
Hot Line .................................................................................................................................. 91
Function Key Features Settings ................................................................................................. 93
Line ......................................................................................................................................... 93
Speed Dial ............................................................................................................................... 94
BLF ......................................................................................................................................... 95
BLF List .................................................................................................................................. 97
Voice Message......................................................................................................................... 98
Direct Pickup .......................................................................................................................... 99
Group Pickup ........................................................................................................................ 100
Call Park................................................................................................................................ 101
Intercom ................................................................................................................................ 102
DTMF ................................................................................................................................... 104
Prefix ..................................................................................................................................... 105
Local Group .......................................................................................................................... 106
XML Group........................................................................................................................... 107
LDAP .................................................................................................................................... 108
5
tiptel 3030 User Manual
XML Browser ....................................................................................................................... 109
Broadsoft Group.................................................................................................................... 110
Conference ............................................................................................................................ 111
Forward ................................................................................................................................. 111
Transfer ................................................................................................................................. 112
Hold....................................................................................................................................... 113
Group Listening .................................................................................................................... 113
DND ...................................................................................................................................... 114
Redial .................................................................................................................................... 115
SMS....................................................................................................................................... 115
Send SMS...................................................................................................................... 115
Set SMS Memory Key .................................................................................................. 116
Record ................................................................................................................................... 117
URL Record .......................................................................................................................... 118
Paging ................................................................................................................................... 118
Shared Line ........................................................................................................................... 119
Public Hold ........................................................................................................................... 120
Private Hold .......................................................................................................................... 121
Share line .............................................................................................................................. 122
Hot Desking (Pending).......................................................................................................... 123
ACD (Pending) ..................................................................................................................... 124
Zero Touch (Pending) ........................................................................................................... 125
Factory Reset .............................................................................................................................. 126
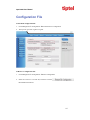
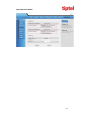
Configuration File ....................................................................................................................... 127
Appendix ...................................................................................................................................... 129
Warranty ................................................................................................................................ 129
Guarantee .............................................................................................................................. 129
Declaration of conformity ..................................................................................................... 129
Disposal................................................................................................................................. 129
6
tiptel 3030 User Manual
Safety notes
You may not set-up and use this device in the following surroundings:
o Outdoors
o In damp or wet spaces (bath, shower, swimming pool, etc.)
o In hazardous environments
o In locations exposed to direct sunlight
o At ambient temperatures below 0 °C or above 40 °C
o In case of strong vibrations or shocks
o In dusty environments
Only use a soft, damp cloth to clean the device. Do not use chemicals or abrasive
cleaners.
During a thunder storm you should neither phone nor connect or disconnect any lines
(electrical shock hazard in case of a lightning strike)
Opening the device and conducting improper repairs may hazard the user.
Disposal of this device must be carried out according to local regulations.
Please note that in case of mains outage emergency calls cannot be placed.
Only such devices may be connected to the phone, which deliver safety extra low voltage
(SELV).
Only headsets with integrated volume limiter for hearing protection according to EN
60950 may be used.
Make sure that the connecting lines are installed carefully so that no one can trip over the
cable. Connected cables must not be bent excessively or subjected to mechanical strain.
Connecting cables must be wired inside buildings only (Danger of electrical shock due to
transients).
In case of malfunctions disconnect power cord and all communication lines.
Before opening the device, unplug any communication lines.
In case of operating the device with external AC adapter:
Only the original AC adapter (Article-No. 3054051) may be used (Danger of electrical
shock and/or fire)
The AC adapter must be easily accessible so that it can be removed from the wall outlet
any time in case of danger.
7
tiptel 3030 User Manual
In case of malfunction remove the AC adapter from the wall outlet and disconnect any
communication lines.
Before opening the device remove the AC adapter from the wall outlet and disconnect any
communication lines.
The device, AC adapter (inclusive, has been developed and manufactured in compliance
with Standard EN 60950 "Safety of information technology equipment".
Any changes or modifications not expressly approved by the manufacturer can void the
user's authority to operate the equipment.
Getting Started
Packing List
The package contains the following parts, please check if all the items are not missed:
1. The phone device
8
tiptel 3030 User Manual
2. The footstand
3. Handset
4. Headset cord
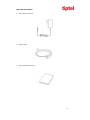
9
tiptel 3030 User Manual
5. Power adapter (optional)
6. Ethernet cable
7. Quick installation reference
10
tiptel 3030 User Manual
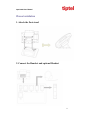
Phone Installation
1. Attach the Foot stand
2. Connect the Handset and optional Headset
11
tiptel 3030 User Manual
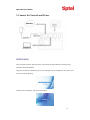
3. Connect the Network and Power
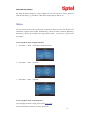
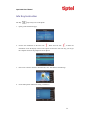
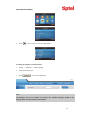
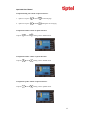
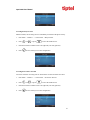
Initialization
After your phone has been powered up, the system boots up and performs the following steps:
Automatic Phone Initialization
The phone finishes the initialization process by loading the saved configuration. The phone LCD
screen will display "Booting"
And then show “Initializing “during the initialization.
12
tiptel 3030 User Manual
By default the phone attempts to contact a DHCP server in your network in order to obtain its
valid network settings, e.g. IP address, subnet mask, default gateway, DNS server.
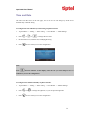
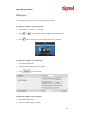
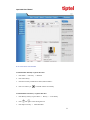
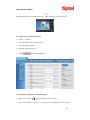
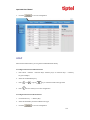
Status
You can view the system status of your phone via phone user interface or web user interface. The
information of phone status includes: Information(e.g., Model, IP, MAC, Firmware, Hardware),
Network(e.g., WAN Type, IP, Mask, LAN Type, Gateway, DNS… )Account (e.g., register status
of accounts)
To view the phone status via phone interface:
1. Press Menu →Status →Information Network/ Account
2. Press Menu →Status →Network
3. Press Menu →Status →Account
To view the phone status via Web interface:
Login webpage( For How to login, please refer to Web Login)
View the information of Version, Account and Network.
13
tiptel 3030 User Manual
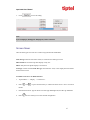
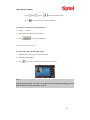
Registration
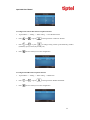
To register via phone interface:
1.
Press Menu SettingAdvanced setting (default password:admin)Accounts
2.
Select the desired account
3.
Select Enable for Account active
4.
Filled the SIP Server
5.
Filled the Failover SIP server if need (Optional)
6.
Filled the Outbound Proxy (Optional)
7.
Filled the SIP User ID, Authenticate ID
8.
Filled the password, Name (shown on LCD) and Ringtone.
9.
Press Save to save the configuration.
14
tiptel 3030 User Manual
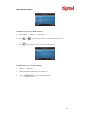
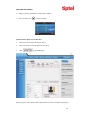
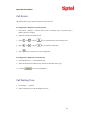
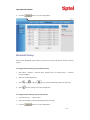
To register via web interface:
1. Login webpage and Click AccountBasic
2. Select the desired Account
3. Select Yes for Account Active
4. Filled the Primary SIP SERVER and other account information
5. Click
to save the configuration.
Note:
1. All fields with * must be filled. If changed, it requires a phone restart.
2. Account Status says the account registered successfully or not.
3. When change the account information via phone, it will show Restart note when back to
idle page.
15
tiptel 3030 User Manual
Idle Screen
Name
Description
1. Date&Time
It shows the phone’s time & date. For Date&time setting, see
Time&Date
2. Notice
3. Line Keys
It shows the phone features status, More see Icon Preview
This area shows the four line key labels. Line keys are also can be
used as other function keys. For more information you can refer to
Memory Keys
This area shows the soft key labels. The default soft key labels are
4. Soft Key
5. Default Account
“History”, “Directory”, “DND” and “Menu”. More to see
Programmable Key
This shows the current use account. User can use
change the default use account.
to
This shows the backgrounds picture. You can also change it.
6. Wallpaper
For more information you can refer to Wallpaper.
16
tiptel 3030 User Manual
Getting Familiar with Your Phone
Hardware Components Preview
Item
Description
LCD screen
To Presentation all information about the date& time, accounts,
soft keys, messages, calls and other some information.
Power Indicator LED
To indicate the power status
The phone supported up to 4 accounts
Line keys
1. Steady green: idle interface, during a call..
2. Blink red: a call incoming
Soft keys
Labels automatically to identity their context-sensitive features.
1. OK.
Navigation keys
Up arrow key: To move up of the selection shows on the
screen.
Right arrow key: To move right of the selection
17
tiptel 3030 User Manual
shows on the screen.
Left arrow key: To move left of the selection shows
on the screen.
Down arrow key: To move down of the selection shows
on the screen.
1. To return to idle screen.
2. To cancel the information or call on the screen.
1. To mute the voice during the call (green light).
Mute key
2. To un-mute the call.
Conference
To place a conference call
To be configured as different function as:
1. Line
2. Speed Dial
3. BLF
4. BLF List
5. Voice mail
6. Direct Pickup
7. Group Pickup
Memory Keys
8. Call Park
9. Intercom
10. DTMF
11. Prefix
12. Hold
13. Conference
14. DND
15. Redial
18
tiptel 3030 User Manual
16. Transfer
17. SMS
18. Hot -Desking
19. Call Return
20. Paging
21. Record
22. Shared Line
The LED lights status when set as Shared line:
Stay green: Idle
Stay red: Busy
Blinked green: Ring Back
Blinked red: A call incoming
Steady orange: During a call
Blinked orange: Public Hold
Blinked green: Private Hold
Light Drown: Unregistered
Speaker
Redial
Press this button to place a call in hands-free mode.
To dial the previous dialed number. To act as send key.
To decrease the volume.
Volume
To increase the volume.
Hold
Information
Transfer
To hold or to resume a call during a conversation.
To show the accounts status and some other relevant
information. More refer to Info key instruction.
To transfer a call to a third party.
19
tiptel 3030 User Manual
To enable or disable Forward feature during the idle page.
Alphanumeric keypad
To enter the phone numbers, letters and so on.
Message
To indicator the New message, and press to read.
Headset
To indicate that the phone is or not in Headset mode.
Icon Preview
Icon
Description
Network available
Network down
Line(Registered succeed)
Line (Unregistered)
Line(Ringing)
Speed Dial
BLF
BLF(Ringing)
BLF(Talking)
20
tiptel 3030 User Manual
Speakerphone mode
Handset mode
Headset mode
Voice messages
Text message
Mute
Do Not Disturb
Volume is 0
SRTP
Hold
Dialed calls
Received calls
Missed calls
21
tiptel 3030 User Manual
Forward calls
Conference
Keypad locked
Keypad unlocked
Pick up
Call Park
Intercom/Paging
DTMF
Prefix
XML Group
Local Group
XML Browser
LDAP
Broadsoft Group
Conference
22
tiptel 3030 User Manual
Forward
Transfer
Hold
Line on Hold
DND
Redial
Call Return
SMS
Record
Recording
Group Listening
Shared Line
Other Functions
23
tiptel 3030 User Manual
LED Instruction
This part mainly instructs the LED status. The Power LED Status describe on the premise that the
LED setting all set as Yes. For LED status setting, please refer to: LED Status Setting
Power Indicator LED
LED Status
Description
Blinked green
Ringing or have missed call
Steady Green
Idle status(Power on)
Off
Powered off.
Line LED: (Line or Memory Key set as Line)
LED Status
Description
Steady Green
Hold
Steady Green
Off hook or during a conversation.
Blinked red
Off
Ringing.
Idle status
BLF or BLF List Key LED :( Line/Memory Key set as BLF)
LED Status
Steady Green
Description
Idle status for the monitored line
Steady Red
The monitored line is calling or during a call
Blinked red
The monitored line is ringing.
Off
All other unknown status
24
tiptel 3030 User Manual
Shared Line Key LED :( Line/Memory Key set as Shared Line)
LED Status
Stay green
Stay red
Blinked green
Blinked red
Description
Idle status
The line is busy
Ring Back, Private hold
The line is ringing
Steady orange
During a Call
Blinked orange
Public Hold
Off
Unregistered
Other Key Led
Key
Description
Headset Key
When use in headset mode, the led is steady
green or the LED is off.
Message Key
Blinked green when there is new messages
or the LED is off.
Mute Key
Red when the mute the call, or the LED is
off.
25
tiptel 3030 User Manual
Info Key Instruction
Info Key
plays many roles in this phone:
1. Quick get the Information page.
2. Get the full information of the item with
. When the item with
, it means the
information is not full display or there more options for the item. Press info key, you can get
the complete content or the prompt list for all options.
3. Fast access to the new missed or Forward calls, New Voicemail or Text Message.
4. Get all other parties information during a conference.
26
tiptel 3030 User Manual
User Interface
There are two ways to customize specific configurations on your IP phone:
The user interface on the IP phone
The user interface in a web browser on your PC
The hardware components keypad and LCD screen constitute the phone user interface, which
allows the user to execute all call operation tasks and basic configuration changes directly on the
phone. In addition, you can use the web user interface to access all configuration settings. In many
instances, it is possible to use both the phone user interface and the web user interface to operate
the phone and change settings. However, in some instances, it is only possible to use the phone or
the web user interface.
Phone Interface Overview
Option
Model
IP
MAC
Firmware
Status
Hardware
Network
Account
Device Cert
Language
Call Forward
Function Key(Line and Memory key setting)
More Key see Memory Key Overview
Key as Send
Features
Hot Line
Anonymous Call
DND
History Setting
27
tiptel 3030 User Manual
Language
Time & Date
Basic Settings
Time & Date Format
DHCP Time
Ring tone
Account
Network
Advanced Settings
Factory Reset
Auto provision
Directory
Add, view and delete
History
View and delete
Message
Voice Mail set and View. Text Message view and set.
Display Mode
Display
Wallpaper
Screensaver
Factory Function
System Restart
Others
Device Reboot
Pcap Feature
Memory Key Function Overview
Line
Speed Dial
BLF
BLF List
Voice Mail
28
tiptel 3030 User Manual
Direct Pick Up
Group Pick Up
Call Park
Intercom
DTMF
Prefix
Local Group
XML group
LDAP
XML Browser
Broadsoft group
Conference
Forward
Transfer
Hold
Group Listening
DND
Redial
29
tiptel 3030 User Manual
Call Return
SMS
Record
URL Record
Paging
Shared Line
Public Hold
Private Hold
30
tiptel 3030 User Manual
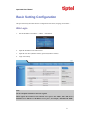
Basic Setting Configuration
This part will mainly introduce the basic configuration as the Time, Language, and Volume…
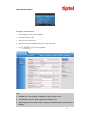
Web Login
1.
Get the IP address: Press Menu →Status →Information.
2.
Input the IP Address in the web browser.
3.
Input the user name (default is admin), password (default is admin).
4.
Login successfully.
Note:
The PC and phone should be in the same segment.
When register the accounts in web and the server port is not “5060”, then “SIP Server”
should be set as “SIP Server’s IP address: server port.”, for example, “192.168.0.122: 5090”.
31
tiptel 3030 User Manual
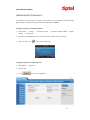
Administrator Password
The password is mainly used for login the web interface or set the advanced settings through
phone interface. And the default password of the administrator is: admin
To change to password via Phone Interface
1. Press Menu → setting → Advanced settings → password (default admin) → Phone
Setting → Set Password
2. Enter the current PWD (password), new password and confirm the new password.
3. Press save soft key or
to save the new password.
To change to password via Web Interface
1. Management → Password
2. Fill the value
3. Click
to save the configuration.
32
tiptel 3030 User Manual
Note:
When you use the web interface: user name: admin,
password: admin(default)
Basic Network Setting
The IP Phone support three mode of Network: DHCP, Static, and PPPoE. The default mode is
DHCP, it will obtain IP address and other information automatically.
If your phone cannot contact a DHCP server for any reason, you need to configure a static IP
address manually.
When switch DHCP, Static IP and PPPoE to each other, or change the Static IP on webpage, it
will show the warning of restart as following.
WAN Port
To configure a static IP address via phone interface:
1. Press MenuSettingAdvanced Settings (password: admin) NetworkWANPort
Static mode.
2. Enter the parameters: IP, Netmask, Gateway, Pri. DNS(primary dns), sec. DNS(second DNS)
in the corresponding fields.
3. Click Save and restart the phone.
33
tiptel 3030 User Manual
Press the Save soft key to accept the change or the Cancel soft key to cancel. If you are using an
xDSL modem, you can connect your phone to the Internet via PPPoE mode. You can set a WAN
port to be a PPPoE port. The PPPoE port will perform a PPP negotiation to obtain the IP address.
Contact your system administrator for the PPPoE user name and password.
To configure PPPoE via phone interface:
1. Press MenuSettingAdvanced Settings (password: admin) NetworkWANPort
PPPoE mode.
2. Enter the User ID and password
3. Click Save and restart the phone.
To configure DHCP via phone interface:
1. Press MenuSettingAdvanced Settings (password: admin) NetworkWAN Port
DHCP mode.
2. Click Save and restart the phone.
To configure Network via web interface:
1. Click NetworkBasic
2. Select the desired Type: DHCP, Static or PPPoE
3. Filled the necessary information.
4. Click the SaveSet and restart the phone.
34
tiptel 3030 User Manual
Note:
Wrong network parameters may result in inaccessibility of your phone and may also have
an impact on your network performance. For more information about these parameters,
contact your system administrator.
PC Port
Two modes for PC port: bridge and router.
To configure PC Bridge via Phone interface:
1. Press MenuSettingAdvanced Settings (password: admin) NetworkPC Port Bridge
mode.
2. Click Save and restart the phone.
To configure PC router via Phone interface:
1. Press MenuSettingAdvanced Settings (password: admin) NetworkPC Port Router
35
tiptel 3030 User Manual
mode.
2. Enter the IP, Netmask and DHCP server
3. Click Save and restart the phone.
To configure Bridge via web interface:
1. Click NetworkBasic
2. Select
3. Click
and restart the phone
To configure Router via web interface:
1. Click NetworkBasic
2. Select As Router
3. Fill the IP address and other necessary information.
4. Click
and restart the phone
36
tiptel 3030 User Manual
Display Mode
This phone support two Display mode: Text and Icon.
Icon Mode: all Items are shown same as the main with Icon.
Text Mode: Only the 8 main items shown as Icon, and others all text description.
To Configure Display mode via phone interface:
1. Press Menu DisplayDisplay Mode
2. Select Text or Icon
3. Press Save soft key to save the configuration.
To Configure Display mode via web interface:
1. Login web interface, and click Setting Preference
2. Select Icon Mode or Text Mode for the Display mode
3. Click
to save the configuration.
Language
The default Phone interface language is English.
To change the language via Phone interface
1.
Press Menu → Setting → Basic Settings → Language.
37
tiptel 3030 User Manual
2.
Press
or Save soft key to save the configuration.
To change the language via Web Interface
1.
Setting → Preference →Web Language
2.
Select the necessary one.
3.
Press
to save the configuration.
Note:
All languages may not be available for selection. The available languages depend on the
language packs currently loaded to the IP phone.
38
tiptel 3030 User Manual
Time and Date
The time and date show on the idle page, and it can be set and change by SNTP server
automatically or manual setting.
To configure the time and Date by SNTP setting via phone interface
1. To press Menu → Setting → Basic setting → Time & Date → SNTP Settings
2. Press
or
, or
to change the Time zone.
3. Fill the NTP server1, NTP Server2, and Daylight Saving.
4. Press
or Save soft key to save the configuration.
Note:
Press
, all zone will show on the display, select the one you want and press save or
confirm key to save the configuration.
To configure time and date manually via phone interface
1. To press Menu → Setting → Basic setting → Time & Date → Manual Settings
2. Press
3. Press
and
or change the right time, or you can input the right time.
or Save soft key to save the configuration.
39
tiptel 3030 User Manual
To configure the Time & Date Format via phone interface
1. To press Menu → Setting → Basic setting → Time & Date Format
2. Press
and
or press
to change between 12 Hour or 24 Hour.
3. Press
and
or press
to change among Y-M-D (year-month-day), M-D-Y
(month-day-year), D-M-Y (day-month-year).
4. Press
or Save soft key to save the configuration.
To configure the DHCP time via phone interface
1. To press Menu → Setting → Basic setting → DHCP time
2. Press
3. Press
and
or press
to change between Disable and Enable.
or Save soft key to save the configuration.
40
tiptel 3030 User Manual
To configure the NTP Server by web interface
1.
Login
Login name: admin, password: admin(default)
2.
Setting → Date &Time →NTP Server
3.
Fill the value in the blank.
To change the Time Zone and Date Display Format via web interface
1.
Setting → Date &Time
2.
Select the necessary one.
3.
Press
to save the configuration.
41
tiptel 3030 User Manual
Note:
If the IP Phone cannot obtain the time and date from the Simple Network Time Protocol
(SNTP) server, please contact your system administrator for more information.
Ring Tone
You can adjust the type and volume of the ring tone.
To adjust the Ring Tone Type via Phone interface:
1. Press Menu → Setting → Basic Settings → Ring Tone.
2. Press
3. Press
and
to select the aimed one.
or Save soft key to save the configuration.
42
tiptel 3030 User Manual
To adjust the Ring Tone Type via Web Interface
1. Setting → Preference → Ring Tone
2. Select the wanted one
to save the configuration.
3. Click
To configure Distinctive Ring Tone via Phone Interface
1. Press Directory
2. Select the target contact
3. Press Detail soft key to edit the contact.
4. Press
and
to select the wanted Ring Tone for the contact
5. Press Save soft key to save the contact.
43
tiptel 3030 User Manual
To configure Distinctive Ring Tone via Web Interface
1. Directory → Directory → Contact
2. Choose the Ring Tone you want to use.
3. Click
→
to save the configuration.
Click Ring tone for more information.
Volume
You can adjust the volume for the phone by the volume keys:
and
.
44
tiptel 3030 User Manual
To adjust the Ring tone volume via phone interface:
1. Option 1: To press
and
on the idle page
2. Option 2: To press
and
during the call is ringing.
To adjust the handset volume via phone interface:
To press
and
during a call in handset mode.
To adjust the headset volume via phone interface:
To press
and
during a call in headset mode.
To adjust the speaker Volume via phone interface:
To press
and
during a call in speaker mode.
45
tiptel 3030 User Manual
Wallpaper
To change the preferred one picture for you by the following steps:
To change the wallpaper via phone interface:
1. To press Menu → Display → wallpaper
2. Press
3. Press
and
or press Switch soft key to display the different pictures.
or Save soft key to save the selected picture as the wallpaper.
To change the wallpaper via web interface:
1. Click SettingPreference
2. Select the desired wallpaper picture to upload.
3. Click
to save the setting.
To delete the wallpaper via web interface:
1. Click SettingPreference
2. Select the desired wallpaper to delete.
46
tiptel 3030 User Manual
3. Click
to save the setting.
Note:
System wallpaper (Wallpaper1-Wallpaper6) cannot be deleted.
Screen Saver
There are three types of screen saver: Time & Logo, Photo Switch and Photo.
Time & Logo: when the screensaver works, it will show Time and logo in turns.
Photo Switch: all screensaver pictures display one by one.
Phone: Only the select phone display as screensaver.
Text logo: It works with the Time & Logo, when enter the value, it will display the time and the
entered value in turns.
To enable screen saver via Phone interface:
1. To press Menu → Display → Screensaver...
2. Press
and
or press Switch soft key to Choose the Time-out as 1 min or 2/5/10/30
minute.
3. Enter the Screensaver Type to choose one of the type: Backlight off, Time & Logo and Photo
4. Press
or Save soft key to save the selected configuration.
47
tiptel 3030 User Manual
To disable screen saver via Phone interface
1. To press Menu → Display → Screensaver...
2. Press
3. Press
and
or press Switch soft key to Choose the Time-out as off.
or Save soft key to save the selected configuration.
To upload screen saver via Web interface:
1.
Setting → Preference
2.
Choose the picture wanted to use as screen saver
3.
Click
to save the upload picture
48
tiptel 3030 User Manual
To delete upload screen saver phone via Web interface:
1. Setting → Preference
2. Select the photo that to delete.
3. Click Delete to delete the photo.
Note:
System Screen Photo(ScreenSaver1-ScreenSaver3) cannot be deleted.
To custom text logo via web interface:
1.
Click SettingPreference.
2.
choose the Time-out as 1 min or 2/5/10/30 minute.
3.
Enter the desired value in the Text Logo field.
4.
Click Saveset to save the configuration.
49
tiptel 3030 User Manual
To wake up screen saver via Web interface:
1. Setting → Preference
2. Choose Dial First Digit: Screensaver Wakes up or Screensaver Wakes up and Dial
Note:
1. The upload Photo size should be less than 2M bytes, name length should be less than 48,
and the File name should be letters, numbers or underline '_' and photo number should
be less than 9.
2. The default screensaver photos cannot be deleted.
LED Status Setting
Backlight
To set Backlight via web interface:
1. Click settingPreference
2. Enter the time for Backlight time (In seconds).
3. Click
to save the configuration.
The default is 0, which means Backlight is always on.
50
tiptel 3030 User Manual
Contact Management
This section provides the operating instructions for managing contacts. The topics
include:
Local Directory
Blacklist
Remote Phonebook
Call History
LDAP
BroadSoft Phonebook
CallLog
Local Directory
In the directory, you can add or delete your friends, business partner or anyone others’ phone No.
so you will not forget their number. Or put some anonymous phone No. in the blacklist to prevent
from being disturbed. The local Directory can add up to 1000 contacts.
A. To add contacts list into local directory
To add contacts manually via phone interface
1. Press Menu → Directory → Local Directory
2. Press Add soft key.
3. Enter the necessary information as Name, Phone number…
4. Press save soft key or
to add the contacts successfully.
51
tiptel 3030 User Manual
To add contacts from history via phone interface:
1. Press History soft key or press Menu → History → Local history
2. Press
and
to select the targeted one. (Press
and
switched among the All
calls, Dialed calls, Received calls, Missed Calls and Forward Calls).
3. Press Option soft key → Add to Contacts
4. Edit the necessary information as Name, Phone number…
5. Press save soft key or
to add the contacts successfully.
To add contacts via web interface:
1. Click DirectoryDirectory
2. Enter the name, number and some other information.
3. Press
and then press
button.
52
tiptel 3030 User Manual
B: To add contacts into blacklist
To add blacklist manually via phone interface:
1. Press Menu → Directory → Blacklist
2. Press Add soft key.
3. Enter the necessary information as Name, Phone number…
4. Press save soft key or
to add the contacts successfully.
To add blacklist from history via phone interface:
1. Press History soft key or press Menu → History → Local history
2. Press
and
to select the targeted one.
3. Press Option soft key → Add to Blacklist
53
tiptel 3030 User Manual
4. Edit the necessary information as Name, Phone number…
5. Press save soft key or
to add successfully.
Upload Contacts photo via web interface:
1.
Click Directory and select the desired contact.
2.
Click Choose file to select the photo for the contact
3.
Click
to upload the photo.
When you place a call from the contact, the phone idle screen will show the contact photo.
54
tiptel 3030 User Manual
Note:
The format of the photo supported is jpg or bmp, and the size should be less than 128 *128
To import or export the contact list
You can manage your phone’s local directory via phone or web user interface. But you can only
import or export the contact list via web interface.
To import an XML file of contact list via web interface:
1.
Click on Directory
2.
Click Browse to select a contact list file (file format must be .xml) from your local system.
3.
Click Import XML to import the contact list.
To export an XML file of contact list via web interface:
1.
Click on Directory
2.
Click Export XML to import the contact list.
To import a CSV file of contact list via web interface:
1.
Click on Directory
2.
Click Browse to select a contact list file (file format must be .csv) from your local system.
3.
Click Import Csv to import the contact list.
To export a CSV file of contact list via web interface:
1.
Click on Directory
2.
Click Export Csv to import the contact list.
55
tiptel 3030 User Manual
Note:
If the xml file and CSV file more than 1000 contacts, the phone will only upload 1000
contacts.
Remote Phonebook
To set Remote PhoneBook via web interface:
1. Login the webpage and click DirectoryRemote Phone Book
2. Fill the path of the remote file in the Phone Book URL field.
For example,
http://192.168.0.240/Phonebook/Phonebook.xml
3. Fill the Name and then click
to save the configuration.
To check the contacts via phone interface:
Press DirectoryLeft ButtonLeft Button, and then you can see the item you set, press enter you
will find the detail.
56
tiptel 3030 User Manual
Note:
Every remote contact only support 1000 contacts.
Call History
This phone maintains call history lists of Dialed Calls, Received Calls, Missed Calls and
Forwarded Calls. The call history list supports up to100 entries in all on phone interface and more
than 1500 items. You can check the call history, dial a call, add a contact or delete an entry from
the call history list. You should enable the history record feature in advance.
To enable the history record feature via phone interface:
1. Press MenuFeatureHistory Setting
2. Press
and
or Switch soft key to enable History record.
3. Press Save soft key to save the configuration.
To check the call history via phone interface:
1.
Press the History soft key. The LCD screen displays All Calls list.
2.
Press Right or Left Key to switch among All Calls, Missed Calls, Received Calls, Dialed
Calls and Forwarded Calls.
3.
Press to select the desired entry.
4.
Press the Option soft key, and then select Det ail from the prompt list.
5.
The detailed information of the entry appears on the LCD screen.
57
tiptel 3030 User Manual
To delete an entry from the call history list via phone interface:
1. Press the History soft key.
2. Press Right or Left Key to switch among All Calls, Missed Calls, Received Calls, Dialed Calls
and Forwarded Calls.
3. Press UP or DOWN key to select the desired entry.
4. Press the Delete soft key.
To delete all entries from the call history list via phone interface:
1. Press the History soft key.
2. Press Right or Left Key to switch among All Calls, Missed Calls, Received Calls, Dialed Calls
and Forwarded Calls.
3. Press the Option soft key, and then select Delete All from the prompt list.
4. Press the OK soft key.
5. Press the OK soft key to confirm the deleting or the Cancel soft key to cancel.
To check the call history via web interface:
1.
Click Directory Call History
2.
Click Dialed List, Missed List, Received List, Forwarded List then you can see the history
list.
58
tiptel 3030 User Manual
To Dial a call from Call History via web interface:
1.
Click DirectoryCall History
2.
Select the desired history item, and click Tel Number.
3.
Then the call is dialed on phone.
To Dial a call from Call History via phone interface:
1. Press History soft key or press Menu → History → Local history
2. Press
and
to select the targeted one.
3. Press the Send soft key, or
, or
, or the corresponding line key.
59
tiptel 3030 User Manual
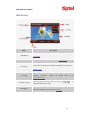
LDAP Phonebook
When use the LDAP feature, you can get the LDAP Phonebook directly.
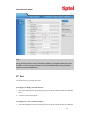
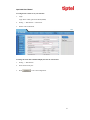
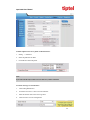
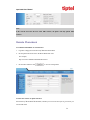
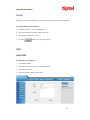
To configure LDAP via web interface:
1. Login webpage and click DirectoryLDAP
2. Filled the LDAP Name Filter:
a)
This parameter specifies the name attributes for LDAP searching. The “%” symbol in
the filter stands for the entering string used as the prefix of the filter condition.
b)
For example (cn=%), when the name prefix of the cn of the contact record matches the
search criteria, the record will be displayed on the IP PHONE LCD.
3. Filled LDAP Number Filter:
This This parameter specifies the number attributes for LDAP searching.
4. Filled Server Address: Fill the domain name or IP address of the LDAP Server.
For example: 192.168.0.124
5. Port(the port of the LDAP Serve) Base, User Name, Password
6. Max.Hits (1-32000): the maximum number of the search results to be returned by the LDAP
server.
7. LDAP Display Name: the display name of the contact record displayed on the LCD screen.
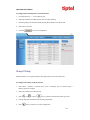
8. Filled the relative value and then click save button the save the settings.
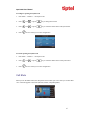
Following is the example screenshot for the configuration.
60
tiptel 3030 User Manual
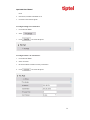
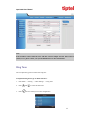
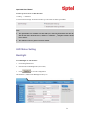
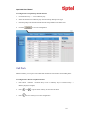
To Configure LDAP Key
To configure LDAP Key via web interface:
1. Click Function KeyMemory Key choose Memory Key 1(for example)
2. Select LDAP in the Type field.
3. Click Saveset to save the configuration.
61
tiptel 3030 User Manual
To Configure LDAP Key via phone interface:
1. Press MenuFeatureFunction KeysMemory Keys as Function KeysMemory Key 1
2. Select LDAP in the Type field
3. Press save or OK key to save the configuration.
When press the LDAP Key the LCD will display as following:
Broadsoft Phonebook
You can access the BroadSoft directory through your phone. You can add local contacts from the
BroadSoft directory. You can also dial a contact from the BroadSoft directory. You can configure
your new phone to access up to 6 BroadSoft directories and every broadsoft directory support 100
contacts. Contact your system administrator for the access URL of the BroadSoft directory.
To Configure Broadsoft via web interface:
1. To click DirectoryBroadsoft
2. Select the desired Broadsoft Item
3. Enter the Display name
4. Enter the Server, port, User and password
5. Click
to save the configuration.
62
tiptel 3030 User Manual
Call log
You can access the call log of the BroadSoft user through the IP phone. The call log contains call
information such as remote party identification, time and date. You can check the call log and dial
a call from the call log list. The BroadSoft call log allows users to view and dial the stored
numbers in the following lists: missed, received, and placed. You can configure the IP phone to
access up to 3 call log items and every call log item support 100 contacts. Contact your system
administrator for the access URL of the BroadSoft call log.
To Configure Call log via web interface:
1. To click DirectoryCall log
2. Select the desired Call log Item
3. Enter the Display name
4. Enter the Server, port, User and password
5. Click
to save the configuration.
63
tiptel 3030 User Manual
Other features settings
Dial Plan
Dial plan is a string of characters that governs the way this phone processes the inputs received
from your phone keypad. This phone supports dial plan with following accept digits:
1,2,3,4,5,6,7,8,9,0,*,#
Grammer
x
xx+
Description
any digit from 0-9;
at least 2 digit number;
^
exclude;
,
hear dial tone;
[3-5]
any digit of 3, 4, or 5;
[147]
any digit 1, 4, or 7;
<2=011>
replace digit 2 with 011 when dialing.
64
tiptel 3030 User Manual
To configure dial plan via web interface:
1.
Click Account—Advanced—Dial Plan.
2.
Filled the value in dial plan field.
3.
Click SaveSet to save the configuration.
Note:
Illegal input will fall back to default: {[x*]+}. For More, please refer to dial plan.
Emergency Call
Public telephone networks in countries around the world have a single emergency telephone
number (emergency services number), that allows a caller to contact local emergency services for
assistance when required. The emergency telephone number may differ from country to country. It
is typically a three-digit number so that it can be easily remembered and dialed quickly. Some
countries have a different emergency number for each of the different emergency services.
You can specify the emergency telephone numbers on the IP phone for contacting the emergency
65
tiptel 3030 User Manual
services in an emergency situation.
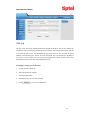
To configure emergency call via web interface:
1.
Click SettingFeaturesPhone Lock
2.
Enter the emergency services number(e.g.110,119,120) in the Emergency field,
3.
Click SaveSet to save the configuration.
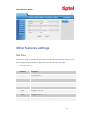
LED Status Setting
The LED Status setting mainly defines the power indicator LED.
To configure LED Status via web interface:
1. Click SettingPreference
2. Select Yes or No for Power Status, Ringing Status, Miss Calls Status and Voice Message
Status.
3. Click
for the setting.
For the LED status description, see: LED Instruction Power Indicator LED
66
tiptel 3030 User Manual
Action URL
To configure action url via web interface:
1. Click SettingAction URL
2. Filled the needed value in the necessary blank.
3. Click
to save the setting.
67
tiptel 3030 User Manual
Softkey Layout
This feature mainly defines which shown on the soft key in some status. For example, what the
soft key displays when dialing, or talking.
To configure Soft key via web interface:
1. Click SettingSoftkey Layout
2. Select Enable for Custom Softkey
3. Select call States.
4. Select the feature form the disable key to enable key field by
Disable to Enable field.
5.
Delete the Enable, and it will back to Disable
field.
6. Click
7. Click
or
to change to position or each feature.
to save the configuration.
68
tiptel 3030 User Manual
Note:
When there more than 5 items in the Enable field, the last softkey will display More, and last
two item will show in the next page softkey, you can check by press more.
Programmable Key
For the default keys as Soft keys, Navigation keys and so on, you can define them as some
specific feature, and it works only on the idle page.
To configure Programmable Key via web interface:
1. Click Function KeysProgrammable Keys
2. Select the desired Key to set.
3. Click
4. By clicking
to save the setting.
, all setting of the keys will be back to default.
69
tiptel 3030 User Manual
Ext Key
It only works when there is expansion module connected with the phone.
Basic Call Features
Place a Call
There are three ways to dialing a call: Handset, Headset and Hands-free speakerphone.
To place a call by Handset
1.
Pick up the handset, or press a line key and dial the necessary number.
2.
Press
or
or press the send softkey, then the call is sending.
To place a call by Headset:
( light is Green),
1. Press the
2. Enter the desired number.
3. Press
or
, or press the Send softkey, then the call is sending.
Using headset to place and answer calls for all time
1. Click webpage Setting Preference
2. HeadSet Priority Enable
3. Ring Device For HeadSet User Headset
4. Press
70
tiptel 3030 User Manual
Placing a call by hands-free speakerphone
1. Press the
, or press the Line key, then you can hear the dial tone.
2. Press the number.
3. Press
or
press the Send soft key, then the call is sending.
To place a call by call history or Directory via phone interface.
1. Press the History soft key (On the idle page) or Menu → History /Directory
2. Press
and
to select the targeted one.
3. Press the Send soft key, or
sending.
, or
, or the corresponding line key, then the call is
Note:
1. The
key is set to be a send key. For more information, refer to the Key as Send on
page
2. During the call, you can also change among Headset, Handset or Free-speaker mode.
Making two calls with one line and one account
1. Press a line key and dial one phone number, then make a call.
2. Press the corresponding line key
3. Dial another phone number,
71
tiptel 3030 User Manual
4. Press the Send soft key, or
, then make the second call.
End a Call
Here shows to end a call during three modes:
To end a call by Handset
Press the Cancel soft key or hang up the handset, or press
To end a call under Headset Mode
Press the Cancel soft key or press
, or press
.
To end a call under hands-free speakerphone Mode
Press the Cancel soft key or press
, or press
.
Note:
During the conference, to end the call is same as mentioned above.
Redial a Call
1.
To redial the last placed call from the IP Phone
2.
Press
directly when LCD is on the idle interface.
Receive a Call
There are three ways to receive a call when the phone is ringing:
To receive a call by handset
Pick up the handset the conversation is built.
72
tiptel 3030 User Manual
To receive a call by headset
Press
and now the conversation is built.
To receive a call by hands-free speaker
1. Option 1: Press
directly.
2. Option 2: Press Answer soft key.
3. Option 3: Press the Line key (flashes red).
Moreover, some other action can be done by soft key when the call is coming.
1. To press the Reject soft key to reject the call. Or press
to reject the current call.
2. To press Forward to forward to another phone.
3. To press Silence soft key, and then the call will keep silent, no ring tone display.
Incoming Call Show Mode
There are two incoming call show modes for this phone:
1. name and number of the contacts
2. name and number of the incoming call and the account which is connecting
To set incoming call show mode via web interface:
1. Click setting preference
2. Select the desire mode for the incoming call show mode
3. Click
to save the setting.
73
tiptel 3030 User Manual
Auto Answer
Enable auto answer feature, you will answer all incoming call automatically.
To enable Auto Answer via Web interface
1. To Click Account → Advanced
2. To choose Yes for the Auto Answer.
3. To click Saveset to save the configuration.
To Disable Auto Answer via Webpage
1. To Click Account → Advanced
2. To choose No for the Auto Answer.
3. To click Saveset to save the configuration.
74
tiptel 3030 User Manual
Call Hold
When use hold feature, the Hold icon will show on the display.
To make a call on hold during three modes:
To hold a call under handset mode:
1. Press Hold soft key or
to hold the current call.
to resume the call on hold.
2. Press Resume soft key or
To hold a call under headset mode:
1. Press Hold soft key or
2. Press Resume soft key or
to hold the current call.
to resume the call on hold.
To hold a call during the speaker mode:
1. Press Hold soft key or
2. Press Resume soft key or
to hold the current call.
to resume the call on hold.
Call Transfer
This phone supports blind, attended and Semi-Attended Transfer.
Blind Transfer
When you use this feature, you can transfer
1. Press
or Transfer soft key during the conversation, the call is on hold now.
2. Enter the number that transfers to.
3. Press
, and now the blind transfer completed.
75
tiptel 3030 User Manual
NOTE:
The “Enable Call Feature” must be configured to “Yes” to enable this feature
(AccountAdvanced).
Attended Transfer
When you use this feature, you can
1. Press
or transfer soft key during the conversation, the call is on hold now.
2. Enter the number that transfer to, and press the send soft key or
3. Start the second conversation, press
.
or transfer soft key, then, transfer completed.
NOTE:
To transfer calls across SIP domains, SIP service providers must support transfer across SIP
domains. Blind transfer will usually use the primary account SIP profile.
Semi-Attended Transfer
1. Press
or transfer soft key during the conversation, the call is on hold now.
2. Enter the number transfer to, and then press
3. Press
, then you can here the ring tone.
or the Tran soft key, and now the Semi-attended transfer completed.
BLF Transfer
1. Set a Programmable Key or line key is set as BLF. For how to set BLF, please refer to BLF
2. Press
or transfer soft key during the conversation, the call is on hold now.
3. Press BLF key then realize blind, attended and Semi-Attended Transfer.
76
tiptel 3030 User Manual
Hold transfer on hook:
1. Setting Features Transfer Setting: Hold Transfer On Hook: ON.
2. A place a call to B, B answer, A press the hold softkey and place a call to C, A cancel the call
when C is ringing or answering, then C and B in the same call and the transfer is successful.
Transfer to New Call via web interface
1. Click Setting → Feature
2. Select Transfer Mode via DSS key → New Call
3. Select the desired Line or Memory key and select Transfer in the Type.
4. Enter the phone number in the Value field.
77
tiptel 3030 User Manual
NOTE: if the person that wanted to be spoken to do not want to answer the call, then the person
that answered the coming call could use this function.
78
tiptel 3030 User Manual
Call Conference
This IP Phone supports up to 5-way conference.
5-way conference
1. Assuming that call party A and B are in conversation. A wants to bring C, D and E in a
conference
2. A press line 2 key, the call is placed on hold.
.
3. A enter the number of C and then press send soft key or
4. C answering the call.
or the conference soft key, then A, B and C are now in a conference.(and now
5. A press
this is 3-way conference)
6. A press line 3 key, the current 3-way conference is placed on hold.
.
7. A enter the number of D and then press send soft key or
8. D answering the call.
9. A press
or the conference soft key, then A, B, C and D are now in a conference.(and
now this is 4-way conference)
10. A press line 4 key, the call is placed on hold.
11. A enter the number of E and then press send soft key or
.
12. E answering the call.
13. A press
is built.
or the conference soft key, then A, B, C, D and E are now the 5-way conference
14. A end the call, the conference is finished.
79
tiptel 3030 User Manual
Note:
1. If C does not answer the call, A can back to continue the conversation with B;
2. Once A hangs up the call, the conference is ended, while if B or C drops the call, A&C or
A&B conversation continues.
3. The conference feature is not available on all servers. For more information, contact your
system administrator.
4. To realize the 5 way conference, the line should be all available.
5. Press
to get all parties information.
Call Forward
This phone supports static forward (always forward, busy forward and no answer forward) and
dynamic forward.
To configure static forward
To configure always forward
With this feature, all incoming calls will forward immediately to configured number.
1. Press Menu → Features → Call forward →Always Forward.
2. Press
and
or press
to select the enable choice
3. Enter the forward to number and on code (optional), off code (optional).
4. Press
or Save soft key to save the configuration.
80
tiptel 3030 User Manual
To configure busy forward
With this feature, the incoming calls are immediately forwarded if the phone is busy.
1. Press Menu →Features → Call forward →Busy forward.
2. Press
and
or press
to select the enable choice.
3. Enter the forward to number and on code (optional), off code (optional).
4. Press
or Save soft key to save the configuration.
To configure no answer forward
No Answer Forward: Incoming calls are forwarded if not answered after some time.
1. Press Menu →Features → Call forward →No answer forward.
2. Press
and
or press
to select the enable choice
3. Enter the forward to number and on code (optional), off code (optional).
4. Press
or Save soft key to save the configuration.
81
tiptel 3030 User Manual
When the Forward feature is enabled, the Icon
will display on Top of the LCD.
To configure Forward via Web Interface
1. Setting → Features
2. Click On for the Always/Busy/No Answer
3. Fill the Forward to Number
4. (Optional) fill the on/off code
5. Click
to save the configuration
To cancel the forward feature via Phone Interface
1. Option 1: To press the
key to disable the forward feature.
2. Option 2: Press Menu →Features → Call forward→Always/Busy/No answer Forward
82
tiptel 3030 User Manual
Press
Press
and
or press
to select the disable choice
or Save soft key to save the configuration.
To cancel the forward feature via Web Interface
1. Setting → Features
2. Click Off for the Always/Busy/No Answer
3. Click
to save the configuration
To configure dynamic forward
Forward an incoming call during the ringing.
1. When the phone is ringing, press Forward soft key.
2. Enter the forward number.
3. Press
or press the send soft key, then the call is forwarded.
Note:
If the Programmable Key or line key is set as BLF, when an incoming call ringing, press this
BLF key directly to realize the dynamic forward.
83
tiptel 3030 User Manual
Call Return
This feature allows you to dial the last phone call you received.
To configure the Call Return via phone interface
1. Press Menu →Features →Function Keys→Line or Memory keys as Function Keys →
Memory key1(for example)
2. Select the wanted Line or Memory key.
3. Press
and
or press
key to select the Key Event in the type field.
4. Press
and
or press
key to select the Call Return.
5. Press
or Save soft key to save the configuration
To configure the Call Return via Web interface
1. Click Function keys → Line or Memory key.
2. Select the desired Line or Memory key and select Call Return in the Type.
3. Click the
to save the configuration.
Call Waiting Tone
1. Click Setting → Features
2. Select Call Waiting: On and Call Waiting Tone: On
84
tiptel 3030 User Manual
To Change the Call Waiting Tone time via Web interface
1. Click Setting → Tone
2. Change the Tone Time as you want (for example 3s)
85
tiptel 3030 User Manual
Hide Caller ID
Just enable the anonymous call feature, you can set your ID do not appear on the other phone that
you called.
To configure anonymous call
1. Press Menu →Features →Anonymous Call
2. Press
and
or press
to change the Line ID
3. Press
and
or press
to select the enable choice in Anonymous Call filed.
4. Enter the call on code (optional), call off code (optional).
5. Press
or Save soft key to save the configuration.
To cancel anonymous call feature
1. Press Menu →Features →Anonymous Call
2. Press
and
or press
key to select the disable choice in Anonymous Call
filed.
3. Press
or Save soft key to save the configuration.
Reject Anonymous
If you do not want to be disturb by anonymous calls, you can set the reject anonymous call
features, so you will not hear the unknown calls
86
tiptel 3030 User Manual
To configure rejecting anonymous call
1. Press Menu →Features →Anonymous Call
2. Press
and
or press
key to change the Line ID
3. Press
and
or press
key to select the enable choice in Rejection filed.
4. Press
or Save soft key to save the configuration
To cancel rejecting anonymous call
1. Press Menu →Features →Anonymous Call
2. Press
and
3. Press
or press
key to select the disable choice in Rejection filed.
or Save soft key to save the configuration.
Call Mute
When you use the Mute feature, the other parties will not hear your voice while you can hear their
voice. Call mute applies to all modes (handset, headset, and speakerphone).
87
tiptel 3030 User Manual
To mute the call during a call (including a conference call)
1. Press the mute key
, then the mute key glows green, and the LCD display
2. To disable the mute function, press
again.
DND
When you use the DND feature, the phone is to reject all incoming calls automatically and you
can see the mute icon
shown on the Top of the LCD on idle page.
To enable DND feature via phone interface:
Press the DND soft key when the phone is idle, and then
shown on the LCD.
To disable DND feature via phone interface:
Press the DND soft key again, and then there is no
on the LCD.
Key as Send
To configure Key as Send via phone interface:
1.
Press Menu →Features → Key as Send
2.
Press
3.
Press
and
or press
key to select the enable choice.
or Save soft key to save the configuration
88
tiptel 3030 User Manual
To cancel # Key as Send via phone interface:
1.
Press Menu →Features → Key as Send
2.
Press
3.
Press
and
or press
key to select the disable choice.
or Save soft key to save the configuration
No Key Entry Timeout
No Key Entry Timeout means that when you entry the number, it will dial out automatically after
some time when you stop enter the number.
To configure No Key Entry Timeout via web interface:
1. Click Webpage Setting → Preference
2. Fill the blank of No Key Entry Timeout: for example 5(seconds).(0 means never timeout, you
should press the send key the dial out the number.
3. Click the
button to save the configuration.
89
tiptel 3030 User Manual
Keypad Lock
To enable Keypad Lock via Phone
1.
Press Menu--Settings--Advanced Setting--Phone Setting--Lock
2. Press Info or Switch to change choose lock type:All Keys Menu Key Function Key Lock &
Answer
3.
Press Save or OK key to save the configuration.
To enable Keypad Lock via Phone
1. Press Menu--Settings--Advanced Setting--Phone Setting--Lock
2. Press Info or Switch to change to choose Off.
3. Press Save or OK key to save the configuration.
To enable Keypad Lock via Webpage
1. Click Webpage Setting → Features
2. To choose the Phone Lock.
3. To fill the unlock PIN and auto lock time
90
tiptel 3030 User Manual
4. Fill the Emergence Number, when the phone is Lock, only Emergency Number can be sent.
to save the configuration.
5. To click
To Disable Keypad Lock via Webpage
1. Click Webpage Setting →Features
2. To choose Disable for the Phone Lock.
to save the configuration.
3. To click
Hot Line
To configure Hot Line
1.
Press Menu →Features → Hot Line
2.
Enter the Number and delay time (as present, we support off hook auto dial).
3.
Press
or Save soft key to save the configuration
91
tiptel 3030 User Manual
To configure Hotline auto dial via Web Interface
1. Setting → Features.
2. Fill the number in the Hotline Number and Hotline Time-out.
3. Click
to save the configuration.
Delete the hotline number and save the configuration, and then now the Hotline auto dial is
cancelled.
92
tiptel 3030 User Manual
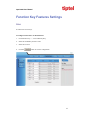
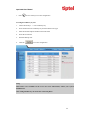
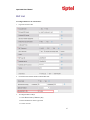
Function Key Features Settings
Line
It works same as Line keys.
To configure Line Feature via Web Interface
1. Click Function keys → Line or Memory Key.
2. Select the wanted Key and set as Line.
3. Select the Account.
4. Click the
button to save the configuration.
93
tiptel 3030 User Manual
Speed Dial
With this feature, you can dial one directory by press the definite key.
To configure Speed Dial feature via phone interface
1. Press Menu →Features →Function Keys→Line or Memory keys as Function Keys →
Memory key1(for example)
2. Press
and
or press
key to select the Speed Dial in the type field.
3. Enter the targeted Number.
4. Press
or Save soft key to save the configuration
Then the selected Line or Memory key will work as Speed Dial.
To configure Speed Dial feature via Web Interface
1.
Click Function keys → Line or Memory key.
2.
Select the wanted Line or Memory key and set as Speed Dial.
3.
Enter the desired phone number in the Value field.
4.
Select the Account ID
5.
Click the
button to save the configuration.
94
tiptel 3030 User Manual
BLF
You can use the BLF (Busy Lamp Field) feature to monitor a specific one whether his phone is
busy or free.
1. When the monitored line is idle, the light is steady green.
2. When the monitored line is ringing, the light is blinking red, press the BLF key to pick the
phone up directly.
3. When the monitored line is calling or in a conversation, the light is steady red.
To configure a BLF key by phone
1. Press Menu →Features →Function Keys→Line or Memory keys as Function Keys →
Memory key1(for example).
2. Select the targeted Line or Memory key.
3. Press
and
or press
key to select the BLF in the type field.
4. Enter the targeted Value Number.
5. Press
and
or press
key to select the Account ID.
6. Enter the Pickup Code.
95
tiptel 3030 User Manual
7. Press
or Save soft key to save the configuration
To configure a BLF key by web
1.
Click Function keys → Line or Memory key.
2.
Select the desired Line or Memory key and select BLF in the Type.
3.
Enter the monitored phone number in the Value field.
4.
Select the Account ID
5.
Filled the Pickup code.
6.
Click the
to save the configuration.
Note:
This feature is not available on all servers. For more information, contact your system
administrator.
After setting the BLF key, do not need to restart the phone.
96
tiptel 3030 User Manual
BLF List
To configure BLF List via web interface:
1. Login and click Account
2. Click Advanced and then fill the Eventlist BLF URL.
3. To configure BLF List Keys
3.1 ClickFunction KeysMemory Key
3.2 Select the BLF List in the Type Field.
3.3. Select Account
97
tiptel 3030 User Manual
to save the configuration.
3.4 Click
.
Voice Message
This phone supports Voicemail, and when there is message, the message will
will light
green. Moreover, when pick up the handset, or press speaker key, you will hear some quick busy
tone.
To configure the Voice mail feature via phone interface:
1. Press Menu→Messages→Voice Mail→Set Voice Mail.
2. Enter the Account1/2/3/4 NO.
3. Press
or Save soft key to save the configuration
To configure Voice Mail Memory Key via Web Interface:
1. Click Function keys → Memory Key.
2. Select the wanted Key.
3. Enter the desired voicemail feature codes in the Value field.
4. Filled the Label displayed on LCD.
5. Select the Account.
6. Click the
to save the configuration.
98
tiptel 3030 User Manual
To configure a Voice mail key by phone interface:
1.
Press Menu →Features →Function Keys→Line or Memory keys as Function Keys →
Memory key1(for example).
2.
Select the targeted Line or Memory key.
3.
Press
4.
Enter the Value Number.
5.
Press
6.
Press
and
and
or press
or press
key to select the Voice mail in the type field.
key to select the Account ID.
or Save soft key to save the configuration
Note:
This feature is not available on all servers. For more information, contact your system
administrator.
Direct Pickup
With this feature, you can pick up the set line when it ringing.
To configure Direct Pickup feature via phone interface
1. Press Menu →Features →Function Keys→Line or Memory keys as Function Keys →
Memory key1(for example)
2. Press
and
or press
key to select the Speed Dial in the type field.
3. Enter the value.
4. Press
or Save soft key to save the configuration
Then the selected Line or Memory key will work as Direct Pickup.
99
tiptel 3030 User Manual
To configure Direct Pickup feature via Web Interface
1. Click Function keys → Line or Memory key.
2. Select the wanted Line or Memory key and set as Direct Pickup.
3. Enter the pickup code and followed the desired phone number in the Value field.
4. Select the Account ID
to save the configuration.
5. Click the
Group Pickup
With this feature, you can pick up the specified group that you want incoming calls.
To configure the Pickup via phone interface
1. Press Menu →Features →Function Keys→Line or Memory keys as Function Keys →
Memory key1(for example)
2. Select the wanted Line or Memory key.
3. Press
and
or press
key to select the Group Pickup in the type field.
4. Enter pickup code and followed the desired group number
5. Press
or Save soft key to save the configuration
100
tiptel 3030 User Manual
To configure the Group Pick up via Web interface
1. Click Function keys → Line or Memory key.
2. Select the desired Line or Memory key and select Group Pickup in the Type.
3. Enter the pickup code and followed the desired Group number in the Value field.
to save the configuration.
4. Click the
Call Park
With this feature, you can put a call on hold and continue the conversation from another phone.
To configure the Call Park via phone interface
1. Press Menu →Features →Function Keys→Line or Memory keys as Function Keys →
Memory key1(for example)
2. Press
3. Press
and
or press Switch soft key to select the Call Park.
or Save soft key to save the configuration
101
tiptel 3030 User Manual
To configure the Call Park via Web interface
1. Click Function key → Line or Memory key.
2. Select the desired Line or Memory key and select call park in the Type.
3. Enter the call park code in the value field.
button to save the configuration.
4. Click the
Intercom
When use the intercom feature, you can quickly get access connect to the configured one.
To configure intercom feature via phone interface
1. Press Menu →Features →Function Keys→Line or Memory keys as Function Keys →
Memory key1(for example)
2. Press
and
or press
key to select the intercom in the type field.
3. Enter the intercom codes followed by desired number.
4. Press
or Save soft key to save the configuration
Then the selected Line or Memory key will work as intercom.
102
tiptel 3030 User Manual
To configure Intercom feature via Web Interface
1. Click Function keys → Line or Memory key.
2. Select the wanted Line or Memory key.
3. Enter intercom codes followed by desired number in the Value field.
4. Select the Account ID
5. Click the
button to save the configuration.
If you want to achieve the intercom feature, you must enable the “Allow Auto Answer By
Call-Info”
1. Click the account
2. Select the desired account from the pull-down list of Account in the Account field.
3. Click the advanced
4. Enable the “Allow Auto Answer By Call-Info”
5. Click the
button to save the configuration.
103
tiptel 3030 User Manual
Note:
This feature is not available on all servers. For more information, contact your system
administrator.
DTMF
When the key is configured as DTMF key, you are allowed to send out the desired DTMF number
during the conversation.
To use this feature, you should sure that the DTMF Tone is on.
To configure the DTMF via Web Interface
1. Click SettingPreference
2. Select On for Keypad DTMF Tone.
to save the configuration.
3. Click the
To configure the DTMF via Phone Interface
1. Press Menu →Features →Function Keys→Line or Memory keys as Function Keys →
Memory key1(for example)
2. Select the wanted Line or Memory key.
3. Press
and
or press
key to select the DTMF in the type field.
4. Enter the value with the Desired DTMF number
5. Press
or Save soft key to save the configuration
To configure the DTMF via Web interface
1. Click Function keys → Line or Memory key.
2. Select the desired Line or Memory key and select DTMF in the Type.
3. Fill the value with the Desired DTMF number.
104
tiptel 3030 User Manual
to save the configuration.
4. Click the
Prefix
If the key is configured as Prefix key, you can set the number prefix (e.g. Before the number plus
9), then you don't input 9, press the key and 9 will display on the LCD interface.
To configure the Prefix via Phone Interface
1. Press Menu →Features →Function Keys→Line or Memory keys as Function Keys →
Memory key1(for example)
2. Select the wanted Line or Memory key.
3. Press
and
or press
key to select the Prefix in the type field.
4. Enter the value with with number that you want to set as prefix
5. Press
or Save soft key to save the configuration
To configure the Prefix via Web interface
1. Click Function key → Line or Memory key.
2. Select the desired Line or Memory key and select Prefix in the Type.
3. Fill the value.
105
tiptel 3030 User Manual
to save the configuration.
4. Click the
Then when you press this key, the set value is input directly.
Local Group
When use the Local Group feature, press the key and enter the local Contacts interface quickly.
To configure the Local group via Phone Interface
1. Press Menu →Features →Function Keys→Memory keys as Function Keys → Memory
key1(for example)
2. Select the wanted Memory key.
3. Press
4. Press
and
or press
key to select the Local group in the type field.
or Save soft key to save the configuration
To configure the Local Group via Web interface
1. Click Function key → Memory Key.
2. Select the desired Key and select Local group in the Type.
106
tiptel 3030 User Manual
to save the configuration.
3. Click the
Then you can press the local group key to access the pre-defined contact group in the local
directory quickly.
XML Group
When use the XML Group feature, press the key and enter the Remote Contacts interface quickly.
To configure the XML group via Phone Interface
1. Press Menu →Features →Function Keys→Memory keys as Function Keys → Memory
key1(for example)
2. Select the wanted Memory key.
3. Press
4. Press
and
or press
key to select the XML group in the type field.
or Save soft key to save the configuration
To configure the XML Group via Web interface
1. Click Function key → Memory Key.
2. Select the desired Key and select XML group in the Type.
107
tiptel 3030 User Manual
to save the configuration.
3. Click the
LDAP
When use the LDAP feature, you can get the LDAP Phonebook directly.
To configure the LDAP via Phone Interface
1. Press Menu →Features →Function Keys→Memory keys as Function Keys → Memory
key1(for example)
2. Select the wanted Memory key.
3. Press
4. Press
and
or press
key to select the LDAP in the type field.
or Save soft key to save the configuration
To configure the LDAP via Web interface
1. Click Function key → Memory Key.
2. Select the desired Key and select LDAP in the Type.
3. Click the
to save the configuration.
108
tiptel 3030 User Manual
XML Browser
You can use this key feature to access the Xml browser quickly. The Xml browser allows you to
create custom services which meet your functional requirements on the server. You can customize
practical applications, such as weather report, stock information, Google search, etc.
To configure the XML Browser via Phone Interface
1. Press Menu →Features →Function Keys→Memory keys as Function Keys → Memory
key1(for example)
2. Select the wanted Memory key.
3. Press
and
or press
key to select the XML Browser in the type field.
4. Filled the access URL for xml browser
5. Press
or Save soft key to save the configuration
To configure the XML Browser via Web interface
1. Click Function key → Memory Key.
2. Select the desired Key and select xml browser in the Type.
3. Filled the access URL for xml browser (e.g.http://192.168.0.240:8080/xmlbrowser/text.xml)
109
tiptel 3030 User Manual
button to save the configuration.
4. Click the
Broadsoft Group
When use the BroadSoft Group feature, press the key and enter the Remote Contacts interface
quickly.
To configure the Broadsoft group via Phone Interface
1. Press Menu →Features →Function Keys→Memory keys as Function Keys → Memory
key1(for example)
2. Select the wanted Memory key.
3. Press
4. Press
and
or press
key to select the Broadsoft group in the type field.
or Save soft key to save the configuration
To configure the Broadsoft group via Web interface
1. Click Function key → Memory Key.
2. Select the desired Key and select Broadsoft group in the Type.
3. Click the
button to save the configuration.
110
tiptel 3030 User Manual
Conference
The IP Phone supports up to 5-way conference. You are allowed to configure the programmable
key to be used as a conference key. This key works same as
.
To configure the Conference via Phone Interface
1. Press Menu →Features →Function Keys→Memory keys as Function Keys → Memory
key1(for example)
2. Select the wanted Memory key.
3. Press
4. Press
and
or press
key to select the Conference in the type field.
or Save soft key to save the configuration
To configure Conference via Web Interface
1. Click Function keys →Memory Key.
2. Select the desired Key and select Conference in the Type.
3. Click the
button to save the configuration.
Forward
If the key is configured as Forward key, press this key under the idle status, the IP phone will turn
to the Always Forward interface and you can set the Forward to number, then when there is any
call to the number will be forwarded to the set number automatically.
To configure the Forward via Phone Interface
1. Press Menu →Features →Function Keys→Memory keys as Function Keys → Memory
key1(for example)
2. Select the wanted Memory key.
3. Press
and
or press
key to select the Forward in the type field.
111
tiptel 3030 User Manual
4. Enter the Number that to forward.
5. Press
or Save soft key to save the configuration
To configure Forward via Web Interface
1.
Click Function keys →Memory Key.
2.
Select the desired Key and select Forward in the Type.
3.
Enter the Value with the number you want to forward
4.
Click the
button to save the configuration.
Transfer
You are able to configure the key as a transfer key to perform the Blind/Attended Transfer.
To configure the Transfer via Phone Interface
1. Press Menu →Features →Function Keys→Memory keys as Function Keys → Memory
key1(for example)
2. Select the wanted Memory key.
3. Press
and
or press
key to select the Transfer in the type field.
4. Enter the Number that transfer to
5. Press
or Save soft key to save the configuration
To configure Transfer via Web Interface
1. Click Function keys →Memory Key.
2. Select the desired Key and select Transfer in the Type.
3. Enter the Value with the number that wanted transfer to
4. Click the
button to save the configuration.
112
tiptel 3030 User Manual
Hold
The key can be configured as a hold key. You can use this key to hold and resume a call during the
conversation.
To configure the Hold via Phone Interface
1.
Press Menu →Features →Function Keys→Memory keys as Function Keys → Memory
key1(for example)
2.
Select the wanted Memory key.
3.
Press
4.
Press
and
or press
key to select the Hold in the type field.
or Save soft key to save the configuration
To configure Hold via Web Interface
1. Click Function keys →Memory Key.
2. Select the desired Key and select Hold in the Type.
button to save the configuration.
3. Click the
Group Listening
With this feature, when you active a call, you can listen using Handset and Free-speaker, but only
can use the handset to speak.
To configure the Group listenning via Phone Interface
1. Press Menu →Features →Function Keys→Memory keys as Function Keys → Memory
key1(for example)
2. Select the wanted Memory key.
3. Press
4. Press
and
or press
key to select the group listening in the type field.
or Save soft key to save the configuration
113
tiptel 3030 User Manual
To configure Group listening via Web Interface
1. Click Function keys →Memory Key.
2. Select the desired Key and select Group listening in the Type.
to save the configuration.
3. Click the
DND
If the key is configured as DND key, you are allowed to active the DND function immediately
when you press it and the phone is to reject all incoming calls automatically. Press it again to
deactivate DND mode.
To configure the DND via Phone Interface
1. Press Menu →Features →Function Keys→Memory keys as Function Keys → Memory
key1(for example)
2. Select the wanted Memory key.
3. Press
4. Press
and
key to select the DND in the type field.
or Save soft key to save the configuration
To configure DND via Web Interface
1. Click Function keys →Memory Key.
2. Select the desired Key and select DND in the Type.
3. Click the
button to save the configuration.
To enable DND feature
Press the DND soft key when the phone is idle status, and then DND icon shown on the LCD.
To disable DND feature
Press the DND soft key again, and then there is no DND icon on the LCD.
114
tiptel 3030 User Manual
Redial
If the key is configured as Redial key, you can redial the last placed call from the IP Phone.
To configure Redial via Web Interface
1. Click Function keys →Line key/Memory key
2. Select the desired Key and select redial in the Type.
3. Enter the Label displayed on LCD.
4. Click the
button to save the configuration.
SMS
Send SMS
To send SMS via web Interface
1. Click SettingSMS
2. Select the account(from which account the SMS sent)
3. Enter the target number
4. Input the content of SMS, and click Send.
115
tiptel 3030 User Manual
To send SMS via phone interface:
1. Click MenuMessageText MessageSet SMS
2. Enter the contents in the white field.
3. Press the save button
4. Select the account (from which account the SMS sent)
5. Enter the target number (to which account the number sent)
6. Press the Send button.
Set SMS Memory Key
To configure the SMS via Phone Interface
1. Press Menu →Features →Function Keys→Memory keys as Function Keys → Memory
key1(for example)
2. Select the wanted Memory key.
3. Press
4. Press
and
or press
key to select the SMS in the type field.
or Save soft key to save the configuration
To configure SMS via Web Interface
1. Click Function keys →Memory Key.
2. Select the desired Key and select SMS in the Type.
3. Click the
to save the configuration.
116
tiptel 3030 User Manual
Record
With record feature, you can record calls by pressing a record key on the phone.
To configure the record via phone interface
1. Press Menu →Features →Function Keys→Line or Memory keys as Function Keys →
Memory key1(for example)
2. Select the wanted Line or Memory key.
3. Press
4. Press
and
or press
key to select the Record.
or Save soft key to save the configuration
To configure the record via Web Interface
1. Click Function keys → Line or Memory key.
2. Select the desired Line or Memory key and select Record in the Type.
3. Click the
button to save the configuration.
Note:
Please contact the system administrator whether support this feature or not.
117
tiptel 3030 User Manual
URL Record
The phone sends HTTP URL request to trigger a recording. Contact your system administrator for
the predefined URL.
To configure the URL record via phone interface
1. Press Menu →Features →Function Keys→ Memory keys as Function Keys → Memory
key1(for example)
2. Select the wanted Line or Memory key.
3. Press
4. Press
and
or press
key to select the URL Record.
or Save soft key to save the configuration
To configure the record via Web Interface
1. Click Function keys → Memory key.
2. Select the desired Line or Memory key and select URL Record in the Type.
3. Click the
button to save the configuration.
Paging
With this feature, you can call a paging group directly.
To configure the paging via phone interface
1. Press Menu →Features →Function Keys→Memory keys as Function Keys → Memory
key1(for example)
2. Select the wanted Line or Memory key.
3. Press
and
or press
key to select the Paging.
4. Enter the paging code followed the number.
5. Press
or Save soft key to save the configuration
118
tiptel 3030 User Manual
To configure the Paging via Web interface
1. Click Function keys → Memory key.
2. Select the desired Memory key and select Paging in the Type.
3. Enter the paging code followed the number.
button to save the configuration.
4. Click the
Shared Line
This feature allows subscribers to share SIP lines. Moreover it also provides status monitoring of
the shared line.
To configure the line key as shared line via phone interface
1. Press Menu →Features →Function Keys→Line or Memory keys as Function Keys →
Memory key1(for example)
2. Select the wanted Line or Memory key.
3. Press
and
or press
key to select the Shared Line in the type field.
4. Press
and
or press
key to select the Account ID.
5. Enter the Label
6. Enter the Value
7. Press
or Save soft key to save the configuration
To configure the line key as shared line via Web Interface
1. Click Function keys → Line or Memory key.
2. Select the desired Line or Memory key and select Shared Line in the Type.
3. Enter the Value.
4. Enter the Label.
5. Select the Account ID
119
tiptel 3030 User Manual
button to save the configuration and then restart.
6. Click the
Note:
This feature is not available on all servers. For more information, contact your system
administrator.
Public Hold
The key can be configured as a public hold key. During a conversation, all members belonging to
that particular SLA group can use this key to hold or resume a call.
To configure the Public hold via phone interface
1. Press Menu →Features →Function Keys→Line or Memory keys as Function Keys →
Memory key1(for example)
2. Select the wanted Line or Memory key.
3. Press
4. Press
and
or press
key to select the Public Hold.
or Save soft key to save the configuration
To configure public hold via Web Interface
1.
Click Function keys →Memory Key.
2.
Select the desired Key and select public hold in the Type.
3.
Click the
button to save the configuration.
120
tiptel 3030 User Manual
Private Hold
The key can be configured as a private hold key. During a conversation, all members belonging to
that particular SLA group can use this key to hold the call, but only the initiator can resume the
call.
To configure the Private hold via phone interface
1. Press Menu →Features →Function Keys→Line or Memory keys as Function Keys →
Memory key1(for example)
2. Select the wanted Line or Memory key.
3. Press
4. Press
and
or press
key to select the Private Hold.
or Save soft key to save the configuration
To configure private hold via Web Interface
1.
Click Function keys →Memory Key.
2.
Select the desired Key and select Private hold in the Type.
3.
Click the
button to save the configuration.
121
tiptel 3030 User Manual
Share line
Shared line is configured by assigning the same extension number to multiple lines. You can use
the shared line feature to share an extension number which is used on two or more IP phones at the
same time. An incoming call to that number will cause all phones to ring simultaneously. The
incoming call can be answered on one of the phones but not all of them. This feature is very useful
in the boss and secretary scenario. For example, the secretary can share the boss' extension
number on her phone. When there is an incoming call to the extension number of the boss, both
the phones of the boss and the secretary will ring simultaneously. Either the boss or the secretary
can answer the call. Calls on shared line can be placed on hold or barged in.
To configure the share line via phone interface
1.
Press Menu →Features →Function Keys→Line or Memory keys as Function Keys →
Memory key1(for example)
2.
Select the wanted Line or Memory key.
3.
Press
4.
Enter the number in the value field.
5.
Select the desired account in the Account field.
6.
Press
and
or press
key to select the share line.
or Save soft key to save the configuration
122
tiptel 3030 User Manual
To configure the share line feature via web interface:
1.
Click Function keys →Memory Key.
2.
Select the desired Key and select share line in the Type.
3.
Enter the number in the value field.
4.
Select the desired account from the pull-down list of Account field.
5.
Click the
button to save the configuration.
Note:
This feature is not available on all servers. For more information, contact your system
administrator.
Hot Desking (Pending)
Hot Desking originates from the definition of being the temporary physical occupant of a work
station or surface by a particular employee. A primary motivation for Hot Desking is cost
reduction. This feature is regularly used in places where not all the employees are in the office at
the same time, or not in the office for very long at all, which means actual personal offices would
be often vacant, consuming valuable space and resources.
You can use Hot Desking on the IP phone to logout the existing accounts and then log in a new
account, that is, many users can share the phone resource in different time. To use this feature, you
need to configure a Hot Desking key in advance.
To configure the hot desking via phone interface
1.
Press Menu →Features →Function Keys→Line or Memory keys as Function Keys →
Memory key1(for example)
2.
Select the wanted Line or Memory key.
3.
Press
4.
Enter the number in the value field.
5.
Select the desired account in the Account field.
6.
Press
and
or press
key to select the hot desking.
or Save soft key to save the configuration
123
tiptel 3030 User Manual
To configure the hot desking via web interface:
1.
Click Function keys →Memory Key.
2.
Select the desired Key and select hot desking in the Type.
3.
Enter the number in the value field.
4.
Select the desired account from the pull-down list of Account field.
5.
Click the
button to save the configuration.
6.
Note:
This feature is not available on all servers. For more information, contact your system
administrator.
ACD (Pending)
ACD feature is often used in offices for customer service, such as call center. The ACD system
handles large volumes of incoming calls from callers who have no need to talk to a specific person
but who require assistance from any of multiple persons at the earliest opportunity. The ACD
feature on the IP Phone allows the ACD system to distribute calls from large volumes of incoming
calls to the registered IP phone users. To use this feature, you should configure an ACD key in
advance.
To configure the ACD via phone interface
1.
Press Menu →Features →Function Keys→Line or Memory keys as Function Keys →
Memory key1(for example)
2.
Select the wanted Line or Memory key.
3.
Press
4.
Enter the label in the label field.
5.
Select the desired account in the Account field.
6.
Press
and
or press
key to select the ACD.
or Save soft key to save the configuration
124
tiptel 3030 User Manual
To configure the ACD via web interface:
1.
Click Function keys →Memory Key.
2.
Select the desired Key and select ACD in the Type.
3.
Enter the label in the label field.
4.
Select the desired account from the pull-down list of Account field.
5.
Click the
button to save the configuration.
6.
Note:
This feature is not available on all servers. For more information, contact your system
administrator.
Zero Touch (Pending)
You can use this key feature to configure auto provision and network parameters quickly.
To configure the zero touch via phone interface
1.
Press Menu →Features →Function Keys→Line or Memory keys as Function Keys →
Memory key1(for example)
2.
Select the wanted Line or Memory key.
3.
Press
4.
Press
and
or press
key to select the zero touch
or Save soft key to save the configuration
To configure the zero touch via web interface:
1.
Click Function keys →Memory Key.
2.
Select the desired Key and select zero touch in the Type.
3.
Click the
button to save the configuration.
125
tiptel 3030 User Manual
Note:
This feature is not available on all servers. For more information, contact your system
administrator.
Factory Reset
To set Factory Reset by phone interface
1. Press Menu → Setting → Advanced Setting( default password: admin)→ Factory Reset
2. Press OK soft key in the warning page.
To set Factory Reset via web interface
Click Management → Upgrade
Click
and then confirm the setting.
126
tiptel 3030 User Manual
Configuration File
To download configuration file:
1. Click Management Configuration Download Device Configuration
2. Then you can get a file: cfg.bin or cfg.xml
To Restore a configuration file:
1. Click Management Configuration Restore configuration
,
2. Select the xxx.bin or xxx.xml file, and then Click the
then IP Phone will reboot.
127
tiptel 3030 User Manual
128
tiptel 3030 User Manual
Appendix
Warranty
Your point of contact for warranty obligation benefits is the specialist retailer where you acquired
your device. Warranty conditions are based upon the legal regulations of the country in which the
device was purchased. Your specialist retailer will be glad to provide more information.
Guarantee
Tiptel provides a voluntary guarantee on the device, the conditions of which are published on
http://www.tiptel.com. The guarantee conditions applicable at the time of purchase apply. The
original sales slip (receipt, bill) with serial number and/or IMEI number is used as proof of
purchase. Please keep these documents in a safe place.
Declaration of conformity
This device satisfies the requirements of the EU directive on radio and telecommunication
terminal equipment and the mutual recognition of their conformity. The CE mark on the device
confirms conformity with the above directive.
We hereby declare that the device satisfies all fundamental requirements of European directives.
For details on the declaration of conformity please visit http://www.tiptel.com.
Disposal
Packaging: Dispose of card and cardboard boxes in the used paper container and throw plastic
parts into a recycling container.
Device disposal: Used electrical devices should not be disposed of in the household waste.
Dispose of the device at your local collection points (scrap or recycling yards). Please contact your
local authority for information on disposal sites.
129
Tiptel.com GmbH
Business Solutions
Halskestraße 1
40880 Ratingen
Deutschland
Tel.: 0900 100–84 78 35*
Vanity Tel.: 0900 100–TIPTEL*
Internet: www.tiptel.de
E-Mail: [email protected]
International: www.tiptel.com
Tiptel GmbH
Ricoweg 30/B1
2351 Wiener Neudorf
Österreich
Tel.: 02236 677 464-0
Fax: 02236 677 464-22
E-Mail: [email protected]
Internet: www.tiptel.at
*(1,49 Euro/Min. aus dem Festnetz der Deutschen Telekom,
abweichende Mobilfunkpreise möglich)
Tiptel AG
Bahnstrasse 46
8105 Regensdorf
Schweiz/Suisse/Svizzera
Tel.: 044 843 13 13
Fax: 044 843 13 23
E-Mail: [email protected]
Internet: www.tiptel-online.ch
Tiptel B.V.
Camerastraat 2
1322 BC Almere
Nederlands
Telefoon: 036 53 666 50
Fax: 036 53 678 81
e-mail: [email protected]
Internet: www.tiptel.nl
Tiptel NV/SA
Imperiastraat 10 B8
1930 Zaventem
Belgique/België
Tel.: 02 714 93 33
Fax: 02 714 93 34
E-Mail: [email protected]
Internet: www.tiptel.be
Tiptel s.a.r.l.
23, avenue René Duguay-Trouin
78960 Voisins-le-Bretonneux
France
Tél.: 01 39 44 63 30
Fax: 01 30 57 00 29
e-mail: [email protected]
Internet: www.tiptel.fr
(en) 03/2015