1
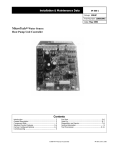
Installation Manual IM 660-4 Group: Controls Part Number: IM 660 Date: June 2012 Supersedes: IM 660-3 MicroTech 2000® Water Source Heat Pump Unit Controller NOTICE Use this manual to physically install the unit controller and connect it to your network. Use the appropriate Daikin Engineering Data (ED), known as the Protocol Information document, to integrate the unit into your network. The Protocol Information document contains addressing details and a list of the data points available to the network. See the Reference Documents section of this manual for Protocol Information document numbers. MicroTech 2000 control integration literature is available at www.DaikinApplied.com. Table of Contents Table of Contents.................................................................................................................. 2 Figures................................................................................................................................................... 3 Revision History.................................................................................................................................... 4 Reference Documents ........................................................................................................................... 4 Limited Warranty .................................................................................................................................. 4 General Information .............................................................................................................. 5 Description............................................................................................................................................ 5 1. LONMARK 3.3 Certified Unit Controllers .................................................................................. 6 Component Data.................................................................................................................................... 6 Unit Controller Microprocessor ........................................................................................................ 6 Yellow Status LED............................................................................................................................ 6 Service Pin ........................................................................................................................................ 6 Red Service LED............................................................................................................................... 6 Temperature Sensing......................................................................................................................... 7 Auxiliary Board Components............................................................................................................ 8 Installation ............................................................................................................................. 9 Installing a MicroTech 2000 Unit Controller........................................................................................ 9 The following steps describe how to field install a new MicroTech 2000 unit controller................. 9 Tools Required.................................................................................................................................. 9 Installation Procedure........................................................................................................................ 9 Replacing a MicroTech 2000 WSHP Unit Controller......................................................................... 10 Tools Required................................................................................................................................ 10 Replacing a MicroTech 2000 WSHP Auxiliary Board ....................................................................... 11 Network Commissioning .................................................................................................... 12 Connecting to the Network.................................................................................................................. 12 LONWORKS Network Addressing.................................................................................................... 12 Commissioning the MicroTech 2000 LonMark Unit Controller ......................................................... 13 External Interface File (XIF) and NXE Files .................................................................................. 13 Commissioning the MicroTech 2000 LonWorks Unit Controller ....................................................... 13 MicroTech 2000 Network Parameters ............................................................................... 15 Configurable Relay Outputs ................................................................................................................ 15 Communications Failure (LONMARK 3.3):................................................................................... 17 Communications Failure (LONWORKS): ..................................................................................... 17 Wall-Mounted Sensor ..................................................................................................................... 17 Remote Room Set Point Adjustment............................................................................................... 18 Tenant Override .............................................................................................................................. 18 Diagnostic Services ............................................................................................................ 19 Unit Identification (Wink) Command ................................................................................................. 19 Alarm Monitoring and Control............................................................................................................ 19 Clearing Faults .................................................................................................................................... 19 Alarm Fault Descriptions .................................................................................................................... 19 High Pressure Fault ............................................................................................................................. 20 Symptoms (as applicable) ............................................................................................................... 20 Low Temperature Fault....................................................................................................................... 20 Symptoms........................................................................................................................................ 20 Low Pressure Faults ............................................................................................................................ 20 Symptoms........................................................................................................................................ 21 Condensate Overflow Fault................................................................................................................. 21 Symptoms........................................................................................................................................ 21 Brownout Fault.................................................................................................................................... 21 Symptoms (as applicable) ............................................................................................................... 21 Change Filter Notification (Network Units Only) ............................................................................... 21 Symptoms........................................................................................................................................ 21 Service and Troubleshooting ............................................................................................ 22 2 IM 660-4 Inputs and Outputs .............................................................................................................................. 22 Analog Inputs .................................................................................................................................. 22 Digital Inputs................................................................................................................................... 22 Digital Outputs ................................................................................................................................ 22 Input/Output Table .......................................................................................................................... 23 General Troubleshooting..................................................................................................................... 24 Microprocessor Problems................................................................................................................ 24 Power Supply Problems .................................................................................................................. 24 Erroneous Temperature Readings ................................................................................................... 24 Digital Input Faults.......................................................................................................................... 25 Brownout Fault................................................................................................................................ 26 Parts List ............................................................................................................................................. 26 Field-Installed Kits .......................................................................................................................... 26 Figures Figure 1. MicroTech 2000 Unit Controller Major Components............................................................ 7 Figure 2. MicroTech 2000 Auxiliary Controller Major Components................................................... 8 Figure 3. Inserting the MicroTech 2000 Board into the Control Panel .............................................. 10 Figure 4. First Control Signal Output.................................................................................................. 16 Figure 5. Second Control Signal Output ............................................................................................. 16 Figure 6. Third Control Signal Output ................................................................................................ 17 Figure 7. Fourth Control Signal Output............................................................................................... 17 Figure 8. Wall-Mounted Temperature Sensor Wiring......................................................................... 18 Figure 9. Maximum Wire Length to Sensors...................................................................................... 18 Figure 10. Alarm and Fault Code Summary....................................................................................... 20 3 IM 660-4 Revision History IM 660-4 June 2012 Updated Daikin logo and associated references. Drawing and replacement part number updates for new hardware design. Reference Documents Number lM 407 lM 439 IM 447 lM 494 lM 526 lM 544 lM 656 IM 742 IM 778 IM 660 Company Daikin Daikin Daikin Daikin Daikin Daikin Daikin Daikin Daikin Daikin ED 15054 8000_51 Daikin LonMark Interoperability Association Title Vertical WSHP(007 to 060) Large Vertical WSHP (070 to 290) Console Units WSHP WMH/CWH (007 to 019) Horizontal WSHP (007 to 120) CCH/HWH (006 to 060)* Horizontal WSHP (019 to 060) Enfinity Horizontal WSHP (007 to 060) Enfinity Vertical WSHP (007 to 060) MicroTech 2000 WSHP Unit Controller Installation Manual MicroTech 2000 WSHP Protocol Document LonMark Functional Profile: Heat Pump Source www.DaikinApplied.com www.DaikinApplied.com www.DaikinApplied.com www.DaikinApplied.com www.DaikinApplied.com www.DaikinApplied.com www.DaikinApplied.com www.DaikinApplied.com www.DaikinApplied.com www.DaikinApplied.com www.DaikinApplied.com www.lonmark.org Limited Warranty Consult your local Daikin epresentative for warranty details. Refer to Form 933-43285Y. To find your local Daikin Representative, go to www.DaikinApplied .com. Notice © 2013 Daikin Applied, Minneapolis MN. All rights reserved throughout the world. Daikin reserves the right to change any information contained herein without prior notice. The user is responsible for determining whether this product is appropriate for his or her application. The following are trademarks or registered trademarks of their respective companies: Echelon, LonWorks, LonMark, and LonTalk from Echelon Corporation, Windows from Microsoft Corporation, Daikin, and MicroTech 2000. 4 IM 660-4 General Information This manual provides information about the MicroTech 2000™ Water Source Heat Pump (WSHP) unit controller with LONMARK® or LONWORKS® communication capability. The manual describes the controller’s components, input/output configurations, and service procedures. For network installation or commissioning instructions for new projects, refer to the protocol information document ED 15054. For general information on a particular WSHP unit, refer to the model-specific installation manual (see Reference Documents section.) ! DANGER Dangers indicate a hazardous situation that will result in death or serious injury if not avoided. ! WARNING Warnings indicate potentially hazardous situations, which can result in property damage, severe personal injury, or death if not avoided. ! CAUTION Cautions indicate potentially hazardous situations, which can result in personal injury or equipment damage if not avoided. ! WARNING Electric shock hazard. Can cause personal injury or equipment damage. This equipment must be properly grounded. Connections and service to the MicroTech III Chiller Unit Controller must be performed only by personnel knowledgeable in the operation of the equipment being controlled. ! CAUTION Static sensitive components. Can cause equipment damage. Discharge any static electrical charge by touching the bare metal inside the control panel before performing any service work. Never unplug cables, circuit board terminal blocks, or power plugs while power is applied to the panel. NOTICE This equipment generates, uses and can radiate radio frequency energy and, if not installed and used in accordance with this instruction manual, may cause interference to radio communications. It has been tested and found to comply with the limits for a Class A digital device, pursuant to part 15 of the FCC rules. These limits are designed to provide reasonable protection against harmful interference when the equipment is operated in a commercial environment. Operation of this equipment in a residential area is likely to cause harmful interference in which case the user will be required to correct the interference at his or her own expense. Daikin disclaims any liability resulting from any interference or for the correction thereof. Description The MicroTech 2000™ WSHP unit controller provides control of water source heat pumps. The controller enables the mode of operation, monitors the water and air temperatures, and indicates fault conditions. Each unit controller is loaded with the application software and is tested for effective operation of the MicroTech 2000 WSHP unit controller. The MicroTech 2000 WSHP controller is capable of communicating to a building automation system (BAS) of your choice using LONWORKS technology. 5 IM 660-4 Note: There are two versions of LONWORKS communication available on the WSHP unit controller. The LONWORKS software is downloaded at the factory, so it is important to determine which version is required when placing the order for field-installed MicroTech 2000 WSHP unit controller. Please contact the WSHP technical support group at 315-282-6240 for assistance, if necessary. 1. LONMARK 3.3 Certified Unit Controllers MicroTech 2000 unit controllers with LONMARK application code are used with stand-alone WSHPs or for units that are connected to a Building Automation System (BAS). For network integration information, refer to the Protocol Information document ED 15054. ® 2. LONWORKS (LonTalk ) Unit Controllers MicroTech 2000 unit controllers with LONWORKS (i.e. using the LonTalk protocol) were designed prior to LonMark certification. Use this application software only in existing systems where an existing MicroTech Communications Gateway (MCG) or MicroTech Communications Gateway for Open Protocol (MCGOP) panel is installed. Component Data Unit Controller Microprocessor The MicroTech 2000 WSHP unit controller is a preprogrammed microprocessor containing the software required to monitor and control the unit. The controller supports a minimum of six analog inputs, four digital inputs and five digital outputs (including the LED). All electrical connections to the board are provided by three mass termination style headers. Two of the headers are designated strictly for factory wiring, the other for a field wiring harness that terminates to a screw-type terminal strip on the unit’s exterior. The controller uses set points and fixed preprogrammed parameters to maintain unit control (many of the set points and preprogrammed parameters can be adjusted with a PC over the network). Yellow Status LED A yellow, on-board status LED aids in diagnostics by indicating the water source heat pump operating mode and alarm conditions. The yellow LED indicates the unit operating mode as shown in Table 1. For more information on alarms, refer to the “Alarm monitoring and control” section. A remote status LED is provided with all optional wall-mounted temperature sensor packages. It has the same function as the on-board status LED. If used, the remote LED connects to the MicroTech WSHP controller at connection #1 on Terminal Board #1. Service Pin The service pin is used for network commissioning. A service pin is a button located on the unit ® controller that, when pressed, causes the Neuron chip to broadcast a message over the LONWORKS network containing its unique 48-bit Neuron ID. This ID identifies the device during network commissioning. Red Service LED A red on-board service LED provides diagnostics by indicating the Neuron chip status. The red LED indicates the Neuron chip status as shown in Table 2 below. 6 IM 660-4 Temperature Sensing The MicroTech 2000 WSHP unit controller uses negative temperature coefficient (NTC) thermistors for temperature sensing. A thermistor chart, which provides voltage-to-temperature and resistance-totemperature conversion data, is included in Table 9. The discharge air temperature sensor is located at the inlet to the fan. The leaving water temperature sensor is located in the leaving water line. Table 1. Status LED Description Status LED status Mode On continually On 0.5 sec, Off 5.5 sec On 5.5 sec, Off 0.5 sec On 0.1 sec, Off 0.1 sec Occupied, Occupied Load Shed Unoccupied Tenant Override, Override Load Shed Alarm Condition (Condensate Overflow, Brownout, Compressor Fault) Service LED status Off continually On continually Blink slowly Mode (Normal) The Neuron has an application and is configured. The Neuron does not have an application or is damaged. (Downloading an application may correct this.) The Neuron has an application but is unconfigured. Table 2. Service LED Description Figure 1. MicroTech 2000 Unit Controller Major Components 24 VAC COM Status LED Service LED Service Pin Button FT-X1 Transceiver 7 Microprocessor IM 660-4 Auxiliary Board Components The MicroTech 2000 WSHP controller provides one relay output that can be configured for the following four options: • • • • Boilerless system (skin heat) relay Motorized water valve relay Fresh air damper relay Timed output relay (LONWORKS only) These options can affect installation requirements and unit control. If more than one configurable relay output option is required, the MicroTech 2000 WSHP auxiliary board is required to provide the three additional outputs. The MicroTech 2000 WSHP auxiliary board typically is factory mounted only in 2compressor-circuit WSHP units. See Figure 2 for important features. Figure 2. MicroTech 2000 Auxiliary Controller Major Components 24 VAC COM Power LED 8 IM 660-4 Installation The following section describes how to field install a new MicroTech 2000 WSHP unit controller or replace an existing unit controller. Installing a MicroTech 2000 Unit Controller The following steps describe how to field install a new MicroTech 2000 unit controller. ! DANGER The terminals on the Water Source Heat Pump unit controller are high voltage. Disconnect power to avoid electrical shock potential, which will result in death or serious injury if not avoided. Tools Required • • • Pan head screwdriver Self-retaining nylon spacers (included with kit) #6 pan head screws (included with kit) Installation Procedure 1. 2. 3. 4. 5. 6. 7. Disconnect power from the unit controller. Insert the tapered tabbed portion of the board into the matching slot that has been cut into the sheet metal at the rear of the control box cabinet (see Figure 3.) Secure the board at the front end by means of a self-retaining nylon spacer (provided). Insert #6 pan head screws (provided) through the spacers and tighten them using the screwdriver. Plug the female connectors to the board-mounted male plugs. Re-apply power to the unit controller. Check the status LED and operating mode changeover devices. The Status LED should illuminate 30 to 40 seconds after power-up (see Figure 1.) • 8. 9 If a wall sensor package is used, the remote status LED should also illuminate. Check the Power LED for auxiliary board (if present). See Figure 2. Verify that WSHP is functioning according to the specified sequence of operation (see OM 128 for details). IM 660-4 Factory Header 1 Figure 3. Inserting the MicroTech 2000 Board into the Control Panel Field Header 1 1 1 Rear Factory Header 2 Front 1 Top View Side View Replacing a MicroTech 2000 WSHP Unit Controller Data relating to the water source heat pump controller configuration and characteristics are stored at the factory when each unit is built and tested. If a WSHP controller must be replaced, its unit-specific software (described previously) must be loaded into the replacement controller at the factory. To do this, the following information is required: • Full model number • Serial number • Software version of application (LONMARK or LONWORKS) loaded in the controller The unit model and serial numbers are listed on the unit data-plate. The date code and software version of code are printed on the MicroTech 2000 unit controller adhesive-backed label. This information must be included with the replacement WSHP controller part order. The following steps describe how to field install a new MicroTech 2000 unit controller. Tools Required • • • Pan head screwdriver Self-retaining nylon spacers (included with kit) #6 pan head screws (included with kit) ! DANGER The terminals on the Water Source Heat Pump unit controller are high voltage. Disconnect power to avoid electrical shock potential, which will result in death or serious injury if not avoided. 10 IM 660-4 1. 2. 3. 4. 5. 6. 7. 8. 9. 10. 11. 12. 13. Disconnect power from the unit controller. Unplug the wired female connectors from the board-mounted male plugs. Remove the screws from the spacers using a pan head screwdriver. Remove the existing unit controller by removing the nylon spacers and then placing them on a static protected surface. Remove the MicroTech 2000 replacement board from its static-protected bag. Insert the tapered tabbed portion of the board into the matching slot that has been cut into the sheet metal at the rear of the control box cabinet. See Figure 3. Secure the board at the front end by means of a self-retaining nylon spacer (provided). Insert #6 pan head screws (provided) through the spacers and tighten them using the screwdriver. Plug the female connectors to the board-mounted male plugs. Re-apply power to the unit controller. Check the status LED and operating mode changeover devices. The Status LED should illuminate 30 to 40 seconds after power-up. See Figure 1. If a wall sensor package is used, the remote status LED should also illuminate. Check the Power LED for auxiliary board (if present). See Figure 2. Verify that WSHP is functioning according to the specified sequence of operation (see OM 128 for details). Replacing a MicroTech 2000 WSHP Auxiliary Board Follow the steps below to remove an existing MicroTech 2000 auxiliary board attached to the unit controller and install a replacement auxiliary board. ! DANGER The terminals on the Water Source Heat Pump unit controller are high voltage. Disconnect power to avoid electrical shock potential, which will result in death or serious injury if not avoided. 1. 2. 3. 4. 5. 6. 7. 8. 9. 11 Disconnect power from the unit controller. Unplug the wired female connectors from the board-mounted male plugs. Gently pull the auxiliary board from the TR3 snap-track mounted outside unit the control box. Remove the replacement auxiliary board from the static-protected bag. Insert the auxiliary board on the TR3 snap-track. Plug the female connectors to the board-mounted male plugs. Re-apply power to the unit controller. Confirm that the auxiliary board’s Power LED is illuminated (see Figure 2.) Verify that WSHP is functioning according to the specified sequence of operation (see OM 128 for details). IM 660-4 Network Commissioning The commissioning procedure for a MicroTech 2000 Water Source Heat Pump unit controller differs depending on whether it is a LonMark or LonWorks application. This section identifies the commissioning process for each version. Units running in stand-alone mode (i.e. not connected to a BAS, MicroTech gateway panel (MCG), or other LonWorks-supported device) do not require commissioning. Note: The commissioning procedure must be performed in addition to the mechanical and electrical system commissioning procedures outlined in the model-specific installation literature (see Reference Documents section). Before applying power to any unit, closely follow the prestart procedures in the model-specific installation literature. ! CAUTION Electrostatic discharge hazard. Can cause equipment damage. This equipment contains sensitive electronic components that may be damaged by electrostatic discharge from your hands. Before you handle a communications module, you need to touch a grounded object, such as the metal enclosure, in order to discharge the electrostatic potential in your body. Connecting to the Network Each MicroTech 2000 unit controller is equipped with an FT-X1 or FTT-10A transceiver for network communications. This transceiver allows for (1) free topology network wiring schemes using twisted pair (unshielded) cable and (2) polarity insensitive connections at each node. Free topology segments require termination for proper transmission performance. The MicroTech 2000 unit controller with the LonMark 3.3 application conforms to the Water Source Heat Pump with Space Comfort Control (SCC) profile as defined by the LonMark organization. The required integration files (XIF/NXE) are available from www.lonmark.org (see “External Interface File (XIF) and NXE Files” section below for details.) LONWORKS Network Addressing Every Neuron Chip has a unique 48-bit Neuron ID or physical address. This address is generally used only at initial installation or for diagnostic purposes. For normal network operation, a device address is used. Device addresses are defined at the time of network configuration. All device addresses have three parts. The first part is the Domain ID, designating the domain. Devices must be in the same domain in order to communicate with each other. The second part is the Subnet ID that specifies a collection of up to 127 devices that are on a single channel or a set of channels connected by repeaters. There may be up to 255 subnets in a domain. The third part is the Node ID that identifies an individual device within the subnet. A group is a logical collection of devices within a domain. Groups are assembled with regard for their physical location in the domain. There may be up to 256 groups in a domain. A group address is the address that identifies all devices of the group. There may be any number of devices in a group when unacknowledged messaging is used. Groups are limited to 64 devices if acknowledged messaging is used. A broadcast address identifies all devices within a subnet or domain. 12 IM 660-4 Refer to Echelon Corporation’s Transceiver User’s Guide for details regarding acceptable configurations, cabling requirements, terminations, and other requirements for proper connection of the unit to the LONWORKS network (www.echelon.org.) Commissioning the MicroTech 2000 LonMark Unit Controller ! WARNING Electric shock hazard. Can cause personal injury or equipment damage. This equipment must be properly grounded. Connections and service to the Unit Controller must be performed only by personnel knowledgeable in the operation of the equipment being controlled. Once the MicroTech 2000 LonMark WSHP unit controller is installed properly in the control panel, it can be integrated into a Building Automation System (BAS). 1. Apply power to the unit. Turn the main power switch to ON. 2. Check the Status LED and operating mode changeover devices. The status LED should illuminate 30 to 40 seconds after power-up. 3. If a wall sensor package is used, the remote status LED should also illuminate. 4. Verify that the WSHP is functioning according to its sequence of operation (see OM 128 for details.) 5. Press the service pin button on the unit controller (see Figure 1). Doing so generates a service-pin message, which is broadcast on the network and contains the Neuron ID and the program code identification of the node. Next, use a LONWORKS network configuration tool, such as Echelon LonMaker®, to map the device Neuron ID to the domain/subnet/node logical addressing scheme when it creates the network image, the logical network addresses and connection information. Download XIF/NXE files from www.lonmark.org. See section directly below for additional details. 6. 7. External Interface File (XIF) and NXE Files LONMARK guidelines specify exact documentation rules so that proprietary configuration tools are not required to commission and configure LONWORKS devices. The MicroTech 2000 unit controller is selfdocumenting so that any LONWORKS network management tool can obtain all the information needed over the network to connect it into the system and to configure and manage it. An external interface file (a specially formatted PC text file with the extension .XIF) is required, along with LONWORKS network management tool, so that you can design and configure the network prior to commissioning the unit controller. The NXE file contains the application image that is downloaded into the MicroTech 2000 unit controller. The XIF and NXE files are available at www.lonmark.org. Refer to MicroTech 2000 WSHP Unit Controller Protocol Information, ED 15054 for additional details. Commissioning the MicroTech 2000 LonWorks Unit Controller ! WARNING Electric shock hazard. Can cause personal injury or equipment damage. This equipment must be properly grounded. Connections and service to the Unit Controller must be performed only by personnel knowledgeable in the operation of the equipment being controlled. Once the MicroTech 2000 LonWorks WSHP unit controller is installed properly in the control panel, it can be integrated into an existing network of MicroTech 2000 WSHP units that are connected to a MicroTech gateway panel (MCG). 13 IM 660-4 Tools The following tools may be required to properly commission a MicroTech 2000 LonWorks unit controller: • PC equipped with Monitor™ software (for LonWorks network integration to a BAS from an existing MicroTech network) • Program-specific sequence of operation bulletin • MicroTech Monitor Program User’s Manual (if PC is used) Follow the steps below to enable WSHP communication to a MicroTech network. 1. Perform Field Wiring Check. A unit wiring diagram is provided with each unit, along with a model-specific Installation and Maintenance Guide. Before the commissioning process begins, thoroughly check the electrical installation. 2. Verify Wall Sensor Packages: 3. a. Check that the cable is twisted and shielded with drain wire (Belden 8729 or equivalent). Check that four conductors are available. b. Check that the conductors are terminated at the unit and at the wall sensor package to screw terminal board #1 in accordance with the field wiring diagram, on which terminals are clearly labeled. Terminal 4 is used for both the room sensor common and the shield wire. c. Check the cable length between the wall sensor package and its water source heat pump controller. Confirm Network Communication to MicroTech Gateway Panel (if applicable.) a. Check that the cable is a twisted, unshielded pair of copper strand conductors. b. Check that the conductors are terminated properly. c. Check that the conductors are terminated at the MicroTech gateway panel according to the field wiring diagram supplied with the panel. 4. Note setpoint values before any changes are made over the network. The WSHP setpoint values are held in memory and can be modified only over the MicroTech network. 5. Apply power to the unit. Turn the main power switch to ON. 6. Check the Status LED and operating mode changeover devices. The status LED should illuminate 30 to 40 seconds after power-up. a. If a wall sensor package is used, the remote status LED should also illuminate. 7. Verify that the WSHP is functioning according to its sequence of operation (see OM 128 for details.) 8. Refer to the MicroTech Communications Gateway (MCG) Installation Manual, IM 661 for further commissioning details. The service pin must be pressed at a specific time, depending on which of the four commissioning methods is used. 14 IM 660-4 MicroTech 2000 Network Parameters Control sequencing, stop/start, equipment protection monitoring, and fault resets can be accomplished through a network connection. The following unique values and parameters can be accessed for each unit (refer to Protocol Document ED15054 for more information): • Return air and discharge air temperatures • Compressor, fan and reversing valve status • High pressure, low temperature, brownout and drain pan status • Occupied and unoccupied heat and cool set points • Auto/manual and occupied/unoccupied fan control • Mode, fault, system, schedule and set point operation • Compressor starts and fan run hours • Load shed level (LONWORKS only) • Tenant override status In addition, the following unique operation and maintenance parameters can display for each unit: • Leaving water temperature • Return air temperature set point (wall sensor adjustment) • Adaptive optimal start (LONWORKS only) • Occupied/unoccupied (on/cycle) fan mode • Room temperature warning • Filter changes from fan hours • Compressor management: on/off differential, minimum off time, minimum on time Configurable Relay Outputs The MicroTech 2000 WSHP controller provides one relay output that can be configured for the following four options: • • • • Boilerless system (skin heat) relay Motorized water valve relay Fresh air damper relay Timed output relay (LONWORKS only) These options can affect installation requirements and unit control. If more than one configurable relay output option is required, the MicroTech 2000 WSHP auxiliary board is required to provide the three additional outputs. The MicroTech 2000 WSHP auxiliary board typically is factory mounted only in 2compressor-circuit WSHP units. Only three relay outputs are available for use as configurable relay outputs in 2-circuit WSHP units. See Figures 4-7 for terminal locations and outputs. All configurable relay outputs are set to “no function” by default and must be field configured. A description of the four relay options follows. Boilerless System/Auxiliary Heat Relay (LONWORKS only) The relay receives loop water temperature input from the MicroTech Loop Water Controller through the gateway panel and provides relay output to electric heat on a call for heat after loop temperature falls. 15 IM 660-4 Boilerless System/Auxiliary Heat Relay (LONMARK only) The relay output energizes when the space temperature reaches the heating set point and de-energizes when the space temperature exceeds the heating set point plus a configurable differential set point (defaulted to 3°F). Motorized Valve Relay The relay provides output to the motorized valve to shut off water through the unit when the compressor is not operating. Fresh Air Damper Relay The relay provides output to the open damper whenever the fan is operating in the occupied cycle. Timed Output Relay (LONWORKS only) The relay provides output to an auxiliary load to control its operation based on a specific time schedule different from that of the heat pump unit. Figure 4. First Control Signal Output Figure 5. Second Control Signal Output 16 IM 660-4 Figure 6. Third Control Signal Output Figure 7. Fourth Control Signal Output Communications Failure (LONMARK 3.3): If the network link fails for any reason (for example, communication is lost between the WSHP and a networked room sensor, or the WSHP and the BAS), the affected WSHP controller remains operational. The status of its heating and cooling set points as well as its occupancy and other network adjustable settings depends upon how the BAS is implementing the “heartbeat” functionality. Refer to ED 15054, available on www.DaikinApplied .com, for further details. Communications Failure (LONWORKS): If the network communication link fails for any reason, the affected WSHP controller remains operational. Its operating mode will be the last received over the network until communication is restored or power is cycled on the unit. If power is cycled, the WSHP defaults to Occupied mode. Its minimum position, heating, and cooling set points will be those last received over the network, regardless of whether power is cycled. Wall-Mounted Sensor There are four optional wall sensor packages available. All include a remote status LED and tenant override button. Set point adjustment and thermometer are optional features. The wall-mounted sensor must be field installed and field wired to the water source heat pump. Terminal Board #1 provides the connections for all room temperature sensor field wiring. Refer to the unit wiring diagrams, Figures 8 and 9 below, and IM 529, MicroTech Room Temperature Sensors, for information on wall sensor package installation. 17 IM 660-4 Figure 8. Wall-Mounted Temperature Sensor Wiring Figure 9. Maximum Wire Length to Sensors Gauge 18 AWG 20 AWG 22 AWG Length (ft.) 625 380 260 Remote Room Set Point Adjustment The remote set point adjustment potentiometer allows the room set point to be adjusted up or down by as much as 3°F (1.7°C). It is available with several of the optional wall sensor packages. Tenant Override A wall-mounted tenant override switch is standard on all MicroTech 2000 Room Temperature Sensors. Pressing and holding the tenant override button for 1.0 to 6.0 seconds puts the unit into tenant override mode for a set time period (default = 60 minutes). Press the tenant override button again for 1.0 to 6.0 seconds and the unit returns to unoccupied mode by default. A separate configuration property is available that allows users to extend the tenant override period for up to 60 minutes with a second button press. Except for the fact that it is temporary, the tenant override operating mode is identical to the occupied operating mode. LONWORKS Only: Pressing and holding the tenant override button for at least 6 seconds but not more than 10 seconds activates the network “query address” mode, indicating the unit address in question at the MicroTech gateway panel. LONWORKS Only: Pressing and holding the tenant override button more than 10 seconds activates the network “self-configure” mode, requesting the assignment of the next sequential address from the MCG - MicroTech gateway panel. LONMARK 3.3 Only: Similar to pressing the service pin, pressing and holding the tenant override button for more than 10 seconds causes the Neuron chip to broadcast a message over the LONWORKS network containing its unique 48-bit Neuron ID. This is useful during network commissioning. 18 IM 660-4 Diagnostic Services The following section provides a description of the diagnostic services available for the MicroTech 2000 WSHP unit controller, including how to verify unit communication, alarm management, and fault conditions. Unit Identification (Wink) Command The unit identification function allows verification of an individual unit network address without opening the unit access panels. The compressor shuts off during this period and the minimum off timer must expire before the compressor is allowed to run again. Upon receiving a “wink” command from a network management node, the heat pump exhibits the following identification sequence (status LED and fan sequences occur simultaneously): Status LED: Flashes (on 0.5 sec, off 0.5 sec) for 15 seconds. Fan: The heat pump fan turns off for 5 seconds, turns on for 5 seconds, then off again for 5 seconds. Alarm Monitoring and Control The water source heat pump controller is programmed to monitor the water source heat pump for specific alarm conditions that may occur on the various model types. If an alarm condition exists and is detected by the controller, a “fault” occurs. The water source heat pump controller indicates that a fault has occurred at the status LED (on-board or remote) and executes appropriate control actions for the alarm conditions. During a fault condition, the status LED flashes constantly (on 0.1 second, off 0.1 second) until the fault is cleared. Refer to the Service and Troubleshooting section for information on troubleshooting digital input faults. Clearing Faults Before any fault can be cleared, the alarm conditions that caused it must have returned to normal. When the alarm conditions are gone, a fault may be cleared either automatically or manually, as follows. An auto reset fault immediately clears whenever the alarm conditions that caused it disappear. To clear a manual reset fault, cycle power to the unit controller. Note: Investigate and eliminate the cause of a manual reset fault before placing the unit back into service. Alarm Fault Descriptions Figure 10 below describes the alarm faults, how they are triggered, the factory settings that trigger them, and how they are reset. A detailed discussion of each follows. 19 IM 660-4 Figure 10. Alarm and Fault Code Summary Fault Source High pressure Hardware Default Setting Fault Reset (Clear) Opens at 395 ± 10 psig Closes at 250 ± 25 psig Manual Low pressure Condensate overflow Brownout Hardware Opens at 7 ± 3 psig Closes at 22 ± 7 psig Manual Hardware Conductivity trip point: 2.5 micro ohms Manual Software Line voltage ± 82%of nameplate voltage Auto High Pressure Fault The “High Pressure” fault indicates that the high pressure switch input (J4-9) sensed an open circuit while the controller was calling for the compressor to run. The high pressure switch (HP) is wired in series with the compressor relay output (J4-5) and the compressor relay coil. Therefore, if a high pressure condition occurs, the switch immediately shuts down the compressor; then unit operation is disabled by the WSHP controller software. For information on troubleshooting digital input faults, see the Service and Troubleshooting section. Symptoms (as applicable) • The compressor immediately de-energizes. • The software disables normal unit operation until the fault condition is manually corrected. Low Temperature Fault The “Low Temperature” fault indicates that the low temperature switch input (J4-12) sensed an open circuit while the controller was calling for the compressor to run. The low temperature switch opens when the temperature falls below its set point (model and size dependent). For information on troubleshooting digital input faults, see the Service and Troubleshooting section. Symptoms • Unit changes to cooling for 60 seconds for coil defrost. • After 60 seconds in cooling, the software immediately de-energizes the compressor and fan. • The software disables normal unit operation until the fault condition is manually corrected. Low Pressure Faults The “Low Pressure” fault indicates that the low pressure switch input (J4-11) sensed an open circuit while the controller was calling for the compressor to run. The low pressure switch opens when the temperature falls below Troubleshooting section. 20 IM 660-4 Symptoms • The compressor immediately de-energizes. • The software disables normal unit operation until the fault condition is manually corrected. Condensate Overflow Fault The “Condensate Overflow” fault indicates that the condensate overflow sensor (J4-14) sensed a grounded signal while the controller was calling for the compressor to run. For information on troubleshooting analog input faults, see the Service and Troubleshooting section. Symptoms • The compressor immediately de-energizes. • The software disables normal unit operation until the fault condition is manually corrected. Brownout Fault The “Brownout” fault indicates the water source heat pump is sensing low voltage levels. It is designed to protect the compressor and contactors from low line voltage or “brownout” conditions. The controller is programmed with a brownout set point that corresponds to 82% of the water source heat pump’s nameplate line voltage value. If the water source heat pump controller senses a voltage level less than its set point for more than 1 second, it triggers the brownout fault. The fault resets automatically when the sensed voltage remains at or above a level corresponding to 90% of the nameplate value for a period of one second. For information on troubleshooting this alarm, see Service and Troubleshooting section. Symptoms (as applicable) • The compressor immediately de-energizes. Change Filter Notification (Network Units Only) The “Change Filter” notification indicates that the fan has operated longer than the set number of hours. Typically, this warning is used to alert the building operator to replace the filter. To clear the notification, reset the filter timer at the network PC. Symptoms • 21 An alarm message identifying the water source heat pump network address and time of occurrence is sent to the network printer. IM 660-4 Service and Troubleshooting The following section defines the inputs and outputs available for the MicroTech 2000 WSHP unit controller to assist with field service and troubleshooting efforts. It also identifies common problems and solutions. Inputs and Outputs Analog Inputs The MicroTech WSHP unit controller has six standard analog inputs. The controller can sense temperatures in the range of 0° to 158°F (–18° to 70°C). See Table 3. Table 3. Analog Inputs Description Discharge air temp sensor Leaving water temp sensor Condensate overflow sensor Brownout (supply voltage) sensor Room air temp sensor Tenant override/set point adjust Location Inlet to fan Leaving water line Condensate drain pan On board Remote basic wall sensor Remote wall sensor Digital Inputs The water source heat pump controller has four standard digital inputs.. Digital input conditioning includes RC filtering with a time constant of at least 4.7 milliseconds. The base module provides additional filtering using software filtering techniques. See Table 4 The digital inputs sense the presence or absence of an external 24 VAC ± 20% power source with a minimum of 10 mA AC current flowing through the following isolated contacts:. Refer to the wiring diagram supplied with your unit for specific wiring details. Table 4. Digital inputs Description Refrigerant high pressure—N/C Refrigerant low pressure—N/C Refrigerant low temp—N/C Remote start/stop—N/O Location HP switch LP switch LT switch Remote switch Digital Outputs All digital outputs, with the exception of the on-board and off-board status LEDs, are capable of controlling electromechanical or solid state relays. They switch inductive loads at 24 VAC ± 20%, 0.4 pF and at the steady state AC RMS currents listed in Table 9 (10x single cycle surge currents are assumed on initial turn on). The on-board and off-board status LEDs are controlled by one of the Neuron’s I/0 pins capable of PuIse Width Modulation. See Table 5. 22 IM 660-4 Table 5. Digital Outputs Description Fan contactor Compressor contactor Reversing valve solenoid Type/AC RMS current rating E/M pilot duty relay at 300 mA-AC (SPST N/O contacts) E/M pilot duty relay at 300 mA-AC (SPST N/O contacts) E/M pilot duty relay or SS random turn on Triac at 600 mA-AC (SPST N/O contacts) On-board status LED Off-board status Yellow DC-sourced signal—current limited to 10 mA-DC LED Multi-purpose (spare) isolated E/M E/M pilot duty relay at 300 mA-AC (SPST N/O contacts) contacts Input/Output Table All WSHP controller input and output connections and the corresponding component descriptions are shown below in Table 6. Table 6. Inputs and Outputs for MicroTech 2000 WSHP Units Connection J1-1 / TB#2-E J1-2 / TB#2-L J1-3 / TB#2-U J1-4/TB#2-P J1-5 / TB#2-C J2-6 / TB#1-1 J2--7 / TB#1-2 J2-8 / TB#1-3 J2-9 / TB#1-4 J2-10 / TB#1-5 J2-11 /TB#1-6 J2-12 / TB#1-7 J41 J4-2 J4-3 J4-4 J4-5 J4-6 J4-7 J4-8 J4-9 J4-10 J4-11 J4-12 J4-13 J4-14 J5-8 J5-9 J5-10 J5-11 J6-1-7 23 Component description Remote digital source Remote digital signal Spare relay normally closed Spare relay common Spare relay normally open Room sensor LED Tenant override Room sensor input Room sensor common LonTalk connection LonTalk connection 24 VAC common 24 V ground 24 VAC Fan relay output Fan relay common Compressor contactor output Compressor contactor common Reversing valve solenoid output Reversing valve solenoid common High pressure switch signal Low pressure switch source Low pressure switch signal Low temperature switch signal Low temperature switch source Condensate overflow sensor Leaving water temperature sensor input Leaving water temperature sensor common Discharge air temperature sensor input Discharge air temperature sensor common Auxiliary module connections IM 660-4 General Troubleshooting Microprocessor Problems The status LED indications can aid in WSHP controller diagnostics. Approximately 40 seconds after power is applied to the WSHP, the status LED should illuminate (see Figure 1 and Table 1). If not, either there is a software problem or the WSHP controller is defective. Power Supply Problems The WSHP controller requires a 24 VAC power supply. It is connected to the board at the section labeled 24V GND and 24 VAC (terminals J41 and J42). Refer to the unit wiring diagram. If you suspect a problem with the WSHP controller power, check the following: 1. Verify that the main power switch is at ON. 2. Check the voltage at the secondary of the transformer. It should be approximately 24 VAC (load dependent). Erroneous Temperature Readings If you suspect that the WSHP controller is operating using erroneous temperature data, check the sensors using the following procedure: 24 1. Measure the temperature at the suspect sensor using an accurate thermometer. 2. Determine the sensor’s analog input number. Refer to the unit wiring diagram or to the input/output table (Table 6). 3. Remove the connector from its WSHP controller terminals and measure the resistance of the sensor (through the sensor connections). 4. Using the Thermistor chart (Table 7), compare this value to the measured temperature. 5. If the measured resistance and temperature match, the WSHP controller may require factory service, or it may be defective. 6. If the measured resistance and temperature do not match, either there is a wiring problem or the sensor is defective. Check the wiring connection and the sensor circuit wiring for defects. IM 660-4 Table 7. Thermistor Chart °C 18 17 16 15 14 13 12 11 10 9 8 7 6 5 4 3 2 1 0 1 2 3 4 5 6 7 8 9 10 11 12 13 14 15 16 17 18 19 20 21 22 23 24 25 26 27 10 k ohm 8.654 8.173 7.722 7.298 6.900 6.526 6.175 5.845 5.534 5.242 4.967 4.708 4.464 4.234 4.017 3.812 3.620 3.438 3.266 3.104 2.951 2.806 2.669 2.540 2.418 2.302 2.192 2.089 1.990 1.897 1.809 1.726 1.647 1.571 1.500 1.432 1.368 1.307 1.249 1.194 1.142 1.092 1.045 1.000 0.9572 0.9165 °F 0 1 3 5 7 9 10 12 14 16 18 19 21 23 25 27 28 30 32 34 36 37 39 41 43 45 46 48 50 52 54 55 57 59 61 63 64 66 68 70 72 73 75 77 79 81 °C 28 29 30 31 32 33 34 35 36 37 38 39 40 41 42 43 44 45 46 47 48 49 50 51 52 53 54 55 56 57 58 59 60 61 62 63 64 65 66 67 68 69 70 71 72 73 10 k ohm 0.8777 0.8408 0.8056 0.7721 0.7402 0.7098 0.6808 0.6531 0.6267 0.6015 0.5774 0.5545 0.5326 0.5116 0.4916 0.4725 0.4543 0.4368 0.4201 0.4041 0.3888 0.3742 0.3602 0.3468 0.3340 0.3217 0.3099 0.2987 0.2878 0.2775 0.2675 0.2580 0.2489 0.2401 0.2317 0.2236 0.2158 0.2084 0.2012 0.1944 0.1878 0.1814 0.1753 0.1695 0.1638 0.1584 °F 82 84 86 88 90 91 93 95 97 99 100 102 104 106 108 109 111 113 115 117 118 120 122 124 126 127 129 131 133 135 136 138 140 142 144 145 147 149 151 153 154 156 158 160 162 163 Digital Input Faults A digital input fault usually is caused by high-pressure, low-pressure or low-temperature alarm conditions resulting from mechanical problems in the water source heat pump. It also can be caused by a problem in the digital input circuit. Below is a procedure to use to check for problems in the digital input circuit. If the probable cause of the fault is found using this procedure, attempt to clear the fault by cycling power to the WSHP. If the 25 IM 660-4 probable cause of the fault is not found using this procedure, assume that mechanical problems exist and have a qualified technician service the unit before attempting to reset the WSHP Controller. 1. Check the voltage at the secondary of transformer; it should be approximately 24 VAC. 2. Determine the switch’s digital input number. Refer to the unit wiring diagram. 3. Check the wiring and connections throughout the digital input circuit. 4. Measure the resistance through the switch contacts (with at least one wire disconnected). The switches normally are closed. Brownout Fault The WSHP controller senses the AC voltage at the power input section terminals J41 and J42 (see unit wiring diagram). If the voltage at these terminals is less than 19.68 VAC for at least 1 second, the brownout fault occurs. The fault automatically clears if the voltage at the terminals remains greater than 21.6 VAC for at least 1 second. If a brownout fault occurs, check the line voltage to the water source heat pump. If it is less than 82% of the nameplate value, contact the power company. If the line voltage remains greater than 90% of the nameplate value for more than 1 second but the fault does not reset, perform the following procedure: 1. Measure the voltage between terminals J41 and J42 on the WSHP controller. If the voltage is low or fluctuates around 19.68 VAC, the WSHP controller is functioning properly. Go on to step 2. 2. If the voltage remains above 21.6 VAC for 1 second but the fault does not reset, the WSHP controller is defective. 3. Check the primary and secondary voltages of the power supply transformers. 4. Check for faulty wiring or connections throughout the power supply circuit. Please contact the WSHP technical support group at 315-282-6240 for additional assistance, if necessary. Parts List MicroTech 2000 unit controller boards are only available as field-installed kit through Daikin Parts at 763-553-5465 or [email protected]. Before placing an order, identify the following: 1. The version of software (i.e. LonMark or LonWorks) required in order to verify that the correct part number, as shown below, is referenced in the order. 2. If the order is for a replacement board, verify if an auxiliary board is attached to the controller. If so, a new auxiliary board will need to be ordered along with each unit controller as a matching set. 3. If additional assistance is needed, contact the WSHP technical support group at 315-2826240. Field-Installed Kits Description Part Number MicroTech 2000 WSHP Unit Controller - LonMark 3.3 250808301 MicroTech 2000 WSHP Unit Controller - LonWorks 250808401 MicroTech 2000 WSHP Auxiliary Board 073312721 26 IM 660-4 This document contains the most current product information as of this printing. For the most current product information, please go to www.DaikinApplied.com. All equipment is sold pursuant to Daikin Standard Terms and Conditions of Sale and Limited Warranty. 27 IM 660-4