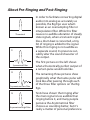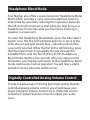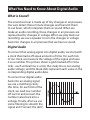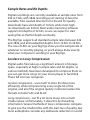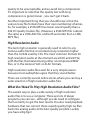
1
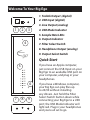
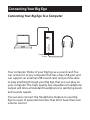
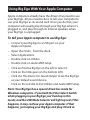
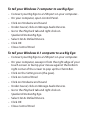
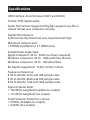
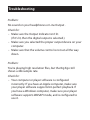
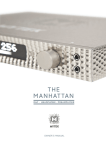
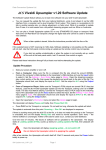
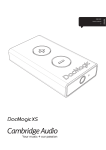
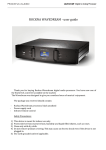
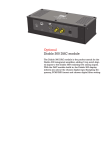
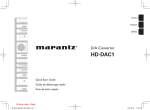
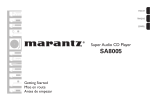
Welcome To Your Big Ego
1. Toslink Output (digital)
2. USB Input (digital)
3. Line Output (analog)
1
2
3
4. USB Mode Indicator
5. Sample Rate LEDs
6. Output Indicator
4
7. Filter Select Switch
8. Headphone Output (analog)
9. Output Select Switch
Quick Start
If you have an Apple computer,
just connect the USB Input on your
Big Ego to an available USB port on
your computer, and plug in your
headphones.
5
6
7
8
9
If you have a Windows computer,
your Big Ego can play files up
to 24/96 without installing
any drivers. Just hold the Filter
Select Switch button down while
connecting your Big Ego to a USB
port; the USB Mode Indicator will
light red. Plug in your headphones
and you’re all set to go.
Connecting Your Big Ego
Connecting Your Big Ego To a Computer
Headphone
Output
Your computer thinks of your Big Ego as a sound card. You
can connect it to any computer that has a free USB port and
can support an external USB sound card, and you’ll be able
to play anything through your Big Ego that you can play on
your computer. The high-quality low-impedance headphone
output will drive all standard headphones to satisfying levels
and sounds superb.
You can also connect the Headphone Output on your Big
Ego to a pair of powered monitors that don’t have their own
volume control.
Line
Output
Headphone
Amplifier
The analog Line Output bypasses the headphone amplifier,
and provides the best possible sound quality for connection
to the line level inputs on preamps, pre/pros, external
headphone amplifiers, and powered monitors that have
their own volume controls.
Toslink
Output
Toslink
Digital Input
The Toslink digital output carries a S/PDIF version of the
digital audio at the input, which can be routed to another
DAC or a digital input on a pre/pro or AVR. Pressing the
Output Select Switch toggles between the analog and
digital outputs on your Big Ego, and the Output Indicator is
lit green when the Toslink digital output is selected.
Using Big Ego With Your Apple Computer
Apple computers already have the drivers they need to use
your Big Ego. All you need to do is to tell your computer to
use your Big Ego as its sound card. Once you do that, your
computer will usually play through your Big Ego when it’s
plugged in, and play through its internal speakers when
your Big Ego is unplugged.
To tell your Apple computer to use Big Ego:
• Connect your Big Ego to a USB port on your
Apple computer.
• Open the Finder - from the dock.
• Select Applications.
• Double click on Utilities.
• Double click on Audio MIDI Setup.
• Click on Emotiva Big Ego on the left to select it.
• Click on the little gear (on the bottom left).
• Click Use This Device For Sound Output to set the Big Ego
as your default sound device.
• Click on the red dot to Exit Utilities and Audio MIDI Setup.
Note: Your Big Ego has a special driverless mode for
Windows computers. If you hold the Filter Select Switch
while plugging in your Big Ego you’ll end up in this
mode; and the USB Mode Selector will light up red. If this
happens, it may confuse your Apple computer. If that
happens, just unplug your Big Ego and plug it back in.
Using Big Ego With Your Windows Computer
The audio drivers that are built into Microsoft Windows only
support sample rates up to 96k.
To enable your Big Ego to play high resolution audio files up
to 384k, you’ll need to install our Emotiva Big Ego drivers for
Windows. You can download the drivers for free from the
Resources tab on the Big Ego product page. Instructions for
installing the drivers on your computer are included along
with the drivers.
If you only play files below 96k, or you’re using your Big Ego
on a friend’s machine, your Big Ego has a special mode that
supports up to 96k without having to install drivers. To use
this Driverless Mode, all you need to do is press and hold
down the Filter Selector Switch while connecting Big Ego to
your computer. When your Big Ego is in Driverless Mode, the
USB Mode Indicator will be lit red.
Note: If you’re using Driverless Mode, and you turn your
computer off or let it hibernate while Big Ego is still
connected, you’ll have to unplug Big Ego and plug it back
in while holding the Filter Selector Switch button down
after you turn your computer back on.
To tell your Windows 7 computer to use Big Ego:
•
•
•
•
•
Connect your Big Ego to a USB port on your computer. .
On your computer, open Control Panel.
Click on Hardware and Sound.
Under Sound, click on Manage Audio Devices.
Go to the Playback tab and right click on
Speakers Emotiva Big Ego.
• Select Set As Default Device.
• Click OK.
• Close Control Panel.
To tell your Windows 8.1 computer to use Big Ego:
• Connect your Big Ego to a USB port on your computer.
• On your computer, sweep in from the right edge of your
touch screen or bump your mouse against the bottom
right corner of the screen to pop up the Charm Bar.
• Click on the Settings icon (the gear).
• Click on Control Panel.
• Click on Hardware and Sound.
• Under Sound, click on Manage Audio Devices.
• Go to the Playback tab and right click on
Speakers Emotiva Big Ego.
• Select Set As Default Device.
• Click OK.
• Close Control Panel.
Playing High Resolution Audio Files
Your Big Ego can play high resolution audio files up to
32/384k. However, both your computer and the music player
software you’re using have to cooperate if you want to get
the best possible quality from all of your digital audio files.
The Sample Rate LEDs on your Big Ego always display the
sample rate of the audio the Big Ego is receiving. If you’re
playing a high resolution audio file, but the Big Ego is only
receiving 44k, then your computer probably isn’t configured
correctly.
Apple Computers
By default, Apple computers always play audio files at
a single preset sample rate. If you want to play all high
resolution audio files at full quality on an Apple computer,
you’ll have to select a player program that supports “bit
perfect playback”. Some popular choices include Amarra,
Audirvana, jRiver Media Center, and the Bitperfect plugin for
iTunes.
Windows Computers
By default, Windows computers always play audio files
at a single preset sample rate. If you want to play all high
resolution audio files at full quality on a Windows computer,
you’ll have to select a player program that supports
“WASAPI Mode” and configure it to do so. Some popular
choices include jRiver Media Center and Foobar2000.
USB Modes (technical)
In order to deliver the absolute best performance and
the ideal level of convenience with the widest variety of
computers, your Big Ego supports two different USB audio
modes - UAC1 and UAC2 (this is not the same as USB 1.0,
USB 2.0, and USB 3.0).
The Big Ego’s default operating mode is called USB Audio
Class 2 (UAC2), which supports all standard bit depths and
sample rates up to 32/384. The drivers needed to support
UAC2 are built into all modern Apple computers, but not
into Microsoft Windows, which is why you have to install
our drivers to unleash the full potential of the Big Ego with
a Windows computer. Some versions of Linux also support
UAC2, but not all.
Since it isn’t always convenient to install drivers on a
Windows computer, the Big Ego also gives you the option
of running in USB Audio Class 1. Both Apple and Windows
computers have support for UAC1 built in, as well as most
versions of Linux, so you can use UAC1 on most computers
without drivers. The only limitation is that UAC1 only
supports bit depths and sample rates up to 24/96k.
The Big Ego’s UAC1 mode is engaged by holding down the
Filter Select Switch button while connecting the Big Ego to
the computer, and the USB Mode Indicator LED will light up
red when the Big Ego is in UAC1 mode.
Digital Oversampling Filters
Your Big Ego offers a choice of three different digital
interpolation filters, each of which sounds subtly different.
To select a digital filter, press the Filter Select Switch once.
The first LED will blink, and one or more of the LEDs above
it will light steady blue - indicating which filter is currently
selected. While the first LED is still blinking, press the Filter
Select Switch repeatedly to cycle through the available
filters. Within a few seconds after you stop pressing the
button, your Big Ego will switch to the new filter, and resume
normal operation. You will hear a slight period of silence
when the filter switch occurs.
The Symmetrical filter (F1) is a classical design which
combines equal amounts of pre-ringing and post-ringing.
This is the filter most commonly used by other DACs.
The Asymmetrical Low filter (F2) has virtually no pre-ringing,
but several cycles of post-ringing. Many listeners find this
combination to sound more natural, while still preserving
the liveliness of your music.
The Asymmetrical High filter (F3) has virtually no pre-ringing,
and very little post-ringing. Listeners tend to describe
this filter as sounding very mellow, but possibly more flat
sounding than F2 with some program material.
About Pre-Ringing and Post-Ringing
Theoretical
F1
Symmetrical Filter
F2
Asymmetrical Low Filter
F3
Asymmetrical High Filter
In order to facilitate converting digital
audio into analog as accurately as
possible, the Big Ego uses what’s
known as an oversampling filter or
interpolation filter. While this filter
causes no audible alteration of steady
state signals, when a transient signal
like a drum beat is converted, a tiny
bit of ringing is added to the signal.
While this ringing is not audible as
a separate sound, its presence can
subtly alter the sound character of
the output.
The first picture on the left shows
what a theoretically perfect output of
a certain pulse would look like.
The remaining three pictures show
graphically what that same pulse will
look like after passing through each
of the three filter options on the Big
Ego.
Tests have shown that ringing after
the main signal is less audible than
ringing before it, and many people
perceive the Asymmetrical filter
choices as sounding better, but it’s
really a matter of personal preference.
Headphone Blend Mode
Your Big Ego also offers a special precision Headphone Blend
Mode which provides a more natural headphone listening
experience by selectively reducing the separation between
the left and right channels so that what you hear from your
headphones is more like what you hear when listening to
speakers in a real room.
To select the Headphone Blend Mode, press the Filter Select
Switch once. The first LED will blink, and one or more of the
LEDs above it will light steady blue - indicating which filter
is currently selected. While the first LED is still blinking, press
the Filter Select Switch repeatedly to cycle through the
available filters until the fourth LED is lit: HP (Headphone
Blend Mode). Within a few seconds after you stop pressing
the button, your Big Ego will switch to the Headphone Blend
mode, and resume normal operation. You will hear a slight
period of silence when the switch occurs.
Digitally Controlled Analog Volume Control
To take full advantage of the Big Ego’s high quality digitally
controlled analog volume control, you should leave your
player program’s Volume Control set to 100% and use the
computer’s System Volume Control to adjust your audio
level.
What You Need to Know About Digital Audio
What is Sound?
The sound we hear is made up of tiny changes in air pressure.
Our ears detect these minute changes and transmit them
to our brain, which interprets them as sound. When we
make an audio recording, these changes in air pressure are
represented by changes in voltage. When we play back our
recording, we use a speaker to turn the changes in voltage
back into changes in air pressure that we hear as sound.
Digital Audio
To convert that analog signal into digital audio, we start with
a clock that marks off equal amounts of time. For each tick
of our clock, we measure the voltage of the signal and save
it as a number. The picture shows a grid marked off in time
ticks - each vertical line is a tick; the snaky line is our analog
audio voltage; and the black dots represent each value in the
corresponding digital audio data.
To convert our digital audio
back into an analog signal,
we use a matching clock;
this time, for each tick of the
clock, we read one number
off our list and convert the
number value back into a
voltage. Finally, after we use
some filtering to smooth the
signal and “connect the dots”,
we end up with a very good reproduction of our original
analog audio signal. The math involved can get complicated,
but you don’t need to know that part to enjoy digital audio.
The Basics
How often we take a measurement is known as the
sample rate. The sample rate for standard CDs is 44.1 kHz,
which means that each channel on a CD stores 44,100
measurements for each second of digital audio, and the
math tells us that means we can store frequencies up to
about 21 kHz (which most people agree is about as high as
we can hear).
How many digits we allow for each measurement, which
determines how accurately we can store each value, is called
the bit depth. The bit depth used by standard CD audio is
16 bits (which means 16 digits in binary). The math there
tells us that a CD can store information accurately enough to
give us a dynamic range of about 90 dB, which means that
the loudest sound we can store is about 90 dB louder than
the noise floor.
Those two numbers are usually written together, so a CD is
“16/44” - or sometimes “44/16”. If we want to store higher
frequencies, we can use a higher sample rate and, if we need
more dynamic range, we can use a higher bit depth.
While the CD specification requires CDs to store digital audio
at 44/16, digital audio files are available in several bit depths
and a wide range of sample rates.
Sample Rates and Bit Depths
Digital recordings are currently available at sample rates from
44k to 192k, with 384k recordings just starting to become
available. Files created directly from CDs and CD quality
downloads have a bit depth of 16 bits, while most high
res downloads are 24 bits. Most audio mastering software
supports bit depths of 32 bits, so we can expect to start
seeing files at that bit depth eventually.
The Big Ego supports all standard sample rates between 44k
and 384k, and all standard bit depths from 16 bits to 32 bits.
The row of LEDs on your Big Ego show you the sample rate of
whatever is currently playing, so you’ll always know exactly
what your computer is sending to your Big Ego.
Lossless vs Lossy Compression
Digital audio files take up a significant amount of storage
space, especially at higher sample rates and bit depths, so
various methods have been developed to compress them so
you can get more songs on your music player or hard disk.
These fall into two categories.
Lossless compression - uses math to store the data more
efficiently, while still preserving every single bit of the
original, and all of the original quality. Common lossless file
formats include FLAC and ALAC.
Lossy compression - can fit a lot more music into a much
smaller space. Unfortunately, it does this by discarding
information. Several methods of lossy compression compete
to give you the smallest files with the least loss of quality, but
most audiophiles consider any deliberate reduction in sound
quality to be unacceptable, and so avoid lossy compression.
It’s important to note that the quality lost with lossy
compression is gone forever - you can’t get it back.
Another important thing that you should know is that the
various lossy file formats have their own numbering schemes.
So, for example, a 256k MP3 has lower sound quality than a
44k CD quality lossless file. (However, a 256k MP3 file is about
the same as a 256k AAC file, and both are better than a 128k
MP3 file.)
High Resolution Audio
The term high resolution is generally used to refer to any
lossless audio file that is recorded at any resolution higher
than the 16/44k used by CDs. The most common formats for
high resolution audio at the moment are 24/96 and 24/192,
with the files themselves being either uncompressed WAV
files, or in the lossless FLAC or ALAC formats.
High resolution audio files exist for a very simple reason:
because most audiophiles agree that they sound better.
There are currently several online stores where you can buy a
wide selection of high resolution audio files.
What Do I Need To Play High Resolution Audio Files?
The easiest way to play a wide variety of high resolution
audio files is to use a computer. There are lots of player
programs you can use - although you do need to configure
them correctly to get the best results. You also need playback
hardware that can convert those superb quality high res files
back into analog audio at the best quality possible. Luckily
you have a Big Ego!
Specifications
USB Interface: Asynchronous (UAC1 and UAC2)
Format: PCM digital audio.
Audio File Formats Supported: Big Ego supports any file or
stream format your computer can play.
Digital Filter Options:
Symmetrical; Asymmetrical Low; Asymmetrical High.
Maximum Output Level:
1.8 VRMS (headphone); 2.1 VRMS (line).
Sample Rates Supported:
Apple computers: 44.1k - 384k (no drivers required).
Windows computers: 44.1k - 384k (with free drivers).
Windows computers: 44.1k - 96k (driverless).
Bit Depths Supported: 16 bits, 24 bits, 32 bits.
Frequency Response:
8 Hz to 20 kHz; 44.1k and 48k sample rates.
8 Hz to 40 kHz; 88.2k and 96k sample rates.
8 Hz to 60 kHz; 176k and 192k sample rates.
Signal to Noise Ratio:
> 106 dB (A-weighted; headphone output).
> 113 dB (A-weighted; line output).
Total Harmonic Distortion + Noise:
< 0.006% (headphone output).
< 0.004% (line output).
Troubleshooting
Problem:
No sound on your headphones or Line Output .
Check for:
• Make sure the Output Indicator isn’t lit.
(If it’s lit, then the digital output is selected.)
• Make sure you selected the proper output device on your
computer.
• Make sure that the volume control is not set all the way
down.
Problem:
You’re playing high resolution files, but the Big Ego still
shows a 44k sample rate.
Check for:
• Your computer or player software is configured
incorrectly. If you have an Apple computer, make sure
your player software supports bit-perfect playback. If
you have a Windows computer, make sure your player
software supports WASAPI mode, and is configured to
use it.
Warranty
The Emotiva Big Ego DAC carries a one year transferable
warranty on parts and labor. Please refer to the product
page and the Warranty Information section of our website
for details.
If you’re new to computer and digital audio, we highly
recommend that you check out our user forums. We have
lots of discussion groups about digital audio, Emotiva digital
audio products, player software, and other related topics. It’s
a great place to read up on digital audio and interact with
other digital audio fans.
All information contained in this manual is accurate to the
best of our knowledge at the time of publication. In keeping
with our policy of ongoing product improvement, we
reserve the right to make changes to the design and features
of our products without prior notice.
All trademarked names used in this manual are the property
of their respective owners.
Manual v 1.0 June 2, 2015
Emotiva Audio Corporation
135 Southeast Parkway Court
Franklin, TN 37064
www.emotiva.com