1
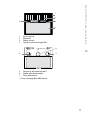
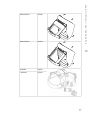
Beta
60, 90, 90 A, 90 X
Operating manual • English
Käyttöohje • Suomi
EN
FI
Bruksanvisning • Svenska
SV
Bruksanvisning • Norsk
NO
Brugsanvisning • Dansk
DA
Gebrauchsanweisung • Deutsch
DE
Gebruiksaanwijzing • Nederlands
NL
Manuel d’utilisation • Français
FR
Manual de instrucciones • Español
ES
Instrukcja obsługi • Polski
PL
Инструкции по эксплуатации • По-русски
RU
EN
Operating manual
English
Beta 60, 90, 90 A, 90 X / © Kemppi Oy / 0940
Beta 60, 90, 90 A, 90 X / © Kemppi Oy / 0940
Contents
1.Preface.................................................................................................................. 3
1.1
1.2
1.3
Product introduction............................................................................................. 3
Before welding.......................................................................................................... 3
General Safety Instructions................................................................................ 3
2. degrees of protection for lenses.......................... 7
3.Replacement of filter parts............................................. 8
3.1
3.2
Viewing position of welding helmet hatch. ............................................. 9
Adjustments. .............................................................................................................. 9
4.Inspection and service........................................................... 11
4.1
Cleaning..................................................................................................................... 11
5. using the auto-darkening
welding filter........................................................................................ 12
6.Technical data. .................................................................................... 14
7.Terms of guarantee..................................................................... 14
8. Ordering numbers.......................................................................... 15
EN
2
Preface
1.1
Product introduction
KEMPPI BETA 60, 90, 90A and 90X are welding helmets for arc welding,
carbon arc gouging and plasma cutting, used to protect welder´s eyes, and
skin of welder’s head, neck and throat against arc radiation, environment
radiation and welding spatter. In the upper position of the flip-up welding
filter lens, protection during grinding and de-slagging is possible.
1.2
Before welding
For your own protection read these operation instructions carefully before
using the welding helmet.
Make sure that the shade number of your welding filter lens is suitable for
your work. The welding helmet is delivered with a welding filter lens or auto
darkening welding filter, the shade number of which can be chosen from the
spare part list in paragraph 7. The shade number is also always marked on the
welding filter lens. Replace the welding filter lens if necessary.
Protection glasses and welding filter lenses of welding helmet are strong, but
not unbreakable. The welding helmet does not protect against hard shocks,
particles from grinding wheel, explosions or corrosive substances. Always use
appropriate safety devices and instruments required for each job.
Adjust the height and girth of the headband for comfort and the welding
helmet angle as necessary.
1.3
General Safety Instructions
Kemppi welding equipments conform to international safety standards.
Safety is an important issue in equipment design and manufacturing.
Therefore, Kemppi welding solutions are unparalleled in safety. There are,
however, always certain hazards involved in using welding equipment.
Therefore, to ensure your personal safety and the safety of your working
environment, carefully read the safety instructions below and respect them.
Use of personal protective equipment
• The arc and its reflecting radiation damage unprotected eyes. Shield
your eyes and face appropriately before you start welding or observe
welding. As the welding current increases, the welding face screen lens
darkness should also increase.
• Arc radiation and spatters burn unprotected skin. Always wear protective
gloves, clothing and footwear when welding.
3
Beta 60, 90, 90 A, 90 X / © Kemppi Oy / 0940
1.
EN
Beta 60, 90, 90 A, 90 X / © Kemppi Oy / 0940
• Always wear hearing protection if the ambient noise level exceeds the
allowable limit (e.g., 85 dB).
General operating safety
• Exercise caution when handling parts heated during welding. For
example, the tip of the welding torch or gun, and the end of the welding
rod and the work piece. The temperature of items burn unprotected
skin.
• Never wear any welding device on the shoulder during welding and
never suspend it by the carrying strap during welding.
• Do not expose the machine to high temperatures, as this may cause
damage.
• Keep intermediate and earth return cables as close to each other as
possible throughout their length. Straighten any loops in the cables as
this limits inductive effects on welding performance. This also minimizes
your exposure to harmful magnetic fields, which may, for example,
interfere with a pacemaker.
• Do not wrap the welding cables around your body.
• In environments classified as dangerous, only use S-marked welding
equipments with a safe idle voltage level. These work environments
include, for example, humid, hot or small spaces, where the user may be
directly exposed to the surrounding conductive materials.
EN
Spatter and fire safety
• Welding is always classified as hot work, so pay particular attention to
the fire safety regulations during welding and after it.
• Remember that fire can break out from sparks, even several hours after
the welding work is completed.
• Protect the environment from welding spatter. Remove combustible
materials, such as flammable liquid from the welding vicinity, and supply
the welding site with adequate fire fighting equipment.
• In special welding jobs, be prepared for hazards such as fire or explosion
when welding inside enclosed work spaces, such as tanks and vessels.
Ensure you have authority to work.
• Never direct the sparks or cutting spray of a grinder toward the welding
machine or flammable materials.
• Beware of hot objects or spatter falling on the machine when working
above. Welding in flammable or explosive sites is absolutely forbidden.
General electric safety
• Only connect the welding machine to an earthed electric network. Note
the recommended mains fuse size.
• Do not take the welding machine inside a container, vehicle or similar
work piece unless authorized to do so.
4
Welding power circuit
• Insulate yourself from the welding circuit by using dry and undamaged
protective clothing.
• Never touch the work piece and welding rod, welding wire, welding
electrode or contact tip at the same time.
• Do not put the welding torch or ground cable on the welding machine
or other electric equipment.
Beta 60, 90, 90 A, 90 X / © Kemppi Oy / 0940
• Do not place the welding machine on a wet surface and do not work on
a wet surface.
• Do not allow the mains cable to be directly exposed to water.
• Ensure cables or welding torches are not squashed by heavy objects and
that they are not exposed to sharp edges or a hot work piece.
• Make sure that faulty and damaged welding torches are changed
immediately as they may cause electrocution or fire.
• Remember that the cable, plugs and other electric devices may be
installed or replaced only by an electrical contractor or engineer
authorized to perform such operations.
• Turn off the welding machine when it is not in use.
EN
Welding fumes
• Ensure proper ventilation and avoid inhaling the fumes.
• Ensure a sufficient supply of fresh air, particularly in closed spaces. You
can also ensure an adequate supply of clean breathing air by using a
filtered fresh-air mask.
• Take extra precautions when working on metals or surface-treated
materials containing, for example, lead, cadmium, zinc, mercury or
beryllium.
Transportation, lifting and suspension
• Never pull or lift the machine by the welding torch or other cables.
Always use the lifting points or handles designed for that purpose.
• Only use a transport unit designed for the equipment. Try to transport
the machine in an upright position, if possible.
• Never lift a gas cylinder and the welding machine at the same time.
There are separate provisions for gas cylinder transportation.
• Never use a welding machine when suspended unless the suspension
device has been designed and approved for that particular purpose.
• Do not exceed the maximum allowable load of suspension beams or the
transportation trolley of welding equipment. It is recommended that the
wire coil be removed during lifting or transportation.
Environment
• Welding equipment is not recommended for use in rain or snow – see
5
Beta 60, 90, 90 A, 90 X / © Kemppi Oy / 0940
•
•
•
•
EN
•
manual. Protect the equipment against rain and strong sunlight. Always
store the machine in a dry and clean space.
Protect the machine from sand and dust during use and in storage.
The recommended operating temperature range is -20 to +40 °C. The
machine’s operation efficiency decreases and it becomes more prone to
damage if used in temperatures in excess of 40 °C.
Place the machine so that it is not exposed to hot surfaces, sparks or
spatter.
Make sure the airflow to and from the machine is unrestricted.
EMC classification of this product is class A in accordance with
electromagnetic compatibility standards CISPR 11 and IEC 6097410, and therefore the product is designed to be used in an industrial
environment only.
WARNING: This class A equipment is not intended for use in residential
locations where the electrical power is provided by a public lowvoltage supply system. In those locations it may be difficult to ensure
the electromagnetic compatibility due to conducted and radiated
disturbances.
Arc welding equipments cause electromagnetic disturbance. To
minimize the harmful effects, strictly use the equipment according to
the operating manual and other recommendations.
Gas bottles and pneumatic devices
• Adhere to the instructions for handling pneumatic devices and gas
bottles.
• Make sure that gas bottles are used and stored in properly ventilated
spaces.
• A leaking gas bottle may replace the breathable air, causing suffocation.
• Before use, make sure that the gas bottle contains gas suitable for the
intended welding purpose.
• Always fix the gas bottle securely in an upright position, against a bottle
wall rack or purpose-made bottle cart.
• Never move a gas bottle when the regulator or flow adjuster is in place.
Replace the valve cover during transportation. Close the bottle valve
after use.
Disclaimer
• While every effort has been made to ensure that the information
contained in this guide is accurate and complete, no liability can be
accepted for any errors or omissions. Kemppi reserves the right to
change the specification of the product described at any time without
prior notice. Do not copy, record, reproduce or transmit the contents of
this guide without prior permission from Kemppi.
6
Select appropriate welding filter lens for your welding job using the table
below. Make sure that other persons working in the area are using suitable
protection with appropriate shade number. The shade number (EN number)
stands for the degree of protection.
Welding
process
MMA
MIG,
steel
MIG,
aluminiums
TIG, all
materials
MAG
(CO₂-welding)
Carbon arc
gouging
Plasma
cutting
9
15
20
9
10
10
11
30
40
60
80
10
10
11
11
11
100
10
11
11
12
10
150
175
EN
12
125
12
12
12
12
13
13
14
13
11
200
225
12
250
13
275
300
13
13
13
350
14
14
14
400
450
500
15
14
14
Beta 60, 90, 90 A, 90 X / © Kemppi Oy / 0940
degrees of protection for lenses
Shade number selection for arc welding filter (Current in amperes), EN 169
2.
15
15
Higher value of the degree of protection means darker welding filter. Kemppi
welding filter lenses have the degree of protection and approval markings
stamped on the face of welding filter lens. In auto darkening welding filters
they are marked on the reverse side.
Do not use any welding filter lens without shade number and approval
marking.
7
Beta 60, 90, 90 A, 90 X / © Kemppi Oy / 0940
3.
Replacement of filter parts
Replacement of welding filter lens and front-mounted protection plate:
• Lift up hatch of welding filter lens.
• (1) Release filter retaining spring (3149850/3149840) with finger from
hatch slot.
• (2) Remove welding filter lens (and eventual protection plate).
• Mount new welding filter lens (and eventual protection plate) to its
place.
• Press filter retaining spring into the slot, in which case it is locked at its
place.
• (3) Front-mounted protection plate is removed by drawing it outwards.
EN
Replacement of the inner safety plate (9873254), attached to the welding
helmet:
• Lift up hatch of welding filter lens.
• (4) Press safety plate out of its place.
• Mount new safety plate by bending it so that its ends slide between the
cogging in the helmet. Release the plate at its place by unbending it.
Make sure that the plate is fully in the slot.
NOTE! For safety reasons, use only original 1.5 mm thick Kemppi safety plate
(9873254).
8
Beta 60, 90, 90 A, 90 X / © Kemppi Oy / 0940
3.1
Viewing position of welding helmet hatch
The welding filter lens hatch has an intermediate position to make welding
start or e.g. short tack welds easier.
NOTE! Through the slit you can check the start point before starting but you
should adjust the welding helmet before arc ignition in such a way that the
igniting arc can be seen through the welding filter lens.
We recommend that the viewing position is used only temporarily and with
low welding currents. At higher currents the radiation coming through the
hatch openings may burn the skin and reduce vision through the welding
filter lens.
NOTE! Never use the viewing position with auto darkening welding filter.
Diffused light hinders normal function of the filter.
NOTE! Never watch the arc through the slit!
3.2
Adjustments
EN
Height adjustment of band:
Adjust the headband height so that the band part circling the head is
positioned relatively low, in which case the welding helmet stays rigidly
positioned on the head. The sweatband should be a little above the eyebrows
and the ears.
Lift the right inner strip (C) of band out of the hole of the counterpart (D) and
adjust the headband to desired length by moving plastic strips in regard to
each other. Press the plastic strips against each other so that the plastic pins
are placed into holes of counterpart.
Tightening and neckpart adjustments of band:
Turn the neckpart of the band (L) so that it will be placed in the confluence of
back of your head and neck. Adjust the band tightness suitable for your head
by rotating the adjusting wheel (G).
Adjustment of welding helmet angle:
Adjust the welding helmet angle in regard to your face so that the lower
edge of welding helmet is positioned near your chest in the welding
situation, in which case the welding helmet gives the best protection. Bend
the adjustment plate (A) inwards so much that the plastic pin (B) of the
welding helmet comes out of the hole of the adjustment plate. Turn the
adjustment plate and release the plate so that the screw is placed to the
desired hole of the adjustment plate.
9
Beta 60, 90, 90 A, 90 X / © Kemppi Oy / 0940
Tightening adjustment of welding helmet:
Adjust the tightness of welding helmet in regard to band by rotating the
tightning adjustmets (E) and (F). Adjust the tightness of helmet so that the
high raised helmet stays up, but goes down when you nod your head. If the
helmet strikes against your chest when falling, the adjustment is too loose or
the helmet angle has been adjusted too near your face from the adjustment
plate (A).
Distance adjustment of welding helmet:
Unscrew the tightening adjustments (E and F) of welding helmet until
the tightening screw (H) will be released from gear (I). Now you can move
the band forward or backward in regard to the welding helmet. Press the
gearing of tightening screw (H) between gears (I) and tighten the tightening
adjustment (E and F). Make sure that the adjusted length is similar on both
sides of the welding helmet.
Height adjustment of welding helmet:
EN
If necessary, the height of the helmet in regard to band can be fine adjusted:
Loose the tightening adjustments (E and F) until the tightening screws
(H) come out of the adjustment case. Now you can choose the height
adjustment’s position up/down by twisting tightening screws (H) half lap
turn. On the right side of the helmet both tightening screw (H) and the piece
of adjustment (J) have to be turned. Settle the tightening screws (H) back
to gears in adjustment cases and tighten the tightening adjustments (E and
F). To facilitate these adjustments releaf the strip of the band for forhead
(K) temporarily from the locking cave. Make sure that the adjusted hight is
similar on both sides of the welding helmet.
10
Inspection and service
Always inspect the welding helmet carefully before starting to weld. Cracked,
pitted or scratched parts should be replaced immediately.
Never use a damaged welding helmet or a welding helmet with defective or
insufficient equipment!
Before use always inspect the condition of welding filter lens, protection
plate and plastic safety plate and that these have been mounted in the right
way:
• Inspect that the front-mounted protection plate and inner plastic safety
plate are undamaged, clean enough and correctly mounted. Replace
protection plate or safety plate immediately if they are damaged, or if
spatter or scratches reduce vision. Dirty protection glass may hinder
normal function of the auto darkening welding filter.
• Inspect that the welding filter lens is undamaged and clean. Damaged
welding filter lens impairs protection. Therefore it should be replaced
immediately. Make sure that the degree of protection of welding filter
lens is appropriate for your work.
Inspect that the welding helmet and headband are undamaged.
Inspect that the hatch of the welding helmet is completely closed when in
down position.
Careful use and safe keeping of welding helmet make its operating life longer
and improve your safety!
Do not put the welding helmet on hot surface, e.g. on hot welding seam!
4.1
Cleaning
Blow dirt and dust with compressed air off the welding helmet.
Clean the welding helmet with damp cleaning cloth which is watered with
mild soap water. To clean the auto darkening welding filter, first remove the
filter from its place as described in paragraph 2.1.
Do not use any dissolvents for cleaning the welding helmet.
Do not wipe the plastic safety plates e.g. with gloves because they are easily
scratched.
11
Beta 60, 90, 90 A, 90 X / © Kemppi Oy / 0940
4.
EN
Beta 60, 90, 90 A, 90 X / © Kemppi Oy / 0940
5.
using the auto-darkening
welding filter
Auto darkening welding filter is delivered ready for use. Make sure that the
filter is mounted to the hatch so that the photocell is directed towards the
work piece.
Kemppi Beta 90X:
With the knob (6) you can adjust the shade of the filter in the range of DIN 9
DIN 13. Adjust the shade according to the welding method and current used.
With the sensitivity knob (5) you can adjust the photosensitivity of the
filter. The sensitivity increases with a clockwise turn and decreases with a
counter clockwise turn. As a simple rule for optimum performance, it is
recommended to set sensitivity to the maximum at the beginning and then
gradually reduce it, until the filter reacts only to the welding light flash and
without annoying spurious triggering due to ambient light conditions, such
as direct sun, intensive artificial light, and neighbouring welder’s arcs.
With the delay adjustment knob (7) you can adjust the filter brightening
time delay from 0.2 to 0.8 seconds. The delay time increases with a clockwise
turn and decreases with a counter clockwise turn. It is recommended to
use a shorter delay with spot welding applications and a longer delay with
applications using higher currents. Longer delays can also be used for low
current TIG welding in order to avoid the filter opening when the light path
to the sensors is temporarily obstructed by a hand, torch, etc.
The photocells and light detectors of the filter should always be kept clean.
Clean them with soft cleaning cloth which is moistened with mild soap water
(or alcohol).
The operation temperature range of the filter is – 10 ºC…+ 60 ºC.
Do not cover the photocells or light detectors! Inspect that the protection
plate is not dirty so that it hinders the filter’s function.
Do not immerse in liquid!
Do not drop!
Do not try to open the filter!
Protect from heat and direct sunlight.
Store at dark and dry room temperature.
EN
12
Beta 60, 90, 90 A, 90 X / © Kemppi Oy / 0940
1.
2.
3.
3.
4.
1
2
3
4
Filter housing
Photocell
Photo-sensors
Liquid crystal active light filter
6.
Sensitivity
Shade
5.
EN
Delay
13
12 11
7.
10 9
5 Sensitivity adjustment knob*)
6 Shade adjustment knob*)
7 Delay adjustment
*) Only in Kemppi Beta 90X helmet
13
Beta 60, 90, 90 A, 90 X / © Kemppi Oy / 0940
EN
6.
Technical data
Manufacturer
Kemppi Oy, Box 13, FIN-15801 LAHTI, FINLAND
Size of welding filter lens
60 x 110 mm / 90 x 110 mm
Degrees of protection of welding filter lenses
8 - 14
Operation temperature range
-20...+60 °C / auto darkening welding filter -10...+60 °C
Storage temperature range
-40...+70 °C / auto darkening welding filter -20...+60 °C
Welding helmet material
impact resistant plastic
Welding helmet meets conformity requirements for
the standard EN 175: 1997
CE-marking: EN 175 B
EN 175: standard number
B: Medium energy impact, mechanical strength.
The product has been type inspected by Finnish Institute of Occupational Health, Dept. of Physics,
Notified Body No. 0403.
Address: Topeliuksenkatu 41 A, FIN-00250 HELSINKI, FINLAND.
7.
Terms of guarantee
KEMPPI OY gives the auto darkening welding filters of Kemppi Beta welding
helmets a guarantee of 2 (two) years, provided that the helmet is used for
single-shift operation.
Guarantee does not cover damage caused by use not in accordance with
the instructions, carelessness, damages during transportation or storing, or
caused by fire or natural phenomena.
Guarantee does also not cover direct or indirect travel expenses caused by
guarantee repair, or direct or indirect damage caused by defective product.
Guarantee defects must be informed to Kemppi Oy or authorised Kemppi
service workshop. Part replaced under the terms of guarantee remains the
property of Kemppi Oy and is to be returned to Kemppi Oy.
14
Beta 60, 90, 90 A, 90 X / © Kemppi Oy / 0940
8.
Ordering numbers
KEMPPI BETA 60
9873040
Protection plate
9873252
Safety plate
9873254
Welding filter lens
9873181
Filter retaining spring
3149840
KEMPPI BETA 90
9873045
Protection plate
9873253
Welding filter lens
9873243
Welding filter lens
9873254
Filter retaining spring
3149850
KEMPPI BETA 90 A
9873046
Protection plate
9873253
Auto darkening welding filter/90 A
9873051
Protection plate
9873253
Filter retaining spring
3149850
Safety plate
9873254
EN
15
Beta 60, 90, 90 A, 90 X / © Kemppi Oy / 0940
KEMPPI BETA 90 X
9873047
Protection plate
9873253
Auto darkening welding filter/90 X
9873055
Protection plate
9873251
Filter retaining spring
3149850
Safety plate
9873254
NOTE! For safety reasons, use only original Kemppi spare parts.
EN
16
4301040
Hatch set Beta 90
4301050
Beta 60, 90, 90 A, 90 X / © Kemppi Oy / 0940
Hatch set Beta 60
EN
Head band
4306370
Sweat band
9873018
17
Beta 60, 90, 90 A, 90 X / © Kemppi Oy / 0940
Welding filter lenses
Standard (pcs)
Use/version
Beta 60
9873161
DIN 8 60X110
spare part
9873171
DIN 9 60X110
9873181
DIN 10 60X110
9873191
DIN 11 60X110
spare part
9873202
DIN 12 60X110
spare part
9873211
DIN 13 60X110
spare part
9873212
DIN 14 60X110
spare part
9873241
DIN 8 90X110
spare part
9873242
DIN 9 90X110
9873243
DIN 10 90X110
9873244
DIN 11 90X110
spare part
9873245
DIN 12 90X110
spare part
9873246
DIN 13 90X110
spare part
9873247
DIN 14 90X110
spare part
spare part
1
60
Beta 90
EN
spare part
1
90
Auto darkening welding filters
9873051
DIN 3 / 11
90x110
1
90 A
9873055
DIN 4 / 9 – 13
90x110
1
90 X
Springs
3149840
Filter retaining spring 60
1
60
3149850
Filter retaining spring 90
1
90, 90 A, 90 X
4300700
Hatch spring
2
all
9873251
Protection plate 51x107x1
1
90 X
9873252
Protection plate 60x110x1
1
60
9873253
Protection plate 90x110x1
1/2
9873254
Safety plate 90x110x1,5
Protection plates
Other spare parts
18
4301040
Hatch set 60
4301050
Hatch set 90
4306370
Headband
9873018
Sweat band
1
90X / 90, 90A
all
KEMPPI OY
PL 13
FIN-15801 LAHTI
FINLAND
Tel +358 3 899 11
Telefax +358 3 899 428
www.kemppi.com
KEMPPIKONEET OY
PL 13
FIN-15801 LAHTI
FINLAND
Tel +358 3 899 11
Telefax +358 3 734 8398
e-mail: myynti.fi @kemppi.com
KEMPPI SVERIGE AB
Box 717
S-194 27 UPPLANDS VÄSBY
SVERIGE
Tel +46 8 590 783 00
Telefax +46 8 590 823 94
e-mail: [email protected]
KEMPPI NORGE A/S
Postboks 2151, Postterminalen
N-3103 TØNSBERG
NORGE
Tel +47 33 346000
Telefax +47 33 346010
e-mail: [email protected]
KEMPPI DANMARK A/S
Literbuen 11
DK-2740 SKOVLUNDE
DANMARK
Tel +45 4494 1677
Telefax +45 4494 1536
e-mail:[email protected]
KEMPPI BENELUX B.V.
Postbus 5603
NL-4801 EA BREDA
NEDERLAND
Tel +31 765717750
Telefax +31 765716345
e-mail: [email protected]
KEMPPI FRANCE S.A.S.
65 Avenue de la Couronne des Prés
78681 EPONE CEDEX
FRANCE
Tel +33 1 30 90 04 40
Telefax +33 1 30 90 04 45
e-mail: [email protected]
KEMPPI GmbH
Otto-Hahn-Straße 14
D-35510 BUTZBACH
DEUTSCHLAND
Tel +49 6033 88 020
Telefax +49 6033 72 528
e-mail: [email protected]
KEMPPI SPÓŁKA Z O.O.
Ul. Borzymowska 32
02-565 WARSZAWA
POLAND
Tel +48 22 7816162
Telefax +48 22 7816505
e-mail: [email protected]
KEMPPI AUSTRALIA PTY LTD.
25A, Stennett Road
INGLEBURN NSW 2565
AUSTRALIA
Tel. +61 2 9605 9500
Telefax +61 2 9605 5999
e-mail: [email protected]
KEMPPI OY LIMITADA
Av. Pdte. Edo. Frei Montalva 6001-81
Conchalí, SANTIAGO,
CHILE
Tel +56-2-949 1990
Telefax +56-2-949 1991
e-mail: [email protected]
OOO KEMPPI
Polkovaya str. 1, Building 6
127018 MOSCOW
RUSSIA
Tel +7 495 739 4304
Telefax +7 495 739 4305
e-mail: [email protected]
ООО КЕМППИ
ул. Полковая 1, строение 6
127018 Москва
Tel +7 495 739 4304
Telefax +7 495 739 4305
e-mail: [email protected]
KEMPPI, TRADING (BEIJING) COMPANY,
LIMITED
Room 420, 3 Zone, Building B,
No.12 Hongda North Street,
Beijing Economic Development Zone,
100176 Beijing
CHINA
Tel +86-10-6787 6064
+86-10-6787 1282
Telefax +86-10-6787 5259
e-mail: [email protected]
肯倍贸易(北京)有限公司
中国北京经济技术开发区宏达
北路12号
创新大厦B座三区420室
(100176)
电话: +86-10-6787 6064
+86-10-6787 1282
传真: +86-10-6787 5259
e-mail: [email protected]
1918790
0940
www.kemppi.com
KEMPPI (UK) Ltd
Martti Kemppi Building
Fraser Road
Priory Business Park
BEDFORD, MK44 3WH
ENGLAND
Tel +44 (0)845 6444201
Telefax +44 (0)845 6444202
e-mail: [email protected]