1
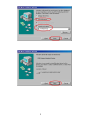
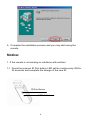
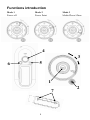
Multi-Function Remote Control User Manual
(2.4GHZ Remote & Receiver)
1
Warning Statement
15.21
CAUTION: any changes or modifications not expressly approved by
the party responsible for compliance could void the user’s authority to
operate the equipment.
15.105Federal Communications commission (FCC)
Requirements, Part 15
This equipment has been tested and found to comply with the limits for
a class B digital device, pursuant to part 15 of the FCC Rules. These
limits are designed to provide reasonable protection against harmful
interference in a residential installation.
This equipment generates, uses and can radiate radio frequency
energy and, if not installed and used in accordance with the
instructions, may cause harmful interference to radio communications.
However, there is no guarantee that interference will not occur in a
particular installation. If this equipment does cause harmful
interference to radio or television reception, which can be determined
by turning the equipment off and on, the user is encouraged to try to
correct the interference by one or more of the following measures:
---Reorient or relocate the receiving antenna.
---Increase the separation between the equipment and receiver.
---Connect the equipment into an outlet on a circuit different from that
to which the receiver is connected.
---Consult the dealer or an experienced radio/TV technician for help.
2
How to use the remote:
1. Insert 2 x AAA batteries in remote control.
2. Plug the receiver unit into any USB port.
3. Your operating system will start to setup the receiver unit
automatically, and you can see the information display in your
computer as below.
3
4. But in Win98/Me operation system you need to follow the dialog
boxes on your screen. During the installation process, the O/S may
ask you to put Win98 CD into the CD-ROM.
4
5
5. Complete the installation process and you may start using the
remote.
Notice:
1. If the remote is not working or interferes with another:
1-1 Press the receiver ID Pair button, LED will be continuously ON for
20 seconds and complete the change of the new ID.
ID Pair Button
LED Indicator
6
1-2 Place the remote near the receiver, press the ID Change button.
After pairing the remote and receiver, the LED on the receiver will
blink for 3 times.
The Receiver’s ID indicator blinks when receive commands from
remote.
(Warning: please do not press and hold this button more than 3
seconds, otherwise the ID will switch back to default ID.)
ID Change Button
2. If you had change ID before, remove the battery, or the remote does
not work, please repeat the steps from 1-1 to 1-2.
3. All keys will not work if you have pressed the ID Change button for
more than 40 seconds.
4. When the Receiver ID Pair button is push and hold more than 5
seconds, the receiver will not receive any code. Then you will have
to repeat steps 1-1 to 1-2 to start the remote.
7
Functions introduction
Mode 1
Power off
Mode 2
Power Point
Mode 3
Media Player/iTune
4
3
6
5
1
7
8
2
No Parts
Mode 1
Power off
Wheel
center
1
2.
3
4
5
Push up
Push
down
Push left
Push
right
Single
button
3 mode Mode 1/2/3
slide
switch
Push
button
ID
change
Mode 2
Power Point
Enter
slideshowÅÆExit
slideshow
Arrow up
Mode 3
MP/iTune
Arrow down
Volume down
PlayÅÆPause
Volume up
Arrow left
Previous track
Arrow right
Next track
Black screen
Mute
Mode 1/2/3 switch Mode 1/2/3 switch
Laser pointer
Starting media player/
iTune
ID change
ID change
Method of holding the remote and receiver together by magnet.
Press the receiver body close to the rear side of remote, two raised points
(7) into the chink of battery door and USB connector head on top of
magnet point (6)
Notice:
1) Low battery is detected when reach 2.4V, all LED will keep blinking
until new batteries were replaced.
2) When Laser Pointer is not in use for 30 minutes, the
laser pointer function will be disabled.
3) Power:DC-3V 2 x AAA Batteries
4) Laser poses danger to eyes! Do not stare into
beam, and be sure to avoid your child getting the remote.
9
Wireless Remote Hot Keys for media player
No. Key Function
98 SE
ME
2000
XP
1 Power key
X
V
X
V
2 Previous track
X
V
X
V
3 Next track
X
V
X
V
4 Play/Pause
X
V
X
V
5 Stop
X
V
X
V
6 Volume up
V
V
V
V
7 Volume down
V
V
V
V
8 Mute
V
V
V
V
PS: In Windows 98 SE and Win 2K O/S, you need to update the Media
player AP from Microsoft Website, in order for item (2-5) to work.
Certification:
1) FCC:
FCC ID: PTITSFC-2401
FCC Guideline:
This device complies with part 15 of the FCC Rules.
(1) This device may not cause harmful interference and
(2) This device must accept any interference received,
Including interference that may cause undesired operation
2) CE:
Part No.: TSFC-001
Doc No.: APR0418 Rev.1
10