1
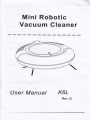
Mini Robotic
Vacuum Cleaner
User Manual
K6L
Rev.
01
SAFETY INSTRUCTION
----------
'Safety instructions
-1
* Battery and Recharging
instructions----------
PRODUCT FEATURES
MAIN BODY AND
1
------
1
------------------ 2
ACCESSORTES---
-------------2
BATTERY INSTALLATION AND REMOVAL..-.............4
RECHARGING BATTERY
G EN
5
ERAL OPERATION..-.-......-
* Starting
Operation
6
-------------6
SIDE BRUSH INSTALLATION
---6
USING DUSTING PAPER
CLEANING AND
MAINTENANCE....
* Cleaning Dust Bin
.--8-10
* Cleaning lntake----TROU
B
LES
H
OOTI
..........-..-8
N
12
G....-..-
r/t3
12
Before using this product, please read the safety instructions and follow
all normal safety precautions.
r
o
Read this user manual thoroughly and carefully before using this product.
definitely a good household helper.
Any operation that oppose to descriptions in this user manual may lead to harm
to human or this product.
e.g. Bathroom
or laundry.
( remove all the fragile objects and cords, clothing, papers,
loose cables, as well as making sure to lift curtains and drapes off the floor to avoid any
possible accidents. ln case of a loose cable is tangled with the product, the cable might move
around with the product as it works and topple down the table, chairs, or cabinet and might
cause hurt or property damage.)
5. Do not sit on top of this product or attach an object on the top of it. Beware of children or pets
while the product is in operation.
6. Do not make this product close to cigarette, lighter, match or any flammables.
7. Never use the product to clean up combustible or highly volatile liquids such as gasoline.
While the product is in operation, make sure all doors leading outside are closed.
BL ln case the product is malfunctioned or damaged by out force, please contact the seller for
repairing.
10. Turn off the power switch when you don't need to use this product for a long time.
1 1 . Before use, check whether adapter and outlet are properly connected.
12. Use this product in temperature form 0C to 40C (centigrade degree) and do not place this
product in hightemperature environment or under baking sunlight for a long time.
13. The appliance is not to be used by persons (including children) with reduced physical, sensory or
mental capabilities, or person lack of experience and knowledge, unless they have been given
4.
This revolutionary Mini Robotic Vacuum Cleaner is equipped with functions suitable for cleaning up floor
surfaces of home and office, such as wood, tile, and linoleum. The K6L Mini Robotic Vacuum Cleaner is
Save this user manual.
Safety lnstructions
1. Only use the product indoors, do not use it outdoors.
2. Before starting the product, make sure the dust bin filter is properly installed.
3. Do not use this product in wet or moist environment (any environment with liquid),
Thanks for purchasing the K6L Mini Robotic \hcuum Cleaner!
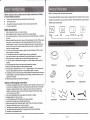
B
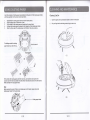
Random
+-'l---1'
Spiral
Along the
-----|
wall
,
Spiral
Before use, collect the floor environment
w
Main body x1
Rechargeablebatteryxl
z^
\t
supervision or instruction.
14. Children being supervised do not play with the appliance.
Battery and Recharging instructions
1. The battery is rechargeable, please use the voltage and current
specified on the packing. lf you
are not sure of the voltage and current of your house, please contact the seller or local power
company of a licensed electrician. (Only use battery pack which provided by manufacturer or
specified by manufacturer, please check the polarity before installing the battery. Battery voltage:
14.4VDC, working current: 800mA)
2. Only use the original baftery and power adapter of the product for charging.
3. Charging adapter is for indoors use only.
4. Do not recharge the product if the battery cord or plug is damaged.
5. Never touch the charger, plug or cable with damped hands.
6. Before cleaning the product, unplug the adapter, switch off the unit and take out the battery
7. Please take out the battery when it not in use for a long time.
8. The battery must be removed from the product before it is scrapped.
9. The product must be disconnected from the supply mains when removing the battery'
10 The battery is to be disposed of safety.
2/13
Adapterxl
Dusting paper base
Filter x1
@
User manual x1
xl
Dusting paper x3
Ve/ Lb *-:Q
*=l
Side brushes x
4
3/t3
Screws
x2
Triangle screw driver x1
T
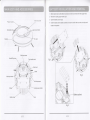
lnner dust bin
Power button
I*
*
I
1.
2.
3.
4.
Before install or take out the battery, the product must be disconnected from the supply mains.
Remove the dusting paper holder. (Fig 1)
Open the battery cover" (Fig 2)
lnsert the battery into the battery cabinet and close the cover" Make sure the cover clips well
located in its position.
cover button
I
il
$
fi
aa
:l
.l
Handle lift groove
Anti-drop sensor
V
small wheel
a@
3tr
AtB
q4r,
paper holder
I
I
Battery cover
Fig 3
4/t3
5/13
t
Before charging, make sure the battery is correctly installed and keep the power button to off
Starting Operation
position.
2.
1.
2.
3.
When to charge the product, firstly, connect the adapter output into the DC jack, and then
plug into power socket of the other end, then blue light will flash in the illumination ring.
l
3.
After fully charged, blue LED will keep on in the illumination ring.
4.
When the product runs out of power, LED indicator will keep red light on, it indicate the user
Before operation, empty the dust bin and install the filter properly.
Place the product in a room with much free space, and then power on. it to do cleaning work.
When the product runs out of power, the LED indicator in the illumination ring will keep on red,
the product will stop working.
4.
to charge the product.
Turn off the power switch when the product is not to be used or going to be charged.
To ensure the best performance and life span of the battery, please charge the product for
Note:
4hrs continuously. After fully charged for 4hrs, blue LED will keep on in the illumination ring.
* Remove the dusting paper holder and side brushes before using the product on the carpet, just to
Since the LED indicators light color is depended on its timing, if there is power cut off during
charging, when recharge the product, it will always timing from zero automatically. Therefore,
avoid wearing these parts.
* This product is not suitable for long-pile carpets,
t,,,
if the product has charged for 4hrs in total, it can be used to do cleaning work.
Note:
Before charging, make sure the power button is on off position, othenivise the LEb will keep
Use the accessories of screw driver and screws to lock the side brushes to its position as shown in
on red to remind user to power off it. lf the product is charged with power on, it can only be
the picture.
started to work after fully charged with re-set the product.
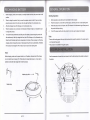
Wry
Adapter plug outlet
->
€p@
Adapter plug
lllumination ring
6/t3
ll
I
3tr
a@
7
/t3
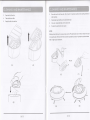
lnsert the accessory of dusting paper (expendables) into the grip slot of the dusting paper holder,
and then assemble it on the product main body bottom.
1.
2.
3.
4.
5.
Disassemble the dusting paper holder as shown in below picture.
Flat the dusting paper on clean floor or desk.
Put the holder on the dusting paper with contact on the smooth side.
Fold back the dusting paper one edge into lhe zigzag clip of the dusting paper holder.
Strain the other edge of the dusting paper and fold back it the same as above.
Put forefinger under the dusting
Cleaning Dust Bin
1.
Open the upper cover by pressing the button as shown in the picture
2.
Put your finger into the dust bin groove and grip to take it out.
it to the left
paper holder back, then lift it up
(1)
{,4!*1"
'|
+
".
...",
t
Put the holder with dusting paper under the main body, and make its raised point to the
concave clip of the main body bottom near the wheel. And take same action to the other side to
finish assembly of the dust paper holder.
Note:
Before operate the product, if there is no dusting paper on the holder, please remove the
dusting paper holder from the main body.
.rl--
B/t3
Q)
Dusting PaPer holder
9/13
3.
4.
5.
Rinse the dust bin with tap water. Do not wash it in washing machine, dish-washing machine or
Open the lid of dust bin.
other machine.
Take out the inner filter.
Empty the dirt in the dust bin.
7.
Periodically clean the filter with a soft bristle brush'
8.
Once dry, reinstall the filter and the dust bin lid.
L
Put back the dust bin into the cleaner.
,4.
NOTE:
t
Before put back the dust bin, please make sure the PE pad (function as non-return valve) in the dusl
bin is well located. Recheck the filter also before operate the product. lf operate the product without
filter, it might cause malfunction.
I
(3)
G)
(7)
(6)
(
*a
a ,*_
{-
_
a
(5)
(8)
t0/ t3
tr/t3
Cleaning intake
r;itt.r:riailiiri,iitiritrrrirtttit ltt.;rtlitl
After repeated use for some time, dirt and dust might accumulate around the intake of the product,
r,r;;t,iilitiliiii itiilr,*;,iulii,i*]i( jiiirtl:
to ensure its best cleaning efficiency and constant airflow it should
1.
2.
b<i
*lilli$
ffi
**tl
cleaned periodically.
1
Power off the main body.
Clean up the dirt and dust at the intake.
2
Air intake
1. Battery Low condition
2. Main body is picked up
/acuum on but can not
,ollect dirt and hair
1. The dust bin is full
1. Clean the dust bin
2. The filter is not installed
2.
The product is moving
backwards after being
started
3
-ED indicators flash in
rlue after 4hrs charging
4
1. Recharge the battery
2. Re-place the robot on the
floor
Red LED stays after
power on
correctlv
1. The product is on dark color
Re-install the filter
correctlv
1. Put the robot on light color
floor.
floor
2. Anti-drop sensor light was
2. Clean anti-drop sensor light"
Power supply might been cut
off during charging
The robot can be operated if
the battery has been fully
charged for 4hrs
@
a&
lf it becomes crooked,
[E
]D
5
@
;rooked, not good to
iweep
6^n
(
please scald it in hot water
the side brushes
6
lhe product cannot starl
7
-he product
circles
rround only, cannot go
rtraight
10)
Being used for a long time
to recover it to its original
shape
1. Battery is not installed
properly
2. Battery low
3. The robot is under protection
status
1. To install the battery correcth
2. To have the battery fully
charged(turn off the
cleaner first)
3. To re-set the robot
1. Open the wheel cover and
Notg:
1)
2)
t2/13
)ne of the wires of the
vheels might be loosened
connect the loosen wire
properly
2. Send the robot to seller for
reoairino
tt att above solutions don't work, please take below actions:
Re-set the robot by switching on the power button on the control panel;
lf re-set action doesn't work, please send the robot to seller for repairing
13/t3