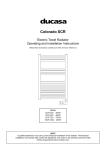
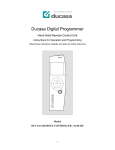
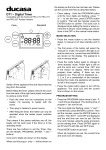
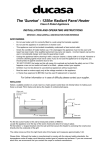
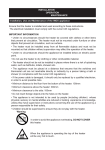
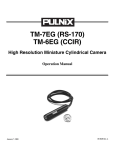
1
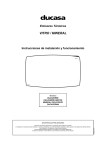
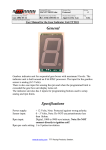
COLORADO MCR/TCR
Electric Towel Radiator
Instructions for Operating and Installation
(Read these instructions carefully and retain for future reference)
Models:
MCR-40/80
MCR-40/120
MCR-40/140
TCR-140
White
White
White
Chrome
NOTE:
A qualified electrician must carry out the electrical installation of this radiator. The Electrical
installation must comply with current UK regulations. Any claim on the warranty could be invalid
if these requirements have not been met.
CONTENTS
General / Important Information
Page 2
Installation Instructions
Page 4
�
�
�
Electrical Power Supply
Location of Towel Radiator
Mounting of Towel Radiator
Operating Instructions
�
�
�
Page 6
Controls
Mode Indicator Table
Function Modes
Maintenance and Guarantee
Page 8
GENERAL INFORMATION
Manufactured in steel, with a white or chrome finish, the Colorado towel radiator is simple to fit and
maintenance-free. Filled with a special heat conducting fluid and with a selection of wattages and two
hour boost facility, these towel radiators will grace any home.
The two hour boost facility can be set at the touch of a button and means the radiator will operate at full
power for sufficient time to warm your towels while you are bathing and dry them afterwards.
�
Designed and fabricated in accordance with EN 60335-1, EN 60335-2- 43 and EN 55014
(regulations for domestic appliances)
�
Standard colour White (RAL 9016)
�
NEC Class II and IP44 Rated
�
220–240V A.C.
�
Wall mounted
�
On-off main switch
�
Regulation by electronic thermostat
�
Comfort, Economy, Turbo and Frost Protection settings
�
Overheat protection with safety cut-out
�
Two colour LED indicators to show operating status
�
Programmable by infrared remote control (Ducasa Remote) – optional
�
Fitted with connecting power cable 1200mm long (without a plug)
2
Technical Data
MODEL
Wattage (W)
MCR 40/80
300
MCR 40/120
450
MCR/40/140
750
TCR 140
450
Power
230-240V/1/50Hz.
230-240V/1/50Hz.
230-240V/1/50Hz.
230-240V/1/50Hz.
Weight (Kg.)
10.5
13
18
18
Dimensions (mm)
500 x 790 x 70
500 x 940 x 70
500 x 1400 x 70
500 x 1400 x 70
Class
II
II
II
II
IP Rating
44
44
44
44
Cable (mm)
1200
1200
1200
1200
Important Information
See Section “Installation Instructions – Location of Heater” for important notes regarding the siting of the
appliance.
Due to the surfaces of the radiator becoming hot, it must not be positioned directly against or below
flammable surfaces.
This appliance is only intended for the drying of damp towels or clothes. Do not place flammable objects
(e.g. paper, magazines, spray cans, volatile substances or similar objects) near or on the appliance.
WARNING: To avoid risks to very young children this appliance must be installed with the lowest heated
rail at least 600mm above the floor.
In case of breakdown or damage turn off the radiator at the main On/Off switch and notify the supplier.
If the electricity cable gets damaged it must only be replaced by a technician appointed by the supplier.
This will avoid possible risks and ensure that special tools are available if needed
The radiator is filled with a precise amount of oil and in the event of leakage it must only be opened, if
needed, by the manufacturer or by the authorised after sales service.
This appliance is not intended to be used by persons (incl. children) with limited physical, sensory or
mental capabilities, or lack of experience, except for those under supervision or have received instruction
in the use of the appliance from a person responsible for their security.
Children must be supervised in order to ensure that they do not play with the appliance.
3
INSTALLATION INSTRUCTIONS:
Electrical Power Supply
A qualified electrician must carry out the electrical installation of this radiator. The electrical installation
must comply with current UK regulations. Any claim on the warranty could be invalid if these
requirements have not been met.
The radiator requires a 230/240V 50/60Hz power supply.
Connecting wires:
� Brown:
Live
� Blue:
Neutral
NOTE: The towel rail does not require an earth wire.
The connecting wires must be of the appropriate section, in regards to the length of cable, type of cable
and power rating of the apparatus.
The apparatus must be connected into a connecting box. According to regulations, the apparatus must
be connected to the power supply by means of an all-pole circuit breaker with a contact gap of at least
3mm or by a thermal-magnetic circuit breaker.
Location Of Towel Radiator
WARNING: To avoid risks to very young children this appliance must be installed with the lowest heated
rail at least 600mm above the floor.
It is essential to mount the towel radiator with the control box on the lower right hand side.
In bathrooms, the radiators must not be sited inside the protected area. The control unit switches must
not be reachable, directly or indirectly, by a person in the bath or shower.
The radiator, under no circumstances, should be installed below an electric power point.
Mounting The Towel Radiator
The components for fastening the Towel Radiator to a wall are supplied in a bag together with the
appliance. There are four support assemblies, each consisting of the following components:
(A)
(B)
(C)
(D)
(E)
(F)
1 plastic tube Ø28 x 65mm + screw M-5(H)
1 plastic tube Ø20 x 55mm with threaded inserts
1 screw Ø10 x 40mm
1 plastic retainer
1 plastic cap
1 screw Ø3 x 45mm
The towel radiator is fixed to the wall by four support assemblies. Two support assemblies should be
positioned between the 2nd and 3rd horizontal tubes from the top and two between the 2nd and 3rd
horizontal tubes from the bottom. At each level the supports should be spaced so that they are close to
the vertical tubes at each end.
4
First position the four support assemblies on the towel rail. Locate component (B) in a support position
between the tubes from the back of the towel radiator and hold it in position by attaching the retaining
component (D) from the front using screw (C). Repeat this in all four support positions.
Now lift the towel radiator onto the wall in the desired location and press against the wall, check that it is
level and then mark the position of the four supports. Remove the towel radiator and then drill and plug
the wall for the M-5(H) fixing screws.
Screw all four components (A) to the wall ensuring that the hole for the screw (F) is at the top (see Step
1). Then insert components (B) into components (A) and insert the screws (F) (see Step 2). Do not
tighten these screws at this stage.
Lift towel radiator onto the supports and secure it there by screwing the retaining components (D) back
onto components (B) using screws (C) (see Step 3). Now push the plastic caps (E) onto components
(D) (see Step 4).
Check that the towel radiator is in a perfectly vertical position and tighten the screws (F).
5
OPERATING INSTRUCTIONS:
MCR / TCR Towel Radiator Controller
2. Power indicator
Red= Room below set temperature (heat on)
Off = Room above set temperature (heat off)
1. Mode indicator:
Green = Comfort
Green Flashing = Eco Mode
Red Flashing = Frost Protection
Red = Turbo
3. On / Off & Manual Mode Selector
4. Thermostat Control
Use Of Controls
To Turn On: Press On/Off/Mode selection button (3).
Further single presses of the On/Off/Mode selection button (3) will now set the thermostat to the various
function Modes, stepping through the modes as shown on the following table.
MODE INDICATOR TABLE
Mode Indicator
(1)
On/Off Indicator
(2)
Mode
Function
Towel Rail Off
OFF
OFF
Green
OFF
Comfort
The room temperature is higher than the user
set Comfort temperature.
Green
Red
Comfort
The room temperature is lower than the user
set Comfort set temperature.
Red
Red
Turbo
Two hours at full power. At the end of 2hrs. the
thermostat will automatically reset to the
Comfort Mode.
Green Flashing
OFF
Economy
The room temperature is higher than 3.5ºC
below the user set Comfort temperature
Green Flashing
Red
Economy
The room temperature is lower than 3.5ºC
below the user set Comfort temperature.
Red Flashing
OFF
Anti-Frost
The room temperature is higher than 7ºC
Red Flashing
Red
Anti-Frost
The room temperature is lower than 7ºC
Green
Off
Comfort
To Turn off: Press and hold down On/Off/Mode selection button (3) for 3 seconds.
6
Function Modes:
�
Comfort Mode
The room temperature is controlled by means of a thermostat. In order to set the desired Comfort Mode
temperature, turn the Thermostat Control knob (4) from the position - towards + . The range of
temperature control is from 7ºC to 30ºC. When the room temperature is lower than the Comfort
temperature set on the Thermostat Control, the towel radiator heats up and the green indicator light (1)
comes on indicating that the heating element is on. When the temperature in the room is higher than
that set on the Thermostat Control, the heating element will be turned off and the indicator light (1) will
go out.
�
Turbo Mode
This mode is used to speed up the drying of towels or to heat up the room rapidly. This mode permits
the appliance to function at full power for 2hrs., irrespective of the temperature that is set on the
thermostat.
�
Economy Mode
In this mode the towel rail will maintain a room temperature 3.5ºC below the Comfort temperature that
has been set on the Thermostat Control.
�
Frost Protection Mode
In this Mode the thermostat is automatically set at 7ºC. The towel radiator will only come on if the room
temperature falls below 7ºC.
Control Using A Ducasa Remote Programmer (Optional)
The Ducasa digital controller can be used to set all the function modes previously described. In addition
to setting the heating mode it also allows 24 hour, 7 day timing and a range of features such as Holiday
Programme.
If the towel radiator is controlled by the Ducasa remote programmer the mode indicator will flash Green
periodically.
7
MAINTENANCE AND CARE
Ducasa radiators require very little maintenance.
The surfaces of the radiator must not be cleaned with an abrasive product or those containing granular
substances.
We recommend regular cleaning with PH neutral products.
In order to clean the radiator, it is recommended that the electric power is switched off.
Guarantee
Your appliance is guaranteed for two years from the date of purchase – during this period we will repair
or exchange, at our discretion, any faulty or defective parts providing the appliance has been used in
accordance with the operating & installation instructions and has not been misused or mistreated in any
way.
Any unauthorised repair or attempted repair will invalidate the guarantee.
This guarantee is additional to your statutory rights.
In the unlikely event of a problem with your appliance please contact your supplier.
Correct Disposal of This Product
(Waste Electrical & Electronic Equipment)
(Applicable in the European Union and other European countries with separate collection
systems)
This marking shown on the product or its literature, indicates that it should
not be disposed of with other household wastes at the end of its working
life.
To prevent possible harm to the environment or human health from
uncontrolled waste disposal, please separate this from other types of
wastes and recycle it responsibly to promote the sustainable reuse of
material resources.
Household users should contact either the retailer where they purchased this product, or their local
government office, for details of where and how they can take this item for environmentally safe
recycling.
Business users should contact their supplier and check the terms and conditions of the purchase
contract. This product should not be mixed with other commercial wastes for disposal.
UK Distributor of Ducasa Products:
Heattend Products Ltd
Web: www.heattend.co.uk
Email: [email protected]
8