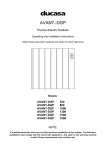
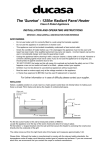
1
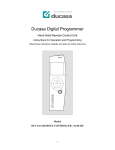
the display as the time has not been set. Please
set the current time first as described below:
DT1 – Digital Timer
Compatible with the Sunburst PRC-10T, PRC-15T
and PRC-20T Radiant Heaters
• Clock setting - Hold the PROGRAM button
until the hour digits are flashing, press “+”
or “-“ to set the hour, press ENTER button
to confirm. Then set the minutes, press the
ENTER button to confirm. The clock icon is
displayed when setting the clock or when current time is shown. Clock setting can only be
done in the OFF or the manual mode status.
MODE SELECTION
• Press the mode button to set the desired
status 1) manual on 2) timer standby and 3)
off.
• The first press of the button will select the
‘manual on’ mode, the power LED light is on
and the clock icon, current time and MANUAL
are shown on the display. The appliance is
now in manual mode.
timer
screw
remove
timer cover
assembly of timer
Switch off the appliance first and disconnect the
plug from the socket.
Before fitting the timer, please remove the cover
from the back of the right hand plastic end panel
by using a screw driver.
• Press the mode button again to change to
‘timer standby’ mode. Power light is still on
and the clock icon, current time, OFF and
P are shown on display. There are three
program timer setting. If there are any
programs set. They will be displayed as –
1, 2 or 3 or a combination of the numbers.
During this mode, the appliance will operate
as set in the program chosen.
• Press the mode button again to turn off the
appliance. The clock icon and the current
time is shown on the screen.
PROGRAM SETTING
• Push the timer into the connectors on the
heater. Fix securely to heater with the
screw.
• Press the PROGRAM button twice to set - P,
1 and ON are displayed. The starting time of
program 1 can now be set.
• Then plug in heaters to power source.
• The hour digits are flashing, press “+” and “-“
to set the hour, press ENTER to confirm. Then
set the minutes, press the ENTER button to
confirm. Then the P, 1 and OFF are displayed
and the end time can now be set. Set the
hour and minutes using the same procedure
as the starting time. Press ENTER again to
set P2 and P3 with ON and OFF times.
• After fitting the timer, the heater can only be
operated when the heater power switches
are on.
That means if the power switches are off, the
heater will not work even if the timer is in the
operating mode.
There are five buttons to set the Timer, they
are the MODE, PROGRAM, ENTER, + and –
buttons.
Icons and 4 digits are shown on the display.
When you first plug in, only ---- will be shown on
Press MODE button to go back.
When all programs are set, the current time
and clock icon are display.
PROGRAM CHOSEN
• After setting programs they can be chosen individually or in combinations.
• Hold the MODE button first and then press PROGRAM. P, 1 is flashing. Press ENTER to choose
and 1 will stop flashing and P1 is chosen. Then P, 2 is flashing and can be chosen. Press ENTER
to confirm and repeat for P,3. If you do not wish to choose a Program, press “+” or “-“ and the
program number will flash again. Press mode to cancel. After a few seconds, the program is
confirmed and set. When the timer is set to standby mode, the heater will operate according to
the program set and chosen.
SINGLE PROGRAM OPERATION
• During the program timer operation, the corresponding program no.1, 2 or 3 and ON will be
displayed. And the power LED will be on.
• At the end of the program, the program no. will disappear and OFF is displayed. (only when
single program chosen). The power LED is off.
• During program operation press ‘mode’ to stop the program or choose the ‘manual on’ mode.
COMBINATION PROGRAM OPERATION
• Press PROGRAM and ENTER buttons at same time to choose a combination of programs.
Press PROGRAM and ENTER buttons again to revert to single program operation.
• When a combination of programs is chosen, the repeated icon is shown on display.
• If a combination of programs is chosen, at the end of the program, the corresponding program
no. will remain displayed. The programs will be repeated each day.
SELF BUTTON LOCKING
• Press ENTER and “+” buttons at the same time and hold for 5 secs to lock the keypad.
Press the same keys again for 5 secs to unlock.
UK Distributor of Ducasa Products:
Heattend Products Ltd.
Web: www.heattend.co.uk
Email:[email protected]