1
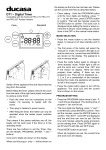
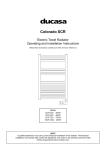
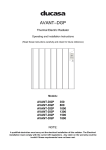
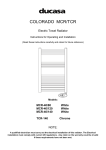
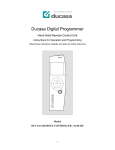
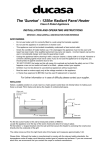
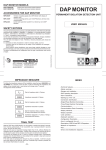
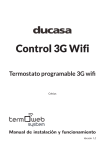
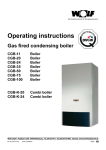
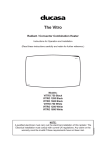
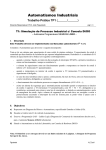
INSTALLATION OPERATION MAINTENANCE Installation, Use and Maintenance of the INOX appliance Ensure that the heater is installed and used according to these instructions. The electrical installation must comply with the current UK regulations. IMPORTANT INFORMATION • Under no circumstances should the heater be covered with clothes or other items that prevent air circulation. The heater must not be mounted under furniture or other objects that prevent air circulation, such as curtains. • The heater must be installed away from all flammable objects and must not be mounted so that children without supervision may affect the operation of the heater. • Under no circumstances should the appliance be installed below an electric power point. • Do not use the heater to dry clothing or other combustible material. • The heater should not be not be installed in places where there is a risk of splashing water, such as bathtubs, toilets, showers etc. • The appliance must be placed at a distance that ensures that the switches and thermostat unit are not reachable directly or indirectly by a person taking a bath or shower (in compliance with the current UK regulations). • If the power cable is damaged, it should only be replaced by a qualified electrician, in order to avoid possible risks. • Minimum distance to the floor from the bottom of the heater: 100mm • Minimum clearance above the heater: 300mm • Minimum clearance to the side: 100mm • Do not insert foreign objects into the holes on the heater. • This appliance is not intended to be used by people (including children) whose physical, sensory or mental abilities are reduced or lacking experience or knowledge, unless they have supervision or instructions concerning the use of the appliance by a person responsible for their safety. • Children should be supervised to ensure they do not play with the heater. Warning In order to avoid the appliance overheating, DO NOT COVER this heater. When the appliance is operating the top of the heater will be very hot to touch. Assembly instructions Wall fixing (see Figure 1): Wherever possible, install the heater on an external wall (cold) under a window. Do not install the heater near a ventilation system; this could interfere with the heat flow. Respect the specified minimum distances (see Figure 2):. 1. Make 4 holes in the wall, as shown in Figure 1. 2. Fix the mounting bracket on the wall. 3. Place the heater onto the bracket so that it is suspended Safety distances and location Figure 1 Maintenance and Care Figure 2 To clean the heater it is recommended that you switch off the appliance. Use non-abrasive products and a soft cloth. Regulations This appliance complies with the current regulations Electrical Connection The heater must connect to the corresponding power supply, indicated on the rating label. Important: The connection / disconnection of the appliance must be done through the plug. For a safe electrical disconnection during long periods of non-usage, the appliance must be disconnected by means of the plug incorporated in the electricity cable. Instructions for use VERY IMPORTANT: Before you operate the heater, completely remove the blue protection sheet from the front cover. 2. Signal light 1. Main On-Off switch 4. Display 5. Infrared receiver 3. Thermostat’s Knob Main switch (1): Located on the back of the heater Signal light (2): Whenever the indicator light is on, the appliance will be heating until it reaches the room temperature selected with the thermostat. Thermostat Knob (3): The thermostat sets the desired temperature, frost protection and turbo mode, which will be shown on the display. Display (4): The symbols of the different functions of the thermostat will be shown in this display. Infrared receiver IR (5): Direct the remote control (Easy Control unit) towards the infrared receiver for the transfer of temperature settings and programmes. Once the appliance is mounted and correctly connected, press the main On-Off switch (1), on the back of the heater, to the position I. By using the thermostat control knob (3) the operation of the heater can be controlled in the following way: • With the knob completely turned to the left a horizontal line will be shown in the display, indicating that the appliance is connected (Fig. 3). • Turning the knob slightly to the right (position *), the letters HG will be shown in the display, indicating that the heater is in the frost protection mode. In this position, the heater operates when the room temperature is less then 7ºC. (Fig. 4) • Continue to turn the thermostat knob to the right, different values from 8 to 29 are shown in the display. The temperature on the display shows the temperature required in the room. • The temperature shown refers to the comfort temperature required in the room. When the room temperature is lower than the comfort temperature, the heater will automatically heat until it detects that the room temperature is equal or higher than the one shown on the display. Note: when the appliance is heating, a dot appears to the right of the number shown in the display. • Turbo Mode. : In this mode, the heater will operate on full power continuously for 1 hour, regardless of room temperature. To set the heater to Turbo, turn the thermostat to the far right until it stops. Then turn the thermostat back to the temperature you want in the room during the “turbo-period”. When 1 hour is over the thermostat will automatically return to the temperature you requested in the room. When the thermostat is on the turbo setting, the letter A and the room temperature you have selected it to go back to after the turbo period will be displayed (fig. 6) To stop the turbo operation before an hour has elapsed, turn the thermostat completely to the left, to the off position. connected Activado Figure 3 frost protection Anti hielo Figure 4 Set-up Turbo Turbo (1 hour) Temperatura de temperature (8-29ºC) consigna (8-29ºC) Figure 5 (1hora) Figure 6 To programme the heater please refer to the instruction manual of the Easy Control Unit Correct Disposal of This Product (Waste Electrical & Electronic Equipment) (Applicable in the European Union and other European countries with separate collection systems) This marking shown on the product or its literature, indicates that it should not be disposed of with other household wastes at the end of its working life.To prevent possible harm to the environment or human health from uncontrolled waste disposal, please separate this from other types of wastes and recycle it responsibly to promote the sustainable reuse ofmaterial resources. Household users should contact either the retailer where they purchased this product, or their local government office, for details of where and how they can take this item for environmentally safe recycling. Business users should contact their supplier and check the terms and conditions of the purchase contract. This product should not be mixed with other commercial wastes for disposal. UK Distributor of Ducasa Products: Heattend Products Ltd Web: www.heattend.co.uk Email: [email protected]