1
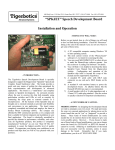
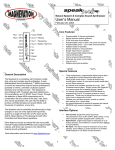
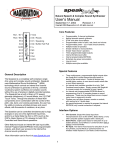
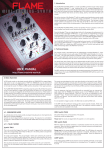
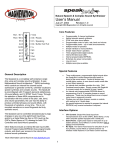
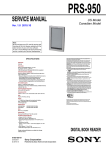
`
Phrase- A-Lator
Users Guide
Version 1.4
March 17, 2006
General Description
The Phrase-A-Lator is a demonstration program that
allows all of the SpeakJet’s features to be utilized and
experimented with. By demonstrating all of the features,
the engineer can better understand how to use the
features needed for a particular project. This manual will
explain all of the features of the Phrase-A-Lator. This
manual will break apart each of the modules that are part
of the software package and give demonstrations of each
aspect were appropriate.
Main Menu
The main menu screen (see Figure 1) will be displayed
upon executing the program. The main menu screen is
composed of 6 buttons across the top to choose which
module to load and utilize. Across the bottom is a
window for setting testing which serial port on your
computer will be used to communicate with the SpeakJet.
A “Done” button is included to close the program.
Phrase editor:
Pressing this button opens the Phrase Editor screen (See
Figure 2). The Phrase Editor is the main work area for the
development of words, phrases and sound effects using
the built-in phonemes and sound effects. The Phrase
Editor also lets you experiment with Pitch, Volume, Bend,
and Speed of each phoneme and sound.
The Phrase Editor has 3 areas of interest, “Phonemes and
Sound Effects”, “Modifiers and Controls” and the “Phrase
Construction and Dictionary area”.
The Phoneme and Sound Effect area is further broken
down into the Vowels, Diphthongs, Resonance and Nasal,
R’s, Voiced Fricatives, Voiced Stops, Voiceless Fricatives
and Miscellaneous Sounds.
Modifier and Controls area is further broken down into the
Musical Scales, Commands, Controls and Modifiers.
Phrase Construction area is further broken down into the
Say Data area and the Dictionary lookup area. The Say
Data area also has the view codes option to see the actual
codes sent directly to the SpeakJet.
The final section in the bottom right hand corner has the
“Shut Up” and the “Done” button to silence the SpeakJet
and to exit from this screen back to the Main Menu screen.
Figure 1
Once the SpeakJet is connected to the PC serial port
through the appropriate interface circuit, select the port
number in the “Serial Port:” dialog box and make sure the
“Use Flow Control” box is checked. Press the “Test
Serial Connection” button to verify the serial connection.
The serial port number box will change color to indicate
testing and good connection. The SpeakJet is now ready
to be used through control of the PC.
Figure 2
1
EEPROM Editor:
By “Single Clicking” on any of the white buttons on
the Phrase Editor screen, you will here the sound
immediately. By “Double Clicking” on any of the
white buttons on the Phrase Editor screen the sound
or control is copied to the “Say Data” window. Once
the window has the desired word, phrase, sentence,
or sound, press the “Say It” button to hear the
compilation or the “Say Selection” to say only words
or sounds sections highlighted by the mouse.
The EEPROM Editor window shows the 16 memory
cells used to store predefined speech, sound effects
or control codes (See Figure 3). Events on the Event
Input lines can call these memory cells and their
contents for playback or execution. SCP commands
may also call these predefined memory cells for
playback or execution.
If you click in the large gray windows for each cell,
the software will open the Phrase Editor screen to
allow compilation of words, phrases, sentences or
sounds. When the “Done” button is pressed on the
Phrase Editor screen, the software will close the
Phrase Editor screen and copy the contents of the
“Say Data” window into the memory cell that was last
clicked on. To hear the contents of the memory cell,
just “Click” on the white number button next to the
memory cell. Once the desired contents are in each
memory cell, press the “Write Data to SpeakJet”
button. This will download and write the contents to
the internal EEPROM on the SpeakJet using the built
in SCP commands.
Any word may be typed directly into the “Say Data”
and if the word is in the dictionary, the word will be
uttered once the “Say It” button is pressed. If the
word is not listed in the dictionary no sound will be
uttered for that word.
Any word entered into the “Dictionary” window will be
compared to the words in the dictionary once the
“Load Overwrite”, “Load Insert” or Load & Say Next
Word”, if a match is found the words phonetic
equivalent spelling is loaded and either overwriting
the current “Say Data” window, inserting at the
current cursor location in the “Say Data” window, or
immediately loaded into the “Say Data” window and
played back the next word in the dictionary is loaded.
Memory usage window will indicate the amount of
total amount of memory being used. 37 bytes will
always be unavailable due to some locations are
used by the SpeakJet for setup of Event Input Lines
and other internal functions.
The “Save” button will allow you to save an entry into
the dictionary that may not be already included or
editing of an existing entry in the dictionary.
The “Shut Up” button is used to immediately silence
the SpeakJet.
The “Clear Say Data” button will clear the “Say Data”
window of all contents.
The “Done” button will close this window and bring
back the Main Menu window.
To view the actual data that is sent to the SpeakJet,
press the “View Code” or the “View Codes for
Selection” button. If the “Apply Controls Before
Playing “Say Data” box is checked, the two byte
codes for Volume, Speed, Pitch and Bend and the
values from the four sliders will be added to the front
end of the codes going to the SpeakJet. This feature
is very handy for “Copying and Pasteing” into
compilers and programming stations for
microprocessors that may be used with the
SpeakJet.
Be careful with using the “Wait” button under the
Pauses section. This places the SpeakJet into a
standby state and will shut down until a Start
command is issued through SCP or one of the Event
Input lines having previously been programmed to
issue the Start command when the changing logic
state has been detected.
Figure 3
2
buffer after the memory phrase is played.
Event Configure:
The Event Configure page is the setup area for all 8
of the Event Input lines and how the Events behave
and interact (See Figure 4).
“Restart From Wait” is the last column of the Event
Configuration area. These checkboxes select which
“Event Inputs” will start the SpeakJet after it
processes the wait command. This allows multiple
SpeakJets to be synchronized to each other or a host
processor. You can load the buffer with the pitch,
and phrase data, load other SpeakJets with their data
then by having an event input “Restart From Wait” all
the SpeakJets can “sing” in multi-part harmony.
You will notice several columns of functions.
In the first column are the “Event Input Transitions”
for each Event Input line and the Power Up/Reset
phrase. There are both High to Low and Low to High
Events listed for every Event Input Line.
On the right hand side of the window is where the
special functions of the SpeakJet can be configured.
These include Input Style, Output Controlled By and
Output Startup State.
In the next column are the “Play Phrase” selection
boxes. These enable or disable the Event inputs.
In the next column are the “Phrase # to Play” number
boxes. These are the EEPROM Memory cells to play
from when the Event is received. Please note: more
than one event can call the same memory cell. Also
both events on an Event Input may be active at the
same time.
“Input Style” for Event Input numbers 6 and 7 are
selectable between TTL events or “RC” pulse width
events such as servos for Radio Control. This will
read the pulses of a radio control receiver and make
an Event High for positive pulses greater than 1.5 ms
in length and an Event Low for positive Pulses less
than 1.5 ms. Factory default setting is “TTL” for both
Input #7 and Input #6.
“Clear Buffer” checkbox column is where you select if
the Event will clear the buffer and play the memory
cell or append to the end of the current buffer. If
checked the contents of the 64-byte buffer is cleared
and the memory cell plays immediately.
“Output Controlled By” section determines whether
the three General Purpose Outputs are controlled by
the SpeakJet’s internal processor status or by the
phrase control codes. Factory default settings are all
selected to “Chip”.
The next column contains the “Call Phrase”
checkboxes. In these boxes you select to call a
phrase in the middle of the buffer and return to the
“Output Startup State” determines if the three
general-purpose outputs are enabled or not. Factory
default settings are “On” for all three Outputs.
After completing the configuration of all events and
output selections, you must press the “Write Data to
SpeakJet“ button to write data to the EEPROM. This
must be done before any changes will take effect.
Along the bottom are the “Auto Silence” checkbox,
which ends the last sound or plays the last sound
continuously until the next sound is received in the
buffer. The factory default setting is true.
SCP Node selects which node number this SpeakJet
is. The default is zero.
The “Shut Up” button will immediately silence the
SpeakJet when pressed.
The “Done” button will exit this window and take you
back to the “Main Menu” window.
Figure 4
3
Synth Control:
between 1 and 4000 will cause all three Tone
Generators frequency to adjust to an octave of the
value in the Harmonize or H – Frequency box. The
Tone Generators frequency boxes must contain a
none zero value for this to work. The Value will
adjust up or down from their current values to get
the closest value that is a harmonic of the value in
the H-Frequency box. As an example, if you set
Oscillator #1 frequency to 100Htz, Oscillator #2 to
200 and Oscillator #3 to 700 then type 110 in the
H-Frequency box and press the Harmonize button,
The software will adjust the frequency value of the
three oscillators to 110, 220, 770 respectively.
This is also sent to the SpeakJet as soon as the
frequencies are calculated.
The Synthesizer Control window will allow the low
level access to the five - channel synthesizer (See
Figure 5).
The top section has slide selectors for Master
Volume and Envelope Pitch. Also the selector
button boxes for the envelope type of Saw tooth,
Sine wave, Triangle, and Square wave.
The next section down is the Tone Generation
Oscillators. Each of the three tone generators
have a Volume and Pitch slider. These sliders also
have a numeric box that shows the value of the
sliders. You may type in the number there or use
the sliders to change the values. The Volumes
must not exceed a value of 63 total for all of the
Tone Generators. Once the value gets over
60 total, the numeric value background will turn
Yellow to indicate that you are approaching a
clipping level and distortion may occur. After you
exceed 63 for the total value of the three Tone
Generation Volumes, the numeric box background
will turn red to warn you that you are now clipping
and causing distortion.
The next feature is the “Frequency Adjust” slider.
This will move all three frequencies in a scale
move based on the Frequency Adjust slider. The Z
button will zero the adjustment to allow more range
for either up or down scaling.
The “Volume Adjust” slider works the same as the
Frequency Adjust but adjust the volume of the
three main oscillators.
The lower section makes the adjustments to the
two special oscillators. These oscillators have a
unique feature of an adjustable distortion or white
noise source. The number represents the amount
of pure tone or noise. The lower value represents
the pure tone while higher numbers increase the
noise source with a “flavor” of the frequency
selections. The one “Distortion” slider will adjust
both oscillators then each oscillator has its own
“Frequency” and “Volume” sliders.
On the left side of the Tone Generation area, you
will find the Envelope check box. This is used to
select whether the pure tones are passed through
the Envelope Generator or bypass the Envelope
Generator.
The next section below this checkbox you will find
the Tools section. These tools are for adjusting the
Tone Generators. The first box is the Harmonize
button and numeric box. Placing a number
The One-Half enveloped checkbox will select these
oscillators to be enveloped at a 50 percent level or
not.
The “Sound” text box and the Load and Save
buttons are features to allow sounds to be saved
and recalled at any time.
The “Sound” Text box is for naming the sound after
you are ready to save your creation. Simply type in
the name you want to save the new sound as.
When you press the Save button, a text file will be
created in the default folder and named
SJSounds.txt. In this file you will find all sounds
saved and the information needed to re-create this
sound later.
Figure 5
4
The “Load” button will load the sound named in the
“Sound” text box and adjust all of the Oscillators to
the proper value to reproduce the sound saved
earlier.
spelling for the words. This will compact the
dictionary and free up space when storing since
the unused words are purged.
The “Find” button will open a find text window that
gives the user a quick way to find any matching
text and bring this into the main dictionary window.
The “Shut up” button will silence the SpeakJet in
the event that you want to mute SpeakJet
immediately.
The “Save and Sort” button will re-sort the
dictionary alphabetically then save the new
dictionary into the default folder with the
“PhraseALator.Dic” file name.
The Done button will close this window and take
you back to the Main Menu.
The “Save Changes” button will save the current
dictionary to the default folder with the
“PhraseALator.Dic” file name. This Button does
not do an alphabetic sort before save. You might
want to use this if you want to find an entry easily
by placing your entry in a certain location that you
can find easily when you come back to the
Dictionary Editor such as the first word in the list or
the last word in the list or by another word that may
have some relation to the word you are currently
editing.
Dictionary Editor:
The Dictionary Editor Screen will allow the editing
and displaying of the dictionary (See Figure 6).
You will see the main text window where the words
are listed on the left and their phonetic spelling and
formatting is on the right side of the equals mark.
On the right hand side of the large text window you
will find 6 main buttons.
The “Done” button will close this window and take
you back to the Main Menu.
The “Import New Words” button will open a dialog
box to allow a new text file to be imported with the
words and the phonetic spelling to be added later.
This feature will allow a text file to be “read in” and
new words extracted out of and added to the
current dictionary. Once the words are added, you
may then compile your own phonetic spelling for
these words and complete the new dictionary
entries.
Baud Rate and Detune:
The SpeakJet Baud Rate and Detune window is a
SpeakJet calibration window and should only be
used if you are sure you need to make changes in
these values (See Figure 7). Factory Default
settings is 9600 for the baud rate. The detune
value should not be changed. This affects the
overall function of the chip as well as the serial
communications speed.
The “Erase Blank Entries” button will clean the
dictionary of words that do not have any phonetic
Figure 6
Figure 7
5
The Baud Rate adjustment area is used to change
the Baud Rate of the serial port on the SpeakJet.
Refer to the SpeakJet User Manual on how to
set up the SpeakJet to change the baud rate.
Once the SpeakJet is waiting for the sync
character for the new baud rate, it will be sounding
the ping sound to indicate it is you can then select
the new baud rate from the bullet circle selectors
and press the “Send Sync Character” button.
The first thing to do is to get the phrase to sound
the way you want. You do not have to use the
same phrase as we do in this example but to keep
the flow of the example going, it is recommended
to follow on with this example as we go.
Lets start by opening the “EEPROM Editor” window
(See Figure 3). In this window you will find the 16
memory cells with a small number in the left side
that is in a white box. Once you find a cell that is
empty that you would like to store you phrase in,
you may click on the white number box. This will
call the “Phrase Editor” window and allow you to
compose your phrase or sound effect that will be
stored in that memory cell. If there are contents
already in this memory cell, these will be loaded
automatically into the “Say It” box at the bottom of
the screen.
The Chip de-tune section is to make adjustments
to the internal oscillator. It can be trimmed up or
down to compensate for extreme temperature
operation and where output frequency is important.
Under normal use, this is not necessary for the
complete temperature operating range and is preadjusted at the factory. This section should only be
changed if absolutely necessary for unique
application such as extreme temperature
environments and the output frequency is
important. To return to the Factory default settings,
a frequency counter will be necessary to adjust this
value until the PWM output frequency back to 32.0
kHz (+/- 0.1 kHz) during silence.
Once you have gotten to the Phrase Editor screen
from the EEPROM Editor screen, type in the
following phrase exactly as stated here, you may
use copy and paste if you like:
you \Fast \VV got mail
Once the frequency adjustment has been made the
baud rate will have to be re-calibrated since the
master oscillator affects the internal baud rate of
the SpeakJet. This will have to be done after each
Detune function to ensure correct communications
to the SpeakJet for subsequent adjustments or
communications.
The “\Fast” will play the next phoneme at a 50%
faster time than normal and in this case the \VV
(slash and double V not the letter W). This helps
modify the normal phonemes to sound proper in
certain instances.
The words “you”, “got” and “mail” are found in the
dictionary and automatically converted into a
phoneme stream and sent directly to the SpeakJet
when encountered. This is done in the Phrase-ALator software and not in the SpeakJet. The
phonemes are then stored in the EEPROM also
and not the real word.
To de-tune the internal master oscillator, simply
enter the HEX value in the Detune value box and
press the “Send Detune Value” button. Make sure
to precede the HEX value with the “&H” prefix.
Programming Example:
To hear the new compilation, just press the “Say It”
and the SpeakJet will utter the new phrase. Once
you are happy with the phrase, just press the
“Done” button and the newly compiled phrase will
be carried over to the EEPROM editor screen. If
you still would like to hear the phrase again just
single click on the gray area that contains the
phrase and the SpeakJet will again sound the
phrase. If you are happy with this selection the
next step is to click the “Write Data to SpeakJet”
button on the bottom of the screen. If you are
finished with the EEPROM phrase editing at this
time, then press the “Done” button. This will carry
you back to the “Main Menu” screen.
In this example we will program an Event Input pin
to call the phrase “You’ve Got Mail” when the
Event Input line 1 goes “High”. In this example we
will assume that the SpeakJet is new and has not
been changed from the factory settings.
The very first thing is to be sure that the SpeakJet
is properly communicating with the computer and
responding. Also make sure that “Use Flow
Control” checkbox is checked before you begin.
6
The next and final step is to configure the
EEPROM configuration area to turn on the Event
Input lines and configure which Event Input line will
call our new phrase.
Make sure the “Auto-Silence” box is checked and
the SCP node is set to zero (just for this example).
After all the items have been adjusted
appropriately, press the “Write to SpeakJet” button.
This will write the configuration data to the
SpeakJet. Now perform a reset on the SpeakJet to
make sure the new features are loaded into the
proper operation of the SpeakJet.
From the “Main Menu” press the “Event Configure”
Button to start the configuration page for the
events. In this page we will set up the Event Input
line number one to say our phrase when it senses
a Low to High going transition.
The only stage left is to make sure that the Event
Input line #1 is low and momentarily raise the
Event Input line #1 to a High state and the
SpeakJet should utter “You’ve Got Mail”.
Go down to the third line from the top of the list.
This should be the Event Input #1 High line. Make
sure to check the box in the “Play Phrase” column
is checked. You may uncheck all of the other
boxes in this column at this time if you do not want
any other phrases to be called from an event. Un
checking the Power up & Reset box will stop the
SpeakJet from announcing ready whenever the
SpeakJet is reset or powered up.
Have fun with SpeakJet and keep watching for new
items and project to use SpeakJets.
Now enter the Memory Cell number that the phrase
“you’ve got mail” phoneme sequence now resides
into the “Phrase # to Play” numeric box.
The next column is the “Clear Buffer” checkbox
and will force the buffer to clear and the phrase
stored in the EEPROM to be play immediately
when the event calls the phrase. Check this box or
uncheck this box depending on the way you want
things to work.
The column “Call Phrase” and “Restart from Wait”
should both be un-checked at this time.
All of the bullet boxes on the sections “Input Style”
should be the left most choices.
All of the bullet boxes on the sections “Output
Controlled By” should be the left most choices.
All of the bullet boxes on the sections “Output
Startup State” should be the left most choices.
7