1
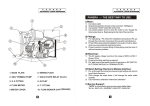
WII Quick Reference Guide— Palm™ Tungsten C Contents Features Reference ________2 Taking Care of Palm™ ____ 4 Common Tasks ___________5 Nomad Wireless Access _____8 System Resets ____________ 9 HotSync® to Computer ____10 Data Input Options _______12 Web Browser Tips ________ 16 Features Reference 2 1. 2. 3. 4. 5. 6. 7. 8. 9. 10. 11. 12. 13. 14. 15. Color Display of the Home Screen Web Browser Email 5-way Navigator Address Book Date Book Thumb-size Keyboard Power Button Embedded WiFi Antenna (802.11b) Headset Jack (2.5mm) Expansion Slot Universal Connector (for Cradle) Infrared (IR) Port Stylus Speaker (on back) (See Handbook p.15-18 for more features) 3 Taking Care of your Palm™ 1. Touch screen only with stylus or a plastic tipped item. 2. Do not expose to moisture 3. Do not expose to extreme heat or cold. This includes placing it in a window near direct sunlight or placing it in a car for extended periods. 4. To clean your screen, use a dry, lint-free cloth and gently pat the dust away. 5. Never touch the screen with your hand. Notes ________________________ ________________________ ________________________ ________________________ ________________________ ________________________ ________________________ 4 Common Tasks Power on/off the Palm™ Press (don’t hold) the Power button bottom right side on the Navigation Press Home icon to go to home screen or exit an application. Press the 5-way Navigator up/down or left/right to select applications or tap with the stylus on the application icon. Calculator Tap the Calculator icon on the homepage. It opens a basic calculator. Recharging the Battery • Plug the Cradle Adapter into a standard wall outlet. • Place the Palm™ into the Cradle and allow to charge. • A green light on the top of the Palm™ will light up to indicate charging is in progress. * charge the battery in cradle 15-30 minutes each day for optimum performance. After approx. 5 days without charging, all data will be lost. 5 Adjust Screen Brightness Hold Power to bring up Brightness Options (or Function + Tab ) Reorienting the Touch Screen Go to Prefs; Digitizer. Touch stylus to indicate points on the screen. Beaming a File • Locate the record, file or category to beam. • Press Function + Menu • Tap Beam [Category/ Photo/Record] • Point IR port toward other Palm’s IR port and hold at approx. arms length during beaming Help File For a tour of basic Palm™ techniques click on the Quick tour icon and follow through the brief steps. Setting up WebMail The Palm can support up to 8 email accounts. To configure an account with WebMail: 1. Tap VersaMail on your home screen. 2. Press Function + Menu 3. Tap Accounts, Account Setup 4. Tap New, enter a name (like UT) 5. Select Mail Service as Other 6. Select Protocol as IMAP, tap Next 6 7. Enter NetID and password, tap Next 8. Set the server settings: Email: [email protected] Incoming Mail Server: imap.utk.edu Outgoing Mail Server: smtp.utk.edu 9. Tap Next, Tap Done, then Tap Ok You are now able to access WebMail. * these steps used for yahoo, hotmail, etc. setup. Configuring MS Outlook To allow sync with WebMail, on your PC, set Outlook as the default email handler: 1. Go to the Control Panel. Click Internet options. 2. Go to Programs tab. 3. Select Outlook as the default e-mail program and Click Ok. Steps to create a PDF 1. Create a PDF file on computer. 2. Then send it to Palm™. (refer to p.10 on HotSync®) 3. To open PDF’s one must have Adobe Reader installed on the Palm™. To install go to: http://www.adobe.com/products/acrobat/ acrrsystemreqs.html/ 7 Nomad Wireless Access To sync email with your UT Account, you will need to access the internet. UT’s wireless network “nomad” makes it simple. 1. Tap the WiFi Setup icon from Home Screen 2. Tap Next 3. Select nomad and tap Next or If nomad is not detected, tap other and enter nomad and tap Ok. 4. Tap Done. ∗ In Web Browser, press Menu key to view WiFi signal strength ∗ For more information, go to http://wireless.utk.edu and http://oit.utk.edu/helpdesk/section/wireless 8 System Resets To perform the three types of system resets, you must press the Reset button on the back of the Palm using the reset tool inside the stylus. Soft Reset Press the reset button with reset tool in the stylus. Data should be preserved. System (Warm) Reset Press the reset button and hold the Up navigation button until the Palm is on the screen. This reset can erase data and is done when the Palm freezes. Hard Reset* Press the reset button and hold the Power button. Hard Reset erases everything on the Palm * WARNING: Resets can erase your Palm entirely. Check your user manual for more information before conducting a reset. 9 HotSync® to Computer 1. Connect the HotSync® cradle to the PC’s USB port and plug the adapter to the wall. 2. Install Palm™ Desktop Software from the CD. 3. Place the handheld in the cradle. 4. Press the button on the cradle to begin the HotSync® process. 5. When the HotSync® process is complete, data should be on both the handheld and PC. In the event of the same file being edited in both locations, wireless HotSync® will ask which version to retain. Wireless network HotSync 1. Press Home 2. Tap the HotSync icon. 3. Tap Network, and than tap the HotSync icon. * To avoid data loss, synchronize often. ∗ Only synchronize with one computer to prevent information loss or data corruption. 10 To Sync using iSync on OS X: Install at least: iCal 1.5, iSync Palm™ Conduit 1.2, and Palm™ Desktop 4.0 (w/ HotSync 3.0) 1. Open iSync; Under “Devices” select “Enable Palm OS Devices.” 2. Open HotSync Manager. 3. Choose HotSync, and Conduit Settings. 4. Double-click the iSync Conduit and select "Enable iSync for this Palm™ device." 5. Click OK. 6. The Palm™ will now appear in iSync where the preferences can be set. 7. Sync as normal with HotSync outlined previously. * iSync connects to Address Book and iCal instead of Outlook as on the PC. Address Book, Date Book, and To Do information will still sync with Palm™ Desktop. Palm™ does not support multiple Calendars from iCal might prompt to choose between data on Palm™ or the computer. 11 Data Input Options Use thumb-size keyboard To type capital letters or • Press the Caps Key • Press and hold a character key twice to initiate Caps lock. * Press Caps To unlock, press the Caps key once. To type numbers: Press Function key + corresponding letter key (e.g. T for 5). * Number/Function Lock by pressing Function twice; once more to unlock. Use the on-screen keyboard 1. Open any application (such as Memo Pad). 2. Tap any file, or tap New. 3. Press Function + Symbol bar 4. Select the type of keyboard. (See below) 12 Use the stylus to write Graffiti 2 characters on the screen 1. Activate via Home Screen; System; Prefs; Writing Area; Graffiti 2 2. Open the application (such as Memo Pad) A shaded box appears in the lower-right corner of screen 3. Position the cursor where you want the characters to appear. 4. Write the desired characters: Letters on the left of the screen 13 Numbers and Accents on the right of the screen (Follow letter on left with accent on right) 14 Uppercase in middle of the screen. Use shift stroke (on right) before writing symbols and special characters. Access buttons and other controls that appear on the screen by tapping and holding the control until it activates. 15 Web Browser Tips 1. Press the Web Browser icon 2. Tap the Home icon on the right of the screen to browse to the default page. 3. Tap the World icon to enter an URL. WiFi Free Hot Spots on the Cumberland Strip (from www.jiwire.com) Krystal 1718 Cumberland Avenue Mellow Mushroom 2109 Cumberland Avenue Panera Bread (all Knoxville locations) 2000 Cumberland Avenue 16