Download acrobat-hd-mini-user-manual

Transcript
Users Manual
Congratulations on your purchase of the Acrobat HD Mini. Enhanced
Vision products are designed to give you the highest quality and
convenience available.
The Acrobat HD Mini product can enable people with low vision to
read, write and to see objects at any distance. The unique design of
this product provides the ultimate in flexibility and offers a large
range of magnification with multiple viewing options that make
reading easier than ever. The Acrobat HD Mini is a fully integrated
battery operated solution.
Prior to using this system, please carefully read and follow the
instructions provided within this booklet. A thorough understanding
of the functionality will allow you to fully benefit from the flexibility
and great features of this device.
If you have any questions, please contact the eye-care professional
or the supplier from whom you have acquired the unit.
Product enhancements and revisions are an integral part of what we
do here at Enhanced Vision. Please visit http://www.enhancedvision.com/low-vision-product-line.html
and select your Enhanced Vision Product. You will find the most
up-to-date version of the User Manual at the bottom of the page.
FCC COMPLIANCE NOTICE
This device complies with Part 15 of the FCC Rules. Operation is subject
to the following two conditions: (1) This device may not cause harmful
interference, and (2) this device must accept any interference received,
including interference that may cause undesired operation.
This equipment has been tested and found to comply with the limits for a
Class B digital device, pursuant to Part 15 of the FCC Rules. These limits are
designed to provide reasonable protection against harmful interference in
a residential installation. This equipment generates, uses, and can radiate
radio frequency energy and, if not installed and used in accordance with
the instructions, may cause harmful interference to radio communications.
However, there is no guarantee that interference will not occur in a
particular installation. If this equipment does cause harmful interference
to radio or television reception, which can be determined by turning
the equipment off and on, the user is encouraged to try to correct the
interference by one or more of the following measures:
– Reorient or relocate the receiving antenna.
– Increase the separation between the equipment and receiver.
– Connect the equipment into an outlet on a circuit different from
that to which the receiver is connected.
– Consult the dealer or an experienced radio/TV technician for help.
Unauthorized changes or modification to this system can void the user’s
authority to operate this equipment.
If your Low Vision device has an option to connect to a TV, it must be used with
shielded interface cables in order to meet FCC emissions limits for Class B digital
devices. It is the responsibility of the user to use the shielded interface cables
supplied with the equipment.
FCC Compliance Notice
Important Safety Precautions .......................................................................... 5 - 8
Acrobat HD Mini
Acrobat HD Mini Package Contents ....................................................... 9 -10
Acrobat HD Mini Setup...................................................................................... 11
Using Acrobat HD Mini .............................................................................. 12 - 30
Troubleshooting......................................................................................................... 30
Advanced Programming................................................................................. 31 - 32
Warranty Statement ................................................................................................ 33
Specifications ............................................................................................................. 34
Other Enhanced Vision Products.............................................................. 35 - 36
Contact Information ................................................................................................ 37
Table of Contents
Important Safety Precautions
For your safety and to obtain the most benefit and life from the Acrobat
HD Mini, please read these safety precautions very carefully.
The Acrobat HD Mini is designed to enlarge and enhance images in
order to improve the quality of life for people who are visually
impaired. The extent to which this product can improve the ability to
see images depends on a person’s individual condition and level of
visual impairment.
The Acrobat HD Mini is not designed to restore vision, correct eye
conditions or halt degenerative vision loss. An eye-care professional
can determine the usefulness and suitability of the Acrobat HD Mini
for a patient’s individual condition. Please follow these safety
precautions:
• Use the Acrobat HD Mini on a stable, level surface such as a solid desk
or table, according to its intended design specifications.
• Avoid placing the Acrobat HD Mini on an unstable table, cart or
stand. It may fall causing serious damage to the unit or bodily
injury to the user.
• Use the Acrobat HD Mini indoors only – it should NOT be exposed to
extreme or rapid changes in temperature or humidity. Do not place
the Acrobat HD Mini near a radiator, heater or areas exposed to long
hours of direct sunlight.
• Always place the power cord away from traffic areas to avoid
damage of power supply.
• Prevent the risk of electrical shock by NOT attempting to
disassemble the unit. Please refer all service to an authorized
repair facility.
Important Safety Precautions
5
To Move the Acrobat HD Mini to Another Location
• Use caution if you are repositioning the Acrobat HD Mini a short
distance across a desk or table. Make sure you do not pull on
any power cords or connector cables.
Caring for the Acrobat HD Mini
• Always turn the power OFF on the Acrobat HD Mini when the
system is not in use.
• Always turn the power OFF before cleaning the Acrobat HD Mini.
• Clean the Acrobat HD Mini with a soft dry cloth or an
electrostatic dusting cloth. DO NOT use liquid cleaners on its
plastic surfaces.
• Clean the lens glass as needed with the lens cloth provided
within the Acrobat HD Mini’s packaging (See figure 1).
Figure 1
6
Important Safety Precautions
• Follow all warnings, cautions, and instructions marked on the
product.
• The attached power cord is a disconnect device for electrical
equipment. The socket-outlet should be installed near the
equipment and be easily accessible.
• This product is equipped with a 3-wire grounding type plug as a
safety feature. This plug has a third (grounding) pin and can only
be plugged into a grounding-type power outlet. If necessary,
contact an electrician to replace your power outlet with a
grounding-type power outlet.
• Do not use the Acrobat HD Mini in, near or around water. The
Acrobat HD Mini is not designed to offer protection against contact
with liquids of any kind.
• Do not use the Acrobat HD Mini near flammable liquids.
• At least once per week, clean the Acrobat HD Mini with a soft
dry cloth or an electrostatic dusting cloth. DO NOT use
liquid cleaners on its plastic surfaces. No additional methods
of sterilization or cleaning are recommended or required.
Important Safety Precautions
7
• This product contains moving
parts. Please use caution when
moving the adjustable slide
arm or when transporting the
Acrobat HD Mini to avoid
possible injury to hands and
fingers.
• To avoid personal injury or damage
to the Acrobat HD Mini, do not
make any other type of
connections to the camera
input jacks other than those
indicated in the photos below.
Susceptibility to Interference
There may be temporary degradation of the image when the Acrobat HD
Mini is subjected to a strong radio frequency field, electro-static discharge
or transient electrical noise. An electro-static discharge (caused by static
electricity) may cause the screen to go blank. If this happens, switch the
unit off and on again.
8
Important Safety Precautions
ACROBAT HD MINI PACKAGE CONTENTS
All required accessories for operation are included in your Acrobat HD
Mini
package.
Acrobat HD Mini is comprised of the following items and features:
1.
13.3” LCD w/LED Backlight: displays high quality image
2.
HD Camera: rotates 340 degrees to capture and enlarge the image
3.
Carrying Handle: used for lifting the Acrobat HD Mini
4.
Zoom Lens: used for up close high magnification
5.
Arm: rotating arm that holds the camera
Accessories included:
6.
Remote Control: (batteries included): allows the user to control
the Acrobat HD Mini functions from a distance
7.
Lens Cloth: permits cleaning of the LCD display
8.
Power Cord: connects to an AC outlet and the back of the
Acrobat HD Mini
Accessories NOT included:
9.
Roller Case (optional): Provides protection for the Acrobat HD Mini and
makes transportation even easier
10. Mini X-Y Table: Mini X-Y table is available for your Acrobat HD Mini,
place underneath your acrobat camera and make reading even
easier!
Acrobat HD Mini Package
9
2
1
4
7
6
8
3
5
9
10
10
Acrobat HD Mini Package
ACROBAT HD MINI SETUP
1. Unpacking and transporting the Acrobat HD Mini
During unpacking and transporting, be sure to lift the
Acrobat HD Mini by the built-in carrying handle.
Do not attempt to lift or carry the LCD by the base.
(See Figure 1)
2. Setup the Acrobat HD Mini
Place the Acrobat HD Mini on a flat level surface such
as a table or desk.
3. Connect the AC power
Connect the power cord to an available wall outlet (See
Figure 2). Connect the other end of the power cord to the
back of the Acrobat HD Mini. To offer additional
protection during an electrical storm, a surge
protector may also be used and is recommended.
4. Turn the power on
On the front, center, of the Acrobat HD Mini LCD
press the power button (See Figure 3). The LCD
screen will turn ON in a few seconds.
Turn the power OFF by pressing the same button.
However, leave the power ON for this training section.
Figure 1
Figure 2
Once the Acrobat HD Mini has been powered on you
can then use the green “Power” button located in the
upper right corner of the Acrobat HD Mini Remote to
power the Acrobat HD Mini camera on/off. The LCD
will go into standby (Amber).
**Note: When the LCD is in standby and the unit
is not plugged into the wall power the battery
will drain over time.
Figure 3
Acrobat HD Mini Setup
11
USING ACROBAT HD MINI
Adjust the camera position
The Acrobat HD Mini camera is attached to a specially designed arm that allows
the camera to swivel left or right, or to pivot in multiple directions. (See Figure
1, 2 and 3)
Figure 1
Figure 2
Figure 3
12
Using Acrobat HD Mini
Adjusting the Viewing Angle
The Acrobat HD Mini Camera rotates 340 degrees, providing unsurpassed
flexibility for the visually impaired. Do NOT force the camera beyond its
340-degree angular range as this may damage the unit.
The Acrobat HD Mini may be used to see objects in the distance,
viewing oneself and reading or writing. To change the viewing mode,
simply turn the position of the Camera by rotating it on the arm.
Distance Viewing Mode
The camera can rotate forward to capture people, objects and scenery.
“Distance Viewing” is displayed in the upper-left corner of the screen when
changing to this viewing angle. Be sure to open the Reading Lens for
Distance Viewing (See Figure 1).
This Distance mode enables up to 25X magnification for objects 3 feet
away. In this mode, although the camera can view objects at an infinite
distance, the recommended distance from camera to the distant object
is within 3-30 feet to achieve maximum magnification benefit.
(See Figure 2).
Figure 1
Figure 2
Using Acrobat HD Mini
13
Self Viewing Mode
The Camera can be rotated backwards to provide you with the
equivalent of a full-length mirror. “Self Viewing” is displayed in the
upper-left corner of the screen when changing to this viewing angle.
In this position, you can use the Acrobat HD Mini to help you put on
make-up, shave or perform other personal hygiene (See Figure 1).
For optimum clarity, use the Zoom Lens and position yourself between
7.5”-22” away from the Camera.
7.5” - 22” (Recommended)
Figure 1
14
Using Acrobat HD Mini
Reading and Writing Mode
The Camera can be adjusted downward for reading, writing and
enjoying crafts or other hobbies (See Figure 1). This makes it ideal for
classroom use. When the camera is rotated downward,
“Reading-Mode” is displayed in the upper-left corner of the screen.
The Acrobat HD Mini can slide freely, left or right, along the
specially designed bracket mechanism.
It is best to close the Zoom Lens when objects are placed 4.75”-13.75”
away from the Camera for optimal viewing clarity.
4.75" - 13.75" (Recommended)
Figure 1
Using Acrobat HD Mini
15
Adjusting Magnification
The Acrobat HD Mini offers a large range of magnification capabilities.
The following directions can be used with the Remote or Camera
(See Figure 1 & 2).
1. To adjust the magnification press and hold the + or - buttons located on
the Remote or Camera until you reach your desired magnification.
2. “Zoom In” will appear in the upper left corner of your monitor when you
are increasing magnification. ”Max Zoom,” will appear at the maximum
magnification.
3. “Zoom Out” will appear in the upper left corner of your monitor when you
are decreasing magnification. “Min Zoom,” will appear at the minimum
magnification.
NOTE: The extent of the magnification is dependent upon the distance from
the Camera to the object.
Figure 1
16
Figure 2
Using Acrobat HD Mini
Changing the Viewing Mode
The Acrobat HD Mini was designed to provide optimum viewing for people
with certain visual conditions by offering a range of choices in both text and
background colors. Use the Mode key (See Figure 1 & 2) to toggle
between full color viewing, Black and White, enhanced positive,
enhanced negative, and your 5 favorite color select modes. The 5
favorite color select modes can be modified to any of the 28 color
select options by following the instructions provided on page 24.
The following directions can be used with the Remote or Camera.
Adjusting Viewing Modes
1. You can choose a viewing mode by pressing the "Mode" button on
the Remote or Camera (See figure 1 & 2).
2. Each push will allow you to cycle through all seven viewing modes
(See next page).
Figure 2
Figure 1
Using Acrobat HD Mini
17
Viewing Modes
Full Color Image
This mode gives a true color representation of the image being magnified.
Black-and-White Image
This mode gives a black and white representation of the image being
magnified.
Enhanced-Positive Image
Crisp, Clear Text
This mode provides a white background with
black text. It increases the contrast to offer crisp
Images!
text images for reading.
Enhanced Positive
Enhanced-Negative Image
This mode provides a black background with
white text. It increases the contrast to offer crisp
Crisp, Clear Text
text images for reading.
Images!
Color Select 1
Enhanced Negative
In factory default this mode provides a blue
background with yellow text. This is one of the
most commonly used color combinations. To change this mode to any of
the 28 available follow the instructions on page 19.
Color Select 2
In factory default this mode provides a black background with green text.
To change this mode to any of the 28 available follow the instructions on
page 19.
Color Select 3
In factory default this mode provides a black background with yellow text.
To change this mode to any of the 28 available follow the instructions on
page 19.
Color Select 4
In factory default this mode is turned off. Follow the instructions on page
19 to turn this color mode on.
Color Select 5
In factory default this mode is turned off. Follow the instructions on page
19 to turn this color mode on.
18
Using Acrobat HD Mini
Changing Favorite Color Modes
The Acrobat provides 28 selectable color modes,
and allows selecting up to 5 favorites for use, as
described on page 17. The following directions
can be used to change the favorite color modes
on your Acrobat:
1. Press and hold the "Mode" button for at least 3
seconds to begin the “Entering Setup” Menu.
2. Scroll with the "+" to "6. Color Select".
6. COLOR SELECT
3. Press the "Mode" button.
4. Choose with "+ or -" which Color Select mode
favorite you would like to change 1, 2, 3, 4 or 5.
5. Press the "Mode" button.
6. Choose if you would like this favorite "On" or "Off" by pressing the "+" or "-".
7. Press the "Mode" button.
8. Press the “+ or -” button to preview each of the 28 available color modes.
9. Press the "Mode" button to select and save the desired favorite color
mode.
10. Scroll with the “+“ to “8. Exit” and press the “Mode” button to return
to “live’ mode.
Adjusting Brightness (Color Mode Only)
The following directions can be used if you would like to
adjust the brightness of the screen when in Color Mode:
ENTERING SETUP
1. Press and hold the “Mode” button for at least 3 seconds
to begin the “Entering Setup” Menu.
2. Scroll with the “+” to “4. Brightness Color”
3. Press the “Mode” button.
4. BRIGHTNESS
COLOR
4. Press the “+ or -” button to increase or decrease screen
brightness.
5. Press the “Mode” button to set and save the screen brightness.
6. Scroll with the “+“ to “8. Exit” and press the “Mode” button to return to
“live’ mode.
Using Acrobat HD Mini
19
Adjusting Brightness (Color Select Mode)
The following directions can be used if you would
like to adjust the brightness of the screen in Color
Select Mode:
1. Press and hold the “Mode” button for at least 3 seconds
to begin the “Entering Setup” Menu.
2. Scroll with the “+” to “5. Brightness C. Sel”
ENTERING SETUP
5. BRIGHTNESS
C. SEL
3. Press the “Mode” button.
4. Press the “+ or -” button to increase or decrease screen brightness.
5. Press the “Mode” button to set and save the color select screen
brightness.
6. Scroll with the “+“ to “8. Exit” and press the “Mode” button to
return to “live’ mode.
Setting the Sleep Timer (Off, 15, 30, 45, 60 minutes)
The following directions can be used if you would like to
set the Sleep Timer (Factory set at 30 minutes):
1. Press and hold the “Mode” button for at least 3 seconds
to begin the “Entering Setup” Menu.
2. Scroll with the “+” to “7. Sleep Timer”
3. Press the “Mode” button.
ENTERING SETUP
7. SLEEP TIMER
4. Press the “+ or -” button to increase or decrease the Sleep
Timer setting.
5. Press the “Mode” button to set, and save, the Sleep Timer setting.
6. Scroll with the “+“ to “8. Exit” and press the “Mode” button to return to
“live’ mode.
If you do not press any button on the keypad or remote, and do not rotate the
camera to change viewing mode, the unit will shut off automatically after your
specified Sleep Timer setting. If you do the timer will be reset and start
counting down again from the set time you chose.
** Note: Sleep Timer value is retained when the unit is powered off.
20
Using Acrobat HD Mini
Adjusting the White Balance with the Remote Control
The color white is often affected by the lighting used in a room. The
Acrobat HD Mini White Balance control allows you to achieve optimum
clarity.
The following directions can be used to adjust the White Balance with the
Remote:
1. Press the White Balance “WB” button (See figure 1) on the Remote, and
wait 2 seconds for the key to become active.
2. Repeat Step 1 to scroll through all four settings.
a. W.B. Auto automatically adjusts to the lighting in the room
b. W.B. Warm casts a red tone
c. W.B. Normal casts a balanced tone
d. W.B. Cool casts a blue tone
Figure 1
Using Acrobat HD Mini
21
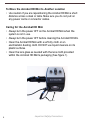
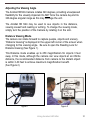
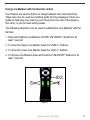
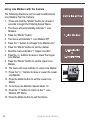
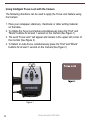
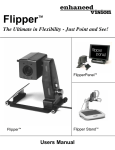
Adjusting the White Balance with the Camera
The following directions can be used to adjust the
White Balance from the Camera:
1. Press and hold the Mode button for 3
seconds to “Entering Setup” Menu.
2. Press the + to scroll to “2. White Balance”.
3. Press the Mode button to initiate the White
Balance feature.
4. Press the +/- to scroll through the four
settings.
5. Press the Mode button to exit this feature.
4
2
Figure 1
22
Using Acrobat HD Mini
Using Line Markers with the Remote control
Line Markers are used to frame an image between two horizontal lines.
These lines may be used as a reading guide for long passages of text, as a
guide to help keep your place as you move from one side of the page to
the other, or just to make writing easier.
The following directions can be used to add/remove Line Markers with the
Remote:
1. Press and hold the Line Markers On/Off (“LM ON/OFF”) button for at
least 1 second.
2. To move the Upper Line Marker press the “ULM+/-” buttons.
3. To move the Lower Line Marker press the “LLM+/-” buttons.
4. To remove Line Markers press and hold the “LM ON/OFF” button for at
least 1 second.
4
2
Figure 1
Using Acrobat HD Mini
23
Using Line Markers with the Camera
The following directions can be used to add/remove
Line Markers from the Camera:
1. Press and hold the "Mode" button for at least 3
seconds to begin the “Entering Setup” Menu.
2. The menu will automatically indicate “1. Line
Markers.
3. Press the "Mode" button.
4. The menu will indicate “1. Line Makers Off”
5. Press the “-” button to activate "Line Markers On."
6. Press the "Mode" button to set line marker.
7. Next the menu indicates “1. Upper Line ADJ”
8. Press the +/- buttons to raise or lower the Upper
Line Marker.
9. Press the "Mode" button to set the Upper Line
Marker.
10. The menu will now indicate “2. Lower Line Marker.
11. Press the "+/-" buttons to raise or Lower the Lower
Line Marker.
12. Press the Mode button to set the Lower Line
Marker.
13. To remove Line Markers repeats steps 1-4.
14. Press the “+” button to return to the “1. Line
Markers Off” Menu.
15. Press the Mode button to exit the Menu.
24
Using Acrobat HD Mini
Using Left handed mode
The following directions can be used if you would like
to switch between left and right handed mode:
1. Press and hold the "Mode" button for at least 3
seconds to begin the “Entering Setup” Menu.
2. Scroll with the "+" to "3. Left Handed Mode"
3. Press the "Mode" button.
4. The menu will indicate “1. Left Handed Off”
5. Press the “+” button to activate " 2. Left Handed
On."
6. Press the "Mode" button to set Left Handed mode On
or Off.
Adjusting Brightness
The following directions can be used if you would like
adjust the brightness of the screen:
1. Press and hold the "Mode" button for at least 3
seconds to begin the “Entering Setup” Menu.
2. Scroll with the "+" to "4. Brightness"
3. Press the "Mode" button.
4. Press the “+ or -” button to increase or decrease
screen brightness.
5. Press the "Mode" button to set and save the screen
brightness.
Using Acrobat HD Mini
25
Using the Object Locator
The Acrobat HD Mini Object Locator feature can help you quickly locate
something you're looking for on a page, or a specific part of an object
you want to view more closely.
The following directions can be used to locate a desired object with the
Remote and Camera:
1. Press and hold down the "Find" button on Remote (See Figure 1) or
Camera (See Figure 2).
The Acrobat HD Mini will automatically zoom out to
the widest field of view, and a "target" (as shown in
Figure 3) will appear in the center of the monitor
screen.
2. Move your work or reading material until you
have located the desired item within the
"target" area.
3. Release the "Find" button, and it will magnify the item you located
within the targeted area.
Figure 2
Figure 1
26
Using Acrobat HD Mini
Using Intelligent Focus Lock with the Remote Control
When The Acrobat HD Mini is turned on, it is automatically set on auto focus.
This is the most convenient setting for everyday activities, such as reading
from a single page to a book, reading a prescription bottle or working with
arts and crafts.
Focus Lock allows you to maintain focus on a specific
object at a fixed distance, such as writing. The Acrobat
HD Mini Intelligent Focus Lock feature will automatically
refocus on the object you are viewing after changing
the magnification size. The Acrobat HD Mini will keep
your writing in focus, rather than your hand when it
comes into the Camera's frame.
Figure 1
The following directions can be used to apply the
Focus Lock feature using the Remote:
1. Place your notepaper, stationery, checkbook or
other writing material on the table.
2. Press the “Lock” button on the Remote (See Figure
1).
3. The word "Focus Lock" will appear and remain in the upper left corner of
the monitor (See Figure 2).
4. To Return to Auto-Focus, press the “Lock” button on the Remote
(See Figure 1).
Using Acrobat HD Mini
27
Using Intelligent Focus Lock with the Camera
The following directions can be used to apply the Focus Lock feature using
the Camera:
1. Place your notepaper, stationery, checkbook or other writing material
on the table.
2. To initiate the Focus Lock feature simultaneously press the “Find” and
“Mode” buttons for at least 1 second on the Camera (See Figure 1).
3. The word "Focus Lock" will appear and remain in the upper left corner of
the monitor (See Figure 2).
4. To Return to Auto-Focus, simultaneously press the “Find” and “Mode”
buttons for at least 1 second on the Camera (See Figure 1).
2
4
Figure 1
28
Using Acrobat HD Mini
Using the Freeze Function
Freeze allows you to take a snap shot of what the Acrobat HD Mini is
magnifying in order for you to have extended time to view the image.
This is particularly helpful when taking notes in a classroom.
The following directions can be used to apply the Freeze mode using the
Remote control only:
1. Press and hold the “Freeze” button for at least 2 seconds (See Figure 1).
2. The picture or video will freeze and in the upper left corner of the
screen will indicate “Freeze” (See Figure 2).
3. To release the Freeze mode, press any key or change the
viewing angle.
Figure 1
Using Acrobat HD Mini
29
Using the Acrobat HD Mini with a Computer
The LCD of the Acrobat HD Mini can be used along with a computer using the VGA
port on the back of the LCD. Simply connect one end of a VGA cable to your
desktop, or laptop, video output and the other end to the VGA port on the back of
the Acrobat HD Mini’s LCD.
** Note: The ‘Video Source’ button is locked at the factory to prevent accidental
changing of the Video Source setting. If you plan to use the Acrobat HD Mini with
a computer it is necessary to unlock the button. To do so - ‘Press and Hold’ the
Video Source button for 5 seconds.
Then, press the ‘Video Source’ button on the right side of the LCD until “VGA” is
displayed. Although the Acrobat HD Mini will not magnify computer images, it is
possible to use the built-in LCD with either the camera or a computer (equipped
with a standard VGA connection). This permits a single LCD display to be used for
either purpose.
Please contact your local Enhanced Vision dealer for more details.
TROUBLESHOOTING
Q. How should I clean the Acrobat HD Mini?
A. At least once per week, clean the Acrobat HD Mini with a soft
dry cloth or an electrostatic dusting cloth. DO NOT use liquid
cleaners on any of the plastic surfaces.
Q. The Remote Control is not functioning properly. What should I do?
A. After ensuring you have fresh batteries installed in the remote
control, please reset the remote control back to factory settings.
Simply press and hold the [FIND] and [MODE] buttons on the
remote control for at least 3 seconds, or until the LED indicator
begins to flash. Then, attempt normal operation of the remote
control functions.
30
Troubleshooting
ADVANCED PROGRAMING
Advanced Programming Options
The Acrobat HD Mini has advanced capabilities for modifying the programming of the
included remote control (when using multiple units) as well as changing the default
language used within the setup menus. These settings are completely optional and
should not be changed under normal circumstances. The information listed on the
following pages are for technical reference purposes only. Please see your Enhanced
Vision representative or call our toll-free technical support should it be necessary for you
to modify these settings.
Remote Codes
Remote Control (Transmit) Code Change:
By default, a single remote control (and
corresponding remote control code) is factory
programmed and used for all Acrobat camera
functions. While acceptable for most single-use
applications, when 2 or more Acrobats are used
within close proximity to each other (lab
setting), exclusive remote control over each
unit may be desired. Therefore, it is possible to
modify the sending/receiving codes of the
remote control and Acrobat head for exclusive
use, if desired. Up to 15 unique codes can be
assigned. For proper communication, both the
Remote control (transmit) and camera head
(receive) must be set to matching ID codes.
Please refer to the chart on the right for more
information.
• #28 (default/factory reset):
Push MODE and FIND for 3 secs.
• #15: Push MODE and LLM- for 3 secs.
• #24: Push MODE and ULM- for 3 secs.
• #25: Push MODE and LLM+ for 3 secs.
• #27: Push MODE and ULM+ for 3 secs.
• #07: Push + and FIND for 3 secs.
• #11: Push + and LLM- for 3 secs.
• #14: Push + and ULM- for 3 secs.
• #23: Push + and LLM+ for 3 secs.
• #31: Push + and ULM+ for 3 secs.
• #08: Push - and FIND for 3 secs.
• #09: Push - and LLM- for 3 secs.
• #10: Push - and ULM- for 3 secs.
• #12: Push - and LLM+ for 3 secs.
• #13: Push - and ULM+ for 3 secs.
Language Select
The default language used for the on-screen-display (OSD) may be changed by accessing the
Advanced Programming Features menu on the Acrobat. This is accomplished using a special
key combination sequence (4321), accessed by pressing the [+] and [MODE] buttons
on the Acrobat camera head. Language selection can be adjusted within the second menu
level. Please refer to the chart on the following page for detailed reference.
Advanced Programming
31
Secret 4321 code to
enter menu using SIZE +:
4 press, mode
3 press, mode
2 press, mode
1 press, mode
ACROBAT HD MINI FEATURES
MENU
** Items currently selected appear
in GREEN **
Select different IR codes to avoid
multiple remote control conflicts
2nd Menu Level
FEATURES MENU
REMOTE CTRL CODES SUB
MENU
1. REMOTE CTRL CODES
1. SC 28
(Default)
Press
MODE to
enter menu
Size + or
Size - to
navigate
Size + or Size –
to navigate
2. SC 15
Size + or Size –
to navigate
2. LANGUAGES
Press Mode to
Select Code
3. SC 24
Size + or
Size - to
navigate
Press
MODE to
enter menu
Size + or Size –
to navigate
4. SC 25
3. 50-60Hz MAINS
Size + or Size –
to navigate
Press
MODE to
enter menu
Size + or
Size - to
navigate
5. SC 27
Size + or Size –
to navigate
6. SC 07
4. EXIT
Size + or Size –
to navigate
Languages Sub Menu
7. SC 11
1. ENGLISH
Size + or Size –
to navigate
2. FRENCH
Size + or Size –
to navigate
Press Mode to
Select
LANGUAGE
8. SC 14
Size + or Size –
to navigate
Size + or Size –
to navigate
9. SC 23
3. GERMAN
Size + or Size –
to navigate
Size + or Size –
to navigate
10. SC 31
4. ITALIAN
Size + or Size –
to navigate
5. SPANISH
Size + or Size –
to navigate
Press Mode to
Select
LANGUAGE
11. SC 08
Size + or Size –
to navigate
Size + or Size –
to navigate
12. SC 09
6. JAPANESE
Size + or Size –
to navigate
Size + or Size –
to navigate
13. SC 10
7. PREVIOUS MENU
Size + or Size –
to navigate
50-60HZ MAINS SUB MENU
For use in 50Hz based countries
(Europe, UK, Australia…) to avoid
flicker
For use in 60Hz based countries
(USA, Canada…)
Press
Mode
Size + or Size –
to navigate
14. SC 12
Size + or Size –
to navigate
AC 50HZ FORMAT
Press
Mode
15. SC 13
Size + or Size –
to navigate
AC 60HZ FORMAT
Size + or Size –
to navigate
Press
Mode
16. PREVIOUS MENU
Press MODE
PREVIOUS MENU
32
Press Mode to
Select Code
Advanced Programming
Press Mode to
Select Code
WARRANTY STATEMENT
Enhanced Vision
Acrobat HD Mini Video Magnifier Warranty
Policy
Enhanced Vision products are designed to give you the highest quality image,
convenient features, ease of use and reliable service. The Acrobat HD Mini has
been inspected and tested prior to shipping. Enhanced Vision warrants the
Acrobat HD Mini against defects in material and workmanship under normal use for
two years from the date of original purchase. Enhanced Vision, at its option, will at
no charge either repair the product or replace it during the warranty period. There
are no other expressed or implied warranties accompanying this product.
This warranty does not cover: a) Defects or damage from misuse, use in other than
normal and customary manner, accident or neglect; b) Defects or damage from
improper operation, maintenance, installation, adjustment, alterations or modification;
c) Defects or damage from spills of food or liquid; d) All plastic surfaces and all other
externally exposed parts that are scratched or damaged due to normal use; e)
Damage due to operation of the Acrobat HD Mini with equipment not supplied by
Enhanced Vision.
• You must provide proof of purchase, bearing the date of purchase, in order to
receive warranty service.
• Anyone using this product does so knowingly assuming certain risks, due to the
need to utilize vision enhancement devices.
• A 2-year extended warranty option is available within 12 months from the date of
purchase. Please contact Enhanced Vision for detailed information.
Service Process
In the event that technical support or repair service is needed, please contact your local
Enhanced Vision representative or the Enhanced Vision warranty service center.
If warranty service is required, please contact Enhanced Vision at (800)440-9476 ext.3
Monday through Friday, between 8 a.m. and 5 p.m. Pacific Standard Time (PST) to request
a return authorization number. Warranty repairs will not be accepted without a valid
return authorization number.
You may wish to keep the original product packaging in case warranty service is
required. The manufacturer cannot provide packaging for warranty repairs.
NOTE: Please completely fill out and send in the enclosed warranty registration
card.
Warranty Statement
33
ACROBAT HD MINI SPECIFICATIONS
Product Dimensions:
18 1/4”H x 13.5”W x 15”D (46.35cm x 34.3cm x 38.1cm)
Product Weight:
12.2 lbs / 5.5 kg
Display:
Type: 13.3” TFT active-matrix with LED-backlight
Resolution: 1366 X 768 pixels (16:9)
Contrast Ratio: 500:1 typ.
Brightness: 250 cd/m2 typ.
Magnification range:
1.6X (minimum) - to 65.1X (maximum)
Field of View (Near Mode): 8.7 inches (min); .18 inches (max)
Working Distance (Near Mode): 17 inches
Video output Resolution on LCD:
SMPTE 296M – HD 720p 60/50
Viewing Modes:
Color, Black & White, High Contrast, Positive/Negative, Digital Color Select (5 modes)
Power Supply:
Input voltage/current: 120-240 VAC / 0.3-0.5A (nominal)
Frequency: 60/50 Hz
Power usage: 27W (nominal)
Equipment Classification (IEC 601-1):
Type of Protection: Class 1
Degree of Protection: Type B
Mode of Operation: Continuous
Operating temperature range: 10-40°C / 50-104°F
Storage/transport temperature range: 0-60°C / 32-140°F
Warranty: 2 years
34
Acrobat HD Mini Specifications
OTHER ENHANCED VISION PRODUCTS
DaVinci
DaVinci is a high performance desktop video
magnifier (CCTV), featuring HD, text-to-speech (OCR)
and a 3-in-1 camera. With HD you will experience high
definition color and contrast giving you a beautiful,
crystal clear picture and vibrant colors. Experience the
joy of reading with our new text- to-speech feature.
DaVinci will read any printed text aloud with the push of
a button.
Magnification: 24” LCD: 2x (min.) - to 80x (max.)
Pebble-mini
Pebble-mini’s ultra-compact design makes it the ideal
hand-held magnifier whether you’re home or on the
go. Easily read prescriptions, mail, labels, price tags,
menus and so much more. 3.0”LCD screen. Freeze
frame and image capture.
28 available viewing modes.
Magnification 2X to 10X
Amigo
Amigo is a truly portable desktop magnifier. Optimal
viewing is achieved with a tilting 6.5 inch viewing
screen. Amigo provides 3.5 to 14x digital magnification
and the lightest weight in its class. Amigo is battery
operated and can be taken anywhere.
Magnification: 3.5X – 14X (digital)
Other Enhanced Vision Products
35
Transformer
Transformer is the most flexible and portable solution
for reading, writing and viewing magnified images
at any distance. Compatible with popular magnification
software and the latest Windows operating systems.
Transformer’s unique design is perfect for work,
home or school. Weighs less than 3 pounds. Battery
operated up to 4 hours. 28 custom color select
modes.
Magnification 2.4X to 30X
(based on 17”screen)
Merlin elite
See and hear the difference!
Merlin elite is a high performance desktop video
magnifier (CCTV), featuring HD and text-to-speech
(OCR). High definition color and contrast provides a
beautiful, crystal clear picture and vibrant colors. Merlin
elite’s unique design allows for a wide field of view,
displaying more text on the screen.
Magnification: 2.4x - 70x
Merlin ultra HD
Merlin ultra HD’s camera technology produces an even
truer, more natural image. Easily read books and
magazines, read and write letters, manage your financial
records, view color photos, do crossword puzzles, and
even pursue a favorite hobby.
Magnification:
20” LCD: 1.9x (min) to 51.2x (max)
22” LCD: 2.1x (min) to 55.9x (max)
24” LCD: 2.3x (min) to 61.2x (max)
36
Other Enhanced Vision Products
Accessories
VGA Toggle Box
Allows you to toggle between either the Acrobat HD Mini or your
computer display (VGA connection).
Smart Video
Connects Enhanced Vision’s low vision devices to a computer monitor.
Carrying Cases
Convenient cases for storage and transport of all Enhanced Vision
products.
Battery
Rechargeable batteries for Enhanced Vision’s low vision devices.
Contact information:
(US Office) Phone: (714)465-3400
Fax: (714)374-1821
(UK Office) Phone: +44 (0)115 9442317
Fax: +44 (0)115 9440720
(DE Office) Phone: +49 (0) 6078 969827-0 Fax: +49 (0) 6078 969827-33
www.enhancedvision.com
Technical Support:
Main Toll Free (800) 440-9476 ext. 3
Local Phone: (714) 465-3400 ext. 3
E-mail: [email protected]
37
Other Enhanced Vision Products
NOTES
Notes
NOTES
Notes
The Acrobat HD Mini video magnifier is designed to enlarge
and enhance images to improve the lives of people who
have low vision. The extent to which the Acrobat HD Mini
can improve the ability to see images and text depends on a
person's individual condition and level of visual impairment.
The Acrobat HD Mini is not designed to restore vision, correct
eye conditions or halt degenerative vision loss. An eye-care
professional can best determine the suitability of the
Acrobat HD Mini for a patient's specific condition. Please visit
www.enhancedvision.com for more information.
www.enhancedvision.com
(800) 440-9476 (US Office, toll free)
(714) 465-3400 (US Office)
+44 (0) 115 9442317 (UK Office)
Tel. +49 (0) 6078 969827-0 (DE Office)
Fax +49 (0) 6078 969827-33 (DE Office)
Part # MAN-0010-00 Rev X1
April, 2014
Copyright © 2009 by Enhanced Vision. All rights reserved.
Product specifications subject to change without prior notice.