1
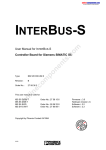
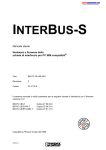
INTERBUS-S IBS SYS DIAG DCB UM E Revision: A m Type: co Order No.: 27 47 04 4 This guide is valid for: lin e on po ne n ts .c om Diagnostics Guide IBS S5 DCB... IBS IPC DCB... IBS A 25 DCB/I-T IBS S5 100U CB IBS PC CB IBS VME CB Firmware ≥ 3.3 Firmware ≥ 3.3 Firmware ≥ 3.3 Firmware ≥ 3.3 Firmware ≥ 3.3 Copyright by Phoenix Contact 06/1995 Table of Contents Diagnostic Indicators on the Front Plate of an IBS S5 DCB Controller Board 1 Exemplary InterBus-S Topology For This Diagnostics Guide 2 General Information on the Diagnostics Guide 3 Diagnostic Functions of Front Plate 4 11 14 16 24 26 30 32 34 36 Diagnostic Functions on IBS Devices 38 Diagnostic Functions on the BK Module IB ST I/O Modules Flat-Pack Modules with IP20 Protection Installation Remote Bus Modules with IP65 Protection 38 40 42 44 Additional Diagnostic Tools 46 IBS SYS SWT Configuration Software IBS CMD SWT - The InterBus Manager Process Data Monitor Program IBS PC CB MONI Fuse Types for IBS Devices 46 47 48 49 Replacement of INTERBUS-S Components 51 Replacing the InterBus-S Controller Board VMEbus Systems PC Replacing an InterBus-S Device (IB ST) Replacing InterBus-S Devices with IP20 Protection Replacing InterBus-S Devices with IP65 Protection 51 51 51 52 53 53 .c ts po ne n m co lin e on 4 6 8 8 10 om Display After the Self-Test Display When the Bus Is Active STOP Request of the PLC Bus Segment Disabled (BSA) Settings of the Selector Switches (for IBS S5 DCB only) Selector Switch Setting for Diagnostic Information in Mode 9 (valid as of firmware version 3.5) Hardware Fault on the Controller Board Parameterization Error CTRL Diagnostics After a Bus Stop (≥ FW 3.72) Remote Bus Error RB Bus Error E0x Error Message "Bus-Error-Information-Indication" for Error E03 Local Bus Error LB Module Error MOD i 5096A Table of Contents 55 IBS Devices with Voltage or Short-Circuit Monitoring Retrofitting IBS Analog Modules with a Voltage Input to a Current Input IBS CNT IBS AI x/8, IBS AI x/16 55 55 55 55 Repair of Defective INTERBUS-S Components 56 Information on a Defective Device Consulting Through Your Phoenix Contact Representative Consultation in the Event of Application Difficulties 56 56 56 We Are Interested in Your Opinion! 57 ts Notes .c Service Sheet For the Repair of Defective INTERBUS-S Components om Making Settings on/Configuring a New Device 58 60 61 Flowchart for the Error Recovery 62 Notes 63 on lin e co m po ne n Comparing the DCB Board With Other Controller Boards 5096A ii 5096A 0 om .c ts po ne n m co lin e on Diagnostic Indicators on the Front Plate of an IBS S5 DCB Controller Board om Selector switches for the display and the LEDs, Page 10 .c Diagnostic display (7-segment), Page 4, 24 4 8 6,8 8 co Remote bus interface m Ready, BASP RUN BSA, CTRL, RB, LB, MOD, 14,16 26 34 36 RS 232 interface for the connection of a PC with an external diagostics software, Page 46, 47 on lin e Reset button (RESET) ts po ne n LED indicators for the operating state: Page LED indicators for errors: Page Figure 1: Front plate of the IBS S5 DCB controller board with diagnostic indicators and diagnostic elements A flowchart showing you how to remove errors can be found on the back cover page. 1 5096A Exemplary InterBus-S Topology For This Diagnostics Guide (max. 10 m) max. 1.5 m .c max. 1.5 m po ne n ts max. 400 m max. 12.8 km Remote bus Remote bus segment Local bus max. 1.5 m om InterBus-S controller board Installation remote bus max: 50 m 50 m max. 400 m ST compact station on lin e Remote bus segment co m max. 5074B104 Figure 2: Exemplary InterBus-S toplogy which can be used to locate transmission errors (The maximum distances given in the figure refer to copper lines.) 2 5096A General Information on the Diagnostics Guide Unless mentioned otherwise, all information in this guide refers to the IBS S5 DCB/I-T controller board (in particular the illustrations of the front plate). .c om Moreover, this guide is also valid for the controller boards IBS VME CB, IBS PC CB and IBS S5 100 CB. Unlike the IBS S5 DCB board, the other controller boards feature only some of the diagnostic indicators (LEDs, no 7-segment display). For the mentioned contoller boards, the information given about the 7-segment display applies to their software registers. po ne n ts The back cover page contains a table listing the various LEDs on the IBS S5 DCB board and their equivalents on other controller boards. All descriptions are valid for firmware version 3.7x. "FW3.3:" or "FW3.5:" is written in front of information that is only valid for firmware versions 3.3 or 3.5. When using this guide, please observe the following notes: co m The attention symbol refers to erroneous handling, which could lead to damage to the hardware or software, or in indirect connection with dangerous process peripherals, to personal injury. This symbol is always located to the left of the tagged text. on lin e The hand symbol gives you tips and advice on the efficient use of hardware and on software optimization, to save you from performing extra work, for example. In addition, text marked in this way informs you of system-related conditions that must absolutely be observed to achieve error-free operation. The hand is also found in front of clarifications of terms. The text symbol refers to detailed sources on information (manuals, data sheets, literature, etc.) on the subject matter, product, etc. This text also provides helpful information for the orientation, reading order, etc. in the manual. 5096A 3 Diagnostic Functions of the Front Plate Display After the Self-Test po ne n ts .c om X = valid I/O address setting LED on LED off or on on lin e co m LED off 4 5096A Table 1: Display after the self-test (DD=diagnostic display) DD Description Remedy ts .c Check the application program and/or the EEPROM card. Logical addressing detected an error in an address list. (These displays appear when the board is operated with ISFP functions, address block FB72 with mode=1, or with a programmed EEPROM card). The list number is specified in detail in the EREG byte of the FB 72 address block. Note: The representation of the letter "b" and the number "6" on the diagnostic display are similar. Do not confuse! on lin e co m 2b or 68 The board waits for commands from the control system or the EEPROM card. po ne n -||- om The controller board has completed the self-test without errors and is ready for operation (mode of oper.: controlled start). 5096A 5 Display When the Bus Is Active po ne n LED on ts .c om X = valid I/O address setting LED off or on = invalid address setting on lin e co m LED off LED on LED off or on LED off 6 5096A Table 2: Display when the bus is active (DD=diagnostic display) DD The InterBus-S system is in operation and transmits data. ts .c The data item of the set I/O address is shown with the two rows of status LEDs. - Invalid address area (mode) Odd address set The set address is not used by any IBS module or the associated module is located in a segment that was shut down. Note (cf. Page 10): for FW 3.3 : Mode 4 to 9 must not be set. Change the setting of the address and/ or mode selector switches co m Ad * po ne n The selector switches have a wrong setting: lin e on Remedy om -- * Description for FW 3.5x: Mode 4 to 8 must not be set. for FW 3.7 and higher: Mode 8 must not be set. * In addition to the displays mentioned above the displays below mean that the transmission statistics feature was disabled by means of the application program: or 5096A 7 STOP Request of the PLC po ne n LED on ts .c om X = valid setting LED off or on LED off co m Bus Segment Disabled (BSA) on lin e X = valid setting LED on LED off or on LED off 8 5096A Table 3: STOP request of the PLC (DD=diagnostic display) Description Remedy Any The automation equipment is in the STOP state. The cause of the STOP state can be found in the application program. po ne n Data transmission over the bus continues. Table 4: Bus segment disabled (BSA) (DD=diagnostic display) The BSA LED indicates that one (or several) bus segments were shut down with a command in the user program. co Any Description m DD lin e on .c ts With an active BASP signal (Befehls Ausgabe Sperren= block command output) the outputs of all IBS devices are set to zero. om DD Table 5: Designations for BASP on other controller boards Controller board Equivalent designation IBS A25 DCB NORM IBS BA AT CLAB IBS IPC DCB CLEAR OUT IBS VME CB SYS FAIL IBS S5 100 CB Diagnostic bit 6 5096A 9 Settings of the Selector Switches (for IBS S5 DCB only) om With the selector switches you may set device addresses and values for the representation of diagnostic information on the diagnostic display. Please observe the following figure when you select the area (1st digit; P,Q or extended) of an I/O address (digits 2-4). MODE Address Area MODE Address Area .c Device address Inputs P area 4 Inputs Extended area 1 1 Outputs P area 5 Outputs Extended area 1 2 Inputs Q area 6 Inputs Extended area 2 3 Outputs Q area 7 Outputs Extended area 2 as of FW 3.7 po ne n 4-9 Do not set (up to FW 3.3) 4-8 Do not set (up to FW 3.5x) ts 0 Figure 3: Modes to be set with the selector switches Set I/O address 1 co m Example: Figure 4 shows how the input data word (P area) of a set module address (1) is displayed on the controller board (2). on lin e PLC 34 2 16-bit input word Read I/O status 5096A116 Figure 4: Example of a selector switch setting 10 5096A 5096A 11 . s o c 919x o DD shows the nos. of the last 10 local busses with a module status error (x=0,1,...9; last, last but one, .....LB No.); observe the type of addressing (logical or physical) for the local bus numbers! il n n c e m o Additional explanation for 918x: If there are less than ten module to which errors can be assigned, the DD will display less than 10 module numbers. The free positions then show Ad. Transmission errors on the path from the last module to the controller board are shown with the module number FF. In addition, all I/O data LEDs light up. The hundred’s place of the module numbers is also mapped onto the I/O data LEDs. LED 0 lights up for the module numbers 0 to 99, LED 1 for the module numbers 100 to 199, and so on, and the LED 5 lights up for the module numbers 500-511. DD shows the nos. of the ten modules with the most transmission errors (x=0...9, highest...smallest number of errors). The module numbers correspond to the physical appearance of the modules in the bus toplogy. 918x e n o p Meaning/Explanation Mode switch t n Selector Switch Setting for Diagnostic Information in Mode 9 (valid as of firmware version 3.5) The mode selector switch is set to 9 to show the diagnostic information. With the last three positions you may select the desired diagnostic information which will then be shown on the diagnostic dispay (DD = diagnostic display). 12 5096A DD shows the number of modules of the current configuration. DD shows the ID codes (in hexadecimal notation) of the current physical configuration (9401 = first bus device), the first position of the diagnostic display is invalid. 9400 94019912 o il n n c e m o An output and an input word are reserved in the PLC memory with the help of the special ID code 0015hex. The contents of the output word appears on the yelIow I/O LEDs when the selector switches are set to 93xx. The switch setting xx (decimal, value range 0 - 99) is copied into the defined input word. By means of logical addressing the two words can then be placed on any address in the PLC memory. 93xx (as of FW 3.71) e n o p . s o c DD shows the implemented firmware revision. t n Meaning/Explanation 9200 Mode switch on lin e co m po ne n ts .c om This page is intentionally left blank. 5096A 13 Hardware Fault on the Controller Board ts .c om X = valid I/O address setting po ne n LED on LED off or on InterBus-S controller board co m LED off on lin e Error location 1 IBS BK-T ID: 52 2 IBS 24 DI ID: 130 4 3 IBS AO1 ID: 65 IBS 24 DO ID: 129 5 IBS PT 100 ID: 70 5096B102 14 5096A Table 6: Description of the hardware fault (DD=diagnostic display) Description Outputs Bus Blinking numbers The READY LED is off. There is a hardware fault. -> Replace controller board. When you send in the board for repair, please note the number that is shown on the display on the service sheet (Page 57 ff). 00 STOP on lin e co m po ne n ts .c om DD 5096A 15 Parameterization Error CTRL ts .c om X = valid I/O address setting po ne n LED on LED off or on LED off InterBus-S controller board lin e co m The diagnostic display shows an error number (in hexadecimal notation), see Table 7 on opposite page. on Error location 1 IBS BK-T ID: 52 2 IBS 24 DI ID: 130 4 3 IBS AO1 ID: 65 IBS 24 DO ID: 129 5 IBS PT 100 ID: 70 5096B102 16 5096A Table 7: Error codes shown on the diagnostic display (DD=diagnostic display) Description Remedy 07 An invalid command was sent. Remove the nondefined command (PCP commands as well) from the application program. 08 Parameters are expected after a command, but another command follows Check the command sequences in the application program and add data blocks, if necessary. 09 The PLC accessed the communication registers. Reasons: - Double addressing of the communication register with other boards or modules connected to the PLC - Communication register access via the application program - Communication register base address lies in the process image - A command was written without parameters. 0A An interrupt was caused which cannot be assigned. 1. Set controller to the STOP state. 2. Perform a reset on the PLC and the controller board or exchange the hardware when the error occurs during operation. Error on the controller board Send in controller board (see Page 56ff). .c ts po ne n m co lin e on om DD 0b 5096A 17 Table 7: Error codes shown on the diagnostic display (DD=diagnostic display) Description Remedy 0C Gen.: The controller board sent a message (error message, command acknowledgment) and the PLC did not fetch it in time (Esp. S5: ISFP block CON/IND). Esp. S5: Call CON/ IND block in the cycle of the application program unconditionally (auxiliary driver CIH must be available in the programmable controller) or, gen., disable receipt of message directly or by programming the parameterization memory (DISABLE ALL MESSAGES command). 0d Gen.: Previous command has not yet been processed. Esp. S5: Wrong parameters in the ADDRESS data block Gen.: Check application program. Esp. S5: Correct parameters in ADDRESS data block Error on the controller board Replace controller board; inform Phoenix Contact if the error continues to occur (see Page 56 ff). .c ts po ne n m co 2325 lin e on om DD 2629 18 Hardware fault Send in controller board (see Page 56 ff). 5096A Table 7: Error codes shown on the diagnostic display (DD=diagnostic display) DD Description Remedy 2b a) Address list error in the input or output address list a) Check address lists. om Error on controller board 46 Esp. S5: Wrong base address of window 1 Esp. S5: Change base address of window 1. 47 Esp. S5: Wrong base address of window 2 Esp. S5: Change base address of window 2. po ne n m co 48 Replace controller board (see Page 56 ff); inform Phoenix Contact if the error continues to occur. ts 3b45 Esp. S5: Wrong address length of window 1 Esp. S5: Change address length of window 1. 49 Esp. S5: Wrong address length of window 2 Esp. S5: Change address length of window 2. 4A No ID list available or non-existent IBS configuration. Check ID list and/or connect IBS remote bus cable to controller board. 4b Too many or not enough parameters in the command. Check number of parameters. 4C Error in event list Check event list. lin e on b) Change bus to STOP mode and send address list again. .c b) An attempt was made to send address lists to the controller board, while the bus is in operation. 5096A 19 Table 7: Error codes shown on the diagnostic display (DD=diagnostic display) Description Remedy 4d Error on the controller board Replace controller board (see Page 56 ff); inform Phoenix Contact if the error continues to occur. 4E Too many commands were sent within a short time. Gen.: Check application program. .c po ne n ts Esp.: Call function blocks conditionally, evaluate the busy bits of the individual function blocks individually. Error on the controller board 55 Error in the group definition Check the group definition. Error on the controller board Replace the controller board (see Page 56 ff); inform Phoenix Contact if the error continues to occur. co 57, 58 m 50, 51 lin e on om DD Replace controller board (see Page 56 ff); inform Phoenix Contact if the error continues to occur. 59 Function call with a group no. that was not defined or a group that cannot be disconnected Apply function only to groups that are defined as a group and can be disconnected. 5A A wrong bus segment number was specified when a BK alarm was enabled or disabled. Use only defined or available bus segment number. 20 5096A Table 7: Error codes shown on the diagnostic display (DD=diagnostic display) Description Remedy 5b Non-allowable length code Check ID code list, a non-allowable length code was entered. 5c Esp. for AEG, IPC PLC: - Base node address and node number do not match - Base address for dig./ analog areas is not in the valid range Adapt base node address and node number. Set correct base address. 65 The maximum number of communication modules on the bus was exceeded. Reduce the number of the communication modules (PCPcapable). 66 Invalid communication reference (CR) or wrong number of parameters Check CR list. .c ts po ne n m co lin e on 68 om DD a) Differences in the ID code list and the existing bus configuration - Check the parameter number in the address list. - Check the CR no., CRs in the CR list must be in an ascending order (starting with CR=2) and without gap. a, b) Check ID code list. b) Wrong number of parameters in the ID code list 5096A 21 Table 7: Error codes shown on the diagnostic display (DD=diagnostic display) Description Remedy 69 PCP command sent, and the communication was not initialized. Gen.: Initialize communication Spec. S5: Specify CR list in the ADDRESS function block. 6A Base address of window 3 was not set correctly. Base address must be divisible by 4 and outside the process image. 6b Error on the controller board Replace the controller board (see Page 56 ff); inform Phoenix Contact if the error continues to occur. 6C Checksum error on the parameterization memory; (may also occur when the firmware is changed from 3.5x to 3.72 or higher) 1. Place PLC in STOP mode on lin e co m po ne n ts .c om DD 2. Reprogram the parameterization memory (with firmware 3.72 or higher) 3. Push the reset button on the controller board or - replace the parameterization memory if the error occurs again. 6D 22 Write error on the parameterization memory; write protection active - De-activate the write protection. 5096A Table 7: Error codes shown on the diagnostic display (DD=diagnostic display) Description Remedy 6E Minimum voltage of the battery of the S-RAM reached (only if it is used as a parameterization memory) Replace the battery of the S-RAM on lin e co m po ne n ts .c (as of FW 3.72) om DD 5096A 23 Diagnostics After a Bus Stop (≥ FW 3.72) po ne n LED on ts .c om X = valid I/O address setting LED off or on LED off Checked areas on lin e co m InterBus-S controller board 5096A130 24 5096A Table 8: Description of the diagnostic behavior after a bus stop as of firmware revision 3.72 (DD=diagnostic display) Wait until DD stops blinking! Afterwards om As of FW 3.72: Bus operation was often interrupted. Thus, the bus is stopped and all outputs are reset. In the course of the error analysis the entire bus topology is checked. The diagnostic display is blinking during this analysis, which may last from several seconds up to several minutes. - see error remedy of the respective display: .c -||-, blinking * Remedy ts Description Error indication Page po ne n DD 16 RB 26 LB 34 MOD 36 E0x 30 on lin e co m Note: Depending on the PLC’s status, the BASP LED may also light up when the bus stops. If groups were disabled before the bus was stopped, the BSA LED lights up. CTRL Upon completion of the diagnostic phase there is either an - - LED error indication (CTRL, RB, LB or MOD) or E0x is output on the diagnostic display. * At the same time the analysis bit is set in the diagnostic register (bit 15). 5096A 25 Remote Bus Error RB LED on po ne n LED off or on ts .c om X = valid I/O address setting When logical addressing (physical addressing is shown here) is used, the order of the bus segment numbering may differ from the one shown here (see System Documentation). LED off co Remote bus segment number m InterBus-S controller board lin e 1 IBS BK-T ID: 52 on 0 Error location 2 4 3 IBS 24 DI ID: 130 IBS AO1 ID: 65 5 IBS 24 DO ID: 129 IBS PT 100 ID: 70 IBS IP DIO 1/24-F ID: 7 1 6 IBS IP CBK 1/24 2 IBS IP CDI 1/24-F ID: 12 7 IBS IP CDO 1/24-F ID: 10 8 IBS IP CDI 1/24-F ID: 9 9 ID: 10 10 5096B105 26 5096A Table 9: Error description of the remote bus error (DD=diagnostic display) Remedy Check the following in the remote bus segment: Please refer to Page 32 for additional information on the error description. om Bus operation is disturbed and the bus was stopped. All outputs were reset. The display shows the number of the remote bus segment with the error. - Power supply of the remote bus device .c - Cabling to the remote bus device (with the help of the LEDs on the BK module, see Page 38) on lin e co m po ne n 0-255 Description ts DD 5096A 27 LED on po ne n LED off 1 BS 0 BK I/O BS 1 BK I/O I/O The dashed area indicates the error location with regard to the displayed bus segment. A detailed determination of the bus segment with the error is possible by evaluating the error message 80C4 (see Page 32). I/O m BS 2 lin e co BK I/O on 3 BS 0 2 BS 0 BK I/O BS 1 ST BK ST I/O ST I/O BS 2 BK I/O BK I/O BS 1 BK BK I/O BS 4 ts LED off or on .c om X = valid I/O address setting When logical addressing is used (physical addressing is shown here!) the order of the bus segment number may differ from the one shown here (see System Documentation). BS 2 BK I/O BS 3 BK I/O 5096A127 Figure 5: Error location (dashed area) with respect to the displayed bus segment (BS2 or BS4, gray) 28 5096A Table 10: Error description of the remote bus error (DD=diagnostic display) Bus operation was disturbed and the bus was stopped. All outputs were reset. The display shows a bus segment number. The error can be found in the previous bus segment - Power supply of the bus devices - Cabling of the bus devices (with the help of the LEDs on the BK module, see Page 38) po ne n 1) of a local bus Check the following in the indicated bus segment: om 0-255 Remedy .c Description ts DD 2) of an IB ST compact station or in the bus segments of a previous m 3) installation remote bus on lin e co and/or in the displayed bus segment (see numbered, schematic examples on the left). 5096A 29 Bus Error (E0x) po ne n LED on ts .c om X = valid I/O address setting LED off or on on lin e co m LED off 30 5096A As of firmware version 3.7 the following applies to the displays E01-E06: The LEDs RB and LB light up simultaneously and the associated bits in the diagnostic register are set. Remedy E01 No error was found when the configuration was acquired and compared after the error occurred. Cabling and/or shielding error - Check remote and local bus cabling - Check the power supply - Check the PE connection - Diagnostic tool; IBS SYS SWT or IBS CMD SWT - Evaluate mode 918x, see Page 11 E02 The maximum permissible configuration was exceeded. - Check the address lists and the configuration. m co ts The configuration could not be acquired because the device does not respond. Check the power supply for dips. - Evaluate mode 918x, see Page 11 E05 All groups were disabled. Check the application program. E06 No error was found when the configuration was acquired and compared, but no data cycle is possible due to transmission errors. - Diagnostic tool: IBS SYS SWT/ IBS CMD SWT - Inform the Technical Support Dep. of Phoenix Contact. - Evaluate mode 918x, see Page 11 E04 lin e on .c Description po ne n DD om Table 11: Error description of the E0x error (DD=diagnostic display) 5096A 31 The error message "Bus-Error-Information-Indication (80C4)" shows all bus errors. The following illustration shows the error E03. The location of the error is encoded in the specified way. m co z+1 z+2 lin e on EE03 FF01 .c 80C4 for 1st GRPNO ts Bus-Error-Information-Ind. PC Defective-Bus GROUPS block QTYGRP GRPNO ... GRPNO REMOTE BUS block QTYRB RBNO RBERRNO ... RBNO RBERRNO LOCAL BUS block QTYLB LBNO LBERRNO ... LBNO LBERRNO for nth GRPNO FF02 po ne n Word 1 2 3 4 5 6 om Error Message "Bus-Error-Information-Indication (80C4)" for Error E03 Bit for 1st RBNO for 1st RBERRNO ... for mth RBNO for mth ERRNO FF03 for 1st LBNO for 1st ERRNO ... for pth LBNO for pth LBERRNO 15 ..........................................0 Key to abbreviations: PC Parameter count (is generated automatically) QTYGRP GRPNO QTYFB Quantity of disconnected groups Number of the first /nth disconnected group Quantity of remote busses with errors RB( -ERR)-NO No.(error no.) of 1st to last remote bus with an error QTYLB Quantity of local busses with errors LB( -ERR)-NO No.(error no.) of 1st to last local bus with an error Please refer to the following table for the error numbers (Abbr.: BK= bus terminal module, LB = local bus, E or e.= error, w = wire, DC= data cycle) 32 5096A 5096A 33 E.-No. DD01 DD02 DD03 DD04 DD05 DD06 DD07 DD08 DD09 DD0A DD0B DD0C DD11 DD12 DD15 DD18 DD19 DD1A DD2B DD42 DD50 DD51 DD52 e n o p t n . s o c o il n n c e m o Error description (error numbers used with FW 3.71, FW 3.72 extended). The BK ID does not agree with the original configuration (e.g. due to replacement or device error). Error description like DD01, however, related to a BK I/O. LB is missing or there is an open LB cable (no or defective local bus connection). LB is longer than expected, because a module was added during operation. LB is shorter than expected, because the module was removed during operation. In the specified LB a module ID code does not agree with the original configuration. The configuration could not be read in, because the bus system was not connected. Local bus was connected to a BK module that originally had no local bus connected. Bus segment is missing or there is an open remote bus cable (no or defective remote bus cable connection). Too many transm. err. (=E. type EE06,no error when configuration was acquired a. compared) between 2 error-free DC. Configuration is longer than expected, because the remote bus was extended compared with the original configuration. Maximum configuration was exceeded, the no. of bus devices or the register locations are too large. Wrong process data length or data register of a bus device is defective (remote bus). Wrong process data length or data registers of a bus device defective (local bus). Short-time change of an ID code during operation with specified BK or module in specified LB (similar to DD01/02/06). Short-time err. in a LB using the 8-w techn. during operation caused by cable and/or module error (similar to DD03/05/08). Bus interruption or voltage reset in the additional diagnostic phase. Like DD0A, but in the additional diagnostic phase. Like DD0B, but in the additional diagnostic phase. Short-time bus interrupt, voltage reset or jumper in outgoing remote bus connector defective. Remote bus - or local bus error detected in the additional diagnostic phase. Local bus error detected in the additional diagnostic phase. Remote bus error detected in the additional diagnostic phase. Error numbers for the error message 80C4 (in particular the error E03) Local Bus Error LB X = invalid I/O address setting .c om When logical addressing is used (physical addressing is shown here!) the order of bus segment numbering may differ from the one shown here (see System Documentation). ts LED on LED off or on po ne n LED off InterBus-S controller board m Error location co Local bus segment number IBS BK-T ID: 52 2 IBS 24 DI ID: 130 3 IBS AO1 ID: 65 4 IBS 24 DO ID: 129 5 IBS PT 100 ID: 70 on lin e 1 0 11 IB ST 24 BK-T ID: 8 12 IB ST 24 DI 32/2 ID: 190 13 IB ST 24AI/SF ID: 126 5096B107 34 5096A Table 12: Error description of the local bus error (DD=diagnostic display) Description Remedy 0-255 (dec) InterBus-S operation is disturbed and the bus was stopped. All outputs were reset. Possible causes: - Defective module - Defective connection between the modules. - Replace defective module - Replace defective connection Help for remedy: ts .c - LEDs on the modules on lin e co m po ne n This display shows the number of the defective local bus. Please refer to Page 32 for additional information on the error description. om DD 5096A 35 Module Error MOD .c om X = invalid I/O address setting ts LED on LED off or on po ne n LED off Error location 1 2 IBS 24 DI ID: 130 IBS AO1 ID: 65 5 IBS 24 DO ID: 129 IBS PT 100 ID: 70 co BS0 4 3 m IBS BK-T ID: 52 lin e IBS IP DIO 1/24-F ID: 7 BS1 on 6 IBS IP CBK 1/24 IBS IP CDI 1/24-F ID: 12 7 11 IBS IP CDO 1/24-F ID: 10 BS2 12 8 IBS IP CDI 1/24-F ID: 9 BS3 9 ID: 10 BS4 10 BS5 13 BS6 IB ST 24 BK-T ID: 8 IB ST 24 DI 32/2 ID: 190 IB ST 24AI/SF ID: 126 5096B109 36 5096A Table 13: Error description of the module error Description Remedy 0255 (dec) The module error (MOD) indicates an error in the periphery of an I/O module, and the associated bus segment number is shown on the display. Check the I/O voltage of the module concerned and/or determine a short-circuit at the actuator(s). - Short-circuit or overload of an output (Indication: red E LED is on) m Note: on lin e co The bus is not affected by a module error and continues to operate! 5096A .c After the error has been removed: po ne n - Failure of the I/O voltage of a module (Indication: green LED is off) ts Possible causes: om Display The error is indicated on the controller board and remains on the display even after the error has been removed. Depending on the current consumption, a short-circuit at an actuator can have an effect on further outputs of the voltage group concerned. Clear the message with the CLEAR DISPLAYREQUEST or SEND-ALLMODULEERRORREQUEST commands For modules with a holding error indication the error indication must be cleared with the CONFIRMMODULEERROR-ALLREQUEST (0065) command. 37 Diagnostic Functions on IBS Devices Diagnostic LEDs RC: Incoming remote bus connected Supply voltage BA : Bus active LD : Local bus disabled ts E : Error in connected local bus branch .c UL : Logic voltage po ne n RD : Outgoing remote bus disabled green PE +- red PE terminal Alarm output Reconfiguration input 5096A124 m Reconfiguration button co Figure 6: Diagnostic LEDs for BK modules (here: IBS 24 BK-T) BK modules with I/O terminals can also indicate module errors (short-circuit of a sensor/actuator, missing I/O voltage). For this purpose, they have additional LEDs (see also diagnostic function on I/O modules). lin e on om Diagnostic Functions on the BK Module UL Green LED on: off: Voltage for the module’s logic circuitry Voltage is in the valid range No voltage, remedy the cause, replace fuse, if required (either under the housing or with IBS ST modules pluggable from the outside, for fuse type see data sheet or "Fuse Types for IBS Devices", Page 49) BA Green LED on/off: Bus active indication Bus active/stopped 38 5096A RC Green LED on/off: Status of incoming remote bus Incoming remote bus active/shut down RD Red LED on/off: Status of outgoing remote bus Outgoing remote shut down/active LD Red LED on/off: Local bus status Local bus shut down/active After the button has been actuated the PLC application program receives a for ext. button message. The application program must fetch the message. om Rec button or terminal Error indication for outgoing local bus Error in the outgoing local bus Local bus active .c Red LED on: off: ts E on lin e co m po ne n Some BK terminals (e.g. IBS 24 BK-T, IBS 24 BK-I/O-T) offer a floating alarm output (relay changeover contact). The alarm output is switched in the event of errors in the branching local bus (E LED is on). 5096A 39 IB ST I/O Modules 65 73 57 F2 Us1 F3 Us2 3 4 5 IN 6 7 8 9 10 11 12 13 14 15 16 OUT po ne n 2 Us3 E2 Us4 ts Us1 E1 Us2 1 Us4 IB ST 24 DIO 8/8/3-2A NTER UL CC BA F4 Us3 .c F1 om 49 8 digital Input, 8 digital Output, 24 V DC, Module Ident.: 191 Us1 2 3 4 17 18 19 20 33 34 35 lin e on F1: F2: F3: F4: Us3 Us4 6 7 8 9 10 11 12 13 14 15 16 21 22 23 24 25 26 27 28 29 30 31 32 39 40 41 42 43 44 45 46 47 48 37 38 co 36 Us2 5 m 1 Us1 Isolated group I Fuse +Us1 (4AF) Fuse +Us2 (4AF) Fuse +Us3 (4AF) Fuse +Us4 (4AF) internally connected to be connected externally Isolated group II 5096B110 Figure 7: LED locations using the IB ST 24 DIO 8/8/3-2A module as an example 40 5096A Green LEDSupply voltage for the electronics module on: Supply voltage UL present off: Supply voltage UL not present - Incoming ST cable missing - Fuse blown in BK module - Internal power pack of BK module defective BA Green LEDBus active on: Data transmission on InterBus-S active off: No data transmssion CC Grn LED on: off: E1 Red LED Fuse blown in isolated group I terminals 1-8/9-12 (inputs or outputs) on: F1 is blown, if Us1 off and Us2 on (relevant for terminals 1-8 and 9-10) F2 is blown, if Us2 is off and Us1 is on (relevant for terminals 11-12) off: No fuse is blown E2 Red LED Fuse blown in isolated group II terminals 13-16 (outputs) on: F3 is blown, if Us3 is off and Us4 is on (relevant for terminals 13-14) F4 is blown, if Us4 is off and Us3 is off (relevant for terminals 15-16) off: No fuse is blown m po ne n ts .c ST cable check Incoming ST cable connected Incoming ST cable not connected or defective co lin e on om UL XX Yel.LED on: off: I/O status (of channel XX) Input/output is active Input/output is inactive Usn Grn LED on: off: 24V I/O supply (group n) Supply voltage Usn is present - Supply voltage Usn is not present - Fuse of group n blown 5096A 41 Flat-Pack Modules with IP 20 Protection ts .c om U L :Logic voltage po ne n Diagnostic LEDs yellow: I/O status green: US switching voltage red: E Short-circuit PE Us Yel. LED I/O status on: Output set or input is active co No. m Figure 8: Example of LED diagnostics on an I/O module with IP20 protection Grn LED lin e on 5096A123 on: off: Switching (I/O) voltage for the sensors and/or actuators Voltage is in the valid range No voltage or voltage is too low E Red LED Overload or short-circuit indication on: Output of the module is shorted or overloaded. off: Output is okay UL Green LED Logic voltage for the module’s electronics. (drawn from the local bus cable of the BK module) on: Voltage is in the valid range off: No voltage is present 42 5096A The meaning of the LEDs described above is different for all PCP modules that are capable of communications (IBS V.24, IBS AI 3/16, IBS UTHJ, IBS AI 1/8, IBS AI,6/8, IBS CNT, etc.). In this case, the three green LEDs between the local bus terminals have the following meanings: Green LED Power supply of the module electronics on: Voltage is in the valid range off: No voltage or voltage is too low R Green LEDReset on: Reset is not active off: Reset active TR Green LEDTransmission of parameter data is active on: Transmission is active off: No transmission on lin e co m po ne n ts .c om UP 5096A 43 Installation Remote Bus Modules with IP 65 Protection Bus supply voltage (green) Remote bus check (green) I/O supply voltage (red/green) RC BA RD 7 6 5 4 3 2 1 .c UL 0 po ne n ts US om Bus active (green) LED 0-7 I/O status (yellow) Short circuit (red) 5096A125 Figure 9: LED diagnostics on the installation remote bus module with IP65 protection co m No. Yel./red LED I/O status/overload or short-circuit indication Yellow on: Ouput is set or input is active Red on: Short-circuit or overload at the output Us Green LED Switching (I/O) voltage for the sensors Green (f. CDI) and/or actuators green/red (f.CDO) on: Voltage is present and in the valid range off: No voltage or voltage is too low lin e on Remote bus disabled (only for IBS IP CD... 3/24-F; red) UL Green LED on: off: Voltage for the module electronics Voltage is present and in the valid range No voltage is present BA Green LED on: Bus active indication Bus active RC Green LED on/off: Status of incoming remote bus cable Incoming cable connected/not connected RD Red LED Remote bus status (for IBS CDI or CDO 3/24-F only) Remote bus disabled due to an error on/off: 44 5096A For all IP65 modules that were not designed for the use in an installation remote bus the LEDs have the following meaning: Operating voltage indication Remote bus active Remote bus check Remote bus disabled I/O status indicators om Green LED Green LED Green LED Red LED Yellow LED on lin e co m po ne n ts .c US BA RC RD 0-7 5096A 45 Additional Diagnostic Tools IBS SYS SWT Configuration Software The flowchart shows the operating steps in the program part "Diagnostics" which are used to evaluate the InterBus-S transmission quality. om Please refer to the user manual IBS SYS SWT UM E (Order no. 27 53 87 6) for a detailed description of the operating steps for all program parts. Call "Diagnostics" program part po ne n (2) ts (1) Evaluate diagnostic file only (2) Record and evaluate diagnostic data (1) .c Start InterBus-S Set/modify scan time Set/modify data update mode (auto or manual) m If "manual": define time delay lin e co Define evaluation period in the diagnostic file If manual data regeneration: select <Forward>, <Backward> on - Evaluate table of error messages, change accuracy of representation, if necessary For online operation: - Assess total evaluation and allow for the sum of bus cycles (1) (1) Exit "Diagnostics" program part (2) Terminate online operation (2) Online operation with <STOP> - - - - - = optional step 46 5096A om IBS CMD SWT - The InterBus Manager The IBS CMD SWT program is a graphical user interface under Microsoft Windows, which offers functions for system configuration, start-up and diagnostics. Dialog functions allow to operate and display (monitor) all connected IBS devices. Moreover, the open structure of the software allows the integration of vendor- or device-specific operation and parameterization functions: The program makes the following functions available: Functions to design a bus topolgy which is needed to assign the addresses between the PLC and the connected IBS devices - Functions to parameterize complex IBS devices - Dialog functions to output data (e.g. set outputs) as well as to read and display current input data (monitor inputs) - Diagnostic functions to detect and locate defective system parts (IBS devices, cables, power supplies, etc.) - Functions for documentation of your IBS system by preparing a system description including the programmed device settings Utility programs, which are written by other IBS device manufacturers or IBS user groups (e.g. DRIVECOM) provide further functions. The user can integrate these utility program easily into the IBS CMD SWT user interface. m po ne n ts .c - lin e co Thus, IBS CMD SWT is a platform which is open to all IBS users and device manufacturers and which allows an easy to manage configuration, monitoring and diagnostics of your InterBus-S system under Microsoft Windows. IBS CMD SWT can be fully used as of firmware 3.7, and with restrictions with firmware 3.5x. on Please refer to the IBS CMD SWT UM E user manual (Order no.: 27 53 95 7) for further information about the IBS SYS SWT software. 5096A 47 Process Data Monitor Program IBS PC CB MONI The file PCCBMONI.EXE is delivered together with the driver software for the IBS PC CB/../I-T controller boards. ts .c Start-up of an InterBus-S system using the PC Test of an InterBus-S system using the PC Control of the connected configuration Address allocation of the peripheral words Setting of outputs (binary and hex.) Display of the status of inputs (binary and hex.) Start and stop of the InterBus-S system lin e co m po ne n - om The file is a separate program which can be started under DOS by calling PCCBMONI.EXE. It provides the following services: 5096A117 on Figure 10: Input and output screen of the process data monitor program IBS PC CB MONI 48 5096A Fuse Types for IBS Devices om All IBS devices with a 24V terminal are equipped with TR5 fuses. They protect the device on the bus side and, if the ones with active inputs are used, on the input side. The TR5 fuses are available from Phoenix Contact. The following table lists the fuses that are used in the modules. Fuses which are soldered in and can only be replaced at Phoenix Contact are listed as well. Module Order no Device po ne n Table 14: Overview of the fuse types Fuse type Order no. Order designation SI. TR5 0,200AT SI. TR5 0,400AT SI. TR5 0,400AT SI. TR5 0,400AT SI. TR5 0,400AT SI. TR5 1AT 2753452 2753478 2753478 2753478 2753478 2806600 IBS TR5 0,2AT IBS TR5 0,4AT IBS TR5 0,4AT IBS TR5 0,4AT IBS TR5 0,4AT IBS TR5 1AT SI. TR5 5AT 2767383 IBS TR5 5AT SI. TR5 1AT SI. TR5 1AT SI. TR5 1AT SI. TR5 1AT SI. TR5 1AT SI. TR5 2AT SI. TR5 2AT SI. TR5 4 AT SI. TR5 4AT SI. TR5 4AT SI. TR5 5AT SI. TR5 5AT SI. TR5 4AT SI. TR5 0,4AT 2806600 2806600 2806600 2806600 2806600 2752505 2752505 2753465 2753465 2753465 2767383 2767383 2750374 2753478 IBS TR5 1AT IBS TR5 1AT IBS TR5 1AT IBS TR5 1AT IBS TR5 1AT IBS TR5 2AT IBS TR5 2AT IBS TR5 4AF IBS TR5 4AF IBS TR5 4AF IBS TR5 5AT IBS TR5 5AT IBS TR5 4AT IBS TR5 0,4 AT IB ST modules 2752440 co 2753232 2754435 2753504 2754341 2752437 2753012 2752479 2753708 2753449 2754914 2754325 2752482 2754891 2752767 IB ST 24 AI 4/SF IB ST 24 AI 4/SF IB ST 24 AI 4/SF-WT IB ST 24 AO 4/BP IB ST 24 AO 4/SF IBS ST 24-BK- DIO-8/8/ 3-T-WT IBS ST 24-BK- DIO-8/8/ 3-T-WT IBS ST 24 BK LB-T IBS ST 24 BK-LK IBS ST 24 BK-RB-T IBS ST 24 BK-T IBS ST 24 BK-T-WT IB ST 24 DI 32/2 IB ST 24 DI 32/2-WT IB ST 24 DIO 8/8/3-2A IB ST 24 DIO 8/8/3-2A-S IB ST 24 DO 16/3 IB ST 24 DO 32/2 IB ST 24 DO 32/2-WT IB ST 24 DO 8/3/2A IB ST 24 PT100 4/4 m 2754309 2754309 2752534 2752521 2754312 2752440 lin e on ts .c For some modules (marked in bold) the built-in medium-blow fuses are to be replaced by the ones listed below after they have blown. IBS flat-pack modules with IP 20 protection 2784023 2784065 2784036 2784078 2784104 2784120 2784133 2784133 2759980 2753630 2758981 2767529 2759090 2780797 2784010 2784421 5096A IBS 115 DI IBS 115 DO IBS 220 DI IBS 220 DO IBS 230 BK IBS 24 BK IBS 24 BK I/O IBS 24 BK I/O IBS 24 BK I/O-T IBS 24 BK-I/O-LK IBS 24 BK LWL/K IBS 24 BK/LC IBS 24 BK/LC 2 IBS 24 BK-T IBS 24 DI IBS 24 DI/32 SI. 5x20 2 AM SI. 5x20 6,3 AFF SI. 5x20 2 AM SI. 5x20 6,3 AFF UL500 mA SI. TR5 1,600AT SI. TR5 0,5AT SI. TR5 5AT SI. TR5 5AT SI. TR5 1AT SI. TR5 1AT SI. TR5 0,500AT SI. TR5 1AT SI. TR5 1AT No fuse No fuse 5032086 None 5032086 None None 2767367 2767370 2767383 2767383 2806600 2806600 None 2806600 2806600 SI. 5*20 2AM SI. 5*20 2AM IBS TR5 1,6AT IBS TR5 0,5AT IBS TR5 5AT IBS TR5 5AT IBS TR5 1AT IBS TR5 1AT IBS TR5 0,5AT IBS TR5 1AT IBS TR5 1AT 49 Table 14: Overview of the fuse types 2784913 2768007 2784926 2784081 2758583 2767192 2759223 2752709 2751522 2806590 2780658 2784094 2784230 2767202 2758596 2784227 2787839 2787842 IBS 24 Rels IBS 60 DI IBS 60 Rels IBS AI IBS AI 1/8 IBS AI 3 IBS AI 3/16 IBS AI 3/D IBS AI 3/I IBS AI 5/8 IBS AI/I IBS AO 1 IBS AO 2 IBS AO 3 IBS AO 4/8 IBS CNT IBS PT 100A/2 IBS PT 100A/4 IBS TR5 5AT IBS TR5 1AT IBS TR5 1AT IBS TR5 1AT Soldered 2767383 5032086 2767383 2767383 2806600 2806600 Soldered IBS TR5 5AT SI. 5*20 2AM IBS TR5 5AT IBS TR5 5AT IBS TR5 1AT IBS TR5 1AT 2806600 IBS TR5 1AT 2806600 2767370 2753478 2767370 IBS TR5 1AT IBS TR5 0,5AT IBS TR5 0,4AT IBS TR5 0,5AT 2767370 2767370 IBS TR5 0,5AT IBS TR5 0,5AT 2767370 2767370 2767370 2767370 2753478 2767383 2767370 2767370 IBS TR5 0,5AT IBS TR5 0,5AT IBS TR5 0,5AT IBS TR5 0,5AT IBS TR5 0,4AT IBS TR5 5AT IBS TR5 0,5AT IBS TR5 0,5AT SI. 5x20 6,3 AT SI. TR5 1AT 5030512 2806600 SI. 5*20 6,300AT IBS TR5 1AT SI. 5x20 6,3 AT SI. 5x20 6,3 AT 5030512 5030512 SI. 5*20 6,300AT SI. 5*20 6,300AT SI. 5x20 0,5 AT None SI. TR5 0,5AT SI. TR5 0,5AT SI. TR5 0,5AT SI. TR5 0,5AT SI. TR5 0,5AT SI. TR5 0,5AT SI. TR5 0,5AT 2767370 2767370 2767370 2767370 2767370 2767370 2767370 IBS TR5 0,5AT IBS TR5 0,5AT IBS TR5 0,5AT IBS TR5 0,5AT IBS TR5 0,5AT IBS TR5 0,5AT IBS TR5 0,5AT Soldered 2767367 2752505 2752505 2806600 2806600 2806600 2806600 2752505 2752505 2752505 2752505 IBS TR5 1,6AT IBS TR5 2AT IBS TR5 2AT IBS TR5 1AT IBS TR5 1AT IBS TR5 1AT IBS TR5 1AT IBS TR5 2AT IBS TR5 2AT IBS TR5 2AT IBS TR5 2AT IBS modules with IP 65 protection co 2758046 IBS 24 IP DIO BB1-T 2754260 IBS 24 IP DIO BB1/EFKT 2758020 IBS 24 IP DIO BB1/ET 2758033 IBS 24 IP DIO BB1/ RELS-T 2758033 IBS 24 IP DIO BB1/ RELS-T 2759948 IBS IP CBK 1/24-F 2759731 IBS IP CDI 1/24-F 2754503 IBS IP CDI 2/24-F 2753203 IBS IP CDI 3/24-F 2759799 IBS IP CDO 1/24-F 2754493 IBS IP CDO 2/24-F 2753216 IBS IP CDO 3/24-F lin e on 2767383 2806600 2806600 2806600 Soldered .c IBS 24 DO/32 IBS 24 DO/32/F2 IBS 24 DO/32B IBS 24 DO/LC IBS 24 DO/R IBS 24 DO/SSR IBS 24 DO-B m 2784052 2806503 2780810 2784667 2767215 2754422 2758347 Order no. Order designation po ne n 2767972 IBS 24 DO 1 No fuse SI. TR5 5AT No fuse SI. TR5 1 AT SI. TR5 1AT SI. TR5 1AT PICO 15 AF Wickmann PICO 15 AF Wickmann SI. TR5 5AT SI. 5x20 2 AM SI. TR5 5AT SI. TR5 5AT SI. TR5 1AT SI. TR5 1AT PICO 15 AF Wickmann SI. TR5 1AT No fuseg SI. TR5 1AT SI. TR5 0,500AT SI. TR5 0,400AT SI. TR5 0,500AT No fuse SI. TR5 0,5AT SI. TR5 0,5AT No fuse SI. TR5 0,5AT SI. TR5 0,5AT SI. TR5 0,5AT SI. TR5 0,5AT SI. TR5 0,4AT SI. TR5 5AT SI. TR5 0,5AT SI. TR5 0,5AT om Fuse type Device IBS 24 DI/32/F2 IBS 24 DI/I IBS 24 DI/LC IBS 24 DIO BB1/ET IBS 24 DIO BB1/RELS-T IBS 24 DIO BB1-T IBS 24 DO ts Module Order no 2806516 2784654 2784670 2758017 2807007 2806998 2784049 Host controller boards 2806969 2751153 2806448 2806435 2784780 2806040 2784793 2806587 2751797 2806215 2758156 2752712 50 IBS A25 DCB/I-T IBS ETH CB-T IBS IPC DCB/I-T IBS IPC DCB-T IBS PC AT IBS PC AT 2 IBS PC AT/I IBS PC AT/I 2 IBS S5 DSC/I-T P1 IBS S5 DCB-T IBS S5 DCB/I-T IBS SIN CB-T SI. TR5 1AT SI. TR5 1,6AT SI. TR5 2AT SI. TR5 2AT SI. TR5 1AT SI. TR5 1AT SI. TR5 1AT SI. TR5 1AT SI. TR5 2AT SI. TR5 2AT SI. TR5 2AT SI. TR5 2AT 5096A Replacement of INTERBUS-S Components Replacing the InterBus-S Controller Board If you want to replace the controller board you should proceed as follows: po ne n ts .c om 1. Observe system-related safety information 2. Shut down the host system (PLC, VMEbus computer, PC). Caution: The bus system stops! 3. Unplug the remote bus cable from the controller board. 4. Pull out the controller board (In the case of DCB controller boards the EEPROM card must be replaced as well.) 5. Make the necessary settings on the controller board (jumper/DIP switches). 6. Insert the new controller board. 7. Plug the remote bus cable into the controller board and screw it tight. 8. Supply the host system with voltage 9. Start the host system. on lin e co m The settings on the controller board should be put down in writing and, if they are not quite clear, be verified by means of the user manual of the controller board. Tighten the screws of the remote bus cable only manually tight using a screwdriver. Otherwise, the threads in the connector socket may be pulled out. VMEbus Systems The front plate of the controller board for VMEbus systems must be connected conductively with the mounting rack. Therefore, transitions between front pate and the mounting rack must neither be anodized nor painted! PC The IBS CB cover plate must be connected conductively with the PC housing. Tighten the screw of the IBS CB cover plate carefully. 5096A 51 Replacing an InterBus-S Device (IB ST) If you want to replace a device you should proceed as follows: on lin e co m po ne n ts .c om 1. Put the system into a safe state 2. Switch off power supply of the bus segment concerned. 3. Unplug the bus cable at the device (does not apply to IB ST modules). 4. Remove signal cable/CombiCon connector from IBS device (does not apply to IB ST modules). 5. Remove the IBS device; for IB ST: pull out the electronics module. 6. Make the necessary settings/configuration on the new device (Page 55). 7. Install the new device. For IB ST: insert new electronics module. 8. Connect the signal cable/CombiCon connectors to the device (does not apply to IB ST modules). 9. Connect the bus cable with the device (does not apply to IB ST modules). 10. Switch on the power supply of the bus segment concerned. Signal cables which are connected to CombiCon screw-clamp connectors need not be removed if the device is to be replaced. 5096B126 Figure 11: CombiCon screw-clamp connectors 1 Press down FUSE FUS E FUSE FUSE PR SS E IB Us Us Us I NT B US ER 1 E1 Us 5 UL RC BA 5096B120 1 2 3 4 6 1 7 8 16 1 ST 24 DI 16 /4 E1 E1 2 E2 12 11 24 ut, 10 9 l Inp ita Dig 16 nt: Ide 15 14 dule 13 , Mo DC V 19 0 2 Pull out Figure 12: Easy removal of the IB ST electronics module 52 5096A Replacing InterBus-S Devices With IP20 Protection Do not remove the cover from the devices! om 1. Unplug the bus connectors from the device. 2. Remove connectors and PE connecting cable. 3. Unhook the device from the DIN rail. 4. Installation is done in reverse order. IBS 24 BK-T Remove connector for the reconfiguration button REC (if used), remove connector for the alarm output and unscrew the power supply cables (not pluggable). ts .c IBS BB1 module without IP65 housing The module electronics is located in the middle of the module in its own housing and can be pulled out after two fixing screws have been loosened. po ne n Replacing InterBus-S Devices With IP65 Protection The location of the mouting screws is described in the data sheet of the associated device. IBS CBK, IBS CDI, IBS CDO (compact module) The module can be replaced without having to open the housing. co m 1. Remove connectors after the screwed cap has been loosened. 2. Unscrew the mounting screws. IBS BB2 module on lin e 1. Switch off the power. 2. Open the housing. 3. The module electronics can be found in the middle of the module in its own housing and can be pulled out after two fixing screws have been removed. IBS IP DIO and IBS IP BDIO module 1. Open the housing. 2. Remove the flanges by pulling out the fixing clamps (see figure on next page). 3. Take out the CombiCon scew-clamp connectors through the openings on the side. 4. Loosen the PE connecting cable. 5. Loosen the fixing screws. 6. Installation is done in reverse order. 5096A 53 om .c ts po ne n co m Figure 13: Removing a flange from the housing of an IP DIO module on lin e Please ensure that there is a conductive connection between the flange and the housing when you re-install the housing. Only then can a proper shielding be ensured. 54 5096A Making Settings on/Configuring a New Device Some IBS devices can be configured. In this case, the settings of the old device must be set on the new device as well. .c om IBS Devices with Voltage or Short-Circuit Monitoring: Some IBS devices can indicate a power supply failure or the short circuit of an output via the bus system. This is not a standard setting, it must be activated by a jumper. Please refer to the package slip for information about this function and the location of the jumpers. po ne n ts Retrofitting IBS Analog Modules with a Voltage Input to a Current Input: The modules IBS AI/3 and IBS AI can be retrofitted with a current input. The current input is implemented by soldering a 50 Ω precision measurement resistor (IBS AI/R , Order No.: 27 84 43 53) into the input step of the voltage input. These resistors must be ordered when the module is purchased. When the module is replaced, it has to be ensured that the new module also has this 50 Ω resistor. The package slip shows the location of the 50 Ω resistor. co m IBS CNT: Unscrew the cover of the module. A jumper bank is located on the motherboard above the LEDs. These jumpers can be used to configure the counter channels. The positions of the jumpers must be set on the new module as well. on lin e IBS AI x/8, IBS AI x/16: If an input gain different than 1 is required, this gain can be stored in an EEPROM on the module. The module can be programmed directly by means of the control program (via PCP) or by means of the configuration software SACON (Order no. 27 58 56 7). 5096A 55 Repair of Defective INTERBUS-S Components Information on a Defective Device If you need to send in a defective InterBus-S component for repair to Phoenix Contact, please copy the service sheet overleaf to a DIN A4 format and fill it out. Please enclose the filled out service sheet with the component to be sent in. om Your complete information facilitates the service and allows a quick processing. ts .c Send defective parts which were manufacturered by Phoenix Contact with the note "For Repair" to your nearest Phoenix Contact representative or agency. po ne n Consultation in the Event of Application Difficulties on lin e co m Should you have any general questions concerning InterBus products, or application difficulties which cannot be overcome by means of this diagnostics guide, please contact your nearest Phoenix Contact representative or agency. 56 5096A We Are Interested in Your Opinion! We would like to hear your suggestions, wishes, criticism concerning this diagnostics guide. No matter how small your contribution, we will deal with any hint or comment. om Please sent your comments, suggestions, etc. to the following address: Phoenix Contact GmbH & Co. Produktmarketing INTERBUS/ME-DOKU .c Flachsmarktstr. 8-28 D-32825 Blomberg ts Germany po ne n Alternatively, you may use the following FAX number: FAX No.: Germany-5235-331199 on lin e co m Phoenix Contact GmbH & Co. Produktmarketing INTERBUS/ME-DOKU 5096A 57 Service Sheet For the Repair of Defective INTERBUS-S Components Contact name for Phoenix Contact Mr./Mrs./Ms. Company om Department Address ts .c Postal code/city country FAX po ne n Phone General information about the system concerned Control system and CPU used What other boards are plugged? m Type and serial number of the controller board co The letter which is marked on the controller board or B C D E F Version number of the controller board lin e on A Version number of the software Is PCP communication used? Yes No Defective component Designation Revision letter/number Serial number Vendor 58 5096A Error description Since when does the error occur? How often does it occur? on lin e co m po ne n ts .c om How does the error manifest itself? 5096A 59 om .c ts po ne n m co lin e on Notes: 60 5096A Comparing the DCB Board With Other Controller Boards Table 15: Comparison of the displays between the DCB controller board and other controller boards LED indicators Ready RDY MA Ready BASP SYSFAIL See user manual RUN MA RUN po ne n RUN BSA Run (blinking) Diagnostic bit 6 RUN (permanent light) BSA Driver message x1 ERR x2 Error (quadruple blinking interval) ERR x2 Error (triple blinking interval) LB ERR x2 Error (double blinking interval) MOD ERR x2 Error (single blinking interval) - - Error (permanent light) co m CTRL RB lin e on S5 100 CB om PC CB .c VME CB ts DCB Blinking diagnostic display - x1: Get IBS Diagnostic , structure element "State" x2: Get IBS Diagnostic , structure element "ErrType" 5096A 61 Flowchart for the Error Recovery An error occurs The error is reported: - Front plate of controller board - Software function - Distributed diagnostic LEDs LED RB ERR LED LB ERR LED MOD ERR LED READY off Parameterization error Error is indicated Note: Observe bus segment numbering (physical or logical) Controller board is defective! Replace it! po ne n ts .c LED CTRL ERR Check the bus segment with errors LED RB LED LB Error: remote bus cabling, power supply of BK module Help: LED of BK. Caution: Bus stopped Error: Local bus cabling I/O module Error: Failure of I/O voltage, short-circuit on the sensor or actuator Caution: Bus continues to run m Help: LED on module Caution: Bus stopped LED MOD co Repair the system Clear error indication: a: By means of the application program (send Clear-Display Req. 004E) or Perform a RESET only when b: Perform a RESET, the PLC is in the STOP state switch PLC voltage and if it is permitted by the on/off application program. lin e on om Front plate diagnostics shows the group, location and code of the error 5096B118 The diagnostic response of the controller board is as follows: 1. Detection of an operating or error condition; automatic diagnostics 2. Display of the diagnostic data by means of - Front plate (error group and parameter via LED) - Diagnostic reg. (like front plate, but via memory) - Acknowledgment delay 3. Further diagnostic functions by means of the ISFP software program (included function blocks) V.24 port for the connection of a diagnostic program (IBS SYS SWT or IBS CMD SWT). 5096A 62 5096A 63 om .c ts po ne n m co lin e on om .c ts po ne n m co lin e on Phoenix Contact GmbH & Co. KG Postfach 13 41 D-32819 Blomberg Phone: Germany-5235-3-00 Fax: Germany-5235-3-41200