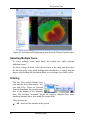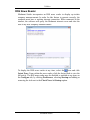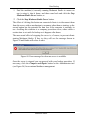
1
MEDMONT STUDIO
USER MANUAL
Medmont Pty Ltd
Unit 5, 56 Norcal Road, NUNAWADING,
VICTORIA 3131, AUSTRALIA
Phone: 61-3-9259-0800 Fax: 61-3-9877-6431
e-mail: [email protected]
Web: www.medmont.com.au
Doc No: P-1435 V2.2 © MEDMONT Dec 2012
Table of Contents
1.
INTENDED PURPOSE ................................................................................... 1
Software Conventions ..............................................................................1
Explanation of Symbols ...........................................................................2
Accessories ..............................................................................................2
2.
HARDWARE CONFIGURATION ................................................................ 4
PC and Associated Equipment Requirements ..........................................4
3.
INSTALLATION CONFIGURATIONS ........................................................ 6
Standalone ................................................................................................6
Configuration Typical Use
7
Network (Client / Server) .........................................................................7
Configuration Typical Use
8
Single User Review ..................................................................................8
Configuration Typical Use
8
4.
INSTALLING THE SOFTWARE .................................................................. 9
Common Installation Steps ....................................................................10
Installing a Stand-Alone System ............................................................12
Installing a Server Based System ...........................................................19
Installing the Server
19
Installing the Clients
19
rd
Installing with a 3 Party Practice Management System .......................22
5.
RUNNING MEDMONT STUDIO ................................................................ 25
For the First Time...................................................................................25
6.
CONFIGURING A SERVER/CLIENT SYSTEM ...................................... 26
Setup for a Secure System .....................................................................26
Setting the Administrator Password .......................................................26
Adding Clinicians ..................................................................................27
Setting Permissions ................................................................................27
Database management............................................................................28
Session Management..............................................................................29
Database Locks ......................................................................................29
7.
PRACTICE MANAGEMENT SYSTEM INTEGRATION ....................... 31
Adding a New Patient in Medmont Studio ............................................31
Synchronising the Databases .................................................................32
8.
OVERVIEW ................................................................................................... 35
The User Interface ..................................................................................35
9.
THE EXPLORER PANE ............................................................................... 36
i
Sample Data .......................................................................................... 36
Changing the Size and Position of the Explorer Pane ........................... 37
Docking and Undocking
37
Unpinning and Pinning
37
The Tree View ....................................................................................... 38
The Patients View .................................................................................. 38
Adding a Patient .................................................................................... 39
The Refresh Button ............................................................................... 41
Editing a Patient .................................................................................... 41
Selecting Explorer Pane Items .............................................................. 41
Selecting Multiple Items ....................................................................... 42
Filtering ................................................................................................. 42
Searching ............................................................................................... 45
Searching by Patient Name
45
Searching by patient External ID
46
Searching a 3rd-party Practice Management
46
Search Behaviour and the Different Filter Modes
46
Sorting ................................................................................................... 46
Using Favourites ................................................................................... 47
10. THE VIEW PANE .......................................................................................... 48
Displaying Multiple Views .................................................................... 48
Thumbnail View
49
11. THE RIBBON MENU .................................................................................... 51
On The Home Tab
On The Configure Tab
The Application Button
The Views
The Help Menu
51
52
53
53
53
12. THE RIBBON ................................................................................................. 54
13. HELP ............................................................................................................... 56
14. ANNOTATIONS ............................................................................................. 57
15. ATTRIBUTES ................................................................................................. 58
16. PRINTING ...................................................................................................... 59
The Print Dialog .................................................................................... 59
Print Dialog Settings
59
Print Preview ......................................................................................... 60
17. USAGE HINTS ............................................................................................... 62
Auto-Capitalisation ............................................................................... 62
Tabbing between Fields ......................................................................... 63
ii
Default Buttons ......................................................................................63
Entering Dates ........................................................................................64
Numeric / Arrow Key Entry
64
Graphic Calendar Selection
64
18. UTILITIES ...................................................................................................... 65
Medmont Studio Configuration Tool .....................................................65
RSS News Reader ..................................................................................67
19. LICENSING .................................................................................................... 68
Updating from the old Rockey license dongle .......................................68
Installing a Medmont Studio license. .....................................................69
Installing a license on a computer with internet access.
70
Installing a license on a computer without internet access
71
Authenticating via a web page
Authenticating via email.
72
75
Frequently Asked Questions (FAQ). ......................................................77
Session Licenses ....................................................................................78
20. DATA BACKUP ............................................................................................. 79
Backup Media ........................................................................................79
Backup Locations ...................................................................................80
Initiating a Backup .................................................................................81
iii
Intended Purpose
1. Intended Purpose
Medmont Studio is a powerful software package for controlling the
Medmont range of medical instruments from your personal computer or
laptop. Medmont Studio is a component of the following instruments:
Medmont Automated Perimeters (all models)Medmont DV2000
Diagnostic Video Imaging
Medmont Corneal Topographers (all models)
The extensibility of Medmont Studio means that its capabilities expand as
you purchase new instruments and software, fully integrating into a single
working environment.
In addition to controlling the instruments, Medmont Studio provides
additional Analysis Tools and Patient Management facilities. These include
complete patient management functions out-of-the-box using Medmont’s
own database, or optionally via a 3rd party Practice Management system.
Check the Medmont web site for an up-to-date list of supported 3rd party
systems.
In a small practice Medmont Studio can be run from just one computer,
managing both the patient database and controlling the instrument. This is
called the standalone configuration.
For larger practices, Medmont Studio contains powerful features for interconnecting multiple computers to centralise data-storage on one computer
called the server. All other computers on the network are called clients.
Medmont instruments may be connected to any client in the network.
This document describes the basic Medmont Studio capabilities, including
patient management. Separate on-line and printed documentation is available
describing the additional functionality specific to particular instruments.
Software Conventions
The term Application Button refers to the circular button in the top left of
the menu bar. This button can have different icons but is always in the same
position on the ribbon bar. When navigating the application button menu we
use the following format: Application Button > Import.
Medmont Studio
1
Intended Purpose
When referring to menu selection, the terminology Home > Patient > New
means click on the Home ribbon bar tab, then look for the Patient group on
the ribbon bar and click on the New icon. This format conforms to the Tab >
Group > Action system for identifying menu items in a ribbon bar menu
system.
A small glossary is included for terminology that originated with Medmont.
It also includes some common terms where they apply to Medmont
equipment. It is not a glossary of perimetry. Terms that appear in the glossary
are underlined in the text.
Explanation of Symbols
Warning - In event of user error or equipment
fault condition there may be a serious risk to
health or life of patients or operator, or product
damage or loss may occur.
Accessories
- PC incl. Operating system
(provided by customer)
- Licensing Dongle
- User Manual
- Isolation Transformer
2
Medmont Studio
(optional)
Intended Purpose
- Dummy plug network connection
(optional)
- Dummy plug serial 9 pin serial port
(optional)
- Label for Patient environment
(optional)
Medmont Studio
3
Hardware Configuration
2. Hardware Configuration
Important: Install the software before inserting or attaching
any new hardware to your computer. This allows the software to
pre-install the hardware drivers ready for when the hardware is
connected.
PC and Associated Equipment Requirements
Check that your computer meets or exceeds the very basic requirements
listed below to run Medmont Studio.
Pentium™ processor-based personal computer, P4 2.8 GHz or Higher
(P4 1GHz minimum). Motherboard using genuine Intel™ PCI chipset
highly recommended. VIA chipsets have proven to be unreliable.
Microsoft™ Windows™ XP SP2, Microsoft™ Windows™ Vista or
Microsoft™ Windows™ 7
1 GB RAM or more (512MB minimum)
VGA card supporting at least 24-bit colour and 128MB onboard
memory. Video cards that share main memory are not recommended.
For stereo viewing using shutter glasses, a compatible NVidia video
card is required.
10GB of available hard-disk space setup to use NT File System
(NTFS).
DVD-ROM drive (CD-ROM minimum)
At least 3 free USB 2.0 ports.
4
Medmont Studio
Hardware Configuration
Use only PC and associated equipment that has been
certified to the Standard EN/IEC60950 (Information
Technology Equipment) and the Standards for
Electromagnetic Emissions CISPR22/EN55022.
If used within a patient environment, power the PC and
associated equipment with an EN/IEC60601-1
compliant isolation transformer e.g. Medmont TR2450
(230/240V), or an additional fixed protective earth
connection.
Cover any open PC communication ports that have
accessible conductors with dummy plugs if used in a
patient environment.
If you have a previously installed version of Medmont Studio we strongly
recommend that you back-up your old database before proceeding.
If you have used the archiving facility of the very old versions of Medmont
Studio, you should un-archive old exams to allow the installation data
conversion program to upgrade your data. The later versions do not support
archiving.
Medmont Studio
5
Installation Configurations
3. Installation Configurations
There are a number of configurations for a Medmont Studio installation that
depend on the practice patient management environment and whether a
networked computer system exists. Medmont Studio can be run in three
configurations:
Standalone – A small practice configuration consisting of only one
computer or alternately a small network system. The latter would have a
computer for instrument control and another for administration where
the patient data resides, and typically including a 3rd party Practice
Management package.
Network (Client/Server) - For large practices with a local area
computer network (LAN) in place.
Single User Review - An analysis-only mode is available that allows
editing and analysis, but no capture from instruments.
Standalone
The standalone configuration is the most popular and simplest to use.
Appropriate licensing for this configuration is included with each Medmont
instrument. This is a versatile configuration that can be configured in a
number of ways.
Warning! Networking of the instrument computer with other computers may
cause unacceptable leakage currents. Only connect through wireless network
connections.
A standard configuration consists of
A computer including monitor.
One or more Medmont instruments.
The Medmont Studio software.
Optional supported 3rd party practice management software same
computer
Printer (wireless unless connected through isolation transformer)
Another common configuration consists of
Two computers. One configured to control the Medmont instrument(s),
and the other configured with one of the supported 3rd party Practice
Management packages, the two typically connected as a Windows
Workgroup through a wireless network connection.
6
Medmont Studio
Installation Configurations
One or more Medmont instruments.
The Medmont Studio software.
Both systems would also include:
License dongle (see Licensing on page 68).
An activation key with licenses for
Exactly one session.
Instrument license(s).
Additional functionality licenses.
Configuration Typical Use
Conducting exams.
Subsequent review, editing, and analysis of exams.
Patient management.
Network (Client / Server)
The Medmont network configuration works with one or more Medmont
client computers connected to a single Medmont server computer. The
underlying network can be either a Workgroup or a Domain based system.
This configuration requires the purchase of a license upgrade from Medmont
to allow multiple computers to run the software simultaneously.
Warning! Networking of the instrument computer with other computers may
cause unacceptable leakage currents. Only connect through wireless network
connections.
Where the Medmont Studio server software is installed depends on the
operating system running on the network’s server computer. The options are:
The Medmont Studio server installed on the network server computer
itself, as long as the server is running Windows Server 2003 or
Windows Small Business Server 2003 or later versions of these
products, or
The Medmont Studio server installed on one of the client computers in
the network.
The computer on which the Medmont Studio is configured as a server
requires:
A license dongle.
Medmont Studio
7
Installation Configurations
An activation key with licenses
Maximum number of sessions (typically more than one).
Instrument license(s).
Additional functionality licenses.
3rd party Practice Management software with software license as
required (optional).
One or more Medmont client computers with:
Medmont Studio software configured as a client.
Medmont instruments as required, although a computer can be a
Medmont client without having an instrument connected.
Configuration Typical Use
Administration - Provides centralized functionality for large practices
One shared database.
One practice management system.
Central maintenance of licensing.
Testing - Exams are conducted from any client computer with an
instrument attached.
Review - Any computer in the network can act as a review machine,
including the server.
Single User Review
The unlicensed mode is available when no dongle or activation key is
present. This mode replaces the now obsolete Medmont Studio Viewer.
The physical configuration consists of
A computer.
Medmont Studio software.
Configuration Typical Use
Review – For a small numbers of exams on a laptop or home PC. Data
is transferred from the licensed system using the import/export
facilities.
Referral to specialists - By a specialist (non-Medmont user) who is
sent exam data by a practitioner using a Medmont instrument.
Presentation - When giving talks using a laptop and data projector.
Spread the word - Give a copy of the Medmont Studio CD to a
colleague to try before they buy.
8
Medmont Studio
Installing the Software
4. Installing the Software
Medmont Studio is provided on a single CD that contains all the necessary
software. When you insert the Medmont Studio CD, the installation menu
should automatically run. If not, click on the CDStarter program in the root
of the CD folder.
Figure 1. Installation menu.
At this point, the installation menu will display the following options:
Install Medmont Studio
Install Adobe Acrobat, prerequisite for viewing the user manuals
Install DirectX 9c
Read the Release Notes
View the location Sample Data for importing once Medmont Studio
is installed.
Browse the CD to view all files on the CD from Windows Explorer
Visit Medmont Website
Click on a button to perform that action.
Click Install Medmont Studio to start the software installation process.
Medmont Studio
9
Installing the Software
Common Installation Steps
Medmont Studio requires the installation of the Microsoft .Net (pronounced
dotNet) Framework and the Visual C++ Runtime Libraries.
If the Microsoft .Net Framework was previously installed, or if your
operating system has this package preloaded, then the Medmont Studio will
skip the installation of this software package. Otherwise, click accept to
install the Microsoft .Net Framework
Figure 2. DotNet Framework Accept screen.
The installation will then present a screen asking to install the Visual C++
Runtime Library. Click install to proceed.
Figure 3. Visual C++ Runtime Libraries installation.
10
Medmont Studio
Installing the Software
Note that if cancel is selected at any stage, then the installation of Medmont
Studio will not proceed any further.
The next dialog will show the progress of the .Net installation (if required)
and the Visual C++ Runtime Libraries.
Once the software packages are installed, click Next to start the Medmont
Studio installation wizard.
Figure 4. The Medmont Studio Setup Wizard.
The next dialog allows you to define where the associated files will be
stored. Medmont strongly recommend that you leave the chosen default
path. Click Next to proceed.
Figure 5 Installation folder selector
Medmont Studio
11
Installing the Software
Next, the dialog asks you to confirm that the installation can begin. Click
Back if you need to review or change any of the previous options.
Otherwise, click the Install button and the installation will proceed. At this
point the setup process displays a dialog with a progress bar to visualise the
file copying process.
Figure 6 Installation confirmation.
With all files transferred, the Medmont Studio Configuration Tool will run
and asks you to select from the set of Medmont Studio language translations.
The Medmont Configuration tool presents the next series of
system configuration dialogs. When the installation is complete,
this
can
be
run
at
any
time
from
Start > Programs > Medmont > Medmont Studio Configuration
Tool at any time to re-configure the system.
Once the language is selected the next dialog asks you to select the type of
Medmont Studio installation.
Installing a Stand-Alone System
Click on the Standalone radio button and then on the Next button.
12
Medmont Studio
Installing the Software
Figure 7. Configuration Tool mode selection.
The contents of the next dialog will depend on whether you are upgrading an
existing system or if this is a new installation. The configuration tool will
detect if there is an earlier version of Medmont Studio and allow you to
convert the data so it is accessible in the new installation. Regardless of
whether an earlier version of Medmont Studio is detected, you can continue
the installation process and not convert any data by selecting the radio
button, Do not convert legacy data. Otherwise, select the version of
Medmont Studio that has been detected or would like to upgrade by clicking
the appropriate radio button and clicking Next to continue to the next screen.
WARNING: it is recommended that the database be backed up
before the conversion takes place.
Figure 8. Convert Medmont Studio legacy data.
Medmont Studio
13
Installing the Software
The installation program will then ask for the location of the database. If the
database was previously detected, the location will already be inserted. Click
Next to continue.
Figure 9. Select the location of legacy data.
There is a possibility the installation program may not find your earlier
database if it was installed in a non-standard location. In this case, click on
the Legacy Data button and navigate to the correct location. Click Next.
You will now be prompted to select the type of database you would prefer to
use to store patient exams and data. Unless you have a large practice with a
shared central database, leave the default option of Microsoft Access
selected. Click next to proceed to the database location screen.
Figure 10. Option to select database technology.
However, if you would like to use SQL Server, select the appropriate radio
button and click Next to configure SQL Server integration.
14
Medmont Studio
Installing the Software
The SQL Server must be previously configured before
proceeding with this next step. Contact your IT department if
you have any concerns or are unsure of what to select.
You will now be prompted for the SQL server name and database name.
Select the server name from the drop down list. You can also enter the server
name manually but it must also include the instance name if an instance is
being used. The database name can also be changed but Medmont
recommends that the default name be left as MedmontStudio. Click Next.
Figure 11. SQL server name.
The next step will prompt for the logon details for the SQL Server. Select
from Use Integrated Windows Authentication or Use a specific username
and password. If Use a specific username and password is selected, enter
the username and password in the space provided before proceeding. Click
Next to continue.
Figure 12. SQL Database login screen.
Medmont Studio
15
Installing the Software
The next dialog asks for the location where the exam files should be stored,
for either Microsoft Access or SQL Server. Medmont recommends the
default location but select Location to change the database location. Click
the Next button to continue.
At this point the installation needs to know whether you are integrating
Medmont Studio with a 3rd party practice management system. This option
seamlessly integrates the patient management of both systems (see Installing
with a 3rd Party Practice Management System on page 22). We will
continue with the None option here. Click the Next button to continue.
Figure 13. Option to select PMI.
An installation typically consists of one or more Medmont instruments. The
next dialog allows you to select which instruments to install. Installing
instruments for which you do not have a license will use additional computer
resources, but nevertheless does offer a review capability where you can
view results produced by those instruments on other computers or from other
practices.
16
Medmont Studio
Installing the Software
Figure 14. Instrument selection dialog.
The next dialog is associated with installing the Windows Drivers for M700
instrument features and the various digital image frame grabbers associated
with the DV2000 and E300 instruments.
Complete the installation of Medmont Studio before connecting
or installing the associated hardware for the first time.
Some of these selections may be greyed-out depending on the instruments
that were previously selected for installation. Select the drivers associated
with your instrument(s).
Figure 15. Windows Driver installation dialog.
The next dialog gives you the option to install the Email linked application.
This allows you to send exam’s via email directly from the Medmont Studio
application. You will need to have a third party email client installed and
configured on the PC for this feature to work correctly.
Medmont Studio
17
Installing the Software
Important: This feature is only intended for use within a
secured network environment. Use of this utility over an
insecure intranet or the internet is not recommended, as data
exchange over these networks is inherently insecure and liable
to eavesdropping. Users of this utility bear full responsibility
for all issues arising in case of breach of confidentiality and
Medmont Pty Ltd cannot be held liable for any such issues.
Clicking the Next button will proceed to the final step of the installation. You
now have an option to review your previous steps or cancel the setup. Click
Back to change any of the previously selected options or click Cancel to
stop the setup of your software.
Otherwise, click Finish to finalise the installation. Once this process
completes, and depending on the selected instruments and existing installed
Windows Drivers, a number of device driver installers will automatically
run. Simply follow the prompts and click on the OK button. If previously
configured, the database conversion from another version of Medmont
Studio will also happen at the end of the installation process.
Figure 16. Installation complete screen.
The Medmont Studio icon
will now appear on the Windows desktop.
Additionally, you can also launch Medmont Studio , Medmont Studio
Administrator Tools and Medmont Studio Configuration Tools from
Start > All Programs > Medmont.
18
Medmont Studio
Installing the Software
Installing a Server Based System
A server based system consists of a computer with Medmont Studio installed
as a database server, and one or more additional computers with Medmont
Studio installed as clients, all connected with a standard Windows network.
The server is configured to manage the patient database.
Installing the Server
Install the software as per the previous instructions until you are prompted
for a Stand-Alone, Server or Client installation. Click on the Server radio
button and then the Next button.
Figure 17. Selecting a Server installation.
The installation will proceed from this point exactly the same as the standalone installation. When the installation completes the server starts
automatically and you should see the Medmont Studio server icon
in the
Windows desktop tray.
Installed Medmont Studio clients can now connect to the server. However
there are a number of steps required to license the server and these are
covered in Running Medmont Studio starting on page 25.
Installing the Clients
The server installation must be completed, configured, and running on the
designated server computer before attempting to install any clients.
Install the software as per the previous instructions until you are prompted
for a Stand-Alone, Server or Client installation. Click on the Client radio
button to select a client computer installation as shown in Figure 20.
Medmont Studio
19
Installing the Software
Figure 18. Selecting a Client installation.
The next dialog will present a drop-down list with the names of the
computers in your network. Select the computer on which the Medmont
Studio server is running, then click Next.
Figure 19. Selecting a server.
The next dialog will ask for the instruments attached to this client computer
(see Figure 16). Based on your current license, select the appropriate
instruments to be installed and click Next.
The next step will allow you to install Windows drivers for the appropriate
instruments. Some of these selections may be greyed-out depending on the
instruments that were previously selected for installation. Select the drivers
associated with your instrument(s) and click Next.
20
Medmont Studio
Installing the Software
Figure 20. Final installation dialog.
Review your previous configuration by clicking Back if needed. Otherwise,
click the Finish button to complete the setup.
Figure 21. Installation complete screen.
Lastly, if the setup will only be used for exam review, then the installation is
complete. Double click the Medmont icon on the desktop to start Medmont
Studio. Check that the Practice database is visible and that patient and exam
details are also visible. Whether these can be edited or changed will depend
on the permissions given to the particular clinician (see Setting Permissions
on page 27).
If the computer will have an instrument attached then use the procedure
described in the Installation section of the relevant instrument User Manual.
Medmont Studio
21
Installing the Software
Installing with a 3rd Party Practice Management System
You can integrate a 3rd party Practice Management System with Medmont
Studio. The option to create a Patient Management Integration (PMI) system
is presented during both a Stand-alone and a Server installation.
22
Medmont Studio
Installing the Software
Figure 22. Option to select PMI.
When prompted by the configuration tool, select your Patient Management
system from the drop-down selection box. At the time of writing, the
following Patient Management systems can be linked to Medmont Studio:
1.
2.
3.
4.
5.
6.
7.
8.
9.
10.
11.
12.
13.
14.
Compulink
Compulink Advantage
FOCUS
Houston
IFile
I-Optic
My Vision Express
OfficeMate
OPM
OptiPro
Optomate
Optomate Premier
Sunix Vision Elite
Visual Eyes
The IFile and Visual Eyes PMI systems will require a separate
ODBC driver to allow Medmont Studio access to their database.
Please contact your vendor for details.
The list of supported Patient Management systems will be updated when a
new
system
receives
integration
support.
Please
check
http://www.medmont.com.au for an up-to-date list.
Medmont Studio
23
Installing the Software
Click the Next button and you will be asked for the location of the PMI data
files.
Figure 23. Selecting the path to a 3rd Party Patient management system.
Click the Location button to make any changes to the default if required.
When you click the Next button the install program will examine the entered
location for the expected set of files. If they exist the installation will
proceed as previous.
24
Medmont Studio
Running Medmont Studio
5. Running Medmont Studio
Double-click the Medmont Studio icon
on your Windows desktop. A
banner with the Medmont Studio logo is displayed while the software loads.
For the First Time
The first time that the software is run after installation it will start in an
unlicensed mode, unless you licensing the application during the installation
process.
In the case that the software was not activated during installation, you can
license the application in license manager. To activate your licence, on the
Configure tab, click Licence from the main menu, and click the Edit button
to enter your Activation Key. The key needs to be entered exactly as it
appears on the supplied document, including the dashes.
Read the Licensing chapter on page 68 for additional information on how
licensing affects the way you operate the software.
You are now ready to start using Medmont Studio.
Medmont Studio
25
Configuring a Server/Client
System
6. Configuring a Server/Client System
A standalone Medmont Studio system is ready-to-go once the installation
completes. However a Server/Client installation will require some additional
configuration.
Setup for a Secure System
By default a system installed with a server and several clients will be an
insecure system. This means anybody can use Medmont Studio and have full
administrator privileges.
This may be an adequate configuration in a small practice. However, in a
large practice with many clinicians, or in a teaching environment, the
recommendation is for a password-protected system. This allows the system
administrator some control over the access each clinician has to the
Medmont Studio capabilities. For example, a clinician (or more correctly, a
particular password) can be prevented from deleting patients, or from
(re-)configuring instruments. In a teaching situation, students can be issued
with a generic password that only allows for creating patients and
performing tests.
Password protection can be useful even for a small practice, where the
system is normally accessed via a password that allows everything except
patient deletion. For this case the clinician must log back in using the admin
password. This action therefore requires a specific step, and helps to prevent
inadvertent deletions.
Setting the Administrator Password
The first step is to setup the administrator password. With Medmont Studio
running, on the Configure tab, click Set Password. It will present the login
dialog shown here.
26
Medmont Studio
Configuring a Server/Client System
Fill in and confirm the password you will use to administer the networked
Medmont Studio system. The name “admin” has by default all the
permissions shown in Figure 27.
Adding Clinicians
The next step is to register the clinicians who will be using the system. On
the Configure tab, click on Clinicians to display the Clinicians dialog
shown in Figure 26
Figure 24. Manage the Clinicians in the Practice dialog.
Click the New button in this dialog to display the New Clinician dialog
shown in Figure 27. Fill in the text boxes in the Details section. By default
this clinician will be enabled to use the system with the Enable Logon
checkbox ticked. Enter the name the clinician will use to log on to Medmont
Studio into the Logon text box. Click the Set Password button and enter
their password.
Setting Permissions
If you tick the Administrator checkbox that clinician will have access to all
the listed options.
If you click nothing then that clinician will be able to review results only.
Tick the other options as your situation requires.
Medmont Studio
27
Configuring a Server/Client
System
Figure 25. Enter and Edit the New Clinicians dialog.
You can prevent a user from logging on by un-checking the Enable Logon
checkbox if necessary.
Database management
A separate program to Medmont Studio performs database management.
Click
on
Start > Programs > Medmont > Medmont
Studio
Administrator Tool. The Data Management tab on this dialog provides the
path to and size of the Medmont Studio database. Prior to running a system
backup (see Data Backup on page 79) execute the steps listed on this dialog.
The Passwords tab has a single button that will clear the Medmont Studio
administrator password.
28
Medmont Studio
Configuring a Server/Client System
Session Management
A client logged on to the system constitutes a Session (see also Session
Licenses on page 68). You can review the current sessions at any time by
clicking the Tools > Session Manager menu entry.
Figure 26. Medmont Studio Sessions Manager.
The administrator can kill a session at any time by selecting the entry and
clicking the Kill Session button. This does not literally kill the Medmont
Studio application on the client computer, but just disconnects it from the
database.
If the session is in use there is a strong possibility of data loss
for that session.
Database Locks
When a client computer accesses the database by examining a patient’s
details or by viewing an exam, there is nothing stopping another client
computer examining that same patient or exam. However, as soon as one
client attempts an edit function like adding some patient details or annotating
an exam, that entry in the database will be locked. Because an editing
session may consist of several edits, the item will remain locked until it is
dismissed, typically by the clinician saving it or by moving on to the next
patient or exam.
While an entry is locked, if another client attempts to change the same entry,
they are immediately presented with a message indicating that someone else
has that entry locked.
As an example, if a clinician on client computer A is adding comments to a
particular patient’s record, and a clinician on client computer B also attempts
Medmont Studio
29
Configuring a Server/Client
System
to add some comments to the same patient record, client B will be presented
with a warning message about the record being locked the instant typing
starts. In effect he or she will be prevented from typing anything at all.
As soon as client A moves on, the lock will be removed. At this point if
client B tries once more to add his or her comments, at the instant typing
starts a message will be presented stating that another user has changed this
record. Clicking OK on the message will update the client B display,
showing the changes made by client A. Client B can now see these new
comments as well as being free to start entering further comments.
Clicking on the Locks tab in the Session Manager dialog shown in Figure 28
will show the current set of database locks.
30
Medmont Studio
Practice Management System Integration
7. Practice Management System Integration
When Medmont Studio is operating with Practice Management Integration
(PMI) activated, it smoothly integrates the patient management of a 3 rd party
Patient Management system with its own Patient management. Medmont
Studio uses the 3rd party system only as a source of patient data - it cannot
change the data in any way.
An additional license is required to connect Medmont Studio to a 3 rd party
Practice Management system.
Patients who are listed in Medmont Studio are those for whom an
examination has been performed using a Medmont instrument. A new
Medmont Studio installation will therefore have no patients listed even
though the PMI may have hundreds.
While you can still create patients with Medmont Studio by clicking on the
Create New Patient icon, they will be unknown to the PMI.
Adding a New Patient in Medmont Studio
The idea is to link Medmont Studio to a patient entry in the PMI. The
technique is to use the Find Patient menu entry when starting a new exam.
This displays the Find Patient dialog, which for a PMI system is directly
linked to the 3rd Party Patient Management system database.
Figure 27. Find a Patient in 3rd party Management System.
Figure 29 shows the range of selection options for a patient search. At this
point it is more than likely you will have the PMI application open prior to
Medmont Studio
31
Practice Management System
Integration
starting Medmont Studio as part of your initial patient interview. This
implies the patient either already existed there or you have just entered the
details for a new patient. Now use the Find Patient dialog to copy the patient
details to Medmont Studio.
The quickest method is to copy the 3rd party Management System patient ID
number into the Medmont Studio External ID field and click the Search
button. This will produce a guaranteed singular match. Click OK to create a
matching patient entry in Medmont Studio.
The alternative is to enter some search criteria into one or more of the text
boxes. In Figure 29 the clinician has entered B* in the last name box and
then clicked the Search button. This will search for all names in the PMI that
start with “B”, as the asterisk is shorthand for “match anything” (see
Searching by Patient Name on page 45). The search example located three
patients. Select the correct one and click OK to create a matching patient
entry in Medmont Studio.
Synchronising the Databases
If for some reason a patient has been entered into Medmont Studio without
being linked to the PMI, you can reconcile the entry at some later time.
First select the patient in Medmont Studio and on the Home tab, click on
Synchronise Current. If the details previously entered into Studio match
those in the PMI, this will reconcile the two entries, automatically adding the
PMI external ID to the Medmont database. The ID will now be visible in the
patient details External Record box.
What if there is no matching entry in the PMI database? As an example,
suppose someone had previously entered a patient called Peter Adams with a
birth date of 14-5-1956 and proceeded with some exams but without linking
to the PMI. Perhaps the network was down. At some later time it is noticed
this patient has no external ID number. Select this patient and on the Home
tab, click on Synchronise Current. Medmont Studio displays the dialog in
Figure 11, indicating no matching entry in the PMI.
32
Medmont Studio
Practice Management System Integration
Figure 28. Example No Patient Match in PMI dialog.
The next step is to check if there is such a patient as Peter Adams in the PMI.
On the Home tab, click on Find, entering this name and then clicking the
Search button shows the dialog of Figure 12.
Figure 29. Example search PMI database.
The dialog shows that there is such a person, but that the birth date is 14-121956 rather than the 14-5-1956 entry in the Medmont Studio database. Redoing the Synchronise Current sequence and clicking on the Clear button
for the Date of Birth entry will remove that criterion. Now clicking on the
Search button will find this patient and clicking OK will update the
Medmont Studio database with a complete entry.
Medmont Studio
33
Practice Management System
Integration
Figure 30. Example patient found dialog.
34
Medmont Studio
Overview
8. Overview
The User Interface
Medmont Studio has a single main Windows Explorer style user-interface,
and provides point-and-click access to its capabilities. The user can swap
between instruments and most tasks with a single mouse click.
Figure 31. Studio Main Window.
The main window shown in Figure 33 is divided into four areas:
Explorer pane: Lists patients and exams. These can be selected by
mouse click. Filtering, sorting and searching are also supported.
View pane: Displays the current patient(s) or exam(s) selected in the
Explorer pane.
Ribbon: Tabs to select a function with a single mouse click. Examples
are entering a new patient or creating, analysing and editing an exam.
These are described in detail in subsequent sections.
Medmont Studio
35
The Explorer Pane
9. The Explorer Pane
The Explorer pane provides a choice of data views. The basic views are the
Tree view shown in Figure 34, and the Patients view shown in Figure 35.
Figure 32. Explorer pane showing the Tree View.
You can select either of these views by clicking on the respective selection
tab along the bottom of the Explorer pane as shown below. Additional tabs
typically list the exams created with particular instruments, and will be
present or not depending on the installed components.
Figure 33. Explorer pane showing the Patient View.
Sample Data
If this is the first time you have used Medmont Studio, you can become
familiar with most aspects described in this and the instrument manuals by
importing the various sample data sets on the distribution CD. There is
36
Medmont Studio
The Explorer Pane
sample data for the M700, E300 and DV2000 instruments and a
corresponding set of patients.
Click on the Application button, then click Import and navigate to the
Sample Data folder on the CD. You can import any or all of the files
(although only one at a time).
Changing the Size and Position of the Explorer Pane
A vertical splitter bar separates the Explorer pane from the View pane (see
Figure 35). The size of the Explorer pane can be changed by clicking and
dragging the splitter bar to the left or right. The View pane rescales itself
correspondingly.
A horizontal scroll bar will appear along the bottom edge of either pane if
required.
Docking and Undocking
Double clicking on the title bar of the Explorer pane undocks the Explorer
pane turning it into a free-floating window. This creates maximum space for
the View pane. If your system has dual monitors, dragging the Explorer pane
to the other monitor leaves the View pane full-screen.
Double clicking the title bar again re-docks the Explorer pane in its usual
spot (left of the View pane).
Unpinning and Pinning
Clicking on the Explorer pane vertical drawing-pin icon (see Figure 36)
unpins the pane. The pin will change to a pin lying on its side and the pane
will slide off screen to the left of the main window and auto-hide itself when
not in use. The pane appears as a thin vertical strip containing the same set of
filter icons as were across the bottom of the expanded pane.
Medmont Studio
37
The Explorer Pane
Figure 34. Explorer pane docking pin location.
When the Explorer pane is unpinned, a single click anywhere on the
expanded selection tab in this strip will temporarily expand the Explorer
pane. Any one of the selection tabs can be selected by hovering the mouse
cursor over the tab for a short period - no click is required.
Clicking on the horizontal pin turns off auto-hide.
The Tree View
The tree view lists all patients known to the system in alphabetical order. An
icon represents the patient’s gender.
If the patient has exams stored on the system a small
symbol will be visible to the left of their name. Clicking on
this symbol will show the exams for that patient, and the
symbol will change to a
symbol. Clicking on this
symbol will hide the exams again and restore the original
symbol.
The same symbol will appear for some types of exam that have associated
sub-items.
The Patients View
The Patients View (see Figure 37) shows a tabular list of
the patients and their clients. No exams are shown. The
width of the columns can be adjusted by clicking on the
vertical line separating adjacent column headings and dragging left or right.
The mouse cursor will change to two small vertical lines when positioned
correctly as shown here.
38
Medmont Studio
The Explorer Pane
Figure 35. Studio Main Window showing the Patient View.
Adding a Patient
From the Medmont Studio main window, on the Home tab, click on the New
to bring up the New Patient dialog shown in Figure 38.
Figure 36. New Patient dialog.
Medmont Studio
39
The Explorer Pane
Text entry boxes in Medmont Studio such as Last Name and First Name in
Figure 38 use Auto Case by default. For details of how this effects entering
patient details, see Auto-Capitalisation on page 62.
The General tab provides for entering a standard set of patient identification
parameters such as Name, Date of Birth, Gender, etc. The External Record
entry can be used to link the patient to a 3 rd party patient management
system.
The Clinical tab dialog shown in Figure 39 provides for selecting clinical
details that describe the patient’s condition. The Current Refraction entries
provide for recording a current prescription and are quite straightforward.
You can enter numbers directly or by using the up/down spin buttons.
Figure 37. New Patient Clinical tab.
The three drop-down boxes will present selections from your practice set of
categories as entered into the Configure tab, Lookup Fields option, as
shown in Figure 40. Use the Custom Fields dialog to enter Procedure,
Condition and Category descriptions (both patient and exam) that apply in
your practice. Note that you cannot make new entries in the Clinical tab from
the New Patient dialog; they must be entered from the Custom Fields dialog.
The Comments tab of the New Patient dialog presents a simple text-editing
window into which you can enter any relevant details. Once comments have
been entered an indicator icon
shall appear in the title for the comments
tab.
40
Medmont Studio
The Explorer Pane
Figure 38. Custom Fields Entry and Editing dialog.
The Refresh Button
The Refresh button in Figure 40 and other dialogs in Medmont Studio
software only have a real function in a networked system. In these systems,
clicking the button will update the items associated with the current dialog
from the central database. Thus if items have been edited on one client
computer, they can be updated on any other client computer by clicking the
Refresh button in the relevant dialog.
Editing a Patient
If you click on an existing patient you will see the same dialog shown in
Figure 38, only now the title bar will show the selected patient’s name and
the various fields will be filled with data. You can use the dialog to review
the patient’s details or make any changes that may be required.
Selecting Explorer Pane Items
To select a single item in the Explorer pane, such as a name, click on the
symbol or the label to the right of the symbol (in the tree) or anywhere on
the line (in other views). The selected item will be highlighted in reversed
text and the View pane will show information or imagery for that item.
Figure 41 shows a patient with the exams shown, a particular exam selected
(shown in reversed text), and with that exam displayed in the View pane.
Medmont Studio
41
The Explorer Pane
Figure 39. Selecting and Displaying an item from the Patient Explorer pane.
Selecting Multiple Items
To select multiple items, hold down the control key while selecting
additional items.
To select a range of items, select the first item in the range and then select
the last item in the range while holding down the shift key or simply drag the
mouse while holding the left button down, over the items you wish to select.
Filtering
The Tree View and the Patient View
both provide three filter modes: All,
One and Filter. These are selected
from the dropdown list just above the
tabs at the bottom of the Explorer
pane. The message “xx found” beside the selector, indicates how many
matching patients can be seen using the current filter.
The selections are:
All - shows all the patients in the system.
42
Medmont Studio
The Explorer Pane
One - shows the currently selected patient. This is especially useful
where privacy is a concern, for example when showing a patient her or
his exam; it will prevent that patient seeing a list of your other patients.
Filter - pops up a custom filter that allows the user to specify more
detailed criteria.
Selecting the Filter option will display the dialog of Figure 42 that
demonstrates the very extensive patient filtering capabilities of Medmont
Studio. As a simple example, with this dialog displayed, click on the Female
radio button and then the Apply button. You should see the Explorer pane redisplay with just the female patients.
Figure 40. Patient Filter selection dialog.
This dialog provides for selection based a number of standard selection
criteria. The Advanced tab however, provides for considerably more detailed
selection. The initial dialog is shown in Figure 43.
Medmont Studio
43
The Explorer Pane
Figure 41. Advanced Filter dialog.
You may create a number of conditions via the New condition button, and
the resulting selection will be based on each and every one being true if you
leave the default AND radio button selected. Otherwise only one of the
conditions need be true if you select the OR button.
Click on the New button to define a new simple condition.
Figure 42. Advanced Filter Simple Condition entry dialog.
The Simple Condition dialog shown in Figure 44 provides for selecting a
field variable and equating it in some way with a value or perhaps with
another field. A field in the Medmont Studio condition context is a patient or
exam attribute. A Patient attribute would be age, name, gender, etc, while
Exam attributes are items like an M700 threshold exam false positive count
or an E300 exam iris area.
The drop-down Field box allows for selection of the particular attribute. The
drop-down Operation box provides for selecting from the criteria list, and
the Value drop-down box provides for selecting a comparison value.
Note that this dialog can extend the width of the Field drop-down box by
clicking and dragging the left or right edge.
44
Medmont Studio
The Explorer Pane
Taken together, the set of simple conditions and whether they are ANDed or
ORed provides for very powerful analysis of your patients and their exam
results.
Searching
In both the Tree View and the Patient View a search box is provided at the
top of the Explorer pane. It normally reflects the current patient selection.
Figure 43. Patient name Search box.
Searching by Patient Name
Type the last-name or a combination last-name, first-name to search for a
particular patient. If a unique match is found that patient will be selected.
Otherwise the Find Patient dialog will appear and you can use this to find
the patient. The dialog will also appear where the search criteria is not
sufficiently unique, such as entering “mi” when the patient database includes
a Mills and a Mitchell.
Recently selected patients can also be found by clicking on the down arrow
beside the search box.
Some additional points about searching are:
The search is not case sensitive.
Entering in the first few letters of the surname may be sufficient.
You may enter patterns:
Medmont Studio
45
The Explorer Pane
o
? stands for any single character (e.g. Jons?n will find Jonson
and Jonsen)
o * stands for any group of characters (e.g. St*s will find Sticks
and Stones)
Tip: Entering (for example) c,j will find all patients with the initials J C
like John Citizen.
Searching by patient External ID
You can search by the patient external identifier (the patient index in a 3rd
party Patient Management system). If these are numeric, then just enter the
number, eg. 2345. If your 3rd party system uses an alphabetic or
alphanumeric index system, then you must precede the identifier with the
hash “#” character to distinguish the identifier from a name, eg. #DF451. No
pattern search is available for external IDs.
Searching a 3rd-party Practice Management
If a 3rd party practice management is installed the patient search is first
carried out in the 3rd party database.
If a unique match is found this will result in pertinent information about the
patient being read from the 3rd party database into Medmont Studio. The
information for that patient is either added to Medmont Studio or updated
(the two databases are synchronised).
Search Behaviour and the Different Filter Modes
The exact effect of a search depends on the current filtering:
All - The selection jumps to the sought patient (the simple case).
One - The selection changes to the sought patient.
Filter - If the sought patient is in the filter result, the selection jumps to
that patient; otherwise filtering reverts to All and the selection then
jumps to that patient.
Sorting
In tabular views, such as Patients view and the various Exam views, clicking
on a sortable column heading will sort the patients according to that
criterion. A second click reverses the order of the sort.
A small arrow in one of the column headings indicates the current sort
criterion and the direction of the sort (ascending or descending).
46
Medmont Studio
The Explorer Pane
In the Patients View the sortable columns are: External ID, Last Name, First
Name, Date of Birth, and Gender.
The Tree View is not sortable and is fixed alphabetical.
You can use the Sort Exams by button (See Figure 33) to sort the exams
belonging to each patient. The sort selections are by Date, Eye and
Instrument. This does not change the patient list order, only the order of the
exams belonging to that patient.
Using Favourites
The Favourites menu allows you to add a shortcut to frequently accessed
patients and exams.
Figure 44. Organise Favourites dialog.
Select the item in the Explorer pane and on the Home tab, click Add
Favorites to add a shortcut to the item in the Favourites menu. You can
optionally rename the shortcut to indicate its purpose. The new shortcut is
then shown under the Goto drop down box within the Favourites group.
The Organise Favourites displays the dialog shown in Figure 46. This
allows you to change the order of shortcuts by selecting the shortcut and
using the up or down arrows, or to edit or delete the selected shortcut.
You can jump to a favourite entry by clicking on it in this dialog. The item
referenced by the shortcut will be displayed in the View pane and selected in
the Explorer pane.
Medmont Studio
47
The View Pane
10. The View Pane
The View pane is the area to the right of the Explorer pane. It displays
graphics and information for the patient or exam selected in the Explorer
pane.
The exact display depends on the current view mode set using the View
menu or toolbar. What is displayed depends on the Medmont instrument
associated with the selected exam, and this is covered in the respective
instrument manuals.
Displaying Multiple Views
When multiple items are selected in the Explorer pane the View pane will
display (if possible) a separate view for each selected item.
Figure 45. Multiple Views.
For this to be possible each selected item must have a view mode that
supports Multiple Views. If more than four items are selected, or one of the
selected items does not support Multiple Views then no views are displayed.
48
Medmont Studio
The View Pane
The title bar of one view is drawn in a different colour to indicate that this is
the active view. The menus and toolbars displayed are determined by, and
relate to, the active view. You can change the active view by clicking on the
title bar of another view.
Any of the views can be temporarily made to fill the View pane by clicking
on the
explode button or double-clicking the view’s title bar. To restore
the Multiple View display, click on the
implode button or double-click on
the view’s title bar.
You can use the zoom and pan controls in this view and the translations will
apply to all images. The Cntrl-I key for example, will zoom in on all four
images, and the Cntrl-O will zoom them out. Note that if you have a wheel
mouse, the wheel allows you to zoom in and out on just the currently active
view.
Thumbnail View
Some Explorer pane items provide a special kind of multi-view known as the
thumbnail view. This View displays a thumbnail image of each item
belonging to the current selection (typically a patient). For example, the
Thumbnail View for a patient displays images of all exams for that patient
(see Figure 48).
Figure 46. Thumbnail View
Medmont Studio
49
The View Pane
By default, this view will show a 4x4 grid of the patient’s exams, but this
configuration can be changed on the Configure tab, by clicking
Preferences, under the Review Pane tab to allow for more (or less) rows
and columns.
If the number of exams for that patient exceeds the number of grid squares
(e.g. sixteen grid squares for a 4x4 grid), a vertical scrollbar will appear,
allowing you to scroll through the images.
50
Medmont Studio
The Ribbon Menu
11. The Ribbon Menu
The following lists the contents of each tab, and gives a brief summary of
what each function performs when selected from those tabs. Tabs and
function will vary depending on which instruments are installed or what
exam is selected.
Items that are inappropriate for the current exam(s) or patient(s) appear
greyed out (disabled), and clicking will have no effect.
On The Home Tab
Find – Search for a particular patient based on their name, birth date, or
external ID if using 3rd party practice management.
New - Create a new Patient
Delete - Permanently delete the currently selected patient(s).
Note - deleting a patient will also delete all of that patient’s
exams.
Move To – Copies the selected exam(s) from the current patient to a
different patient, and removes them from the current patient. Moving
exams whilst a patient is selected moves all exams belonging to that
patient to a different patient.
Copy To – Duplicates, without removing, the selected exam(s) from the
current patient to a different patient. Copying exams whilst a patient is
selected copies all exams belonging to that patient to a different patient.
Delete - Permanently delete the currently selected exam(s).
Digital Image – Opens the DV2000 exam window.
Corneal Topography – Opens the E300 exam window.
Contact Lens – Fit a Contact Lens to an existing E300 exam.
Perimetry Exam – Opens the M700 exam window.
Synchronize All – Synchronise all exiting Medmont Studio patient data
with an integrated 3rd party Practice Management System
Synchronize Current – Synchronise the currently selected patient’s
data with an integrated 3rd party Practice Management System
Link unlinked – Link a patient in Medmont Studio that is not already
linked with an integrated 3rd party Practice Management System
Add – Add a patient or exam to the Favourites list.
Organise – Change the order of favourites in the list or add/delete an
entry.
Medmont Studio
51
The Ribbon Menu
Goto – Select a Favourite that has previously been added.
Links - Export data to 3rd party tools, for example contact lens designer
tools or email results.
On The Configure Tab
Set Password - Change the password of the current user.
Change User - Switch users without restarting the application.
Practices - Add, modify, import or export associated practice names.
Clinicians - Add or modify clinicians using Medmont Studio and
assign or edit their passwords and security access.
Lookup Fields - Define or edit conditions, procedures, categories (of
exams), and categories (of patients).
Attributes – Displays the Attributes management dialog.
Licence – Check, install and update licensing details.
Session - Check who is logged on and has exclusive access (data locks)
to particular patients and exams.
Preferences – Set global preferences for Medmont Studio.
Instrument Setup (M700) – Opens the M700 instrument setup
window, allowing you to install, uninstall and calibrate your M700
instrument
Template Setup (M700) – Opens the M700 Template setup window so
Test Templates, used for M700 exams can be created, modified,
imported and exported
Instrument Setup (E300) – Similar to the M700, this button opens the
E300 instrument setup window, allowing you to install, uninstall and
calibrate your E300 instrument
Calibrate – Calibrate your installed E300
System Settings – allows you to configure to adjust the Eccentricity
and Shape Factors, the height and Wavefront errors which affects the
attribute values.
Image Sources – provides access to the Images Sources dialog,
allowing you to setup an image source to create DV2000 exams.
Custom Operations – provides access to the Custom Operations dialog
allowing you to create a custom operation with its own icon.
52
Medmont Studio
The Ribbon Menu
The Application Button
Print - Print a report based on the currently selected patient(s) or
exam(s).
Print Preview - Preview the appearance of a print report.
Refresh – Forces an update of data from the database. Useful in
client/server configurations where users on other computers may be
making simultaneous changes to the database.
Export - Export a file summarising the currently selected items and
other information on which they depend. For example, if an exam is
selected, the essential information about the clinician who conducted
the exam will be included in the export file.
Import - Reads in a file created by Export.
Close - Close the application.
The Views
Click on a particular view from the top of the explorer pane.
The views are:
Details
- View and edit personal details and clinical notes.
Thumbnail
exams.
- Shows thumbnail-sized images of all the patient’s
Regression
- Statistical analysis tools.
Exam views include a primarily text-based Details view, together with a
variety of instrument-specific graphic views.
The Help Menu
Links to the various electronic User Manuals and other useful information.
See Help on page 56 for more details.
Medmont Studio
53
The Ribbon
12. The Ribbon
Replacing the existing menus and toolbar is Ribbons, a tab style bar across
the top of the Medmont Studio window. The tabs are organized into groups
and are labeled according to the function. For example, the Home tab
contains all function for creating a new patient or exam. All functions have
an icon and are labeled, to assist the user with identifying functions.
There is also a quick access toolbar which is used to store a shortcut to a
function. The toolbar will become available when a quick access shortcut has
been added and is located next to the Application button
The toolbar looks like this:
By right-clicking on an icon, you can choose from one of the following
options:
Add to Quick Access toolbar – creates a shortcut to the function in the
Quick Access toolbar.
Customize the Quick Access toolbar – Opens a dialog box where
changes can be made to the quick access toolbar. See (Customizing the
Quick Access toolbar).
Place Quick Access toolbar below the ribbon –Moves the quick
access toolbar below the ribbon.
Minimize the Ribbon – Hides the ribbon, only leaving the tab labels.
To access functions when the ribbon is minimized, click the required
tab, which temporarily displays the ribbon containing those functions.
The ribbon will then minimize once a function has been selected. To
leave the ribbon on permanently again, double-click on a tab label.
54
Medmont Studio
The Ribbon
Customizing the Quick Access toolbar:
To customize the toolbar, first right-click on an icon and click Customize
the Quick Access toolbar. Functions are broken down into groups. Select
the appropriate group from the Choose commands from drop down menu
and the functions will then appear on left hand side of the divider. Click a
function and click add. Functions for the quick access toolbar will now
appear on the right hand side of the divider.
You can also remove a function from the quick access toolbar by clicking on
it from the right hand side of the divider and clicking remove. Once all
changes have been made, click OK.
Placing the quick access toolbar below the ribbon can also be done from this
dialog box. Click the box next to Place the quick access toolbar below the
ribbon and then click OK to enable this option.
Medmont Studio
55
Help
13. Help
The Help menu provides access to the User Manuals for Studio and the
installed instruments. These are in PDF format and therefore require the
installation of a PDF reader such as Adobe Acrobat or similar. These readers
are freely available on the Internet and a version of Acrobat is provided on
the Medmont Studio distribution CDROM.
The individual manuals include a Bookmark page organised as a directly
accessible table of contents that indexes the main section headings. Press F6
to show the bookmarks page or click on the sidebar. Clicking on an entry
will navigate to the corresponding page.
Also directly accessible are the internal links within each document such as
the italicised chapter headings, page numbers, Figures and Tables. Move the
mouse cursor over any of these links and the cursor will change to a pointer.
Figure 47 shows a typical situation. Clicking on any of these will move the
displayed page to the reference. Use the Previous View button on the
Acrobat toolbar to return to the original page.
Figure 47. Selection of an internal navigation link.
56
Medmont Studio
Annotations
14. Annotations
Medmont Studio allows you to define eight types of shapes on your exam
images. These are shown in Figure 50.
Figure 48. Available annotation shapes.
Ruler Annotation
Circle Annotation
Ellipse Annotations
Rectangle Annotation
Square Annotation
Curved Area Annotation
Freehand Area Annotation and
Polygon Area Annotation
Click on the desired shape tool from the Edit tab. Move the mouse to the
image pane, the mouse cursor changes to reflect the type of shape being
drawn.
See the individual instrument manuals for examples of how to use
Annotations.
Medmont Studio
57
Attributes
15. Attributes
Attributes are named values that apply to a particular type of exam result.
They may be a physical measurement or dimension, or they could be a
number that is the result of applying some statistical based calculation.
Medmont have supplied a large set of standard attributes for each instrument.
In many cases you can elaborate on these attributes or use the underlying
exam results to derive your own.
The tools and methods to explore attributes are common to all instruments,
with each manual including detailed explanations.
58
Medmont Studio
Printing
16. Printing
The Print Dialog
The Application button, Print and Application button, Print Preview
menu items bring up a list of reports pertinent to the current selection.
Figure 49. The Print dialog.
Select a report format from the list and click OK to Print or Print Preview the
report.
Print Dialog Settings
Clicking the Settings button in this dialog brings up another that allows you
to customize the report by changing the General settings (see Figure 52).
Figure 50. Print Settings dialog.
Medmont Studio
59
Printing
For some reports, typically exams, additional options are available from a
second tab. An M700 exam for example, would name the second tab an
Overview Print, and selecting this tab would display the dialog in
Figure 53.
Figure 51. M700 Threshold exam Overview Print dialog.
The New button enables you to name a customized report format and retain
it for future use.
Print Preview
The Application button, Print Preview option brings up a similar dialog to
Application button, Print, but clicking OK now shows a preview window
containing a precise version of what the report would look like on paper.
Note that what is printed for a given view is not necessarily the current
display in the View pane, depending on the Print settings.
60
Medmont Studio
Printing
The preview window provides the following options for working with the
preview:
Report – Select the type of report to print
Settings - Change the settings for this report.
Print - Prints the report.
Clipboard - Save the preview image to the clipboard.
File - Save the preview image to a file. Supported file formats are:
i. Windows bitmap - .bmp
ii. Graphics-interchange-format - .gif
iii. JPEG - .jpg
One Page – Show on one page of the report
Two Pages – Show two pages of the report (if applicable)
Four Pages – Show four pages of the report (if applicable)
Six Pages – Show four pages of the report (if applicable)
Page – Change the currently displayed page of the report (if one
page is only shown).
Whole Page – Adjust the current view so the entire page is shown
Page Width – Adjust the current view so only the page width is
shown across
200% - Zoom the current page of the report to 200%
150% - Zoom the current page of the report to 150%
100% - Zoom the current page of the report to 100%
50% - Zoom the current page of the report to 50%
Medmont Studio
61
Usage Hints
17. Usage Hints
This section provides some hints for making the most of Medmont Studio.
Auto-Capitalisation
Text entry boxes in Medmont Studio use Auto Case by default. This means
that if you type “john citizen”, it will automatically be translated to
“John Citizen” as you type. However, this is not what you want if you are
entering a name like “McDonald”, so you can change this option with a right
mouse click.
For example, if you are entering a Procedure called “Cataract & IOL
Surgery” into the custom Fields dialog, you will need to turn off auto-case so
the “IOL” is not entered as “Iol”. A right-click on the Name text box will
popup a window (see Figure 54) that allows you to select from the available
options. The options are:
62
uSer cAse
There is no automatic case control. Only the
keyboard Shift key controls case.
Auto Case
The leading character of any single word will be
capitalised.
UPPER
CASE
All characters entered will be converted to upper
case, regardless of the keyboard Shift key.
lower case
All characters entered will be converted to lower
case, regardless of the keyboard Shift key.
Medmont Studio
Usage Hints
Figure 52. Right mouse click for Case entry control.
The particularly dialog will remember the auto-case setting. Thus if you have
selected uSer cAse to enter a new patient name like “MacDonald”, the next
time you enter a new patient the setting will still be uSer cAse.
Tabbing between Fields
When entering data in dialogs, you can navigate between data fields using
the Tab key. This is often more efficient then swapping continually between
using the mouse and keyboard. Tab moves the focus to the next field. ShiftTab moves the focus to the previous field.
Default Buttons
Many displays and dialogs support default buttons. This is the button with a
darker shadow around it, like the OK button shown here.
You can activate the default button at any time by just pressing the Enter key.
When combined with the use of Tab, these keys provide a very efficient
mechanism for entering data.
Medmont Studio
63
Usage Hints
Entering Dates
Many dialogs use the Microsoft Date control for entering dates. This control
lets you enter dates in a variety of ways. Choose the one that suits your
needs best:
Numeric / Arrow Key Entry
1. Select the date control. The day is highlighted.
2. Type in the day using the numeric keypad.
3. Press the spacebar, “/” key, “–” key, or right arrow key to move to the
month. You can change the month using the up/down arrow keys.
4. Move to the year. You can enter either a 2- or 4-digit year. Change the
year using the up/down arrow keys.
Graphic Calendar Selection
1. Select the down arrow next to the date control.
2. A small calendar is displayed.
3. Click on the year and use the up/down arrow keys to select the year.
4. Click on the month to select the month from a drop down list, or click
on the left/right arrow keys.
5. Select the day on the displayed calendar.
Today’s date can be quickly selected by clicking on “Today” at the bottom
of the calendar.
64
Medmont Studio
Utilities
18. Utilities
Medmont Studio Configuration Tool
The Configuration tool allows you to re-configure Medmont Studio without
requiring a new installation. Run this tool if, for example, you have
purchased a new instrument, selecting it in the Select Instruments dialog:
As another example, if it was necessary to move the Medmont Studio
database to a different folder on another disk or even onto another computer,
use this tool to manage the transfer. Ensure Medmont Studio is not running
then move through the Configuration dialogs until the data location entry
appears. Note the current location, as you will need this later.
Ensure the new data directory exists. Click on the Location button and
navigate to the new folder. Click on OK and then move through to finish the
configuration. This step will have reconfigured Medmont Studio to now use
Medmont Studio
65
Utilities
the new folder, but it has not moved the data. You will need to use Windows
Explorer or similar to actually copy the data from the old to the new
location. Remember to copy all the source sub-folders too.
66
Medmont Studio
Utilities
RSS News Reader
Medmont Studio incorporates an RSS news reader to display up-to-date
company announcements. In order for this feature to operate correctly, the
computer must have a working internet connection. When connected to the
internet, the software will query the Medmont internet server and alert the
user to any new company announcements.
To display the RSS news reader at any time, select the
icon and click
Latest News. From within the news reader, click the desired link to view the
full article. The RSS news reader may be disabled or enabled at any time, on
the Configure tab, by clicking Preferences, selecting Startup and adding or
removing the tick next to the Check News At Startup option.
Medmont Studio
67
Licensing
19. Licensing
Medmont Studio uses an online licensing scheme which limits access to only
licensed software modules called components. A special alpha-numeric code
called an Activation Key is required to activate components of Medmont
Studio. The Activation Key is then locked to the computer and the lock is
sent to Medmont via the internet, this process shall be referred to as
“authenticating your license”. If the computer does not have an active
internet connection a license file can be sent via email or other electronic
medium. Components can be licensed indefinitely or for a set time period.
In the absence of a valid Activation Key, or if your component licenses have
expired, Medmont Studio will function in Single User Review Mode.
Updating from the old Rockey license dongle
If you are currently using the previous blue Rockey4
license dongle and you want to update to version
5.3.0 or later you will need to obtain a new activation
key from Medmont before proceeding.
If you update without first obtaining a new activation
key then you will not be able to use your instruments
until Medmont can provide you with an updated
license.
To obtain a new activation key please visit the following website
http://ww.medmont.com/UpdateLicense.html and follow the onscreen
prompts. Please be aware that there may be up to 2-3 business days before
your new activation key is returned.
Once the activation key is received please proceed to the section titled
Installing a Medmont Studio license.
In some cases the License Dongle will need to be returned to Medmont. In
this case a temporary license will be allocated to allow the dongle to be
returned. Once received Medmont will update your license and you will
need to repeat the license process again.
68
Medmont Studio
Licensing
Installing a Medmont Studio license.
Licensing Medmont Studio requires you to first install the software on a
computer in either Server or Standalone mode. Please follow the instructions
for installing Medmont Studio which can be found in the section titled
Installing the Software.
All licensing tasks are performed from the License Manager. To start the
licensing process, open the License Manager by clicking the License button
on the Configure tab as per Figure 53.
Figure 53 Opening the License Manager
The License Manager window should now be displayed. An example of the
License Manager window is displayed in Figure 54.
Figure 54 License Manger Window with no license installed.
Before proceeding to the next step please enter contact information into the
fields surrounded by the License To frame. The fields marked with a red
asterisks are required fields. The license process cannot continue until
information has been entered for these fields. The License Manager window
should now contain contact information as per the example in Figure 55
Medmont Studio
69
Licensing
Figure 55 License Manager Window with contact information
You can update your contact information at any time by
repeating the license process.
Once contact information has been entered click on the Install button. The
Install License window should now be displayed as per Figure 56.
Figure 56 Install License window
Installing a license on a computer with internet access.
If your computer has a working internet connection enter the Activation Key
which was provided with your instrument into the field marked License Key
as per Figure 57 and click the Install button.
Figure 57 Install License window with Activation Key
70
Medmont Studio
Licensing
The Install License window should now contain the phrase “License
Installed” in the License Status field as per Figure 58. If any other message
appears in the License Status field please contact your local Medmont
support agent for help.
Figure 58 Install License window with valid license installed.
The license process is now complete click Close to display a list of active
components. Verify you have been assigned the correct licenses. If you
believe an error has been made with your license please feel free to contact
the agent who supplied you with the instrument for support.
Installing a license on a computer without internet access
If on-the-other-hand your computer does not have a working internet
connection enter the Activation Key which was provided with your
instrument into the field marked License Key as per Figure 57 and click the
Install button.
Figure 59 Install License window with Activation Key installed.
After a brief pause the message in Figure 60 will be displayed.
Medmont Studio
71
Licensing
Figure 60 Warning message displayed if no internet connection is available.
Click No if you would like to repair your internet connection and try again.
Click Yes if you would like to save the license to a file. By choosing to save
to a file you then have the option of either emailing the file to Medmont or
transferring it to a computer with a working internet connection and
authenticate it via a web page.
Authenticating via a web page
If you would prefer to authenticate your license right away then you can
authenticate your license file via a web page available online. Transfer your
license file onto a computer with a working internet connection. A USB
Flash drive is ideal for this task.
From the online computer open a web browser and enter the following web
address into the address bar. We recommend using Internet Explorer 9 or
higher.
http://www.medmont.com/authenticate/AuthenticateFile.aspx
The following web page in should now be displayed.
72
Medmont Studio
Licensing
Click on the Browse button and select the License file just transferred. Click
the Authenticate button.
Click Save. The authenticated license file will then be saved to the download
folder.
Medmont Studio
73
Licensing
Click the Open folder button to locate the authenticated license file called
AuthenticatedLicense.lic. Transfer the authenticated license file back to the
original computer. From the Install License window press the Load License
button as per Figure 61
Figure 61 Install License window showing location of Load License button
The Load License file window should now be displayed. Navigate to the
AuthenticatedLicense.lic file and click Open. The license should now be
installed. The text “License Installed” should be displayed in the License
Status field as per Figure 62.
Figure 62 Install License Window with license installed successfully.
Click Close. The Medmont Studio License Manager should now display a
list of components activated by your license as per Figure 63
74
Medmont Studio
Licensing
Figure 63 License Manager Window will list of active components.
Authenticating via email.
If you would prefer to have Medmont handle the authentication of your
license then you will need to email the license file to your local Medmont
representative.
You can close the License Manager while you wait for a response from your
local distributor. After receiving a reply email, transfer the attached
AuthenticatedLicense.lic file back to the computer where Medmont Studio
will be installed.
There could be up to 3-4 business days before a
response is received. If you do not receive an email
response within this timeframe please check your
Junk or Spam email box to see if the return email has
been marked as junk. If it cannot be found here then
contact your local authorized Medmont distributor
for help.
Next you will need to import the authenticated license back into License
Manager. Open License Manager by clicking Configure > License from the
main menu. When the License Manager window appears click on the Load
License button as per Figure 64
Medmont Studio
75
Licensing
Figure 64 License Manager Window with Load License button highlighted.
You will now be prompted for the authenticated license file which was
attached to the email response from Medmont. Specify the location of this
file and click Open.
The authenticated license should now be installed. The License Manager
Window should now display a list of components which have been activated
by your license as per Figure 65
Figure 65 License Manager Window with list of installed components
highlighted.
76
Medmont Studio
Licensing
Frequently Asked Questions (FAQ).
How do I transfer my license to another computer?
If your computer breaks down or you need to upgrade your computer to an
earlier model then you will need to contact Medmont to remove the lock on
your license. Once Medmont has confirmed that the lock has been removed
you will need to follow the license process again using your original
Activation Key. If you cannot find your original Activation Key then
Medmont can provide you with your key for a small administrative fee.
What should I do if I cannot find my Activation Key?
If you cannot find your original Activation Key then Medmont can provide
you with your key for a small administrative fee.
What’s the best way to contact Medmont for license related questions?
Medmont uses a global network of distributors to handle local support issues
like licensing. Please contact your local authorized Medmont distributor. It
most cases this will be the company that sold you the instrument originally
but since distributors do change from time to time you can find the contact
details of your local distributor from the following web page
http://www.medmont.com/contact.aspx
How do I update my contact details if they have changed?
If you change your contact details and you want to update your license
details then you can simply update your details in License Manager and reinstall your license. Your details will be updated when you authenticate your
license. You can re-authenticate your license on the same computer as many
times as you like.
I already own a fabulous E300 Corneal Topographer from Medmont
and I want to buy their equally amazing M700 Automated Perimeter.
Can I get a license which combines both instruments?
At the time of purchasing your instrument a sales representative should ask
you if you already own any other Medmont instruments. If you do then we
can update your license to include the new instrument. Once Medmont has
updated your license you will need to perform the license process again to
update the license on your computer. Use the same Activation Key that you
used originally. If you cannot find your original Activation Key then
Medmont can provide this to you.
Medmont Studio
77
Licensing
The laptop I use with a licensed version of Medmont Studio was stolen.
Can I get a replacement license?
Yes. Please contact a Medmont authorized distributor who will remove the
lock on your license so it can be re-used on another computer.
Session Licenses
Sessions are important for network configurations. In these, each active
Medmont Studio application running on a client computer needs the server
computer to supply it with a session. The maximum number of sessions
allowed is controlled by the license and is encoded in the activation key.
This means that licenses can float between computers. The server will assign
up to the maximum number of sessions to client machines, so there may be
more client computers than sessions as long as at any one time there are only
the given number of clients actively using Medmont Studio.
In normal use each time the Medmont Studio software is started on a client
computer, the server assigns a license to that client. When the application
exits the license is returned to the server pool and becomes available for
another client.
Once a license has been assigned to a client that client gains all functionality
available under the license.
For example, a local-area network with ten computers attached could run
Medmont Studio on all of the computers at different times, but if the
maximum number of sessions is five, then no more than five computers can
run Medmont Studio simultaneously. A sixth user trying to start Medmont
Studio will get a Not Enough Sessions error message.
If this happens, the user could ask another user to exit, thereby freeing up a
license. If this happens often, you may wish to purchase licensing for
additional sessions from Medmont.
Extraordinary conditions that could result in the client software ceasing to
operate include an administrator logging off a user, the server software
shutting down, or the dongle being pulled out of the server.
78
Medmont Studio
Data Backup
20. Data Backup
It is in your own interests to regularly perform backups to avoid loss of data
due to hardware failure or accidental deletion or corruption of the database.
If you have been using a 3rd party Practice Management system, it will have
its own database files, and it is likely you will have already established a
regular backup procedure. If so, then simply add the Medmont database
location (see Backup Locations on page 80) to the list of folders you are
already backing up.
However, if you are just at the planning stage of a backup policy, Medmont
suggests that all the various practice databases be regularly backed up to
media that can be taken off-site. This could be a laptop computer that is
plugged into the practice network, a CD-ROM or DVD, or a USB disk.
Medmont recommend that you periodically backup to media your can store.
Backup Media
The choice of backup media will depend somewhat on the size of your
practice, the instruments you are using, and the number and type of exams
your practice does in a given period. But no matter how small your practice,
the days of using floppy disks for backup are long gone. A medium sized
practice that includes imagery as a service can easily require several
gigabytes of backup storage.
Backing up to a laptop is convenient in that you can just connect it to the
practice network, navigate to the various Medmont and Practice
Management data folders, and use Windows Explorer to copy the files. The
feasibility of this method depends on first having a laptop with a large
enough disk, having plug-in access to the network, and your confidence in
the long-term reliability of the laptop.
USB disks in early 2007 come in sizes up to 4 gigabytes, and this would be
adequate for most practices. The amount of storage available on these
devices will only get bigger, so with the same caveat about long-term
reliability, this could be a satisfactory backup solution.
Backup to a CD-ROM burner is a more reliable option, in that the CD is
essentially a permanent system snapshot. However, if you are using
instruments that produce imagery such as the Medmont E300, it will not be
long before your overall database size exceeds the around 700 megabytes
available on a single CD. In comparison, the hardware costs and procedures
Medmont Studio
79
Data Backup
to backup to a DVD burner are now no different to a CD-ROM, with the
advantage of nearly seven times the backup space.
With all this in mind, Medmont recommend using a DVD burner as your
backup medium, either mounted in the server computer or capable of being
plugged into its USB2 port.
The next decision is the backup software. Unlike Windows 2000, Windows
XP and subsequent versions like Vista provide for direct transfer from the
various database storage locations to a DVD using Explorer. However this
means manually navigating to the various directories to backup each
individual database for the products your practice uses. Windows provides a
backup program appropriately called Backup on the Windows distribution
CD,
and
if
installed
it
is
available
from
Start > Programs > Accessories > System Tools. This has facilities that
allow you to pre-program the integration of selected files and folders from a
number of locations into a single backup file, along with how it should be
stored and to where (an adequate solution if you are backing up to another
computer or a laptop). However the program knows nothing about CDROMs or DVDs.
The requirement is therefore for backup software that offers facilities to prespecify the locations and folders that require backup (i.e. it will remember
the various locations between backup sessions), and the ability to copy to a
CD-ROM or DVD burner. In addition, it should have the ability to span the
backup file across multiple disks for when the size of the backup exceeds the
media capabilities.
Medmont recommended you survey the market yourself for backup software
that meets these requirements.
Backup Locations
The Medmont Studio database is by default stored in a sub-folder of the
Medmont Studio 5 folder called Data. In a default installation this will be:
C:\Program Files\Medmont\Medmont Studio 5\Data
Do not confuse this Data directory with the data directory
belonging to an earlier Version 3 Medmont Studio that was
usually located at C:\Program Files\Medmont\Data.
At installation this folder can be assigned to any computer in the practice
network, to any disk on that computer, and to any folder path on that disk.
However, clicking on Start > Medmont > Medmont Studio Administrator
80
Medmont Studio
Data Backup
Tool will display the dialog in Figure 56, and this will list the database
location in the Data Location field.
Figure 66. System Administrator Tool.
Initiating a Backup
No matter what Medmont configuration you have installed, all copies of
Medmont Studio must be stopped before initiating a backup. For a standalone system this is easy, but for a server system you will need to stop the
Medmont server using the Server Manager.
Figure 67. Medmont Studio Server Manager.
The Server Manager icon
will be present in the desktop tray of the
network server computer. Double click on this icon to display the Studio
Server Manager dialog shown in Figure 57. The Active Sessions entry will
show if any clients are running Medmont Studio. Click the Refresh button
if the Manager has been running. You can choose from two options.
Medmont Studio
81
Data Backup
1. Find the machine(s) currently running Medmont Studio to ensure no
one is using it, shut it down, and then come back and click the Stop
Medmont Studio Server button, or
2. Click the Stop Medmont Studio Server button.
The effect of clicking this button on connected clients is to disconnect them
from the server with no mechanism to reconnect other than re-starting, so the
second option has the potential for data loss if the computer is currently in
use. Avoiding this situation is a company procedures issue, where either a
certain time is set-aside for backup or it happens after hours.
The more usual effect of stopping the server is, of course, to prevent clients
starting Medmont Studio. If they try they will see the message shown in
Figure 58 and Studio will refuse to start.
Figure 68. Error message for when no server is available.
Once the server is stopped you can proceed with your backup procedure. If
necessary, click the Compact and Repair button on the Administrator tool
(see Figure 56) for occasional database management.
82
Medmont Studio