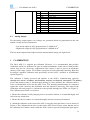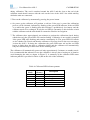
1
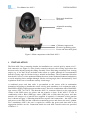
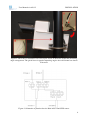
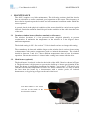
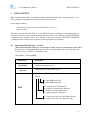
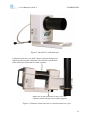
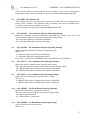
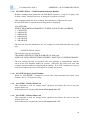
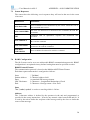
Ambient Light Sensor
ALS -2
USER MANUAL
[INTENTIONALLY BLANK]
ii
Produced by:
Bristol Industrial and Research Associated Limited (BIRAL),
P. O. Box 2, Portishead, Bristol, BS20 7JB, UK.
Email: [email protected]
Webpage: http://www.sensovant.com
Tel: (+34) 96 816 2005 - (+34) 96 111 3302
This manual describes the installation and operation of the Biral ambient light sensor
ALS-2 and calibrator and should be read fully before the instrument is used.
If there are any questions about the equipment supplied or the instructions contained
within this manual please consult Biral at the above address.
To assist Biral in the event of questions could you please indicate the equipment type
(and serial number if applicable), nature of your question, approximate number of hours
in use and your return contact details.
Copyright Declaration
The information contained within this manual (including all illustrations, drawings,
schematics and parts list) is proprietary of Biral. It is provided for the sole purpose of
aiding the buyer or user in the operation and maintenance of the instrument. This
information is not to be used for the manufacture or sales support of similar items
without the express written permission of Biral, nor is it to be communicated to any
third party without the express written permission of Biral. In the event that written
permission is provided by Biral to disseminate any of the information contained within
this document (in whatever form), this page (including this copyright declaration) must
be attached.
© Bristol Industrial and Research Associates Limited (Biral) 2012
This manual does not create nor include any legally binding obligation for Biral or its
customers and end users. This documentation (and any attached appendices) is for
customer information only.
All information contained in this manual is correct (to the best knowledge of Biral) at
the time of publication. Biral reserves the right to revise this manual without
notification.
The Equipment is CE marked and as such is deemed safe for use under
normal operating conditions. Failure to comply with these conditions may
result in personal injury not covered by the CE classification.
Manual Number:
Revision:
106134
00A
iii
TABLE OF CONTENTS
1
2
PRODUCT DESCRIPTION ............................................................................................ 1
INSTALLATION .............................................................................................................. 2
2.1 Configuration Options .............................................................................................................................. 5
2.1.1
Standalone Connection details ............................................................................................................. 5
2.1.2
Operating State Configuration options ................................................................................................ 5
3
MAINTENANCE .............................................................................................................. 7
4
DATA OUTPUT ................................................................................................................ 9
3.1
3.2
3.3
4.1
4.2
4.3
5
6
6.1
7
De-mister window heater (fitted as standard to all sensors) ................................................................. 7
Hood heater (optional) .............................................................................................................................. 7
Window Cleaning ...................................................................................................................................... 8
Operational Data Message - ALS-D? ...................................................................................................... 9
Remote Maintenance Monitor Message - ALS-R? ............................................................................... 10
Analog Output ......................................................................................................................................... 11
CALIBRATION .............................................................................................................. 11
SPECIFICATIONS ......................................................................................................... 14
Digital Communication Interface .......................................................................................................... 15
APPENDIX – ALS COMMUNICATION ..................................................................... 16
7.1 Command Line Interface ....................................................................................................................... 16
7.2 Standard Commands and Responses .................................................................................................... 16
7.2.1
ALS-ADR? – Get RS485 Sensor Address ......................................................................................... 16
7.2.2
ALS-ADRxx - Set RS485 Sensor Address ........................................................................................ 16
7.2.3
ALS-D? - Operational Message......................................................................................................... 16
7.2.4
ALS-DHO - Hood Heater on ............................................................................................................. 16
7.2.5
ALS-DHX - Hood Heater off ............................................................................................................ 17
7.2.6
ALS-OSAM? – Get Automatic Message Operating Settings ............................................................ 17
7.2.7
ALS-OSAMx – Set Automatic Message Operating Settings ............................................................ 17
7.2.8
ALS-OSCS? – Get Communication Operating Settings ................................................................... 17
7.2.9
ALS-OSCSx – Set Communication Operating Settings .................................................................... 17
7.2.10
ALS-OSHH? – Get Hood Heater Operating Settings ................................................................... 17
7.2.11
ALS-OSHHx – Set Hood Heater Operating Settings ................................................................... 17
7.2.12
ALS-OSWC? – Get Window Contamination Operating Settings................................................. 18
7.2.13
ALS-OSWCx – Set Window Contamination Operating Settings ................................................. 18
7.2.14
ALS-OSWH? – Get Window Heater Operating Settings ............................................................. 18
7.2.15
ALS-OSWHx – Set Window Heater Operating Settings .............................................................. 18
7.2.16
ALS-PV? – Program Version ....................................................................................................... 18
7.2.17
ALS-R? - Remote Maintenance Message ..................................................................................... 18
7.2.18
ALS-RST - Reset sensor ............................................................................................................... 18
7.2.19
ALS-SETCOM1,x - COM1 Baudrate Selection Routine ............................................................. 19
7.2.20
ALS-SNUM? Query Serial Number ............................................................................................. 19
7.2.21
ALS-WHO - Window Heater on .................................................................................................. 19
7.2.22
ALS-WHX - Window Heater off .................................................................................................. 19
7.3 Sensor Responses..................................................................................................................................... 20
7.4 RS485 Configuration .............................................................................................................................. 20
iv
TABLE OF FIGURES
Figure 1: Main components of the Biral ALS-2 .................................................................... 2
Figure 2: Biral ALS-2 installation on vertical pole ............................................................... 4
Figure 3: Schematic of junction box for Biral ALS-2 and SWS sensor .............................. 4
Figure 4: Hood Heater (optional) ........................................................................................... 7
Figure 5: Biral ALS-2 calibration unit ................................................................................. 13
Figure 6: Calibrator connected to ALS-2 whilst mounted on a pole ................................. 13
Table 1: Connections for RS 232 configured Model ............................................................. 3
Table 2: Connections for RS 422/485 configured Model ...................................................... 3
Table 3: Connections for Analog Output configured Model ................................................ 3
Table 4: Calibrator LED indicator patterns ........................................................................ 12
Table 5: Digital Communication Interface Specifications.................................................. 15
v
SAFETY
The Equipment does not pose a safety risk to the user when operated under normal conditions
as described in this manual. However, the user is referred to the safety information below
which details the potential risks if the equipment is not operated as intended.
Warning
The optional calibrator equipment contains a Nickel-Cadmium
(NiCad) battery, which can be accessed if disassembled. DO
NOT disassemble the calibrator.
This battery does not pose a hazard when operated within this
equipment following the instructions contained in this user
manual.
Do not dispose of this equipment other than by the recycling
procedures according to local environmental laws.
Note: Biral complies with the European WEEE regulations for
waste electrical equipment.
Do not burn this equipment or short circuit the battery.
Only charge the battery using the charger assembly supplied
with this equipment and avoid overcharging.
WARRANTY
All Biral products are covered by a Manufacturer's Warranty.
This Ambient Light Sensor comes with a one year limited warranty against defective
materials and workmanship.
Any concerns regarding the Warranty cover should be addressed to Biral or an appointed
representative. Shipping costs will be covered by the user.
In the event that the equipment requires repair whilst under a hire agreement, Biral reserves
the right to cancel that agreement if the repair time extends beyond the hire contract deadline.
Alternatively, Biral may, at its discretion extend the hire contract to include the sensor
downtime as a result of the repair (all shipping and time to be covered by the user).
All requests for repairs and replacement parts should be addressed to Biral, email:
[email protected].
vi
User Manual for ALS-2
1
PRODUCT DESCRIPTION
PRODUCT DESCRIPTION
The Biral ALS-2 is a sensor designed to provide an accurate and reliable determination of the
amount of background light during all weather conditions. Such a sensor is usually referred to
either as an Ambient Light Sensor (ALS) or Background Luminance Sensor. Such sensors are
typically used as part of a system to determine the Runway Visual Range at an aerodrome.
The ambient light received by the sensor’s6° field of view is focussed onto a photodiode of
similar spectral response as the human eye. The output from the photodiode is used to
determine the ambient light level using the standard (SI) units of candela per square metre (cd
m-2), averaged over one minute.
The Biral ALS-2 sensor is a significantly upgraded version of Biral’s original ALS and is
designed to meet the world’s most stringent
ambient light sensor requirements as stated by
the US Federal Aviation Authority (FAA) and ICAO recommendations. This sensor offers
significant versatility including the option of serial or analogue outputs and the ability to be
used standalone or integrated with a Biral visibility/present weather sensor. Calibration can
be checked in the field using the custom-designed portable calibration unit. Extensive selfchecking is also featured to ensure optimal performance.
To ensure the sensor’s viewing window remains unobstructed by
precipitation, a hood is
fitted around the window that has the option of being automatically heated to prevent the
build-up of snow if the temperature falls below 2°C. The amount of contamination on the
window is checked automatically and compensated for. The window heater is continuously
active to remove any water or ice. For operation in extremely cold (below -40°C) conditions,
the Biral ALS-2 has the option of additional internal heaters activated along with that on the
hood, permitting full functionality down to a temperature of -60°C.
The main components of the Biral ALS-2 are shown in Figure 1. The sensor electronics are
protected by a water and dust-proof metal enclosure. A light-receiving lens at the front is
protected from precipitation by a heated window and hood. A mounting bracket is attached to
the enclosure for installation on a vertical pole, including the ability to adjust the viewing
angle above the horizon. The combined power and data cable is connected to the electronics
through a single gland without compromising the water and dust proof enclosure, designed to
meet IP66.
1
User Manual for ALS-2
INSTALLATION
IP66 rated aluminium
enclosure
Adjustable mounting
bracket
Calibrator support rods
Electrical grounding point
Power and data cable gland
Figure 1: Main components of the Biral ALS-2
2
INSTALLATION
The Biral ALS-2 has a mounting bracket for installation on a vertical pole by means of a Ubolt connector (see Figure 2). Once firmly secured to the pole, the viewing angle above the
horizon can be adjusted using the sliding assembly. Lines indicating commonly used viewing
angles (e.g. 6° for the US) are included on the sensor as a guide, although it is recommended
that the viewing angle be checked using a suitable inclinometer. The recommended direction
that the ALS views is of the northern/southern horizon (in the Northern/Southern hemisphere)
to avoid sampling direct sunlight although, like the viewing angle, this is determined by local
regulations in the case of aerodrome runway visual range.
A combined power and data cable is pre-attached to the sensor, with its termination
determined according to whether the sensor is being used standalone or in conjunction with a
Biral HSS or SWS visibility/present weather sensor. If used in combination with a Biral HSStype sensor (VPF 710,730 or 750) then the ALS-2 is connected directly to the appropriate
socket of the HSS sensor for power and the transfer of data. If the ALS-2 is used in
combination with a Biral SWS-type sensor (SWS 100 or 200) then the power and data
transfer will connect via a junction box (supplied if required). A schematic of this junction
box is shown in Figure 3, indicating that the box requires four connections – the ALS-2, data
and power to the SWS and the connection transferring power and data to the user’s system.
For a standalone ALS-2, the user is required to connect the power and data cable to the
appropriate facilities on site. Connection details for each ALS-2 model version are provided
in Tables 1-3.
2
User Manual for ALS-2
INSTALLATION
Table 1: Connections for RS 232 configured Model:
Signal
+ve Supply
-ve Supply
Hood Heater Supply - Option
Hood Heater Supply (return) - Option
Tx (RS232)
Rx (RS232)
Signal Ground (RS232)
No Connection
Colour
Red
Black
Red/Black
White/Black
Blue
Orange
Green
White
Comments
9 – 36V DC
0V
24 – 28 V DC/AC
Supply Return
Comms From ALS
Comms to ALS
Table 2: Connections for RS 422/485 configured Model:
Signal
+ve Supply
-ve Supply
Hood Heater Supply - Option
Hood Heater Supply (return) - Option
Tx (+) (RS422/485)
Tx (-) (RS422/485)
Rx (+) (RS422/485)
Rx (-) (RS422/485)
Colour
Red
Black
Red/Black
White/Black
Blue
Orange
Green
White
Comments
9 – 36V DC
0V
24 – 28 V DC/AC
Supply Return
Comms From ALS
Comms From ALS
Comms to ALS
Comms to ALS
Table 3: Connections for Analog Output configured Model:
Signal
+ve Supply
-ve Supply
Hood Heater Supply - Option
Hood Heater Supply (return) - Option
Analog Low (+ve) 0 – 10 V DC
Analog Low (-ve) 0V
Analog High (+ve) 0 – 10 V DC
Analog High (-ve) 0V
Colour
Red
Black
Red/Black
White/Black
Blue
Orange
Green
White
Comments
9 – 36V DC
0V
24 – 28 V DC/AC
Supply Return
0 – 4,000 cd m-2
0 – 4,000 cd m-2
0 – 40,000 cd m-2
0 – 40,000 cd m-2
3
User Manual for ALS-2
INSTALLATION
Figure 2: Biral ALS-2 installation on vertical pole. Insert A shows the adjustable mounting
angle arrangement. The guide lines for popular mounting angles above horizontal are shown
in insert B.
Figure 3: Schematic of junction box for Biral ALS-2 and SWS sensor.
4
User Manual for ALS-2
INSTALLATION
2.1
Configuration Options
The ALS-2 can be configured via the serial connection to enable the user to modify
certain functions of the sensor. If the sensor is connected to a Biral HSS or SWS
visibility/present weather sensor then all commands can be transmitted via the
HSS/SWS communications interface (See the user manual for the HSS/SWS sensor for
connection details.
2.1.1
Standalone Connection details
1. Connect the signal cable to a PC running a terminal program - for example
Windows® Hyper Terminal™. (For RS422 sensors a RS422 to RS232 converter
must be used).
2. Configure the terminal program as follows:
Default Interface Parameters
Baud Rate ..................................................... 9600
Data Bits....................................................... 8
Stop Bits ....................................................... 1
Parity ............................................................ None
Flow Control ................................................ None
(If using Hyper Terminal the options 'Send line ends with line feeds' and 'Echo
typed characters locally' in ASCII set up should be checked.)
3. Turn the local power source "ON".
4. Check Data Transmission to the sensor by sending the ALS-R? command to the
sensor. The sensor will respond with the Self Test and monitoring message as
described in section 4.2.
2.1.2
Operating State Configuration options
The following operating state configuration options are available to the user:
Hood Heater Control Settings
Window Heater Control Settings
Automatic Message Transmission Settings (For Standalone sensors only)
Communication Protocol Settings
Hood Heater Control Settings
By default the Hood Heater is set to turn on automatically when the temperature falls
below 2°C. The hood heater can be disabled so that it never turns on in order to save
power using the ALS-OSHH commands. (See sections 7.2.10 and 7.2.11 for details).
Window Heater Control Settings
The Window Heater is always on by default and this is the recommended setting for the
sensor. For situations where power consumption is critical the sensor can be modified
to either turn the window heater off or to have the window respond to the window
contamination setting using the ALS-OSWH commands. (See sections 7.2.14 and
7.2.15 for details).
5
User Manual for ALS-2
INSTALLATION
Automatic Message Transmission Settings
The sensor can operate in either standard mode where the data message is transmitted
automatically once a minute or in polled mode where the data message is transmitted in
response to an ALS-D? command. This setting can be changed via the ALS-OSAM
commands. (See sections 7.2.6 and 7.2.7 for details).
Note: For ALS-2 sensors connected to a Biral HSS / SWS visibility / present sensor
then the ALS-2 MUST be in polled mode.
Communication Protocol Settings
The ALS-2 sensor can operate using either RS232/RS422 or Addressable RS485
protocols. The sensor will configured to use either RS232 or RS422/RS485 on
manufacture. The user can switch between RS422 and addressable RS485 options using
the ALS-OSCS commands. (See sections 7.2.8 and 7.2.9 for details).
6
User Manual for ALS-2
3
MAINTENANCE
MAINTENANCE
The ALS-2 requires very little maintenance. The following sections detail the checks
that are advisable to ensure continued good operation of the sensor. The frequency of
these checks depends upon the location and environmental conditions under which the
sensor operates.
A general check of the physical condition of the sensor should be carried out at regular
intervals. Particular attention should be paid to the condition of the cable from the base
of the unit.
3.1
De-mister window heater (fitted as standard to all sensors)
The window de-mister is a low powered heater designed primarily to prevent
condensation. It maintains the temperature of the window at a few degrees above
ambient temperature.
The default setting is ON. See section 7.2.14 for details on how to change this setting.
The warmth may be detected with the finger on the window but is easier to detect using
a thermometer with surface temperature probe or infrared thermometer. The window
should be between 5 and 10 C above ambient temperature after at least 10 minutes
operation. Ensure that window is cleaned after coming into contact with the skin.
3.2
Hood heater (optional)
The hood heater, if ordered, is fitted to the inside of the ALS-2 hood as shown in Figure
4. The hood heater is high-power to prevent the build-up of frozen precipitation in the
hood. The heater is temperature dependent (by default – see section 7.2.10) and is only
switched on when the temperature is below 2oC. When switched on, it is easy to detect
the heat from the heater by a thermometer with a surface probe, an infrared
thermometer, or by placing a finger on the end of the hood.
The Hood Heater is the raised
red mat on the inside of the
hood near the window
Figure 4: Hood Heater (optional)
7
User Manual for ALS-2
MAINTENANCE
When the temperature is above the switching temperature the heater will be switched
off but may be controlled using a PC running a terminal program such as Windows
Hyper Terminal: The heater may be switched on temporarily using the command ALSDHO and off again using the command ALS-DHX (see sections 7.2.4 and 7.2.5).
3.3
Window Cleaning
The ALS-2 is an optical instrument and is therefore susceptible to accumulation of
contaminants on the window in the hood. The window should be cleaned by gently
wiping the window using a pure alcohol (propanol) and a soft cloth (appropriate safety
precautions must be taken when using pure alcohol).
The ALS-2 is fitted with a window monitoring system which compensates for
contamination of the window. The contamination levels will be provided in the remote
maintenance monitoring message (see section 4.2)
When the contamination exceeds 10% a window contamination warning flag occurs in
the remote maintenance monitoring and operational data messages (see section 4.1). In
this state the data can still be assumed to be accurate but the window should be cleaned
at the earliest opportunity.
For window contamination levels exceeding 30% a fault flag occurs in both data
messages. In this state the data can no longer be assumed accurate and the window
should be cleaned immediately.
8
User Manual for ALS-2
4
DATA OUTPUT
DATA OUTPUT
Data from the Biral ALS-2 is transferred either digitally through the serial connection or via
analog outputs, depending on the options selected on purchase.
Serial output includes:
- One minute average of observed luminance (in cd m-2)
- Self-test status
The serial message from the ALS-2 is sent either directly to a computer if used standalone, or
included at the end of the standard output message from an accompanying Biral HSS/SWS
visibility/present weather sensor. For details of the data message from Biral HSS/SWS
visibility/present weather sensors please see the appropriate user manual.
4.1
Operational Data Message - ALS-D?
The operational data message is a text output of the sensor’s measurements and status.
The message is transmitted automatically after calculation when the Operating State bit
1 is set or if an " ALS-D?" command is sent.
ALS-DATA, AAAAA,BBB
MESSAGE
MEANING
ALS-DATA
ALS data message prefix
AAAAA
ALS Signal average value (cd m-2).
Self Test and Monitoring (Remote maintenance)
BBB
O - other RM faults OK
X - other RM fault exists
BBB
O = windows not contaminated
X = window contamination warning
F = window contamination fault
S = inputs saturated with light
O = sensor not reset since last Data message
X = sensor reset since last Data Message
9
User Manual for ALS-2
4.2
DATA OUTPUT
Remote Maintenance Monitor Message - ALS-R?
The Remote Maintenance Monitor Message is used to report information about the
sensors hardware. All of the readings that can be measured are reported. The self-test
routines are called before the message is built in memory to ensure that the readings
and flags are all current.
ALS-TEST,AA,B.BBB,CC.C,DD.D,EE.E,FF,±GGG.G,HHHH,IIIII
MESSAGE
MEANING
ALS-TEST
Header for the Self-Test message
AA
Hexadecimal representation of Heater status
Where
3. Hood heater and Window heater on
2. Hood heater on, Window heater off
1. Hood Heater off, Window heater on
0. Hood Heater and Window heater off
B.BBB
ADC reference voltage (2.5V).
CC.C
Sensor power input voltage.
DD.D
Negative 12V rail value
EE.E
Positive 12V rail value
FF
Window contamination percentage.
GGG.G
HHHH
Temperature
AC interrupts per second
Other RM Fault indicator.
The fault indicator is a 5 character decimal where individual
bits have been set to correspond to certain errors.
IIIII
Bit
0
1
2
3
Decimal
value
1
2
4
8
Description of error
NVRAM checksum error
Program checksum error
Ram error
Register error
10
User Manual for ALS-2
CALIBRATION
4
5
6
7
8
9
10
11
12
13
14
15
4.3
16
32
64
128
256
512
1024
2048
4096
8192
16384
32768
ADC error
Voltage Reference error
DC Power error
-12V error
+12V error
Interrupts / second error
Window Contamination Warning
Window Contamination Fault
Other Internal error
ADC Saturated
Unused
Unused
Analog Output
For the analog output option, two voltages are generated which are proportional to the one
minute average observed luminance:
- Low mode output (0-10V) proportional to 2-4,000 cd m-2
- High mode output (0-10V) proportional to 2-40,000 cd m-2
The low mode output allows high resolution measurements during low light levels.
5
CALIBRATION
The Biral ALS-2 is supplied pre-calibrated. However, it is recommended that periodic
calibration checks are performed as part of routine maintenance of the sensor. Such periodic
checks may also be a necessary requirement if the sensor is used as part of an aerodrome
runway visual range system. To facilitate convenient in-field calibration checking, Biral has
developed a portable calibration unit specifically for the ALS-2, available as an additional
option (Figure 5).
The calibrator is battery powered and attaches to the ALS-2, communicating optically
through the sensor’s windows and therefore requires no electrical connection. The battery
power and memory status is checked upon turning on. Once initiated, the calibrator emits a
series of illumination levels into the ALS-2 lens. The intensity measurements are compared
against the values stored by the calibration unit and adjusted if necessary. The status of the
calibration unit and progress is indicated to the operator through two LEDs (see Figure 5).
The calibration procedure is as follows:
1. Ensure the calibrator is fully charged prior to use and its window is cleaned thoroughly and
free from any obstruction.
3. Ensure the ALS-2 window is cleaned thoroughly and free from any obstruction.
4. Attach the calibrator to the front of the ALS-2 using the stand and elastic cord as shown in
Figure 6. The calibrator hood slots over the entire ALS-2 hood. Please ensure that the end of
the calibrator hood makes contact with the ALS-2 front to prevent background light ingress
11
User Manual for ALS-2
CALIBRATION
during calibration. The cord is attached around the ALS-2 and the slots at the end of the
calibrator stand should connect with the rods on the base of the ALS-2 for added stability
whilst the units are connected.
5. Turn on the calibrator by momentarily pressing the power button.
6. On power up the calibrator will perform a self-test. If the test is passed the calibration
process will be initiated, indicated by flashing of the green LED indicator. If the red LED
is on whilst the green is flashing then this indicates a prohibitively low battery and the
calibrator needs to be recharged. If only the red LED is constantly on this indicates a fault
with the calibrator and the unit should be returned to Biral for investigation.
7. The calibrator takes approximately two minutes to perform the calibration check, during
which time only the green LED will remain flashing. Calibration is successfully complete
if the green LED stops flashing and remains continuously lit. The green LED will remain
on for a further 20 seconds and then the calibrator will power down so the user can remove
it from the ALS-2. If during the calibration the green LED turns off and the red LED
begins to flash, there has been a calibration failure and the calibrator will automatically
retry the calibration up to three times before shutting down.
The calibrator will automatically power-off after approximately 2 minutes on standby mode.
It is recommended that when not in use the calibrator is always placed resting on its stand to
avoid damaging the unit (as shown in Figure 5). A summary of the calibrator LED status
indicator patterns is provided in Table 4 (and on the side of the calibrator).
Table 4: Calibrator LED indicator patterns
LED1
(Red)
On
On
Off
Off
On
Flash
LED2
(Green)
On
Flash
Flash
On
Off
Off
Description
Start-up
Low battery
Calibrating
Calibration success
Calibrator fault
Calibration failed
12
User Manual for ALS-2
CALIBRATION
Figure 5: Biral ALS-2 calibration unit
Calibrator hood slots over ALS-2 hood to prevent background
light from affecting the calibration. The flexible cord attached
to the calibrator secures the two units together.
Metal rods on the underside of ALS-2 slot into
calibrator stand end grooves for added support.
Figure 6: Calibrator connected to ALS-2 whilst mounted on a pole.
13
User Manual for ALS-2
6
SPECIFICATIONS
SPECIFICATIONS
Biral ALS-2 Specifications
Dynamic range
2-40,000 cd m-2 (0.5-11,700 fL)
Resolution
1 cd m-2 for low mode (2-4,000 cd m-2)
10 cd m-2 for high mode (2-40,000 cd m-2)
Measurement error
<10% of value
Field of view
6°
Spectral response
Wavelength sensitivity range 420-675 nm, peak 565 nm.
Analogous to CIE luminous spectral efficiency.
Window contamination
monitoring
Window, hood and
internal heaters
In-field calibration
check capability
Yes
Yes (hood and internal heaters are optional)
Yes
Automatic self-checking
Yes (power and memory check on start-up)
Interfacing
Sensor can operate either standalone or integrated with Biral
visibility sensor (HSS or SWS series).
Output connections
RS232 for integration with Biral HSS or SWS visibility sensors.
RS232, RS422, RS485 or Analog (0-10V for high and low
ranges) available for standalone ALS applications.
Operating environment
-40°C (-60°C with optional internal heaters) to +70°C
0 to 100% (condensing) relative humidity.
Enclosure rating
IP66 (water and dust tight), corrosion resistant.
Supply voltage
Supply power
9-36 VDC for sensor and window heater, 24-28V AC or DC for
optional hood and internal heaters. Can draw power directly
from Biral HSS sensor.
2W for sensor and window heater @24V
14W for sensor, window and hood heaters @24V
27W for sensor, window, hood and internal heaters @24V
14
User Manual for ALS-2
SPECIFICATIONS
Biral ALS-2 in-field Calibrator Specifications
Automatic self-checking
Yes (voltage and memory on start-up)
Interfacing
Infrared serial communication with ALS-2 through the sensor’s
window (no electrical connection required).
Operating environment
-40°C to +70°C, 0 to 95% relative humidity
Enclosure rating
IP54 (splash-proof and dust protected), corrosion resistant.
Power
Rechargeable NiCad battery.
6.1
Digital Communication Interface
Table 5: Digital Communication Interface Specifications
Interface Type
RS232C, (Full Duplex)
Optional
RS422/RS485
Selectable Parameters:
Baud Rates
1200 Baud to 38K4 Baud
Data Bits
8
Parity
None
Stop Bits
1
Flow Control
None
Message Termination
CR-LF
Message Check Sum:
Selectable
Reporting Interval
Programmable
(Response to poll, or Automatic at 1 minute intervals:
Message Content:
• Luminance Value
• Remote Self-Test & Monitoring Flags
15
User Manual for ALS-2
7
APPENDIX – ALS COMMUNICATION
APPENDIX – ALS COMMUNICATION
In normal use, the ALS-2 acts as a passive ambient light sensor, sending the measured light
levels to a host computer at regular intervals. The operation of the ALS-2 can however be
adjusted by the host processor, to a limited extent. The available commands from the host
processor and the possible responses from the ALS-2 are listed in this appendix.
7.1
Command Line Interface
The command line interface is the software that deals with commands received through
the serial port, and is displayed as a text box where command codes can be typed by the
user. The first character received is checked for a match with the valid command
characters (all lower case characters are converted to upper case by the serial port
handler software). If any other character is detected it will be rejected and the sensor
will respond with "ALS-BAD CMD".
If the first character is valid then control is handed over to a specific handler for the
first character.
7.2
Standard Commands and Responses
All commands start with the prefix ALS-.
7.2.1
ALS-ADR? – Get RS485 Sensor Address
The sensor can be set up to use an addressable RS485 communications protocol. This
will allow multiple sensors to be on a network and each one will only respond to
commands that are addresses to it specifically. The address is a number between 0 and
99 which can be set as required by the user.
7.2.2
ALS-ADRxx - Set RS485 Sensor Address
The user can set the address of a sensor to a number between 0 and 99. This number is
used to address the sensor when using the RS485 communication protocol. If the
command is accepted, the sensor will respond with “OK”.
7.2.3
ALS-D? - Operational Message
This command requests a copy of the latest operational message (the text string
including the ALS measurements and status) to be sent. The actual format of the test
string is dependent on whether the ALS-2 is standalone or connected via a Biral present
weather sensor.
7.2.4
ALS-DHO - Hood Heater on
This command is used for testing sensor operation and allows the user to turn the hoodheater on for 2 minutes. There are two mechanisms for controlling the hood-heater, the
first is the temperature sensor which will turn the hood heater on when the temperature
falls below 2 C for at least 30 seconds and off when the temperature rises above 2 C
for at least 30 seconds. The second mechanism is the DHO command (or DHX - see
16
User Manual for ALS-2
APPENDIX – ALS COMMUNICATION
below) which will force the hood heater on for 2 minutes, after which it will return to
temperature control. If the command is accepted, the sensor will respond with “OK” .
7.2.5
ALS-DHX - Hood Heater off
This command is used for testing sensor operation and allows the user to turn the hoodheater off for 2 minutes. The operation of this command is the same as for DHO above
except the state of the hood heater is set to off.
If the command is accepted, the sensor will respond with “OK”
7.2.6
ALS-OSAM? – Get Automatic Message Operating Settings
Return the automatic message transmission operating state settings. The sensor will
respond with the automatic message transmission settings where:
00 = Automatic Message transmission Disabled
01 = Automatic Message transmission Enabled
7.2.7
ALS-OSAMx – Set Automatic Message Operating Settings
Set the Automatic Message Transmission operating state.
Where x is:
0 = Automatic Message transmission Disabled
1 = Automatic Message transmission Enabled
For sensors connected to a SWS/HSS sensor this MUST be set to Disabled.
7.2.8
ALS-OSCS? – Get Communication Operating Settings
Return the Serial Communication operating state settings.
The sensor will respond with the serial communication settings where:
00 = RS485 addressable Communications protocol Disabled,
01 = RS485 addressable Communications protocol Enabled,
7.2.9
ALS-OSCSx – Set Communication Operating Settings
Set the Serial Communication operating state settings.
Where x is :
0 = RS485 addressable Communications protocol Disabled,
1 = RS485 addressable Communications protocol Enabled,
7.2.10
ALS-OSHH? – Get Hood Heater Operating Settings
Return the hood heater operating state settings.
The sensor will respond with the hood heater settings where:
00 = Hood Heater Disabled
01 = Hood Heater on Automatic
7.2.11
ALS-OSHHx – Set Hood Heater Operating Settings
Set the Hood Heater operating state.
Where x is :
17
User Manual for ALS-2
APPENDIX – ALS COMMUNICATION
0 = Hood Heater Disabled
1 = Hood Heater on Automatic
7.2.12
ALS-OSWC? – Get Window Contamination Operating Settings
Return the window contamination operating state settings.
The sensor will respond with the window contamination settings where:
00 = Window contamination adjustment Disabled
01 = Window contamination adjustment Enabled and On
7.2.13
ALS-OSWCx – Set Window Contamination Operating Settings
Set the Window contamination adjustment operating state.
Where x is :
0 = Window contamination adjustment Disabled
1 = Window contamination adjustment Enabled and On
7.2.14
ALS-OSWH? – Get Window Heater Operating Settings
Return the window heater operating state settings.
The sensor will respond with the window heater settings where:
00 = Window Heater Disabled
01 = Window Heater Enabled and On
02 = Window Heater Enabled and controlled according to contamination levels
7.2.15
ALS-OSWHx – Set Window Heater Operating Settings
Set the Window Heater operating state.
Where x is :
0 = Window Heater Disabled
1 = Window Heater Enabled and On
2 = Window Heater Enabled and controlled according to contamination levels
7.2.16
ALS-PV? – Program Version
When a "PV?" command is received the sensor returns the Program Version and date in
the form: SI100255.00A, 26/07/2012.
7.2.17
ALS-R? - Remote Maintenance Message
When an "R?" command is received the sensor returns the Remote Maintenance
Message.
7.2.18
ALS-RST - Reset sensor
When an "ALS-RST" command is received the sensor is reset. If the command is
accepted, the sensor will respond with “OK”
18
User Manual for ALS-2
7.2.19
APPENDIX – ALS COMMUNICATION
ALS-SETCOM1,x - COM1 Baudrate Selection Routine
Default communication parameters are 9600 Baud, 8 data bit, 1 stop bit, no parity, and
no flow control. The baud rate may be changed if required as follows.
This command allows the user to change the baudrate for COM1 on the sensor.
If ALS-SETCOM1 is entered the following menu is displayed:
ALS-SETCOM1
SELECT REQUIRED BAUDRATE BY TYPING ALS-SETCOM1,(NUMBER)
1....1200 BAUD
2....2400 BAUD
3....4800 BAUD
4....9600 BAUD
5....19K2 BAUD
6....38K4 BAUD
The user can select the baudrate to use, for example to select 9600 baud the user would
type
ALS-SETCOM1,4 <enter>
The user then receives the prompt:
CHANGING SETTINGS. NEW BAUDRATE IS: 9600 baud
SEND 'OK' USING NEW SETTINGS WITHIN 1 MINUTE TO CONFIRM CHANGE
The new setting will only be accepted if the user manages to communicate with the
sensor at the new baudrate within 60 seconds. Otherwise the sensor will reset and
continue operation with the original baudrate settings. If an "OK" command is received
at the new baudrate the sensor will update its settings and restart.
7.2.20
ALS-SNUM? Query Serial Number
When an "ALS-SNUM?" command is received the sensor transmits the sensor serial
number– this is a 12 character string.
7.2.21
ALS-WHO - Window Heater on
This command is used for testing sensor operation and allows the user to turn the
window heater on.
If the command is accepted, the sensor will respond with “OK”
7.2.22
ALS-WHX - Window Heater off
This command is used for testing sensor operation and allows the user to turn the
window heater off.
If the command is accepted, the sensor will respond with “OK”
19
User Manual for ALS-2
7.3
7.4
APPENDIX – ALS COMMUNICATION
Sensor Responses
The sensors have the following set of responses they will send to the user in the event
of an error.
RESPONSE
MEANING
ALS-BAD CMD
Your command was not understood by the sensor. Check the text of
the command and re-send.
ALS-COMM ERR
An error was detected in a character in the command. Re-send the
command.
OK
Command with no quantitative response was understood and
executed.
ALS-TIMEOUT
Command was sent with more than 10 seconds between characters.
Re-send the command
ALS-TOO LONG
Command message was longer than 60 characters including end
characters. Re-send the command.
ALS-BAD
CHECKSUM
Error in RS485 Checksum. Re-send the command.
RS485 Configuration
The ALS sensor can be set to use addressable RS485 communication protocols. RS485
configuration is an optional factory defined setting that must be specified on order.
RS485 Protocol Format
The communication protocol is based on the Modbus ASCII Frame Format.
Each data request and transfer is configured as follows:
Start:
Station Address:
Data:
LRC Checksum:
End:
‘:’ (3A Hex)
2 Character address field
As standard SW message format.
2 Characters - Longitudinal Redundancy Check
2 Characters Carriage return + Line Feed
Start
The ‘:’ (colon) symbol is used as a start flag which is 3A hex.
Address
The 2 character address is defined by the operator for the unit and programmed as
specified in the set-up instructions. It can be any numeric value between 00 and 99. It
is used by the unit to define the recipient of the message and by the slave to define the
source of the message.
20
User Manual for ALS-2
APPENDIX – ALS COMMUNICATION
Data
This is a variable length ASCII character string. The master has a defined range of
commands available for the SW sensor. The SW sensor has a range of defined data
messages. These messages can either be sent as a response to a request for data by the
master unit, or sent without any request on a timed basis, according to the instrument
user settable configuration. However, it is recommended that a polled system is used in
a multi-sensor application as this can avoid most data contention issues through the
design of a suitable system operating schedule.
LRC Checksum
This enables error checking, allowing the master to request a re-send if errors are
detected. For RS485 a Longitudinal Redundancy Check (LRC) Checksum is generated
on the data.
The LRC is one byte, containing an 8–bit binary value. The LRC value is calculated by
the transmitting device, which appends the LRC to the message. The receiving device
calculates an LRC during receipt of the message, and compares the calculated value to
the actual value it received in the LRC field. If the two values are not equal, an error is
implied.
The LRC is calculated by adding together successive 8–bit bytes of the message,
discarding any carries, and then two’s complement
ing the result. It is performed on the
ASCII message field contents excluding the ‘colon’ character that beginsthe message,
and excluding the CRLF pair at the end of the message. The LRC byte is converted to 2
ASCII characters and appended to the message.
For example, the message:
:42ALS-D?
Checksum is calculated as :
ASCII string 42ALS-D?
BYTE Values (in HEX) 34+32+41+4C+53+2D+44+3F = 0x1F6
Checksum is F6
One’s compliment (0xFF – 0xF6) = 0x09
Two’s compliment 0x09 + 1 = 0x0A
Checksum is 0x0A (Hex)
Checksum ASCII characters are “ 0A”
Transmitted string will therefore be:
:42ALS-D?0A<CRLF>
End
All communications will end with the standard 2 characters, carriage return – line feed
(CRLF) pair (ASCII values of 0D & 0A hex)
Sensor Addressing
To use addressable RS485 communication each sensor must have a unique address in
the range 0-99. By default the sensor address is set to 0.
21
User Manual for ALS-2
APPENDIX – ALS COMMUNICATION
Querying the sensor address
To query the sensor address, send the command: ALS-ADR?
The sensor should respond with the address: e.g. 00
Changing the sensor address
To change the sensor address, send the command: ALS-ADRxx
Where xx is a number between 00 and 99
E,g, ADR02 sets the sensor address to 02.
The sensor should respond with: OK
Checksum Override
When using addressable RS485 communications, the sensor will disregard any
commands that do not have the sensor address or have an incorrect checksum. When
transmitting to the sensor all commands must be prefixed by :XX (where XX is the
address) and have the 2 character checksum on the end. If the checksum character is set
to FF then the sensor will accept the message without checking the checksum. This is
useful when using programs such as HyperTerminal for diagnostics.
For example.
A sensor with address 00 to request a data message:
Send command
:00ALS-D?FF
T: (+34) 96 816 2005
[email protected]
www.sensovant.com
Avda. Benjamin Franklin, 28
Parque Tecnológico Valencia
46980 - PATERNA
22