1
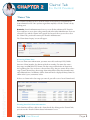
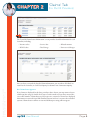
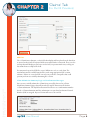
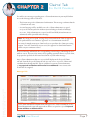
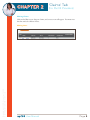
myCGS
CHAPTER 2
User Manual
‘Claims’ Tab
(for Part B Providers)
Originated July 31, 2012
Revised June 13, 2014
© 2014 Copyright, CGS Administrators, LLC.
CHAPTER 2
‘Claims’ Tab
(for Part B Providers)
Table of Contents
‘Claims’ Tab 3
Accessing Detailed Claim Information 3
Viewing Detailed Claim Information 4
No Claims Data Appears 5
Claims Tab (for Part B Providers) 5
Submitting Claims 5
Claim Submission Summary Page and Confirmation Messages 6
Originated July 31, 2012 • Revised June 13, 2014
© 2014 Copyright, CGS Administrators, LLC.
Editing Claims 8
myCGS User Manual
Page 2
CHAPTER 2
‘Claims’ Tab
(for Part B Providers)
‘Claims’ Tab
The ‘Claims’ tab allows users to check the status of a beneficiary’s claim which has
been submitted to CGS. Once you have signed into myCGS, select the “Claims” tab by
clicking on it.
Reminder: Provider Administrators have access to all tabs within myCGS. Provider
Users only have access to those tabs granted by their Provider Administrator. If you are
a Provider User and the ‘Claims’ tab is grayed out, but you believe you need access to
the ‘Claims’ Tab, you should contact your Provider Administrator.
The ‘Claim Status Inquiry’ screen will appear.
Accessing Claims Data
To access claim status information, you must enter the beneficiary’s HIC (Health
Insurance Claim) number, also known as Medicare number. You must also enter a
date range in a MM/DD/CCYY format. The date range will default to 45 days from
the beginning date. You can choose a shorter date range, but you cannot choose a date
range of more than 45 days. Retrieving claims information older than 6 months may
take additional time. In addition, offline claims will not be displayed. Many claims are
offline after 3 years, sometimes earlier.
Originated July 31, 2012 • Revised June 13, 2014
© 2014 Copyright, CGS Administrators, LLC.
If there are claims in the date range you entered, you will receive a list of claims found.
Viewing Detailed Claim Information
Each claim line will have a link to the claims details. By clicking on the ‘Claim #’ link,
you can view the ‘Detailed Claims Status Information’ screen.
myCGS User Manual
Page 3
CHAPTER 2
‘Claims’ Tab
(for Part B Providers)
The ‘Detailed Claims Status Information’ screen provides detailed information for each
claim line, including:
• Revenue codes
• HCPCS codes
• Service date
• Total charge
• Allowed amount
• Non-covered charges
Originated July 31, 2012 • Revised June 13, 2014
© 2014 Copyright, CGS Administrators, LLC.
Once you have reviewed the detailed claim information, you can either click ‘Back’ to
return to the claim list, or click ‘New Inquiry’ to submit a new claim status inquiry.
No Claims Data Appears
If no claims are displayed for the date period you have chosen, you may want to choose
a different date range or double-check your records to make sure you have entered the
correct HIC number. Claims that are paid, in process, returned, or denied are displayed.
Information is retrieved from CMS standard systems and is as current as the standard
systems. Claims that are offline or returned without processing will not appear.
myCGS User Manual
Page 4
CHAPTER 2
‘Claims’ Tab
(for Part B Providers)
‘Claims’ Tab (for Part B Providers)
Part B users can access the electronic claim submission (e-Claim) feature by accessing
the Claim Submission sub-tab located under the Claims tab. If the Claim Submission
sub-tab is not displaying, the user may not have access to this feature yet.
Submitting Claims
‘Claim Submission’ Sub-Tab
Hover your mouse over each field,
or click the question mark icon, to
view tips for completing each field.
Originated July 31, 2012 • Revised June 13, 2014
© 2014 Copyright, CGS Administrators, LLC.
Before you begin: Gather the same information you would need prior to submitting
a claim through PC-ACE Pro32, paper CMS-1500 claim form, or to transmit to your
vendor. You will enter detailed information that corresponds with CMS’s claim
submission requirements. Use the “Add Line” icon below the Narrative field to enter
additional lines (services).
myCGS User Manual
Page 5
CHAPTER 2
‘Claims’ Tab
(for Part B Providers)
Add Line
The e-Claim form is dynamic, so the fields that display will vary based on the data that
is entered on the form. All required fields are marked with a red asterisk. There are also
tool tips that will display as you hover on the field, or question mark icon, to help you
determine how to complete the field.
You may attach up to five PDF files, up to 5 MB in size each, to each claim. The
attachments must be in PDF format and created using appropriate PDF creation
software. Failure to create the PDF correctly can result in a corrupt file that could
prevent you from successfully submitting the e-Claim.
Originated July 31, 2012 • Revised June 13, 2014
© 2014 Copyright, CGS Administrators, LLC.
Claim Submission Summary Page and Confirmation Messages
Once you successfully submit the eClaim form, you will be directed to a Claim
Submission Summary page that will provide the myCGS Transaction ID for this
e-Claim submission. The myCGS transaction ID will serve as a confirmation number
for the e-Claim submission until the submission is accepted and an Internal Control
Number (ICN) is assigned. Rejected claims will not receive an ICN.
Claim Submission Summary Screen
myCGS User Manual
Page 6
CHAPTER 2
‘Claims’ Tab
(for Part B Providers)
You will receive messages regarding your e-Claim submissions in your myCGS inbox.
Access the Messages tab to read these.
• The first message is the Submission Confirmation. This message confirms that the
e-Claim form was sent.
• A second message will be available once the e-Claim submission is accepted
or rejected. This may take 24–48 hours (not including weekends or holidays)
to receive. If the submission is accepted, an ICN and DCN (if attachments are
submitted) will be provided in the message.
Note: Receiving an “accepted” message does not mean that the claim is approved
to be paid and does not constitute “approval” or a determination of medical
necessity. It simply means your claim has been accepted into the claims processing
system. Once the claim has been processed, the approval or denial information
will be on your remittance advice.
A rejected message will include the corresponding error messages, informing the user
what to correct. If you need to contact CGS regarding questions about a rejected claim,
be prepared to provide the file name listed in the rejected inbox message.
Any e-Claim submissions that were rejected will display on the Rejected Claims
sub-tab. From the Rejected Claims sub-tab, you can correct rejected e-Claims and
resubmit them through myCGS. This is considered a separate claim submission,
so any required attachments will need to be resubmitted. A new transaction
ID will also be assigned.
Originated July 31, 2012 • Revised June 13, 2014
© 2014 Copyright, CGS Administrators, LLC.
Messages Tab
Secure Claim Submission Confirmation will appear once claim is submitted. Secure
Claim Submission Receipt will appear when claim is accepted or rejected. Rejected
claims will have no Submission ID.
myCGS User Manual
Page 7
CHAPTER 2
‘Claims’ Tab
(for Part B Providers)
Editing Claims
Click on the Edit icon to edit your claims, and a new screen will appear. You must view
this line and select Edit or Delete.
Originated July 31, 2012 • Revised June 13, 2014
© 2014 Copyright, CGS Administrators, LLC.
Editing Lines
myCGS User Manual
Page 8