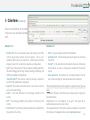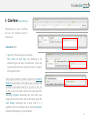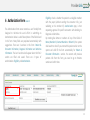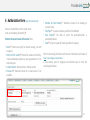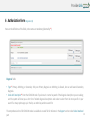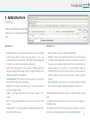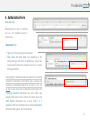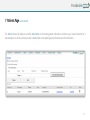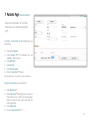
1
ProviderLink
Healthcare Providers’ eClaim Application
User Guide - Release 1.0
MAY 2012
in partnership with
www.eclaimlink.ae
1
ProviderLink
Table of Contents
Getting Started
Registration
Logging In & Setup
ProviderLink System
Claim Form
Authorization Form
Patients Page
Encounter Page
Authorizations Page
Claims Page
Submission Tracking
Settings
Support
3
4
5
6
7
12
17
19
21
22
24
25
29
eClaimLink is the eClaim project of the Dubai Health Authority implemented in partnership with
Dimensions Healthcare with the objectives of establishing a unified standard healthcare language
communicated across the emirate, implementing a unified structured communication schema,
providing a centralized health data tracking system, facilitating eClaim financial and clinical
information between payers, providers, patients & authorities. Empowering the Dubai Health
Authority with the needed information to organize, strategize, and optimize the healthcare setting
in Dubai. The eClaimLink portal is intended to manage eClaims and health data. In addition, it will
serve to connect all the healthcare community of Dubai and through its many anticipated modules
will raise the quality of care, enhance efficiency, and reduce mistakes, fraud and abuse in the
Emirate of Dubai. Visit www.eclaimlink.ae for more information.
2
ProviderLink
1 Getting Started
Accessing the eClaimLink system requires
that your facility is equipped with a
computer and internet connection.
To get started, open your internet browser
and navigate to the following website:
www.eclaimlink.ae
You will be then be directed to the
eClaimLink main website.
On the upper left corner of the website, you
will find a login form, click to register if you
are a new user.
Please enter your username, and password
if you are already a registered user.
3
ProviderLink
2 Registration
If you are a new user, to register you need to
have a valid license with one of the health
authorities or MOH in the UAE.
Register your licensed facility on eClaimLink
by clicking ‘Click to register’ in the login
section on main page. If you are part of a
group of facilities, each of these facilities
need to be registered on eClaimLink and the
account of the facility you are practicing in
should be used.
Enter all requested info in the form, after
validation for your ID is done, your account
shall be activated and you should receive a
notification through the email you registered
with.
4
ProviderLink
3 Logging In and Setup
After logging in from the login section on main
page, explore the different components of the
system by clicking on various buttons on the
header menu, get familiar with various
components of eClaimLink before you start.
Visit the DHD’s section of Data Flow to
understand the expected flow for the system.
Check the awareness workshops files on the
Info Hub for more details.
Click on Support and setup your Group
Management for your facility groups and their
access permissions. Click on User Management
to add your users and decide to which group
they belong.
If you are a clinic, hospital or optical center then
click on Clinicians Management to add the
physicians who work at your facility. Its critical
to add all physicians who you will claim for.
When done, click on Applications to login to the
ProviderLink application and start entering
claims and authorizations.
5
ProviderLink
4 ProviderLink System
After logging in to ProviderLink, the Claim Form is automatically activated. Get familiar with the menu that you will be
using while in the application to fill forms, search, generate submission files to submit it to the dhpo.
ProviderLink
5 Claim Form General
The Claim Form screen contains a user friendly form designed
to minimize the user’s effort in submitting a claim. Below is a
brief descriptions of the fields found in this form. Many fields
are populated automatically with suggestions. There are 4
sections in this form: Patient Information, Encounter Header
Information, Diagnosis Information and Activities Information.
The last 2 sections shall appear when the first 2 sections are
filled and saved.
By entering few letters or numbers of any of the fields of
Name, Member ID, Contact Number or Patient ID, the system
shall search to check if you entered this patient earlier in the
system and shall fill the form automatically for Patient
Information section. You cannot edit previous patients info
from this form, you need to go to Patients section and edit it
there.
7
ProviderLink
5 Claim Form Patient & Encounter Info
Here are the definitions of the fields, notice
some are mandatory (denoted by *).
Patient Information fields:
• Name*: Patient name (it doesn’t go to payers, but stay in
system for tracking purposes.
• Patient ID (File number)*: Patient file number at the facility,
it will automatically populate an auto generated one if not
entered by user.
• Contact Number: Patient phone or mobile number
• Emirates ID*: Enter National Emirate ID or select reason if
not available
• Member ID (Card Number)*: Member insurance ID as
showing on Insurance Card
• Plan/Payer*: Insurance Company and Plan of the Member,
this is not the TPA but the payer.
Encounter Header Information fields:
• Encounter ID*: Is the encounter (visit or episode) number, it will
automatically populate as an auto generated one if not filled manually.
Many use it to track invoices (invoice number).
• Clinician*: Physician supervising the activities in this encounter (the
consultation, prescribing drugs, conduction a procedure or a service.) If
you are a clinic, hospital or optical center then you need to enter all
clinicians working at your facility in the system before seeing the
clinician name here in the list (refer to section 3 on how to add your
clinicians). Enter few letters of name or license number to choose from
list.
• Start Time*: Encounter Start date and time (automatically populated if
done at time of service)
• Type*: Encounter Type (choose from the list)
• Start Type*: Encounter start type (choose from the list)
When entering inpatients, more fields (End Type and Time) shall be requested, also
more info is requested in patient transfer cases.
After finish entering the Patient and Encounter Information, click the
button of Save to enter diagnosis and activities.
A new sections open for Diagnosis and Activities to enter the remaining
information.
8
ProviderLink
5 Claim Form Diagnosis Info
Here are the definitions of the fields,
notice some are mandatory (denoted
by *).
Diagnosis fields:
• Type*: Primary, Admitting, or Secondary. Only one Primary Diagnosis or Admitting is allowed, but can add several Secondary
diagnosis.
• Code with Description *: Enter the ICD10-CM code if you know it or enter key word of the diagnosis description you are seeking
and the system will show you a short list of related diagnosis descriptions and codes to select from. Be more specific in your
search if so many options pop up in the list, use other key words to search for.
The comprehensive list of all ICD10-CM codes is available in an excel file for reference in the Support section under Codes Download
part.
9
ProviderLink
5 Claim Form Activities Info
Here are the definitions of the fields,
notice some are mandatory (denoted
by *).
Activities fields:
Activities fields:
• Non-Std Code: Your non-standard service code used by your facility
with the payer before eclaims came into picture. This is not a
mandatory field and can be used till Jan 1, 2013 when this field is
dropped. Currently it’s a code that is captured as an observation.
• Type*: Type of the activity: CPT (for procedures including operations,
labs and radiology), Dental, Drug, Service (including consultation), and
HCPCS (consumable and disposables).
• Code Description*: Enter code or search by entering a keyword to
search for the needed code or description.
• Quantity*: The number of Activities served. It can be also a fraction
such as half a pack of drug.
• Gross*: Is the total AED amount of the charges included on the
Activity.
• Net*: The net charges billed by the provider to the Payer for this
Activity.
• Patient Share*: Any fee the provider have effectively collected from
the patient for this activity.
• Start*: Insurance Company and Plan of the Member
• Authorization ID : The ID number given by the payer for authorizing
the activity.
• Clinician*: Is the same Clinician ID entered in Encounter Information
section before, no need to change unless needed for this specific
activity.
• Show observation: observations are not required except in certain
cases. Check next page for more details about rules related to it.
The Non-Standard Code must be mapped to a specific Activity Type and
Code.
Its important to keep in mind that Gross is always equal or larger than
Net+Patient Share.
Authorization ID is not mandatory, if you got it from payer (by eAuthorization, phone or fax) enter it here.
The comprehensive list of all Activity codes are available in an excel file
for reference in the Support section under Codes Download part.
10
ProviderLink
5 Claim Form Observations Info
Observation(s) are part of activities
and are not mandated except in
certain cases.
Observation fields:
• Type: One of the listed types to be selected.
• Code, Value and Value Types vary depending on the
observation type and nature of needed data. Payers may
request specific data to be captured and sent in a special
DHA approved format.
Enaya program mandate providers to capture the Presenting
Complaint in observation if the Activity Type is a Service and
the Code is a consultation code (9, 9.1, 10, 10.1, 11, 11.1, 21,
22, 23). As soon as the code is entered, the system opens the
Presenting Complaint Observation box. Also similar case
happens when Dental code is entered, the system opens the
Tooth Number Observation Box to enter tooth if it is
applicable. With rest of Activity code, an optional Description
Observation Box appears, but not mandatory.
11
ProviderLink
6 Authorization Form General
The Authorization Form screen contains a user friendly form
designed to minimize the user’s effort in submitting an
Authorization. Below is a brief descriptions of the fields found
in this form. Many fields are populated automatically with
suggestions. There are 3 sections in this form: Patient &
Encounter Information, Diagnosis Information and Activities
Information. The last 2 sections shall appear when the first 2
section are filled and saved. There are 2 types of
authorizations: Eligibility and Authorization .
Eligibility, checks whether the patient is an eligible member
with the payer (without sending the encounter info, just
validating on his member ID). Authorization type, is that
requesting approval for specific encounter with detailing its
Diagnosis and Activities.
By entering few letters or numbers of any of the fields of
Name, Member ID, Contact Number or Patient ID, the system
shall search to check if you entered this patient earlier on the
system and shall fill the form automatically for Patient &
Encounter Information section. You cannot edit previous
patients info from this form, you need to go to Patients
section and edit it there.
12
ProviderLink
6 Authorization Form Patient & Encounter Info
Here are the definitions of the fields, notice
some are mandatory (denoted by *).
Patient & Encounter Header Information fields:
• Name*: Patient name (only for internal tracking, not sent
to payers).
• Patient ID (File number)*: Patient file number at the facility,
it will automatically populate an auto generated one if not
entered by user
• Contact Number: Patient phone or mobile number
• Emirates ID*: National Emirate ID or select reason if not
available
• Member ID (Card Number)*: Member insurance ID as showing on
Insurance Card
• Plan/Payer*: Insurance Company and Plan of the Member
• Date Ordered*: The date on which the prescription/order is
prescribed/ordered.
• Code*: The prior request ID (tracking number for request).
After finish entering the Patient and Encounter Information, click button of
Save to enter diagnosis and activities.
A new sections open for Diagnosis and Activities open to enter the
remaining information.
13
ProviderLink
6 Authorization Form Diagnosis Info
Here are the definitions of the fields, notice some are mandatory (denoted by *).
Diagnosis fields:
• Type*: Primary, Admitting, or Secondary. Only one Primary Diagnosis or Admitting is allowed, but can add several Secondary
diagnosis.
• Code with Description*: Enter the ICD10-CM code if you know it or enter key word of the diagnosis description you are seeking
and the system will show you a short list of related diagnosis descriptions and codes to select from. Be more specific in your
search if so many options pop up in the list, use other key words to search for.
The comprehensive list of all ICD10-CM codes is available in an excel file for reference in the Support section under Codes Download
14
part.
ProviderLink
6 Authorization Form
Activities Info
Here are the definitions of the fields,
notice some are mandatory (denoted
by *).
Activities fields:
Activities fields:
• Non-Std Code: Your non-standard service code used by your facility
with the payer before eclaims came into picture. This is not
mandatory and can be used till Jan 1, 2013 when this field is dropped.
Currently it’s a code that is captured as an observation.
• Type*: Type of the activity: CPT (for procedures including operations,
labs and radiology), Dental, Drug, Service (including consultation), and
HCPCS (consumable and disposables).
• Code Description*: Enter code or search by entering a keyword to
search for the needed code or description.
• Quantity*: The number of Activities served. It can be also a fraction
such as half a pack of drug.
• Gross*: Is the total AED amount of the charges included on the
Activity.
• Net*: The net charges billed by the provider to the Payer for this
Activity
• Patient Share*: Any fee the provider have effectively collected from
the patient for this activity.
• Start *: Insurance Company and Plan of the Member
• Clinician*: Physician supervising the activities in this encounter (the
consultation, prescribing drugs, conduction a procedure or a service.)
If you are a clinic, hospital or optical center then you need to enter all
clinicians working at your facility in the system before seeing the
clinician name here in the list (refer to section 3 on how to add your
clinicians). Enter few letters of name or license number to choose
from list.
• Show observation: observations are not required except in limited
cases. Check next page for more details about rules related to it.
The Non-Standard Code must be mapped to a specific Activity Type and
Code
Its important to keep in mind that Gross is always equal or larger than
Net+Patient Share.
The comprehensive list of all Activity codes are available in an excel file
for reference in the Support section under Codes Download part.
15
ProviderLink
6 Authorization Form
Observations Info
Observation(s) are part of activities
and are not mandated except in
certain cases.
Observation fields:
• Type: One of the listed types to be selected
• Code, Value and Value Types vary depending on the
observation type and nature of needed data. Payers may
request specific data to be captured and sent in a special
DHA approved form.
Enaya programs mandate providers to capture the presenting
Complaint in observation if the Activity Type is a Service and
the Code is a consultation code (9, 9.1, 10, 10.1, 11, 11.1, 21,
22, 23). As soon as the code is entered the system opens the
Presenting Complaint Observation box. Also similar case
happens when Dental code is entered, the system opens the
Tooth Number Observation Box to enter tooth if it is
applicable. With rest of Activity code, an optional Description
Observation Box appears, but not mandatory.
16
ProviderLink
7 Patients Page Search and Edit
The Patients Screen will allow you to define New Patient or edit existing patient information, and allow you to create Encounter for a
selected patient. It will also provide you with a detailed look on the patient general information and Plan information.
17
7 Patients Page Create New Patient
Here are the definitions of the fields,
notice some are mandatory (denoted
by *).
To Create a New Patient or edit existing ones, you
will need to:
1. Enter patient Name:*
2. Enter Emirates ID*. If the Emirates ID is not
available , select a reason.
3. Enter Birth Date
4. Select Gender
5. Enter Phone Number
6. Click on “Save Patient”* button.
Rest of Information is not important for claims and follow up.
Patient Insurance Plans, you will need to:
1. Enter Member ID*
3. Select Plan/Payer* The Plan/Payer is a smart list.
Enter the first 2 or 3 letters of the plan/payer
name or code and the system will show the
matching records.
4. Enter Expiry Date
5. Click on “Save Patient Plan” *
18
ProviderLink
8 Encounters Page Search and Edit
To view encounters navigate to the “Encounter
Page”. In this screen you will be able to view all
generated encounters in details.
Use the search engine to enter the criteria in
which you want to filter your results. If you
desire to view all encounters leave all fields
empty and click on search.
You may also Edit or Delete previously entered
encounters ,by clicking on Edit or Delete
buttons.
19
ProviderLink
8 Encounters Page Generate Claims
To send Claims to dhpo (post office), you need
to:
1. Select the related encounters (see previous
page).
2. Click on “Claim Selected” button
3. Click on “Go to Generate Page” button
4. If the TPA is receiving the file, enter the
received ID as indicated (e.g. Enaya is the
payer and Neuron is the TPA).
5. Enter the submission code (ID)
6. Click on “Save”.
Note: Only encounters with at least one activity
and one diagnosis can be added in claim
submissions.
Now you can go to Claims Page and see the
generated file.
20
ProviderLink
9 Authorizations Page
To view previously generated and submitted Prior Requests/ and Prior Authorization, navigate to the “Authorizations Page”.
Use the search engine to enter the criteria in which you want to filter your results. If you want to view all Prior Requests/ Prior
Authorizations leave all fields empty and click on “Filter/Search” button. You may also view the results received for the
Requests/Authorization (Yes or No). To review details of already submitted requests, click on the needed line.
21
ProviderLink
10 Claims Page Submissions
The “Claims Page” is where you will send and
review status of submissions.
When you click on the Send button, the system
shall update the ‘Submitted’ column status and
shall inform you if there is an error message
coming from dhpo and if unable to upload with
excel file containing reason (such as clinician
license is expired).
If nothing appears and status of submission
becomes ‘Yes’ then its already submitted. You
can validate this by checking the dhpo for the
file.
Use the search engine to enter the criteria in
which you want to filter your results.
22
ProviderLink
10 Claims Page Remittance Advices
Use the search engine to view all the
previously saved Remittances in the system.
To check for new Remittances, click on
“Check for new Remittances” button. The
system will allow you to download (to see it
in xml format) or import (to include the file
in the system) by clicking on “Download”
or “Import” buttons.
Also you can click ‘View’ to see response
from payers on your submission after
importing the file and do resubmission for
claims as needed.
23
ProviderLink
11 Submission Tracking Page
To view submissions, navigate to the
“Submission Tracking Tab”. In this
screen you will be able to track all
submissions and if payers responded
to, with payment details.
Use the search engine to enter the
criteria in which you want to filter
your results. If you desire to view all
submissions leave all fields empty
and click on “Search” button.
24
ProviderLink
12 Settings Page Insurance Plans
The Settings module allow you to Add New
Plans, Edit and Delete Plans.
To Add new plans, navigate to the “Add
Plan” button then you need to :
1. Select Insurance Plan. The Insurance
Plan is an auto fill field. Enter the first 2
or 3 letters of the plan/payer name or
code and the system will show the
matching records.
2. Enter Description.
3. Enter Discount Rate (%).
4. Enter Patient share (%).
5. Select Out of : Net or Gross.
6. Enter Maximum Patient share.
7. Check the Is Active check box
8. Click on “Save” button
If price lists are uploaded with the concerned
activities, it will override the equation set
here.
25
ProviderLink
12 Settings Page Price Lists
The Settings module allow you to Search
for existing Prices, Add New Prices, Edit
and Delete Prices.
Also Import and Export Prices Sheet.
To Add new Prices, navigate to the “Add
Price” button then you need to :
1. Select Activity. The Activity is a auto
fill field. Enter the first 2 or 3 letters
of the plan/payer name or code and
the system will show the matching
records.
2. Select Plan.
3. Enter Gross.
4. Enter Net.
5. Select Patient Share.
6. Enter
Non-Standard
code
(if
available)
7. Click on “Save Price” button
26
ProviderLink
12 Settings Page Price Lists
To Import Prices sheets, navigate to the
“Import Prices sheets” button then you
need to use specific file template.
Click on “Get Sample File” to see sample
or click on “Choose File” button if ready
to upload.
Click on “Upload Prices” button once
Finish.
To Export Prices sheets, Click on “Export
Prices sheets” button.
27
ProviderLink
12 Settings Page Backup Data
The Settings module incorporates a
backup option which will allow you to
back up your data on the system.
To backup your data navigate to the
backup section, specify the name for the
back up folder and click “Backup” button.
You will then be able to save your backup
file locally on your computer device.
28
ProviderLink
13 Support
The eClaimLink System is a user-friendly platform built
around the true needs of payers, providers, and
regulators in the United Arab Emirates.
If you have any questions regarding the use of the
system, you can:
Download ProviderLink Quick Guide.
If you still have inquiries, you can call us at:
Dimensions Healthcare – Contact Call Center
Failure to access system, login issues, functionality related inquiries, etc.
600 522 004
[email protected]
Post Support Tickets through the Ticketing System
(starting June 1, 2013).
29