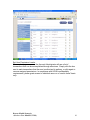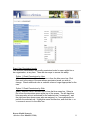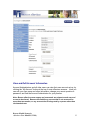
1
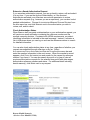
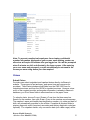
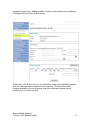
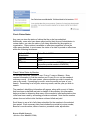
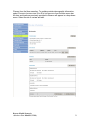
Beacon Health Strategies eServices Provider Manual Revised: February 2, 2009 Beacon Health Strategies eServices Provider Manual Table of Contents INTRODUCTION............................................................................................................... 3 BEACON HEALTH STRATEGIES ........................................................................................ 3 BEACON ESERVICES ....................................................................................................... 3 ELECTRONIC DATA INTERCHANGE ................................................................................... 4 EDI AND ESERVICES USER ACCESS TO PROTECTED HEALTH INFORMATION ..................... 4 BEACON ESERVICES ..................................................................................................... 5 REGISTER TO OPEN AN ESERVICES ACCOUNT ................................................................. 5 Registration Step 1: Practice/Organization Identification .......................................... 5 Registration Step 2: Terms and Conditions............................................................... 6 Registration Step 3: User Name & Password ........................................................... 6 Registration Step 4: User and Provider Information: ................................................. 7 Registration Step 5: Submit and Complete Registration .......................................... 7 LOG ON TO BEACON ESERVICES ..................................................................................... 8 ACCOUNT ADMINISTRATOR ............................................................................................. 8 How the Account Administrator is Assigned.............................................................. 8 Change the Account Administrator ........................................................................... 9 Role of the Account Administrator ............................................................................. 9 Provider Alert! Important Guidelines for the Account Administrator .......................... 9 Activate a new user: .............................................................................................. 9 Set User Permission Levels: ............................................................................... 10 Reset User Permission Levels ............................................................................ 11 Terminate or deactivate a user:........................................................................... 12 FORGOT PASSWORD / RESET PASSWORD ..................................................................... 12 VIEW AND EDIT ACCOUNT INFORMATION ....................................................................... 13 FIND A MEMBER............................................................................................................ 14 Quick Search ........................................................................................................... 14 Standard Member Search ....................................................................................... 14 ELIGIBILITY AND BENEFITS ............................................................................................ 15 Check Member-Specific Eligibility and Benefits ...................................................... 15 View Benefits by Health Plan .................................................................................. 18 AUTHORIZATIONS ......................................................................................................... 19 Request an Authorization ........................................................................................ 19 Pre-Load Information from Previous to New Authorization Request ................... 20 Save an Authorization Request ............................................................................... 21 Return to a Saved Authorization Request ............................................................... 22 Check Authorization Status ..................................................................................... 22 Beacon Health Strategies eServices User Manual (2/2/09) 1 CLAIMS ........................................................................................................................ 23 Submit Claims ……………………………………………………………………………23 Check Claims Status ............................................................................................... 25 Check Claims Status by Member ........................................................................ 25 Check Claims Status for Practice or Organization .............................................. 26 Resubmit a Denied Claim.................................................................................... 26 Submit a Claim Adjustment ................................................................................ 26 Request Reconsideration of a timely filing denial................................................ 26 Check Number of Visits (Initial Encounters) Used .................................................. 27 REPORTS ..................................................................................................................... 28 Explanation of Benefits ........................................................................................... 28 Claim Approvals and Denial Report ........................................................................ 29 PRACTICE DEMOGRAPHICS AND CAPABILITIES .................................................................. 29 Add and Update Practice Information ..................................................................... 29 Provider Alert! Required Information ....................................................................... 30 EDIT SITE. ............................................................................................................ 32 ADD CONTACTS t: ................................................................................................. 32 EDIT .................................................................................................................... 32 DELETE ................................................................................................................ 32 EDIT SCHEDULE to ............................................................................................... 32 EDIT SERVICES .................................................................................................... 32 EDIT CLINICIAN ..................................................................................................... 33 PROVIDER MATERIALS .................................................................................................. 34 ESERVICES HELP .......................................................................................................... 34 ELECTRONIC DATA INTERCHANGE (EDI) ................................................................. 35 EDI HELP ..................................................................................................................... 35 Beacon Health Strategies eServices User Manual (2/2/09) 2 Introduction Beacon Health Strategies Beacon Health Strategies (Beacon) is a behavioral health management organization specializing in the development and management of behavioral health services for health insurance plans. Beacon integrates managed care operations and information technology to improve the quality, effectiveness and efficiency of health and human services. Through deployment of the principles and techniques of total quality management at all levels of operations, Beacon has been able to successfully administer programs that yield both cost savings and improved satisfaction from members and providers. Beacon provides customers with a number of comprehensive services including managed behavioral health program design, development and implementation, provider network development and management, clinical protocol development, service authorization and utilization management, claims processing, provider contracting and credentialing, and managed care readiness / accreditation services. Beacon eServices Beacon eServices is a web-based suite of tools that allow Beacon contracted providers to do business at their convenience. This free service is aimed at improving business processes for providers by allowing secure access to a host of clinical and administrative functions, as well as a multitude of helpful resources. eServices allows you to complete all of the following transactions online: Submit claims; Check real-time claim status; Print Explanation of Benefit (EOB) information; Check member eligibility; Check initial encounters used; Request authorizations; Check the status of authorizations, including units used; Update practice and clinician information; View or print provider documents such as manuals, forms or bulletins; and Generate and print reports eServices transactions take less time to complete than paper submissions, enabling providers to improve productivity. Fax transmission problems, mail delays and most errors are eliminated, and as a result, rework by provider administrative staff is nearly eliminated. Beacon Health Strategies eServices User Manual (2/2/09) 3 Electronic Data Interchange Electronic Data Interchange (EDI) is a secure application, accessed through the internet. Health care providers, business associates and vendors who have established trading partner relationships with Beacon, can use EDI as an effective and efficient tool for large volume claim submissions Authorized representatives of health care providers who render behavioral health treatment to members of the health plans served by Beacon, are eligible to use EDI. EDI enables users to: Upload EDI files Check the status submitted files Download responses and reports EDI functions are accessible through eServices. EDI and eServices User Access to Protected Health Information EDI and eServices users may be allowed access to certain confidential or individually identifiable Protected Health Information (PHI) of health plan members. In exchange, users must agree to take certain precautions, comply with certain practices, and implement certain procedures required by applicable law and Beacon for the purposes of guarding data integrity and safeguarding the confidentiality of Protected Health Information. Beacon Health Strategies eServices User Manual (2/2/09) 4 Beacon eServices Register to Open an eServices Account Before using eServices the first time, you must open an account by registering with Beacon. This mechanism is designed to protect the extensive member information that is accessible through eServices. To begin, go to the Beacon website, www.beaconhealthstrategies.com, and click the PROVIDER ESERVICES quicklink on the home page. This will take you to the main eServices page, where you will click REGISTER. Registration Step 1: Practice/Organization Identification To ensure that only authorized individuals open accounts, you will need two very important pieces of information to register: National Provider Identifier (NPI) number for your practice or organization Tax Identification Number (TIN) for your practice or organization. Enter these two numbers, and click SUBMIT. Please do not enter a personal NPI or TIN at registration, unless you are a solo, unincorporated practitioner. Beacon Health Strategies eServices User Manual (2/2/09) 5 Registration Step 2: Terms and Conditions Review the eServices Terms & Conditions carefully, including: User’s Responsibilities and Obligations Changes, Updates, Governing Law Termination Unauthorized Use/Misuse Accept the terms and conditions. Click NEXT to continue. Registration Step 3: User Name & Password Create a unique user name and password that you will use to access the Beacon eServices website. The user name you choose is for your use only. Other staff members must create their own unique user names and passwords. You will also be required to select a secret question and corresponding answer. Choose a question and answer that you will remember, as these will be needed to reset your password in the event that it is lost or forgotten in the future. Please keep your password written in a secure place as Beacon does not store user passwords in any form. Users can reset their own passwords at any time (See Forgot Password / Reset Password). Note: User name, password, secret question and secret answer fields are all casesensitive. Beacon Health Strategies eServices User Manual (2/2/09) 6 Registration Step 4: User and Provider Information: Enter all user and provider information accurately. Review all entries carefully, and correct any typographical or other errors. Registration Step 5: Submit and Complete Registration Click SUBMIT to complete your online registration for eServices. If you are the first person in your practice to register for eServices, the confirmation email will designate you as the Account Administrator. You will be asked to print, sign and fax the eServices Terms of use to Beacon. Upon receipt and verification, we will activate your account and send an email confirming your eServices registration. The Account Administrator is automatically registered with permission to use all eServices features. If you are not the first user, the name of the Account Administrator for your organization will be included in the confirmation message and also visible at MY ACCOUNT. The Account Administrator will receive an email notification that you have registered, and can activate your account. As soon as your account is activated -- by Beacon for the first user or by the Account Administrator for subsequent users in your practice -- you will be able to log on and begin using the many great features available through Beacon’s Provider eServices. Note that each user will see only the menu options for which he or she has been given permission. Beacon Health Strategies eServices User Manual (2/2/09) 7 Log on to Beacon eServices Go to the Beacon homepage at www.beaconhealthstrategies.com, and choose the eServices quicklink at the top right. This will take you to the Login screen. Enter your user name and password, and click LOGIN. You will be directed to the eServices welcome page, from which you can select any option on the blue menu bar. Note: To prevent unauthorized employees from viewing confidential member information displayed on your screen, each working session on eServices will expire 30 minutes after you logged on. You will be prompted when 5 minutes are left, and directed to the logon screen. After entering your user name and password, you will automatically be returned to the screen you were using before your time expired. Account Administrator How the Account Administrator is Assigned The Account Administrator for each provider is automatically assigned by Beacon. At group practices and provider organizations who were using eServices prior to September 2008, the individual who appeared to be the highest level user or the only active user was designated as Account Administrator. For providers who are new to eServices during and after September 2008, the first user to register will be designated as the Account Administrator. Solo practitioners are the Account Administrators for their own accounts, but will have limited use for these functions. Beacon Health Strategies eServices User Manual (2/2/09) 8 Change the Account Administrator To change the Account Administrator at your practice at any time, email [email protected]. Role of the Account Administrator The Account Administrator controls all user accounts within his/her practice or organization and as such, plays a critically important role. The Account Administrator is responsible for activating new users within the group or facility, terminating accounts when staff leaves the practice, and determining which features are available to each user. Provider Alert! Important Guidelines for the Account Administrator To ensure protection of member confidentiality as required by HIPAA, set each user’s permission level in accordance with their legitimate “need to know” for Treatment, Payment and/or health care Operations (TPO), and your organization’s internal criteria; Each user, including you, should use only his/her own username and password; Do not create new accounts for users who forget their passwords. Users can reset their own passwords at the log-in screen. There is no limit to the number of accounts that can be created at your organization; and Remember to deactivate accounts when employees leave the practice, or no longer need to access eServices. Activate a new user: When a new user registers for eServices (see Registration below), the name of the designated Account Administrator at his/her practice is automatically emailed to the new user. At the same time, the Account Administrator receives an email indicating that the new user has registered, with a link to the eServices logon page. The Account Administrator selects MANAGE USERS / MANAGE ACCOUNTS. The new registrant’s name will be visible, but “locked” to indicate that it is not activated. Click on EDIT next to the person’s name. Unclick the “locked” box, click the “active” box, and set the user’s permission levels. Beacon Health Strategies eServices User Manual (2/2/09) 9 Set User Permission Levels: When activating a new user, the Account Administrator will see a list of transactions that can be accomplished through eServices. Simply click the box next to each transactions that the user is authorized to perform, or click again to remove assigned permissions. In compliance with HIPAA confidentiality requirements, please grant access to individual users on a “need to know” basis only. Beacon Health Strategies eServices User Manual (2/2/09) 10 Reset User Permission Levels The Account Administrator can modify permission levels for users within his or her organization, at any time. There are two ways to access this ability: Option 1: Reset Permissions by User Select MANAGE USERS / MANAGE ACCOUNTS from the blue menu bar. Click EDIT next to the name of the user whose permission levels you wish to change. Check additional roles or uncheck roles no longer appropriate for the user. Option 2: Reset Permissions by Role Select MANAGE USERS / MANAGE ROLES from the blue menu bar. Select a ROLE from the drop-down menu at the top of the screen. The left-hand box lists users who are not authorized for the selected role (“unassigned”), and the right hand box shows users who are assigned, i.e., have permission to perform the selected role. Highlight a name in either box, and click the >> or << arrows to move it to the other box. Beacon Health Strategies eServices User Manual (2/2/09) 11 Terminate or deactivate a user: To protect member confidentiality, it is very important to “lock” the accounts of users who leave the practice. To do so, go to Manage Users/Manage Roles and click “edit” next to the user’s name. Click to remove the checkmark in “active” and to place the checkmark in “locked.” It is also important to notify Beacon that the clinician has left the practice. (See Edit Provider Information/Edit Site/Terminate Clinician). Note: To prevent unauthorized employees from viewing confidential member information displayed on your screen, each working session on eServices is set to expire 30 minutes after you logged on. You will be prompted when 5 minutes are left, and directed to the logon screen. After entering your user name and password, you will automatically be returned to the screen you were using before your time expired. Forgot Password / Reset Password eServices allows an immediate password reset option should you lose or forget your password. Note that Beacon does not store user passwords in any form. If you lose your password, create a new password according to the instructions below. DO NOT re-register as a new user. On the eServices login page, simply scroll to the lower half of the page and click the “FORGOT PASSWORD?” link. You will be asked to enter your user name, and then to answer the secret question you selected when you registered. Below your answer, fill in a new password. A message will appear verifying that you have successfully reset your password, and a confirmation will automatically be sent to you by email. You can also change your password at any time, by clicking on the “MY ACCOUNT” button at the top of the screen. See “View and Edit Account Information.” Beacon Health Strategies eServices User Manual (2/2/09) 12 View and Edit Account Information Account Administrators and all other users can view their own account set-up, by clicking the “My Account” button at the top of most eServices screens. Here you can edit your user name and other information, change your secret question or password, and find the Account Administrator for your practice. Note: Beacon eServices user names and passwords are unique to each user and are not to be shared. Beacon will disable any account that is not accessed for more than two months, or any account that is being used by a person other than the intended user. Beacon Health Strategies eServices User Manual (2/2/09) 13 Find a Member Most transactions available in eServices are member-specific. There are 2 ways to search for members: Quick Search Click SEARCH HISTORY on the blue menu bar to find all members for whom you have searched in the last 10 days. Select the member you need. Standard Member Search For all other members, click ELIGIBILITY, AUTHORIZATIONS or CLAIMS on the blue menu bar and choose any member-specific function, (e.g., submit authorization, submit claim, check eligibility, etc.) This will take you to the member look-up screen. You will need two identifying data elements unique to the member: And Enter the Member’s Beacon identification number or Date of Birth Enter the member’s first or last name. Click SEARCH. Records for all members who match the search criteria will appear. Select the member you are treating. Note: Due to restrictions set forth by the federal Centers for Medicare and Medicaid Services (CMS), information about individual Medicare members is not accessible via eServices. Please call Beacon at the applicable phone number below: Fallon Community Health Plan: Beacon Health Strategies eServices User Manual (2/2/09) (888) 421-8861 14 ELIGIBILITY and BENEFITS Eligibility and benefit information can be retrieved for a specific member or for each benefit category (Medicaid, Commercial, etc.) within a particular health plan. Check Member-Specific Eligibility and Benefits On the blue menu bar, choose ELIGIBILITY/BENEFITS / CHECK ELIGIBILITY, which will take you to the MEMBER SEARCH screen. Select the member whose eligibility and benefits information is needed, as described above. The member’s record indicates whether the member is currently eligible for benefits, as a “Yes” or “No” under ELIGIBLE. (Note that you can also proceed to request or check an authorization, submit a claim, or view claims status from this screen.) Beacon Health Strategies eServices User Manual (2/2/09) 15 Note: Due to restrictions set forth by the federal Centers for Medicare and Medicaid Services, information about individual Medicare members is not accessible via eServices. To view general Medicare benefit information, select See Benefits by Health Plan below.) For individual information about a Medicare member, please call Beacon at the applicable phone number below: Affinity Health Plan: Fallon Community Health Plan: Neighborhood Health Plan of New York: (800) 974-6831 (888) 421-8861 (866) 969-2661 Click the YES or NO entry and the member’s basic demographic information will appear, including name, city and state of residence, and date of birth. Below that, you’ll find a history of the member’s health plan eligibility, along with his or her Health Plan, benefit type (e.g., Medicaid, Commercial), PCP name, and PCP practice name. Beacon Health Strategies eServices User Manual (2/2/09) 16 Click MORE next to the time period under “Eligible?” to see the following additional information about the selected member: Coverage for Outpatient Mental Health and Substance Abuse benefits Coverage Inpatient Mental Health and Substance Abuse benefits Copayment amount, if any. Number of medically necessary initial visits not requiring authorization, that have been paid to all behavioral health providers for the member in the current year or period. (Note that this number does not reflect initial visits attended by the member but not yet billed.) Note: Due to restrictions set forth by the Centers for Medicare and Medicaid Services, information about individual Medicare members is not accessible via eServices. To view general Medicare benefit information, select See Benefits by Health Plan below. Beacon Health Strategies eServices User Manual (2/2/09) 17 View Benefits by Health Plan To view benefits levels within a particular health plan, click BENEFITS/ELIGIBILITY then BENEFITS from the blue menu bar. Choose the health plan and benefit type that you wish to view. A summary of inpatient and outpatient mental health and substance abuse benefits will appear. Beacon Health Strategies eServices User Manual (2/2/09) 18 Authorizations Request an Authorization eServices users can request authorization for outpatient services, day treatment and methadone services where applicable. Requests submitted through eServices get priority over requests submitted by fax or mail. To create and submit an authorization request, choose AUTHORIZATIONS/SUBMIT AUTHORIZATION from the blue tool bar. This will take you to the member search function, to find the member you are treating. (See Find a Member) Once you have selected a member, click the REQUEST AUTHORIZATION link in the member’s record summary. Next, select the type of authorization. On the following page, choose the start and end dates for the authorization by clicking on the calendar or type the dates using MM/DD/YY format. Select the site where you will provide treatment, and enter the number of visits or units you are seeking. To continue with the authorization request, click NEXT at the bottom of each screen, or SAVE to complete the request at a later date/time, or to pend it for supervisory review. (see Save an Authorization Request). Beacon Health Strategies eServices User Manual (2/2/09) 19 Pre-Load Information from Previous to New Authorization Request After entering the number of visits requested, users have the opportunity to copy information from a previous request into a new request for the same member, eliminating re-entry of unchanged data. Click the down arrow in the box under “Existing Reviews” and select the previous request you wish to use. Click SHOW to see the request, then PRELOAD to copy information into the new authorization. Diagnostic and other fields will auto-populate. Edit the pre-loaded data as needed and continue with the Request an Authorization process. Enter all required clinical information as identified by asterisks, on the subsequent screens. You may also wish to complete the non-required fields to help Beacon make a determination on your request. Be sure to include accurate and complete information in all required fields. Note that the “Goals” and “Modality” fields require free text, while the “Progress Update” fields have drop-down menus. At least 2 goals are required. If you fail to input required information, the fields will be highlighted in yellow as an indication that you are missing information. When done, click SAVE if you or your supervisor want to complete or review the request later, or click SUBMIT. Beacon Health Strategies eServices User Manual (2/2/09) 20 You will immediately receive a printable confirmation, reference number and copy of the electronic authorization request. Save an Authorization Request You can save the authorization request at any point by clicking SAVE at the bottom of the screen. This action will save and close the request, enabling providers to complete the request later, and/or pend it for supervisory review before or after submission. Beacon Health Strategies eServices User Manual (2/2/09) 21 Return to a Saved Authorization Request If you saved an authorization request, you can go back to review, edit and submit it at any time. If you are the Account Administrator, or if the Account Administrator activated your eServices account with permission to review authorization requests (e.g., because you are a supervisor), you can also look at pended authorizations. Choose AUTHORIZATION/MANAGE PENDING REVIEWS from the blue menu bar, and click MANAGE next to the authorization you wish to review, edit, and/or submit. Check Authorization Status When Beacon staff has made a determination on your authorization request, you will receive an email notification containing the reference number and the medical necessity decision. Consistent with HIPAA requirements, no patientidentifying information is included in the email message. Instead, it contains a link to eServices where you can log on and use the reference number to search for detailed information . You can also check authorization status at any time, regardless of whether your request was submitted through eServices or by fax. Select AUTHORIZATION/CHECK AUTHORIZATION REQUEST from the blue menu bar and enter the member information in the next screen. When the member’s record appears, click CHECK AUTHORIZATION and search for the request by reference number if you have it. You can also search by month or by year to view all previous authorization requests for the selected time period with date ranges, authorization reference numbers and status. For additional detail including denial reason(s), click MORE next to any request. Beacon Health Strategies eServices User Manual (2/2/09) 22 Note: To prevent unauthorized employees from viewing confidential member information displayed on your screen, each working session on eServices will expire 30 minutes after you logged on. You will be prompted when 5 minutes are left, and directed to the logon screen. After entering your user name and password, you will automatically be returned to the screen you were using before your time expired. Claims Submit Claims Providers can submit outpatient and inpatient claims directly via Beacon’s website. The process is fast and easy, and saves time and resources for providers. The eClaim includes critical fields from the CMS 1500 form for outpatient services, and from the UB 04 for inpatient services. However, since much of the required provider and member information is already in Beacon’s database, you fill out fewer fields in eServices than on the paper forms. To submit a claim, choose CLAIMS / SUBMIT ECLAIM from the blue menu bar. Search for the member, then click SUBMIT CLAIM in the member record summary. The member’s name and health plan identification number, city, state and date of birth, will automatically populate on the eClaim. Complete all required fields (a primary diagnostic code is required; secondary and tertiary diagnostic codes are optional). For outpatient claims, only one service date (not a date range) will be Beacon Health Strategies eServices User Manual (2/2/09) 23 accepted for each line. Additional dates of service (claim lines) can be added by clicking ADD SERVICE LINE in the final box. When done, click SUBMIT ECLAIM. A confirmation screen will immediately appear, with the claim reference number for future inquiries. All claims information remains available to you in eServices, and the confirmation screen can be printed for your records, as well. Beacon Health Strategies eServices User Manual (2/2/09) 24 Check Claims Status Any user can view the status of claims that he or she has submitted. Additionally, users who have been authorized by their Account Administrator to review claims, can view the status of all claims submitted by the practice or organization. Claims status is available on eServices regardless of how the claim was submitted. In most cases, the status of a claim is posted on eServices within the following timeframes: Method of Claim Submission eServices EDI EMDEON Paper Status Posted Within: 1 hour 1 hour 1 hour after receipt from EMDEON (usually 24 hours after provider sends to EMDEON) 21 days Check Claims Status by Member On the blue menu bar, choose CLAIMS / CHECK CLAIMS BY MEMBER. Enter required information to find the member and CLAIMS STATUS on the member’s summary record. At the next screen, choose whether you wish to search by year or by month. If searching by month, enter the month and year of your search. If searching for a full year, enter any month, and the year you wish to search. The member’s identifying information will appear, along with a count of claims that have been submitted and paid on behalf of the member; this information helps providers to determine how many of the member’s initial authorization-free visits have been used by all treating providers combined. Note that the number shown does not reflect visits that have not been billed and paid. Scroll down to see a list of all claims submitted for the member in the selected time period. Each summary claim line includes the provider’s invoice number, Beacon’s record number, dates of service, procedure code, adjudication Beacon Health Strategies eServices User Manual (2/2/09) 25 decision, and payment status. Note that you can sort the list by clicking on any column heading. To resubmit a claim that denied, click on RESUBMIT at the far right of that claim line. Click More at the beginning of any claim line, to see additional detail including the reason for denial. Check the bottom of the screen to see if the list of claims continues onto other pages. Move from page to page by clicking the arrows. Check Claims Status for Practice or Organization Select CLAIMS / CHECK CLAIMS BY PROVIDER on the blue menu bar. Enter the month and year you wish to search, and a list of claims submitted within that timeframe will appear below. Check the bottom of the screen to see if the list of claims continues onto other pages. Move from page to page by clicking the arrows. Resubmit a Denied Claim If a claim is denied by Beacon because it contained invalid or incorrect information, you may resubmit the claim following timely filing guidelines. Follow the instructions for checking claim status, then click RESUBMIT at the end of that service line to be resubmitted. All information submitted on the original claim will display. Correct the data element(s) that caused the claim to deny, and click Submit. You then have an option to review claim, if additional edits are needed click “edit claim”, if not additional edits are needed click submit claim. Submit a Claim Adjustment If you were overpaid or underpaid for a claim you can submit a claims adjustment via eServices. Follow the instructions for submitting a claim. Under the Claim Information section. Answer yes to “Is this claim a resubmission/adjustment of an original Claim?” This will open the REC ID entry field under Service Line Information Section. Enter the REC ID of the claim you wish to adjust. It is important to remember that you can only adjust a claim that has paid. Request Reconsideration of a timely filing denial When a claim falls outside of all timely filing for resubmission, a provider may submit a request for a reconsideration of the timely filing rules. To submit a request for reconsideration of timely filing denial, first find the member through SEARCH HISTORY on the blue menu bar. Select your member and then under action select SUBMIT RECONSIDERATION. Select the type of claim and enter all required claims field. Please explain why you are requesting a waiver of timely filing in the EXPLANATION free text field. Please note that filing such a request is not a guarantee of payment. The request will be reviewed and a determination will be posted on a future Explanation of Benefit statement. Beacon Health Strategies eServices User Manual (2/2/09) 26 Check Number of Visits (Initial Encounters) Used Each member has an allowance of outpatient visits that can be used without authorization, called Initial Encounters or IEs. The number of IEs varies by health plan and benefit type. For most health plans, the IE allowance is counted per calendar year, but for some health plans, it is a lifetime allowance. Click here for plan-specific benefit information. [Link to Eligibility and Benefits section above) There are two ways to determine how many IEs have been billed by and paid to all treaters, on behalf of a member: Users can follow instructions to Check Claim Status for a Member, or to Check Member-Specific Eligibility and Benefits. Note that the information provided by Beacon reflects only paid claims; the member may have used additional visits that have not been billed as of the day you check. Beacon Health Strategies eServices User Manual (2/2/09) 27 Reports eServices enables users to view and print Explanation of Benefits (EOB) and Claims Approval/Denial reports. Explanation of Benefits To print an Explanation of Benefits (EOB) form, select PROVIDER REPORTS / EXPLANATION OF BENEFITS from the blue menu bar. Select a month and year and a list of claims submitted in that time period will appear. Click PRINT next to any Beacon Health Strategies eServices User Manual (2/2/09) 28 claim, to display a screen view of the EOB. Click the printer icon at the top of the page to print a hardcopy. Claim Approvals and Denial Report Authorized users can view aggregate claims information for their entire practice or organization, by month. Select PROVIDER REPORTS / CLAIMS APPROVAL WITH DENIAL REPORT from the blue menu bar. The report displays a table and pie charts, showing the number and percent of claims approved, and of claims denied for various reasons. These calculations are provided both by member and by all claims, since any single member may have multiple claims. Move your mouse over denial codes in the table, to see a full description. Similarly, move your mouse over any segment of the pie charts, to see its title. If your practice is contracted with Beacon to serve more than one health plan, results for each health plan are displayed separately. Press CONTROL/P or click the printer icon to print this report. Practice Demographics and Capabilities Add and Update Practice Information Providers are contractually required to notify Beacon of material practice changes, including the addition or departure of outpatient clinicians. To make this as easy as possible, providers can now add and maintain their detailed practice information online, thus avoiding calls to Beacon and completion of detailed paper forms. Beacon Health Strategies eServices User Manual (2/2/09) 29 Provider Alert! Required Information It is imperative that Beacon have current information about providers! Our “live” provider database is used constantly, as follows: Published in health plan provider directories; Reported to state agencies; Available to the public online at www.beaconhealthstrategies.com; Shared with members to direct referrals appropriately; and Source of email and mail addresses for important notices to providers.* * Beacon is phasing out paper communication. All important notices are posted at our main website (www.beaconhealthstrategies.com) and in eServices (See Provider Materials; Alerts), and/or sent by electronic mail. Beacon Health Strategies eServices User Manual (2/2/09) 30 Choose from the blue menu bar. To update provider demographic information, select PROVIDER INFORMATION / EDIT SITE INFORMATION from the blue menu bar. All sites and locations previously provided to Beacon will appear in a drop-down menu. Select the site to review and edit. Beacon Health Strategies eServices User Manual (2/2/09) 31 A summary of information currently in Beacon’s database is displayed. Note that many additional data elements are available to edit. Choose the area(s) to be updated. Please recheck your entries for accuracy and capitalization (initial caps only), before clicking SUBMIT. EDIT SITE to update site name, site address, site phone and fax numbers, and site email address. ADD CONTACTS to identify key personnel in your organization. Fill in the person’s complete name, title, address(es), telephone, fax and email. Beacon currently maintains contacts for the following categories, in order to distribute information appropriately: Administrator/Practice Manager Claims/Billing Manager CMO/ Medical Director Executive Director Intake Managed Care Contracting PA Fax/Mail/Email (Person to receive authorization notices) EDIT next to an existing contact, to edit the person’s name, title, address(es), telephone, fax, email. Email address will soon be a required field, as Beacon is transitioning to all electronic communication with providers. Click UPDATE CONTACT INFORMATION. DELETE next to an existing contact name, when the person changes positions or leaves the organization. Click UPDATE CONTACT INFORMATION. EDIT SCHEDULE to enter/update the site’s hours of operation, by day of the week. Recheck for accuracy. Click UPDATE SITE SCHEDULE. EDIT SERVICES to specify whether you provide inpatient mental health, inpatient substance abuse, outpatient mental health, outpatient substance abuse, accessibility features, and additional services. Your current practice information will be displayed – edit by checking or unchecking boxes below. Click each Save button as segments are completed. ADD CLINICIAN to provide information about a new outpatient clinician joining your provider organization. Follow the instructions below, under EDIT CLINICIAN to complete all fields. Note that the ADD CLINICIAN option will appear only for licensed hospitals, health centers, clinics and other facilities. Due to credentialing requirements, private practices should contact [email protected] to add clinicians. Beacon Health Strategies eServices User Manual (2/2/09) 32 EDIT CLINICIAN to edit/update an array of important information about clinicians, and to notify Beacon when a clinician leaves the practice. Current information about the clinician is displayed at the top of the screen. Scroll down to edit the following fields. CLINICIAN DETAILS including prefix (Mr., Ms., Dr.), name, gender, dob, ethnicity, and whether s/he is accepting new referrals. Recheck for accuracy and initial caps only. Click UPDATE CLINICIAN INFORMATION. Or click TERMINATE CLINICIAN if he or she leaves the practice. The screen will refresh and you will see a message that your request for updates is pending. Beacon’s Provider Relations staff may contact you with questions, and/or you will be notified by email after they verify the new information. Note: Clinicians who leave the practice must be terminated from eServices to prevent unauthorized access to PHI and to alert Beacon that the clinician’s languages and specialties are no longer available. LANGUAGE DETAILS to specify languages spoken by the clinician. The left box contains a list of all available languages and the right box lists the languages spoken (“assigned”) to this clinician. Add or remove assigned languages by clicking the arrows between the boxes. Hold the shift key to highlight two or more adjacent listings, or hold the Control key to highlight multiple languages that are not adjacent within a box. Click on SAVE when done – the screen will refresh and you will see a message that your request for updates is pending. Beacon’s Provider Relations staff may contact you with questions, and/or you will be notified by email after they verify the new information. DEGREE DETAILS to identify the clinicians’ professional training. Highlight a degree in the left-hand box, and assign it to the clinician by using the >> key. Or highlight an incorrect degree from the right-hand box and use the << button to remove it. Hold the shift key to highlight two or more adjacent listings, or hold the Control key to highlight multiple languages that are not adjacent within a box. Click on SAVE when done – the screen will refresh and you will see a message that your request for updates is pending. Beacon’s Provider Relations staff may contact you with questions, and/or you will be notified by email after they verify the new information. SPECIALTY DETAILS to specify up to 10 clinical specialties in which the clinician has appropriate experience and expertise. Hold the shift key to highlight two or more adjacent listings, or hold the Control key to highlight multiple languages that are not adjacent within a box. Click on SAVE when done – the screen will refresh and you will see a message that your request for updates is pending. Beacon’s Provider Relations staff may contact you Beacon Health Strategies eServices User Manual (2/2/09) 33 with questions, and/or you will be notified by email after they verify the new information. ID DETAILS to provide NPI and other state-specific and health plan-specific identification numbers. An individual NPI number is required for each clinician, and should be included for the “rendering provider” on all claims. The items that begin with “NYS” and the Medicare number need only be completed for clinicians serving New York members. The IDX number is only required for providers in Beacon’s Fallon Community Health Plan network. Click on SAVE when done – the screen will refresh and you will see a message that your request for updates is pending. Beacon’s Provider Relations staff may contact you with questions, and/or you will be notified by email after they verify the new information. Provider Materials Beacon’s Provider Manuals and Level-of-Care Criteria are available to contracted providers. Select PROVIDER MATERIALS from the blue menu bar, then choose PROVIDER MANUALS or LEVEL OF CARE CRITERIA. Additional options will be added in the future. Similarly, current and archived news and bulletins can be found by clicking the ALERTS button. We encourage users to check ALERTS frequently. Additional forms, bulletins, tools and links are available in the public area of Beacon’s website, www.beaconhealthstrategies.com, under Providers, and Providers/Tools. eServices Help For questions or comments about eServices, please visit the Provider section on https://provider.beaconhs.com, email [email protected]. If you are having trouble finding a member, submitting a claim, or submitting an authorization please make sure that all of the required information fields have been filled in. Beacon Health Strategies eServices User Manual (2/2/09) 34 ELECTRONIC DATA INTERCHANGE (EDI) Beacon accepts standard HIPAA 837 Professional and Institutional health care claims transactions as well as provides 835 transactions through EDI. Download Beacon’s 837 and 835 companion guides from http://www.beaconhealthstrategies.com/Resources/Hipaa/ for information regarding testing and setup for EDI transactions with Beacon. Electronic Data Interchange, or EDI, can be accessed at the Beacon eServices site. To access EDI, select EDI GATEWAY from the blue menu bar. The EDI Gateway will open, allowing you to upload EDI files, check the status of files, and download responses and reports. EDI Help Technical and business related questions regarding EDI should be directed to [email protected]. Beacon Health Strategies eServices User Manual (2/2/09) 35