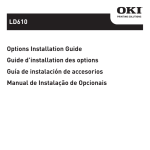
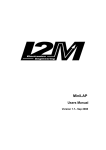
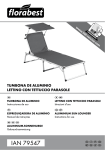
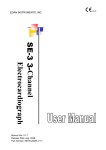
1
ENGLISH
MD60LOG
USER MANUAL
By Athena Evolution
ENGLISH
MD60LOG User Manual revision 05
Release FW 3.5
Copyright © 2010 GET by Athena Evolution. All rights reserved.
The contents of this document, or any part of it, may not be reproduced, transferred, distributed or memorised in any form
whatsoever without the written permission of GET by Athena Evolution s.r.l.
GET reserves the right to modify the content of this manual without prior notice.
The GPS positioning system is probabilistic and is directly linked to the proper
reception of the signals on the part of the receiver. In case of faulty positioning,
electromagnetic or environmental disturbances, the precision of the data provided by
the device cannot be guaranteed.
MD60LOG User Manual rev. 05
Copyright ©2010 GET by Athena Evolution srl. All rights reserved
1
2
3
4
5
6
7
7.1
8
9
9.1
9.2
9.2.1
9.2.2
10
10.1
10.2
10.3
10.4
11
11.1
11.1.1
11.2
11.2.1
11.3
11.4
11.5
12
13
13.1
14
MD60LOG KIT .................................................................................................................................... 3
MAIN FEATURES AND FUNCTIONS ............................................................................................... 4
FOR PROPER USE ........................................................................................................................... 5
WARNINGS ........................................................................................................................................ 5
CHRONO MODE AND DATA LOGGER MODE FOR THE MD60LOG ............................................. 5
PREPARATION OF THE DEVICE ..................................................................................................... 6
LAYOUT OF THE COMMANDS AND SIGNALS ON THE MD60LOG .............................................. 7
MD60LOG TIMES VISUALISATION SCREEN (CHRONO PAGE ) .................................................. 7
USE OF THE BUTTONS ON THE MD60LOG................................................................................... 8
USE OF THE MD60LOG ................................................................................................................... 8
FIRST TURN-ON OF THE UNIT ........................................................................................................ 8
LATER TURN-ON OF THE UNIT ...................................................................................................... 9
Turning on the unit with a track already properly set ......................................................................... 9
Turn on of the unit and selection of a track ........................................................................................ 9
MD60LOG MENUS AND FUNCTIONS ........................................................................................... 11
VIEW TIMING REPORT MENU ....................................................................................................... 11
DATA LOGGING FUNCTION .......................................................................................................... 12
TRACK MENU .................................................................................................................................. 14
MENU OPTIONS.............................................................................................................................. 15
CREATION OF A CUSTOM TRACK ............................................................................................... 18
CREATION OF A CUSTOM TRACK IN LOOP MODALITY ............................................................ 18
Starting line and intermediate times definition ................................................................................. 18
CREATION OF A CUSTOM TRACK IN LINEAR MODALITY ......................................................... 19
Starting line and intermediate times definition ................................................................................. 19
SAVING A CUSTOM TRACK .......................................................................................................... 21
SUGGESTIONS FOR THE CREATION OF A CUSTOM TRACK ................................................... 22
UPDATING THE TRACK LIBRARY ................................................................................................. 22
FIRMWARE UPDATING .................................................................................................................. 23
OPTIONAL ....................................................................................................................................... 24
HANDLEBAR SUPPORT KIT .......................................................................................................... 24
TECHNICAL SPECIFICATIONS ...................................................................................................... 25
Dear Client,
Thank you for having chosen a product from the DATA ACQUISITION AND ANALYSIS SYSTEMS line from
GET by Athena Evolution. Certain that our passion and experience will be able to assist you in
successfully expressing yourself in any competition in which you may wish to participate, we invite you to
read this manual, confident that it will assist you in the use of your new GET by Athena Evolution device.
The MD60LOG device, thanks to GPS technology, enables real time recording and visualisation of lap times,
partial times and speed, without the use of external sensors.
Featuring great ease of use and flexibility, the MD60LOG contains, memorised in it, finish lines and sectors
for the major Italian and Spanish racetracks and enables the creation and customisation of any track. The
automatic recognition of the track will make the use of this device simple and intuitive.
The GPS (Global Positioning System) System, on which your GET instrument is based, uses a spherical
positioning system to determine the point where the receiver of the satellite signals is. By way of the
measurement of the time needed for a radio signal to cover the distance between satellite and receiver and
by knowing the precise position of at least 4 satellites, it is possible to determine the position in (3D) space of
the same receiver. The constellation of 24 satellites set in orbit at a 55° inclination with respect to the plane
of the equator, is at an altitude of between 18,000 and 20,000 km and a 12 hour orbit. The satellites transmit
signals at carrier frequencies of 1.2 and 1.5 GHz (to avoid possible errors derived from atmospheric
refraction), originated from a single high precision and high stability oscillator (atomic clock). The data
transmitted in these frequencies contain the information relative to the orbit and the hour signal (ephemeris
messages), enabling the receiver to carry out the calculations necessary to determine the position on the
Earth's surface.
MD60LOG User Manual rev. 05
Copyright ©2010 GET by Athena Evolution srl. All rights reserved
1
ENGLISH
INDEX
ENGLISH
One of the parameters that characterise GPS modules is the update rate expressed in Hz (Hertz): with this
information the number of times per second that the device is able to detect terrestrial latitude and longitude
coordinates is indicated.
In other words a module with an update rate of 1 Hz will detect the position once per second, whilst one with
a frequency of 5 Hz will provide, in the same time frame, 5 different coordinates: this translates into a higher
precision for the acquired trajectories.
The MD60LOG chronometer is capable of reading the times and the interval times on the lap thanks to a
finish line distinguished by precise GPS coordinates.
The above mentioned lines must be set out so that they intersect the track (see figure below): when the
vehicle passes the line the instrument is in this manner able to perform a calculation of the time for the lap (in
the case that this has to do with the FL, that is the actual finish line of the track) or for intermediate times (in
the case that a SPLIT line is crossed).
FINISH LINE
As indicated above, the GPS module provides the position at regular intervals of time (update frequency),
not necessarily in correspondence to the finish line. It often occurs that the system receives the position in
the P1 point (before the finish line) and P2 (after the finish line). The time correction on the lap read comes
about automatically considering the interpolation between these two points.
The basic hypothesis on which the above-mentioned calculation is based is that the speed of the vehicle is
constant. Therefore, if the speed between points P1 and P2 is constant, two modules with different update
frequencies will obtain the same performance in the calculation of the lap time.
FINISH LINE
P1 POINT
2
P2 POINT
MD60LOG User Manual rev. 05
Copyright ©2010 GET by Athena Evolution srl. All rights reserved
MD60LOG KIT
ENGLISH
1
The MD60LOG system is supplied with:
•
•
•
•
•
•
Packing:
MD60LOG
SIZE AA ALKALINE Batteries
CD containing the software and documentation relative to the instrument
USB Cable
Case
Do not use batteries different than those indicated. In case of the contrary, the
instrument could become irreparably damaged. Use only SIZE AA ALKALINE batteries
or SIZE AA Ni-Mh RECHARGEABLE BATTERIES with nominal capacity at least
2700mAh *
DO NOT OPEN THE UNIT BY UNSCREWING THE SIX CLOSING SCREWS ON THE
BOTTOM OF THE BATTERY COMPARTMENT. OPENING OR TAMPERING WILL BE
INDICATED BY THE BREAKAGE OF THE INTERNAL SEALS AND WILL PREJUDICE
ANY FORM OF GUARANTEE. OPENING OF THE DEVICE BY INEXPERT
PERSONNEL COULD CAUSE THE DAMAGE OR BREAKAGE OF PARTS.
* ATTENTION: the autonomy of the instrument is determined by the quality of the batteries used
MD60LOG User Manual rev. 05
Copyright ©2010 GET by Athena Evolution srl. All rights reserved
3
ENGLISH
2
MAIN FEATURES AND FUNCTIONS
•
•
•
•
•
•
•
•
•
•
•
•
•
•
•
•
•
•
•
•
•
•
•
•
•
IP65 protection grade anti-shock plastic casing
Lap time visualisation (average error +/- 1 tenth of a second)
Sector time visualisation in relative mode for the single sector or absolute
LED notification of the best lap or sector time
Memorisation of the best sector times
Visualisation of the speed in kilometres per hour or miles per hour (user setting options)
Visualisation of the number of laps during a test run
Visualisation of the current track in a settable field
Visualisation of the best lap time obtained in a settable field
Visualisation of the date and time with automatic GPS updating
Visualisation of the number of satellites detected by the system
Visualisation of the battery level
Visual LED low battery level signal alarm
Automatic GPS search for the track (if automatic track search is activated)
Possibility of creating and memorising any type of track
Automatic memorisation of the test run session, archived by date and time
Recording of sessions carried out for later PC data analysis
Lap times report
Intermediate times report (Maximum 4)
Maximum speed report
Automatic vehicle speed acquisition start up (only with display on)
Settable acquisition threshold for start up
Settable chronometric measurement display times
USB port for PC connection
Operational autonomy 6 hours continuous use with new batteries of the type recommended (ref.
Chapter 1 in this document)
GET by Athena Evolution reserves the right to implement new functions over time.
All of the information relative to this and other GET products by Athena Evolution are available on the
internet site: www.getdata.it
4
MD60LOG User Manual rev. 05
Copyright ©2010 GET by Athena Evolution srl. All rights reserved
FOR PROPER USE
ENGLISH
3
Use of the MD60LOG requires the observance of the following guidelines:
•
Use the instrument outdoors.
•
Remove the transparent protective film placed on the display so as to avoid the accumulation of
electrostatic charges on the upper part of the instrument.
•
Turn on the device and position it in an open area. Avoid any obstacles that may impede the reception
of the GPS signals.
•
Wait for from 2 to 5 minutes for the lock on and reception of at least 5 satellites: Beyond this time, try
turning the unit off and then turning it back on again.
•
Once the message “NO SAT” disappears from the display, the unit is ready for use.
4
WARNINGS
In case the system freezes up, it may be necessary to remove the batteries for a brief time (10-15 seconds),
and then replace them so as to proceed with a reset of the entire system.
Do not tamper with the device in case of malfunction. Consult your reseller or the GET technical service
centre.
It is strongly recommended that discharged batteries not be left inside of the MD60LOG for long periods of
time.
For proper disposal of your MD60LOG remove the batteries.
5
CHRONO MODE AND DATA LOGGER MODE FOR THE MD60LOG
The MD60LOG that you have purchased operates in two possible modes:
•
CHRONO: The instrument works as if it was a normal chronometer, measuring lap times and then
showing them in the VIEW TIMING REPORT menu window (See chap. 10.1 of this manual). There may
be a maximum number of 10 sessions with 99 laps each. Once the memory has run out, any new
sessions are memorised in the place of the oldest present in memory. The report with the data relative
to the sessions archived in memory may be downloaded to a PC using the included USB port and the
GATE LITE software.
The file obtained may not be analysed with the MX2 LITE or MX2, analysis software but may be
visualised with any text program (such as One Note or Microsoft Word).
•
DATA LOGGER: The instrument records up to 4 hours of sessions in its internal memory, which once
downloaded onto a PC enables the analysis of trajectory and speed by way of the MX2 LITE or MX2
software. This mode is activated by recording a session (see chap. 10.2 in this manual). Once the
session has been memorised, it must be transferred to a PC using GATE LITE software.
The sessions acquired in the DATA LOGGER mode may also be visualised on the View Timing Report
menu and may be downloaded as reports in text format onto the PC.
MD60LOG User Manual rev. 05
Copyright ©2010 GET by Athena Evolution srl. All rights reserved
5
6
PREPARATION OF THE DEVICE
ENGLISH
It is recommended that the entire instruction manual be read carefully before using the unit.
•
Insert the batteries in the battery compartment paying attention to the polarity of each (positive pole is
on the side without the spring). The unit will turn itself on automatically.
•
Close the battery compartment back up again, remembering to replace the O-ring seal provided and to
adequately tighten down the four screws.
•
Position the device on the vehicle keeping the GPS antenna side (underneath the writing GET), pointed
upwards, or as far as possible from coverings that may limit the reception of the signal.
•
Make sure that the unit is attached to the vehicle as securely as possible, so as to limit the
vibrations to which it may be exposed. In particular, avoid that the instrument (in its lateral
perimeter) comes into contact with vibrating parts of the vehicle. This condition could bring
about continual stress to the internal batteries, causing shutdowns.
For application on motorcycles, it would be preferable to locate the instrument on the
upper fork plate.
Faulty installation could prejudice the proper operation of your MD60LOG.
6
MD60LOG User Manual rev. 05
Copyright ©2010 GET by Athena Evolution srl. All rights reserved
LAYOUT OF THE COMMANDS AND SIGNALS ON THE MD60LOG
ENGLISH
7
BEST LAP
LED
SELECTION
BUTTON S
BEST LAP
LED
INTEGRATED
GPS ANTENNA
DISPLAY
NAVIGATION
BUTTON
ARROW
LOW BATTERY
ALARM LED
USB
CONNECTOR
7.1
BATTERY
HOLDER
MD60LOG TIMES VISUALISATION SCREEN (CHRONO PAGE )
7
5
6
1
2
3
4
The fields on the CHRONO page of the MD60LOG provide the driver with the following data:
Field 1: Lap time
Field 2: Number of satellites seen by the system
Field 3: Current date and time / notification for the recording of the session under way
Field 4: Battery level indicator
Field 5: Speed expressed in km/h or mp/h
Field 6: Number of laps driven;
Field 7: User settable field: enables visualisation of information relative to the track (CURTRACK), best lap
time (BESTIME), last lap time (LASTIME)
This message
NO SAT
appears in field 1 when the GPS system is not available: in this condition it is not
possible to perform chronometric acquisitions or measurements.
MD60LOG User Manual rev. 05
Copyright ©2010 GET by Athena Evolution srl. All rights reserved
7
8
USE OF THE BUTTONS ON THE MD60LOG
ENGLISH
Each button is set up for two kinds of use: brief pressure and prolonged pressure. According to the length of
time of the pressure on the buttons, different commands may be issued.
•
To turn on the unit, push for over two seconds the S (SET) button.
•
To turn off the device, or quickly scroll the menus push and hold down the ARROW button.
•
To enter in the MAIN MENU or in the SUBMENUS briefly press the S (SET) button.
•
To scroll through the MENU items, press briefly the ARROW button.
•
To confirm a setting briefly press the S (SET) button.
9
USE OF THE MD60LOG
Before using the device it is strongly recommended that this manual be read carefully.
Trying out each of the functions described below, you will quickly gain confidence with the use of the unit.
NOTE: for ease of use the following manual describes the menus and the relative items in English.
9.1
FIRST TURN-ON OF THE UNIT
When turning on the unit for the first time it will ask that the system language be set: select with the ARROW
button the language desired and then confirm by pressing the S button.
LANGUAGE ENGLISH
<< EXIT
LANGUAGE
<< EXIT
LANGUE
<< EXIT
LANGUE
<< EXIT
FRANCAIS
ENGLISH
LANGUE
<< EXIT
FRANCAIS
FRANCAIS
NOTE: The language is requested even in the case of a RESET of the instrument (see chapter 10.4 of this
manual).
After setting the language it will be necessary to follow what is found in the following chapters.
8
MD60LOG User Manual rev. 05
Copyright ©2010 GET by Athena Evolution srl. All rights reserved
LATER TURN-ON OF THE UNIT
The next time that the MD60LOG is turned on the unit requires the user to, with the TRACK SEARCH option
set on MAN (see chap. 10.4 of this manual) or with current track not present in the internal library of the
instrument, perform certain preliminary operations.
The following chapters illustrate the behaviour to follow in possible situations that a user may encounter.
9.2.1 Turning on the unit with a track already properly set
Under normal use of the unit, each time that it is turned on with the TRACKING MOD option set on MAN
(see chap. 10.4 of this manual) or with current track not present in the internal library of the instrument, the
display will visualise the following screen.
PROPOSED
TRACK
ITEM
SELECTED
In this condition it is necessary to perform the setting of the track (or to create a new one): if the track
proposed by the instrument corresponds to the track desired the OK item is selected, push S (SET) briefly to
access the CHRONO page on the MD60LOG:
In this condition the instrument is ready to be used either in the CHRONO or the DATA LOGGER mode (see
chap. 5 of this manual).
To learn the different start-up methods and the other possibilities offered by the MD60LOG refer to chap. 10
of this manual.
NOTE: stand by until the message
LOGGER mode.
NO SAT
disappears before starting up the unit in CHRONO or DATA
9.2.2 Turn on of the unit and selection of a track
Under normal use of the unit, each time that it is turned on with the TRACK SEARCH option set on MAN
(see chap. 10.4 of this manual) the display will visualise the following screen.
PROPOSED
TRACK
MD60LOG User Manual rev. 05
Copyright ©2010 GET by Athena Evolution srl. All rights reserved
9
ENGLISH
9.2
In this condition it is necessary to set the track (or create a new one): if the track proposed by the instrument
does not correspond to the track desired push the ARROW button briefly (the cursor on the display will shift
to the NO item), then push the S (SET) button to access the TRACK SELECTION.
ENGLISH
To scroll the selections on the TRACK SELECTION submenu briefly press the ARROW button; once
positioned over the option desired, press the S (SET) button briefly to confirm.
The items available in this menu are:
•
LOAD FROM LIBRARY: enables the selection of one of the tracks present in the unit's library. Pressing
the S (SET) button briefly, when the item is highlighted by the cursor, the screen with the tracks present
in the library of the MD60LOG will be visualised. Scroll the items by pressing the ARROW button and
select the track desired pressing briefly the S (SET) button: the unit will load the track and return to
visualise the CHRONO page.
•
CREATE NEW: enables one to go on to create a customised track to be entered into the unit's track
library. Pressing the S (SET) button briefly, when the item is highlighted by the cursor, access to the
create tracks function will be given (see chap. 11 of this manual).
•
DELETE TRACK: enables one to delete a track to be entered in the unit's track library. Briefly pressing
the S (SET) button when the item is highlighted by the cursor, access to the list of tracks will be given:
by way of the use of the ARROW button (to scroll the items) and the S button (for the selection) it is
possible to remove the unwanted track from the unit's memory.
•
<< EXIT: enables the return to the CHRONO page of the unit without making any changes to the track
offered in the start menu of the unit. The selection of this function comes about briefly pressing the S
(SET) button, when the item is highlighted by the cursor.
10
MD60LOG User Manual rev. 05
Copyright ©2010 GET by Athena Evolution srl. All rights reserved
ENGLISH
10 MD60LOG MENUS AND FUNCTIONS
Access to the menus and the functions of the MD60LOG is possible pressing the S (SET) button briefly
when the unit is on the CHRONO page.
10.1 VIEW TIMING REPORT MENU
The VIEW TIMING REPORT menu enables read access of the reports of the sessions archived in the
internal memory of the unit:
Pressing the S (SET) button briefly on VIEW TIMING REPORT accesses the list of the sessions archived by
number (S), date (DATE), creation time (TIME) and best lap realised (BEST). Ten memory positions are
available, selectable by way of the ARROW button. Once used up, the system overwrites the eleventh into
the first position.
The maximum number of laps per session that may be memorised is 99.
To view reports from the unit follow the procedure below:
•
Enter the VIEW TIMING REPORT menu
•
Move around the sessions list using a brief pressure on the ARROW button; once the cursor has
highlighted the desired item press the S (SET) button to visualise the report:
The L column indicates the number of the lap of the session currently visualised, the TIME column
indicates the lap time, the TSPD column indicates the maximum speed achieved. It is possible scroll
the lines of the report by pressing the ARROW button.
Two options are available to exit from the session report (selectable by briefly pressing the S button):
•
RETURN TO SESSION: the unit returns to the VIEW TIMING REPORT menu
•
RETURN TO CHRONO: the unit returns to the CHRONO page.
•
<< EXIT: enables the return to the CHRONO page of the unit
MD60LOG User Manual rev. 05
Copyright ©2010 GET by Athena Evolution srl. All rights reserved
11
10.2 DATA LOGGING FUNCTION
ENGLISH
The DATA LOGGING function enables the user to record a session in the memory of the MD60LOG. This
function makes a series of data available (from the GPS) that enable an analysis of the trajectory, the speed
and the times of the lap with the MX2 LITE and MX2 software, providing the user the possibility of
understanding how to improve his or her driving performance.
The MD60LOG memory is capable of containing up to 4 hours of recording.
It is recommended that you regularly download the data using the specific software, before the memory of
your MD60LOG is used up entirely (visualisation of the message MEMFULL on the display).
Pressing the S (SET) button briefly, when the instrument is in the CHRONO screen the main menu page is
accessed.
•
Scroll the main menu items with the ARROW button until the DATA LOGGING item is highlighted.
•
Press the S (SET) button to activate the session recording mode: the instrument will display a screen
with the list of any sessions present in memory and the REC SESSION function.
If one intends on recording a session press the S (SET) button when the item REC SESSION is
highlighted by the cursor: the instrument will return to the CHRONO page beginning to record.
The user may, at any moment, decide to exit the DATA LOGGER menu pressing the S (SET) button
when the <<EXIT item is highlighted by the cursor.
MEMORY RESERVE
INDICATOR BAR
SESSION NUMBER
NOTE: When beginning to record a session the data present in field 3 (GPS date and time) these are
substituted by the indication of the current session number (ex. SESSION 2) and by the memory
reserve indicator bar.
ATTENTION: SESSION RECORDING IS AVAILABLE ONLY WHEN THE INSTRUMENT PROPERLY
RECEIVES AT LEAST 5 GPS SATELLITES
•
Select the REC SESSION item with the ARROW and confirm the choice with the S (SET) button: the
instrument goes to the screen displaying times and the message REC (in the date/time field) will
indicate that the unit is in recording mode. The field will darken progressively to indicate the level of
reserve internal memory.
In the event that the memory in the unit was to fill up, the MEMFULL message will appear in field 3 and
recording will be interrupted.
•
To stop recording of the session, press the ARROW button: the item REC disappears and in its place
the current date and time appear again.
In the event that you would like to record a new session and the memory of the MD60LOG is exhausted the
unit will request the deletion of all of the previous sessions recorded: Download the data to your PC before
carrying out this operation or you will lose all of it.
12
MD60LOG User Manual rev. 05
Copyright ©2010 GET by Athena Evolution srl. All rights reserved
ENGLISH
In the event that this situation arises the unit will display the following screen:
The selection (by pressing the S button briefly) on the items NO or YES will produce the following effects:
•
NO: the unit returns to the CHRONO screen.
•
YES: all of the sessions saved to the unit's internal memory will be deleted. A new acquisition will be
started up.
MD60LOG User Manual rev. 05
Copyright ©2010 GET by Athena Evolution srl. All rights reserved
13
10.3 TRACK MENU
ENGLISH
The TRACK menu enables the user to access the functions for loading, creating or deleting the tracks
present in the internal library of the MD60LOG.
The functions available in this menu are:
•
LOAD FROM LIBRARY: enables the selection of one of the tracks present in the unit's library. Pressing
the S (SET) button briefly, when the item is highlighted by the cursor, the screen with the tracks present
in the library of the MD60LOG will be visualised. Scroll the items by pressing the ARROW button and
select the track desired pressing the S (SET) button briefly: the unit will load the track and return to
visualise the CHRONO page.
•
CREATE NEW: enables one to go on to create a customised track to be entered into the unit's track
library. Pressing the S (SET) button briefly, when the item is highlighted by the cursor, access to the
create tracks function will be given (see chap. 11 of this manual).
•
DELETE TRACK: enables one to delete a track entered in the unit's track library. Briefly pressing the S
(SET) button when the item is highlighted by the cursor, access to the list of tracks will be given: by way
of the use of the ARROW button (to scroll the items) and the S button (for the selection) it is possible to
remove the unwanted track from the unit's memory.
•
<< EXIT: enables the return to the CHRONO page of the unit without making any changes to the track
offered in the start menu of the unit. The selection of this function comes about briefly pressing the S
(SET) button, when the item is highlighted by the cursor.
14
MD60LOG User Manual rev. 05
Copyright ©2010 GET by Athena Evolution srl. All rights reserved
10.4 MENU OPTIONS
ENGLISH
The OPTIONS submenu enables the modification and customisation of the functions of the device:
The options selectable by way of the ARROW and S buttons are:
•
INFO FIELD: Briefly pressing the S (SET) button on the option INFO FIELD, it is possible to customise
the visualisation of the data on field 7 of the time visualisation screen on the MD60LOG during the
CHRONO or DATALOGGER modes.
The options selectable by way of the ARROW button are:
CURRENT TRACK: name of the track loaded and used by the unit.
BEST TIME: visualisation of the best time in the session
LAST TIME: visualisation of the last time in the lap just finished
To confirm the parameter set, again briefly press the S (SET) button.
•
SEC/SPLIT: Briefly pressing the S (SET) button on the option SEC/SPLIT, it is possible to decide on
the visualisation method for the intermediate times upon passing the (SPLIT) sectors of the track
loaded.
The options selectable by way of the ARROW button are:
ABSOLUTE: upon passing of the intermediate sectors, the time will be displayed counting from the
finish line to the sector just passed.
RELATIVE: upon passing the sectors, the time will be displayed counting from the previous sector.
To confirm the parameter set, again briefly press the S (SET) button.
•
KEEP TIME: Briefly pressing the S (SET) button on the option KEEP TIME, you can choose the display
duration for the time just recorded. The values selectable by way of the ARROW button are: 000 (no
display of the time recorded), 005, 010, 015, 020, 025, and 030.
Example: setting 005, upon passing the finish line, the time just obtained will be visible for five seconds.
The setting is also the same for the intermediate times.
To confirm the parameter set, again briefly press the S (SET) button.
•
TIMEZONE: Briefly pressing the S (SET) button in the field TIMEZONE it is possible to adjust the hour
displayed by the MD60LOG: the GPS signal, actually, provides the time at the 0 meridian, (Greenwich),
which therefore must be adjusted to the time zone in which one is.
The values selectable by way of the ARROW button are: from -12 to +12.
Example: if we are in Italy during a month with daylight savings time set the value to 2.
Confirmation of the value set comes about by way of the brief pressing of the S (SET) button.
•
RESET UNIT: Briefly pressing the S (SET) button in the field RESET UNIT the unit will be brought back
to its factory default values. During this operation the sessions present in the memory will also be
MD60LOG User Manual rev. 05
Copyright ©2010 GET by Athena Evolution srl. All rights reserved
15
•
ENGLISH
•
deleted. The RESET UNIT command will cause the MD60LOG to restart and the user must then reset
the system language (see chap. 9.1 in this manual).
SPEED: Briefly pressing the S (SET) button in the field SPEED it is possible to select the units of
measure for the speed. The values selectable by way of the ARROW button are: KPH (kilometres per
hour) / MPH (miles per hour).
Confirmation of the value set comes about by way of the brief pressing of the S (SET) button.
TRACK MODE: Briefly pressing the S (SET) button in the field TRACK MODE it is possible to set the
starting strategy for the MD60LOG chronometer.
The options selectable by way of the ARROW button are:
LOOP: used in closed circuits and in races with a running start in which the starting line and the finish
line coincide.
LINEAR: Used in open tracks (such as acceleration races or climbs) in which the starting line and the
finish line are at two very distant positions.
To confirm the parameter set, again briefly press the S (SET) button.
•
START SPEED: Briefly pressing the S (SET) button in the field START SPEED it is possible to set the
GPS speed threshold for the MD60LOG chronometer start.
The values selectable by way of the ARROW button are: from 10 to 150 with increments of 10
Example: setting 020, the chronometer will start its count after passing the speed value of 20 (whether
this is in KPH or MPH).
Confirmation of the value set comes about by way of the brief pressing of the S (SET) button.
•
STOP DELAY: Briefly pressing the S (SET) button in the field LOG STOP DELAY it is possible to set
the time threshold to stop the MD60LOG chronometer.
The values selectable by way of the ARROW button are: from 10 to 30 with increments of 5
Example: setting 015 the chronometer stops after the GPS speed has dropped to 0 for more than 15
seconds.
Confirmation of the value set comes about by way of the brief pressing of the S (SET) button.
•
FL LENGTH: Briefly pressing the S (SET) button in the field FL LENGTH it is possible to vary the
transversal width of the finish lines and the intermediate times of the tracks. The range is between 10 m
and 500 m, with intervals of 10 m between one value and the next, settable with the ARROW button.
Confirmation of the value set comes about by way of the brief pressing of the S (SET) button.
ATTENTION: the measurement set will be applied, permanently, to all of the tracks loaded in the
MD60LOG (see chap. 9.2.2 and 10.3).
•
BACKLITE: Briefly pressing the S (SET) button in the field BACKLITE it is possible to activate the
backlighting of the MD60LOG display.
The options available are:
ON: backlighting on (to ease reading in the case of low ambient lighting) until shut down of the
MD60LOG
OFF: backlighting off
AUTO ON: backlighting on automatically upon turn on of the’MD60LOG
ATTENTION: Use of the backlighting reduces the duration of the batteries.
•
PWR OFF MIN: briefly pressing the S (SET) button in the field POWER OFF MINS it is possible to set
the automatic shut off time for the MD60LOG. The values selectable by way of the ARROW button are:
from 00 to 10 with increments of 1
Set the value desired confirming by briefly pressing the S (SET) button.
Example: setting 00 the unit will not turn itself off automatically. Selecting 05 the unit will turn itself off
automatically after having detected an absence of activity for more than five minutes.
16
MD60LOG User Manual rev. 05
Copyright ©2010 GET by Athena Evolution srl. All rights reserved
TRACK SEARCH: briefly pressing the S (SET) button in the field TRACK SEARCH it is possible to
activate/deactivate the automatic recognition of the track by way of the GPS positioning. The values
selectable by way of the ARROW button are:
AUTO: In this mode the MD60LOG, once locked onto the GPS system satellites, will automatically
select the track without requesting the setting upon turn-on (see chap. 9.2).
ATTENTION: this option may only be used if the track is in the unit's library. In case there is more than
one track with the same GPS coordinates (ex. 04 MUGELLO GP and 05 MUGELLO SBK) the track
loaded will be the first on the list (ex. 04 MUGELLO GP).
MAN: Select this option if you want to load the track manually.
Confirmation of the value set comes about by way of the brief pressing of the S (SET) button.
•
LANGUAGE: Briefly pressing the S (SET) button in the field LANGUAGE it is possible to set the
language for the unit. The values selectable by way of the ARROW button are:
ENGLISH: The language of the unit is set to English.
FRANCAIS The language of the unit is set to French.
Confirmation of the value set comes about by way of the brief pressing of the S (SET) button.
•
REF BEST TIME: Briefly pressing the S (SET) button in the field REF BEST TIME it is possible to set
how MD60LOG store’s the reference best time in its internal memory. The values selectable by way of
the ARROW button are:
ALL: reference time will be hold in memory until the user change the track on the MD60LOG.
LAST: reference time will be hold in memory until chrono running .
•
<< EXIT: enables one to return to the CHRONO page on the unit. The selection of this function comes
about briefly pressing the S (SET) button, when the item is highlighted by the cursor.
The default settings of MD60 LOG are:
OPTION
INFO FIELD
SEC/SPLIT
KEEP TIME
TIMEZONE
RESET UNIT
SPEED
TRACK MODE
START SPEED
STOP DELAY
FL LENGHT
BACKLITE
PWR OFF MIN
TRACK SEARCH
LANGUAGE
REF BEST TIME
SETTING
BEST TIME
ABSOLUTE
010
00
NO
KPH
LOOP
020
010
030
OFF
00
MAN
ENGLISH
LAST
MD60LOG User Manual rev. 05
Copyright ©2010 GET by Athena Evolution srl. All rights reserved
17
ENGLISH
•
11 CREATION OF A CUSTOM TRACK
ENGLISH
11.1 CREATION OF A CUSTOM TRACK IN LOOP MODALITY
If you want create a custom track in LOOP modality (suitable for closed circuits like car/bike speed way or
motocross ), please verify that the TRACK MODE option in OPTIONS menù is set as LOOP.
After this check follow the procedure described at the next chapter.
11.1.1 Starting line and intermediate times definition
In the event that the track desired is not in the unit's library, or you wish to create a new one with different
settings from those present in the memory of the MD60, proceed in the following manner:
•
Make sure that there is adequate satellite coverage (the unit must be locked on to at least 5 satellites).
•
From the CHRONO screen, briefly pressing the S (SET) button, enter the main menu and select the
submenu TRACK pressing the S button briefly. Scroll the page with the ARROW button and briefly
pressing the S (SET) button select the item CREATE NEW.
The LINE 1 item will appear on the CHRONO screen indicating the create track mode.
•
Upon passing the first intermediate time desired (in the case of closed or open circuits), press the
ARROW button: the unit will record the GPS coordinates of the point just defined and will prepare to
memorise the next, showing the message, LINE 2. The length of the transversal finish line set will be
defined by the value associated with the parameter FL LENGTH (see chap. 10.4)
•
Upon passing the next intermediate point press the ARROW to memorise its position. The unit will
prepare for the next intermediate line displaying the message, LINE3. It is possible to continue with the
same procedure until arriving at the last intermediate line available (LINE4).
•
Once the finish line position (LINE5) has been defined by pressing the S (SET) button: the unit will then
return to the time measurements page.
•
Make sure that the chrono start running (by passing the speed threshold defined on START SPEED
option): this condition it’s necessary to allow the saving custom track procedure.
•
In these conditions it is possible to start a test session or to save the track just created in the unit's
archive (see chap.11.3).
18
MD60LOG User Manual rev. 05
Copyright ©2010 GET by Athena Evolution srl. All rights reserved
LOAD FROM LIBRARY
CREATE NEW
DELETE TRACK
<<EXIT
S
S
LINE 1 (SPLIT1)
LINE 3 (FL)
LINE 2 (SPLIT 2)
11.2 CREATION OF A CUSTOM TRACK IN LINEAR MODALITY
If you want create a custom track in LINEAR modality (suitable for open circuits like car/bike dragster
competitions ), please verify that the TRACK MODE option in OPTIONS menù is set as LINEAR.
Please note: the starting point position will be automatically calculated when the vehicle starts
running. Beware: if the first split point is too near the starting point the MD60 LOG can’t be display
the first split time.
After this check follow the procedure described at the next chapter.
11.2.1 Starting line and intermediate times definition
In the event that the track desired is not in the unit's library, or you wish to create a new one with different
settings from those present in the memory of the MD60, proceed in the following manner:
•
Make sure that there is adequate satellite coverage (the unit must be locked on to at least 5 satellites).
•
From the CHRONO screen, briefly pressing the S (SET) button, enter the main menu and select the
submenu TRACK pressing the S button briefly. Scroll the page with the ARROW button and briefly
pressing the S (SET) button select the item CREATE NEW.
The LINE 1 item will appear on the CHRONO screen indicating the create track mode.
MD60LOG User Manual rev. 05
Copyright ©2010 GET by Athena Evolution srl. All rights reserved
19
ENGLISH
NOTE: during the creation of the track, it is not necessary to define all of the intermediate positions.
If just the (FINISH LINE) is needed it is enough to press the S (SET) button when the display
visualises the message LINE 1: in this condition upon the next passage over the finish line the
instrument will begin to read the lap times.
If only 2 split points and a finish line are needed, user can press the S button when the display show
LINE3:
ENGLISH
•
Upon passing the first intermediate time desired (in the case of closed or open circuits), press the
ARROW button: the unit will record the GPS coordinates of the point just defined and will prepare to
memorise the next, showing the message, LINE 2. The length of the transversal finish line set will be
defined by the value associated with the parameter FL LENGTH (see chap. 10.4)
•
Upon passing the next intermediate point press the ARROW to memorise its position. The unit will
prepare for the next intermediate line displaying the message, LINE3. It is possible to continue with the
same procedure until arriving at the last intermediate line available (LINE4).
•
Once the finish line position (LINE5) has been defined by pressing the S (SET) button: the unit will then
return to the time measurements page.
•
Make sure that the chrono start running (by passing the speed threshold defined on START SPEED
option): this condition it’s necessary to allow the saving custom track procedure.
•
In these conditions it is possible to start a test session or to save the track just created in the unit's
archive (see chap.11.3).
NOTE: during the creation of the track, it is not necessary to define all of the intermediate positions.
If just the (FINISH LINE) is needed it is enough to press the S (SET) button when the display
visualises the message LINE 1: in this condition upon the next passage over the finish line the
instrument will begin to read the lap times.
If only 2 split points and a finish line are needed, user can press the S button when the display show
LINE3:
LOAD FROM LIBRARY
CREATE NEW
DELETE TRACK
<<EXIT
S
S
LINE 1 (SPLIT1)
LINE 3 (FL)
LINE 2 (SPLIT 2)
20
MD60LOG User Manual rev. 05
Copyright ©2010 GET by Athena Evolution srl. All rights reserved
After having created a track it is possible to proceed with its saving in the internal library of the MD60LOG.
The function is automatically activated when the lap timer stops (only if the procedure indicated in chap.
11.1 and 11.2 has been performed properly).
•
From the CHRONO screen, when chronometer stopped (please remember that the unit mustn’t be in
DATA LOGGER mode) the track saving page will be displayed automatically.
•
The options available (selectable by way of a brief pressing of the S button) are:
YES: enables the track created to be given a name and then saved to the unit's library.
Set the name pressing the ARROW, to scroll the different alphanumeric characters and briefly press the
S button to confirm the character entered. Continue until the name is completed. To exit from the
setting of the track name briefly press the S (SET) button on the special character “ ” (visible among
those used for the composition of the name of the track).
In the case of a name chosen that is already present in the library the track will be saved adding a
number at the end of the name selecting (for example setting MUGELLO, a name already present in the
library the track will be saved as MUGELLO1).
NO: turns off the unit without saving the track created.
MD60LOG User Manual rev. 05
Copyright ©2010 GET by Athena Evolution srl. All rights reserved
21
ENGLISH
11.3 SAVING A CUSTOM TRACK
11.4 SUGGESTIONS FOR THE CREATION OF A CUSTOM TRACK
ENGLISH
The finish lines set have a transversal length in the forward direction determined by the value of the
parameter FL LENGTH (see chap. 10.4)
Factory setting is equal to 30 metres (15 m on the right hand side in the forward direction and 15 m on the
left side).
We suggest that the finish lines not be placed in points that could interfere with other components of the
track.
In figure A, a proper positioning; in figure B a faulty positioning of finish lines on a closed track.
A
It is suggested that the finish lines be set at a speed greater than 30 km/h.
11.5 UPDATING THE TRACK LIBRARY
The unit's track library may be updated by way of the GATE – LITE software.
Consult the manual provided in the CD included with the kit to find out the updating methods.
22
MD60LOG User Manual rev. 05
Copyright ©2010 GET by Athena Evolution srl. All rights reserved
B
The firmware of the MD60LOG is updated by way of a connection to a personal computer by way of a USB.
To carry out the updating, proceed as follows:
•
Turn on the instrument and connect to a PC by way of the USB cable.
•
Start up the firmware updating clicking the left mouse button on the self-starting file contained in the fw.
•
Press the UPDATE button and stand by until the end of the updating procedure (please attempt that the
MD60LOG restart and show SYNC on the display).
WARNING: DON’T DISCONNECT USB CABLE UNTIL DEVICE IS RESETTED
•
Disconnect the USB cable.
ATTENTION: USE CHARGED BATTERIES DURING THE FIRMWARE UPDATING. NON
COMPLIANCE WITH FIRMWARE UPDATE MAY LOCK THE DEVICE
MD60LOG User Manual rev. 05
Copyright ©2010 GET by Athena Evolution srl. All rights reserved
23
ENGLISH
12 FIRMWARE UPDATING
13 OPTIONAL
ENGLISH
Your MD60LOG may be equipped with certain options created specifically by GET to increase its reliability
its potential and its service life.
13.1 HANDLEBAR SUPPORT KIT
Manufactured specifically to increase the reliability and the service life of your MD60LOG also in the most
arduous conditions of use, the handlebar support kit without stalk (FAT BAR), with stalk (STANDARD BAR)
and the suction mount support have been designed to permit rapid installation.
No brackets or screws: very simple installation procedure to mount your MD60LOG on the vehicle.
HANDLEBAR SUPPORT WITHOUT
STALK (FAT BAR)
HANDLEBAR SUPPORT WITH STALK
(STANDARD BAR)
SUCTION MOUNT SUPPORT
24
MD60LOG User Manual rev. 05
Copyright ©2010 GET by Athena Evolution srl. All rights reserved
ENGLISH
14 TECHNICAL SPECIFICATIONS
HARDWARE
•
•
•
•
•
•
•
•
•
•
•
Internal power supply with two AA alkaline or rechargeable (Ni-Mh or Ni-Cd) batteries with protection
against overload and incorrect installation of the batteries.
Maximum autonomy with the system turned on: 61 hours with Sony Stamina Plus alkaline batteries
Standard standby autonomy: 2 months with alkaline batteries
4 MB internal flash memory
On board button turn on
Graphic transflective positive FSTN 128x96 pixel Display with user activated back light
GPS Module at 5Hz high sensitivity (-159 dBm) with integrated antenna
Two on board buttons for unit management.
Three LEDs for signals.
Dimensions (length X width. X depth) in mm: 108 X 55 X 30
Weight (batteries not included) 150 g
FUNCTIONS
•
•
•
•
•
•
•
•
•
•
•
•
•
•
•
•
Automatic shut down in absence of external input with settable time-out
Battery level visualisation
Energy saving function may be set on the unit
Automatic management of the time (setting the correct time zone) in the instrument
Track library pre-loaded.
Creation of custom tracks by way of quick setting of the finish lines and of the intermediate splits (max.
4)
Saving of the tracks custom created by the user in the internal memory
Automatic Selection, by way of the GPS coordinates, of the track (if present in the library)
GPS lap and intermediate time calculations without sensors on the edges of the track
Top speed and best lap reports
Memorisation of 10 sessions and 99 laps per session.
Speed display in Kph or Mph
Visualisation of the number of satellites detected by the system
LED indication of the best lap
Alarm and low battery display
Alarm and no satellite lock with display messages
GPS MODULE SPECIFICATIONS
•
•
•
•
•
•
•
•
•
•
1
2
GPS Module with 32 parallel channels
Update rate frequency 5 Hz
Current consumption ~ 30 mA @ 5Hz
Sensitivity 158 dBm
Normal lock on time with initialised module (warm start): 33 s 2
Normal lock on time with non-initialised module (cold start): 34 s 2
Normal lock on time with initialised module (hot start): 1 s 2
Maximum admissible speed: 515 m/s
Maximum CEP 1.8 m
Operational temperature: from - 30° C to + 85° C
Under the conditions of: GPS satellite locked in, backlight off, led alarms off.
Measured in conditions of good visibility and with an indicated power signal of -125 dBm
MD60LOG User Manual rev. 05
Copyright ©2010 GET by Athena Evolution srl. All rights reserved
25
ENGLISH
26
MD60LOG User Manual rev. 05
Copyright ©2010 GET by Athena Evolution srl. All rights reserved
ENGLISH
NOTE / NOTES:
MD60LOG User Manual rev. 05
Copyright ©2010 GET by Athena Evolution srl. All rights reserved
27
NOTE / NOTES:
ENGLISH
28
MD60LOG User Manual rev. 05
Copyright ©2010 GET by Athena Evolution srl. All rights reserved
ENGLISH
ITALIANO
Direttive 2002/95/CE, 2002/96/CE e 2003/108/CE del Parlamento Europeo relative ai rifiuti di Apparecchiature Elettriche ed
Elettroniche
Smaltimento dei rifiuti elettrici ed elettronici (applicabile nell’Unione Europea e negli altri paesi europei con servizio di raccolta
differenziata).
II simbolo del cassonetto barrato presente sul prodotto o sulla sua confezione indica che il prodotto non deve essere trattato come rifiuto domestico, bensì
raccolto separatamente ed essere consegnato ad un centro di raccolta autorizzato per il riciclo dei rifiuti elettrici ed elettronici (oppure reso al rivenditore nel
momento dell’acquisto di un nuovo prodotto di tipo equivalente, in ragione di uno a uno). Provvedendo a che il prodotto venga smaltito in modo
ambientalmente compatibile, si evita un potenziale impatto negativo sull’ambiente e per la salute umana, favorendo il reimpiego e/o riciclo dei materiali di
cui è composta l’apparecchiatura.
Lo smaltimento abusivo del prodotto da parte dell’utente comporta l’applicazione delle sanzioni amministrative previste dalla normativa vigente.
Per adempiere correttamente alla normativa, i produttori partecipano a “sistemi collettivi” che hanno il compito di organizzare e gestire sistemi di raccolta
dei RAEE provenienti dai nuclei domestici.
Per maggiori informazioni, contattare l’ufficio preposto nella Vostra città, il servizio per lo smaltimento dei rifiuti domestici o il negozio in cui avete acquistato
il prodotto.
ENGLISH
Directive 2002/95/EC, 2002/96/EC and 2003/108/CE of the European Parliament on waste electrical and electronic equipment
(WEEE)
Disposal of old Electrical & Electronic Equipment (applicable throughout the European Union and other European countries
with separate collection programs).
The symbol of crossed out wheeled bin, found on the product or on its packaging, indicates that this product should not be treated as household waste
when you wish to dispose of it. Instead, it should be handed over to an applicable collection point (or the recycling of electrical and electronic equipment).
By ensuring that product is disposed of correctly, you will help prevent potential negative consequences to the environment and human health, which could
otherwise be caused by inappropriate disposal of this product. The recycling of materials will help to conserve natural resources.
For more detailed information about the recycling of this product, please contact your local city office, household waste disposal service or the retail store
where you purchased the product.
FRANÇAIS
Directive 2002/95/CE, 2002/96/CE et 2003/108/CE du Parlement européen relative aux déchets d’équipements électriques et
électroniques (DEEE)
Disposition concernant les anciens équipements électriques et électroniques (applicable dans l’Union Européenne et dans
d’autres pays européens avec des systèmes de collecte séparés).
Ce symbole sur le produit ou sur son emballage indique que ce produit ne sera pas traité comme perte ménagère. Au lieu de cela il sera remis au point de
collecte dédié pour le recyclage de l’équipement électrique et électronique. En s’assurant que ce produit est trié et jeté correctement, vous contribuerez a
empêcher de potentielles conséquences négatives pour l’environnement et la santé humaine, qui pourraient autrement être provoquées par la manutention
de rebut inadéquate de ce produit.
La réutilisation des matériaux aidera à conserver les ressources naturelles.
Pour des informations plus détaillé sur la réutilisation de ce produit, vous pouvez contacter votre mairie, la société de collecte et tri des rebuts ménagers
ou le magasin où vous avez acheté le produit.
DEUTSCH
Richtlinie 2002/95/EG, 2002/96/EG, 2003/108/EG des Europäischen Parlaments über Elektro- und Elektronik-Altgeräte Gemeinsame Erklärung
Entsorgung von alten Elektro- und Elektronikgeraten (gültig in dar Europäischen Union und anderen europäischen Ländern
mit separatem Sammelsystem).
Dieses Symbol auf dem Produkt oder auf der Verpackung bedeutet, dass dieses Produkt nicht wie Hausmüll behandelt werden darf. Stattdessen soll
dieses Produkt zu dem geeigneten Entsorgungspunkt zum Recyceln von Elektro- und Elektronikgeraten gebracht werden.
Wird das Produkt korrekt entsorgt, helfen Sie mit, negativen Umwelteinflussen und Gesundheitsschàden vorzubeugen, die durch unsachgemäße
Entsorgung verursacht werden könnten. Das Recycling von Material wird unsere Naturressourcen erhalten. Für nähere Informationen über das Recyceln
dieses Produktes kontaktieren Sie bitte Ihr lokales Bürgerbüro, Ihren Hausmüll Abholservice oder das Geschäft, in dem Sie dieses Produkt gekauft haben
ESPAÑOL
Directiva 2002/95/CE, 2002/96/CE y 2003/108/CE del Parlamento Europeo sobre residuos de aparatos eléctricos y electrónicos
(RAEE)
Legislación referida a la eliminación de residuos de aparatos eléctricos y electrónicos (que se aplica en la Unión Europea y en
los otros países europeos con servicio de recogida selectiva).
El símbolo del contenedor de basura tachado presente en el producto o en el embalaje indica que el producto no se puede tratar como residuo doméstico,
sino que se debe eliminar por separado y se debe entregar a un centro de recogida autorizado para el reciclaje de los residuos de aparatos eléctricos y
electrónicos (o se debe devolver al revendedor en el momento de la compra de un nuevo producto equivalente).
Haciendo que el producto se elimine de una manera compatible con el medio ambiente se evitan las potenciales consecuencias negativas sobre el mismo
y sobre la salud del hombre, y se favorece el nuevo uso o el reciclaje de los materiales que componen el aparato.
La eliminación incontrolada del producto por parte del usuario implica la aplicación de las sanciones administrativas previstas por la legislación vigente.
Para la aplicación correcta de la legislación, los fabricantes participan en “ sistemas colectivos ” que tienen la función de organizar y gestionar los sistemas
de recogida de los RAEE procedentes núcleos domésticos.
Para mayor información, dirigirse a la oficina de la ciudad de residencia encargada del servicio de eliminación de desechos urbanos o a la tienda donde se
adquirió el producto.
MD60LOG User Manual rev. 05
Copyright ©2010 GET by Athena Evolution srl. All rights reserved
29
ENGLISH
Athena Evolution s.r.l.
Via delle Albere 8
36045 Alonte (VI) Italy
30
MD60LOG User Manual rev. 05
Copyright ©2010 GET by Athena Evolution srl. All rights reserved