1
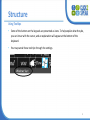
User Manual
Version 1.0
1
Table of content
Introduction
3
Structure
6
Settings page
16
Selected functionalities
27
2
Introduction
What is Click2Speak?
Click2Speak is an innovative on-screen keyboard and mouse, catering to disabled
individuals who cannot use a standard keyboard. It enables users to type and
operate within Windows environment using various input methods such as a
traditional mouse, foot mouse, eye tracker and others. Thanks to Swiftkey’s
revolutionary technology, it offers word prediction in over 81 languages, enabling
fast and accurate typing.
What are the system requirements for Click2Speak?
Click2Speak runs in Windows 7 + 8 PC environment. To operate Click2Speak using
input devices other than a traditional mouse (e.g. eye tracker), please check the
system requirements for your specific device. For example, Tobii EyeX Controller
requires a USB 3.0 port due to the high amount of data received. If your computer
doesn’t have a native USB 3.0 port, you must upgrade your system to be able to
use the Tobii EyeX Controller.
3
Introduction
How to install Click2Speak?
To install Click2Speak on your PC, please go to:
http://www.click2speak.net/category/download
After entering your name and e-mail address you will receive an e-mail with a link
to a webpage allowing the download. The keyboard will automatically install
layout and prediction engine based on the languages used on your PC. Following
the installation, please familiarize yourself with the settings page to ensure that
you select suitable options, such as keyboard font and size, enabling extra keypads
and buttons etc.
Which input devices is Click2SPeak compatible with?
Click2Speak can be operated using various input options, depending on the needs
of the user, such as: standard mouse, foot mouse, eye tracking cameras, head
movement tracking, roller or trackball mouse, joystick, touchscreen.
4
Introduction
What can you do with Click2Speak?
Once you have installed the on-screen keyboard, you can effectively start typing
text to any Windows editor such as MS Word, send emails, surf the web… using
your preferred pointing device. You can click on and outside of the keyboard
space. You can change and adjust the keyboard settings according to your
preferences in the setting page. You can also control your surrounding electronic
devices (TV, set top box, media streamer…) by activating the remote keypad (this
features requires the purchase of a 3rd party Infra Red USB receiver transmitter).
Examples
Right click on
mouse keypad
is activated
Click by blink
in active mode
Click by dwell
in active mode
5
Structure
Main key description
A Drag keyboard: allows you to drag and
F Windows Start: opens the start menu.
release (place) the keyboard in your desired
screen position.
B Open settings window: opens the window
with the settings panel (see more here)
G Text-to-speech: Reads the highlighted text.
H Call for assistance: alarm button that plays
a selected sound file.
I Change layout and prediction language: in
C Minimize keyboard: minimize/hide keyboard
the picture below by clicking Français, the
prediction language will become French,
D Close keyboard: switch off key
and the key will show the next language
based on your computer settings.
E Hide / show utility keypad: in the picture
J Prediction keypad: shows the predicted
below, clicking E, will hide the right column
words based on the letter(s) you clicked.
(utility keypad with keys A-D). To unhide, click
K Numbers keypad: shows/ hides numbers.
E again.
A
B
H
J
I
C
K
G
F
E
6
D
Structure
Word prediction tips
• The prediction engine has auto-learning capabilities. Once you choose a word,
it will be suggested to you more often in the future. It is also able to learn
names.
• In the settings, you can have the keyboard automatically add a space between
words and use capital letters when needed during typing.
• The prediction engine will adjust based on the language used.
• You can also have emoticons (emoji) suggested to you (settings->events>output improvment)
7
Structure
Using Tooltips
•
Some of the buttons on the keypads are presented as icons. To help explain what they do,
you can hover with the cursor, and an explanation will appear at the bottom of the
keyboard.
•
You may cancel these tool tips through the settings.
8
Structure
Special characters
• As with regular keyboards, to type centain keys and characters you will
need to use: Caps Lock, Shift, Fn buttons, Alt GR.
• The option to display Fn buttons will appear when the numbers row is
displayed.
• Not all languages use the Alt Gr function.
9
Structure
Additional keys/ keypads
The keyboard includes more keys and keypads that can be activated through the
settings page. These are:
1
5
1
2
2
3
4
3
4
5
Close window: closes the window that is currently
active
Shows the Windows desktop
Switch app: switch between open programs
Flow: allows typing by gliding the cursor on the
keyboard. It predicts as you flow; click once to start
a word, and once you see the word you want, just
click again. Link to video example:
https://www.youtube.com/watch?v=Kbh2ye7VkXE
The Helper keypad: allows you to perform actions
such as print screen, copy-cut-paste, navigation
arrows, etc.
*Keys 1-3 comprise the left helper keypad
10
Structure
Mouse clicks keypad
Mouse clicks keypad is an additional keypad which can be opened via the settings
page. It emulates the functionality of a regular mouse.
8
1
1
2
7
2
3
4
5
6
3
6
7
5
0
4
9
8
9
0
Drag keypad
Dock mouse keypad to main keyboard
Open the keypad’s settings window
Minimize keypad
Dwell key (click by hovering with the curser)
Drag item. Can also be used to resize Windows
Double-click
Right-click
Tip:
If you have selected to see the
Open/Close keypad
mouse keypad, it will pop up as
Show/Hide utility buttons
a separate keypad. To integrate
it into the main keyboard click
on «dock keypad to keyboard»
11
Structure
Eye tracking keypad
Eye tracking keypad is an additional keypad which can be opened through the
settings page. It includes a number of functionalities which can be operated with
an eye tracker
1
1 Drag keypad
8
2 Dock keypad to keyboard
3 Open the keypad’s settings window
7
2
4 Minimize keypad
5
6
5
3
4
6
7
8
9
0
0
9
Toggle Cursor (show or remove curser from screen)
Toggle Click by blink (enbale/disable blink)
Toggle Eye Scroll (enbale/disable eye scroll)
Toggle Magnifier (enbale/disable magnifier)
Open/Close keypad
Show/Hide utility buttons
Tip
The eye tracking keypad will pop up as a
separate keypad. To integrate it into the main
12
keyboard click on «dock keypad to keyboard»
Settings pages
Each additional keypad (mouse, eye tracking, remote control) has its own ‘thin’
settings page. The page consists of options to control position, size, and an
enable/disable keypad button.
13
Structure
Remote keypad
The Remote keypad is an additional keypad which allows you to control your
surrounding electronics from your PC/Tablet with infra-red capability. It currently
includes tabs with remote buttons for TV, Set Top Box and Media streamer.
We currently have tabs with remote buttons for TV, Set Top Box
and Media streamer, but will soon add controls for AC and
projector. In the near future we will add a feature to allow
control over anything with infra-red capability, from the lights to
the windows blinds… all at low cost.
At present, in order to work with our remote keypad, you will
need a 3rd party device that sends and receives infrared signals.
Currently you will need to purchase the following IR emitter
(30$-60$) -http://www.usbuirt.com
14
Structure
Remote keypad - continue
After you purchase the IR receiver transmitter device, and
connect it to your PC/Tablet USB port– you need to 'teach’
your keypad buttons what each controls does.
Remember that when in 'teach mode’ - place the remote
2-5 inch from the emitter, press the desired key on the
keyboard you want to bind to the remote key, then press
and hold until a green V is displayed. Test each key you
bind. Some remotes use short bursts so if the key doesn't
work, repeat the process and press normally on the
remote (don't hold).
15
Settings page
Upon clicking on the
key, the settings page will open. The page consists of
four sections with multiple tabs allowing you to change the style and the content
of the keyboard, select and adjust events, add/remove additional keypads and
adjust eye tracking functionalities.
16
Settings page
Keyboard style
In this section of the Settings you can adjust the look and feel of the keyboard. The
following options are available:
• Size: allows you to regulate the width and the height of the keyboard
• Position: allows you to dock (i.e. attach) the keyboard to the bottom or top of
any open document so that it does not ‘disappear’ behind them.
• Key style: allows you to adjust the font and the transparency of the keyboard
so that you can see any documents behind it
• Color: allows you to change the color of the keyboard and font
• Reset: allows you to reset your keyboard settings so that it returns to its default
version (i.e. just as it was after you installed it)
17
Settings page
Keyboard content/ Summary
In this section of the Settings page you can adjust the content of your keyboard.
More specifically:
• Keyboard Layout: allows you to change the type and layout of your keyboard
• Keypads: allows you to display existing keypads (e.g., Mouse, Eye Tracking and
Helper) and adjust their settings
• More Keypads: allows you to activate an additional keypad, i.e., left helper
• Keyboard Sections: allows you to adjust the position of the prediction and the
numbers within the keyboard as well as display / hide Text-to-Speech and Flow
Key buttons
18
Settings page
Keyboard content/ Keyboard layout
In this section of the Settings page you can adjust the layout of your keyboard:
• Allows you to select type of keyboard arrangement (e.g., qwerty, qwertz, etc.) and
activate tooltips (they appear in a row under the prediction language).
• By selecting key enlargement, individual keys will "pop-out" once they get selected.
This helps when you have hard time focusing.
19
Settings page
Keyboard content/ Keypads
In this section of the Settings page you can adjust the keypads of your keyboard:
• Allows you to display keypads such as Mouse Clicks, Eye Tracking, Helper and
Remote, to enlarge the Alarm Button and to introduce auto fade of keypads
20
Settings page
Keyboard content/ More keypads
In this section of the Settings page you can adjust additional keypads:
• More Keypads: allows you to display the left helper keypad, which includes the
functions ‘close window’, ‘show desktop’, ‘switch apps’. When activated the
keypad appears on the left side of your keyboard
21
Settings page
Keyboard content/ Keyboard sections
In this section you can adjust appearance and position of several buttons:
22
Settings page
Keyboard content/ Keyboard sections
In this section you can adjust the appearance and position of several buttons:
• Prediction position within the keyboard: Choose to position the predicted words row
on the top or bottom
• Display text to speech key: show or hide the ‘text to speech’ button
• Display Flow key: show or hide the ‘flow’ button
• Numbers position within the keyboard: Choose to position the numbers row on the
top, bottom, or right side of the main keyboard.
• Display ‘Call for Assistance’ button: show or hide the ‘play sound’ button.
• Call for assistance sound: browse for a sound file to be played upon clicking the
sound/assistance button
23
Settings page
Events/ Summary
In this section of the Settings page you can select different click functionalities and
add on keyboard events. These events are:
• Dwell: allows you to select ‘Dwell’ as a trigger for a click and adjust settings
such as area, animation/ color, delay and toggle time
• Events after a click: allows you select sounds accompanying a click and turn on
a magnifying glass for zooming in
• Special events: allows you to adjust the behavior of the keyboard when clicking
into/ outside text box and staring windows
• Output improvement: allows you to select functionalities linked to text output
and text prediction such as automatic spacing
24
Settings page
Events/ Dwell (1/3)
25
Settings page
Events/ Dwell (2/3)
The dwell function allows you to simulate a mouse (or other pointing device) click
without actually clicking. While the feature is especially useful for users of head
mouse and eye gaze, it is also useful for people who use any other pointing device.
The Dwell function can be turned on and off from the mouse click keypad.
• Dwell Only on Keyboard: selecting ‘’No’’ allows you to click by dwelling outside of
the keyboard and control the whole screen
• Dwell Click Area: increases or decreases the area you dwell
• Animate Dwell: by selecting ‘’Yes’’ a red dot
pops-up animating the dwell
function; the color of the animation dot can also be adjusted
26
Settings page
Events/ Dwell (3/3)
• Enable Auto Repeat: allows you to repeat last action (e.g., typing the same letter),
when you keep dwelling in the same spot (e.g., same letter); the time for Auto
Repeat can also be adjusted
• Dwell Delay: adjusts the time you have to look at a tab until it is clicked
• Dwell Key Toggle time: adjusts the time you have to look at the ‘Dwell Key’ until
Dwell is turned on
27
Settings page
Events/ Events after a Click
In this section of the Settings page you can adjust events after clicking:
• Play Sound: allows you to activate a sound after clicking
• Display Magnifier: allows you to display a magnifier for zooming keys
• Disable Magnifier After Each Click: allows you to disable the magnifier or to
keep it displayed after clicking to zoom in
28
Settings page
Events/ Special Events
• Display keyboard after clicking in text box: will automatically show the
keyboard after clicking into windows such as MS word, Notepad, Browser etc.
• Hide keyboard after clicking outside:
will automatically hide the keyboard after
clicking on a window such as your desktop, or an
opened folder etc.
• Run when Windows starts, in secure Windows:
Will launch the keyboard when you turn on your
PC, AND will allow you to use the keyboard in secure
screens like Windows Log-in
• Run when Windows starts: choosing ‘no’
for the previous button, will display this option (in case you wish to run the
program when Windows starts, but not in secure windows).
29
Settings page
Events/ Output improvement
In this section of the Settings page you can improve the output of the generated
text by
• Adding a space automatically after selecting a predicted word
• Capitalizing the beginning of a new sentence
• Selecting whether you wish to predict more than words and numbers
30
Settings page
Eyetracking/ Summary
In this section of the Settings page you can select and adjust the eye tracking
functionality. Important: this part of the settings page will not be visible if an eye
tracker is not connected to the PC.
View if no
eye tracker
is connected
31
Settings page
Eyetracking/ Summary
When an eye tracker is connected:
32
Settings page
Eyetracking/ Summary
In this section of the Settings page you can adjust all settings related to the eye
tracking:
• Click by Blink: allows you simulate a mouse click by blinking. You can choose
between both eyes, left or right. This function can be extended beyond the
keyboard to the whole screen.
• Blink Sensitivity: allows you to adjust the ‘click by blink’ sensitivity. Testing is
recommended
• Move Cursor: this will disable or enable the mouse curser, useful when watching a
movie for example.
• Enable Auto Scroll: will automatically scroll the screen (horizontal and vertical)
• Sleep Mode: this will turn off your screen when you fall asleep (close your eyes or
look away from the screen) and will turn the screen back on when you wake up
(open your eyes or look at the screen). In your Windows operating system, you will
need to set “Turn off the display” and “Put the computer to sleep” to ‘Never’.33
Settings page
Help – contact us
You can contact us via a form in the settings that will generate an email:
34
Selected functionalities
Magnifier (Settings/Keyboard content/Keyboard layout)
• A feature that allows you to zoom into the screen for easier key selection
• Display Magnifier: allows you to display a magnifier for zooming into keys
• Disable Magnifier After Each Click: allows you to keep it displayed after zooming in
Selected functionalities
Key enlargement (Settings/Keyboard content/Keyboard layout)
• This is an important feature that allows you to make the keys bigger for easier
clicking.
• By selecting key enlargement, individual keys will "pop-out" once they are selected.
This helps when you have hard time focusing.
Selected functionalities
Flow
Allows typing by gliding the cursor on the keyboard. It predicts as you flow; click once to
start a word, and once you see the word you want, just click again.
Link to video example: https://www.youtube.com/watch?v=Kbh2ye7VkXE
Selected functionalities
Dwell
Allows you to click just by gazing at a key. You can activate the dwell button either
by gazing at it for the defined time (e.g. 1 sec) or via the settings page. Example
below:
1 Connect to eye-
3
4
tracker
2 Activate Dwell button
by gazing at it
2
5
3 Gaze at the first
letter of your word
4 Click on the
1
5 You can also click outside of the
keyboard using Dwell
5
desired
predicted word
by gazing at it
38
Selected functionalities
Right click
You can use the mouse clicks keypad to perform several actions. For example, right
click an icon on your desktop:
1
2
3
4
1
2
3
4
Activate Right Click with
regular left click
Click the Show Desktop
button of the left helper
Left click on your desired
desktop icon. It will
preform a Right Click
function since the Right
click button was
selected.
Perform any action (e.g.
Rename)
39
Selected functionalities
Type text via blinking
You can type text by activating the Click by Blink button and using an eye-tracker.
You can activate this button either by gazing at it or via the settings page. Then, by
just looking at the letters you want to type, blinking, and doing the same with the
predicted words, you can type your text:
1 Connect to eye2
3
tracker
2 Activate Click by
4
Blink button
3 Look at the
character you want
to type and blink
5
1
5 You can also click by blinking
outside of the keyboard and, for
example, save your document
4 Blink after
5
looking at the
desired
predicted word
40
(if any)
Selected functionalities
Text to Speech
Although this relates to only a small percentage Click2Speak users, for some people text
to speech functionality is an obligatory means of communication. Click2Speak currently
supports the default voice and language that comes with the installed Windows version.
In the future we will offer the option to choose from a variety of third party voices and
many languages.
To use this functions, make sure your PC speakers are on, highlight the desired text (in
Word, Outlook…), and click the text to speech button.
41
Contact Us
[email protected]
http://www.click2speak.net/category/contact-us
42