1
Templar 5 User’s Manual
Version 5.5.57.25
1
This manual, Templar 5, Templar, all logos, and screenshots are copyright © 2003 - 2009 by
Classified Information, Inc. Any other references to brands, products, or logos are copyright of
their respective owners.
Templar is a registered Trademark of Classified Information, Inc.
2
Table of Contents
Templar 5 User’s Manual
1
Introduction
6
Welcome.......................................................................................................... 6
What is Templar 5? ......................................................................................... 6
Installation and Setup
7
Operating System Requirements.............................................................. 7
Java Requirements ................................................................................. 10
Hardware and Storage Requirements .................................................... 11
CPU: ................................................................................................. 11
Memory............................................................................................. 11
Hard Drive......................................................................................... 11
Network Adapter ............................................................................... 11
Templar 5 Installation .................................................................................... 12
Pre-Installation ........................................................................................ 12
Installation and Setup ............................................................................. 13
Templar 5 Server and Desktop Installation ...................................... 16
Templar 5 Client Installation ............................................................. 19
Getting Started
20
Starting Your Templar 5 System ................................................................... 20
Starting the Templar 5 Enterprise Server ...................................................... 20
Windows.................................................................................................. 20
Unix/Linux ............................................................................................... 20
Starting The Templar 5 Enterprise Client ...................................................... 21
Starting the Templar 5 Desktop..................................................................... 22
Using Templar 5
23
Templar 5 Welcome Screen ................................................................... 23
Setting the Templar 5 Theme ................................................................. 23
Templar 5 Windows ....................................................................................... 24
Trading Partners ............................................................................................ 27
Local Trading Partners............................................................................ 29
Overview........................................................................................... 29
Adding a Local Trading Partner........................................................ 29
Exporting a Local Trading Partner.................................................... 39
Editing a Local Trading Partner ........................................................ 46
Deleting a Local Trading Partner...................................................... 47
Remote Trading Partners........................................................................ 48
Remote Trading Partners Overview ................................................. 48
Adding a Remote Trading Partner.................................................... 48
Importing a Remote Trading Partner ................................................ 56
Editing a Remote Trading Partner .................................................... 58
Deleting a Remote Trading Partner.................................................. 59
Trading Partner Agreements................................................................... 60
Navigating Trading Partner Agreements................................................. 61
Adding a Trading Partner Agreement ..................................................... 62
General Tab...................................................................................... 63
Receive Policy .................................................................................. 67
Send Policy....................................................................................... 70
Receipt Policy................................................................................... 75
Retransmission Policy ...................................................................... 78
Notes Tab ......................................................................................... 79
3
Edit a Trading Partner Agreement .......................................................... 80
Delete a Trading Partner Agreement ...................................................... 81
Certificates..................................................................................................... 82
Intermediate Authorities .......................................................................... 82
Trusted Root CA ..................................................................................... 82
Creating a New Certificate ...................................................................... 83
Creating a Certificate Request ......................................................... 83
Creating A Self-Signed Certificate.................................................... 90
Importing Certificates .............................................................................. 95
Importing a Remote Certificate......................................................... 95
Importing a Local Certificate (Digital ID)........................................... 98
Exporting Certificates ............................................................................ 101
Export a Certificate ......................................................................... 101
Export a Digital ID (Local Certificate) ............................................ 105
Viewing a Certificate ............................................................................. 107
General Tab.................................................................................... 108
Details Tab ..................................................................................... 109
Certification Path Tab ..................................................................... 110
Certificate Revocation ................................................................................. 111
View and Edit CRL Properties .............................................................. 111
Delete a CRL......................................................................................... 112
Tracking Inbox ............................................................................................. 113
Deleting Transmissions......................................................................... 114
Reprocess a Transmission ................................................................... 114
Reprocess a Receipt............................................................................. 115
Viewing Transmissions ......................................................................... 115
Viewing an Attached File ................................................................ 117
Sorting in T5.......................................................................................... 118
Searching in T5 ..................................................................................... 118
Tracking Outbox .......................................................................................... 119
Deleting Transmissions......................................................................... 120
Reprocess a Transmission ................................................................... 120
Set a Transmission to Error .................................................................. 121
Viewing Transmissions ......................................................................... 121
Viewing an Attached File ................................................................ 123
Data ............................................................................................................. 124
Archive Data.......................................................................................... 125
Delete Data ........................................................................................... 127
Audit Log...................................................................................................... 129
Delete a Log Entry ................................................................................ 129
View the Properties of a Log Entry ....................................................... 130
Monitor Templar 5 Services......................................................................... 132
Schedule Jobs ............................................................................................. 133
Editing Existing Jobs ............................................................................. 134
Deleting Jobs ........................................................................................ 136
Adding a New Job ................................................................................. 137
Archive Data Parameters ............................................................... 139
Clean-Up Database Parameters .................................................... 140
Delete Data Parameters ................................................................. 141
Clean-Up Audit Log Parameters .................................................... 142
User Defined Command Parameters ............................................. 143
View Permissions ........................................................................................ 144
Templar 5 Server ......................................................................................... 145
Add a Templar 5 Server ........................................................................ 146
Delete a Templar 5 Server .................................................................... 146
Client Preferences ....................................................................................... 147
4
General Client Preferences................................................................... 148
Certificate Client Preferences ............................................................... 150
System Log Files ......................................................................................... 152
View a Log File...................................................................................... 152
Delete a Log File ................................................................................... 153
Server Properties......................................................................................... 154
General Server Properties .................................................................... 155
Server Services Properties ................................................................... 160
Server Service Settings Properties ....................................................... 162
Server Templar 5 Parallel Tasking Properties ...................................... 165
Server Data Type Mapping Properties.................................................. 166
Server Database Setup Properties ....................................................... 167
Templar 5 Internal Database .......................................................... 169
Oracle ............................................................................................. 170
Microsoft SQL Server ..................................................................... 171
Informix ........................................................................................... 172
Sybase............................................................................................ 173
IBM DB2 ......................................................................................... 174
ODBC Bridge .................................................................................. 175
Other JDBC Database.................................................................... 176
Logging Properties ................................................................................ 177
FTP Server Properties .......................................................................... 179
Security Envelopes ............................................................................... 180
Modifying Security Envelopes............................................................... 181
S/MIME ........................................................................................... 181
S/MIME v2 MPS ............................................................................. 182
XML Definitions ........................................................................................... 184
Add a New XML Definition .................................................................... 184
Edit an Existing XML Definition............................................................. 187
Delete an Existing XML Definition......................................................... 189
FTP .............................................................................................................. 190
FTP Users ............................................................................................. 190
FTP Steps ............................................................................................. 192
FTP Orchestrations ............................................................................... 193
Users ........................................................................................................... 195
Adding a New User ............................................................................... 195
Deleting a User ..................................................................................... 198
Editing a User........................................................................................ 199
Appendix A: Quick Start Guide
201
Appendix B: Templar 5 Services
203
Appendix C: Transport Methods
204
Appendix D: Permissions
205
Appendix E: Encryption Types
206
Appendix F: Signature Types
208
Appendix G: Templar 5 Directory Structure
209
Appendix H: How Trading Works
210
One-Time “Flat File” Transmission ....................................................... 210
Automatic “Flat File” Transmission ....................................................... 212
Automatic EDI or XML transmission ..................................................... 213
5
Introduction
Welcome
Welcome to Templar 5, the premier application for trading sensitive, critical business data with
your trading community partners using the Internet. Based on the flexible, platform-independent
Java programming language, Templar 5 allows you to manage your trading community and send
data to members from virtually any operating system. And, unlike similar products, Templar 5 is
not restricted to just EDI or XML. The power and flexibility of the Templar 5 system allows you to
trade any information you wish—EDI data, Excel Files, .ZIP files, flat files—with the utmost
security.
What is Templar 5?
Templar 5 is a messaging system of software, services, and network services that provides
secure and reliable transmission of documents over TCP/IP (for a complete list of transport
protocols, see Appendix C). At each end of an exchange, Templar 5 applies the security policies
upon which you and your trading partners have agreed.
Templar 5 resides on your system between the EDI/XML translator and the protocol that Templar
5 will use to securely transmit the data. Templar 5 tracks messages at the EDI/XML interchange
level (by assigning a temporary interchange number during transmission) and provides an audit
log that informs you of all processes—incoming and outgoing documents.
There are two different versions of Templar 5 for your data-trading needs. These include
6
Enterprise—The Enterprise version of Templar 5 is a bundled package of the
Templar 5 Server and the Templar 5 Client. Through the Transactional Server backend,
Templar 5 Enterprise moves data quicker and faster by providing more pipes through
which to transfer and receive data. Templar 5 Enterprise also offers the option of
utilizing other databases (such as MS SQL or Oracle). Finally, Templar 5 Enterprise
allows Templar 5 Client installations to connect into the Templar 5 Server from other
machines within the same network.
o Templar 5 Server—Templar 5 Server is the housing for all services required to
move, record, edit, and secure data
o Templar 5 Client—Templar 5 Client connects to a Templar 5 Server to allow a
user to monitor, view, edit, and send data.
Desktop—The Desktop version of Templar 5 is scaled down for small companies which
move very little data (as compared to a Templar 5 Enterprise user which may move data
between many trading partners). This version of Templar 5 contains the same data
transfer and receiving functionality but is limited by its reliance on a Java database, a
limit of 15 Trading Partners, the absence of the Transactional Server backend, and the
inability for other Templar 5 clients to connect outside of the machine on which the
desktop version is installed.
Installation and Setup
Operating System Requirements
The installation of your Templar 5 system depends largely upon your operating system:
Templar 5 Enterprise
Templar 5 Desktop
7
8
9
10
Client
Windows (2000, XP, 2003)
Linux (Kernel 2.2 or Higher)
Solaris (2.6 or Higher)
HP-UX (11 or Higher)
AIX (5.0 or Higher)
Mac OS X (10.1 or Higher)
Windows (95, 98, ME, 2000,
XP, 2003)
Linux (Kernel 2.2 or Higher)
Solaris (2.6 or Higher)
HP-UX (11 or Higher)
AIX (5.0 or Higher)
Mac OS X (10.1 or Higher)
Desktop
Windows (2000, XP, 2003)
Linux (Kernel 2.2 or Higher)
Solaris (2.6 or Higher)
HP-UX (11 or Higher)
AIX (5.0 or Higher)
Mac OS X (10.1 or Higher)
Java Requirements
Templar 5 requires Java version 1.4.2 with the Java Cryptography Extension (JCE) Unlimited
Strength Jurisdiction Policy Files 1.4.2.
The Java Jar file placement is crucial to Templar 5 installation. If you have installed Java in the
default directory, Templar 5 will have no problem locating it for installation. But, if you installed
Java in a non-default directory (and even changed the name), you must reflect those changes in
your system environment path.
11
Hardware and Storage Requirements
Templar 5 requires the following hardware and storage requirements
• CPU
• Memory
• Hard drive
• Network Adapter
CPU:
Minimum: 400 MHZ
Suggested 800 Megs - 1.4+ GHZ
Templar 5 uses about 1 percent of CPU usage at a constant and will spike to 100% available
during data processing. You will need to set your own application variables to limit Templar 5’s
use of available system resources if you with it operate using less that 100% of available system
CPU.
Memory
Minimum 128 MB
Suggested: 512 MB – 1 GB
Templar 5 uses 100 MB of memory at a constant.
When processing data memory may spike as much as twice the data size
Hard Drive
With regard to performance hard disk is that the single most important factor affecting
performance of the system. This is because it is used extensively when creating and processing
messages
Minimum Space Available: 200 MB
Suggested Space Available: 5 – 10 GB
Suggested Hard Drive: Ultra DMA Mode 5 Hard disk, or Ultra Wide SCSI, however any hard disk
will do.
Templar 5 Archives all data sent in and out, Depending on the size of data please plan
appropriately. Example: 1 MB data sent 100 times a day = 200 MB of archived data a day = 6 GB
a month in storage.
Network Adapter
Templar 5 is a protocol based data encryption movement software. Which utilizes the following
protocols HTTP(S); FTP; SMTP; POP3; POP3 with SSL; SSH; TCP/IP; TCP/IP with SSL; and
Direct File Transfer. Internet Access, or appropriate routing, will be needed depending on your
choice of transportation.
12
Templar 5 Installation
Pre-Installation
It is highly recommended that you complete the Pre-Installation Checklist found on the installation
media before beginning this process.
Prior to installing Templar 5, you should verify your available memory and CPU (see Hardware
Requirements).
13
Installation and Setup
Follow the screens on the Templar 5 CD-ROM to specify your Operating System and that you
want to install Templar 5. Once you have located the page click the option to install the Templar 5
Server, Client, or Desktop.
•
The first screen of the Templar 5 Installer prepares your system for the installation
process. Once prepared, the process continues.
Figure 1: Templar 5 Installer Opening Screen
14
•
Before you can install Templar 5, you must agree to the Templar 5 License Agreement.
After reading, click on the I Accept the Agreement Option to and then click Next to
continue, the Cancel Button to abort the installation, or the Back Button to return to the
previous screen.
Figure 2: Templar 5 Installation Licensing Agreement
15
•
The next step in the installation process is to fill in the licensing information for
installation.
o Company Name—the name of the company with which you registered. This
name is tied into the license and must match exactly (including capitalization and
punctuation) with what you provided Classified Information, Inc.
o Serial Number—the 32-digit license provided to you by Classified Information,
Inc. when you purchased your software. This license will be located on your
Templar 5 CD-ROM under the license folder. You may also request a copy of
your license be sent via email from your sales executive.
o Subscription—if you are installing an Evaluation Version of Templar 5 you will
need to enter the 32-digit subscription number. If you are not installing an
evaluation version this field must be left blank.
Figure 3: Templar 5 Installation Registration
16
Templar 5 Server and Desktop Installation
After entering the license information the Installer will check to see if Java 1.4.2 has been
installed on the system. If the Installer cannot find the Java 1.4.2 installation it will present a
prompt for the location to be specified.
Once the Java 1.4.2 location has been determined you will be prompted for the location you wish
to install your Templar 5 Server.
Figure 4: Templar 5 Server Installation (Choose Location)
•
After you have specified the location, the Templar 5 Installer will confirm if you would like
a desktop icon created and to confirm the name of the Start Menu Folder to use for the
Templar 5 shortcuts. Then, the Installer will copy the files to the directory you chose. You
can click the Cancel Button if you want to abort the installation.
17
Figure 5: Templar 5 Server Installation (Configuration)
•
18
After the files have been installed, the Templar 5 Server requires default configurations to
be set before installation can complete.
o This Machine’s Name—the network name of this machine as found in Control
Panel >> System. You can also specify an IP address of the machine. This field
is required.
o
System Name—the name of the Templar 5 Server as the client will see it (i.e.,
Templar 5 Production Server, Templar 5 Development Server, etc.). This field is
required.
o
Operator e-mail—the email of the primary operator (usually a network or
systems administrator). This email is for the purpose of error notification (if that
option is enabled in the application configuration; for more information about
program configuration, see the chapter “Server Properties”). This can be a single
email address, a distribution list, or a group email address. This field is required.
o
Graphical Display for Server—check this box to have the server represented
with a graphical display (when selected from the Templar 5 Program Group).
This graphical display will show the Templar 5 Server Log as the server starts up.
If you close this graphical interface, the server will shut down.
o
Install Templar 5 as a Service—you can choose to have Templar 5 install as a
Windows Service so that it can be automatically started upon system boot. This
is a single service (at the OS level) that governs the entire operation of the
Templar 5 Server. Although Templar 5 has many internal services that govern
the operation of the application, these services are all underneath the umbrella of
the OS Service. For more information about Windows Services, consult your
Windows Operating System documentation.
o
SMTP Mail Transmission—
These fields are required.
• SMTP Relay Server—enter the IP Address or the Domain Name of the
relay server.
• DNS Server Address—the IP Address of the DNS Server available to
the Templar 5 Server. This is required if the option to ‘Always Use Relay
Server for Sending Mail’ is not checked.
• Always use Relay Server for sending mail—select this check box to
only use your Relay Server to send Templar 5 email.
o
POP3 Mail Reception
If you select this the SMTP Mail Reception section need not be filled in.
• Allow mail collection via POP3—select this box to allow Templar 5
Server to utilize your POP3 server for incoming transmissions from
trading partners.
• POP3 Mail Server—the IP address or fully-qualified domain name of
your POP3 mail server
• POP3 Account—the POP3 account that will be used to receive
transmissions from trading partners.
• Password—the POP3 account password
• Confirm Password—retype the password for validation purposes
o
SMTP Mail Reception
If you select this the POP3 Mail Reception section need not be filled in.
• Allow Mail Collection via SMTP—check this box to have mail received
via SMTP (rather than POP3).
• Accept Mail For—enter the email address for which Templar 5 will
accept mail.
•
Click the Next Button to continue.
•
Upon successfully configuring your Templar 5 Server, the installer will present a
confirmation dialog box. Click the OK Button to continue.
19
Templar 5 Client Installation
The Templar 5 Client Installation follows the same process as the Templar 5 Server installation
until the setup screen.
Figure 6: Templar 5 Client Installation (Configuration)
•
1
After successfully copying the files, the Templar 5 Installer requires information to finalize
the installation of Templar 5 Client
o Templar 5 Server Name—specify the name of your Templar 5 Server as you
indicated in the System Name field during the Templar 5 Server Installation.
Note: This field is not required if you choose the option ‘Automatic Discovery of
Servers’ option.
o Port Number—the port number for your Templar 5 Server. Unless you manually
changed the port number on your Templar 5 Server, the default port (8452)
should be left as is.
o Automatic Discovery of Servers—selecting this box allows the Templar 5
Client to automatically search for Templar 5 Servers in the same subnet as the
1
client .
You can have your Templar 5 Client check additional Templar 5 Servers that are not on the
same subnet under Configuration Options in the Templar 5 Client.
20
Getting Started
Starting Your Templar 5 System
Starting your Templar 5 software depends upon which components are present in your Templar 5
System
• Templar 5 Server
• Templar 5 Client
• Templar 5 Desktop
Starting the Templar 5 Enterprise Server
Windows
•
To start your Templar 5 Server manually on Windows, select the Templar 5 Server icon
from the Templar 5 Program Group
•
If you checked the option to Install T5 as a service during the installation the Templar 5
Server will start automatically as a service upon restart of your system.
Unix/Linux
•
Execute the tfive script (tfive start). The default location of the tfive script is the Templar
5 Server directory.
•
During the installation of Templar 5, if you check the option to install as a service, you will
be notified of the directory location of the tfive script.
21
Starting The Templar 5 Enterprise Client
To start your Templar 5 Client
• Click on the Templar 5 Client icon from the Templar 5 Program Group. This will bring
up the Templar 5 Splash screen and then the Templar 5 Login Screen.
Figure 7: Templar 5 Client Startup Screen
•
•
•
•
•
22
Figure 8: Templar 5 Client Login Screen
To start the Templar 5 Client, you must login to the Templar 5 Server. This is
accomplished by typing in your Username and Password.
The default username is templar.
The default password is templar.
Next, select the System you will be connecting to from the drop-down menu.
Upon successful acceptance of your username and password, the Templar 5 Client
Application will launch.
Starting the Templar 5 Desktop
To start your Templar 5 Desktop
• Select the Templar 5 Desktop icon from the Program Group.
• Because the Server and Client are integrated in the Desktop application, launching
Templar 5 Desktop will first load the Templar 5 services and then will automatically
launch the Templar 5 Client.
Figure 9: Templar 5 Client Startup
Screen
•
•
•
•
Figure 10: Templar 5 Client Login Screen
To use the Templar 5 Desktop, you must login in to Templar 5. This is accomplished by
typing in your Username and Password.
The default username is templar.
The default password is templar.
Upon successful acceptance of your username and password, the Templar 5 Desktop
will launch.
23
Using Templar 5
The Using Templar 5 section concerns only the Templar 5 Client application (whether part of the
Enterprise or Desktop package).
Templar 5 Welcome Screen
The Templar 5 Client Welcome Screen displays important information about your connection to
the Templar 5 server, the Templar 5 version, and provider of the JVM on your machine.
The Welcome screen also provides information that will remain on each screen of Templar 5 as
you use the application. Located in the lower-right corner, this information details who is currently
logged in, the server (name and port number), and licensing information.
Setting the Templar 5 Theme
Templar 5 has made it possible for you to customize the look and feel of the software interface
through several default themes. When you select a theme, the color of the main header, buttons,
and drop-down menus change to reflect the new look. There are no actual changes made to the
functionality of the program.
To change the theme of your Templar 5 interface
• Select the Theme option from the main menu;
• The current theme will be highlighted with a checkmark;
• To change the theme, simply click on the name of the theme;
• The interface will change immediately.
24
Templar 5 Windows
There are several windows in Templar 5 that correspond to different aspects of the application.
These windows include
• Root
• Applications
o
Trading Partners
The Trading Partners Window provides a list of all your current trading partners.
You can also look at subsets of your Trading Partners by expanding the Trading
Partners Node—All Partners, Local Partners, and Remote Partners.
For more information about Trading Partners, see the Trading Partner Section.
o
Trading Partner Agreements
The Trading Partner Agreements Window provides a list of all your current
trading partner agreements. When you expand the Trading Partner Agreement
Node, you will be able to access individual Trading Partner Agreements (they are
listed by name).
For more information about Trading Partner Agreements, see the Trading
Partner Agreements Section.
o
Certificates
The Certificates Window provides information on all of the certificates and
certificate requests currently in your Templar 5 system. By expanding the
Certificates Node, you can also see installed Intermediate Authorities and
Trusted Root Certificate Authorities.
For more information about Certificates, see the Certificates Section.
o
Certificate Revocation
The Certificate Revocation window shows a list off all of the certificates in
Templar 5 that have a Certificate Revocation List specified.
For more information about Certificate Revocation, see the Certificate
Revocation Section.
o
Tracking Inbox
The Tracking Inbox Window provides information on transmissions that have
been sent to you, are in the progress of being received, or have encountered
errors. Expanding the Tracking Inbox Node provides opportunities to filter inbox
transmissions.
For more information about Tracking Inbox, see the Tracking Inbox Section
o
Tracking Outbox
The Tracking Outbox Window provides information on transmissions that you
have sent, are in the progress of being sent, or have encountered errors.
Expanding the Tracking Outbox Node provides opportunities to filter outbox
transmissions.
For more information about the Tracking Outbox, see the Tracking Outbox
Section.
25
26
•
Data
The Data Window provides two key functions—archiving data and deleting data. For
more information on Archiving and Deleting Data through the Data Window, see the Data
Section.
o Archive Data
o Delete Data
•
Tools
o View Audit Log
The Audit Log Window provides a list of all the audit logs currently available to
Templar 5 (those that have not been deleted or archived). By expanding the View
Audit Log Node, audit log data can be filter by Error Logs, Warning Logs,
Diagnostic Logs, and Successful Logs.
For more information about Audit Logs, see the Audit Logs Section.
o
Monitor T5 Services
The Monitor Window provides a list of all currently running Templar 5 services.
For more information about the Monitor Window, see the Monitor Section.
For more information about the Templar 5 Services shown in this window, see
Appendix B: Templar 5 Services.
o
Scheduled Jobs
The Schedule Jobs Window provides information on the currently scheduled
jobs. Expanding the Schedule Jobs Node displays the types of jobs—Archive
Data Jobs, Clean up Database Jobs, Delete Data Jobs, and User Defined
Commands Jobs.
For more information about Scheduling Jobs, see the Schedule Jobs Section.
o
View Permissions
The Permissions Window displays the permission requirements needed for
specific Templar 5 functionality. For example, in order to administer the server,
the currently logged-in user would require Full Access.
For more information about the Permissions Window, see the View Permissions
Section.
o
T5 Server Locations
The Server Location Window provides information on the servers currently
available to you (through the Client interface). This window also provides you the
opportunity to add additional servers (depending upon access levels).
For more information about Server Locations, see the Templar 5 Server Section.
o
Client Preferences
The Client Preferences window provides interface to modify default settings for
the Client such as Send Policy Defaults, Host Settings, and Certificates.
For more information about setting Client Preferences, see the Client
Preferences Section.
•
Administration
o System Log Files
The System Log Files Window displays a list of all the Templar 5 Server logs that
are generated each time the server is initialized (either automatically or
manually). For more information about the Templar 5 Server logs, see the
Starting the Templar 5 Enterprise Server Section.
For more information about the System Log Files Window, see the System Log
Files Section.
o
Server Properties
The Server Properties Window provides you the ability to modify settings for the
Templar 5 Server to which the client is currently connected. This requires that the
appropriate permissions be set.
For more information about setting Server Properties, see the Server Properties
Section.
o
Security Envelopes
The Security Envelopes Window provides information on the current security
envelopes Templar 5 will use to encrypt data.
For more information about the Security Envelopes Window, see the Security
Envelopes Section.
o
XML Definitions
The XML Definitions Window provides you the ability of defining XML Data types.
For more information about the XML Definitions Window, see the XML Definitions
Section.
o
Users
The User Window provides a current list of all users as well as the ability to
modify existing users and add new users.
For more information about working with Users, see the Users Section.
Templar 5 is a context-sensitive application. Navigation will often change based upon the open
window. For example, when you open the Trading Partner Agreements Window, functionality
(like the Action Button) will allow you to create new Trading Partner Agreements. In contrast, if
you open the Trading Partners Window, the same functionality will allow you to make new
Trading Partners.
27
Trading Partners
Trading Partners are the entities within your Templar 5 System that can exchange data through
Trading Partner Agreements (for more information about Trading Partner Agreements, see the
Trading Partner Agreements section).
Templar 5 supports two types of Trading Partners: Local and Remote. Local Trading Partners are
Trading Partners within your own network or company (i.e., the Finance Division). Remote
Trading Partners are Trading Partners outside of your network or company (i.e., vendors,
suppliers, customers, partners, etc.).
Templar 5 offers you a number of ways in which to add, edit, manage, group, and work with your
trading partners available through the Applications icon in the Menu Window of the Templar 5
Application.
Figure 11: Trading Partners
These Applications include
• Trading Partners
o Adding a Local Partner
o Adding a Remote Partner
o Importing a Remote Partner
o Trading Partner Properties
o Deleting Trading Partners
o Exporting Trading Partners
• Trading Partner Agreements
• Certificates and Revoking Certificates
28
In addition to the ways in which you can add and edit trading partners, Templar 5 also provides
you with three built-in Filters to help you quickly locate Trading Partners. These filters include:
• All—selecting this filter from the Trading Partners Menu will list all trading partners
currently configured in your Templar 5 Application.
• Local—selecting this filter from the Trading Partners Menu will list all of your Local
Trading Partners currently configured in your Templar 5 Application.
• Remote—selecting this filter from the Trading Partners Menu will list all of your Remote
Trading Partners currently configured in your Templar 5 Application
You can select a specific filter by expanding the Applications Icon in the Menu Window and
then expanding the Trading Partners icon. Click on the name of the filter you want to display. In
each instance, the appropriate Trading Partners are displayed in the Main Window.
29
Local Trading Partners
Overview
Local Trading Partners are members, groups, departments, etc. within your organization. By
creating multiple Local Trading Partners, you can better organize your incoming and outgoing EDI
transactions. Traditionally there needs to be a separate certificate for each local Trading Partner.
Adding a Local Trading Partner
There are two ways to Add a Local Trading Partner from the Trading Partners Window:
• The first way is to click on the Edit Menu and select the Actions option. This will open
the Actions Submenu. From the Actions Submenu, select the New option which will
open the New Submenu. From the New Submenu, select the Local Partner option.
• The second way is to click on the Actions button displayed at the top of the Main
Window. This will open the Actions Submenu. From the Actions Submenu, select the
New option which will open the New Submenu. From the New Submenu, select the
Local Partner option.
• Both methods will open the New Local Trading Partner Details Window.
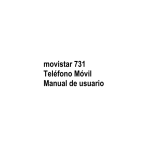
Figure 12: New Local Trading Partner Details (General Tab)
This window has five tabs for which you can enter Local Trading Partner information
• General—basic information about the Local Trading Partner
• EDI Qualifier / ID—the unique ID that identifies this Local Trading Partner in Templar 5
• Certificates—secure certificates that ensure identity
• Contact Information—contact information for the Local Trading Partner
30
•
Notes—any additional notes about the Local Trading Partner
31
New Local Trading Partner General Tab
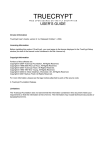
Figure 13: New Local Trading Partner Details (General Tab)
The New Local Trading Partner Details Window >> General Tab has three primary fields that
you can enter information:
• Partner ID—a unique combination of letters and numbers to identify this partner easily
within Templar 5. This generally is your company’s full, legal business name. Note: once
you have created this Partner ID and saved the Local Partner, you cannot change the ID.
• Partner Name—the name of the partner. This may be used to identify a specific
department or person (i.e. Bob Smith at Classified Information, Inc., EDI Department at
Classified Information, Inc., etc.)
• EDI Email Address—this is the local EDI Email address that the Local Trading Partner
will be sending data to when sending to this partner utilizing SMTP.
32
New Local Trading Partner EDI Qualifier / ID Tab
An EDI qualifier/ID is a unique, two-part interchange ID.
The first part is the qualifier, which is a two-character value. The qualifier indicates the type of ID
established for the trading partner. The second part is the identifier for the Trading Partner, such
as a telephone number or DUNS number.
This tab is where you add, edit, and delete the Local Trading partner’s qualifier/IDs.
Figure 14: New Local Trading Partner Details (EDI Qualifier/ID Tab)
33
To Add a New EDI Qualifier and ID:
• Click on the New button. This will bring up the EDI Qualifier and ID Window.
Figure 15: EDI Qualifier and ID Window
There are two fields for which you must enter information
o Qualifier—a two-character qualifier
o ID— a telephone number, DUNS number, or other string that uniquely identifies
the Trading Partner
• Click on the OK button when finished.
Figure 16: New Local Trading Partner Details (EDI Qualifier/ID Tab)
•
The Qualifier and ID will now appear in the table. To add another Qualifier and ID, repeat
the process.
To Delete an EDI Qualifier and ID:
• Select the EDI Qualifier that you wish to delete and press the Delete Button. This will
bring up the Confirmation Window.
• Click on the Yes Button to delete the Qualifier or the No Button to cancel the deletion.
34
New Local Trading Partner Certificates Tab
A certificate is a digital document that verifies that a public key belongs to a given organization.
X.509 certificates make it possible for Templar 5 to provide encryption/decryption of data,
authentication, non-repudiation of origin, and non-repudiation of receipt.
This tab is where you bind certificates to the Local Trading Partner and unbind certificate from the
Local Trading Partner.
Figure 17: New Local Trading Partner Details (Certificates Tab)
35
To Bind a Certificate to the Local Trading Partner
• Use the drop-down menu in the Unbound Certificates section to select a certificate for
this Local Trading Partner. Any Local Certificate that has been created or imported will be
in the Unbound Certificates List.
Figure 18: New Local Trading Partner Details (Certificates Tab - Bound)
•
36
Once you have selected the appropriate certificate, click on the Bind Button. The
certificate will now appear in the Bound Certificates table displaying the following
information:
o Alias—identifier assigned to the certificate.
o Issued To—which organization the certificate has been issued to
o Issued By—who issued the certificate (whether a Certificate Authority or
someone within your organization, i.e., a Self-Signed Certificate).
o Expiration Date—when the certificate expires
o Usage—these certificate extensions determine in what capacity the certificate
can be used. Extensions can include Digital Signature and Data Encryption. For
more information, see the Certificates Section.
Figure 19: Certificate Details Window
•
To view the details of the certificate, click on the Details Tab. This will bring up the
Certificate Details Window.
To Unbind a Certificate from the Local Trading Partner:
• Select the certificate that you wish to Unbind from this Trading Partner.
• Click the Unbind Button. This will immediately remove the certificate from the Local
Trading Partner profile and place it below in the unassigned group.
37
New Local Trading Partner Contact Information Tab
Local Trading Partner Contact Information is simply the information for this Local Partner.
Figure 20: New Local Trading Partner Details (Contact Information Tab)
The New Local Trading Partner Details Window >> Contact Information Tab has a number of
fields into which you may enter information about this Local Trading Partner. None of the fields
are required. These fields include:
• Name—The name of the Local Trading Partner. This should be the primary person who
is responsible for dealing with Templar 5 on the receiving end.
• Title—The title of that person.
• Phone—The Local Trading Partner’s main contact phone number.
• Fax—The Local Trading Partner’s main contact fax number.
• Email Address—The Local Trading Partner’s main email address.
• Address—The Local Trading Partner’s mailing address.
38
New Local Trading Partner Notes
Figure 21: New Local Trading Partner Details (Notes Tab)
For each Local Trading Partner, you can type in free-form notes. This is an excellent place to jot
down specific requirements (such as transmission times) or alternate contact names, numbers, or
email addresses.
Note: if you decide to export this Local Trading Partner Profile to send to a Remote Trading
Partner, remember that the notes field is exported as part of the profile.
39
Exporting a Local Trading Partner
Exporting Local Trading Partners is a great way to share Trading Partner information with other
members of your Trading Community who also use Templar 5. This exported file includes all the
trading partner information including the remote certificate, Qualifier/IDs, and EDI email address.
Once your Trading Partner imports your profile, all they need to create is a Trading Partner
Agreement to start trading data with you.
Templar 5 allows you to export a Local Trading Partner in one of two ways:
• Via Email
• As a File
40
Export via Email
To Export a Local Trading Partner via Email
Figure 22: Trading Partners Window with Trading Partner
•
•
To export a Local Trading Partner, you must first open the Local Trading Partner you
want to export. You can do this in one of three ways
o The first way is to double click on the Local Trading Partner
o The second way is to highlight the Local Trading Partner and select the Actions
Button, which will open the Actions Submenu. From the Actions Submenu,
select the Properties Option.
o The third way is to click on the Local Trading Partner you want to export with
your secondary mouse button. This will bring up the Context-Sensitive Menu.
Select the Properties Option.
All of these methods will open the Edit Local Trading Partner Details Window.
41
Figure 23: Export Local Trading Partner via Email
•
42
From the Edit Local Trading Partner Details Window, click on the Export Button at
the bottom of any tab. This will bring up the Context Sensitive Menu. Select the Via email Option. This will bring up the Send Trading Partner Details via Email Window.
Figure 24: Export Local Trading Partner via Email (specify address to send)
•
•
There are two fields for which you can enter information to send the Local Trading
Partner information via Email:
o Email Address—this field is required. You must specify an Email address to
which to send the Local Trading Partner information. This will need to go to the
personal Email of your partner and not the EDI Email address.
o Additional Information—you can use this field to enter a message to the
recipient such as who the Local Trading Partner is and what to do with the
information.
When you are satisfied with the email address and any additional information, press the
OK Button to send the Email. If there are no errors in sending, the Successfully
Submitted to Queue Window will be display that the email will be processed
immediately.
43
Export as a File
To Export a Local Trading Partner as a ".tpd" (Trading Partner Details) File
Figure 25: Trading Partner Window with Trading Partner
•
•
44
To export a Local Trading Partner, you must first open the Local Trading Partner you
want to export. You can do this in one of three ways
o The first way is to double click on the Local Trading Partner
o The second way is to highlight the Local Trading Partner and select the Actions
Button, which will open the Actions Submenu. From the Actions Submenu,
select the Properties Option.
o The third way is to click on the Local Trading Partner you want to export with
your secondary mouse button. This will bring up the Context-Sensitive Menu.
Select the Properties Option.
All of these methods will open the Edit Local Trading Partner Details Window.
Figure 26: Export Local Trading Partner via File
•
From the Edit Local Trading Partner Details Window, click on the Export Button at
the bottom of any tab. This will bring up the Context Sensitive Menu. Select the To a
File Option. This will bring up the Select File to Save Details To Window.
45
Figure 27: Export Local Trading Partner via File (save file window)
•
•
46
To save the Local Trading Partner information to a file, you simply need to specify a
name and location:
o Look In—Use the drop-down menu to search your hard drive for the location in
which you wish to save the file. You can also use the “folder manipulation
buttons” at the top right to further help you find a location for your file
o File Name—specify a name for the file. Templar 5 will automatically append the
.TPD extension to whatever name you select.
When you are satisfied, click the Save Button to save the file to the location on your hard
drive.
Editing a Local Trading Partner
Editing a Local Trading Partner
At any time, you can Edit Local Trading Partner information.
• There are three ways to Edit a Local Trading Partner:
o The first way is to double click on the Local Trading Partner
o The second way is to highlight the Local Trading Partner by clicking on it. Then
click the Actions Button. This will bring up the Actions Button Menu.
• Select the Properties Option from the Actions Button Menu.
o The third way is to click on the Local Trading Partner with your secondary mouse
button. This will bring up the Context-Sensitive Menu.
• Select the Properties Option from the Context-Sensitive Menu.
• All of these options will bring up the Edit Local Trading Partner Details Window.
Editing a Local Trading Partner is simply changing information you entered when you created a
New Local Trading Partner. The information you can change includes:
• General
• EDI Qualifier / ID
• Certificates
• Contact Information
• Notes
47
Deleting a Local Trading Partner
Deleting a Local Trading Partner
At any time, you can Delete a Local Trading Partner.
• There are two ways to Delete a Local Trading Partner,
o The first way is to highlight the Local Trading Partner by clicking on it. Then click
the Actions Button. This will bring up the Actions Button Menu. Select the
Delete Option from the Actions Button Menu.
o The second way is to click on the Local Trading Partner with your secondary
mouse button. This will bring up the Context-Sensitive Menu. Select the Delete
Option from the Context-Sensitive Menu.
• Both methods will bring up the Templar 5 Confirmation Dialog Box.
Figure 28: Delete a Local Trading Partner Confirmation
o
o
To delete the Local Trading Partner, click the Yes Button.
To cancel the deletion, click the No Button.
Note: deletion of a trading partner is irreversible.
48
Remote Trading Partners
Remote Trading Partners Overview
Remote Trading Partners are members outside your organization—these are the companies,
vendors, partners, etc. with whom you actually trade data.
Adding a Remote Trading Partner
Adding a Remote Trading Partner
You can add a new Remote Trading Partner in one of two ways
• From the Edit Main Menu, select the Actions option. From the Actions Submenu,
select the New option. From the New Submenu, select the Remote Partner option.
• After selecting a Filter from the Trading Partners Icon in the Menu Window, click on
the Actions Button displayed at the top of the Main Window. From the Action Button
menu, select the New option. From the New Submenu, select the Remote Partner
option.
Through either method, the New Remote Trading Partner Details Window is displayed.
49
Figure 29: Remote Trading Partners
This window has five tabs for which you can enter Remote Trading Partner information
• General
• EDI Qualifier / ID
• Certificates
• Contact Information
• Notes
50
New Remote Trading Partner General Tab
Figure 30: New Remote Trading Partner Details (General Tab)
The New Remote Trading Partner Details Window >> General Tab has three primary fields
that you can enter information:
• Partner ID—a unique combination of letters and numbers to identify this partner easily
within Templar 5. Note: once you have created this Partner ID and saved the Remote
Trading Partner, you cannot change the ID.
• Partner Name—the name of the Remote partner. This may be used to identify a specific
department or person (i.e. Jane Doe at Classified Information, Inc. of EDI Department at
Classified Information, Inc.)
• EDI Email Address—the Email of the Remote Trading Partner where EDI documents
will be sent.
51
New Remote Trading Partner EDI Qualifier / ID Tab
An EDI qualifier/ID is a unique, two-part interchange ID.
The first part is the qualifier, a two-character value, depending on the standard. The qualifier
indicates the type of ID established for the Trading Partner. The second part is the identifier for
the trading partner, such as a telephone number or DUNS number.
Figure 31: New Remote Trading Partner Details (EDI Qualifier/ID Tab)
To Add a New EDI Qualifier and ID,
• Click on the New button. This will bring up the EDI Qualifier and ID Window. There are
two fields for which you must enter information
o Qualifier—a two-character qualifier
o ID— a telephone number or DUNS number that uniquely identifies the trading
partner
• Click on the OK button when finished.
• The Qualifier and ID will now appear in the table. To add another Qualifier and ID, repeat
the process.
To Delete an EDI Qualifier and ID,
• Select the EDI Qualifier that you wish to delete and press the Delete Button. This will
bring up the Confirmation Window.
• Click on the Yes Button to delete the Qualifier or the No Button to cancel the deletion.
52
New Remote Partner Certificates Tab
A certificate is a digital document, which verifies that a public key belongs to a given organization.
X.509 certificates make it possible for Templar 5 to provide encryption/decryption of data,
authentication, non-repudiation of origin, and non-repudiation of receipt.
Figure 32: New Remote Trading Partner Details (Certificates Tab)
To Bind a Certificate to the Remote Trading Partner,
• Use the drop-down menu in the Unbound Certificates section to select a certificate for
this Remote Trading Partner.
• Once you have selected the appropriate certificate, click on the Bind Button. The
certificate will now appear in the Bound Certificates table displaying the following
information:
o Issued To—which organization the certificate has been issued to
o Issued By—who issued the certificate (whether a Certificate Authority or
someone within your organization, i.e., a Self-Signed Certificate).
o Expiration Date—when the certificate expires
o Usage—these certificate extensions determine in what capacity the certificate
can be used. Extensions can include Digital Signature and Data Encryption. For
more information, see the Certificates Section.
53
Figure 33: Certificate Details Window
•
To view the details of the certificate, click on the Details Tab. This will bring up the
Certificate Details Window.
To Unbind a Certificate from the Remote Trading Partner,
• Select the certificate that you wish to Unbind from this Trading Partner.
• Click the Unbind Button. This will immediately remove the certificate from the remote
Trading Partner and return it to the Unbound Certificates List.
54
New Remote Trading Partner Contact Information Tab
Remote Trading Partner Contact Information is simply the contact information for this Remote
Partner.
Figure 34: New Remote Trading Partner Details (Contact Information Tab)
The New Remote Trading Partner Details Window >> Contact Information Tab has a number
of fields into which you may enter information about this Remote Trading Partner. None of the
fields are required. These fields include:
• Name—The name of the Remote Trading Partner. This should be the primary person
who is responsible for dealing with Templar 5 on the receiving end.
• Title—The title of that person
• Phone—The Remote Trading Partner’s main contact phone number.
• Fax—The Remote Trading Partner’s main contact fax number.
• Email Address—The Remote Trading Partner’s main email address.
• Address—The Remote Trading Partner’s mailing address.
55
New Remote Trading Partner Notes
Figure 35: New Remote Trading Partner Details (Notes Tab)
For each Remote Trading Partner, you can type in free-form notes. This is an excellent place to
jot down specific requirements (such as transmission times) or alternate contact names,
numbers, or Email addresses.
56
Importing a Remote Trading Partner
Importing a Remote Trading Partner is an easy way to add new Trading Partners to your Templar
5 system. For example, if you have a trading partner at another company that is also using
Templar 5, they can simply export the specific Local Trading Partner to a “.tpd” (Trading Partner
Details) file and email it to you. When it arrives, you import is as a Remote Trading Partner.
• There are several ways to import a Remote Trading Partner:
o The first way is to select the Actions Option from the Edit Menu. This will bring
up the Actions Submenu.
• From the Actions Submenu select the New Option. This will bring up
the New Submenu.
• From the New Submenu, select the Import Remote Partner
Option.
o The second way is to click the Actions Button at the top of the Trading
Partners Screen. This will bring up the New Submenu.
• From the New Submenu, select the Import Remote Partner Option.
o The third way is to click the Import Button at the bottom of the New Remote
Trading Partner Window.
• All of these methods will bring up the Select the File to Load Details From Window.
57
Figure 36: Import Remote Trading Partner (find file) Window
•
•
•
•
58
To import the Remote Trading Partner information from a ".TPD" file, you simply need to
specify a name and location:
o Look In:—Use the drop-down menu to search your hard drive for the location of
the “.tpd” (Trading Partner Details) file. You can also use the “folder manipulation
buttons” at the top right to further help you locate the file
o File Name—when you click on the file name in the search window, you will
populate this field with the name of the file.
When you are satisfied, click the Save Button to open the file into the New Remote
Partner Details Window.
Much like adding a new Remote Trading Partner, you can modify or examine data in
each of the five tabs:
o General
o EDI Qualifier / ID
o Certificates
o Contact Information
o Notes
If you are satisfied with the information, click on the Save Button. The new Trading
Partner will be added to your Templar 5 system.
Editing a Remote Trading Partner
At any time, you can Edit Remote Trading Partner information.
• There are three ways to Edit a Remote Trading Partner,
o The first way is to double click on the Remote Trading Partner
o The second way is to highlight the Remote Trading Partner by clicking on them.
Then click the Actions Button. This will bring up the Actions Button Menu.
• Select the Properties Option from the Actions Button Menu.
o The third way is to click on the Remote Trading Partner with your secondary
mouse button. This will bring up the Context-Sensitive Menu.
• Select the Properties Option from the Context-Sensitive Menu.
• All of these options will bring up the Edit Remote Trading Partner Details Window.
Editing a Remote Trading Partner is simply changing information you entered when you created
or imported a New Remote Trading Partner. The information you can change includes:
• General
• EDI Qualifier / ID
• Certificates
• Contact Information
• Notes
59
Deleting a Remote Trading Partner
At any time, you can Delete a Remote Trading Partner.
• There are two ways to Delete a Remote Trading Partner:
o The first way is to highlight the Remote Trading Partner by clicking on them.
Then click the Actions Button. This will bring up the Actions Button Menu.
Select the Delete Option from the Actions Button Menu.
o The second way is to click on the Remote Trading Partner with your secondary
mouse button. This will bring up the Context-Sensitive Menu. Select the Delete
Option from the Context-Sensitive Menu.
• Both methods will bring up the Templar 5 Confirmation Dialog Box.
Figure 37: Delete a Remote Trading Partner Confirmation Dialog
o
o
To delete the Remote Trading Partner, click the Yes Button.
To cancel the deletion, click the No Button.
Note: Deletion of a trading partner is irreversible.
60
Trading Partner Agreements
A trading partner agreement is a unique agreement between a Local Trading Partner and a
Remote Trading Partner. The agreement identifies the Trading Partners and specifies the details
of how each partner will receive and send data between partners.
The agreement specifies which security features to apply to outgoing data, which to expect for
incoming data, and what transport to use for sending data. Creating an agreement is the last step
in setting up the specifications for using Templar 5. You and your remote trading partner each
create a Trading Partner Agreement after
• creating a local profile for your organization and a remote profile for your Trading Partner.
• creating a local certificate for your organization and accepting a remote certificate sent
from your Trading Partner.
• binding a local certificate to the local profile and a remote certificate to the remote profile
61
Navigating Trading Partner Agreements
Templar 5 provides you with the ability to create multiple agreements for a single Trading Partner
based upon different parameters. This allows you to route different data based on different EDI
Qualifiers/IDs to other locations. Multiple Trading Partner Agreements allow you to utilize multiple
methods of transport to the same customer.
Templar 5 organizes Trading Partner Agreements in two ways:
• All—you can view all of the Trading Partner Agreements currently in effect within your
Templar 5 system by clicking on the All Icon underneath the Trading Partner node.
• {local trading partner ID}—each Local Trading Partner’s ID will be reflected underneath
the Trading Partner node. You can click on the specific Local Trading Partner to see just
the Trading Partner Agreements currently in effect for that partner.
62
Adding a Trading Partner Agreement
There are two ways to add a new Trading Partner Agreement after selecting the Trading Partner
Agreements Node in the Navigation Window.
• The first way is to click on the Actions Button. This will bring up the Actions Button
Submenu. Select the New Option from the submenu.
• The second way is to select the Actions Option from the Edit Menu. This will bring up
the Actions Submenu. Select the New Option.
• Both of these methods will bring up the New Trading Partner Agreement Window.
Figure 38: New Trading Partner Agreement
•
The New Trading Partner Agreement Window is divided into four main tabs:
o General
o Receive Policy
o Send Policy
o Receipt Policy
o Retransmission Policy
o Notes
63
General Tab
Figure 39: New Trading Partner Agreement (General Tab)
The General Tab allows you to enter information that defines the agreement. This Tab is divided
into two primary areas plus an alias:
• Remote Trading Partner
• Local Trading Partner
The Trading Partner Agreement Alias gives you a place to give the Trading Partner Agreement
an unique name that describes the trading partner agreement. This information is displayed on
the main Trading Partner Agreement sscreen.
Both areas have the same fields to enter complimentary information about each trading partner
• Partner ID—click the “…” Button to bring up the Trading Partner Lookup Window.
64
Figure 40: Trading Partner Lookup
o
•
•
•
You can either browse through the list of partners or type in a Trading Partner
Name in the Find Field to quickly jump to a specific partner. Once you have
selected the partner, click the OK Button.
If you do not have a partner to enter, you can click the New Partner Button to create a
New Local Partner or New Remote Partner.
You can also edit the partner you have chosen by clicking the Properties Button. This
will allow you to Edit the Local Partner or Edit the Remote Partner.
EDI Qualifier / IDs—this field will be automatically populated with the first Qualifier/ID
pair listed in the Trading Partner’s Profile. To choose ‘Any Listed’ Qualifier/ID just click
the Button to the right of the “…” Button. To specify a different EDI/Qualifier ID, click on
the “…” Button. This will bring up the EDI Qualifier / IDs Lookup Window.
65
Figure 41: EDI Qualifier/IDs Lookup
o
66
You can either browse through the list of partners or type in a Trading Partner
Name in the Find Field to quickly jump to a specific partner. Once you have
selected the partner, click the OK Button.
Encryption Certificate—encryption certificates govern how data is transmitted between
the partners. Click the … Button to bring up the Certificate Lookup Window.
o You can either browse through the list of certificates or type in a Certificate Name
in the Find Field to quickly jump to a specific certificate. Once you have selected
the certificate, click the OK Button. Note: you can only choose a certificate that
is bound to the Trading Partner.
•
Signature Certificate—signature certificates guarantee the authority and identity of the
sending and receiving parties. Click the “…” Button to bring up the Certificate Lookup
Window.
o You can either browse through the list of certificates or type in a Certificate Name
in the Find Field to quickly jump to a specific certificate. Once you have selected
the certificate, click the OK Button. Note: you can only choose a certificate that
is bound to the Trading Partner.
67
Receive Policy
Figure 42: New Trading Partner Agreement (Receive Policy Tab)
The Receive Policy Tab allows you to set parameters for how EDI data is received from the
Remote Trading Partner. This tab is divided into three main areas:
• Received Data’s Expected Security
• Post processing
• FTP Pulling
To configure how Data is received,
• Status—select the appropriate radio button to determine the status of the Receive Policy
within the agreement.
o Active—the policy is currently enforced
o Held—there is data inputted however no data will be accepted
o None—there is no receive policy for this TPA
o Expected Encryption—select an encryption type using the drop-down menu.
o Expected Signature—select the type of signature using the drop-down menu.
68
•
Post Processing—the Post Processing area allows you to set parameters for how any
data is handled after it is decrypted.
o Destination Folder—specify a destination directory to output the decrypted EDI
or XML file. The filename will be OUT####.dat (with the #### incrementing with
each file).
Output File Pattern— type in the output file name pattern you want to use to
name all decrypted files for this Trading Partner Agreement. If left blank the
Server Level Output File Pattern will be used. The following replaceable
parameters (not case sensitive) are available:
# - next number
%CONTROLNUMBER% - Interchange Control Number
%SENDERID% - ID of Sender
%SENDERIDQUAL% - Qualifier of Sender
%RECIPID% - ID of Recipient
%RECIPIDQUAL% - Qualifier of Recipient
%TRACKINGNUM% - Tracking Number
%DATE% - Current Date
%TIME% - Current time
o Save to Temporary File while Receiving—when checked, files will be saved
with a .tmp extension while being written out. Then once completely written out
will be renamed without the .tmp extension.
o Preserve Original Filename—when checked, templar 5 will attempt to find the
original filename of the file in the MIME Headers of the received file and save the
decrypted file with this name.
o Receive Run Command—specify a script to when the file is stored in the
destination directory (i.e., moving received data to translator)
The following parameters can be passed to the script being called:
%f = filename
%t = tracking ID
%l = local partner ID
%r = remote partner ID
%p = production/test flag
%i = interchange control number
•
FTP Pulling—the FTP Pulling area allows you to set parameters for how you want
Templar 5 to pull data from this partner’s FTP Server. This section is only used when
you are trading via FTP with your partner and they are hosting the FTP Server. The
option is provide to setup separate locations for pulling files and MDNs from this partner.
IF the files and MDNs are in the same location, just ignore the MDN’s tab as the File’s tab
will also pull MDNs.
o Pull files from this remote partner’s ftp server—checking this option will
cause T5 to start checking the FTP server specified at regular intervals.
o Host Name—the name of the remote Trading Partner’s FTP host (IP address or
DNS name) from which the data will be pulled.
o User ID—the user ID to use to access the FTP site.
o Password—the password to use for access to the FTP site.
o Destination Folder—the subfolder in the FTP directory into which the data will
be saved.
o Port Number—the port number on the remote Trading Partner’s FTP server
through which the connection will be made. You can click on the Use Standard
Port Button to set the port to 21.
o Retry Times—the number of times that Templar5 should try the connection in
the event of connection failure before producing an error.
69
o
o
o
o
70
Secure Socket Layer—the type of SSL or TSL to be used in the connection is
specified here by selecting the line in the drop down list.
Orchestration—the specific orchestration for pulling files from this partner is
selected from the drop down list.
Use Passive FTP More—selecting this option will over-ride the orchestration
and always force Templar 5 to always use passive mode.
User Client Authentication—Select this option if your partner requires you to
use client authentication when trading via FTP.
Send Policy
Figure 43: New Trading Partner Agreement (Send Policy Tab)
The Send Policy Tab allows you to set parameters for how EDI data is sent from the Local
Trading Partner to the Remote Trading Partner.
To configure how EDI Data is sent,
• Status—select the appropriate radio button to determine the status of the Send Policy
within the agreement,
o Active—the policy is current enforced. You can only send data using this policy
when this is selected.
o Held— There is data inputted; however no data will be sent.
o None—there is no send policy.
71
72
•
Security Envelope—select a security envelope using the drop-down menu.
Options include:
o None
o Templar 4.0 Compatible MIME
o S/MIME
o S/MIME Multipart/Signed
o TCIF IA Message
•
Encryption Type—use the drop-down menu to select an encryption type for the sending
message. Options include:
o DES
o DES-EDE3
o RCA (40-Bit)
o RCA (128-Bit)
o RC2 (40-Bit)
o RC2 (128-Bit)
o Blowfish
o Cast 128
o MARS
o Rijindael
o Rijindael-256
o Serpent
o Twofish
o IDEA
o < None >
•
Signature Type—select the type of signature using the drop-down menu.
Signature types include:
o RSA-MD5 (Autack)
o RSA-MD5 (S/Mime)
o RSA-SHA1 (S/Mime)
o < None >
•
Expected Receipt—use the drop-down menu to select the type of receipt you expect to
receive from the recipient. Options include:
o Unsigned MDN
o MDN signed using RSA-MD5
o MDN signed using RSA-SHA1
o TCIF IA Receipt
o AUTACK signed using RSA-MD5
o < None >
•
Remove CRLF from EDI Data—check this box to remove all return breaks from the EDI
data. This option only needs to be used when sending to Templar 4.
•
Compress Data—when checked, Templar 5 will compress the data before sending.
•
Use Filename in Content-Disposition—when checked, Templar 5 will place the original
filename in the Content-Disposition Header of the outbound transaction.
•
Monitor Directory—specify the Trading Partner Agreement directory in which non-EDI
data will be placed. Anything placed in this directory will be picked up, wrapped in an EDI
header and footer, and sent as an X12 document automatically by Templar 5.
•
File Pickup Mask—Templar 5 will only pick up files from the monitor directory that have
filenames that correspond to the masks listed here. Multiple file masks for pick up can be
specified by separating them with a comma. (i.e. *.dat, *.edi)
•
Custom MIME Header—Templar 5 will allow you to include additional custom MIME
headers in your outbound transactions when this option is checked. Once Enabled click
the “Edit” button to Add, Remove, or Change the custom MIME headers that are included
on outbound transactions for that Trading Partner Agreement.
•
Send Transport—the Send Transport section of the Send Policy Tab allows you to
specify how data will be transmitted
o Active Transport—use the drop-down menu to specify how the data will be sent
to the Remote Trading Partner
• Email (AS1)
• File Transfer
• TCP Direct
• Web Interface (AS2)
• FTP (AS3)
• TCP with SSL
• SSH
o Each type of Active Transport requires its own parameters
• Email (AS1)
• MIME Message Size (KB)—specify a size for the message via
email. If the encrypted file is larger than the size specified
Templar 5 will split it into pieces of the size specified here and
send them separately. The receiving Templar 5 will put these
pieces back together when decrypting the file. Setting this to
zero will turn this function off.
• Recipient— the email address Templar 5 will send files to.
• Sender— the email address files will be sent from.
• Retry Times—the number of times that Templar 5 should try
the connection in the event of connection failure before
producing an error.
• Retry Delay—how many seconds Templar 5 should wait
before trying the connection in the event of connection failure
before producing an error.
• File Transfer
• Destination Folder—the folder where the data will be placed
• Run Command—a batch command to be executed on the data
prior to sending. Can pass the same parameters as the
Receive Run Command.
TCP Direct
• Host Name—the name of the remote Trading Partner’s TCP
host to which the data will be sent. IP address or DNS name is
acceptable.
• Port Number—the port number on remote Trading Partner’s
TCP server through which the connection will be made.
• Retry Times—the number of times that Templar 5 should try
the connection in the event of connection failure before
producing an error.
• Retry Delay—how many seconds Templar 5 should wait
before trying the connection in the event of connection failure
before producing an error.
HTTP(S) (AS2)
73
•
•
•
•
•
•
•
•
•
•
•
74
Host Name—the name of the remote Trading Partner’s
HTTP(s) host (IP address or DNS name) to which the data will
be sent.
Script—a script to run which would provide access or specific
instructions for communicating through the Web Interface on
Remote Trading Partner’s web server (i.e., a, CGI, Java or ASP
Script).
AS2 From Header—your unique AS2 ID
AS2 To Header—your partner’s unique AS2 ID
Port Number—the port number on the remote Trading
Partner’s HTTP(S) server through which the connection will be
made. You can click on the Use Standard Port Button to set
the port to 80.
Retry Times—the number of times that Templar 5 should try
the connection in the event of connection failure before
producing an error.
Retry Delay—how many seconds Templar 5 should wait
before trying the connection in the event of connection failure
before producing an error.
Request Synchronous Receipt—when checked, Templar 5
will request that the MDN receipt come back on the same open
HTTP(S) connection as the original file was sent over.
Enable SSL—when checked, Templar 5 will send the file over
HTTPS using SSL v3.
Basic HTTP Authentication Username—if the receiving web
server uses Basic Authentication the username is specified
here.
Basic HTTP Authentication Password— if the receiving web
server uses Basic Authentication the password is specified
here.
•
FTP (AS3)
• Host Name—the name of the remote Trading Partner’s FTP
host (IP address or DNS name) to which the data will be sent.
• User ID—the user ID to use to access the FTP site.
• Password—the password to use for access to the FTP site.
• Destination Folder—the subfolder in the FTP directory into
which the data will be saved.
• AS3 From Header—your unique AS3 ID
• AS3 To Header—your partner’s unique AS3 ID
• Port Number—the port number on the remote Trading
Partner’s FTP server through which the connection will be
made. You can click on the Use Standard Port Button to set
the port to 21.
• Retry Times—the number of times that Templar5 should try
the connection in the event of connection failure before
producing an error.
• Secure Socket Layer—the type of SSL or TSL to be used in
the connection is specified here by selecting the line in the drop
down list.
• Orchestration—the specific orchestration for pulling files from
this partner is selected from the drop down list.
• Use Passive FTP More—selecting this option will over-ride the
orchestration and always force Templar 5 to always use
passive mode.
User Client Authentication—Select this option if your partner
requires you to use client authentication when trading via FTP.
TCP with SSL
• Host Name—the name of the Remote Trading Partner’s host
(IP address or DNS name) to which the data will be sent.
• Port Number—the port number on the Remote Trading
Partner’s TCP server through which the connection will be
made.
• Retry Times—the number of times that Templar 5 should try
the connection in the event of connection failure before giving
up and producing an error.
• Resume Time Limit—the break between retries until Templar
5 attempts to resend the data.
SSH
• Host Name—the name of the remote Trading Partner’s SSH
host (IP address or DNS name) to which the data will be sent.
• User ID—the user ID provided to you by the receipt recipient to
access an SSH site.
• Identity File—provided in your own SSH setup.
• Destination Folder—the folder in the SSH directory into which
the data will be saved.
• Port Number—the port number on the remote Trading
Partner’s SSH server through which the connection will be
made. You can click on the Use Standard Port Button to set
the port to 22.
•
75
Receipt Policy
The Receipt Tab area allows you to set information about what kind of receipt will be sent back to
the transmitting party.
Templar 5 will automatically send back whatever type of receipt your partner requests via
whatever mode they request if you select the <Automatic> option for Receipt Type. Choosing the
Automatic option applies to trading via email or HTTP. If you want to send back the type of MDN
requested, but via a different mode of transport choose <Automatic with Transport Override>.
This is most effective when trading via FTP or TCP. Also, you can override these with a specific
type of receipt by filling in the information listed in the Receipt Processing section.
76
o
Receipt Type—use the drop-down menu to choose a type of receipt to send.
Options include:
< None >
<Automatic>
<Automatic with Transport Override>
AUTACK NRR
Unsigned MDN
MDN Signed with MD5
MDN Signed with SHA
MDN Signed with SHA-1
o
Active Transport—once a receipt type has been chosen (other than None),
you can set how the receipt will be transmitted back to the transmitting party.
Use the drop-down menu to select a transport. Options include:
Email (AS1)
• MIME Message Size (KB)—specify a size for the receipt email
if receipt should exceed sizing limits specified it will be split into
multiple emails.
• Recipient—the email address Templar 5 will send the receipt
to.
• Sender— the email address Templar 5 will send from.
• Retry Times—the number of times that Templar 5 should try
the connection in the event of connection failure before
producing an error.
• Retry Delay—how many seconds Templar 5 should wait
before trying the connection in the event of connection failure
before producing an error.
File Transfer
• Destination Folder—the folder where the receipt will be placed
• Run Command—a script to be executed on receipt file once it
has been saved.
TCP Direct
• Host Name—the name of the remote Trading Partner’s TCP
host to which the receipt will be sent. IP address or DNS name
is acceptable.
• Port Number—the port number on remote Trading Partner’s
TCP server through which the connection will be made.
• Retry Times—the number of times that Templar 5 should try
the connection in the event of connection failure before
producing an error.
Web Interface (AS2)
• Host Name—the name of the remote Trading Partner’s
HTTP(s) host (IP address or DNS name) to which the data will
be sent.
• Script—a script to run which would provide access or specific
instructions for communicating through the Web Interface on
Remote Trading Partner’s web server (i.e., a, CGI, Java or ASP
Script).
• AS2 From Header—your unique AS2 ID
• AS2 To Header—your partner’s unique AS2 ID
• Port Number—the port number on the remote Trading
Partner’s HTTP(S) server through which the connection will be
made. You can click on the Use Standard Port Button to set
the port to 80.
• Retry Times—the number of times that Templar 5 should try
the connection in the event of connection failure before
producing an error.
• Retry Delay—how many seconds Templar 5 should wait
before trying the connection in the event of connection failure
before producing an error.
FTP (AS3)
• Host Name—the name of the remote Trading Partner’s FTP
host (IP address or DNS name) to which the data will be sent.
• User ID—the user ID to use to access the FTP site.
• Password—the password to use for access to the FTP site.
• Destination Folder—the subfolder in the FTP directory into
which the data will be saved.
• AS3 From Header—your unique AS3 ID
• AS3 To Header—your partner’s unique AS3 ID
• Port Number—the port number on the remote Trading
Partner’s FTP server through which the connection will be
made. You can click on the Use Standard Port Button to set
the port to 21.
• Retry Times—the number of times that Templar5 should try
the connection in the event of connection failure before
producing an error.
• Secure Socket Layer—the type of SSL or TSL to be used in
the connection is specified here by selecting the line in the drop
down list.
• Orchestration—the specific orchestration for pulling files from
this partner is selected from the drop down list.
• Use Passive FTP More—selecting this option will over-ride the
orchestration and always force Templar 5 to always use
passive mode.
• User Client Authentication—Select this option if your partner
requires you to use client authentication when trading via FTP.
TCP with SSL
• Host Name—the name of your host (IP address or DNS name)
to which the receipt will be sent.
• Port Number—the port number on the remote Trading
Partner’s TCP server through which the connection will be
made.
• Retry Times—the number of times that Templar 5 should try
the connection in the event of connection failure before giving
up and producing an error.
77
•
SSH
•
•
•
•
•
78
Resume Time Limit—the break between retries until Templar
5 attempts to resend the receipt.
Host Name—the name of the remote Trading Partner’s SSH
host (IP address or DNS name) to which the receipt will be
sent.
User ID—the user ID provided to you by the receipt recipient to
access an SSH site.
Identity File—provided in your own SSH setup.
Destination Folder—the folder in the SSH directory into which
the receipt will be saved.
Port Number—the port number on the remote Trading
Partner’s SSH server through which the connection will be
made. You can click on the Use Standard Port Button to set
the port to 22.
Retransmission Policy
Figure 44: New Trading Partner Agreement (Retransmission Policy Tab)
The Retransmission Policy Tab allows you to set parameters for how EDI data will be
retransmitted in the event of a transmission failure or interruption.
• Click on the Add Button. This will bring up the Retransmission Details Window.
79
Figure 45: Retransmission Policy Details
•
•
Elapsed Time (in minutes)—for each policy, you can set how long Templar 5 will wait
before retransmitting data.
Action—you can specify an action that Templar 5will take once the elapsed time is over.
Actions include:
o Retransmit—resends the MIME file. This resend will be reflected in the Tracking
Outbox.
o Send Email—send an Email about the retransmission. When you select this
action, you will be prompted to enter an Email address. This Email will contain a
message stating the Transaction ID and Interchange #, identifying that there as
been transmission failure.
o Retransmit and Send email—resend the data and send an Email about the
retransmission. When you select this action, you will be prompted to enter an
Email address.
o Complete with Error—sets the status of the transaction to Error.
o Complete with Error and Send email— sets the status of the transaction to
Error and sends an email notifying you that of the retransmission. When you
select this action, you will be prompted to enter an Email address.
o User Defined—specify a custom action usually tied to a system command (i.e.,
executing a batch file or some other program). When you select this option, you
will be prompted to type in a command to execute upon retransmission. The User
Defined Command can be passed the same parameters as the Receive Run
Command.
To Edit an existing policy,
• Double-click on the policy name in the main window. This will bring up the
Retransmission Details Window.
• You can adjust the settings for the policy as if you were creating a New Policy as
described above.
To Delete an existing policy,
• Select the policy in the main window and click the Delete Button. This will bring up the
Templar 5 Confirmation Window.
• Click on the Yes Button to delete the policy or the No Button to cancel.
Notes Tab
For each Trading Partner Agreement, you can type in free-form notes. This is an excellent place
to jot down specific requirements (such as transmission times) or alternate email addresses,
URLs, or FTP Account information.
80
Edit a Trading Partner Agreement
There are four ways to edit an existing Trading Partner Agreement.
• The first was is to double click on the Trading Partner Agreement you want to edit.
• The second way is to select the Trading Partner Agreement you want to edit. Then, click
on the Actions Button. This will bring up the Actions Button Submenu. Select the
Properties Option.
• The third way is to select the Trading Partner Agreement you want to edit. Then, select
the Actions Option from the Edit Menu. This will bring up the Actions Submenu.
Select the Properties Option from the Actions Submenu.
• The fourth way is to click on the Trading Partner Agreement you want to edit with your
secondary mouse button. This will bring up the Context-sensitive menu. Select the
Properties Option.
• All of these methods will open the Edit Trading Partner Agreement Window where you
can edit information for all of the tabs.
o General
o Receive Policy
o Send Policy
o Retransmission Policy
81
Delete a Trading Partner Agreement
There are three ways to edit an existing Trading Partner Agreement.
• The first way is to select the Trading Partner Agreement you want to edit. Then, click on
the Actions Button. This will bring up the Actions Button Submenu. Select the Delete
Option.
• The second way is to select the Trading Partner Agreement you want to edit. Then,
select the Actions Option from the Edit Menu. This will bring up the Actions Submenu.
Select the Delete Option from the Actions Submenu.
• The third way is to click on the Trading Partner Agreement you want to edit with your
secondary mouse button. This will bring up the Context-sensitive menu. Select the
Delete Option.
• All of these methods will bring up the Templar 5 Confirmation Dialog Box.
Figure 46: Delete Trading Partner Confirmation Dialog
o
o
Select the Yes Button to delete the Agreement.
Select the No Button to cancel.
Note: Deleting a Trading Partner Agreement is irreversible.
82
Certificates
A certificate is a digital document that verifies that a public key belongs to a given organization.
X.509 certificates make it possible for Templar 5 to provide encryption/decryption of data,
authentication, non-repudiation of origin, and non-repudiation of receipt.
A certificate includes
• the public key of the subject
• the subject’s distinguished name information
• the certificate issuer’s distinguished name information
• the digital signature of the certificate issuer, a serial number, an effective date, and
expiration date
• the usage of the key: encryption only, signature only, or both encryption and signature
(applies to X.509 v3 certificates)
Templar 5 utilizes certificates to provide for digital encryption and digital signatures of transmitted
data. Through public/private key technologies, these certificates ensure the validity of the data
and the identity of the sender. Templar 5 also supports X.509 v1 certificates, which are open to all
extensions.
Public key encryption uses a pair of keys for encryption and decryption. One key is called a public
key and the other is called a private key. The public key is part of the certificate and is distributed
to your trading partners. The private key is never distributed and is a secret. You and each of
your trading partners need your own key pair.
Templar 5 allows you several options when utilizing certificates and attaching them to your
partners and agreements. These options include:
• Creating a New Certificate
o Self-Signed
o A certificate request (for submission to a trusted authority)
• Importing an Existing Certificate (for a remote partner)
• Importing a Local ID (for a local partner)
Intermediate Authorities
Templar 5 comes with several Certificates for Intermediate Authorities already installed in your
system. These certificates are intended to provide validation for other certificates in a Certificate
Chain.
Trusted Root CA
Templar 5 comes with several Certificates for Trust Root Certificate Authorities (CAs) already
installed in your system. These certificates are intended to provide validation for other certificates
in a Certificate Chain.
83
Creating a New Certificate
There are two ways to create a new certificate,
• Create a Certificate Request (for submission to a certified Certificate Authority)
• Create a Self-Signed Certificate
Creating a Certificate Request
A Certificate Request generates a specially encoded text string that you can send to a certified
Certificate Authority (CA) for processing. Once processed, the CA will send a verified, digitally
signed certificate that you can use to prove the identity of your networking systems to outside
resources.
There are two ways to create a Certificate Request.
• The first way is to click on the Actions Button. This will bring up the Actions Button
Submenu. Select the New Option. This will bring up the New Submenu. Select the
Create Certificate Request Option.
• The second way is to select the Actions Option from the Edit Menu. This will bring up
the Actions Submenu. Select the New Option. This will bring up the New Submenu.
Select the Create Certificate Request Option.
Both of these methods will bring up the Create Certificate Request Window.
84
Figure 47: Create Certificate Request
•
•
There are three main tabs for which you need to specify information
o General
o Contact
o Address
There is also a general property of the certificate request that is independent of any
specific type of information.
o Key Generation—the size of the public/private key pairs that will be used to
encrypt messages using this certificate. Use the drop-down menu to select a key
size.
85
Figure 48: Create Certificate Request (General Tab)
•
86
The General Tab provides basic information about the company to which the certificate
will be assigned.
o Country—use the drop-down menu to select the country in which the Templar 5
application is installed
o Organization—the full name of your company
o Organizational Unit—the division to which the certificate will be assigned
o Email address—the email address of the requesting party. This should be a
general email box of a person or entity responsible for Templar 5.
Figure 49:Create Certificate Request (Contact Tab)
•
The Contact Tab provides basic information about the individual requesting the
certificate.
o Common Name—the name of the person requesting the certificate.
o Title—common title within the company (i.e., Manager of Information Services)
o Phone number—department phone number.
87
Figure 50: Create Certificate Request (Address Tab)
•
The Address Tab provides more detailed information about the company to which the
certificate will be assigned. This information will be included in the certificate
o Street Address—the address of your company
o Locality— City or Province
o State or Province—the state or province in which your company is located
o Zip/Postal Code—your postal code
When you are finished providing information, click the OK Button to generate the request. This
will bring up the Templar 5 Confirmation Dialog Box.
Figure 51: Generate Certificate Request Confirmation Dialog
Click the OK Button again to confirm the creation of your Certificate Request.
88
Figure 52: Certificate Request Details Window
If the request is generated properly, Templar 5 will display the Request Details Window.
• Request String—the text in the main window is the Certificate Request. This entire string
of characters must be provided to the Certificate Authority. Most authorities have online
forms that you can simply paste in the string. Templar 5 allows you to:
Figure 53: Certificate Request (copy to clipboard)
o
Copy—copy the entire string to the clipboard for pasting later. If you click this
button, Templar 5 will display a Confirmation Dialog Box reminding you to
Save Private Key.
89
Figure 54: Certificate Request (save certificate)
Save—save the string to a text file on your hard drive. If you click this button,
Templar 5 will display a standard Save Window for you to specify a file name
and location for your Certificate Request.
Private Key—when a certificate is generated by a Certificate Authority, the certificate is
created based upon the information you supplied. In order for you to import that
certificate, it must establish the validity of your system’s identity. That is done through a
Private Key, which is generated during the Certificate Request process. If you do not
save the Private Key (by clicking the Save Private Key Button), there will be no way for
the certificate to validate your identity when you import it into Templar 5.
o
•
90
Creating A Self-Signed Certificate
When you and your trading partner don’t need to worry about a validated identify, you can use a
Self-Signed Certificate to generate your public/private key pair.
There are two ways to create a Self-Signed Certificate.
• The first way is to click on the Actions Button. This will bring up the Actions Button
Submenu. Select the New Option. This will bring up the New Submenu. Select the
Self-Signed Certificate Option.
• The second way is to select the Actions Option from the Edit Menu. This will bring up
the Actions Submenu. Select the New Option. This will bring up the New Submenu.
Select the Self-Signed Certificate Option.
Both of these methods will bring up the Create Certificate Window.
91
Figure 55: Create Self-Signed Certificate
•
•
92
There are three main tabs for which you need to specify information
o General
o Contact
o Address
There are also general properties to set for your Certificate.
o Certificate Alias—a unique name for the specific certificate
o Effective Date Range—use the From Date and To Date to set when your
Certificate was issued and when it will expire.
o Key Usage—set the types of activities for which this certificate will be used.
Signature—check this box to allow this certificate’s keys to be used as a
digital signature
Encryption—check this box to allow this certificate’s keys to be used in
encryption
Certificate Version—use the drop-down box to select a version of
certificate. Options include.
• X.509v3—a certificate with additional security extensions (such
as basic constraints, key usage, and subjectAltName
• X.509v1—a certificate without security extensions
Key Generation—the size of the public/private key pairs that will be
used to encrypt messages using this certificate.
Figure 56: Create Self-Signed Certificate (General Tab)
•
The General Tab provides basic information about the company to which the certificate
will be assigned.
o Country—use the drop-down menu to select the country in which your business
resides
o Organization—the name of your company
o Organizational Unit—the division to which the certificate will be assigned
o Email address—the email address of the requesting party
93
Figure 57: Create Self-Signed Certificate (Contact Tab)
•
94
The Contact Tab provides basic information about the individual requesting the certificate
o Common name—the name of the certificate creator
o Title—common title within the company (i.e., Manager of Information Services)
o Phone Number—department phone number
Figure 58: Create Self-Signed Certificate (Address Tab)
•
The Address Tab provides more detailed information about the company to which the
certificate will be assigned. This information will be included in the certificate
o Street Address—the address of your company
o Locality—city or province
o State or Province—the state or province in which your company is located
o Zip/Postal Code—your postal code
When you are finished providing information, click the OK Button to generate the request. This
will bring up the Templar 5 Confirmation Dialog Box.
Click the OK Button again to confirm the creation of your Certificate Request.
Templar 5 will display the Successfully Created Dialog.
Click the OK Button to finish the creation.
The new Certificate will appear in the Local Certificates window.
95
Importing Certificates
There are two types of Certificates that you can import.
• Remote (Public Certificate Files)
• Local (Digital ID - Private Certificate Files)
Importing a Remote Certificate
There are two ways to import a Remote Certificate.
• The first way is to click on the Actions Button. This will bring up the Actions Button
Submenu. Select the Import Option. This will bring up the Import Submenu. Select the
Certificate Option.
• The second way is to select the Actions Option from the Edit Menu. This will bring up
the Actions Submenu. Select the Import Option. This will bring up the Import
Submenu. Select the Remote Option.
Both of these methods will bring up the Import Certificate Window.
Figure 59: Import a Certificate
•
•
96
Click on the … Button to open the Open Window. Use the navigation to locate the
Certificate File to import.
Once you have located the file, select it and click the Open Button. This will open the
Import Certificate Window.
Figure 60: Import Certificates Details Window
o
o
The Import Certificates Window displays the certificate prior to importing. Much
like viewing a certificate when adding it to a Local Trading Partner or Remote
Trading Partner, you can verify all of the certificate information prior to finalizing
the import. Information about this certificate is contained in the three tabs.
General
Details
Certification Path—other certificates attached to this one in the
Certificate Chain
When you are satisfied with the details of the Certificate, click on the Import
Button. This will bring up the Templar 5 Confirmation Dialog.
97
Figure 61: Import Certificates Confirmation Dialog
o
Click on the Yes Button to confirm and finalize the import.
Figure 62: Import Certificate Success Confirmation
o
Templar 5 will display the Templar 5 Success Window.
Click the OK Button to finish.
After closing the Templar 5 Success Window, you will be returned to the Import Certificates
Window. Click the Cancel Button to exit.
98
Importing a Local Certificate (Digital ID)
A Local Certificate is a combination of public key and private key. Storing a private key with a
certificate is a serious security risk. Classified Information Inc, recommends that you only export
Local Certificates for backup purposes.
There are two ways to import a Local Certificates
• The first way is to click on the Actions Button. This will bring up the Actions Button
Submenu. Select the Import Option. This will bring up the Import Submenu. Select the
certificate.
• The second way is to select the Actions Option from the Edit Menu. This will bring up
the Actions Submenu. Select the Import Option. This will bring up the Import
Submenu. Select the certificate.
Both of these methods will bring up the Import Digital ID Window.
Figure 63: Import a Digital ID
•
•
•
Click on the … Button to open the Open Window. Use the navigation to locate the
Digital ID to import.
Once you have located the file, you need to enter the Challenge Phrase. This phrase (a
combination of characters, letters, and numbers) was entered when the Digital ID was
exported.
When you have entered the Challenge Phrase, click the OK. This will bring up the
Certificate Import Window.
99
Figure 64: Certificate Import Window
o
o
100
The Certificate Import Window displays the certificate prior to importing. Much
like viewing a certificate when adding it to a Local Trading Partner or Remote
Trading Partner, you can verify all of the certificate information prior to finalizing
the import. Information about this certificate is contained in the three tabs:
General
Details
Certification Path—other certificates attached to this one in the
Certificate Chain
When you are satisfied with the details of the Certificate, click on the Import
Button. This will bring up the Templar 5 Confirmation Dialog.
Figure 65: Import Certificate Confirmation
o
Click on the Yes Button to confirm and finalize the import.
Figure 66: Import Certificate Success
o
If there were no errors in the import process, Templar 5 will display the Templar
5 Success Window. Click the OK Button to finish.
After closing the Templar 5 Success Window, you will be returned to the Import Certificates
Window. Click the Cancel Button to exit.
101
Exporting Certificates
Exporting a Certificate allows you to quickly share your public key with your trading partners.
Templar 5 allows you to export:
• Certificates
• Digital IDs (Public and Private Keys)
Export a Certificate
Templar 5 allows you to Export a Certificate in four different ways
• Certificate to a File
• Certificate via e-mail
• Certificate to a File (Templar 4.0 Compatible)
• Certificate via e-mail (Templar 4.0 Compatible)
Export a Certificate to a File
There are four ways to Export a Certificate to a File from the Certificate Window
• First, click on the Actions Button. This will bring up the Actions Button Submenu.
From the Actions Button Submenu, select the Export Option. This will bring up the
Export Submenu. Select the Certificate to a File Option.
• Second, click on the Edit Menu and select the Export Option. This will bring up the
Export Submenu. Select the Certificate to a File Option.
• Third, click on the Certificate you want to export with your secondary mouse button. This
will bring up the Context-Sensitive Menu. From the Context-Sensitive Menu, select the
Export Option. This will bring up the Export Submenu. Select the Certificate to a File
Option.
• Fourth, double click on the Certificate you want to export. This will open the Certificate
into the Certificate Details Window.
o Click on the Export Button. This will bring up the Templar 5 Confirmation
Dialog. To export just the Certificate, click on the No Button.
All of these methods will bring up the Save Window.
102
Figure 67: Export a Certificate to a File (save file window)
•
•
To save the Certificate to a *.CER file, you simply need to specify a name and location.
o Look In—Use the drop-down menu to search your hard drive for the location in
which you wish to save the file
o File Name—specify a name for the file. Templar 5 will automatically append the
.CER extension to whatever name you select.
When you are satisfied, click the Save Button to save the file to the location on your hard
drive.
Export a Certificate via Email
There are four ways to Export a Certificate via Email from the Certificate Window.
• First, click on the Actions Button. This will bring up the Actions Button Submenu.
From the Actions Button Submenu, select the Export Option. This will bring up the
Export Submenu. Select the Certificate via Email.
• Second, click on the Edit Menu and select the Export Option. This will bring up the
Export Submenu. Select the Certificate via Email.
• Third, click on the Certificate you want to export with your secondary mouse button. This
will bring up the Context-Sensitive Menu. From the Context-sensitive Menu, select the
Export Option. This will bring up the Export Submenu. Select the Certificate via
Email.
• Fourth, double click on the Certificate you want to Export. This will open the Certificate
into the Certificate Details Window.
o Click on the Export Button. This will bring up the Templar 5 Confirmation
Dialog. To export just the Certificate, click on the No Button.
• All of these methods will bring up the Send Certificate via Email Window.
103
Figure 68: Export a Certificate via Email (specify email address)
•
•
104
There are two fields for which you can enter information to send the Certificate
information via email
o Email Address—this field is required. You must specify an Email address to
which to send the Certificate. This is not the same Email address that someone
might use to receive data from Templar 5.
o Additional Information—you can use this field to enter a message to the
recipient such as what the Certificate is and who it is from.
When you are satisfied with the email address and any additional information, press the
OK Button to send the email. If there are no errors in sending, the email will be
processed immediately.
Templar 4.0 Compatibility
In recognizing that some of your trading partners may be working with older versions of the
Templar Software, Templar 5 allows you to export certificates that are compatible with those older
versions.
There are four ways to Export a Certificate via Email or File that is compatible with Templar 4.0
from the Certificate Window.
• First, click on the Actions Button. This will bring up the Actions Button Submenu.
From the Actions Button Submenu, select the Export Option. This will bring up the
Export Submenu. Select either the
o Certificate to a File (Templar 4.0 Compatible)
o Certificate via email (Templar 4.0 Compatible)
• Second, click on the Edit Menu and select the Export Option. This will bring up the
Export Submenu. Select either the
o Certificate to a File (Templar 4.0 Compatible)
o Certificate via email (Templar 4.0 Compatible)
• Third, click on the Certificate you want to export with your secondary mouse button. This
will bring up the Context-Sensitive Menu. From the Context-Sensitive Menu, select the
Export Option. This will bring up the Export Submenu. Select either the
o Certificate to a File (Templar 4.0 Compatible)
o Certificate via email (Templar 4.0 Compatible)
• Fourth, double click on the Certificate you want to Export. This will open the Certificate
into the Certificate Details Window.
o Click on the Export Button. This will bring up the Templar 5 Confirmation
Dialog. To export just the Certificate, click on the No Button.
The actual process by which to export a Certificate to a File or via email for Templar 4.0 is exactly
the same as Exporting a Certificate to a File or Exporting a Certificate via Email.
105
Export a Digital ID (Local Certificate)
A Digital ID is the combination of a Certificate and Private Key. This export process should only
be used for backup purposes.
There are four ways to Export a Digital ID from the Certificate Window
• First, click on the Actions Button. This will bring up the Actions Button Submenu.
From the Actions Button Submenu, select the Export Option. This will bring up the
Export Submenu. Select the Certificate and Private Key (Digital ID).
• Second, click on the Edit Menu and select the Export Option. This will bring up the
Export Submenu. Select the Certificate and Private Key (Digital ID).
• Third, click on the Certificate you want to export with your secondary mouse button. This
will bring up the Context-Sensitive Menu. From the Context-Sensitive Menu, select the
Export Option. This will bring up the Export Submenu. Select the Certificate and
Private Key (Digital ID).
• Fourth, double click on the Certificate you want to Export. This will open the Certificate
into the Certificate Details Window.
o Click on the Export Button. This will bring up the Templar 5 Confirmation
Dialog. To export just the Certificate, click on the No Button.
All of these methods will bring up the Templar 5 Confirmation Window.
Figure 69: Export a Digital ID WARNING
•
106
Templar 5 recommends that you only export a Digital ID for backup purposes.
You should never provide your Private Key to a Trading Partner.
o To continue with the export, click the OK Button. This will bring up the Export
Digital ID Window.
o To abort the export, click the Cancel Button.
Figure 70: Export Digital ID
•
•
•
•
•
Filename—choose a filename for the Digital ID. If you want to save the file to a specific
location on your hard drive, click the … Button. This will bring up Templar 5’s default
Save Window where you can find a location and specify a file name.
Challenge Phrase—type in a phrase or string of characters that must be re-entered
when this Digital ID is imported into Templar 5 (that verifies the identity of the person
importing the ID).
Confirm—retype the Challenge Phrase
Export complete certificate chain—check this box to export the entire certificate chain
Use enhanced security—check this box to use enhanced security.
107
Viewing a Certificate
From the Certificate Window, you can view the details about a Certificate.
There are three ways to view the Certificate Details for a certificate that you have highlighted by
clicking on it.
• First, click on the Actions Button. This will bring up the Actions Button Submenu.
From the Actions Button Submenu, select the Properties Option.
• Second, click on the Edit Menu and select the Properties Option.
• Third, double-click on the Certificate.
All of these methods will open the Certificate into the Certificate Details Window.
There are three tabs of information within the Certificate Details Window.
• General
• Details
• Certification Path
108
General Tab
Figure 71: View Certificate (General Tab)
The Certificate Details >> General Tab displays basic information about the Certificate such as
• Certificate Intentions—what the certificate is intended to do such as
o Provide a digital signature
o Provide data encryption
• Issued to—to whom the certificate was issued
• Issued by—who issued the certificate
• Valid from—the date range from which the certificate is valid
109
Details Tab
Figure 72: View Certificate (Details Tab)
The Certificate Details >> Details Tab displays more detailed information about the Certificate
such as.
• Version
• Serial Number
• Signature Algorithm
• Issuer
• Valid From
• Valid To
• Subject
• Public Key Algorithm
• Public Key Data
• Thumbprint
• KeyUsage
110
Certification Path Tab
Figure 73: View Certificate (Certification Path Tab)
The Certificate Details >> Certification Path Tab displays information about other certificates
upon which this certificate is dependent for validation. This is called the Certificate Chain.
111
Certificate Revocation
CRLs (Certificate Revocation List) are published by Certificate Authorities, and are used to
prevent Templar 5 from using a compromised certificate. Entries in here are made automatically
whenever you import a Remote Certificate. Templar 5 will automatically place that Certificate into
the list so that you can manage its revocation settings.
For each Certificate in the Certificate Revocation Window, you can accomplish two tasks:
• View and Edit CRL Properties
• Delete CRL Properties
View and Edit CRL Properties
The CRL Properties of a Certificate determine how and when it will be checked against Certificate
Revocation Lists.
There are three ways to View the CRL Properties of a Certificate.
• First, click on the Actions Button. This will bring up the Actions Button Submenu.
From the Actions Button Submenu, select the Properties Option.
• Second, highlight the Certificate for which you want to review the CRL. Then click on the
Edit Menu and select the Properties Option.
• Third, click on the Certificate for which you want to modify the CRL Properties. This will
bring up the Context-sensitive Menu. From the Context-sensitive Menu, select the
Properties Option.
All of these methods will bring up the CRL Details Window.
Figure 74: View CRL Details
•
112
You can set the following CRL Properties for each certificate:
o Issuer—the name of the issuer of the Certificate. This will be auto-populated by
information contained in the Certificate.
o Distribution Type—use the drop-down menu to determine how Templar 5 will
check the status of this Certificate. Options include:
No CRL Checking
CRL List Download (Full and Delta)—downloading a full list or just
downloading changes
OCSP Server—Verisign and Entrust’s CRL server
o URL—the URL where the CRL can be downloaded
o
o
o
Update Frequency—use the drop-down menu to determine how frequently the
CRL status will be checked. Options include:
Specified by issuer—this is information contained within the certificate
Hourly
Twice Daily
Daily
Weekly
Bi-Weekly
Monthly
Three Monthly
Six Monthly
Annually
Last Update—the date and time of the last update of this certificate’s CRL status
Next Update—based upon the specifications in Update Frequency, the date
and time of the next update of this certificate’s CRL status.
Delete a CRL
There are three ways to Permanently Delete a Certificate from Templar 5
• First, click on the Actions Button. This will bring up the Actions Button Submenu.
From the Actions Button Submenu, select the Delete Option.
• Second, click on the Edit Menu and select the Delete Option.
• Third, click on the Certificate you want to delete with your secondary mouse button. This
will bring up the Context-sensitive Menu. From the Context-sensitive Menu, select the
Delete Option.
All of these methods will bring up the Templar 5 Confirmation Window.
Figure 75: Permanently Delete a Certificate Confirmation Dialog
o
o
To permanently delete the Certificate, click the Yes Button.
To cancel the deletion, click the No Button.
Note: Deletion of a Certificate is irreversible.
113
Tracking Inbox
The Tracking Inbox contains both general and detailed information about incoming interchanges,
including whether they were successful, when they were received, the names and email
addresses of your trading partners, and whether digital signatures were received and receipts
were sent.
Figure 76: In-Box Window
The Tracking Inbox Window allows you to monitor incoming transmissions from trading
partners. This window is divided into four primary Filters.
• All—this displays all the transmissions including Errors, Completed, and In Progress.
• Errors—this displays only those transmissions that encountered an error.
• Completed—this displays only those transmissions that are completed.
• In Progress—this displays only those transmissions that are currently in progress.
For each transmission, you can
• Delete it
• View Properties
114
Deleting Transmissions
There are three ways to Delete a Transmission
• The first way is to click on the transmission you want to delete with your secondary
mouse button. This will bring up the Context-sensitive menu. Select the Delete Option.
• The second way is to highlight the transmission you want to delete by clicking on it once.
Then, click the Actions Button. This will bring up the Actions Button Submenu. Select
the Delete Option.
• The third way is to highlight the transmission you want to delete by clicking on it once.
Then select the Delete Option from the Edit Menu.
All of these methods will bring up the Templar 5 Confirmation Dialog Box.
Figure 77: Delete InBox Transmission Confirmation Dialog
•
Click on the OK Button to delete the transmission or the Cancel Button to abort the
deletion.
Note: Deleted transmission cannot be recovered.
Reprocess a Transmission
If a transmission encounters an error Templar 5 provides you the ability to reprocess any
transmission.
There are three ways to Reprocess a Transmission.
• The first way is to click on the transmission you want to reprocess with your secondary
mouse button. This will bring up the Context-Sensitive menu. Select the Reprocess
Option.
• The second way is to highlight the transmission you want to reprocess by clicking on it
once. Then, click the Actions Button. This will bring up the Actions Button Submenu.
Select the Reprocess Option.
• The third was is to highlight the transmission you want to reprocess by clicking on it once.
Then select the Reprocess Option from the Edit Menu.
115
Reprocess a Receipt
If a transmission encounters an error sending the Receipt Templar 5 provides you the ability to
reprocess any Receipt.
There are three ways to Reprocess a Transmission.
• The first way is to click on the transmission you want to reprocess with your secondary
mouse button. This will bring up the Context-Sensitive menu. Select the Reprocess
Receipt Only Option.
• The second way is to highlight the transmission you want to reprocess by clicking on it
once. Then, click the Actions Button. This will bring up the Actions Button Submenu.
Select the Reprocess Receipt Only Option.
• The third was is to highlight the transmission you want to reprocess by clicking on it once.
Then select the Reprocess Receipt Only Option from the Edit Menu.
Viewing Transmissions
There are three ways to View a Transmission.
• The first way is to click on the transmission you want to view with your secondary mouse
button. This will bring up the Context-sensitive menu. Select the Properties Option.
• The second way is to highlight the transmission you want to view by clicking on it once.
Then, click the Actions Button. This will bring up the Actions Button Submenu. Select
the Properties Option.
• The third way is to highlight the transmission you want to view by clicking on it once.
Then select the Properties Option from the Edit Menu.
All of these methods will bring up the Tracking Details Window.
116
Figure 78: Tracking Details Window
•
The Tracking Details Window provides you a number of information data elements
about the transmission. This data includes:
o Tracking Number—the internal, unique tracking number assigned to the
transmission by Templar 5
o From—the Remote Trading Partner from whom the transmission originated
o To— the Local Trading Partner to whom the transmission is intended
o Direction—whether the file was incoming or outgoing
o Start Date—when the transmission was officially started
o Status—the status of the transmission (this coincides with the filters)
Error
Completed
In-Progress
o Method—the transmission method as specified by the Trading Partner
Agreement between the two partners
o Notes—the original filename
o Details—details of each file attached to the transmission. Details include:
Date/Time—the date and time each step occurred
Filename—the name of the file in each step of the transaction
Status—the status of the transmission
117
Viewing an Attached File
An attached file can only be viewed from within the Tracking Details Window. There are three
ways to access the Tracking Details Window.
• The first way is to click on the transmission you want to view with your secondary mouse
button. This will bring up the Context-Sensitive menu. Select the Properties Option.
• The second way is to highlight the transmission you want to view by clicking on it once.
Then, click the Actions Button. This will bring up the Actions Button Submenu. Select
the Properties Option.
• The third way is to highlight the transmission you want to view by clicking on it once.
Then select the Properties Option from the Edit Menu.
All of these methods will bring up the Tracking Details Window.
Figure 79: Viewing an Attached File
•
118
There are two ways to view the attached file of the transmission.
o The first way is to double click on the file name within the Details Section at the
bottom of the Tracking Details Window.
o The second way is to highlight the file you want to view by clicking on it. Then,
click the View File Button.
o Both ways will bring up the File Details Window with the file displayed as an EDI
document.
Sorting in T5
To sort ascending simply click the column you want to sort by.
To sort descending just hold Shift and click the column you want to sort by.
Sorting is not restricted to Templar 5’s Tracking Inbox. All screens within the T5 client that are
table based can be sorting; including the Tracking Outbox, Certificates, Trading Partners, and
Trading Partner Agreements.
Searching in T5
Searching is across all columns, and proceeds from the row after the currently selected row.
Entering text in the "Find" box and clicking OK will locate the next row containing that value,
clicking OK again will find the next row, and so on.
Searching is not restricted to Templar 5’s Tracking Inbox. All screens within the T5 client that are
table based can be searched; including the Tracking Outbox, Certificates, Trading Partners, and
Trading Partner Agreements.
Figure 803: Searching the Tracking Inbox
119
Tracking Outbox
The Tracking Outbox provides both general and detailed information about outgoing
interchanges, including their destination, whether they were successful, when they were sent,
whether they were retransmitted, the names of your trading partners, and whether or not digital
signatures were sent and receipts were received. Besides using the Outbox for keeping track of
outgoing transactions.
Figure 133: Out-Box Window
The Tracking Outbox Window allows you to monitor outgoing transmissions to Trading
Partners. This window is divided into four primary Filters.
• All—this displays all the transmissions including Errors, Completed, and In Progress.
• Errors—this displays only those transmissions that encountered an error.
• Completed—this displays only those transmissions that are completed.
• In Progress—this displays only those transmissions that are currently in progress.
For each transmission, you can
• Delete it
• Reprocess
• Set to Error
• View Properties
120
Deleting Transmissions
There are three ways to Delete a Transmission
• The first way is to click on the transmission you want to delete with your secondary
mouse button. This will bring up the Context-Sensitive menu. Select the Delete Option.
• The second way is to highlight the transmission you want to delete by clicking on it once.
Then, click the Actions Button. This will bring up the Actions Button Submenu. Select
the Delete Option.
• The third way is to highlight the transmission you want to delete by clicking on it once.
Then select the Delete Option from the Edit Menu.
All of these methods will bring up the Templar 5 Confirmation Dialog Box.
Figure 81: Delete Outbox Transmission Confirmation Dialog
•
Click on the OK Button to delete the transmission or the Cancel Button to abort the
deletion.
Note: Deleted transmissions cannot be recovered.
Reprocess a Transmission
If a transmission encounters an error (or your Trading Partner wants you to resend a
transmission), Templar 5 provides you the ability to reprocess any transmission.
There are three ways to Reprocess a Transmission.
• The first way is to click on the transmission you want to reprocess with your secondary
mouse button. This will bring up the Context-Sensitive menu. Select the Reprocess
Option.
• The second way is to highlight the transmission you want to reprocess by clicking on it
once. Then, click the Actions Button. This will bring up the Actions Button Submenu.
Select the Reprocess Option.
• The third way is to highlight the transmission you want to reprocess by clicking on it once.
Then select the Reprocess Option from the Edit Menu.
121
Set a Transmission to Error
If a transmission encounters an issue where no receipt is going to be returned, Templar 5
provides you the ability to set these transactions to an error status.
There are three ways to Set a Transmission to Error.
• The first way is to click on the transmission you want to reprocess with your secondary
mouse button. This will bring up the Context-Sensitive menu. Select the Set to Error
Option.
• The second way is to highlight the transmission you want to reprocess by clicking on it
once. Then, click the Actions Button. This will bring up the Actions Button Submenu.
Select the Set to Error Option.
• The third way is to highlight the transmission you want to reprocess by clicking on it once.
Then select the Set to Error Option from the Edit Menu.
Viewing Transmissions
There are three ways to View a Transmission.
• The first way is to click on the transmission you want to view with your secondary mouse
button. This will bring up the Context-Sensitive menu. Select the Properties Option.
• The second way is to highlight the transmission you want to view by clicking on it once.
Then, click the Actions Button. This will bring up the Actions Button Submenu. Select
the Properties Option.
• The third way is to highlight the transmission you want to view by clicking on it once.
Then select the Properties Option from the Edit Menu.
All of these methods will bring up the Tracking Details Window.
122
Figure 82: Tracking Details Window
•
The Tracking Details Window provides you a number of information data elements
about the transmission. This data includes:
o Tracking Number—the internal, unique tracking number assigned to the
transmission by Templar 5
o From—the Local Trading Partner from who the transmission originated
o To—the remote Trading Partner to whom the transmission is intended
o Direction—whether the transaction was incoming or outgoing
o Start Date—when the transmission was officially started
o Status—the status of the transmission (this coincides with the filters)
Error
Completed
In-Progress
o Method—the transmission method as specified by the Trading Partner
Agreement between the two partners
o Notes—the original filename
o Details—details of each file attached to the transmission. Details include:
Date/Time—the date and time of each step of the transaction
Filename—the name of the file during each step of the transaction
Status—the status of the transmission
123
Viewing an Attached File
An attached file can only be viewed from within the Tracking Details Window. There are three
ways to access the Tracking Details Window.
• The first way is to click on the transmission you want to view with your secondary mouse
button. This will bring up the Context-Sensitive menu. Select the Properties Option.
• The second way is to highlight the transmission you want to view by clicking on it once.
Then, click the Actions Button. This will bring up the Actions Button Submenu. Select
the Properties Option.
• The third way is to highlight the transmission you want to view by clicking on it once.
Then select the Properties Option from the Edit Menu.
All of these methods will bring up the Tracking Details Window.
Figure 83: Viewing an Attached File
•
124
There are two ways to view the attached file of the transmission
o The first way is to double click on the file name within the Details Section at the
bottom of the Tracking Details Window.
o The second way is to highlight the file you want to view by clicking on it. Then,
click the View File Button.
o Both ways will bring up the File Details Window with the file displayed.
Data
Every transmission that comes into or goes out of Templar 5 is logged in the Tracking Inbox and
Tracking Outbox. This data includes information about the transmission (i.e., who it’s from, where
it’s going to, what it contains, etc.) and the transmission status (i.e., completed, error, etc.). This
information can get quite large. Because of that, Templar 5 allows you to run jobs to remove data
from these lists. The types of jobs that you can schedule are
• Archive
• Delete
125
Archive Data
To archive data,
• Click on the Archive and Delete Data Icon in the navigation window. This will open the
Archive and Delete Window into the main area.
Figure 84: Archive Data Window
•
126
You can specify the following parameters to schedule Templar 5 to Archive and Delete
Data:
o Status—the status of the transmission that you want to archive. Options include:
Completed
Errors
Both
o Criteria—the criteria that the transmission must match in order to be archived.
Figure 85: Archive Data (set job parameters)
Start date / time—the starting date and time of the transmissions to be
archived. Click on the drop-down menu to open the calendar for date
selection. The time will automatically default to the current time. Click in
the field to modify the time.
End date / time—the ending date and time of the transmissions to be
archived. Click on the drop-down menu to open the calendar for date
selection. The time will automatically default to the current time. Click in
the field to modify the time.
Older than (in days)—select this radio button to specify any
transmissions that are older than a certain number of days.
Tracking range—select this radio button to specify transmission tracking
numbers.
Archive to Folder—specify a folder on your hard drive in which to archive the
data.
o
When you are finished, click the Run Archive and Delete Button to run the job immediately
or the Cancel Button to cancel the job.
127
Delete Data
To delete data,
• Click on the Delete Data Icon in the navigation window. This will open the Delete
Window into the main area.
Figure 86: Delete Data Window
•
128
You can specify the following parameters to schedule Templar 5 to Delete Data:
o Status—the status of the transmission that you want to delete. Options include:
Completed
Errors
Both
o Criteria—the criteria that the transmission must match in order to be deleted.
Figure 87: Delete Data (set parameters)
Start date / time—the starting date and time of the transmissions to be
deleted. Click on the drop-down menu to open the calendar for date
selection. The time will automatically default to the current time. Click in
the field to modify the time.
End date / time—the ending date and time of the transmissions to be
deleted. Click on the drop-down menu to open the calendar for date
selection. The time will automatically default to the current time. Click in
the field to modify the time.
Older than (in days)—select this radio button to specify any
transmissions that are older than a certain number of days
Tracking range—select this radio button to specify transmission tracking
numbers.
When you are finished, click the Run Delete Button to run the job immediately or the Cancel
Button to cancel the job.
129
Audit Log
The Audit Log provides you information about every activity that you perform in Templar 5. For
the purposes of logging, these activities are categorized accordingly and can be viewed by
clicking on their respective icon in the Navigation Window.
• Error—any errors that have occurred in Templar 5. Errors include:
o Transmission errors
o Connection errors
o Service errors
• Warning—warnings from Templar 5
• Diagnostic—information about the operation of Templar 5 such as
o Adding certificates successfully
o Updating a CRL
o SMTP Diagnostic
o POP Diagnostic
Successful—information about successfully completely activities within Templar 5 such
as
o Sending data
o Updating server properties
o Successfully logging in and out
For each event recorded in the Audit Log by Templar 5, you can perform the following:
• Delete an event
• View the properties of an event
Delete a Log Entry
There are three ways to Delete a Log Entry.
• The first way is to click on the log entry you want to delete with your secondary mouse
button. This will bring up the Context-Sensitive menu. Select the Delete Option.
• The second way is to highlight the log entry you want to delete by clicking on it once.
Then, click the Actions Button. This will bring up the Actions Button Submenu. Select
the Delete Option.
• The third way is to log entry the transmission you want to delete by clicking on it once.
Then select the Delete Option from the Edit Menu.
All of these methods will bring up the Templar 5 Confirmation Dialog Box.
Figure 88: Delete a Log Entry Confirmation Dialog
•
Click on the OK Button to delete the transmission or the Cancel Button to abort the
deletion.
Note: Deleted log entries cannot be recovered.
130
View the Properties of a Log Entry
There are three ways to View a Log Entry.
• The first way is to click on the log entry you want to view with your secondary mouse
button. This will bring up the Context-Sensitive menu. Select the Properties Option.
• The second way is to highlight the log entry you want to view by clicking on it once. Then,
click the Actions Button. This will bring up the Actions Button Submenu. Select the
Properties Option.
• The third way is to highlight the log entry you want to view by clicking on it once. Then
select the Properties Option from the Edit Menu.
All of these methods will bring up the Audit Log Details Window.
Figure 89: View Properties of an Audit Log Entry
•
The Audit Log Details Window provides you a number of information data elements
about the transmission. This data includes:
o Date—the date the event was logged
o Time—the time that the event was logged
o Program Name—the software component of Templar 5 that is responsible for
generating the event
o Tracking Number—a unique number assigned by Templar 5 for certain types of
events
o Message Type—the type of message. Options include:
Error
Warning
131
o
o
132
Diagnostic
Successful
Message—the specific message
Details—specific details about the event
Monitor Templar 5 Services
The Templar 5 Monitor Services window provides you an overview of what services are currently
running in your Templar 5 system. See Appendix B for a complete listing of Templar 5 Services
and their functionality.
133
Schedule Jobs
The Templar 5 Schedule Jobs utility is a useful tool to automate the cleanup of data and the
Templar 5 database. With this utility, you can schedule jobs at night that involve large amounts of
data so that those jobs don’t strain important resources.
Although there is a separate location to create Data Archive and Data Deletion jobs, all jobs
scheduled in Templar 5 are listed in the Schedule Jobs Window.
The Schedule Jobs Window allows you to create and run the following types of jobs:
• Archive and Delete
• Delete Data
• Clean Up Database
• Clean Up Audit Log
• User Defined Command
134
Editing Existing Jobs
There are three ways to Edit an Existing Job.
• The first way is to click on the job you want to edit with your secondary mouse button.
This will bring up the Context-Sensitive menu. Select the Properties Option.
• The second way is to highlight the job you want to edit by clicking on it once. Then, click
the Actions Button. This will bring up the Actions Button Submenu. Select the
Properties Option.
• The third way is to highlight the job you want to edit by clicking on it once. Then select the
Properties Option from the Edit Menu.
All of these methods will bring up the New Scheduled Job Window.
Figure 90: Edit Scheduled Job Window
•
You can modify the following for the existing Job:
o Job Type—use the drop down menu to select the job type. Options include:
Archive Data
Clean-up Database
Delete Data
User Defined Command
Parameters—click this button to set parameters for the type of job.
o
o
Schedule Type—use the drop-down menu to select when the job should recur.
Options include:
One Time
Daily
Monthly
Last Day of Month
Time—enter a time when the job should start. The default time is the current
time.
135
Select Date—select a date for the job to begin (or recur). The default date is
today’s date. Click on the drop-down arrow to open the calendar for easy date
selection.
Click the Save Button when finished to schedule the job or the Cancel Button to abort
the job.
o
•
136
Deleting Jobs
There are three ways to Delete a Job.
• The first way is to click on the job you want to delete with your secondary mouse button.
This will bring up the Context-Sensitive menu. Select the Delete Option.
• The second way is to highlight the job you want to delete by clicking on it once. Then,
click the Actions Button. This will bring up the Actions Button Submenu. Select the
Delete Option.
• The third way is to highlight the job you want to delete by clicking on it once. Then select
the Delete Option from the Edit Menu.
All of these methods will bring up the Templar 5 Confirmation Dialog Box.
Figure 91: Delete Schedule Job Confirmation Dialog
•
Click the OK Button to confirm the deletion or the Cancel Button to abort
Note: Deleted jobs cannot be recovered.
137
Adding a New Job
There are two ways to Add a New Job.
• The first way is to select the New Option from the Templar 5 Schedule Jobs Window,
Actions Button Submenu.
• The second way is to select the Actions Option from the Edit Menu. This will bring up
the Actions Submenu. Select the New Option.
Both of these methods will bring up the New Scheduled Job Window.
138
Figure 92: New Scheduled Job
•
To schedule a New Job,
o Job Type—use the drop down menu to select a job type. Options include:
Archive Data
Clean-up Database
Delete Data
Clean-up Audit Log
User Defined Command
Parameters—click this button to set parameters for the type of job.
o
o
o
Schedule Type—use the drop-down menu to select when the job should recur.
Options include:
One Time
Daily
Monthly
Last Day of Month
Time—enter a time when the job should commence. The default time is the
current time.
Select Date—select a date for the job to begin (or recur). The default date is
today’s date. Click on the drop-down arrow to open the calendar for easy date
selection.
Click the Save Button when finished to schedule the job or the Cancel Button to abort the
job.
139
Archive Data Parameters
The Archive Data Parameters function allows you to schedule a job to automatically archive data
according to your parameters and remove that data from the database.
Figure 93: Archive Data Parameters
The following parameters can be set for the Archive Data Job:
o Status—select what type of data will be archived (according to Status Message).
Options include:
Completed
Errors
Both
o Start date / time—the starting date and time of the data to be archived. Click on
the drop-down menu to open the calendar for date selection. The time will
automatically default to the current time. Click in the field to modify the time.
o End date / time—the ending date and time of the data to be archived. Click on
the drop-down menu to open the calendar for date selection. The time will
automatically default to the current time. Click in the field to modify the time.
o Older than (in days)—select this radio button to specify any transmissions that
are older than a certain number of days
o Tracking Range—select this radio button to specify data tracking numbers.
o Archive to Directory—specify a folder on your hard drive in which to archive the
data
Click the OK Button when you are satisfied with the Job Parameters.
•
140
Clean-Up Database Parameters
The Clean-Up Database Parameters function allows you to schedule a job to automatically clean
up the database (remove records that match your parameters). This should be run after a archive
or delete.
Figure 94: Clean-up Database Parameters
•
The following parameters can be set for the Clean-Up Database Job:
o Status—select what type of data will be cleaned (according to Status Message).
Options include
Completed
Errors
Both
o Start date / time—the starting date and time of the data to be cleaned. Click on
the drop-down menu to open the calendar for date selection. The time will
automatically default to the current time. Click in the field to modify the time.
o End date / time—the ending date and time of the data to be cleaned. Click on
the drop-down menu to open the calendar for date selection. The time will
automatically default to the current time. Click in the field to modify the time.
o Older than (in days)—select this radio button to specify any transmissions that
are older than a certain number of days.
o Tracking range—select this radio button to specify data tracking numbers. Once
selected you can specify:
Click the OK
Button when you are satisfied with the Job Parameters.
141
Delete Data Parameters
The Delete Data Parameters function allows you to schedule a job to automatically delete data
according to specific parameters. Note: Deleted data cannot be recovered.
Figure 95: Delete Data Parameters
The following parameters can be set for the Delete Job:
o Status—select what type of data will be cleaned (according to Status Message).
Options include:
Completed
Errors
Both
o Start date / time—the starting date and time of the data to be deleted. Click on
the drop-down menu to open the calendar for date selection. The time will
automatically default to the current time. Click in the field to modify the time.
o End date / time—the ending date and time of the data to be deleted. Click on the
drop-down menu to open the calendar for date selection. The time will
automatically default to the current time. Click in the field to modify the time.
o Older than (in days)—select this radio button to specify any transmissions that
are older than a certain number of days.
o Tracking range—select this radio button to specify data tracking numbers.
Click the OK Button when you are satisfied with the Job Parameters.
•
142
Clean-Up Audit Log Parameters
The Clean-Up Audit Log Parameters function allows you to schedule a job to automatically clean
up the audit log (remove records that match your parameters).
Figure 148: Clean-up Audit Log Parameters
The following parameters can be set for the Clean-Up Audit Log Job:
o Status—select what type of data will be cleaned (according to Status Message).
Options include
Completed
Errors
Both
o Start date / time—the starting date and time of the data to be cleaned. Click on
the drop-down menu to open the calendar for date selection. The time will
automatically default to the current time. Click in the field to modify the time.
o End date / time—the ending date and time of the data to be cleaned. Click on
the drop-down menu to open the calendar for date selection. The time will
automatically default to the current time. Click in the field to modify the time.
o Older than (in days)—select this radio button to specify any transmissions that
are older than a certain number of days.
Click the OK Button when you are satisfied with the Job Parameters.
•
143
User Defined Command Parameters
Figure 96: User-Defined Parameters
•
144
The following parameters can be set for the User Defined Command Job
o Enter Parameters—enter the command line parameters you would like run
against the data.
View Permissions
The Templar 5 View Permissions Window provides you an overview of what permissions are
currently assigned to your user account. See Appendix D for a complete listing of Templar 5
Permissions.
145
Templar 5 Server
The Templar 5 Client application allows you to specify a number of different Templar 5 Servers in
the Templar 5 Server Locations Window. In this window, you can.
• Add Templar 5 Server Locations
• Delete Templar 5 Server Locations
Templar 5 Servers on a different network subnet than the Client will need to be added manually.
146
Add a Templar 5 Server
To Add a Templar 5 Server
• Click on the Add Button. This will bring up the Add Server Window.
Figure 97: Add a Templar 5 Server
•
•
Server Name—specify a name for the server (either an IP Address or host name)
Port Number—the port number upon which the Templar 5 server is communication.
If you are not an administrator, you will not be able to add servers.
Delete a Templar 5 Server
To Delete a Templar 5 Server,
• Click on the Delete Button. This will bring up the Templar 5 Confirmation Dialog Box.
Figure 98: Delete a Templar 5 Server Confirmation Dialog
•
Click the OK Button to delete the server or the No Button to cancel the deletion.
If you are not an administrator, you will not be able to delete servers.
147
Client Preferences
There are two categories of Client Preferences that you can modify to configure the Templar 5
Client. These categories include:
• General
• Certificate
148
General Client Preferences
There are a number of General Client Preferences which you can specify to customize your
Templar 5 experience.
Figure 99: Client Preferences (General Tab)
•
Host Settings—you cannot change these settings
o Server Host Name—this is the current name of the Templar 5 server to which
you are connected
o Port—the port settings for the current Templar 5 server
•
Receive Policy Defaults—the default properties for the Receive Policies of all Trading
Partner Agreements. The receive policies of individual Trading Partner Agreements can
be changed from this default through the Trading Partner Agreement Window >> Receive
Policy Tab. Note: this only affects the receive policies of New Trading Partner
Agreements.
o Expected encryption—use the drop-down menu to choose an encryption type
for all receive policies (see Appendix G for a definition of these encryption types).
Encryption options include:
o Expected Signature—use the drop-down menu to choose a signature type for
all receive policies. Signature options include:
o Send Receipt—select the checkbox to specify if a receipt should be sent for
every received transmission.
149
Send Policy Defaults—the default properties for the Send Policies of all Trading Partner
Agreements. The receive policies of individual Trading Partner Agreements can be
changed from this default through the Trading Partner Agreement Window >> Send
Policy Tab. Note: this only affects the send policies of New Trading Partner Agreements.
Security Envelope—select a security envelope using the drop-down
menu.
o Active Transport—set how the receipt will be transmitted back to the
transmitting party. Use the drop-down menu to select a transport. Options
include:
Email (AS1)
File Transfer
TCP Direct
Web Interface (AS2)
FTP (AS3)
TCP with SSL
SSH
o MIME Message Size (KB)—the maximum size (in Kilobytes) of an MIME
messages.
Click the Save Button when satisfied or the Cancel Button to abort the changes.
•
150
Certificate Client Preferences
There are a number of Certificate Client Preferences, which you can specify to customize your
Templar 5 experience.
Figure 100: Client Preferences (Certificates Tab)
•
Regenerated Certificate effective date—when your self-signed certificates regenerate
o Certificate Valid For—enter a number in the field and then use the drop-down
box to specify a time parameter. Options include:
Year(s)
Month(s)
Week(s)
Day(s)
•
Key Usage—the default properties for key usage in all self-signed certificates. These
defaults can be overridden for individual certificates in the Self-signed Certificate
Window.
o Signature—select this box to use keys as signature keys
o Encryption—select this box to use keys for encrypting data
o Certificate Version—use the drop down box to set a default Certificate Version
type. Options include:
X.509v3
X.509v1
151
•
Key Generation—the default method by which keys are generated in Self-Signed
Certificates
o Algorithm—use the drop-down menu to select a default algorithm. Options
include:
RSA
DSA
o
•
Regenerated Certificate effective date—when the regenerated certificate is effective
o Day of Regeneration—based upon the Certificate Validation Rules set above,
check this radio button to make the regenerated certificate effective on the day it
regenerates.
o
152
Key Length—use the drop-down menu to select a default key length size.
Options include:
512K
768K
1024K
2048K
4098K
8192K
{blank} days after regeneration—enter a number in the field and select this
radio button to make the certificate effective a specific number of days after
regeneration.
System Log Files
Much like the Event Viewer in Microsoft Windows NT and 2000, the System Log Files are a
repository of all activity encountered during the start-up of Templar 5. For each System Log File,
you can accomplish the following:
• View the Log File
• Delete the Log File
View a Log File
There are three ways to View a Log File.
• The first way is to click on the log file you want to view with your secondary mouse
button. This will bring up the Context-Sensitive menu. Select the View File Option.
• The second way is to highlight the log file you want to view by clicking on it once. Then,
click the Actions Button. This will bring up the Actions Button Submenu. Select the
View File Option.
• The third way is to highlight the log file you want to view by clicking on it once. Then
select the Actions Option from the Edit Menu. This will bring up the Actions Submenu.
Select the View File Option.
All of these methods will bring up the Log File Viewer Window.
Figure 101: View Log File
•
•
The Log File Viewer Window displays all of the events associated with the startup of the
Templar 5 system.
You can copy the entire file to the clipboard (for inclusion in another document such as a
status report) by clicking on the Copy to Clipboard Button.
153
Delete a Log File
There are three ways to Delete a Log File.
• The first way is to click on the log file you want to delete with your secondary mouse
button. This will bring up the Context-Sensitive menu. Select the Delete Option.
• The second way is to highlight the log file you want to delete by clicking on it once. Then,
click the Actions Button. This will bring up the Actions Button Submenu. Select the
Delete Option.
• The third way is to highlight the log file you want to delete by clicking on it once. Then
select the Actions Option from the Edit Menu. This will bring up the Actions Submenu.
Select the Delete Option.
All of these methods will bring up the Templar 5 Confirmation Dialog Box.
Figure 102: Delete a Log File Confirmation Dialog
•
Click the Yes Button to delete the file or the No Button to cancel the deletion.
Note: Deletion of a log file is irreversible.
154
Server Properties
There are nine categories of Server Properties that you can modify to configure the Templar 5
Server. These categories include:
• General
• Services
• Service Settings
• Templar 5 Parallel Tasking
• Database Setup
• Data Type Mapping
• Archive and Delete
• Clean Up
• Logging
• FTP Server
155
General Server Properties
There are a number of settings you can set for the General Server Properties to better customize
the Templar 5 experience.
Figure 103: Server Properties (General Tab)
•
File Masks and Naming Options
o Pickup Masks—Templar 5 will only pick up files from the transmit/pick directory
that have filenames that correspond to the masks listed here. Multiple file masks
for pick up can be specified by separating them with a comma. (i.e. *.dat, *.edi)
o Output File Pattern—type in the output file name pattern you want all decrypted
files to be named using. The following replaceable parameters (not case
sensitive) are available:
# - next number
%CONTROLNUMBER% - Interchange Control Number
%SENDERID% - ID of Sender
%SENDERIDQUAL% - Qualifier of Sender
%RECIPID% - ID of Recipient
%RECIPIDQUAL% - Qualifier of Recipient
%TRACKINGNUM% - Tracking Number
%DATE% - Current Date
%TIME% - Current time
If the generated file name already exists, we add a number to the end of the file,
such as test.dat.3343
The default pattern is OUT#.dat, which creates a file called OUT followed by the
next sequential number with a .dat extension.
156
You can put multiple parameters into the pattern and any other text so you could
have something like this
Outputfile%controlnumber%-from-%senderid%.%date%.%time%.dat
•
Server Settings
o Operator email address—type in the email address of the Templar 5 operator
(i.e., the server administrator)
o Send email when any error is logged—select this box to send an email to the
operator email address when an error is logged by Templar 5.
•
HTTP Server Settings
o AS2 HTTP Port Number— the port number that the remote Templar 5 trading
partner must use when transmitting data via HTTP.
o AS2 HTTPS Port Number— the port number that the remote Templar 5 trading
partner must use when transmitting data via HTTPS.
o HTTP Response Timeout— the number of seconds to hold an HTTP connection
before ending inactive connections. Setting to 0 will allow connections to be
open indefinitely.
o HTTP Receive Page—the path that the HTTP Listener will monitor for incoming
files. If set to AS2DataIn you full URL would be
http://domain_name:port/AS2DataIn
•
TCP Direct Receive Settings—configure how TCP Direct will work when receiving
documents.
o Port Number—the port number that the remote Templar 5 trading partner must
use when transmitting data via TCP Direct.
o Max Concurrent Connections—specify the number of concurrent connections
(i..e, the number of Remote Trading Partners that can be transmitting data via
TCP Direct at the same time).
•
TCP With SSL Settings—configure how TCP with SSL will work when sending
documents.
o Certificate—click the “…” Button to open the Certificate Lookup Window.
157
Figure 104: Certificate Lookup Window
o
o
•
158
Find—type a name of the company to whom the certificate was issued.
Otherwise, you can browse the list of certificates until you find the
appropriate one.
Select the certificate by clicking on it.
Click the OK Button to confirm the selection. The name of the certificate
will be automatically added to the Certificate Field.
Port Number—the port number that the remote Templar 5 trading partner must
use when transmitting data via TCP Direct.
Max Concurrent Connections—specify the number of concurrent connections
(i.e., the number of Remote Trading Partners that can be transmitting data via
TCP Direct at the same time).
POP3 Settings—configure how data is transmitted using POP3.
o Incoming mail server—the name or IP address of the incoming mail server
where Templar 5 will look for incoming POP3 messages.
o Account—the username for the incoming mail server.
o Click the Password Button to specify the password associated with that
Account on the Incoming Mail Server. This will bring up the Enter Password
Window.
Figure 105: POP3 Settings Account Information
o
o
Password—type in the password associated with the Account on the
Incoming Mail Server.
Confirm Password—retype the exact same password to confirm.
Use Secure (SSL/TLS) Connection to POP3—select this box if you wish to
have the connection with your Incoming Mail Server encrypted.
Check for new mail every—specify (in number of seconds) how often Templar
5 should check the incoming mail server for new mail.
•
Incoming SMTP Settings—configure how data is received via SMTP.
Note: POP3 and SMTP Inbound cannot be used at the same to retrieve email messages
o Listen on Port—specify the port on which Templar 5 should listen for attempted
transmission of data via SMTP. The default port is 25.
o Accept mail for Email address— Pay attention to Email that is addressed to
only one person (i.e., [email protected]) by typing the Email address in the
field.
•
Sendmail Integrated Mail Collection
o Mail Filename for Collection— specify the Path and user account you want
Templar 5 to collect email for.
•
Outgoing SMTP Settings—configure how data is sent via SMTP
o Outgoing Mail Relay Server—the IP address or host name of the outgoing relay
mail server that will be used to transmit the mail.
o DNS Server Address—the IP Address of the DNS (Domain Name Server) by
which outgoing email address domains will be resolved.
o Always use Relay Server—check this box to always use the SMTP Relay
Server specified in the Outgoing Mail Relay Server and to never use DNS.
•
FTP Pull (AS3) Settings
o Check for new files/MDNs every— specify (in number of seconds) how often
Templar 5 should check the FTP Servers specified in the Receive Policy of the
Trading Partner Agreements for new files or MDNs.
•
Certificates
o Server Certificate—specify which local certificate to use for server functions.
o Client Authentication Certificate—specify which certificate to use for client
authentication functions.
o Default MDN Signature Certificate—specify which certificate is used in the
signature of error MDNs.
•
Receive Files—configure where the default location for received data to be saved.
159
o
•
160
Default Dir for Received Files—specify a directory for received files. The
default is the Templar 5 server install directory.
Client File Display Settings—configure how clients will see files displayed.
o Maximum File Size Displayed—specify the maximum size of file to display in
the client. Files of larger sizes will only display up to the limit specified here.
Server Services Properties
There are a number of settings you can set for the Services Properties to better customize the
Templar 5 experience.
Figure 106: Server Properties (Services Tab)
•
You can turn on and off each of the Templar 5 services by checking or unchecking their
boxes. The Templar 5 services include:
o Internal Database Server
o Login Service
o Certificate Store Service
o Control Service
o Receive Decryption Service
o Receive Service
o Transmit Service
o Retransmit Service
o Certificate Regeneration / CRL Update Service
o SMTP Mail Send Service
o Ad-Hoc Transfer Service
o TCP Send Service
o FTP Send Service
o Direct File Transmit Service
o HTTP Send Service
o TCP with SSL Send Service
o Schedule Service
o POP3 Mail Receive Service
161
o
o
o
o
o
o
TCP Receive Service
TCP with SSL Receive Service
EDI File Rationalization Service
FTP Server
FTP Pull Service
HTTP Server
For more information about what each service does, see Appendix B.
162
Server Service Settings Properties
This option lets you specify parameters for Templar 5’s fundamental server services.
Figure 107: Server Properties (Service Settings Tab)
•
•
•
•
•
•
•
System Display Name—the name of this Templar 5 system that will be displayed in the
Login Window. This name helps to differentiate between different Templar 5 systems that
a user may log into.
Server Name—the name of the server for this Templar 5 system or the IP Address
Message-ID Server Override—the name to used in outbound transactions Message-ID
headers. If blank the default is used.
Login Control Port—the port for the Templar 5 server through which login authentication
will be carried out. The default port is 8452.
DB Server Port—the port of your database server.
DB Server Database Name—by default, the name of this database server is TFive.
Transmit Base Directory—the base directory from which all transmissions are.
processed.
163
•
•
•
•
164
Receive Base Directory—the base directory into which all received transmissions are
processed.
System Logs Directory—a directory for the storage of system logs.
SCP Location and Name—For SSH setup.
Async MDN Return URL—your complete URL that MDNs would be sent to via AS2.
Such as, http://as2.templarsoftware.com/as2proc/datain.asp.
Figure 108: X.509vs Certificate Usage Extensions WARNING
•
Ignore X.509v3 Certificate Usage Extensions—by selecting this box, you are opting to
utilize certificates for purposes that the certificate may not be authorized. For example, a
certificate from a Remote Partner may only be authorized for signature yet you want to
use it for data encryption. When doing so, Templar 5 will provide a detailed warning
message that outlines the consequences of such an action. Click the OK Button to
accept this or the NO Button to continue using the certificate extensions. Note: This
allows Templar 5 to import non-standard certificate types created with legacy or thirdparty applications.
•
Text Only Display and Server—when this option is checked, Templar 5 will not display
a GUI for the server.
Integrated Client and Server—this will integrate the Templar 5 Client and Templar 5
Server so that the Client automatically starts when the Server is started.
Enhanced HTTPS Transport Security—checking this option will require the SSL
certificate’s URL to match the URL you are sending to.
Block Duplicate Interchanges—when checked this option blocks Templar 5 from
sending or receiving duplicate files.
•
•
•
165
Server Templar 5 Parallel Tasking Properties2
Templar 5’s Parallel Tasking feature allows you to run multiple instances of the Templar 5
Transmission and Receive services. This provides increased throughput and bandwidth by
preventing Templar 5 from "bottlenecking" on large files—while one instance of the transaction
service deals with a particularly large file, another instance could be sending other, smaller files
and still yet, another instance could be working on files as well.
Figure 109: Server Properties (Templar 5 Parallel Tasking Tab)
It is recommended that you run between 1 and 5 service instances per processor of the services
that you are actually using. However, each additional instance of a service increases the amount
of memory Templar 5 uses. The following formula will give you the total amount of memory that
Templar 5 will need based on the Services and Parallel Tasking setup.
Total memory = 256MB
+ 64MB for each parallel decrypting thread
+ 32MB for each parallel sending thread
2
This tab is only available in the Templar 5 Enterprise edition
166
Server Data Type Mapping Properties
The Data Type Mappings allow Templar 5 to use standardized scripts for database creation and
maintenance. You supply the correct data types according to the database you are using.
Each data type uses its own naming system to define types of data in a column. For example, in
Microsoft SQL Server, the data type CHAR defines a text data column. Check the documentation
of your database or your Database Administrator to help you in completing this section.
Figure 110: Server Properties (Data Type Mapping Tab)
•
•
•
•
•
•
•
•
•
•
Create Table Statement—the script statement to create a table in your database.
Date Insert Format—the format for inserting dates into the table.
BLOB Datatype—the datatype in your database used to represent BLOB data.
CLOB Datatype— the datatype in your database used to represent CLOB data.
String Datatype—the datatype in your database used to represents string data.
Int Datatype—the datatype in your database used to represent numerical integer data.
SmallInt Datatype—the datatype in your database used to represent small numerical
integer data.
Date Datatype—the datatype in your database used to represent date data.
Not Null Definition—how your database defines a cell as Not Null.
Null Definition—how your database defines a cell that is Null.
Note: that with the standard databases, these values are filled in automatically for you.
167
Server Database Setup Properties
Templar 5 provides integration and operability with a variety of databases. The Database Setup
Properties tab provides you the opportunity to select the database to which you want Templar 5
to connect and the appropriate parameters.
Templar 5 uses your database's native drivers in order to establish a JDBC connection between
itself and the external database. Before Templar 5 can establish this connection to your
database it needs to have access to a copy of the native JDBC driver. Each database uses a
different JDBC driver set and as such the setup is unique to each operating and database. For
assistance setting up your Templar 5 with the database JDBC driver please contact technical
support.
For every database, you can specify the following:
• JDBC User Name—the username that will be used to access the database through a
JDBC connection between Templar and the database.
• Set Password—click on the Set Password Button. This will bring up the Enter
Password Window.
Figure 111: Server Properties (Database Setup Tab)
•
Use Connection Pooling—in order to reduce the strain on server resources, you can
check this box to enable Connection Pooling, which creates a pool of "virtual
connections" based upon a single physical connection between the server and the
database. This pool is then provided to clients on a first-come, first-served basis.
In addition to those basic settings that apply to all databases, Templar 5 also allows you to
specify the specific parameters associated with different database types.
168
•
•
Database Type—use the drop-down menu to select a database. Options include:
o Templar 5 Internal Database (this is the default database)
o Oracle
o Microsoft SQL Server
o Informix
o Sybase
o IBM DB2
o ODBC Bridge
o Other JDBC database
Database Properties File—use the Edit/Copy option to setup or modify the database
properties as needed.
169
Templar 5 Internal Database
Figure 112: Database Setup (Templar 5 Internal Database)
•
170
The Templar 5 Internal Database has the following settings:
o Host Name— The host name is the name of the Templar 5 server running the
Internal Database Server, and the port is the port number defined for the
database. If this server machine is also running the Internal Database Server,
then the database name and port number is set up on the "Service Settings"
page (under "DB Server Database Name" and "DB Server Port"), and the
"Internal Database" Service must be enabled.
o Port Number—the port for the Templar 5 Internal Database.
Oracle
Figure 113: Database Setup (Oracle)
•
The Templar 5 Oracle Database Option has the following settings:
o Connection Type—select a Thin or OCI interface. The Thin driver is a pure Java
driver, that requires no further client software, or client configuration, and works
on all platforms, and is recommended for use with Templar 5.
o Database Name—the name of the Oracle database. For an OCI Connection, the
database name can be either an entry in TNSNAMES.ORA or a SQL*net namevalue pair. To use an OCI connection, all machines must have OCI installed.
For a thin connection, the database name can either be in the format
<host>:<port>:<sid> (default port is 1521), or a SQL*net name-value pair.
The database must have been created with JServer support to use the Thin
driver.
o Database Properties File—For Oracle 8i set this to oracle. For Oracle 9i or 10g
set this to Oracle9.
171
Microsoft SQL Server
Figure 114: Database Setup (Microsoft SQL Server)
•
172
The Templar 5 Microsoft SQL Server Database Option has the following settings:
o SQL Server Version—the version of Microsoft SQL Server being used as the
database. Options include:
7.0, 2000, or above
6.0 or 6.5
o Host String— The Host string can be any one of the following:
For TCP/IP connections, use Hostname, or Hostname:port for ports other than
the standard 1433. For Named Pipe connections, use
\\servername\pipe\pipename (standard is \\servername\pipe\sql\query). TCP/IP
gives the best performance, and is recommended for use with Templar 5.
The SQL Server Driver is a Pure Java type 4 driver, meaning no SQL Server
Client software is required on client computers, and all platforms are supported.
o Database Name—the name of the Microsoft SQL Server Database.
Informix
Figure 115: Database Setup (Informix)
•
•
The Templar 5 Informix Database Option has the following settings:
o Host String— The Host string can be either hostname, or hostname:port for
ports other than the standard 1526. The Informix Server Name is the name of the
Informix Database Server, and the database is the name of the database on the
server. The database must exist and have been created with the ANSI Log
option.
o Informix Server Name—the name of the Informix Server.
o Database Name—the name of the database within the Informix Server.
o Database Properties File—set this to Informix.
Informix databases have a limitation to them that does not support derived tables. In
order to accommodate the limitation, it is necessary to implement five stored procedures.
Please contact Templar Support for additional instructions on implementing the stored
procedures.
173
Sybase
Figure 116: Database Setup (Sybase)
\
•
•
174
The Templar 5 Sybase Option has the following settings:
o Host String— The host string can be either hostname, or hostname:port for
ports other than the standard 2025.
o Database Name—the name of the Sybase database.
o Database Properties File—set this to Sybase.
Sybase databases version 12.5 and earlier have a limitation to them that does not
support derived tables. In order to accommodate the limitation, it is necessary to
implement five stored procedures. Please contact Templar Support for additional
instructions on implementing the stored procedures.
IBM DB2
Figure 117: Database Setup (IBM DB2)
•
The Templar 5 IBM DB2 Option has the following settings:
o Host String— The host string can be either hostname, or hostname:port for
ports other than the standard 6789. This setting uses the thin JDBC Driver, which
means that clients do not have to have DB2 Client Software installed, no client
configuration is required, and all platforms are supported. However, the DB2
Server must be running the DB2 JDBC server.
o Database Name—the name of the IBM DB2 database.
o Database Properties File—set this to DB2.
175
ODBC Bridge
Figure 118: Database Setup (ODBC Bridge)
•
176
The Templar 5 ODBC Bridge Option has the following settings:
o Data Source Name— The database name must be already defined to use the
ODBC Bridge, and it must also be defined on all client computers that wish to
connect to this server. This driver requires that both the ODBC Runtime, and also
the ODBC Driver for the database exist on all machines wishing to connect.
ODBC is not available for all platforms, and the use of ODBC should be avoided
where possible. You should also review the settings on the "Data type mapping"
tab to ensure compatibility with your database.
Other JDBC Database
Figure 119: Database Setup (Other JDBC Database)
•
The Templar 5 Other JDBC Database Option has the following settings:
o JDBC Driver Name— For other JDBC Databases, you must provide the driver,
and it must be on the classpath for the client and the server. The driver must also
be present on all client computers. You should also review the settings on the
"Data type mapping" tab to ensure compatibility with your database. Templar 5
requires a JDBC 1.0 compliant driver with support for Prepared Statements.
o JDBC URL—the URL of the JDBC database to which Templar 5 will connect.
177
Logging Properties
Templar 5 provides you the option to specify what items you want to be stored in both he Audit
Log and in the debug.log.
Figure 145: Server Properties (Logging Tab)
178
•
•
Debug.log
o Enable debug.log—When checked Templar 5 generates a debug.log file that
contains a trace of each action it takes for each transaction.
o Save incoming SMTP conversations to the debug.log—When checked
Templar 5 stores the conversations that occur between mail server and Templar
5 for inbound SMTP transactions in the debug.log.
o Save outgoing SMTP conversations to the debug.log—When checked
Templar 5 stores the conversations that occur between mail server and Templar
5 for outgoing SMTP transactions in the debug.log.
o Save POP3 conversations to the debug.log—When checked Templar 5 stores
the conversations that occur between mail server and Templar 5 for POP3
transactions in the debug.log.
o Save FTP Server conversations to debug.log—When checked Templar 5
stores the conversations that occur between FTP client and Templar 5’s FTP
Server in the debug.log.
o Save FTP send/FTP pickup conversations to the debug.log—When checked
Templar 5 stores the conversations that occur between FTP server and Templar
5 for FTP transactions in the debug.log.
o Save Incoming HTTP Server conversations to debug.log—When checked
Templar 5 stores the conversations that occur between the sending party and
Templar 5’s HTTP Listener Server in the debug.log.
o Save Outgoing HTTP Server conversations to debug.log—When checked
Templar 5 stores the conversations that occur between Templar 5 and the
receiving Web Server in the debug.log.
Audit Log
o Enable Sendmail Integrated Mail Collection diagnostic logging—When
checked Templar 5 stores that a conversation occurred with the mail server via
Sendmail Integration in the Audit Log.
o Enable incoming SMTP diagnostic logging—When checked Templar 5 stores
that a conversation occurred with the mail server for inbound SMTP connections
in the Audit Log.
o Enable outgoing SMTP diagnostic logging—When checked Templar 5 stores
that a conversation occurred with the mail server for outbound SMTP
connections in the Audit Log.
o Enable POP3 diagnostic logging—When checked Templar 5 stores that a
conversation occurred with the mail server for POP3 connections in the Audit
Log.
o Enable TCP diagnostic logging—When checked Templar 5 stores that a TCP
connection occurred in the Audit Log.
o Enable FTP server diagnostic logging—When checked Templar 5 stores that
an inbound FTP connection occurred in the Audit Log.
o Enable FTP Send diagnostic logging—When checked Templar 5 stores that a
FTP connection occurred in the Audit Log.
o Enable FTP pickup diagnostic logging—When checked Templar 5 stores that
a FTP Pickup occurred in the Audit Log.
o Enable incoming HTTP diagnostic logging—When checked Templar 5 stores
that a conversation occurred with the mail server for inbound HTTP connections
in the Audit Log.
o Enable outgoing HTTP diagnostic logging—When checked Templar 5 stores
that a conversation occurred with the mail server for outbound HTTP connections
in the Audit Log.
o Log client IP address at login—When checked Templar 5 logs the IP address
and description of user as they log into Templar 5 in the Audit Log.
o Keep history of user interactions—When checked Templar 5 logs all key
changes to Trading Partners, Trading Partner Agreements, Certificates, and
Server Properties to the Audit Log.
179
FTP Server Properties
Templar 5 provides you with an embedded sFTP Server. This tab allows you to configure its
basic settings.
Figure 146: Server Properties (FTP Server Tab)
•
•
•
•
•
180
Listen Port—The port number which you want Templar 5’s Server to use for listening for
inbound FTP connections.
Base FTP Directory—The base directory you wish to use for files received via FTP and
for files you partners need to pick up via FTP.
External IP Address (for Passive FTP)—The IP address that your partners will be
connecting to for FTP. When inbound connections are made using a passive connection
this IP will be provided to the requesting FTP client.
Passive Port Pool—List of port numbers, comma separated, that Templar 5 can use for
inbound passive FTP connections
Maximum Simultaneous Connections—The maximum number of inbound connections
you wish to allow you be made to your Templar 5’s sFTP server. This number can not be
larger than the number of ports in the passive port pool.
Security Envelopes
The Templar 5 Security Envelopes Settings is where you can define the default Security
Envelopes—the parameters that determine how EDI data is wrapped and sent. Templar 5
includes the following types of Security Envelopes:
• S/MIME
• S/MIME v2 MPS
• TCIF AI Message
• Templar 4.0 MIME
Figure 120: Security Envelopes
There are two ways to change the default parameters of a Security Envelopes:
• The first way is to highlight the security envelope that you want to change by clicking on it
with your primary mouse button. Click the Action Button. This will bring up the Action
Submenu. Select the Properties Option.
• The second way is to highlight the security envelope that you want to change by clicking
on it with your primary mouse button. Select the Properties Option from the Edit Menu.
Both of these methods will bring up the Security Envelope Defaults Window.
181
Modifying Security Envelopes
S/MIME
Figure 121: Modifying Security Envelopes (S/MIME)
•
182
For the S/MIME Security Envelope, you can configure the following parameters in the
Security Envelope Defaults Window.
o Description—a textual description of the security envelope.
o Encryption type—use the drop-down menu to choose the type of encryption
that Templar 5 should use when wrapping documents with S/MIME security (see
Appendix G for definitions of Templar 5 encryption types).
o Signature Type—use the drop-down menu to choose the type of signature that
Templar 5 should use when wrapping documents with S/MIME security.
o Expected Receipt—use the drop-down menu to select the type of receipt that is
expected from documents encrypted with this type of security envelope.
S/MIME v2 MPS
Figure 122: Modifying Security Envelopes (S/MIME v2 MPS)
•
For the S/MIME v2 MPS Security Envelope, you can configure the following parameters
in the Security Envelope Defaults Window:
o Description—a textual description of the Security Envelope
o Encryption Type—use the drop-down menu to choose the type of encryption
that Templar 5 should use when wrapping documents with S/MIME v2 MPS
security (see Appendix G for definitions of Templar 5 encryption types).
o Signature Type—use the drop-down menu to choose the type of signature that
Templar 5 should use when wrapping documents with S/MIME v2 MPS security.
o Expected Receipt—use the drop-down menu to select the type of receipt that is
expected from documents encrypted with this type of security envelope.
183
Templar 4.0 MIME
Figure 123: Modifying Security Envelopes (Templar 1.0 MIME)
•
184
For the Templar 4.0 MIME Security Envelope, you can configure the following
parameters in the Security Envelope Defaults Window:
o Description—a textual description of the Security Envelope
o Encryption Type—use the drop-down menu to choose the type of encryption
that Templar 5 should use when wrapping documents with Templar 4 S/MIME
security (see Appendix G for definitions of Templar 5 encryption types).
o Signature Type—use the drop-down menu to choose the type of signature that
Templar 5 should use when wrapping documents with Templar 4 S/MIME
security.
o Expected Receipt—use the drop-down menu to select the type of receipt that
is expected from documents encrypted with this type of security envelope.
XML Definitions
By defining XML Data types, you can natively transfer XML data files through the standard
Transmit/Receive folder set.
Add a New XML Definition
There are two ways to create XML Definitions.
Figure 124: XML Definitions Window
Click on the Actions Button. Select the New Option.
Select the Actions Option from the Edit Menu then select the New Option from the
Edit Submenu.
Both of these methods will bring up the XML Definitions Window.
•
•
185
Figure 125: Create New XML Definition Window
•
•
•
186
XML Sample File—Click on the … Button to select a sample XML file located on your
hard drive to define the XML structure within Templar 5.
Root XPath— Templar 5 will automatically populate this with information from the XML.
Description—This is a description of the XML Definition. For example, “Purchase
Orders.”
Figure 126: XML Node View
•
•
•
•
•
Sender ID— Click on the “…” Button to open the XML data file. The Sender ID is a
mandatory field within the XML Definition.
Sender Qualifier— Click on the “…” Button to open the XML data file. The Sender
Qualifier is not a mandatory field within the XML Definition.
Recipient ID— Click on the “…” Button to open the XML data file. The Recipient ID is a
mandatory field within the XML Definition.
Recipient Qualifier—Click on the “…” Button to open the XML data file. The Recipient
Qualifier is not a mandatory field within the XML Definition.
IC Num—Click on the “…” Button to open the XML data file. The Interchange Number is
not a mandatory field within the XML Definition.
187
Edit an Existing XML Definition
There are two ways to edit XML Definitions.
Figure 127: Edit XML Definitions
After selecting the XML Definition you want to edit.
o Click on the Actions Button. Select the Properties Option.
o Select the Actions Option from the Edit Menu then select the Properties
Option from the Edit Submenu.
Both of these methods will bring up the XML Definitions Window.
•
188
Figure 128: Edit Existing XML Definitions Window
•
•
•
•
•
•
•
•
XML Sample File—If you need to see the XML nodes in order to edit the definition, click
on the “…” Button to select a sample XML file located on your hard drive to define the
XML structure within Templar 5.
Root XPath— Templar 5 will automatically populate this with information from the XML.
You cannot physically change this.
Description—This is a description of the XML Definition. For example, “Purchase
Orders.”
Sender ID— Click on the “…” Button to open the XML data file. The Sender ID is a
mandatory field within the XML Definition.
Sender Qualifier— Click on the “…” Button to open the XML data file. The Sender
Qualifier is not a mandatory field within the XML Definition.
Recipient ID— Click on the “…” Button to open the XML data file. The Recipient ID is a
mandatory field within the XML Definition.
Recipient Qualifier—Click on the “…” Button to open the XML data file. The Recipient
Qualifier is not a mandatory field within the XML Definition.
IC Num—Click on the “…” Button to open the XML data file. The Interchange Number is
not a mandatory field within the XML Definition.
189
Delete an Existing XML Definition
There are several ways to delete XML Definitions.
Figure 129: Delete XML Definitions
After selecting the XML Definition you want to delete.
o Click on the Actions Button. Select the Delete Option.
o Select the Actions Option from the Edit Menu then select the Delete Option
from the Edit Submenu.
Both of these methods will bring up the Templar 5 Delete Confirmation Dialog Box.
•
•
•
Click the Yes Button to delete the XML Definition
Click the No Button to cancel the delete
Note: This action is irreversible.
190
FTP
Templar 5 contains an embedded sFTP Server. You can setup the related users and
orchestrations in this section.
FTP Users
The FTP Users sections allows for specific accounts to be added that allow you partners to
connect to you Templar 5’s sFTP Server and upload or download files.
Adding a New FTP User
There are two ways to add a New User within the FTP User Window
• The first way is to click on the Action Button. This will bring up the Action Button
Submenu. Select the New Option.
• The second way is to select the Actions Option from the Edit Menu. This will bring up
the Actions Submenu. Select the New Option.
Both of these methods will bring up the FTP User Maintenance Window.
Figure 130: FTP User Maintenance Window
There are 5 things you will need to setup for each new FTP User.
• User Name—The account name your partner’s FTP Client will use to connect to your
sFTP server.
• FTP Directory—The full path to the specific directory for your partner to upload files to or
download files from.
• User Enabled—Checking this option enables the account.
• Write Permission—Checking this option gives the account write permissions.
• Password—Clicking the Set Password button will bring up a dialog box to allow you to
set the account password.
191
Deleting a FTP User
There are three ways to delete an Existing User within the FTP Users Window.
• The first way is to click on the Action Button. This will bring up the Action Button
Submenu. Select the Delete Option.
• The second way is to select the Actions Option from the Edit Menu. This will bring up
the Actions Submenu. Select the Delete Option.
• The third way is to click on the user you want to delete with your secondary mouse
button. This will bring up the Context-Sensitive menu. Select the Delete Option.
All of these of these methods will bring up the Templar 5 Confirmation Window.
Editing a User
There are three ways to edit an Existing User within the FTP User Window
• The first way is to click on the Action Button. This will bring up the Action Button
Submenu. Select the Properties Option.
• The second way is to select the Actions Option from the Edit Menu. This will bring up
the Actions Submenu. Select the Properties Option.
• The third way is to click on the user you want to edit with your secondary mouse button.
This will bring up the Context-Sensitive menu. Select the Properties Option.
All of these of these methods will bring up the User Maintenance Window.
The settings that can be edited in an FTP User profile are the same as when adding a new user.
192
FTP Steps
The FTP Steps sections allows for specific FTP commands to be used by Templar 5. Templar 5
has all of the steps necessary for trading via FTP using the AS3 standard. It is not recommended
that you add, modify, or delete any steps without the direct instruction of a Templar 5 Support
Technician. Modifying or deleting existing steps may result in the inability to properly trade via
FTP.
Here is a list of the FTP Steps preconfigured in Templar 5 and what they do.
• CWD - change working directory
• LIST - list remote files
• Login - send username and send password
• MODE S - set transfer mode to stream
• NLIST - name list of remote directory
• PASV - enter passive mode
• PBSZ 0 – set the protection buffer size to zero
• PROT P – set the data channel protection level to private
• QUIT - terminate the connection
• Retrieve then delete all files - retrieve remote files and delete remote files
• Retrieve all files - retrieve remote files
• RNFR - rename from
• RNTO - rename to
• STOR - store a file on the remote host
• STOU - store a file uniquely
• STRU F - set file transfer structure to file
• TYPE A - set transfer type to ASCII text
• TYPE I - set transfer type to image (binary data)
193
FTP Orchestrations
The FTP Orchestrations section allows for user to setup their Templar 5 to send files via FTP
specifically as their partners FTP Servers require. Each Trading Partner Agreement can use
multiple orchestrations or all of your Trading Partner Agreements might be able to use the made
orchestration depending on how your partner’s FTP Server are setup. Generally you will need 2
orchestrations, one for uploading and one for downloading. However, if your FTP server will be
hosting the files you may not need any orchestrations. A generic orchestration for both uploading
and downloading is listed at the end of this section.
Adding a New FTP Orchestration
There are two ways to add a New Orchestration within the FTP Orchestration Window
• The first way is to click on the Action Button. This will bring up the Action Button
Submenu. Select the New Option.
• The second way is to select the Actions Option from the Edit Menu. This will bring up
the Actions Submenu. Select the New Option.
Both of these methods will bring up the FTP Orchestration Details Window.
Figure 1318: FTP User Orchestration Window
There are 3 things you will need to setup for each new FTP Orchestration.
• Code—This is a unique name for the orchestration. Something like the name of the
partner or trading partner agreement that the orchestration is best.
• Description—This is a description of what the orchestration is to be used for Some thing
like “Outbound Files” or “Download MDNs” is best.
• Details—This is where the steps for your Templar 5 to take when making the FTP
connection for this orchestration are listed. Simply select the step you want and click
insert. Be sure the steps are listed in the correct order. Buttons to delete and move
specific steps up and down in the orchestration are also provided.
194
Deleting a FTP Orchestration
There are three ways to delete an Existing Orchestration within the Orchestration Window.
• The first way is to click on the Action Button. This will bring up the Action Button
Submenu. Select the Delete Option.
• The second way is to select the Actions Option from the Edit Menu. This will bring up
the Actions Submenu. Select the Delete Option.
• The third way is to click on the user you want to delete with your secondary mouse
button. This will bring up the Context-Sensitive menu. Select the Delete Option.
All of these of these methods will bring up the Templar 5 Confirmation Window.
Editing a FTP Orchestration
There are three ways to edit an Existing Orchestration within the Orchestration Window
• The first way is to click on the Action Button. This will bring up the Action Button
Submenu. Select the Properties Option.
• The second way is to select the Actions Option from the Edit Menu. This will bring up
the Actions Submenu. Select the Properties Option.
• The third way is to click on the user you want to edit with your secondary mouse button.
This will bring up the Context-Sensitive menu. Select the Properties Option.
All of these of these methods will bring up the FTP Orchestration Details Window.
Once the window is open the Description and Details can be edited using the buttons
provided.
Generic FTP Upload Orchestration
Here is a list of the steps most orchestrations for upload will have. This is also the orchestration
that should be used when sending to a Templar 5 sFTP Server.
• Login
• TYPE I
• PASV
• CWD
• STOU
• QUIT
Generic FTP Download Orchestration
Here is a list of the steps most orchestrations for download will have. This is also the
orchestration that should be used when pulling from a Templar 5 sFTP Server.
• Login
• TYPE I
• PASV
• CWD
• NLST
• Retrieve then delete all files
• QUIT
195
Users
Templar 5 recognizes that you may have multiple users interacting within a single Templar 5
system. In order to facilitate this, you can add, edit, and delete users within Templar 5.
The ability to add, modify, or delete users is only available if the currently logged-in individual is
an administrator with User Administration privileges.
Adding a New User
There are two ways to add a New User within the User Window
• The first way is to click on the Action Button. This will bring up the Action Button
Submenu. Select the New Option.
• The second way is to select the Actions Option from the Edit Menu. This will bring up
the Actions Submenu. Select the New Option.
Both of these methods will bring up the User Maintenance Window.
Figure 132: Adding a New User - Permissions
196
For each user, you can specify the following:
• Permission Information Tab
o User Name—the user name
o Full Name—the full name of the user
o Description—a textual description of the user (i.e., their title)
o Set Password—click the Set Password button to specify the New User’s
password. This will bring up the Enter Password Window.
o Permissions—identify which features of Templar 5 the user has.
To enable a permission for this user, select the Yes Option.
To disable permission, select the No Option.
For several permissions, there is a Read Only Option that will allow the user to
see the respective Windows but not make any changes to the content.
Figure 13350: Adding a New User – Settings
197
•
Settings Information Tab
o Allow multiple simultaneous logins—when checked the user account can be
logged into multiple Templar 5 Clients at once.
o Reset Lock Out—if a users account is not allowed multiple simultaneous logins
and their machine crashes Templar 5 will not allow them to log back in until an
administrator comes in and clicks this option to reset their logout.
o Enable Automatic Logout—when checked the user will log out automatically
after they are inactive for the number of minutes specified.
o Force user to change password at next login—when checked will required the
user account to change their password the next time they log into Templar 5.
o Password never expires—when checked the user account never needs a new
password. When unchecked the user will be required to change their password
on regular intervals, which are determined by the setting Password expires
every __ days.
o Allow Bank Passwords—when checked the user can have a blank password.
Click the Save Button when finished to add the New User.
198
Deleting a User
There are three ways to delete an Existing User within the User Window.
• The first way is to click on the Action Button. This will bring up the Action Button
Submenu. Select the Delete Option.
• The second way is to select the Actions Option from the Edit Menu. This will bring up
the Actions Submenu. Select the Delete Option.
• The third way is to click on the user you want to delete with your secondary mouse
button. This will bring up the Context-Sensitive menu. Select the Delete Option.
All of these of these methods will bring up the Templar 5 Confirmation Window.
Figure 134: Delete a User Confirmation Dialog
Click the Yes Button to delete the User or the No Button to cancel the deletion.
Note: Deleting a user cannot be undone.
199
Editing a User
There are three ways to edit an Existing User within the User Window
• The first way is to click on the Action Button. This will bring up the Action Button
Submenu. Select the Properties Option.
• The second way is to select the Actions Option from the Edit Menu. This will bring up
the Actions Submenu. Select the Properties Option.
• The third way is to click on the user you want to edit with your secondary mouse button.
This will bring up the Context-Sensitive menu. Select the Properties Option.
All of these of these methods will bring up the User Maintenance Window.
Figure 135: Editing a User
For each user, you can edit the following:
• User Name—the user name
• Full Name—the user’s full name
200
•
•
•
Description—a textual description of the user (i.e., their title)
Set Password—click the Set Password button to specify the New User’s password.
This will bring up the Enter Password Window.
Permissions—identify which features of Templar 5 the user has the ability to modify.
To enable a permission for this user, select the Yes Option.
To disable a permission, select the No Option.
For several permissions, there is a Read-Only Option that will allow the user to see the
respective windows but not make any changes to the content.
Click the Save Button when finished to commit the changes to the User’s settings.
201
Appendix A: Quick Start Guide
After Templar 5 is installed there are a few steps you will need to take before you can trade data
with your partner. Below is a list of the steps that are required before you can begin trading data.
Step 1: Database Setup
If you are running an Enterprise version of Templar 5 and want to use an external database it
should be setup before anything else. See the Database Setup Section for more information
about utilizing an external database.
Step 2: General and Logging Setup
Once you have the database setup, you should specify the default receive location, server
certificates, and logging settings you want Templar 5 to use. See the General Properties and
Logging Properties Sections for more information about the logging and configuration.
Step 3: Create or Import a Local Certificate
Certificates verify identity. This certificate will be used with your Trading Partners to let them know
that you are who you are. See the Certificates Section for more information about creating or
importing a Local Certificate.
Step 4: Create Your Local Trading Partner Information
Once you have a certificate created, you need to create information about yourself that you will
use when trading. See the Trading Partner Section for more information about creating a new
Local Trading Partner.
Step 5: Exchange Trading Partner Information
Now that you have your “trading identity” set (your certification and your Local Trading Partner
information), you need to swap information with your Trading Partners.
If your Trading Partner is using Templar 5
All you need to do is export your local trading partner information (as a .TPD) file so that they can
import it. See the Exporting a Local Trading Partner Section for more information.
If your Trading Partner is Not Using Templar 5
If your trading partner is not using Templar 5, you need to export specific information.
• Your certificate—see the Exporting Certificates section.
• Your EDI/Email address—provide them the Email address in which you received EDI
information. For more information on this part of your Local Trading Partner profile, see
the New Local Partner General Tab section.
• Your EDI/Qualifier ID—provide them the unique EDI Qualifier ID. For more on this part of
your Local Trading Partner profile, see the New Local Partner EDI Qualifier/ID section.
202
Step 6: Import your Partner’s Trading Information
After swapping information, you need to create a Remote Trading Partner.
If your Trading Partner is Using Templar 5
All you need to do is import their .TPD as a Remote Partner. For more information about
importing remote trading partner information, see the Importing a Remote Trading Partner
section.
If your Trading Partner is Not Using Templar 5
If your trading partner is not using Templar 5, you need to:
• Import their certificate—see the Importing Certificates section.
• Create a New Remote Trading Partner—using the information that your Trading Partner
sent you, create a New Remote Trading Partner. For more information about this, see the
Adding a Remote Trading Partner section.
Step 7: Create a Trading Partner Agreement
Using your Local Trading Partner Profile and either the Remote Partner Profile you imported or
created, create a Trading Partner Agreement so that you can exchange data. For more
information about Trading Partner Agreements, see the Adding a Trading Partner Agreement
section.
Once you and your partner have both created a Trading Partner Agreement you are ready to
trade data.
Step 8: Set the Default Directory for Received Files
In the Server Properties section, under Administration, Specify your default directory for received
files to be placed after decryption. For more information about this property, see the General
Server Properties section.
Step 9: Schedule and Archive/Delete and Clean Up
Under Tools, in the Scheduled Jobs section, setup you’re jobs for your Templar 5 system, see the
Adding a Scheduled Job section for more information.
203
Appendix B: Templar 5 Services
The Templar 5 Services are background processes that perform the tasks as described below.
• Internal Database Server—Runs the internal Java-based Templar 5 database.
• Login Service—Runs the service that enables clients to connect to the Templar 5 server
and login.
• Certificate Store Service—Handles the storage and retrieval of certificates and private
keys from encrypted storage.
• Control Service—Controls the other services and handles routing of requests to the
Certificate Store service, and any other message based services that may be plugged
into the system.
• Receive Decryption Service—Decrypts data upon receipt into Templar 5.
• Receive Service—Handles the receiving of files and any post-processing requirements.
• Transmit Service—Picks files up, encrypts them, and wraps them in a MIME envelope.
• Retransmit Service—Evaluates the retransmission policies in the Trading Partner
Agreements and retransmits data as required.
• Certificate Regeneration / CRL Update Service—Regenerates certificates and updates
the certificate revocation list.
• SMTP Mail Send Service—Sends data via SMTP.
• Ad-Hoc Transfer Service—Handles the conversion of non-EDI files into EDI files.
• TCP Send Service—Sends data via TCP.
• FTP Send Service—Sends data via FTP (File Transfer Protocol).
• Direct File Transmit Service—Sends data for direct file transfer, i.e. when a file is
placed straight into a directory either on the same machine or one on a local network.
• HTTP Send Service—Sends data via HTTP(S) (Hyper Text Transfer Protocol).
• TCP with SSL Send Service—Sends data via TCP with SSL.
• Schedule Service—Processes scheduled jobs.
• POP3 Mail Receive Service—Receives data via POP3 mail.
• TCP Receive Service—Receives data via TCP direct.
• TCP with SSL Receive Service—Receives data via TCP with SSL.
• EDI File Rationalization Service—Breaks files with multiple interchanges into multiple
files with single interchanges.
• SMTP Inbound Service—Receives the incoming SMTP connections, accepts the
incoming emails, and pulls them into Templar 5.
• Sendmail Integrated Mail Collection—Checks the sendmail user account for emails
and pulls them into Templar 5
• SSH Send Service—Sends data via SSH.
• FTP Server—Runs the internal FTP server embedded into Templar 5.
• FTP Pull Service—Retrieves data via FTP.
• HTTP Server—Retrieves data via HTTP/S.
204
Appendix C: Transport Methods
Templar 5 provides a number of different transmit methods in sending data.
• Email Transport (AS1)—When you send data using the Email transport, Templar 5
automatically sends the file to the EDI Email address specified in your Send policy for the
trading partner agreement. When you receive the data sent using the Email transport,
Templar 5 automatically processes the data in the templar\receive folder.
• File Interface Transport— When you send data using the File Interface transport,
Templar 5 places the file containing the data in the folder specified in the Send policy of
the Trading Partner Agreement. From the specified folder, you can then manually route
the file to your Trading Partner. When you receive data sent using the File Interface
transport, you must manually put the file containing the data into a Templar 5 folder or an
EDI/XML Translator application, or enter a run command to move the file.
• TCP Direct Transport— When you send data using the TCP Direct transport, T5
automatically sends the data to the remote host name and port number specified in the
Send policy of the Trading Partner Agreement. The port number you specify in the TCP
Direct transport must match the port number your partner enters in the TCP Direct
Receive settings in Server Preferences.
• Web Interface Transport (AS2)— When you send data using the Web Interface
transport, Templar 5 automatically sends the data to the Web server URL address
specified in the Send policy of the Trading Partner Agreement. When you receive data
sent using the Web Interface transport, you can use a CGI script to prepare the data for
your T5 system or EDI/XML Translator; copy and name files; and send a status reply to
your partner.
• FTP Transport (AS3)— When you send data using the FTP transport, Templar 5
automatically sends the data to the port number and folder on the FTP server specified in
the Send policy of the Trading Partner Agreement. When you receive data sent using the
FTP transport, you need to route the file to your templar\receive folder where Templar 5
processes it. (When the data file is sent without a security envelope or a MIME header,
you can route it directly to the EDI/XML Translator.)
• TCP with SSL Transport— When you send data using the TCP with SSL transport,
Templar 5 automatically sends the data to the remote host name and port number
specified in the Send policy of the Trading Partner Agreement. The port number you
specify in the TCP with SSL transport must match the port number your partner enters in
the TCP Receive settings in Server Preferences.
205
Appendix D: Permissions
Below is a list of Templar 5 Permissions and what activities they allow.
• Server Administration—this permission allows the user to modify servers properties.
• Database Administration—this permission allows the user to schedule database jobs
and manipulate stored data.
• User Administration—this permission allows the user to modify, add, and delete,
Templar 5 user accounts.
• Audit Log Access—this permission allows the user to open the Audit Log. If this
permission is set to No, then the icon will not be visible in the icon tree.
• History Database Access—this permission allows the user to view and modify any
archived data.
• Trading Partners—this permission allows the user to modify Trading Partners (adding,
editing, deleting, importing, exporting) and any Trading Partner information. This
permission can be set to read only.
• Trading Partner Agreements—this permission allows the user to modify trading partner
agreements (adding, editing, deleting) and any trading partner information. This
permission can be set to read only.
• Certificate Management—this permission allows the user to modify certificates
(requesting, adding, editing, deleting, importing, exporting). This permission can be set to
read only.
• Tracking Inbox/Outbox—this permission allows the user to look at and modify the Inbox
and Outbox. This permission can be set to read-only.
If you set a permission to No, the icon representing that functionality will not be visible in the icon
tree.
206
Appendix E: Encryption Types
•
DES
DES encrypts and decrypts data in 64-bit blocks, using a 64-bit key (although the
effective key strength is only 56 bits, as explained below). It takes a 64-bit block of
plaintext as input and outputs a 64-bit block of ciphertext. Since it always operates on
blocks of equal size and it uses both permutations and substitutions in the algorithm,
DES is both a block cipher and a product cipher.
DES has 16 rounds, meaning the main algorithm is repeated 16 times to produce the
ciphertext. It has been found that the number of rounds is exponentially proportional to
the amount of time required to find a key using a brute-force attack. So as the number of
rounds increases, the security of the algorithm increases exponentially.
•
DES-EDE3
Triple DES is simply another mode of DES operation. It takes three 64-bit keys, for an
overall key length of 192 bits. The Triple DES DLL then breaks the user provided key into
three subkeys, padding the keys if necessary so they are each 64 bits long. The
procedure for encryption is exactly the same as regular DES, but it is repeated three
times. Hence the name Triple DES. The data is encrypted with the first key, decrypted
with the second key, and finally encrypted again with the third key.
•
Blowfish
Blowfish is a symmetric block cipher that can be used as a drop-in replacement for DES
or IDEA. It takes a variable-length key, from 32 bits to 448 bits, making it ideal for both
domestic and exportable use. Blowfish was designed in 1993 by Bruce Schneier as a
fast, free alternative to existing encryption algorithms. Since then it has been analyzed
considerably, and it is slowly gaining acceptance as a strong encryption algorithm.
Blowfish is unpatented and license-free, and is available free for all uses.
•
CAST 128
CAST-128 is a DES-like Substitution-Permutation Network (SPN) cryptosystem which
appears to have good resistance to differential cryptanalysis, linear cryptanalysis, and
related-key cryptanalysis. This cipher also possesses a number of other desirable
cryptographic properties, including avalanche, Strict Avalanche Criterion (SAC), Bit
Independence Criterion (BIC), no complementation property, and an absence of weak
and semi-weak keys. It thus appears to be a good candidate for general-purpose use
throughout the Internet community wherever a cryptographically-strong, freely-available
encryption algorithm is required.
•
MARS
MARS is a 128-bit block cipher, meaning that data is encrypted and decrypted in 128-bit
chunks. The key length can vary from 128 to over 400 bits, but for the purposes of the
AES it is defined to be either 128, 192, or 256 bits. This block size and variable key
length is standard among all AES candidates and was one of the major design
requirements specified by NIST. The main cryptographic core uses 16 rounds, or
iterations, to encrypt and decrypt data. This inner core is wrapped by a layer of mixing
207
rounds using an entirely different structure. This is the second structure that was
mentioned above. These "wrappers" don't actually perform encryption or decryption, but
merely mix up the input data and prepare to feed it to the cryptographic core. Eight
mixing rounds are executed before the input data is fed to the main algorithm, and eight
more mixing rounds are performed on the resulting ciphertext to complete the process. It
is possible to turn off these mixing rounds and pass the plaintext directly through the
cryptographic core, but this is not advisable because it would significantly weaken the
security of MARS.
•
Rijindael/Rjindael-256
The block cipher Rijndael was designed by Joan Daemen and Vincent Rijmen as a
candidate for the Advanced Encryption Standard. It is one of the five finalists chosen by
NIST from a field of 15 candidates as explained above. The design of Rijndael was
strongly influenced by the design of the block cipher Square, which was also created by
Joan Daemen and Vincent Rijmen. The name of the algorithm is a combination of the
names of its two creators. The Rijndael web page jokes that the name Rijndael was used
"because we were both fed up with people mutilating the pronunciation of the names
'Daemen' and 'Rijmen'". The algorithm can be implemented very efficiently on a wide
range of processors and in hardware. Like all AES candidates, Rijndael is very secure
and has no known weaknesses.
•
Serpent
Serpent is a 128-bit block cipher, meaning that data is encrypted and decrypted in 128-bit
chunks. The key length can vary, but for the purposes of the AES it is defined to be either
128, 192, or 256 bits. This block size and variable key length is standard among all AES
candidates and was one of the major design requirements specified by NIST. The
Serpent algorithm uses 32 rounds, or iterations of the main algorithm.
Like DES, Serpent includes an initial and final permutation of no cryptographic
significance; these permutations are used to optimize the data before encryption. The
detailed description of the actual algorithm is contained in the official Serpent paper
submitted for the AES by the algorithm's designers.
•
Twofish
Twofish is a symmetric block cipher; a single key is used for encryption and decryption.
Twofish has a block size of 128 bits, and accepts a key of any length up to 256 bits.
(NIST required the algorithm to accept 128-, 192-, and 256-bit keys.) Twofish is fast on
both 32-bit and 8-bit CPUs (smart cards, embedded chips, and the like), and in hardware.
And it's flexible; it can be used in network applications where keys are changed
frequently and in applications where there is little or no RAM and ROM available.
•
IDEA
IDEA is a block cipher which uses a 128-bit length key to encrypt successive 64-bit
blocks of plaintext. The procedure is quite complicated using subkeys generated from the
key to carry out a series of modular arithmetic and XOR operations on segments of the
64-bit plaintext block. The encryption scheme uses a total of fifty-two 16-bit subkeys.
These are generated from the 128-bit subkey as follows:
• The 128-bit key is split into eight 16-bit keys which are the first eight subkeys.
• The digits of the 128-bit key are shifted 25 bits to the left to make a new key
which is split into the next eight 16-bit subkeys.
(Please see the MediaCrypt website at http://www.mediacrypt.com for information about
licensing this algorithm for commercial purposes.)
208
Appendix F: Signature Types
•
MD5
MD5 was developed by Rivest in 1991. It is basically MD4 with "safety-belts" and while it
is slightly slower than MD4, it is more secure. The algorithm consists of four distinct
rounds, which has a slightly different design from that of MD4. Message-digest size, as
well as padding requirements, remain the same. Den Boer and Bosselaers have found
pseudo-collisions for MD5. More recent work by Dobbertin has extended the techniques
used so effectively in the analysis of MD4 to find collisions for the compression function
of MD5. While stopping short of providing collisions for the hash function in its entirety
this is clearly a significant step.
•
SHA
The Secure Hash Algorithm (SHA), the algorithm specified in the Secure Hash Standard
(SHS, FIPS 180), was developed by NIST. Its design is very similar to the MD4 family of
hash functions developed by Rivest.
The algorithm takes a message of less than 264 bits in length and produces a 160-bit
message digest. The algorithm is slightly slower than MD5, but the larger message digest
makes it more secure against brute-force collision and inversion attacks. SHA is part of
the Capstone project.
•
SHA-1
SHA-1 is a revision to SHA that was published in 1994; the revision corrected an
unpublished flaw in SHA. Its design is very similar to the MD4 family of hash functions
developed by Rivest. SHA-1 is also described in the ANSI X9.30 (part 2) standard.
The algorithm takes a message of less than 264 bits in length and produces a 160-bit
message digest. The algorithm is slightly slower than MD5, but the larger message digest
makes it more secure against brute-force collision and inversion attacks. SHA is part of
the Capstone project. For further information on SHA, see [Pre93] and [Rob95b].
209
Appendix G: Templar 5 Directory Structure
The Templar 5 directory structure ensures an efficient and automated operation. Templar 5
utilizes the following directories
• receive/archive—stores a copy of all of the received files
• receive/pickup—all received files go here. Templar 5 uses this as a working directory
while decrypting the files.
• transmit/archive—stores a copy of all of the sent files
• transmit/pickup—outgoing EDI & XML files get placed here and Templar 5 picks them
up and sends them
• transmit/preprocess—outgoing files with multiple ISAs get placed here and Templar 5
splits them and moves them to the transmit/pickup folder for sending.
210
Appendix H: How Trading Works
Templar 5 provides you the ability to trade data in one of three ways
• One-Time "Flat File" Transmission (Ad-Hoc)
• Automatic "Flat File" Transmission
• Automatic EDI file Transmission
• Automatic XML file Transmission
One-Time “Flat File” Transmission
Ad-Hoc file transfers refer to the single transmission of a file to a specific Trading Partner. When
you utilize Templar 5’s Ad-Hoc transmission functionality, Templar 5 picks up your flat file,
encrypts it, and sends it to the Trading Partner.
There are three ways to send a single file to a Trading Partner
• The first way is to click on the Trading Partner Agreement with your secondary mouse
button. This will bring up the Context-sensitive Menu. Select the Send File Option.
• The second way is to click on the Actions Button from the Trading Partner Agreement
Window. This will bring up the Actions Button Submenu. Select the Send File Option.
• The third way is to choose the Send File Option from the Edit Menu while in the Trading
Partner Agreement Window.
• All of these methods will bring up the Open File Window.
211
Figure 136: Open File Window
•
•
•
212
From the Open File Window, navigate your hard drive to select the file you want to send.
When you have selected the file, click the Open Button.
If your Templar 5 system is setup properly, the Templar 5 Success Dialog Box will
display informing you that the message has been sent to the transfer queue, which can
be accessed via the Tracking Outbox feature.
Automatic “Flat File” Transmission
Figure 137: Edit Trading Partner Agreement (Send Policy Tab)
3
Templar 5 will automatically transmit non-EDI files placed into a specific Monitor Directory as
specified in the Trading Partner Agreements >> Send Policy. Note: the monitor directory must
be an absolute path to a directory on your hard drive or network.
When you send a flat-file through Templar 5 using the automatic transmission option, Templar 5
picks up your flat file (as-is), encrypts it, and sends it to the Trading Partner.
Note: files that are placed into the Monitor Directory for automatic transmission are deleted from
that directory upon transmission.
3
For a complete list of Templar 5 directory, see Appendix I
213
Automatic EDI or XML transmission
Templar 5 automatically transmits EDI and XML data in one of the following ways
• Preprocess—Multiple interchange data is placed into the Templar 5 preprocess directory
by your EDI/XML Translator (..\transmit\preprocess\ is the default directory off the install
of the Templar 5 Server for this directory). Utilizing the EDI File Rationalization Service.
Templar 5 then splits each Interchange into a separate file and sends it automatically.
• Pickup—Single interchange data is placed into the Templar 5 pickup directory where it is
processed without manipulation (..\transmit\pickup is the default directory off the install of
the Templar 5 Server for this directory).
214
Index
A
Add a Templar 5 Server .............................................................................................................. 143
Adding a New Job........................................................................................................................ 134
Adding a New User...................................................................................................... 189, 192, 194
Adding a Remote Trading Partner................................................................................................. 46
Adding a Trading Partner Agreement............................................................................................ 60
Appendix B Templar 5 Services ................................................................................................. 202
Appendix C Transmit Methods ................................................................................................... 203
Appendix D Permissions ............................................................................................................ 204
Appendix G Encryption Types ............................................................................................. 205, 207
Appendix I
Templar 5 Directory Structure.................................................................................................. 208
Archive Data ................................................................................................................................ 122
Archive Data Parameters ............................................................................................................ 136
Audit Log...................................................................................................................................... 126
Automatic..................................................................................................................................... 213
Automatic EDI transmission ........................................................................................................ 214
B
Blowfish ............................................................................................................................... 205, 207
C
CAST 128 .................................................................................................................................... 205
Certificate Client Preferences...................................................................................................... 147
Certificate Revocation ................................................................................................................. 108
Certificates..................................................................................................................................... 79
Clean-up Database Parameters .......................................................................................... 137, 139
Client Perferences ....................................................................................................................... 144
Configuring the Templar 5 Datasource ....................................................................................... 209
Creating a Certificate Request ...................................................................................................... 80
Creating a New Certificate............................................................................................................. 80
D
Data ............................................................................................................................................. 121
Delete a Log Entry ....................................................................................................................... 126
Delete a Log File.......................................................................................................................... 150
Delete a Templar 5 Server .......................................................................................................... 143
Delete a Trading Partner Agreement............................................................................................. 78
Delete Data.................................................................................................................................. 124
Delete Data Parameters .............................................................................................................. 138
Deleting a Local Trading Partner................................................................................................... 45
Deleting a Remote Trading Partner............................................................................................... 57
Deleting a User ............................................................................................................ 190, 193, 197
Deleting Jobs ............................................................................................................................... 133
Deleting Transmissions ....................................................................................................... 111, 117
DES ..................................................................................................................................... 205, 207
DES-EDE3........................................................................................................................... 205, 207
E
Edit a Trading Partner Agreement................................................................................................. 77
Editing a Local Trading Partner ..................................................................................................... 44
Editing a Remote Trading Partner ................................................................................................. 56
Editing a User .............................................................................................................. 190, 193, 198
Editing Existing Jobs ........................................................................................... 131, 189, 191, 192
Export a Certificate ........................................................................................................................ 98
Export a Certificate to a File .......................................................................................................... 98
Export a Certificate via Email ........................................................................................................ 99
Export a Digital ID........................................................................................................................ 102
215
Export as a File.............................................................................................................................. 41
Export via Email............................................................................................................................. 38
Exporting........................................................................................................................................ 37
Exporting Certificates .................................................................................................................... 98
G
General Client Preferences ......................................................................................................... 145
General Server Properties ........................................................................................................... 152
Getting Started............................................................................................................................... 18
H
Hardware Requirements.................................................................................................................. 9
I
IBM DB2 ...................................................................................................................................... 172
IDEA ............................................................................................................................................ 206
Importing a Remote Trading Partner ............................................................................................. 54
Importing Certificates..................................................................................................................... 92
Informix ........................................................................................................................................ 170
Intermediate Authorities................................................................................................................. 79
L
Local ID.......................................................................................................................................... 95
Local Trading Partner Overview .................................................................................................... 27
Local Trading Partners .................................................................................................................. 27
M
MARS .......................................................................................................................................... 205
Microsoft SQL Server .................................................................................................................. 169
Migrating from an Older Version of Templar ............................................................................... 209
Migrating Templar 5..................................................................................................................... 209
Monitor Templar 5 Services......................................................................................................... 129
N
Navigating Trading Partner Agreements ....................................................................................... 59
New Local Tradig Partner EDI Qualifier / ID Tab .......................................................................... 30
New Local Trading Partner Certificates Tab ................................................................................. 32
New Local Trading Partner Contact Information Tab .................................................................... 35
New Local Trading Partner Notes ................................................................................................. 36
New Remote Partner Certificates Tab........................................................................................... 50
New Remote Trading Partner Contact Information Tab ................................................................ 52
New Remote Trading Partner EDI Qualifier / ID Tab .................................................................... 49
New Remote Trading Partner Notes ............................................................................................. 53
O
ODBC Bridge ............................................................................................................................... 173
One-Time..................................................................................................................................... 211
Operating System Requirements .................................................................................................... 8
Oracle .......................................................................................................................................... 168
Other JDBC Datasource.............................................................................................................. 174
P
Permanently Delete a Certificate................................................................................................. 109
R
Remote Certificate ......................................................................................................................... 92
Remote Trading Partners .............................................................................................................. 46
Reprocess a Transmission .................................................................................................. 111, 117
Rijindael/Rijindael-256 ................................................................................................................. 206
S
S/MIME ........................................................................................................................................ 179
Schedule Jobs ............................................................................................................................. 130
Security Envelopes ...................................................................................................................... 178
Self-Signed Certificate ................................................................................................................... 87
Serpent ........................................................................................................................................ 206
216
Server Archive and Delete Properties ......................................................................................... 163
Server Clean Up Properties......................................................................................................... 164
Server Data Type Mapping Properties ........................................................................................ 162
Server Database Setup Properties...................................................................................... 165, 175
Server Properties......................................................................................................................... 151
Server Service Settings Properties.............................................................................................. 159
Server Services Properties .......................................................................................................... 157
Server Templar 5 Parallel Tasking Properties............................................................................. 161
Setting the Templar 5 Theme ........................................................................................................ 21
Starting Templar 5 Desktop on Windows ...................................................................................... 20
Starting The Templar 5 Client on non-Windows............................................................................ 20
Starting The Templar 5 Client on Windows ................................................................................... 19
Starting the Templar 5 Desktop..................................................................................................... 20
Sybase......................................................................................................................................... 171
System Log Files ......................................................................................................................... 149
T
Templar 4.0 Compatibility............................................................................................................ 101
Templar 5 Client Welcome Screen................................................................................................ 21
Templar 5 Internal Database ....................................................................................................... 167
Templar 5 Server ......................................................................................................................... 142
Templar 5 Windows ....................................................................................................................... 22
Tracking InBox............................................................................................................................. 110
Trading......................................................................................................................................... 211
Trading Partner Agreements ......................................................................................................... 58
Trading Partners ...................................................................................................................... 25, 26
Trusted Root CA ............................................................................................................................ 79
Twofish ........................................................................................................................................ 206
U
Users ........................................................................................................................................... 194
V
View a Log File ............................................................................................................................ 149
View Permissions ........................................................................................................................ 141
View Revoked Certificate Properties ........................................................................................... 108
View the Properties of a Log Entry .............................................................................................. 127
Viewing a Certificate .................................................................................................................... 104
Viewing an Attached File ..................................................................................................... 114, 120
Viewing Transmissions ........................................................................................................ 112, 118
W
Welcome.......................................................................................................................................... 7
What is Templar 5? ......................................................................................................................... 7
X
XML Definitions...................................................................................................................... 24, 183
217