1
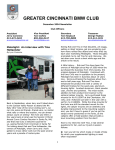
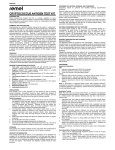
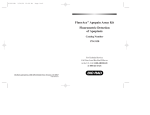
FLICA Booklet Immunochemistry Technologies, LLC For technical questions and orders, please contact us at: 1-800-829-3194 952-888-8788 952-888-8988 fax www.immunochemistry.com Carboxyfluorescein FLICA Apoptosis Detection Kit Caspase Assay Poly-Caspases FLICA (FAM-VAD-FMK) Caspase 1 FLICA (FAM-YVAD-FMK) Caspase 2 FLICA (FAM-VDVAD-FMK) Caspase 3 FLICA (FAM-DEVD-FMK) Caspase 6 FLICA (FAM-VEID-FMK) Caspase 8 FLICA (FAM-LETD-FMK) Caspase 9 FLICA (FAM-LEHD-FMK) Caspase 10 FLICA (FAM-AEVD-FMK) Caspase 13 FLICA (FAM-LEED-FMK) For Research Use Only. Copyright 2002 Immunochemistry Technologies, LLC FLICA Apoptosis Detection Kit Ordering Information Caspase Poly-Caspases Caspase 1 Caspase 2 Caspases 3&7 Caspase 6 Caspase 8 Caspase 9 Caspase 10 Caspase 13 Poly-Caspases Caspase 3&7 FLICA Peptide FAM-VAD-FMK FAM-YVAD-FMK FAM-VDVAD-FMK FAM-DEVD-FMK FAM-VEID-FMK FAM-LETD-FMK FAM-LEHD-FMK FAM-AEVD-FMK FAM-LEED-FMK SR-VAD-FMK SR-DEVD-FMK 25-test kit part# 91 part# 97 part# 918 part# 93 part# 95 part# 99 part# 912 part# 922 part# 929 part# 916 part# 931 100-test kit__ part# 92 part# 98 part# 919 part# 94 part# 96 part# 910 part# 913 part# 923 part# 930 part# 917 part# 932 Publication Version: FAM FLICA Flat Manual #818-081502 No part of this manual may be reprinted without the express written permission of Immunochemistry Technologies, LLC. www.immunochemistry.com Immunochemistry Technologies, LLC 9401 James Avenue South, Suite 155 Bloomington, MN 55431 800-829-3194 / 952-888-8788 fax 952-888-8988 Immunochemistry Technologies, LLC 1-800-829-3194 www.immunochemistry.com 2 FLICA Booklet Table of Contents 1. Introduction Apoptosis is an evolutionarily conserved form of cell suicide, which follows a specialized cellular process. The central component of this process is a cascade of proteolytic enzymes called caspases. These enzymes participate in a series of reactions that are triggered in response to proapoptotic signals and result in the cleavage of protein substrates, causing the disassembly of the cell 1. 1. Introduction ……………………………………………………………... 4 2. Contents of the FLICA Apoptosis Detection Kit ...…………...……... 6 3. Recommended Materials and Equipment ..………………...….……. 6 Caspases have been identified in organisms ranging from C. elegans to humans. The mammalian caspases play distinct roles in apoptosis and inflammation. In apoptosis, caspases are responsible for proteolytic cleavages that lead to cell disassembly (effector caspases), and are involved in upstream regulatory events (initiator caspases). An active caspase consists of two large (~20 kD) and two small (~10 kD) subunits that form two heterodimers which associate in a tetramer 2-4. In common with other proteases, caspases are synthesized as precursors that undergo proteolytic maturation, either autocatalytically or in a cascade by enzymes with similar specificity 5. 4. Instrumentation ...…………………....………………………….……… 7 5. Storage and Shelf-Life ………………………………………………... 7 6. Safety Information ……………………………………………………… 7 7. Overview of the FLICA Protocol …………...…………………………. 7 8. Induction of Apoptosis …………………………………………………. 8 9. Preparation of 1X Wash Buffer .………..……………..……………… 8 10. Propidium Iodide ……………………………………………………….. 9 11. Hoechst Stain ……….………………………………………………….. 9 12. Fixative ………………………………………………………………….. 9 13. Reconstitution of the 150X FLICA Stock ……………………………. 10 14. Preparation of 30X FLICA Solution for Immediate Use ………….… 10 15. Storage of 150X FLICA Stock for Future Use …....………………… 10 16. Preparation of 30X FLICA Solution from a Frozen Aliquot ………... 11 17. 96-Well Fluorescence Plate Reader Staining Protocol ……….…… 11 18. 96-Well Fluorescence Plate Reader Set Up ..………………………. 13 19. 96-Well Fluorescence Plate Reader Sample Data .……………….. 13 20. Fluorescence Microscopy Staining Protocol for Adherent Cells ….. 14 21. Fluorescence Microscopy Staining Protocol for Suspension Cells . 15 22. Fluorescence Microscopy Sample Data ..…………………………… 17 23. Flow Cytometry with Single-Color Staining …………………………. 19 24. Flow Cytometry with Bicolor Staining ……...………………………… 20 25. Flow Cytometry Sample Data ………………………………………… 22 26. References …………………....………………………………………... 23 Immunochemistry Technologies, LLC 1-800-829-3194 www.immunochemistry.com FLICA Booklet 3 Caspase enzymes specifically recognize a 4 amino acid sequence (on the target substrate) which necessarily includes an aspartic acid residue. This residue is the target for the cleavage reaction, which occurs at the carbonyl end of the aspartic acid residue6. Caspases can be detected via immunoprecipitation, immunoblotting techniques using caspase specific antibodies, or by employing fluorochrome substrates which become fluorescent upon cleavage by the caspase. FLICA Apoptosis Detection Kits use a novel approach to detect active caspases. The methodology is based on a Fluorochrome Inhibitor of Caspases (FLICA). Once inside the cell, the FLICA inhibitor binds covalently to the active caspase 7. These inhibitors are cell permeable and non-cytotoxic. For kits using green fluorescence, a carboxyfluoresceinlabeled fluoromethyl ketone peptide inhibitor of caspases is used. (ICT also offers a line of red FLICA Apoptosis Detection Kits that use sulforhodaminelabeled inhibitors; please contact ICT for more details.) For example, the Poly-Caspases FLICA Apoptosis Detection Kit contains ICT's green fluorescent-labeled inhibitor, FAM-VAD-FMK, which is a carboxyfluorescein (FAM) derivative of valylalanylaspartic acid (VAD) fluoromethyl ketone (FMK), a potent inhibitor of caspase activity. When added to a population of cells, the FAM-VAD-FMK FLICA probe enters each cell and covalently binds to a reactive cysteine residue that resides on the large subunit of the active caspase heterodimer, thereby inhibiting further enzymatic activity. Because the FAM-VAD-FMK FLICA reagent becomes covalently coupled to the enzyme, it is retained within the cell, while any unbound FAM-VAD-FMK FLICA reagent will diffuse out of the cell and is Immunochemistry Technologies, LLC 1-800-829-3194 www.immunochemistry.com 4 FLICA Booklet washed away. The remaining green fluorescent signal is a direct measure of the number of active caspase enzymes that were present in the cell at the time the reagent was added. Cells that contain the bound FLICA can be analyzed by 96-well-plate based fluorometry, fluorescence microscopy, or flow cytometry. Because the FLICA reagent FAM-VAD-FMK irreversibly binds to many activated caspases (caspase-1, -3, -4, -5, -6, -7, -8 and -9), it can be used as a generic probe for the detection of most caspases. In comparison, when the FLICA reagent FAM-YVAD-FMK enters the cell, it primarily binds to caspase-1, therefore it can be used to measure the amount of active caspase-1 that was present in the cell at the time when the FAM-YVADFMK FLICA reagent was added. Other green fluorescence FLICA Apoptosis Detection Kits are available to analyze specific caspases: FAMVDVAD-FMK FLICA can be used to detect caspase-2; FAM-DEVD-FMK to detect caspase-3 and caspase-7; FAM-VEID-FMK to detect caspase-6; FAM-LETD-FMK to primarily detect caspase-8; FAM-LEHD-FMK to primarily detect caspase-9; FAM-AEVD-FMK to detect caspase-10; and FAM-LEEDFMK to detect primarily caspase-13. Following the suggested protocols listed here, each sample requires 10 µL of 30X FLICA solution (equal to 2 µL of 150X FLICA stock). The FLICA-25 Kit will test 25 samples; the FLICA-100 Kit will test 100 samples. The FLICA kit was designed to evaluate apoptotic events using 3 different fluorescence detection methods: 96-well microtiter plate fluorometry for quantitation; fluorescence microscopy for qualitative analysis; and flow cytometry for quantitation. The FLICA reagent has an optimal excitation range from 488 - 492 nm, and emission range from 515 - 535 nm (the excitation / emission pairs which best approximate this optimal range should be used). Cells labeled with the FLICA reagent may be read immediately or preserved for 24 hours using the fixative. Unfixed samples may be analyzed with propidium iodide or Hoechst stain. Using a fluorescence plate reader (with black microtiter plates), apoptosis can be quantitated as the amount of green fluorescence emitted from FLICA probes bound to caspases. Cell populations in more advanced stages of apoptosis will have a higher RFU intensity than cell populations in earlier stages (see Section 19 for sample data). FLICA Booklet Using a flow cytometer, analysis is done using a 15 mW argon ion laser at 488 nm. Fluorescein is measured on the FL1 channel, and a log FL1 (Xaxis) versus number of cells (Y-axis) histogram may be generated. On this histogram, there will appear two cell populations represented by two peaks. The majority of the caspase negative cells will occur within the first log decade of the FL1 (X) axis (first peak), whereas the caspase-positive cell population will appear as a separate peak or as a shoulder of the first peak showing increased fluorescence intensity. Cells with the active caspase (those undergoing apoptosis) will fluoresce green (see Sections 25 and 26 for sample data). For Research Use Only. Not for use in diagnostic procedures. 2. Contents of the FLICA Apoptosis Detection Kit: FAM-XXX-FMK FLICA Reagent, lyophilized 25-test kits contain 1 vial of the FLICA; 100-test kits contain 4 vials. 10X Wash Buffer, 60 mL (part# 634) or 15 mL (part# 635) Fixative, 6 mL (part# 636) Propidium Iodide, 1 mL (part# 638) Hoechst Stain, 1 mL (part# 639) Assay Manual (part# 817) MSDS sheets 3. Recommended Materials and Equipment (not all are required): Cultured cells with media Reagents to induce apoptosis 15 mL polystyrene centrifuge tube (1 per sample) Amber vials or polypropylene tubes for storage of 150X concentrate at –20°C, if aliquoted 150 mL or 600 mL graduated cylinder Slides Hemocytometer Clinical centrifuge at <400 X g 37°C CO2 incubator Vortexer Pipette(s) capable of dispensing at 10µL, 50µL, 200µL, 300µL, 1mL dI H2O, 135 mL or 540 mL needed Phosphate Buffered Saline (PBS) pH 7.4, up to 100 mL needed Dimethyl Sulfoxide (DMSO), 50µL or 200µL needed Ice or 4°C refrigerator to store cells Viewing cells through a fluorescence microscope, apoptotic cells will fluoresce green, while non-apoptotic cells will appear mostly unstained. As apoptosis progresses, the amount of active caspase enzymes capable of binding the FLICA increases and eventually reaches a maximum level. Therefore, cells in more advanced stages of apoptosis will appear brighter green than cells in earlier stages (see Section 22 for sample data). 4. Instrumentation (not all are required): 96-well fluorescence plate reader with excitation at 488 nm, emission 520 nm filter pairings, and black round or flat bottom 96well microtiter plates. Immunochemistry Technologies, LLC Immunochemistry Technologies, LLC 1-800-829-3194 www.immunochemistry.com 5 1-800-829-3194 www.immunochemistry.com 6 FLICA Booklet Fluorescence microscope with appropriate filters (excitation 490 nm, emission >520 nm for FLICA; excitation at 490 nm and emission at 635 nm for PI; and if Hoechst is used, a UV-filter with excitation at 365 nm, emission at 480 nm) and slides. Flow cytometer equipped with a 15 mW, 488 nm argon excitation laser, with appropriate filters (excitation 490 nm, emission >520 nm for FLICA; excitation at 490 nm and emission at 635 nm for PI). 5. Storage and Shelf-Life Store the unopened kit (and each unopened component) at 2°C to 8°C until the expiration date. Protect the FLICA reagent from light at all times. Once reconstituted, the 150X FLICA stock should be stored at –20°C protected from light. This reagent is stable for up to 6 months and may be thawed twice during that time. Once diluted, store the 1X wash buffer at 2 - 8°C up to 14 days. Replacement components can be ordered by calling ICT at 1-800829-3194 or 952-888-8788. 6. Safety Information Use gloves while handling the FLICA reagent, propidium iodide, Hoechst stain, and fixative. Dispose of all liquid components down the sink and flush with copious amounts of water. Solid components may be tossed in standard trash bins. MSDS sheets are available at www.immunochemistry.com or by calling 1-800-829-3194 or 952-888-8788. 1. Culture cells to a density optimal for apoptosis induction according to your specific induction protocol, but not to exceed 106 cells/mL. 2. At the same time, culture a non-induced negative control cell population at the same density as the induced population for every labeling condition. For example, if labeling with FLICA and Hoechst stain, make 8 populations: a. Unlabeled, induced and non-induced populations. b. FLICA labeled, induced and non-induced populations. 1-800-829-3194 www.immunochemistry.com 3. 4. 5. 6. 7. 8. 9. 10. 11. c. FLICA and Hoechst labeled, induced and non-induced populations. d. Hoechst labeled, induced and non-induced populations. Induce apoptosis following your protocol (4 sample protocols are mentioned in Section 8). Prepare 1X wash buffer (Section 9). Prepare 150X FLICA stock (Section 13). Prepare 30X FLICA solution (Section 14 or 16). Stain cells with 30X FLICA solution, incubate for 1 hour, and wash cells (Section 17, 20, 21, 23, or 24). If desired, label cells with propidium iodide (Section 10). If desired, label cells with Hoechst stain (Section 11). If desired, fix cells (Section 12). Analyze data via microtiter plate fluorometry, fluorescence microscopy, or flow cytometry. 8. Induction of Apoptosis The FLICA kit works with your current apoptosis protocols - induce apoptosis as you normally would, then label the cells with FLICA. Four quick examples of protocols to induce apoptosis in suspension culture are: 1) treating Jurkat cells with 2 µg/ml camptothecin for 3 hours. 2) treating Jurkat cells with 1 µM staurosporine for 3 hours. 3) treating HL-60 cells with 4 µg/ml camptothecin for 4 hours. 4) treating HL-60 cells with 1 µM staurosporine for 4 hours. 9. Preparation of 1X Wash Buffer The wash buffer is supplied as a 10X concentrate which must be diluted to 1X with DI H20 prior to use. 7. Overview of the FLICA Protocol Staining apoptotic cells with the FLICA kit can be completed within a few hours. However, the FLICA kit is used with living cells, which require periodic maintenance and cultivation several days in advance. In addition, once the proper number of cells has been cultivated, time must be allotted for the induction process (which typically requires a 2-4 hour incubation at 37°C). Therefore, as the 30X FLICA solution must be used immediately, the FLICA reagents should be prepared at the end of the apoptosis induction process. The following is a quick overview of the FLICA protocol: Immunochemistry Technologies, LLC FLICA Booklet 7 1. If necessary, gently warm the 10X concentrate to completely dissolve any salt crystals that may have come out of solution. 2. For the FLICA-25 Kit, add the entire bottle (15 mL, Part# 600035) of 10X wash buffer to 135 mL of DI H2O (to make 150 mL). 3. Or, for the FLICA-100 Kit, add the entire bottle (60 mL, Part# 600034) of 10X wash buffer to 540 mL of DI H2O (to make 600 mL). 4. Or, if not using the entire bottle, dilute the 10X wash buffer 1:10 in DI H2O. For example, add 10 mL 10X wash buffer to 90 mL DI H2O (to make 100 mL). 5. Let the solution stir for 5 minutes or until all crystals have dissolved. 6. If not using the 1X wash buffer the same day it was prepared, store it covered at 2° - 8°C for up to 14 days. If more buffer is needed, please contact ICT at 1-800-829-3194 or 952-888-8788 for technical assistance or to order a replacement component. Warning: The wash buffer contains sodium azide, which is harmful if swallowed or absorbed through the skin. Sodium azide can react with lead and copper sink drains forming explosive compounds. When disposing of Immunochemistry Technologies, LLC 1-800-829-3194 www.immunochemistry.com 8 FLICA Booklet excess wash buffer, flush sink with copious amounts of water; see MSDS for further information. 10. Propidium Iodide Propidium iodide (PI) may be used to distinguish between live cells and dead cells, either caspase-negative or caspase-positive. PI stains necrotic, dead, and membrane-compromised cells. They may be viewed through a fluorescence microscope, or analyzed on a flow cytometer (Section 21 or 24). The dye excites at 488 - 492 nm and exhibits an emission maximum at 635 nm. PI is provided ready-to-use at 250 µg/mL. Warning: Propidium iodide is a potential mutagen. Use of gloves, protective clothing, and eyewear are strongly recommended. When disposing, flush sink with copious amounts of water; see MSDS for further information. 11. Hoechst Stain Hoechst stain can be used to label the nuclei of dying cells after labeling with the FLICA reagent. It is revealed under a microscope using a UV-filter with excitation at 365 nm and emission at 480 nm (Section 20 or 21). Hoechst stain is provided ready-to-use at 200 µg/mL. Warning: Hoechst stain is a potential mutagen. Use of gloves, protective clothing, and eyewear are strongly recommended. When disposing, flush sink with copious amounts of water; see MSDS for further information. 12. Fixative If the stained cell populations cannot be evaluated immediately upon completion of the FLICA staining protocol, cells may be fixed and analyzed up to 24 hours later on a microscope or flow cytometer. The fixative is a formaldehyde solution designed to cross-link cell components and will not interfere with the carboxyfluorescein labeling once the FLICA reaction has taken place. After labeling, add the fixative into the cell solution at a 1:10 ratio. For example, add 100 µL fixative to 900 µL cells (Section 20, 21, or 23). Fixed cells may be stored on ice or at 4°C up to 24 hours. Do not use ethanol-based or methanol-based fixatives to preserve the cells - they will inactivate the FLICA label. Never add the fixative until the staining and final wash steps have been completed. Immunochemistry Technologies, LLC 1-800-829-3194 www.immunochemistry.com 9 FLICA Booklet 13. Reconstitution of the 150X FLICA Stock The FLICA reagent is supplied as a highly concentrated lyophilized powder. It must first be reconstituted in DMSO, forming a 150X stock concentrate, and then diluted 1:5 in PBS to form a final 30X working solution. For best results, the 30X working solution should be prepared immediately prior to use; however, the reconstituted 150X stock concentrate can be stored at –20°C for future use. The newly reconstituted 150X FLICA stock must be used or frozen immediately after it is prepared and protected from light during handling. 1. Reconstitute each vial of lyophilized FLICA with 50 µL DMSO. This yields a 150X concentrate. (The FLICA-25 kit contains 1 vial; the FLICA-100 kit contains 4 vials.) 2. Mix by swirling or tilting the vial, allowing the DMSO to travel around the base of the amber vial until completely dissolved. At room temperature (RT), this reagent should be dissolved within a few minutes. 3. If immediately using this solution, dilute it to 30X (Section 14). 4. Or, if using later, aliquot and store it at –20°C (Section 15). 14. Preparation of 30X FLICA Solution for Immediate Use Using the freshly reconstituted 150X FLICA stock, prepare the 30X workingstrength FLICA solution by diluting the stock 1:5 in PBS at pH 7.4. Following the suggested protocols here, each sample to be tested requires only 10 µL of 30X FLICA solution (or 2 µL of the 150X FLICA stock). 1. If you are using the entire vial, add 200 µL PBS pH 7.4 to each vial (each vial contains 50 µL of the 150X stock; this yields 250 µL of a 30X solution). 2. If not using the entire vial, dilute the 150X stock 1:5 in PBS, pH 7.4. For example, add 10 µL of the 150X stock to 40 µL PBS (this yields 50 µL of a 30X solution). Store the unused 150X stock at –20°C (Section 15). 3. Mix by inverting or vortexing the vial at RT. The 30X working strength FLICA solution must be used the same day that it is prepared. 15. Storage of 150X FLICA Stock for Future Use If not all of the 150X FLICA stock will be used the same time it is reconstituted, the unused portion may be stored at -20°C for 6 months. During that time, the 150X FLICA stock may be thawed and used twice. After the second thaw, discard any remaining 150X FLICA stock. If you anticipate using it more than twice, make small aliquots in amber vials or polypropylene tubes and store at -20°C protected from light. When ready to use, follow Section 16 below. Immunochemistry Technologies, LLC 1-800-829-3194 www.immunochemistry.com 10 FLICA Booklet 16. Preparation of 30X FLICA Solution from a Frozen Aliquot If some of the 150X FLICA reagent was previously reconstituted and then stored at –20°C, it may be used 2 more times within 6 months. 1. Thaw the 150X FLICA stock and protect from light. 2. Once the aliquot has become liquid, dilute the 150X stock solution 1:5 in PBS, pH 7.4. For example, mix 10 µL of 150X FLICA reagent with 40 µL of PBS. 3. Mix by inverting or vortexing the vial at RT. 4. If the 150X FLICA stock was frozen immediately after reconstitution and was never thawed, return it to the freezer. If the stock was thawed once before, discard it. 5. Proceed to the labeling protocol (Section 17, 20, 21, 23, 24, or 25). 17. 96-Well Fluorescence Plate Reader Staining Protocol Following this fluorescence plate reader protocol, each sample requires 10 µL of 30X FLICA solution (equal to 2 µL of 150X FLICA stock). 1. As discussed in Section 7, culture cells to a density optimal for apoptosis induction according to your specific induction protocol. Cell density in the cell culture flasks should not exceed 106 cells/mL. Cells cultivated in excess of this concentration may begin to naturally enter apoptosis. Optimal cell concentration will vary depending on the cell line used. 2. Induce apoptosis following your protocol (as mentioned in Section 8). 3. At the same time, culture an equal volume of non-induced cells for a negative control cell population. Make sure that both tubes of cells contain similar quantities of cells. Cells can be concentrated just prior to induction to 2 - 6 X 10⁶ cells/mL. (Cells may be induced at even lower concentrations, but must be concentrated to ~ 1 X 10⁷ cells/mL for FLICA labeling. If necessary, cells can be concentrated by centrifugation for 5 minutes at <400 X g at RT.) 4. Once induction is completed, transfer 290 – 300 µL of each cell suspension to sterile tubes. Larger cell volumes can also be used as determined by each investigator, however more of the FLICA reagent may be needed per sample. Larger volume cell suspensions label nicely using 25 cm2 tissue culture flasks (laid flat) as the incubation vessel. When ready to label with the 30X FLICA solution, cells should be at least 5 X 10⁵ cells/100 µL aliquot per microtiter plate well. Density can be determined by counting cell populations on a hemocytometer. Immunochemistry Technologies, LLC 1-800-829-3194 www.immunochemistry.com 11 FLICA Booklet 5. Add 10 µL 30X FLICA solution directly to the 290 – 300 µL cell suspension. 6. Or, if a different cell volume was used, add the 30X FLICA solution at a 1:30 ratio. For example, if 2.9 mL of cell suspension was used, add 100 µL of the 30X FLICA solution (forming a final volume of 3 mL). Each investigator should adjust the amount of FLICA reagent used to accommodate their particular cell line and research conditions. 7. Mix the cells by slightly flicking the tubes. 8. Incubate cells for 1 hour at 37oC under 5% CO2, protecting the tubes from light. As cells may settle on the bottom of the tubes, gently resuspend them by swirling cells once or twice during this incubation time. This will ensure an even distribution of the FLICA reagent among all cells. 9. Add 2 mL of 1X wash buffer to each tube. 10. Mix the cells. 11. Centrifuge cells at <400 X g for 5 minutes at room temperature (RT). 12. Carefully remove and discard supernatant. 13. Gently vortex the cell pellet to disrupt any cell-to-cell clumping. 14. Resuspend the cell pellet in 1 mL 1X wash buffer. 15. Centrifuge cells at <400 X g for 5 minutes at RT. 16. Carefully remove and discard supernatant. 17. Gently vortex the cell pellet to disrupt any cell-to-cell clumping. 18. Resuspend the cell pellet in 1 mL 1X wash buffer. 19. Determine the concentration of both the induced and non-induced cell populations. This can be done while the cells are being pelleted down for the last time (Step 20). To count cells: a. Remove 50 µL from each tube. b. Add to 450 µL PBS (forming a 1:10 dilution of each). c. Count the cells using a hemocytometer. d. After counting, compare the density of each. The non-induced population may have more cells than the induced population, as some induced cells may be lost during the apoptotic process. If there is a dramatic loss in stimulated cell population numbers, adjust the volume of the induced cell suspension to match the cell density of the non-induced suspension (Step 24). 20. Centrifuge the remaining cells at <400 X g for 5 minutes at RT. 21. Carefully remove and discard supernatant. 22. Resuspend non-stimulated cells in 400 µL PBS 23. If it is not necessary to equilibrate the cell concentrations (as discussed in Step 19d), resuspend the stimulated cells in 400 µL PBS as well. 24. If it is necessary to equilibrate the cell concentrations (from Step 19d), adjust the suspension volume of the PBS for the induced cells to approximate the cell density of the non-induced population. This Immunochemistry Technologies, LLC 1-800-829-3194 www.immunochemistry.com 12 FLICA Booklet adjustment step is optional if your cell treatment does not result in a dramatic loss in stimulated cell population numbers. 25. Place 100 µL of the cell suspensions into each of 2 wells of a black microtiter plate. Do not use clear plates. Avoid bubbles. 26. Measure the fluorescence intensity of fluorescein (Section 18). 18. 96-Well Fluorescence Plate Reader Set Up 1. Set the plate reader to perform an endpoint read. 2. Set the excitation wavelength at 490 nm and the emission wavelength to 520 nm. Fluorescein has an optimal excitation range from 488 - 492 nm, and emission range from 515 - 535 nm. Select the filter pairing which most closely approximates this range; the filter pairing used may differ slightly from these optimal settings. 3. Read the sample. 4. An example of differential FLICA fluorescence intensities in induced versus non-induced Jurkat cells is shown in Figure 1 using a 96-well fluorescence plate reader. 19. 96-Well Fluorescence Plate Reader Sample Data Jurkat Cells (FAM-VAD-FMK) FLICA Booklet 20. Fluorescence Microscopy Staining Protocol for Adherent Cells 1. Trypsinize cells. 2. Count cells. 3. Seed about 104 - 105 cells onto a sterile glass coverslip in a 35 mm petri dish or onto chamber slides. 4. Grow cells in their respective cell culture media formulation for 24 hours at 37°C (as discussed in Section 7). 5. Induce cells to undergo apoptosis and sample at time points according to your specific protocol (as mentioned in Section 8). 6. Add the 30X FLICA solution to the medium at a 1:30 ratio. For example, add 10 µl 30X FLICA to 290 – 300 µl medium. Each investigator should adjust the amount of FLICA reagent used to accommodate their particular cell line and research conditions. 7. 8. 9. 10. 40 34.11 35 11. 12. 30 RFUs 25 13. 20 15 10 6.35 14. 5 0 Negative Control (Non-induced) std dev 1.58 Apoptotic (Induced) std dev 1.60 Figure 1. FAM-VAD-FMK fluorometric detection of active caspases in Jurkat cells (SD of 6 wells). In Figure 1, cells were either treated with DMSO (negative, non-induced cells – bar on the left side of the graph) or with staurosporine (apoptotic, induced cells - bar on the right side of the graph) for 2 hours at 37°C. Cells were labeled with FAM-VAD-FMK solution for 60 minutes at 37°C. Samples were read on a 96-well fluorescence plate reader (Molecular Devices, Gemini XS) set at 490 nm excitation and 520 nm emission using a 495 nm cut-off filter. As the caspases became more active, indicating apoptosis, the amount of green fluorescence increased by over 500% in the induced Jurkat cells. Immunochemistry Technologies, LLC 1-800-829-3194 www.immunochemistry.com 13 15. Mix well. Incubate cells for 1 hour at 37o C under 5% CO2. Remove the medium. If cells are to be monitored using Hoechst stain, add 1.5 µL Hoechst stain to 300 µL media (0.5% v/v). Add this media to the cells. a. Incubate for 5 minutes at 37oC under 5% CO2. b. Go on to Step 11. Wash cells twice with 2 ml 1X wash buffer. At this point, cells may be analyzed directly (Step 13), or fixed and analyzed later (Step 14). To analyze directly, mount a coverslip with cells facing down onto a microscope slide containing a drop of 1X wash buffer. Or, remove the plastic frame of the chamber slide, add a drop of 1X wash buffer onto the glass slide and cover with a coverslip. Go on to Step 15. To fix the cells and analyze later, add fixative to wash buffer at a 1:10 ratio. For example, add 40 µL fixative to 360 µL 1X wash buffer. a. Mount a coverslip with cells facing down onto a microscope slide containing a drop of fixative plus wash buffer. Or, remove the plastic frame of the chamber slide, add a drop of fixative plus wash buffer onto the glass slide and cover with a coverslip. b. Keep fixed cells at 2o C - 8o C protected from light for up to 24 hours. Go on to Step 15. Observe cells under a fluorescence microscope using a bandpass filter (excitation 490 nm, emission >520 nm) to view the green fluorescence of caspase positive cells. If Hoechst stain was also used, it can be seen using a UV-filter with excitation at 365 nm and emission at 480 nm. (If these filters are not available, select a filter combination that best approximates these settings.) Immunochemistry Technologies, LLC 1-800-829-3194 www.immunochemistry.com 14 FLICA Booklet 21. Fluorescence Microscopy Staining Protocol for Suspension Cells 1. Culture cells to a density optimal for apoptosis induction according to your specific induction protocol (as discussed in Section 7). 2. Cultivate or concentrate cells to a density of at least 5 X 10⁵ cells/mL. Cell density in the cell culture flasks should not exceed 106 cells/mL. Cells cultivated in excess of this concentration may begin to naturally enter apoptosis. Optimal cell concentration will vary depending on the cell line used. 3. Induce cells to undergo apoptosis and take samples according to your specific protocol (as mentioned in Section 8). 4. At the same time, culture an equal volume of non-induced cells for a negative control cell population. Make sure that both the negative control and induced positive cell population tubes contain similar quantities of cells. 5. Transfer 290 – 300 µL of each induced and negative control cell populations into fresh tubes. Or, if desired, larger cell volumes can be used, however more of the 30X FLICA solution may be required. Larger volume cell suspensions label nicely using 25 cm2 tissue culture flasks (laid flat) as incubator vessels. FLICA Booklet 14. 15. 16. 17. 18. 19. 20. 21. 22. 23. 24. 25. 26. When ready to label with the 30X FLICA solution, cells should be at least 5 X 10⁵ cells/mL. Density can be determined by counting cell populations on a hemocytometer. 6. Add 10 µL of the 30X working dilution FLICA solution directly to each 290 – 300 µL cell suspension. 7. Or, if a larger cell volume was used, add the 30X FLICA solution at a 1:30 ratio. For example, if 2.9 mL of cell suspension was used, add 100 µL of the 30X FLICA solution (forming a final volume of 3 mL). 27. Each investigator should adjust the amount of FLICA reagent used to accommodate their particular cell line and research conditions. 8. Mix the cells by slightly flicking the tubes. 9. Incubate cells for 1 hour at 37oC under 5% CO2, protecting the tubes from light. As cells may settle on the bottom of the tubes, gently resuspend them by swirling cells once or twice during this incubation time. This will ensure an even distribution of the FLICA reagent among all cells. 10. If cells are to be monitored using Hoechst stain, add 1.5 µL Hoechst stain (0.5% v/v). Incubate for 5 minutes at 37oC under 5% CO2. 11. Add 2 mL of 1X wash buffer to each tube. 12. Gently mix. 13. Centrifuge the cells at <400 X g for 5 minutes at RT. Immunochemistry Technologies, LLC 1-800-829-3194 www.immunochemistry.com 15 28. Carefully remove and discard supernatants. Gently vortex the pellets to disrupt any cell-to-cell clumping. Resuspend cells in 1 mL 1X wash buffer. Gently mix. Centrifuge the cells at <400 X g for 5 minutes at RT. Carefully remove and discard supernatants. Gently vortex pellets to disrupt any cell-to-cell clumping. Resuspend the cell pellets in 300 µL 1X wash buffer (higher volumes may be used if a larger staining cell volume was used). Place cells on ice. At this point, the cells may be stained with propidium iodide (PI) for bicolor analysis (Step 24), observed immediately (Step 25), or fixed for future viewing (Step 26). To exclude dead cells from the analysis, 1.5 µL PI solution may be added at this point (0.5% v/v). Cells may then be viewed using a long pass filter with the excitation at 490 nm, emission >520 nm; PI has a maximum emission at 637 nm. To view cells immediately, place 1 drop of the cell suspension onto a microscope slide and cover with a coverslip; go to Step 27. If not viewing immediately, cells may be fixed for viewing up to 24 hours later. If cell pellets were resuspended in 300 µL wash buffer, add 30 µL fixative to each tube. If cells were resuspended in a different volume, add the fixative at a 1:10 ratio into the volume of cell suspension to be fixed. For example, if 3 mL was used, add 300 µL fixative. a. Incubate cells for 15 minutes at RT in the dark. b. Dry cells onto a microscope slide. c. Briefly wash the cells with PBS. d. Cover cells with mounting media and coverslip. e. Store slides at 2° – 8°C up to 24 hours. Go on to Step 27. Observe cells under a fluorescence microscope using a bandpass filter (excitation 490 nm, emission >520 nm) to view green fluorescence. Cells bearing active caspase enzymes covalently coupled to the FLICA reagent appear green. If Hoechst stain was also used, it can be seen using a UV-filter with excitation at 365 nm and emission at 480 nm. (If these filters are not available, select a filter combination that best approximates these settings.) Examples of FLICA and Hoechst staining of Jurkat cells are shown in Figures 2, 3, and 4. Immunochemistry Technologies, LLC 1-800-829-3194 www.immunochemistry.com 16 FLICA Booklet FLICA Booklet 22. Fluorescence Microscopy Sample Data A Figure 3. Suspension cells were incubated with 1 µM staurosporine for 3 hours at 37°C to induce apoptosis. Cells were then labeled with FAM-VAD-FMK for 60 minutes at 37°C. Cells were washed, then Hoechst stain was added and incubated for 5 minutes. Wet-mount slides were prepared and 2 photos were taken of the same cells and superimposed. Caspase activity (green) was detected using a band pass filter (excitation at 488 nm, emission at 520 nm). Nuclear staining by Hoechst stain (blue) was revealed using a UV-filter (excitation at 365 nm, emission at 480 nm). B Figure 2. Suspension cells were incubated with 1 µM staurosporine for 3 hours at 37°C to induce apoptosis. Cells were then labeled with FAM-VAD-FMK for 60 minutes at 37°C. Cells were washed, then Hoechst stain was added and incubated for 5 minutes. Wetmount slides were prepared and 2 photos were taken of the same cells. Caspase activity on left (photo A) was detected using a band pass filter (excitation at 488 nm, emission at 520 nm). Nuclear staining by Hoechst stain on right (photo B) was revealed using a UV-filter (excitation at 365 nm, emission at 480 nm). In Figure 3, only one cell of the three cells appears green (middle of the picture) – it is apoptotic and stained positive for poly caspase activity with the FAM-VAD-FMK reagent. It also has many bright blue spots from the Hoechst stain, indicating that the cell is beginning to die In Figure 2, photo A, only one cell appears green – it is apoptotic and stained positive for poly caspase activity with the FAM-VAD-FMK reagent. The other cell, which is not visible, did not bind to the reagent and therefore is not apoptotic. The same cells, photographed at right under a different wavelength for Hoechst stain, appear blue. The cell in the top right of photo B (which appears green in photo A) has a very brightly stained nucleus – its DNA is condensing in the cell, a sign it is dying. The cell in the bottom left of photo B (which is not visible in photo A) does not have a brightly stained nucleus, therefore it is not apoptotic nor necrotic. Immunochemistry Technologies, LLC 1-800-829-3194 www.immunochemistry.com 17 All the cells were stained with Hoechst. The top left cell is somewhat blue throughout the cell – it is not dying and is neither necrotic nor apoptotic. The middle cell has many bright blue spots, indicating that chromosome condensation has begun and the cell is beginning to die. The bottom right cell has a very brightly stained blue nucleus indicating that it is dying. This cell did not stain green so it is either necrotic (caspases were not activated and therefore could not bind to FAM-VAD-FMK), or apoptotic but far past the active caspase stage (and therefore did not stain green with FAM-VADFMK because the caspases were no longer active). Figure 4. Cells were prepared as in Figure 3 and photos superimposed. Both cells are apoptotic (green) and dying (blue nuclei). As the cell at left is much brighter green than the right cell, the left cell had more active caspases. Immunochemistry Technologies, LLC 1-800-829-3194 www.immunochemistry.com 18 FLICA Booklet 23. Flow Cytometry with Single-Color Staining Positive control samples can be prepared by inducing cells in suspension culture to undergo apoptosis (see Section 8 for examples of apoptosis induction protocols). Following this flow cytometer protocol, each sample requires 10 µL of 30X FLICA solution (equal to 2 µL of 150X FLICA stock). After labeling with FLICA, cells can be analyzed directly by flow cytometry, or the cells may be fixed first and then analyzed by flow cytometry. For a thorough analysis, 2 types of samples are recommended (both should have induced and non-induced populations): 1) unstained cells (induced and non-induced). 2) cells stained with FLICA (induced and non-induced). 1. As discussed in Section 7, culture cells to a density optimal for apoptosis induction according to your specific induction protocol. 2. Induce apoptosis following your protocol (as mentioned in Section 8). 3. Culture an equal volume of non-induced cells for a negative control cell population. Make sure that both tubes of cells contain similar quantities of cells. Ideally, cells should be at ~ 1 X 10⁶ cells/mL for FLICA labeling. If necessary, cells may be induced to undergo apoptosis at lower concentrations, but then concentrated just prior to labeling to 0.5 2 X 10⁶ cells/mL by centrifugation for 5 minutes at <400 X g at RT. 4. Once induction is completed, transfer 300 µL of each cell suspension to sterile tubes. (Larger cell volumes can also be used as determined by each investigator, however more of the FLICA reagent may be needed per sample. Larger volume cell suspensions label nicely using 25 cm2 tissue culture flasks (laid flat) as the incubation vessel.) 5. Add 10 µL 30X FLICA solution directly to the 300 µL cell suspension. 6. Or, if a different cell volume was used, add the 30X FLICA solution at a 1:30 ratio. For example, if 2.9 mL of cell suspension was used, add 100 µL of the 30X FLICA solution (forming a final volume of 3 mL). Each investigator should adjust the amount of FLICA reagent used to accommodate their particular cell line and research conditions. 7. Mix the cells by slightly flicking the tubes. 8. Incubate cells for 1 hour at 37oC under 5% CO2, protecting the tubes from light. As cells may settle on the bottom of the tubes, gently resuspend them by swirling cells once or twice during this incubation time. This will ensure an even distribution of the FLICA reagent among all cells. 9. Add 2 mL of 1X wash buffer to each tube. 10. Mix the cells. 11. Centrifuge cells at <400 X g for 5 minutes at room temperature (RT). Immunochemistry Technologies, LLC 1-800-829-3194 www.immunochemistry.com 19 FLICA Booklet 12. 13. 14. 15. 16. 17. 18. 19. 20. Carefully remove and discard supernatant. Gently vortex the cell pellet to disrupt any cell-to-cell clumping. Resuspend the cell pellet in 1 mL 1X wash buffer. Centrifuge cells at <400 X g for 5 minutes at RT. Carefully remove and discard supernatant. Gently vortex the cell pellet to disrupt any cell-to-cell clumping. Resuspend the cell pellet in 400 µL 1X wash buffer. At this point, cells may be fixed (Step 20) or analyzed directly (Step 21). If desired, fix cells by adding 40 µL fixative to the 400 µL cell suspension and mix. Or, if a different volume was used, add the fixative at a 1:10 ratio into the volume of cell suspension to be fixed. Keep fixed cells at 2o C - 8o C protected from light for up to 24 hours. Go on to Step 22. 21. Put samples on ice. 22. For single-color analysis, use a 15 mW argon ion laser at 488 nm. Measure fluorescein on the FL1 channel. Generate a log FL1 (X-axis) versus number of cells (Y-axis) histogram. On the histogram, there will appear two cell populations represented by two peaks. The majority of the caspase negative (-) cells will normally occur within the first log decade of the FL1 (X) axis (first peak), whereas the caspase-positive (+) cell population will appear as a separate peak or as a shoulder of the first peak showing increased fluorescence intensity. Position the vertical cursor in the gap between the two peaks. Events falling to the right of the vertical cursor should be counted as caspase positive (+). 23. See Figure 5 for an example of single color analysis using FACS. 24. Flow Cytometry with Bicolor Staining If a bicolor analysis is desired, cells may be stained with PI along with the FLICA reagent. PI stains necrotic, dead, and membrane-compromised cells. Using PI, a flow cytometer can distinguish among live cells, dead cells, caspase-negative, and caspase-positive cells. Positive control samples can be prepared by inducing cells in suspension culture to undergo apoptosis (see Section 8 for examples of apoptosis induction protocols). After labeling with FLICA and PI, cells can be analyzed directly by flow cytometry. For a thorough bicolor analysis, 4 types of samples are recommended to set up electronic compensation and quadrant statistics (both types should have induced and non-induced populations): a. unstained cells (induced and non-induced). b. cells stained with FLICA only (induced and non-induced). c. cells stained with PI only (induced and non-induced). d. cells stained with FLICA and PI (induced and non-induced). 1. As discussed in Section 7, culture cells to a density optimal for apoptosis induction according to your specific induction protocol. 2. Induce apoptosis following your protocol (as mentioned in Section 8). Immunochemistry Technologies, LLC 1-800-829-3194 www.immunochemistry.com 20 FLICA Booklet 3. Culture an equal volume of non-induced cells for negative control cell populations. Make sure that all tubes of cells contain similar quantities of cells. Ideally, cells should be at ~ 1 X 10⁶ cells/mL for FLICA labeling. If necessary, cells may be induced to undergo apoptosis at lower concentrations, but then concentrated just prior to labeling to 0.5 2 X 10⁶ cells/mL by centrifugation for 5 minutes at <400 X g at RT. 4. Once induction is completed, transfer 300 µL of each cell suspension to sterile tubes. (Larger cell volumes can also be used as determined by each investigator, however more of the FLICA reagent may be needed per sample. Larger volume cell suspensions label nicely using 25 cm2 tissue culture flasks (laid flat) as the incubation vessel.) 5. Add 10 µL 30X FLICA solution directly to the 300 µL cell suspension. 6. Or, if a larger cell volume was used, add the 30X FLICA solution at a 1:30 ratio. For example, if 2.9 mL of cell suspension was used, add 100 µL of the 30X FLICA solution (forming a final volume of 3 mL). FLICA Booklet 22. Put samples on ice. Keep bicolor cells at 2oC - 8oC protected from light for up to 24 hours. 23. For bicolor analysis, measure fluorescein on the FL1 channel and red fluorescence (PI) on the FL2 channel. Generate a log FL1 (X-axis) versus log FL2 (Y-axis) dot plot. Put in quadrant cursors. The 4 quadrant areas contain the following cell populations (Figure 5): (i) quadrant 1, PI positive fluorescein negative cells; (ii) quadrant 2, fluorescein positive PI positive cells; (iii) quadrant 3, fluorescein negative PI negative cells; (iv) quadrant 4, fluorescein positive PI negative cells. The cell population in quadrant 4 consists of living caspase positive (+) cells. 25. Flow Cytometry Sample Data A B Each investigator should adjust the amount of FLICA reagent used to accommodate their particular cell line and research conditions. 7. Mix the cells by slightly flicking the tubes. 8. Incubate cells for 1 hour at 37oC under 5% CO2, protecting the tubes from light. As cells may settle on the bottom of the tubes, gently resuspend them by swirling cells once or twice during this incubation time. This will ensure an even distribution of the FLICA reagent among all cells. 9. Add 2 mL of 1X wash buffer to each tube. 10. Mix the cells. 11. Centrifuge cells at <400 X g for 5 minutes at room temperature (RT). 12. Carefully remove and discard supernatant. 13. Gently vortex the cell pellet to disrupt any cell-to-cell clumping. 14. Resuspend the cell pellet in 1 mL 1X wash buffer. 15. Centrifuge cells at <400 X g for 5 minutes at RT. 16. Carefully remove and discard supernatant. 17. Gently vortex the cell pellet to disrupt any cell-to-cell clumping. 18. Resuspend the cell pellet in 400 µL 1X wash buffer. 19. Stain one 400 µL aliquot of FLICA-treated induced cells with 2 µL PI. Figure 5. Jurkat cells were treated with DMSO, non-induced cells (A) or camptothecin, induced cells, for 3 hours (B). Cells were labeled with FAMVAD-FMK for 1 hour, washed, and analyzed. Caspase activity was detected using a BD Facscalibor flow cytometer. The frequency histogram of the number of events (Y axis) versus fluorescein intensity (X axis) shows 2 peaks: caspase-negative cells occur to the left of the M1 region (unlabeled cells); caspase-positive cells lay within the M1 region (cells were labeled with FLICA). Cells that are to be analyzed by the bicolor PI screening protocol cannot be fixed. 20. Set aside a second aliquot of FLICA-treated induced cells that does not contain PI. 21. Mix cells. Immunochemistry Technologies, LLC 1-800-829-3194 www.immunochemistry.com 21 Immunochemistry Technologies, LLC 1-800-829-3194 www.immunochemistry.com 22 FLICA Booklet FLICA Booklet 26. References 1. Slee, E. A., C. Adrain, and S. J. Maritin. 1999. Serial Killers: ordering caspase activation events in apoptosis. Cell Death and Differ. 6:10671074. 2. Walker, N. P., R. V. Talanian, K. D. Brady, L. C. Dang, N. J. Bump, C. R. Ferenz, S. Franklin, T. Ghayur, M. C. Hackett and L. D. Hammill. 1994. Crystal Structure of the Cysteine Protease Interleukin-1βConverting Enzyme: A (p20/p10)2 Homodimer. Cell 78:343-352. 3. Wilson, K. P., J. F. Black, J. A. Thomson, E. E. Kim, J. P. Griffith, M. A. Navia, M. A. Murcko, S. P. Chambers, R. A. Aldape, S. A. Raybuck, and D. J. Livingston. 1994. Structure and mechanism of interleukin-1 beta converting enzyme. Nature 370: 270-275. 4. Rotonda, J., D. W. Nicholson, K. M. Fazil, M. Gallant, Y. Gareau, M. Labelle, E. P. Peterson, D. M. Rasper, R. Ruel, J. P. Vaillancourt, N. A. Thornberry and J. W. Becker. 1996. The three-dimensional structure of apopain/CPP32, a key mediator of apoptosis. Nature Struct. Biol. 3(7): 619-625. 5. Kumar, S. 1999. Mechanisms mediating caspase activation in cell death. Cell Death and Differ. 6: 1060-1066. 6. Thornberry, N. A., T. A. Rano, E. P. Peterson, D. M. Rasper, T. Timkey, M. Garcia-Calvo, V. M. Houtszager, P. A. Nordstrom, S. Roy, J. P. Vaillancourt, K. T. Chapman and D. W. Nicholson. 1997. A combinatorial approach defines specificities of members of the caspase family and granzyme B. Functional relationships established for key mediators of apoptosis. J. Biol. Chem. 272(29): 17907-17911. 7. Ekert, P. G., J. Silke and D. L. Vaux. 1999. Caspase inhibitors. Cell Death and Differ. 6:1081-1086 www.immunochemistry.com Immunochemistry Technologies, LLC 9401 James Avenue South, Suite 155 Bloomington, MN 55431 800-829-3194 / 952-888-8788 fax 952-888-8988 Copyright 2002 Immunochemistry Technologies, LLC Copyright 2002 Immunochemistry Technologies, LLC