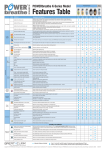
1
USER GUIDE
1
Intended Use and Indications
The LungBoost Respiratory Trainer is a device which assists its user in strengthening their respiratory
muscles. This device uses dual purpose training – Endurance Aerobic Training and High Intensity Anaerobic
Interval Training, while strengthening inspiration (inhalation) and expiration (exhalation) muscles.
LungBoost Respiratory Trainer is intended for anyone who wishes to improve the strength and endurance of
his or her respiratory muscles.
This includes professional athletes, weekend athletes & healthy individuals.
Warnings
This device is not intended for use by people who are too weak to use the device. This device is not
intended for use in conditions not mentioned in this guide. For example: outdoors or in extreme weather.
This device is not intended to be used by more than one person unless cleaned according to the instructions
in section 10, page 21.
Limited Warranty
Thank you for purchasing a ChoiceMMed product.
Visit www.choicemmedamerica.com/register to register your product to obtain full warranty services.
For detailed warranty information, visit
www.choicemmedamerica.com/warranty
For questions regarding our products or services, visit: www.choicemmedamerica.com/contact
or contact our helpline at: (215) 874-0458
Disclaimer
Information provided by ChoiceMMed is believed to be accurate and reliable. However, ChoiceMMed
assumes no responsibility for the use of such information, nor for any infringements of patents or other
rights of third parties, that may result from its use.
PLEASE READ THIS USER GUIDE
BEFORE OPERATING THE SYSTEM
2
TABLE OF CONTENTS
1. Introduction...........................................................................................................................................................................4
1.1 ABOUT THIS USER GUIDE........................................................................................................................................................................................ 4
1.2 CHOICEMMED LUNGBOOST RESPIRATORY TRAINER.................................................................................................................................. 4
1.3 FEATURES OF THE CHOICEMMED LUNGBOOST RESPIRATORY TRAINER............................................................................................ 4
2. Conditions for Use................................................................................................................................................................4
2.1 INTENDED USE AND INDICATIONS..................................................................................................................................................................... 4
2.2 CONTRAINDICATIONS.............................................................................................................................................................................................. 4
3. Safety.........................................................................................................................................................................................5
3.1 TYPES OF WARNINGS, CAUTIONS AND NOTES.............................................................................................................................................. 5
3.2 GENERAL SAFETY INSTRUCTIONS...................................................................................................................................................................... 5
3.3 ELECTRICAL SAFETY................................................................................................................................................................................................. 5
3.4 EMC COMPLIANCE..................................................................................................................................................................................................... 5
4. Overview of System components.....................................................................................................................................6
4.1 DESCRIPTION OF DEVICE........................................................................................................................................................................................ 6
4.2 SYSTEM COMPONENTS........................................................................................................................................................................................... 6
5. Inserting Batteries in the Handheld unit.....................................................................................................................8
6. The Handheld Device Console...........................................................................................................................................8
7. Using the Device......................................................................................................................................................................9
7.1 TURNING THE DEVICE ON AND OFF................................................................................................................................................................... 9
7.2 INITIAL DISPLAY.......................................................................................................................................................................................................... 9
7.3 STARTUP/FIRST TIME USE - SETTING THE TIME.............................................................................................................................................. 9
7.4 STARTUP/NOT FIRST TIME USE...........................................................................................................................................................................10
7.5 RESISTANCE CONES - BEFORE TRAINING.......................................................................................................................................................10
7.6 CHOOSING A TRAINING MODE..........................................................................................................................................................................10
7.7 ENDURANCE MODE................................................................................................................................................................................................11
7.8 STRENGTH MODE.....................................................................................................................................................................................................13
7.9 MEMORY MODE........................................................................................................................................................................................................16
8. Labels and Symbols.............................................................................................................................................................19
8.1 LABELS..........................................................................................................................................................................................................................19
8.2 SYMBOLS.....................................................................................................................................................................................................................19
9. Specifications........................................................................................................................................................................20
9.1 ENVIRONMENTAL INFORMATION......................................................................................................................................................................20
9.2 ELECTRICAL................................................................................................................................................................................................................20
9.3 SIZE AND WEIGHT....................................................................................................................................................................................................20
10. Cleaning and Maintenance.............................................................................................................................................21
10.1 NOTES ON CLEANING AND MAINTENANCE...............................................................................................................................................21
10.2 GENERAL CLEANING PROCEDURES...............................................................................................................................................................21
10.3 Cleaning the device........................................................................................................................................................................................21
11. Troubleshooting................................................................................................................................................................21
12. Warranty POLICY.................................................................................................................................................................22
12.1 WARRANTY COVERAGE.......................................................................................................................................................................................22
12.2 ObTAINING WARRANTY......................................................................................................................................................................................22
3
1. INTRODUCTION
1.1 ABOUT THIS USER GUIDE
This User Guide provides the information necessary to operate the ChoiceMMed LungBoost Respiratory Trainer.
PLEASE READ THIS USER GUIDE BEFORE OPERATING THE SYSTEM. If any part of this User Guide is
not clear, contact Customer Support for assistance.
1.2 CHOICEMMED LUNGBOOST RESPIRATORY TRAINER
LungBoost is a device used for training the respiratory muscles. Multiple researches have shown that using a
Respiratory Muscle Training (RMT) device, with the addition of a fitness regime such as walking, improves the
strength and endurance of the respiratory muscles. Other improvements may include: longer walking distance (five
minute test), less shortness of breath, improved quality of life and a general feeling of well being.
1.3 FEATURES OF THE LUNGBOOST RESPIRATORY TRAINER
•
•
•
•
•
•
•
•
•
Calculate the endurance effort level and strength effort level of breathing maneuvers
Sense inhaling or exhaling
Set the difficulty level according to the user’s ability
Separate the breathing maneuvers with rest periods
Save the breathing maneuvers in the internal memory
View the saved breathing maneuvers on the digital display
Display daily, weekly, monthly, and overall averages
Erase the memory
Change the intensity pressure level by attaching and removing resistance cones
2. CONDITIONS FOR USE
2.1 INTENDED USE AND INDICATIONS
LungBoost Respiratory Trainer is a device which assists the user in strengthening their respiratory muscles. The
device uses dual purpose training – Endurance Aerobic Training and High Intensity Anaerobic Interval Training,
while strengthening inspiration (inhalation) and expiration (exhalation) muscles.
LungBoost is intended for anyone who wishes to improve the strength and endurance of his or her respiratory
muscles. This includes professional athletes, recreational athletes and healthy individuals.
2.2 CONTRAINDICTIONS
This device is not indicated for use by people who are too weak or ill to use the device.
This device is not intended for use in conditions not mentioned in this booklet.
For example: outdoors or in extreme weather.
This device is not intended to be used by more than one person unless cleaned according to the instructions in
Section 10. Cleaning and Maintenance on page 21.
4
3. SAFETY
3.1 TYPES OF WARNINGS, CAUTIONS AND NOTES
Three types of special messages appear in this user guide.
WARNING: Take necessary precautions to avoid the possibility of personal injury or death
CAUTION: A condition that may lead to the damage of equipment, or a lower quality of treatment
NOTE: Other important information
3.2 GENERAL SAFETY INSTRUCTIONS
WARNINGS
DO NOT USE THIS UNIT BEFORE READING THIS USER GUIDE
CAUTIONS
If the system is not working correctly, discontinue use and refer servicing to qualified service
personnel
This device is not water-proof – Keep away from any form of liquid
Do not disassemble any part of this unit. This unit is not meant to be serviced by the consumer
Do not use this device if the screen is dirty or cracked
Do not use this device if the screen is missing pixels or not working correctly. Contact
ChoiceMMed for service
3.3 ELECTRICAL SAFETY
This device complies with IEC/EN 60601-1 for general requirements of medical electrical equipment safety.
3.4 EMC COMPLIANCE
The unit has IEC 60601-1-2 compliance.
5
4. OVERVIEW OF SYSTEM COMPONENTS
4.1 DESCRIPTION OF THE DEVICE
ChoiceMMed LungBoost is a device used for training the respiratory muscles. Multiple researches have shown that
using a Respiratory Muscle Training (RMT) device, with the addition of a fitness regime such as walking, improves
the strength and endurance of the respiratory muscles. Other improvements may include: longer walking distance
(five minute test), less shortness of breath, improved quality of life and a general feeling of well being.
4.2 SYSTEM COMPONENTS
The ChoiceMMed LungBoost consists of the handheld unit, breathing tube and mouthpiece, adapter with filter, and
resistance cones (See diagram on next page)
6
9
1
2
4
10
3
5
6
7
8
11
NOTE: The number of resistance cones may vary, depending on the model.
7
5. INSERTING BATTERIES IN THE HANDHELD UNIT
Insert two AA batteries into the handheld unit as shown.
6. THE HANDHELD DEVICE CONSOLE
The handheld device console is your way of navigating your LungBoost device. The front panel consists of a few
simple buttons and a display screen. ( See below )
ENDURANCE
EXIT
STRENGTH
OK
MEM
LEVEL
ENDURANCE Button
Press to enter Endurance Mode
STRENGTH Button
Press to enter Strength Mode
EXIT Button
Press to cancel an operation or scroll
through data
OK Button
Press to turn the device ON/OFF
Press to confirm a request to delete memory,
switch between days, weeks and months
LEVEL Button
Press to change resistance level
Press and hold to present data faster
MEM Button
Press to display results of previous trainings
Press to scroll forward between the three
groups of data
8
7. USING THE DEVICE
7.1 TURNING THE DEVICE ON AND OFF
Press the OK button briefly to turn on the device.
When you are finished using the device, press and hold the OK
button until the device turns off.
The device will also turn off automatically after 10 minutes.
After replacing the batteries the device will turn on automatically.
7.2 INITIAL DISPLAY
When you turn on the device, the screen will flash briefly and perform a
quick system test.
During this short period, a test display showing all of the system icons will
be visible, as shown here.
7.3 START UP/ FIRST TIME USE - SETTING THE TIME
The first time you use your LungBoost, or after replacing the batteries, you are
asked to enter the time of day, in the format of hours and minutes (12-hour
clock).
The hour will display as a flashing 01. Use the RIGHT ARROW (LEVEL) button
to increase the hour. When you have reached the desired hour, press OK. The
minutes will display a flashing zero. Use the RIGHT ARROW (LEVEL) button to
change the minutes and press OK when you are finished setting the time.
You can press and hold the RIGHT ARROW (LEVEL) button to move the digits
faster.
To correct a mistake, press the LEFT ARROW (EXIT) button to return to the
previous step.
The device automatically turns on in Endurance Mode for you to be able to
quick start.
9
ENDURANCE
EXIT
STRENGTH
OK
MEM
LEVEL
7.4 START UP/NOT FIRST USE
After the first time you use your LungBoost, the last maneuver will be
displayed for five seconds:
After this display the device will move to the default Endurance
Mode, as described in the following sections.
7.5 RESISTANCE CONES - BEFORE TRAINING
WHAT ARE RESISTANCE CONES?
Resistance cones are small circular-shaped plastic caps that can be attached to the back of the unit to create a
higher return pressure in the breathing tube. These cones are used in order to increase your exercise difficulty.
The more closed the cone’s opening, the higher the resistance.
It is recommended that you begin using your LungBoost without using the cones (open pipe airflow). As you
progress to higher difficulty levels (see pages 11 and 14), you may find that even the highest difficulty level is too
easy. You may then proceed to attach a cone to increase the difficulty of the exercise.
Please use caution when adding cones to prevent dyspnea, or hyperventilation. If necessary, please consult your
physician.
7.6 CHOOSING A TRAINING MODE
The device automatically turns on in Endurance Mode (default). The buttons on the handheld unit allow you to choose
among three modes of operation for LungBoost – Endurance Mode, Strength Mode, and Memory Mode.
Endurance Mode allows you to perform endurance aerobic training.
ENDURANCE
STRENGTH
For instructions on how to use Endurance Mode, Proceed to Section 7.7 on page 11.
Strength Mode allows you to perform high intensity anaerobic interval training.
For instructions on how to use Strength Mode, Proceed to Section 7.8 on page 13.
EXIT
OK
MEM
LEVEL
Memory Mode allows you to review:
1. The results of previous maneuvers.
2. Average scores for today, previous weeks, and previous months.
3. Aggregate averages: The endurance, strength, inhale and exhale average
for all previous measurements.
For instructions on how to use Memory Mode, Proceed to Section 7.9 on page 16.
10
7.7 ENDURANCE MODE
Endurance Mode is used to perform endurance aerobic training.
* The goal of endurance training is to inhale or exhale air as long as possible, and to keep the ball in the air stable.
STEP 1: PRESS ENDURANCE Button
The first step in performing an Endurance Mode exercise is to press the ENDURANCE button. You will see the
Endurance Mode screen, as shown below. Note: If you are already in the default Endurance Mode, there is no need to
press the ENDURANCE button.
1
ERROR
Normally Blank. Lights if there is a system error
2
GO
Indicates you may begin a maneuver
3
REST
Indicates you must wait before starting another maneuver
4
BATTERY STATUS
Indicates the battery life remaining
5
MANEUVER COUNT
Indicates the number of maneuver completed
6
SECONDS
Indicates the number of seconds an endurance maneuver was held
7
ENDURANCE MODE
Indicates you are training in Endurance Mode
8
DIFFICULTY LEVEL
Indicates the level of difficulty you are training. There are 5 levels.
9
EXHALE
Indicates you are performing an exhale maneuver
10 INHALE
Indicates you are performing an inhale maneuver
11 EXERTION EFFORT
Indicated the effort exerted. Ball height will vary from 1 to 7
EFFORT
STEP 2: CHOOSE DIFFICULTY LEVEL (1-5)
1
ERROR
Normally Blank. Lights if there is a system error
The next step is to choose the Difficulty Level. This is done by pressing the LEVEL button, which raises one level
Indicates you may begin a maneuver
2 GO
at a time, until you reach the desired difficulty level. The device starts at the lowest difficulty level 1 (default). It is
must
starting
another
3 REST
recommended
to start Indicates
at this you
level.
If wait
youbefore
feel that
you
can maneuver
reach the highest ball (7) too easily, it is recommended to
raise
level.
RaisingIndicates
above the
level
fivelife
returns
the device to level one.
BATTERY
STATUS
battery
remaining
4 the
5 MANEUVER COUNT Indicates the number of maneuver completed
If you
reach the highest ball (7) with level 5 (highest level) you can further increase the difficulty level by attaching
DIFFICULTY
LEVEL
levelunit.
of difficulty
are training.
6
resistance cones
to theIndicates
back the
of the
(seeyou
page
10) There are 5 levels.
7
STRENGTH MODE
Indicates you are training in Strength Mode
8
EXHALE
Indicates you are performing an exhale maneuver
9
INHALE
Indicates you are performing an inhale maneuver
STEP 3: BREATHE INTO THE MOUTHPIECE
EXERTION
Indicated
the effort exerted.
Ballready
height will
vary fromyour
1 to 7
GO
flash EFFORT
on the screen
indicating
you are
to begin
endurance maneuver. With the measuring tube
10 will
and mouthpiece firmly attached, gently inhale or exhale through the mouthpiece. (The unit will automatically adjust to
EFFORT
whichever breathing action you choose to exercise. ) The Inhale/exhale indicator (Number 7 in the diagram above )
will change to reflect the type of breathing action (inhaling or exhaling). The effort will vary (Number 8 in the diagram
above), from one ball to seven balls, depending on the volume of air that you displace.
11
As you breathe into the device, the effort will be indicated by the number on the ball that is highlighted on the right
side of the display. In the example below, the user is exerting an increasing pressure, from one ball to seven balls.
User starting at 1 ball
exerted at 00 seconds
After 01 seconds,
user exerted 2 balls
After 03 seconds,
user exerted 7 balls
We recommend trying to raise the effort to two (2 balls) and staying at that level until the end of the exercise. On
subsequent exercises, you may try at a higher level for a longer duration of time.
If you feel that you can reach the highest effort (ball seven) too easily, you can raise the difficulty level by pressing
the LEVEL button, raising the difficulty level by one step at a time.
If you reach the highest ball (7) with level 5 (highest level) you can further increase the difficulty level by attaching
resistance cones to the back of the unit. (see page 10)
STEP 4: WAIT 15 SECONDS
After every inhale/exhale exercise, REST will appear on the top of the screen. You must rest for 15 seconds, to
prevent hyperventilation or muscle fatigue. During this resting period, the two left digits on the display will count
down from 15 to 1, indicating the number of seconds the user must wait before starting another maneuver. The
right two digits will show the number of seconds the user inhaled or exhaled the previous maneuver at the effort
(highlighted ball) indicated.
a.
b.
(see diagram a.)
After the 15 seconds, GO will appear
on the top of the screen indicating you
may begin another maneuver. The two
left digits will now display the number
of maneuvers completed today. The two
right digits will reset to 0.
(see diagram b.)
In this example, the user exhaled in endurance
mode for 3 seconds at an effort of 5 on level 1.
In this example, the user has completed
2 maneuvers today.
This user has 10 more seconds to rest before
beginning another maneuver.
This user is ready to start the next maneuver.
12
WHAT CAN I DO NEXT?
After you have completed the Endurance Mode exercise, several options
are available to you:
1. Perform another Endurance Mode exercise
To do another exercise, wait until the seconds countdown reaches zero
and the GO indicator is displayed. If needed, press the LEVEL button
on the handheld unit console to set the difficulty level and perform the
exercise.
2. Perform a Strength Mode exercise
To do a Strength Mode exercise, press the STRENGTH button and
follow the instructions for Strength Mode exercise in Section 7.8 on page
13.
3. View a list of previous exercises (Memory)
In this example, the user has completed
02 maneuvers today.
This user is ready to start the next
maneuver
ENDURANCE
Press the MEM button to see previous results, as discussed in Section
7.9 Memory Mode on page 16.
EXIT
STRENGTH
OK
LEVEL
4. Turn off the device
MEM
Press and hold the OK button for a few seconds to turn off the device.
7.8 STRENGTH MODE
Strength Mode is used to perform high intensity anaerobic interval training.
*The goal of interval training is to inhale or exhale as hard as you can, and fill/light as many balls as possible.
You should try to fill/light the balls in the shortest amount of time possible, preferably in less than two seconds.
STEP 1: PRESS STRENGTH Button
The first step in performing a Strength Mode exercise is to press the
STRENGTH button. You will see the Strength Mode screen, as shown
below. Note that if you are already in Strength Mode, there is no need to
press the STRENGTH button.
ENDURANCE
EXIT
STRENGTH
OK
MEM
13
LEVEL
11 EXERTION EFFORT
Indicated the effort exerted. Ball height will vary from 1 to 7
1
ERROR
Normally Blank. Lights if there is a system error
2
GO
Indicates you may begin a maneuver
3
REST
Indicates you must wait before starting another maneuver
4
BATTERY STATUS
Indicates the battery life remaining
5
MANEUVER COUNT
Indicates the number of maneuver completed
6
DIFFICULTY LEVEL
Indicates the level of difficulty you are training. There are 5 levels.
7
STRENGTH MODE
Indicates you are training in Strength Mode
8
EXHALE
Indicates you are performing an exhale maneuver
9
INHALE
Indicates you are performing an inhale maneuver
10 EXERTION EFFORT
EFFORT
Indicated the effort exerted. Ball height will vary from 1 to 7
EFFORT
STEP 2: CHOOSE DIFFICULTY LEVEL (1-5)
The next step is to choose the Difficulty Level. This is done by pressing the LEVEL button, which raises one level
at a time, until you reach the desired difficulty level. The device starts at the lowest difficulty level 1 (default). It is
recommended to start at this level. If you feel that you can reach the highest (7) ball easily, it is recommended to
raise the level. Raising above level five returns the device to level one.
To further increase the difficulty level, you can attach one of the cones. (see page 10)
STEP 3: BREATHE INTO THE MOUTHPIECE
GO will flash on the screen indicating you are ready to begin your
strength maneuver. The two digits on the screen will show how many
STRENGTH maneuvers were completed.
With the measuring tube and mouthpiece firmly attached, inhale or
exhale through the mouthpiece. (The unit will automatically adjust
to whichever breathing action you choose to exercise. ) The Inhale/
exhale indicator (Number 7 in the diagram above ) will change to
reflect the type of breathing action (inhaling or exhaling). The effort will
vary (Number 8 in the diagram above), from one ball to seven balls,
depending on the volume of air that you displace.
If you fill all the balls too easily (7 balls), you can raise the difficulty
level by pressing the LEVEL button, raising the difficulty level by one
step at a time.
If you reach the highest ball (7) with level 5 (highest level) you can
further increase the difficulty level by attaching resistance cones to
the back of the unit. (see page 10)
14
The user is ready to begin a strength
maneuver on level 1.
This user has completed 00 maneuvers.
STEP 4 : WAIT 15 SECONDS
After every inhale/exhale exercise, REST will appear on the top of the screen. You must rest for 15 seconds, to
prevent hyperventilation or muscle fatigue. During this resting period, the two digits on the display will count down
from 15 to 1, indicating the number of seconds the user must wait before starting another maneuver. The screen
will indicate the details of the maneuver the user just completed. (see diagram a.)
After the 15 seconds, GO will appear on the top of the screen indicating you may begin another maneuver. The two
digits will now display the number of maneuvers completed today. (see diagram b.)
a.
b.
In this example, the user inhaled in strength mode
at level one at an effort of 5.
In this example, the user is ready to begin
another maneuver.
This user has 07 more seconds to rest before
beginning another maneuver.
This user has completed 02 maneuvers.
WHAT CAN I DO NEXT?
After you have completed the Strength Mode exercise, several options
are available to you:
1. Perform another Strength Mode exercise
To do another exercise, wait until the seconds countdown reaches zero
and the GO indicator is displayed. If you need to, press the LEVEL
button on the Handheld unit console to set the difficulty level and perform
the exercise.
In this example, the user has completed
01 maneuvers today.
2. Perform a Endurance Mode exercise
To do an Endurance Mode exercise, press the ENDURANCE button
and follow the instructions for Endurance Mode exercise in Section 4.8.
Endurance Mode on page 11.
This user is ready to start the next
maneuver
ENDURANCE
3. View a list of previous exercises (Memory)
Press the MEM button to see previous results, as discussed in Section
7.9. Memory Mode on page 16.
4. Turn off the device
Press and hold the OK button for a few seconds to turn off the device.
15
EXIT
STRENGTH
OK
MEM
LEVEL
7.9 MEMORY MODE
Memory Mode is used to view the results of all previous exercises. Memory Mode has three options:
1. The last 30 Exercises
2. Daily, Weekly, and Monthly Scores
3. Overall Maneuver Averages for Endurance Exhale, Endurance Inhale, Strength Exhale and Strength Inhale
ENDURANCE
STEP 1 : PRESS MEM Button
The first step in entering Memory Mode is to press the MEM button.
EXIT
A short animation will appear for a few seconds and then the last of the
previous 30 training scores will appear (default). Pressing the MEM button
will navigate through the three different Memory Mode options.
STRENGTH
OK
LEVEL
MEM
NOTE: You can press the ENDURANCE or STRENGTH button to exit the
memory at any time. This will return you to the Endurance or Strength screen
and you can immediately train.
MEMORY MODE OPTION 1: THE LAST 30 EXERCISES
In this memory mode option, the user can view the previous maneuvers completed. You can view up to thirty
previous maneuvers. By default, the first screen will show the last exercise done, indicated by 01 and LAST
will appear on the top left hand of the screen. Pressing the EXIT or LEVEL button will scroll through previous
exercises. (02, 03, 04, etc.)
The users most recent (01) maneuver was
exhaling on strength mode at level 2 and
an effort of 5.
The users 2nd most recent (02) maneuver
was exhaling on strength mode at level 2
and an effort of 3.
16
The users 3rd most recent (03) maneuver
was inhaling on strength mode at level 1
and an effort of 3.
MEMORY MODE OPTION 2: DAILY, WEEKLY AND MONTHLY SCORES
In this memory mode, you can view your scores by Day, Week or Month. You can navigate through the Day, Week
and Month scores by pressing the OK button. Pressing the EXIT or LEVEL button will scroll through previous
scores within the Day, Week or Month.
In this example the Average score for
Day 01 (the most recent day) is “11”
In this example the Average score for Week
02 (the 2nd most recent week) is “30”
In this example the Average score for
Month 01 (the most recent month) is “42”
The LungBoost uses mathematical equations to score your exercises.
The Endurance Scores take into account BOTH the average amount of seconds inhaled and exhaled AND the number of times you
exercised. When you first begin and the exercises are easy, your scores go up faster. But as you improve, it becomes more difficult to get a
better score. As you progress, you have to work harder.
The Strength Scores take into account BOTH the average ball height inhaled and exhaled AND the number of times you exercised. When
you first begin and the exercises are easy, your scores go up faster. But as you improve, it becomes more difficult to get a better score. As
you progress, you have to work harder.
MEMORY MODE OPTION 3: Overall Maneuver Averages
In this memory mode, you can view 4 averages
1. Endurance Exhale
Endurance Exhale
The user’s average for Endurance
Exhale was 03 seconds at effort 4
(ball 4)
2. Endurance Inhale
3. Strength Exhale
Endurance Inhale
Strength Exhale
The user’s average for Endurance
Inhale was 05 seconds at effort 3
(ball 3)
The user’s average for Strength
Exhale was an effort of 5 (ball 5)
17
4. Strength Inhale
Strength Inhale
The user’s average for Strength
Inhale was an effort of 4 (ball 4)
ERASE ALL HISTORY DATA
ENDURANCE
You can choose to delete the information for all previous
measurements from the device’s memory.
EXIT
Press and hold the MEM button and the LEFT ARROW button
(EXIT button) at the same time to display the “Erase Memory?”
screen, as shown below.
STRENGTH
OK
LEVEL
MEM
Press OK to confirm and erase all previous exercises
Press EXIT to cancel and keep all of the previous exercises in
memory.
WHAT CAN I DO NEXT?
After you have finished displaying data in Memory Mode, several options are available to you:
1. Perform an Endurance Mode exercise
To do an Endurance Mode exercise, simply press the ENDURANCE
button on the Handheld unit console and follow the instructions for
Endurance Mode exercise in Section 7.7. Endurance Mode on page 13.
2. Perform a Strength Mode exercise
ENDURANCE
EXIT
To do a Strength Mode exercise, press the STRENGTH button and
follow the instructions for Strength Mode exercise in Section 4.8.
Endurance Mode on page 13.
3. Turn off the device
Press and hold the OK button for a few seconds to turn off the device.
18
STRENGTH
OK
MEM
LEVEL
8. LABELS AND SYMBOLS
8.1. LABELS
8.2. SYMBOLS
A number of internationally recognized symbols are found on the LungBoost unit. These relate to safety
requirements and standards and are briefly reviewed below.
Follow instructions for use
Serial Number.
Dispose of this product according to local environmental regulations
Type BF applied part
Manufacturer details
19
9. SPECIFICATIONS
9.1. ENVIRONMENTAL INFORMATION
Operating temperature
0°C to 40°C (32°F to 104°F)
Relative Humidity
30% to 85% non-condensing
Storage temperature
10°C to +65°C (14°F to +149°F)
9.2. ELECTRICAL
9.2.1 BATTERY PACK
Type
2 AA batteries
Minimum
expected
battery life
1 year
9.3. SIZE AND WEIGHT
9.3.1 HANDHELD MEASURING DEVICE
Dimensions
70 mm W x 117 mm D x 160 mm H
Weight
(including
batteries)
250g
20
10. CLEANING AND MAINTENANCE
10.1. NOTES ON CLEANING AND MAINTENANCE
The LungBoost Respiratory Trainer does not require maintenance or cleaning, except as suggested in this User
Guide. Any other service should only be provided by an authorized ChoiceMMed representative. Failure to do so
voids the warranty.
10.2. GENERAL CLEANING PROCEDURES
Please observe the following cautions when cleaning the device:
Caution: Use cleaning solution sparingly. Excessive solution can cause damage to internal components.
Caution: Contact with solvents can cause severe deterioration of plastic parts and malfunctioning of the
instrument and accessories.
10.3. CLEANING THE DEVICE
The device should be cleaned periodically.
The plastic outer surface of the device may be cleaned with a soft, lint-free cloth dampened in a mild soap and water
solution or ethyl alcohol (70-85%).
If disinfecting is required, wipe the surface with isopropyl alcohol (IPA), then wipe with a water-moistened soft cloth.
11. TROUBLESHOOTING
The following table lists some typical conditions that may occur with the LungBoost System.
If any problem arises, please contact ChoiceMMed service at [email protected].
CONDITION
POSSIBLE CAUSE
RECOMMENDED ACTION
ERROR CODE 1
EMPTY BATTERIES
REPLACE BATTERY
ERROR CODE 3
Button(s) remains pressed
during power on
PRESS EACH Button ONCE THEN TURN DEVICE
BACK ON. IF ERROR STILL OCCURS,
CONTACT CUSTOMER SERVICE
INTERNAL ERROR
CONTACT CUSTOMER SERVICE
TURN DEVICE OFF
ERROR CODE 22
ERROR CODE 25
“PM” SEGMENT WITH
4 CHARACTERS
“D” SEGMENT WITH
4 CHARACTERS
TURN DEVICE OFF THEN ON
ERROR CODE 21
ERROR CODE 26
INTERNAL ERROR
21
If this does not help, turn power ON,
remove and insert batteries. If there is
still error code, contact the
customer service.
12. WARRANTY POLICY
Lung Boost is warranted to be free from defects in materials or workmanship for 1 year from the date of
purchase. Within this period, ChoiceMMed America will, at its sole option, repair or replace any components that
fail in normal use.
We recommend you to visit www.choicemmedamerica.com/warranty to learn more about our detailed and
complete warranty service.
To obtain our satisfactory warranty service, the following information is important to attach attention:
12.1 WARRANTY COVERAGE
12.1.1 This Limited Warranty is valid for one year, only if you purchased the product from a ChoiceMMed
America authorized Reseller.
12.1.2 Such repairs or replacement will be made at no charge to the customer for parts or labor, provided the
customer shall be responsible for any transportation cost.
12.1.3 This warranty cover all defects encountered in normal use of the equipment and does not apply in
the following case: (i) cosmetic damage, such as scratches, nicks and dents; (ii) consumable parts,
such as batteries, unless product damage has occurred due to a defect in materials or workmanship;
(iii) damage caused by accident, abuse, misuse, water, flood, fire, or other acts of nature or external
causes; (iv) damage caused by service performed by anyone who is not an authorized service provider
of ChoiceMMed America; (v) damage to a product that has been modified or altered without the written
permission of ChoiceMMed America.
12.2 OBTAINING WARRANTY
By taking just a few minutes to visit www.choicemmedamerica.com/register to register your product,
you can improve your experience with ChocieMMed America. Enjoy more efficient warranty support and
more.
12.2.1 PRODUCT REGISTRATION
12.2.2 Get an RMA Number
Call or email Contact Us to request a RMA number. You will need the device serial number (if
applicable), a return shipping address and a daytime phone number.
Phone: (215) 874-0458
E-mail: [email protected]
For additional support information, please visit www.choicemmedamerica.com/contact.
12.2.3 Send Us the Device
Securely pack the device and a copy of the original sales receipt, which is required as the proof of
purchase for warranty repairs. Write the tracking number clearly on the outside of the package. Send
the device, freight charges prepaid, to Ship the device (insured) to the following address. It is very
important to include your RMA number.
ChoiceMMed America Co.
2558 Pearl Buck Road, Suite 8A
RMA Number: (insert your RMA number here)
Bristol, PA 19007
Note: If you can not complete the Product Register, please enclose the following items when shipping the device for service:
(i) Warranty information: RMA number, device model and serial number, a copy of your original sales receipt or other applicable
documentation.
(ii) Name and phone number of the person to contact for warranty.
(iii) A brief description of the problem encountered, or the repairs felt necessary.
(iv) Ship to and bill to information
22