1
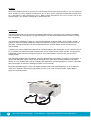
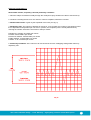
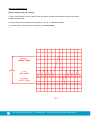
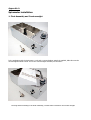
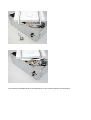
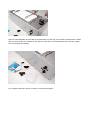
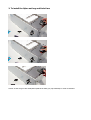
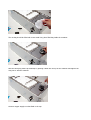
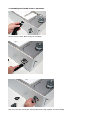
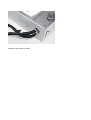
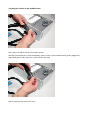
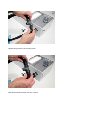
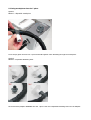
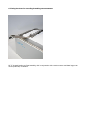
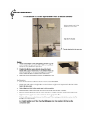
THE
Clifton RANGE
SM-1
Spirometer
Contents
About this Manual
3
General Information
3
Amendments
3
Location
4
Introduction
4
Unpacking
5
Setting up
5
Operating Instructions
6
Suggested Investigations
7
Cleaning
10
Warranty
10
Accessories
10
Maintenance
10
Appendix A
- Installation
11
Data Harvest datalogger and motion sensors
22
2
The Clifton Education Range - 1 Year Warranty High Quality products at affordable prices
About this Manual
This user Manual contains instructions which must be followed to ensure that the product is operated
correctly.
General Notes
1.
Always follow good teaching and safety practice. CLEAPSS October 2005 report recommends a Risk
Assessment is produced.
Spirometers should only be used under the direct supervision of a teacher who is experienced in
their correct use. Teachers are reminded that they have a special responsibility when pupils are
used as the subject of experiments. Investigations involving unusual ventilation of the lungs can be
dangerous to epileptics, asthmatics or children suffering from bronchial disorders.
2.
When using spirometers for gas analysis, be aware of the possible consequences of hyperventilation
or of holding the breath. If the experiment requires a supply of oxygen it must be of medical
quality.
3.
In experiments where indicating soda-lime is used to absorb the expired carbon dioxide, the
spirometer float must be filled with medical grade oxygen. Medical Grade oxygen, recommend BOC
Medical Tel: 0800 111 333 email: [email protected].
4.
A Kymograph or Datalogger system is required to record results. Recommend a Logit, from Griffin
Education http://www.griffinandgeorge.co.uk/ or Data Harvester, from Scientific and Chemical http://
www.sci-chem.co.uk/ with necessary motion sensor fitted to logger.
Amendments
Issue
Issue
Issue
Issue
1
2
3
4
December
December
May
March
1994
2005
2008
2012
Initial issue instruction book [G&G orig].
Book update following customer feedback.
Additions to Accessories.
Added Data Harvest datalogger and motion sensor info.
Symbols
Caution refer to Instructions
Protective earth conductor terminal.
The Clifton Education Range - 1 Year Warranty High Quality products at affordable prices 3
3
Location
The product must be placed on a smooth, level and sturdy work surface and used indoors. Use in a ventilated
room. Suitable for use in ambient temperatures 5°C to 40°C with a maximum humidity 80% (temperature
31°C) decreasing to 50% (temperature 40°C). Mains voltage fluctuations are not to exceed ±10% of the
nominal supply. The product is designed for educational use.
Introduction
The Clifton Spirometer can be used for investigating tidal volumes, respiratory rate, pulmonary ventilation,
reserve volumes and vital capacity. Oxygen consumption can also be measured which is useful in a metabolic rate studies.
The Spirometer essentially consists of a counterbalanced float, sealed by water, which contains oxygen. A
system of valves and tubing enables the subject to breathe this oxygen, thus causing the float to move up
and down. Indicating soda-lime can be incorporated into the circuit to absorb carbon dioxide from the
expired breath.
A simple lever control enables the subject to be connected either to the atmosphere or to the float for recording. A container for soda lime crystals is fitted which can be used to absorb carbon dioxide. The Spirometer
is designed to offer minimum resistance to air flow. This means greater comfort for the user and more
realistic results.
The Spirometer enables rate of breathing, volume of breaths and consumption of oxygen to be monitored. It
has a scale calibrated in litres, which can be read against the water level, enabling readings to be taken
directly, or it can be fitted with a pen arm allowing the attachment of a fibre tipped pen or used in conjunction
with a Kymograph or electronic datalogger system to record results.
Recommended data loggers: Logit, from Griffin Education http://www.griffinandgeorge.co.uk/ or Data Harvester, from Scientific and Chemical http://www.sci-chem.co.uk/ with necessary motion sensor fitted to
logger for recording results.
4
The Clifton Education Range - 1 Year Warranty High Quality products at affordable prices
Unpacking
Remove the Spirometer from its packaging and check following parts are included:
*
*
*
*
*
*
*
*
*
Spirometer - body
Float assembly
Pen arm assembly
Nylon net bag
Corrugated tube (x2)
Snapper clip (x2)
Mouth piece
Nose clip
Instruction manual
If any of the above are missing or damaged, contact your distributor.
Setting up - for more detailed information Appendix A.
1. Place the float in position, ensuring that the pivot pins are correctly located in the dimples (top of the tank).
2. Screw the counter balance weight fully into the back of the float support, but do not adjust until the float
chamber has been filled with water.
3. Connect the flexible hoses to the ports on the Spirometer. When new, these may be a tight fit (they can be
fitted more easily lubricated with water). Fit the clips to secure the hoses.
Note the way the valves in the T piece operates and connect the corrugated hoses to
the T piece so that expired air enters the Spirometer via the port labelled IN and expired
air from the float leaves via port labelled OUT.
Do not use oil or grease as a lubricant anywhere in the system as oxygen can form
explosive compounds with these materials.
4. Immerse the mouthpiece in a sterilising solution. Spare mouthpieces are available from your distributor
request Stock No. BX0612 “Disposable Mouth piece”.
5. If the results are to be recorded on a Kymograph, fit the pen arm and clamp a fine fibre-tipped pen in the
holder. Arrange the kymergraph so that the pen writes properly over the full height of the chart. If the full
Spirometer capacity of 7 litres is to be used, a chart and drum 200mm is required. When fitted, 10mm
vertical movement of the pen corresponds to approximately 500ml change in volume in the Spirometer.
Alternatively use electronic datalogger system to record results. Recommend either a Logit, from Griffin
Education http://www.griffinandgeorge.co.uk/ or Data Harvester, from Scientific and Chemical http://www.scichem.co.uk/ with necessary motion sensor fitted to logger.
6. Fill the tank with water, almost to the very top.
7. Calibrate the recording device to known volume of air for the “Suggested Investigations”.
8. Ensure the float is in the lowest position, set the valve to ATMOSPHERE, the kymograph should produce
a continuous horizontal line and dataloggers will record zero motion. This corresponds to zero volume.
9. To introduce a measured volume of air, fill a flask with an accurately measured volume of water (500ml).
Mark the level of the water on the neck of the flask. Empty the water, fit a two hole bung with one tube
connected to the oxygen inlet of the Spirometer, the other to the water tap. Fill the flask to the mark and air
will be displaced from the flask into the Spirometer. Close the clip and empty the flask.
10. A second line or readings should appear above zero volume line which should provide a scale e.g.
500ml air volume = height ?mm. This is basis for defining the scale.
The Clifton Education Range - 1 Year Warranty High Quality products at affordable prices
5
5
11. Set the valve to SPIROMETER and adjust the weight so that the Float comes to rest in the mid-position.
12. If oxygen consumption is to be measured, fill the nylon net bag with coarse soda-lime and place it in the
container (front view, right hand side of the tank, unscrew the wing nut and remove the cap) .
13. Ensure there are no gaps between the net bag and the walls of the container. Replace the cover and
tighten.
14. Gently press down on the float to expel the air and turn the valve to ATMOSPHERE.
15. Connect the medical grade oxygen supply to the oxygen inlet (container, adjacent to the wing nut -tube)
use pressure tubing.
16. Slowly turn on the oxygen supply. Oxygen will flow into the unit and raise the float. When it contains
about 2 litres, turn off the supply, set the valve to SPIROMETER, press down on float. This forces the
oxygen out through the mouthpiece and flushes air out of the system. Do no allow oxygen to be discharged
near a naked flame.
17. Repeat the process, filling and flushing, and then close off the oxygen supply and turn the valve to
ATMOSPHERE. If the cylinder is to be removed, ensure a tube and clip are left closing the oxygen inlet.
Operating Instructions
1. A two-way valve is fitted, when this valve is set to ATMOSPHERE, the breathing tubes are open to the
atmosphere and the Spirometer is closed. The subject therefore breathes normal atmospheric air. This
position should be used when the subjects first use the Spirometer to enable them to become accustomed
to it.
2. When the valve is set to SPIROMETER, the subject takes in the oxygen contained under the float, causing the float to fall. The exprired gases pass through the soda-lime container before returning to the float. If
soda-lime is placed in the container, it absorbs carbon dioxide from expired gases. The valve is set to this
position when the Spirometer is in normal use.
Your medical grade oxygen cylinder must only be used for respiration purposes. Before using soda-lime, dust should be removed from it by pouring the soda-lime from
one container to another, in the open air.
3. Select a subject. To enable some degree of standardisation the subject should be rested for half and hour
and should not have eaten a meal for the previous two hours.
4. Fit a sterilised mouthpiece to the T piece, seat the subject comfortably and place the mouthpiece and
nose clip in postion.
5. Allow the subject to become accustomed to breathing through the tubes and then at the end of an outward breath, turn the valve to SPIROMETER and begin recording.
6
The Clifton Education Range - 1 Year Warranty High Quality products at affordable prices
Suggested investigations 1
Normal tidal volume, respiratory rate and pulmonary ventilation.
1. Allow the subject to breathe normally through the mouthpiece (they should not be able to see the trace).
2. Contunue recording the trace for one minute or until its completed, whichever is shorter.
3. Normal tidal volume: is given by the amplitude of the trace (see fig. 2).
4. Respiratory rate: The number of breaths per minute or, more formally, the number of movements indicative of inspiration and expiration per unit time. In practice, the respiratory rate is usually determined by
counting the number of times the chart rises or falls per minute.
# Newborns: Average 44 breaths per minute
# Infants: 20-40 breaths per minute
# Preschool children: 20-30 breaths per minute
# Older children: 16-25 breaths per minute
# Adults: 14 to 18 breaths per minute
5. Pulmonary ventilation: is the volume of air moved and is found be multiplying average tidal volume by
respiratory rate.
The Clifton Education Range - 1 Year Warranty High Quality products at affordable prices
5
7
Suggested investigations 2
Reserve volumes and vital capacity
1. After a normal breath, ask the subject to take the deepest possible inward breath and then the deepest
possible outward breath.
2. These peaks give the inspiratory and expiratory (see fig. 2). Reserve volume.
3. The total volume from maximum to minimum is the Vital capacity.
8
The Clifton Education Range - 1 Year Warranty High Quality products at affordable prices
Suggested investigations 3
Oxygen consumption
1. Seat the subject comfortably and allow them to breathe normally through the mouthpiece.
2. As medical grade oxygen is consumed and respiratory carbon dioxide is removed from expired breathe,
the volume falls progressively. The slope on the trace indicates the rate at which oxygen is consumed (see
diagram 3).
3. Continue until half the oxygen has been used or for two minutes, whicever occurs first.
4. Draw a straight line linking the upper or lower extremities of the trace for the section under examination. It
is convenient if the line extends over the length of the chart corresponding to one minute. Measure the
vertical change in this time. This corresponds to the volume of oxygen consumed in one minute.
The investigation can be repeated during and after exercise and it is interesting to compare.
The Clifton Education Range - 1 Year Warranty High Quality products at affordable prices
5
9
Cleaning
1.Outside surfaces - wipe with a cloth or sponge soaked in warm soapy water
2.Inside surfaces - can be descaled to maintain it in as new condition. Descale by adding 1 litre of vinegar to
water and leave for an hour, empty, and brush the lime away. Rinse thoroughly afterwards.
NOTE: Although the stainless steel tank is resistant to chloride containing solutions it is important to avoid
high concentrations of halogens - especially chloride. With such a high quality and resistant tank it may show
rust, often deposits from external sources. These deposits can be removed with nitric acid (10%) on a cloth.
WEAR PROTECTIVE EQUIPMENT!
Where applicable, a medical disinfectant can be used in the water during normal use, we recommend
'Virkon'.
Warranty
The Spirometer is covered by a One Year Warranty against defects in materials and workmanship.
In the case of a problem contact your Dealer for advice or Nickel-Electro Ltd., Service Dept. Tel: 01934
626691
Accessories
It is recommended that due to the spirometer being operated by multiple users the following consumables
are replaced for each:
BX0612
Disposable Mouth Pieces
BP0555
Disposable Nose Clip
BX0978
Disposable Breathing Filter
MXM0894
Adaptor for Disposable Breathing Filter
Maintenance
There are no useable maintainable components.
10
The Clifton Education Range - 1 Year Warranty High Quality products at affordable prices
Appendix A
Spirometer installation
1. Float Assembly and Counterweight
In the packaging with the Spirometer, a rod and a counter balance weight is supplied, slide this onto the
rod and tighten thumb screw. This is the counterweight assembly for the Float.
The large white moulding is the Float assembly, a metal frame is fitted for the Counter weight.
The Float has a threaded stud on the metal frame for the counter weight to be screwed on.
Place the Float Assembly into the tank of the Spirometer, on each leg of the frame a pointed screw is fitted,
each one then locates into a dimple on the top rim of the tank. The Float Assembly will “see saw”, adjust
the counterweight accordingly.
In a polythene bag there will be a number of loose parts supplied.
2. To install the Nylon net bag and Soda Lime
Loosen off the wing nut and twist/slide upwards the dark grey cap assembly to reveal a container.
The net bag should be filled with coarse soda lime, place filled bag inside the container.
Refit the dark grey plastic cap assembly by pushing it back into the top of the container and tighten the
wing nut to seal the container.
Connect oxygen supply to outlet fitted in the cap.
3. Assembling the flexible hoses to Spirometer
On one end of a hose, place a clip, do not fasten.
Push the hose fully onto a pipe outlet and pinch the clip together for secure fitting.
Repeat so both hoses are fitted.
4. Fitting the T piece to the flexible hoses.
The T piece is a tight fit into the hose and is correct.
Hold the hose and tilt the T piece back slightly, push ¾ of the T piece inside the hose, gently wiggle and
rotate both parts to fully insert the T piece into the hose end.
Hose is fitted correctly onto the T piece.
Repeat the process to fit the other hose.
Both hoses fitted correctly onto the T piece.
5. Fitting mouthpieces into the T piece.
Option1.
BX0612 – disposable mouthpiece
In use simply push the tube into T piece and hold together when breathing through the mouthpiece.
Option2.
BX0978 – Disposable Breathing Filter
Fit the accessory adaptor MXM0894 into the T piece. Push the Disposable Breathing Filter into the Adaptor.
6. Fitting Pen Arm for recording breathing measurements.
Fit “Z” shaped bracket to Float Assembly, this in conjunction with a motion sensor and data logger can
record pulmonary ventilation.
BX0854