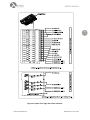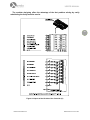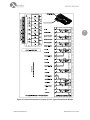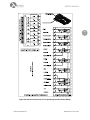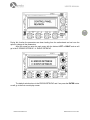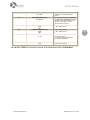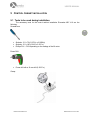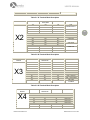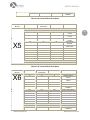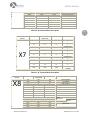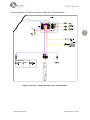
1
DIOMEDES V2.0 LIFT ELECTRONIC CONTROL CABINET USER’S MANUAL & INSTALLATION GUIDE LAMDA ELECTRONICS S.A. USER’S MANUAL Copyright © 2011 Lamda Electronics. All Rights Reserved. This document may not be reproduced, electronically or mechanically, in whole or in part, without written permission from Lamda Electronics. Warning and Disclaimer Although every effort has been made to make this document as complete and accurate as possible, Lamda Electronics and the document authors, publishers, distributors, and representatives have neither liability nor responsibility for any loss or damage arising from information contained in this document or from informational errors or omissions. Information contained in this document shall not be deemed to constitute a commitment to provide service, equipment, or software by Lamda Electronics or the document authors, publishers, distributors, or representatives. Limited Warranty Lamda Electronics (manufacturer) warrants its products for a period of 15 months from the date of shipment from its factory to be free from defects in workmanship and materials. Any defect appearing more than 15 months from the date of shipment from the factory shall be deemed to be due to ordinary wear and tear. Manufacturer, however, assumes no risk or liability for results of the use of the products purchased from it, including, but without limiting the generality of the forgoing: (1) The use in combination with any electrical or electronic components, circuits, systems, assemblies or any other material or equipment (2) Unsuitability of this product for use in any circuit, assembly or environment. Purchasers’ rights under this warranty shall consist solely of requiring the manufacturer to repair, or in manufacturer's sole discretion, replace free of charge, F.O.B. factory, any defective items received at said factory within the said 15 months and determined by manufacturer to be defective. The giving of or failure to give any advice or recommendation by manufacturer shall not constitute any warranty by or impose any liability upon the manufacturer. This warranty constitutes the sole and exclusive remedy of the purchaser and the exclusive liability of the manufacturer, AND IN LIEU OF ANY AND ALL OTHER WARRANTIES, EXPRESSED, IMPLIED, OR STATUTORY AS TO MERCHANTABILITY, FITNESS, FOR PURPOSE SOLD, DESCRIPTION, QUALITY PRODUCTIVENESS OR ANY OTHER MATTER. In no event will the manufacturer be liable for special or consequential damages or for delay in performance of this warranty. Products that are not manufactured by LAMDA ELECTRONICS are not covered under the above warranty terms. LAMDA ELECTRONICS, however, extends the same warranty terms that the original manufacturer of such equipment provide, with their product (refer to the warranty terms for such products in their respective manual). LAMDA ELECTRONICS S.A. INNOVATION THAT LIFTS YOU 2 USER’S MANUAL 1 TABLE OF CONTENTS 1 TABLE OF CONTENTS ......................................................................................................................... 3 2 SAFETY PRECAUTIONS ........................................................................................................................ 5 3 2.1 Information on Safety ................................................................................................................... 5 2.2 Personnel’s Safety Precautions..................................................................................................... 5 2.3 Product’s Safety Precautions ........................................................................................................ 5 2.4 Symbols and Safety terms............................................................................................................. 6 PREPARATION....................................................................................................................................... 6 3.1 Reading the Manual ...................................................................................................................... 6 3.2 Hardware usage ............................................................................................................................ 6 3.2.1 Boxes and Cabinets ............................................................................................................... 6 3.2.2 Control Cabinet’s Grounding Terminal Blocks ...................................................................... 6 3.2.3 Minimum distance between power cabling and signal cabling............................................ 7 3.2.4 Shielding of an AC motor Power Supply ............................................................................... 7 3.2.5 The grounding of a shielded power supply cable (AC motor) .............................................. 7 3.2.6 Omit direct grounding of the shielding................................................................................. 7 3.2.7 Power supply cable for a DC motor ...................................................................................... 7 3.2.8 Direct grounding of the motor’s metallic cover.................................................................... 7 3.2.9 Maximum permissible length of the motor’s cabling inside the control cabinet................. 7 3.2.10 Encoder’s Cabling.................................................................................................................. 8 3.3 4 Control Cabinet’s Maintenance and Repair.................................................................................. 8 3.3.1 Care ....................................................................................................................................... 8 3.3.2 Service ................................................................................................................................... 8 3.3.3 Repairs .................................................................................................................................. 8 LIFT ELECTRONIC CONTROLLER - Phoenix...................................................................................... 9 4.1 Technical Characteristics............................................................................................................... 9 4.2 Inputs .......................................................................................................................................... 10 4.3 Outputs ....................................................................................................................................... 16 4.4 Communications ......................................................................................................................... 20 4.5 Thermo elements........................................................................................................................ 21 4.6 Programmer – LCD Screen .......................................................................................................... 22 LAMDA ELECTRONICS S.A. INNOVATION THAT LIFTS YOU 3 USER’S MANUAL 4.6.1 Parameters.......................................................................................................................... 32 4.6.2 Errors................................................................................................................................... 41 4.7 5 6 Operation Systems...................................................................................................................... 43 CONTROL CABINET INSTALLATION .................................................................................................... 45 5.1 Tools to be used during installation............................................................................................ 45 5.2 Control Cabinet casing ................................................................................................................ 46 5.3 Control Cabinet’s Terminal Blocks .............................................................................................. 48 5.4 Cable Color Coding...................................................................................................................... 52 5.5 Component naming legend......................................................................................................... 53 5.6 Connecting the Control Cabinet.................................................................................................. 54 5.7 Pre – wiring ................................................................................................................................. 69 5.7.1 Car pre – wiring................................................................................................................... 69 5.7.2 Shaft pre ‐ wiring................................................................................................................. 72 TROUBLESHOOTING ........................................................................................................................... 77 6.1 The lift doesn’t move in the Revision state. ............................................................................... 77 6.2 The Lift does not move downwards while it is in the Revision Stage......................................... 79 6.3 The Lift does not move upwards while it is in the Revision Stage.............................................. 79 6.4 The Lift does not move while it is in the normal operation........................................................ 80 6.5 The Lift does not stop at the station when we reset it............................................................... 80 6.6 The Lift stops at the station but it’s not operational for any further calls. ................................ 81 6.7 The Lift counts two stations instead of one................................................................................ 81 6.8 The Lift changes its speed when it reaches a station and stops at the next station. ................. 81 7 INDEX ................................................................................................................................................ 82 8 Pictures – Tables – Figures Catalogue......................................................................................... 84 9 Revision history ................................................................................................................................ 86 LAMDA ELECTRONICS S.A. INNOVATION THAT LIFTS YOU 4 USER’S MANUAL 2 SAFETY PRECAUTIONS 2.1 Information on Safety Please, read this manual carefully, before you proceed to the installation of the Control Cabinet, the cabling and the regular inspection of the cabinet. Keep this manual in a safe place and available to all installation and engineering personnel during the operation of the lift control cabinet. The product that is described in this manual can be adjusted so that it can comply with the international norms and EE derivatives. LAMDA ELECTRONICS shall take no responsibility if the installation company does not adjust the product according to the current laws which are effective in the country which the installation process is taking place. 2.2 Personnel’s Safety Precautions Do not touch any of the electric, electrical or electronic part of the system which is under voltage. Before you start operating the lift control cabinet or a part of it, be sure that there are no people close to you that could be hurt by the lift’s move or any part of it. All safety components should be checked for their proper functionality. In any case, the lift should be in the inspection position. 2.3 Product’s Safety Precautions • Do not plug or unplug electronic boards or electronic components under voltage. • Do not use a megometer when the electronic boards (PCBs) are plugged in. Megometers operate under high voltage and can easily destroy the PCB’s semiconductors. • Do not force the terminal blocks while you install them. They are designed for easy use and installation. If you cannot install them easily, it’s probably because either you try to install them up-side-down or they are not aligned. • Do not install the product near heating sources, vibrating sources or sources of high humidity. • Check out and be sure about the grounding quality. All groundings should have star type connections. Groundings of bad quality can cause interference in the proper operation of the system. • Use proper material for packaging the entire product or parts of it. LAMDA ELECTRONICS S.A. INNOVATION THAT LIFTS YOU 5 USER’S MANUAL 2.4 Symbols and Safety terms The symbols below might appear either on the product or in the installation manual. DANGER HIGH VOLTAGE ATTENTION NOTE GROUNDING 6 Table 2-1 Symbol Interpretation 3 PREPARATION 3.1 Reading the Manual The current User’s Manual is for use only by technical personnel, specialized in the Lift market. The thorough knowledge of the Lift Installation is mandatory, as well as the good knowledge of electrical installations. This manual also covers extensively the use of the “PHOENIX” electronic board (controller) as a separate part, as well as the Lift Electronic Control Cabinet “DIOMEDES”. 3.2 Hardware usage 3.2.1 Boxes and Cabinets All metallic boxes and cabinets which are installed (doors included) should be grounded directly to the grounding installation. If the boxes and the cabinets are painted, the paint should be removed at the connection points as well as at the points where they will be hanged on the wall. Anodized aluminum is not a good conductor. 3.2.2 Control Cabinet’s Grounding Terminal Blocks LAMDA ELECTRONICS’ lift control cabinets have a grounding bar (metallic terminal block with screws) which should be connected with the grounding installation. LAMDA ELECTRONICS S.A. INNOVATION THAT LIFTS YOU USER’S MANUAL 3.2.3 Minimum distance between power cabling and signal cabling The minimum distance between the parallel signal cabling and the power cabling is 30cm. Cabling cross-sections should take place a 90ο angle. 3.2.4 Shielding of an AC motor Power Supply The power supply of an AC motor should be set up with the use of a shielded four-pole cable (three cables for the three phases and one yellow-green cable for the grounding) or with the use of an unshielded cable which is installed in the metallic trunking. It is important that the connection of the AC motor with the control cabinet’s grounding should be done with the use of a shielded cable. 3.2.5 The grounding of a shielded power supply cable (AC motor) The shielding of the power supply cable should be grounded on both sides, so that it can provide full protection. This can be done by using appropriate metallic cables which are grounded (360ο grounding) both at the side of the control cabinet and at the side of the AC motor. If this connection is not applicable, the shielded cables should be connected in the control cabinet with the use of an “Omega – Ω” connector. Regarding the side of the AC motor connection, if the full shielding at the terminal blocks is not applicable, the shielding should be grounded before it reaches the terminal blocks. The grounding is achieved by the use of an “Omega-Ω” connector at the metallic supporting brackets of the AC motor. When a metallic trunking is used it should also be shielded 360ο wherever this is applicable. 3.2.6 Omit direct grounding of the shielding The shielding of the grounding should be done with the use of an “Omega-Ω” connector (360ο grounding) and never directly. 3.2.7 Power supply cable for a DC motor The power supply cable of a DC motor is not necessary to be shielded. 3.2.8 Direct grounding of the motor’s metallic cover The motor’s metallic cover should be grounded through the control cabinet’s grounding. 3.2.9 Maximum permissible length of the motor’s cabling inside the control cabinet The maximum permissible length from the control cabinet’s terminal where the grounding is plugged in, is 30cm. LAMDA ELECTRONICS S.A. INNOVATION THAT LIFTS YOU 7 USER’S MANUAL 3.2.10 Encoder’s Cabling Encoder’s cabling should be shielded and 360ο grounded on the control cabinet. The cable terminal, which is connected to the inverter is already shielded and grounded, therefore it needs no further protection. In order to check out that the shielding is not connected on the motor’s side, the encoder’s connection is deducted from the inverter and it is confirmed, by measuring, the presence of high impedance between the shielding and the encoder’s or motor’s metallic housing. 8 3.3 Control Cabinet’s Maintenance and Repair 3.3.1 Care The control cabinets should be installed following the installation guides and regulations. They don’t need any particular maintenance. It is forbidden to wipe them with a wet cloth. The power supply should always be switched off before you proceed to the maintenance, repair or cleaning procedure. 3.3.2 Service All junction screws on the control cabinet should be re-screwed two weeks after the initial delivery. The same procedure should be repeated every year. If any control cabinet is stored for more than two years, the capacitors might have been discharged. It is recommended that the capacitors of these devices should be recharged for two hours, while the control cabinet is under power supply and in a standby mode. After the above actions, the control cabinet is ready to be installed without any problem. 3.3.3 Repairs All electronic boards should be repaired by specialized personnel that are certified by the manufacturer. You should never repair anything by yourself. When you order spare parts, indicate not only the electronic board’s type, but also the serial number of your control cabinet. LAMDA ELECTRONICS S.A. INNOVATION THAT LIFTS YOU USER’S MANUAL 4 LIFT ELECTRONIC CONTROLLER - Phoenix 4.1 Technical Characteristics The electronic controller’s dimensions are: 29,5Χ15,7cm. The electronic controller has holes on the board in order to be mounted. Use 8 metallic separators M3 in order to mount the electronic controller. 9 Power Inputs Inputs Outputs Voltage 200 και 202 12VAC typical (10 VAC min14VAC max) (14VDCmin – 20VDCmax) Panel Signals 61-68 31-38 69-54 55-97 48VDC (35-51VDC) Calls 81-96 24VDC (20 – 28VDC) RLY-1 ~ 9 401-420 RLY-10-23 130-100 Motor Oil CPU (electronic circuit) PTC Thernistors Terminal Blocks Current 2 A (max) Typical 8mA, (6mA min15mA max) per input Typical 8mA, (6mA min15mA max) per input Temperature Comments - The bridge output (non-stabilized 12VDC) powers the output relay coils (Power and Signal) - Common at 48VDC - Common at 24VDC 230V AC/DC (220-250VAC/DC) 125VAC 24VDC 60VDC max 5A max - Power Relays (noninductive load) 0,5Α 1,0A 0,5A max - Signal Relays (noninductive load) 252-253 PTC - 75 C 254-255 PTC - 75 C o o Problem when there is large resistance or absence of PTC Problem when there is large resistance or absence of PTC Table 4-1 Technical Characteristics LAMDA ELECTRONICS S.A. INNOVATION THAT LIFTS YOU USER’S MANUAL The power supply connections are shown in Figure 4-1 that follows. 10 Figure 4-1 Power supply connections 4.2 Inputs The inputs of the controller depending on the type of incoming signals are designated into two groups: • Call inputs and • Inputs of control cabinet peripherals LAMDA ELECTRONICS S.A. INNOVATION THAT LIFTS YOU USER’S MANUAL Call inputs are activated via the grounding of the 24VDC and are grouped per octad (groups of eight) in detachable modules. This modular design offers the advantage of immediate resolve of any problem by replacing them (see figure 4-2). 11 Figure 4-2 Call Inputs The table below shows the call inputs and their functionality in regard to the calling system that the electronic controller is programmed to operate LAMDA ELECTRONICS S.A. INNOVATION THAT LIFTS YOU USER’S MANUAL CALL APB DCS UCS FCS Input Κ01 CAR-LND 01 CAR 01 CAR 01 CAR 01 Input Κ02 CAR-LND 02 CAR 02 CAR 02 CAR 02 Input Κ03 CAR-LND 03 CAR 03 CAR 03 CAR 03 Input Κ04 CAR-LND 04 CAR 04 CAR 04 CAR 04 Input Κ05 CAR-LND 05 CAR 05 CAR 05 CAR 05 Input Κ06 CAR-LND 06 CAR 06 CAR 06 CAR 06 Input Κ07 CAR-LND 07 CAR 07 CAR 07 LND 02 DOWN Input Κ08 CAR-LND 08 CAR 08 CAR 08 LND 03 DOWN Input Κ09 CAR-LND 09 LND 01 UP LND 01 UP LND 04 DOWN Input Κ10 CAR-LND 10 LND 02 DOWN LND 02 UP LND 05 DOWN Input Κ11 CAR-LND 11 LND 03 DOWN LND 03 UP LND 06 DOWN Input Κ12 CAR-LND 12 LND 04 DOWN LND 04 UP LND 01 UP Input Κ13 CAR-LND 13 LND 05 DOWN LND 05 UP LND 02 UP Input Κ14 CAR-LND 14 LND 06 DOWN LND 06 UP LND 03 UP Input Κ15 CAR-LND 15 LND 07 DOWN LND 07 UP LND 04 UP Input Κ16 CAR-LND 16 LND 08 DOWN LND 08 DOWN(UP) LND 05 UP Table 4-2 Table of Calls The rest of the inputs are activated with voltage of 48VDC and are grounded also per octade (groups of eight) in detachable modules (see Figure 4-3, 4-4 and 4-5). LAMDA ELECTRONICS S.A. INNOVATION THAT LIFTS YOU 12 USER’S MANUAL 13 Figure 4-3 Inputs of the right side of the Controller LAMDA ELECTRONICS S.A. INNOVATION THAT LIFTS YOU USER’S MANUAL The modular designing offers the advantage of the fast problem solving by easily substituting the faulty modules on site. 14 Figure 4-4 Inputs of the left side of the Controller (Α) LAMDA ELECTRONICS S.A. INNOVATION THAT LIFTS YOU USER’S MANUAL 15 Figure 4-5 Inputs of the left side of the Controller (Β) LAMDA ELECTRONICS S.A. INNOVATION THAT LIFTS YOU USER’S MANUAL 4.3 Outputs The outputs of the controller are of two types: • Signal Outputs • Power Outputs Signal outputs are dry contact relays which drive indicators and devices outside the control panel. Generally there is the ability to drive low current devices (See Fig. 4-6). 16 Figure 4-6 Signal Relay Outputs Power outputs are dry contacts which drive the whole of the motion circuit of the elevator. In Fig. 4-7, 4-8 and 4-9 the internal connections of the Power Relays for the Inverter (V.V.V.F.) and the Hydraulic type elevators are given respectively. LAMDA ELECTRONICS S.A. INNOVATION THAT LIFTS YOU USER’S MANUAL 17 Figure 4-7 Internal Connections of Inverter (V.V.V.F.) type elevator Power Relays LAMDA ELECTRONICS S.A. INNOVATION THAT LIFTS YOU USER’S MANUAL 18 Figure 4-8 Internal Connections of Two-Speed type elevator Power Relays LAMDA ELECTRONICS S.A. INNOVATION THAT LIFTS YOU USER’S MANUAL 19 Figure 4-9 Internal Connections of Hydraulic type elevator Relays LAMDA ELECTRONICS S.A. INNOVATION THAT LIFTS YOU USER’S MANUAL 4.4 Communications The Controller can communicate with external devices through serial ports RS-485 and RS232 (Figure 4-10). The RS-485 serial port provides the ability to connect the controller with external devices up to 1800m distance. Examples of such devices are the Voice Announcer, the Car module, etc. Furthermore, computers can be connected to the controller through RS-232 serial port (Figure 4-10). 20 Figure 4-10 Connections of serial ports RS-485 / RS-232 LAMDA ELECTRONICS S.A. INNOVATION THAT LIFTS YOU USER’S MANUAL 4.5 Thermo elements The elevator’s manufacturer places a thermistor (P.T.C.) in the oil (if it is for a hydraulic lift) and in the motor. When an overheating problem arises, the thermistor’s resistance increases a lot (P.T.C.) and the Element Check continuity is interrupted. Its connection diagram is presented in Figure 4-11. 21 Figure 4-11 PTC Thermistor Inputs – Internal Connections LAMDA ELECTRONICS S.A. INNOVATION THAT LIFTS YOU USER’S MANUAL 4.6 Programmer – LCD Screen The controller comes with a programmer and an LCD screen used for the change and/or the correction of the parameters as well as for the presentation of the operational state and the error history. 22 Figure 4-12 Programmer – LCD Screen As you start the operation of the board, the screen which will be programmed should display this message: “SLAVE FUNCTION” LAMDA ELECTRONICS S.A. INNOVATION THAT LIFTS YOU USER’S MANUAL 23 In normal operation the screen presents the current operation state of the elevator. In order to activate the Revision Process from the programmer we must push buttons PRG and ENTER at the same time and we get the following screen message: At first, the word «NO» flashes on the screen as a pre-selected option. If we press ENTER then, we will go back to the initial state of the programmer’s operation. Using the UP and DOWN buttons we may choose the YES or NO (the flashing option is the selectable one). By choosing YES (and then ENTER), we get the following message «LOAD PARAMETERS FROM CONTROLLER». LAMDA ELECTRONICS S.A. INNOVATION THAT LIFTS YOU USER’S MANUAL 24 At this stage, the parameters are loaded from the Controller’s main board and we are able to modify the parameters. As soon as we get into the main menu, the first screen appears with the group of messages: «G: GEN. PARAMETERS» και «T: TIMERS». When we press the LEFT or the RIGHT button the screens of the rest options will appear: LAMDA ELECTRONICS S.A. INNOVATION THAT LIFTS YOU USER’S MANUAL 25 LAMDA ELECTRONICS S.A. INNOVATION THAT LIFTS YOU USER’S MANUAL 26 LAMDA ELECTRONICS S.A. INNOVATION THAT LIFTS YOU USER’S MANUAL 27 In this screen the GEN. PARAMETERS option is flashing, and if it is selected (by pushing the ENTER button) we will see on the screen the first group of parameters of the GEN. PARAMETERS to be in a state of change/correction mode. The parameter can be changed with the buttons UP (increase) and DOWN (decrease). The values that can be accepted are from 1 to 4 (as it is shown in the picture above and is described in the paragraph 4.6.1. – parameter G1). If we wish to change this parameter in a hydraulic elevator we have to push the down button (DOWN) twice. The value that flashes will change to 2 and then to 1.As long as we are sure about the value (by checking it with the user’s manual), we press ENTER. Then we press ESC to return at the starting menu (GEN.PARAMETERS/TIMERS). It is recommended: that after any parameter change we reinsure its change by re-entering in the parameter section and by checking if that changed value is flashing. As long as we are sure about the value of the parameter, we press the button RIGHT and we go to the EEPROM WRITE/SAVE TO CONTRLR screen and we select the SAVE TO CONTRLR option. LAMDA ELECTRONICS S.A. INNOVATION THAT LIFTS YOU USER’S MANUAL 28 This way the parameters are being transferred in the ROM memory. As soon as the saving finishes, the screen returns to the first group of parameters (G:GEN. PARAMETERS / T:TIMERS). With a press of ESC the exit screen is being displayed. We can select the YES option by pressing the DOWN button. Now, YES is flashing and by pressing ENTER the programmer will exit from the programming menu and the starting message will be displayed: SLAVE FUNCTION. LAMDA ELECTRONICS S.A. INNOVATION THAT LIFTS YOU USER’S MANUAL 29 Now we can restart the elevator with the new updated parameters. The pair of 7 – segment displays on the Phoenix board will display “St” as the internal controls are in progress. Then, we can see “00” and the first restart begins. If the setting of the parameters has successfully ended it is recommended to save them at the removable memory (DIP-EEPROM) of the programmer. The procedure is rather simple, we enter the main menu and we are moving with the LEFT or RIGHT buttons on our screen to the option EEPROM WRITE/SAVE TO CONTRLR. In this screen the “active” option is the one that interests us, so with a press of the ENTER button all the parameters will be saved in the DIP-EEPROM of the programmer. By doing this all the range of the parameters will be saved. If for any reason we want to return to the previous set of saved parameters we will have to go to the main menu and select the X: SUPERVISOR P EEPROM READ option. The EEPROM READ option will transfer the parameters from the DIP-EEPROM to the menu of the programmer. Next we should check the parameters (one by one) if they are the appropriate for the elevator to function properly. If we are sure for the proper functionality of the elevator we have to “download” the parameters in the Phoenix board with the option SAVE TO CONTRLR. LAMDA ELECTRONICS S.A. INNOVATION THAT LIFTS YOU USER’S MANUAL The PHOENIX board has the ability to record the errors that occurred and display them on the screen. Moreover, it can record and display all the latest functions.! 30 If we want the main menu to be displayed on the screen we have to press the buttons PRG and ENTER the same time, and the option to enter the MENU screen or not is being given. First of all we can see the NO option flashing ot the screen, which is the factory setting, and if we press now the “ENTER” button we will return to the default state of the programmer. By using the buttons “UP” and “DOWN” we can change the selection between “YES” and “NO”. Always the active choice will be the flashing one. If we select “YES” (and then press “ENTER”) momentarily the screen will display this message: CONTROL PANEL REVISION. LAMDA ELECTRONICS S.A. INNOVATION THAT LIFTS YOU USER’S MANUAL 31 During this function the parameters are been loading from the motherboard and we have the option to change all the parameters. After this screen we enter the main menu with the buttons LEFT or RIGHT and we will go to the E: ERROR RETRIEVE / V: EVENT RETRIEVE. The default selection here is the ERROR RETRIEVE and if we press the ENTER button we will go to the first error display screen. LAMDA ELECTRONICS S.A. INNOVATION THAT LIFTS YOU USER’S MANUAL 32 Here we can see the last error. Its description is located in the first line. At the second line we can see the floor that the error occurred, (FL: 01) the ascending number of the error (I: 02) and finally the frequency that this error has occurred (#001). With the buttons UP and DOWN we can move to the list of the errors. If we reach at the end of the list a message will be displayed END LIST or START LIST. If we wish to exit from the error retrieve screen we press the button ESC. The board returns to the normal operation and the screen displays “SLAVE FUNCTION” The total amount of saved errors is 91. If we wish to reset the saved errors we have to press the PRG and ENTER button at the same time and then the ESC button. The board will return to its normal operation and the screen will display the “SLAVE FUNCTION” message. The same procedure is been followed when we wish to check the latest events occured «V: EVENT RETRIEVE». The total amount of events occurred is 16. R: REVISION R 4.6.1 CONTROL PANEL REVISION In case that the car revision is activated (Input 69=0) there is no motion ability with the use of the UP/DOWN buttons. In order to exit this screen we press the ESC button. In different case (Input 69=1) the Revision process is taken over by the programmer and the car can move using the UP/DOWN buttons. In order to exit this screen we press the ESC button. Parameters G: GENERAL PARAMETERS LIFT TYPE (1 – 4) G1 SPEEDS (1 – 3) G2 G3 MID SPEED FLOORS (0-4) LAMDA ELECTRONICS S.A. 1: Hydraulic Elevator 2 Hydraulic Elevator with soft start (*FW) 3: Mechanical – Conventional Elevator 4: Mechanical – Conventional Elevator with Inverter 1: One Speed (*FW) 2: 2 speed elevator 3: 3 speed elevator (Inverter only) (*FW) Only for elevators with Inverter and 3 speeds. (*FW) INNOVATION THAT LIFTS YOU USER’S MANUAL It is the minimum distance between floors, over which maximum speed is used. G4 MARGINAL FL. SPEED (0-4) OPERATION SYSTEM (1 – 7) G5 G6 G7 G8 NUMBER OF BASEMENTS (0-9) NUMBER OF STATIONS (2 – 16) RELEVELLING (0 - 1) G9 CALL OPERATION (0-1) G10 BACKLIGHT (0-50%) G11 POS. INDICATOR TYPE (0-2) DIRECTION ARROWS (0-5) G12 Only for elevators with Inverter and 3 speeds. 0: Normal Function. (*FW) 1: Motion to the upper most floor with mid. speed. (*FW) 2: Motion to the lower most floor with mid. speed. (*FW) 3: Motion to the upper most and lower most floors with mid. speed (*FW) 1: SIMPLE 2: SIMPLE CALLS 3: Collective down (Collects in down dir) 4: Selective Up/Dwn (1 Button per floor) (*FW) 5: Selective Up/Dwn (2 Button per floor) 6: Collective Up (1 Button per floor) 7: Mixed Up-Up/Dwn-Dwn (*FW) 33 We enter the number of basements of the building. MAX VALUES: 1. 5 FULL SELECTIVE 2B 2. 8 DWN COLLECTIVE 3. 8 FULL COLLECTIVE 1B 4. 16 SIMPLE CALLS 5. 7 MIXED CALLS (*FW) Relevelling Deactivation(0) Relevelling Activation(1) (Required for pre-open door system, also) 0 :The activated call buttons are flashing near approach (*FW) 1: The activated call buttons are on until the call is executed. % light emission percentage of Buttons. (*FW) 0: ΑBCD binary indications 1: Decimal indications 2: ΑBCD + 1 0: Arrows are active only during motion 1: Arrows are active during motion and with next direction. 2: next direction, (Hall-Lantern) 3: next direction, with Flickering during motion (*FW) 4: next direction, stay switched on for 2sec and then they switch off 5: next direction, permanently switched on in upward and downward motion GONG TYPE (0-5) 0: Simple GONG at speed change 1: Direction Gong at speed change 2: Simple GONG at landing. 3: Direction Gong at landing. 5:GONG=OFF/ output 107 is used for Fire Fighting BUZZER G14 FIRE ALARM (0-1) 0: Moves to the firefighting floor and stays idle with doors closed (*FW) 1: Moves to the firefighting floor and stays idle with doors open (*FW) G15 FIRE ALARM STATION (0-15) G13 G16 OUTPUT FROM FIRE ALARM (0-1) G17 PARKING STATION (0-15) G18 SPECIAL PARK STATION (0-15) G19 INVERTER TYPE (0-2) G20 LOW CONSUMPTION (Y - N) LAMDA ELECTRONICS S.A. We set the floor at which the car will stop after a Fire Alarm (*FW) If a Reset or Revision needed after the Fire Alarm procedure (*FW) We set the floor at which we want the car to PARK This is the PARK station floor when Input «S_Park» is active 0: FUJI multy (*FW) 1: FUJI FRENIC (*FW) 2: YASKAWA Y: After the end of the Low Consumption time the displays switch off (*FW) N: No Function. (*FW) INNOVATION THAT LIFTS YOU USER’S MANUAL G21 G22 CALLING FILTER (Y - N) Y: If the photocell is not active and there are over 5 calls (*FW) N: Inactive Function (*FW) LANGUAGE PARAMETER 0: English (*FW) 1: Greek (*FW) Etc. Τ: TIMERS T1 T2 T3 TRAV. TIME FAST SP. (SEC: (0 – 99sec) The maximum travel time between two consecutive stations. TRAV. TIME SLOW SP. (SEC: (0 – 50sec) The maximum travel time allowed for the car at slow speed during normal operation. MAINTENANCE TIMER (0 – 50sec) The maximum time allowed for the car to move at maintenance speed. LIGHT TIMER 0-99 sec) The waiting time until the car light turns off. STOP TIMER (0 – 10 sec) The minimum time at station, for a car with semi-automatic doors. It clears to zero value once the doors open. STAR-DELTA TIMER (0 – 20 sec) The time in seconds that the STAR stays active during start. T7 RELEVELLING TIMER (0 – 30 sec) The maximum time required for the completion of relevelling. T8 LOCK TIMER (0 – 40sec) T9 CAM DELAY TIMER (0 – 10sec) T10 PUMP DELAY TIMER (0.0 – 4.0sec) T11 PARK TIMER (0 – 99min) T12 PARK HYDRAUL TIMER (0 – 99min) T13 ARRIVAL GONG (0 – 9 sec) T4 T5 T6 The maximum time that lapses between the events of CAM activation and the lock contact closing. The time in seconds that the CAM stays active after a stop. The delay in multiples of 0.1 seconds of the pump after a stop. If set to 0 (zero) is deactivated. The time that the controller awaits the PARK command. If set to 0 (zero) is deactivated. After the time set for this timer the car moves to the lowest station. If set to 0 (zero) is deactivated. The duration in seconds of the GONG pulse. LOW CONSUMPTION TIME (0 – 99min) The maximum allowed idle time until the indicators are switched off. (*FW) Τ15 DELAY ON RELEASE (1 – 9 sec) After an event of a voltage drop the time set in this parameter have to elapse before the start of release process evacuation. D1 DOOR TYPE Α (0-6) D2 DOOR OPENING TIME Α (0-99 sec) Time at a station with doors open. If it is set at 99 it is to floor with door open D3 DOOR CLOSING TIME Α (0 – 99sec) Time in which the door has to close so that no error occurs. D4 TIME OP. DOOR Α (-> REOPEN): (0 – 99sec) Τ14 D: DOOR PARAMETERS LAMDA ELECTRONICS S.A. 0: NO Door 1: Semiautomatic (Bus) 2: Single signal with permanent closing command 3: Two signal 4. Two signal with permanent closing command 5. For Future Use 6. Single signal with permanent opening command The Reopen command is given for the following reasons: 1: Photocell 2: Obstruction 3: Reopen (Car Button) INNOVATION THAT LIFTS YOU 34 USER’S MANUAL 4: A Car call or a Landing call is received for the station where the car is stopped. D5 NUMB. OF CLOS. RETRIES Α (2 - 9) We enter the desired number of continuous attempts to close the doors before the controller decides not to try closing the doors for another 5 minutes. The counter is activated with obstruction. D6 EXTENDED DOOR CLOS. TIME Α (0 – 3 sec) The time that the door closing command stays active after the door has closed. D7 DELAY ON OPEN DOORΣφάλμα! Δεν έχει οριστεί σελιδοδείκτης. Α (0 - 3 sec) D8 PRE-OPENING ACTIVE (Y - N) NO: Inactive YES: Active D9 DOOR Α CLOS. ON FLOOR ‘0’ Opens Normally («1») Will not open at the specific floor («0») D10 DOOR Α CLOS. ON FLOOR ‘1’ Opens Normally («1») Will not open at the specific floor («0») D11 DOOR Α CLOS. ON FLOOR ‘2’ Opens Normally («1») Will not open at the specific floor («0») D12 DOOR Α CLOS. ON FLOOR ‘3’ Opens Normally («1») Will not open at the specific floor («0») D13 DOOR Α CLOS. ON FLOOR ‘4’ Opens Normally («1») Will not open at the specific floor («0») D14 DOOR Α CLOS. ON FLOOR ‘5’ Opens Normally («1») Will not open at the specific floor («0») D15 DOOR Α CLOS. ON FLOOR ‘6’ Opens Normally («1») Will not open at the specific floor («0») D16 DOOR Α CLOS. ON FLOOR ‘7’ Opens Normally («1») Will not open at the specific floor («0») D17 DOOR Α CLOS. ON FLOOR ‘8’ Opens Normally («1») Will not open at the specific floor («0») D18 DOOR Α CLOS. ON FLOOR ‘9’ Opens Normally («1») Will not open at the specific floor («0») D19 DOOR Α CLOS. ON FLOOR ‘10’ Opens Normally («1») Will not open at the specific floor («0») D20 DOOR Α CLOS. ON FLOOR ‘11’ Opens Normally («1») Will not open at the specific floor («0») D21 DOOR Α CLOS. ON FLOOR ‘12’ Opens Normally («1») Will not open at the specific floor («0») D22 DOORΣφάλμα! Δεν έχει οριστεί σελιδοδείκτης. Α CLOS. ON FLOOR ‘13’ Opens Normally («1») Will not open at the specific floor («0») D23 DOOR Α CLOS. ON FLOOR ‘14’ Opens Normally («1») Will not open at the specific floor («0») D24 DOOR Α CLOS. ON FLOOR ‘15’ Opens Normally («1») Will not open at the specific floor («0») D25 DOOR TYPE B (0-1) 0: NO Door (*FW) 1: Semiautomatic (Bus) (*FW) 2: Single signal with permanent closing command (*FW) 3: Two signal (*FW) 4. Two signal with permanent closing command (*FW) 5. For Future Use (*FW) 6. Single signal with permanent opening command (*FW) D26 DOOR OPENING TIME Β (0-99 sec) Time at a station with doors open (*FW) D27 DOOR CLOSING TIME Β Time in which the door has to close so that no error occurs. (*FW) LAMDA ELECTRONICS S.A. The time that the door closing command is delayed right after a stop at a station. 35 INNOVATION THAT LIFTS YOU USER’S MANUAL (0 – 99sec) D28 NUMB. OF CLOS. RETRIES Β (2 - 9) We enter the desired number of continuous attempts to close the doors before the controller decides not to try closing the doors for another 10 minutes. (*FW). D29 TIME OP. DOOR B (-> REOPEN): (0 – 99sec) The Reopen command is given for the following reasons: 1: Photocell (*FW) 2: Obstruction (*FW) 3: Reopen (Car Button) (*FW) 4: A Car call or a Landing call is received for the station where the car is stopped. (*FW) D30 EXTENDED DOOR CLOS. TIME Β (0 – 3 sec) The time that the door closing command stays active after the door has closed. (*FW) The time that the door closing command is delayed right after a stop at a station. (*FW) D31 DELAY ON OPEN DOOR Β (0 - 3 sec) D32 PRE-OPENING ACTIVE (Y - N) NO: Inactive (*FW) YES: Active (*FW) D33 DOOR B CLOS. ON FLOOR ‘0’ Opens Normally («1») Will not open at the specific floor («0») D34 DOOR B CLOS. ON FLOOR ‘1’ Opens Normally («1») Will not open at the specific floor («0») D35 DOOR B CLOS. ON FLOOR ‘2’ Opens Normally («1») Will not open at the specific floor («0») D36 DOOR B CLOS. ON FLOOR ‘3’ Opens Normally («1») Will not open at the specific floor («0») D37 DOOR B CLOS. ON FLOOR ‘4’ Opens Normally («1») Will not open at the specific floor («0») D38 DOOR B CLOS. ON FLOOR ‘5’ Opens Normally («1») Will not open at the specific floor («0») D39 DOOR B CLOS. ON FLOOR ‘6’ Opens Normally («1») Will not open at the specific floor («0») D40 DOOR B CLOS. ON FLOOR ‘7’ Opens Normally («1») Will not open at the specific floor («0») D41 DOOR B CLOS. ON FLOOR ‘8’ Opens Normally («1») Will not open at the specific floor («0») D42 DOOR B CLOS. ON FLOOR ‘9’ Opens Normally («1») Will not open at the specific floor («0») D43 DOOR B CLOS. ON FLOOR ‘10’ Opens Normally («1») Will not open at the specific floor («0») D44 DOOR B CLOS. ON FLOOR ‘11’ Opens Normally («1») Will not open at the specific floor («0») D45 DOOR B CLOS. ON FLOOR ‘12’ Opens Normally («1») Will not open at the specific floor («0») D46 DOOR B CLOS. ON FLOOR ‘13’ Opens Normally («1») Will not open at the specific floor («0») D47 DOOR B CLOS. ON FLOOR ‘14’ Opens Normally («1») Will not open at the specific floor («0») D48 DOOR B CLOS. ON FLOOR ‘15’ Opens Normally («1») Will not open at the specific floor («0») Ι: I/O PARAMETERS I1 MAINTENANCE NC (Y - N) (69) LAMDA ELECTRONICS S.A. N:NO (48Vdc trigger) It will go into revision in we send 48VDC Y: NC (0Vdc trigger) It will go into revision in we send 0VDC (Maintenance Input – if activated the control panel enters into maintenance mode and motion can take place only from Car calls 0 και INNOVATION THAT LIFTS YOU 36 USER’S MANUAL 1– or from the programmable inputs 1 and 2 (*FW)) I2 OVERLOAD NC (Y - N) (53) N: NO – Open Contact (48Vdc trigger) Y: NC – Closed Contact (0Vdc trigger) If activated while not in motion it triggers the relay output OVERLOAD I3 FULL LOAD NC (Y - N) (54) N: NO – Open Contact (48Vdc trigger) Y: NC – Closed Contact (0Vdc trigger) If activated while not in motion it triggers the relay output OVERLOAD I4 HALF LOAD NC (ΝΑΙ - ΟΧΙ) (55) N: NO – Open Contact (48Vdc trigger) Y: NC – Closed Contact (0Vdc trigger) I5 VOLTAGE MONITORING (Y - N) (56) N: NO – Open Contact (48Vdc trigger) Y: NC – Closed Contact (0Vdc trigger) I6 REOPEN NC (Y - N) (57) N: NO – Open Contact (48Vdc trigger) Y: NC – Closed Contact (0Vdc trigger) I7 CLOSE DOORS NC (Y - N) (58) N: NO – Open Contact (48Vdc trigger) Y: NC – Closed Contact (0Vdc trigger) I8 PHOTOCELL Α NC (Y - N) (59) N: NO – Open Contact (48Vdc trigger) Y: NC – Closed Contact (0Vdc trigger) I9 OBSTRUCTION Α NC (Y - N) (99) N: NO – Open Contact (48Vdc trigger) Y: NC – Closed Contact (0Vdc trigger) I10 PRO_INP 1 NC (Y - N) (98) N: NO – Open Contact (48Vdc trigger) Y: NC – Closed Contact (0Vdc trigger) I11 PRO_INP 2 NC (Y - N) (97) N: NO – Open Contact (48Vdc trigger) Y: NC – Closed Contact (0Vdc trigger) I12 PRO_INP 3 NC (Y - N) (64) N: NO – Open Contact (48Vdc trigger) (*FW) Y: NC – Closed Contact (0Vdc trigger) (*FW) I13 FUNCTIONS PRO_INP 1 (0 – 9) 1: PHOTO B 3: S_PARK (When activated the PARK station changes) 5: (Reserved) 6: (Reserved) 7. (Reserved) 9: Shooting Bolts I14 FUNCTIONS PRO_INP 2 (0 – 8) 1: (Reserved) 2: (Reserved) 3: (Reserved) 4: (Reserved) 5: ( Reserved) 6: (Reserved) 7. Lock Lift 8. (Reserved) I15 FUNCTIONS PRO_INP 3 (0 – 7) 0: (Reserved) 1: (Reserved) 2: (Reserved) 3: Reserved) 4: (Reserved) 5: (Reserved) 6: ( Reserved) 7: ZONE B I16 INPUT FOR FIRE NC (Y - N) (68) N: NO – Open Contact (48Vdc trigger) Y: NC – Closed Contact (0Vdc trigger) I17 EXPRESS INP NC (Y - N) (67) N: NO – Open Contact (48Vdc trigger) Y: NC – Closed Contact (0Vdc trigger) LAMDA ELECTRONICS S.A. 37 INNOVATION THAT LIFTS YOU USER’S MANUAL 0: Door Commands 131 close / 132 open (Door B) 1: 131 open command / 132 close command for door announce (not serial) 2: RESERVED I18 FUNCTIONS PRO_OUT_ 1 (0 – 2) (131 - 132) I19 FUNCTIONS PRO_OUT_2 (0 – 2) (121) 0: ALARM FILTERING 1: ( Reserved) 2: ( Reserved) 3: ( Reserved) 4: ( Reserved) 5: ( Reserved) 6: STATION 5 7: ( Reserved) I20 FUNCTIONS PRO_OUT_3 (0 – 2) (104) I21 38 0: ( Reserved) 1: ( Reserved) 2: ( Reserved) 3: ( Reserved) 4: ( Reserved) 5: ( Reserved) 6: STATION 4 7: ( Reserved) N: NO – Open Contact Y: NC – Closed Contact LIGHT OUTPUT NC (Y - N) (420) C: COUNTING SYSTEM C1 COUNTING SYSTEM (0 – 1) 0: OTINOR (*FW) 1: LAMDA C2 SHORT FLOOR 1 (*FW) C3 SHORT TYPE 1 (*FW) C4 SHORT FLOOR 2 (*FW) C5 SHORT TYPE 2 (*FW) C6 SHORT FLOOR 3 (*FW) C7 SHORT TYPE 4 (*FW) C8 SHORT FLOOR 5 (*FW) C9 SHORT TYPE 6 (*FW) C10 REVISION LIMITS 0: Stops at Pre-limits 1: Reaches the top and bottom stations S: SPECIAL FUNCTIONS S1 GROUP OPERATION (0-1) S2 ELEVATOR ID (0-7) S3 DUPLEX TIMER (SEC) (0 – 99 sec) LAMDA ELECTRONICS S.A. 0: SIMPLEX (*FW) 1: Group Operation (*FW) ELEVATOR ADDRESS (*FW) The time of call execution in group operation. If an elevator does not execute a call within time then a different elevator picks up the calls (*FW). INNOVATION THAT LIFTS YOU USER’S MANUAL S3 GSM ERROR TRANSMISSION VIA GSM (*FW) S4 VOICE S5 CAN S6 MODEM SERIAL VOICE ANNOUNCER 0 : Deactivation of serial announcer 1 : Activation of serial announcer MODULE CAN (*FW) TELEMETRY (*FW) V: EVENT RETRIEVE 39 The event retrieve menu option recalls from memory the most recent events. It can recall up to 16 events. E: ERROR RETRIEVE The error retrieve menu option recalls from memory the most recent errors. It can recall up to 91 errors. EEPROM READ Reads the stored parameters held in the EEPROM of the programmer. EEPROM WRITE Stores the parameters on the EEPROM of the programmer. SAVE TO CONTRLR Stores the parameter settings on the main board of the controller. It is necessary to be performed every time changes of the parameters are made. Χ: SUPERVISOR PARAMETERS Χ1 MAINTENANCE LIMITS (Y - N) N (Default): While in Maintenance we can move up to the final stations. Y: While in Maintenance we can move up to Pre-limits. Χ2 RESET STATION (Y - N) N (Default): Performs a reset at the bottom floor. (*FW) Y: Performs a reset at the top floor. (*FW) Χ3 NUMBER OF CONTINUOUS RESETS (2 - 9) If this many continuous RESETS occur then the elevator expects a call for a new RESET.(FW) Χ4 MAINT. DRIVE Κ1 – Κ2 – Κ3 (Y - N) Y: DOWN – UP – FAST N: Inactive Function Χ5 RESTART TIME AFTER A SF (0 – 10 sec) The minimum time required for restarting the car after an SF. Χ6 TIME FOR NEW RELEVELLING (0 – 10 sec) The minimum time required to start a new attempt for relevelling. Χ7 STOP DELAY (0 – 5 sec) Delay at station after a stop switch input becomes active. Χ8 DELAY ON CHANGE (0 – 5 sec) Delay at change of speed after a change of speed input becomes active. LAMDA ELECTRONICS S.A. INNOVATION THAT LIFTS YOU USER’S MANUAL X9 DEPARTURE TIME (0 – 3 sec) X10 IDLE TIME AFTER A STOP (0 – 99 sec) The maximum time that the carΣφάλμα! Δεν έχει οριστεί σελιδοδείκτης. remains idle after a stop. If after a stop the door opens or a call is given this timer becomes equal to timer T4. X11 UP PRE-LIMIT SWITCH NO (Y/N) (66) N: NC – Closed Contact Y: NO – Open Contact X12 DOWN PRE-LIM SWITCH NO (Y/N) (65) N: NC – Closed Contact Y: NO – Open Contact X13 ERROR REPEAT LOCKING PANEL: (1 – 9) X14 GONG OFF TIME (SEC) (0-5) The maximum time for departing from a station when no reason for delay is present. After an error in the traveling timer the control panel blocks. 1-9: Number of attempts before the control panel blocks.(FW) Delay time between 2 gongs when the 2 gong function is active. The indication (*FW) in the comments column of the parameters refers to Future Work. LAMDA ELECTRONICS S.A. INNOVATION THAT LIFTS YOU 40 USER’S MANUAL 4.6.2 Errors ERROR NAME CATEGORY Error 0 NORMAL OPERATION - 7-Seg DISPLAY POSSIBLE CAUSE – DESCRIPTION FLOOR There are no errors. ERRORS RELEVANT TO THE PARAMETERS 1 LIFT TYPE Α G1 G1 = 0 G2 = 1 With Inverter G2 = 3 Without Inverter 41 2 NUMB. OF SPEED Α G2 3 STATIONS SET Α G3 Wrong value in parameter «G6: Number of Stations» 2-5 for call collection with 2 buttons 2-8 for with 1 button 2-16 for APB Car and Landing calls 4 F.ALARM STATI Α G4 Wrong value in parameter «G15: FIRE ALARM STATIONΣφάλμα! Δεν έχει οριστεί σελιδοδείκτης.» Allowed values 0-Max. Number of Floors. 5 PARK STATION Α G5 Wrong value in parameter «G17:PARKING STATIONΣφάλμα! Δεν έχει οριστεί σελιδοδείκτης.» Allowed values 0-Max. Number of Floors. 6 SP.PARK STATI Α G6 Wrong value in parameter «G18:SPECIAL PARK STATIONΣφάλμα! Δεν έχει οριστεί σελιδοδείκτης.» Allowed values 0-Max. Number of Floors. 7 PRE-OPENING Α G7 Wrong value in parameter G5 (The relevelling G8 must be active) TIMER ERRORS 8 FAST SPEED TM Β T1 The Fast speed timer has elapsed (Performs as many resets as set with parameter X13 and then the control panel blocks) 9 SLOW SPEED TM Β T2 The Slow speed timer has elapsed (Performs as many resets as set with parameter X13 and then the control panel blocks) 10 MAINTENANCE T - Τ3 The Maintenance timer has elapsed (The elevator stops for 30 sec and then restarts operation) 11 RELEVELLING T B T5 The Relevelling timer has elapsed (Performs as many resets as set with parameter X13 and then the control panel blocks) 12 CAM DL TIMER C T6 Timer has elapsed 13 CLOS. TIME D-A C T7 Timer has elapsed 14 CLOS. TIME D-B C T8 (*FW) FLOOR SELECTOR / COUNTING SYSTEM 16 PRE-TERM. OPEN 17 COUNTING UP 18 COUNTING DOWN 19 STP SWITCH UP Reset Reset Reset H1 Both Pre-limits open H2 Missing counting during the upward motion (Floor Selector) H3 Missing counting during the downward motion (Floor Selector) H4 No signal from the magnetic switch. (Magnetic switch fault or bad connection or wrong placement of the magnet) Reset LAMDA ELECTRONICS S.A. INNOVATION THAT LIFTS YOU USER’S MANUAL Reset 20 STP SWITCH DN 21 ZONE SWITCH Α 22 ZONE SWITCH Β 23 NO ZONE 24 WRONG ZONE 25 OSCILLATION 26 RELEV. NO ZONE Reset Reset Reset Reset Reset Reset H5 No signal from the magnetic switch. (Magnetic switch fault or bad connection or wrong placement of the magnet) H6 During Landing or Relevelling there is no signal is ZONE switch A H7 During Landing or Relevelling there is no signal is ZONE switch B H8 During Landing or Relevelling there is no signal from the SF H9 Signal from the SF at a position that is not expected (*FW) Error in pre-open. HΒ Oscillation around the position of the station during relevelling. HC During relevelling the car got out of the zone. SAFETY CIRCUIT 27 UP TERMINAL A Α1 Up PRE-LIMIT has been reached. 28 DOWN TERMINAL A Α2 Down PRE-LIMIT has been reached. 29 STOP ENG. ROOM - Α3 A STOP has occurred during motion. The car stops and restarts after as much time as set at parameter X10 has passed. 30 STOP WELL - Α4 A STOP has occurred during motion. The car stops and restarts after as much time as set at parameter X10 has passed. 32 CAR STOP - Α5 A STOP has occurred during motion. The car stops and restarts after as much time as set at parameter X10 has passed. 33 STATION CONTA - Α6 A contact has failed during motion. The car stops and restarts after as much time as set at parameter X5 has passed. 34 CAR CONTACTS - Α7/UD A contact has failed during motion. The car stops and restarts after as much time as set at parameter X5 has passed / the counter D5 has been expired. 35 LOCKS - Α8 A contact has failed during motion. The car stops and restarts after as much time as set at parameter X5 has passed. 36 LOCKS STUCK A Α9 Without any input from the CAM the locks are closed. FUNCTIONS 37 ELEMENT CHECK C F1 Element Check circuit interrupted. 38 POWER RELAY C F2 The Power Relay did not open at stopping. Or it did not close after a command (Used in VVVF) 39 BREAK RELAY C F3 The Break Relay did not open at stopping. Or it did not close after a command (Used in VVVF) 40 MOTOR THERMIS C F4 Motor overheating 41 OIL THERMISTO C F5 Oil overheating (Hydraulic Elevator) 42 AMBIENT TEMP C F6 Car overheating 43 INVERTER ERR C F7 Error Input (INVERTER). (*FW) 44 MAX. NUMB. LINK Α F8 Elevator Lock (*FW) 45 VOLT. MONITOR C F9 Power Outage 46 OVERLOAD C F10 Overload Input 47 PHOTOCELL Α C F11 Activated for 2min continuously (override) 48 PHOTOCELL Β C F12 Activated for 2min continuously (override) (*FW) MEMORY 49 PARAMETER LAMDA ELECTRONICS S.A. Β E1 Distortion of Parameter Data (*FW) INNOVATION THAT LIFTS YOU 42 USER’S MANUAL DAT 50 51 ERROR DATA MEMORY ERROR Β E2 Distortion of Error Data (*FW) Β E3 Will not store parameters in memory (*FW) Α: Blocks the Control Panel Β: Programmable depending on the Block State C: Does not Block and continues operation as soon as the error is removed. 4.7 Operation Systems 43 01: SIMPLE In this system, calls are performed the way they did in the early versions of elevators that had no memory chips (ONE call is executed each time) 02: AUTOMATIC PUSH BUTTON CONTROL (APB) In this system the landing and car calls are uniform and are executed depending on the direction of the car motion. In simple terms all calls are considered as car calls and are executed as the car passes from the relevant floors. Example: The car is at the ground floor and the controller receives a call from the 5th floor. The car moves upwards. During its motion and before it reaches the 3rd floor someone calls it from the 3rd floor. The car will perform a stop at the 3rd floor and then will continue its motion towards the target floor which remains the 5th floor. 03: DOWN COLLECTIVE (DCS) In this system landing calls and car calls are considered to be different. Car calls have a priority in execution and landing calls are executed during the downward motion of the elevator. The change to the direction of the elevator happens when there are no more car calls to be executed in the current direction. This means that the elevator moving upwards will execute all of its car calls in series. When they are all executed it will check if there are any other calls in the same direction and it will execute them as well. If there are no other calls in the same direction it will start its downward motion and execute all its car and landing calls in series. The aim of this call system is to serve faster the car in its upward motion. Generally, it is used in residential buildings where landing calls are mostly demanding the move of the elevator to the ground floor. Examples: 1. The car is at the ground floor and the controller receives a landing call from the 5th floor. The car starts moving upwards. During its motion and BEFORE the car reaches the 3rd floor someone pushes the call button from the 3rd floor. The car will NOT stop at the 3rd floor but only during its downward motion. This means that once it reaches its target floor (5th floor) and the user inside the car chooses to travel to the ground floor the car will stop at the 3rd floor during its downward motion. 2. The car is at the 5th floor and it receives a landing call from the ground floor. The elevator starts moving downwards. During its motion and BEFORE the car reaches the 3rd floor someone presses the call button at the 3rd floor. In this case the car will stop at the 3rd floor and then continue its motion towards the target floor (ground floor). LAMDA ELECTRONICS S.A. INNOVATION THAT LIFTS YOU USER’S MANUAL 04: FULL COLLECTIVE (FCS) This system requires separate calls for the car and separate calls for the floors as well as the intention for upward motion, and separate landing calls with the intention for downward motion. This system finds applications in office buildings where people are moving in both directions. In this system landing calls are recognized (upward or downward motion) and executed with the same priority as car calls in the same direction. When there no car or landing calls in the current direction the calls made in the opposite directions are being executed while maintaining the motion of the elevator. For example, if during the change of speed for stopping at the 3rd floor there are no car calls for upper floors or there are no landing calls for floors higher than the 3rd floor then the controller considers whether there are car calls for the 4th or upper floors. In case that there are more than two such calls for downward motion, the higher one is being executed and thereafter we have a change in direction. If the car is in a downward motion the exact opposite procedure is being followed. 05: UP COLLECTIVE (UCS) This system operates with the exact opposite logic as in the down collective system. Meaning that all car calls are being executed during the downward motion and landing calls are being executed during the upward motion. This system finds applications in underground parking lots and generally when there are many basements. LAMDA ELECTRONICS S.A. INNOVATION THAT LIFTS YOU 44 USER’S MANUAL 5 CONTROL CABINET INSTALLATION 5.1 Tools to be used during installation The necessary tools for the control cabinet installation Diomedes MR V1.0 are the following: Screwdrivers: 45 • • • Slotted n. 3.5 x 75 (0.1378 in x 2.9528in) Slotted n. 5.5 x 100 (0.2165 x 3.937 in) Phillips PH1 – PH3 depending on the wattage of the lift motor Power Drill: • Power drill with a 10 mm drill (0.3937 in) Clamp: LAMDA ELECTRONICS S.A. INNOVATION THAT LIFTS YOU USER’S MANUAL 5.2 Control Cabinet casing The casing dimensions can be seen in figure 5-1. As it appears in the figure we have accounted space for a Fan (picture 5-1) and an air filter (picture 5-2). The Fan works along with the cabin lights and is necessary for the reduction of the heat produced inside the control cabinet. The air filter is used to block dust from entering the casing. On the front of the case one can notice a STOP button as well as a “CABIN AT STATION” LED Indicator (picture 5-3). All control cabinets are equipped with a fluorescent bulb light with local switch. 46 LAMDA ELECTRONICS S.A. INNOVATION THAT LIFTS YOU USER’S MANUAL Figure 5-1 Casing Dimensions 47 Picture 5-1 Fan Picture 5-2 Air Filter Picture 5-3 Emergency STOP - “CABIN AT STATION” LED Indicator LAMDA ELECTRONICS S.A. INNOVATION THAT LIFTS YOU USER’S MANUAL 5.3 Control Cabinet’s Terminal Blocks The terminal blocks of the control cabinet are being described in the following tables. Each terminal block has its own label starting with the letter X and each of its outputs has its own label depending on its control operation. Our terminal blocks have been designed in order to make the installer’s work easier. Terminal block X1 is related to the machine room connections. Terminal blocks X2, X3, X4, X5, X6, are related to the cabin wiring (trailing cables) while terminal blocks X7 and X8 are associated with the shaft wiring (LOOM). We also offer the option for shaft lighting to either use a push button and a latch relay or a switch with allé retour connection, on terminal block X13. TERMINAL BLOCK Χ1 LAMDA ELECTRONICS S.A. V.V.V.F. 2 SPEED TRACTION HYDRAULIC DESCRIPTION R R R PHASE R S S S PHASE S T T T PHASE T N N N PHASE N SU - SU NU - NU S - S N - N U U1 U1 V V1 V1 W W1 W1 - U2 U2 - V2 V2 UPS OUTPUT UPS INPUT MOTOR - W2 W2 U1 U1 U1 U2 U2 U2 B+ B+ - B- B- - BRAKE - B1 - - V.V.V.F. RESISTOR B2 - - V.V.V.F. RESISTOR - - SL2 - - SL3 LOW PRESSURE SWITCH - - EV+ EMERGENCY VALVE - - EV- - - VSU UP DIRECTION VALVE SLOW SPEED - - VFU UP DIRECTION VALVE FAST SPEED - - VSD DOWN DIRECTION VALVE SLOW SPEED - - VFD DOWN DIRECTION VALVE FAST SPEED - - +48 OVERLOAD - - 53 - - H1 BRAKE + OIL THERMISTOR INNOVATION THAT LIFTS YOU 48 USER’S MANUAL - - H2 Table 5-1 Χ1 Terminal Block Description TERMINAL BLOCK X2 V.V.V.F. 2 SPEED TRACTION HYDRAULIC DESCRIPTION +24 +24 +24 -24 -24 -24 COP POWER SUPPLY 105 105 105 106 106 106 UP ARROW A A A INDICATION Α DOWN ARROW B B B INDICATION Β C C C INDICATION C SL4 SL4 SL4 CAR STOP SL5 SL5 SL5 SL6 SL6 SL6 SL7 SL7 SL7 53 53 53 +48 +48 +48 GND GND GND CAR DOOR OVERLOAD GROUND Table 5-2 Χ2 Terminal Block Description TERMINAL BLOCK Χ3 V.V.V.F. 2 SPEED TRACTION HYDRAULIC DESCRIPTION ΖΑ ΖΑ ΖΑ ZONE Α ΖΑC ΖΑC ΖΑC COMMON ZONE Α ΖΒ ΖΒ ΖΒ ZONE Β ΖΒC ΖΒC ΖΒC COMMON ZONE Β SU SU SU STATION UP SD SD SD STATION DOWN CS CS CS STATION COMMON PU PU PU PRE – LIMIT UP PD PD PD PRE – LIMIT DOWN +48 +48 +48 PRE-LIMIT COMMON Table 5-3 Χ3 Terminal Block Description TERMINAL BLOCK V.V.V.F. 2 SPEED TRACTION HYDRAULIC DESCRIPTION X4 C1 C1 C1 CAR CALL 1 C2 C2 C2 CAR CALL 2 C3 C3 C3 CAR CALL 3 C4 C4 C4 CAR CALL 4 C5 C5 C5 CAR CALL 5 C6 C6 C6 CAR CALL 6 C7 C7 C7 CAR CALL 7 C8 C8 C8 CAR CALL 8 LAMDA ELECTRONICS S.A. INNOVATION THAT LIFTS YOU 49 USER’S MANUAL COM COM COM CAR CALL COMMON Table 5-4 Χ4 Terminal Block Description TERMINAL BLOCK X5 V.V.V.F. 2 SPEED TRACTION HYDRAULIC DESCRIPTION +12 +12 +12 +12 VDC -12 -12 -12 -12 VDC VL VL VL EMERGENCY LIGHTS LV LV LV TEMPORARY CAR LIGHTS LCL LCL LCL PERMANENT CAR LIGHTS NL NL NL CAR LIGHTS NEUTRAL 122 122 122 OVERLOAD INDICATION 107 107 107 GONG -24 -24 -24 - 24 VDC V01 V01 V01 SPEAKER V02 V02 V02 SPEAKER 121 121 121 ALARM FILTERING TF1 TF1 TF1 TELEPHONE LINE TF2 TF2 TF2 TELEPHONE LINE GND GND GND GROUND Table 5-5 Χ5 Terminal Block Description TERMINAL BLOCK V.V.V.F. 2 SPEED TRACTION HYDRAULIC DESCRIPTION X6 69C 69C 69C REVISION / NORMAL 70 70 70 INSPECTION UP SIGNAL 71 71 71 INSPECTION DOWN SIGNAL ND ND ND DOOR NEUTRAL LAMDA ELECTRONICS S.A. LD LD LD DOOR LINE COM COM COM DOOR SIGNAL COMMON 1 CLS CLS CLS DOOR CLOSE SIGNAL 1 OPN OPN OPN DOOR OPEN SIGNAL 1 MA+ MA+ MA+ CAM 1 (+) MA- MA- MA- CAM 1 (-) 99 99 99 DOOR OBSTRUCTION 1 +48 +48 +48 +48 VDC 59 59 59 PHOTOCELL 58 58 58 DOOR CLOSE BUTTON 57 57 57 DOOR OPEN BUTTON COM2 COM2 COM2 DOOR SIGNAL COMMON 2 INNOVATION THAT LIFTS YOU 50 USER’S MANUAL CLS2 CLS2 CLS2 DOOR CLOSE SIGNAL 2 OPN2 OPN2 OPN2 DOOR OPEN SIGNAL 2 MB+ MB+ MB+ CAM 2 (+) MB- MB- MB- CAM 2 (-) 98 98 98 DOOR OBSTRUCTION 2 +48 +48 +48 +48 VDC - - - GND GND GND GROUND Table 5-6 Χ6 Terminal Block Description 51 TERMINAL BLOCK X7 V.V.V.F. 2 SPEED TRACTION HYDRAULIC DESCRIPTION L1 L1 L1 LANDING CALL 1 L2 L2 L2 LANDING CALL 2 L3 L3 L3 LANDING CALL 3 L4 L4 L4 LANDING CALL 4 L5 L5 L5 LANDING CALL 5 L6 L6 L6 LANDING CALL 6 L7 L7 L7 LANDING CALL 7 L8 L8 L8 LANDING CALL 8 COM COM COM LANDING CALL COMMON Table 5-7 Χ7 Terminal Block Description TERMINAL BLOCK V.V.V.F. 2 SPEED TRACTION HYDRAULIC DESCRIPTION Χ8 105 105 105 DOWN ARROW 106 106 106 UP ARROW Α Α Α INDICATION Α Β Β Β INDICATION Β C C C INDICATION C 53 53 53 OVERLOAD +48 +48 +48 +48 VDC +24 +24 +24 +24 VDC -24 -24 -24 - 24 VDC SL0 SL0 SL0 SL1 SL1 SL1 SL2 SL2 SL2 SL3 SL3 SL3 SL4 SL4 SL4 SL5 SL5 SL5 LAMDA ELECTRONICS S.A. FINAL SWITCH UP FINAL SWITCH DOWN SHAFT STOP INNOVATION THAT LIFTS YOU USER’S MANUAL SL6 SL6 SL6 SL7 SL7 SL7 SL8 SL8 SL8 GND GND GND MANUAL LANDING DOOR CONTACT LOCKS GROUND Table 5-8 Χ8 Terminal Block Description TERMINAL BLOCK X13 V.V.V.F. 2 SPEED TRACTION HYDRAULIC DESCRIPTION LSL LSL LSL SHAFT LIGHTS 220VAC NSL NSL NSL SHAFT NEUTRAL LIGHTS SLB SLB SLB SHAFT LATCH BUTTON LIGHTS RELAY SLB SLB SLB SHAFT LATCH BUTTON LIGHTS RELAY Table 5-9 Χ13 Terminal Block Description 5.4 Cable Color Coding The coding of the cables has been done according to the I.E.C. (International Electrotechnical Commission) directive and is shown in the table below. COLOR SYMBOL VOLTAGE OPERATION RED RD 220 VAC, +48 VDC, 38 VAC PHASE R, SAFETY CIRCUIT +48VDC BROWN BN 220 VAC PHASE S BLACK BK 220 VAC, PHASE T BLUE BU ΟΥΔΕΤΕΡΟΣ NEUTRAL PINK PK 12 VDC 12 VDC, BATTERY GREY GY – 12 VDC, -24 VDC, -48 VDC, -110 VDC - YELLOW YE -24 VDC CAR CALLS PURPLE VT +110 VDC, ΣΗΜΑΤΑ V.V.V.F V.V.V.F SIGNALS WHITE WH 12VACN, 20VACN, 38 VACN - ORANGE OG 20VAC, 24 VDC, POWER SUPPLY 20VAC, 24 VDC GREEN GN -24 VDC FLOOR CALLS YELLOW - GREEN GNYE GROUND GROUND Table 5-10 Color Coding LAMDA ELECTRONICS S.A. INNOVATION THAT LIFTS YOU 52 USER’S MANUAL 5.5 Component naming legend The naming of the components has been done according to I.E.C. (International Electrotechnical Commission) directive and is as follows: C D F G Η J Κ L Μ P Q R S Τ Χ Υ Capacitors Diodes Fuses, Thermo magnetic switches, Thermal switches Generators, Batteries Optical and Audio Indicators Connectors Power relays Coils Motors, Fans Power sockets Quadruple circuit-breaker, circuit-breaker Relays, Resistors Sensors, switches Transformers Terminal Blocks brakes, electro valves, electromagnets NAME 53 DESCRIPTION Q1 Quadruple Circuit-Breaker Q2 Ground Fault Current circuit-breaker Q3 Transformer circuit-breaker Q4 Brake circuit-breaker Q5 Car Lights circuit breaker Q6 Shaft Lights circuit-breaker Q7 Power Socket circuit-breaker Q8 Doors circuit-breaker Q9 UPS circuit-breaker Q10 Oil Thermistor circuit-breaker K1 Motion Power Relay / Pump On Relay K2 Motion Power Relay / Delta Power Relay K3 Brake Power Relay / Star Power Relay KM Mains Supervisor Relay PSP Phase Sequence Relay T1 Transformer LRSB Lamda Relay System Base Module LRSH Lamda Relay System Hydraulic Module L-CM1 Cam Drive Module L-DR1 Automatic Door Drive Module L-RK 1 Shaft Lights Latch Relay Module BRAKE RELEASE MODULE Brake Release Module, Safety Gear Short Circuit Button and Overspeed Governor Testing PHOENIX Lamda Lift Controller LAMDA ELECTRONICS S.A. INNOVATION THAT LIFTS YOU USER’S MANUAL YASKAWA L1000 V.V.V.F. CARLO CAVAZZI MODULE Relevelling Module M7 Fan H3 Control Cabinet Light P1 Power socket F Thermal Relay Χ Terminal Blocks Table 5-11 Component Naming 54 5.6 Connecting the Control Cabinet Step 1: Connect to the mains, all three phases, neutral and ground (Figure 5-1). If there is no neutral then you should short the connection with the ground. Open the switch Q1 and check whether the sequence of the phases is correct on the phase sequence relay (PSP). In order for the phase sequence to be correct both LEDS should be turned on, on the PSP. If it seems to be incorrect then change the connection between two phases. At DIN rail terminals R and N you should connect the single phase supply for the lighting. When using a UPS (Universal Power Supply) device which is required in the case of a V.V.V.F. control cabinet for cabin and door rescue and in the case of a Hydraulic control cabinet for automatic door rescue, you should perform the following connections. Connect the UPS inputs to DIN rail terminals N and S, and connect the UPS outputs at DIN rail terminals NU and SU. Step 2: Connect the Motor. If the motor is installed along with a V.V.V.F. then you should follow the connection scheme shown in figure 5-1. At DIN rail terminals U, V, W, we connect the motor. At terminals Θ1 and Θ2 we connect the motor thermistor. At terminals B+ and Β- we connect the motor brake and finally at terminals Β1 and Β2 we connect the V.V.V.F. resistor. LAMDA ELECTRONICS S.A. INNOVATION THAT LIFTS YOU VVVF GND 8 9 USER’S MANUAL Project THREE PHASE POWER SUPPLY Page Page Ed. 0 1 2 3 Date È MOTOR S R M 3~ 4 UPS R 5 Q1 S T T 6 N N GND 7 55 Figure 5-2 Terminal Block Χ1 Connections for V.V.V.F. Lift Control Cabinet LAMDA ELECTRONICS S.A. INNOVATION THAT LIFTS YOU USER’S MANUAL In case the motor is installed on a Hydraulic lift, we have two discrete cases. Case 1: Delta Drive. In this case the motor is connected as shown in figure 5-3. At terminals U, V, W we connect the motor while at terminals Θ1 and Θ2 the motor thermistor. Case 2: Star-Delta Drive. In this case the motor is connected as shown in figure 5-4. At terminals U1, V1, W1, of Terminal Block X1 we connect the respective U1, V1, W1, terminals of the motor while at terminals U2, V2, W2, of Terminal Block X1 we connect the respective U2, V2, W2, terminals of the motor. The motor thermistor is connected at terminals Θ1 and Θ2. Then, we must connect the valves. Follow the directions of either figure 5-3 or figure 5-4 for the connection of the valves. At terminals H1 and Η2 connect the oil thermistor. If the motor is of a traction 2-Speed lift then make connections as shown in figure 5-5. At terminals U1, V1, W1, of Terminal Block X1 we connect the respective U1, V1, W1, terminals of the motor του κινητήρα while at terminals U2, V2, W2, of Terminal Block X1 we connect the respective U2, V2, W2, terminals of the motor. The motor thermistor is connected at terminals Θ1 and Θ2. At terminals B+ and Β- you connect the motor’s brake. LAMDA ELECTRONICS S.A. INNOVATION THAT LIFTS YOU 56 GND THREE PHASE POWER SUPPLY GND S 57 MOTOR 14 Page Page Ed. 12 0 1 2 11 3 Date P 4 13 Project È 5 M 3~ UPS 6 R R Q1 S 7 T T N N 8 9 USER’S MANUAL Figure 5-3 Terminal Block Χ1 Connections for Hydraulic Lift Control Cabinet Δ LAMDA ELECTRONICS S.A. INNOVATION THAT LIFTS YOU USER’S MANUAL GND THREE PHASE POWER SUPPLY GND N T S R UPS M 3~ 6 58 MOTOR N R Q1 7 S 8 T 9 14 Page Page Ed. 12 0 1 2 11 3 Date P 4 13 Project 5 È Figure 5-4 Terminal Block Χ1 Connections for Hydraulic Lift Control Cabinet Υ – Δ LAMDA ELECTRONICS S.A. INNOVATION THAT LIFTS YOU GND 8 9 USER’S MANUAL Project M 3~ MOTOR THREE PHASE POWER SUPPLY S R R 5 Q1 S T T 6 N N GND 7 59 Page Page Ed. 0 1 2 X1 3 Date 4 È Figure 5-5 Terminal Block Χ1 Connections for Traction 2-Speed Lift Control Cabinet LAMDA ELECTRONICS S.A. INNOVATION THAT LIFTS YOU USER’S MANUAL Step 3: Enter Inspection mode. The switch on the LRS-B (picture 5-4) should be turned on the REVISION position. By pressing COM and UP buttons we perform upward revision. By pressing COM and DOWN buttons we perform downward revision. At this stage we check the turning direction of the motor and its correct connections. If the turning direction is not the desired one then we change the connection between two phases. 60 Picture 5-4 L.R.S.B – 1 Step 4: Connect the magnetic switches and the maintenance box. At this stage you should also connect the car emergency stop. The proper connection set is shown in figure 5.9. LAMDA ELECTRONICS S.A. INNOVATION THAT LIFTS YOU 13 14 14 14 13 13 14 14 13 13 14 8 13 9 USER’S MANUAL 12 14 13 14 ZA ZB Page Page Ed. 99 70 71 SU SD CS PU PD 24P 10P 2 3 Date 14 13 4 Project 14 5 13 13 6 P 11 7 61 + 48 VDC + 48 VDC X6 X3 0 + 48 VDC 5 1 5 Figure 5-6 Terminal Block Χ3 and X6 Connections While performing the revision process we could install the floor selector. The correct positioning of the magnets is shown in the figure below. LAMDA ELECTRONICS S.A. INNOVATION THAT LIFTS YOU USER’S MANUAL HYDRAULIC LIFT CASE USING RECTANGULAR BISTABLE PU ZA SD SU ZB PD ZA: MAGNETIC SWITCH Ν.Ο. FOR ZONE Α ΖΒ: MAGNETIC SWITCH Ν.Ο. FOR ZONE Β SU: MAGNETIC SWITCH Ν.Ο FOR STATION IN UPWARD DIRECTION - CHANGE SPEED IN UPWARD DIRECTION SD: MAGNETIC SWITCH Ν.Ο FOR STATION IN DOWNWARD DIRECTION - CHANGE SPEED IN DOWNWARD DIRECTION PU: RECTANGULAR BISTABLE MAGNETIC SWITCH FOR PRE - LIMIT UP PD: RECTANGULAR BISTABLE MAGNETIC SWITCH FOR PRE - LIMIT DOWN 62 LAST FLOOR PLASTOFERRITE 20 CM FOR SPEED CHANGE ROUND MAGNET BLACK SIDE n INTERMEDIATE FLOOR n ATTENTION!!!! NEVER PLACE THE MAGNETS THIS WAY ROUND MAGNET WHITE SIDE PLASTOFERRITE 20 CM FOR STATION GROUND FLOOR SPEED 0.3 m/Sec n= 0.3 m SPEED 0.6 m/Sec n= 0.7 m SPEED 1.2 m/Sec n= 1.5 m SPEED 1.6 m/Sec n= 2.1 m Figure 5-7 Hydraulic Lift Floor Selector LAMDA ELECTRONICS S.A. INNOVATION THAT LIFTS YOU USER’S MANUAL TRACTION LIFT CASE USING RECTANGULAR BISTABLE PU SU SD PD SU: MAGNETIC SWITCH Ν.Ο FOR STATION IN UP DIRECTION - CHANGE SPEED IN UP DIRECTION SD: MAGNETIC SWITCH Ν.Ο FOR STATION IN DOWN DIRECTION - CHANGE SPEED IN DOWN DIRECTION PU: RECTANGULAR BISTABLE MAGNETIC SWITCH FOR PRE - LIMIT UP PD: RECTANGULAR BISTABLE MAGNETIC SWITCH FOR PRE - LIMIT DOWN LAST FLOOR 63 MAGNET 20 CM FOR SPEED CHANGE ROUND MAGNET BLACK SIDE n INTERMEDIATE FLOOR n ATTENTION!!!! NEVER PLACE THE MAGNETS THIS WAY ROUND MAGNET WHITE SIDE MAGNET 20 CM FOR STATION GROUND FLOOR SPEED 0.3 m/Sec n= 0.3 m SPEED 0.6 m/Sec n= 0.7 m SPEED 1.2 m/Sec n= 1.5 m SPEED 1.6 m/Sec n= 2.1 m Figure 5-8 Traction Lift Floor Selector LAMDA ELECTRONICS S.A. INNOVATION THAT LIFTS YOU USER’S MANUAL HYDRAULIC LIFT CASE USING PENCIL BISTABLE PU:PENCIL BISTABLE MAGNETIC SWITCH FOR PRE - LIMIT UP PU PD PD:PENCIL BISTABLE MAGNETIC SWITCH FOR PRE - LIMIT DOWN ATTENTION!!! PLACE THE TWO MAGNETS AS FOLLOWS THE FIRST MAGNET SHOULD BE PLACED YELLOW SIDE UP AND THE SECOND ONE BLACK SIDE UP ZA SD SU ZB ZA: MAGNETIC SWITCH Ν.Ο. FOR ZONE Α ΖΒ: MAGNETIC SWITCH Ν.Ο. FOR ZONE Β SU: MAGNETIC SWITCH Ν.Ο FOR STATION IN UPWARD DIRECTION - CHANGE SPEED IN UPWARD DIRECTION SD: MAGNETIC SWITCH Ν.Ο FOR STATION IN DOWNWARD DIRECTION - CHANGE SPEED IN DOWNWARD DIRECTION LAST FLOOR MAGNET 20 CM FOR SPEED CHANGE MAGNET YELLOW SIDE 64 MAGNET BLACK SIDE n INTERMEDIATE FLOOR n ATTENTION!!!! NEVER PLACE THE MAGNETS THIS WAY ATTENTION!!! PLACE THE TWO MAGNETS AS FOLLOWS THE FIRST MAGNET SHOULD BE PLACED YELLOW SIDE UP AND THE SECOND ONE BLACK SIDE UP MAGNET YELLOW SIDE MAGNET 20 CM FOR STATION MAGNET BLACK SIDE GROUND FLOOR SPEED 0.3 m/Sec n= 0.3 m SPEED 0.6 m/Sec n= 0.7 m SPEED 1.2 m/Sec n= 1.5 m SPEED 1.6 m/Sec n= 2.1 m Figure 5-9 Hydraulic Lift Floor Selector using pencil bistable LAMDA ELECTRONICS S.A. INNOVATION THAT LIFTS YOU USER’S MANUAL TRACTION LIFT CASE USING PENCIL BISTABLE PU:PENCIL BISTABLE MAGNETIC SWITCH FOR PRE - LIMIT UP PU SU PD SD SU: MAGNETIC SWITCH Ν.Ο FOR STATION IN UPWARD DIRECTION - CHANGE SPEED IN UPWARD DIRECTION SD: MAGNETIC SWITCH Ν.Ο FOR STATION IN DOWNWARD DIRECTION - CHANGE SPEED IN DOWNWARD DIRECTION PD:PENCIL BISTABLE MAGNETIC SWITCH FOR PRE - LIMIT DOWN ATTENTION!!! PLACE THE TWO MAGNETS AS FOLLOWS THE FIRST MAGNET SHOULD BE PLACED YELLOW SIDE UP AND THE SECOND ONE BLACK SIDE UP LAST FLOOR MAGNET 20 CM FOR SPEED CHANGE MAGNET YELLOW SIDE 65 MAGNET BLACK SIDE n INTERMEDIATE FLOOR n ATTENTION!!!! NEVER PLACE THE MAGNETS THIS WAY ATTENTION!!! PLACE THE TWO MAGNETS AS FOLLOWS THE FIRST MAGNET SHOULD BE PLACED YELLOW SIDE UP AND THE SECOND ONE BLACK SIDE UP MAGNET YELLOW SIDE MAGNET 20 CM FOR STATION MAGNET BLACK SIDE GROUND FLOOR SPEED 0.3 m/Sec n= 0.3 m SPEED 0.6 m/Sec n= 0.7 m SPEED 1.2 m/Sec n= 1.5 m SPEED 1.6 m/Sec n= 2.1 m Figure 5-10 Traction Lift Floor Selector using pencil bistable Step 5: Connect the safety circuit and the car doors. Connect the overload switch. Test the safety circuit connections. During inspection check the CAM and the door operation. If everything works well then turn the inspection switch on the car top control box to “OPERATION” also turn the switch on the LRS-B module (picture 5-4) to “NORMAL”. The car will move downwards (if it is above the pre-limit) and it will stop at the first floor. If the car is already at the first floor (and below the pre-limit) then it will move upwards and it will stop at the second floor. If there are automatic doors present then the control cabinet will first open and then will close the doors. If there are bus doors present then they will open and stay open. The above mentioned procedure is called RESET. LAMDA ELECTRONICS S.A. INNOVATION THAT LIFTS YOU USER’S MANUAL Step 6: Connect Car and Floor calls, indicators and the rest of the signals (lights, gong, 12 66 12 11 12 11 12 Page Page Ed. 12 C1 C2 C3 C4 C5 C6 C7 C8 2 3 11 Date 4 Project 5 6 7 11 8 11 9 emergency lights etc). Follow the instructions in figures 5-9, 5-10 και 5-11. + 48 VDC X2 X4 0 + 24 VDC - 24 VDC 5 1 5 Figure 5-11 Terminal Block Χ4 and X2 Connections LAMDA ELECTRONICS S.A. INNOVATION THAT LIFTS YOU 0 LAMDA ELECTRONICS S.A. + 48 VDC + 24 VDC - 24 VDC X8 5 5 X7 1 L1 L2 L3 L4 L5 L6 L7 L8 19P 10P 2 Date 11 Project 11 NOTE 1 Page Page Ed. 12 12 FOR AUTOMATIC DOOR CONNECT LANDING DOOR CONTACT TO SL7, SL8 12 6 12 5 11 4 11 3 7 12 11 NOTE 2 FOR AUTOMATIC DOOR CONNECT A JUMPER WIRE TO SL5, SL6 12 9 11 12 11 12 11 8 USER’S MANUAL 67 Figure 5-12 Terminal Block Χ7 and X8 Connections INNOVATION THAT LIFTS YOU 14 2 1 L2 3 2 2 3 L1 L N 8 PE 9 13 USER’S MANUAL 6P 7 L N 68 2 PE Page Page Ed. 14 14 Date 13 GROUND - 24 VDC 0 X5 5 + 12 VDC - 12 VDC 5 1 6P 15P 2 3 13 4 1 Project 5 6 5 Figure 5-13 Terminal Block Χ5 and X13 Connections LAMDA ELECTRONICS S.A. INNOVATION THAT LIFTS YOU USER’S MANUAL 5.7 Pre – wiring 5.7.1 Car pre – wiring The internal connections as well the signal connections are shown in wiring diagrams 5-14, 515, 5-16. The wiring diagram 5-14 refers to the case of using up to 2 bus doors. 69 Figure 5-14 Car pre – wiring up to 2 bus doors LAMDA ELECTRONICS S.A. INNOVATION THAT LIFTS YOU USER’S MANUAL The wiring diagram 5-15 refers to the case of using up to 2 automatic doors. 70 Figure 5-15 Car pre – wiring connection up to 2 automatic doors LAMDA ELECTRONICS S.A. INNOVATION THAT LIFTS YOU USER’S MANUAL The wiring diagram 5-16 presents the internal connections of the car top control box. 71 Figure 5-16 Car top control box internal wiring LAMDA ELECTRONICS S.A. INNOVATION THAT LIFTS YOU USER’S MANUAL 5.7.2 Shaft pre - wiring Diomedes is using dedicated pre-wired shaft units in order to fulfill the EN 81.1 – 2 norms. This pre – wiring technique allows the installer to finish the electrical installation quick and easy. During the installation the technician should follow the steps below. 1. Install plastic or metal trunk (ΕΝ 81.72) in the shaft. 2. Place the loom inside the trunk. From the one side of the loom there are three male terminal blocks. Connect the terminal to Χ7, Χ8 and Χ13 of the control cabinet. Tie the ends of the loom to the trunk. 3. Place all the shaft components into the shaft (final switches, lamps etc). Connect the components using the connectors provided by Lamda Electronics. Follow the below wiring diagrams according to your installation. Figure 5-17 Loom connections down collective – bus doors LAMDA ELECTRONICS S.A. INNOVATION THAT LIFTS YOU 72 USER’S MANUAL 73 Figure 5-18 Loom connections down collective – automatic doors LAMDA ELECTRONICS S.A. INNOVATION THAT LIFTS YOU USER’S MANUAL 74 Figure 5-19 Loom connections full collective selective – bus doors LAMDA ELECTRONICS S.A. INNOVATION THAT LIFTS YOU USER’S MANUAL 75 Figure 5-20 Loom connections full collective selective – automatic doors LAMDA ELECTRONICS S.A. INNOVATION THAT LIFTS YOU USER’S MANUAL The following table shows the description of each loom’s cable. TERMINAL CROSS SECTION CABLE NUMBER, CABLE COLOR DESCRIPTION L1 ή L1U 0.75 mm2 L2 ή L2D 1 , WHITE Call 1 ή Call up 1 2 2, WHITE Call 2 ή Call Down 2 2 0.75 mm L3 ή L2U 0.75 mm 3, WHITE Call 3 ή Call up 2 L4 ή L3D 0.75 mm2 4, WHITE Call 4 ή Call Down 3 L5 ή L3U 0.75 mm2 5, WHITE Call 5 ή Call up 3 L6 ή L4D 0.75 mm2 6, WHITE Call 6 ή Call Down 4 L7 ή L4U 0.75 mm2 7, WHITE Call 7 ή Call up 4 L8 ή L5D 0.75 mm2 8, WHITE Call 8 ή Call Down 5 L5U 0.75 mm2 9, WHITE Call up 5 2 10, WHITE Common for calls or Call Down 6 2 C0M ή L6D 0.75 mm 105 0.75 mm 11, WHITE Arrow Down 106 0.75 mm2 12, WHITE Arrow up 2 A 0.75 mm 13, WHITE Indication Α B 0.75 mm2 14, WHITE Indication Β 2 15, WHITE Indication C 2 C 0.75 mm 58 0.75 mm 16, WHITE Overload signal (MRL) +48 0.75 mm2 17, WHITE + 48VDC 2 18, WHITE +24VDC 2 +24 0.75 mm ‐24 0.75 mm 19, WHITE ‐24VDC SL0 0.75 mm2 20, WHITE Up final switch start SL1 0.75 mm2 21, WHITE Up final switch return/ Down final switch start SL2 0.75 mm2 22, WHITE Down final switch return 2 SL3 0.75 mm 23, WHITE Shaft stop start SL4 0.75 mm2 24, WHITE Shaft stop return SL5 0.75 mm2 25, WHITE Manual doors start / Short circuit in case of automatic doors SL6 0.75 mm2 26, WHITE Manual doors return / Short circuit in case of automatic doors SL7 0.75 mm2 27, WHITE Locks start / Landing automatic door SL8 0.75 mm2 28, WHITE Locks return / Landing automatic door LSL 1.5 mm2 BROWN L – Shaft lights 2 NSL 1.5 mm BLUE N – Shaft lights SLB 0.75 mm2 RED Lights button start SLB 0.75 mm2 GREEN Lights button return GND 0.75 mm2 GREEN ‐ YELLOW Ground Table 5-12 Loom description LAMDA ELECTRONICS S.A. INNOVATION THAT LIFTS YOU 76 USER’S MANUAL 6 TROUBLESHOOTING Follow the procedure below in order to check out for any faults that have occurred: 1. Look at the controller’s display for the errors occurred. Look for help in the troubleshooting tables and correct the problem. 2. Stop (switch off) the control cabinet’s operation and restart it after 30secs. 3. If the car cannot move, look in the menu in the “error retrieve” tab and find out the errors that exist. 4. Erase the errors in the “error retrieve” tab inside the menu (Look in the help menu for the programming). 5. There must be at least one error that holds the control cabinet at this stage. 6. If the error retrieve table is empty, then look at the “event retrieve” tab in the menu. 6.1 The lift doesn’t move in the Revision state. 1. Check the voltage at the power supply input terminals R, S, T and the neutral in the terminal block N (Picture 7.1) Picture 6-1 Electric Power Circuit 2. Check the Phase minder. Both LEDs should be on. (Picture 7.1). 3. Check the fuses (Picture 7.1) and the motor’s temperature (for a hydraulic lift). 4. Check the motor’s connections (Picture 7.1). LAMDA ELECTRONICS S.A. INNOVATION THAT LIFTS YOU 77 USER’S MANUAL 5. Check the voltages on the boards: 48V DC on the LRS electronic board. 24V DC at the led LED +24 on the LRS electronic board. 12 V DC at the LED +12 on the LRS electronic board. 5V DC at the LED +5 on the Phoenix electronic board (Picture7.3 red LED). 78 Picture 6-2 Power Supply 6. Check the safe brackets of the terminal blocks # 31, 32, 33, 34, 35, 36, 37, 38, (firstly look at the electronic board’s LEDs: # 31, 32, 33, 34, 35, 36, 37, 38 ). Measure also the voltage at the terminal block # 31, 32, 33, 34, 35, 36, 37, 38. The voltage should be between 40VDC and 50 VDC. The LEDs simply shows that voltage exists in each terminal. They can’t give a feedback if there is low voltage at the terminals! LAMDA ELECTRONICS S.A. INNOVATION THAT LIFTS YOU USER’S MANUAL 79 Picture 6-3 Safety Circuit 7. Check the pre-terminal switches at the PU and PD terminals (look at the LEDs “65”, “66” on the controller’s board). Measure also the voltage at the Επίσης PU and PD terminals. The voltage should be between 40VDC and 50 VDC. Look at Picture 7.3. 8. Check the LED’s state on the controller’s board: If the LEDs of the Rup relays (upgoing) and Rdwn relays (downgoing) are lit when you are trying to give motion to the car, it means that the controller is operating properly and the error is due to a problem in the Power Circuit. 6.2 The Lift does not move downwards while it is in the Revision Stage 1. Check the valve’s junctions. 2. Check the connections of the motion relays as well as the connections of the rest relays. 3. Check the limit switch at the bottom (PD terminal). 6.3 The Lift does not move upwards while it is in the Revision Stage 1. Check the valve’s junctions. LAMDA ELECTRONICS S.A. INNOVATION THAT LIFTS YOU USER’S MANUAL 2. Check the connections of the motion relays as well as the connections of the rest relays. 3. Check the limit switch at the bottom (PU terminal). 6.4 The Lift does not move while it is in the normal operation 1. Check the operation while the lift is in the Revision stage. The car should be able to move in both directions. 2. Check the operation of the car door. The door should be able to close (LED #39). Check what might keep the door open: • Terminal 99 Forcing • Terminal 59 Photo sensor’s signal • Terminal 57 Open door Button • Check if inputs 99, 59, are properly programmed (see chapter 4, paragraph 4.6 about the controller’s programming). 3. Check all parameters that do not allow the control cabinet to become operational: • Terminal 53 Overweight • Terminal 67 Express • Terminal 68 Fire alarm input • Check if inputs 53, 67, are properly programmed (see chapter 4, paragraph 4.6 about the controllerΣφάλμα! Δεν έχει οριστεί σελιδοδείκτης.’s programming). 4. Check the motor and the valves. 5. Check the motion relays 6. Observe the error on the controller’s display. Get a help from the Table of Errors and remove the error occurred. 6.5 The Lift does not stop at the station when we reset it 1. Check the ferromagnets at the station. (Terminals 61,62,63,64 on the controller and terminals ZA, ZB, SU, SD at the control cabinet’s terminal block). Check the voltage at these terminals. It should be between 40VDC and 50VDC. 2. Check the placement of the ferromagnets. 3. Observe the error on the controller’s display. Get a help from the Table of Errors and remove the error occurred. LAMDA ELECTRONICS S.A. INNOVATION THAT LIFTS YOU 80 USER’S MANUAL 6.6 The Lift stops at the station but it’s not operational for any further calls. 1. Check the COMPONENTS CHECK LED (terminal 50 on the controller). The LED SHOULD be lit when the car is at a station. 2. Check the POWER RELAYS CHECK LED (terminal 51 on the controller). The LED SHOULD be lit when the car is at a station.. 3. Check the FIRE ALARM input (terminal 68 on the controller). The LED SHOULD NOT be lit when the car is at a station. 4. Check the Re-Leveling electronic board, with the doors open, (Carlo Cavazzi NA12D). The “SAFETY OK“ LED SHOULD be lit. If it doesn’t, either the electronic board or the magnetic switches do not operate properly. 5. Observe the error on the controller’s display. Get a help from the Table of Errors and remove the error occurred. 6.7 The Lift counts two stations instead of one 1. Check the operation of the ferromagnetic switches. 2. Check the distance between the ferromagnetic switches and the ferromagnets. It should be 1cm at most. 3. Check the Terminal Limit Switches. 4. Check if there are screws or screw nuts near the ferromagnets (if they are close to them, they might perform as ferromagnets themselves). 5. Observe the error on the controller’s display. Get a help from the Table of Errors and remove the error occurred. 6.8 The Lift changes its speed when it reaches a station and stops at the next station. 1. Check the ferromagnetic switches’ state and their proper placement. 2. Check the distance between the ferromagnetic switches and the ferromagnets. It should be 1cm at most. 3. Check if there are screws or screw nuts near the ferromagnets (if they are close to them, they might perform as magnets themselves). 4. Observe the error on the controller’s display. Get a help from the Table of Errors and remove the error occurred. LAMDA ELECTRONICS S.A. INNOVATION THAT LIFTS YOU 81 USER’S MANUAL 7 INDEX 2 H 2 Speed traction ...............................................47 2 SPEED TRACTION.....................48, 49, 50, 51 Hydraulic ...16, 19, 32, 41, 52, 53, 55, 56, 57, 61, 63 A I AC motor ............................................................7 ALARM FILTERING ...................................37, 49 Arrows ..............................................................32 AUTOMATIC PUSH BUTTON CONTROL ......42 Inputs .................................10, 11, 12, 36, 53, 79 INSPECTION Down ...................................................................49 Up ........................................................................49 Inverter............................................................... 8 B BRAKE .......................................................47, 52 C Cabin wiring .....................................................47 Calling system..................................................11 CAM ........................................ 33, 40, 41, 49, 64 Car call .......................................................34, 35 Car calls .....................................................42, 43 Car calls ...........................................................36 Casing ..............................................................45 Clamp ...............................................................44 Connectors .......................................................71 Control cabinet5, 7, 8, 10, 44, 45, 47, 53, 64, 71, 76, 79 COUNTING SYSTEM ................................37, 40 D DC motor ............................................................7 Delay ......................................................2, 33, 39 Detachable modules ..................................11, 12 DIP-EEPROM ............................................28, 29 Door................. 32, 34, 35, 37, 39, 53, 64, 75, 79 DOOR...............................................................35 DOWN COLLECTIVE ......................................42 E Element Check...........................................21, 41 Encoder ..............................................................8 Error .... 22, 31, 34, 35, 38, 39, 42, 76, 78, 79, 80 ERROR DATA..................................................42 Error history......................................................22 Event retrieve .............................................38, 76 L Landing call................................................ 34, 35 Landing calls .............................................. 42, 43 LCD screen ...................................................... 22 LED ....................................45, 46, 77, 78, 79, 80 Lock contact..................................................... 33 LOOM .............................................................. 47 M Megometer......................................................... 5 Menu ............................24, 27, 28, 29, 30, 38, 76 Modular ...................................................... 11, 13 MOTOR...................................................... 41, 47 O Obstruction................................................. 34, 35 Outputs ................................................16, 47, 53 Overheating Motor ..................................................................41 Oil ........................................................................41 P P.T.C................................................................ 21 Photocell .................................................... 34, 35 Power Drill........................................................ 44 Power supply .....................................7, 8, 10, 76 PRE – LIMIT Down ...................................................................48 Up ........................................................................48 Pre – wiring ...................................................... 68 Programmer .................22, 23, 28, 29, 30, 32, 38 R F Fire Alarm.........................................................33 Firefighting........................................................33 G GONG ............................................32, 33, 39, 49 GROUND .......................................48, 49, 50, 51 LAMDA ELECTRONICS S.A. Relevelling .....................................32, 40, 41, 52 Reopen ......................................................34, 35 Retrieve................................................31, 38, 76 Revision .............................23, 32, 33, 76, 78, 79 ROM memory................................................... 28 RS-232............................................................. 20 RS-485............................................................. 20 INNOVATION THAT LIFTS YOU 82 USER’S MANUAL S UPS......................................................47, 52, 53 Screwdrivers ....................................................44 Semiautomatic ...........................................34, 35 Shaft wiring ......................................................47 Shielding.........................................................7, 8 SIMPLE ............................................................42 Single signal with permanent closing command ...............................................................34, 35 Single signal with permanent opening command ...............................................................34, 35 V V.V.V.F.......16, 17, 47, 48, 49, 50, 51, 52, 53, 54 V.V.V.F. RESISTOR ........................................ 47 VALVE Down direction fast speed ..................................47 Down direction slow speed.................................47 Emergency...........................................................47 Up direction fast speed .......................................47 Up direction slow speed......................................47 Voltage drop..................................................... 33 VVVF................................................................ 41 T Terminal blocks ............................5, 7, 47, 71, 77 Thermistor ............................................21, 53, 55 Timer ................................................................40 Two signal ..................................................34, 35 Z ZONE A 48 B 48 U UP COLLECTIVE.............................................43 LAMDA ELECTRONICS S.A. INNOVATION THAT LIFTS YOU 83 USER’S MANUAL 8 Pictures – Tables – Figures Catalogue Picture 5-1 Fan..........................................................................................................................................................47 Picture 5-2 Air Filter..................................................................................................................................................47 Picture 5-3 Emergency STOP - “CABIN AT STATION” LED Indicator.............................................................47 Picture 5-4 L.R.S.B – 1 ............................................................................................................................................60 Picture 6-1 Electric Power Circuit ...........................................................................................................................77 Picture 6-2 Power Supply ........................................................................................................................................78 Picture 6-3 Safety Circuit .........................................................................................................................................79 Table 2-1 Symbol Interpretation ...............................................................................................................................6 Table 4-1 Technical Characteristics.........................................................................................................................9 Table 4-2 Table of Calls...........................................................................................................................................12 Table 5-1 Χ1 Terminal Block Description..............................................................................................................49 Table 5-2 Χ2 Terminal Block Description..............................................................................................................49 Table 5-3 Χ3 Terminal Block Description..............................................................................................................49 Table 5-4 Χ4 Terminal Block Description..............................................................................................................50 Table 5-5 Χ5 Terminal Block Description..............................................................................................................50 Table 5-6 Χ6 Terminal Block Description..............................................................................................................51 Table 5-7 Χ7 Terminal Block Description..............................................................................................................51 Table 5-8 Χ8 Terminal Block Description..............................................................................................................52 Table 5-9 Χ13 Terminal Block Description............................................................................................................52 Table 5-10 Color Coding..........................................................................................................................................52 Table 5-11 Component Naming..............................................................................................................................54 Table 5-12 Loom description...................................................................................................................................76 Figure 4-1 Power supply connections....................................................................................................................10 Figure 4-2 Call Inputs ...............................................................................................................................................11 Figure 4-3 Inputs of the right side of the Controller .............................................................................................13 Figure 4-4 Inputs of the left side of the Controller (Α) .........................................................................................14 Figure 4-5 Inputs of the left side of the Controller (Β) .........................................................................................15 Figure 4-6 Signal Relay Outputs ............................................................................................................................16 Figure 4-7 Internal Connections of Inverter (V.V.V.F.) type elevator Power Relays ......................................17 Figure 4-8 Internal Connections of Two-Speed type elevator Power Relays ..................................................18 Figure 4-9 Internal Connections of Hydraulic type elevator Relays ..................................................................19 Figure 4-10 Connections of serial ports RS-485 / RS-232 .................................................................................20 Figure 4-11 PTC Thermistor Inputs – Internal Connections...............................................................................21 Figure 4-12 Programmer – LCD Screen ...............................................................................................................22 Figure 5-1 Casing Dimensions................................................................................................................................47 Figure 5-2 Terminal Block Χ1 Connections for V.V.V.F. Lift Control Cabinet..................................................55 Figure 5-3 Terminal Block Χ1 Connections for Hydraulic Lift Control Cabinet Δ ............................................57 Figure 5-4 Terminal Block Χ1 Connections for Hydraulic Lift Control Cabinet Υ – Δ .....................................58 Figure 5-5 Terminal Block Χ1 Connections for Traction 2-Speed Lift Control Cabinet ..................................59 Figure 5-6 Terminal Block Χ3 and X6 Connections.............................................................................................61 Figure 5-7 Hydraulic Lift Floor Selector .................................................................................................................62 Figure 5-8 Traction Lift Floor Selector ...................................................................................................................63 Figure 5-9 Hydraulic Lift Floor Selector using pencil bistable ............................................................................64 Figure 5-10 Traction Lift Floor Selector using pencil bistable ............................................................................65 Figure 5-11 Terminal Block Χ4 and X2 Connections...........................................................................................66 Figure 5-12 Terminal Block Χ7 and X8 Connections...........................................................................................67 LAMDA ELECTRONICS S.A. INNOVATION THAT LIFTS YOU 84 USER’S MANUAL Figure 5-13 Terminal Block Χ5 and X13 Connections ........................................................................................68 Figure 5-14 Car pre – wiring up to 2 bus doors....................................................................................................69 Figure 5-15 Car pre – wiring connection up to 2 automatic doors.....................................................................70 Figure 5-16 Car top control box internal wiring ....................................................................................................71 Figure 5-17 Loom connections down collective – bus doors .............................................................................72 Figure 5-18 Loom connections down collective – automatic doors...................................................................73 Figure 5-19 Loom connections full collective selective – bus doors .................................................................74 Figure 5-20 Loom connections full collective selective – automatic doors.......................................................75 85 LAMDA ELECTRONICS S.A. INNOVATION THAT LIFTS YOU USER’S MANUAL 9 Revision history The revision dates and content of the revised manual appear on the following table. Date of publication October 2010 May 2011 Revision number 1 2 Revised content First edition Pre - wiring LAMDA ELECTRONICS S.A. INNOVATION THAT LIFTS YOU 86 4, Riga Fereou Str. XANTHI – GREECE TEL. & FAX +3025410 – 78852 www.ElevatorElectronics.com E‐mail: [email protected]