1
MAMEtopia
User Guide v1.0
Contents
About this project
Disclaimer
Hardware
Installation
Controlling the front end
Controlling MAME
Known Bugs/Issues
1
Page
Page
Page
Page
Page
Page
Page
02
03
04
08
09
11
12
About this project
This project was started when I decided I wanted to have a compact, neat
and reliable MAME installation in my game cabinet, then finding there was
little available to fulfil that need. The closest I could find was the xxxx-in-1
Game Box type setups which were expensive and limited in upgrade paths. I
soon discovered I was not alone and realised I could both satisfy my need
and help out some other like minded folk by making my own platform.
This has evolved to what you now hold in your grubby wee paws. The unit
comprises the following features:
•
•
•
•
•
•
•
2
A 90% self contained MAME machine
On-Board joystick controllers
Break-out PCB with power and user assignable inputs
MONO/STEREO switchable audio from JAMMA edge and built in
phonos
15khz video output suitable for all standard resolution JAMMA
cabinets via Soft15khz
Upgradable to latest CPU, more RAM, bigger Hard Drive, latest
Motherboard
Software infinitely upgradable
Disclaimer
So here’s the deal; I can take no responsibility for improper use, damage
caused by use, death caused by use or anything really. I’ll help out where I
can and can even supply parts but if you damage it, it’s on your own head.
This product is also not intended for commercial use. Doing so is very much
against the law and goes against the spirit in which this unit was intended.
Any legal ramifications that arise from commercial use are the soul property
of the perpetrator, i.e. not me!
I also cannot guarantee this unit will work as you expect in your cabinet
since each cab is different though 99.9% of cabs out there should work with
this unit just fine.
If the software fails, this is most likely a known issue (see page 10) and while
irritating, there is little I can do to resolve it. The software used in the unit
however is constantly updated and can be downloaded online for free.
Lastly, the software on the unit is provided FREE OF CHARGE. You have paid
for the unit + PC + my time, nothing else.
3
Hardware
The hardware on this unit is broken down into three sections; the MAMEtopia
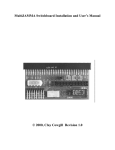
PCB, the PC and the extra controls PCB.
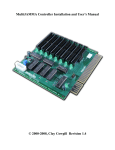
The MAMEtopia PCB is outlined below and each port/connector described:
Audio Input
VGA Input
Controls Input
Status LEDs
ATX Header
Extra Controls Header
ATA Hard Disk Mount
MONO/STEREO Switch
JAMMA Edge
4
Kick/JAMMA+ Header
Stereo Output
VGA Input
This connects to the VGA output socket on the PC motherboard. A standard
VGA cable is supplied.
Audio Input
This connects to the Green audio output jack on the PC motherboard unless
you are using an external amplifier in which case this would connect to the
output of the external amplifier. The output of the PC motherboard would in
this case be connected to the input of the external amplifier. A 3.5mm jack
to jack lead is supplied.
Controls Input
These connect to the USB sockets on the PC motherboard.
Status LEDs
These indicate power status (green = on) and Hard Disk status (orange =
accessing).
ATX Header
The unit is shipped with this lead attached and should not be removed. If
you have a bare board and are attaching you own PC, make sure your
motherboard does NOT have 5v connected on this header as the cable is not
rated for the current it supplies.
Extra Controls Header
This header connects to the extra controls PCB and provides the user with
two replicated status LEDs, a power switch, reset switch and five user
assignable buttons for use in MAME.
MONO/STEREO Switch
This switches between the MONO output on the JAMMA edge connector and
the STEREO phono outputs on the front of the unit.
STEREO Output
This connects to the stereo input on your game cabinet if one exists. Check
your user manual for your cabinet to see what options you have here.
5
Kick/JAMMA+ Header
This header connects to buttons 4,5 and 6 on your control panel for both
players. The layout is compatible with Capcom’s CPS-2 and CPS-3 kick
harnesses. Not supplied.
JAMMA Edge
This obviously connects to your JAMMA connector in your cabinet. Worthy of
note is that the coin meter, tilt, test, service and coin outputs are all
connected and preconfigured as per the JAMMA standard. Player buttons
from 1 through 5 are also connected.
ATA Hard Disk Mount
Here is where you connect your half-height standard internal PC ATA hard
disk. Note the orientation indicated on the MAMEtopia board and make sure
you use non-conductive washers to avoid interference.
The PC
The board you receive will either be a ECS Geforce6100SM-M or a ECS
MCP61SM-GM. An online manual and drivers for both models are included
on the drivers CD provided with the unit.
6
The Extra Controls PCB
Interconnect Header
Status LEDS
Power Switches
User Assignable Switches
Status LEDs
These LEDs are identical to the status LEDs on the MAMEtopia board. They
are placed on here for your convenience.
Interconnect Header
This connects to the Extra Controls header on the MAMEtopia board.
Power Switches
Use these to power the system on and off. To power off the system, close
the front end then tap the power button and your unit will shut down safely.
You can tap it at any point and the system will still shut down safely but your
position and orientation in the frontend will not be saved for the next power
on.
• WARNING: ONLY USE RESET BUTTON IF ABSOLUTELY NESSECCARY!!
DAMAGE TO YOUR HARD DISK CAN OCCUR!
User Assignable Switches
These are controls you can use within MAME for the menu, on screen
display, volume controls etc. You can set them up within the MAME menu.
See page 9 for this.
7
Installation
• WARNING: MAKE SURE YOUR GAME CABINET IS SWITCHED OFF
BEFORE INSTALLING
Your MAMEtopia unit will come with all connections in place unless you have
purchased the bare board. To set up the unit in your cabinet, you will need
to screw the stand-off feet to the inside of your machine, or if you have a
rail, install as normal.
If you are using an external audio amplifier then you will need to attach the
supplied 3.5mm jack to wire cable to the input on the MAMEtopia board and
the output of the amplifier. Next attach the supplied 3.5mm jack to jack
cable from the PC motherboard’s green audio output to the input 3.5mm
jack socket on the amplifier. You will then need to attach the amplifier to the
side of your cabinet or on the floor of your cabinet. If possible, attach it in a
service hatch as it has onboard volume, treble and bass controls. Finally
attach the supplied molex power to jack cable to the power socket on the
amplifier and a free hard disk power plug on your power supply.
Once you have the board in your cabinet, you will need to connect your
chosen power supply (not supplied) of at least 250w. The power supply is
best mounted in the same way as your MAMEtopia board if possible but if
you have a standard PC power supply unit you will need to stand it on the
floor of the cabinet.
•
WARNING: SOME CABINETS HAVE METAL FLOORS AND YOU WILL
NEED TO PLACE A NON- CONDUCTIVE MAT BETWEEN THIS AND
YOUR POWER SUPPLY TO AVOID DAMAGE TO HARDWARE!
Once you have your ATX power plug and 4 pin “P4” connector attached you
will need to attach your Extra Controls PCB. The best place for this is
somewhere you can access with little effort like a coin door or service hatch.
The PCB has stand-offs with sticker pads to make mounting easier though
these can be detached and replaced with screws. Make sure you do not
mount the PCB flush to any metallic surface as this will cause a short and can
damage your MAMEtopia unit and PC motherboard.
Next attach your JAMMA connector and if your cabinet supports it, your
Stereo cable.
Make sure all connectors are firmly in place and power on your cabinet,
followed by your MAMEtopia unit. If all goes well you should see the PC BIOS
screen and your MAMEtopia unit will boot into the frontend after about 30
seconds. The screen will remain blank in this time.
8
Controlling The Frontend
Once your MAMEtopia unit boots, you will be presented with MALA, the
frontend for choosing your games. Here is an overview of MALA:
Game screenshot is shown
here
Game list is shown here
Information on highlighted game is
shown here
The controls for navigating MALA are as follows:
1P UP –
Game up
1P Down - Game down
1P Left Letter up
1P Right - Letter down
1P B1 Page up
1P B2 Page down
1P B3 Menu
1P Start - Start game
Extra Control User Button 4 - Volume up
Extra Control User Button 5 - Volume down
Within Menu
1P UP Move up
1P Down - Move down
1P Start - Choose/Select
1P B3 Cancel/Exit Menu
9
While in MALA you can navigate around the MAME romset and launch any
game directly. If you wish to choose a different emulator however, you can
do so by entering the menu and selecting the desired emulator from the list.
MAMEtopia comes with the current MAME romset (minus non-working/slow
CHDs) and the Daphne laserdisc game emulator.
To select a filer for your roms, enter the menu and chose the filter option.
This allows you to view only horizontal or vertical games, only parent roms
or parent and clones etc.
MALA can also display on vertical monitors correctly. On the MAMEtopia
units, MALA will enter vertical or horizontal mode depending on the last
game played. For example, if you play street fighter and exit the game, you
will be in horizontal mode. If you then choose Dodonpachi and exit the
game, MALA will be in vertical mode. Note: to keep the position in the game
list or or orientation after power off, make sure you exit MALA via the menu
before turning off the system.
You can also adjust the volume in MALA to better match the volume in MAME
by using the user assignable keys 4 and 5 on the Extra Controls PCB.
10
Controlling MAME
As with MALA, all controls in MAME are predefined, however you can change
any that you wish via the MAME menu. The joystick and player buttons are as
you might expect, button 1 is button 1 in the game etc.
The controls in MAME are as follows:
Extra Control User Button
Extra Control User Button
Extra Control User Button
Extra Control User Button
Extra Control User Button
1P Start + 2P Start -
1
2
3
4
5
-
OSD (On Screen Display)
MAME Menu/Menu Cancel
Pause
Volume Up
Volume Down
Exit game/Menu Cancel
Controls within MAME Menu
1P Up Menu up
1P Down - Menu down
1P B1 Menu Select
1P Start + 2P Start Menu Cancel
Extra Control User Button 2 - MAME Menu/Menu Cancel
To set up your own user or other controls, use the MAME Menu button and
navigate to Input (General) or Input (This Game). Chose the control you wish
to change with the menu select button then press the button you wish to
reassign it to.
Note: Some games do not support the volume control. This feature is
emulated in MAME. For global volume control, use the OSD.
11
Known Bugs/Issues
MALA
Occasionally, MALA will crash on boot. In this event, tap the power button to
shut the system down and then power it back on. This should be fixed in a
future version of MALA.
MAME
Some games will not display properly on the screen. This is due to the
refresh rate not being properly supported by Soft15khz. This should be fixed
in a future version.
Occasionally, a game’s sound will appear to skip slightly. This is due to
MAME being quite power hungry in terms of the processor. Most games are
catered for by the CPU but some are either not correctly emulated or just
require too much horse power to run. Keep in mind MAME does not make
use of 3D graphics acceleration as it tries to emulate everything fully in
software. This way, when PCs are powerful enough to run those games they
will be 100% accurate and will not require old hardware to run. If you have a
game which is unplayable you might want to upgrade the PC’s CPU.
Hardware
The USB cables supplied are NOT standard USB. Nor are the ports on the
MAMEtopia board.
The audio volume may be too low even after adjusting the volume on your
cabinet. In this case, you will need an external amplifier.
Most cabinet monitors will look too dim since PC RGB is not as strong as
JAMMA RGB. You will most likely need to adjust the brightness/contrast on
your cabinet.
A lot of games will not be properly fit to the screen. This is due to the
games’ native resolution being different. Real hardware exhibits this
problem also and is unavoidable.
12